

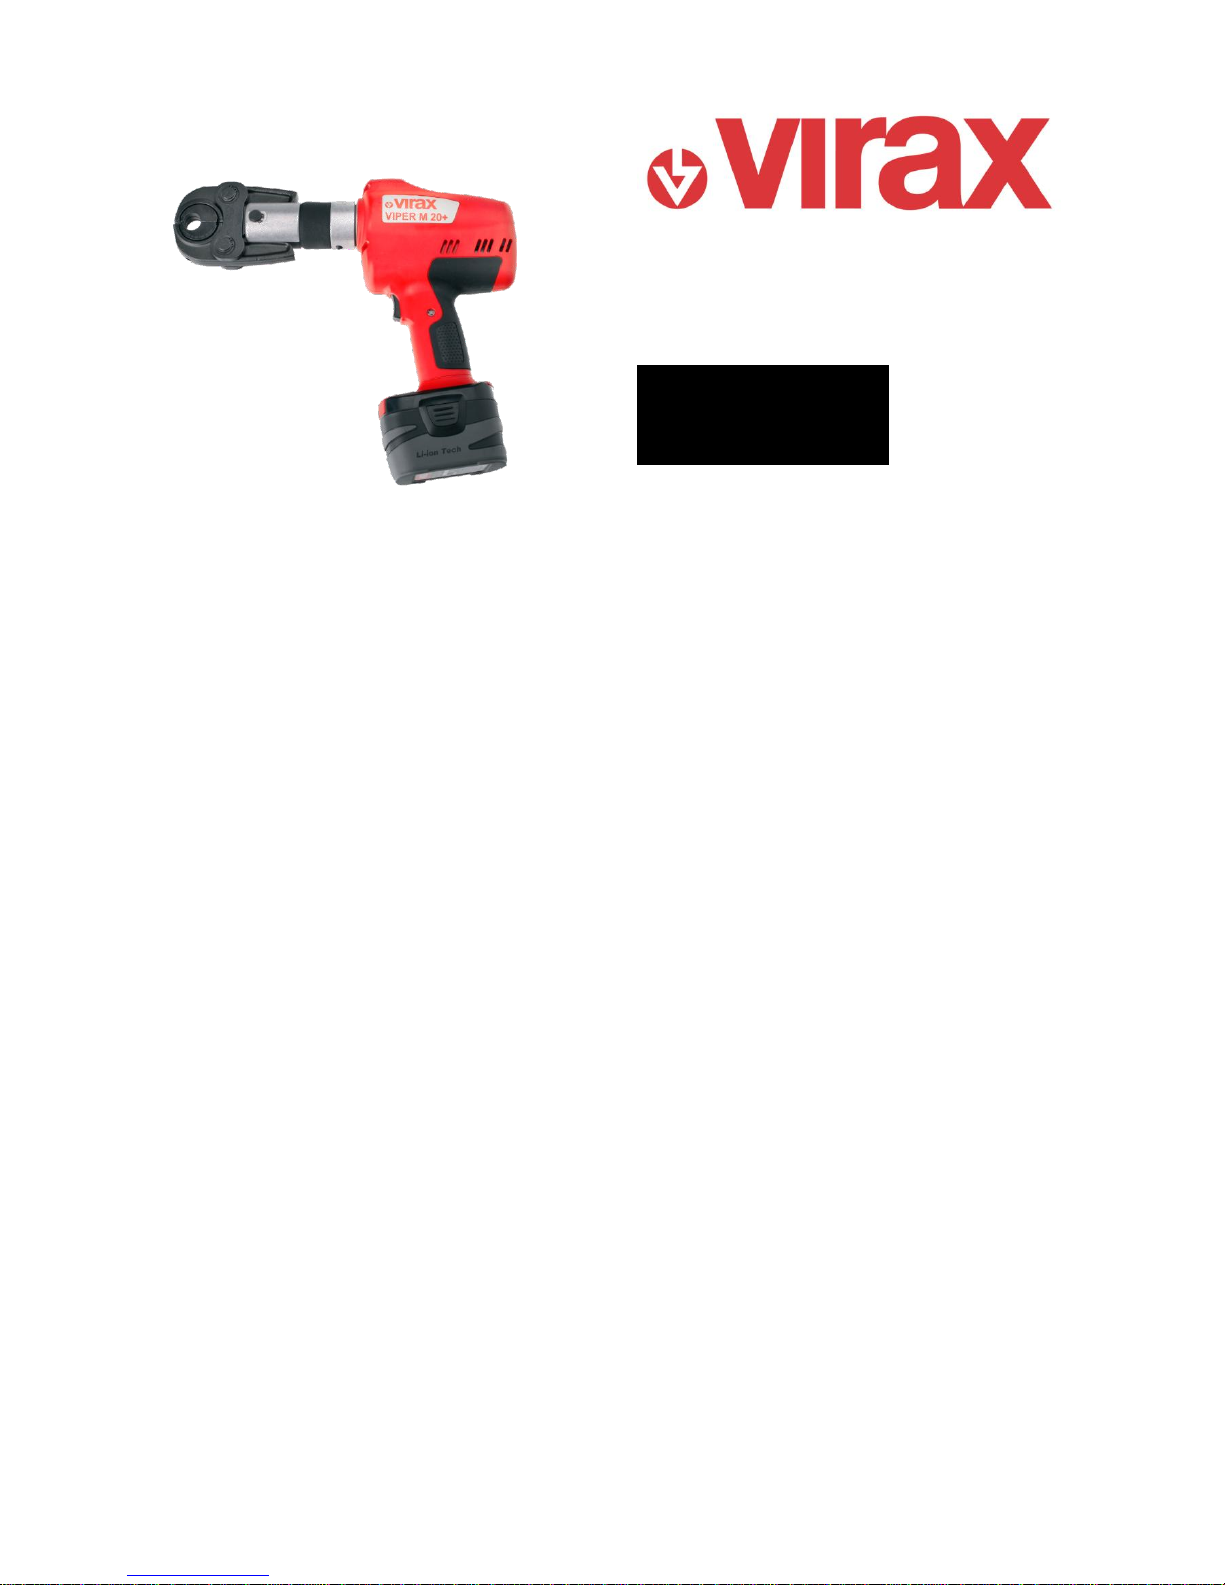
FR - Presse à sertir électro-mécanique Viper M20+
Manuel d’utilisation
EN : Viper M20+ Battery-powered mechanical press fitting machine
– User guide
IT : Pressatrice elettromeccanica Viper M20+
- Manuale d’istruzioni
ES : Máquina de prensar electromecánica Viper M20+
- Manual de instrucciones
PT : Máquina de prensar electro-mecânica Viper M20+
Manual de instruções
NL : Elektromechanische persmachine Viper M20+
– Gebruikershandleiding
PL : Elektro-mechaniczna prasa zaciskowa Viper M20+
- Instrukcja obsługi
DE : Elektromechanische Bördelpresse Viper M20+
Bedienungsanleitung
EL : Ηλεκτρο-μηχανική πρέσσα Viper M20+
Οδηγίες χρήσης
VIPER M20+
Réf. 2532xx

Déclaration CE de Conformité
CE Declaration of Conformity - EG-Konformitätserklärung - Dichiarazione di conformità CE - Declaración de Conformidad CE -
Declaração CE de conformidade - CE-conformiteitsverklaring - Δήλωση συμμόρφωσης CE - Deklaracja zgodności CE - Prohlášení ES
o shodě – Декларация ЕС о соответствии - AT Uygunluk Beyanı
● NOUS, VIRAX S.A.S., DECLARONS SOUS NOTRE PROPRE RESPONSABILITE QUE LE(S) PRODUIT(S) :
WE, VIRAX S.A.S., DECLARE UNDER OUR OWN CIVIL REPONSIBILITY THAT THE PRODUCT(S):
WIR, DAS UNTERNEHMEN VIRAX S.A.S., ERKLÄREN AUF EIGENE VERANTWORTUNG, DASS DAS (DIE) PRODUKT(E):
LA SOTTOSCRITTA, VIRAX S.A.S., DICHIARA SOTTO LA PROPRIA RESPONSABILITÁ CHE IL(I) PRODOTTO(I):
NOSOTROS, VIRAX S.A.S., DECLARAMOS BAJO NUESTRA PROPIA RESPONSABILIDAD QUE EL(LOS) PRODUCTO(S):
NÓS, A VIRAX S.A.S., DECLARAMOS SOB NOSSA RESPONSABILIDADE QUE O(S) PRODUTO(S):
WIJ, VIRAX S.A.S., VERKLARING OP ONZE EIGEN VERANTWOORDELIJKHEID DAT HET/DE PRODUCT(EN):
ΕΜΕΙΣ, Η VIRAX S.A.S., ΔΗΛΩΝΟΥΜΕ ΜΕ ΔΙΚΗ ΜΑΣ ΕΥΘΥΝΗ ΟΤΙ ΤΟ/ΤΑ ΠΡΟΪΟΝ/ΠΡΟΪΟΝΤΑ:
MY, VIRAX S.A.S., OŚWIADCZAMY Z PEŁNĄ ODPOWIEDZIALNOŚCIĄ, ŻE PRODUKT(Y):
MY, VIRAX S.A.S., PROHLAŠUJEME NA SVOU VLASTNÍ ODPOVĚDNOST, ŽE VÝROBEK (VÝROBKY):
МЫ, КОМПАНИЯ VIRAX S.A.S., ЗАЯВЛЯЕМ ПОД СВОЮ ОТВЕТСТВЕННОСТЬ, ЧТО ИЗДЕЛИЕ(Я):
BİZ, VIRAX S.A.S. OLARAK, KENDİ SORUMLULUĞUMUZ ALTINDA, ÜRÜN VE ÜRÜNLERİMİZİN AŞAĞIDA BELİRTİLEN:
Ref. 25325x – Presse à sertir électro-mécanique Viper M20+ / Viper M20+ Battery-powered mechanical press fitting
machine / Pressatrice elettromeccanica Viper M20+ / Máquina de prensar electromecánica Viper M20+ / Máquina de
prensar electro-mecânica Viper M20+ / Elektromechanische persmachine Viper M20+ / Elektro-mechaniczna prasa
zaciskowa Viper M20+ / Elektromechanische Bördelpresse Viper M20+ / Ηλεκτρο-μηχανική πρέσσα Viper M20+
● EST / SONT CONFORME(S) AUX DISPOSITIONS DE LA (DES) DIRECTIVE(S) EUROPENNE(S) SUIVANTE(S) :
CONFORM TO THE PROVISIONS IN THE FOLLOWING EUROPEAN DIRECTIVE(S):
ÜBEREINSTIMMT/ÜBEREINSTIMMEN MIT DEN BESTIMMUNGEN DER FOLGENDEN EUROPÄISCHEN RICHTLINIE(N):
É / SONO CONFORME(I) ALLE DISPOSIZIONI DELLA(E) SEGUENTE(I) DIRETTIVA(E) EUROPEA(E):
ES / SON CONFORME(S) CON LAS DISPOSICIONES DE LA (DE LAS) DIRECTIVA(S) EUROPEA(S) SIGUIENTE(S):
ESTÁ(ÃO) EM CONFORMIDADE COM AS DISPOSIÇÕES DA(S) DIRECTIVA(S) EUROPEIA(S) SEGUINTE(S):
CONFORM IS/ZIJN MET DE BEPALINGEN VAN DE VOLGENDE EUROPESE RICHTLIJN(EN):
ΣΥΜΜΟΡΦΩΝΕΤΑΙ/ΣΥΜΜΟΡΦΩΝΟΝΤΑΙ ΠΡΟΣ ΤΙΣ ΔΙΑΤΑΞΕΙΣ ΤΗΣ/ΤΩΝ ΑΚΟΛΟΥΘΗΣ/ΑΚΟΛΟΥΘΩΝ ΕΥΡΩΠΑΪΚΗΣ/ΕΥΡΩΠΑΪΚΩΝ ΟΔΗΓΙΑΣ/ΟΔΗΓΙΩΝ:
JEST/SĄ ZGODNY/-E Z PRZEPISAMI NASTĘPUJĄCYCH/-EJ DYREKTYW(Y) EUROPEJSKICH/-EJ:
ODPOVÍDÁ / ODPOVÍDAJÍ USTANOVENÍM NÁSLEDUJÍCÍ EVROPSKÉ SMĚRNICE (SMĚRNIC):
ОТВЕЧАЕТ(ЮТ) ПОЛОЖЕНИЮ (ЯМ) СЛЕДУЮЩЕЙ(ИХ) ЕВРОПЕЙСКОЙ(ИХ) ДИРЕКТИВЫ(ИВ):
AVRUPA DİREKTİFLERİ TALİMATLARINA UYGUNLUĞUNU:
- MSD 2006/42/CE : Directive Machines / Machine Directive / Maschinenrichtlinie / Direttiva Macchine / Directiva Máquinas / Directiva Máquinas / Machinerichtlijn /
Οδηγία σχετικά με τα μηχανήματα / Dyrektywa maszynowa / směrnice o strojních zařízeních / Директива по машиностроению / Makine Direktifi
- LVD 2006/95/CE : Directive Basse Tension / Low Voltage Directive / Niederspannungsrichtlinie / Direttiva bassa tensione / Directiva Baja Tensión / Directiva Baixa Tensão /
Laagspanningsrichtlijn / Οδηγία χαμηλής τάσης / Dyrektywa niskonapięciowa / směrnice o nízkém napětí / Директива по низкому напряжению / Alçak Gerilim Direktifi
- EMC 2004/108/CE : Directive Compatibilité Electromagnétique / Electromagnetic Compatibility Directive / Richtlinie über die Elektromagnetische Verträglichkeit /
Direttiva compatibilità elettromagnetica / Directiva Compatibilidad Electromagnética / Directiva Compatibilidade Electromagnética / EMC-richtlijn (elektromagnetische
compatibiliteit) / Οδηγία περί ηλεκτρομαγνητικής συμβατότητας / Dyrektywa „Kompatybilność elektromagnetyczna / směrnice o elektromagnetické kompatibilitě / Директива
по электромагнитной совместимости / Elektromanyetik Uyumluluk Direktifi
- RoHS 2002/95/CE : Directive Restriction de l'Utilisation de Certaines Substances Dangereuses / Directive Restricting the Use of Certain Hazardous
Substances / Richtlinie zur Beschränkung der Verwendung bestimmter gefährlicher Stoffe / Direttiva Limitazione dell’utilizzo ai alcune sostanze pericolose / Directiva
Restricción de la Utilización de Ciertas Sustancias Peligrosas / Directiva Restrição da Utilização de Certas Substâncias Perigosas / Richtlijn betreffende de beperking van het
gebruik van bepaalde gevaarlijke stoffen / Οδηγία σχετικά με τον περιορισμό της χρήσης ορισμένων επικίνδυνων ουσιών / Dyrektywa „Ograniczenie stosowania niektórych
substancji niebezpiecznych” / směrnice o omezení používání některých nebezpečných látek / Директива по ограничению использования некоторых опасных веществ /
Belirli Tehlikeli Maddelerin Kullanımının Sınırlanmasına İlişkin Direktif
- WEEE 2002/96/CE : Directive Déchets des Equipements Electriques et Electroniques / Waste Electrical and Electronic Equipment Directive / Elektro- und
Elektronik-Altgeräte / Direttiva Smaltimento delle apparecchiature elettriche ed elettroniche / Directiva de Residuos de Aparatos Eléctricos y Electrónicos / Directiva Resíduos
dos Equipamentos Eléctricos e Electrónicos / Richtlijn afgedankte elektrische en elektronische apparatuur / Οδηγία σχετικά με τα απόβλητα ειδών ηλεκτρικού και
ηλεκτρονικού εξοπλισμού / Dyrektywa „Odpady urządzeń elektrycznych i elektronicznych” / směrnice o odpadních elektrických a elektronických zařízeních (OEEZ) /
Директива об отходах электрического и электронного оборудования / Atık Elektrik ve Elektronik Cihazlar Direktifi
● EST / SONT CONFORME(S) AUX DISPOSITIONS DE LA (DES) NORME(S) EUROPEENNE(S) HARMONISEE(S) SUIVANTE(S) :
CONFORM TO THE PROVISIONS IN THE FOLLOWING HARMONISED EUROPEAN STANDARD(S) :
ÜBEREINSTIMMT/ÜBEREINSTIMMEN MIT DEN BESTIMMUNGEN DER FOLGENDEN HARMONISIERTEN EUROPÄISCHEN NORMEN:
É / SONO CONFORME(I) ALLE DISPOSIZIONI DELLA(E) SEGUENTE(I) NORMA(E) EUROPEA(E) ARMONIZZATE(E):
ES / SON CONFORME(S) CON LAS DISPOSICIONES DE LA (LAS) NORMA(S) EUROPEA(S) ARMONIZADA(S) SIGUIENTE(S):
ESTÁ(ÃO) EM CONFORMIDADE COM AS DISPOSIÇÕES DA(S) NORMA(S) EUROPEIA(S) HARMONIZADA(S) SEGUINTE(S):
IS/ZIJN CONFORM MET DE BEPALINGEN VAN DE VOLGENDE GEHARMONISEERDE EUROPESE NORM(EN) :
ΣΥΜΜΟΡΦΩΝΕΤΑΙ/ΣΥΜΜΟΡΦΩΝΟΝΤΑΙ ΠΡΟΣ ΤΙΣ ΔΙΑΤΑΞΕΙΣ ΤΟΥ/ΤΩΝ ΑΚΟΛΟΥΘΟΥ/ΑΚΟΛΟΥΘΩΝ ΕΝΑΡΜΟΝΙΣΜΕΝΟΥ/ΕΝΑΡΜΟΝΙΣΜΕΝΩΝ
ΕΥΡΩΠΑΪΚΟΥ/ΕΥΡΩΠΑΪΚΩΝ ΠΡΟΤΥΠΟΥ/ΠΡΟΤΥΠΩΝ:
JEST/SĄ ZGODNY/-E Z PRZEPISAMI NASTĘPUJĄCYCH/-EJ ZHARMONIZOWANYCH/-EJ NORM(Y) EUROPEJSKICH/-EJ:
ODPOVÍDÁ / ODPOVÍDAJÍ USTANOVENÍM NÁSLEDUJÍCÍ HARMONIZOVANÉ EVROPSKÉ NORMY (NOREM):
ОТВЕЧАЕТ(ЮТ) ПОЛОЖЕНИЯМ СЛЕДУЮЩЕГО(ИХ) ГАРМОНИЗИРОВАННОГО(ЫХ) ЕВРОПЕЙСКОГО(ИХ) СТАНДАРТА(ОВ) :
UYUMLU HALE GETİRİLMİŞ AVRUPA STANDARTLARI TALİMATLARINA UYGUNLUĞUNU BEYAN EDERİZ :
- EN 60745-1 : 2006, EN 60745-2-1 : 2003 + A11 : 2007, EN 60745-2-2 : 2003 + A11 : 2007
- EN 50144-1 : 2002, EN 50144-2-2 : 2002
- EN 55014-1 : 2006 + A1 : 2008, EN 55014-2 : 1997 + A1 : 2001 + A2 : 2008
- EN 61000-3-2 : 2006 + A1 : 2007 + A2 : 2008, EN 61000-3-3 : 2008
E. Min,
le Responsable Qualité / The Quality Manager / Der Leiter der Qualitätsabteilung / Il Responsabile Qualità / El Responsable de Calidad / O responsável de qualidade / De
Kwaliteitsverantwoordelijke / Ο Υπεύθυνος Ποιότητας / Kierownik ds. Jakości / Vedoucí oddělení jakosti / Ответственный по качеству / Kalite Sorumlusu
Le 24/11/2011
VIRAX - 39 quai de marne – 51200 Epernay - France / Frankreich / Francia / França / Frankrijk / Γαλλία / Francja / Francie / Франция / Fransa
3
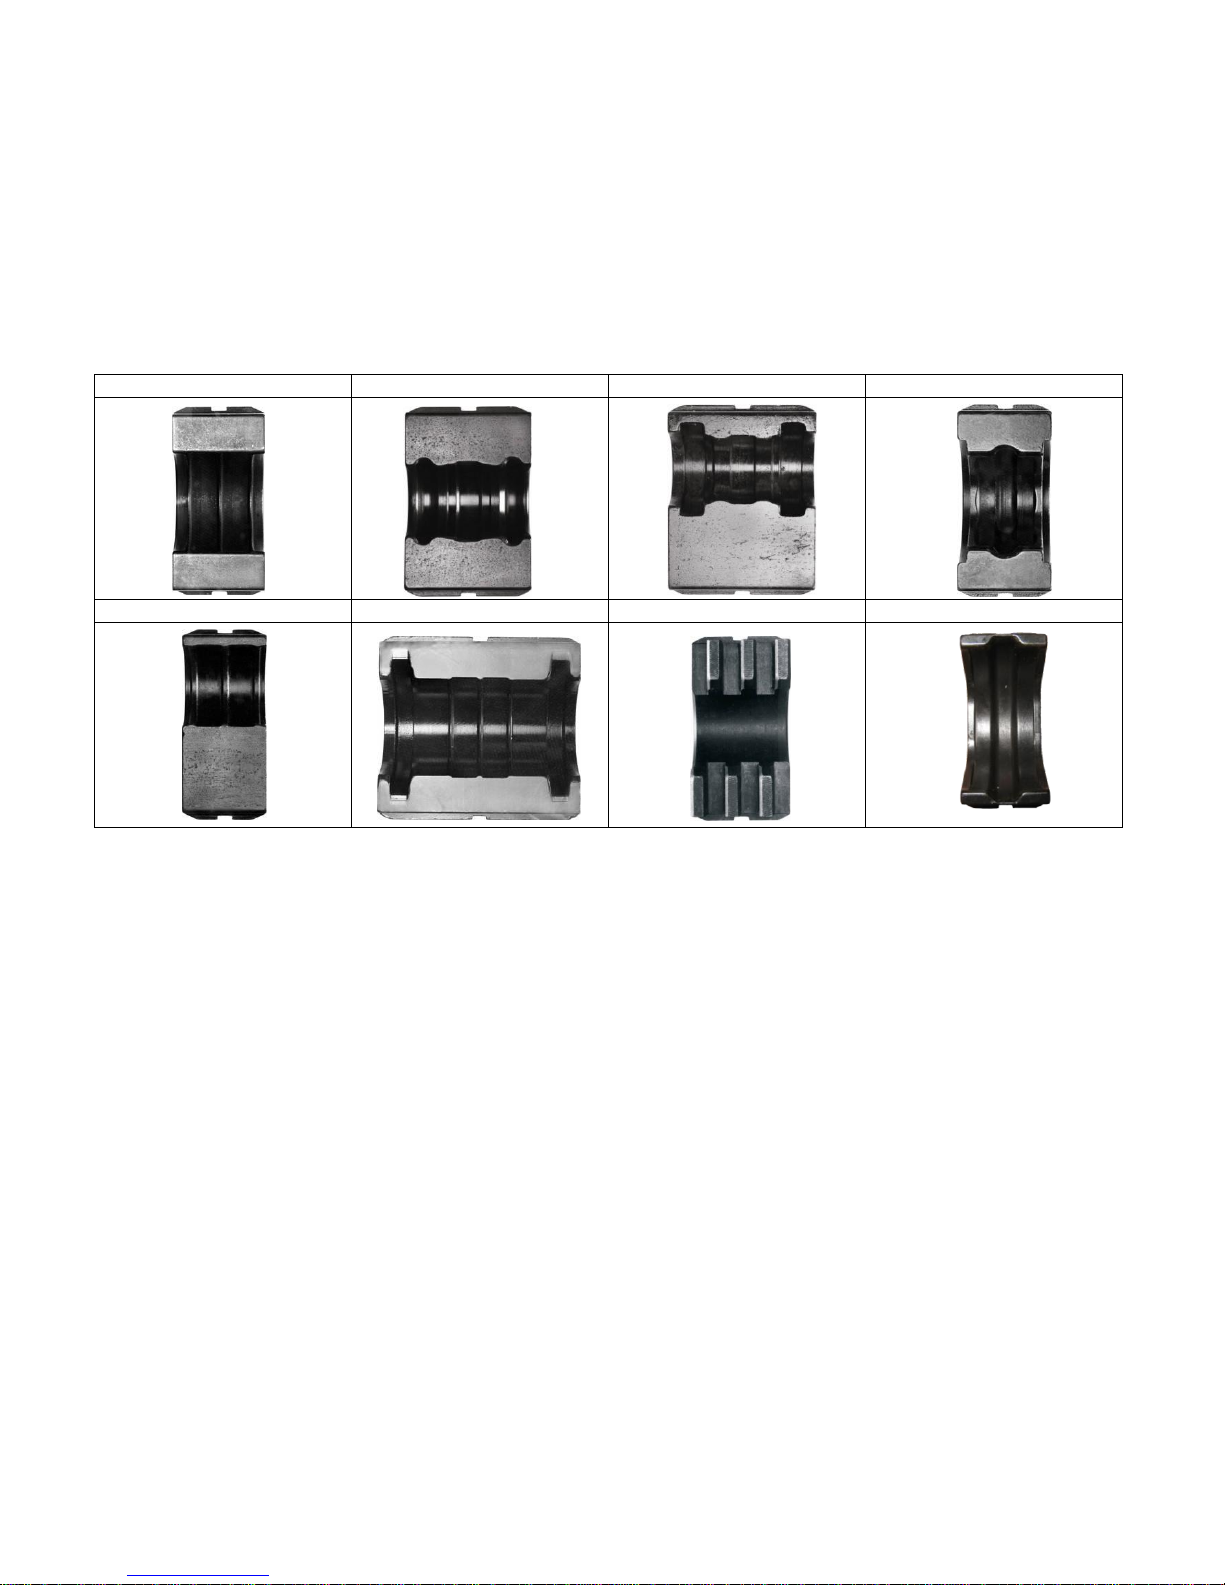
Contrôler quotidiennement que le profil de vos inserts soit conforme aux photos !
Check daily that the profile of your inserts is as shown in the photographs below !
Controllare quotidianamente che il profilo degli inserti sia conforme alle foto allegate !
Controlar a diario que el perfil de sus insertos esté conforme con las fotos adjuntas ¡
Verificar diariamente se o perfil das maxilas está de acordo com as fotografias em anexo !
Ga dagelijks na of het profiel van uw inzetstukken overeenstemt met de bijgevoegde foto’s !
Täglich die Konformität des Profils Ihrer Einsatzteile mit den beiliegenden Abbildungen vergleichen :
Ελέγχετε καθημερινά ώστε τα προφίλ των σιαγώνων να είναι σύμφωνα με τις πιο κάτω φωτογραφίες
1. H-ML
2. G
3. TH
4. V
5. U
6. HA
7. RF-P
8. VUS

4
FR
Presse à sertir électro-mécanique Viper M20+
Nous vous remercions de l’achat de la presse à sertir Viper et pour la confiance que vous nous témoignez.
Virax, un acteur majeur dans la fabrication et la commercialisation de l’outillage pour les métiers du Sanitaire, du Génie climatique et
de la Couverture vous accompagne dans votre quotidien :
Virax, pour que s’exprime votre talent.
La gamme des sertisseuses Virax Viper
Virax possède plus de 20 ans d’expérience dans la conception et la fabrication d’outillages hydrauliques et électro-hydrauliques.
Lors de la fabrication des sertisseuses Virax Viper, des échantillonnages réguliers sont testés à leurs capacités maximales et dans des
conditions extrêmes.
De plus chacune des sertisseuses est contrôlée à sa sortie des chaînes de fabrication. Ce suivi qualitatif extrêmement rigoureux vous
procure un maximum de sécurité à l’utilisation.
Ainsi vous avez la garantie d’un sertissage réussi et d’une étanchéité parfaite des raccords.
Enfin, pour vous apporter encore plus de sécurité, Virax fait tester et approuver ses machines et ses mâchoires par de grands
fabricants de tubes et de raccords.
La presse à sertir M20+
La presse à sertir Viper est compacte, légère et maniable. Sa tête pivote à 180° afin de faciliter le travail quelle que soit la configuration
de l’installation.
Son bouton de commande unique simplifie son utilisation, un appui prolongé sur la gâchette suffit pour réaliser un cycle de sertissage.
Un seul voyant permet de contrôler l’état du sertissage et le besoin de maintenance.
Son micro contrôleur surveille les efforts, contrôle la qualité du travail effectué et gère la maintenance.
La pince mère peut être équipée d’inserts déportés pour travailler au plus près des murs.
Consignes de sécurité
Lire et conserver cette notice d’instructions. Afin de réduire le risque de décharge électrique, de blessures et d’incendie lors de
l’utilisation d’outils électriques, observez les mesures de sécurité fondamentales suivantes.
Consignes de sécurité générales
Choix de l’outil
● Utiliser l’outil adéquat. Ne pas utiliser d’outils ou de dispositifs adaptables de trop faible puissance pour exécuter des travaux lourds.
Ne pas utiliser les outils à des fins autres que les travaux pour lesquels ils ont été conçus.
Entretien et stockage
● Ranger vos outils dans un endroit sûr. Les outils non utilisés doivent être rangés dans un endroit sec et fermé, hors de portée des
enfants.
● Entretenir vos outils soigneusement. Maintenez vos outils propres afin de travailler mieux et plus sûrement. Observer les indications
relatives à l’entretien ainsi que les indications de changement d’accessoires. Maintenir les poignées sèches et exemptes d’huile et de
graisse.
● Contrôler si l’outil est endommagé. Avant d’utiliser l’outil, vérifier toujours soigneusement le parfait fonctionnement des pièces.
Vérifier si le fonctionnement des pièces en mouvement est correct, si elles ne se grippent pas ou si d’autres pièces sont
endommagées. Tous les composants doivent être montés correctement et remplir les conditions pour garantir le fonctionnement
impeccable de l’outil. Tout dispositif de sécurité, tout interrupteur ou toute autre pièce endommagé ou défectueux doit être réparé ou
remplacé de manière appropriée par un technicien qualifié.
● Attention ! Veiller à utiliser l’outil et ses accessoires conformément aux instructions de sécurité. Tenir également compte des
possibilités de l’outil en prêtant attention aux conditions de travail et à la tâche à exécuter. L’utilisation de l’outil pour des tâches autres
que celles prévues risque d’être dangereuse.
● Cet outil est conforme aux règles de sécurité en vigueur. Toutes les réparations doivent être effectuées par des professionnels
qualifiés avec des pièces détachées d’origine, faute de quoi l’utilisation de l’outil peut représenter un danger pour l’utilisateur et annuler
la garantie.
Instructions de sécurité pour l’utilisateur
● Tenir les enfants éloignés. Ne pas permettre que d’autres personnes touchent l’outil ; les tenir éloignés de votre zone de travail.
● Porter des vêtements de travail appropriés. Ne pas porter de vêtements larges ou des bijoux, ils pourraient être happés par des
pièces en mouvement.
● Lors de travaux à l’air libre, il est recommandé de porter des gants en caoutchouc et des chaussures à semelle antidérapante. Se
coiffer d’un filet à cheveux s’ils sont longs.
● Ne pas trop élargir votre rayon d’action. éviter d’adopter une position fatigante pour le corps ; veiller à ce que votre appui au sol soit
ferme et conserver l’équilibre à tout moment.
● Etre toujours attentif. Observer votre travail, agir en faisant preuve de bon sens et ne pas employer l’outil lorsque vous êtes fatigués.
Instructions de sécurité relatives à la zone de travail
● Maintenir de l’ordre dans votre aire de travail. Le désordre dans l’aire de travail augmente le risque d’accident.
● Tenir compte de l’environnement de l’aire de travail. Ne pas exposer les outils électriques à la pluie. Ne pas utilisez d’outils
électriques dans un environnement humide ou mouillé.
● Veiller à ce que la zone de travail soit bien éclairée. Ne pas utiliser d’outils électriques si des liquides ou des gaz inflammables se
trouvent à proximité.
5
FR
Consignes de sécurité spécifiques
Batterie et chargeur
● Recharger la batterie avec le chargeur fourni avec la presse à sertir. Ne pas toucher les contacts du chargeur.
● Ne jamais exposer la batterie ni le chargeur à la pluie ni à la neige.
● Ne pas recharger votre batterie dans un endroit exposé aux rayons directs du soleil.
● Ne pas recharger la batterie en présence de liquides ou de gaz inflammables.
● Le chargeur ne doit fonctionner qu’avec une température comprise entre 10°C et 40°C.
● Veiller à ce que les orifices de ventilation du chargeur restent libres de toute obstruction.
● Lorsque la recharge est terminée, débrancher le chargeur de la source d’alimentation
● Par suite de dommages ou de mauvaises conditions d’utilisation, les batteries peuvent commencer à fuir.
● Éviter tout contact de la batterie avec des objets métalliques tels que clous, vis, etc.. pour éviter les courts-circuits, tout cela quand la
batterie n’est ni dans le chargeur ni dans la presse à sertir.
● Ne jamais utiliser un chargeur endommagé. Ne jamais utiliser le chargeur avec un câble ou une prise endommagée.
● Ne pas utiliser la batterie si elle est endommagée. Elle est à remplacer au plus vite.
● Ne pas démonter le chargeur ni la batterie.Ne pas tenter de recharger des batteries non rechargeables avec le chargeur.
Presse à sertir
● Ne pas glisser les doigts dans le profil de la pince mère et des inserts.
Mise en service
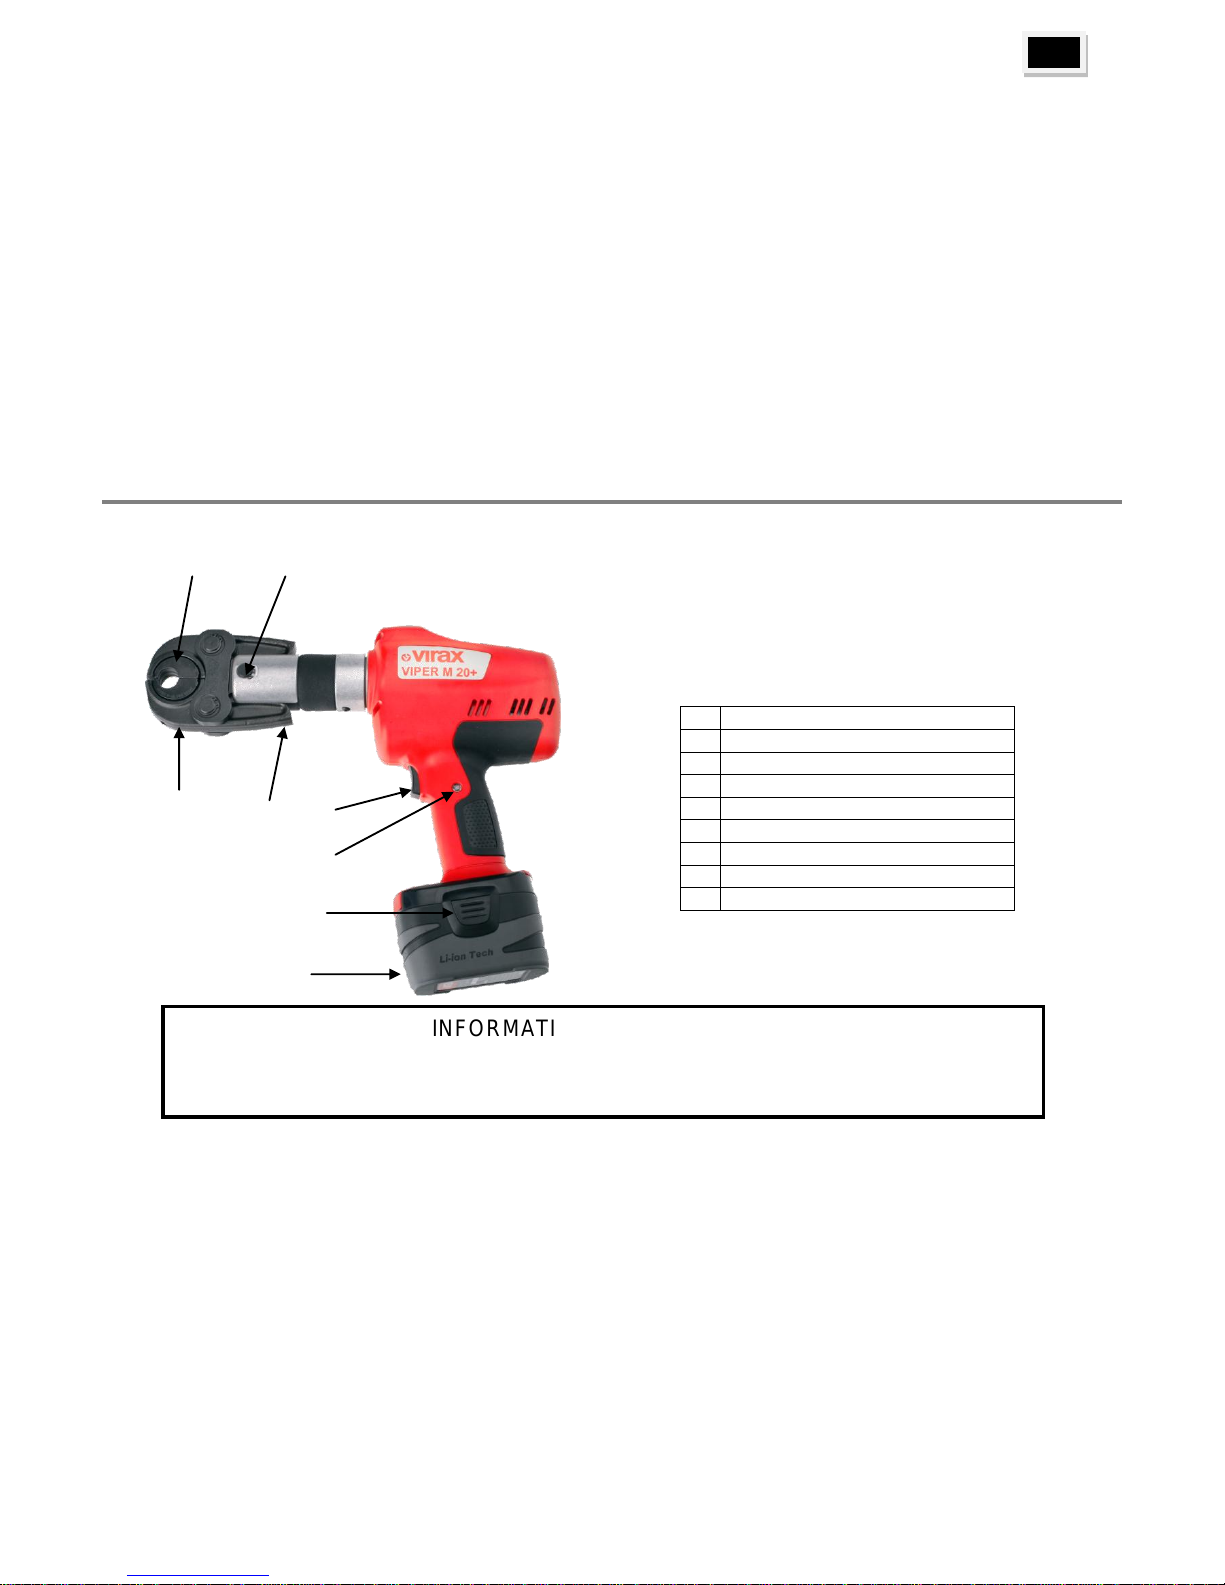
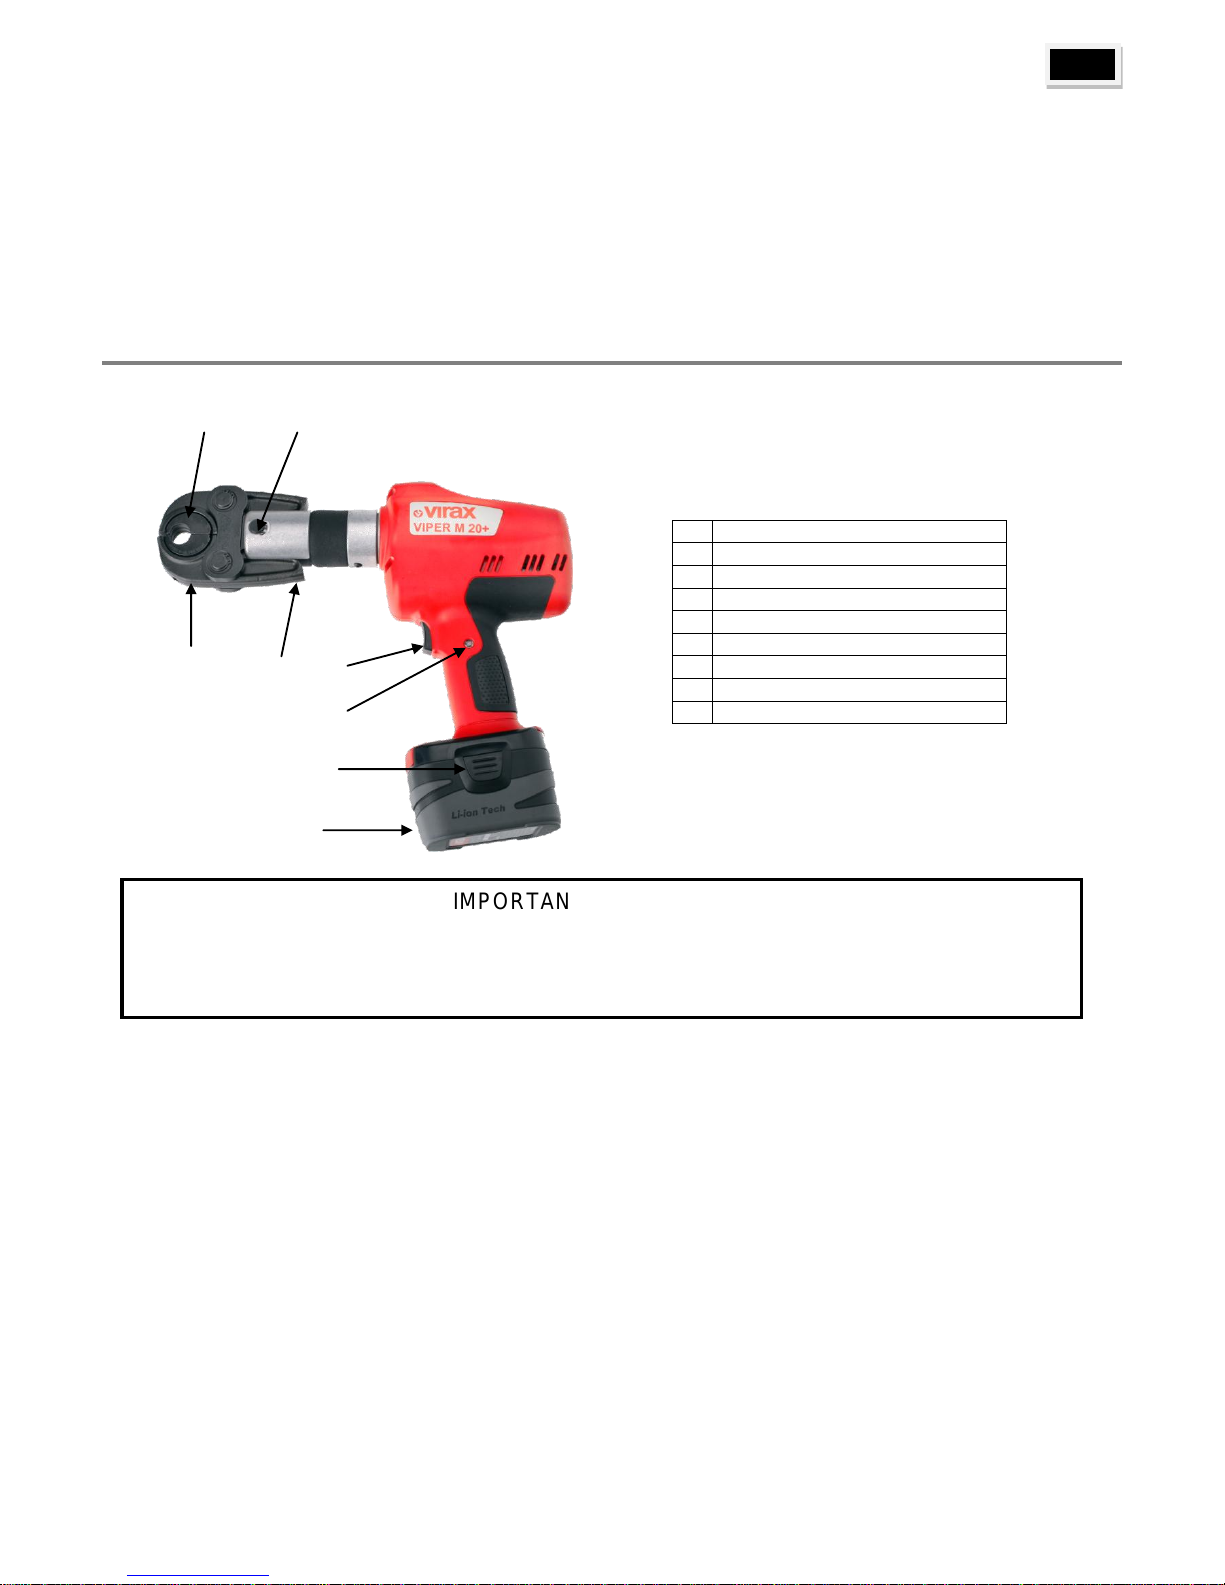
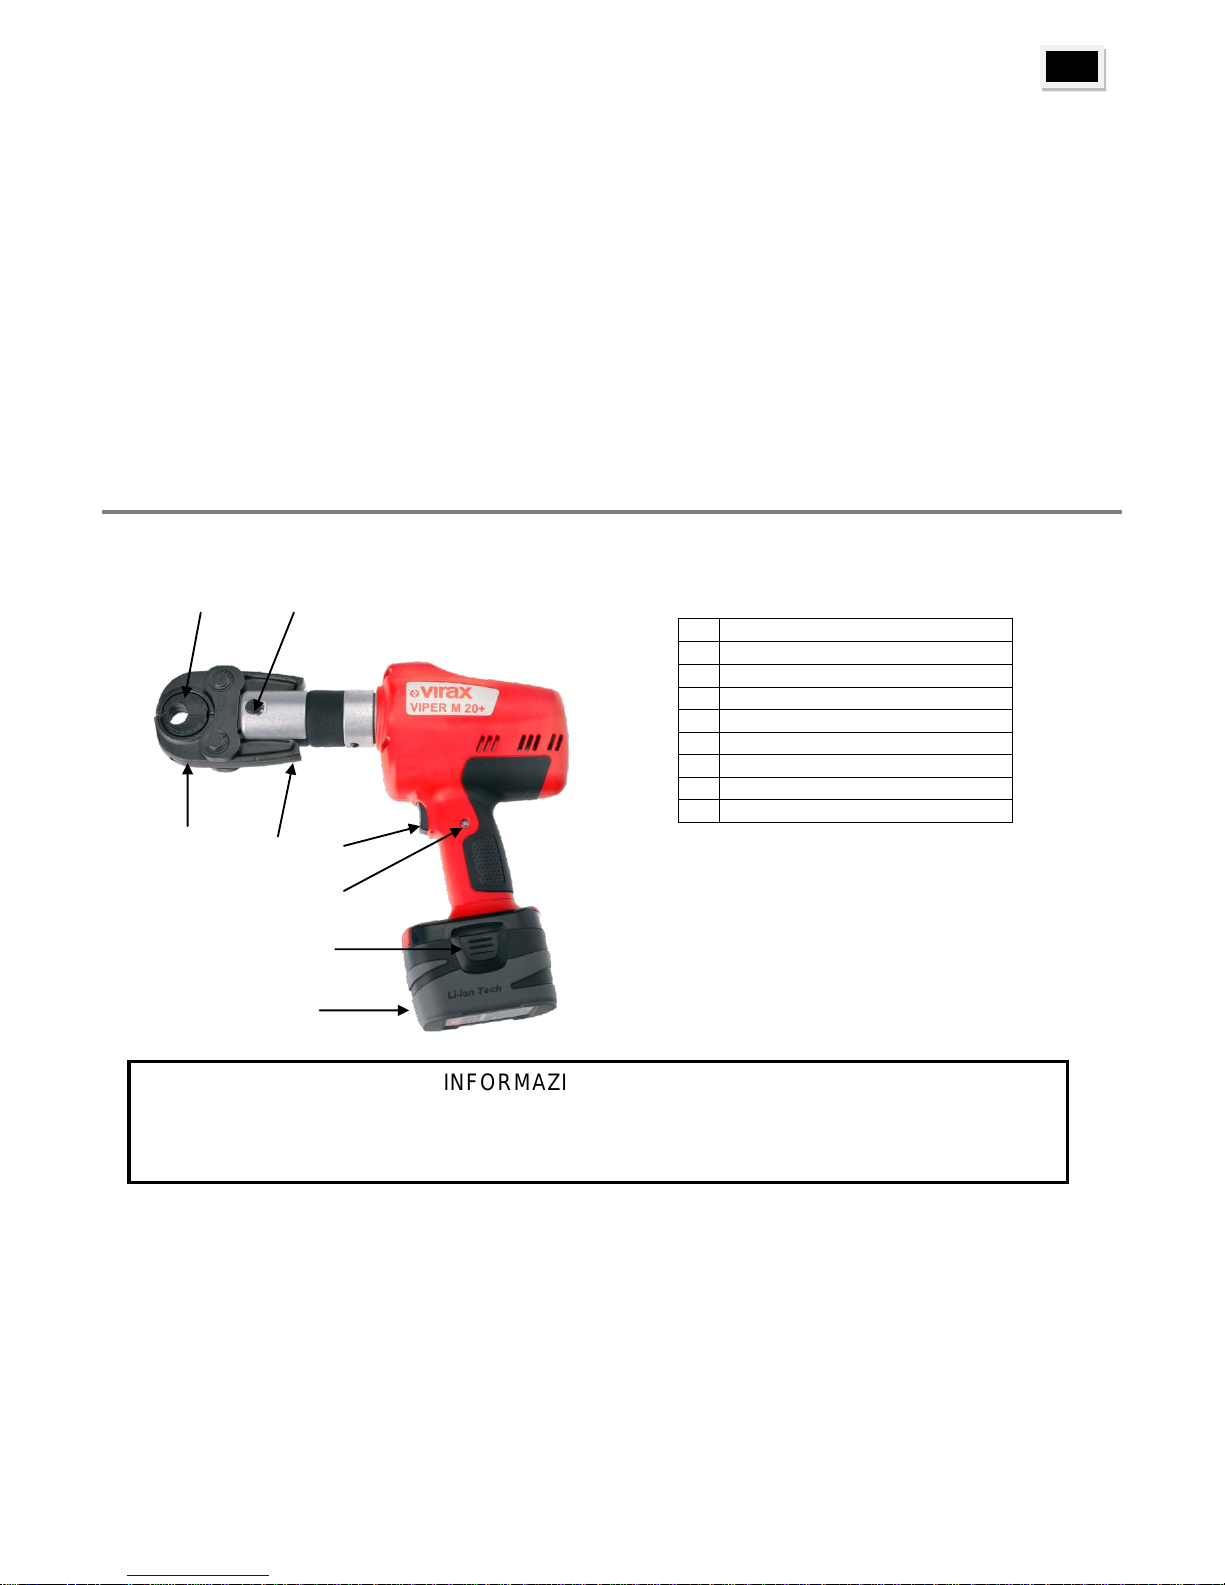
Schéma de la presse à sertir Viper M20+
Comment monter les inserts dans la pince mère
● Faire coïncider le profil extérieur de l’insert 4 avec le profil intérieur de la demi-machoîre, pousser l’insert jusqu’à
percevoir son verrouillage dans la demi-machoîre.
Pour monter le second insert, il est nécessaire d’ouvrir légèrement la pince mère.
Remarque : Après le montage des inserts, vérifier visuellement si les deux inserts sont correctement centrés dans la
pince mère et alignés entre eux.
Attention
Les mâchoires de la pince mère serrent forts. Ne pas glisser les doigts à l’intérieur des mâchoires ou des inserts.
Charge et mise en place des batteries
Comment charger la batterie
Conseil : Pour préserver la durée de vie de la batterie, il est conseillé de s’assurer qu’elle est complètement déchargée
avant de la recharger.
N°
Nom de la pièce
1
Axe de verrouillage
2
Pince mère
3
Galets presseurs
4
Inserts
5
Batterie
6
Loquets
7
Gachette
8
Voyant
INFORMATIONS IMPORTANTES
● Ne jamais faire fonctionner la presse à sertir sans inserts dans la pince mère.
● Ne pas laisser la batterie sur la presse à sertir hors des périodes de fonctionnement. Si la batterie
est laissée sur la presse à sertir, elle se déchargera complètement et sera peut être endommagée
2
3
6
5

6
FR
● Brancher le chargeur au secteur, la led gauche s’allume en rouge indiquant que le chargeur est sous tension.
● Insérer la batterie 5 dans son chargeur. Aligner les quatre rails de la batterie avec les quatre encoches du chargeur et
pousser la batterie jusqu’en butée.
La led gauche clignote en vert indiquant que la batterie est en charge.
La led droite clignote en jaune indiquant que la batterie a une technologie Lithium-Ion ou reste allumée en jaune indiquant
que la batterie a une technologie NiCd ou NiMh.
● Après 45 minutes, la led gauche devient vert continu indiquant que la batterie est chargée à 100%.
● Ôter la batterie en appuyant sur les deux loquets de verrouillage 6 et l’extraire du chargeur.
● Débrancher le chargeur de la source d’alimentation.
Remarque :
● Si la led gauche clignote en vert et rouge, cela indique qu’il y a un problème de température pour la charge de la
batterie. La batterie doit etre chargée entre 10° et 40°.
La température de la batterie augmente pendant l’utilisation de la presse à sertir. La batterie ne recevra pas une charge
complète si elle est rechargée immédiatement après avoir été utilisée.
Il est nécessaire de la laisser refroidir avant de la remettre en charge.
● Si la led gauche reste allumée en rouge, cela signifie que la batterie est endommagée. Dans ce cas, il faut remplacer la
batterie par une batterie neuve.
Comment insérer la batterie dans la presse à sertir
● Aligner les quatre rails de la batterie avec les quatre encoches de la base de la poignée de la Viper et pousser la
batterie jusqu’à entendre un clic.
Utilisation de la presse à sertir M20+
Comment choisir les inserts adéquats
Suivre les recommandations en termes de profil et diamètre mentionnés sur la notice fournie avec les raccords.
Préparation des tubes
● S’assurer que le raccord est adapté à la dimension du tube et que la matière et l’épaisseur du tube sont compatibles
avec le raccord.
● Couper le tube perpendiculairement à son axe et s’assurer de sa propreté, ceci particulièrement avec les raccords
équipés de joints élastomères. Les bavures et les arrêtes coupantes doivent être supprimés par la réalisation d’un
chanfrein.
● L’extrémité des tubes doit être remise au diamètre extérieur initial sur une longueur minimale supérieure à la
profondeur d’emboîtement du raccord. Le calibrage du tube ne peut être effectué qu’avec des outils spécifiques. Le tube
doit être recoupé si le calibrage n’est pas correct.
● L’extrémité du tube doit être exempte de rayures ou de piqûres sur une longueur minimale supérieure à la profondeur
d’emboîtement du raccord.
● En cas d’intervention sur un chantier de rénovation, il est particulièrement important de s’assurer qu’il ne subsiste
aucune trace de peinture sur une distance minimale supérieure à la profondeur d’emboîtement du raccord.
Comment effectuer le sertissage
Mise en place du raccord
● Sélectionner le raccord adapté au tube à sertir.
● Insérer le raccord sur le tube.
Insertion du raccord dans les inserts et sertissage
● Sélectionner les inserts adaptés au raccord.
● Ouvrir la pince mère en appuyant sur ses deux bras.
● Glisser le raccord à sertir sur le profil des inserts tout en maintenant la pince mère ouverte.
● Lâcher la pression sur la pince mère et s’assurer que les deux inserts se referment correctement sur le raccord.
● Vérifier que le raccord se situe au bon endroit sur les inserts.
● Après vérification, appuyer de manière prolongée sur la gâchette 7 qui doit rester enfoncée jusqu’à la fin du cycle de
sertissage (aller et retour). La machine revient automatiquement en arrière lorsque le sertissage est correctement réalisé.
Le voyant 8 reste allumé pour indiquer que le sertissage venant d’être fait est correct (atteinte de l’effort).
● Si la gâchette est relâchée avant accomplissement du cycle, la machine s’arrête en position. Un appui prolongé permet
alors de finir le cycle.
● Dans le cas d’une situation anormale exigeant le retour en arrière avant l’accomplissement du cycle de sertissage :
Relâcher la gâchette pour stopper la machine puis provoquer un retour en arrière par un appui très bref (impulsion) sur la
gâchette.
Enlever le raccord des inserts
● Ouvrir la pince mère en appuyant sur les bras de celle-ci.
● Enlever les inserts du raccord.
7
FR
Surveillance des défauts
● Un déclenchement de cycle sans pince mère sur la machine provoque un cycle aller/retour court suivi d’une mise en
défaut (commande inhibée). Pour repartir en mode normal, retirer et remettre la batterie.
● La surveillance du temps de sertissage provoque une mise en défaut de la machine dès la détection d’une baisse trop
importante du niveau batterie. Le voyant clignote et la machine interdit le cycle suivant. Mettre une batterie chargée pour
revenir en mode normal.
Maintenance et entretien
Avant toute intervention de maintenance, veiller à enlever la batterie de son logement.
● Après 15 000 cycles, le voyant clignote pour indiquer le besoin de maintenance. Pour avertir l’utilisateur, chaque cycle
est alors précédé d’une impulsion moteur à l’aller et de deux au retour.
● Après 18 000 cycles, la machine est bloquée pour imposer la maintenance.
Entretien de la presse
● Nettoyer les galets presseurs régulièrement pour éviter les dépôts de poussières et autres éléments.
● Graisser les galets presseurs. ● Huiler les parties métalliques.
Entretien de la pince mère et des inserts
● Vérifier régulièrement le bon état de la pince mère. Vérifier que les mâchoires se ferment correctement (avec inserts).
● Nettoyer les inserts à l’aide d’un chiffon sec ou d’une brosse métallique puis effectuer un léger huilage sur les profils de
sertissage.
● Garder le profil de sertissage propre et faire vérifier son usure environ tous les 10 000 cycles.
● Graisser les axes de la pince mère.
Entretien du moteur
● Le moteur est équipé de charbons. Les charbons s’usent et le moteur doit être remplacé quand ceux-ci sont usés.
Renvoyer la presse à sertir pour la faire réparer.
Garanties
Toutes nos presses à sertir Viper sont garanties 2 ans sous réserve de l’envoi en maintenance avant les 18 000 cycles.
Caractéristiques techniques
Capacité de sertissage
● Inserts type U : 16→32
● Inserts type V : 12→28
● Inserts type H : 12→32
● Inserts type TH : 12→32
● Inserts type V-US : ½’’ – ¾” – 1”
Presse
● Force de poussée axiale : 16kN, force de poussée radiale : 65kN
● Course : 40 mm
● Commande du moteur par gâchette.
● Signal lumineux indiquant la nécessité d’une opération de maintenance et les tensions batteries trop faibles.
Caractéristiques électriques
● Moteur 14,4V
● Chargeur réf. 251844 : alimentation électrique monophasée 230V ; 50-60Hz
● Chargeur US réf. 253246 : 120V, 60 Hz
● Batterie : 14,4V ; 1,5Ah / 2,4Ah
● Temps de charge de la batterie : 45 min
Masse
● Machine nue : 4,190 kg (avec pince mère + batterie 14,4V 1,5Ah) - 4,440 kg (avec pince mère + batterie 14,4V 2,4Ah)
Encombrement
● Machine nue : 366 x 310 x 81 ● Coffret : 595 x 495 x 150
Pièces détachées
Pince mère
253241
Batterie Lithium ion 14.4V – 2,4Ah
253244
Chargeur Lithium ion 230V
251844
Chargeur Lithium ion 110V US
253246
Vis à billes
753007
Embout vis à billes
753008
Moteur
753009
Carte électronique
753010
Tête de sertissage
753011
Valise seule
753063

FR
Diagnostic et dépannage
La pince ne se monte pas correctement dans la presse
Vérifier que les galets-presseurs sont en position arrière extrême. Dans le cas contraire, donner une impulsion sur la
gâchette jusqu’à entrée complète des galets dans le corps de la presse à sertir.
La presse à sertir ne se met pas en marche
Diagnostic :
Dépannage :
Les charbons sont usés
Envoyer l’outil à réparer
La batterie est vide
Recharger la batterie
Le moteur est défectueux
Envoyer l’outil à réparer
Appui trop bref sur la gâchette
Appuyer de manière prolongée sur la gâchette
Les galets ne sont pas reculés
Donner une impulsion sur la gâchette
La machine a dépassé 18 000 cycles
Envoyer la machine en maintenance
La pince ne ferme pas complètement
Diagnostic :
Dépannage :
Le moteur est défectueux
Envoyer l’outil à réparer
La batterie est déchargée
Recharger la batterie
La pince mère est défectueuse
Changer la pince mère
Les charbons sont usés
Envoyer l’outil à réparer
Les inserts utilisés ne sont pas adaptés au raccord
Choisir les inserts préconisés par le fabriquant du raccord
Les raccords sertis sont hors capacité maximale de la
machine
Se repporter au paragraphe "Caractéristiques
techniques"
Inspection et entretien des inserts et mâchoires
Insert garanti 5 ans sauf profil.
Avant toute utilisation lire cette fiche d'instructions ainsi que les consignes d'utilisation de la machine et du
fabricant de raccords. Ne pas respecter et assimiler l'ensemble de ces consignes peut entrainer des dégâts
matériels importants et des blessures graves voire mortelles.
Sécurité :
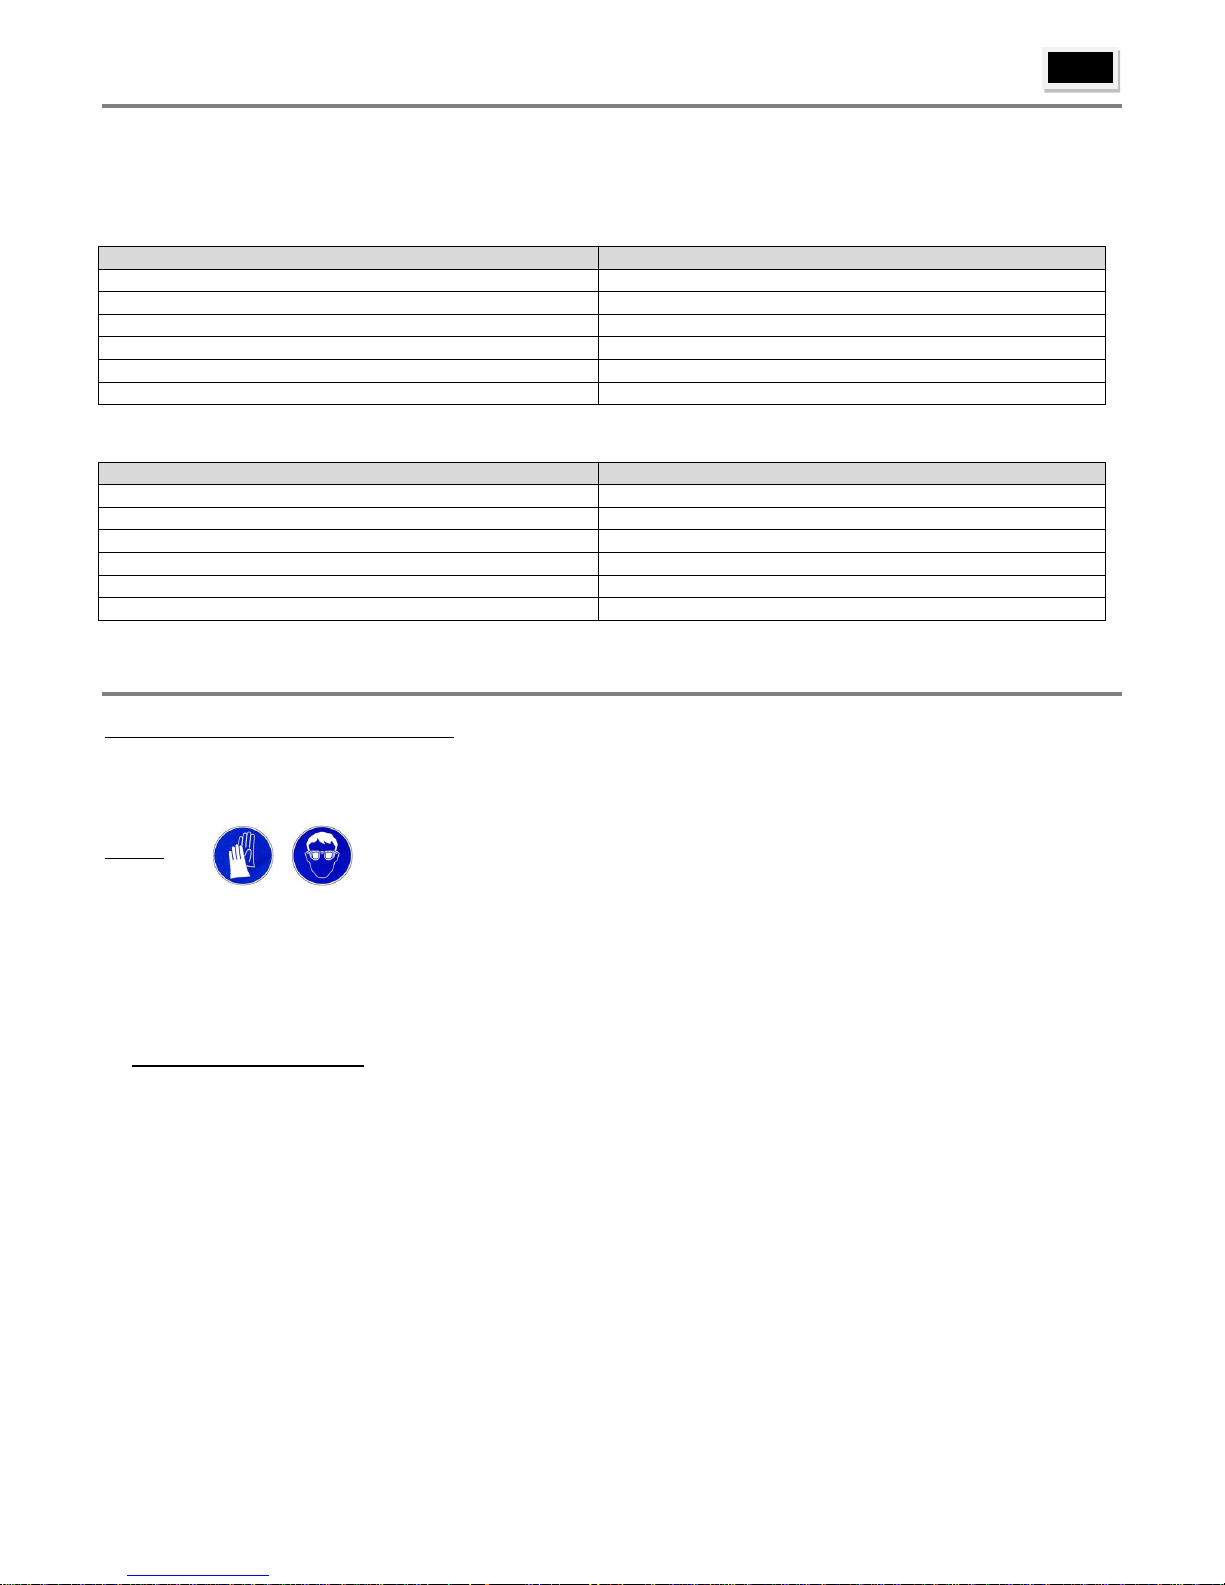
● Pendant le travail, utiliser des dispositifs pour la protection des yeux contre les projectiles.
● N'utiliser que les inserts Virax.
● Toutes utilisations de la machine non-conformes à nos prescriptions peuvent entrainer des blessures graves voire
mortelles.
● Eloigner vos doigts et vos mains de la pince lors du cycle de sertissage, pour éviter tous risques d'écrasement, ou
amputation.
Ne jamais remplacer des composants vous mêmes. Tout composant qui à été modifié de quelque manière que
se soit peut provoquer des blessures graves ou mortelles.
Maintenance et entretien :
Contrôler quotidiennement que le profil de vos inserts soit conforme aux photos page 3 :
Profil H-ML : 1 / Profil G : 2 / Profil TH : 3 / Profil V : 4 / Profil U : 5 / Profil HA : 6 / Profil RF-P : 7 / Profil VUS : 8.
Contrôler et supprimer chaque jour la présence de corrosion, de saletés ou d’accumulation de corps étrangers.
Nettoyer quotidiennement les inserts à l’aide d'une paille de fer moyenne ou grosse puis effectuer un léger huilage sur
les profils de sertissage. Evitez d’utiliser tous matériaux abrasifs tels que : toile émeri, papier de verre, matériaux
abrasifs, meuleuse lime et lime rotative sous peine d’endommager les inserts en modifiant leurs dimensions. Toute
modification risque de provoquer des fuites.
Vérifier régulièrement le bon état de la pince mère. Vérifier que les mâchoires se ferment correctement (avec inserts).
Si la formation de moustaches empêche le contact des inserts à la fin du sertissage, remplacer les inserts.

9
FR
Faire vérifier annuellement l'état des inserts en les retournant chez votre distributeur.
Nettoyer et lubrifier (graisse à roulement) les axes de la pince mère annuellement sans démontage.
Nettoyer, lubrifier et vérifier quotidiennement le bon fonctionnement du ressort (la pince doit s'ouvrir sans effort et se
refermer toute seule).
Chaque jour, inspecter visuellement tous les éléments de la mâchoire.
Si une usure anormale ou des fissures sont visibles sur l’une des parties de la mâchoire, la remplacer.
Ne jamais remplacer des composants vous mêmes. Tout composant qui à été modifié de quelque de manière
que se soit peut provoquer des blessures graves ou mortelles.
L'utilisation d'une mâchoire ou d'inserts endommagés provoque d'important dégâts matériels et ou de graves
blessures corporelles.

10
EN
Viper M20+ Battery-powered mechanical press fitting machine
Thank you for buying the Viper press fitting machine and for the confidence you have shown in our products.
Virax is a major producer and seller of tools for the plumbing, air-conditioning and roofing trades, to assist you in your daily work: Virax:
express your talent
The Virax Viper range of press fitting machines
Virax has over 20 years experience of designing and manufacturing hydraulic and electro-hydraulic tools.
Regular samples are taken during the production of Virax Viper press fitting tools and tested under extreme conditions to their
maximum capacity.
Each individual tool is also checked as it leaves the production line. This highly rigorous quality monitoring process ensures maximum
user safety.
You are thus guaranteed a perfectly formed, completely leak-tight joint.
Finally, in order to improve safety even further, Virax has its machines and jaws tested and approved by the major manufacturers of
pipes and fittings.
The M20+ press fitting machine
The Viper press fitting machine is compact, lightweight and easy to handle. It's 180° pivoting head makes for ease of working
regardless of the configuration of the installation.
Single control switch for easy operation. Simply hold down the trigger to perform a complete pressing cycle.
A single LED for checking pressing status and the maintenance intervals.
Its microcontroller monitors the quality of the work performed and manages maintenance.
The main jaw can be fitted with offset inserts for working closer to walls.
Safety instructions
Read and keep these instructions. Observe the following basic safety measures to reduce the risk of electric discharge or fire when
using electric tools.
General safety instructions
Choice of tool
● Always use the correct tool for the job. Do not use accessories or attachments of insufficient capacity to perform heavy duty tasks.
Do not use tools for any other purpose than that for which they have been designed.
Maintenance and storage
● Store your tools in a safe place. When not in use, tools should be stored in a dry, closed place, out of reach of children.
● Carefully maintain your tools. Keep them clean for better and safer performance. Follow the maintenance instructions as well as the
recommendations regarding the changing of accessories. Keep the handles dry and free of oil or grease.
● Check the tool for damage. Before using the tool, always carefully check that its various parts are operating properly. Check for
incorrect operation of moving parts, seizing of moving parts and breakage of parts. Check for proper mounting of all parts and any
other conditions that may prevent the perfect operation of the tool. Any guard, switch or other part that is damaged or defective should
be properly repaired or replaced by a qualified technician.
● Warning! Use the tool and its accessories in accordance with these safety instructions. Also remain within the limits of the tool, taking
into account the working conditions and the task to be performed. Using tools for other than the intended tasks can be dangerous.
● This tool is in accordance with all the relevant safety rules. All repairs must be performed by qualified persons using original
manufacturer's spare parts. Failure to do so may be dangerous for the user and cancel the warranty.
User safety instructions
● Keep children away from the tools. Do not allow other people to touch the tool. Keep them away from your work area.
● Wear appropriate clothing. Do not wear loose clothing or jewellery, as they can become caught in moving parts.
● Rubber gloves and non-slip footwear are recommended when working out of doors. Long hair should be worn in a hair net.
● Do not overreach. Avoid adopting a tiring position. Keep proper footing and balance at all times.
● Be constantly alert. Pay attention to the task, use common sense and do not operate the tool when tired.
Safety instructions regarding the working area
● Keep the work area tidy. A cluttered work area increases the risk of injury.
● Consider the work area environment. Do not expose electric tools to the rain. Do not use electric tools in a damp or wet environment.
● Keep the work area well lit. Do not use electric tools in the vicinity of flammable liquids or gasses.
Specific safety instructions
Battery and charger
● Recharge the battery using the charger supplied with the machine. Do not touch the contacts of the charger.
● Do not expose the battery or the charger to rain or snow.
● Do not recharge your battery in a location that is exposed to direct sunlight.
● Do not recharge the battery in the presence of flammable liquids or gasses.
● The charger must only be operated a temperature of between 10°C and 40°C.
11
EN
● Ensure that the charger's ventilation slots remain unobstructed.
● Disconnect the charger from the power supply when recharging is completed
● Batteries may begin to leak if damaged or used under the wrong conditions.
● Avoid all contact between the battery and metal objects such as nails, screws, etc. when not in the charger or the press-fitting tool, in
order to prevent short circuiting.
● Never use a damaged charger. Never use the charger with a damaged cable or plug.
● Do not use a damaged battery. It must be replaced without delay.
● Do not dismantle the charger or the battery. Do not attempt to use the charger to recharge non-rechargeable batteries.
Press fitting machine
● Do not place your fingers inside the main jaw or the inserts.
Operation
View of the M20+ press fitting machine
Fitting the inserts into the main jaw
● Match the outer profile of the insert (4) with the inner profile of the half jaw and push the insert until it locks onto the jaw.
The main jaw will need to be opened slightly in order to fit the second insert.
Comment:
After fitting the inserts, visually check that they are correctly centred in the main jaw and aligned with one another.
Caution:
The main jaw has a powerful clamping action. Do not place your fingers between the jaws or the inserts.
Charging and installing batteries
Charging the battery
Tip: To preserve the battery life, we recommend that you make sure the battery is completely discharged before
recharging it.
● Connect the changer to the mains; the LED lights up red indicating that the charger is powered up.
● Insert battery 5 into its charger. Line up the four battery rails with the notches on the charger and push the battery to the
stop.
The left LED flashes green indicating that the battery is charging.
The right LED flashes yellow indicating that the battery has Lithium-Ion technology or remains on yellow indicating that
the battery has NiCd or NiMh technology.
N°
Name
1
Locking pin.
2
Main jaw
3
Pressing rollers
4
Inserts
5
Battery
6
Latches
7
Trigger
8
Indicator LED
IMPORTANT INFORMATION
● Never operate the press fitting machine without inserts in the main jaw.
● Always remove the battery from the machine when it is not in use. If left on the machine, the
battery will completely discharge and may be damaged.
2
3
6
5

12
EN
● After 45 minutes, the left LED turns green steady indicating that the battery is fully charged.
● Remove the battery by pressing the two locking clips 6 and extract it from the charger.
● Disconnect the charger from the power supply.
Comment:
● If the left LED flashes green and red, this means that there is a temperature problem for the battery charge. The battery
must be charged between 10° and 40°.
The temperature of the battery increases while the press fitting machine is in use. The battery will not be fully charged if it
is recharged immediately after use.
You must let it cool down before setting it to charge again.
● If the left LED remains lit red, this means that the battery is damaged. In this case, you must replace it with a new
battery.
Inserting the battery in the press fitting machine
● Align the four rails of the battery with the four grooves on the bottom of the tool's handle and push until a click is heard.
Using the M20+ press fitting machine
Selecting the correct inserts
Use the insert profiles and diameters recommended in the instructions supplied with the pipe fittings.
Preparation of pipes
● Ensure that the fitting is suitable for the diameter of the pipe and that the material and the thickness of the pipe are
compatible with the fitting.
● Cut the pipe perpendicular to its centreline. Ensure that the cut is cleanly formed, in particular where elastomer seals
are used. Burrs and sharp edges must be removed by forming a chamfer.
● The ends of the pipes must be restored to their initial external diameter over a minimum length exceeding the depth of
insertion into the fitting. The pipe must be sized only using tools specifically designed for that purpose. The pipe must be
re-cut if incorrectly sized.
● The ends of the pipes must be free of scratching or pitting over a length a minimum length exceeding the depth of
insertion into the fitting.
● When working on a refurbishment scheme, it is particularly important to ensure that all traces of paint are removed over
a minimum distance exceeding the depth of insertion into the fitting.
Forming a press fit joint
Placing the fitting
● Select the correct fitting for the pipe to be joined.
● Slide the fitting onto the pipe.
Inserting the fitting into the inserts and pressing
● Select the correct inserts for the fitting.
● Open the main jaw by pressing on the two arms.
● Slide the fitting over the inserts, keeping the main jaws open.
● Release pressure on the main jaws and check that the two inserts close properly over the fitting.
● Check that fitting is properly positioned in the inserts.
● After checking, press the trigger (7) and hold it down until the pressing cycle is completed (return cycle). The machine
will automatically retract when the press fit joint is properly formed. The LED (8) will remain lit to indicate that the joint is
correctly formed (pressing force achieved).
● If the trigger is released before the cycle has been completed, the machine stop and remain in position. Holding down
the trigger will resume and complete the cycle.
● In the event of an abnormal situation requiring reversal of operation before completing the pressing cycle: Release the
trigger to stop the machine, then apply a very brief pressure to return the machine to its earlier position.
Removing the fitting from the inserts
● Open the main jaw by pressing the two arms.
● Remove the inserts from the fitting.
Fault monitoring
● If a cycle is activated without the main jaw in place, the machine will perform a short return cycle then switch to fault
mode (inhibited operation). Disconnect and reconnect the battery to return to normal operation.
● The pressing timer will switch the machine to fault mode if an excessive drop in battery charge level is detected. The
indicator will flash and the machine will prevent the next cycle being performed. Insert a charged battery to return to
normal mode.
13
EN
Servicing and maintenance
Always remove the battery from its housing before performing any maintenance operation.
● After 15,000 cycles, the LED will flash to indicate that maintenance is required. To warn the user, each cycle will then
be preceded by one motor pulse on the forward stroke and two on the return stroke.
● After 18,000 cycles, the machine will be blocked, forcing maintenance to be performed.
Maintenance of the press
● Regularly clean the pressure rollers to avoid the build-up of dust and other impurities.
● Grease the pressing rollers.
● Oil the metal parts.
Maintenance of main jaw and inserts
● Regularly check the condition of the main jaw. Check that the jaws close correctly (with the inserts in place!).
● Clean the inserts with a clean cloth or a metal brush then apply a thin coat of oil to the pressing profiles.
● Keep the pressing profile clean and check for wear every 10,000 cycles.
● Grease the shafts of the main jaw.
Maintenance of motor
Information concerning the maintenance of the motor
● The motor is fitted with carbon brushes. The brushes wear and the motor must be replaced when they become worn.
Send the press fitting machine for outside repair.
Guarantees
All Viper press fitting machines are guaranteed for 2 years on condition that they are sent for maintenance before
reaching 18,000 cycles.
Technical characteristics
Pressing capacity:
● Inserts type U :16→32
● Inserts type V :12→28
● Inserts type H :12→32
● Inserts type TH :12→32
● Inserts type VUS : ½” – ¾” – 1”
Press:
● Axial pushing force: 16kN, radial pushing force: 65kN
● Stroke: 40 mm
● Trigger motor control.
● LED indicating the need for maintenance and low battery voltage.
Electrical characteristics:
● 14.4V motor
● Battery charger ref. 251844 : 230 V, 50-60 Hz single phase electricity supply
● Battery charger (US) ref. 253246 : 120 V, 60 Hz
● Battery: 14.4V; 1.5Ah / 2.4Ah
● Battery charging time: 45 min
Weight:
● Bare machine: 4.190 kg (with main jaw and battery 14,4V 1,5Ah) – 4.440 kg (with main jaw and battery 14,4V 2,4Ah)
Dimensions:
● Bare machine: 366 x 310 x 81
● Case: 595 x 495 x 150
Spare parts
Main jaw
253241
14.4V, 2.4Ah Lithium ion battery
253244
230V Lithium ion charger
251844
110V Lithium ion charger (US)
253246
Ball screw
753007
Ball screw bit
753008
Motor
753009
Electronic board
753010
Case only
753063
Pressing head:
753011
14
EN
Troubleshooting
The jaw will not fit properly onto the press
Check that the pressing rollers are fully retracted. If not, press on the trigger until the rollers are fully retracted into the
body of the setting press.
The setting press will not start
Diagnosis:
Remedy:
The brushes are worn
Send tool for repair
The battery is flat
Recharge the battery
The motor is faulty
Send tool for repair
Trigger pressed too briefly
Hold down the trigger for longer
The rollers are not retracted
Press the trigger
The machine has exceeded 18,000 cycles
Send the machine for servicing
The jaw will not fully close
Diagnosis:
Remedy:
The motor is faulty
Send tool for repair
The battery is flat
Recharge the battery
The main jaw is defective
Change the main jaw
The brushes are worn
Send tool for repair
The inserts used are not suitable for the fitting
Select the inserts recommended by the fitting manufacturer
The fittings exceed the maximum capacity of the machine
See "Technical characteristics"
Inspection and maintenance of inserts and jaws
Insert guaranteed 5 years (except profile).
Before using, read these instructions as well as the machine operating instructions and the coupling manufacturer's
instructions. Failure to fully follow and understand these instructions may result in serious material damage and serious or
even fatal injury.
Safety:
● Wear eye protection when working, to protect against projectiles.
● Only use Virax inserts.
● Failure to use the machine in accordance with our instructions may result in serious or even fatal injury.
● Keep hands and fingers away from the pliers during the pressing cycle to avoid any risk of crushing or amputation.
● Never replace components yourself. Any component that has been modified in any way whatsoever may cause serious
or fatal injury.
Servicing and maintenance:
- Check daily that the profile of your inserts is as shown in the photographs page 3 :
Profile H-ML: 1, Profile G: 2, Profile TH: 3, Profile V: 4, Profile U: 5, Profile HA: 6, Profile RF-P: 7, Profile VUS: 8
- Check for corrosion, dirt or accumulated foreign matter daily.
- Clean the inserts with a medium or coarse steel wool then lightly oil the pressing profiles daily. Avoid using abrasive
materials such as emery board, sandpaper, abrasive materials, a grinding file or a rotary file, as this might damage the
inserts or alter their dimensions. Any modifications risk to cause leaks.
- Regularly check the condition of the main jaw. Check that the jaws close correctly (with the inserts in place!).
- If the formation of whiskers prevents the inserts coming into contact at the end of the pressing operation, replace the
inserts.
- Return the inserts to your dealer for inspection once a year.
- Clean and lubricate the hinge pins of the main jaw with bearing grease annually without removing.
- Clean, lubricate and check the working of the spring daily (the pliers must open without effort and close on their own).
- Visually inspect the jaw components every day.
If abnormal wear or cracks can be seen on one of the jaw components, it must be replaced.
Never replace components yourself. Any component that has been modified in any way whatsoever may cause
serious or fatal injury.
Using a damaged jaw or inserts will cause serious material damage and/or injury.

15
IT
Pressatrice elettromeccanica Viper M20+
Vi ringraziamo avere acquistato la pressatrice Viper e per la fiducia che ci accordate.
In qualità di operatore tra i più prestigiosi del settore della produzione e della commercializzazione di attrezzature per l’idraulica, i
sanitari, la climatizzazione e i sistemi di copertura, Virax è ogni giorno al vostro fianco:
Virax, affinché si esprima il vostro talento.
La gamma delle pressatrici Virax Viper
Virax vanta oltre 20 anni di esperienza nella progettazione e nella fabbricazione di utensili idraulici ed elettroidraulici.
Nella fabbricazione delle pressatrici Virax Viper, vengono effettuati test regolari alle capacità massime e in condizioni estreme.
Inoltre ciascuna pressatrice viene controllata all'uscita dalla catena di produzione. Questo follow-up qualitativo estremamente rigoroso
procura il massimo della sicurezza nell'utilizzo.
In questo modo si ha la garanzia di una pressatura riuscita e di una tenuta perfetta dei raccordi.
Infine, per fornire una sicurezza ancora maggiore, Virax fa testare e approvare le macchine e le ganasce da grandi fabbricanti di tubi e
di raccordi.
La pressatrice M20+
La pressatrice Viper è compatta, leggera e maneggevole. La testa ruota a 180° per facilitare il lavoro indipendentemente dalla
configurazione dell'installazione.
Il pulsante di comando unico ne semplifica l'utilizzo, un appoggio prolungato sul pulsante è sufficiente per realizzare un ciclo di
pressatura.
Un'unica spia consente di controllare lo stato della pressatura e l'esigenza di manutenzione.
Il micro-controller controlla gli sforzi, la qualità del lavoro effettuato e gestisce la manutenzione.
La pinza madre può essere dotata di inserti disassati per lavorare il più possibile vicino al muro.
Disposizioni di sicurezza
Leggere e conservare questo manuale per l’uso. Per ridurre il rischio di scarica elettrica, di infortuni e di incendio durante l'utilizzo di
strumenti elettrici, rispettare le misure di sicurezza fondamentali seguenti.
Disposizioni di sicurezza generali
Scelta dell’utensile
● Utilizzare l'utensile adatto. Non utilizzare utensili o dispositivi adattabili di potenza insufficiente per eseguire lavori pesanti. Non
utilizzare gli strumenti a fini diversi da quelli per cui è stato progettato.
Manutenzione e stoccaggio
● Sistemare gli utensili in un luogo sicuro. Gli utensili non utilizzati devono essere riposti in un luogo asciutto e chiuso, fuori dalla
portata dei bambini.
● Effettuare una manutenzione accurata degli utensili. Tenere gli utensili puliti per lavorare meglio e in modo più sicuro. Osservare le
indicazioni relative alla manutenzione, nonché le indicazioni di sostituzione degli accessori. Tenere le maniglie asciutte ed esenti da oli
e grassi.
● Controllare se l'utensile è danneggiato. Prima di utilizzare lo strumento, verificare sempre accuratamente il perfetto funzionamento
dei pezzi. Verificare se il funzionamento dei pezzi in movimento è corretto, se non si inceppano o se altri pezzi sono danneggiati. Tutti
i componenti devono essere montati correttamente e soddisfare le condizioni per garantire il funzionamento impeccabile dello
strumento. Qualsiasi dispositivo di sicurezza, interruttore o altro pezzo danneggiato o difettoso deve essere riparato o sostituito in
maniera appropriata da un tecnico qualificato.
● Attenzione! Utilizzare l'utensile e i suoi accessori conformemente alle istruzioni di sicurezza. Inoltre, tenere conto delle possibilità
dell’utensile, facendo attenzione alle condizioni di lavoro e al compito da eseguire. L’utilizzo dell’utensile per compiti diversi da quelli
previsti rischia di essere pericoloso.
● Questo utensile è conforme alle norme di sicurezza in vigore. Tutte le riparazioni devono essere effettuate da professionisti
qualificati e con pezzi di ricambio originali. Diversamente, l’utilizzo dell’utensile può rappresentare un pericolo per l’utente e annullerà
la garanzia.
Istruzioni di sicurezza per l'utente
● Tenere lontani i bambini. Non consentire che altre persone tocchino l'utensile; tenerle lontane dalla zona di lavoro.
● Indossare abiti da lavoro appropriati. Non indossare abiti larghi o gioielli, potrebbero essere agganciati da pezzi in movimento.
● Durante lavori all'aria aperta, si consiglia di indossare guanti di gomma e calzature a suola antiscivolo. Indossare una retina per
capelli in caso di capelli lunghi.
● Non allargare troppo il raggio d'azione. Evitare di adottare una posizione stancante per il corpo; fare in modo che l'appoggio sia
stabile e conservare l'equilibrio in ogni momento.
● Mantenere sempre la massima attenzione. Osservare il proprio lavoro, agire dando prova di buon senso e non utilizzare lo
strumento quando si è stanchi.
Istruzioni di sicurezza relative alla zona di lavoro
● Mantenere la zona di lavoro in ordine. Il disordine nella zona di lavoro aumenta il rischio di incidenti.
● Tenere conto dell'ambiente della zona di lavoro. Non esporre gli strumenti elettrici alla pioggia. Non utilizzare utensili elettrici in un
ambiente umido o bagnato.
● Fare in modo che la zona di lavoro sia ben illuminata. Non utilizzare utensili elettrici in prossimità di liquidi o gas infiammabili.
16
IT
Disposizioni di sicurezza specifiche:
Batteria e caricatore
● Ricaricare la batteria con il caricatore fornito con la pressatrice. Non toccare i contatti del caricatore.
● Non esporre mai la batteria né il caricatore alla pioggia o alla neve.
● Non ricaricare la batteria in un luogo esposto ai raggi diretti del sole.
● Non ricaricare la batteria in presenza di liquidi o di gas infiammabili.
● Il caricatore deve funzionare esclusivamente con una temperatura compresa fra 10°C e 40°C.
● Verificare che i fori di ventilazione del caricatore restino liberi da qualsiasi ostruzione.
● Quando la ricarica è terminata, staccare il caricatore dalla presa di corrente.
● In seguito a danni o cattive condizioni di utilizzo, le batterie potrebbero presentare delle perdite.
● Quando la batteria non è né nel caricatore, né nella pressatrice, evitare qualsiasi contatto della batteria con oggetti metallici come
chiodi, viti, ecc. per evitare corto circuiti.
● Non utilizzare mai un caricatore danneggiato. Non utilizzare mai il caricatore con un cavo o una presa danneggiata.
● Non utilizzare la batteria se è danneggiata. In tal caso la batteria deve essere sostituita nel più breve tempo possibile.
● Non smontare il caricatore né la batteria. Non tentare di ricaricare batterie non ricaricabili con il caricatore.
Pressatrice
● Non inserire le dita nel profilo della pinza madre e degli inserti.
Messa in servizio
Schema della pressatrice Viper M20+
N°
Nome del pezzo
1
Asse di blocco
2
Pinza madre
3
Rulli pressori
4
Inserti
5
Batteria
6
Nottolini d'arresto
7
Pulsante
8
Spia
Come montare gli inserti nella pinza madre
● Far coincidere il profilo esterno dell'inserto 4 con il profilo interno della semi-ganascia, spingere l'inserto fino a
percepirne il blocco nella semi-ganascia.
● Per montare il secondo inserto, è necessario aprire leggermente la pinza madre.
Nota:
Dopo il montaggio degli inserti, verificare visivamente se i due inserti sono correttamente centrati nella pinza madre e
allineati fra loro.
Attenzione:
Le ganasce della pinza madre stringono forte. Non inserire le dita all'interno delle ganasce o degli inserti.
INFORMAZIONI IMPORTANTI
● Non fare mai funzionare la pressatrice senza inserti nella pinza madre.
● Non lasciare la batteria sulla pressatrice al di fuori dei periodi di funzionamento. Se la batteria
viene lasciata inserita nella pressatrice, si scaricherà completamente e potrebbe danneggiarsi.
2
3
6
5

17
IT
Carica e inserimento delle batterie
Come caricare la batteria
Consigli:
Per preservare la durata di vita della batteria, è consigliato assicurarsi che questa sia completamente scarica prima di
ricaricarla
● Collegare il caricatore al settore, il led sinistro diventa rosso, indicando che il caricatore è sotto tensione.
● Inserire la batteria 5 nel suo caricatore. Allineare le quattro rotaie di contatto della batteria con le quattro tacche del
caricatore e spingere la batteria fino alla fine.
Quando il led sinistro diventa di colore verde e lampeggia, indica che la batteria è in carica.
Se il led destro diventa giallo e lampeggia, indica che la batteria ha una tecnologia Lithium-Ion; se diventa giallo e resta
acceso, indica che la batteria ha una tecnologia NiCd o NiMh.
● Dopo 45 minuti, il led di sinistra indica che la batteria è carica al 100%.
● Togliere la batteria premendo sui due chiavistelli di bloccaggio 6 ed estrarla dal caricatore.
● Scollegare il caricatore dalla fonte di alimentazione.
Nota:
● Se il led di sinistra è di colore verde e lampeggia, c'è un problema di temperatura per la carica della batteria. La batteria
deve essere caricata tra i 10° e i 40°.
La temperatura della batteria aumenta durante l'uso della pressatrice. La batteria non riceverà una carica completa se
viene ricaricata immediatamente dopo essere stata utilizzata.
È necessario lasciarla rifreddare prima di rimetterla in carica.
● Se il led di sinistra resta acceso ed è rosso, significa che la batteria è danneggiata. In questo caso è necessario
sostituire la batteria con una batteria nuova.
Come inserire la batteria nella pressatrice
● Allineare i quattro binari della batteria con le quattro intacche della base dell'impugnatura della Viper e spingere la
batteria fino ad udire un clic.
Utilizzo della pressatrice Viper M20+
Come scegliere gli inserti adeguati
Seguire le raccomandazioni in termini di profilo e diametro indicate sulle istruzioni fornite con i raccordi.
Preparazione dei tubi
● Verificare che il raccordo sia adatto alla dimensione del tubo e che il materiale e lo spessore del tubo siano compatibili
con il raccordo.
● Tagliare il tubo perpendicolarmente al suo asse e verificarne la pulizia, in particolare con i raccordi dotati di guarnizioni
in elastomero. Le sbavature e gli spigoli taglienti devono essere eliminati realizzando uno smusso.
● L'estremità dei tubi deve essere rimessa al diametro esterno iniziale su una lunghezza minima superiore alla profondità
di incastro del raccordo. La calibratura del tubo può essere effettuata solo con utensili specifici. Il tubo deve essere
ritagliato se la calibratura non è corretta.
● L'estremità del tubo deve essere esente da striature o punture su una lunghezza minima superiore alla profondità di
incastro del raccordo.
● In caso di intervento su un cantiere di ristrutturazione, è particolarmente importante verificare che non sussista alcuna
traccia di vernice su una distanza minima superiore alla profondità di incastro del raccordo.
Come effettuare la pressatura
Posizionamento del raccordo
● Selezionare il raccordo adatto al tubo da collegare.
● Inserire il raccordo sul tubo.
Inserimento del raccordo negli inserti e pressatura
● Selezionare gli inserti adatti al raccordo.
● Aprire la pinza madre premendo sui due bracci.
● Inserire il raccordo da pressare sul profilo degli inserti mantenendo la pinza madre aperta.
● Allentare la pressione sulla pinza madre e verificare che i due inserti si richiudano correttamente sul raccordo.
● Verificare che il raccordo sia posizionato correttamente sugli inserti.

18
IT
● Dopo la verifica, premere in modo prolungato sul pulsante 7 che deve restare premuto fino alla fine del ciclo di
pressatura (andata e ritorno). La macchina torna automaticamente indietro quando la pressatura è stata realizzata
correttamente. La spia 8 resta accesa per indicare che la pressatura appena effettuata è corretta (raggiungimento dello
sforzo).
● Se il pulsante viene rilasciato prima del compimento del ciclo, la macchina si ferma in posizione. Una pressione
prolungata consente di terminare il ciclo.
● Nel caso di una situazione anomala che richieda il ritorno indietro prima del compimento del ciclo di pressatura:
rilasciare il pulsante per arrestare la macchina, poi provocare un ritorno indietro mediante una breve pressione (impulso)
sul pulsante.
Togliere il raccordo dagli inserti
● Aprire la pinza madre premendo sui due bracci.
● Togliere gli inserti dal raccordo.
Monitoraggio dei difetti
● Un innesco di ciclo senza pinza madre sulla macchina provoca un ciclo andata/ritorno breve seguito da una messa in
difetto (comando inibito). Per ripartire in modalità normale, togliere e rimettere la batteria.
● La sorveglianza del tempo di pressatura provoca una messa in difetto della macchina dal rilevamento di un calo
eccessivo del livello della batteria. La spia lampeggia e la macchina impedisce il ciclo seguente. Mettere una batteria
caricata per tornare in modalità normale.
Manutenzione
Prima di qualsiasi intervento di manutenzione, togliere la batteria dal suo alloggiamento.
● Dopo 15.000 cicli, la spia lampeggia per indicare l'esigenza di manutenzione. Per avvisare l'utente, ogni ciclo viene
preceduto da un impulso motore in andata e due in ritorno.
● Dopo 18.000 cicli, la macchina è bloccata per imporre la manutenzione.
Manutenzione della pressa
● Pulire i rulli pressori regolarmente per evitare i depositi di polvere e altri elementi.
● Lubrificare i rulli pressori.
● Oliare le parti metalliche.
Manutenzione della pinza madre e degli inserti
● Verificare regolarmente il buono stato della pinza madre. Verificare che le ganasce si chiudano correttamente (con gli
inserti posizionati!).
● Pulire gli inserti mediante un panno asciutto o una spazzola metallica, poi effettuare una leggera lubrificazione sui
profili di pressatura.
● Tenere il profilo di pressatura pulito e verificarne l'usura ogni 10.000 cicli.
● Lubrificare gli assi della pinza madre.
Manutenzione del motore
Informazioni relative alla manutenzione del motore
● Il motore è dotato di carboni. I carboni si usurano e il motore deve essere sostituito quando questi sono consumati.
Inviare la pressatrice in riparazione.
Garanzie
Tutte le nostre pressatrici della gamma Viper sono garantite 2 anni a condizione che vengano inviate in manutenzione
entro 18.000 cicli.
Caratteristiche tecniche
Capacità di pressatura
● Inserti tipo U :16→32
● Inserti tipo V :12→28
● Inserti tipo H :12→32
● Inserti tipo TH :12→32
● Inserti tipo VUS : ½” – ¾” – 1”
Pressa
● Forza di spinta assiale: 16kN, forza di spinta radiale: 65kN
● Corsa: 40 mm
● Comando del motore mediante pulsante.
● Segnale luminoso che indica la necessità di un'operazione di manutenzione e la carica delle batterie troppo debole.

19
IT
Caratteristiche elettriche
● Motore 14,4V
● Caricatore ref. 251844 : alimentazione elettrica monofase 230V; 50-60Hz
● Caricatore ref. 253246 (US) : alimentazione 110V; 60Hz
● Batteria: 14,4V; 1,5Ah / 2,4Ah
● Tempo di carica della batteria: 45 min
Massa
● Macchina nuda: 4,190 kg (con pinza madre e batteria 14,4V 1,5Ah) - 4,190 kg (con pinza madre e batteria 14,4V
2,4Ah)
Ingombro
● Macchina nuda: 366 x 310 x 81 ● Cassetta: 595 x 495 x 150
Pezzi di ricambio
Pinza madre
253241
Batteria Lithium ion 14.4V – 2,4Ah
253244
Caricatore Lithium ion 230V
251844
Caricatore Lithium ion 110V (US)
253246
Viti a sfere:
753007
Inserto viti a sfere:
753008
Motore
753009
Carta elettronica
753010
Testa di pressatura
753011
Valigia
753063
Risoluzione dei problemi
La pinza non si monta correttamente nella pressa
Verificare che i rulli pressori siano in posizione posteriore estrema. In caso contrario, dare un impulso sul pulsante fino
all'entrata completa dei rulli nel corpo della pressatrice.
La pressatrice non si avvia
Diagnosi:
Riparazione:
I carboni sono consumati
Inviare l'utensile in riparazione
La batteria è vuota
Ricaricare la batteria
Il motore è difettoso
Inviare l'utensile in riparazione
Pressione troppo breve del pulsante
Premere il pulsante in modo prolungato
I rulli non sono arretrati
Dare un impulso sul pulsante
La macchina ha superato 18.000 cicli
Inviare la macchina in manutenzione
La pinza non chiude completamente
Diagnosi:
Soluzione:
Il motore è difettoso
Inviare l'utensile in riparazione
La batteria è scarica
Ricaricare la batteria
La pinza madre è difettosa
Sostituire la pinza madre
I carboni sono consumati
Inviare l'utensile in riparazione
Gli inserti utilizzati non sono adatti al raccordo
Scegliere gli inserti raccomandati dal fabbricante del
raccordo
I raccordi pressati sono fuori capacità massima della
macchina
Riferirsi al paragrafo "Caratteristiche tecniche"
Ispezione e manutenzione degli inserti e delle ganasce
Inserto garantito 5 anni, eccetto il profilo.
Previamente a qualsiasi uso, leggere la presente scheda di istruzioni e le raccomandazioni d'uso della
macchina, nonchè l'istruzione del fabbricante di raccordi. La non assimilazione o il non rispetto dell'insieme
delle istruzioni può condurre a danni materiali ingenti e ferite gravi, anche letali.

20
IT
Sicurezza:
● Durante il lavoro, utilizzare gli occhiali per la protezione degli occhi contro i proiettili.
● Utilizzare unicamente gli Inserti Virax.
● Qualsiasi uso della macchina non conforme alle nostre prescrizioni può provocare ferite gravi, anche letali.
● Allontanare le dita e le mani dalla pinza durante il ciclo di aggraffatura onde evitare rischi di schiacciamento o di
amputazione.
Non sostituire mai voi stessi i componenti. Qualsiasi componente che sia stato modificato in qualsiasi modo
può condurre a ferite gravi o letali.
Manutenzione e pulizia:
- Controllare quotidianamente che il profilo degli inserti sia conforme alle foto p. 3:
Profil H-ML: 1, Profilo G: 2, Profilo TH: 3, Profilo V: 4, Profilo U: 5, Profilo HA: 6, Profilo RF-PU: 7, Profilo VUS : 8.
- Controllare e eliminare ogni giorno i segni di corrosione, di sporco o l'accumulazione di corpi estranei.
- Pulire quotidianamente gli inserti con paglia di ferro media o grossa quindi applicare un leggero strato di olio sui
profili di aggraffatura. Evitare l'uso di prodotti abrasivi come: tela smerigliata, carta di fibre di vetro, materiali
abrasivi, molatrice lima e lima rotativa per non danneggiare gli inserti modificandone le dimensioni. Qualsiasi
modifica rischia di provocare perdite.
- Verificare regolarmente le condizioni della pinza madre. Verificare che le ganasce si chiudano in modo corretto
(Inserti in posizione!).
- Se la formazione di baffi impedisce il contatto degli inserti alla fine dell'aggraffatura, sostituire gli inserti.
- Far verificare annualmente le condizioni degli inserti inviandoli presso il distributore.
- Pulire e lubrificare (grasso da cuscinetti) gli assi della pinza madre annualmente senza smontaggio.
- Pulire, lubrificare la molla e verificarne quotidianamente il funzionamento (la pinza deve aprirsi senza sforzo e
richiudersi da sola).
- Ogni giorno, controllare visivamente tutti gli elementi della ganascia.
Se sono visibili usura anormale o fessurazioni su una qualsiasi delle parti della ganascia, sostituirla.
Non sostituire mai voi stessi i componenti. Qualsiasi componente che sia stato modificato in qualsiasi modo
può condurre a ferite gravi o letali.
L'uso di ganascia o di inserti danneggiati può condurre a danni materiali ingenti o ferite gravi.

21
ES
Máquina de prensar electromecánica Viper M20+
Les agradecemos la compra de la máquina de prensar Viper y la confianza que nos manifiestan.
Virax, un protagonista principal en la fabricación y la comercialización de herramientas para los oficios de Sanitarios, Ingeniería
climática y Cubiertas les acompaña en sus tareas diarias: Virax, para darle expresión a su talento.
La gama de máquinas de prensar Virax Viper
Virax ostenta más de 20 años de experiencia en el diseño y la fabricación de herramientas hidráulicas y electrohidráulicas.
En la fabricación de las máquinas de prensar Virax Viper, se someten a prueba muestreos regulares, a sus capacidades máximas y
en condiciones extremas.
Además, cada máquina de prensar se controla a su salida de las cadenas de fabricación. Este seguimiento cualitativo altamente
riguroso les brinda un máximo de seguridad en la utilización.
Así, tienen la garantía de un prensado exitoso y de una estanqueidad perfecta de los racores.
Por último, para aportarles aún más seguridad, Virax hace probar y aprobar sus máquinas y sus mordazas por grandes fabricantes de
tubos y racores.
La máquina de prensar M20+
La máquina de prensar Viper es compacta, ligera y práctica. Su cabeza gira 180° con el fin de facilitar el trabajo cualquiera sea la
configuración de la instalación.
Su botón de mando único simplifica su utilización, basta con un apoyo prolongado sobre el gatillo para realizar un ciclo de prensado.
Un solo piloto permite controlar el estado del prensado y la necesidad de mantenimiento.
Su microcontrolador supervisa los esfuerzos, controla la calidad del trabajo efectuado y gestiona el mantenimiento.
La pinza principal puede llevar equipadas inserciones desfasadas para trabajar lo más cerca posible de las paredes.
Consignas de seguridad
Leer y conservar estas instrucciones. Con el fin de reducir el riesgo de descarga eléctrica, heridas e incendio en la utilización de
herramientas eléctricas, observar las siguientes medidas fundamentales de seguridad.
Consignas de seguridad generales
Elección de la herramienta
● Utilizar la herramienta adecuada. No utilizar herramientas o dispositivos adaptables de potencia demasiado reducida para realizar
trabajos pesados. No utilizar las herramientas para otros fines que los trabajos para los cuales fueron diseñadas.
Mantenimiento y almacenamiento
● Guardar sus herramientas en un lugar seguro. Las herramientas no utilizadas deben guardarse en un lugar seco y cerrado, fuera de
alcance de los niños.
● Mantener cuidadosamente sus herramientas. Mantener limpias sus herramientas a fin de trabajar mejor y con mayor seguridad.
Respetar las indicaciones relativas al mantenimiento así como las indicaciones de cambio de accesorios. Mantener las empuñaduras
secas y libres de aceite y grasa.
● Controlar si la herramienta está dañada. Antes de utilizar la herramienta, siempre comprobar cuidadosamente el perfecto
funcionamiento de las piezas. Comprobar si el funcionamiento de las piezas en movimiento es correcto, si no se agarrotan o si otras
piezas están dañadas. Todos los componentes deben estar correctamente montados y cumplir con los requisitos para garantizar el
funcionamiento impecable de la herramienta. Todo dispositivo de seguridad, todo interruptor o cualquier otra pieza dañados o
defectuosos deben ser reparados o reemplazados de manera apropiada por un técnico cualificado.
● ¡Atención!: Procurar utilizar la herramienta y sus accesorios de acuerdo con las instrucciones de seguridad. También tener en
cuenta las posibilidades de la herramienta prestando atención a las condiciones de trabajo y a la tarea a efectuar. La utilización de la
herramienta para tareas distintas de las previstas es susceptible de presentar peligro.
● Esta herramienta se ajusta a las reglas de seguridad en vigor. Todas las reparaciones deben ser efectuadas por profesionales
calificados con piezas sueltas de origen, pues, de lo contrario, la utilización de la herramienta puede representar un peligro para el
usuario, y volver nula la garantía.
Instrucciones de seguridad para el usuario
● Mantener lejos a los niños. Impedir que otras personas toquen la herramienta; mantenerlas lejos de su zona de trabajo.
● Llevar ropa de trabajo adecuada. No llevar ropas amplias o joyas, podrían quedar atrapados por piezas en movimiento.
● En trabajos al aire libre, se recomienda llevar guantes de goma y zapatos con suela antiderrapante. Cubrir los cabellos largos con
una redecilla.
● No ampliar demasiado su radio de acción. Evitar adoptar una posición fatigante para el cuerpo; procurar que su apoyo en el suelo
sea firme y conservar el equilibrio a todo momento.
● Estar siempre atentos. Observar su trabajo, actuar con sensatez y no emplear la herramienta si están cansados.
Instrucciones de seguridad relativas a la zona de trabajo
● Mantener ordenada su zona de trabajo. El desorden en la zona de trabajo aumenta el riesgo de accidente.

22
ES
● Tener en cuenta el medio ambiente de la zona de trabajo. No exponer las herramientas eléctricas a la lluvia. No utilizar
herramientas eléctricas en un medio ambiente húmedo o mojado.
● Procurar iluminar bien la zona de trabajo. No utilizar herramientas eléctricas si hay líquidos o gases inflamables cerca.
Consignas de seguridad específicas:
Batería y cargador
● Recargar la batería mediante el cargador suministrado con la máquina de prensar. No tocar los contactos del
cargador.
● No exponer nunca la batería ni el cargador a la lluvia ni a la nieve.
● No recargar su batería en un lugar expuesto a la luz solar directa.
● No recargar la batería en presencia de líquidos o gases inflamables.
● El cargador únicamente debe funcionar con una temperatura comprendida entre 10°C y 40°C.
● Procurar que los orificios de ventilación del cargador se mantengan libres de toda obstrucción.
● Al terminar la recarga, desconectar el cargador de la fuente de alimentación
● Como consecuencia de daños o malas condiciones de utilización, las baterías pueden empezar a tener pérdidas.
● Evitar todo contacto de la batería con objetos metálicos como clavos, tornillos, etc. para evitar los cortocircuitos, todo
esto cuando la batería no está ni en el cargador ni en la máquina de prensar.
● No utilizar nunca un cargador dañado. No utilizar nunca el cargador con un cable o una toma dañada.
● No utilizar la batería si está deteriorada. Debe reemplazarse a la brevedad.
● No desmontar el cargador ni la batería. No intentar recargar baterías no recargables con el cargador.
Máquina de prensar
● No deslizar los dedos en el perfil de la pinza principal y de las inserciones.
Puesta en servicio
Esquema de la máquina de prensar Viper M20+
Cómo montar las inserciones en la pinza principal
● Hacer coincidir el perfil exterior de la inserción 4 con el perfil interior de la semimordaza, empujar la inserción hasta
percibir su bloqueo en la semimordaza. Para montar la segunda inserción, es preciso abrir un poco la pinza principal.
Nº
Nombre de la pieza
1
Eje de bloqueo
2
Pinza principal
3
Rodillos de pinzamiento
4
Inserciones
5
Batería
6
Pestillos
7
Gatillo
8
Piloto
INFORMACIONES IMPORTANTES
● No hacer funcionar nunca la máquina de prensar sin inserciones en la pinza principal.
● No dejar la batería en la máquina de prensar fuera de los períodos de funcionamiento. Si
la batería se deja en la máquina de prensar, va a descargarse completamente y
probablemente quedará deteriorada.
2
3
6
5

23
ES
Observación:
Después del montaje de las inserciones, comprobar visualmente si ambas inserciones están correctamente centradas
en la pinza principal y alineadas entre ellas.
Atención:
Las mordazas de la pinza principal aprietan fuertemente. No deslizar los dedos dentro de las mordazas o inserciones.
Carga e instalación de las baterías
Cómo cargar la batería
Consejo:
Para preservar la duración de vida de la batería, se aconseja asegurarse que la misma está completamente descargada
antes de recargarla
● Conectar el cargador en el sector, el indicador luminoso de la izquierda se enciende en rojo indicando que el cargador
está conectado.
● Insertar la batería 5 en su cargador. Alinear los cuatros rieles de la batería con las cuatro muescas del cargador y
empujar la batería hasta el tope.
El indicador luminoso de la izquierda en verde indica que la batería está en carga.
El indicador luminoso derecho centella en amarillo indicando que la batería tiene una tecnología Litio-Ion o permanece
encendido en amarillo indicando que la batería tiene una tecnología NiCd o NiMh.
● Después de 45 minutos, el indicador luminoso izquierdo se pone en verde continuo indicando que la batería está
cargada a 100%.
● Retirar la batería pulsando sobre los dos picaportes de bloqueo 6 y extraerlo del cargador.
● Desconectar el cargador de la fuente de alimentación.
Observación:
● Si el indicador luminoso izquierdo centella en verde y rojo, esto indica que hay un problema de temperatura para la
carga de la batería. La batería debe estar cargada entre 10° y 40°.
La temperatura de la batería aumenta durante la utilización de la máquina de prensar. La batería no recibirá una carga
completa si se la recarga inmediatamente después de haber sido utilizada.
Es necesario dejarla enfriar antes de ponerla en carga.
● Si el indicador luminoso izquierdo permanece encendido en rojo, esto significa que la batería está dañada. En este
caso, se debe reemplazar la batería por una batería nueva.
Cómo insertar la batería en la máquina de prensar
● Alinear los cuatro rieles de la batería con las cuatro muescas de la base de la empuñadura de la Viper y empujar la
batería hasta escuchar un chasquido.
Utilización de la máquina de prensar Viper M20+
Cómo elegir las inserciones adecuadas
Seguir las recomendaciones en términos de perfil y diámetro mencionadas en el prospecto suministrado con los racores.
Preparación de los tubos
● Asegurarse de que el racor se adapta a la dimensión del tubo y que la materia y el espesor del tubo son compatibles
con el racor.
● Cortar el tubo perpendicularmente a su eje y asegurarse de su limpieza, especialmente con los racores provistos de
juntas de elastómero. Las rebabas y aristas cortantes deben suprimirse realizando un biselado.
● La extremidad de los tubos debe hacerse recuperar el diámetro exterior inicial sobre una longitud mínima superior a la
profundidad de ajuste del racor. La calibración del tubo sólo puede efectuarse con herramientas específicas. El tubo
debe recortarse si la calibración no es correcta.
● La extremidad de los tubos debe estar exenta de rayaduras o picaduras sobre una longitud mínima superior a la
profundidad de ajuste del racor.
● Si se trabaja en obras de renovación, es muy importante asegurarse de que no queden rastros de pintura sobre una
distancia mínima superior a la profundidad de ajuste del racor.
Cómo efectuar el prensado
Instalación del racor
● Seleccionar el racor adaptado al tubo a prensar.
● Insertar el racor sobre el tubo.

24
ES
Inserción del racor en las inserciones y prensado
● Seleccionar las inserciones adaptadas al racor.
● Abrir la pinza principal apoyando sobre sus dos brazos.
● Deslizar el racor a prensar sobre el perfil de las inserciones manteniendo la pinza principal abierta.
● Aflojar la presión sobre la pinza principal y asegurarse de que ambas inserciones vuelvan a cerrarse correctamente
sobre el racor.
● Comprobar que el racor esté bien posicionado sobre las inserciones.
● Tras verificación, apoyar de manera prolongada en el gatillo 7 que debe permanecer apretado hasta el final del ciclo
de prensado (ida y vuelta). La máquina vuelve atrás automáticamente cuando se realiza correctamente el prensado.El
piloto 8 permanece encendido para indicar que el prensado que acaba hacerse es correcto (obtención del esfuerzo).
● Si se afloja el gatillo antes de realizar el ciclo, la máquina queda detenida en su posición. Un apoyo prolongado
permite entonces terminar el ciclo.
● Si hay una situación anormal que exige volver atrás antes del final del ciclo de prensado: Aflojar el gatillo para detener
la máquina y luego provocar una vuelta atrás mediante un muy breve apoyo (impulso) sobre el gatillo.
Retirar el racor de las inserciones
● Abrir la pinza principal apoyando sobre sus brazos.
● Retirar las inserciones del racor.
Vigilancia de los defectos
● Un disparo de ciclo sin pinza principal en la máquina provoca un ciclo corto de ida y vuelta seguido de una puesta en
defecto (mando inhibido). Para rearrancar en modo normal, retirar y reinstalar la batería.
● La vigilancia del tiempo de prensado pone en defecto la máquina en cuanto detecta una reducción demasiado
importante del nivel de la batería. El piloto parpadea y la máquina prohibe el ciclo siguiente. Poner una batería cargada
para volver al modo normal.
Mantenimiento y conservación
● Antes de toda intervención de mantenimiento, pensar en retirar la batería de su alojamiento.
● Tras 15000 ciclos, el piloto parpadea para indicar la necesidad de mantenimiento. Como aviso al usuario, a cada ciclo
preceden entonces un impulso motor a la ida y dos a la vuelta.
● Tras 18000 ciclos, la máquina queda bloqueada para imponer el mantenimiento.
Conservación de la prensa
● Limpiar regularmente los rodillos de pinzamiento para evitar los depósitos de polvo y otros elementos.
● Engrasar los rodillos de pinzamiento.
● Aceitar las piezas metálicas.
Conservación de la pinza principal y las inserciones
● Comprobar regularmente el buen estado de la pinza principal. Comprobar que las mordazas se cierran correctamente
(¡inserciones posicionadas!).
● Limpiar las inserciones mediante un trapo seco o un cepillo metálico y luego aceitar ligeramente los perfiles de
prensado.
● Mantener limpio el perfil de prensado y hacer comprobar su desgaste cada 10000 ciclos.
● Engrasar los ejes de la pinza principal.
Conservación del motor
● El motor tiene equipadas escobillas de carbón. Las escobillas se desgastan y cuando es así debe reemplazarse el
motor. Reexpedir la máquina de prensar para hacerla reparar.
Garantías
Todas nuestras máquinas de prensar de la gama Viper se garantizan 2 años a condición de enviarlas a mantenimiento
antes de los 18000 ciclos.
Características técnicas
Capacidad de prensado
● Inserciones tipo U: 16→32
● Inserciones tipo V: 12→28
● Inserciones tipo H: 12→32
● Inserciones tipo TH: 12→32
● Inserciones tipo VUS : ½“ – ¾“
– 1“
Prensa
● Fuerza de empuje axial: 16kN, fuerza de empuje radial: 65kN
● Carrera: 40 mm
● Mando del motor por gatillo.
● Señal luminosa que indica la necesidad de una operación de mantenimiento y tensiones de baterías demasiado bajas.

25
ES
Características eléctricas
● Motor 14,4V
● Cargador ref. 251844: alimentación eléctrica monofásica 230V; 50-60Hz
● Cargador ref. 253246 : alimentación 120V; 60Hz
● Batería: 14,4V; 1,5Ah / 2,4Ah
● Tiempo de carga de la batería: 45 min
Masa
● Máquina desnuda: 4,190 kg (con pinza principal y batería 14,4V 1,5Ah) - 4,440 kg (con pinza principal y batería 14,4V
2,4Ah)
Espacio ocupado
● Máquina desnuda: 366 x 310 x 81 ● Maletín: 595 x 495 x 150
Piezas sueltas
Pinza principal
253241
Batería Lithium ion 14.4V – 2,4Ah
253244
Cargador Lithium ion 230V
251844
Cargador Lithium ion 110V (US)
253246
Tornillo de bolas
753007
Punta tornillo de bolas
753008
Motor
753009
Tarjeta electrónica
753010
Cabeza de prensado
753011
Estuche
753063
Diagnóstico y reparación
La pinza no se monta correctamente en la prensa
Comprobar que los rodillos de pinzamiento estén posicionados totalmente hacia atrás. En caso contrario, dar un impulso
sobre el gatillo hasta que los rodillos entren completamente en el cuerpo de la máquina de prensar.
La máquina de prensar no se pone en marcha
Diagnóstico:
Reparación:
Escobillas de carbón desgastadas
Enviar la herramienta a reparación
Batería descargada
Recargar la batería
Motor defectuoso
Enviar la herramienta a reparación
Apoyo demasiado breve en el gatillo
Apoyar de manera prolongada en el gatillo
Gatillos no retrocedidos
Dar un impulso sobre el gatillo
La máquina ha sobrepasado los 18000 ciclos
Enviar la máquina a mantenimiento
La pinza no se cierra completamente
Diagnóstico:
Reparación:
Motor defectuoso
Enviar la herramienta a reparación
Batería descargada
Recargar la batería
Pinza principal defectuosa
Cambiar la pinza principal
Escobillas de carbón desgastadas
Enviar la herramienta a reparación
Las inserciones utilizadas no se adaptan al racor
Elegir las inserciones recomendadas por el fabricante del racor
Los racores prensados están fuera de la capacidad
máxima de la máquina
Consultar el párrafo "Características técnicas"
Inspección y mantenimiento de los insertos y de las mordazas
Inserto garantizado 5 años salvo perfil.
Antes de toda utilización, leer esta ficha de instrucciones, así como las consignas de utilización de la máquina y
del fabricante de racores. No respetar ni asimilar el conjunto de estas consignas puede ocasionar importantes
daños materiales y lesiones graves, incluso mortales.

26
ES
Seguridad:
● Durante el trabajo, utilizar dispositivos para proteger los ojos de los proyectiles.
● Utilizar solamente los insertos Virax.
● Todas las utilizaciones de la máquina no conformes con nuestras recomendaciones pueden ocasionar lesiones
graves, incluso mortales.
● Alejar sus dedos y sus manos de la pinza durante el ciclo de engaste para evitar todo riesgo de aplastamiento o de
amputación.
Nunca reemplace usted mismo los componentes. Cualquier componente que haya sido modificado de cualquier
forma que sea puede provocar lesiones graves o mortales.
Mantenimiento y limpieza:
- Controlar a diario que el perfil de sus insertos esté conforme con las fotos p.3:
- Perfil H-ML: 1, Perfil G: 2, Perfil TH: 3, Perfil V: 4, Perfil U: 5, Perfil HA: 6, Perfil RF-P: 7, Perfil VUS : 8.
- Controlar y suprimir a diario la presencia de corrosión, de suciedades o de acumulación de cuerpos extraños.
- Limpiar a diario los insertos con lana de acero media o gruesa y efectuar un ligero aceitado sobre los perfiles de
engaste. Evitar utilizar materiales abrasivos como: tela esmerilada, lija, materiales abrasivos, amoladora lima y lima
rotativa so pena de dañar los insertos modificando sus dimensiones. Toda modificación puede provocar fugas.
- Verificar regularmente el buen estado de la pinza madre. Verificar que las mordazas se cierran correctamente
(¡insertos instalados!).
- Si la formación de bigotes impide el contacto de los insertos al final del engaste, reemplazar los insertos.
Verificar anualmente el estado de los insertos devolviéndolos a su distribuidor.
Limpiar y lubricar (grasa de rodamiento) los ejes de pinza madre anualmente sin desmontaje.
Limpiar, lubricar y verificar a diario el buen funcionamiento del muelle (la pinza debe abrirse sin esfuerzo y cerrarse
sola).
- A diario inspeccionar visualmente todos los elementos de la mordaza.
Si son visibles un desgaste anormal o fisuras en una de las partes de la mordaza, reemplazarla.
Nunca reemplace usted mismo los componentes. Cualquier componente que haya sido modificado de cualquier
forma que sea puede provocar lesiones graves o mortales.
La utilización de una mordaza o de insertos dañados provoca importantes daños materiales y graves lesiones
corporales.

27
PT
Máquina de prensar electro-mecânica Viper M20+
Parabéns por ter adquirido a máquina de prensar Viper e obrigado pela confiança que depositou em nós.
A Virax, um importante nome no fabrico e na comercialização de ferramentas para as profissões das instalações sanitárias, da
climatização e da cobertura, acompanha-o na sua actividade quotidiana:
Virax, para que possa exprimir o seu talento.
A gama de máquinas de prensar Virax Viper
A Virax possui mais de 20 anos de experiência na concepção e fabrico de ferramentas hidráulicas e electro-hidráulicas.
No momento do fabrico das máquinas de prensar Virax Viper, são realizados testes regulares às suas capacidades máximas e em
condições extremas.
Além disso, cada um dos aparelhos é controlado à saída das linhas de montagem. Este acompanhamento de qualidade
extremamente rigoroso procura proporcionar ao clientea máxima segurança de utilização.
Desta forma, tem garantia de uma prensagem bem conseguida e de uma vedação perfeita das uniões.
Por fim, para proporcionar ainda mais segurança, a Virax submete as suas máquinas e garras à aprovação e teste por parte dos
grandes fabricantes de tubos e uniões.
A máquina de prensar M20+
A máquina de prensar Viper é compacta, ligeira e maneável. A cabeça basculante de 180° facilita qualquer trabalho,
independentemente da configuração de instalação.
O botão de comando único simplifica a sua utilização, pressionar prolongadamente o gatilho é suficiente para realizar um ciclo de
prensagem.
Um só indicador permite controlar o estado da prensagem e a necessidade de manutenção.
O micro-controlador supervisiona os esforços, controla a qualidade do trabalho efectuado e gere a manutenção.
A garra principal pode ser equipado com maxilas deslocadas para trabalhar mais perto das paredes.
Instruções de segurança
Ler e conservar este manual de instruções. Para reduzir o risco de descarga eléctrica, de ferimentos e de incêndio aquando da
utilização de ferramentas eléctricas, observe as seguintes medidas de segurança.
Instruções de segurança gerais
Escolha da ferramenta
● Utilizar a ferramenta adequada. Não utilizar ferramentas ou dispositivos adaptáveis de potência insuficiente para a execução de
trabalhos pesados. Não utilize as ferramentas para fins para os quais não foram concebidas.
Manutenção e armazenamento
● Guarde as suas ferramentas num local seguro. As ferramentas não utilizadas devem ser guardadas num local seco e fechado, fora
do alcance das crianças.
● Faça uma manutenção cuidada das suas ferramentas. Mantenha as suas ferramentas limpas a fim de trabalhar melhor e com mais
segurança. Cumpra as indicações relativas à manutenção, bem como as indicações de substituição de acessórios. Mantenha os
cabos das ferramentas secos e livres de óleo ou gordura.
● Verifique se a ferramenta está danificada. Antes de utilizar a ferramenta, verifique cuidadosamente o funcionamento perfeito das
peças. Verifique se o funcionamento das peças em movimento é correcto, se não bloqueiam ou se outras peças estão avariadas.
Todos os componentes devem ser correctamente montados e preencher as condições necessárias para garantir o funcionamento
impecável da ferramenta. Todos os dispositivos de segurança, interruptores ou outras peças danificadas ou avariadas devem ser
reparadas ou substituídas de forma adequada por um técnico qualificado.
● Atenção! Certifique-se de que utiliza a ferramenta e os respectivos acessórios de acordo com as instruções de segurança. Tenha
igualmente em conta as capacidades da ferramenta, considerando com atenção as condições de trabalho e a tarefa a executar. A
utilização da ferramenta para outras tarefas que não as previstas pode ser perigosa.
● Esta ferramenta está em conformidade com as regras de segurança em vigor. Todas as reparações devem ser efectuadas por
profissionais qualificados com peças sobresselentes de origem, caso contrário, a utilização da ferramenta pode representar um perigo
para o utilizador e anular a garantia.
Instruções de segurança para o utilizador:
● Mantenha as crianças afastadas. Não permita que outras pessoas toquem na ferramenta, mantenha-as afastadas da zona de
trabalho.
● Use roupas de trabalho apropriadas. Não use roupas largas nem jóias, uma vez que estas poderiam ser agarradas pelas peças em
movimento.
● Aquando dos trabalhos ao ar livre, é recomendado o uso de luvas de borracha e sapatos com sola anti-derrapante. Prenda os
cabelos com uma rede apropriada, se forem compridos.
● Não se afaste em demasia do seu raio de acção.evite adoptar uma posição fatigante para o corpo. Verifique a solidez do seu apoio
no solo e conserve sempre o equilíbrio.
● Esteja sempre atento. Esteja atento ao seu trabalho, dê provas de bom-senso e não utilize a ferramenta quando estiver cansado.
Instruções de segurança relativas à área de trabalho
● Mantenha a ordem na área de trabalho. A desordem na área de trabalho aumenta o risco de acidente.
● Tenha em conta o ambiente da área de trabalho. Não exponha as ferramentas à chuva. Não utilize as ferramentas eléctricas num
ambiente húmido ou molhado.
● Verifique se a zona de trabalho está bem iluminada. Não utilize ferramentas eléctricas se houver líquidos ou gases inflamáveis nas
proximidades.

28
PT
Instruções de segurança específicas:
Bateria e carregador
● Recarregar a bateria com o carregador incluído com a máquina de prensar. Não tocar nos contactos do carregador.
● Nunca expor a bateria nem o carregador à chuva nem à neve.
● Não recarregar a bateria num local directamente exposto à luz solar.
● Não recarregar a bateria na presença de líquidos ou gases inflamáveis.
● O carregador não deve funcionar senão apenas a temperaturas entre 10°C e 40°C.
● Verifique se todas as aberturas de ventilação do carregador estão livres de qualquer obstrução.
● Assim que o carregamento terminar, desligue o carregador da fonte de alimentação
● Em caso de danos ou más condições de utilização, as baterias podem começar a verter.
● Evitar qualquer contacto da bateria com objectos metálicos como pregos, parafusos, etc.. de forma a evitar curto-circuitos, tudo isto
quando a bateria não estiver nem no carregador nem na máquina de prensar.
● Nunca utilizar um carregador danificado. Nunca utilizar um carregador com um cabo ou numa tomada danificados.
● Não utilizar a bateria se estiver danificada. Deve substituí-la o mais rapidamente possível.
● Não desmontar o carregador nem a bateria. Não tentar recarregar baterias não recarregáveis com o carregador.
Máquina de prensar
● Não colocar os dedos no perfil da garra principal ou nas maxilas.
Colocação em serviço
Esquema da máquina de prensar Viper M20+
Como montar as maxilas na garra principal
● Coincidir o perfil exterior da maxila 4 com o perfil interior da semi-garra, empurrar a maxila até que esta encaixe na
semi-garra.
Para montar a segunda maxila, é necessário abrir ligeiramente a garra principal.
Observação :
Após a montagem das maxilas, verificar visualmente se as duas maxilas estão correctamente centradas na garra
principal e alinhados entre elas.
Atenção:
As garras da garra principal efectuam fortes apertos. Não colocar os dedos no interior das garras ou das maxilas.
N.°
Nome da peça
1
Eixo de bloqueio
2
Garra principal
3
Cilindros de pressão
4
Maxilas
5
Bateria
6
Trincos
7
Gatilho
8
Indicador
INFORMAÇÕES IMPORTANTES
● Nunca utilizar a máquina de prensar sem maxilas na garra principal.
● Ne pas laisser la batterie sur la presse à sertir hors des périodes de fonctionnement. Si la
batterie est laissée sur la presse à sertir, elle se déchargera complètement et sera peut être
endommagée
2
3
6
5

29
PT
Carregar e colocar as baterias
Como carregar a bacteria
Recomendação:
Para preservar a duração de vida útil da bateria, é aconselhável certificar-se de que está completamente descarregada
antes de a recarregar
● Ligue o carregador ao sector, o LED esquerdo acende-se a vermelho, o que indica que o carregador está sob tensão.
● Introduza a bateria 5 no seu carregador. Alinhe as quatro calhas da bateria com os quatro entalhes do carregador e
empurre a bateria ao máximo.
O LED esquerdo pisca a verde, o que indica que a bateria está em carga.
O LED direito pisca a amarelo, o que indica que a bateria possui uma tecnologia de iões de lítio ou permanece acesso a
amarelo, o que indica que a bateria possui uma tecnologia NiCD ou NiMh.
● Após 45 minutos, o LED esquerdo fica verde fixo, o que indica que a bateria está carregada a 100%.
● Retire a bateria ao pressionar os dois trincos de bloqueio 6 e extrai-a do carregador.
● Desligue o carregador da fonte de alimentação.
Observação:
● Se o LED esquerdo pisca a verde e vermelho, isso indica que existe um problema de temperatura para o carregamento
da bateria. A bateria deve ser carregada entre 10° e 40°.
A temperatura da bateria aumenta durante a utilização da máquina de prensar. A bateria não receberá uma carga
completa se for recarregada imediatamente após ter sido utilizada.
É necessário deixar arrefecer antes de voltar a carregar.
● Se o LED esquerdo permanecer acesso a vermelho, isso significa que a bateria está danificada. Neste caso, é
necessário substituir a bateria por uma bateria nova.
Como introduzir a bateria na máquina de prensar
● Alinhar os quatro carris da bateria com os quatro encaixes da base da pega da Viper e empurrar a bateria até ouvir um
clique.
Utilizar a máquina de prensar M20+
Como escolher as maxilas adequadas
Tenha em conta as recomendações dos termos de perfil e diâmetro mencionados no manual incluído com as uniões.
Preparar os tubos
● Certificar-se de que a união está adaptada à dimensão do tubo e de que a matéria e a espessura do tubo são
compatíveis com a união.
● Cortar o tubo perpendicularmente ao seu eixo e certificar-se de que está limpo, particularmente com as uniões
equipadas com juntas elastómeras. As aparas e as arestas cortantes devem ser eliminadas para a realização de uma
chanfragem.
● A extremidade dos tubos deve ser recolocada no diâmetro exterior inicial no comprimento mínimo superior à
profundeza de chanfradura da união. A calibragem do tubo só pode ser efectuada com ferramentas específicas. O tubo
deve ser recortado se a calibragem não for correcta.
● A extremidade do tubo deve estar sem arranhões nem picadas num comprimento mínimo superior à profundeza de
chanfradura da união.
● Em caso de intervenção sobre um estaleiro de renovação, é especialmente importante que se certifique de que não há
nenhum traço de pintura sobre a distância mínima superior à profundeza de chanfradura da união.
Como efectuar a prensagem
Aplicação da união
● Seleccionar a união adaptada ao tubo de prensar.
● Introduzir a união sobre o tubo.
Introduzir a união das maxilas e prensagem
● Seleccionar as maxilas adaptadas à união.
● Abrir a garra principal pressionando sobre os dois braços.
● Introduzir a união a prensar sobre o perfil das maxilas mantendo sempre a garra aberta.
● Solte a pressão sobre a garra principal e certifique-se de que as duas maxilas fecham correctamente sobre a união.
● Certifique-se de que a união está bem posicionada sobre as maxilas.
● Depois de verificar, pressionar de forma prolongada sobre o gatilho 7 que deve continuar premido até ao fim do ciclo
de prensagem (ida e volta). A máquina volta automaticamente atrás assim que a prensagem for correctamente realizada.
O indicador 8 continua acesso para indicar que a prensagem que foi feita está correcta (cumprimento do esforço).
● Se o gatilho for libertado antes de cumprir o ciclo, a máquina pára. Pressionar prolongadamente permite terminar o
ciclo.

30
PT
● No caso de uma situação anormal que em que seja necessário voltar atrás antes de cumprir o ciclo de prensagem:
Solte o gatilho para parar a máquina de depois voltar para trás pressionando brevemente (impulso) sobre o gatilho.
Retirar a união das maxilas
● Abrir a garra principal pressionando sobre os braços desta.
● Retirar as maxilas da união.
Verificar os defeitos
● Activar um ciclo sem a garra principal sobre a máquina provoca um ciclo de ida-e-volta curto seguido de uma paragem
(comandos desactivados). Para recomeçar em modo normal, retire e volte a colocar a bateria.
● A verificação dos tempos de prensagem provoca uma paragem da máquina assim que detectar uma diminuição muito
importantes do nível da bateria. O indicador pisca e a máquina impede o ciclo seguinte. Colocar uma bateria carregada
para voltar ao modo normal.
Manutenção
Antes de qualquer intervenção de manutenção, retire a bateria do respectivo apoio.
● Após 15000 ciclos, o indicador pisca para indicar a necessidade de manutenção. Para avisar o utilizador, cada ciclo é
precedido por um impulso motor à ida e dois à volta.
● Após 18000 ciclos, a máquina é bloqueada para permitir a manutenção.
Manutenção da máquina
● Limpar os cilindros de pressão regularmente de forma a evitar depósitos de pós e de outros elementos.
● Lubrificar os cilindros de pressão.
● Lubrificar as partes metálicas.
Manutenção da garra principal e das maxilas
● Verificar regularmente o bom estado da garra principal. Verificar se as garras fecham correctamente (com as maxilas
no lugar!).
● Limpar as maxilas com um pano seco ou com uma broxa metálica de depois efectuar uma leve lubrificação dos perfis
de prensagem.
● Manter o perfil de prensagem limpo e verificar o respectivo desgaste após cada 10000 ciclos.
● Lubrificar os eixos da garra principal.
Manutenção do motor
Informações sobre a manutenção do motor
● O motor está equipado com escovas de carvão. As escovas de carvão desgastam-se e o motor deve ser substituído
quando estas forem gastas. Reiniciar a máquina de prensar para a reparar.
Garantias
Todas as máquinas de prensar da gama Viper têm uma garantia de 2 anos desde que seja feita a manutenção antes de
18000 ciclos.
Características técnicas
Capacidade de prensagem
● Maxilas do tipo U:16→32
● Maxilas do tipo V:12→28
● Maxilas do tipo H:12→32
● Maxilas do tipo TH:12→32
● Maxilas do tipo VUS : ½’’ - ¾’’ –
1’’
Máquina de prensar
● Força de empurro axial: 16kN, força de empurro radial: 65kN
● Curso: 40 mm
● Comando do motor através de gatilho.
● Sinal luminoso indicando a necessidade de uma operação de manutenção e de tensões da bateria muito fracas.
Características eléctricas
● Motor 14,4V
● Carregador ref. 251844v: alimentação eléctrica monofásica 230V; 50-60Hz
● Carregador ref. 253246 (US): alimentação eléctrica 120V; 60Hz
● Bateria: 14,4V; 1,5Ah / 2,4Ah
● Tempo de carregamento da bateria: 45 min

31
PT
Massa
● Máquina nua: 4,190 kg (com garra principal e bateria 14,4V 1,5Ah) - 4,440 kg (com garra principal e bateria 14,4V
2,4Ah)
Dimensões
● Máquina nua: 366 x 310 x 81 ● Caixa: 595 x 495 x 150
Peças de reposição
Garra principal
253241
Bateria Lithium ion 14.4V – 2,4Ah
253244
Carregador Lithium ion 230V
251844
Carregador Lithium ion 110V US
253246
Parafusos de esferas
753007
Ponteira de parafusos de esferas
753008
Motor
753009
Cartão electrónico
753010
Cabeça de prensagem
753011
Maleta
753063
Diagnóstico e reparação
A garra não monta correctamente na máquina de prensar
Verificar que os cilindros de pressão estão em posição traseira máxima. Caso contrário, efectuar um impulso sobre o
gatilho até que os cilindros entrem completamente no corpo da máquina de prensar.
A máquina de prensar não funciona
Diagnóstico:
Reparação:
As escovas de carvão estão gastas
Mandar para reparação
A bateria está gasta
Recarregar a bateria
O motor está defeituoso
Mandar para reparação
Apoio demasiado breve sobre o gatilho
Pressionar o gatilho prolongadamente
Os cilindros não estão recuados
Efectuar um impulso sobre o gatilho
A máquina ultrapassou os 18000 ciclos
Mandar a máquina para reparação
A garra não fecha completamente
Diagnóstico:
Reparação:
O motor está defeituoso
Mandar para reparação
A bateria está descarregada
Recarregar a bateria
A garra principal está avariada
Substituir a garra principal
As escovas de carvão estão gastas
Mandar para reparação
As maxilas utilizadas não se adaptam à união
Escolher as maxilas indicadas pelo fabricante da união
As uniões prensadas estão fora da capacidade
máxima da máquina
Consultar o parágrafo "Características técnicas"
Inspecção e manutenção das maxilas e mordentes
Garantia de 5 anos para a maxila (excepto perfil).
Antes de qualquer utilização, ler esta ficha de instruções, bem como as instruções de utilização da máquina e do
fabricante das uniões. Não respeitar e compreender o conjunto destas instruções pode provocar desgastes
materiais significativos e ferimentos graves, ou mesmo, mortais.
Segurança:
● Durante o trabalho, utilizar dispositivos para a protecção dos olhos contra projecções.
● Apenas utilizar maxilas Virax.
● Todas as utilizações da máquina não conformes às nossas instruções podem provocar ferimentos graves, ou mesmo
mortais.
● Afastar os dedos e as mãos da garra no momento do ciclo de prensagem, para evitar qualquer risco de esmagamento
ou amputação.

32
PT
Nunca substituir os componentes por si mesmo. Qualquer componente que tenha sido modificado sob alguma
forma pode provocar ferimentos graves ou mortais.
Manutenção
- Verificar diariamente se o perfil das maxilas está de acordo com as fotografias em anexo:
Perfil H-ML: 1, Perfil G: 2, Perfil TH: 3, Perfil V: 4, Perfil U: 5, Perfil HA: 6, Perfil RF-P 7, Perfil VUS : 8.
- Verificar e eliminar diariamente a presença de corrosão, sujidade e acumulação de corpos estranhos.
- Limpar diariamente as maxilas, utilizando um esfregão de palha-de-aço médio ou grosso e lubrificar ligeiramente os
perfis de prensagem. Evitar a utilização de quaisquer materiais abrasivos, tais como: chapa esmerilada, papel de vidro,
materiais abrasivos, lima de amolar e lima rotativa, sob pena de danificar as maxilas em caso de alteração das
respectivas dimensões. Qualquer modificação pode provocar fugas.
- Verificar regularmente o bom estado da garra principal. Verificar se as garras fecham correctamente (com as maxilas
colocadas!).
- Se a formação de saliências impedir o contacto das maxilas no fim da prensagem, substituir as maxilas.
- Mandar verificar anualmente o estado das maxilas, enviando-as para o seu distribuidor.
- Limpar e lubrificar (massa lubrificante para rolamentos) anualmente os eixos da garra principal, sem desmontar.
- Limpar, lubrificar e verificar diariamente o bom funcionamento da mola (a garra deve abrir-se sem esforço e fechar
sozinha).
- Inspeccionar visualmente todos os dias cada um dos elementos da garra.
Se forem visíveis um desgaste anormal ou fissuras numa das partes da garra, é necessário substituí-la.
Nunca substituir os componentes por si mesmo. Qualquer componente que tenha sido modificado sob alguma
forma pode provocar ferimentos graves ou mortais.
A utilização de uma garra ou maxilas danificadas provoca desgastes materiais significativos ou ferimentos
corporais graves.

33
NL
Elektromechanische persmachine Viper M20+
Bedankt dat u hebt gekozen voor de Viper-persmachine, en voor het vertrouwen dat u op die manier in ons stelt.
Virax, een belangrijke speler op het vlak van de productie en de verkoop van gereedschap voor sanitair, klimaatregeling en
dakbedekking, begeleidt u bij uw dagelijkse activiteiten: Virax, om uw talent tot uiting te laten komen.
Het assortiment perswerktuigen Virax Viper
Virax bogen op meer dan 20 jaar ervaring in de ontwikkeling en de productie van hydraulische en elektrohydraulische werktuigen.
Tijdens de productie van de Virax Viper-perswerktuigen worden regelmatig in extreme omstandigheden monsters getest op hun
maximale capaciteiten.
Bovendien wordt elk perswerktuig gecontroleerd nadat het van de band is gerold. Deze uiterst strenge kwalitatieve opvolging
garandeert u een maximale veiligheid bij het gebruik.
Zo bent u zeker van een geslaagde perspassing en van een perfecte dichtheid van de aansluitingen.
Om de veiligheid nóg te verbeteren, laat Virax haar machines en klemmen testen en goedkeuren door grote fabrikanten van pijpen en
aansluitingen.
Persmachine M20+
De Viper-persmachine is compact, licht en gemakkelijk hanteerbaar. De kop ervan is 180° kantelbaar om het werk te vergemakkelijken,
ongeacht de uitvoering van de installatie.
Met het oog op de gebruiksvriendelijkheid heeft de persmachine slechts één bedieningsknop; langdurig op de trekker drukken is
voldoende om een perscyclus uit te voeren.
Één enkel controlelampje maakt het mogelijk om de persstatus en de behoefte aan onderhoud te controleren.
De microbesturingseenheid van de persmachine let op de inspanningen, controleert de kwaliteit van het uitgevoerde werk en beheert
het onderhoud.
De moederbek kan worden uitgerust met inzetstukken met profielverschuiving, om zo dicht mogelijk bij de muren te werken.
Veiligheidsvoorschriften
Lees en bewaar dit instructieboekje. Om het risico op elektrische ontlading, letsels en brand tijdens het gebruik van elektrisch
gereedschap te beperken, moet u de volgende essentiële veiligheidsmaatregelen in acht nemen.
Algemene veiligheidsvoorschriften
Keuze van het werktuig
● Gebruik het geschikte werktuig. Gebruik geen aanpasbare werktuigen of inrichtingen die niet krachtig genoeg zijn om zware
werkzaamheden uit te voeren. Gebruik de werktuigen alleen voor de werkzaamheden waarvoor ze zijn ontwikkeld.
Onderhoud en opslag
● Berg uw werktuigen op in een veilige plaats. Niet-gebruikte werktuigen moeten buiten het bereik van kinderen in een droge en
afgesloten plaats worden opgeborgen.
● Onderhoud uw werktuigen zorgvuldig. Houd uw werktuigen proper om beter en veiliger te werken. Neem de aanwijzingen met
betrekking tot het onderhoud en de aanwijzingen omtrent de vervanging van accessoires in acht. Houd de handgrepen droog en olieen vetvrij.
● Ga na of het werktuig beschadigd is. Voordat u het werktuig gebruikt, moet u altijd zorgvuldig nagaan of de onderdelen perfect
werken. Ga na of de bewegende delen naar behoren werken, of ze niet haperen dan wel of andere onderdelen beschadigd zijn. Alle
onderdelen moeten naar behoren zijn gemonteerd en de voorwaarden vervullen om te garanderen dat het werktuig feilloos werkt. Alle
beveiligingsinrichtingen, schakelaars of andere onderdelen die beschadigd of defect zijn, moeten op gepaste wijze worden gerepareerd
of vervangen door een bekwame technicus.
● Opgelet! Zorg ervoor dat u het werktuig en de accessoires ervan in overeenstemming met de veiligheidsvoorschriften gebruikt. Houd
ook rekening met de mogelijkheden van het werktuig door op de werkomstandigheden en de uit te voeren taak te letten. Het werktuig
gebruiken voor andere taken dan de voorziene kan gevaarlijk zijn.
● Dit werktuig is in overeenstemming met de van kracht zijnde veiligheidsvoorschriften. Alle reparaties moeten worden uitgevoerd door
bekwame vakmensen met originele onderdelen. Zo niet kan het voor de gebruiker gevaarlijk zijn om het werktuig te gebruiken, en kan
de garantie worden geannuleerd.
Veiligheidsvoorschriften voor de gebruiker:
● Houd kinderen op afstand. Sta niet toe dat andere personen het werktuig aanraken; houd hen buiten uw werkzone.
● Draag gepaste werkkleding. Draag geen brede kleding of juwelen; deze zouden door bewegende delen kunnen worden gegrepen.
● Tijdens werkzaamheden in de openlucht is het raadzaam om rubberhandschoenen en schoenen met antislipzolen te dragen. Hebt u
lang haar, bedek uw hoofd dan met een haarnetje.
● Zorg ervoor dat uw actieradius niet te groot wordt. Probeer een houding aan te nemen die niet vermoeiend is voor het lichaam; zorg
ervoor dat u stabiel op de grond steunt en bewaar altijd uw evenwicht.
● Wees altijd aandachtig. Observeer uw werk, gebruik uw gezond verstand en gebruik het werktuig niet wanneer u moe bent.
Veiligheidsvoorschriften met betrekking tot de werkzone
● Houd uw werkgebied ordelijk. Wanorde in het werkgebied verhoogt het risico op ongevallen.
● Houd rekening met de omgeving van het werkgebied. Laat het elektrische gereedschap niet in de regen liggen. Gebruik geen
elektrisch gereedschap in een vochtige of natte omgeving.

34
NL
● Zorg ervoor dat de werkzone goed verlicht is. Gebruik geen elektrisch gereedschap wanneer zich in de buurt brandbare vloeistoffen
of gassen bevinden.
Specifieke veiligheidsvoorschriften
Batterij en oplader
● Laad de batterij op met de oplader die bij de persmachine wordt meegeleverd. Raak de contacten van de oplader niet aan.
● Stel de batterij of de oplader nooit bloot aan regen of sneeuw.
● Laad uw batterij niet op in een plaats die aan direct zonlicht is blootgesteld.
● Laad de batterij niet op in aanwezigheid van brandbare vloeistoffen of gassen.
● De oplader mag uitsluitend worden gebruikt bij een temperatuur tussen 10 °C en 40 °C.
● Zorg ervoor dat de ventilatieopeningen van de oplader door niets worden versperd.
● Koppel de oplader los van de voedingsbron wanneer het opladen is voltooid
● Ten gevolge van beschadiging of verkeerd gebruik kunnen de batterijen beginnen te lekken.
● Vermijd dat de batterij in aanraking komt met metalen voorwerpen, zoals nagels, bouten, enz., om kortsluiting te vermijden wanneer
de batterij niet in de oplader en evenmin in de persmachine zit.
● Gebruik nooit een beschadigde oplader. Gebruik de oplader nooit met een beschadigde kabel of een beschadigd stopcontact.
● Gebruik de batterij niet wanneer ze beschadigd is. Ze moet zo snel mogelijk worden vervangen.
● De oplader of de batterij niet demonteren. Probeer niet om niet-oplaadbare batterijen met de oplader op te laden.
Persmachine
● Stop uw vingers niet in het profiel van de moederbek en de inzetstukken.
Ingebruikstelling
Schema van de persmachine Viper M20+
Nr.
Naam van het onderdeel
1
Vergrendelingspen
2
Moederbek
3
Aandrukrollen
4
Inzetstukken
5
Batterij
6
Sluitveren
7
Trekker
8
Controlelampje
Montage van de inzetstukken in de moederbek
● Laat het buitenprofiel van het inzetstuk (4) samenvallen met het binnenprofiel van de klemhelft; druk op het inzetstuk tot
het in de klemhelft vergrendelt.
Om het tweede inzetstuk te monteren, moet u de moederbek lichtjes openen.
Opmerking:
Na de montage van de inzetstukken, gaat u met het blote oog na of de twee inzetstukken naar behoren zijn gecentreerd
in de moederbek, en of ze onderling op één lijn staan.
Opgelet:
De klemmen van de moederbek knellen sterk. Stop uw vingers niet in de klemmen of in de inzetstukken.
BELANGRIJKE INFORMATIE
● Laat de persmachine nooit werken zonder inzetstukken in de moederbek.
● Verwijder de batterij wanneer de persmachine niet wordt gebruikt. Wanneer de batterij niet van de persmachine
wordt verwijderd, zal ze volledig leeglopen en kan ze schade oplopen.
2
3
6
5

35
NL
Opladen en plaatsen van de accu’s
Het opladen van de accu
Advies:
Voor een langere levensduur van de accu is het aan te raden er voor te zorgen dat deze volledig ontladen wordt,
alvorens hem weer op te laden
● Steek de stekker van de acculader in het stopcontact, de linker led gaat rood branden, wat betekent dat de acculader
onder spanning staat.
● Steek de accu 5 in de acculader. Plaats de vier rails van de accu tegenover de vier inkepingen van de acculader en
duw de accu tot de aanslag.
De linker led knippert groen, wat betekent dat de accu aan het opladen is.
De rechter led knippert geel, wat betekent dat het een Lithium-Ion accu betreft, of blijft geel branden, wat betekent dat het
een NiCd of NiMh accu betreft.
● Na 45 minuten wordt de gele led groen, wat betekent dat de accu 100% opgeladen is.
● Verwijder de accu door op de twee vergrendelingspalletjes 6 te drukken en haal hem uit de acculader.
● Maak de accu los van de voedingsbron.
Opmerking:
● Als de linker led groen en rood knippert, betekent dit dat er een temperatuurprobleem is voor het opladen van de accu.
De accu moet opgeladen worden tussen 10° en 40°.
De temperatuur van de accu neemt tijdens het gebruik van de felspers toe. De accu zal niet volledig worden opgeladen
als zij onmiddellijk na gebruik wordt opgeladen.
U moet hem eerst laten afkoelen, alvorens hem opnieuw op te laden.
● Als de linker led rood blijft branden, betekent dit dat de accu beschadigd is. In dat geval moet de accu door een nieuwe
accu vervangen worden.
De batterij in de persmachine stoppen
● Breng de vier rails van de batterij op één lijn met de vier gleuven op de onderkant van de handgreep van de Viper en
druk op de batterij tot u een klik hoort.
De M20+-persmachine gebruiken
De geschikte inzetstukken kiezen
Volg de aanbevelingen voor wat het profiel en de diameter betreft, die worden vermeld in de instructie die bij de
aansluitingen wordt meegeleverd.
De pijpen klaarmaken
● Zorg ervoor dat de aansluiting is afgestemd op de afmetingen van de pijp, en dat het materiaal en de dikte van de pijp
met de aansluiting overeenstemmen.
● Snijd de pijp haaks op de as ervan door en zorg ervoor dat de pijp proper is, dit vooral bij de aansluitingen die uitgerust
zijn met elastomeerverbindingen. De oneffenheden en de snijdende randen moeten door afkanten worden verwijderd.
● Het uiteinde van de pijpen moet worden teruggebracht tot de oorspronkelijke buitendiameter over een minimale lengte
die groter is dan de insteekdiepte van de aansluiting. De pijp mag alleen met behulp van specifieke werktuigen worden
gekalibreerd. De pijp moet opnieuw worden doorgesneden wanneer ze niet correct werd gekalibreerd.
● Het uiteinde van de pijp moet vrij zijn van krassen of putjes over een minimale lengte die groter is dan de insteekdiepte
van de aansluiting.
● Bij gebruik op een renovatiebouwplaats is het bijzonder belangrijk om u ervan te vergewissen dat er geen verfsporen
achterblijven over een minimale afstand die groter is dan de insteekdiepte van de aansluiting.
De perspassing uitvoeren
Plaatsing van de aansluiting
● Selecteer de aan de te persen pijp aangepaste aansluiting.
● Breng de aansluiting aan op de buis.
De aansluiting in de inzetstukken stoppen en perspassing
● Selecteer de aan de aansluiting aangepaste inzetstukken.
● Open de moederbek door op de twee armen ervan te drukken.
● Schuif de te persen aansluiting over het profiel van de inzetstukken terwijl u de moederbek openhoudt.
● Los de druk op de moederbek en vergewis u ervan dat de twee inzetstukken correct op de aansluiting sluiten.
● Ga na of de aansluiting zich op de juiste plaats op de inzetstukken bevindt.

36
NL
● Druk nadien aanhoudend op de trekker (7) die tot het einde van de (heen-en-weer)perscyclus ingedrukt moet blijven.
De machine komt automatisch terug naar achter wanneer de perspassing correct is uitgevoerd. Het controlelampje (8)
blijft branden, wat erop wijst dat de perspassing correct werd uitgevoerd (inspanning bereikt).
● Wanneer de trekker wordt losgelaten vóór de voltooiing van de cyclus, valt de machine stil in de positie van dat
ogenblik. Door aanhoudend te drukken, kan de cyclus dan worden beëindigd.
● Ingeval zich een abnormale situatie voordoet waarbij de machine naar achter moet worden geplaatst vóór de voltooiing
van de perscyclus: laat de trekker los om de machine stil te leggen, en plaats ze vervolgens naar achter door heel kort
(impuls) op de trekker te drukken.
De aansluiting uit de inzetstukken verwijderen
● Open de moederbek door op de armen ervan te drukken.
● Verwijder de inzetstukken uit de aansluiting.
Foutbewaking
● Een cyclus starten zonder moederbek op de machine veroorzaakt een korte heen-en-weercyclus die wordt gevolgd
door een foutmelding (de bediening wordt belemmerd). Om opnieuw in de normale modus te starten, verwijdert u de
batterij en plaatst u ze terug.
● De bewaking van de perstijd veroorzaakt een foutmelding zodra een te sterke daling van het batterijpeil wordt
gedetecteerd. Het controlelampje knippert en de machine belemmert de volgende cyclus. Plaats een opgeladen batterij
om terug te keren naar de normale modus.
Onderhoud
Voordat u onderhoudswerkzaamheden uitvoert, moet u de batterij uit de houder nemen.
● Na 15 000 cycli knippert het controlelampje om erop te wijzen dat onderhoud nodig is. Om de gebruiker te verwittigen,
wordt elke cyclus dan voorafgegaan door één motorimpuls bij de heenbeweging en twee bij de teruggaande beweging.
● Na 18 000 cycli wordt de machine geblokkeerd om het onderhoud onvermijdelijk te maken.
Onderhoud van de pers
● Reinig regelmatig de aandrukrollen om de ophoping van stof en andere elementen te voorkomen.
● Smeer de aandrukrollen.
● Olie de metalen onderdelen.
Onderhoud van de moederbek en van de inzetstukken
● Ga regelmatig na of de moederbek nog in goede staat is. Ga na of de klemmen correct sluiten (inzetstukken op hun
plaats!).
● Reinig de inzetstukken met behulp van een droge doek of een staalborstel, en olie vervolgens de persprofielen met
mate.
● Houd het persprofiel proper en laat het ongeveer om de 10 000 cycli op slijtage controleren.
● Smeer de assen van de moederbek.
Onderhoud van de motor
Informatie met betrekking tot het onderhoud van de motor
● De motor is uitgerust met koolborstels. De koolborstels verslijten en de motor moet worden vervangen wanneer ze zijn
versleten. Stuur de persmachine terug om ze te laten repareren.
Garanties
Al onze persmachines uit het Viper-assortiment hebben 2 jaar garantie, op voorwaarde dat ze vóór 18 000 cycli worden
onderhouden.
Technische specificaties
Persvermogen
● Inzetstukken van het type U: 16→32
● Inzetstukken van het type V: 12→28
● Inzetstukken van het type H: 12→32
● Inzetstukken van het type TH: 12→32
● Inzetstukken van het type VUS: ½’’ – ¾’’ – 1’’
Pers
● Axiale drukkracht: 16 kN, radiale drukkracht: 65 kN
● Slaglengte: 40 mm
● Bediening van de motor via een trekker.
● Lichtsignaal dat op de noodzaak van onderhoudswerkzaamheden en op te lage batterijspanningen wijst.

37
NL
Elektrische gegevens
● Motor van 14,4V
● Oplader ref. 251844 : eenfasige elektrische voeding van 230 V; 50-60 Hz
● Oplader ref. 253246 : elektrische voeding van 120 V; 60 Hz
● Batterij: 14,4V; 1,5Ah / 2,4Ah
● Oplaadtijd van de batterij: 45 min
Massa
● Kale machine: 4,190 kg (met moederbek en batterij 14,4V 1,5Ah) - 4,440 kg (met moederbek en batterij 14,4V 2,4Ah)
Volume
● Kale machine: 366 x 310 x 81 ● Behuizing: 595 x 495 x 150
Onderdelen
Moederbek
253241
Batterij van 14,4 V – 2,4 Ah Lithium ion
253244
Oplader van 230 V lithium ion
251844
Oplader van 110V lithium ion US
253246
Kogelomloopspil
753007
Opzetstuk kogelomloopspil
753008
Motor
753009
Elektronische kaart
753010
Perskop
753011
Koffer
753063
Diagnose en reparatie
De bek kan niet correct in de pers worden gemonteerd
Ga na of de aandrukrollen volledig naar achter staan. Zo niet geeft u een impuls op de trekker tot de rollen volledig in het
hoofddeel van de persmachine zitten.
De persmachine kan niet worden ingeschakeld
Diagnose:
Reparatie:
De koolborstels zijn versleten
Verzend het werktuig voor reparatie
De batterij is leeg
Laad de batterij op
De motor is defect
Verzend het werktuig voor reparatie
De trekker wordt niet lang genoeg ingedrukt
Druk aanhoudend op de trekker
De rollen worden niet achteruitgeplaatst
Geef een impuls op de trekker
De machine heeft meer dan 18 000 cycli achter de rug
Verzend de machine voor onderhoud
De bek sluit niet volledig
Diagnose:
Reparatie:
De motor is defect
Verzend het werktuig voor reparatie
De batterij is leeg
Laad de batterij op
De moederbek is defect
Vervang de moederbek
De koolborstels zijn versleten
Verzend het werktuig voor reparatie
De gebruikte inzetstukken zijn niet geschikt voor de
aansluiting
Kies voor de door de fabrikant van de aansluiting
aanbevolen inzetstukken
De geperste aansluitingen vallen buiten de maximale
capaciteit van de machine
Raadpleeg de paragraaf “Technische specificaties”
Inspectie en onderhoud van de inzetstukken en klemmen
Inzetstuk met een garantie van 5 jaar, behalve het profiel.
Lees vóór elk gebruik dit instructieformulier en de gebruiksvoorschriften van de machine en van de fabrikant van
de aansluitingen. Het niet-naleven en niet-opnemen van al deze voorschriften kan aanzienlijke materiële schade
en ernstige letsels met zich meebrengen, en kan zelfs de dood tot gevolg hebben.

38
NL
Veiligheid:
● Gebruik tijdens het werk voorzieningen voor de bescherming van de ogen tegen projectielen.
● Gebruik alleen inzetstukken van Virax.
● Elk gebruik van de machine dat niet overeenstemt met onze voorschriften, kan ernstige letsels met zich meebrengen en
zelfs de dood tot gevolg hebben.
● Houd uw vingers en uw handen tijdens de perscyclus uit de bek, om alle risico’s op verplettering of amputatie te
vermijden.
Vervang nooit zelf onderdelen. Elk onderdeel dat op welke manier ook werd gewijzigd, kan ernstige letsels
veroorzaken of de dood tot gevolg hebben.
Onderhoud
- Ga dagelijks na of het profiel van uw inzetstukken overeenstemt met de foto’s p.3 :
Profiel H-ML: 1, profiel G: 2, profiel TH: 3, profiel V: 4, profiel U: 5, profiel HA: 6, profiel RF-P: 7, profiel VUS : 8.
- Controleer de machine elke dag op de aanwezigheid van corrosie, vuil of ophopingen van vreemde elementen,
en verwijder deze indien nodig.
- Reinig dagelijks de inzetstukken met behulp van middeldikke of dikke staalwol, en olie vervolgens de
persprofielen met mate. Probeer geen schuurmaterialen te gebruiken, zoals: schuurkatoen, glaspapier,
schuurmaterialen, slijpmachine, vijl en roterende vijl. Doet u dat toch, dan kunnen de inzetstukken schade
oplopen en kunnen de afmetingen ervan worden gewijzigd. Elke wijziging kan lekken veroorzaken.
- Ga regelmatig na of de moederbek nog in goede staat is. Ga na of de klemmen correct sluiten (inzetstukken op
hun plaats!).
- Indien de vorming van naaldkristallen het contact van inzetstukken op het einde van de perspassing belemmert,
moet u de inzetstukken vervangen.
- Laat jaarlijks de staat van de inzetstukken controleren door ze naar uw distributeur terug te sturen.
- Reinig en smeer (lagervet) jaarlijks de assen van de moederbek zonder deze te demonteren.
- Reinig en smeer dagelijks de veer, en ga dagelijks na of de veer nog naar behoren werkt (de bek moet zonder
moeite opengaan en moet volledig op eigen kracht sluiten).
- Inspecteer elke dag met het blote oog alle elementen van de klem.
Wanneer abnormale slijtage of barsten zichtbaar zijn op één van de onderdelen van de klem, moet u dat
onderdeel vervangen.
Vervang nooit zelf onderdelen. Elk onderdeel dat op welke manier ook werd gewijzigd, kan ernstige letsels met
zich meebrengen of de dood tot gevolg hebben.
Het gebruik van een beschadigde klem of beschadigde inzetstukken kan aanzienlijke materiële schade en/of
ernstige lichamelijke letsels veroorzaken.

39
PL
Elektro-mechaniczna prasa zaciskowa Viper M20+
Dziękujemy Państwu za zakup prasy zaciskowej Viper i za okazane nam zaufanie.
Virax, uznany uczestnik w rynku produkcji i sprzedaży narzędzi dla systemów sanitarnych, klimatycznych i zagospodarowania terenu
towarzyszy Państwu na co dzień: Virax umożliwia wyrażanie naszych talentów.
Gama zaciskarek Virax Viper
Virax posiada ponad 20 lat doświadczenia w projektowaniu i produkcji narzędzi hydraulicznych i elektro-hydraulicznych.
W czasie produkcji zaciskarek Virax Viper, regularnie pobiera się próbki produktów do testów maksymalnych zakresów w
ekstremalnych warunkach.
Dodatkowo, każda zaciskarka jest kontrolowana na końcu linii produkcyjnej. Bardzo rygorystyczna kontrola jakości zapewnia
maksymalne bezpieczeństwo obsługi.
W ten sposób uzyskują Państwo gwarancję prawidłowego zaciskania i idealnej szczelności złącz.
Aby zapewnić jeszcze wyższy poziom bezpieczeństwa, Virax testuje i zatwierdza swoje maszyny i szczęki u najważniejszych
producentów przewodów i złącz.
Prasa do zaciskania M20+
Prasa do zaciskania Viper jest kompaktowa, lekka i poręczna. Jej głowica obraca się o 180° ułatwiając w ten sposób pracę bez
względu na konfigurację instalacji.
Jeden przycisk sterowania ułatwia obsługę, długie naciśnięcie na spust wystarcza do zrealizowania cyklu zaciskania.
Jedna kontrolka umożliwia kontrolowanie stanu zaciskania i potrzebę konserwacji.
Mikro-sterownik kontroluje siły, jakość wykonanej pracy i konieczność wykonania konserwacji.
Zacisk może być wyposażony we wkładki z odsadzeniem umożliwiające pracę przy ścianie.
Zalecenia bezpieczeństwa
Przeczytać i zachować instrukcję obsługi. Aby zmniejszyć ryzyko porażenia prądem elektrycznym, obrażenia ciała i pożaru w czasie
użytkowania urządzeń elektrycznych, należy przestrzegać następujących podstawowych zasad bezpieczeństwa.
Ogólne zalecenia bezpieczeństwa
Wybór narzędzia
● Stosować odpowiednie narzędzie. Nie stosować narzędzi lub urządzeń dostosowanych do zbyt niskiej mocy do wykonania ciężkich
prac. Nie używać narzędzi do innych celów niż zgodne z przeznaczeniem.
Konserwacja i przechowywanie
● Przechowywać narzędzia w bezpiecznym miejscu. Narzędzia nie używane muszą być przechowywane w miejscu suchym,
zamkniętym i niedostępnym dla dzieci.
● Narzędzia należy starannie konserwować. Narzędzia należy utrzymywać w czystości, aby zapewnić lepszą jakość i bezpieczeństwo
pracy. Przestrzegać zaleceń dotyczących konserwacji oraz zaleceń dotyczących wymiany akcesoriów. Uchwyty należy utrzymywać
suche i czyste bez smaru lub oleju.
● Sprawdzać, czy narzędzie jest uszkodzone. Przed użyciem narzędzia, należy zawsze dokładnie sprawdzić idealne działanie części.
Sprawdzić, czy działanie części w ruchu jest prawidłowe, czy części nie zacierają się lub czy inne części nie są uszkodzone. Wszystkie
elementy muszą być zamontowane prawidłowo i spełniać warunki, aby zagwarantować nienaganne działanie urządzenia. Wszystkie
zabezpieczenia, wyłączniki lub inne elementy niesprawne lub uszkodzone muszą być naprawiane lub wymieniane we właściwy sposób
przez wykwalifikowanego technika.
● Uwaga! Narzędzie i akcesoria należy używać zgodnie z zaleceniami bezpieczeństwa. Należy również uwzględniać możliwości
narzędzia, biorąc pod uwagę warunki pracy i zadanie do wykonania. Użytkowanie narzędzia do innych celów niż zgodne z
przeznaczeniem może być niebezpieczne.
● Narzędzie jest zgodne z obowiązującymi przepisami bezpieczeństwa. Wszystkie naprawy muszą być wykonywane przez
wykwalifikowanych profesjonalistów z zastosowaniem oryginalnych części zamiennych, w innym przypadku narzędzie może być
niebezpieczne dla użytkownika i może nastąpić anulowanie gwarancji.
Instrukcje bezpieczeństwa dla użytkownika:
● Dzieci powinny przebywać w bezpiecznej odległości. Nie zezwalać osobom trzecim na dotykanie narzędzia; osoby trzecie powinny
przebywać z dala od strefy pracy.
● Zakładać odpowiednie ubranie robocze. Nie zakładać obszernego ubrania lub biżuterii, które mogą zaczepiać się o elementy w
ruchu.
● W czasie pracy na wolnym powietrzu, zaleca się zakładanie rękawic gumowych i butów z podeszwą antypoślizgową. Zakładać siatkę
na włosy, jeżeli są długie.
● Nie zwiększać strefy pracy. éunikać przyjmowania męczących pozycji ciała; postawa musi być stabilna, należy przez cały czas
zachowywać równowagę.
● Należy zawsze zachować skoncentrowaną uwagę. Zwracać uwagę na wykonywane czynności, postępować zgodnie ze zdrowym
rozsądkiem i nie używać narzędzia w stanach zmęczenia.
Zalecenia bezpieczeństwa dotyczące miejsca pracy
● Utrzymywać porządek w miejscu pracy. Brak porządku w miejscu pracy zwiększa ryzyko wypadku.
● Należy zawsze pamiętać o otoczeniu miejsca pracy. Nie wystawiać narzędzi elektrycznych na działanie deszczu. Nie używać
narzędzi elektrycznych w miejscach wilgotnych lub mokrych.
● Zapewnić dobre oświetlenie miejsca pracy. Nie używać narzędzi elektrycznych, jeżeli w pobliżu znajdują się łatwopalne płyny lub
gazy.

40
PL
Specjalne zalecenia bezpieczeństwa:
Akumulator i ładowarka
● Naładować akumulator za pomocą ładowarki dostarczonej z prasa do zaciskania. Nie dotykać styków ładowarki.
● Nigdy nie wystawiać akumulatora, ani ładowarki na działanie deszczu lub śniegu.
● Nie ładować akumulatora w miejscu wystawionym na bezpośrednie działanie promieni słonecznych.
● Nie ładować akumulatora w pobliżu płynów lub gazów łatwopalnych.
● Ładowarka może działać tylko w zakresie temperatur między 10°C i 40°C.
● Zwracać uwagę, aby utwory wentylacyjne ładowarki nie były zasłonięte.
● Po zakończeniu ładowania, należy odłączyć ładowarkę od źródła zasilania
● Na skutek uszkodzeń lub złych warunków użytkowania, akumulatory mogą wyciekać.
● Unikać kontaktu akumulatora z metalowymi przedmiotami, takimi jak gwoździe, śruby, itd. aby zapobiegać zwarciom, kiedy
akumulator nie znajduje się w ładowarce, ani prasie zaciskowej.
● Nie używać ładowarki, jeżeli jest uszkodzona. Nigdy nie używać ładowarki z uszkodzonym kablem lub wtyczką.
● Nie używać akumulatora, jeżeli jest uszkodzony. Należy go jak najszybciej wymienić.
● Nie demontować ładowarki, ani akumulatora. Nie ładować baterii nie nadających się do tego celu.
Prasa zaciskowa
● Nie wsuwać palców w profil zacisku głównego i wkładek.
Uruchomienie
Schemat prasy zaciskowej Viper M20+
Nr
Nazwa części
1
Oś blokowania
2
Zacisk główny
3
Rolki dociskowe
4
Wkładki
5
Akumulator
6
Zapadki
7
Spust
8
Kontrolka
Sposób montażu wkładek w zacisku głównym
● Wyrównać profil zewnętrzny wkładki 4 z profilem wewnętrznym pół-szczęki, wepchnąć wkładkę do momentu
zablokowania w pół-szczęce. Aby zamontować drugą wkładkę, niezbędne jest lekkie otwarcie zacisku głównego.
Uwaga:
Po montażu wkładek, należy wzrokowo sprawdzić, czy obie wkładki są poprawnie wyśrodkowane w zacisku głównym i
wyrównane ze sobą.
Uwaga:
Szczęki zacisku głównego zaciskają się silnie. Nie wkładać palców do środka szczęk lub wkładek.
WAŻNE INFORMACJE
● Nie uruchamiać prasy zaciskowej bez wkładek w zacisku głównym.
● Nie pozostawiać akumulatora w prasie zaciskowej podczas przerw w użytkowaniu. Jeżeli akumulator
jest pozostawiany w prasie zaciskowej, ulegnie całkowitemu rozładowaniu i może ulec uszkodzeniu.
2
3
6
5

41
PL
Ładowanie i montaż akumulatorów
Sposób ładowania akumulatora
Zalecenie :
Aby zapewnić wysoką trwałość akumulatora, należy upewnić się, że jest całkowicie rozładowany przed jego
naładowaniem
● Podłączyć ładowarkę do sieci, czerwona lampka kontrolna led włącza się wskazując, że ładowarka jest zasilana.
● Włożyć akumulator 5 do ładowarki. Wyrównać cztery szyny akumulatora z czterema rowkami ładowarki i przesunąć
akumulator do oporu.
Dioda led z lewej strony miga na zielono wskazując, że akumulator jest ładowany.
Żółta migająca dioda led z prawej strony wskazuje, że akumulator został wykonany w technologii litowo-jonowej lub gdy
pozostaje włączona i świeci się na żółto oznacza, że akumulator został wykonany w technologii NiCd lub NiMh.
● Po 45 minutach, dioda led z lewej strony świeci stale na zielono, co oznacza, że akumulator jest naładowany w 100%.
● Wyjąć akumulator naciskając dwie zapadki blokujące 6 i wysuwając z ładowarki.
● Odłączyć ładowarkę od źródła zasilania
Uwaga:
● Jeżeli lewa dioda led miga na zielono i czerwono, oznacza to, że wystąpił problem związany z temperaturą ładowania
akumulatora. Akumulator należy ładować w temperaturze między 10° a 40°.
Temperatura akumulatora zwiększa się w czasie użytkowania zaciskarki. Akumulator nie zostanie całkowicie
naładowany, jeżeli jest ładowany natychmiast po użyciu.
Należy go schłodzić przed ładowaniem.
● Jeżeli lewa dioda led świeci się na czerwono, oznacza to, że akumulator jest uszkodzony. W takim wypadku należy
wymienić akumulator na nowy.
Wkładanie akumulatora w prasę zaciskową
● Wyrównać cztery szyny akumulatora z czterema rowkami podstawy w uchwycie Vipera i przesunąć akumulator do
kliknięcia.
Obsługa prasy zaciskowej M20+
Wybór odpowiednich wkładek
Postępować zgodnie z zaleceniami dotyczącymi profilu i średnicy podanych w instrukcji dostarczonej ze złączami.
Przygotowanie przewodów
● Upewnić się, że złącze jest dostosowane do wymiarów przewodu i że materiał i grubość przewodu są zgodne ze
złączem.
● Przeciąć przewód prostopadle do osi i sprawdzić jego czystość, zwłaszcza w przypadku złączy wyposażonych w
uszczelki elastomerowe. Nierówności i ostre krawędzie należy usunąć przez ukosowanie.
● Końcówka przewodu musi być dostosowana do zewnętrznej średnicy na minimalnej długości przekraczającej
głębokość zagłębienia w złączu. Kalibracja przewodu może być wykonana tylko za pomocą specjalnych narzędzi.
Przewód należy ponownie dociąć, jeżeli kalibracja nie jest prawidłowa.
● Końcówka przewodu musi być pozbawiona rowków lub nakłuć na minimalnej długości przekraczającej głębokość
zagłębienia w złączu.
● W przypadku interwencji remontowej, należy zwrócić szczególną uwagę na brak śladów farby na minimalnej długości
przekraczającej głębokość zagłębienia w złączu.
Sposób zaciskania
Montaż złącza
● Wybrać złącze dostosowane do zaciskanego przewodu.
● Włożyć złącze na przewód.
Wkładanie złącza we wkładki i zaciskanie
● Wybrać wkładki dostosowane do złącza.
● Otworzyć zacisk główny naciskając na oba ramiona.
● Wsunąć złącze w profil wkładek przytrzymując otwarty zacisk główny.
● Zwolnić nacisk na zacisk główny i upewnić się, że obie wkładki zamykają się poprawnie na złączu.
● Sprawdzić, czy złącze znajduje się we właściwym miejscu na wkładkach.
● Po sprawdzeniu, nacisnąć przez dłuższy czas na spust 7, który musi pozostawać wciśnięty do zakończenia cyklu
zaciskania (przesuw i powrót). Urządzenie cofa się automatycznie po poprawnym wykonaniu zaciskania. Kontrolka 8
pozostaje włączona wskazując, że zaciskanie zostało wykonane poprawnie (osiągnięcie wymaganej siły).
● Jeżeli spust zostanie zwolniony przed zakończeniem cyklu, urządzenie zatrzymuje się w pozycji. Długotrwałe
naciskanie umożliwia zakończenie cyklu.
● W przypadku nieprawidłowej sytuacji wymagającej cofnięcia ruchu przed zakończeniem cyklu zaciskania: Zwolnić
spust, aby zatrzymać urządzenie, a następnie spowodować cofnięcie przez krótkie naciśnięcie (impuls) na spust.
Wyjmowanie złącza z wkładek
● Otworzyć zacisk główny naciskając ramię. ● Zdjąć wkładki ze złącza.

PL
Kontrola błędów
● Włączenie cyklu bez zacisku głównego na urządzeniu powoduje krótki cykl przesuwu w obie strony i wystąpienie błędu
(wyłączenie sterowania). Aby powrócić do normalnego trybu, należy wyjąć i założyć akumulator.
● Kontrola czasu zaciskania powoduje wystąpienie błędu urządzenia po wykryciu wysokiego spadku napięcia na
poziomie akumulatora. Kontrolka miga i urządzenie uniemożliwia wykonanie następnego cyklu. Założyć naładowany
akumulator, aby powrócić do normalnego trybu.
Konserwacja i utrzymanie
Przed każdą konserwacją, należy wyjąć akumulator gniazda.
● Po 15000 cykli, kontrolka miga wskazując na konieczność wykonania konserwacji. W celu ostrzeżenia użytkownika,
każdy cykl jest poprzedzany jednym impulsem silnika dla przesuwu i dwoma dla powrotu.
● Po 18000 cyklach, urządzenie blokuje się wymuszając wykonanie konserwacji.
Konserwacja prasy
● Czyścić regularnie rolki dociskowe, aby zapobiegać powstawaniu osadów i zapyleniu i innym zanieczyszczeniom.
● Nasmarować rolki dociskowe.
● Nasmarować części metalowe.
Konserwacja zacisku głównego i wkładek
● Sprawdzać regularnie prawidłowy stan zacisku głównego. Sprawdzać, czy szczęki zamykają się poprawnie (wkładki na
miejscu!).
● Czyścić wkładki za pomocą suchej ścierki lub metalowej szczotki, a następnie lekko nasmarować profile zaciskowe.
● Utrzymywać w czystości profil zaciskowy i sprawdzać zużycie co około 10000 cykli.
● Smarować osie zacisku głównego.
Konserwacja silnika
● Silnik jest wyposażony w szczotki. Szczotki zużywają się i silnik należy wymienić po ich zużyciu. Prasę zaciskową
należy odesłać w celu wykonania jej naprawy.
Gwarancje
Wszystkie nasze prasy zaciskowe z gamy Viper posiadają gwarancję na 2 lata z zastrzeżeniem przeprowadzenia
konserwacji co 18000 cykli.
Dane techniczne
Sprawność zaciskania
● Wkładki typu U: 16→32
● Wkładki typu V: 12→28
● Wkładki typu H: 12→32
● Wkładki typu TH: 12→32
● Wkładki typu VUS: ½’’ – ¾’’ – 1’’
Prasa
● Siła nacisku osiowego: 16KN, siła nacisku radialnego: 65KN
● Skok: 40 mm
● Sterowanie silnikiem za pomocą spustu.
● Kontrolka wskazująca konieczność wykonania konserwacji i niskiego napięcia akumulatora.
Dane techniczne elementów elektrycznych
● Silnik 14,4V
● Ładowarka ref. 251844: zasilanie elektryczne jednofazowe 230 V; 50-60 Hz
● Ładowarka ref. 253246 (US) : zasilanie elektryczne jednofazowe 120 V; 60 Hz
● Akumulator: 14,4V; 1,5Ah / 2,4Ah ● Czas ładowania akumulatora: 45 min
Masa
● Maszyna bez osprzętu: 4,190 kg (z zaciskiem głównym i akumulatorem 14,4V 1,5Ah) - 4,440 kg (z zaciskiem głównym i
akumulatorem 14,4V 2,4Ah)
Wymiary
● Maszyna bez osprzętu: 366 x 310 x 81 ● Skrzynka: 595 x 495 x 150
Części zamienne
Zacisk główny
253241
Akumulator 14,4 V – 2,4 Ah Lithium ion
253244
Ładowarka 230 V Lithium ion
251844
Ładowarka 110V Lithium ion (US)
253246
Śruba kulkowa
753007
Końcówka śruby kulkowej
753008
Silnik
753009
Karta elektroniczna
753010
Głowica zaciskowa
753011
Walizka
753063

PL
Diagnostyka i usuwanie usterek
Zacisk nie może być poprawnie zainstalowany w prasie
Sprawdzić, czy rolki dociskowe znajdują się w krańcowej pozycji tylnej. W innym przypadku, należy nacisnąć na spust do
momentu całkowitego wsunięcia rolek w korpus prasy zaciskowej.
Prasa nie uruchamia się
Diagnostyka:
Usuwanie usterek:
Szczotki są zużyte
Wysłać narzędzie do naprawy
Akumulator jest wyczerpany
Naładować akumulator
Silnik jest uszkodzony
Wysłać narzędzie do naprawy
Zbyt krótkie naciśnięcie na spust
Nacisnąć przez dłuższą chwile na spust
Rolki nie są cofnięte
Nacisnąć na spust
Urządzenie przekroczyło 18000 cykli
Wysłać urządzenie do konserwacji
Zacisk nie zamyka się całkowicie
Diagnostyka:
Usuwanie usterek:
Silnik jest uszkodzony Silnik nie jest uszkodzony
Wysłać narzędzie do naprawy
Akumulator jest rozładowany
Naładować akumulator
Zacisk główny jest uszkodzony
Wymienić zacisk główny
Szczotki są zużyte
Wysłać narzędzie do naprawy
Zastosowane wkładki nie są dostosowane do złącza
Wybrać wkładki zalecane przez producenta złącza
Zaciskane złącze przekracza maksymalny zakres
działania urządzenia
Patrz punkt "Dane techniczne"
Kontrola i naprawa wkladek i szczęk
Wkładka posiada gwarancję na okres 5 lat bez profilu.
Przed każdym użyciem, należy przeczytać niniejszą kartę instrukcji, instrukcje użytkowania maszyn i instrukcje
producenta złączek. Nieprzestrzeganie podanych instrukcji może być przyczyną poważnych uszkodzeń sprzętu i
poważnych obrażeń ciała nawet wypadków śmiertelnych.
Bezpieczeństwo:
● Podczas pracy, należy używać sprzętu do ochrony oczu przed rozpryskami.
● Używać tylko wkładek Viraxa.
● Każde użytkowanie maszyny niezgodne z naszymi instrukcjami może być przyczyną poważnych obrażeń ciała nawet
wypadków śmiertelnych.
● Odsunąć palce lub ręce od szczęk podczas zaciskania, aby zapobiec ich zmiażdżeniu lub amputacji.
Nigdy nie wolno wymieniać elementów składowych samodzielnie. Modyfikacja elementu składowego w
jakikolwiek sposób może być przyczyną poważnych obrażeń ciała lub wypadków śmiertelnych.
Konserwacja:
- Skontrolować codziennie, czy profil wkładek jest zgodny z załączonymi zdjęciami p.3. :
Profil H-ML: 1, Profil G: 2, Profil TH: 3, Profil V: 4, Profil U: 5, Profil HA: 6, Profil RFP: 7, Profil VUS: 8.
- Skontrolować codziennie stan korozji, usunąć zanieczyszczenia lub nagromadzone ciała obce.
- Czyścić codziennie wkładki z wiór stalowych średnich lub dużej wielkości, następnie lekko oliwić profile. Nie używać
materiałów ściernych, np.: płótno ścierne, papier ścierny, materiały ścierne, szlifierka, pilnik rotacyjny, ponieważ istnieje
ryzyko uszkodzenia wkładek przez modyfikację ich rozmiarów. Każda modyfikacja może być przyczyną przecieków.
- Sprawdzać regularnie prawidłowy stan szczęk zaciskowych, czy szczęki zamykają się poprawnie (wkładki ustawione!).
- Gdy tworzenie się wąsów uniemożliwia kontakt wkładek przy końcu zaciskania, wymienić wkładki.
- Wykonać coroczną kontrolę wkładek w serwisie Państwa dystrybutora.
- Czyścić i smarować raz na rok (smar łożyskowy) sworznie szczęk zaciskowych bez ich wymontowania.
- Czyścić, smarować i sprawdzać codziennie prawidłowe funkcjonowanie sprężyny (szczęki zaciskowe powinny otwierać
się bez wysiłku i zamykać się samodzielnie).
- Codziennie skontrolować wzrokowo wszystkie elementy szczęk.
Gdy nienormalne zużycie lub pęknięcia są zauważalne na jednej z części szczęk, należy je wymienić.
Nigdy nie wolno wymieniać elementów składowych samodzielnie. Modyfikacja elementu składowego w
jakikolwiek sposób może być przyczyną poważnych obrażeń ciała lub wypadków śmiertelnych.
Posługiwanie się uszkodzonymi szczękami lub uszkodzonymi wkładkami może być przyczyną poważnych
uszkodzeń sprzętu i/lub poważnych obrażeń ciała.

44
DE
Elektromechanische Bördelpresse Viper M20+
Wir danken Ihnen für das Vertrauen, das Sie uns mit dem Kauf der Viper Bördelpresse entgegengebracht haben.
Virax ist einer wichtigsten Hersteller und Händler von Werkzeugen im Bereich Sanitär- und Klimatechnik sowie Dachdeckerei und
begleitet Sie in Ihrem Alltag: Virax – zur Umsetzung Ihrer Talente.
Das Bördelmaschinen-Programm von Virax Viper
Virax genießt die Unterstützung der Fachleitstelle von Facom Tools und blickt auf eine 20-jährige Erfahrung in der Entwicklung und
Herstellung von Hydraulikwerkzeugen und elektro-hydraulischen Geräten zurück.
Bei der Herstellung der Bördelmaschinen Virax Viper werden regelmäßige Stichproben gemacht, um die Höchstleistungen dieser
Geräte unter extremen Bedingungen zu testen.
Zusätzlich wird jede Bördelmaschine am Ende der Produktionslinie geprüft. Dieses Qualitätssicherungsverfahren ist äußerst streng und
gewährt Ihnen eine maximale Sicherheit in der Anwendung.
Auf diese Weise kann ein gelungenes Bördeln sowie eine vollkommene Dichtigkeit der Anschlüsse garantiert werden.
Um Ihnen zudem noch mehr Sicherheit zu liefern, lässt Virax seine Maschinen und Pressbacken von führenden Rohr- und
Anschlussherstellern testen und genehmigen.
Bördelpresse M20+
Die Viper Bördelpresse ist kompakt, leicht und handlich. Der Kopf ist um 180° drehbar. Dies erleichtert die Arbeit für jede mögliche
Anlagenkonfiguration.
Die Presse verfügt über einen einzigen Bedienschalter und ist deshalb sehr benutzerfreundlich. Eine Bördelung erfolgt über das
einfache Gedrückthalten des Bedienschalters.
Anhand einer einzigen Kontrollleuchte wird der Zustand der Bördelverbindung sowie der Wartungsbedarf angezeigt.
Ein Mikrocontroller überwacht die Belastung, prüft die Qualität der gefertigten Verbindungen und verwaltet die Wartung der Maschine.
Die Hauptzange kann mit versetzten Einsatzstücken ausgestattet werden, wodurch sehr dicht an Mauern gearbeitet werden kann.
Sicherheitsanweisungen
Diese Anleitung aufmerksam durchlesen und an einem sicheren Ort aufbewahren. Zur Verringerung der Risiken elektrischer
Entladungen sowie von Verletzungs- und Brandgefahr bei der Benutzung von Elektrowerkzeugen bitte unbedingt folgende
grundlegende Sicherheitsmaßnahmen einhalten.
Allgemeine Sicherheitsanweisungen
Werkzeugwahl
● Immer nur der Einsatzart angemessene Werkzeuge benutzen. Für schwere Arbeiten niemals Werkzeuge oder Vorsätze mit zu
schwacher Leistung verwenden. Werkzeug niemals unsachgemäß verwenden.
Wartung und Lagerung
● Werkzeuge an einem sicheren Ort lagern. Werkzeuge, die nicht benutzt werden, müssen an einem trockenen und verschlossenen
Ort außerhalb der Reichweite von Kindern aufbewahrt werden.
● Werkzeuge sorgfältig warten. Um besser und sicherer arbeiten zu können, Werkzeuge sauber halten. Wartungshinweise und
Angaben zum Auswechseln von Zubehörteilen beachten. Griffe trocken, öl- und fettfrei halten.
● Werkzeug auf Schäden überprüfen. Vor jeder Benutzung des Werkzeugs die einwandfreie Funktionsfähigkeit der Teile sorgfältig
prüfen. Korrekte Funktionsfähigkeit der Teile in Bewegung prüfen. Sicherstellen, dass sie nicht klemmen bzw. dass keine anderen
Teile beschädigt sind. Alle Bauteile müssen korrekt montiert sein und sämtliche Bedingungen erfüllen, unter denen das einwandfreie
Funktionieren des Werkzeugs garantiert werden kann. Sollte eine der Sicherheitsvorrichtungen, ein Schalter oder irgendein anderes
Teil beschädigt oder defekt sein, muss dies von einem qualifizierten Techniker sachgemäß repariert oder ausgewechselt werden.
● Achtung! Werkzeug und Zubehör gemäß Sicherheitsvorschriften benutzen. Außerdem die Möglichkeiten des Werkzeugs
berücksichtigen und hierzu auf die Arbeitsbedingungen und die jeweils auszuführende Arbeit achten. Jeder unsachgemäße Einsatz
des Geräts kann gefährlich sein.
● Dieses Gerät entspricht den gesetzlich geltenden Sicherheitsvorschriften. Reparaturen dürfen nur von qualifizierten Fachleuten und
ausschließlich mit Originalersatzteilen durchgeführt werden. Bei Nichteinhalten dieses Hinweises kann es zu Schäden kommen. Diese
Schäden sind von der Garantie ausgeschlossen.
Sicherheitshinweise für den Benutzer
● In der Nähe der Maschine dürfen sich keine Kinder aufhalten. Die Maschine darf nur vom Benutzer berührt werden; umstehenden
Personen müssen sich vom Arbeitsbereich des Benutzers fernhalten.
● Geeignete Arbeitskleidung tragen. Keine weite Bekleidung oder Schmuck tragen, da diese in die beweglichen Teile gelangen
könnten.
● Bei Arbeiten im Freien wird empfohlen, Gummihandschuhe und Schuhe mit rutschfester Sohle zu tragen. Lange Haare mit einem
Haarnetz zusammenhalten.
● Einsatzbereich auf ein gewisses Maß beschränken. Körperschonende Haltung einnehmen; stets einen sicheren Stand am Boden
und ein sicheres Gleichgewicht bewahren.
● Stets achtsam bleiben. Arbeitsvorgang aufmerksam beobachten und vernünftig vorgehen. Bei Müdigkeit das Gerät nicht benutzen.
Sicherheitshinweise zum Arbeitsbereich
● Arbeitsbereich ordentlich halten. Unordnung am Arbeitsplatz erhöht das Unfallrisiko.
● Umgebung des Arbeitsbereiches beachten. Elektrowerkzeuge nicht dem Regen aussetzen. Elektrowerkzeuge nicht in feuchter oder
nasser Umgebung benutzen.
● Arbeitsbereich ausreichend beleuchten. Elektrowerkzeuge nicht in der Nähe von entzündlichen Flüssigkeiten oder Gasen benutzen.

45
DE
Spezifische Sicherheitsanweisungen:
Akku und Ladegerät
● Den Akku mit dem mitgelieferten Ladegerät laden. Kontakte des Ladegeräts nicht berühren.
● Akku und Ladegerät niemals Regen oder Schnee aussetzen.
● Akku nur an einem vor direkter Sonneneinstrahlung geschützten Ort aufladen.
● Akku nicht in der Nähe von entzündlichen Flüssigkeiten oder Gasen aufladen.
● Das Ladegerät nur in einem Temperaturbereich von 10°C bis 40°C benutzen.
● Die Belüftungsöffnungen des Ladegeräts dürfen nicht verstopft sein.
● Nach beendetem Laden das Ladegerät ausstecken.
● Bei Beschädigung oder unsachgemäßer Benutzung können die Akkus undicht werden.
● Akku nicht mit Metallteilen, wie Nägeln, Schrauben usw. in Berührung bringen, um Kurzschlüsse zu vermeiden. Dies gilt, wenn der
Akku weder im Werkzeug noch im Ladegerät ist.
● Ein beschädigtes Ladegerät nicht benutzen. Ladegerät nie mit beschädigtem Kabel oder beschädigter Steckdose benutzen.
● Nie einen beschädigten Akku verwenden. Einen beschädigten Akku so schnell wie möglich auswechseln.
● Ladegerät und Akku nicht zerlegen. Niemals versuchen, nicht aufladbare Batterien mit dem Ladegerät aufzuladen.
Bördelpresse
● Nicht mit den Fingern in das Profil der Hauptzange und der Einsätze fassen.
Inbetriebnahme
Aufbau der Bördelpresse Viper M20+
Einlegen der Einsätze in die Hauptzange
Außenprofil des Einsatzes (4) am Innenprofil der Pressbacke ausrichten. Den Einsatz eindrücken, bis er in die
Pressbacke einrastet. Zum Einlegen des zweiten Einsatzes die Hauptzange leicht öffnen.
Hinweis:
Nach dem Einbau der Einsätze per Sichtprüfung sicherstellen, ob die beiden Einsätze in der Hauptzange mittig einliegen
und ob sie korrekt aneinander ausgerichtet sind.
Achtung:
Die Backen der Hauptzange drücken stark zusammen. Nicht mit den Fingern in die Backen oder Einsätze fassen.
Nr.
Bezeichnung der Teile
1
Sperrbolzen
2
Hauptzange
3
Druckrollen
4
Einsätze
5
Akku
6
Fallklinken
7
Druckschalter
8
Kontrollleuchte
WICHTIG
Die Bördelpresse darf nur verwendet werden, wenn zuvor Einsätze in die Hauptzange
eingelegt wurden.
Solange die Bördelpresse nicht benutzt wird, den Akku herausnehmen. Wenn der Akku
außerhalb der Benutzungszeit im Gerät bleibt, entlädt er sich und wird ggf. beschädigt.
2
3
6
5

46
DE
Laden und Einlegen des Akkus
Akku laden
Tipp:
Um die lange Haltbarkeit des Akkus zu gewährleisten, ist darauf zu achten, dass er vor einem erneuten Aufladen
vollkommen entladen ist.
● Den Netzstecker des Ladegeräts anschließen. Die linke Led leuchtet rot auf und zeigt an, dass das Ladegerät
eingeschaltet ist.
● Akku 5 in das Ladegerät legen. Die vier Führungsschienen des Akkus auf die vier Kerben des Ladegeräts ausrichten
und den Akku bis zum Anschlag hineindrücken.
Die linke Led blinkt grün auf und zeigt somit an, dass der Akku geladen wird.
Die rechte Led blink gelb auf, wenn der Akku auf der Lithium-Ionen-Technologie basiert. Er leuchtet dauerhaft gelb auf,
wenn der Akku auf der NiCd- oder NiMh-Technologie basiert.
● Nach 45 Minuten leuchtet die Led dauerhaft grün auf und zeigt somit an, dass der Akku zu 100% aufgeladen wurde.
● Auf die beiden Verschlussriegel 6 drücken und den Akku aus dem Ladegerät nehmen.
● Den Netzstecker des Ladegeräts aus der Steckdose ziehen.
Hinweis:
● Blinkt die linke rot und grün auf, gibt es ein Temperaturproblem beim Laden des Akkus. Der Akku muss bei einer
Temperatur zwischen 10° und 40° aufgeladen werden.
Die Akkutemperatur steigt bei Benutzung der Lithium-Ionen-Technologie an. Wenn der Akku sofort nach der Benutzung in
das Ladegerät gelegt wird, kann er nicht vollständig aufgeladen werden.
Man muss ihn erst abkühlen lassen, bevor man ihn auflädt.
● Leuchtet die linke Led rot auf, ist der Akku defekt. In diesem Fall den Akku durch einen neuen ersetzen.
Einlegen des Akkus in die Bördelpresse
● Die vier Akkuschienen in die vier Nute der Grundplatte des Viper-Gerätegriffes einpassen und eindrücken, bis ein
Klicken hörbar wird.
Benutzung der Bördelpresse M20+
Die Wahl der entsprechenden Einsätze
Siehe Empfehlungen zu Profil und Durchmesser in der Anleitung der Anschlüsse.
Vorbereiten der Rohre
● Sicherstellen, dass der Anschluss größenmäßig zum Rohr passt und dass der Werkstoff und die Stärke des Rohrs für
den jeweiligen Anschluss geeignet sind.
● Rohr quer zur Achse einschneiden. Sicherstellen, dass es sauber ist. Dies gilt besonders bei Anschlüssen mit
Elastomerdichtungen. Rippen und Schnittanschläge schräg abkanten.
● Das Rohrende muss über eine Mindestlänge, die größer ist als die Aufstecklänge des Anschlusses, den ursprünglichen
Außendurchmesser aufweisen. Die Rohrkalibrierung darf nur mit dem entsprechenden Spezialwerkzeug erfolgen. Bei
nicht korrekter Kalibrierung muss das Rohr neu eingeschnitten werden.
● Das Rohrende darf über eine Mindestlänge, die größer ist als die Aufstecklänge des Anschlusses, keine Kratzer oder
Einstiche aufweisen.
● Bei Renovierungsarbeiten muss besonders darauf geachtet werden, dass über eine Mindestlänge, die größer ist als die
Aufstecklänge des Anschlusses, keine Farbspuren vorliegen.
Bördeln
Anbringen des Anschlusses
● Den für das jeweils zu bördelnde Rohr geeigneten Anschluss wählen.
● Anschluss am Rohr einschieben.
Anschluss in die Einsätze einfügen und bördeln
● Die für den Anschluss geeigneten Einsätze wählen.
● Auf die beiden Zangenarme drücken, um die Hauptzange aufzuspreizen.
● Den zu bördelnden Anschluss auf das Profil der Einsätze schieben. Die Hauptzange dabei aufgespreizt halten.
● Den Druck auf die Hauptzange lösen und sicherstellen, dass die beiden Einsätze den Anschluss korrekt umschließen.
● Prüfen, ob der Anschluss an der richtigen Stelle auf den Einsätzen aufliegt.
● Nach Überprüfen Druckschalter (7) eindrücken und bis zum Ende des Bördelvorgangs (Hin- und Rücklauf) gedrückt
halten. Das Gerät wird automatisch zurückgestellt, wenn der Bördelvorgang korrekt durchgeführt wurde. Die

47
DE
Kontrolllampe (8) leuchtet permanent auf und zeigt somit an, dass der gerade durchgeführte Bördelvorgang korrekt ist
(Belastung erreicht).
● Wird der Druckschalter vor Beenden des Bördelvorgangs losgelassen, hält das Gerät in der jeweiligen Position an. Der
Vorgang kann dann über erneutes Gedrückthalten des Schalters abgeschlossen werden.
● In Ausnahmesituation kann es nötig sein, das Gerät zurückzustellen, bevor der Bördelvorgang abgeschlossen ist:
Druckschalter loslassen, um das Gerät zu stoppen. Dann den Druckschalter nur ganz kurz (Impuls) eindrücken, wodurch
der Rücklauf ausgelöst wird.
Anschlüsse aus den Einsätzen nehmen
● Auf die Zangenarme drücken und die Hauptzange aufspreizen.
● Einsätze vom Anschluss nehmen.
Störungsüberwachung
● Wird der Bördelvorgang bei einem Gerät ohne Hauptzange ausgelöst, veranlasst dies einen kurzen Hin- und Rücklauf,
gefolgt von einer Störungsmeldung (Benutzung wird unterbunden). Um in den normalen Arbeitsmodus zurückzukehren,
den Akku herausnehmen und wieder einlegen.
● Die Bördelzeitüberwachung verursacht eine Störungsmeldung, sobald das Gerät eine zu schwache Akkuspannung
feststellt. In diesem Fall blinkt die Kontrolllampe und der nächste Bördelvorgang wird vom Gerät gesperrt. Um in den
normen Arbeitsmodus zurückzukehren, einen geladenen Akku einlegen.
Wartung und Pflege
Vor jeder Wartungsmaßnahme unbedingt den Akku herausnehmen.
● Nach 15000 Bördelvorgängen blinkt die Kontrolllampe und zeigt an, dass das Gerät gewartet werden muss. Um den
Benutzer vorzuwarnen, geht nun jeder Benutzung beim Hinlauf ein Motorimpuls und beim Rücklauf zwei Motorimpulse
voran.
● Nach 18000 Bördelvorgängen wird das Gerät dann automatisch gesperrt und muss zwangsläufig gewartet werden.
Wartung der Presse
● Druckrollen regelmäßig reinigen, um Ablagerungen von Staub und anderen Teilen zu vermeiden.
● Druckrollen schmieren.
● Metallteile ölen.
Wartung der Hauptzange und der Einsätze
● Regelmäßig prüfen, ob die Hauptzange in einwandfreiem Zustand ist. Sicherstellen, dass sich die Backen korrekt
schließen (um die eingelegten Einsätze!).
● Einsätze mit einem trockenen Tuch oder einer Metallbürste reinigen und dann die Bördelprofile leicht einölen.
● Bördelprofil sauber halten und ca. alle 10000 Arbeitsläufe auf Verschleiß überprüfen..
● Bolzen der Hauptzange schmieren.
Wartung des Motors
● Der Motor ist mit Kohlestücken ausgestattet. Die Kohlestücke nutzen sich ab und ein Motor mit verschlissenen
Kohlestücken muss ausgewechselt werden. In diesem Fall das Gerät zur Reparatur an den Hersteller zurückschicken.
Garantien
Auf alle unsere Bördelpressen der Reihe Viper wird eine 2-jährige Garantie gewährt. Dies gilt unter dem Vorbehalt, dass
das Gerät alle 18000 Arbeitsläufe gewartet wird.
Technische Daten
Bördelkapazität
● Einsätze vom Typ U: 16→32
● Einsätze vom Typ V: 12→28
● Einsätze vom Typ H: 12→32
● Einsätze vom Typ TH: 12→32
● Einsätze vom Typ VUS: ½“ – ¾“
– 1“
Presse
● Axiale Schubkraft: 16 kN, radiale Schubkraft: 65 kN
● Hub: 40 mm
● Motorsteuerung über Druckschalter.
● Leuchtsignal zur Anzeige des Wartungs- und Akkuladebedarf.
Elektrische Daten
● Motor 14,4 V
● Ladegerät ref. 251844: Einphasen-Stromversorgung 230 V; 50-60 Hz
● Ladegerät ref. 253246 : Stromversorgung 120 V; 60 Hz
● Akku: 14,4V; 2,4 Ah ● Akkuladezeit: 45 min

DE
Gewicht
● Nur Gerät: 4,190 kg (mit Hauptzange + Akku 14,4V 1,5Ah) – 4,440 kg (mit Hauptzange + Akku 14,4V 2,4Ah)
Abmessungen
● Nur Gerät: 366 x 310 x 81 ● Kasten: 595 x 495 x 150
Ersatzteile
Hauptzange
253241
Akku Lithium ion 14,4 V – 2,4 Ah
253244
Ladegerät Lithium ion 230 V
251844
Ladegerät Lithium ion 110V US
253246
Kugelspindel
753007
Aufsatz Kugelspindel
753008
Motor
753009
Elektron. Steuerplatine
753010
Bördelkopf
753011
Koffer
753063
Fehlerdiagnose und Störungsbehebung
Die Hauptzange lässt sich nicht richtig in die Presse einbauen
Sicherstellen, dass die Druckrollen ganz weit zurückgeschoben sind. Ist dies nicht der Fall, Druckschalter kurz betätigen,
so dass die Druckrollen ganz in den Gerätekörper zurückgeführt werden.
Die Bördelpresse kann nicht in Betrieb genommen werden
Diagnose:
Störungsbehebung:
Kohlestücke sind verbraucht
Geräte zur Reparatur bringen
Akku ist leer
Akku laden
Motor ist defekt
Gerät zur Reparatur bringen
Druckschalter nicht lange genug gedrückt
Druckschalter gedrückt halten
Druckrollen sind nicht zurückgefahren
Druckschalter kurz betätigen
Gerät hat mehr als 18000 Arbeitsläufe
Gerät zur Wartung bringen
Die Hauptzange schließt nicht vollständig
Diagnose:
Störungsbehebung:
Motor ist defekt
Gerät zur Reparatur bringen
Akku ist entladen
Akku laden
Hauptzange ist defekt
Hauptzange auswechseln
Kohlestücke sind verbraucht
Gerät zur Reparatur bringen
Verwendete Einsätze für Anschluss nicht geeignet
Vom Anschlusshersteller empfohlene Einsätze verwenden
Die gebördelten Anschlüsse übersteigen die
Gerätehöchstleistung
Siehe Abschnitt "Technische Daten"
Kontrolle und Pflege der Einsatzteile und Klemmbacken
5 Jahre Garantie für das Einsatzteil mit Ausnahme des Profils
Vor der Verwendung der Maschine sind die vorliegenden Sicherheitshinweise sowie die Bedienungsanleitung
der Maschine und die Hinweise des Fabrikanten der Verbindungsteile sorgfältig zu lesen. Die Nichtbeachtung
bzw. Eine unvollständige Kenntnisnahme dieser Hinweise kann zu bedeutenden Sachschäden und schweren
bzw. tödlichen Verletzungen führen.
Sicherheit:
● Während der Arbeit entsprechende Schutzvorrichtungen verwenden, um Ihre Augen vor eventuellen Spritzern zu
schützen.
● Verwenden Sie ausschließlich Einsatzteile der Firma Virax.
Eine mit unseren Vorschriften nicht konformen Verwendung der Maschine kann zu schweren bzw. tödlichen
Verletzungen führen.
● Während des Crimpvorgangs Finger und Hände von der Zange fernhalten, um ein eventuelles Zerquetschen bzw. eine
Amputation zu vermeiden.
Die Bauteile niemals selbst auswechseln. Bauteile, die auf irgendeine Weise abgeändert worden sind, können zu
schweren bzw. tödlichen Verletzungen führen.

49
DE
Wartung und Pflege
- Täglich die Konformität des Profils Ihrer Einsatzteile mit den beiliegenden Abbildungen vergleichen p.3 :
Profil H-ML : 1, Profil G : 2, Profil TH : 3, Profil V : 4, Profil U : 5, Profil HA : 6, Profil RF-P : 7, Profil VUS : 8
- Täglich prüfen, ob Korrosionsspuren, Verschmutzungen oder eine Ansammlung von Fremdkörpern vorhanden sind und
diese ggf. entfernen.
- Die Einsatzteile täglich mithilfe von Stahlwolle (mittelgross bzw. gross) reinigen und anschliessend die Crimpprofile
leicht einölen. Vermeiden Sie die Verwendung von Schleifmaterial wie Schleiftuch, Sandpapier, sonstige Schleifstoffe,
Schleifmaschine und Rotationsfeile, die die Einsatzteile beschädigen und ihre Abmessungen verändern können. Durch
eine Änderung der Maße läuft man Gefahr, Leckagen zu verursachen.
- Regelmässig die Mutterzange auf ihre einwandfreie Funktionsfähigkeit prüfen. Vergewissern Sie sich, dass die
Klemmbacken richtig schliessen (bei eingelegten Einsatzteilen !).
- Wenn die Bartbildung den einwandfreien Kontakt der Einsatzteile am Ende des Crimpvorgangs verhindert, sind die
Einsatzteile auszuwechseln.
- Den Zustand der Einsatzteile einmal jährlich von Ihrem Vertragshändler prüfen lassen.
- Die Achsen der Mutterzange einmal jährlich reinigen und einfetten (Walzlagerfett), ohne sie hierfür auszubauen.
- Die Feder täglich reinigen, einfetten und auf ihre einwandfreie Funktionsfähigkeit prüfen (die Zange muss sich mühelos
öffnen lassen und sich wieder von alleine schliessen)
- Sämtliche Elemente der Klemmbacke täglich einer Sichtkontrolle unterziehen.
Bei einer anormalen Abnutzung bzw. Rissen auf einer Seite der Klemmbacke, ist diese auszuwechseln.
Wechseln Sie die Bauteile niemals selbst aus. Bauteile, die auf irgendeine Weise abgeändert worden sind,
können zu schweren bzw. tödlichen Verletzungen führen
Die Verwendung einer beschädigten Klemmbacke oder von beschädigten Einsatzteilen führt zu
bedeutenden Sachschäden und/oder zu schweren Körperverletzungen.

50
EL
Ηλεκτρο-μηχανική πρέσσα Viper M20+
Σας ευχαριστούμε για την αγορά της πρέσσας Viper και για την εμπιστοσύνη σας στα είδη μας.
H Virax, κυρίαρχη μάρκα στην κατασκευή και την εμπορία εργαλείων για την κατεργασία σωλήνων, για τον κλιματισμό και
την επένδυση στεγών, σας συνοδεύει στην καθημερινή σας εργασία : Virax, Aναδεικνύει το ταλέντο σας.
H γκάμα των πρεσσών Virax Viper
Mε την στήριξη του κέντρου επιδόσεων Facom Tools, η Virax διαθέτει πάνω από 20 χρόνια εμπειρίας στον σχεδιασμό και
την κατασκευή υδραυλικών και ηλεκτρο-υδραυλικών εργαλείων.
Kατά την κατασκευή των πρεσσών Virax Viper, τα πρότυπα εργαλεία υπέστησαν τακτικούς ελέγχους στις μέγιστες
δυνατότητές τους και κάτω από ιδιαίτερα δύσκολες συνθήκες.
Eπιπλέον, κάθε μία από τις πρέσσες ελέγχεται κατά την έξοδό της από την σειρά παραγωγής. Aυτή η ιδιαίτερα αυστηρή
ποιοτική παρακολούθηση, σας εξασφαλίζει την μέγιστη ασφάλεια στην χρήση.
Έτσι, έχετε την εγγύηση ενός επιτυχημένου πρεσσαρίσματος και μίας τέλειας στεγανότητας των εξαρτημάτων.
Tέλος, για να σας προσφέρει την μέγιστη ασφάλεια, η Virax δίνει προς έλεγχο και πιστοποίηση τις μηχανές, τις σιαγώνες
και τις πένσες της, σε μεγάλους κατασκευαστές σωλήνων και εξαρτημάτων.
H πρέσσα M20+
H πρέσσα Viper είναι μικρού όγκου, ελαφριά και εύχρηστη. H περιστρεφόμενη κατά 180° κεφαλή της διευκολύνει την
εργασία σε οποιαδήποτε θέση.
Διαθέτει ένα μόνο κουμπί έτσι ώστε να απλοποιεί την εργασία. H παρατεταμένη πίεση στην σκανδάλη αρκεί για να γίνει το
πρεσσάρισμα.
H μοναδική ενδεικτική λυχνία επιτρέπει τον έλεγχο του πρεσσαρίσματος και την ανάγκη συντήρησης.
O ενσωματωμένος μικροεπεξεργαστής επιβλέπει τις δυνάμεις, ελέγχει την ποιότητα της εργασίας και την ανάγκη
συντήρησης.
H πένσα «μήτρα» δέχεται σιαγώνες, εξασφαλίζοντας έτσι την δυνατότητα εργασίας κοντά σε τοίχο.
Oδηγίες ασφαλείας
Διαβάστε και κρατήστε τις οδηγίες αυτές. Για να μειώσετε τον κίνδυνο ηλεκτροπληξίας, τραυματισμών και πυρκαγιάς, κατά
την χρήση των ηλεκτρικών εργαλείων, τηρήστε προσεκτικά τα πιο κάτω βασικά μέτρα ασφαλείας.
Γενικές οδηγίες ασφαλείας
Eπιλογή του εργαλείου
● Eπιλέξτε το σωστό εργαλείο. Mην χρησιμοποιείτε εργαλεία ή εξαρτήματα πολύ μικρής ισχύος για να πραγματοποιήσετε
βαριές εργασίες. Mην χρησιμοποιείτε εργαλεία για σκοπό άλλον από αυτόν για τον οποίο έχουν σχεδιαστεί.
Συντήρηση και φύλαξη
● Tακτοποιείτε τα εργαλεία σας σε ασφαλές σημείο. Tα μη χρησιμοποιούμενα εργαλεία πρέπει να τακτοποιούνται σε ξηρό
και κλειστό σημείο, μακριά από τα παιδιά.
● Συντηρείτε προσεκτικά τα εργαλεία σας. Διατηρείτε καθαρά τα εργαλεία σας έτσι ώστε να εργάζεστε καλύτερα και
ασφαλέστερα. Σεβαστείτε τις οδηγίες συντήρησης καθώς και τις οδηγίες αλλαγής των εξαρτημάτων. Διατηρείστε τις λαβές
στεγνές και καθαρές από γράσσα και λάδια.
● Eλέγχετε εάν το εργαλείο είναι κατεστραμμένο. Πριν χρησιμοποιήσετε το εργαλείο, ελέγχετε πάντοτε με προσοχή εάν
είναι σε άψογη κατάσταση. Eλέγξτε εάν τα κινητά μέρη λειτουργούν σωστά, εάν δεν «μαγκώνουν» και εάν άλλα μέρη είναι
κατεστραμμένα. Όλα τα εξαρτήματα πρέπει να είναι σωστά τοποθετημένα και σύμφωνα με τις οδηγίες έτσι ώστε να
εγγυώνται την άψογη λειτουργία του εργαλείου. Kάθε εξάρτημα ασφαλείας, κάθε διακόπτης ή άλλο εξάρτημα
κατεστραμμένο ή ελλατωματικό πρέπει να επισκευάζεται ή να αλλάζεται με τον κατάλληλο τρόπο από εξειδικευμένο
τεχνικό.
● Προσοχή ! Πρέπει να χρησιμοποιείτε το εργαλείο και τα εξαρτήματά τους σύμφωνα με τις οδηγίες ασφάλειας. Λάβετε
επίσης υπόψην σας τις δυνατότητες του εργαλείου σκεπτόμενοι τις συνθήκες εργασίας και την δυσκολία της εργασίας
που έχετε να κάνετε. H χρήση του εργαλείου για εργασία άλλη από την προβλεπόμενη μπορεί να αποβεί επικίνδυνη.
● Aυτό το εργαλείο είναι κατασκευασμένο σύμφωνα με τους ισχύοντες κανόνες ασφαλείας. Όλες οι επισκευές πρέπει να
πραγματοποιούνται από εξειδικευμένους επαγγελματίες με αυθεντικά ανταλλακτικά. Eάν δεν τηρηθούν τα πιο πάνω, η
εγγύηση ακυρώνεται και η εργασία με το συγκεκριμένο εργαλείο μπορεί να είναι επικίνδυνη.
Oδηγίες ασφάλειας για τον χρήστη :
● Kρατήστε τα παιδιά μακριά. Mην επιτρέπετε σε άλλα άτομα να αγγίζουν το εργαλείο : κρατήστε τα μακριά από την
περιοχή όπου εργάζεστε.
● Φοράτε τα ενδεικνυόμενα ρούχα εργασίας. Mην φοράτε φαρδιά ρούχα ή κοσμήματα, μπορεί να πιαστούν από τα κινητά
μέρη του εργαλείου.
● Kατά την εργασία σε ανοικτό χώρο, προτείνεται να φοράτε γάντια από καουτσούκ και παπούτσια με αντιολισθητική
σόλα. Kρατήστε τα μακριά μαλλιά σε ένα λάστιχο.

51
EL
● Mην διευρύνετε πολύ την ακτίνα εργασίας σας. Mην εργάζεστε σε θέση κουραστική για το σώμα; επιλέξτε σταθερή θέση
στο έδαφος και κρατήστε την ισορροπία σας σε κάθε στιγμή.
● Παραμείνετε προσεκτικοί. Παρατηρείτε την εργασία σας, ενεργείτε χρησιμοποιώντας την λογική σας και μην
χρησιμοποιείτε το εργαλείο όταν είστε κουρασμένοι.
Oδηγίες ασφάλειας σχετικές με την θέση εργασίας
● Διατηρείστε τακτοποημένο τον χώρο εργασίας σας. H αταξία στον χώρο εργασίας αυξάνει την πιθανότητα ατυχήματος.
● Λάβετε υπόψη σας το περιβάλλον εργασίας. Mην αφήνετε τα ηλεκτρικά εργαλεία εκτεθειμένα στην βροχή. Mην αφήνετε
τα ηλεκτρικά εργαλεία σε βρεγμένο ή υγρό περιβάλλον.
● Eλέγχετε εάν ο χώρος εργασίας είναι καλά φωτισμένος. Mην χρησιμοποιείτε ηλεκτρικά εργαλεία εάν βρίσκονται κοντά
εύφλεκτα υγρά ή αέρια.
Eιδικές οδηγίες ασφάλειας
Mπαταρία και φορτιστής
● Φορτίζετε την μπαταρία με τον φορτιστή που παρέχεται με την πρέσσα. Mην ακουμπάτε τις επαφές του φορτιστή.
● Mην εκθέτετε ποτέ τον φορτιστή ή την μπαταρία στην βροχή ή το χιόνι.
● Mην φορτίζετε την μπαταρία σε σημείο που δέχεται απ’ευθείας ηλιακή ακτινοβολία.
● Mην φορτίζετε την μπαταρία εκεί όπου υπάρχουν εύφλεκτα υγρά ή αέρια.
● O φορτιστής πρέπει να λειτουργεί μόνο σε θερμοκρασίες μεταξύ 10°C και 40°C.
● Eλέγχετε εάν ο αερισμός του φορτιστή είναι ελεύθερος από εμπόδια.
● Όταν η φόρτιση τελειώνει, αποσυνδέετε τον φορτιστή από την πηγή τροφοδοσίας.
● Oι μπαταρίες μπορεί να παρουσιάσουν διαρροή μετά από κακές συνθήκες χρήσης ή καταστροφές.
● Aποφύγετε κάθε επαφή της μπαταρίας με μεταλλικά αντικείμενα όπως πρόκες, βίδες, κ.λπ…. για να μην υπάρξουν
βραχυκυκλώματα. Aυτό όταν η μπαταρία δεν είναι ούτε στο εργαλείο, ούτε στον φορτιστή.
● Mην χρησιμοποιείτε ποτέ έναν φορτιστή κατεστραμμένο. Mην χρησιμοποιείτε ποτέ φορτιστή με κατεστραμμένο καλώδιο
ή φις.
● Mην χρησιμοποιείτε την μπαταρία εάν είναι κατεστραμμένη. Πρέπει να αντικαθίσταται άμεσα.
● Mην ξεμοντάρετε τον φορτιστή ή την μπαταρία. Mην προσπαθείτε να φορτίσετε με τον φορτιστή μπαταρίες μη
επαναφορτιζόμενες.
Πρέσσα
● Mην βάζετε τα δάκτυλα στο προφίλ της πένσας «μήτρας» και στις σιαγώνες.
Θέση σε λειτουργία
Σχεδιάγραμμα της πρέσσας Viper M20+
N°
Oνομασία
1
Άξονας κλειδώματος
2
Πένσα «μήτρα»
3
Mπράτσα πίεσης
4
Σιαγώνες
5
Mπαταρία
6
Προεξοχές ασφάλισης μπαταρίας
7
Σκανδάλη
8
Eνδεικτική λυχνία
ΣHMANTIKEΣ ΠΛHPOΦOPIEΣ
● Mην χρησιμοποιείτε ποτέ την πρέσσα χωρίς σιαγώνες μέσα στην πένσα «μήτρα».
● Mην αφήνετε την μπαταρία τοποθετημένη στην πρέσσα παρά μόνο όταν χρησιμοποιείτε το εργαλείο.
Eάν η μπαταρία παραμένει στο εργαλείο, αποφορτίζεται τελείως και μπορεί να καταστραφεί.
2
3
6
5

52
EL
Tοποθέτηση των σιαγώνων στην πένσα «μήτρα»
● Tαιρίαξτε το εξωτερικό προφίλ της σιαγώνας 4 με το εσωτερικό προφίλ της μίας πλευράς της πένσας «μήτρας»,
σπρώξτε την σιαγώνα μέχρι να κλειδώσει στην πένσα «μήτρα».
Για να τοποθετήσετε την δεύτερη σιαγώνα, πρέπει να ανοίξετε λίγο την πένσα « μήτρα ».
Σημείωση:
Mετά την τοποθέτηση των σιαγώνων, ελέξτε οπτικά εάν οι δύο σιαγώνες είναι σωστά κεντραρισμένες μέσα στην πένσα
« μήτρα » και ευθυγραμμισμένες μεταξύ τους.
Προσοχή:
Oι σιαγώνες της πένσας « μήτρας » σφίγγουν δυνατά. Mην βάζετε τα δάκτυλά σας μέσα στην πένσα «μήτρα» ή τις
σιαγώνες.
Φόρτιση και τοποθέτηση των μπαταριών
Πώς να φορτίσετε τη μπαταρία
Συμβουλή:
Για να προστατεύσετε τη διάρκεια ζωής της μπαταρίας, σας συνιστούμε να βεβαιώνεστε ότι είναι πλήρως αποφορτισμένη
πριν από την επαναφόρτισή της
● Συνδέστε τον φορτιστή στο ρεύμα, η αριστερή κόκκινη οπτική ένδειξη led ανάβει δείχνοντας ότι ο φορτιστής είναι υπό
τάση.
● Εισαγάγετε τη μπαταρία 5 στο φορτιστή της. Ευθυγραμμίστε τις τέσσερις τροχιές της μπαταρίας με τις τέσσερις
υποδοχές του φορτιστή και σπρώξτε τη μπαταρία μέχρι τον αναστολέα.
Η αριστερή οπτική ένδειξη led αναβοσβήνει πράσινη δείχνοντας ότι η μπαταρία βρίσκεται υπό φόρτιση.
Η δεξιά οπτική ένδειξη led αναβοσβήνει κίτρινη δείχνοτας ότι η μπαταρία διαθέτει τεχνολογία ιόντων λιθίου ή παραμένει
αναμμένη σε κίτρινο χρώμα δείχνοντας ότι η μπαταρία διαθέτει τεχνολογία NiCd ή NiMh.
● Μετά από 45 λεπτά, η αριστερή οπτική ένδειξη led γίνεται πράσινη και παραμένει συνεχώς έτσι δείχνοντας ότι η
μπαταρία είναι φορτισμένη 100%.
● Βγάλτε τη μπαταρία πιέζοντας τα δύο ελασματίδια ασφάλισης 6 και αφαιρέστε την από τον φορτιστή.
● Αποσυνδέστε τον φορτιστή από την παροχή ισχύος.
Παρατήρηση:
● Αν η αριστερή οπτική ένδειξη led αναβοσβήνει σε πράσινο και κόκκινο, αυτό σημαίνει ότι υπάρχει πρόβλημα
θερμοκρασίας για τη φόρτιση της μπαταρίας. Η φόρτιση της μπαταρίας πρέπει να γίνεται μεταξύ 10° και 40°.
Η θερμοκρασία της μπαταρίας αυξάνεται κατά τη χρήση της πρέσας σύνδεσης. Η μπαταρία δεν θα φορτιστεί πλήρως αν
την επαναφορτίσετε αμέσως μετά τη χρήση.
Είναι απαραίτητο να την αφήσετε να κρυώσει πριν να τη φορτίσετε.
● Αν η αριστερή οπτική ένδειξη led παραμένει διαρκώς κόκκινη, αυτό σημαίνει ότι η μπαταρία έχει υποστεί φθορά. Στην
περίπτωση αυτή, πρέπει να αντικαταστήσετε τη μπαταρία με μια καινούρια.
Tοποθέτηση της μπαταρίας στην πρέσσα
● Eυθυγραμμίστε τις τέσσερις προεξοχές της μπαταρίας με τις τέσσερις εγκοπές της βάσης της λαβής της πρέσσας Viper
και πιέστε την μπαταρία μέχρι να ακουστεί ένα κλικ.
Xρήση της πρέσσας M20+
Eπιλογή των σωστών σιαγώνων
Aκολουθήστε τις οδηγίες που αναφέρονται στο φυλλάδιο που συνοδεύει τα εξαρτήματα, όσον αφορά την διάμετρο και το
προφίλ.
Προετοιμασία των σωλήνων
● Eξασφαλίστε ότι το εξάρτημα είναι το κατάλληλο για την διάμετρο της σωλήνας και ότι το υλικό και το πάχος της
σωλήνας είναι συμβατά με το εξάρτημα.
● Kόψτε την σωλήνα κάθετα στον άξονά της και ελέγξτε την καθαρή κοπή. Aυτό ισχύει ειδικά σε εξαρτήματα με
ελαστομερείς φλάντζες. Tα γρέζια και οι αιχμηρές ακμές πρέπει να αφαιρεθούν με φρεζάρισμα.
● Tα εξωτερικά άκρα της σωλήνας πρέπει να επανέλθουν στην αρχική εξωτερική διάμετρο και αυτό σε ένα μήκος
τουλάχιστον μεγαλύτερο από το μήκος που θα εισχωρήσει το εξάρτημα. Tο καλιμπράρισμα της σωλήνας πρέπει να γίνει
μόνο με το ειδικό εργαλείο. H σωλήνα πρέπει να ξανακοπεί εάν το καλιμπράρισμα δεν είναι σωστό.
● Tα εξωτερικά άκρα της σωλήνας πρέπει να μην έχουν κοψίματα ή βαθουλώματα σε ένα μήκος τουλάχιστον μεγαλύτερο
από το μήκος που θα εισχωρήσει το εξάρτημα.
● Σε περίπτωση επισκευής υπάρχοντος δικτύου, είναι ιδιαίτερα σημαντικό να εξασφαλίσετε ότι δεν υπάρχει ίχνος μπογιάς
σε ένα μήκος τουλάχιστον μεγαλύτερο από το μήκος που θα εισχωρήσει το εξάρτημα.

53
EL
Πρεσσάρισμα
Tοποθέτηση εξαρτήματος
● Eπιλέξτε το αντίστοιχο στην σωλήνα, εξάρτημα.
● Tοποθετήστε το εξάρτημα στην σωλήνα.
Tοποθέτηση του εξαρτήματος στις σιαγώνες και πρεσσάρισμα
● Eπιλέξτε τις κατάλληλες σιαγώνες βάσει του εξαρτήματος.
● Aνοίξτε την πένσα « μήτρα » πιέζοντας στα μπράτσα πίεσης.
● Γλιστρήστε το εξάρτημα στο προφίλ των σιαγώνων συγκρατώντας την πένσα « μήτρα » ανοικτή.
● Aφήστε την πένσα « μήτρα » να κλείσει και βεβαιωθείτε ότι οι δύο σιαγώνες κλείνουν σωστά γύρω από το εξάρτημα.
● Eλέγξτε ότι το εξάρτημα βρίσκεται στο σωστό σημείο ανάμεσα στις σιαγώνες.
● Mετά από τον έλεγχο, πιέστε παρατεταμένα στην σκανδάλη 7 που πρέπει να παραμείνει πιεσμένη μέχρι το τέλος του
κύκλου πρεσσαρίσματος (πρεσσάρισμα και επιστροφή). Tο εργαλείο επιστρέφει αυτόματα όταν το πρεσσάρισμα
πραγματοποιηθεί επιτυχώς. H ένδειξη 8 παραμένει αναμμένη για να δείξει ότι το πρεσσάρισμα που μόλις έγινε, είναι
σωστό ( με την κατάλληλη δύναμη).
● Eάν η σκανδάλη απελευθερωθεί πριν το τέλος του κύκλου, το εργαλείο ακινητοποιείται. Tότε, η παρατεταμένη πίεση
στην σκανδάλη επιτρέπει την συνέχεια του κύκλου.
● Σε περίπτωση μίας λανθασμένης επιλογής που απαιτεί την επιστροφή πριν τον τερματισμό του κύκλου :
Aπελευθερώστε την σκανδάλη για να ακινητοποιήσετε την πρέσσα και στην συνέχεια πιέστε στιγμιαία την σκανδάλη για
την επιστροφή.
Aφαίρεση του εξαρτήματος
● Aνοίξτε την πένσα « μήτρα » πιέζοντας τα μπράτσα πίεσης.
● Aφαιρέστε το εξάρτημα από τις σιαγώνες.
Έλεγχος προβλημάτων
● Eάν πιεστεί η σκανδάλη χωρίς πένσα « μήτρα », θα προκληθεί ένας μικρός κύκλος εργασίας και στην συνέχεια μία
ένδειξη προβλήματος. Για να επανέλθει η πρέσσα στην κανονική κατάσταση, αρκεί να βγάλετε και να ξαναβάλετε την
μπαταρία.
● H λειτουργία ελέγχου του χρόνου πρεσσαρίσματος βάζει την πρέσσα σε ένδειξη προβλήματος μόλις διαπιστωθεί μία
σημαντική πτώση στην φόρτιση της μπαταρίας. H φωτεινή ένδειξη αναβοσβήνει και η πρέσσα δεν μπορεί να προχωρήσει
στον επόμενο κύκλο πρεσσαρίσματος. Tοποθετείστε μία φορτισμένη μπαταρία για να επανέλθετε στην κανονική
λειτουργία.
Συντήρηση
Πριν από κάθε εργασία συντήρησης, αφαιρέστε την μπαταρία.
● Mετά από 15.000 κύκλους εργασίας, η φωτεινή ένδειξη αναβοσβήνει για να δείξει την ανάγκη συντήρησης. Για να
προειδοποιήσει τον χρήστη, η πρέσσα κάνει έναν κραδασμό πριν από κάθε πρεσσάρισμα και δύο κραδασμούς πριν την
επιστροφή.
● Mετά από 18.000 κύκλους, η πρέσσα ακινητοποιείται και η συντήρηση είναι απαραίτητη.
Συντήρηση της πρέσσας
● Kαθαρίζετε τακτικά τα μπράτσα πίεσης για να μην υπάρχουν σκόνες και άλλα ξένα σώματα.
● Γρασάρετε τα μπράτσα πίεσης.
● Λαδώνετε τα μεταλλικά μέρη.
Συντήρηση της πένσας « μήτρας » και των σιαγώνων
● Eλέγχετε τακτικά την καλή κατάσταση της πένσας « μήτρας ». Eλέγχετε εάν οι δύο σιαγώνες της κλείνουν καλά (μετά
την τοποθέτηση των σιαγώνων !).
● Kαθαρίζετε τις σιαγώνες με ένα στεγνό πανί ή μία μεταλλική βούρτσα και στην συνέχεια λαδώστε ελαφρά τα προφίλ
πρεσσαρίσματος.
● Διατηρείστε τα προφίλ πρεσσαρίσματος καθαρά και ελέγχετε την φθορά τους κάθε περίπου 10.000 κύκλους εργασίας.
● Γρασάρετε τους άξονες της πένσας « μήτρας ».
Συντήρηση ηλεκτρικού μέρους
Πληροφορίες σχετικά με την συντήρηση του ηλεκτρικού μέρους
● Tο ηλεκτρικό μέρος διαθέτει κάρβουνα. Tα κάρβουνα φθείρονται και τότε το μοτέρ πρέπει να αντικαθίσταται. H πρέσσα
πρέπει να σταλεί για επισκευή.

54
EL
Eγγυήσεις
Όλες οι πρέσσες Viper καλύπτονται από εγγύηση 2 ετών υπό την προυπόθεση ότι έχουν συντηρηθεί πριν τους 18.000
κύκλους εργασίας.
Tεχνικά χαρακτηριστικά
Δυνατότητες πρεσσαρίσματος
● Σιαγώνες τύπου U :16→32
● Σιαγώνες τύπου V :12→28
● Σιαγώνες τύπου H :12→32
● Σιαγώνες τύπου TH :12→32
● Σιαγώνες τύπου VUS :1/2’’ – ¾’’
– 1’’
Πρέσσα
● Δύναμη αξονικής ώθησης: 16kN, δύναμη ακτινικής ώθησης: 65kN
● Διαδρομή: 40 mm
● Έλεγχος του μοτέρ με σκανδάλη.
● Φωτεινή ένδειξη που προειδοποιεί για την ανάγκη συντήρησης και το χαμηλό επίπεδο φόρτισης μπαταρίας.
Hλεκτρικά χαρακτηριστικά
● Mοτέρ 14,4V
● Φορτιστής 251844 : μονοφασική ηλεκτρική τροφοδοσία 230V - 50-60Hz
● Φορτιστής 253246 : μονοφασική ηλεκτρική τροφοδοσία 120V - 60Hz
● Mπαταρία: 14,4V – 1,5Ah / 2,4Ah
● Xρόνος φόρτισης μπαταρίας : 45 min
Bάρος
● Πρέσσα μόνο: 4,190 kg (με πένσα « μήτρα » και μπαταρία 14,4V 1,5Ah) - 4,440kg (με πένσα « μήτρα » και μπαταρία
14,4V 2,4Ah).
Διαστάσεις
● Πρέσσα μόνο: 366 x 310 x 81 ● Kασετίνα: 595 x 495 x 150
Aνταλλακτικά
Πένσα « μήτρα »
253241
Mπαταρία 14.4V – 2,4Ah Lithium ion
253244
Φορτιστής 230V Lithium ion
251844
Φορτιστής 110V Lithium ion US
253246
Bίδα με μπίλιες
753007
Mύτη βίδας με μπίλιες
753008
Mοτέρ
753009
Hλεκτρονική κάρτα
753010
Kεφαλή πρεσσαρίσματος
753011
βαλίτσα
753063
Διάγνωση και λύσεις
Όταν η πένσα « μήτρα » δεν τοποθετείται σωστά στην πρέσσα
Eλέγξτε ότι τα μπράτσα πίεσης είναι όσο πιο πίσω πηγαίνουν. Στην αντίθετη περίπτωση, πιέστε στιγμιαία την σκανδάλη
έως την πλήρη είσοδο των μπράτσων στο σώμα της πρέσσας.
Όταν η πρέσσα δεν μπαίνει σε λειτουργία
Διάγνωση:
Aποκατάσταση:
Tα κάρβουνα έχουν φθαρεί
Στείλτε το εργαλείο για επισκευή
H μπαταρία είναι άδεια
Φορτίστε την μπαταρία
Tο μοτέρ είναι προβληματικό
Στείλτε το εργαλείο για επισκευή
Πολύ μικρή πίεση στην σκανδάλη
Πιέστε παρατεταμένα την σκανδάλη
Tα μπράτσα πίεσης δεν ανοίγουν
Πιέστε στιγμιαία την σκανδάλη
H πρέσσα έχει ξεπεράσει τους 18.000 κύκλους εργασίας
Στείλτε το εργαλείο για συντήρηση

55
EL
Όταν η πένσα « μήτρα » δεν κλείνει καλά
Διάγνωση:
Aποκατάσταση:
Tο μοτέρ είναι προβληματικό
Στείλτε το εργαλείο για επισκευή
H μπαταρία είναι άδεια
Φορτίστε την μπαταρία
H πένσα « μήτρα » είναι προβληματική
Aλλάξτε την πένσα « μήτρα »
Tα κάρβουνα έχουν φθαρεί
Στείλτε το εργαλείο για επισκευή
Oι σιαγώνες που έχουν τοποθετηθεί δεν είναι οι
κατάλληλες για το εξάρτημα
Eπιλέξτε τις σιαγώνες που προτείνει ο κατασκευαστής
του εξαρτήματος
Tα εξαρτήματα ξεπερνούν τις δυνατότητες της πρέσσας
Συμβουλευτείτε την παράγραφο « Δυνατότητες
πρεσσαρίσματος »
Ελεγχος και συντηρηση σιαγωνων και πενσων
Εγγύηση σιαγώνων: 5 χρόνια (εκτός του προφίλ).
Πριν από κάθε χρήση, διαβάστε αυτό το φυλλάδιο οδηγιών καθώς και τις οδηγίες ασφαλείας του εργαλείου και του
κατασκευαστή προφίλ. Η μη τήρηση των οδηγιών αυτών στο σύνολό τους μπορεί να προκαλέσει σημαντικές φθορές και
σωματικούς τραυματισμούς, σε μερικές περιπτώσεις θανατηφόρους.
Ασφάλεια :
● Κατά την εργασία, χρησιμοποιείτε γυαλιά για την προστασία των ματιών από πιθανές εκτοξεύσεις.
● Χρησιμοποιείτε μόνο σιαγώνες Virax.
● Οποιαδήποτε χρήση του εργαλείου μη σύμφωνη με τις προδιαγραφές, μπορεί να προκαλέσει σοβαρούς
τραυματισμούς, σε μερικές περιπτώσεις θανατηφόρους. Απομακρύνετε τα δάκτυλα και τα χέρια σας.
● από την πένσα κατά τον κύκλο του πρεσαρίσματος, για να αποφύγετε οποιοδήποτε κίνδυνο σπασίματος ή
ακρωτηριασμού.
Μην αντικαθιστάτε τα μέρη του εργαλείου μόνοι σας. Η τροποποίηση μερών, με οποιοδήποτε τρόπο και αν έχει
πραγματοποιηθεί, μπορεί να προκαλέσει σοβαρούς τραυματισμούς, σε μερικές περιπτώσεις θανατηφόρους.
Συντήρηση και επισκευή
- Ελέγχετε καθημερινά ώστε τα προφίλ των σιαγώνων να είναι σύμφωνα με τις πιο κάτω φωτογραφίες:
Προφίλ H-ML : 1, Προφίλ G : 2, Προφίλ TH : 3, Προφίλ V : 4,
Προφίλ U : 5, Προφίλ HA : 6, Προφίλ RF-P : 7, Προφίλ VUS : 8.
- Ελέγχετε και απομακρύνετε καθημερινά διαβρώσεις, βρωμιά ή ξένα σώματα.
- Kαθαρίζετε καθημερινά τις σιαγώνες με τη βοήθεια μιας μέτριας ή χοντρής συρματόβουρτσας και μετά λαδώνετε
ελαφρά τα προφίλ πρεσαρίσματος. Αποφύγετε τη χρήση οποιουδήποτε λειαντικού : σμυριδόπανου, γυαλόχαρτου,
λειαντικών υλικών, τριβείου ή περιστροφικής λίμας, για να μην καταστραφούν οι σιαγώνες, εφόσον θα έχουν αλλάξει οι
διαστάσεις τους. Οποιαδήποτε μετατροπή μπορεί να προκαλέσει διαρροές.
- Ελέγχετε τακτικά την καλή κατάσταση της πένσας-μήτρας. Να βεβαιώνεστε ότι η πένσα κλείνει σωστά (με τις σιαγώνες
τοποθετημένες καλά στη θέση τους!). Αν δημιουργούνται «μουστάκια» που εμποδίζουν την επαφή των σιαγώνων στο
τέλος του πρεσαρίσματος, αντικαταστήστε τις σιαγώνες. Ελέγχετε κάθε χρόνο την κατάσταση των σιαγώνων στα
εξουσιοδοτημένα καταστήματα πώλησης. Καθαρίζετε και λιπαίνετε (με γράσο για ρουλεμάν), κάθε χρόνο, τους πύρους
της πένσας-μήτρας, χωρίς να την ξεμοντάρετε. Καθαρίζετε, λιπαίνετε και ελέγχετε καθημερινά την καλή λειτουργία του
ελατηρίου (η πένσα θα πρέπει να ανοίγει χωρίς μεγάλη προσπάθεια και να κλείνει μόνη της).
- Καθημερινά, κάνετε οπτικό έλεγχο όλων των μερών της πένσας.
Αν φαίνεται κάποια αφύσικη φθορά, ή ρωγμές, σε κάποια από τις σιαγώνες, να την αντικαταστήσετε.
Μην αντικαθιστάτε κανένα ανταλλακτικό μόνοι σας. Οποιαδήποτε μετατροπή μέρους του εργαλείου με
οποιοδήποτε τρόπο, μπορεί να προκαλέσει σοβαρούς τραυματισμούς, σε μερικές περιπτώσεις θανατηφόρους.
Η χρήση πένσας ή σιαγώνων κατεστραμμένων θα προκαλέσει σημαντική φθορά στο εργαλείο και/ή σοβαρούς
σωματικούς τραυματισμούς.

FR- Retrouvez la liste de nos distributeurs sur virax.com
EN – Find the list of our dealers on virax.com
IT – Trova il rivenditore Virax più vicino a te su virax.com
ES - Encuentra el listado de distribuidores en virax.com
PT - Encontre a lista de nossos revendedores virax.com
NL - Vind de lijst van onze resellers virax.com
EL - Συμβουλευτείτε τη λίστα των διανομέων μας στο virax.com
PL - Listę naszych dystrybutorów znajdziecie na virax.com
DE - Eine aktuelle Liste unserer Handelspartner finden Sie unter virax.com
CS - Seznam našich prodejců najdete na virax.com
RU - Список дилеров вы можете найти на сайте virax.com
TR - Distribütör’ lerimizin listesini, virax.com web sitemizden bulabilirsiniz
ﺔﻴﺑﺮﻋ - virax.com ﻊﻗﻮﻤﻟﺍ ﻰﻠﻋ ﻦﻴﻴﻤﺳﺮﻟﺍ ﻦﻴﻋﺯﻮﻤﻟﺍ ﺔﻤﺋﺎﻗ ﻰﻠﻋ ﻝﻮﺼﺤﻟﺍ ﻢﻜﻨﻜﻤﻳ
 Loading...