

Virat Pressure Cookers Instructions & Recipes
Instructions & Recipes
2002
Page 1
PRESSURE COOKER
Instructions & Recipes
For Virat Inner Lid Pressure Cookers
Includes Non-vegetarian recipes
Please do not read recipes portion if you are pure vegetarian.
A separate Recipe Book is available at http://viratcooker.com/support.asp for Vegetarians

Instructions & Recipes
2002
Page 2
CONTENTS
Important Safeguards . . . . . . . . . . . . . . . . . . . . . . . . . . . . . . . . . . . . . . .. . . . . . . . . . . . . .3
Introduction . . . . . . . . . . . . . . . . . . . . . . . . . . . . . . . . . . . . . . . . . . . . . . . . . . . . . . . . . . . . 4
Components and Features . . . . . . . . . . . . . . . . . . . . . . . . . . . . . . . . . . . . . . . . . . . . . . . ..5
Cooking with the VIRAT Pressure Cooker . . . . . . . . . . . . . . . . . . . . . . . . . . . . . . . . . . . . .6
• Getting started
• How to fit lid into the cooker body
• How to remove lid from the cooker body
• Adding Food and Liquid
• Cooking time control
• Releasing Pressure After Cooking
Care and Cleaning . . . . . . . . . . . . . . . . . . . . . . . . . . . . . . . . . . . . . . . . . . . . . . . . . . . . . . . 10
Maintenance for Safe Use . . . . . . . . . . . . . . . . . . . . . . . . . . . . . . . . . . . . . . . . . . . . . . . . . 10
Basic instructions for cooking . . . . . . . . . . . . . . . . . . . . . . . . . . . . . . . . . . . . . . . . . . . . . .11
• Fresh and frozen vegetables
• Fresh and dried fruits
• Dried beans and other legumes
• Grains
• Meat
• Seafood and fish
• Adapting Traditional Recipes to Use in the Pressure Cooker
• Troubleshooting
Pressure cooking recipes (Includes Non Vegetarian Recipes)
Please do not read this portion if you are vegetarian.
A separate recipe book is available at
http://viratcooker.com/support.asp for vegetarians . . . . . . . . . . . . . . . . . . . . . . . . . . . .20

Instructions & Recipes
2002
Page 3
Virat pressure cookers are manufactured under strict quality control procedures and latest
technology. You can take maximum advantage of a good product if you adopt a little care
while handling and cooking in our pressure cookers. The following safeguards are
recommended.
IMPORTANT SAFEGUARDS
When using pressure cookers, basic safety precautions should always be followed:
1. Read all instructions.
2. Do not touch hot surfaces. Use handles or knobs.
3. Close supervision is necessary when the pressure cooker is used near children.
4. Do not place the pressure cooker in a heated oven.
5. Extreme caution must be used when moving a pressure cooker containing hot liquids.
6. Do not use pressure cooker for other than intended use.
7. This appliance cooks under pressure. Improper use may result in scalding injury. Make
certain, unit is properly closed before operating. See Operating Instructions.
8. Do not fill the unit over two thirds full. When cooking foods that expand during cooking
such as rice or dried vegetables, do not fill the unit over one half full. Over filling may cause a
risk of clogging the vent pipe and developing excess pressure. See Food Preparation
instructions.
9. Be aware that certain foods, such as applesauce, cranberries, pearl barley, oatmeal or other
cereals, split peas, noodles, macaroni, rhubarb, or spaghetti can foam, froth, and sputter, and
clog the pressure release device (steam vent). These foods should not be cooked in a pressure
cooker.
10. Always check the pressure release devices for clogging before use.
11. Do not open the pressure cooker until the unit has cooled and all internal pressure has
been released. If the handles are difficult to push apart, this indicates that the cooker is still
pressurized - do not force it open. Remove the pressure regulator and run cold water over the
cooker to cool it to reduce the internal pressure. Any pressure in the cooker can be hazardous.
See Operating Instructions.
12. Do not use this pressure cooker for pressure frying with oil.
13. When the normal operating pressure is reached, turn the heat down so all the liquid,
which creates the steam, does not evaporate.
14. SAVE THESE INSTRUCTIONS.

Instructions & Recipes
2002
Page 4
Introduction
Today’s pressure cookers are a far cry from those used by our mothers and grandmothers.
When first introduced in the late 1930’s, pressure cookers were acclaimed to be the
housewives best friend, allowing her to prepare delicious, economical, healthy meals in a
fraction of the time. While this element of healthy, rapid cooking still remains true, the design
and engineering of today’s pressure cookers have gone through a major evolution.
Surrounded by endless myths, pressure cookers are probably the least understood of
cookware. This is unfortunate since pressure cookers provide many advantages over
traditional cooking. First and foremost, most foods can be cooked in a fraction of the time it
normally would take, in most cases, cooking in up to one-third of the time. Since the food is
being cooked for such a short period, it is less likely to lose its colour and flavour, as well as
many of the vital minerals and vitamins that are normally washed away when cooking in large
quantities of water in a open pot, for longer periods of time.
Made from high-quality, aluminium which is light in weight but stronger than stainless steel,
VIRAT pressure cookers are assigned and manufactured with a concern for function and
safety, meeting all international safety standards.
With proper use and care, your VIRAT pressure cooker will provide you with many years of
carefree use, not to mention quick and easy delicious meals.
Instructions & Recipes
2002
Page 5
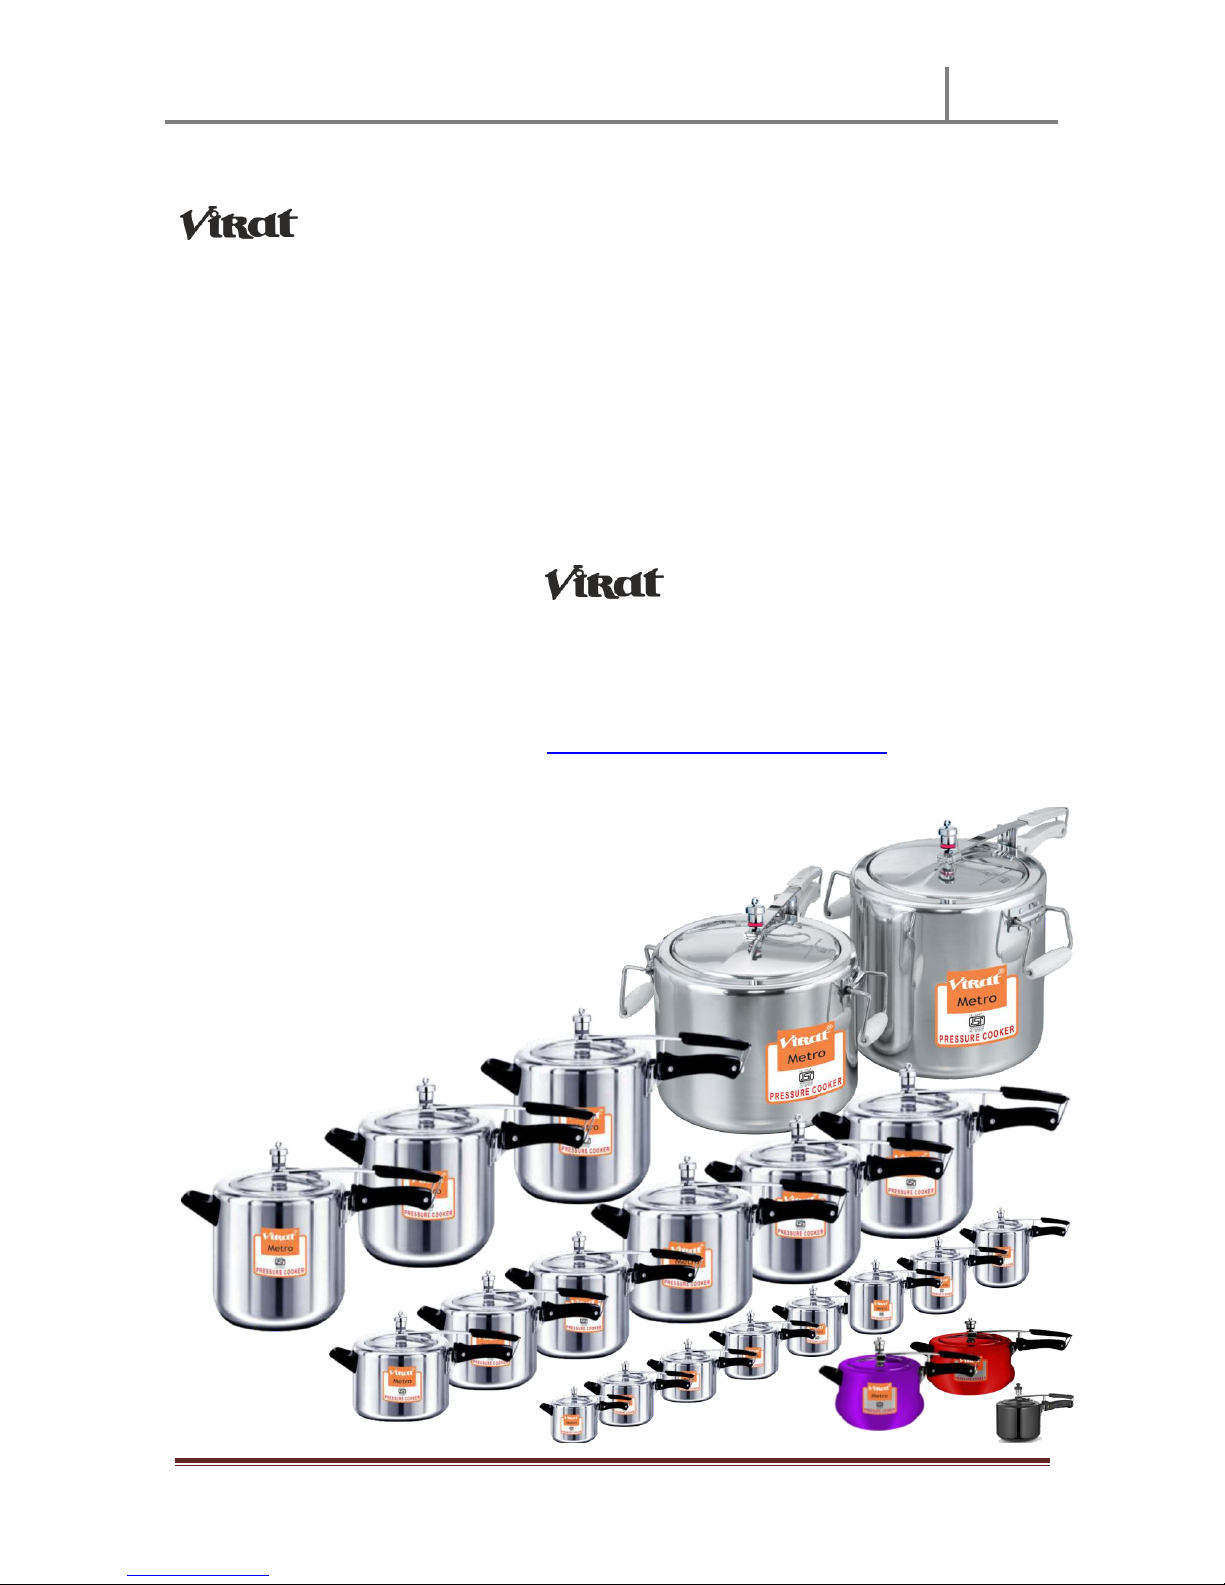
VIRAT Pressure Cooker
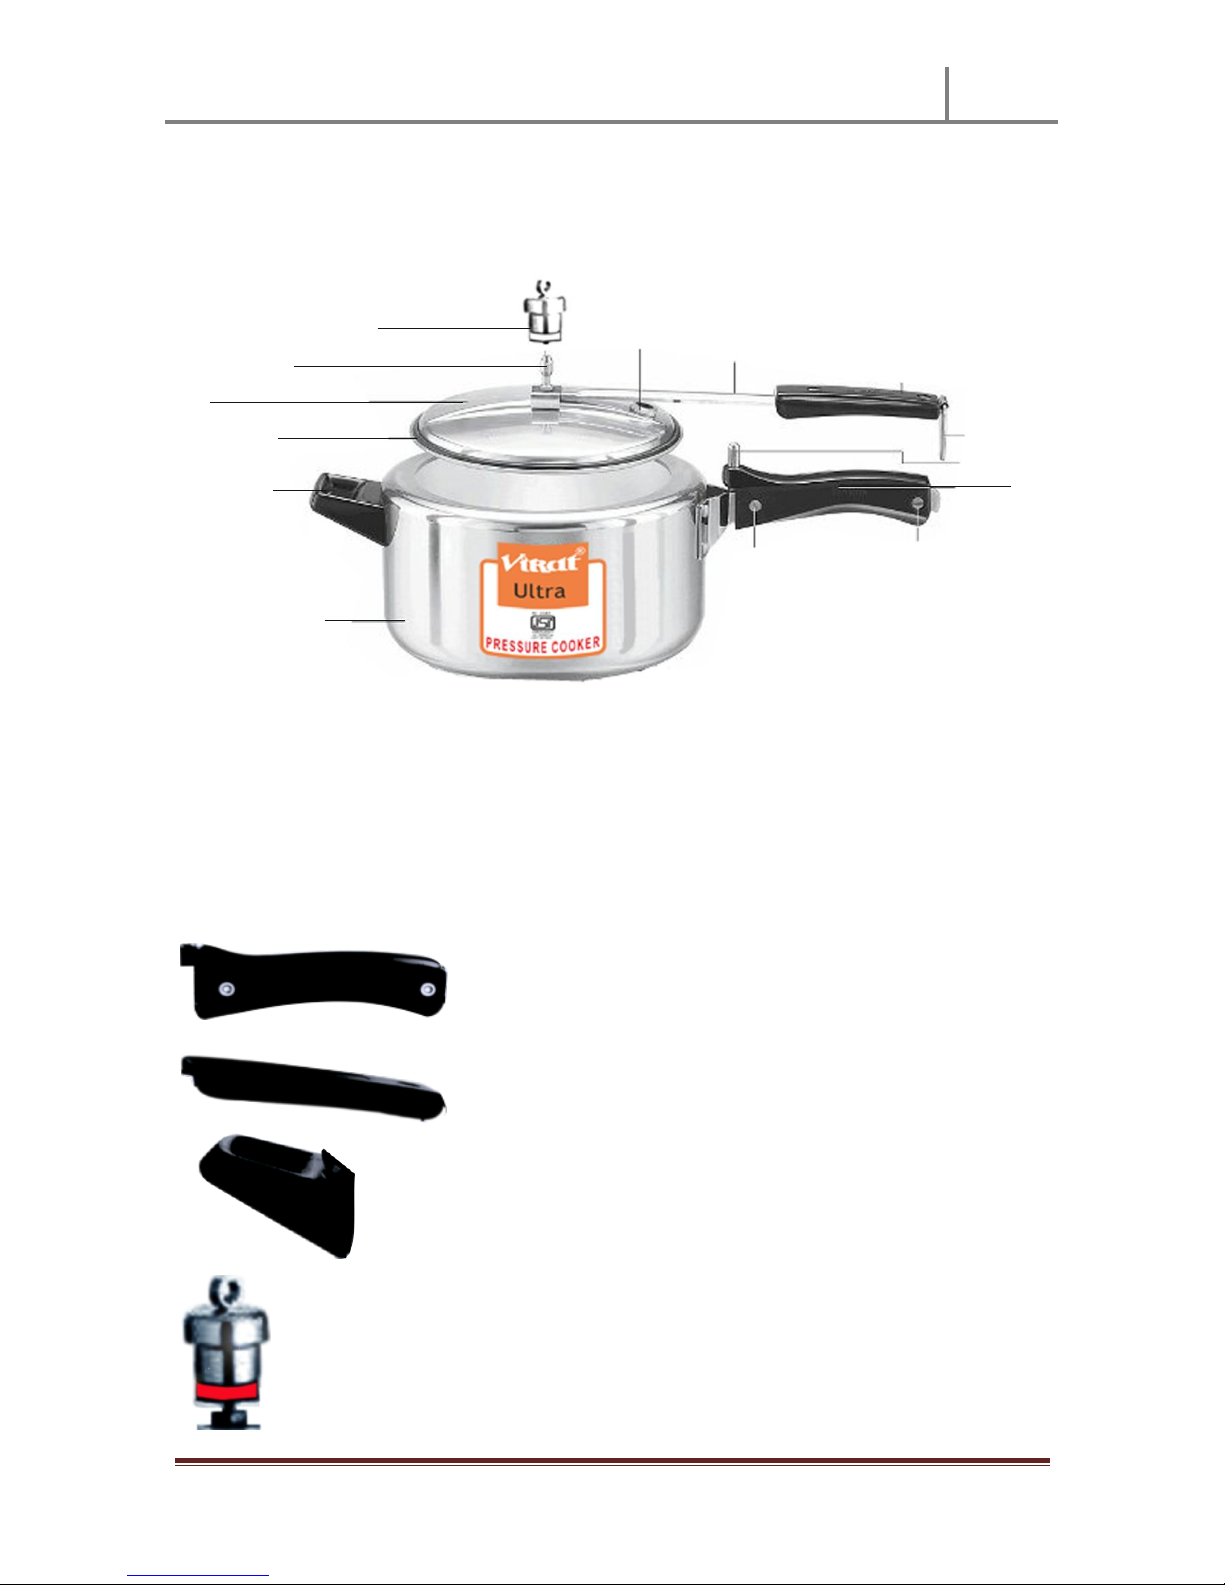
Components and Features
Pressure Regulating Device
Steam Vent Tube
Lid
Rubber Gasket
Support Grip
Pressure Cooker Pot
Locking Loop
Pivot
Fusible Safety Valve
Lid Handle Bar
Lid Handle
Base Handle
Screw & Nut
1. Pressure Cooker Pot: Made of high-quality, aluminium which is light in weight but stronger
than stainless steel, all cooking takes place in the pressure cooker pot.
2. Lid: Made of high-quality, aluminium which is lighter in weight but stronger than stainless
steel, the lid must be properly locked in position in order to build-up sufficient pressure for
cooking.
NEVER FORCE THE PRESSURE COOKER OPEN
3. Base Handle: Besides being used to move and carry the
pressure cooker, the base handle interlocks with the lid handle
when the lid is turned clockwise inside the cooker pot.
4. Lid Handle: Used to remove the lid from the pressure
cooker,
5. Support Grip: The support grip provides greater stability when moving
or carrying the pressure cooker.
6. Pressure Regulating Device: This divice releases pressure from the cooker as
soon as the temperature inside the cooker reaches 120 degree celcius

Instructions & Recipes
2002
Page 6
7. Rubber gasket: In order to provide an air-tight seal, a rubber gasket is positioned around
the underside of the lid. Never use the pressure cooker without the
rubber gasket properly positioned. Do not use the pressure cooker with a
worn or torn gasket, which should be replaced immediately. Contact the
VIRAT Customer Service Department at the phone number provided in
the warranty information.
9. Fusible safety valve: Located under the lid handle. This device is made from a
special alloy that melts as soon as the pressure is about to cross the safe level.
Cooking with the VIRAT Pressure Cooker
* NOTE: VIRAT PRESSURE COOKERS ARE INTENDED FOR DOMESTIC COOKING SURFACES
FOR HOUSEHOLD USE ONLY.
Getting started
USE VIRAT PRESSURE COOKER FOR THE FIRST TIME
1. Remove label.
2. Pour one glass of water into cooker body. Add one-teaspoon fresh limejuice. The addition of
lime juice will ensure that the inside of the cooker body remains clean.
3. Fit lid into the cooker body.
4. Lock the cooker making sure that the cooker is sealed properly.
5. Place cooker on stove ensuring heat is at the maximum.
6. See that air is expelled from inside the cooker and clear and continuous stream of steam
comes out from the vent tube. Fit vent weight on vent tube immediately with the help of a
piece of cloth or pair of tongs.
7. In about 5 minutes you will hear a slight hissing sound and the vent weight will give a whistle.
(Note: if there is no hissing sound after 5-7 minutes and steam is escaping around the rim, it
means the lid has not been fitted properly. Do not touch lid at this stage or you will burn your
fingers. Take cooker off stove and let it cool for sometime and refer to the problem-shooting
chart).
8. Soon after vent weight will lift and steam will be forced out with loud hissing sound from
the vent tube. This means that your cooker has COME TO FULL COOKING RESSURE.
9. Immediately afterwards take cooker off the stove and allow to cool on its own fully, without
removing lid or vent weight. For this first time only, let cooker remain sealed while cooling for
about 3 hours
Instructions & Recipes
2002
Page 7
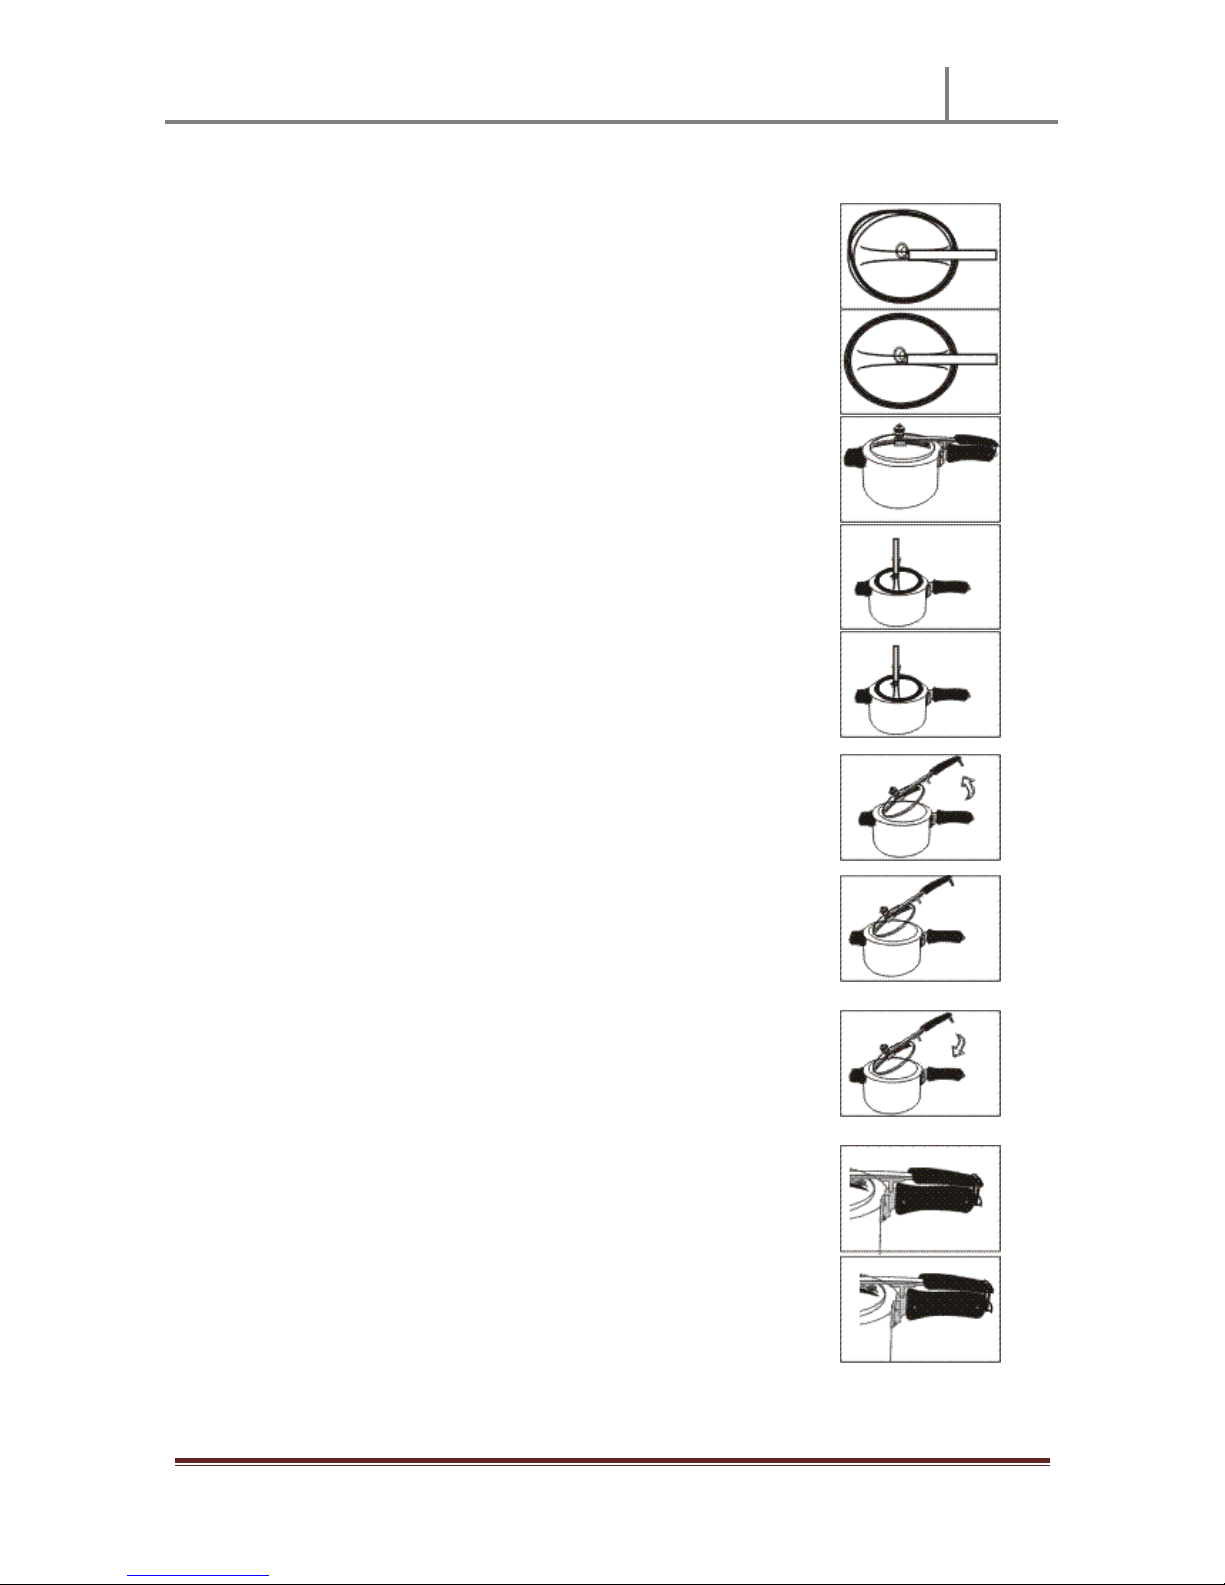
HOW TO FIT LID INTO COOKER BODY
If gasket is not properly fitted into the lid curl. Make sure it is
properly fitted as shown in picture alongside.
Place lid on cooker body so lid handle and body handle are
together. (Note: do not force lid into cooker body.)
Turn lid handle so it is at a right angle to body handle.
See that arrow on rim of cooker body matches arrow on lid s
rim.
Slide the lid slightly away from the body handle and tilt that
portion of the lid that has the arrow on it into the mouth of the
pressure cooker.
Insert lid under rim of cooker body.
Place the lid handle bar on top of the bracket groove. Adjust lid
handle bar on the bracket lever until the gasket on the lid rests
comfortably in direct contact with the underneath of the rim of
the body of the pressure cooker.
Gently squeeze lid and body handles together. And fasten
locking loop to catch on end of the main handle bracket.
If necessary, to ensure lid is properly seated press lid and adjust
Instructions & Recipes
2002
Page 8
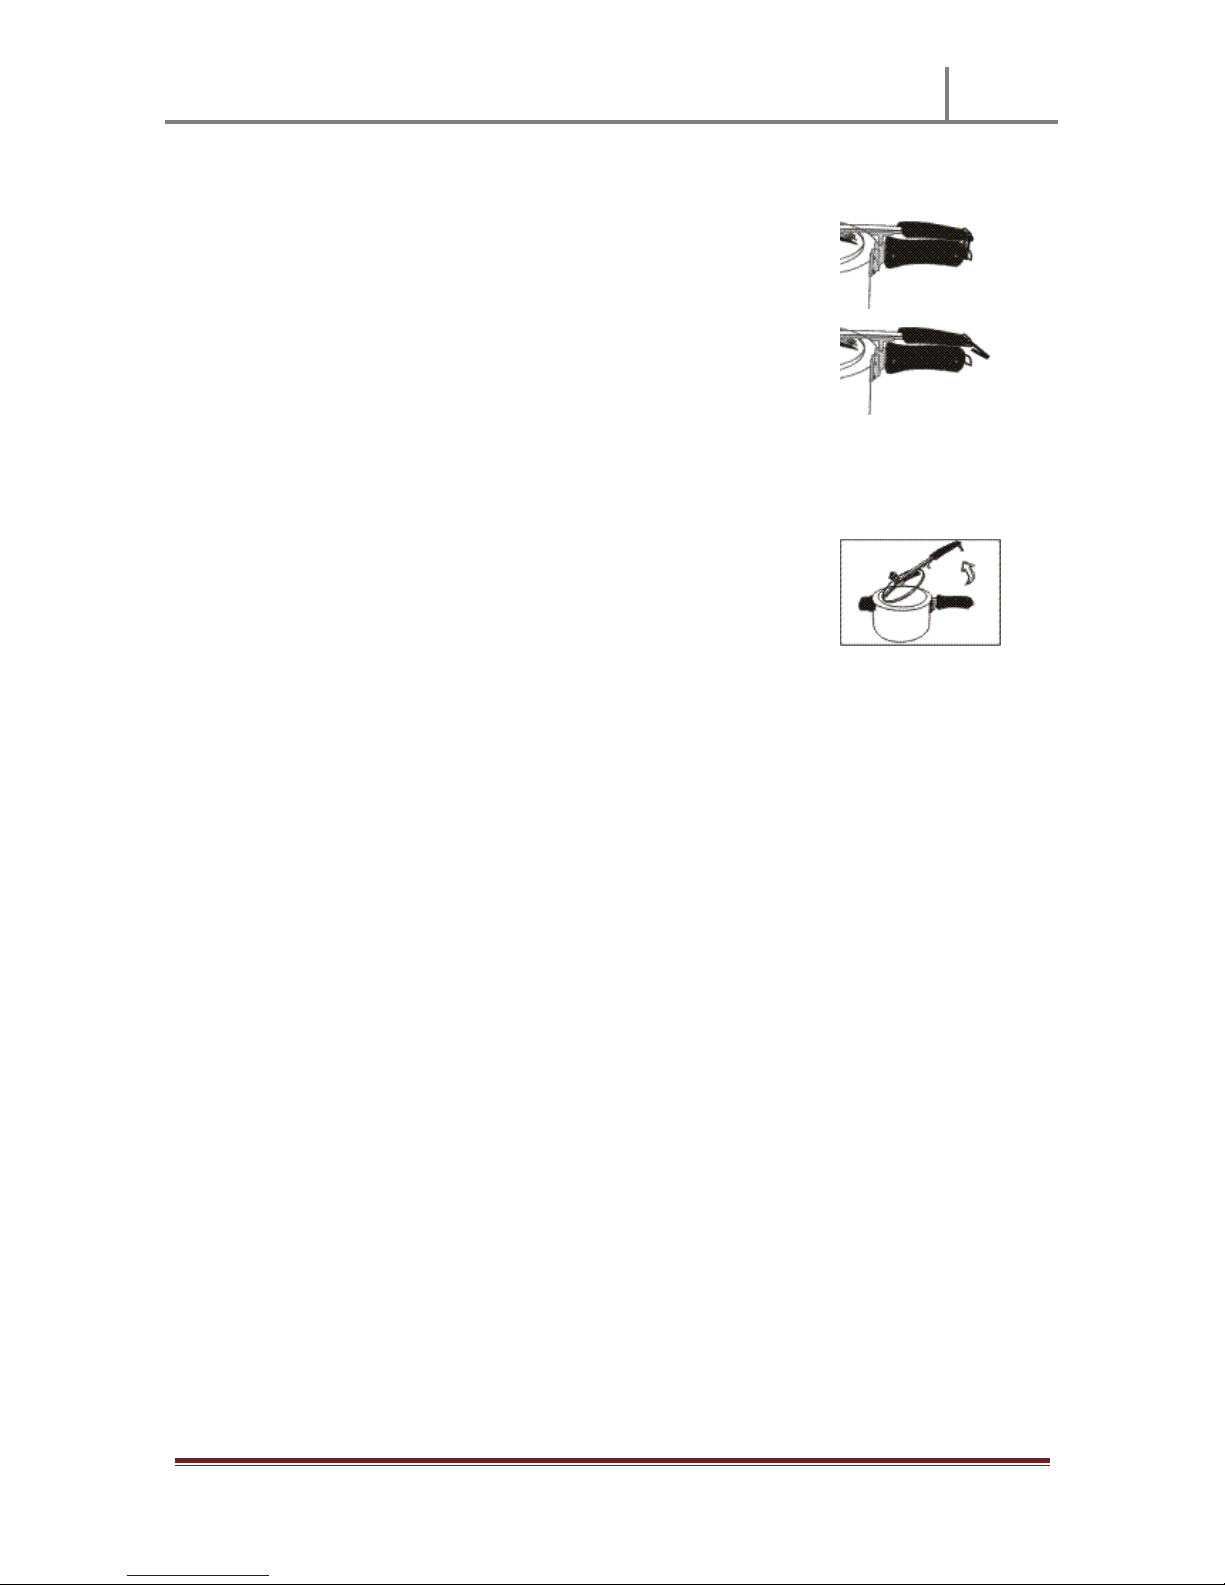
HOW TO REMOVE LID FROM COOKER BODY
Gently squeeze lid and body handles together.
Unfasten locking loop from end of main handle bracket.
Tilt the lid down slightly into the mouth of the cooker and move
the lid handle bar toward the right hand side.
As the lid handle bar approaches right angle position, gently tilt
up the position of the lid away from the body handle and
remove the lid out of the mouth of the pressure cooker.
Adding Food and Liquid
1. To cook with the pressure cooker, it is very important to use at least a 1/2 cup of liquid;
NEVER USE LESS. Do not fill the pressure cooker more than 2/3 full with liquid and food.
2. When called for in the instructions or in your recipe book, place food on the stainless steel
cooking rack, positioned on the metal support trivet in the pressure cooker.
3. Fill only halfway when cooking foods that will either expand in size and/or produce foam as
they cook, such as dried beans, or other legumes and grains. Fill only halfway when preparing
soups or stock.
4. When cooking sauces, make sure they are not too thick. Shake the cooker before opening it,
then release pressure completely and open cooker.
Cooking time control
1. Position the pressure cooker on the centre of the stove burner. The VIRAT pressure
cooker can be used on all types of burners including gas, electric, ceramic, and
induction. As to not discolour the sides of the pot, always adjust the burner so that
when using gas, the flames remain under the base and do not extend up the sides.
When cooking on an electric burner, select a burner the same diameter as the base or
smaller.
2. Begin heating with burner set on high heat. Electric stove users please see note below.

Instructions & Recipes
2002
Page 9
When the steam comes out of the PRESSURE REGULATING DEVICE for first time, lower
the heat to maintain a gentle, steady heat. At this moment, the COOKING TIME STARTS
3. If at any time during cooking an excessive amount of steam is released by the Pressure
Regulating Device, lower the burner heat to adjust and maintain the proper level of
pressure.
4. If the pressure drops and little or no steam comes out of the pressure regulating
device, raise the burner heat just until a gentle, steady stream of steam is released and
can be maintained.
5. While cooking, never inadvertently shake the pressure cooker. This can cause the
pressure regulating device to release steam, which will create a drop in pressure.
NOTE TO ELECTRIC STOVE USERS
Since the coils on an electric stove retain heat for a long time, food often becomes overcooked
when the burner is turned down for simmering (when cooking time is started). To compensate
for that, you have two options:
1. Turn on two electric stove burners, one on high and other on low. Place your pressure
cooker on the burner to high, and bring to pressure. Once pressure has been attained, move
your cooker over to the burner turned on low and start your pressure cooking time. Or...
2. Turn on one burner to medium heat and bring your cooker to pressure. Once pressure has
been attained, turn your burner to low and start your pressure cooking time.
Releasing Pressure after Cooking
1. Always check your recipe to determine if the pressure cooker should be cooled down
naturally or whether the quick release method should be used.
2. Natural Release Method: To use this method, remove the pressure cooker from the
hot burner and let the pressure drop and cool down naturally. Depending on the
amount of food and liquid in the cooker, this method can take from 10 - 15 minutes.
Once pressure has totally been released and no more steam comes out of the pressure
regulating device, go to #5 in this section.
3. Quick Release Method: Also called the cold-water release method, is used to release
pressure as quickly as possible, and primarily used for vegetables, seafood and other
tender foods that can quickly overcook. To use this method, remove the pressure
cooker from the burner, place in the sink and run cold tap water gently over the lid
until steam dissipates and the pressure indicator is lowered. When putting the cooker
in the sink, tilt it so the cold water will run downwards. Once pressure has totally been
released and no more steam comes out of the pressure regulating device, go to #5 in
this section. NEVER FULLY IMMERSE THE PRESSURE COOKER IN WATER.

Instructions & Recipes
2002
Page 10
4. Emergency Release Method: Take a tea spoon. Skit it under the pressure regulating
valve and let the pressure release from the cooker. Once steam has totally been
released and no more steam comes out of the pressure regulating device, go to 5
(below).
5. After all the pressure has been released unhook the lid from the cooker body. Grasp
the bottom of the base handle with your left hand and with your right hand on the lid
handle slowly rotate the lid counter clockwise. Even though you have already released
the pressure, never open the pressure cooker toward your face since there may be
intense cooking steam still inside the unit.
Care and Cleaning
1. The VIRAT Pressure Cooker is made of high-quality, aluminium.
2. The pressure cooker pot and lid should be washed with warm water, mild, dish-
washing soap and a non-abrasive cleaning pad, since aluminium can discolor in a
dishwasher. Since the exterior of the pressure cooker has a mirror finish, do not clean
with metal scouring pads or abrasive cleaners, which will scratch the finish. Wash the
lid with water and towel dry.
3. To remove stubborn stains and any discoloration in the interior of the pressure cooker,
try adding the juice of half a lemon and 1 to 2 cups of water to the pressure cooker
pot. Cook at high pressure for 15 minutes, and then remove from heat. Let pressure
release naturally, and then wash as usual.
4. After cleaning, towel dry with a clean, soft kitchen cloth to retain the polished mirror
finish.
5. In order to extend the life of the rubber gasket, remove after each use and wash with
warm water and mild, dish washing soap. Rinse and dry well, then cover with a thin
coat of vegetable oil before replacing.
6. To store, DO NOT LOCK THE LID IN PLACE. Simply place the lid upside down on top of
the pressure cooker pot.
 Loading...