

Page 1

Mojo/
Horn
Section
USER MANUAL
Page 2

Produced by Vir2 Instruments
Vir2 Instruments / is an international
team of sound designers, musicians,
and programmers, who specialize in
creating the world’s most advanced
virtual instrument libraries. Vir2 is
producing the instruments that shape
the sound of modern music.
29033 Avenue Sherman, Suite 201
Valencia, CA 91355
Phone: 661.295.0761
Web: www.vir2.com
Page 3

Mojo/
Horn
Section
USER MANUAL
Page 4

00
MOJO / HORN SECTION
MOJO/
REQUIREMENTS
AND
INSTALLATION
SYSTEM REQUIREMENTS
For Mac users, MOJO requires OS 10.4.x or greater, a G4 1.4GHz
or Intel Core Duo 1.66GHz or faster, a DVD drive, and 2GB of RAM.
For Windows users, MOJO requires Windows XP or Windows
Vista or greater, a Pentium or Athlon 1.4GHz or faster, a DVD
drive, and 2GB of RAM.
The library requires 15GB of disk space.
Vir2 Instruments strongly recommends 4GB RAM or more and an
88-key controller in order to use MOJO to its fullest potential.
Page 5

INSTALLING
UPDATING & AUTHORIZING
01
The installation of MOJO is two separate steps: the installation of
the Kontakt engine, and the installation of the MOJO library.
Insert the installation disc into your computer, and you will see
the installers for both components. It doesn’t matter which is installed first. Run each of the installers and they will guide you
through the installation process.
The Kontakt installer will install the Kontakt engine, its standalone
application, all of its plug-in versions, and the Service Center authorizer program. We recommend the Easy Install and that the
install locations for each component are left at their default
settings.
The MOJO library is approximate 14GB in size, and its installer will
prompt you for the location you wish to install it. It can be installed
on any available hard drive. For speed reasons, we recommend it
be installed on internal or eSATA drives. Firewire can also be acceptable. External USB drives may give somewhat less optimized
performance. We also recommend 7200 or 10,000rpm drives regardless of the interface used.
After installation, please make sure that you are fully updated to
the most recent versions of the three components that make up
the MOJO package: the library (which contains all the patch information and programming), the engine (which is powered by
Kontakt), and the authorizer (Service Center). It is possible that
any of these components may have a more recent version than
shipped in your physical package, so you should check for updates
to each of these three. You can do this by visiting the vir2.com
web site and checking the Support area.
After you’ve completed installation, MOJO will be working in demo
mode, meaning it will only work for 30 minutes at a time. To fully
authorize it, launch Service Center (found in the Applications folder
on a Mac, or the Program Files folder on Windows) and follow its
instructions. You will be prompted to enter your e-mail address
and password that make up your Native Instruments account, or
will be given an option to create an account if you don’t already
have one. Once inside the Service Center, it will give you a list of
all the Native Instruments and NI-powered products on your hard
drive and give you the option to activate them. You are allowed to
install and use MOJO on up to two computers simultaneously.
Service Center will guide you through the process for either online
(instant) activation, or oine activation.
Page 6

CHAPTER 01
02
TABLE OF CONTENTS
MOJO / HORN SECTION
MOJO/
TABLE
OF
CONTENTS
INTRODUCTION TO THE LIBRARY /
04
CHAPTER 02
USING KONTAKT /
06
HOW TO ACCESS THE MOJO LIBRARY FROM KONTAKT
06
IN STANDALONE MODE
07
VST PLUG-IN IN CUBASE AND NUENDO
08
VST OR AUDIOUNIT PLUG-IN IN ABLETON LIVE
09
AUDIOUNIT PLUG-IN IN LOGIC PRO, LOGIC STUDIO, LOGIC
09
EXPRESS, ETC.
IN GARAGEBAND
10
AUDIOUNIT PLUG-IN IN DIGITAL PERFORMER
11
RTAS PLUG-IN IN PRO TOOLS
12
PLUG-IN IN ANOTHER HOST
12
Page 7

CHAPTER 03
CHAPTER 05 CHAPTER 06
USING MOJO /
14
GETTING STARTED
14
WITH MOJO /
USING MOJO:
14
THE CORE INSTRUMENTS /
PLAYERS.
15
MODE.
16
DISPLAY AREAS.
16
SETUP MENU /
16
VIBRATO
17
SECTION
17
INSTRUMENT
18
LEGATO
18
PITCHBEND
20
RELEASES
20
SPEED
20
EFFECTS TAB /
21
EZRoom
21
ALTERNATE PATCHES /
22
CORE INSTRUMENTS LITE
22
ENSEMBLES
22
RIFFS
22
SPECIAL EFFECTS
23
SUSTAINS ONLY
23
CHAPTER 04
TIPS ON EFFECTIVE
24
SEQUENCING /
KEYMAPPING,
26
ARTICULATIONS, AND
KEYSWITCHES /
MIDI CC CHART /
30
TECH SUPPORT /
32
THE FULL VERSION OF
32
KONTAKT 3 /
LICENSE AGREEMENT /
32
CREDITS /
34
03
Page 8

CHAPTER 01
04
CHAPTER 01 / INTRODUCTION TO THE LIBRARY
MOJO / HORN SECTION
MOJO/
INTRODUCTION
TO
THE
LIBRARY
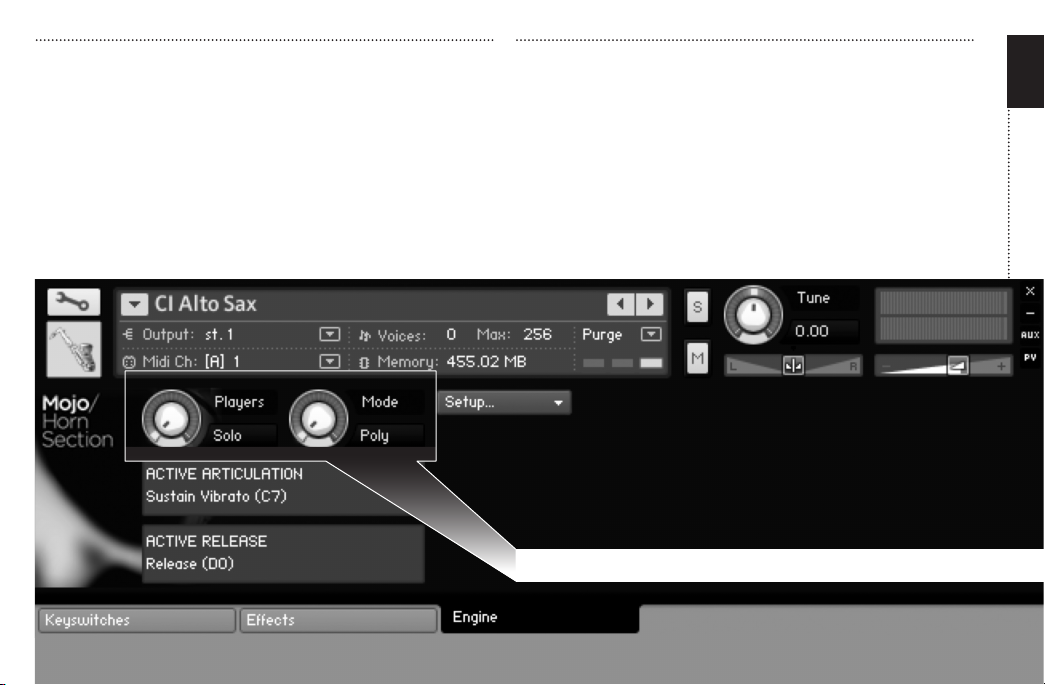
RIght: Screenshot of Mojo’s Interface
Now at the tips of your fingers is the most
versatile horn section in the world, MOJO:
Horn Section, oering the most flexible
and innovative approach to pop, funk,
jazz, and big band horns ever created in a
virtual instrument. Inspired by legendary
groups like Tower of Power and the big
bands of decades past, MOJO is capable
of emulating everything from a sultry sax
solo to a screaming full big band playing
at the top of their lungs.
Pushing the boundaries of sampling and scripting technology far
beyond traditional sample libraries, MOJO oers a simple but feature-packed interface. No need to decide in advance which
articulation you want to play. Simply load the instrument, turn the
Ensemble knob to specify how many players you want playing
that instrument (from a soloist to a dectet) and begin controlling
the instrument from the keyboard.
Page 9
More than a dozen articulations are instantly loaded and intelligently handled via performance features and keyswitches. Behind
the scenes, a humanizing function, smart release layers, and custom legato and vibrato tools assist the player in reproducing the
ultimate dimensions in realism. Crescendos and swells sync instantly to host tempos and can be triggered in real time. Included
in the instrument collection are: soprano, alto, tenor, and baritone
saxophones, trumpet (open, muted, and piccolo), flugelhorn,
trombone (open and muted), bass trombone, and clarinet.
The articulation list varies for each instrument, but generally includes sustains, stabs, staccatos, trills, slurs, shakes, octave runs,
rise to hits, falls (including four dierent lengths), doits, bends,
stylistic ris, special eects, and tempo-synced swells and crescendos. All samples are recorded in 24-bit stereo using the finest
preamps in the world, including a vintage Neve 1073 and a
LaChapell Audio 992EG, and mics by AKG, Neumann, and Coles.
The Ensemble Knobs
05
Page 10

CHAPTER 02
06
CHAPTER 02 / USING KONTAKT
MOJO / HORN SECTION
MOJO/
USING
KONTAKT
HOW TO ACCESS THE MOJO LIBRARY FROM KONTAKT
MOJO ships as a Kontakt-powered library, and MOJO is opened
from within Kontakt, which can be run either as a standalone application, or as a plug-in hosted by any major sequencer on either
Macintosh or Windows platforms. All these versions are installed
by the Easy Install option of the installer.
Users who don’t own a sequencer, or would like to simply boot up
and be able to play MOJO, can go to their Applications folder
(Mac) or Program Files folder (Windows) to launch Native
Instruments > Kontakt.
Users who wish to use MOJO for sequencing or recording, or wish
to play it multitimbrally, should use it in plug-in mode within a
host sequencer. Kontakt supports the VST, AudioUnit, and RTAS
plug-in formats. Any host sequencer that supports these plug-in
formats properly will be able to use Kontakt. Instructions vary
slightly from sequencer to sequencer, but the general procedure
is to instantiate Kontakt as a virtual instrument plug-in, then load
a MOJO instrument in Kontakt, then route a MIDI track to Kontakt
so it can be triggered and recorded.
The following instructions will help standalone and plug-in users
get up and running quickly with a basic track of MOJO.
Page 11
USING KONTAKT IN STANDALONE MODE
The standalone Kontakt application can be found in the
Applications > Kontakt 3 folder for Mac users, or Program Files >
Native Instruments > Kontakt 3 for Windows users.
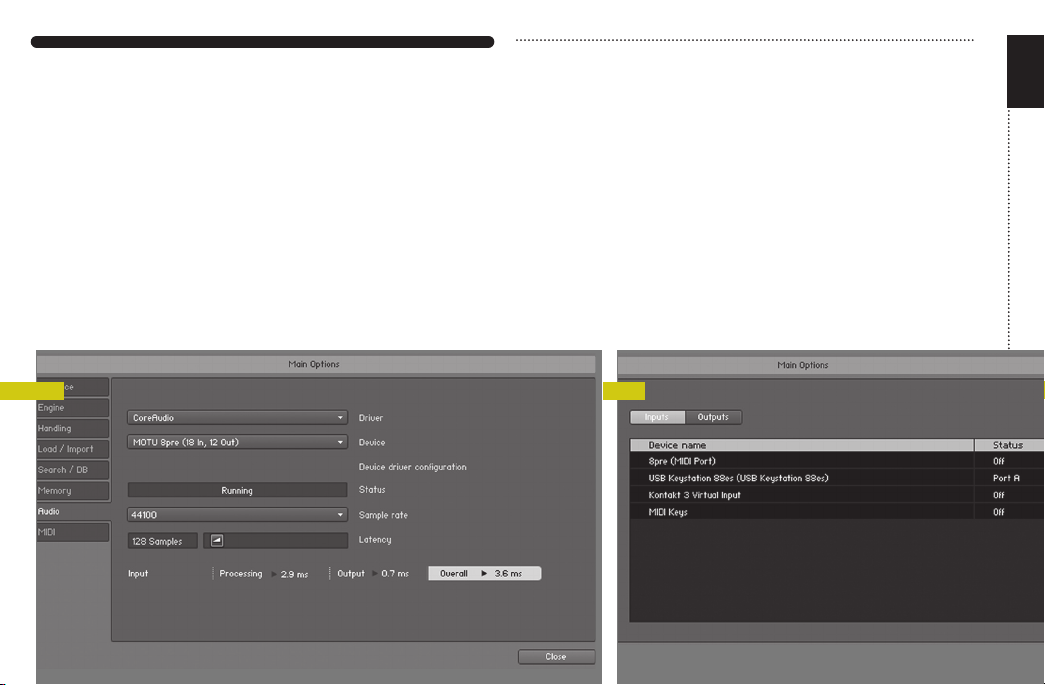
After launching the Kontakt application for the first time, you will
be presented with a dialog box to set up your audio and MIDI settings. Settings will vary for each user according to the specific
setup, but the important thing is to route the audio to a valid audio device, and to set the buer reasonably low for good latency
performance. We recommend 256 samples or less. The lower the
01 02
latency slider, the less latency (the split second between the physical playing of the note and the sound coming out of Kontakt) will
be, but the harder the computer will have to work. Typical useful
values range between 128 and 256, however very fast computers
may be able to handle lower values, while very slow computers
may need higher values. >
The MIDI page of the Options dialog box must be configured in
order to let Kontakt know which MIDI device(s) to respond to.
Kontakt will respond to up to four MIDI input ports (A, B, C, and
D), so we recommend you switch one MIDI source on to Port A,
as shown in the graphic below. >
[
IMAGE 01
07
]
[02]
Page 12
08
CHAPTER 02 / USING KONTAKT
MOJO / HORN SECTION
01
More detailed information on the setup options can be found in
the accompanying Kontakt manual. Once you have completed
Kontakt setup, jump ahead to the Getting Started with MOJO
section below.
USING KONTAKT AS A VST PLUG-IN IN CUBASE AND NUENDO
Users of Steinberg’s Cubase or Nuendo sequencers can use
Kontakt as a VST plug-in. These instructions have been prepared
in Cubase 5, although Kontakt may also work in earlier versions if
the computer meets the system requirements. Once the project is
02
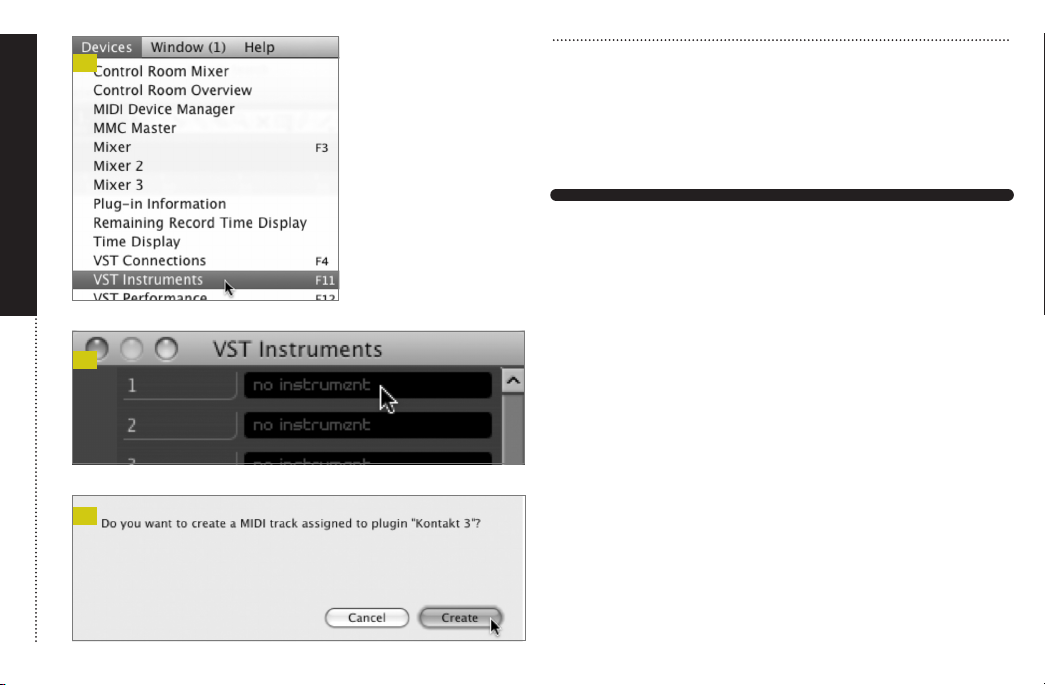
open, go to the Devices menu and choose VST Instruments >
[01]
When the VST Instruments window appears, click in the first
available slot in which “no instrument” is listed. >
[02]
A popup menu will appear; choose Kontakt 3. Then, an alert box
will appear asking if you want to create a MIDI track assigned to
03
the Kontakt 3 plug-in. Click Create. >
[03]
The Kontakt window will appear, and a MIDI track will be created,
transmitting to Kontakt’s MIDI channel A-1. When it is record-enabled, it will send any incoming MIDI played on your controller
into Kontakt. At this point, you can skip down in the instructions
to the Getting Started With MOJO section below.
Page 13
USING KONTAKT AS AN AUDIOUNIT PLUG-IN IN LOGIC PRO,
LOGIC STUDIO, LOGIC EXPRESS, ETC.
Users of Apple’s Logic can use Kontakt as an AudioUnit plug-in.
These instructions have been prepared in Logic Pro 8, although
Kontakt may also work in earlier versions if the computer meets
the system requirements.
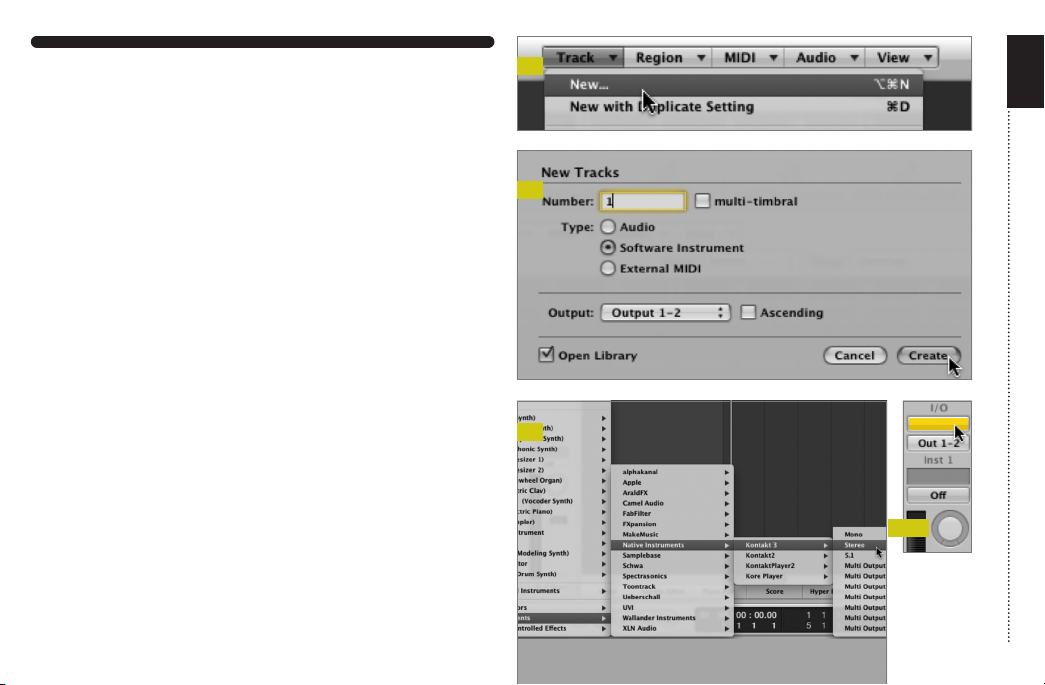
Once inside your Logic project, go to the Track mini-menu (in the
central area of your screen) and choose Track > New... >
[04]
The New Tracks dialog box will appear. Make sure Soft-ware
Instrument is selected, then click Create. >
[05]
The new instrument track will be created. On the left side of the
screen you will see the channel strip for that channel, including a
fader, pan knob, and various insert slots. Locate the blank slot
just below the letters “I/O” and above the output pair: >
[06]
Click there, and a list of plug-ins will appear. Choose AU
Instruments > Native Instruments > Kontakt 3 > Stereo. >
[07]
The Kontakt window will appear, and a MIDI track will be created,
transmitting to Kontakt’s MIDI channel A-1. When it is record-enabled, it will send any incoming MIDI played on your controller
into Kontakt. At this point, you can skip down in the instructions
to the Getting Started With MOJO section below.
04
05
07
09
06
CHAPTER 02 / USING WITH KONTAKT
Page 14
10
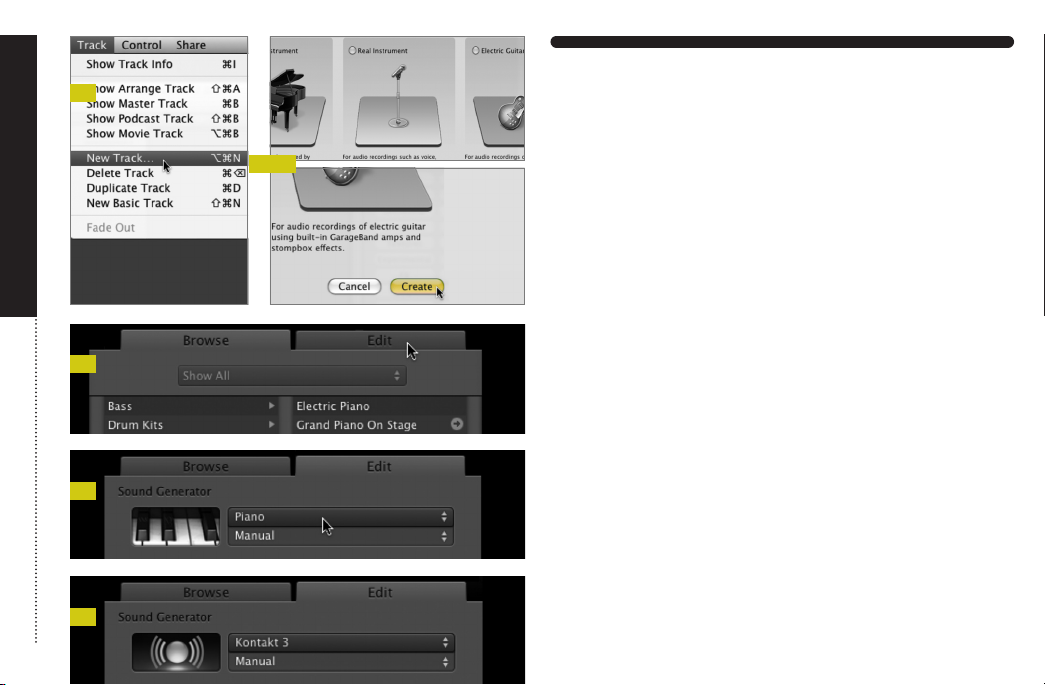
USING KONTAKT IN GARAGEBAND
01
Users of Apple’s GarageBand can use Kontakt as an AudioUnit
plug-in. These instructions have been prepared in GarageBand 5
02
(which shipped with iLife ‘09), although Kontakt may also work in
earlier versions if the computer meets the system requirements.
Once inside your GarageBand project, go to the Track menu and
choose New Track. >
[01]
CHAPTER 02 / USING KONTAKT
03
04
05
MOJO / HORN SECTION
A window with three choices will appear. Choose Software
Instrument, then click Choose. >
[02]
On the right side of the interface, the Browse tab will be showing.
Switch to the Edit tab. >
[03]
The Sound Generator will default to Piano. Click Piano, and a popup menu will appear. Choose Audio Unit Modules > Kontakt 3. >
[04]
Note: GarageBand may default to inserting eects, such as a compressor and a visual EQ on this track. This will color the sound. If
you don’t want these eects used, you can remove them.
Once Kontakt 3 is selected, the icon will change to the AudioUnit
icon (the ball with the sound waves radiating outward). Doubleclick on the icon to bring up the Kontakt window. >
[05]
Page 15
The Kontakt window will appear, and a MIDI track will be created,
transmitting to Kontakt’s MIDI channel A-1. When it is record-enabled, it will send any incoming MIDI played on your controller
into Kontakt. At this point, you can skip down in the instructions
to the Getting Started With MOJO section below.
06
11
08
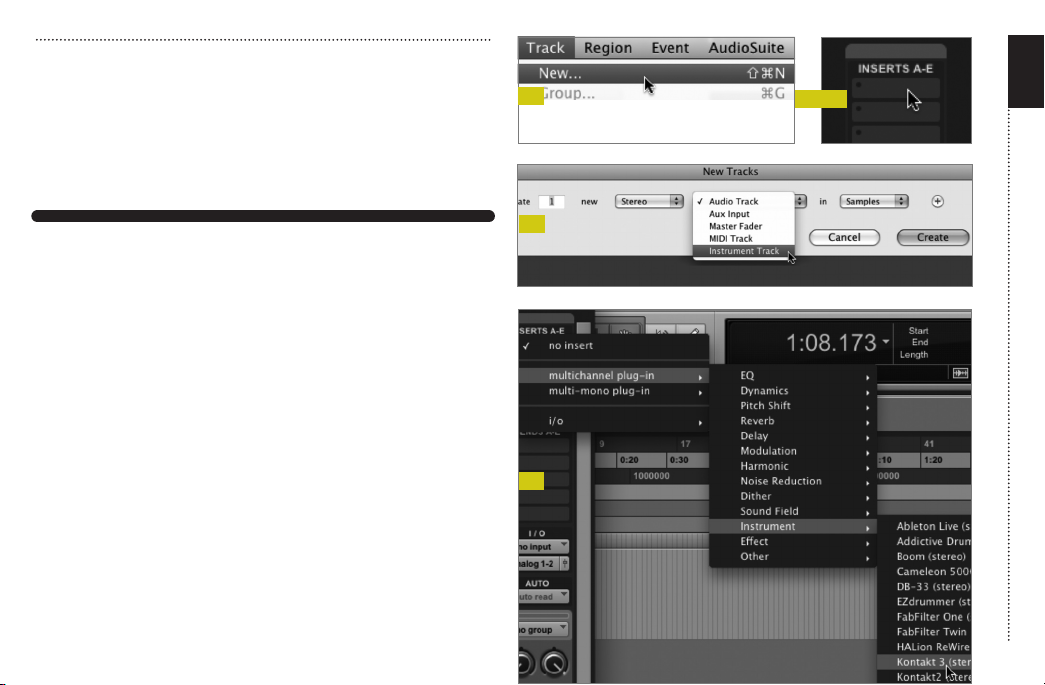
USING KONTAKT AS AN RTAS PLUG-IN IN PRO TOOLS
Users of Digidesign’s Pro Tools (M-Powered, LE, or TDM) can use
Kontakt as an RTAS plug-in. These instructions have been prepared in Pro Tools 8, although Kontakt may also work in earlier
versions if the computer meets the system requirements. Once
the project is open, go to the Track menu and choose New... >
[06]
In the dialog box that appears, choose the appropriate options,
such as the following: create 1 new stereo Instrument Track in
samples. Then click Create. >
[07]
Go to the Mix window and look at the channel strip for the instrument. At the very top is an area for Inserts A-E. Shown in >
[08]
Click on the first of the five slots, and navigate through the popup
menu to choose multichannel plug-in > Instrument > Kontakt 3.
Shown in image >
[09]
07
09
Page 16

12
The Kontakt window will appear. At this point, you can skip down
in the instructions to the Getting Started With MOJO section.
USING KONTAKT AS AN AUDIOUNIT PLUG-IN IN DIGITAL
PERFORMER
Users of MOTU’s Digital Performer can use Kontakt as an AudioUnit
plug-in. These instructions have been prepared in Digital Performer
6, although Kontakt may also work in earlier versions if the com-
CHAPTER 02 / USING KONTAKT
puter meets the needed system requirements.
USING KONTAKT AS A VST OR AUDIOUNIT PLUG-IN IN
ABLETON LIVE
Users of Ableton Live can use Kontakt as a VST or Audio-Unit
plug-in, depending on the version. The functionality is the same.
These instructions have been prepared in Live 7, although Kontakt
may also work in earlier or later versions if the computer meets
the system requirements.
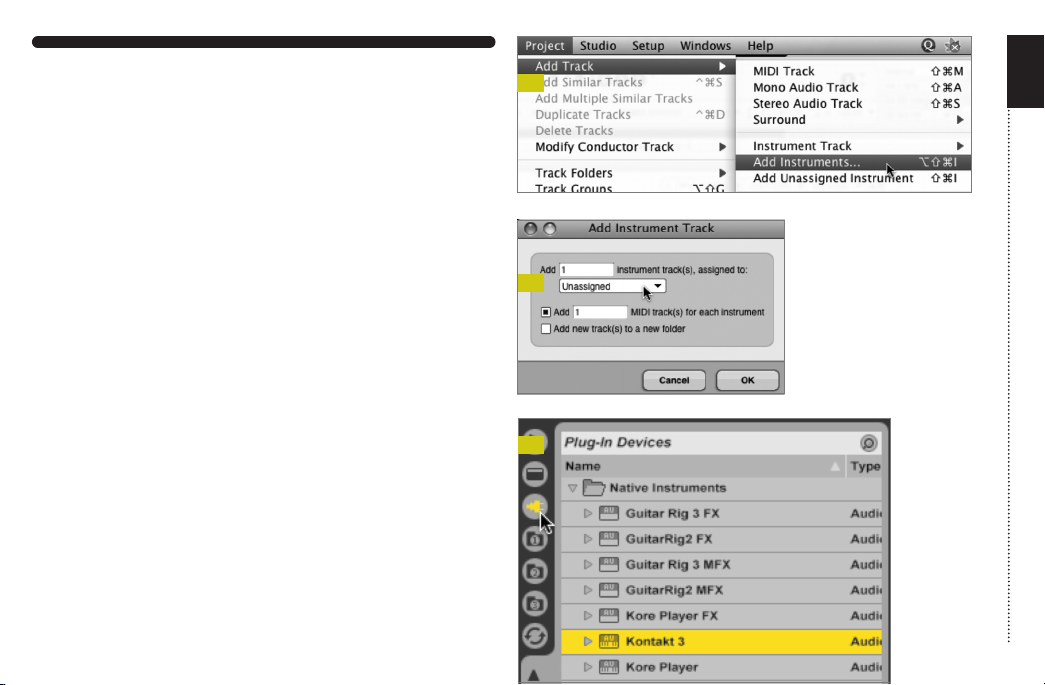
Once the project is open, go to the left side and click on the third
icon down to show the Plug-in Devices list, scroll to the Native
Instruments folder and locate Kontakt 3: >
[03]
Once the project is open, go to the Project menu and choose Add
Track > Add Instruments... >
In the resulting dialog box, click on the Unassigned pulldown menu,
and choose Native Instruments > Kontakt 3. You can also change
the number of MIDI tracks to be added, if you know you will want
to use more than one. >
The Kontakt window will appear, and a MIDI track will be created,
transmitting to Kontakt’s MIDI channel A-1. When it is record-enabled, it will send any incoming MIDI played on your controller
into Kontakt. At this point, you can skip down in the instructions
to the Getting Started With MOJO section below.
MOJO / HORN SECTION
[01]
[02]
Drag Kontakt 3 into the central area where the text “Drop Files
and Devices Here” is shown.
The Kontakt interface will appear, and it will already be actively
transmitting to Kontakt’s MIDI channel A-1. When it is record-enabled, it will send any incoming MIDI played on your controller
into Kontakt. At this point, you can skip down in the instructions
to the Getting Started With MOJO section below.
Page 17
USING KONTAKT AS A PLUG-IN IN ANOTHER HOST
There are too many host programs to cover here in detail, but any
modern sequencer that properly supports the VST, AudioUnit, or
RTAS standards should be able to use Kontakt properly, and load
MOJO within it. Consult the manual for your specific host to find
out how to instantiate the Kontakt virtual instrument.
13
01
02
03
CHAPTER 02 / USING WITH KONTAKT
Page 18

CHAPTER 03
14
MOJO/
USING
THE
CORE
INSTRUMENTS
CHAPTER 03 / USING THE CORE INSTRUMENTS
RIght: Screenshot of Mojo’s Interface
MOJO / HORN SECTION
GETTING STARTED WITH MOJO
Once you’ve followed the instructions above to get Kontakt loaded
in whichever mode you prefer, Kontakt’s inner workings are exactly the same. On the left side of the Kontakt interface is a sidebar
called the Browser, and it has six tabs across the top: Files,
Libraries, Database, Monitor, Modules, and Auto. Click the Library
tab to get started with MOJO. >
The MOJO library will appear, with buttons to access Instruments,
Multis, and other materials. Clicking on the Multis or Instruments
button will reveal folders of loadable patches, which will be discussed in more detail below.
USING MOJO: THE CORE INSTRUMENTS
Let’s jump right in. MOJO is simultaneously designed to be very
easy to use, and yet be almost infinitely tweakable. To accomplish
this, much of its power is hidden below its surface. MOJO is built
around the twelve core instruments, mentioned above. When any
of the instruments are loaded, the interface looks like this, giving
you access to the most central features, including displays to show
you the currently active behaviors, and menus that lead to submenus revealing more of MOJO’s power: The two visible knobs
are called Players and Mode, and each will be discussed separately.
[01]
Page 19
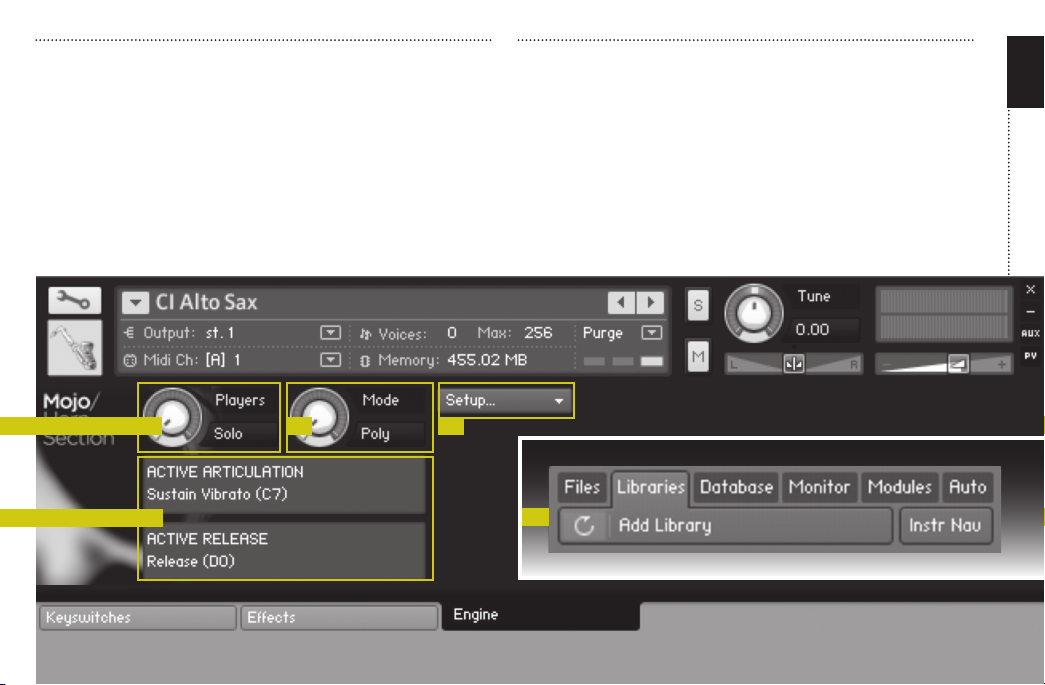
Players. MOJO is designed so that loading any instrument gives
you instant access to both solo and section versions of that instrument. The Players knob can be adjusted from Solo (1 player)
to up to 10 players. As you add players to the ensemble, MOJO
employs a large number of techniques to create the ensemble.
It spaces the players in the ensemble across the stereo field, tells
them how in-tune (or out of tune) to play, and how much variation there should be within the ensemble. (All of these parameters
can be adjusted and will be discussed later, in the Section menu.)
The Players Knob can be controlled via external MIDI CC as well.
This makes it easy, for example, to sequence a MIDI part featuring
stacked trumpet section ensemble lines, then switch to a solo
trumpet for a solo part, then back to the ensemble. Since this is
controlled via MIDI CC, the instructions to alter the number of
people in the section (and indeed, every parameter about the
section’s behavior) can be written into the MIDI track, insuring
perfect recall every time the sequence is played. The external
MIDI CC which controls the players knob is CC#22. >
[02]
15
02
04
03
05
01
Page 20
16
Mode. The Mode knob is a central knob to how each instrument
operates. It has three settings: >
Poly stands for polyphonic playing, meaning that multiple notes
can be played simultaneously. MOJO has a very high polyphony
limit, so if your computer has enough power, it can play a large
number of notes simultaneously. Adding players via the Players
knob also contributes to higher polyphony.
Mono stands for monophonic playing. When in this mode, the
instrument will only play one note at a time. If you play a single
note on your keyboard, then hold it while you strike a second
note, the first original note will stop playing, and only the second
note will be heard.
Legato is similar to Mono in that only one note can be played at a
CHAPTER 03 / USING THE CORE INSTRUMENTS
time, however, when Legato mode is used, MOJO intelligently connects the first note to the second, simulating a true legato style.
Display Areas. Below the Players and Mode knobs lie two dark
areas which are used to display various important pieces of information about what is being played. >
The Active Articulation display shows which articulation is currently in use. Available articulations vary from instrument to
instrument, but generally include: sustains, staccatos, stabs,
swells, crescendos, bends, runs, trills, and so on. Each articulation
MOJO / HORN SECTION
[
03 PREVIOUS PAGE
[
04 PREVIOUS PAGE
is triggered via a silent trigger key called a keyswitch. Keyswitches
]
will be discussed later in this manual. This display is placed here
as an aid to show you which articulation is currently active.
The Active Release display shows which release articulation is currently in use. A release articulation is a sample that is triggered
when a key is released (instead of the Active Articulation which is
the articulation that is triggered when a key is pressed). MOJO
features regular release layers (the sound of the player naturally
stopping the note with their lips) as well as custom release layers
such as falls of varying lengths, or slurs, and so on. Like Active
Articulations, the various available release layers can be triggered
via silent trigger keys called keyswitches. The display always
shows you the currently active release layer.
SETUP MENU
The Setup menu contains several subpages of detailed control
panels which can be used to modify the sound and behaviors
]
of MOJO. >
01
[
05 PREVIOUS PAGE
]
Page 21
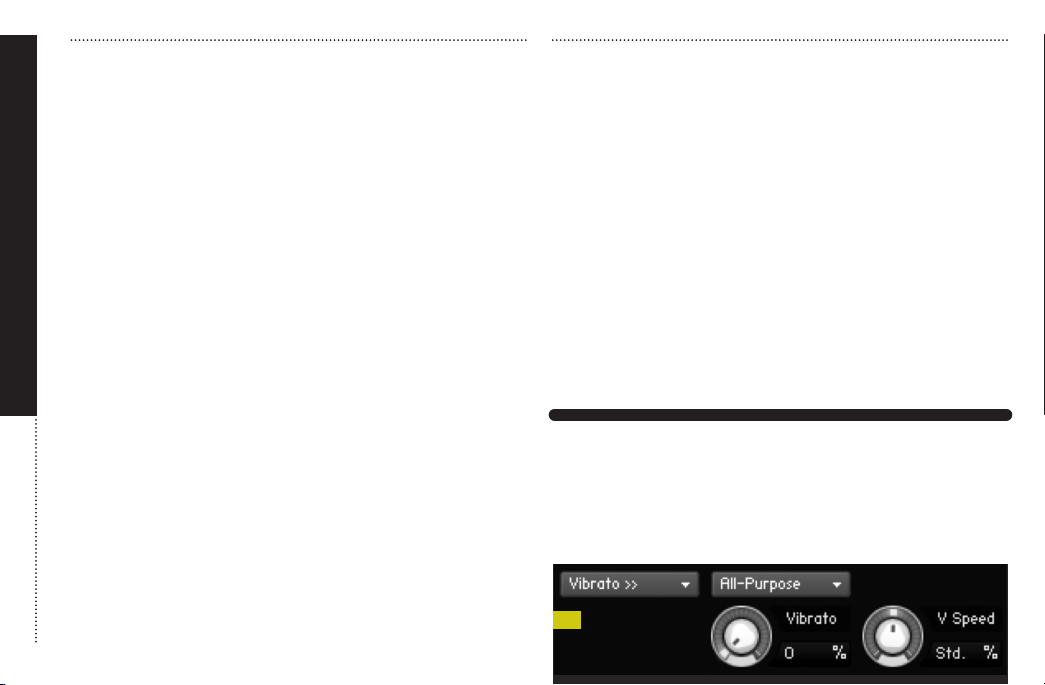
Vibrato. This page allows you to customize the behavior of the
physically modeled vibrato, which is applied by moving the mod
wheel (MIDI CC#1). When the mod wheel is at its minimum position, no vibrato is added. As you move the mod wheel up, a
modeled vibrato is applied to the dry sound. >
The Menu (shown as “All-Purpose”) allows you to choose the character of vibrato to use. Note that each vibrato type only takes
eect after raising the mod wheel (or CC#1); simply choosing the
preset will not immediately cause any change to the sound. >
The Vibrato Knob shows how much vibrato is being applied at the
moment. It moves in real time to reflect the mod wheel or CC#1.
The V Speed Knob allows you to specify the speed of the vibrato.
It defaults to a standardized speed that is universally useful, but
slower speeds may oer better results for ballads, while faster
speeds may oer better results for uptempo songs or quick playing.
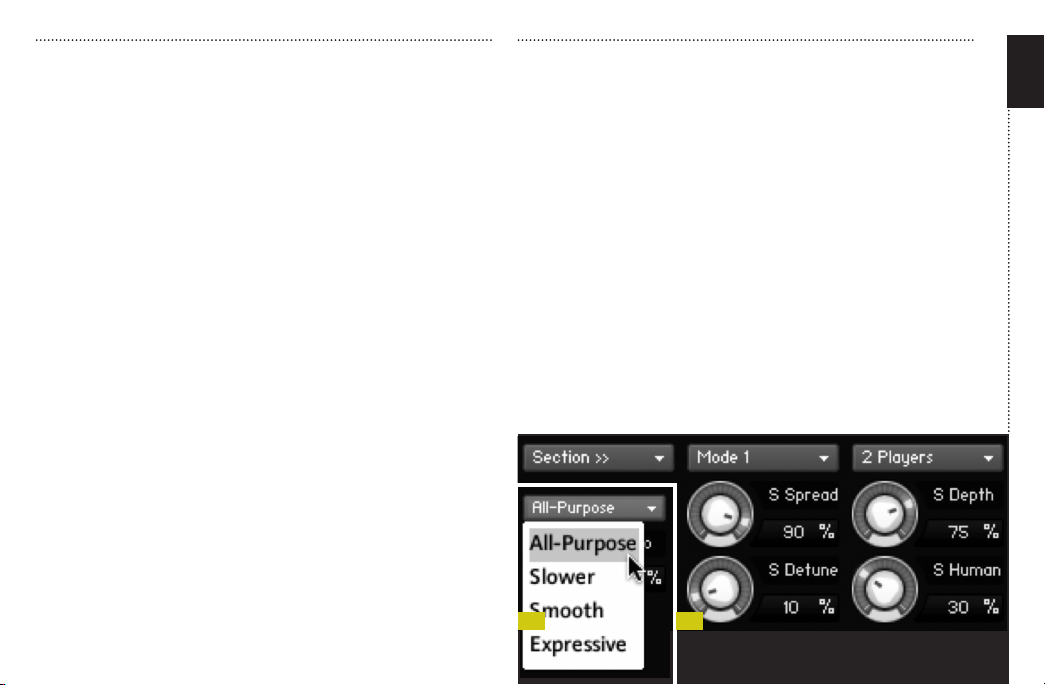
Section. The Section page allows you to customize the characteristics of the section. The settings on this page only aect the
instruments when the Players knob is set to more than 1 player.
Once there are two or more players in the ensemble, the Section
parameters take eect and alter the way the section behaves.
Section page shown in image >
[03]
[01]
[02]
The Mode Menu lets you select between Mode 1 and Mode 2.
Mode 1 uses less granular stretching and is better for more players, while Mode 2 uses more stretching but results in a fuller
sound, and is better for less players.
The Players Pulldown Menu reflects the number of players selected by the Players knob. It also dictates the default number of
players if the section is turned on via the keyswitch.
The S Spread Knob allows you to adjust the position of the players in the stereo field. A higher percentage means that players will
be spread apart widely.
The S Depth Knob allows you to increase a random amount of
timing dierence between the players. Higher values will make
the players play slightly less together.
02
03
17
Page 22

18
The S Detune Knob allows you to increase a random amount that
players will be detuned from each other. Higher values will make
the players play less in tune with each other.
The S Human(ize) Knob allows you to increase a random amount
of velocity randomization.
The Humanize Button governs an advanced series of behaviors
that prevent the engine from using the same sample twice in a row,
thus eliminating the infamous “machine gun” eect so common
to older methods. The engine often uses adjacent samples as well
as alternate takes and velocity layers to render as realistic a performance as possible. It can be defeated by disabling this button.
Each of the knobs in the Section page have been preset to allpurpose values that work well for most situations.
Instrument. The Instrument page gives you several controls over
the overall sound and behavior of the instrument. >
The menu that defaults to Alternate A/B specifies how the engine
uses or orders the alternate samples. Almost every sample in
MOJO has been recorded with multiple takes (A and B) which are
CHAPTER 03 / USING THE CORE INSTRUMENTS
an integral part of its realism. Using this menu, samples can alternate between A and B takes, or reverse (B and A), or only A, or
only B. In general, the greatest realism is achieved with A/B or B/A.
The Character Menu gives seven choices between a standard
character, and dierent shades of aggressive or mellow playing.
The Punch Knob adds additional attack to the beginning of each
sample. More rhythmic playing may benefit from added punch,
and attacks will sound crisper if this knob is turned up.
MOJO / HORN SECTION
[01]
The H Range Knob dictates how widely the Humanize engine
may pull an adjacent sample from, and can be set from 1-4.
Setting this knob higher will result in more randomness but a
greater risk for an odd-sounding sample that might be pitchstretched from too far an interval.
The H Seed Knob gives the Humanize engine a virtually random
start value, from 1000 to 5000.
Legato. MOJO includes an extremely advanced legato engine designed to facilitate realistic smooth legato playing. By default,
MOJO is configured with parameters that result in an all-purpose
optimum legato right out of the box, and is used anytime the
Mode knob is set to Legato. These settings are normally enough
for most legato applications. >
For users who wish to manipulate the legato behavior in greater
depth, we will explain the design here.
MOJO’s legato is actually three dierent legato modes which are
[02]
Page 23
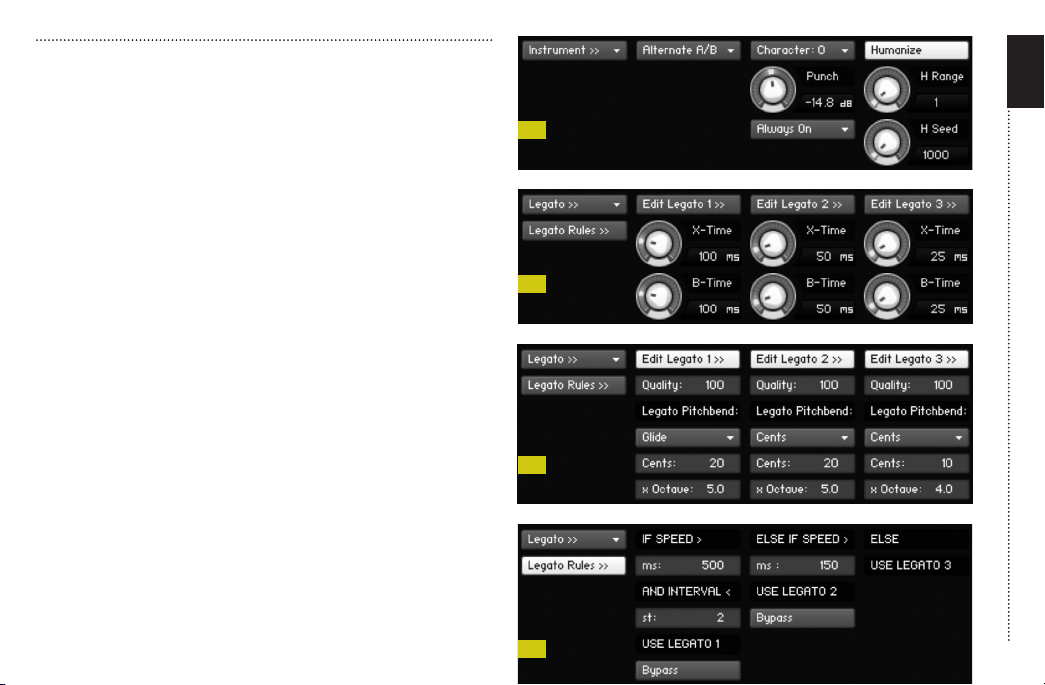
switched between according to certain criteria. In the screenshot
above, each of the three legato mode’s characteristics can be altered. X-Time controls crossfade time (the time in which two
legato notes are crossfaded), and B-Time controls bend time (the
time in which a pitch warp or glide from one legato note to the
next takes place).
With the three Edit Legato Buttons, you can access more detailed
behaviors for the three legato modes: adjusting the quality (lower
quality results in lower CPU usage), and the parameters related to
the pitch-bending of legato notes. If you select “cent” you can enter how many cents the last note is bent towards the new note,
and the new note will start with a small pitch oset closer to the
old note, then it subtly bends towards its true pitch. >
[03]
The Octave Factor multiplies this cent value according to the
played interval, in other words, if you play an octave interval and
you set the octave factor to 5, the pitch warp is five times stronger. You can also select the interval settings which use the played
interval to calculate the pitch warp, or use the glide settings
which result in a full glide from each legato note to the next. Glide
Up and Glide Down limit glides to only up- or only down-glides.
19
01
02
03
With Legato Rules >
[04]
you can tell the engine when each legato
mode is used or not used. By default, legato mode 1 is triggered
by slower playing (time dierences of 500ms or more from one
note to the next, and an interval of less than two half-steps), while
04
Page 24

20
CHAPTER 03 / USING THE CORE INSTRUMENTS
MOJO / HORN SECTION
legato modes 2 and 3 are triggered by progressively faster playing.
The combination of these factors allows MOJO to respond dynamically to dierent styles of playing and produce realistic smooth
legato renderings. Each legato mode can by bypassed in the
Legato Rules page, in case you need to only use one legato, or if
you prefer to use MIDI CC control to alter one legato in real time.
Pitchbend. The Pitchbend page controls how the pitch bend
wheel behaves. When it is selected, a pulldown menu and a knob
appear:
The Mode Knob allows you to select between Mode 1 for standard
pitch bend (which is the default) and Mode 2 which employs a
more advanced formant-correcting algorithm for pitch bend
(which only works in Solo or Legato mode). Formant-correct pitch
bend uses more CPU and polyphony, but results in more realistic
pitch bend. Mode 2 is particularly eective on the instruments
that can naturally slide between pitches, like the Trombone and
Bass Trombone.
The P Range Knob lets you set the maximum range of the pitch
bend sweep (both above and below the source pitch). In Mode 1,
the maximum is 12 half steps or semitones. In Mode 2, the maximum is 7 half steps or semitones.
Releases. MOJO includes extensive and intelligent release layers,
which are samples of the sound of the instrument stopping a
note, triggered when a MIDI key is released. The release layers
contribute greatly to the realism of the instruments. The Releases
page allows you control over how the release layers behave.
The Mode knob lets you choose between Mode 1, which only triggers releases if no other key is pressed anymore, and Mode 2,
which plays all release notes (except in Legato mode, in which
case releases are not played within a legato phrase to facilitate
proper smooth legato rendering.
The Volume Knob allows you to adjust the level of the release
samples. In each instrument, this has already been preset to an
appropriate level for the instrument.
Speed. The Speed menu governs the behavior of both swells and
crescendo articulations for each instrument. Swells and crescendos were recorded at two dierent lengths (long and short) for
every instrument in MOJO, and have been specially designed to
tempo-sync automatically. The engine will read the tempo that
the host is playing at (and will even follow changing tempos), and
will calculate the proper length for the swell. The Speed menu allows you to preset the desired lengths of swells and crescendos
in beats.
Four pulldown menus appear, allowing long crescendos and
swells to be set from 2 beats to 18 beats, and short crescnedos
and swells to be set from 1 beat to 9 beats.
Page 25
There is some overlap between the ranges of the short and long
articulations. For example, it is possible to set long crescendos to
last 4 beats and short crescendos to also last 4 beats. MOJO will
utilize a dierent set of samples for each, and will time-stretch the
crescendos to fit the current tempo. Dierent tempos may result
in better results using one method or the other.
EFFECTS TAB
The Eects tab provides access to nine built-in audio eects that
can be applied to any MOJO instrument.
Each eect features an Active button that must be clicked (enabled) before it will process the audio.
EZRoom. EZRoom is an easy-to-use integrated convolution reverb included with MOJO, and provides a quick way to instantly
place the horns into a new acoustic space.
The Ezroom Menu allows you to choose which impulse response
to use. A large number of impulse responses have been provided
as part of the library.
The Predelay Knob lets you specify a predelay time for the convolution in milliseconds.
Dry And Wet Knobs allow you to adjust the balance of the dry
(unaected) and wet (reverb) sound to taste.
The Equalizer is a 3-band equalizer and oers control over the
frequency, bandwidth, and gain of each band.
The Compressor takes the incoming audio signal, and attenuates
any signal that crosses the threshold (which can be adjusted using the Threshold knob) by the ratio (which can be adjusted using
the Ratio knob). In plain English, the Compressor makes loud signals a little softer, so that the dynamic range of the instrument is
more limited, and therefore more listenable and more likely to sit
in a mix well. In addition, once the Compressor limits the dynamic
range, the overall level of the instrument can now be boosted (using the Output knob). Attack and Release knobs are also provided,
which specify how fast the Compressor attenuates the signal and
how long it takes for the Compressor to stop attenuating the signal after the signal goes below the threshold.
Saturation is an eect that adds density (saturation) to the
sound. It has only one knob, Saturation. Raising this knob will
make the sound thicker and fuller and somewhat louder.
Distortion adds overdriven, amp-style distortion to the sound.
This is useful more as a special eect. Controls are provided for
Drive (overall level of added distortion) and Damping (a dulling
of the high frequencies as distortion is added).
21
Page 26

22
Chorus adds a thickening eect by doubling the signal and detuning the copy. Controls are provided for Depth, Speed, and
Phase.
Reverb adds natural room echo to the sound. It is dierent from
EZRoom, which is a convolution reverb based on actual real sonic
spaces. Controls are provided for Predelay, Size, Color, Damping,
Pan (Stereo Width), and Return Volume.
Delay adds a time-based delay to the sound, and can be fed back
into itself by engaging the Feedback parameter. Controls are provided for Delay Time (in milliseconds), Feedback, Damping, Pan
(Stereo Width), & Return Volume.
Stereo allows you to control the overall stereo character of the instrument. The Spread knob allows for the increasing or decreasing
CHAPTER 03 / USING THE CORE INSTRUMENTS
of the stereo width, and the Pan knob allows for the overall panning of the instrument.
OTHER PATCHES
Core Instruments Lite. These instruments function identically
with their Core Instruments counterparts, except they use a fraction of the number of samples of the full version. As a result, the
playing and the humanizing will be less detailed, however, users
who have limited amounts of RAM will be able to load more at
once by using these Lite versions.
Ensembles. This folder oers various combinations of MOJO instruments, for example, Alto Sax, Tenor Sax, Trumpet, and
Trombone all layered over each other. Only sustain and release articulations are included in these instruments, making them ideal
for quickly building large-sounding horn sections. Note that, due
to the varying range of each instrument, dierent areas of the
keyboard feature dierent overlaps between the instruments,
with the extreme low and high notes sometimes covered by only
one of the included instruments.
The Limiter is a brick-wall limiter, which is enabled by default. It attenuates any signal that exceeds the maximum 0dB level. In Gain,
Release, and Output controls are also provided. Turning the
Output knob above 0dB will result in distortion.
MOJO / HORN SECTION
Ris feature almost two thousand prerecorded ris played across
each of the instruments. They have been grouped by instrument,
tempo, and key.
Within each patch are anywhere from a few to dozens of ris.
Ris are always mapped chromatically, starting at C2 (the C below middle C). The interface in the Ris instruments is dierent
than the Core Instrument. >
[01]
Page 27
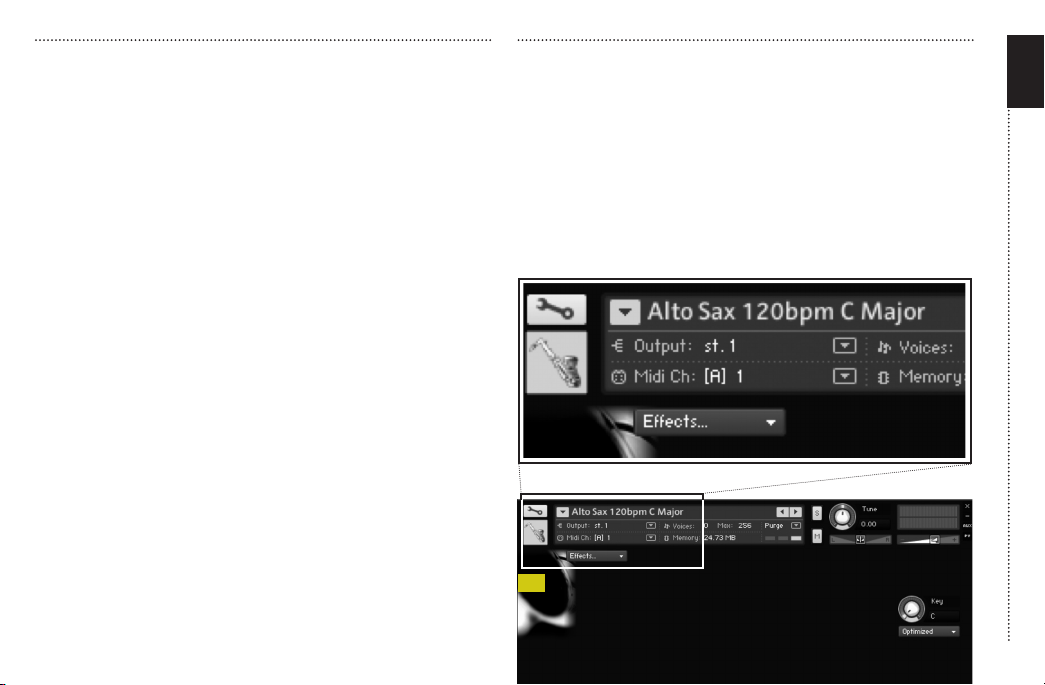
The Eects menu is available and works identically to the Core
Instruments, but there is a Key knob allowing for the easy transposition of the ris into other keys. The Key knob defaults to the
key of the patch loaded (C Major in this example), and a pulldown
menu allows the choice of two dierent transposition methods.
All ris automatically sync to host or MasterKontrol tempo. This
particular instrument, while recorded at 120bpm, will play back
at whatever tempo the host sequencer or the Kontakt Master
Kontrol is set to.
Note that both time-stretching (syncing) and transposing are done
by Kontakt’s DSP, and they work best if the distance to stretch is
smaller rather than larger. This example patch, which was recorded
in C major at 120bpm, should sound fine if played back in C# major
at 110bpm, but may sound strange if stretched to F# major and
50bpm. The best rule of thumb is to try and use ris patches that
are as close as to the key and tempo that you need them to be.
Special Eects encompass various noises that the instruments
can make, such as key clicks, unusual glissandi, and more. Several
hundred samples are included across the instruments, and each
loadable patch features the individual samples mapped chromatically on the keyboard starting at C1 (two octaves below middle C).
Sustains Only contain the same twelve instruments as the Core
Instruments, but remove all additional articulations apart from
sustains and releases. They are much faster to load than the Core
Instruments and use less RAM. They are useful for instances in
which realism is less important than being able to simply orchestrate horn parts.
01
23
Page 28

CHAPTER 04
24
MOJO/
TIPS
ON
EFFECTIVE
SEQUENCING
CHAPTER 04 / TIPS ON EFFECTIVE SEQUENCING
MOJO / HORN SECTION
MOJO is an extremely complicated instrument, and without proper
management, using it in a sequencing environment can be daunting. What follows is a list of tips that can make the use of MOJO
much smoother.
TIP 01: At the beginning of each MIDI track that is triggering MOJO,
write in the starting articulation keyswitch (e.g. sustain), the Players
knob setting (solo or 2-10 players), and the Mode (poly, mono, or
legato). This insures that every time you rewind your sequence to
the beginning, the MOJO instrument will reset itself to the same
starting point. The location of these keyswitches is dierent for
each instrument in MOJO, therefore, you will save time by initially
writing these “reset” commands at the beginning of the sequence
so that MOJO can be reset at any time.
TIP 02: If you would like to sequence multiple solo lines of the
same instrument (for example, four alto sax parts all playing legato), you can load up four instances of the Alto Sax instrument.
This is useful if you require fluid legato playing for each of the
four voices. Because all four instances are using the same set of
core samples, the same amount of RAM is used whether you are
running four Alto Sax instances or one.
Page 29

TIP 03: Combining the previous two tips, if you have multiple instances of the same instrument, you can insert the reset commands for one instance, then copy and paste to the other three.
TIP 04: If you are writing large ensemble horns (e.g. big band
style), you can get more realistic acoustic results by narrowing
the stereo field of the individual instruments (Setup > Section >
S Spread and S Depth, and/or Eects > Stereo > Spread), then
panning the overall instrument to a specific location in the stereo
field. If you don’t apply this technique, then all instruments will
appear to be located everywhere in the stereo field, which makes
for a nice fat sound but is not the way a true ensemble would
sound unless recorded from a great distance. Experiment with
stereo placement to get the results you want.
TIP 06: If you are using a release articulation (e.g. a fall) following
a staccato or stab articulation, note that the fall will trigger when
the note is released, not when the sound of the staccato or stab
finishes. Therefore, it’s crucial to adjust the location of the noteo message (the end of the MIDI note) to coincide with where the
fall should begin.
TIP 07: If you are sequencing fast big band music and need sloppy
doubling, try loading multiple versions of each instrument, then
try setting each instance to dierent articulations, such as sustain,
bend down, stab, and staccato. While the stab and staccato articulations will be very short, the sustain and bend down articulations
will provide the sustain, and the end result will be four players
playing in very dierent styles.
25
TIP 05: When sequencing very short notes, experiment not just
with staccato and stab articulations, but also with sustain and
bend down articulations played very short. The playing style is
very dierent for each. Sustains and bend downs played short tend
to be more pitched and fit well in a section, while staccatos and
stabs tend to have more bite, aggressiveness, and are the exclamation mark of the articulations. Try each of these articulations to
find the best fit for the passage of music being worked on.
TIP 08: Sections will often benefit from a constantly added very
slight amount of vibrato. Since the vibrato is applied per player, it
will add another human factor to the section.
Page 30
26
CHAPTER 05
BASS TROMBONE
CHAPTER 05 / KEYMAPPING, ARTICULATIONS, AND KEYSWITCHES
TROMBONE
TROMBONE
MUTE
BARI SAX
A-1
A-1
A-1
A-1
Play Mode /
Poly
A#1
A#1
A#1
A#1
Solo
B-1
B-1
B-1
B-1
Mono
C0
C#0
C0
C#0
C0
C#0
C0
C#0
Section
Legato
-
B6
A#6--
-
B6
A#6--
-
B6
A#6--
C7B6A#6D6C#6A6G#6C6G6
Articulation /
Sustain Vibrato
Sustain
Bend Down
Run Octave Down
Run Octave Up
A6
G#6C6G6
A6
G#6C6G6
A6
G#6C6G6
Stab
Staccato
Doit
Trill
F#6F6E6
F#6F6E6
F#6F6E6
F#6F6E6
Swell Short
Swell Long
Cresc. Short
D#6--
D#6--
D#6--
D#6B5-
Cresc. Long
Overblown
-
-
G5-A5
-
-
-
-
A5
-
-
-
-
A5
F5
G#5G5-
Overblown Vibrato
Sub Tone
Rise To Hit
Slur Up
Shakes
A5
‘Pow’
Release
Articulation /
D0
D#0
D0
D#0
D0
D#0
D0
D#0
Regular
Doit
Page 31
27
E0F0F#0G0G#0A0A#0
E0F0F#0G0G#0A0A#0
E0F0F#0G0G#0A0A#0
E0F0F#0G0G#0A0A#0
Fall Short
Fall Medium
Fall Long
Fall Extra Long
Trill
None
Slur Up
C1
C1
C1
C1
Shakes
C#2
G#4
C#2
G#4
C#2
G#4
C#2
G#4
Play Range /
Minimum
Maximum
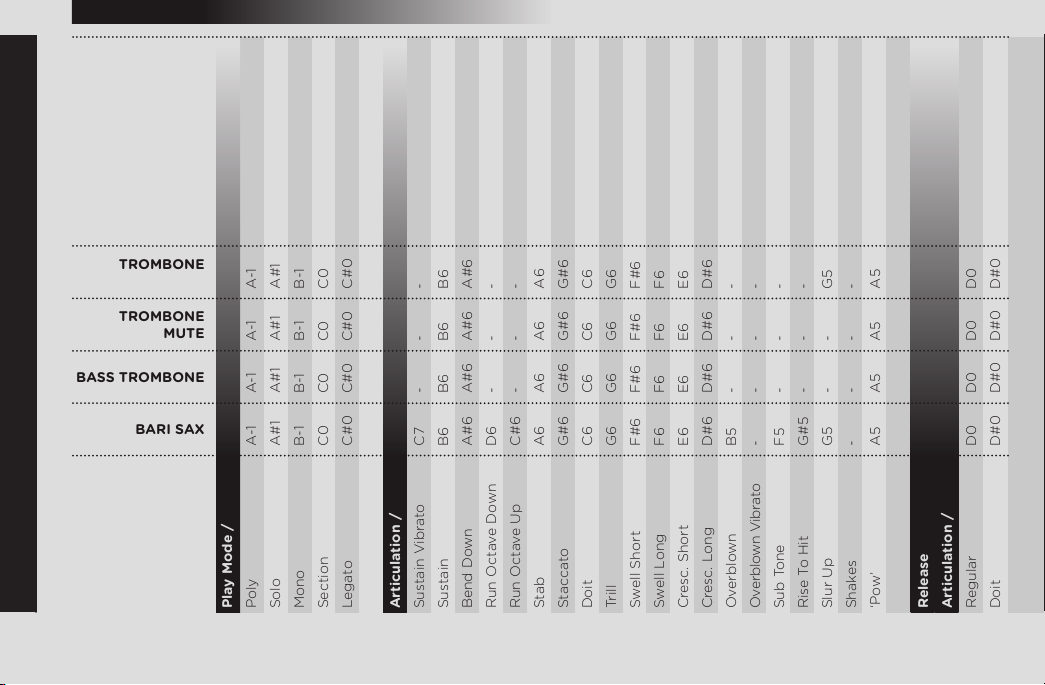
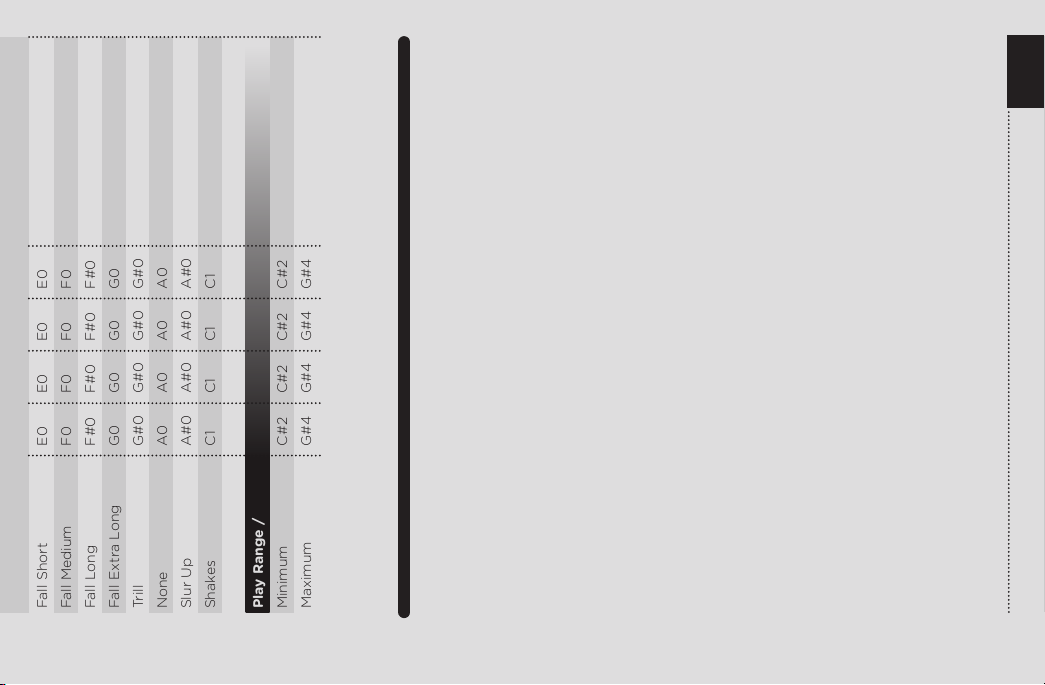
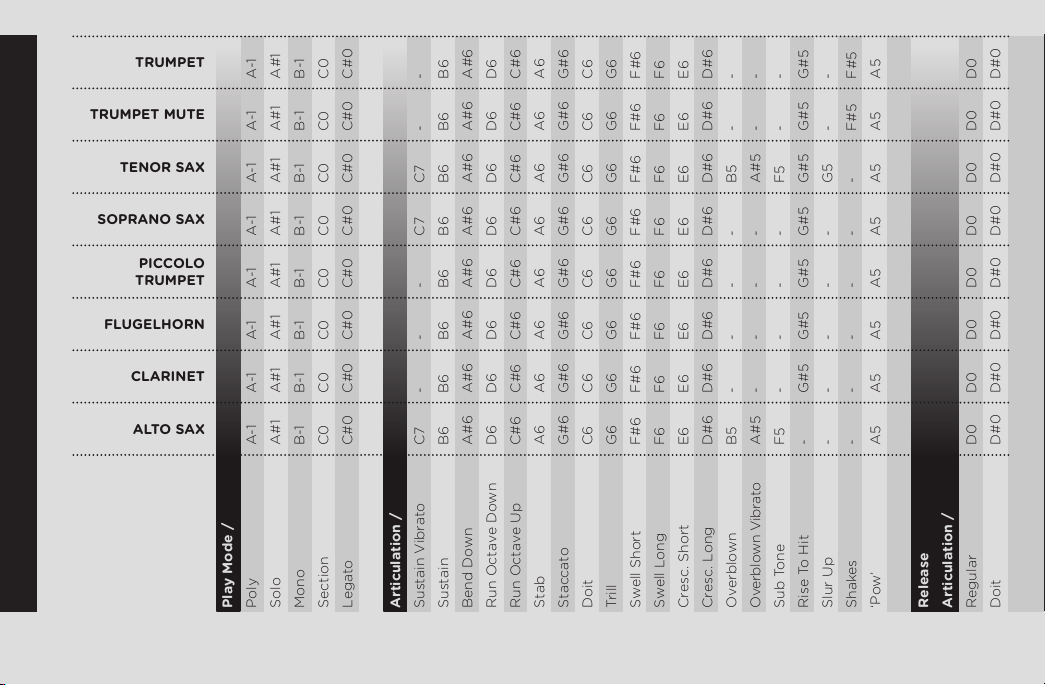
KEYMAPPING, ARTICULATIONS, AND KEYSWITCHES
Each instrument has been mapped on the keyboard at its actual sound-
ing range. In other words, this means that a bass trombone will be at
the lower end of the keyboard while the piccolo trumpet will be at the
upper end of the keyboard.
Each instrument includes silent triggers called keyswitches which don’t
make a sound but instead instruct the engine to activate a specific ar-
ticulation or behavior. The location of the keyswitches varies from
instrument to instrument since the range of each instrument varies.
This guide will specify what keyswitches and available playing ranges
exist for each instrument. Note that the onscreen display is also a help-
ful guide; it will show each keyswitch pressed and indicate its function,
so it is less necessary to constantly refer to this manual.
All of the bass/lower instruments (bari sax, bass trombone, trombone,
and trombone mute) share a very similar keyswitch articulation layout.
The only way in which they dier is with some of the extra articulations
which may or may not be available in certain instruments.
Page 32
28
TRUMPET
A-1
A#1
B-1
C0
C#0
-
B6
A#6D6C#6A6G#6C6G6
F#6F6E6
D#6--
-
G#5-F#5
A5
D0
D#0
CHAPTER 05 / KEYMAPPING, ARTICULATIONS, AND KEYSWITCHES
TRUMPET MUTE
TENOR SAX
SOPRANO SAX
PICCOLO
TRUMPET
FLUGELHORN
CLARINET
ALTO SAX
A-1
A-1
A-1
A-1
A-1
A-1
A-1
Play Mode /
Poly
A#1
A#1
A#1
A#1
A#1
A#1
A#1
Solo
B-1
B-1
B-1
B-1
B-1
B-1
B-1
Mono
C0
C#0
C0
C#0
C0
C#0
C0
C#0
C0
C#0
C0
C#0
C0
C#0
Section
Legato
-
B6
A#6D6C#6A6G#6C6G6
C7B6A#6D6C#6A6G#6C6G6
C7B6A#6D6C#6A6G#6C6G6
-
B6
A#6D6C#6A6G#6C6G6
-
B6
A#6D6C#6A6G#6C6G6
-
B6
A#6D6C#6A6G#6C6G6
C7B6A#6D6C#6A6G#6C6G6
Articulation /
Sustain Vibrato
Sustain
Bend Down
Run Octave Down
Run Octave Up
Stab
Staccato
Doit
Trill
F#6F6E6
F#6F6E6
F#6F6E6
F#6F6E6
F#6F6E6
F#6F6E6
F#6F6E6
Swell Short
Swell Long
Cresc. Short
D#6--
D#6B5A#5F5G#5G5-
D#6--
D#6--
D#6--
D#6--
D#6B5A#5F5-
Cresc. Long
Overblown
Overblown Vibrato
-
G#5-F#5
-
G#5--
-
G#5--
-
G#5--
-
G#5--
Sub Tone
Rise To Hit
-
Slur Up
A5
A5
A5
A5
A5
A5
-
A5
Shakes
‘Pow’
Release
Articulation /
D0
D#0
D0
D#0
D0
D#0
D0
D#0
D0
D#0
D0
D#0
D0
D#0
Regular
Doit
Page 33
E0F0F#0G0G#0A0A#0
C1
C#2
G#4
29
E0F0F#0G0G#0A0A#0
E0F0F#0G0G#0A0-
E0F0F#0G0G#0A0-
E0F0F#0G0G#0A0A#0
E0F0F#0G0G#0A0A#0
E0F0F#0G0G#0A0-
E0F0F#0G0G#0A0-
Fall Short
Fall Medium
Fall Long
Fall Extra Long
Trill
None
Slur Up
C1
-
-
-
-
-
-
Shakes
C#2
G#4
C#2
G#4
C#2
G#4
C#2
G#4
C#2
G#4
C#2
G#4
C#2
G#4
Play Range /
Minimum
Maximum
]
01
[
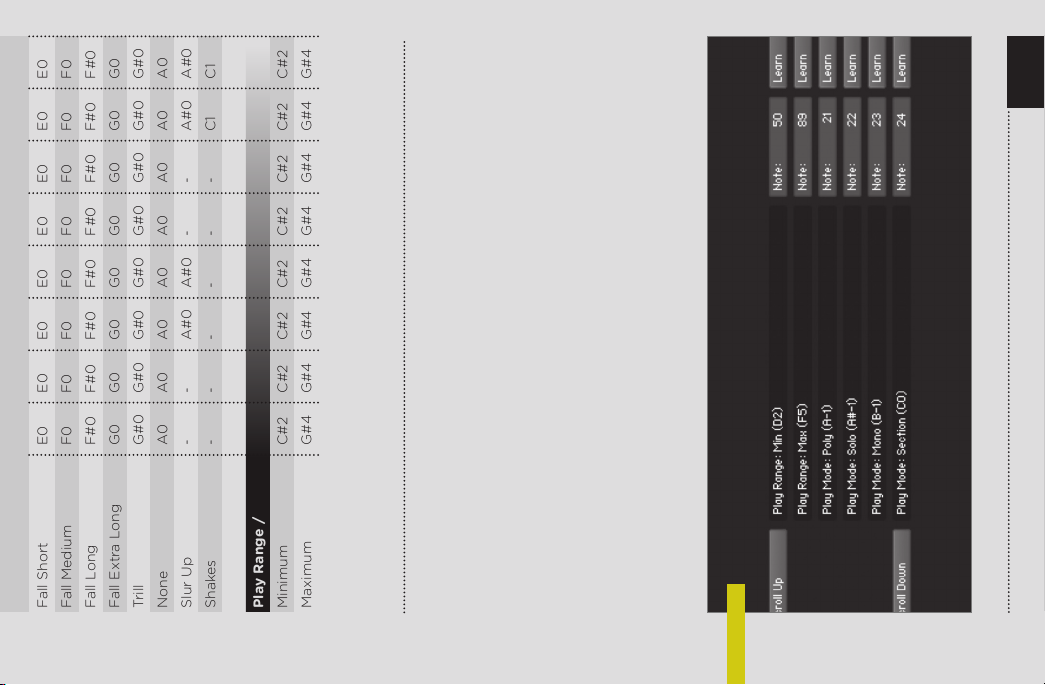
All of the other instruments (alto sax, clarinet, flugelhorn, piccolo trum-
pet, soprano sax, tenor sax, trumpet, and muted trumpet) likewise share
a very similar keyswitch articulation layout:
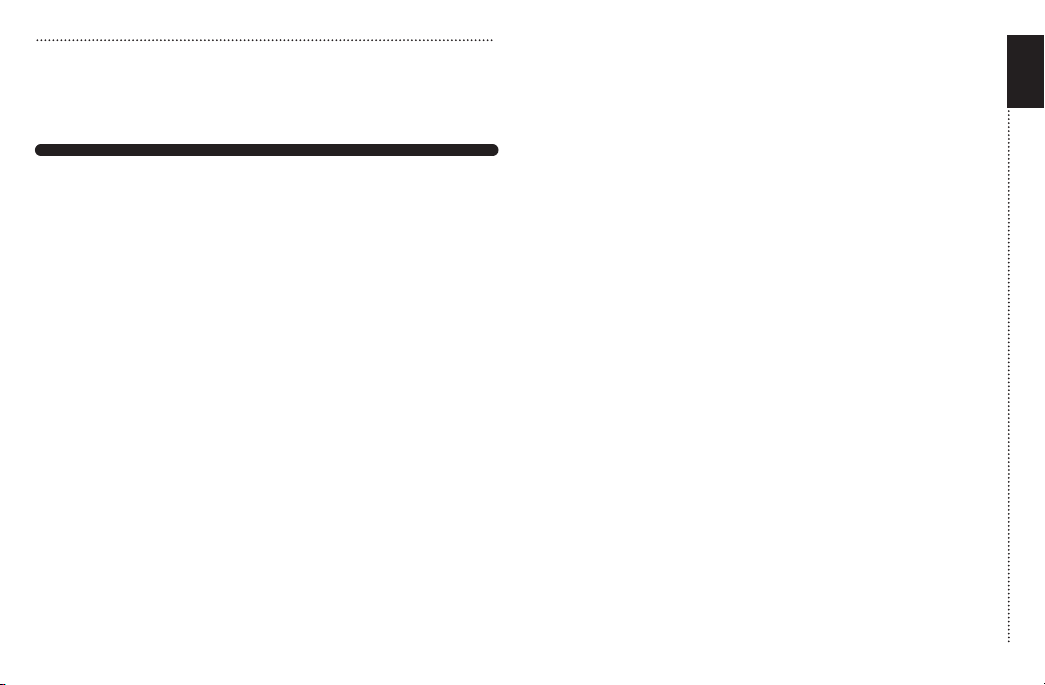
Users who want to customize the keyswitch arrangement can do so by
clicking on the Keyswitch tab, which shows a list of keyswitches avail-
able in the current instrument, along with the ability to scroll up and
down the list, and a quick MIDI Learn button to reassign any keyswitch.
Customized keyswitch menu >
01
Page 34

30
Distortion /
089 On / O
090 Output Gain
091 Drive
092 Damping
Chorus /
093 On / O
094 Return Gain
095 Depth
096 Speed
097 Phase
Reverb /
098 On / O
099 Return Gain
100 Pre Delay
101 Size
102 Colour
103 Damping
104 Stereo
Delay /
105 On / O
106 Return Gain
107 Time
108 Damping
109 Pan
110 Feedback
Stereo Modeler /
CHAPTER 05 / MIDI CC CHART
Legato /
039 Legato1 XTime
040 Legato1 BTime
041 Legato1 Dynamic
042 Legato1 Quality
043 Legato1 Type
044 Legato1 Cent
045 Legato1 Octave
046 Legato1 TurnO
047 Legato2 TurnO
048 Legato2 XTime
049 Legato2 BTime
050 Legato2 Dynamic
051 Legato2 Quality
052 Legato2 Type
053 Legato2 Cent
054 Legato2 Octave
055 Legato3 XTime
056 Legato3 BTime
057 Legato3 Dynamic
058 Legato3 Quality
059 Legato3 Type
060 Legato3 Cent
061 Legato3 Octave
Miscellaneous /
062 Humanize
063 Humanize Range
064 Sustain Pedal
065 Sample Set
064 Character
Global Parameters /
007: Volume
010: Pan
011: Expression (SV)
Vibrato /
001 Vibrato Strength
020 Vibrato Character
021 Vibrato Speed
Sectioning /
022 Section Players
023 Section Stereo Spread
024 Section Mode
025 Section Depth
026 Section Detune
027 Section Humanize
Pitch Bend /
MOJO/
MIDI
CC
CHART
028 Pitch Mode (S/FC)
Page 35

011 On / O
112 Output Gain
113 Spread
114 Pan
067 Punch
068 Punch Mode
Equalizer /
029 Pitch Range (S)
030 Pitch Range (FC)
Releases /
Limiter /
115 On / O
070 On / O
071 Low Freq
072 Mid Freq
031 Release Mode
032 Release Volume
116 Output Gain
117 In Gain
118 Release
073 High Freq
074 Low Bw
075 Mid Bw
Tempo-Syncing /
033 Crescendo Speed Long
034 Crescendo Speed Short
076 High Bw
077 Low Gain
078 Mid Gain
035 Swell Speed Long
036 Swell Speed Short
EZRoom /
079 High Gain
037 EZRoom Wet Volume
038 EZRoom Dry Volume
Compressor /
080 On / O
081 Output Gain
082 Thresh.
083 Ration
084 Attack
085 Release
Saturation /
086 On / O
087 Output Gain
088 Saturation
LOCATED ABOVE
>
31
Many parameter in MOJO’s various menus can be controlled remotely
via MIDI CC, and therefore can be easily automated in a sequencer. This
is a comprehensive list of the CC’s that MOJO responds to.
KEY: SV = Secondary Volume / S = Standard / FC = Format Correct
Page 36

CHAPTER 06
32
MOJO/
TECH
SUPPORT
ETC.
CHAPTER 03 / TECH SUPPORT ETC.
MOJO / HORN SECTION
TECH SUPPORT
Vir2 Instruments stands behind its products and is committed to
helping you get the most out of using them. Please check the
Support area of the www.vir2.com web site if you encounter any
diculties in using the product. You may also e-mail support@
vir2.com.
Before getting in touch with Vir2 Instruments regarding problems
with the product, make sure you are running the latest versions of
the library, engine, and Service Center. We are continuously updating and improving the product, so it is possible that there are
more recent updates available that were released after the physical manufacturing of your installation disc.
THE FULL VERSION OF KONTAKT 3
MOJO ships with Kontakt 3 running in library mode, meaning it is
fully able to play back the MOJO library and access the parameters detailed in this manual.
Registered owners of MOJO are eligible for a special crossgrade
discount to the full version of Kontakt 3, which enables users to
create their own libraries, import libraries in non-Kontakt formats,
Page 37
and access numerous deep editing features. Visit the nativeinstruments.com web site for details on the Kontakt crossgrade.
LICENSE AGREEMENT
The samples contained herein are licensed, not sold to you, the individual end user, by Vir2 Instruments. This non-exclusive,
non-transferable license is granted only to the individual end user
who has purchased an unopened, new, and lawfully made copy of
this product from a dealer or distributor authorized by Vir2
Instruments. All samples remain the property of Vir2 Instruments
and are licensed only for use in the creation of a live or recorded
performance that includes the licensed samples as part of a derivative musical work created by the licensed end user. This
license expressly forbids resale, rental, loan, gift, or transfer of
these samples in any format or via any medium, except as part of
a derivative musical work. The samples may not be included,
whether unmodified or as part of a derivative work, in any sample
library product. Any unlicensed usage will be prosecuted to the
maximum extent possible under the law.
33
Page 38

THANKS
AND
ENJOY/
Produced by Vir2 Instruments
Sound Design and Programming: David Das, Rich Mendelson, Steven Bolar,
Chris Peck, and Benjamin Stelzer
Scripting: Benjamin Stelzer
Cover Artwork: Marvin Burns
Design: Jesse Amborn
Manual: David Das and Benjamin Stelzer
Special thanks to the beta test team, who provided invaluable input to the
product, and to the Native Instruments team, especially Dan Santucci,
Nicki Marinic, Johannes Mai, Markus Krieg, Wolfgang Schneider, Frank Elting,
and Rembert Gantke.
Page 39

Page 40

© 2009 Vir2 Instruments.
All trademarks used are property of their respective owners.
Specifications subject to change.
 Loading...