

Page 1
USER MANUAL
Page 2

Produced by Vir2 Instruments
Vir2 Instruments / is an
international team of sound
designers, musicians, and
programmers, who specialize in
creating the world’s most
advanced virtual instrument
libraries. Vir2 is producing the
instruments that shape the
sound of modern music.
29033 Avenue Sherman, Suite 201
Valencia, CA 91355
Phone: 661.295.0761
Web: www.vir2.com
Page 3
USER MANUAL
Page 4
00
CINEMATIC THUNDER/
TABLE OF
CONTENTS
TABLE OF CONTENTS
CHAPTER 01
01 INTRODUCTION TO THE LIBRARY
CHAPTER 02: REQUIREMENTS AND INSTALLATION
03 SYSTEM REQUIREMENTS
03 INSTALLING
04 UPDATING
04 AUTHORIZING
CHAPTER 03: USING KONTAKT
05 HOW TO ACCESS THE CINEMATIC THUNDER
LIBRARY FROM KONTAKT
05 USING KONTAKT IN STANDALONE MODE
07 USING KONTAKT AS A VST PLUG-IN IN CUBASE AND NUENDO
08 USING KONTAKT AS A VST OR AUDIOUNIT PLUG-IN IN ABLETON
LIVE
09 USING KONTAKT AS AN AUDIOUNIT PLUG-IN IN LOGIC PRO,
LOGIC STUDIO, LOGIC EXPRESS, ETC.
10 USING KONTAKT IN GARAGEBAND
11 USING KONTAKT AS AN AUDIOUNIT PLUG-IN IN DIGITAL
PERFORMER
11 USING KONTAKT AS AN RTAS PLUG-IN IN PRO TOOLS
12 USING KONTAKT AS A PLUG-IN IN ANOTHER HOST
CINEMATIC THUNDER
Page 5
CHAPTER 04: WORKING WITH THE INSTRUMENTS
13 MIXER
15 CHANNEL FX
19 MASTER INSERT FX
CHAPTER 05: PATCH LAYOUT
20 GROUP HITS
21 GROUP RANDOM
22 SOLO MALLETS
23 SOLO STICKS
CHAPTER 06: TECH SUPPORT, ETC.
24 TECH SUPPORT
24 THE FULL VERSION OF KONTAKT 5
24 LICENSE AGREEMENT
25 CREDITS
00
Page 6

01
CHAPTER 01
CINEMATIC THUNDER/
INTRODUCTION
TO THE
LIBRARY
We are proud to present Cinematic Thunder: Epic
Orchestral Toms. Recorded in a large concert hall in
central California from three mic positions for complete
CHAPTER 01 / INTRODUCTION TO THE LIBRARY
flexibility, Cinematic Thunder delivers an epic sound. From
soft and warm to big and bombastic, Cinematic Thunder
is an absolute and indispensable production tool.
Cinematic Thunder contains four master patches: Solo
Sticks, Solo Mallets, Group Hits and Group Random. The
master patches are the natural sound as they were
recorded. Each master patch has a corresponding “Slam”
patch. The slam versions have a bigger, more aggressive
sound that is perfect for your next trailer or action cue.
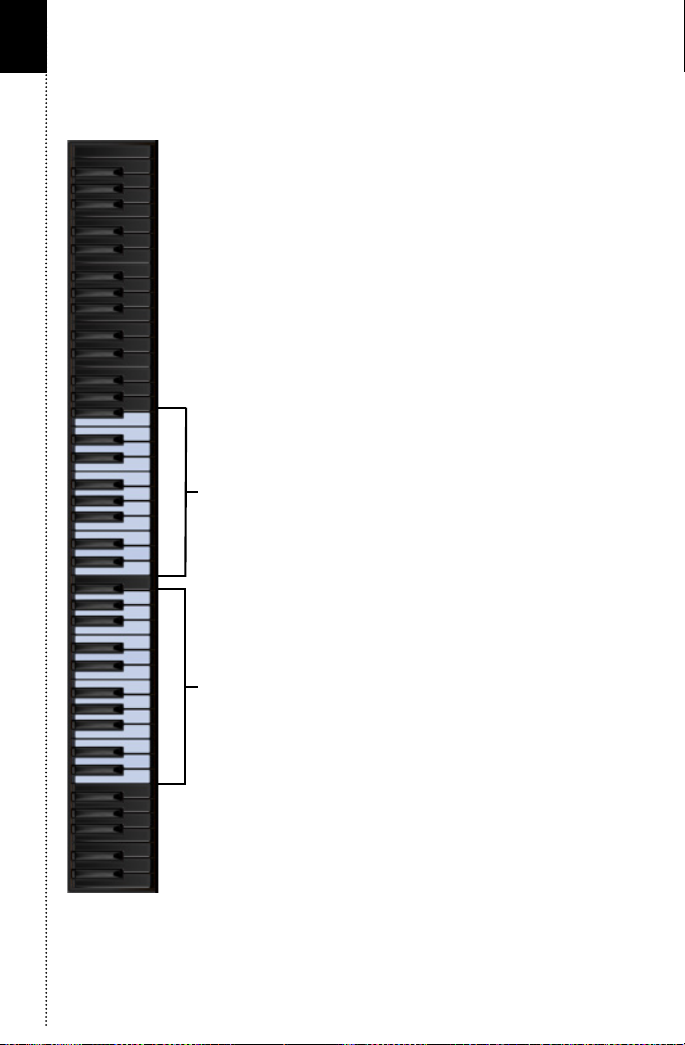
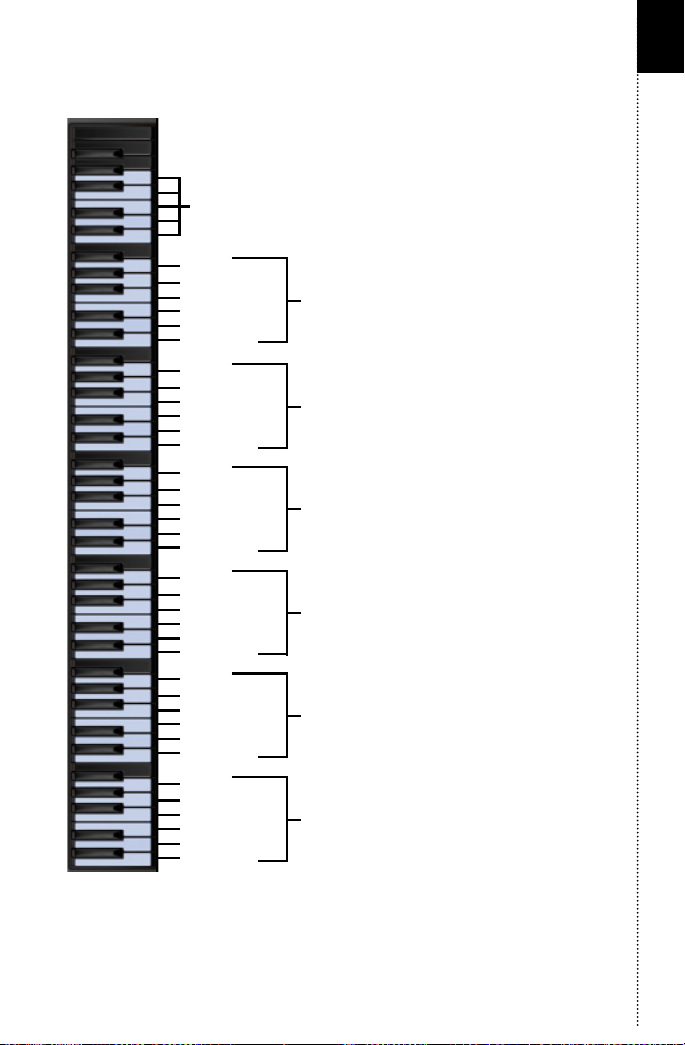
Each drum in the “Solo” patches has left and right hand
hits, flams, 3-stroke rus, 5-stroke rus, and rolls. There
are also combo hits in the highest octave. The Combo hits
consist of two toms being struck simultaneously. We
sampled hits from highest pairs to lowest. In other words,
8”&10” toms, 10”&12” toms, 12”&14” toms, 14”&16” toms, and
16”&18” toms.
CINEMATIC THUNDER
Page 7
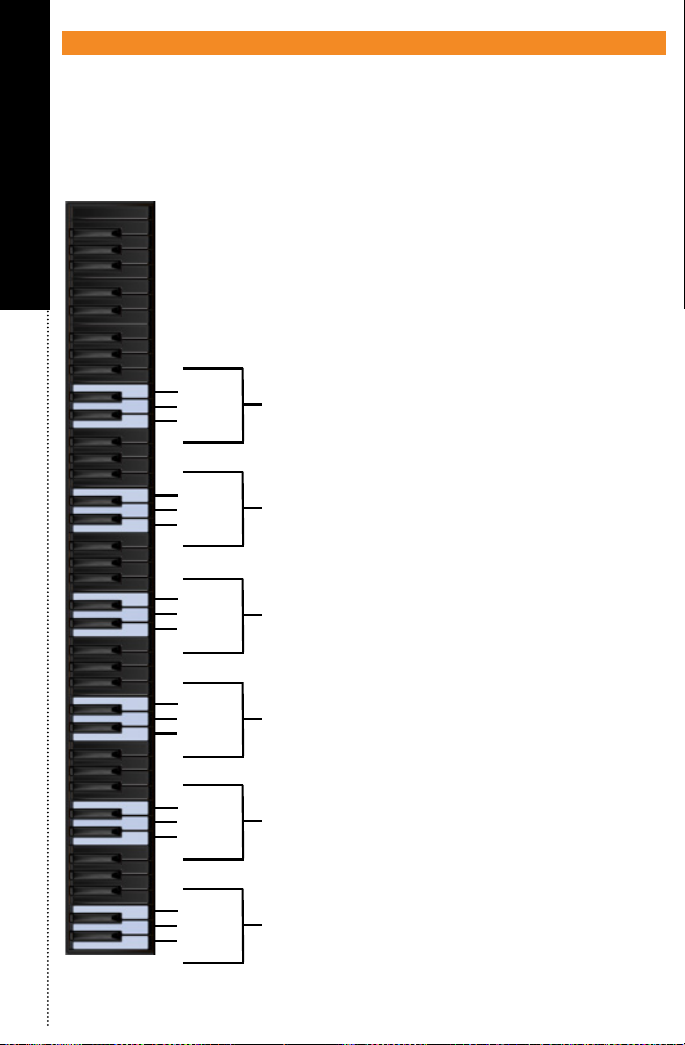
Each drum in the “Group Hits” patch has left and right
hand hits, and flams. Like the “Solo” patches, there are
also combo hits in the highest octave. The “Group
Random” patch is a great patch for adding big accents, it
contains only single hits and flams played at maximum
volume (f).
Cinematic Thunder is powered by the industry-leading
Kontakt engine. It is compatible with VST, AudioUnit, AAX
(Pro Tools 10 & 11) and RTAS (Pro Tools 9 & 10) plug-in
formats allowing it to work seamlessly within any major
sequencer, in addition to standalone use.
02
Page 8

03
CHAPTER 02
CINEMATIC THUNDER/
REQUIREMENTS
AND
INSTALLATION
SYSTEM REQUIREMENTS
The Macintosh version requires an Intel Core Duo, 2GB of RAM, and OS 10.7.x
or later. For optimum performance, Vir2 Instruments recommends a 2.0GHz
processor or faster. The library requires 3GB of free hard drive space.
CHAPTER 02 / REQUIREMENTS AND INSTALLATION
The Windows version requires Windows 7 or Windows 8 (latest Service Pac,
32/64 Bit) Intel Core Duo or AMD Athlon 64, and 2GB of RAM. For optimum
performance, Vir2 Instruments recommends a 2.0GHz processor or faster.
The library requires 3GB of free hard drive space.
INSTALLING
The installation of CINEMATIC THUNDER consists of two separate steps: the
installation of the Kontakt engine, and the installation of the CINEMATIC
THUNDER library.
In the CINEMATIC THUNDER folder, you will see the installers for Kontakt 5
and the CINEMATIC THUNDER library folder. Move the CINEMATIC
THUNDER library folder to any location on your hard drive, then run the
Kontakt 5 installer.
The Kontakt installer will install the Kontakt Player engine, its standalone
application, all of its plug-in versions, and the Service Center authorizer
program. We recommend the Easy Install and that the install locations for
each component are left at their default settings.
The CINEMATIC THUNDER library is approximately 2.7GB in size, and can be
installed on any available hard drive. For speed reasons, we recommend it be
installed on internal or eSATA drives. A Firewire drive is also acceptable.
CINEMATIC THUNDER
Page 9

AExternal USB drives may give somewhat less optimized performance. We
also recommend 7200rpm drives or SSDs regardless of the interface used.
Once Kontakt is installed, launch the standalone application, or open it as an
instrument plug-in from within your preferred host application. Click on the
Libraries tab from the Kontakt browser on the left side of the Kontakt
interface. Just below “Libraries,” click on “Add Library.” A “Locate Folder”
window will appear. Navigate to the CINEMATIC THUNDER Library folder,
highlight it, then click “Choose”. CINEMATIC THUNDER should now appear
in Kontakt’s library browser.
UPDATING
After installation, please make sure that you are fully updated to the most
recent versions of the three components that make up the CINEMATIC
THUNDER package: the library (which contains all the patch information
and programming), the engine (which is powered by Kontakt), and the
authorizer (Service Center). It is possible that any of these components
may have a more recent version than you originally received, so you should
check for updates to each of these three. You can do this by visiting the
vir2.com web site and checking the Support area.
04
AUTHORIZING
After you’ve completed installation, CINEMATIC THUNDER will be working
in demo mode, meaning it will only work for 15 minutes at a time. To fully
authorize it, launch Service Center (found in the Applications folder on a
Mac, or the Program Files folder on Windows) and follow its instructions or
click the Activate button in Kontakt. You will be prompted to enter your
e-mail address and password that make up your Native Instruments
account, or will be given an option to create an account if you don’t
already have one. Once inside the Service Center, it will give you a list of all
the Native Instruments and NI-powered products on your hard drive and
give you the option to activate them. You are allowed to install and use
CINEMATIC THUNDER on up to two computers simultaneously.
Service Center will guide you through the process for either online (instant)
activation, or oine activation if the computer on which you installed
CINEMATIC THUNDER does not have direct access to the internet.
Page 10
05
CHAPTER 03
CINEMATIC THUNDER/
USING KONTAKT
CHAPTER 03 / USING KONTAKT
HOW TO ACCESS THE CINEMATIC THUNDER LIBRARY FROM KONTAKT
CINEMATIC THUNDER ships as a Kontakt-powered library, and CINEMATIC
THUNDER is opened from within Kontakt, which can be run either as a
standalone application, or as a plug-in hosted by any major sequencer on
either Macintosh or Windows platforms. All these versions are installed by
the Easy Install option of the installer.
Users who don’t own a sequencer, or would like to simply boot up and be
able to play CINEMATIC THUNDER, can go to their Applications folder (Mac)
or Program Files folder (Windows) to launch Native Instruments > Kontakt.
Users who wish to use CINEMATIC THUNDER for sequencing or recording,
or wish to play it multitimbrally, should use it in plug-in mode within a host
sequencer. Kontakt supports the VST, AU, AAX and RTAS plug-in formats.
Any host sequencer that supports these plug-in formats properly will be
able to use Kontakt. Instructions vary slightly from sequencer to sequencer,
but the general procedure is to instantiate Kontakt as a virtual instrument
plug-in, then load an CINEMATIC THUNDER instrument in Kontakt, then
route a MIDI track to Kontakt so it can be triggered and recorded.
The following instructions will help standalone and plug-in users get up and
running quickly with a basic track of CINEMATIC THUNDER.
USING KONTAKT IN STANDALONE MODE
The standalone Kontakt application can be found in the Applications >
Kontakt 5 folder for Mac users, or Program Files > Native Instruments >
Kontakt 5 for Windows users.
After launching the Kontakt application for the first time, you will be
presented with a dialog box to set up your audio and MIDI settings. Settings
will vary for each user according to the specific setup, but the important
thing is to route the audio to a valid audio device, and to set the buer
CINEMATIC THUNDER
Page 11
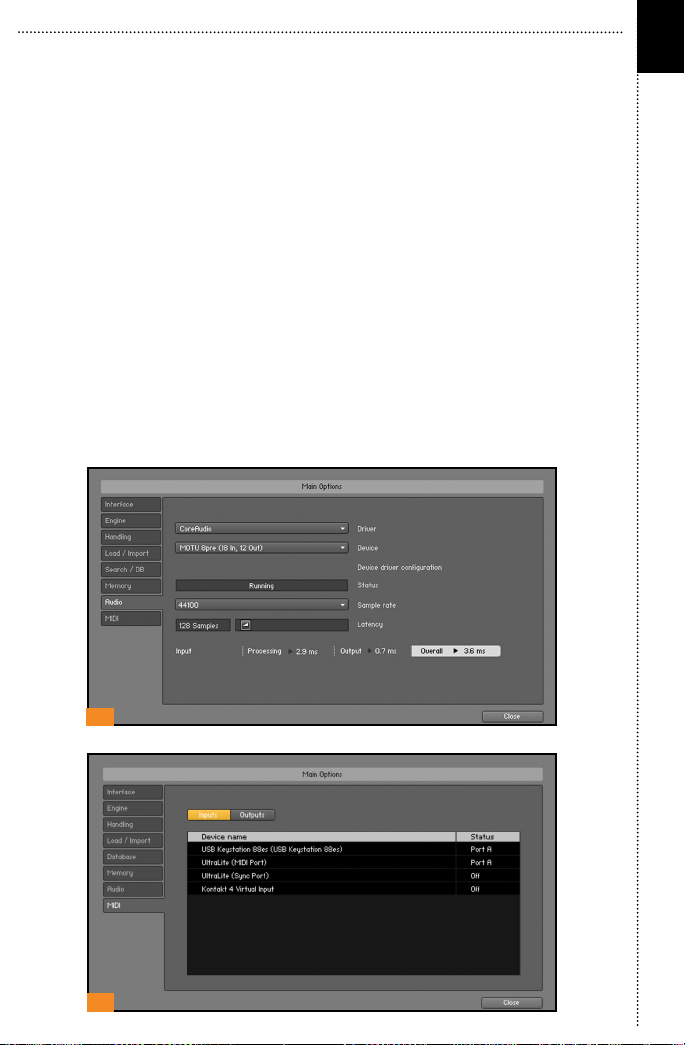
reasonably low for good latency performance. We recommend 256 samples
or less. The lower the latency slider, the less latency (the split second
between the physical playing of the note and the sound coming out of
Kontakt) will be, but the harder the computer will have to work. Typical
useful values range between 128 and 256, however very fast computers may
be able to handle lower values, while very slow computers may need higher
values. [01]
The MIDI page of the Options dialog box must be configured in order to let
Kontakt know which MIDI device(s) to respond to. Kontakt will respond to
up to four MIDI input ports (A, B, C, and D), so we recommend you switch
one MIDI source on to Port A, as shown in the graphic below. [02]
More detailed information on the setup options can be found in the
accompanying Kontakt manual.
Once you have completed Kontakt setup, jump ahead to the Getting Started
with CINEMATIC THUNDER section below.
06
01
02
Page 12
07
USING KONTAKT AS A VST PLUG-IN IN CUBASE AND NUENDO
Users of Steinberg’s Cubase or Nuendo sequencers can use Kontakt as a
VST plug-in. These instructions have been prepared in Cubase 5, although
Kontakt may also work in earlier versions if the computer meets the system
requirements.
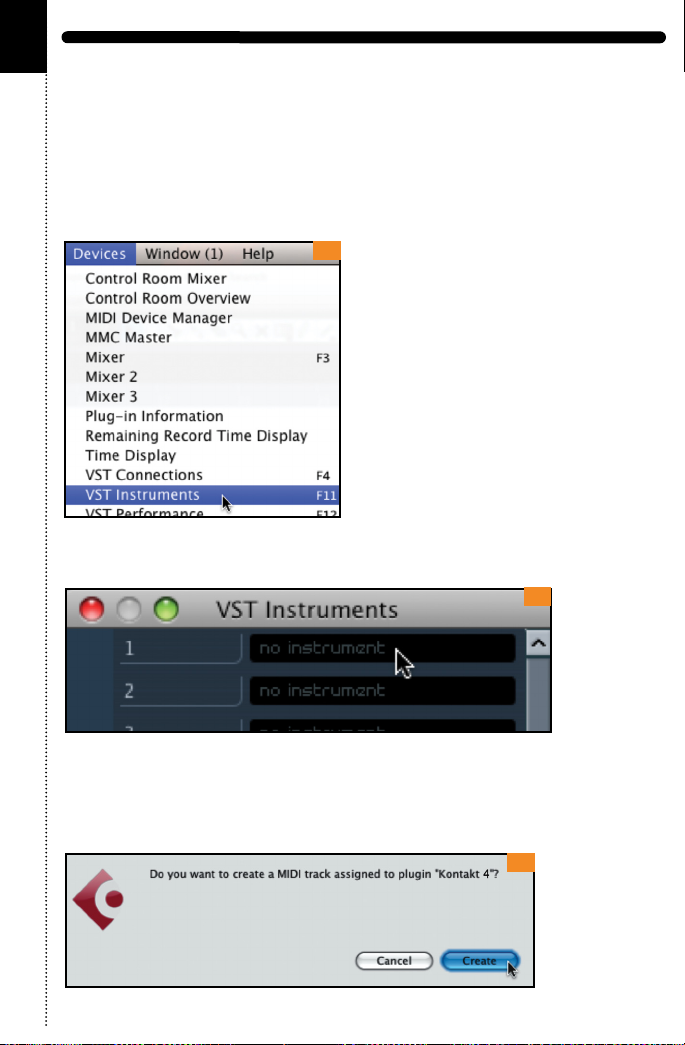
Once the project is open, go to the Devices menu and choose VST
Instruments: [01]
01
When the VST Instruments window appears, click in the first available slot in
which “no instrument” is listed. [02]
02
A popup menu will appear; choose KONTAKT 5.
An alert box will appear asking if you want to create a MIDI track assigned to
the KONTAKT 5 plug-in. Click Create. [03]
03
CINEMATIC THUNDER
Page 13
The Kontakt window will appear, and a MIDI track will be created,
transmitting to Kontakt’s MIDI channel A-1. When it is record-enabled, it will
send any incoming MIDI played on your controller into Kontakt.
At this point, you can skip down in the instructions to the Getting Started
With CINEMATIC THUNDER section below.
USING KONTAKT AS A VST OR AUDIOUNIT PLUG-IN IN ABLETON LIVE
Users of Ableton Live can use Kontakt as a VST or AudioUnit plug-in,
depending on the version. The functionality is the same. These instructions
have been prepared in Live 7, although Kontakt may also work in earlier or
later versions if the computer meets the system requirements.
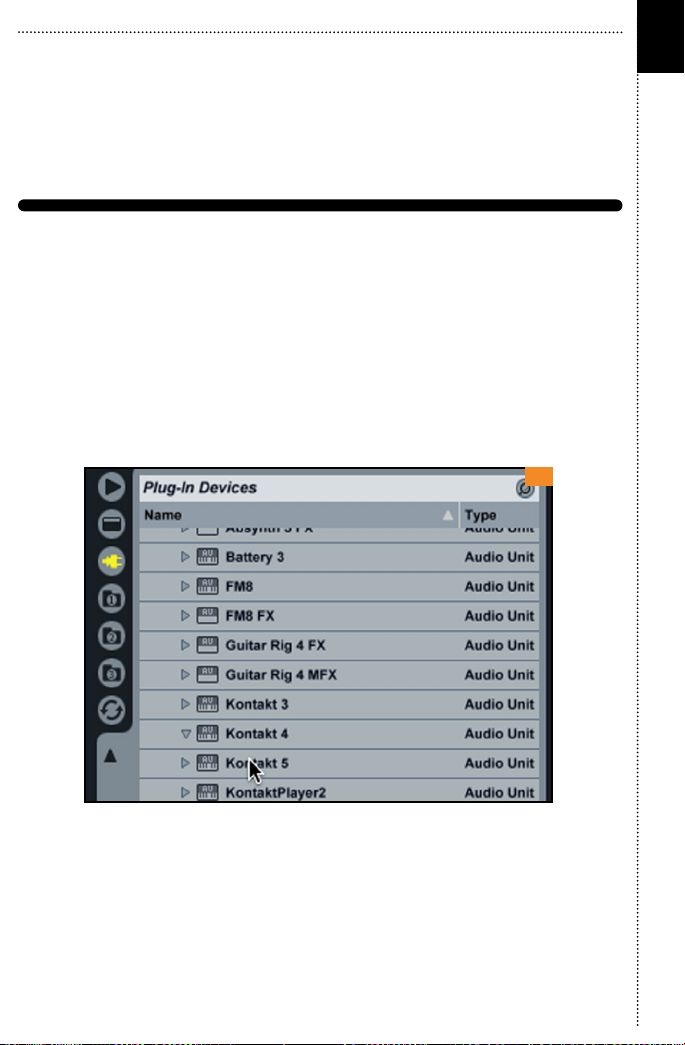
Once the project is open, go to the left side and click on the third icon down
to show the Plug-in Devices list, then scroll to the Native Instruments folder
and locate KONTAKT 5: [04]
04
08
Drag KONTAKT 5 into the central area where the text “Drop Files and
Devices Here” is shown.
The Kontakt interface will appear, and it will already be actively transmitting
to Kontakt’s MIDI channel A-1. When it is record-enabled, it will send any
incoming MIDI played on your controller into Kontakt.
At this point, you can skip down in the instructions to the Getting Started
With CINEMATIC THUNDER section below.
Page 14
09
USING KONTAKT AS AN AUDIOUNIT PLUG-IN IN LOGIC PRO, LOGIC
STUDIO, LOGIC EXPRESS, ETC.
Users of Apple’s Logic can use Kontakt as an AudioUnit plug-in. These
instructions have been prepared in Logic Pro 8, although Kontakt may also
work in earlier versions if the computer meets the system requirements.
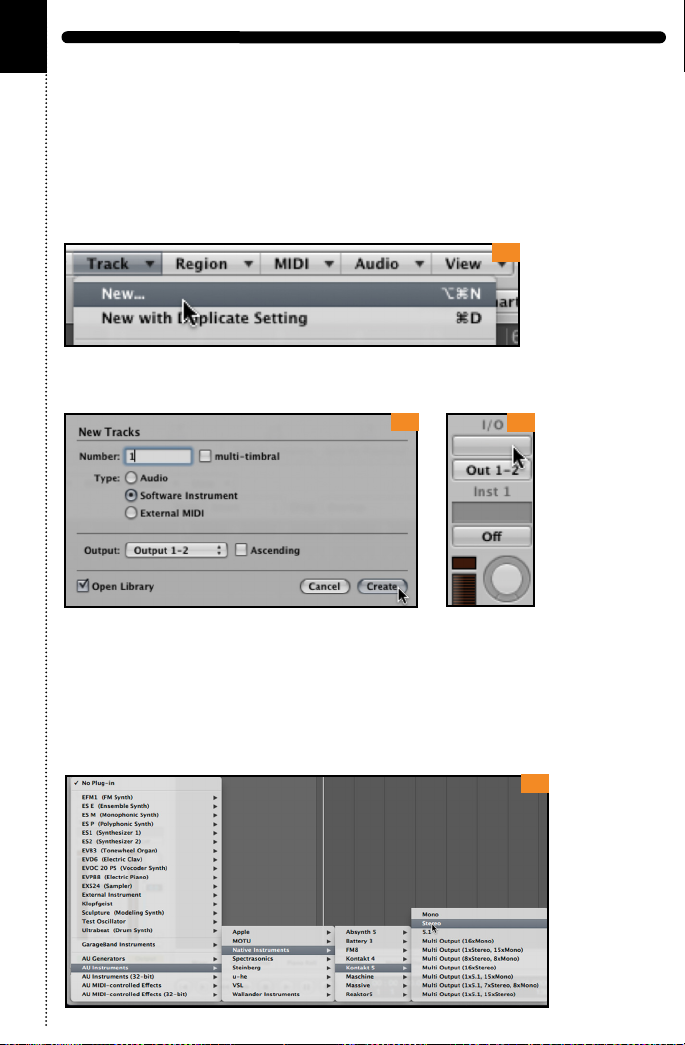
Once inside your Logic project, go to the Track mini-menu (in the central
area of your screen) and choose Track > New... [01]
01
The New Tracks dialog box will appear. Make sure Software Instrument is
selected, then click Create. [02]
02
03
The new instrument track will be created. On the left side of the screen you
will see the channel strip for that channel, including a fader, pan knob, and
various insert slots. Locate the blank slot just below the letters “I/O” and
above the output pair: [03]
Click there, and a list of available instrument plug-ins will appear. Choose AU
Instruments > Native Instruments > KONTAKT 5 > Stereo. [04]
04
CINEMATIC THUNDER
Page 15
The Kontakt window will appear, and a MIDI track will be created,
transmitting to Kontakt’s MIDI channel A-1. When it is record-enabled, it will
send any incoming MIDI played on your controller into Kontakt.
At this point, you can skip down in the instructions to the Getting Started
With CINEMATIC THUNDER section below.
USING KONTAKT IN GARAGEBAND
Users of Apple’s GarageBand can use Kontakt as an AudioUnit plug-in. These
instructions have been prepared in GarageBand 5 (which shipped with iLife ‘09),
although Kontakt may also work in earlier versions if the computer meets the system
requirements.
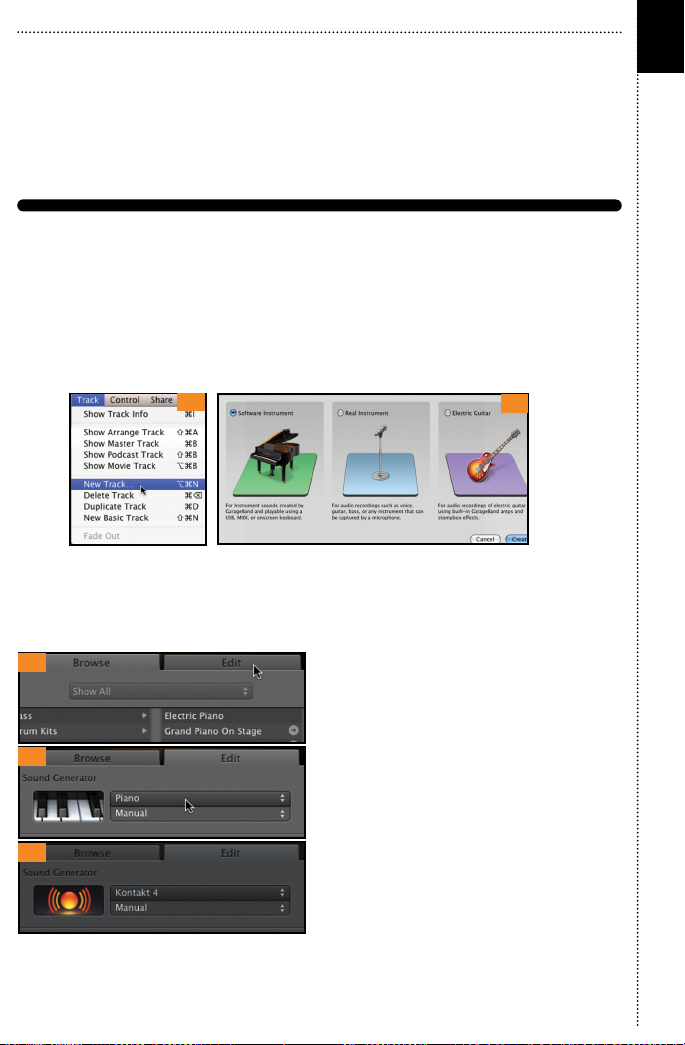
Once inside your GarageBand project, go to the Track menu and choose New Track.
[05]
05
06
A window with three choices will appear. Choose Software Instrument, then click
Choose. [06] On the right side of the interface, the Browse tab will be showing. Switch
to the Edit tab. [07] The Sound Generator will default to Piano. Click on Piano, and a
popup menu will appear. Choose Audio Unit Modules > KONTAKT 5. [08]
07
Note: GarageBand may default to inserting
eects, such as a compressor and a visual
EQ on on this track. This will color the sound. If
you don’t want these eects used, you can
08
remove them.
Once KONTAKT 5 is selected, the icon will change
to the AudioUnit icon (the ball with the sound
waves radiating outward). Double-click on
09
the icon to bring up the Kontakt window. [09]
The Kontakt window will appear, and a MIDI
track will be created, transmitting to Kontakt’s
MIDI channel A-1. When it is record-enabled, it will
send any incoming MIDI played on your controller into Kontakt.
At this point, you can skip down in the instructions to the Getting Started With
CINEMATIC THUNDER section below.
10
Page 16
11
USING KONTAKT AS AN AUDIOUNIT PLUG-IN IN DIGITAL PERFORMER
Users of MOTU’s Digital Performer can use Kontakt as an AudioUnit plug-in.
These instructions have been prepared in Digital Performer 6, although
Kontakt may also work in earlier versions if the computer meets the system
requirements.
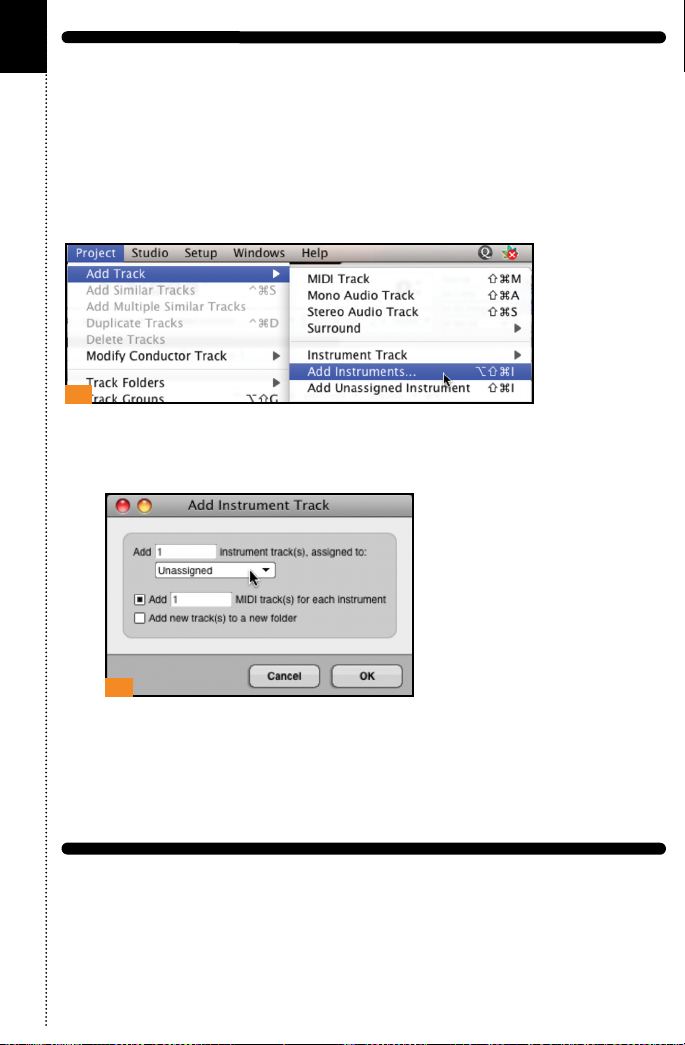
Once the project is open, go to the Project menu and choose Add Track >
Add Instruments... [01]
01
In the resulting dialog box, click on the Unassigned pulldown menu, and
choose Native Instruments > KONTAKT 5. You can also change the number
of MIDI tracks to be added, if you know you will want to use more than one.
[02]
02
The Kontakt window will appear, and a MIDI track will be created,
transmitting to Kontakt’s MIDI channel A-1. When it is record-enabled, it will
send any incoming MIDI played on your controller into Kontakt.
At this point, you can skip down in the instructions to the Getting Started
With CINEMATIC THUNDER section below.
USING KONTAKT AS AN RTAS PLUG-IN IN PRO TOOLS
Users of Digidesign’s Pro Tools (M-Powered, LE, or TDM) can use Kontakt as
an RTAS plug-in. These instructions have been prepared in Pro Tools 8,
although Kontakt may also work in earlier versions if the computer meets
the system requirements.
CINEMATIC THUNDER
Page 17
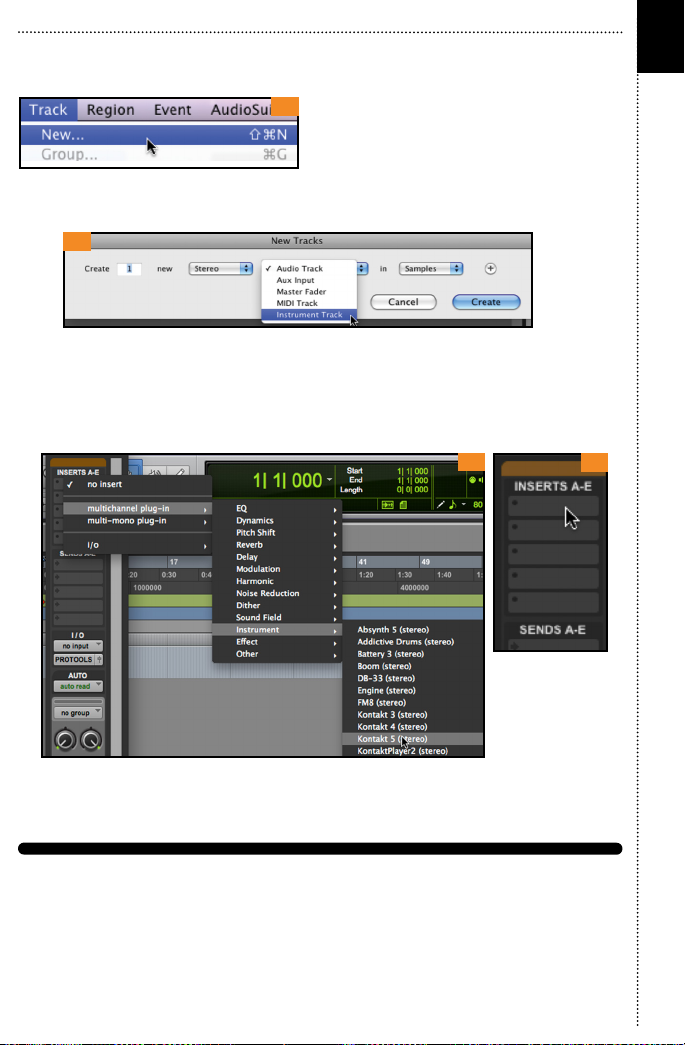
Once the project is open, go to the Track menu and choose New... [03]
03
In the dialog box that appears, choose the appropriate options, such as the
following: create 1 new stereo Instrument Track in samples. Then click Create.
04
[04]
Go to the Mix window and look at the channel strip for the instrument. At the
very top is an area for Inserts A-E. [05]
Click on the first of the five slots, and navigate through the popup menu to
choose multichannel plug-in > Instrument > KONTAKT 5. [06]
12
06
05
The Kontakt window will appear. At this point, you can skip down in the
instructions to the Getting Started With CINEMATIC THUNDER section
below.
USING KONTAKT AS A PLUG-IN IN ANOTHER HOST
There are too many host programs to cover here in detail, but any modern
sequencer that properly supports the VST, AudioUnit, or RTAS standards
should be able to use Kontakt properly, and load CINEMATIC THUNDER
within it. Consult the manual for your specific host to find out how to
instantiate the Kontakt virtual instrument.
Page 18
13
CHAPTER 04
CINEMATIC THUNDER/
WORKING WITH THE
INSTRUMENTS
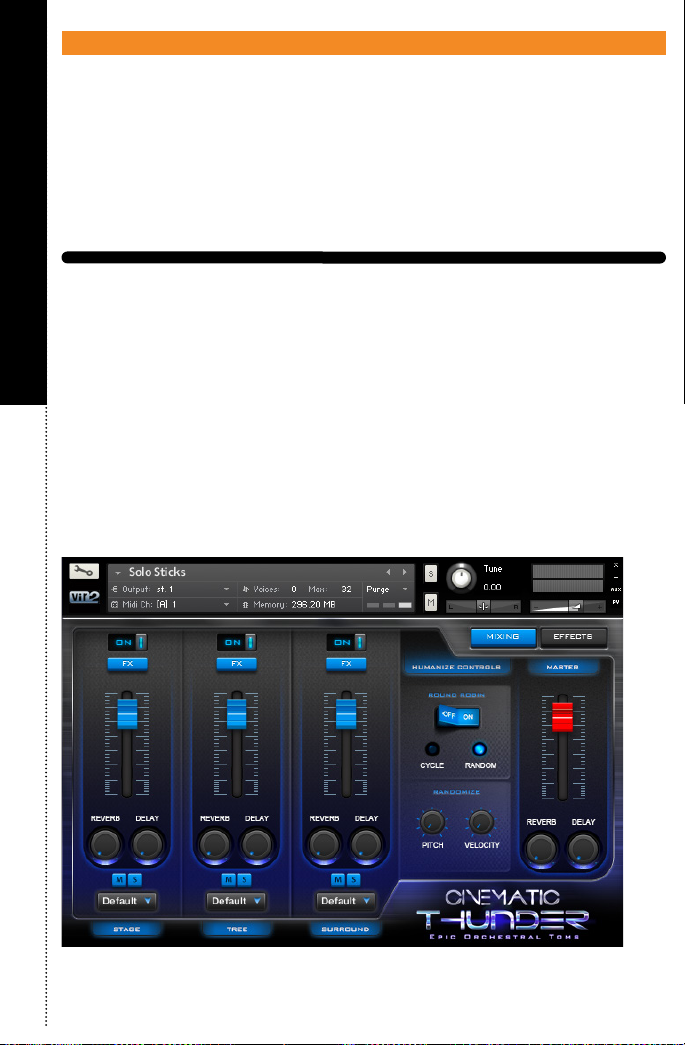
The CINEMATIC THUNDER interface is very easy to navigate. There are four
main pages; Mixer, Channel FX, and Master Insert FX.
MIXER
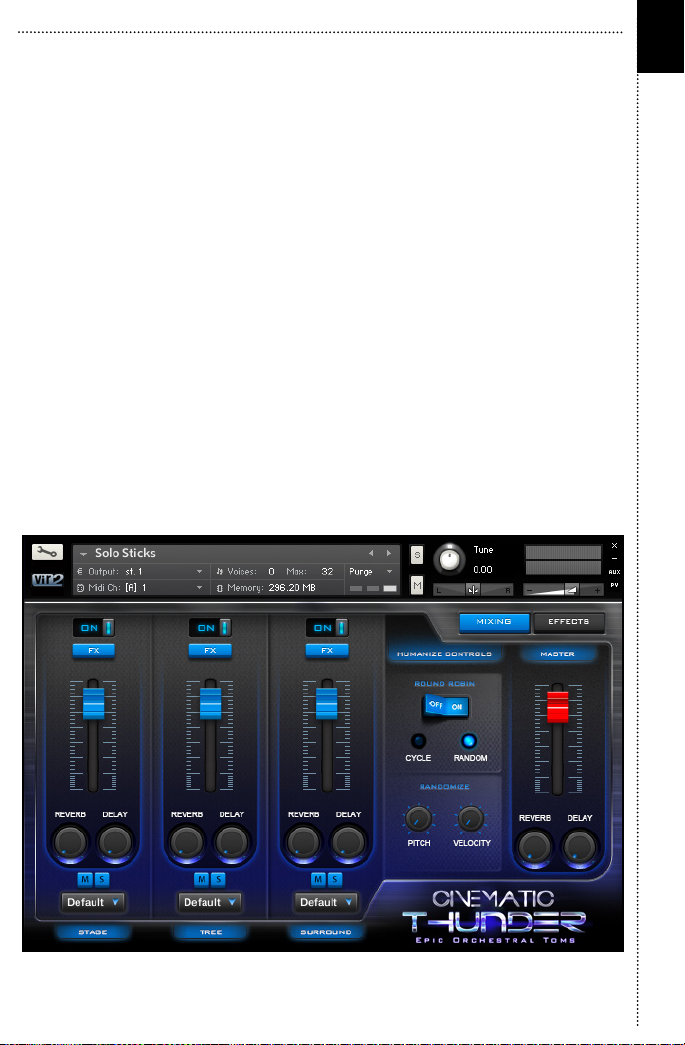
The mixer in Cinematic Thunder gives you complete control over each Mic
position. The easy to use, familiar controls make it easy to quickly tailor the
sound to your composition.
CHAPTER 04 / WORKING WITH THE INSTRUMENTS
The Mixing page contains controls for the Stage, Tree, and Surround mic
positions, as well as the Master buss. Each mic position has an On/O
switch. By default each mic position is On. When switched O, the samples
for that mic position are purged, freeing up RAM. The sample are reloaded
once switched back On.
CINEMATIC THUNDER
Page 19
Here is a description of each of the controls:
On/O Switch – disables or enables that Mic position. When O, samples will
be unloaded.
Pan Knob – controls the Mic position’s placement in the stereo field.
Volume Fader – controls the overall volume level for each Mic position or buss.
Solo (S) Button – temporarily isolates a mic position or buss while listening.
Mute (M) Button – temporarily silences a mic position or buss while listening.
Delay Knob – controls the amount of signal that is sent to the delay eect.
Reverb Knob – controls the amount of signal that is sent to the convolution
reverb eect.
FX Button – opens the Channel FX window.
Eects Button – opens the Master Insert FX window.
Humanize – introduces slight pitch, velocity and volume randomization to all
incoming notes to help create a more natural performance. The knobs adjust
how much of this eect will be applied to incoming notes. When set to 0% the
eect is not applied to any incoming notes. 0% is the default setting.
The Round Robin settings aect how the samples playback. There are three
modes: Cycle, Random and O. The Cycle mode sequentially plays back the
round robin groups. Random plays the round robin groups completely at
random allowing for groups to be repeated or skipped. O disables round
robin mode. When switched o, one sample group will playback for a uniform
and static performance.
14
NOTE - Humanize is not available on Group Random Hits since there is only
one sample group.
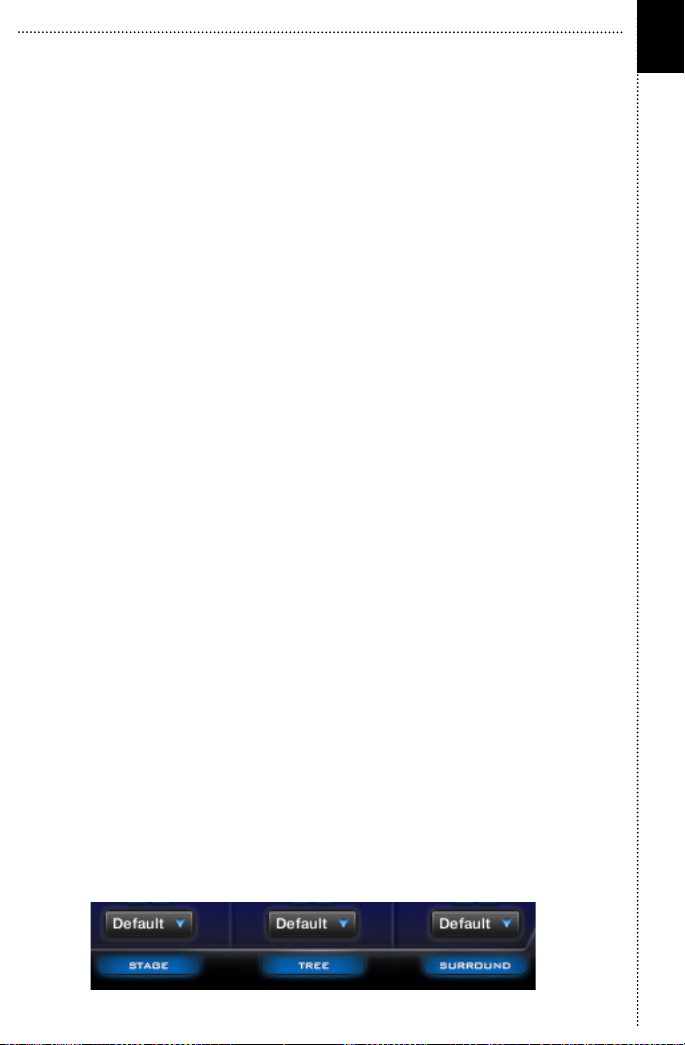
Routing Drop - Down Menu - Selects one of Kontakt’s outputs. By default this
is set to “Default.” Click on the the word “Default” above each mic position’s
label to see a list of available outputs. To create more outputs, see Chapter 14
of the Kontakt reference manual.
Page 20
15
CHANNEL FX
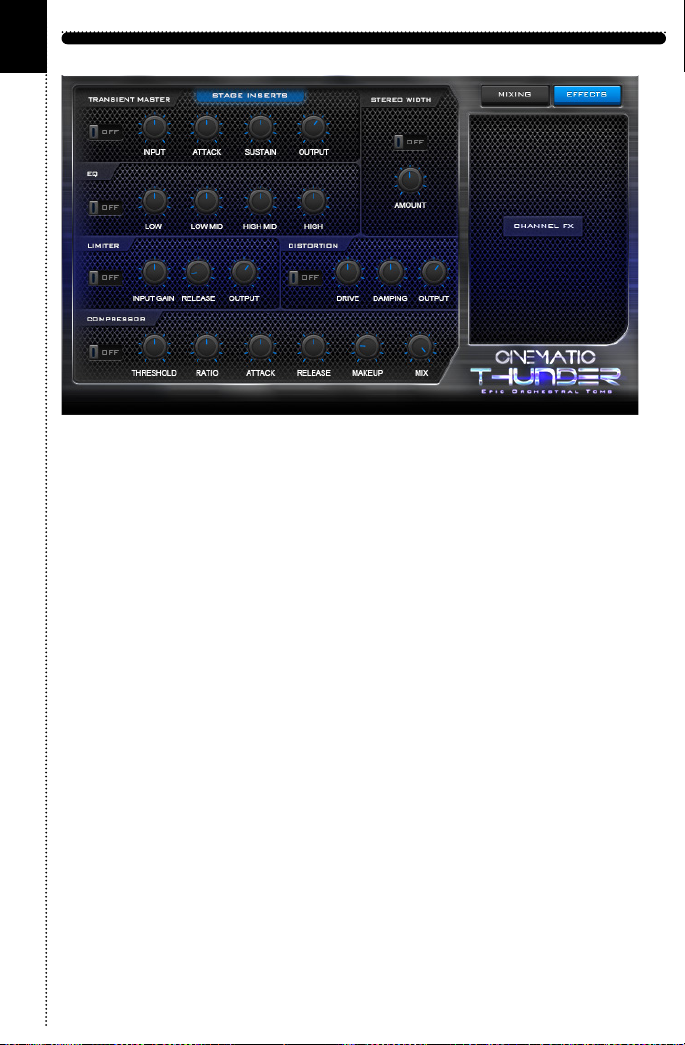
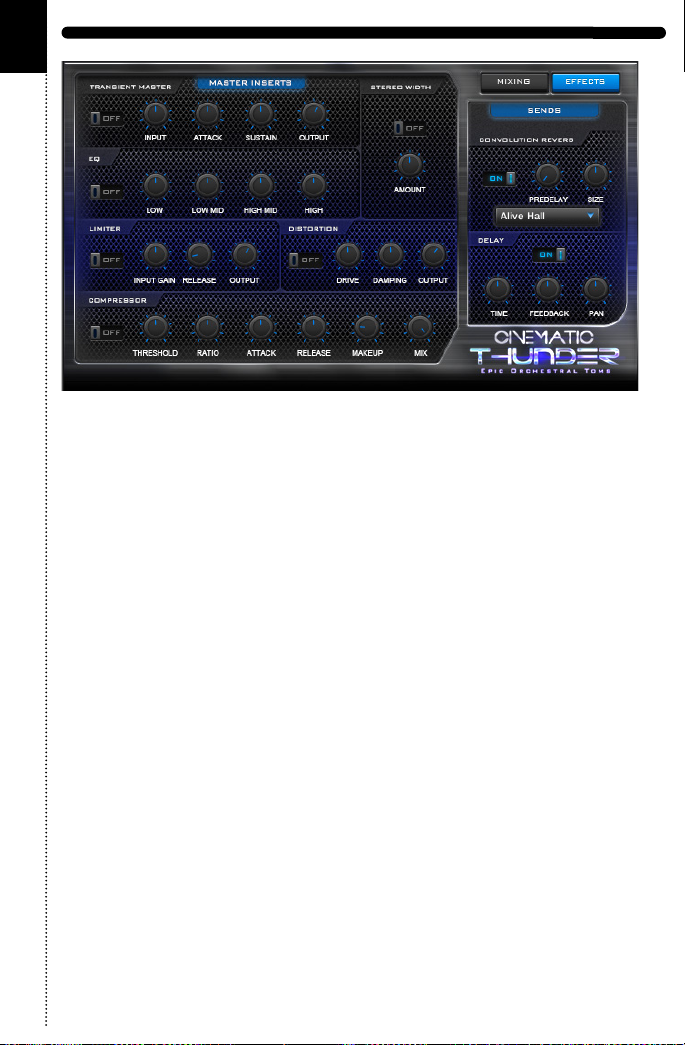
Each eect has an On/O switch. By default, all eects are o. To exit the
FX window, simply click the “Mixing” button.
If you are unfamiliar with any of the available eects, below is a brief
description to help acquaint you each of them:
Transient Master – Input - Controls the input gain to the eect.
Attack - Controls the scaling of the attack portion of the input signal’s
volume envelope. Increasing this parameter will add more punch and
decreasing it will reduce sharp attacks
Sustain - Controls the scaling of the sustain portion of the input signal’s
volume envelope. Increasing this parameter will add more body to the sound
and decreasing it will reduce the sound’s tail.
Output - Controls the output gain after the eect. For dynamic eects like
compressors, this is very important.
CINEMATIC THUNDER
Page 21

Solid G-Equalizer – LF Freq - Adjusts the center frequency of the low
frequency band at which the boost or cut will occur.
LF Gain - Adjusts the amount of boost or cut at the LF Frequency.
LMF Freq - Adjusts the center frequency of the low-mid frequency band at
which the boost or cut will occur.
LMF Gain - Adjusts the amount of boost or cut at the LMF Frequency.
LMF Q - Controls the width (or Q) of the low-mid frequency band. For most
EQs, the higher the width, the narrower the frequency band, but with this
EQ the control is reversed to match the hardware it emulates and becomes a
bandwidth control.
HMF Freq - Adjusts the center frequency of the high-mid frequency band at
which the boost or cut will occur.
HMF Gain - Adjusts the amount of boost or cut at the HMF Frequency.
HMF Q - Controls the width (or Q) of the high-mid frequency band. For
most EQs, the higher the width, the narrower the frequency band, but with
this EQ the control is reversed to match the hardware it emulates and
becomes a bandwidth control.
HF Freq - Adjusts the center frequency of the high frequency band at which
the boost or cut will occur.
16
HF Gain - Adjusts the amount of boost or cut at the HF Frequency.
Output - Controls the output gain after the eect.
Solid Bus Compressor – Threshold - Sets a level threshold above which the
Compressor starts working. Only levels that rise above this threshold will be
reduced by the compression; signals that stay below it will be left
unprocessed.
Ratio - Controls the amount of compression, expressed as a ratio of “input
level change” against “output level change.” A Ratio of 1:1 means that no
compression will be happening. For example, a Setting of 4 represents the
ratio 4:1, which means for every 4 decibel increase of amplitude above the
threshold, the output will increase by only 1 decibel.
Page 22

17
Attack - Adjusts the time the Compressor will take to reach the full Ratio
value after an input signal exceeds the Threshold level.
Release - Adjusts the time the compressor will take to fall back to non-
compression after the input signal falls below the threshold.
Makeup - Controls the output gain of the compressed signal. Used to
compensate for the gain reduction of the eect.
Mix - Controls the dry/wet mix of the compressor. This can be used to create
a parallel compression style routing, which increases the quieter signals
rather than reducing the louder ones. At a setting of 100% you will only hear
the compressed signal, at a setting of 0% you will only hear the unprocessed
input signal.
Output - Adjusts the compressor’s output level.
Stereo – Spread - Collapses (counter-clockwise) or expands (clockwise)
your signal’s stereo base. At the far left position, stereo signals will be
summed to mono. Positive values will result in an artificial widening of stereo
sources that has a tendency to apparently expand beyond the speakers, but
watch out – this can cause mono incompatibilities in your mix.
Output - Adjusts the Stereo eect output level.
Limiter – In Gain - Sets the gain of the input signal. The Limiter is dierent
from the Compressor in that it has a fixed threshold; to achieve a sensible
peak reduction, use this control to adjust the input gain until you see the
Attenuation meter responding only to occasional level peaks.
Release - Just like the Compressor’s control of the same name, this knob
adjusts the time it takes the Limiter to return to an unprocessed signal after
the input level falls below the threshold.
Output - Adjusts the Limiter’s output level.
CINEMATIC THUNDER
Page 23

Distortion - Drive - Adjusts the amount of distortion.
Damping - Turning this knob clockwise attenuates high frequencies in the
output signal, thereby counteracting the brightness caused by the artificial
harmonics.
Output - Adjusts the module’s output level. Since distortion boosts the gain
considerably, it’s often necessary to attenuate the signal at the output stage.
18
Page 24
19
Master Insert FX
Convolution Reverb - Pre Delay - Introduces a short delay between the
direct signal and the reverb trail build up. This corresponds to the natural
reverberation behavior of large rooms, where short time elapses before the
first reflection of a sound wave returns from a wall.
Size - Adjusts the size of the simulated room. This aects the duration of the
reverb tail.
Delay - Time - The delay time in milliseconds. To synchronize the time to
your host or Master Editor tempo, click on the Speed parameter’s unit
display and choose a note length value from the drop-down list.
Pan - Setting a value higher than 0 creates a panning eect, which alternates
echoes between the left and the right side of the stereo panorama – this is
aectionately called a ping-pong delay. Higher values will result in wider
panning; at 100, signals alternate between the far left and far right channel.
Feedb. - Controls the amount of the output signal that’s being fed back into
the input of the delay line, thereby creating a series of echoes that gradually
fade into silence.
CINEMATIC THUNDER
Page 25
Right Hit
Right Hit
Right Hit
Right Hit
Right Hit
Right Hit
8” Tom
20
CHAPTER 05
CINEMATIC THUNDER/
PATCH LAYOUT
Group
CHAPTER 05 / PATCH LAYOUT
Flam
Left Hit
Flam
Left Hit
Flam
Left Hit
Flam
Left Hit
Flam
Left Hit
Hits
10” Tom
12” Tom
14” Tom
16” Tom
CINEMATIC THUNDER
Flam
Left Hit
18” Tom
Page 26
Combo Hits
Roll*
5-stroke Ruff
3-stroke Ruff
Flam
Left Hit
Right Hit
Roll*
5-stroke Ruff
3-stroke Ruff
Flam
Left Hit
Right Hit
Roll*
5-stroke Ruff
3-stroke Ruff
Flam
Left Hit
Right Hit
Roll*
5-stroke Ruff
3-stroke Ruff
Flam
Left Hit
Right Hit
Roll*
5-stroke Ruff
3-stroke Ruff
Flam
Left Hit
Right Hit
Roll*
5-stroke Ruff
3-stroke Ruff
Flam
Left Hit
Right Hit
*
- Roll volume controlled by Mod wheel.
8” Tom
10” Tom
12” Tom
14” Tom
16” Tom
18” Tom
Solo
Mallets
21
Flams
Hits
Group
Random
CINEMATIC THUNDER
Page 27
- Roll volume controlled by Mod wheel.
*
Combo Hits
Roll*
5-stroke Ruff
3-stroke Ruff
Flam
Left Hit
Right Hit
Roll*
5-stroke Ruff
3-stroke Ruff
Flam
Left Hit
Right Hit
Roll*
5-stroke Ruff
3-stroke Ruff
Flam
Left Hit
Right Hit
Roll*
5-stroke Ruff
3-stroke Ruff
Flam
Left Hit
Right Hit
Roll*
5-stroke Ruff
3-stroke Ruff
Flam
Left Hit
Right Hit
Roll*
5-stroke Ruff
3-stroke Ruff
Flam
Left Hit
Right Hit
8” Tom
10” Tom
12” Tom
14” Tom
16” Tom
18” Tom
22
Solo
Mallets
Page 28
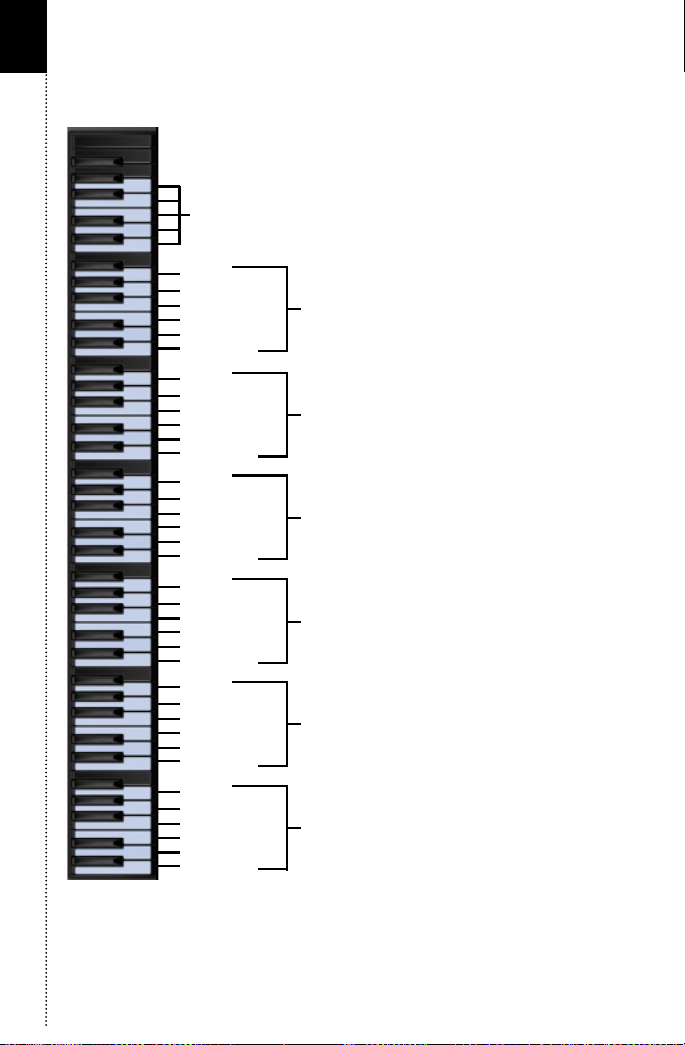
23
- Roll volume controlled by Mod wheel.
*
Combo Hits
Roll*
5-stroke Ruff
3-stroke Ruff
Flam
Left Hit
Right Hit
Roll*
5-stroke Ruff
3-stroke Ruff
Flam
Left Hit
Right Hit
Roll*
5-stroke Ruff
3-stroke Ruff
Flam
Left Hit
Right Hit
Roll*
5-stroke Ruff
3-stroke Ruff
Flam
Left Hit
Right Hit
Roll*
5-stroke Ruff
3-stroke Ruff
Flam
Left Hit
Right Hit
Roll*
5-stroke Ruff
3-stroke Ruff
Flam
Left Hit
Right Hit
8” Tom
10” Tom
12” Tom
14” Tom
16” Tom
18” Tom
Solo
Sticks
CINEMATIC THUNDER
Page 29
24
CHAPTER 06
CINEMATIC THUNDER/
TECH
SUPPORT,
ETC.
TECH SUPPORT
CHAPTER 06 / TECH SUPPORT, ETC.
Vir2 Instruments stands behind its products and is committed to helping you
get the most out of using them. Please check the Support area of the www.
vir2.com web site if you encounter any diculties in using the product. You
may also e-mail [email protected].
Before getting in touch with Vir2 Instruments regarding problems with the
product, make sure you are running the latest versions of the library, engine,
and Service Center. We are continuously updating and improving the
product, so it is possible that there are more recent updates available that
were released after the physical manufacturing of your installation disc.
THE FULL VERSION OF KONTAKT 5
CINEMATIC THUNDER ships with KONTAKT 5 running in library mode,
meaning it is fully able to play back the CINEMATIC THUNDER library and
access the parameters detailed in this manual.
Registered owners of CINEMATIC THUNDER are eligible for a special
crossgrade discount to the full version of KONTAKT 5, which enables users
to create their own libraries, import libraries in non-Kontakt formats, and
access numerous deep editing features.
Visit www.nativeinstruments.com for details on the Kontakt crossgrade.
LICENSE AGREEMENT
The samples contained herein are licensed, not sold to you, the individual
end user, by Vir2 Instruments. This non-exclusive, non-transferable license is
granted only to the individual end user who has purchased an unopened,
new, and lawfully made copy of this product from a dealer or distributor
authorized by Vir2 Instruments. All samples remain the property of Vir2
Instruments and are licensed only for use in the creation of a live or recorded
CINEMATIC THUNDER
Page 30

25
performance that includes the licensed samples as part of a derivative
musical work created by the licensed end user. This license expressly forbids
resale, rental, loan, gift, or transfer of these samples in any format or via any
medium, except as part of a derivative musical work. The samples may not
be included, whether unmodified or as part of a derivative work, in any
sample library product. Any unlicensed usage will be prosecuted to the
maximum extent possible under the law.
CREDITS
Produced by: Sam Estes and Vir2 Instruments
Percussionists: Satnam Ramgotra and Chris Peck
Recording Engineer: Nils Montan
Sample Editing and Patching: Chris Peck
Kontakt Scripting: Mario “Evil Dragon” Kruselj
Graphic Design: Joel Contrares
Layout: Andrew Kosloske
Manual: Chris Peck
All specifications subject to change.
CINEMATIC THUNDER
Page 31

© 2013 Vir2 Instruments.
All trademarks used are property of their respective owners.
Specifications subject to change.
 Loading...