

Page 1
USER MANUAL
Page 2
Produced by Vir2 Instruments
Vir2 Instruments is an international
team of sound designers,
musicians, and programmers who
specialize in creating the world’s
most advanced virtual instrument
libraries. Vir2 is producing the
instruments that shape the
sound of modern music.
29033 Avenue Sherman, Suite 201
Valencia, CA 91355
Phone:661.295.0761
Web:www.vir2.com
USER MANUAL
Page 3
00
Acou6tics/
CHAPTER 11
43 ADVANCED SETUP: CHORD SETUP
00
TABLE OF CONTENTS
CHAPTER 01
01 INTRODUCTION TO THE LIBRARY
TABLE OF CONTENTS
CHAPTER 02
03 REQUIREMENTS AND INSTALLATION
CHAPTER 03
05 USING KONTAKT
CHAPTER 04
13 GETTING STARTED W/ MIC & FX
CHAPTER 05
15 CHORDS
CHAPTER 06
17 KEYSWITCHES
CHAPTER 07
33 PLAYBACK
CHAPTER 08
37 ADVANCED SETUP
CHAPTER 09
38 ADVANCED SETUP: PLAYBACK SETUP
CHAPTER 12
45 ADVANCED SETUP: NOISE SETUP
CHAPTER 13
49 ADVANCED SETUP: PITCH BEND & VIBRATO SETUP
CHAPTER 14
50 ADVANCED SETUP: STRUMMING SETUP
CHAPTER 15
52 ADVANCED SETUP: FINGER SETUP
CHAPTER 16
53 ADVANCED SETUP: HUMANIZE SETUP
CHAPTER 17
56 ADVANCED SETUP: LEGATO SETUP
CHAPTER 18
60 ADVANCED SETUP: VOLUME & DYNAMIC SETUP PER
ARTICULATION
CHAPTER 19
62 ADVANCED SETUP: VOLUME & DYNAMIC SETUP PER
STRING & FRET
CHAPTER 20
64 LEGATO SAMPLE START SETUP
CHAPTER 10
41 ADVANCED SETUP: STRING SETUP
acou6tics
ACOU6TICS
CHAPTER 21
65 QUICK START
Page 4
CHAPTER 01
01
Acou6tics/
INTRODUCTION
TO THE
LIBRARY
Thank you for purchasing Acou6tics.
Acou6tics is powered by the industry-leading Kontakt
engine. It is compatible with VST, AudioUnit, RTAS (Pro
Tools 9 and higher) and AAX (Pro Tools 10 & 11) plug-in
formats allowing it to work seamlessly within any major
sequencer, in addition to standalone use.
**A how to use ‘QUICK START’ can be found on page
02
Following in the footsteps of Vir2 Instruments’ award-
winning electric guitar virtual instrument “Electri6ity”,
CHAPTER 01 / INTRODUCTION TO THE LIBRARY
Acou6tics applies the same advanced technologies to
re-imagine the virtual acoustic guitar. Vir2 has
meticulously recorded six dierent acoustic
instruments: a steel-string guitar, twelve-string, nylon
string, ukulele, mandolin, guitalele and presents them
in astonishing detail. It features both plectrum and
finger picking, as well as Blumlein stereo recordings
alongside the piezo pickup perspective. Thousands of
samples across more than a dozen articulations were
recorded for each instrument including sustains, mutes,
releases, legatos, hammer-ons and pull-os, slides,
harmonics, and eects. Acou6tics also features virtual
room control with adjustable mic distance and
sympathetic resonance.
63 of the Acou6tics manual.
acou6tics
Page 5
CHAPTER 02
03
Acou6tics/
REQUIREMENTS
AND
INSTALLATION
an instrument plug-in from within your preferred host application. Click on
the Libraries tab from the Kontakt browser on the left side of the Kontakt
interface. Just below “Libraries,” click on “Add Library.” A “Locate Folder”
window will appear. Navigate to the Acou6tics Library folder, highlight it,
then click “Choose”. Acou6tics should now appear in Kontakt’s library
browser..
UPDATING
04
SYSTEM REQUIREMENTS
For Mac users, Acou6tics requires OS 10.7.3 or greater, an Intel Core Duo
2.0GHz or higher, a USB port, and minimum 2GB of RAM.
For Windows users, Acou6tics requires Windows 7 or 8 (latest s.p.), 32 or
64 compatible, an Intel Core Duo 2.0GHz or higher, a USB port, and
CHAPTER 02 / REQUIREMENTS AND INSTALLATION
minimum 2GB of RAM.
The library requires approximately 13GB of disk space.
Vir2 Instruments strongly recommends more than 4GB of RAM and an 88key controller in order to use Acou6tics to its fullest potential.
INSTALLING
The installation of Acou6tics consists of two separate steps: the installation
of the Kontakt engine, and the installation of the Acou6tics library.
In the Acou6tics folder, you will see the installers for Kontakt 5 and the
Acou6tics library folder. Move the Acou6tics library folder to any location
on your hard drive, then run the Kontakt 5 installer.
The Kontakt installer will install the Kontakt Player engine, its standalone
application, all of its plug-in versions, and the Service Center authorizer
program. We recommend the Easy Install and that the install locations for
each component are left at their default settings.
The Acou6tics library is approximately 13GB in size, and can be installed on
any available hard drive. For speed reasons, we recommend it be installed
on internal or eSATA drives. A Firewire drive is also acceptable. An external
USB drive may give somewhat less optimized performance. We also
recommend 7200rpm drives or SSDs regardless of the interface used.
After installation, please make sure that you are fully updated to the most
recent versions of the three components that make up the Acou6tics
package: the library (which contains all the patch information and
programming), the engine (which is powered by Kontakt), and the
authorizer (Service Center). It is possible that any of these components
may have a more recent version than shipped in your physical package, so
you should check for updates to each of these three. You can do this by
visiting the vir2.com web site and checking the Support area.
AUTHORIZING
After you’ve completed installation, Acou6tics will be working in demo
mode, meaning it will only work for 15 minutes at a time. To fully authorize
it, launch Service Center (found in the Applications folder on a Mac, or the
Program Files folder on Windows) and follow its instructions. You will be
prompted to enter your e-mail address and password that make up your
Native Instruments account, or will be given an option to create an
account if you don’t already have one. Once inside the Service Center, it
will give you a list of all the Native Instruments and NI-powered products
on your hard drive and give you the option to activate them. You are
allowed to install and use Acou6tics on up to two computers
simultaneously.
Service Center will guide you through the process for either online
(instant) activation, or oine activation if the computer on which you
installed Acou6tics does not have direct access to the internet.
Once Kontakt is installed, launch the standalone application, or open it as
acou6tics
Page 6
CHAPTER 03
05
Acou6tics/
USING
KONTAKT
HOW TO ACCESS THE ACOU6TICS LIBRARY FROM KONTAKT
CHAPTER 03 / USING KONTAKT
Acou6tics ships as a Kontakt-powered library, and Acou6tics is opened
from within Kontakt, which can be run either as a standalone application, or
as a plug-in hosted by any major sequencer on either Macintosh or
Windows platforms. All these versions are installed by the Easy Install
option of the installer.
Users who don’t own a sequencer, or would like to simply boot up and be
able to play Acou6tics, can go to their Applications folder (Mac) or Program
Files folder (Windows) to launch Native Instruments > Kontakt.
Users who wish to use Acou6tics for sequencing or recording should use it
in plug-in mode within a host sequencer. Kontakt supports the VST,
AudioUnit, and RTAS plug-in formats. Any host sequencer that supports
these plug-in formats properly will be able to use Kontakt. Instructions vary
slightly from sequencer to sequencer, but the general procedure is to
instantiate Kontakt as a virtual instrument plug-in, then load an Acou6tics
instrument in Kontakt, then route a MIDI track to Kontakt so it can be
triggered and recorded.
The following instructions will help standalone and plug-in users get up and
running quickly with a basic track of Acou6tics.
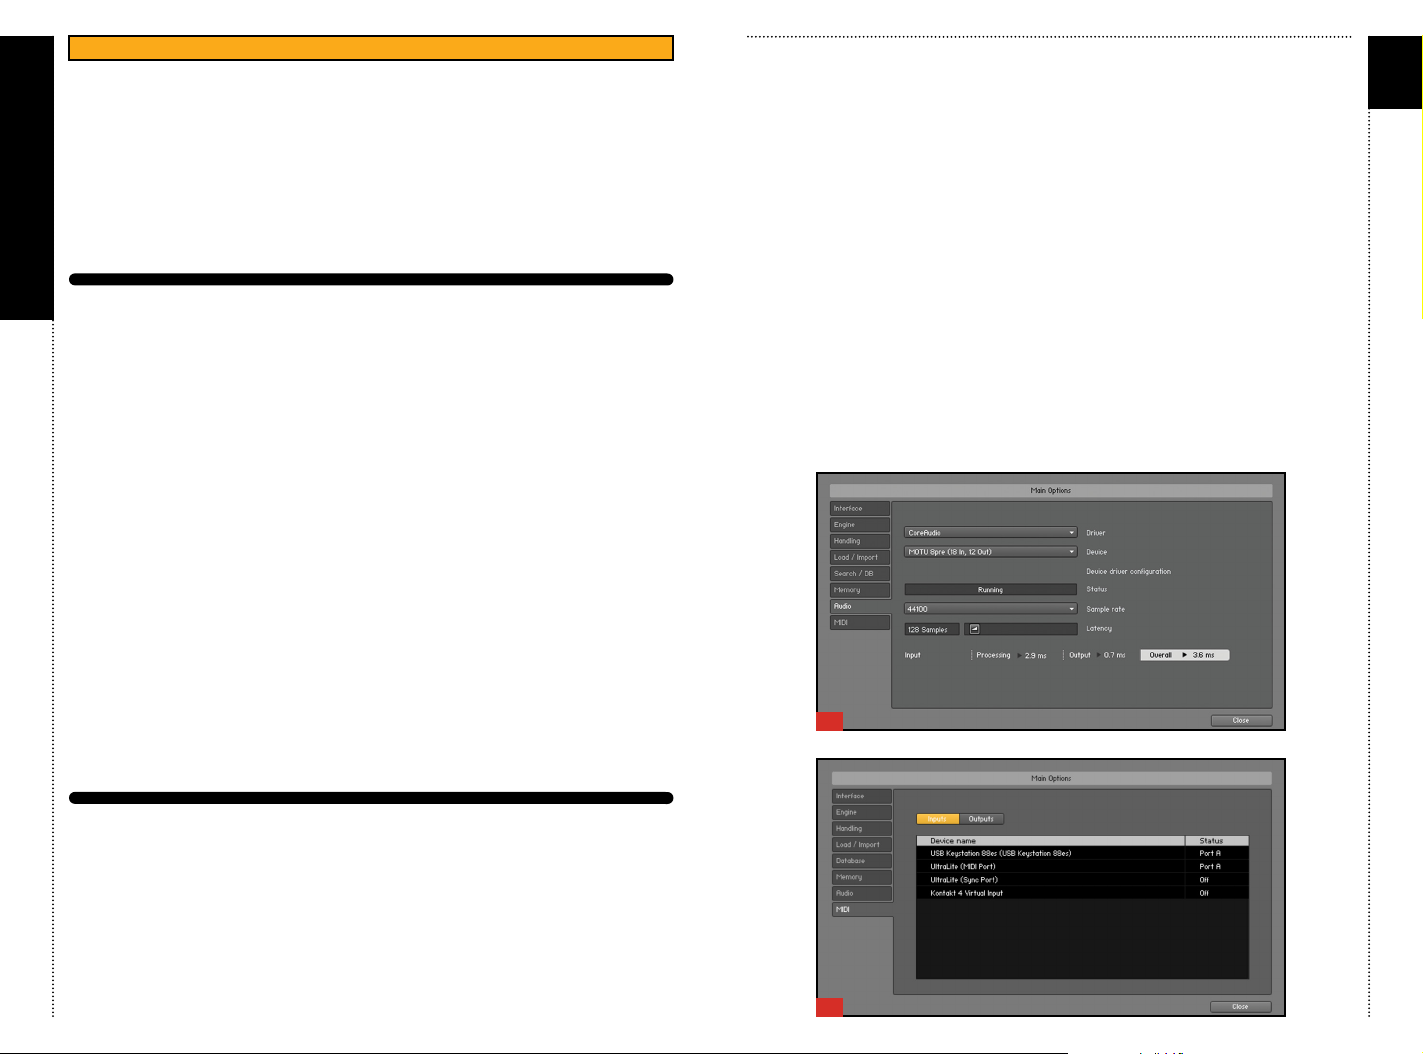
reasonably low for good latency performance. We recommend 256 samples
or less. The lower the latency slider, the less latency (the split second
between the physical playing of the note and the sound coming out of
Kontakt) will be, but the harder the computer will have to work. Typical
useful values range between 128 and 256, however very fast computers may
be able to handle lower values, while very slow computers may need higher
values. [01]
The MIDI page of the Options dialog box must be configured in order to let
Kontakt know which MIDI device(s) to respond to. Kontakt will respond to
up to four MIDI input ports (A, B, C, and D), so we recommend you switch
one MIDI source on to Port A, as shown in the graphic below. [02]
More detailed information on the setup options can be found in the
accompanying Kontakt manual.
Once you have completed Kontakt setup, jump ahead to the Getting
Started with Acou6tics section below.
01
06
USING KONTAKT IN STANDALONE MODE
The standalone Kontakt application can be found in the Applications >
Kontakt 5 folder for Mac users, or Program Files > Native Instruments >
Kontakt 5 for Windows users.
After launching the Kontakt application for the first time, you will be
presented with a dialog box to set up your audio and MIDI settings. Settings
will vary for each user according to the specific setup, but the important
thing is to route the audio to a valid audio device, and to set the buer
acou6tics
02
Page 7
07
USING KONTAKT AS A VST PLUG-IN IN CUBASE AND NUENDO
Users of Steinberg’s Cubase or Nuendo sequencers can use Kontakt as a
VST plug-in. These instructions have been prepared in Cubase 5, although
Kontakt may also work in earlier versions if the computer meets the system
requirements.
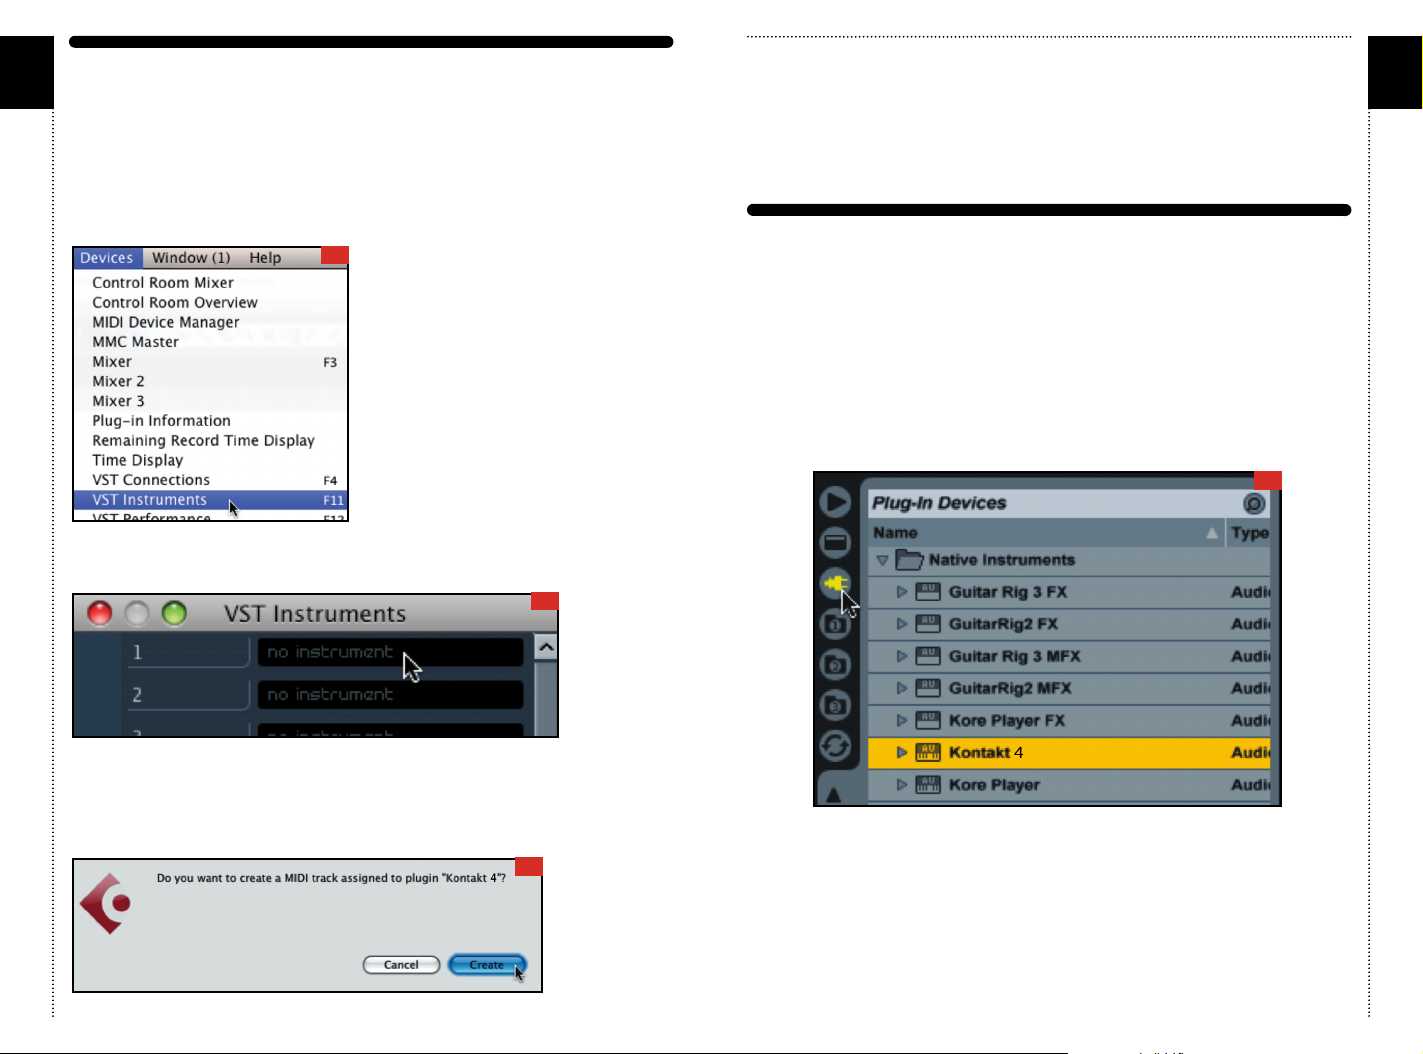
Once the project is open, go to the Devices menu and choose VST
Instruments: [01]
01
When the VST Instruments window appears, click in the first available slot in
which “no instrument” is listed. [02]
02
The Kontakt window will appear, and a MIDI track will be created,
transmitting to Kontakt’s MIDI channel A-1. When it is record-enabled, it will
send any incoming MIDI played on your controller into Kontakt.
At this point, you can skip down in the instructions to the Getting Started
With Acou6tics section below.
USING KONTAKT AS A VST OR AUDIOUNIT PLUG-IN IN ABLETON LIVE
Users of Ableton Live can use Kontakt as a VST or AudioUnit plug-in,
depending on the version. The functionality is the same. These instructions
have been prepared in Live 7, although Kontakt may also work in earlier or
later versions if the computer meets the system requirements.
Once the project is open, go to the left side and click on the third icon
down to show the Plug-in Devices list, then scroll to the Native Instruments
folder and locate Kontakt 5: [04]
04
08
A popup menu will appear; choose Kontakt 5.
An alert box will appear asking if you want to create a MIDI track assigned
to the Kontakt 5 plug-in. Click Create. [03]
03
acou6tics
Drag Kontakt 5 into the central area where the text “Drop Files and Devices
Here” is shown.
The Kontakt interface will appear, and it will already be actively transmitting
to Kontakt’s MIDI channel A-1. When it is record-enabled, it will send any
incoming MIDI played on your controller into Kontakt.
At this point, you can skip down in the instructions to the Getting Started
With Acou6tics section below.
Page 8
09 10
USING KONTAKT AS AN AUDIOUNIT PLUG-IN IN LOGIC PRO, LOGIC
STUDIO, LOGIC EXPRESS, ETC.
Users of Apple’s Logic can use Kontakt as an AudioUnit plug-in. These
instructions have been prepared in Logic Pro 8, although Kontakt may also
work in earlier versions if the computer meets the system requirements.
The Kontakt window will appear, and a MIDI track will be created,
transmitting to Kontakt’s MIDI channel A-1. When it is record-enabled, it will
send any incoming MIDI played on your controller into Kontakt.
At this point, you can skip down in the instructions to the Getting Started
With Acou6tics section below.
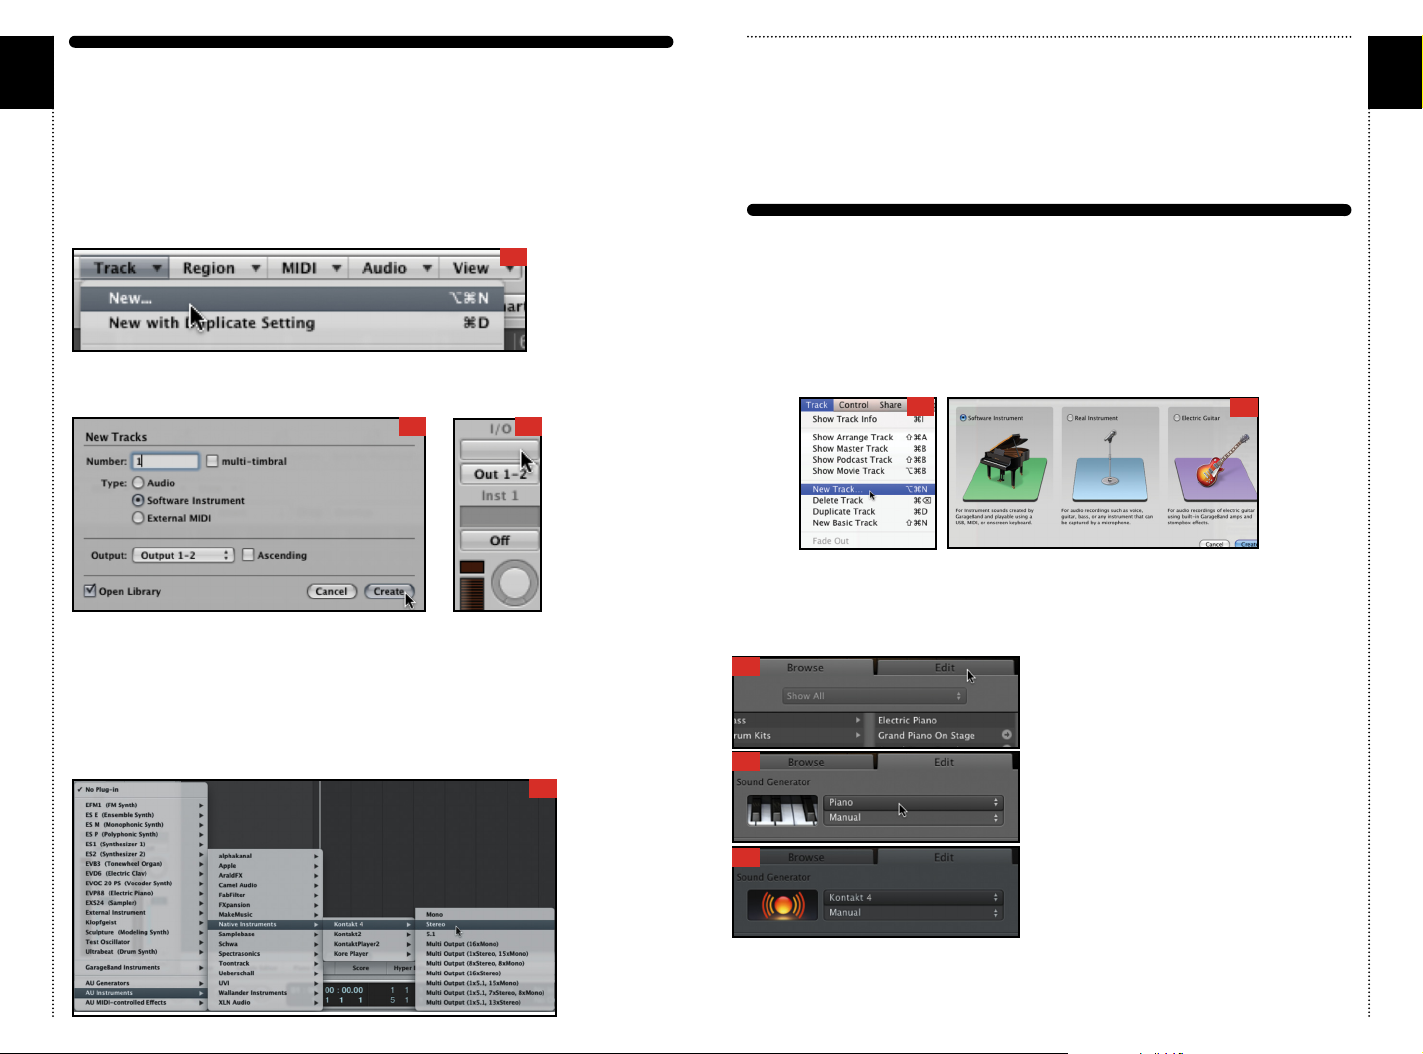
Once inside your Logic project, go to the Track mini-menu (in the central
area of your screen) and choose Track > New... [01]
01
USING KONTAKT IN GARAGEBAND
Users of Apple’s GarageBand can use Kontakt as an AudioUnit plug-in. These
instructions have been prepared in GarageBand 5 (which shipped with iLife ‘09),
although Kontakt may also work in earlier versions if the computer meets the system
requirements.
The New Tracks dialog box will appear. Make sure Software Instrument is
selected, then click Create. [02]
02
03
Once inside your GarageBand project, go to the Track menu and choose New Track.
[05]
05
06
A window with three choices will appear. Choose Software Instrument, then click
The new instrument track will be created. On the left side of the screen you
will see the channel strip for that channel, including a fader, pan knob, and
various insert slots. Locate the blank slot just below the letters “I/O” and
above the output pair: [03]
Click there, and a list of available instrument plug-ins will appear. Choose
AU Instruments > Native Instruments > Kontakt 5 > Stereo. [04]
04
Choose. [06] On the right side of the interface, the Browse tab will be showing. Switch
to the Edit tab. [07] The Sound Generator will default to Piano. Click on Piano, and a
popup menu will appear. Choose Audio Unit Modules > Kontakt 5. [08]
07
Note: GarageBand may default to inserting
eects, such as a compressor and a visual EQ
this track. This will color the sound. If you don’t
want these eects used, you can remove
08
them.
Once Kontakt 5 is selected, the icon will
change to the AudioUnit icon (the ball with
the sound waves radiating outward). Double-click
09
on the icon to bring up the Kontakt window.
[09]
The Kontakt window will appear, and a MIDI
track will be created, transmitting to Kontakt’s
MIDI channel A-1. When it is record-enabled, it will send any incoming MIDI played on
your controller into Kontakt.
acou6tics
Page 9
11 12
USING KONTAKT AS AN AUDIOUNIT PLUG-IN IN DIGITAL PERFORMER
Users of MOTU’s Digital Performer can use Kontakt as an AudioUnit plug-in.
Once the project is open, go to the Track menu and choose New... [03]
03
These instructions have been prepared in Digital Performer 6, although
Kontakt may also work in earlier versions if the computer meets the system
requirements.
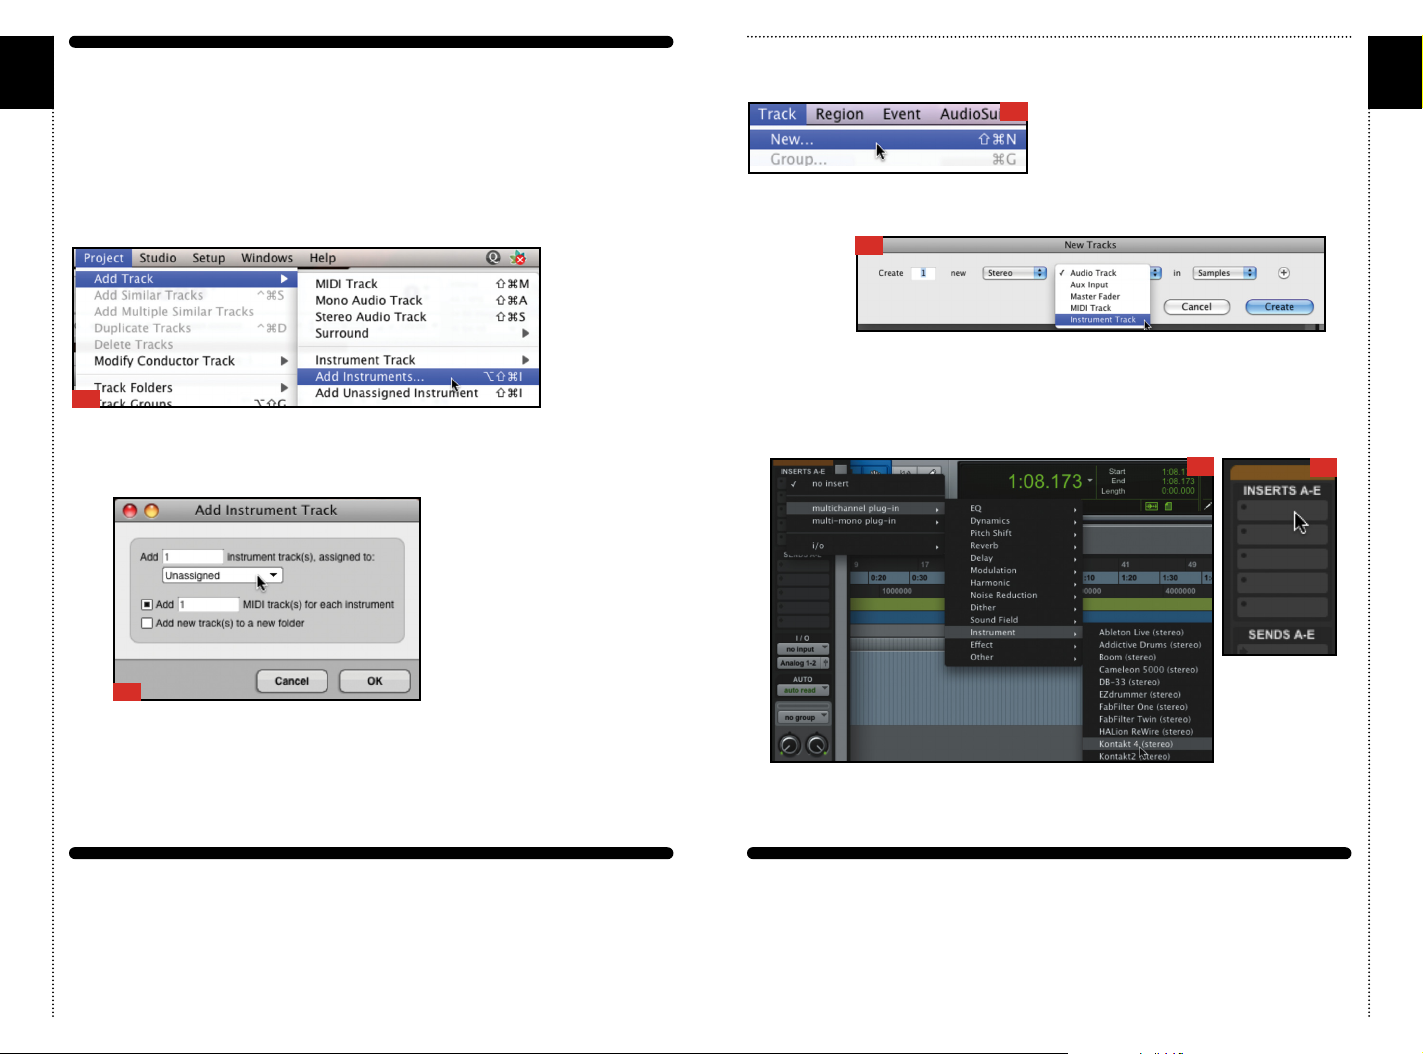
Once the project is open, go to the Project menu and choose Add Track >
Add Instruments... [01]
In the dialog box that appears, choose the appropriate options, such as the
following: create 1 new stereo Instrument Track in samples. Then click
Create. [04]
04
Go to the Mix window and look at the channel strip for the instrument. At
the very top is an area for Inserts A-E. [05]
01
In the resulting dialog box, click on the unassigned pull down menu, and
choose Native Instruments > Kontakt 5. You can also change the number of
Click on the first of the five slots, and navigate through the popup menu to
choose multichannel plug-in > Instrument > Kontakt 5. [06]
06
05
MIDI tracks to be added, if you know you will want to use more than one.
[02]
02
The Kontakt window will appear, and a MIDI track will be created,
transmitting to Kontakt’s MIDI channel A-1. When it is record-enabled, it will
send any incoming MIDI played on your controller into Kontakt.
At this point, you can skip down in the instructions to the Getting Started
With Acou6tics section below.
USING KONTAKT AS AN RTAS PLUG-IN IN PRO TOOLS
Users of Digidesign’s Pro Tools (M-Powered, LE, or TDM) can use Kontakt as
an RTAS or AAX plug-in. These instructions have been prepared in Pro Tools
8, although Kontakt may also work in earlier versions if the computer meets
the system requirements.
acou6tics
The Kontakt window will appear. At this point, you can skip down in the
instructions to the Getting Started With Acou6tics section below.
USING KONTAKT AS A PLUG-IN IN ANOTHER HOST
There are too many host programs to cover here in detail, but any modern
sequencer that properly supports the VST, AudioUnit, or RTAS standards
should be able to use Kontakt properly, and load Acou6tics within it. Consult
the manual for your specific host to find out how to instantiate the Kontakt
virtual instrument.
Page 10
CHAPTER 04
13
Acou6tics/
GETTING STARTED
W/ MIC & FX
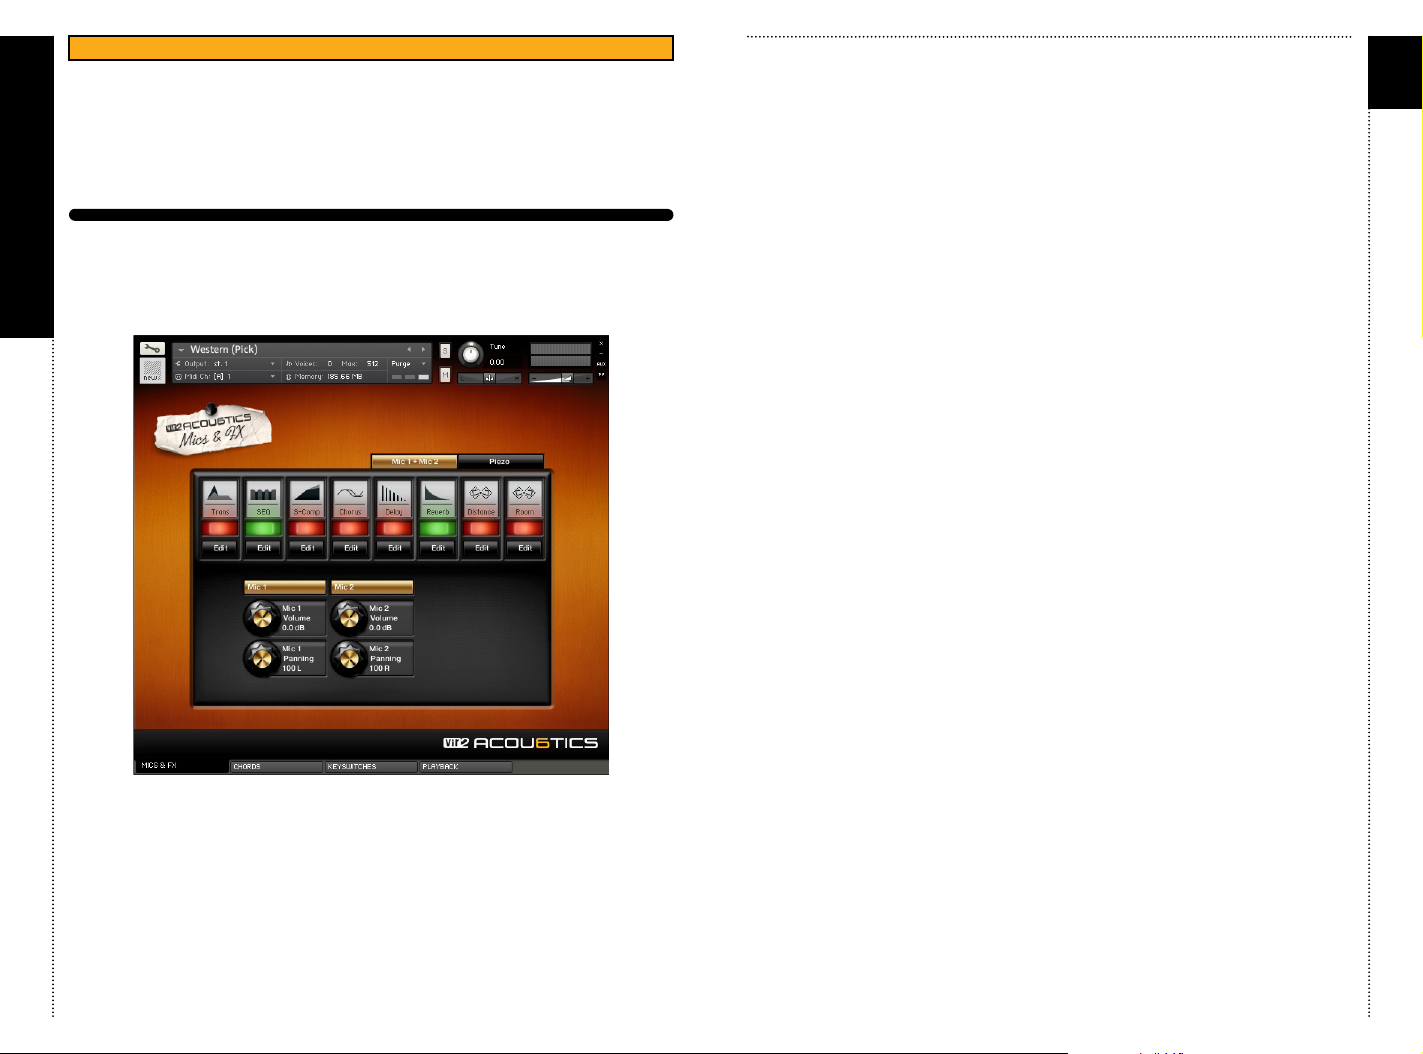
MIC & FX | MIC 1 | MIC 2 | PIEZO
CHAPTER 04 / MIC & FX
14
You can also change the volume and panning for each microphone on this
page. By default, the stereo pair ‘Mic 1 + Mic 2’ is loaded. To load or purge
any of the channels, simply click on the ‘Mic 1’, ‘Mic 2’ or the ‘Piezo’ button.
When the button is highlighted, the samples are loaded. If it’s black, the
samples are purged from memory.
NOTE: If you have performance issues, you can disable all mics except one
(e.g. Mic 1), then later load all the other samples when doing the mixdown
of your track. Also make sure to raise your buer size when having
performance issues. With lower audio buer sizes, the Kontakt engine
needs more and more CPU!
The page is split into two tabs: ‘Mic 1 + Mic 2’ and ‘Piezo’. Each tab has its
own FX which can be turned on or o separately. You can switch the
various build-in FX by clicking on the on/o button. To edit the FX
parameters simply click on ‘Edit’ and to close the FX page, press ‘Edit’
again.
acou6tics
Page 11
CHAPTER 05
15
Acou6tics/
CHORDS
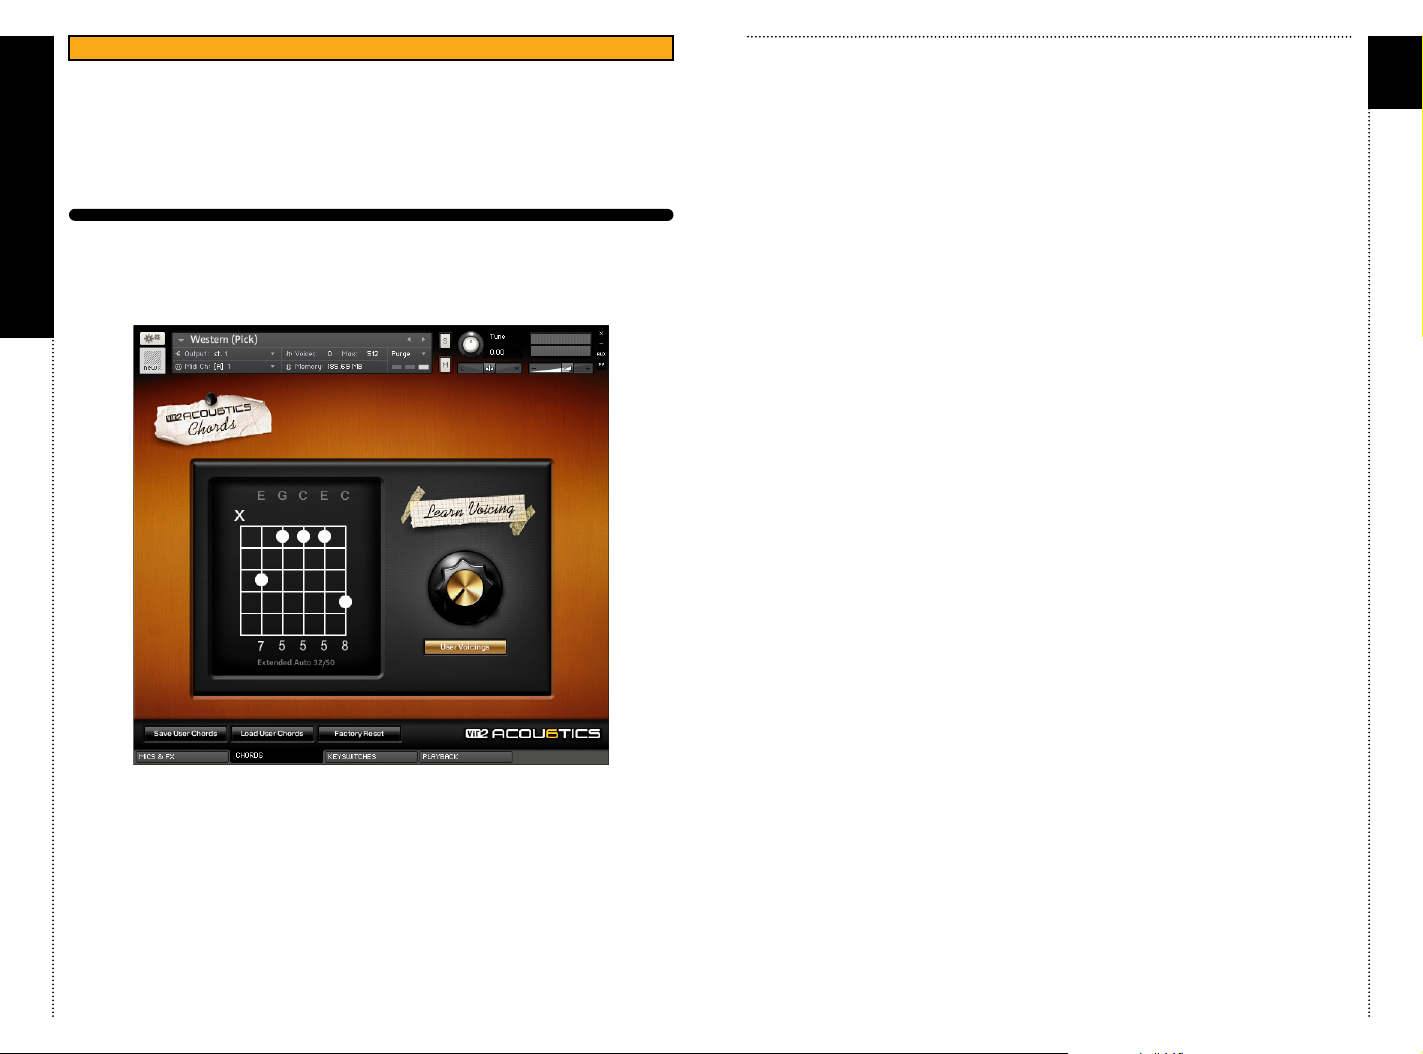
CHORDS | USER VOICINGS | SAVE/LOAD USER CHORDS | FAC. RESET
CHAPTER 05/ CHORDS
16
If you have built yourself a library with custom chords and you now want to
use them in all instruments - which have the same amount of strings and
the same tuning, e.g. Nylon, Western & 12 String, simply press ‘Save User
Chords’. If you want to change some chords for one session, but you decide
to use your default library again at a later point, simply press ‘Load User
Chords’. To reset all chords to their original voicing, press ‘Factory Reset’.
This is also useful to completely start a new chord library from scratch.
Note: Adding a capo makes it necessary to learn your user chords again. All
previously learned chords, without capo added, won’t be overwritten.
Whenever you remove the capo all your user chords are back as they were
before. You can create a user chord library for each fret you put a capo on.
On the Chord tab you can create custom chord libraries. To do so, simply
activate ‘User Voicings’ by clicking on the button. If you now play a chord,
you can select the voicing you’d like to hear, whenever that chord is played.
To change the chord you want played, rotate the knob.
acou6tics
Page 12
CHAPTER 06
17
Acou6tics/
KEYSWITCHES
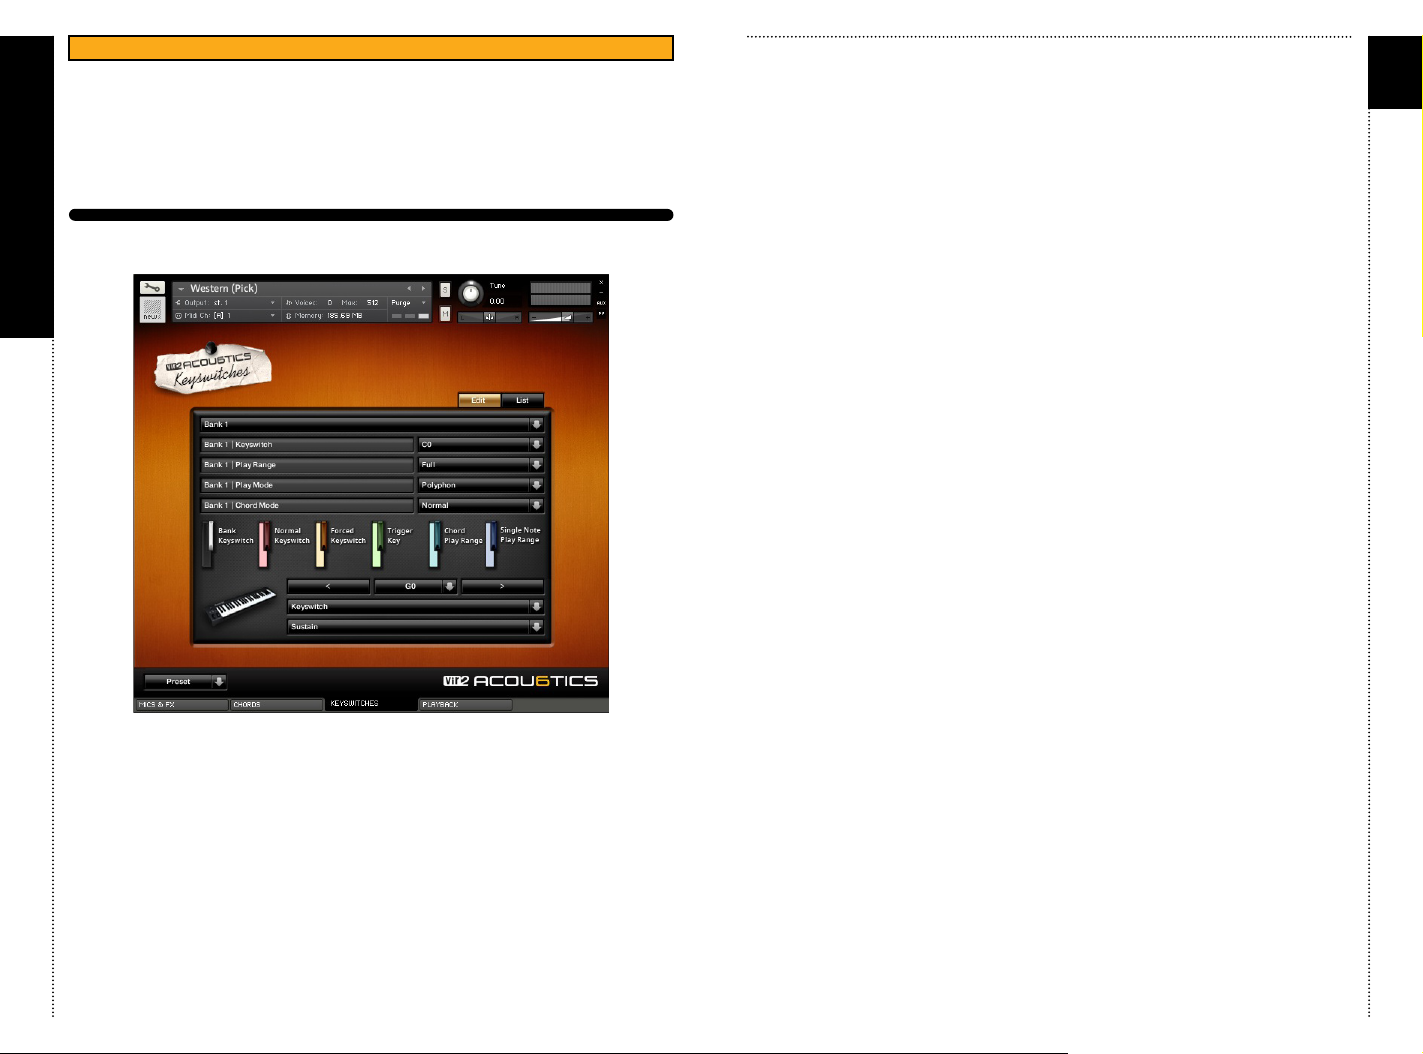
KEYSWITCHES | PRESETS | DEFAULT KEYSWITCHES
CHAPTER 06/ KEYSWITCHES
The keyswitch page allows you to create or modify keyswitch banks.
Through this page you can create your own keyswitch layouts that fit your
needs. To do so, simply press an already assigned keyswitch or any key
outside the blue play range and select the type of the keyswitch (keyswitch,
forced-keyswitch or trigger key) in the menu at the bottom of the tab.
You can save or load a keyswitch setup with the ‘Preset’ menu or you can
copy or reset certain banks to quickly create variations of your default
keyswitch bank.
Note: Keyswitch presets are compatible between all instruments. If you set
up a bank with the Western Guitar and you want to later load this bank
when working with a dierent guitar, for example, the Ukulele, this is
possible. You might notice that some keyswitches won’t be available for the
Ukulele that were available for the Western guitar. That is becuase not all
instruments have all the articulations available but the engine takes care of
this.
acou6tics
Bank Tab (Banks 1-8)
Here you can select up to 8 banks to edit.
Banks | Keyswitch
You can select the MIDI note that will activate the selected bank.
Banks | Play Range
Select up to 3 dierent play ranges:
• Full: The play range covers the full range of the instrument
• Reduced: The play range is reduced to make room for the maximum
amount of keyswitches or trigger keys.
• Minimum: The play range is set to minimum range to make place for more
keyswitches or trigger keys, like e.g. the picking trigger keys. This is useful
for chord picking or strumming, since you don’t necessarily need the high
octaves in that case.
Banks | Play Mode
Select 1 of 4 dierent Play Modes:
• Polyphonic: This is the default mode, you can play chords and single notes
in this mode.
• Tremolo: Plays in tremolo mode. You can play chords and single notes in
this mode (strum related trigger keys will be disabled).
• Legato HO / PO: Plays in legato mode (hammer ons / pull os), strum
related trigger keys will be disabled.
• Legato SU / SD: Plays in legato mode (slides up / slides down), strum
related trigger keys will be disabled.
Banks | Chord Mode
Here you can choose how you want your chords played:
• Normal: Chords are played back immediately when played with left hand.
• Play bass only: Only the root note of a chord is played back when played
with left hand. Use the pick trigger keys for picking patterns or the strum
keys for strumming the full chord.
• Play bass only and alternate bass: The root note and a second note of the
chord alternate playback. Use the pick trigger keys for picking patterns or
the strum keys for strumming the full chord.
• Silent chords: Chords are completely muted. Only the pick trigger keys for
picking patterns or the strum keys for strumming the full chord.
18
Page 13
CHAPTER 06 CONT’D
19
ACOU6TICS KEYSWITCH BANKS
20
CHAPTER 06/ KEYSWITCHES
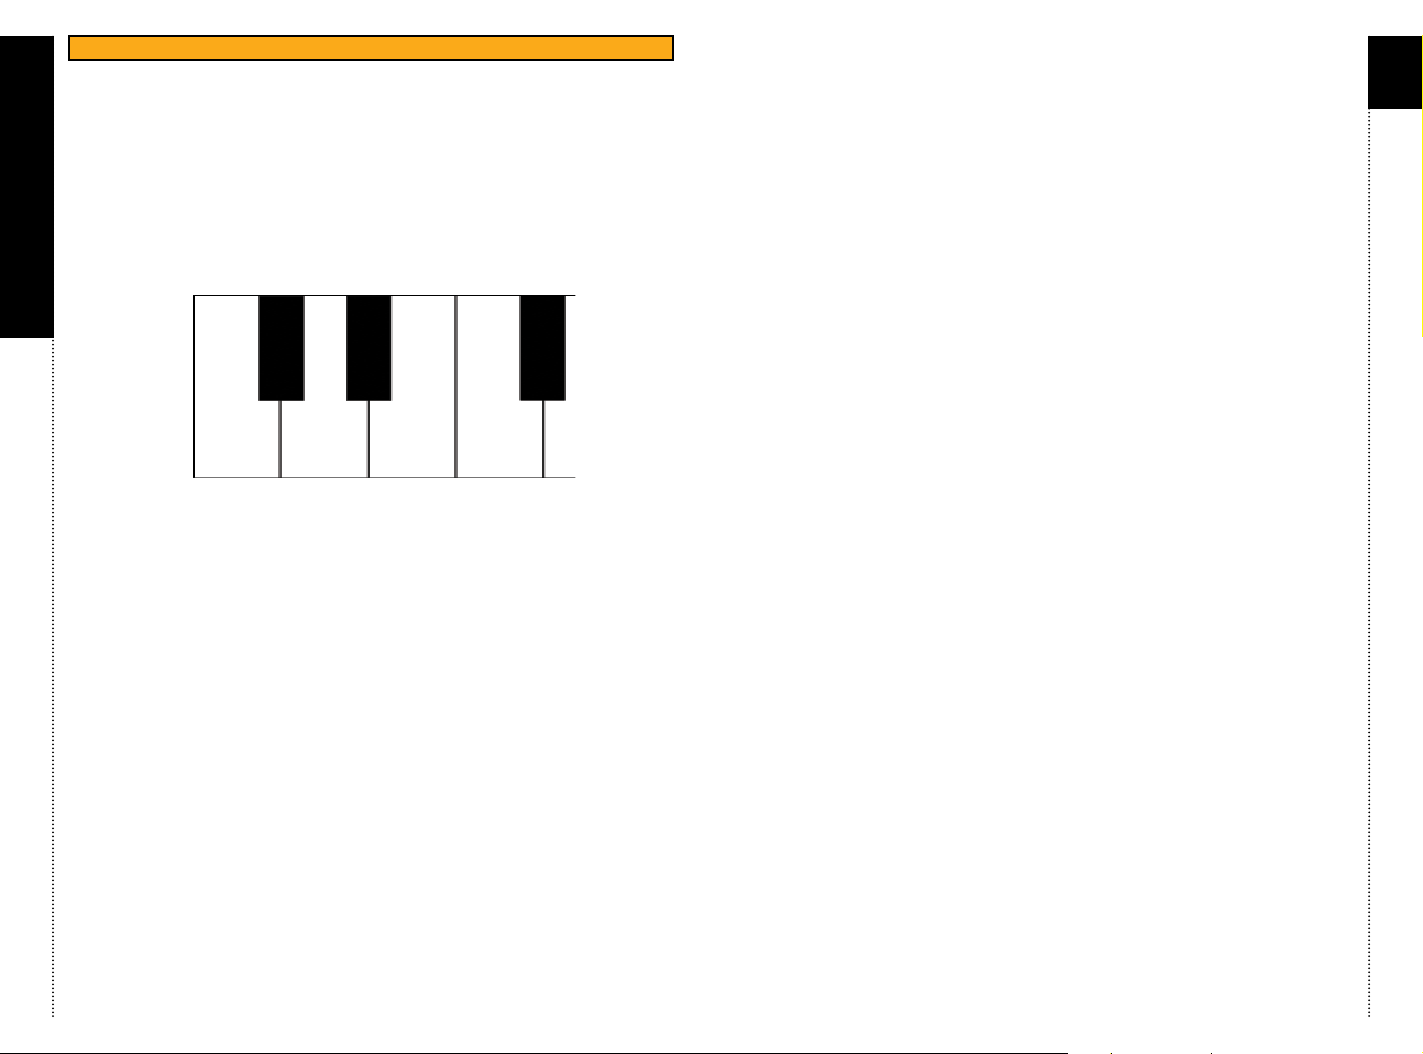
k Bank 1 k Polyphonic mode k Full playrange, (Default Bank)
C0
C#1 k Bank 2 k Polyphonic mode k Minimum playrange k Additional
natural harmonic keys
D0 k Bank 3 k Polyphonic mode k Reduced playrange k Additional
chord picking and sliding keys
D#0 k Bank 4 k Tremolo mode k Full playrange k Use modwheel to
control velocity
E0 k Bank 5 k Legato mode (hammer ons / pull os) k Full playrange
F0 k Bank 6 k Legato mode (slides up / slides down) k Full playrange
DEFAULT KEYSWITCH BANKS
C#0 D#0
C0
D0 E0 F0
ALL DEFAULT KEY SWITCH BANKS ARE MAPPED OUT ON THE NEXT 12
PAGES
Note: Most of the keyswitch banks have exactly the same mapping. In some
cases only the play mode changes from bank to bank or the play range is
reduced to make place for additional picking keys for example. The only
exception is the natural harmonic bank which doesn’t have any keyswitches
or trigger keys above C7.
Red keys in the following lists mark keyswitches and trigger keys outside
the typical range of a 88 note keyboard. Those are meant for sequencing/
programming after you have recorded your MIDI.
acou6tics
Page 14
CHAPTER 06 CONT’D
21
A#7
G#7
CHAPTER 06/ KEYSWITCHES
acou6tics
F#7
D#7
C#7
BREAK
A#-1
G#-1
F#-1
D#-1
C#-1
A#-2
G#-2
D#-2
C#-2
B7
A7
G7
F7
E7
D7
B-1
A-1
G-1
F-1
E-1
D-1
C-1
B-2
A-2
G-2
F-2
E-2
D-2
C-2
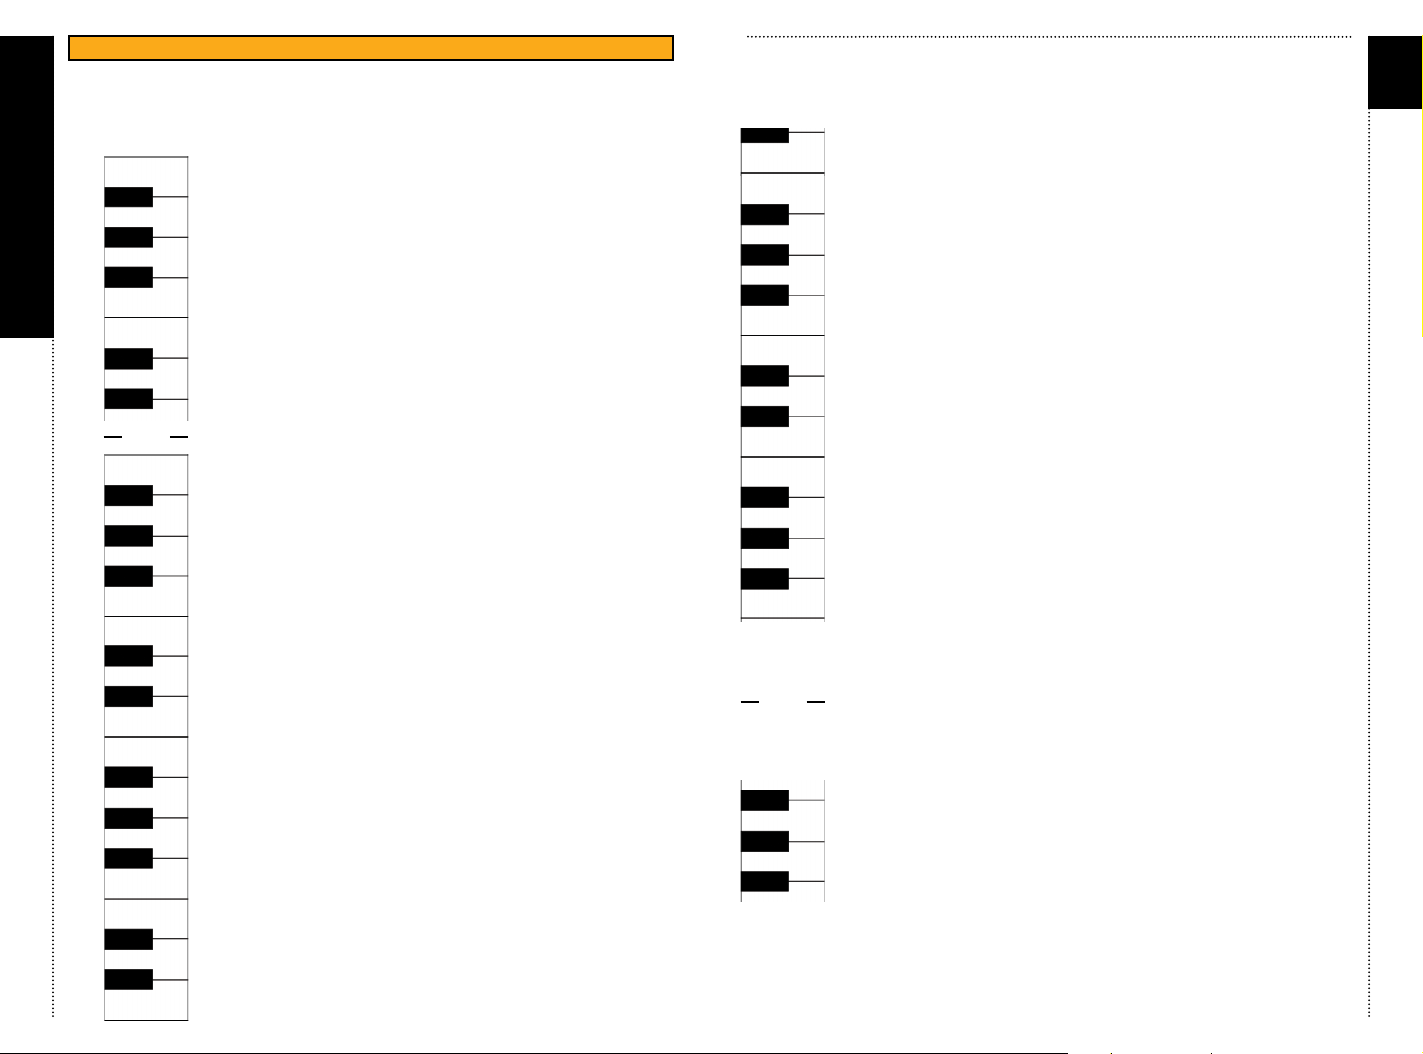
ACOU6TICS KEYSWITCH BANKS
KEYSWITCHS BANK 01 (C0)
Polyphonic | Full Playrange
B7 - Pick | Chord Note 6 (highest) - Trigger Key
A#7 - Mute | Palm - Trigger Key
A7 - Pick | Chord Note 5 - Trigger Key
G#7 - Slide | Up | 2 Frets - Trigger Key
G7 - Pick | Chord Note 4 - Trigger Key
F#7 - Slide | Up | 1 Fret - Trigger Key
F7 - Pick | Chord Note 3 - Trigger Key
E7 - Pick | Chord Note 2 - Trigger Key
D#7 - Slide | Dn | 1 Fret - Trigger Key
D7 - Pick | Chord Note 1 - Trigger Key
C#7 - Slide | Dn | 2 Frets - Trigger Key
B-1 - Release | Open String - Keyswitch Forced
A#-1 - Release | Slide - Keyswitch Forced
A-1 - Release | Pick - Keyswitch Forced
G#-1 - Release | Buzz - Keyswitch Forced
G-1 - Release | Finger - Keyswitch Forced
F#-1 - Play On Last String - Keyswitch Forced
F-1 - Fx Neck Strum | Up - Trigger Key
E-1 - Fx Neck Strum | Down - Trigger Key
D#-1 - Hit | Finger Pos 3 - Trigger Key
D-1 - Hit | Finger Pos 2 - Trigger Key
C#-1 - Hit | Finger Pos 1 - Trigger Key
C-1 - Hit | Slap Pos 3 - Trigger Key
B-2 - Hit | Slap Pos 2 - Trigger Key
A#-2 - Hit | Slap Pos 1 - Trigger Key
A-2 - Hit | Knock Pos 3 - Trigger Key
G#-2 - Hit | Knock Pos 2 - Trigger Key
G-2 - Hit | Knock Pos 1 - Trigger Key
F-2 - Play On String 1 - Keyswitch Forced
E-2 - Play On String 2 - Keyswitch Forced
D#-2 - Play On String 3 - Keyswitch Forced
D-2 - Play On String 4 - Keyswitch Forced
C#-2 - Play On String 5 - Keyswitch Forced
C-2 - Play On String 6 - Keyswitch Forced
A#6
G#6
F#6
D#6
C#6
A#5
G#5
F#5
BREAK
A#0
G#0
F#0
C7
B6
A6
G6
F6
E6
D6
C6
B5
A5
G5
F5
A0
G0
22
C7 - Slide Noise | Up - Trigger Key
B6 - Slide Noise | Dn - Trigger Key
A#6 - Hit | Slap Pos 2 - Trigger Key
A6 - Hit | Slap Pos 1 - Trigger Key
G#6 - Mute | String Slap Pos 2 - Trigger Key
G6 - Mute | String Slap Pos 1 - Trigger Key
F#6 - Chuck | Up - Trigger Key
F6 - Chuck | Down - Trigger Key
E6 - Mute - Trigger Key
D#6 - Open String + Slide Noise | Up - Trigger Key
D6 - Open String + Slide Noise | Dn - Trigger Key
C#6 - Open String | Strum | Up - Trigger Key
C6 - Strum | Lower 1/4 | Down - Trigger Key
B5 - Strum | Upper 1/4 | Down - Trigger Key
A#5 - Strum | Upper 1/4 | Up - Trigger Key
A5 - Strum | Upper 1/2 | Down - Trigger Key
G#5 - Strum | Upper 2/3 | Up - Trigger Key
G5 - Strum | Lower 2/3 | Down - Trigger Key
F#5 - Strum | Full | Up - Trigger Key
F5 - Strum | Full | Down - Trigger Key
A#0 - Slide In - Keyswitch Forced
A0 - Palm Muted – Keyswitch or Sustain Nail – Keyswitch
(depends on instrument)
G#0 - Pull O - Keyswitch Forced
G0 - Sustain - Keyswitch
F#0 - Hammer On - Keyswitch Forced
Page 15
CHAPTER 06 CONT’D
23
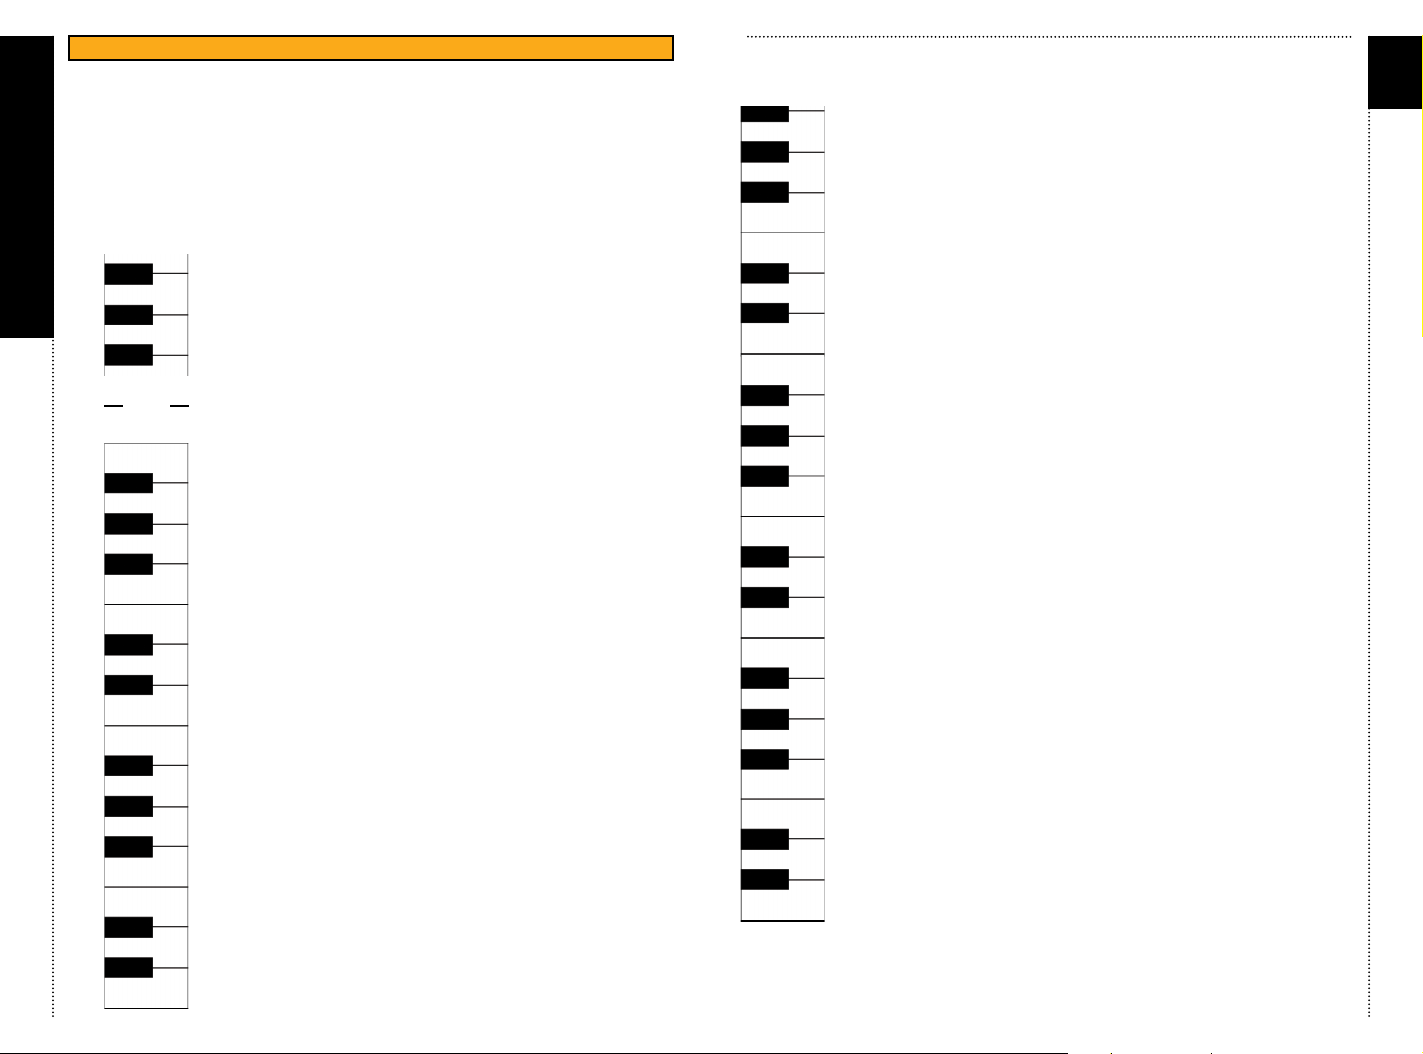
ACOU6TICS KEYSWITCH BANKS
24
CHAPTER 06/ KEYSWITCHES
acou6tics
KEYSWITCHS BANK 02 (C#0)
Polyphonic | Min. Playrange | Inc. Harmonics
A#0 - Slide In - Keyswitch Forced
A#0
A0
G#0
G0
F#0
BREAK
B-1
A#-1
A-1
G#-1
G-1
F#-1
F-1
E-1
D#-2
D-1
C#-2
C-1
B-2
A#-2
A-2
G#-2
G-2
F-2
E-2
D#-2
D-2
C#-2
C-2
A0 - Palm Muted – Keyswitch or Sustain Nail –
Keyswitch (depends on instrument)
G#0 - Pull O - Keyswitch Forced
G0 - Sustain - Keyswitch
F#0 - Hammer On - Keyswitch Forced
B-1 - Release | Open String - Keyswitch Forced
A#-1 - Release | Slide - Keyswitch Forced
A-1 - Release | Pick - Keyswitch Forced
G#-1 - Release | Buzz - Keyswitch Forced
G-1 - Release | Finger - Keyswitch Forced
F#-1 - Play On Last String - Keyswitch Forced
F-1 - Fx Neck Strum | Up - Trigger Key
E-1 - Fx Neck Strum | Down - Trigger Key
D#-1 - Hit | Finger Pos 3 - Trigger Key
D-1 - Hit | Finger Pos 2 - Trigger Key
C#-1 - Hit | Finger Pos 1 - Trigger Key
C-1 - Hit | Slap Pos 3 - Trigger Key
B-2 - Hit | Slap Pos 2 - Trigger Key
A#-2 - Hit | Slap Pos 1 - Trigger Key
A-2 - Hit | Knock Pos 3 - Trigger Key
G#-2 - Hit | Knock Pos 2 - Trigger Key
G-2 - Hit | Knock Pos 1 - Trigger Key
F-2 - Play On String 1 - Keyswitch Forced
E-2 - Play On String 2 - Keyswitch Forced
D#-2 - Play On String 3 - Keyswitch Forced
D-2 - Play On String 4 - Keyswitch Forced
C#-2 - Play On String 5 - Keyswitch Forced
C-2 - Play On String 6 - Keyswitch Forced
A6
G6
F6
E6
D6
C6
A5
G5
F5
E5
D5
C5
A4
G4
F4
E4
D4
C4
A6 - Natural Harm. Fret 12 | String 1 - Trigger Key
G6 - Natural Harm. Fret 12 | String 2 - Trigger Key
F6 - Natural Harm. Fret 12 | String 3 - Trigger Key
E6 - Natural Harm. Fret 12 | String 4 - Trigger Key
D6 - Natural Harm. Fret 12 | String 5 - Trigger Key
C6 - Natural Harm. Fret 12 | String 6 - Trigger Key
A5 - Natural Harm. Fret 7 | String 1 - Trigger Key
G5 - Natural Harm. Fret 7 | String 2 - Trigger Key
F5 - Natural Harm. Fret 7 | String 3 - Trigger Key
E5 - Natural Harm. Fret 7 | String 4 - Trigger Key
D5 - Natural Harm. Fret 7 | String 5 - Trigger Key
C5 - Natural Harm. Fret 7 | String 6 - Trigger Key
A4 - Natural Harm. Fret 5 | String 1 - Trigger Key
G4 - Natural Harm. Fret 5 | String 2 - Trigger Key
F4 - Natural Harm. Fret 5 | String 3 - Trigger Key
E4 - Natural Harm. Fret 5 | String 4 - Trigger Key
D4 - Natural Harm. Fret 5 | String 5 - Trigger Key
C4 - Natural Harm. Fret 5 | String 6 - Trigger Key
Page 16
CHAPTER 06 CONT’D
25
A#7
G#7
CHAPTER 06/ KEYSWITCHES
acou6tics
F#7
D#7
C#7
BREAK
A#-1
G#-1
F#-1
D#-2
C#-2
A#-2
G#-2
D#-2
C#-2
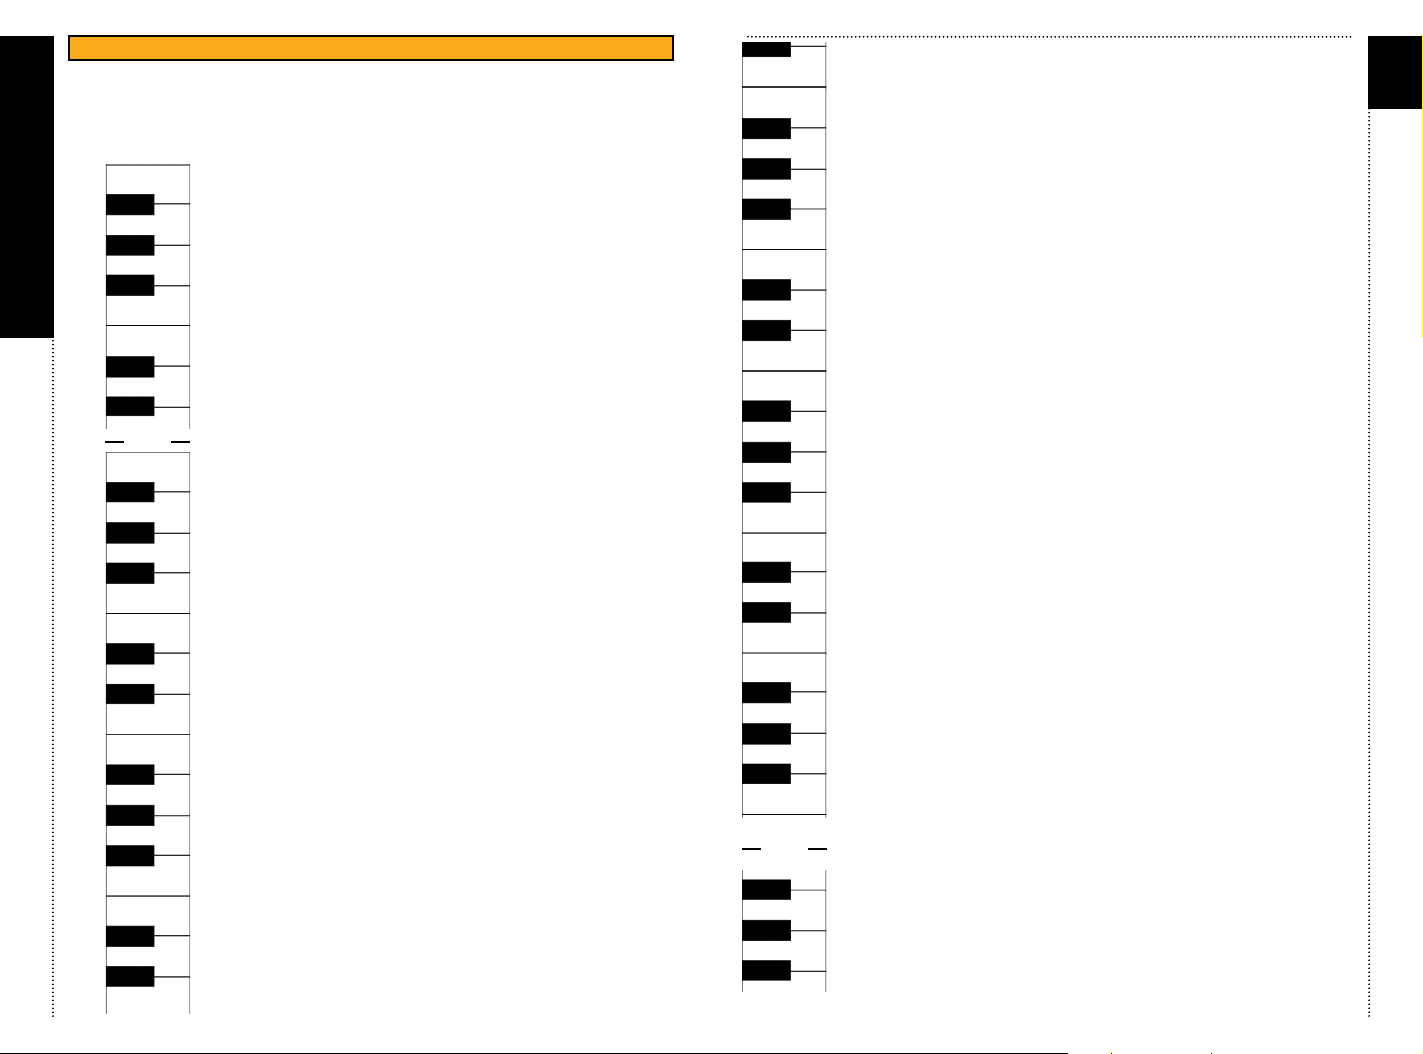
ACOU6TICS KEYSWITCH BANKS
KEYSWITCHS BANK 03 (D0)
Polyphonic | Reduced Playrange |
Inc. Pick Trigger Keys
B7
A7
G7
F7
E7
D7
B-1
A-1
G-1
F-1
E-1
D-1
C-1
B-2
A-2
G-2
F-2
E-2
D-2
C-2
B7 - Pick | Chord Note 6 (highest) - Trigger Key
A#7 - Mute | Palm - Trigger Key
A7 - Pick | Chord Note 5 - Trigger Key
G#7 - Slide | Up | 2 Frets - Trigger Key
G7 - Pick | Chord Note 4 - Trigger Key
F#7 - Slide | Up | 1 Fret - Trigger Key
F7 - Pick | Chord Note 3 - Trigger Key
E7 - Pick | Chord Note 2 - Trigger Key
D#7 - Slide | Dn | 1 Fret - Trigger Key
D7 - Pick | Chord Note 1 - Trigger Key
C#7 - Slide | Dn | 2 Frets - Trigger Key
B-1 - Release | Open String - Keyswitch Forced
A#-1 - Release | Slide - Keyswitch Forced
A-1 - Release | Pick - Keyswitch Forced
G#-1 - Release | Buzz - Keyswitch Forced
G-1 - Release | Finger - Keyswitch Forced
F#-1 - Play On Last String - Keyswitch Forced
F-1 - Fx Neck Strum | Up - Trigger Key
E-1 - Fx Neck Strum | Down - Trigger Key
D#-1 - Hit | Finger Pos 3 - Trigger Key
D-1 - Hit | Finger Pos 2 - Trigger Key
C#-1 - Hit | Finger Pos 1 - Trigger Key
C-1 - Hit | Slap Pos 3 - Trigger Key
B-2 - Hit | Slap Pos 2 - Trigger Key
A#-2 - Hit | Slap Pos 1 - Trigger Key
A-2 - Hit | Knock Pos 3 - Trigger Key
G#-2 - Hit | Knock Pos 2 - Trigger Key
G-2 - Hit | Knock Pos 1 - Trigger Key
F-2 - Play On String 1 - Keyswitch Forced
E-2 - Play On String 2 - Keyswitch Forced
D#-2 - Play On String 3 - Keyswitch Forced
D-2 - Play On String 4 - Keyswitch Forced
C#-2 - Play On String 5 - Keyswitch Forced
C-2 - Play On String 6 - Keyswitch Forced
A#6
G#6
F#6
D#6
C#6
A#5
G#5
F#5
D#5
C#5
A#4
G#4
F#4
BREAK
A#0
G#0
F#0
C7
B6
A6
G6
F6
E6
D6
C6
B5
A5
G5
F5
D5
C5
B4
A4
G4
F4
A0
G0
C7 - Slide Noise | Up - Trigger Key
B6 - Slide Noise | Dn - Trigger Key
A#6 - Hit | Slap Pos 2 - Trigger Key
A6 - Hit | Slap Pos 1 - Trigger Key
G#6 - Mute | String Slap Pos 2 - Trigger Key
G6 - Mute | String Slap Pos 1 - Trigger Key
F#6 - Chuck | Up - Trigger Key
F6 - Chuck | Down - Trigger Key
E6 - Mute - Trigger Key
D#6 - Open String + Slide Noise | Up - Trigger Key
D6 - Open String + Slide Noise | Dn - Trigger Key
C#6 - Open String | Strum | Up - Trigger Key
C6 - Strum | Lower 1/4 | Down - Trigger Key
B5 - Strum | Upper 1/4 | Down - Trigger Key
A#5 - Strum | Upper 1/4 | Up - Trigger Key
A5 - Strum | Upper 1/2 | Down - Trigger Key
G#5 - Strum | Upper 2/3 | Up - Trigger Key
G5 - Strum | Lower 2/3 | Down - Trigger Key
F#5 - Strum | Full | Up - Trigger Key
F5 - Strum | Full | Down - Trigger Key
D5 - Pick | Chord Note 6 (highest) - Trigger Key
C#5 - Slide | Up | 2 Frets - Trigger Key
C5 - Pick | Chord Note 5 - Trigger Key
B4 - Pick | Chord Note 4 - Trigger Key
A#4 - Slide | Up | 1 Fret - Trigger Key
A4 - Pick | Chord Note 3 - Trigger Key
G#4 - Slide | Dn | 1 Fret - Trigger Key
G4 - Pick | Chord Note 2 - Trigger Key
F#4 - Slide | Dn | 2 Frets - Trigger Key
F4 - Pick | Chord Note 1 - Trigger Key
A#0 - Slide In - Keyswitch Forced
A0 - Palm Muted – Keyswitch or Sustain Nail – Keyswitch
(depends on instrument)
G#0 - Pull O - Keyswitch Forced
G0 - Sustain - Keyswitch
F#0 - Hammer On - Keyswitch Forced
26
Page 17
CHAPTER 06 CONT’D
27
A#7
G#7
CHAPTER 06/ KEYSWITCHES
acou6tics
F#7
D#7
C#7
BREAK
A#-1
G#-1
F#-1
D#-2
C#-2
A#-2
G#-2
D#-2
C#-2
ACOU6TICS KEYSWITCH BANKS
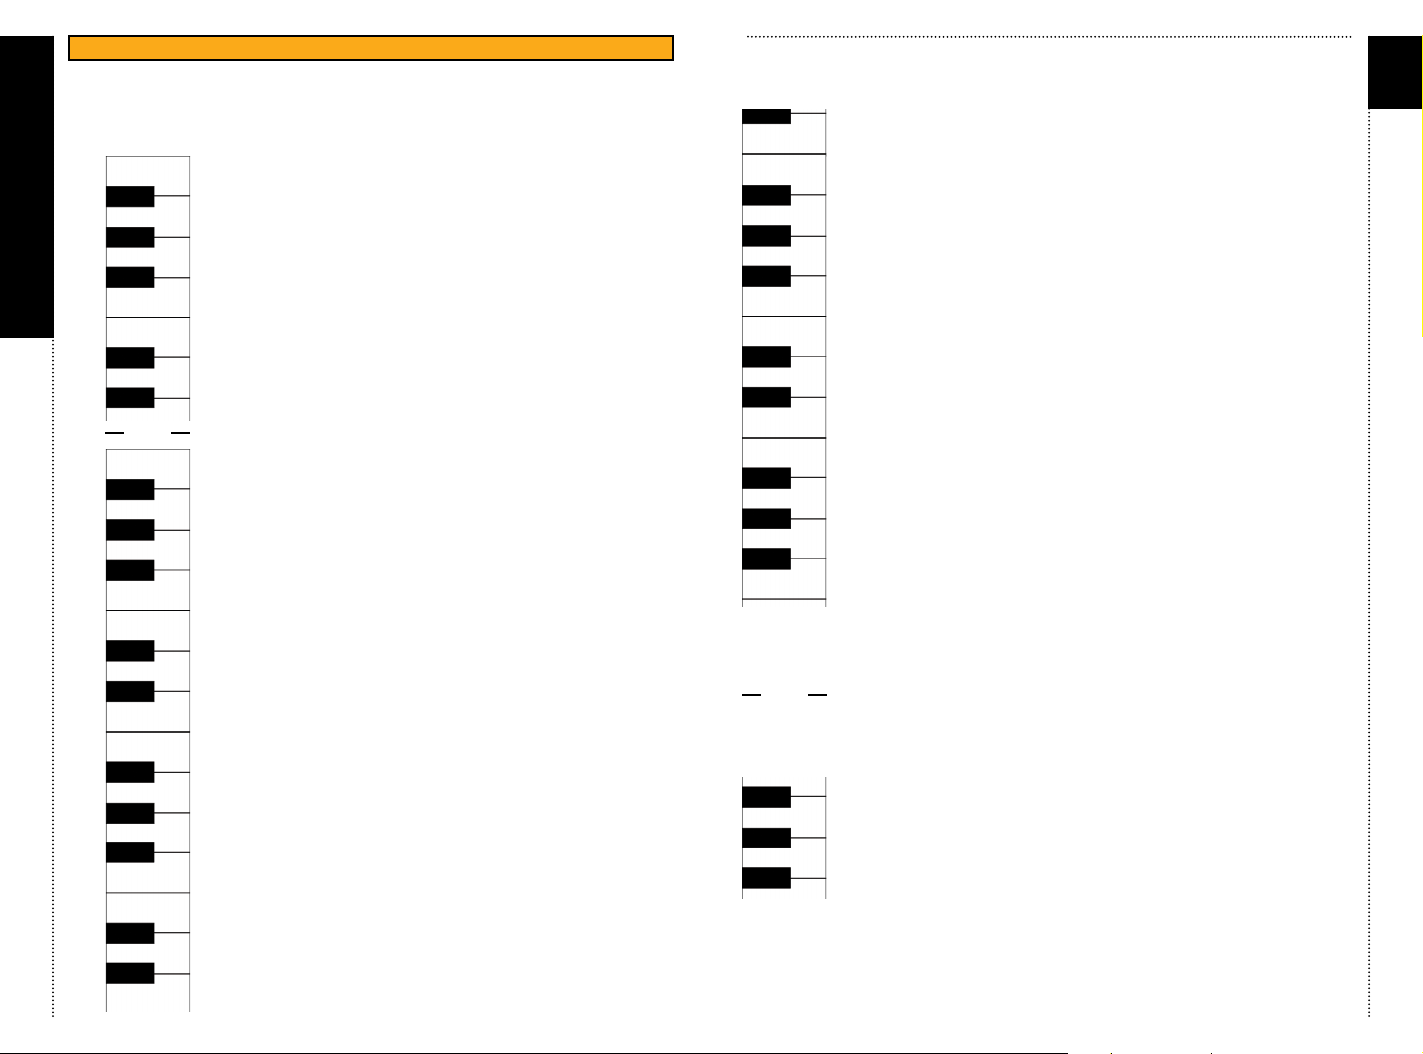
KEYSWITCHS BANK 04 (D#0)
Polyphonic | Tremolo | Full Playrange
B7
A7
G7
F7
E7
D7
B-1
A-1
G-1
F-1
E-1
D-1
C-1
B-2
A-2
G-2
F-2
E-2
D-2
C-2
B7 - Pick | Chord Note 6 (highest) - Trigger Key
A#7 - Mute | Palm - Trigger Key
A7 - Pick | Chord Note 5 - Trigger Key
G#7 - Slide | Up | 2 Frets - Trigger Key
G7 - Pick | Chord Note 4 - Trigger Key
F#7 - Slide | Up | 1 Fret - Trigger Key
F7 - Pick | Chord Note 3 - Trigger Key
E7 - Pick | Chord Note 2 - Trigger Key
D#7 - Slide | Dn | 1 Fret - Trigger Key
D7 - Pick | Chord Note 1 - Trigger Key
C#7 - Slide | Dn | 2 Frets - Trigger Key
B-1 - Release | Open String - Keyswitch Forced
A#-1 - Release | Slide - Keyswitch Forced
A-1 - Release | Pick - Keyswitch Forced
G#-1 - Release | Buzz - Keyswitch Forced
G-1 - Release | Finger - Keyswitch Forced
F#-1 - Play On Last String - Keyswitch Forced
F-1 - Fx Neck Strum | Up - Trigger Key
E-1 - Fx Neck Strum | Down - Trigger Key
D#-1 - Hit | Finger Pos 3 - Trigger Key
D-1 - Hit | Finger Pos 2 - Trigger Key
C#-1 - Hit | Finger Pos 1 - Trigger Key
C-1 - Hit | Slap Pos 3 - Trigger Key
B-2 - Hit | Slap Pos 2 - Trigger Key
A#-2 - Hit | Slap Pos 1 - Trigger Key
A-2 - Hit | Knock Pos 3 - Trigger Key
G#-2 - Hit | Knock Pos 2 - Trigger Key
G-2 - Hit | Knock Pos 1 - Trigger Key
F-2 - Play On String 1 - Keyswitch Forced
E-2 - Play On String 2 - Keyswitch Forced
D#-2 - Play On String 3 - Keyswitch Forced
D-2 - Play On String 4 - Keyswitch Forced
C#-2 - Play On String 5 - Keyswitch Forced
C-2 - Play On String 6 - Keyswitch Forced
A#6
G#6
F#6
D#6
C#6
A#5
G#5
F#5
BREAK
A#0
G#0
F#0
C7
B6
A6
G6
F6
E6
D6
C6
B5
A5
G5
F5
A0
G0
28
C7 - Slide Noise | Up - Trigger Key
B6 - Slide Noise | Dn - Trigger Key
A#6 - Hit | Slap Pos 2 - Trigger Key
A6 - Hit | Slap Pos 1 - Trigger Key
G#6 - Mute | String Slap Pos 2 - Trigger Key
G6 - Mute | String Slap Pos 1 - Trigger Key
F#6 - Chuck | Up - Trigger Key
F6 - Chuck | Down - Trigger Key
E6 - Mute - Trigger Key
D#6 - Open String + Slide Noise | Up - Trigger Key
D6 - Open String + Slide Noise | Dn - Trigger Key
C#6 - Open String | Strum | Up - Trigger Key
C6 - Strum | Lower 1/4 | Down - Trigger Key
B5 - Strum | Upper 1/4 | Down - Trigger Key
A#5 - Strum | Upper 1/4 | Up - Trigger Key
A5 - Strum | Upper 1/2 | Down - Trigger Key
G#5 - Strum | Upper 2/3 | Up - Trigger Key
G5 - Strum | Lower 2/3 | Down - Trigger Key
F#5 - Strum | Full | Up - Trigger Key
F5 - Strum | Full | Down - Trigger Key
A#0 - Slide In - Keyswitch Forced
A0 - Palm Muted – Keyswitch or Sustain Nail – Keyswitch
(depends on instrument)
G#0 - Pull O - Keyswitch Forced
G0 - Sustain - Keyswitch
F#0 - Hammer On - Keyswitch Forced
Page 18
CHAPTER 06 CONT’D
29
A#7
G#7
CHAPTER 06/ KEYSWITCHES
acou6tics
F#7
D#7
C#7
BREAK
A#-1
G#-1
F#-1
D#-2
C#-2
A#-2
G#-2
D#-2
C#-2
ACOU6TICS KEYSWITCH BANKS
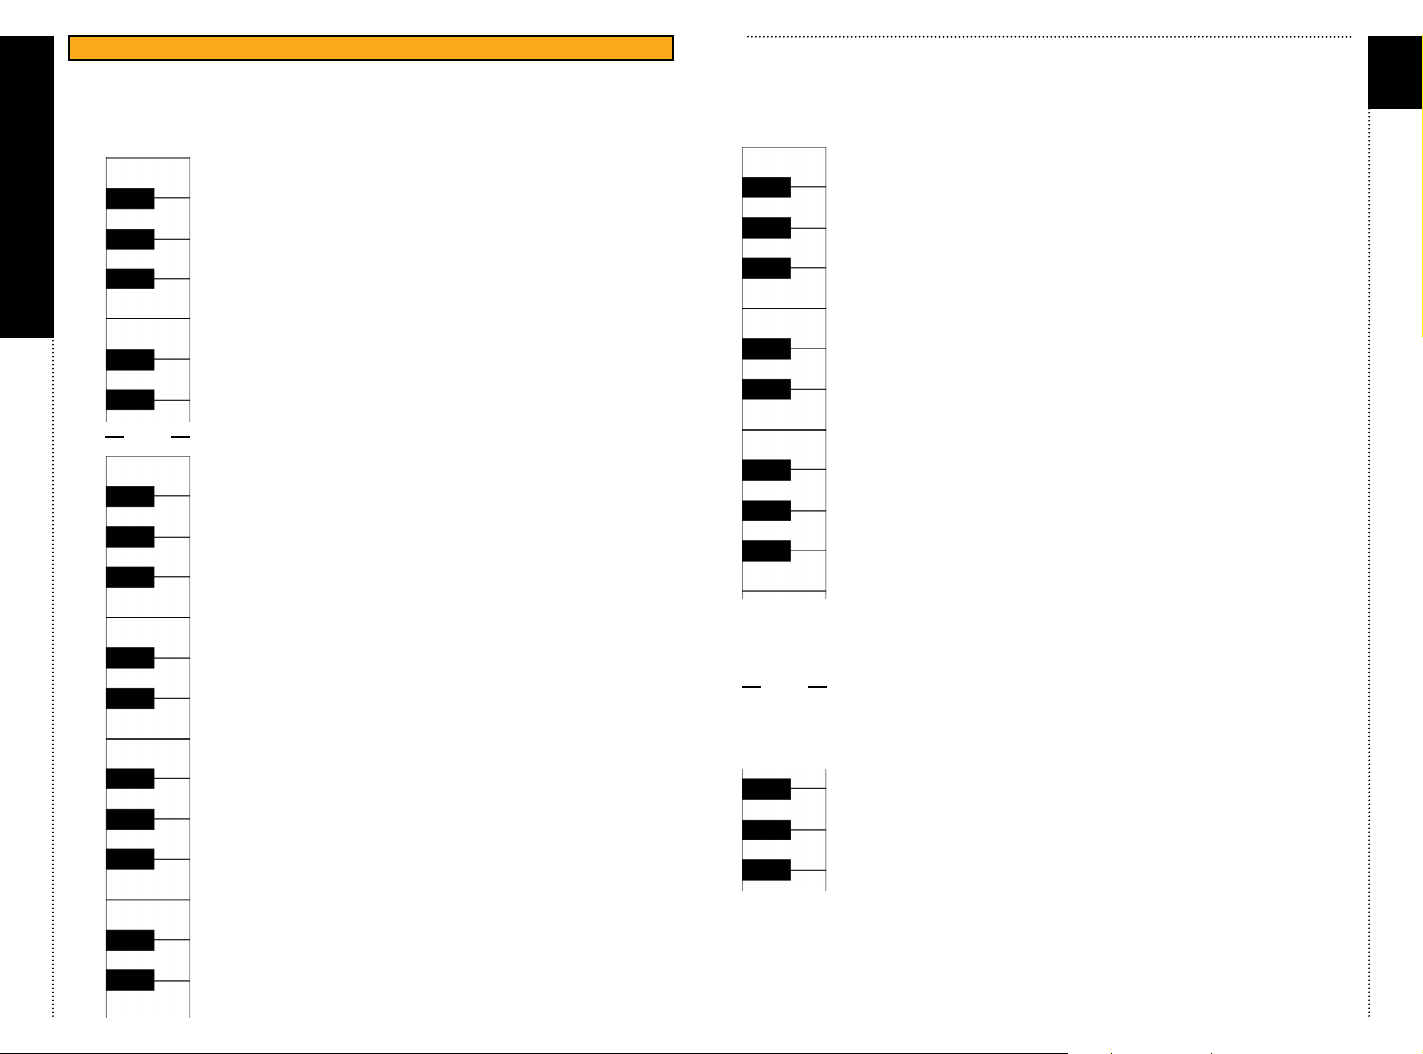
KEYSWITCHS BANK 05 (E0)
Legato | HO/PO | Full Playrange
B7
A7
G7
F7
E7
D7
B-1
A-1
G-1
F-1
E-1
D-1
C-1
B-2
A-2
G-2
F-2
E-2
D-2
C-2
B7 - Pick | Chord Note 6 (highest) - Trigger Key
A#7 - Mute | Palm - Trigger Key
A7 - Pick | Chord Note 5 - Trigger Key
G#7 - Slide | Up | 2 Frets - Trigger Key
G7 - Pick | Chord Note 4 - Trigger Key
F#7 - Slide | Up | 1 Fret - Trigger Key
F7 - Pick | Chord Note 3 - Trigger Key
E7 - Pick | Chord Note 2 - Trigger Key
D#7 - Slide | Dn | 1 Fret - Trigger Key
D7 - Pick | Chord Note 1 - Trigger Key
C#7 - Slide | Dn | 2 Frets - Trigger Key
B-1 - Release | Open String - Keyswitch Forced
A#-1 - Release | Slide - Keyswitch Forced
A-1 - Release | Pick - Keyswitch Forced
G#-1 - Release | Buzz - Keyswitch Forced
G-1 - Release | Finger - Keyswitch Forced
F#-1 - Play On Last String - Keyswitch Forced
F-1 - Fx Neck Strum | Up - Trigger Key
E-1 - Fx Neck Strum | Down - Trigger Key
D#-1 - Hit | Finger Pos 3 - Trigger Key
D-1 - Hit | Finger Pos 2 - Trigger Key
C#-1 - Hit | Finger Pos 1 - Trigger Key
C-1 - Hit | Slap Pos 3 - Trigger Key
B-2 - Hit | Slap Pos 2 - Trigger Key
A#-2 - Hit | Slap Pos 1 - Trigger Key
A-2 - Hit | Knock Pos 3 - Trigger Key
G#-2 - Hit | Knock Pos 2 - Trigger Key
G-2 - Hit | Knock Pos 1 - Trigger Key
F-2 - Play On String 1 - Keyswitch Forced
E-2 - Play On String 2 - Keyswitch Forced
D#-2 - Play On String 3 - Keyswitch Forced
D-2 - Play On String 4 - Keyswitch Forced
C#-2 - Play On String 5 - Keyswitch Forced
C-2 - Play On String 6 - Keyswitch Forced
A#6
G#6
F#6
D#6
C#6
A#5
G#5
F#5
BREAK
A#0
G#0
F#0
B6
A6
G6
F6
E6
D6
C6
B5
A5
G5
F5
A0
G0
30
B6 - Slide Noise | Dn - Trigger Key
A#6 - Hit | Slap Pos 2 - Trigger Key
A6 - Hit | Slap Pos 1 - Trigger Key
G#6 - Mute | String Slap Pos 2 - Trigger Key
G6 - Mute | String Slap Pos 1 - Trigger Key
F#6 - Chuck | Up - Trigger Key
F6 - Chuck | Down - Trigger Key
E6 - Mute - Trigger Key
D#6 - Open String + Slide Noise | Up - Trigger Key
D6 - Open String + Slide Noise | Dn - Trigger Key
C#6 - Open String | Strum | Up - Trigger Key
C6 - Strum | Lower 1/4 | Down - Trigger Key
B5 - Strum | Upper 1/4 | Down - Trigger Key
A#5 - Strum | Upper 1/4 | Up - Trigger Key
A5 - Strum | Upper 1/2 | Down - Trigger Key
G#5 - Strum | Upper 2/3 | Up - Trigger Key
G5 - Strum | Lower 2/3 | Down - Trigger Key
F#5 - Strum | Full | Up - Trigger Key
F5 - Strum | Full | Down - Trigger Key
A#0 - Slide In - Keyswitch Forced
A0 - Palm Muted – Keyswitch or Sustain Nail – Keyswitch
(depends on instrument)
G#0 - Play Slide Forced
G0 - Sustain - Keyswitch
F#0 - Play On Last String Forced
Page 19
CHAPTER 06 CONT’D
31
A#7
G#7
CHAPTER 06/ KEYSWITCHES
acou6tics
F#7
D#7
C#7
BREAK
A#-1
G#-1
F#-1
D#-2
C#-2
A#-2
G#-2
F#-2
D#-2
C#-2
ACOU6TICS KEYSWITCH BANKS
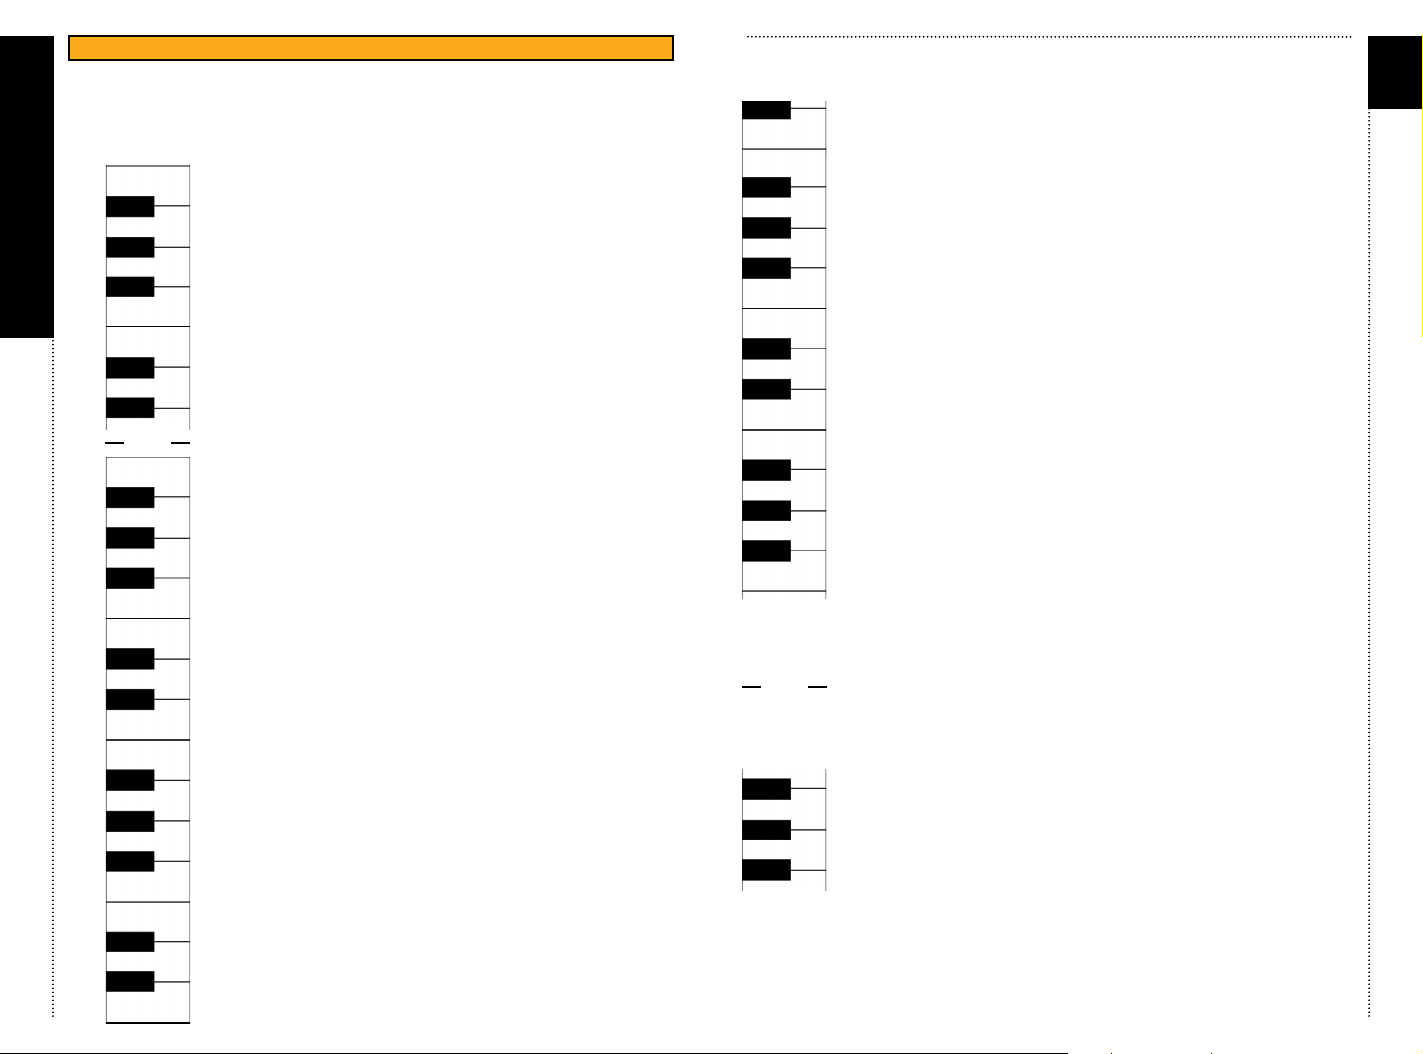
KEYSWITCHS BANK 06 (F0)
Legato | SU/SD | Full Playrange
B7
A7
G7
F7
E7
D7
B-1
A-1
G-1
F-1
E-1
D-1
C-1
B-2
A-2
G-2
F-2
E-2
D-2
C-2
B7 - Pick | Chord Note 6 (highest) - Trigger Key
A#7 - Mute | Palm - Trigger Key
A7 - Pick | Chord Note 5 - Trigger Key
G#7 - Slide | Up | 2 Frets - Trigger Key
G7 - Pick | Chord Note 4 - Trigger Key
F#7 - Slide | Up | 1 Fret - Trigger Key
F7 - Pick | Chord Note 3 - Trigger Key
E7 - Pick | Chord Note 2 - Trigger Key
D#7 - Slide | Dn | 1 Fret - Trigger Key
D7 - Pick | Chord Note 1 - Trigger Key
C#7 - Slide | Dn | 2 Frets - Trigger Key
B-1 - Release | Open String - Keyswitch Forced
A#-1 - Release | Slide - Keyswitch Forced
A-1 - Release | Pick - Keyswitch Forced
G#-1 - Release | Buzz - Keyswitch Forced
G-1 - Release | Finger - Keyswitch Forced
F#-1 - Play On Last String - Keyswitch Forced
F-1 - Fx Neck Strum | Up - Trigger Key
E-1 - Fx Neck Strum | Down - Trigger Key
D#-1 - Hit | Finger Pos 3 - Trigger Key
D-1 - Hit | Finger Pos 2 - Trigger Key
C#-1 - Hit | Finger Pos 1 - Trigger Key
C-1 - Hit | Slap Pos 3 - Trigger Key
B-2 - Hit | Slap Pos 2 - Trigger Key
A#-2 - Hit | Slap Pos 1 - Trigger Key
A-2 - Hit | Knock Pos 3 - Trigger Key
G#-2 - Hit | Knock Pos 2 - Trigger Key
G-2 - Hit | Knock Pos 1 - Trigger Key
F-2 - Play On String 1 - Keyswitch Forced
E-2 - Play On String 2 - Keyswitch Forced
D#-2 - Play On String 3 - Keyswitch Forced
D-2 - Play On String 4 - Keyswitch Forced
C#-2 - Play On String 5 - Keyswitch Forced
C-2 - Play On String 6 - Keyswitch Forced
A#6
G#6
F#6
D#6
C#6
A#5
G#5
F#5
BREAK
A#0
G#0
F#0
C7
B6
A6
G6
F6
E6
D6
C6
B5
A5
G5
F5
A0
G0
32
C7 - Slide Noise | Up - Trigger Key
B6 - Slide Noise | Dn - Trigger Key
A#6 - Hit | Slap Pos 2 - Trigger Key
A6 - Hit | Slap Pos 1 - Trigger Key
G#6 - Mute | String Slap Pos 2 - Trigger Key
G6 - Mute | String Slap Pos 1 - Trigger Key
F#6 - Chuck | Up - Trigger Key
F6 - Chuck | Down - Trigger Key
E6 - Mute - Trigger Key
D#6 - Open String + Slide Noise | Up - Trigger Key
D6 - Open String + Slide Noise | Dn - Trigger Key
C#6 - Open String | Strum | Up - Trigger Key
C6 - Strum | Lower 1/4 | Down - Trigger Key
B5 - Strum | Upper 1/4 | Down - Trigger Key
A#5 - Strum | Upper 1/4 | Up - Trigger Key
A5 - Strum | Upper 1/2 | Down - Trigger Key
G#5 - Strum | Upper 2/3 | Up - Trigger Key
G5 - Strum | Lower 2/3 | Down - Trigger Key
F#5 - Strum | Full | Up - Trigger Key
F5 - Strum | Full | Down - Trigger Key
A#0 - Slide In - Keyswitch Forced
A0 - Palm Muted – Keyswitch or Sustain Nail – Keyswitch
(depends on instrument)
G#0 - Play Slide Forced
G0 - Sustain - Keyswitch
F#0 - Play On Last String Forced
Page 20
CHAPTER 07
33
Acou6tics/
PLAYBACK
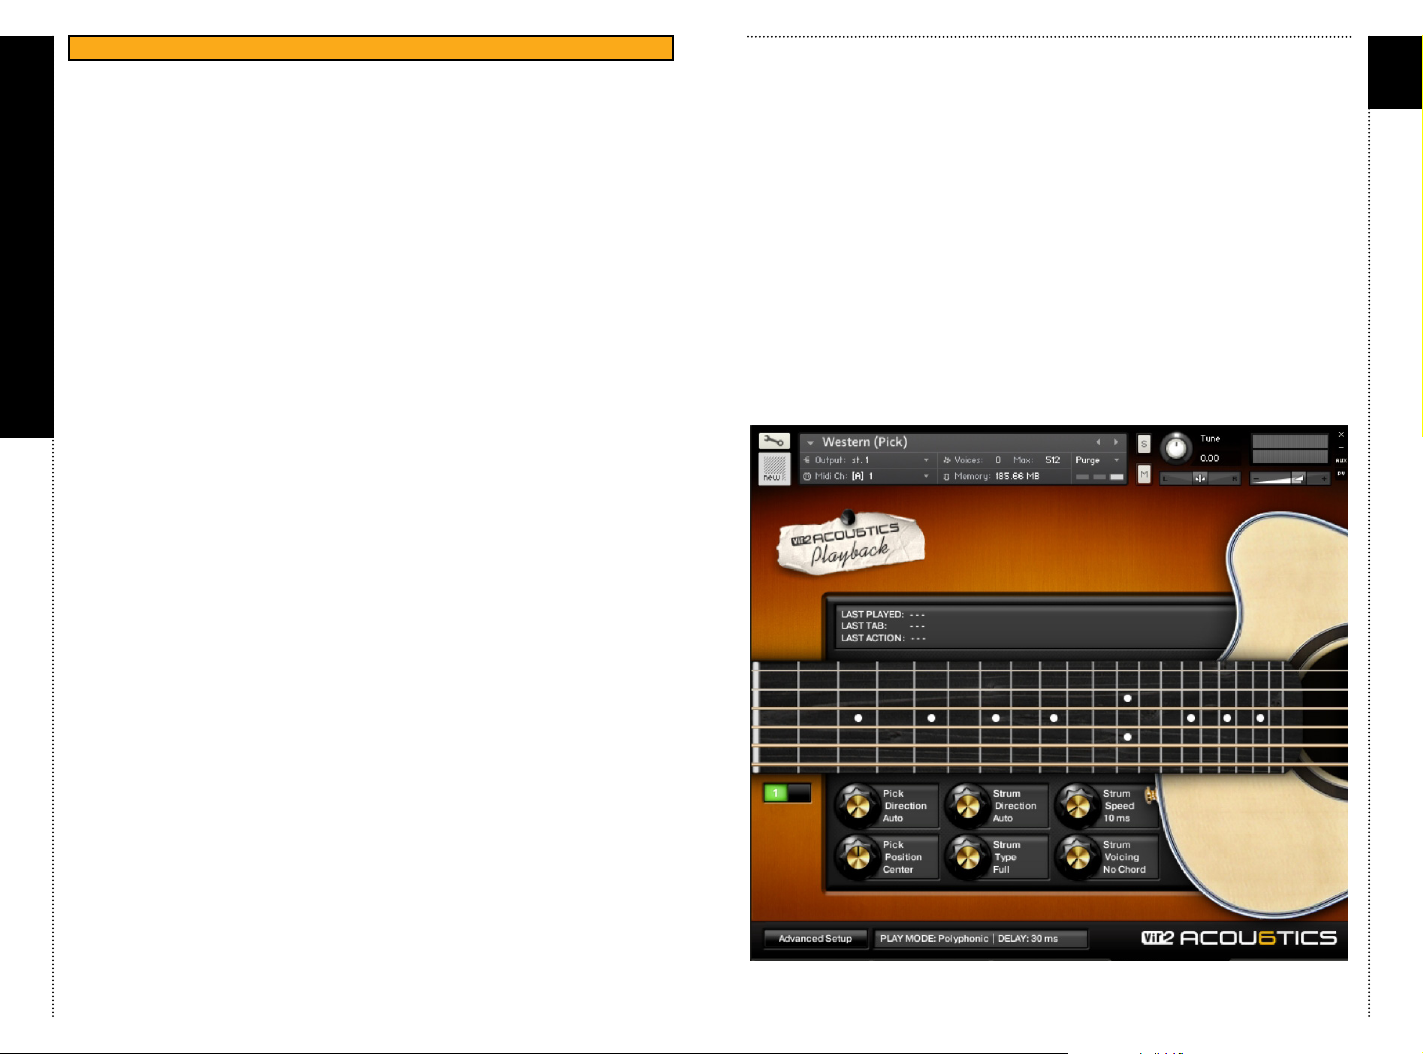
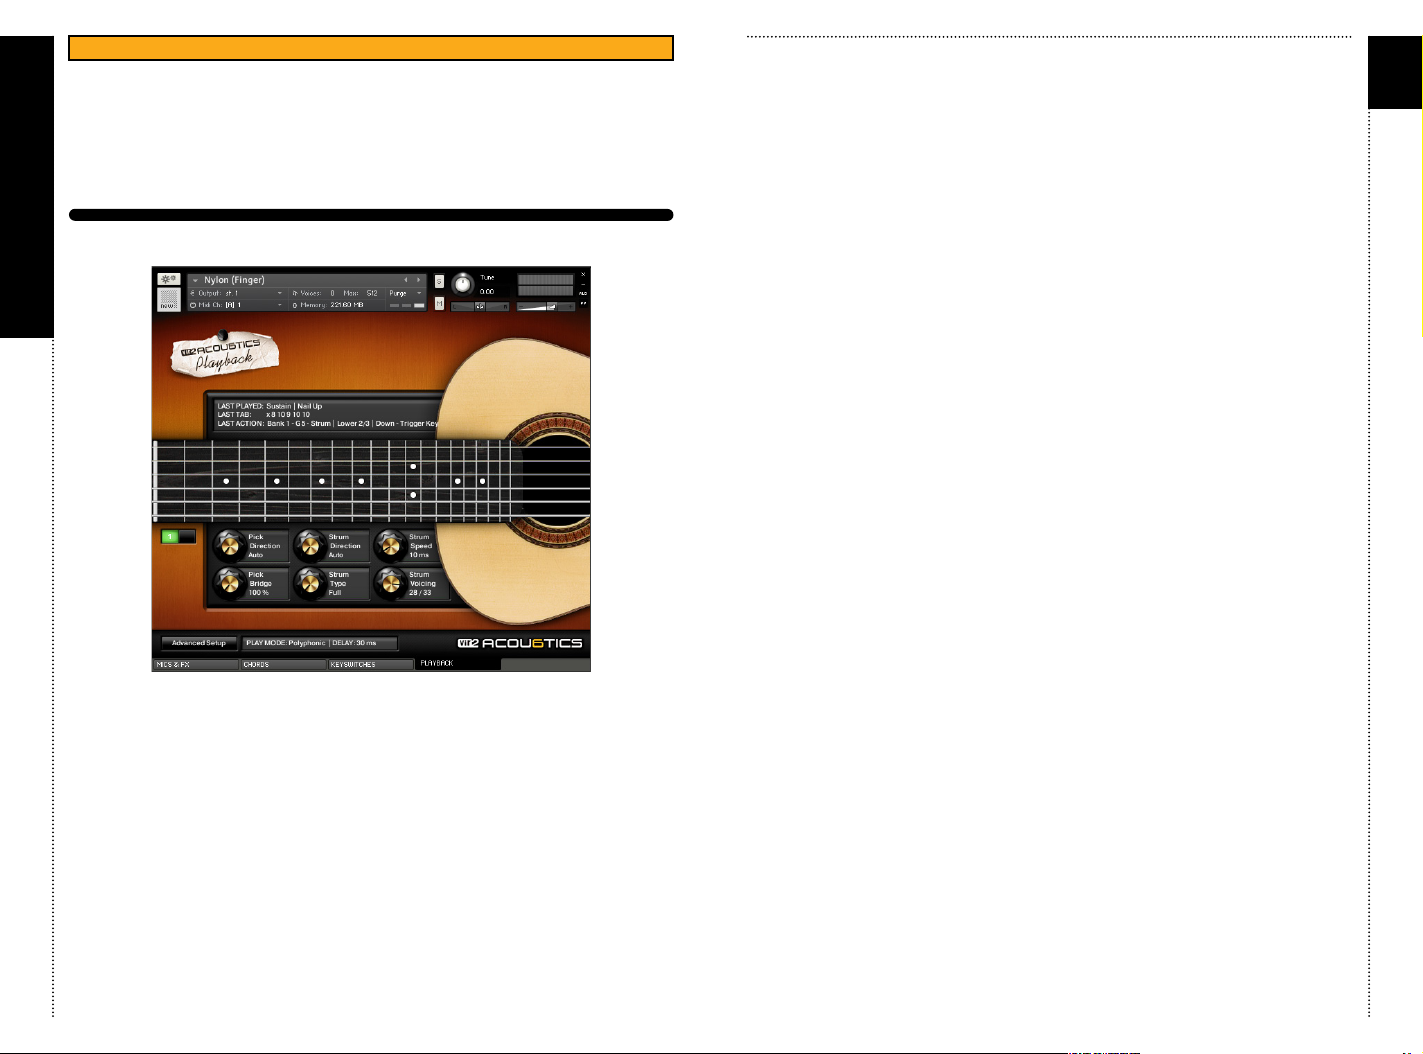
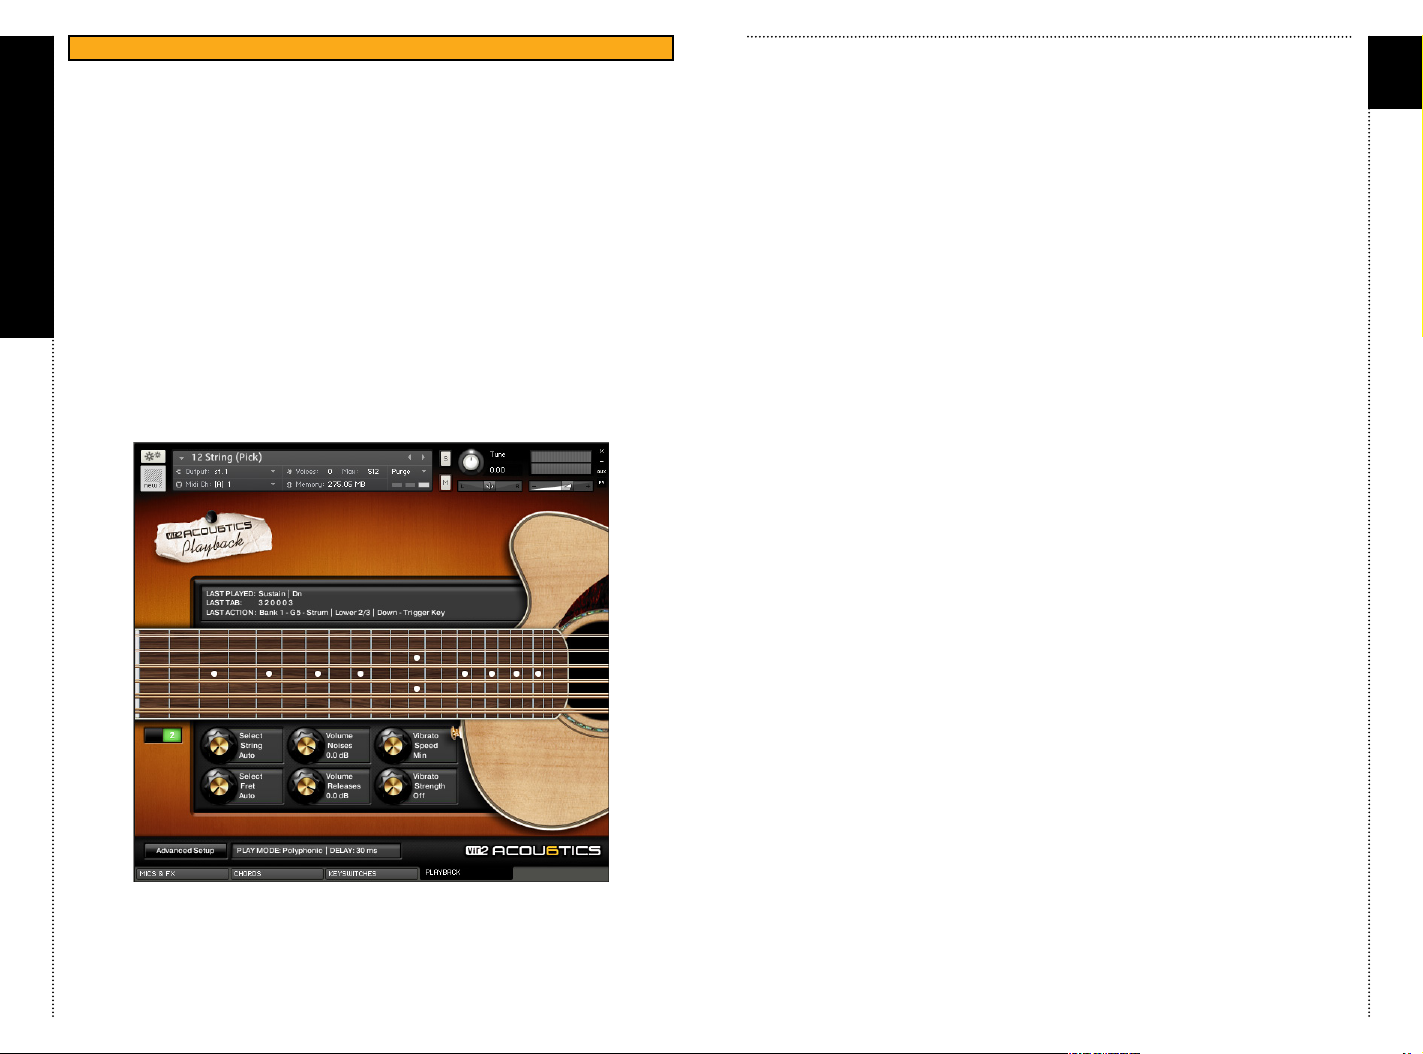
Strum Direction
Change the strum direction for chords that are played in the natural range
of the keyboard (i.e. not the trigger keys) here.
• Auto: Alternating between up and downstrokes.
• Down: Downstrokes only.
• Up: Upstrokes only.
34
PLAYBACK | STRUM | PICK
CHAPTER 07/ PLAYBACK
PAGE 1
Pick Direction
Change the pick direction here.
• Auto: Alternates between up and down pick directions.
• Down: Downstrokes only.
• Up: Upstrokes only.
Strum Type
Change the range of strings played for chords which are played with the
keyboard (not the trigger keys) here.
Strum Speed
Change the strum speed here. In Acou6tics, strum speed means the
duration it takes to strum from one string to the next. A full six string strum
will take 60ms if you set strum speed to 10ms. To play picked patterns we
recommend turning the strum knob all the way to the left. The text,
“Picked”, will appear next to the knob.
Strum Voicing
Manually overwrite the automatically selected voicing here.
PLAYBACK | LEGATO MODE
When switching to a Legato Mode bank a few of the knob controls change
and are listed below.
Legato X-Fade
Higher values will smooth the transitions (more crossfade), lower values will
leave more attack.
Legato S-Start
Higher values will remove more of the attack portion of the legato samples,
lower values leave more of the attack portion.
Pick Position
Change the pick position from 100% neck to 100% bridge here. This results
in dierent timbres. A warmer tone is found in the neck and a more
percussive, metallic tone, is found in the bridge.
acou6tics
Page 21
CHAPTER 07
ACOU6TICS PLAYBACK CONT’D
35
PAGE 1 CONT’D
Legato Slide In
You can setup the velocity threshold for the slide-ins here. If you play a note
with a velocity higher than this threshold a slide-in is played if physically
possible on the fretboard.
36
PAGE 2
Select String
Select a specific string you want to play on. Acou6tics tries to play on this
string as long as it’s physically possible.
Legato <> Range
CHAPTER 07/ PLAYBCK
This allows you to setup what the legato engine is playing when you play a
legato note outside the hammer on/pull o range (which can be setup on
the Advanced Settings Page | Legato Setup). If you set it to Start Art.
(Start Articulation) the start articulation for a new legato phrase is selected.
If you set it to Allow Slide a slide is played instead.
Select Fret
Select a certain fret on the fretboard you want to play on. Acou6tics tries to
play in this position as long as it’s physically possible.
Volume Noises
This is the master volume knob for all noises: pre-pick noise, strum noise
and slide noise.
Volume Releases
This is the master volume knob for all release noises.
Vibrato Speed
Change or automate the vibrato speed here.
Vibrato Strength
Change or automate the vibrato strength here. This knob is controlled via
CC1 (Modwheel).
Note: You can easily automate all the knobs on the playback page by right
clicking on them and changing the CC you want to assign to the designated
knob. For example: to assign ‘Select Fret’ to CC11, right click on the ‘Select
Fret’ knob, play a CC11 controller change in your sequencer or rotate the
knob you assigned to CC11 on your MIDI keyboard.
You shouldn’t assign CC1 (modwheel) or CC64 (sustain pedal) to any of the
knobs, because CC1 is controlling vibrato strength/velocity in tremolo mode
and CC64 is used as sustain pedal.
acou6tics
Page 22
CHAPTER 08 CHAPTER 09
37
Acou6tics/
ADVANCED SETUP
Acou6tics/Advanced Setup
PLAYBACK SETUP
38
CHAPTER 09/ PLAYBACK SETUP
ADVANCED SETUP
CHAPTER 08/ ADVANCE SETUP
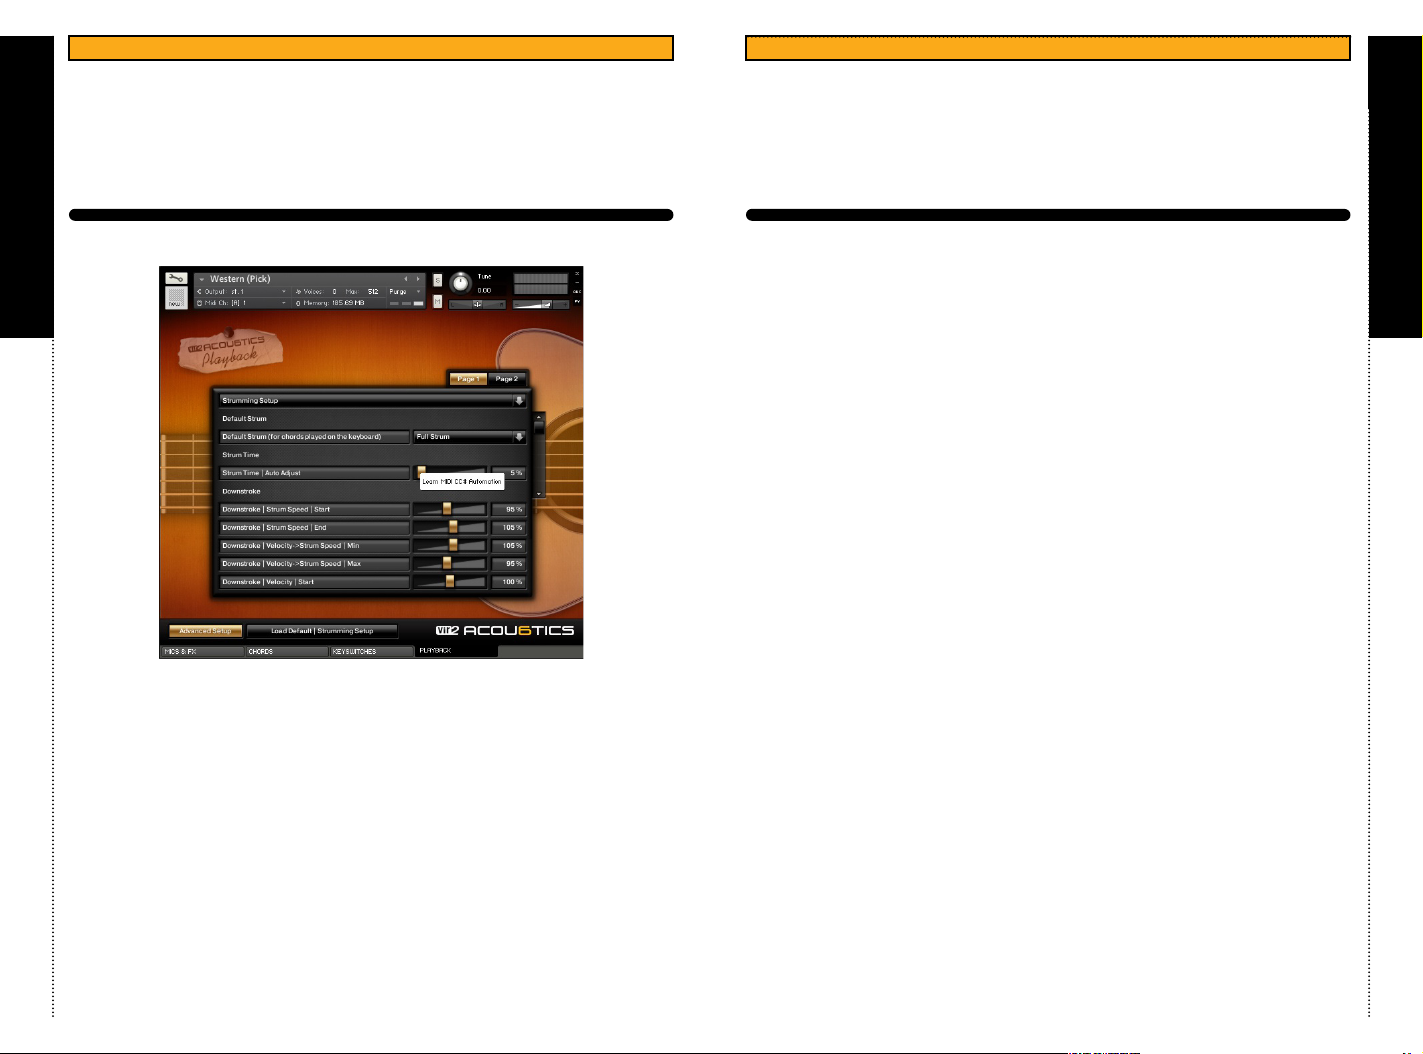
Automation:
Easily automate all the settings (except menus) by right clicking on them
and changing the CC you want to assign to the slider or button here. For
example: You want to assign ‘Strum Time | Auto Adjust’ to CC11. Right click
on the ‘Strum Time | Auto Adjust’ slider (as displayed in the picture above).
After that either play a CC11 controller change in your sequencer or rotate
the knob you assigned to CC11 on your MIDI keyboard.
Note: You shouldn’t assign CC1 (modwheel) or CC64 (sustain pedal) to any
of the slider / buttons, because CC1 is controlling vibrato strength / velocity
in tremolo mode, and CC64 is used as sustain pedal.
Quick Preset:
The Quick Presets allow you to quickly tweak parameters of Acou6tics
without having to go through all the advanced settings. In this menu you’ll
see exactly which settings are aected by the preset you have selected.
acou6tics
PLAYBACK SETUP | SIMULATION
Simulation | CPU:
Enables or disables features of the Acou6tics engine to make it sound more
realistic or to make it more ecient.
• Oine | Strum/Pick: ON | Pick Position: ON | Symp. Reso.: CORRECT |
String X-Fade: MAX (10000 ms)
• High | Strum/Pick: ON | Pick Position: ON | Symp. Reso.: EASY | String
X-Fade: MAX (10000 ms)
• Medium | Strum/Pick: ON | Pick Position: ON | Symp. Reso.: OFF | String
X-Fade: MED (7500 ms)
• Low | Strum/Pick: ON | Pick Position: OFF | Symp. Reso.: OFF | String
X-Fade: MED (7500 ms)
• Minimum | Strum/Pick: OFF | Pick Position: OFF | Symp. Reso.: OFF |
String X-Fade: MIN (5000ms)
Simulation | String X-Fade (Sustain Build Up):
Setup the amount of sustain build up here. High values mean more voices
will be played, lower values mean less voices will be played. Experiment
with this setting until it sounds right. If you have a track at a high tempo try
values below the default, if you have a track at a very slow tempo, try lower
values.
Simulation | Pick Position:
• O: Disables the pick position simulation.
• Normal: Enables the pick position simulation.
• High: Enables the pick position simulation and adds more variation, but
with a bit more phasing.
Simulation | Auto Sustain:
•O: No auto sustain.
• Strum Trigger Keys: Pressing the strum keys automatically adds the
sustain pedal as long as a strum key is pressed.
• Pick Trigger Keys: Pressing the pick keys automatically adds the sustain
pedal as long as a pick key is pressed.
• Strum + Pick Trigger Keys: Pressing the pick/strum keys automatically
adds the sustain pedal as long as a pick/strum key is pressed.
Page 23
CHAPTER 09 ACOU6TICS PLAYBACK SETUP CONT’D ACOU6TICS PLAYBACK SETUP CONT’DCHAPTER 09
39
Simulation | Bad Strum Noises:
Bad strum notes are sustain notes which have been recorded with more
string buzz. They happen on a real guitar if a string isn’t fully pressed down,
which often occurs when fingering chords.
• O: no bad strum notes.
• Lower | only on chord changes: lower amount of bad strum notes and they
occur only on chord changes.
• Low | only on chord changes: low amount of bad strum notes and they
occur only on chord changes
• High: high amount of bad strum notes.
CHAPTER 09/ PLAYBACK SETUP
• Higher: higher amount of bad strum notes.
Simulation | Double Tracking:
If you want to do double tracking, load two instances of the same guitar,
then set one guitar to ‘First Guitar’ and the other one to ‘Second Guitar’.
This helps to eliminate phasing between two instances of the same guitar.
Simulation | Sympathetic Resonance:
String instruments have a characteristic behavior called “Sympathetic
Resonance”. The string you plucked last will sound and its vibration will
make the other strings resonate as well. This results in an fuller tone and
sometimes adds a little disharmony, which is very characteristic for chord
playing on a guitar. You can set up the strength of the sympathetic
resonance between 0 and 100% here.
PLAYBACK SETUP | TIME
Time | Tremolo Speed:
You can set up the tremolo speed anywhere between quarter notes and
1/64 triplet notes.
Time | Delay | Remove (pre-attack portion):
On a real guitar a lot of noise happens between hitting the string and
plucking it with the finger or the plectrum (for example a bit of scratching).
This noise hasn’t been trimmed from the samples because it adds a lot of
realism, however, it will add a bit of delay to the samples (maximum of
15ms). For real-time playing we suggest removing the pre-attack portion,
and for bouncing a track we suggest adding the maximum amount for more
realism.
acou6tics
Time | Delay | Add | Pick (between noise and note):
40
On a real guitar a short ‘ping noise’ may occur when the plectrum is hitting
the string, for example, and there is a short delay between this ‘ping noise’
and the attack of the sample. You can set up this delay time here. For realtime playing we suggest removing the delay completely, and for bouncing a
track we suggest adding the maximum amount of delay for more realism.
Note: also string slide noises occur in this time window, so they are much
more audible when you add more delay and they will sound much more
realistic.
Time | Delay | Max | Strum (between note and noise):
On a real guitar the strum noises occur slightly after you picked a string,
because they happen when you move up or down from string to string with
your fingers or with your plectrum. This setting is the maximum amount of
delay time between the attack of the samples and the strum noise.
Time | Release Note| Fade Out:
Set up the release note fade out time here. The longer the fade out time the
more the release sample will overlap with the next note. If you are playing a
very fast guitar part, you can try reducing it to about 50 or 60ms. If you are
playing a very slow part, you can try raising the delay time to 200ms or
more. The dierences are very subtle, but for maximum realism it’s worth
experimenting with this setting.
Time | Release Note | Delay Compensation:
This is a very important setting since it aects the way the engine works
quite a bit. If you take a look at all the ‘time’ settings described above, you’ll
see that a lot of them add pre-delay to the engine. Per default, Acou6tics
compensates for this delay at the release of a note. So if you release a note,
the same amount delay is added before the release happens as it was
added before the note has been played back. That allows you to easily
adjust for the added delay in your sequencer (by adding a negative delay to
your track). The ‘Delay Compensation’ setting allows you do adjust the
engine to your needs. If you don’t like the way the delay feels at release you
can simply remove it. This however, makes it necessary to use the sustain
pedal much more often since the engine can’t detect overlapping notes
anymore.
• O | Repetitions won’t connect automatically, need sustain pedal.
• Full | Compensate for pre-attack portion and delay between pick noise
and note.
• Pre-Attack | Compensate for pre-attack portion.
• Add Delay | Compensate for delay between pick noise and note.
Page 24
CHAPTER 10 CHAPTER 10 ACOU6TICS STRING SETUP CONT’D
41
Acou6tics/Advanced Setup
STRING SETUP
STRING SETUP | STRINGS
Strings | Tuning:
CHAPTER 10/ STRING SETUP
You can change the tuning of the guitar (from default E-Tuning down to
B-Tuning) here.
Strings | Capo:
You can set up a virtual capo here. Note: this aects your learned chords.
For example: If you set up a chord library with no capo and you add a capo
later, you’ll need to learn your custom chords again.
Strings | Behavior:
• Realistic: Note: Only works with chord detection > 0ms!
• Polyphonic: Make strings polyphonic. Note: May not sound realistic and
fretboard display is turned o. On a real guitar you can only play one note
at a time on each string. So a six string guitar has a maximum polyphony of
6. If you want to use Acou6tics like a traditional sampling instrument with
no artificial intelligence for string placement, strumming etc., simply set this
setting to ‘Polyphonic’.
Strings | Placement | Mode:
Switch between a ‘Dynamic’ mode or ‘Static’ string selection mode here. If
you chose ‘Dynamic’, consider that most notes in the play range of a guitar
can be played on more than one string. A#1, for example, can be played on
the 6th string on the 6th fret or on the 5th string on the first fret so it was
necessary to develop an algorithm that chooses the best fitting string
according to your playing. This means that if you play A#1, it won’t always
sound exactly the same. If you don’t like the idea that most keys will
produce dierent timbres in dierent situations, you can switch to ‘Static’
mode. That way each note on the keyboard will always be played on the
same fret on the fretboard.
• Dynamic (only works with chord dectection > 0ms!
• Static
Strings | Placement | Reset Time:
If a note is held longer than the threshold time set here before the next note
is played, the position on the virtual fretboard is reset. So next time you
play a note it’s played in the lowest possible position again.
42
Strings | Placement:
Two placement options: By AI or By MIDI Channel.
If you set this to ‘By MIDI Channel’ you’ll also need to set the instrument
MIDI input to ‘Omni’. After you have done this, you’ll be able to select
strings via MIDI channel. So all notes played on MIDI channel 1 are played on
string 1 (highest string), and all notes played on MIDI channel 6 are played
on string 6 (lowest string). This is not suitable for real-time playing, but will
allow you full control over the string placement when programming MIDI
parts.
acou6tics
Page 25
CHAPTER 11 CHAPTER 11 Acou6tics CHORD SETUP CONT’D
43
Acou6tics/Advanced Setup
CHORD SETUP
CHORD SETUP | SELECT BEST VOICING
Acou6tics has a guitar chord library with up to 50 dierent voicings per
chord. The engine tries to select the best fitting chord in real-time,
depending on dierent parameters. You can set up the importance of those
CHORD SETUP | CHORD
Chord | Detect Time:
CHAPTER 11/ CHORD SETUP
0ms = Detect Time is OFF
Usually when a chord is played on the keyboard, not all keys are pressed at
the same time. To compensate for this variance and to correctly detect a
chord, the engine has to wait for all chord notes to arrive. By default this
time is 25ms, but it can be lowered if your chord playing is very accurate, or
for faster tempos.
CHORD SETUP | AUTO VOICING
Auto Voicing | Allow String Skipping:
Enable this to simulate how chords would be played by a real guitarist.
Auto Voicing | Extend Chords:
Acou6tics can automatically translate keyboard-voiced chords into guitarvoiced chords. You can turn this feature on or o here. If you turn ‘Extend
Chords’ o, your chords aren’t translated to guitar chords, but of course
they are still transferred to the best fitting position on the virtual fretboard.
parameters with this setting.
Select Best Voicing | Keyboard Octave:
Chords played in higher octaves will move the guitar voicing up on the
fretboard. For example, Cmaj in the lowest octave will be played with an
open voicing and Cmaj in the highest octave will be played as a barred
chord on fret 12.
Select Best Voicing | By Chord Shape:
Prefer easier to play chord shapes over more complex ones.
Select Best Voicing | By Number of Strings:
Prefer voicings which are played on more strings over voicings played on
less strings. E.g. prefer a six string chord over a four string chord.
Select Best Voicing | By Last Position:
Prefer voicings which are played within the same position on the fretboard
you’ve played your last chord in.
44
Auto Voicing | Extend Chords | Keep Root Note:
Select guitar chord voicings which have the same root note as the chord
you are playing on your keyboard.
Auto Voicing | Extend Chords | Prefer Barred Chords:
Prefer barred chords over chords which have open strings in them when
playing in higher positions on the fretboard.
acou6tics
Page 26
CHAPTER 12 CHAPTER 12 Acou6tics NOISE SETUP CONT’D
45
Acou6tics/Advanced Setup
NOISE SETUP
NOISE SETUP | PICKING VOLUME
Volume | Pick Noise:
CHAPTER 12/ NOISE SETUP
Control the amount of pre-pick noise here. Pre-pick noise is noise that
happens before the actual note is played. The plectrum scratches the string
which produces some noise. This noise is barely audible but it also adds
another subtle factor for realism. Note: All noises add to the polyphony
count so if you have a less powerful CPU you can turn them o to minimize
CPU consumption.
PICKING | PROBABILITY
Pick Noise, Slide Noise and Hit Next String Noise allow you to set up how
often a certain noise occurs. 100% means all the time, 50% would cause the
noise to sound only on 50% of notes. With If Velocity > you can set up a
velocity threshold here. The Next Hit String Noise will only occur when you
play a note with a higher velocity than your threshold.
PICKING | RELEASE NOISE
The Release Noise probability settings of Buzz, Slide, Pick and Open String
allow you to set up how often a certain release noise occurs. Note: all
release noise probabilities added together can’t go higher than 100%. So if
you set one to 100% all the others are automatically set to 0%.
46
Volume | Slide Noise:
Slide noise happens when you move your hand along the fretboard to
reposition your hand. Adjust the amount of this slide noise here. Note: All
noises will use more polyphony, so if you have a less powerful CPU, you can
turn them o to minimize CPU consumption.
Volume | Hit Next String Noise:
You can setup the volume of the noise that sometimes happens when
plucking a string and hitting the next string.
Volume | Release Noise:
Release noise happens when you lift your fingers from the fretboard to
reposition your hand after playing a note. Adjust the amount of this release
noise here. Note: All noises will use more polyphony, so if you have a less
powerful CPU, you can turn them o to minimize CPU consumption.
Volume | Open String Noise:
When lifting your left hand to reposition, sometimes you produce a light
open string noise (like a very quiet pull o). You can specify the amount of
this open string noise here. Note: All noises will use more polyphony, so if
you have a less powerful CPU, you can turn them o to minimize CPU
consumption.
acou6tics
CHORDS | VOLUME
Chords | Volume | Strum Noise:
Control the amount of strum noise here. Strum noise happens when you
strum strings. Each time a string is played, the next string stops the
plectrum for a very short time. The sound produced on the stop of the
plectrum is the strum noise. Note: All noises will use more polyphony, so if
you have a less powerful CPU, you can turn them o to minimize CPU
consumption.
Chords | Volume | Slide Noise:
Slide noise happens when you move your hand along the fretboard to
reposition your hand. Adjust the amount of this slide noise here. Note: All
noises will use more polyphony, so if you have a less powerful CPU, you can
turn them o to minimize CPU consumption.
Chords | Volume | Release Noise:
Release noise happens when you lift your fingers from the fretboard to
reposition your hand after playing a note. Adjust the amount of this release
noise here. Note: All noises will use more polyphony, so if you have a less
powerful CPU, you can turn them o to minimize CPU consumption.
Chords | Volume | Open String Noise:
When lifting your left hand to reposition, sometimes you produce a light
open string noise (like a very quiet pull o). You can specify the amount of
this open string noise here. Note: All noises will use more polyphony, so if
you have a less powerful CPU, you can turn them o to minimize CPU
consumption.
Page 27
CHAPTER 12 CHAPTER 12 ACOU6TICS NOISE SETUP CONT’DACOU6TICS NOISE SETUP CONT’D
47
CHORDS | PROBABILITY
Strum Noise and Slide Noise allows you to set up how often a certain noise
occurs. 100% means all the time, 50% for example means that only half the
time a certain noise occurs when playing a note.
CHORDS | PROBABILITY | RELEASE NOISE
The Release Noise probability settings of Buzz, Slide, Pick and Open String
allow you to set up how often a certain release noise occurs. Note: all
CHAPTER 12/ NOISE SETUP
release noise probabilities added together can’t go higher than 100%. If you
set one to 100% all the others are automatically set to 0%.
BAD NOTES |BUZZ | If Velocity >
You can setup a velocity threshold here. A buzz will only occur when you
play a note with a higher velocity than your threshold.
48
TRIGGER | OPEN STRING | STRUM
• Down: Set up the type of strum which is played when playing an ‘open
string strum down’ key here.
• Down Open Strings: Set up the amount of open strings for an ‘open string
strum down’ here. If you set it to 100% all strings are played open. If you set
it to 90%, for example, sometimes a chord note from the last chord is
strummed within the ‘open string strum’, this simulates the fact that not all
fingers are lifted exactly at the same moment when lifting the hand to
reposition it on the fretboard.
• Up: Set up the type of strum which is played when playing an ‘open string
strum up’ key here.
•Up Open Strings: Set up the amount of open strings for an ‘open string
strum up’ here. If you set it to 100% all strings are played open. If you set it
to 90%, for example, sometimes a chord note from the last chord is
strummed within the ‘open string strum’, this simulates the fact that not all
fingers are lifted exactly at the same moment when lifting the hand to
reposition it on the fretboard.
BAD NOTES |BUZZ | VOLUME
BAD NOTES |BUZZ | PROBABILITY
You can setup up the volume and the probability of the buzz noise here.
BAD NOTES |BUZZ | DELAY
BAD NOTES |BUZZ | RANDOMIZE
You can setup up the volume and the probability of the buzz noise here.
TRIGGER | OPEN STRING | MUTE | VOLUME
When playing an open string mute key, which lifts the hand, stops the note,
and plays a open string noise, a slidenoise is played. You can set up the
volume of this slide noise here.
TRIGGER | OPEN STRING | MUTE | PROBABILITY
When playing a open string mute key, which lifts the hand, stops the note,
and plays a open string noise, you can set up the probability for a slide
noise and for an open string noise here. Setting both to 100% means that
every time you play a open string mute key, both noises are played.
acou6tics
TRIGGER | MUTE STRING SLAPS
If you enable the button, the strings are muted when playing a ‘Mute String
Slap’ trigger key. Otherwise only the mute string slap sound is played, but
the strings won’t be muted.
Page 28
CHAPTER 13 CHAPTER 14
49
Acou6tics/Advanced Setup
PITCHBEND & VIBRATO
SETUP
VIBRATO SETUP
Pitchbend | Range:
50
Acou6tics/Advanced Setup
CHAPTER 14/ STRUMMING SETUP
STRUMMING SETUP
Strum | Default:
Change the pitch bend range here.
CHAPTER 13/ PITCHBEND &
Vibrato | Mode:
Change the vibrato mode here.
• All Strings
• Last String | Note: Only works with chord detection = 0ms
• Highest String | Note: Only works with chord detection = 0ms
• Lowest String | Note: Only works with chord detection = 0ms
Vibrato | Curve:
Change the vibrato curve here.
Vibrato | Max:
Change the maximum strange (?) of the vibrato here.
Vibrato Speed | Min/Max:
Set up the minimum and maximum rate of the vibrato here.
Vibrato | Type:
There are 2 options for vibrato type: ‘Up’ and ‘Up & Down’. On a real guitar
you can only bend upwards, not downwards. So the default setting here is
‘Up’, which means that the vibrato is always slightly sharp compared to
traditional LFO vibrato.
acou6tics
Set up the default strum type for chords played on the keyboard here.
Strum Time | Auto Adjust:
Strum time in Acou6tics means the time dierence between one string and
the next in a strum. If ‘Strum Time’ is set to 10ms, a strum over all six strings
for example will take 60ms. ‘Auto Adjust’ will automatically vary this strum
time. If a six string strum takes 60ms, a four string strum will also take
60ms, because the engine automatically compensates the strum time when
playing a four string strum. You can also set up the amount of ‘Auto Adjust’
here. 100% means full adjustment, 10% for example, means that a four string
strum will only be slightly slower than a six string strum.
DOWN-STROKE | UP-STROKE
Strum Speed | Start:
Set up the strum speed at the beginning of a strum here. If you set it to
110% and you have a strum time of 100ms, the strum speed at the beginning
of the strum will be 110ms. The ‘Strum Speed | Start’ and ‘Strum Speed |
End’ settings will allow you to accelerate or slow down a strum over time.
Strum Speed | End:
Set up the strum speed at the end of a strum here. If you set it to 90% and
you have a strum time of 100ms, the strum speed at the end of the strum
will be 90ms. The ‘Strum Speed | Start’ and ‘Strum Speed | End’ settings
will allow you to accelerate or slow down a strum over time.
Page 29
CHAPTER 14 ACOU6TICS STRUMMING SETUP CONT’D CHAPTER 15
51
Velocity Strum Speed | Min:
Here you can set up how much the velocity you play a chord with, is
aecting the strum speed here. If you set ‘Strum Speed | Min’ to 110% and
you have a strum speed of 100ms, a chord played with the lowest velocity is
played with 110ms strum speed.
Velocity Strum Speed | Max:
Here you can set up how much the velocity you play a chord with, is
aecting the strum speed. If you set ‘Strum Speed | Max’ to 90% and you
CHAPTER 14/ STRUMMING SETUP
have a strum speed of 100ms, a chord played with the highest velocity is
played with 90ms strum speed.
Velocity | Start:
Set up the start velocity of a strum here. If you set it to 110% and you have a
chord played with a velocity of 100, the first note in the strum will be played
with a velocity of 110. If ‘Velocity | End’ is set to 100% the velocity will
decrease from string to string, until the last note in the strum is played with
a velocity of 100.
Velocity | End:
Set up the end velocity of a strum here. If you set it to 90% and you have a
chord played with a velocity of 100, the last note in the strum will be played
with a velocity of 90. If ‘Velocity | Start’ is set to 100% the velocity will
decrease from string to string, until the last note in the strum is played with
a velocity of 90.
Pick Position | Start:
Set up the pick position at the beginning of a strum here. This simulates a
hand move with a slight angle when playing a strum. This starts slightly
more at the neck and ends slightly more at the bridge when playing a
strum.
Acou6tics/Advanced Setup
FINGER SETUP
Finger Setup:
‘Finger Setup’ only aects guitars that are finger picked. The setting
doesn’t aect the playback of guitars played with plectrum.
Finger | Mode:
With this setting you can switch the picking mode between using only the
finger, and using thumb/finger for picking.
• Finger
• Thumb/Finger: thumb the low strings (except repetitions), nger the high
strings.
Finger | Position:
There are 4 finger positions: Thumb, Finger 1, Finger 2 and Finger 3. You
can set up the picking position for each finger, simulating that all fingers are
playing at slightly dierent positions on the string.
Finger | Threshold:
• Repetition: Set up the threshold time for repetition detection here. This is
only important if ‘Finger | Mode’ is set to ‘Thumb/Finger’, because
Acou6tics correctly switches to finger picking instead of playing with the
thumb when playing fast repetitions.
• Tremolo: Set up the threshold time for tremolo detection here. When
tremolo picking is detected Acou6tics automatically adds more variation to
avoid the “machine gun” eect.
52
CHAPTER 15/ FINGER SETUP
Pick Position | End:
Set up the pick position at the end of a strum here. This simulates a hand
move with a slight angle when playing a strum. This starts slightly more at
the neck and ends slightly more at the bridge when playing a strum.
acou6tics
Page 30
CHAPTER 16 CHAPTER 16 ACOU6TICS HUMANIZE SETUP CONT’D
53
Acou6tics/Advanced Setup
HUMANIZE SETUP
Humanize | Pick Position:
Specify the amount of humanization of the pick position here(between neck
and bridge).
CHAPTER 16/ HUMANIZE SETUP
Humanize | Velocity:
Specify the amount of velocity variation of each note here.
Humanize | Volume:
Set up the volume variation here.
Lightly Hit | Down:
Set up to miss or lightly hit the start string of a down strum, the end string
of a down strum, or both here.
• O
• Start String
• End String
• Start & End String
Lightly Hit | Down Probability:
Set up the probability to miss or lightly hit a string while doing a down
strum here.
Lightly Hit | Down Reduce Velocity (Start String/End String):
Set up amount of velocity reduction for a missed or lightly hit ‘start/end’
string of a down strum here.
54
Humanize | Timing:
Set up the timing variation here.
Strumming | Down/Up:
You can humanize the strum settings here. ‘Strum Speed’ adds variation to
your strum speed while ‘Strum Settings’ adds variation to all the strum
settings described in the ‘STRUMMING SETUP’ section above.
• Strum Settings
• Strum Speed
Strings | If Strum Speed <:
Control the number of strings which are strummed when the strum speed is
faster than specified here. This simulates that it’s more dicult to do exact
strums the faster you are playing them.
acou6tics
Lightly Hit | Up:
Set up to miss or lightly hit the start string of an up strum, the end string of
an up strum, or both here.
• O
• Start String
• End String
• Start & End String
Lightly Hit | Up Probability:
Set up the probability to miss or lightly hit a string while doing an up strum
here.
Lightly Hit | Up Reduce Velocity (Start String/End String):
Set up amount of velocity reduction for a missed or lightly hit ‘start/end’
string of an up strum here.
Page 31
CHAPTER 16 CHAPTER 17ACOU6TICS HUMANIZE SETUP CONT’D
55
Strings | Add String (Down/Up):
56
Acou6tics/Advanced Setup
Set up the probability to add a string while doing a strum here. For
example, if you play a half strum on a six string guitar, sometimes four
strings are strummed instead of three. This simulates that a real guitarist
sometimes accidentally hits an additional string, especially when playing
fast.
Strings | Miss String (Trigger Keys Only):
CHAPTER 16/ HUMANIZE SETUP
Set up the probability to completely miss a string while doing a strum with
the trigger keys here. This simulates that a real guitarist sometimes
accidentally misses a string, especially when playing fast.
Strings | Start String (Trigger Keys Only):
Set up the probability to vary the start string of a strum when playing the
trigger keys. This simulates that a real guitarist sometimes starts a strum on
dierent strings, especially when playing fast.
LEGATO SETUP
Legato Mode | Start Articulation:
If it’s not possible to play a legato articulation like a hammer-on or a pullo, because either the string has changed since the last note or you setup
“Max Range”, “Max Consecutive” or “Max Time Dierence” in a way that
limits the legato articulations, the start articulation is played.
• Current Articulation
• Current Articulation / Hammer On (current Articulation at phrase start,
otherwise hammer on, even if the string changes)
•Hammer On
Legato Mode | Force Monophonic
This is a very important setting because it drastically changes how the
legato mode works. If “Force Monophonic” is active, only one note at a time
is played in legato mode and all other notes which were active before will
be muted with the first legato note. If you deactivated “Force Monophonic”
all the notes which have been played before the first legato note won’t be
muted. For example: this allows you to play a chord, quickly switch to
legato mode, play a trill and switch back to polyphonic – without muting
the chord.
Legato | Release Volume:
Turn down the volume of the release samples in legato mode here.
CHAPTER 17/ LEGATO SETUP
acou6tics
Legato | Retrigger:
If “Retrigger” is enabled, it allows you to smoothly play legato lines. If you
play and hold E2 followed by F2, it will retrigger E2 as soon as you release
F2.
Legato | Tone:
Add additional variation to the legato samples here by slightly changing the
tone of each sample here. The “Variation | Consecutive” settings will make
legato samples, which are played consecutively, sound more metallic with
each new note simulating that with each new legato sample, less of the
original sustain tone, is audible.
• Variation
• Variation | Consecutive
Page 32
CHAPTER 17 CHAPTER 17ACOU6TICS LEGATO SETUP CONT’D ACOU6TICS LEGATO SETUP CONT’D
57
Legato Mode | Slides | Probability:
If it’s not possible to play a legato articulation like a hammer on or a pull o,
because you setup “MAX RANGE”, “MAX CONSECUTIVE” or “MAX TIME
DIFFERENCE” in a way that limits those articulations, a slide is played
instead if you changed the “Legato <> Range” knob to slide. For example: if
you play E2 followed by G2 and you set “Max Range” for hammer ons to 2,
a slide up will be played instead. The “Probability” settings allows you to
setup how often a slide is randomly played. If no slide is played, the start
articulation is used instead.
CHAPTER 17/ LEGATO SETUP
LEGATO MODE | TRANSITION
The transition parameters allow you to setup the way the legato engine is
connected to the legato samples for each articulation (Hammer Ons, Pull
Os, Slide 1 Fret and Slide 2 Frets). “By Legato AI” means that an
articulation is automatically selected by the legato logic. “By Keyswitch”
means that you activated an articulation via keyswitch.
Transition | X-Fade:
The “Fade In” parameter allows you to setup how much the new note is
crossfaded with the last note. Lower values add more attack, higher values
result in a smoother transition.
Transition | Time | LoVel
Transition | Time | HiVel:
The “Time” parameter allows you to setup how much of the transition
portion in the sample is played. Lower values result in a more direct
response, while higher values will add more of a glide eect. You can setup
dierent values for notes played with low velocity and for notes played with
high velocity.
Legato | Transient:
With the “Transient” setting you can smoothen a transition (an example
would be a hammer on to a pull o) or you can add more attack. Lower
attack settings will result in a smoother sound while higher attack settings
will add more attack. The sustain parameter allows you to extend or shorten
the sustain phase of the new note in a transition.
• Attack
• Sustain
acou6tics
Legato | Max Range:
Setup the maximum range in which hammer ons, pull os or slides are
played here. If you play E2 followed by F#2 on the lowest string and you
setup the max range for a hammer on to 1, the hammer on won’t be played
in because the new note is 2 frets away from the last note.
• Hammer Ons
• Pull Os
• Slides
Legato | Max Consecutive:
Setup the maximum number of hammer ons, pull os or slides than can be
played in a row here. If you set ‘Max Consecutive’ for hammer ons to 1 and
you play E2 followed by F2 and F#2, only F2 will trigger a hammer on and
F#2 will be played with the start articulation instead.
• Hammer Ons
• Pull Os
• Slides
Legato | Max Time Dierence:
Setup the maximum time dierence in which hammer ons, pull os or slides
can be played here. If you set the “Max Time Dierence” for hammer ons to
500ms and you play E2 followed by F2 and you play F2 in less than 500ms,
a hammer on will be played. If you play F2 after 500ms it will be played
with the start articulation instead.
• Hammer Ons
• Pull Os
• Slides
HAMMER ON | BY LEGATO AI
Transition | X-Fade:
The “Fade In” parameter allows you to setup a per string oset of how
much the new note is crossfaded with the last note. Lower values add more
attack, higher values result in a smoother transition.
Transition | X-Fade:
The “Sample Start” parameter allows you to setup a sample start oset per
string. Lower values result in more attack, higher values will cut away more
of the attack portion of the sample.
58
Page 33
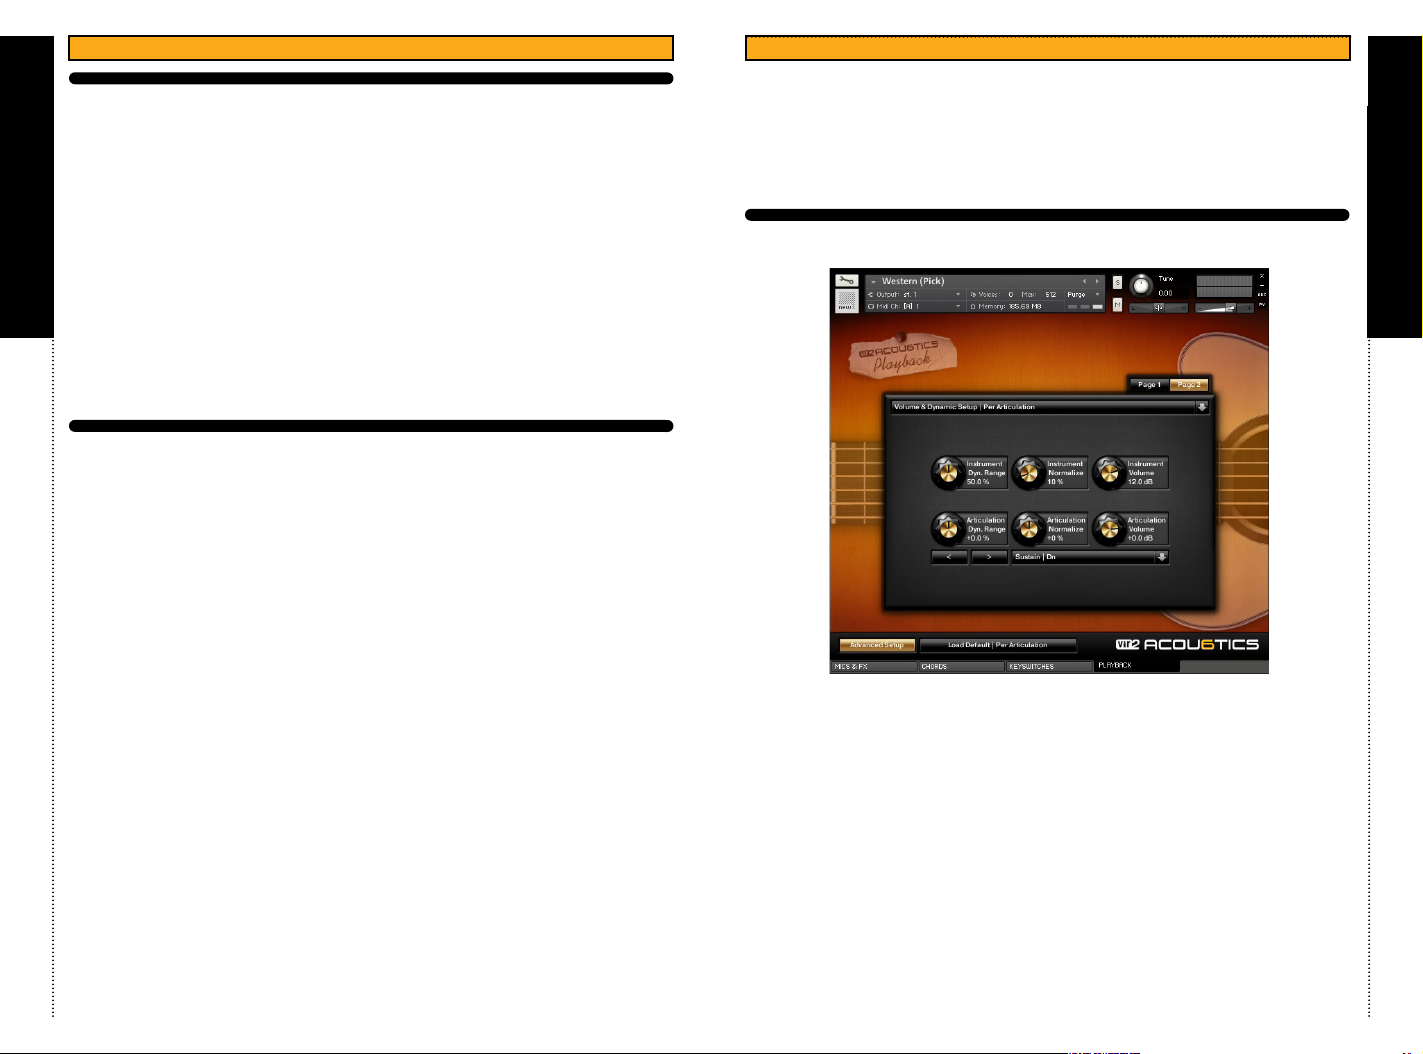
CHAPTER 17 CHAPTER 18ACOU6TICS LEGATO SETUP CONT’D
59
Legato Samples | Transition (when played via keyswitch):
The “Fade In” parameter allows you to setup how much the new note is
crossfaded with the last note. Lower values add more attack, higher values
result in a smoother transition.
• Fade In | Hammer On / Sustain
• Fade In | Pull O
• Fade In | Slides
The “Time” parameter allows you to setup how much of the transition
portion in the sample is played. Lower values result in a more direct
CHAPTER 17/ LEGATO SETUP
response, while higher values will add more of a glide eect.
• Time | Hammer On / Sustain
• Time | Pull O
• Time | Slides
LEGATO SETUP | PLAY SLIDE KEYSWITCH
Play Slide Keyswitch | Speed
The speed of a slide normally depends on the time between the first and
the second note you play to trigger the slide. With the speed setting you
can make all slides faster (1% - 100%) or all slides slower (-1% to -100%).
Speed | Min/Max
These settings allow you to limit the slide speed to a minimum and a
maximum value. If you trigger a very fast or a very slow slide, they will stay
within those limits. For example: if you play one note very shortly after a
second note, which normally would trigger a 20ms slide but you set “Speed
Min” to 50ms, a 50ms slide will be played instead.
Speed | Accelerate (per Fret)
Setup the acceleration of the the simulated finger movement here. The
default value of 5ms means that every fret you move up/down on the
fretboard when playing a up/down slide is played 5ms faster than the fret
before.
Velocity Loss | Up/Down (per Fret)
These settings allows you to setup how much the velocity is automatically
decreased with each fret you slide.
Acou6tics/Advanced Setup
VOLUME & DYNAMIC SETUP
PER ARTICULATIONS
V&D PER ARTICULATIONS | INSTRUMENT:
Instrument | Dyn. Range:
Setup the dynamic range of the instrument here. Higher values mean more
dynamic, lower values mean less dynamic.
Articulation | Dyn. Range:
Setup the amount of normalization of the samples here. 100% means that all
articulations are fully normalized and have the same volume. Note: You’ll
lose the natural dierence between the dierent strings and articulations
and you will need to re-adjust the volume of the individual articulations if
you set this value to high.
60
CHAPTER 18/ VOLUME & DYNAMIC
SETUP PER ARTICULATIONS
acou6tics
Page 34
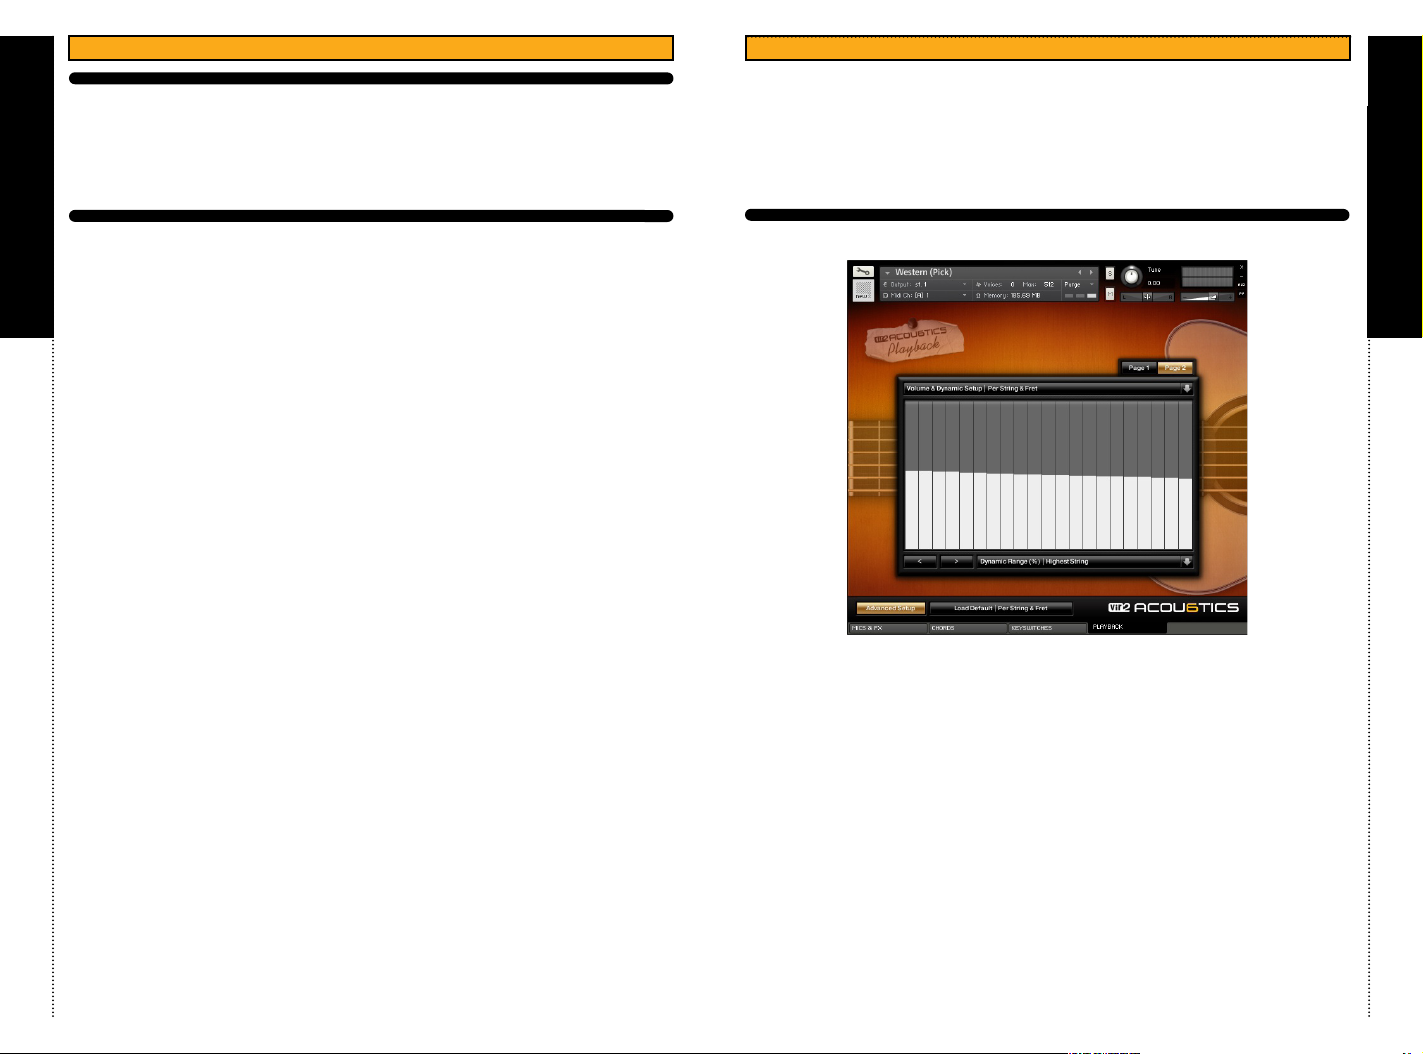
CHAPTER 18 CHAPTER 19ACOU6TICS V&D PER ARTICULATIONS CONT’D
61
Instrument | Volume:
This is the master volume knob. If you turn up the sample normalization we
recommend you lower the master volume to avoid clipping.
Acou6tics/Advanced Setup
VOLUME & DYNAMIC SETUP
PER STRING & FRET
62
CHAPTER 19/ VOLUME & DYNAMIC
SETUP PER STRING & FRET
V&D PER ARTICULATIONS | ARTICULATION:
Setup and tweak all individual articulations available in Acou6tics here. If
SETUP PER ARTICULATIONS
you think the muted notes are too quiet or too loud, simply select “Palm
Muted” from the list and adjust the articulation. This gives you full flexibility
CHAPTER 18/ VOLUME & DYNAMIC
of setting up each instrument the way you prefer it. After you changed
those settings we recommend you save a new version of the instrument. If
at any point you want to go back to the default settings simply click on the
“Load Default | Per Articulation” button.
Articulation | Dyn. Range:
Setup the dynamic range of the selected articulations here. Higher values
mean more dynamics, lower values mean less dynamics.
Articulation | Normalize:
Setup the amount of normalization of individual articulations here. 100%
means that the articulation is normalized to the maximum. Note: You’ll lose
the natural dierence between the dierent strings and articulations and
you will need to re-adjust the volume of the articulation if you set this value
too high.
Articulation | Volume:
Setup the volume of a individual articulations here.
V&D PER STRING & FRET | DYNAMIC RANGE (%):
Dyn. Range | Lowest String/Highest String:
Setup the dynamic range for the lowest and the highest string here. The
dynamic range for the strings in between are interpolated.
The x-axis of the table (from left to right) represent the frets of the each
string. The y-axis (from bottom to top) represents the dynamic range in
percentages. This allows you to correctly setup the changes that happen on
a real guitar. For example: The dynamic range on the lower frets is a bit
higher than the dynamic range of the higher frets.
acou6tics
Normalize | Lowest String/Highest String:
Setup the amount of normalization for the lowest and the highest string
here. The amount of normalization for the strings in between are
interpolated.
The x-axis of the table (from left to right) represent the frets of the each
string. The y-axis (from bottom to top) represents the normalization
amount in percentages.
Page 35
CHAPTER 19 CHAPTER 20ACOU6TICS V&D PER ARTICULATIONS CONT’D
63
Volume | Lowest String/Highest String:
Setup the volume for the lowest and the highest string here. The volume of
the strings in between is interpolated.
The x-axis of the table (from left to right) represent the frets of the each
string. The y-axis (from bottom to top) represents the volume amount in
percent.
Decay (MS) | Lowest String/Highest String:
SETUP PER STRING & FRET
Setup the sustain decay for the lowest and the highest string here. The
sustain decay of the strings in between are interpolated.
CHAPTER 19/ VOLUME & DYNAMIC
This setting aects how much build up is taking place when two or more
notes on the same string and fret are played shortly after each other. Lower
values mean less build up/overlay of two notes. Higher values mean more
build up/overlay of two notes.
The x-axis of the table (from left to right) represent the frets of the each
string. The y-axis (from bottom to top) represents the sustain decay in
milliseconds (1000ms = 1s).
Decrease Release Volume (MDB/S) | Lowest String/Highest String:
Setup how loud release samples are in relation to how long you held a note
for the lowest and highest string here. The decrease release volume value of
the strings in between are interpolated.
The x-axis of the table (from left to right) represent the frets of the each
string. The y-axis (from bottom to top) represents the decrease of the
release volume in mdB / s (1000 mdB = 1 dB). For example: If you set the
decrease release volume to 3000 mdB/S, this will mean that with each
second you hold a note, the release volume will be decreased by 3dB.
Acou6tics/Advanced Setup
Legato Sample Start Setup
Per Articulation, String & Fret
Legato Sample Start Setup | Per Articulation, String & Fret
This page switches the engine into a sample cutting mode. You can select
each legato articulation and setup a sample start for each fret. You can test
and cut each fret by playing a note in the play range marked with the blue
keys on Kontakt’s virtual keyboard. For example, E1 will play fret 0, F1 will
play fret 1, F#2 will play fret 2 and so on. To leave the sample cutting mode
simply close the advanced setup tab or switch back to page 1.
Note: We recommend not to change the default values. We spent a lot of
time setting them up correctly.
64
STRING & FRET
START SETUP PER ARTICULATION
CHAPTER 20/ LEGATO SAMPLE
acou6tics
Page 36
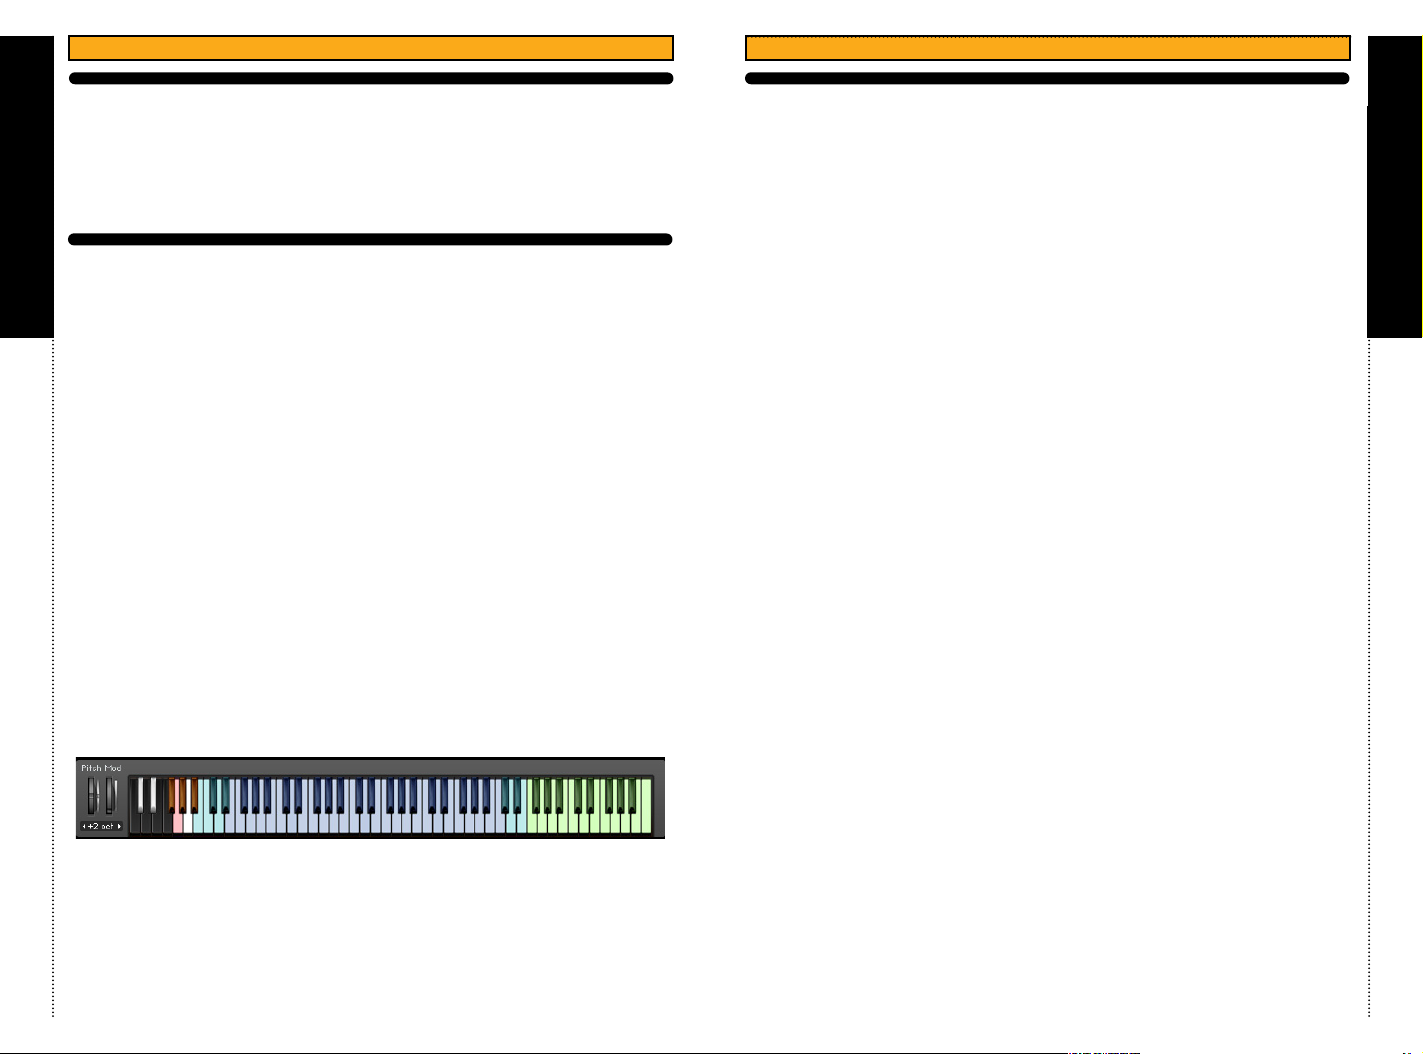
CHAPTER 21 CHAPTER 21 ACOU6TICS QUICK START
65
66
Acou6tics/
QUICK START
ACOUSTICS QUICK START
CHAPTER 21/ QUICK START
To begin, load desired instrument patch into Kontakt. By default, your
instrument is set to Bank 1 which is the Sustain Polyphonic Articulation.
When you press down a key on your keyboard in the blue playable range, a
sustain note is then triggered. To play a chord, simply play a chord as you
would on a piano in the blue play range and Acou6tics’ advanced chord
detection engine will automatically re-voice the chord as it would be played
on a guitar.
To simplify as much as possible how this instrument is played, one must
understand the layout of the instrument on your MIDI keyboard. The range
of the playable notes for the selected instrument are colored blue on the
virtual keyboard shown at the bottom of the Kontakt Player. The keys to the
left of the instrument range are Keyswitches (black/white) and Forced
Keyswitches (red), where as the keys to the right are Trigger Keys (green).
The cyan colored keys trigger no sound, however, will activate if played with
a chord.
The image bellow is the layout for Western (finger).
UNDERSTANDING KEYSWITCHES
Keyswitches control the major articulations. As mentioned before, by
default, the instrument will load the sustain articulation (Bank 1) which on
the keyboard is C0. Pressing C#0 will switch to Bank 2, which is a bank that
includes a reduced sustain range and harmonics. D0 will switch to Bank 3,
which also has a reduced range for sustain which gives you the ability to
control individual strings of whatever chord you play within the instrument
range. D#0 is Bank 3 which switches play mode to tremolo. Banks 4 and 5
control Legato Mode with Bank 4 (E0) being legato focusing on hammer-on
and pull-o transitions, and Bank 5 (F0) focusing on Slide Up and Slide
Down transitions.
UNDERSTANDING KEYSWITCH FORCED
A forced keyswitch is an articulation that is only initiated if the keyswitch is
held down on the keyboard. For instance, if you want to perform a
hammer-on at any given time, simply hold down F#0 while you play the
desired note.
Note: Forced keyswitches change depending on which bank is selected.
UNDERSTANDING TRIGGER KEYS
Trigger Keys trigger a desired sound or strum. Trigger Keys will change
depending on which bank is selected.
Playing Tip: Many MIDI guitar products lose their realism when chords are
changed in a strum pattern. Due to this issue we developed a couple unique
trigger keys to achieve the most realistic transitions between two chords. It
is natural for a guitar player to lift all his fingers o the frets when switching
between chords resulting in the sound of the resonating open strings right
before the next chord is played. Use the Open Strings + Slide Noise trigger
key at D6 or D#6 to achieve this eect. Additionally, when a guitarist is
strumming a quicker and busier strum pattern often it is natural for an Open
Strum to occur because the player has already lifted his fingers to prepare
for the next chord on his final up strum. Use the Open String | Strum | Up
trigger key at C#6 to achieve this eect.
CHAPTER 21/ QUICK START
acou6tics
Page 37
CHAPTER 21 ACOU6TICS QUICK START CONT’D
67
UNDERSTANDING STRUMMING
Strumming is controlled via Trigger Keys and will only work in Polyphonic
Play Mode (Banks 1 and 3).
To strum, simply play any desired chord within the instrument’s play range.
Then, use the Trigger Keys to control what type of strum you prefer. The
layout of the strum keys is simple. By default, white keys are down strums
and black keys are up strums. Also, as one moves further up the keyboard
the amount of strings strummed will be less and less. For instance, F5 is
“Strum | Full | Down”, which is a full strum of all strings played from top to
bottom. In contrast, A#5 is “Strum | Upper 1/4 | Up” which is a partial strum
CHAPTER 21/ QUICK START
of the upper 1/4 of strings on the instrument.
The Humanization engine of Acou6tics will automatically add “Buzz”
sounds, “Slide” sounds, and variations between the strings in the chords
being strummed. Adjustments to these sounds can be made in Advanced
Setup/Noise Setup.
Playing Tip: Try experimenting between various combinations of strum
Trigger Keys. You’ll find this can make a big dierence in achieving the most
realistic strum patterns.
Playing Tip: When strumming, hold down the sustain pedal. The sustain
pedal does not work as a typical sustain pedal would with with a piano.
With Acou6tics, the sustain pedal will recreate the natural resonance of a
guitar between two plucked notes or strummed chords.
Playing Tip: Acou6tics, by default, will only allow for realistic guitar playing.
For example, Acou6tics, on the 6 string instruments, will only allow six notes
to be played at once. Once six strings have been voiced any new notes
played will be played on the most appropriate string for that note replacing
the previously played note.
Playing Tip: To play picked arpeggiated patterns we recommend turning
the strum knob all the way to the left. The text “Picked” will appear next to
the knob.
UNDERSTANDING LEGATO MODE
Bank 5 (E0) is Legato HO/PO mode, which stands for Legato “Hammer On”
and “Pull O” mode. In this mode, when you are playing notes on the
keyboard, the transition between notes will be with hammer-ons or pull-os
if notes being played overlap. Playing HO/PO articulations also depend on
the location and speed of two overlapped notes. To trigger a note without a
HO or PO, simply make sure that notes are not overlapping and a sustain
note will trigger.
Bank 6 (F0) is Legato SU/SD mode, which stands for Legato “Slide Up” and
“Slide Down” mode. This Legato mode works the same as the HO/PO
Legato mode except with the Slide up/Slide Down articulation.
Playing Tip: On Page 1 of the Playback Page, use the Legato X-Fade knob
to control the attack of the Legato performance. Move the knob all the way
to the left at -50 ms for a faster/tighter performance. Moving the knob
further to the right will decrease the attack between notes.
68
Playing Tip: In Legato Mode, a slide-In is automatically triggered when a
key is struck with a velocity of 120 or higher. To control this feature, use the
Legato Slide-In to set the threshold.
Note: In the Legato Setup page of the advanced settings there is a button
called “Forced Monophonic”. If you deactivate this it will easily allow you to
play a chord then switch to legato mode and play a legato articulation
without silencing the existing chord you were playing. This is useful if you
wanted to play a trill on one of the strings of your chord you just played.
QUICK PRESETS
The purpose of the Quick Presets are to give you a quick and easy way to
control the realism of Acou6tics playback without having to dive in too
deep into the advanced setup. This includes presets for humanization,
realism controls, double tracking, and also setting Acou6tics to “General
MIDI” mode which allows it to be played like a traditional keyboard.
Note: Double tracking is very common when recording a guitar. Acou6tics
makes this easy for you with Quick Presets. To use this feature you should
have two instances open of the same instrument. On the first instrument
select “Double Tracking - Guitar Left” in the quick presets tab and on the
other instrument select “Double Tracking - Guitar Right”. Acou6tics will
automatically pan your two instruments and ensure dierent samples are
always used to avoid phasing. In a matter of seconds you will have two
distinct guitar performances that will fit perfectly in your mix.
Playing Tip: If you would like to play Acou6tics like a traditional MIDI guitar
patch, go to Advanced Setup and on the top of the page you will see a
Quick Presets tab. Click on this “Quick Presets” tab and select “General
Midi” on the “Full Reset” section. This will allow you to play any number of
notes on the keyboard without limitation. Note: The fretboard display and
chord functionality will be turned o in this mode.
Note: When setting realism tweaks to “High” there will be a 55ms delay so
you will need to compensate for this on your MIDI track in your DAW. We
recommend using low realism for live playing and using the highest realism
when bouncing your track.
acou6tics
Page 38
69
Acou6tics/
TECH
SUPPORT,
ETC.
TECH SUPPORT, ETC.
recorded performance that includes the licensed samples as part of a
derivative musical work created by the licensed end user. This license
expressly forbids resale, rental, loan, gift, or transfer of these samples in any
format or via any medium, except as part of a derivative musical work. The
samples may not be included, whether unmodified or as part of a derivative
work, in any sample library product. Any unlicensed usage will be
prosecuted to the maximum extent possible under the law.
70
TECH SUPPORT
Vir2 Instruments stands behind its products and is committed to helping
you get the most out of using them. Please check the Support area of the
www.vir2.com web site if you encounter any diculties in using the product.
You may also e-mail [email protected].
Before getting in touch with Vir2 Instruments regarding problems with the
product, make sure you are running the latest versions of the library, engine,
and Service Center. We are continuously updating and improving the
product, so it is possible that there are more recent updates available that
were released after the physical manufacturing of your installation drive.
THE FULL VERSION OF KONTAKT 5
Acou6tics ships with Kontakt 5 running in library mode, meaning it is fully
able to play back the Acou6tics library and access the parameters detailed
in this manual.
Registered owners of Acou6tics are eligible for a special cross-grade
discount to the full version of Kontakt 5, which enables users to create their
own libraries, import libraries in non-Kontakt formats, and access numerous
deep editing features.
Visit www.nativeinstruments.com for details on the Kontakt cross-grade.
LICENSE AGREEMENT
CREDITS
Produced by: Vir2 Instruments
Sound Design and Programming: Benjamin Stelzer, David Das,
Julian Cisneros, Steven Bolar
Cover Design: Vir2 Instruments
Layout: Andrew Kosloske
Manual: Benjamin Stelzer
Recording: Benjamin Stelzer and Felix Strauss
Sampling Tools: Felix Strauss
Scripting and GUI Design: Benjamin Stelzer
The samples contained herein are licensed, not sold to you, the individual
end user, by Vir2 Instruments. This non-exclusive, non-transferable license is
granted only to the individual end user who has purchased an unopened,
new, and lawfully made copy of this product from a dealer or distributor
authorized by Vir2 Instruments. All samples remain the property of Vir2
Instruments and are licensed only for use in the creation of a live or
acou6tics
Page 39

acou6tics
© 2014 Vir2 Instruments.
All trademarks used are property of their respective owners.
Specifications subject to change.
 Loading...