

Page 1

- 1
FORCE CONTROLLED WARTHOG - USER'S MANUAL V1.0
FORCE CONTROLLED
WARTHOG (FCW)
Installation's manual
Page 2

- 2
FORCE CONTROLLED WARTHOG - USER'S MANUAL V1.0
Table of contents
1.#Introduction#........................................................................................................................................#3#
#
2.#FCW#Installation#in#a#Warthog#stick#base#............................................................................................#4#
#
3.#Installing#the#Warthog#FCW#into#other#bases#...................................................................................#19#
3.1$Cockpit$base$....................................................................................................$19#
3.2$Cougar$base$.....................................................................................................$19$
#
4.#Setting#up#your#FCW#..........................................................................................................................#20#
4.1$Electronic$Calibration:$.....................................................................................$20#
4.2$Installing$the$software$.....................................................................................$22$
#
5.#Using#your#FCW#.................................................................................................................................#25#
5.1$Changing$options$through$software$................................................................$25#
5.2$Changing$options$through$stick$button$ combinati ons$.....................................$28$
#
6.#Programming#your#FCW#....................................................................................................................#30#
#
7.#Contacts#and#credits#..........................................................................................................................#31#
Page 3
- 3
FORCE CONTROLLED WARTHOG - USER'S MANUAL V1.0
1. Introduction
Congratulations#with#the#purchase#of#your#Force#Controlled#Warthog.#
The#FCW#is#a#drop-in#replac e m e n t#fo r #th e#o riginal#w arth og #gimbals.#
#
Unlike#the#FCC#for#the#Cougar#the#Warthog#FCW#replace#completely#the#electronics#of#the#warthog.##
As#a#consequence,#you#will#not#be#able#to#program#the#warthog#stick#with#Thrustmaster#software#
(Target).#Programming#will#only#be#ava ilable #thro ug h#D irect#X . #
Please#refer#to#the#DX#programming#capabilities#and#features#of#your#favourite#sims#to#take#full#
advantages#of#the#DX#programming.#(For#BMS,#please#refer#to#the#DX#Setup#Guide.pdf#located#in#
..\Docs\Key#Files#&#Input\Device#Setup#Guides#&#Profiles)##
#
Although#initially#designed#for#the#Warthog,#there#is#no#reason#that#the#FCW #can no t#be #insta lled#w ith#
a#Cougar.#The#FCW#is#indeed#backwards#compatible#with#the#Cougar.#If#you#do#install#the#FCW#in#a#
cougar#be#aware#that#you#will#lose#the#possibility#to#connect#the#rudder#and#throttle#on#the#cougar#
stick#base.#You#must#seek#a#way#to#connect#the#rudder#and#throttle#independently.#
#
#
I#hope#you#enjoy#usin g #y o u r#F CW#as#much#as#I#enjoyed#designing,#building#and#using#it.#
#
If#you#have#any#comments#or#questions#about#your#FCW#you#can#mail#me#at#[email protected]#
Arend#“Eagle”#van#Oosten.#
CAUTION
The Warthog and FCC printed circuit board are electrostatic sensitive device. This
means you can damage the boards if you don’t take precautionary measures. Make
sure you are not electro-statically charged before working on the PCB. You can do
this by grounding yourself and use ESD-approved materials. If you don’t have them at
least discharge yourself by touching a ground wire of your electrical installation.
Page 4

- 4
FORCE CONTROLLED WARTHOG - USER'S MANUAL V1.0
2. FCW Installation in a Warthog stick base
The#hardest#part#of#the#installation#is#to#disassemble#de#warthog#stick#base.#Most#of#the#warthog#
components#will#not#be#necessary#after#the#FCC#installation.#The#FCW#kit#is#made#of#the#assembled#
FCW,#the#warthog#b a s e #p la t e ,#th e #F C W#PCB#and#a#small#bag#of#screws#and#washer.#
#
#
#
#
#
Let’s#put#all#the#FCW#components#away#for#the#moment#and#concentrate#on#disassembling#the#
warthog#base.##Make#sure#you#place#all#screws#and#components#in#a#small#box#while#you#are#working.#
#
Turn#the#base#over#and#unscrew#the#flat#plate#from#the#warthog#base.#That#will#separate#the#base#
from#the#plate#and#give#you#access#to#the #wa rtho g#T M #pc b.#Le t’s#start#by # re m o ving #this#from #th e#
warthog.#As#you#see#on#the#following#pictures#the#base#I#used#for#this#manual#is#one#of#the#early#
warthog#prototype#and#is#not#grounded.##
#
Chances#are#high#that#your#pcb#is#grounded#and#con ne c te d #to #th e #metal#part#of#your#warthog#b a se .#
Unfortunately,#that#ground#wire#is#soldered#on#the#PCB#and#you#will#have#to#either#unsolder#it#or#cut#
it,#whichever#you#prefer.#We#won’t#need#the#warth o g #PC B #a n ymore#so#cutting#it#is#not#the#finest#
solution#but#it#has#no#consequences.##
Page 5
- 5
FORCE CONTROLLED WARTHOG - USER'S MANUAL V1.0
# #
#
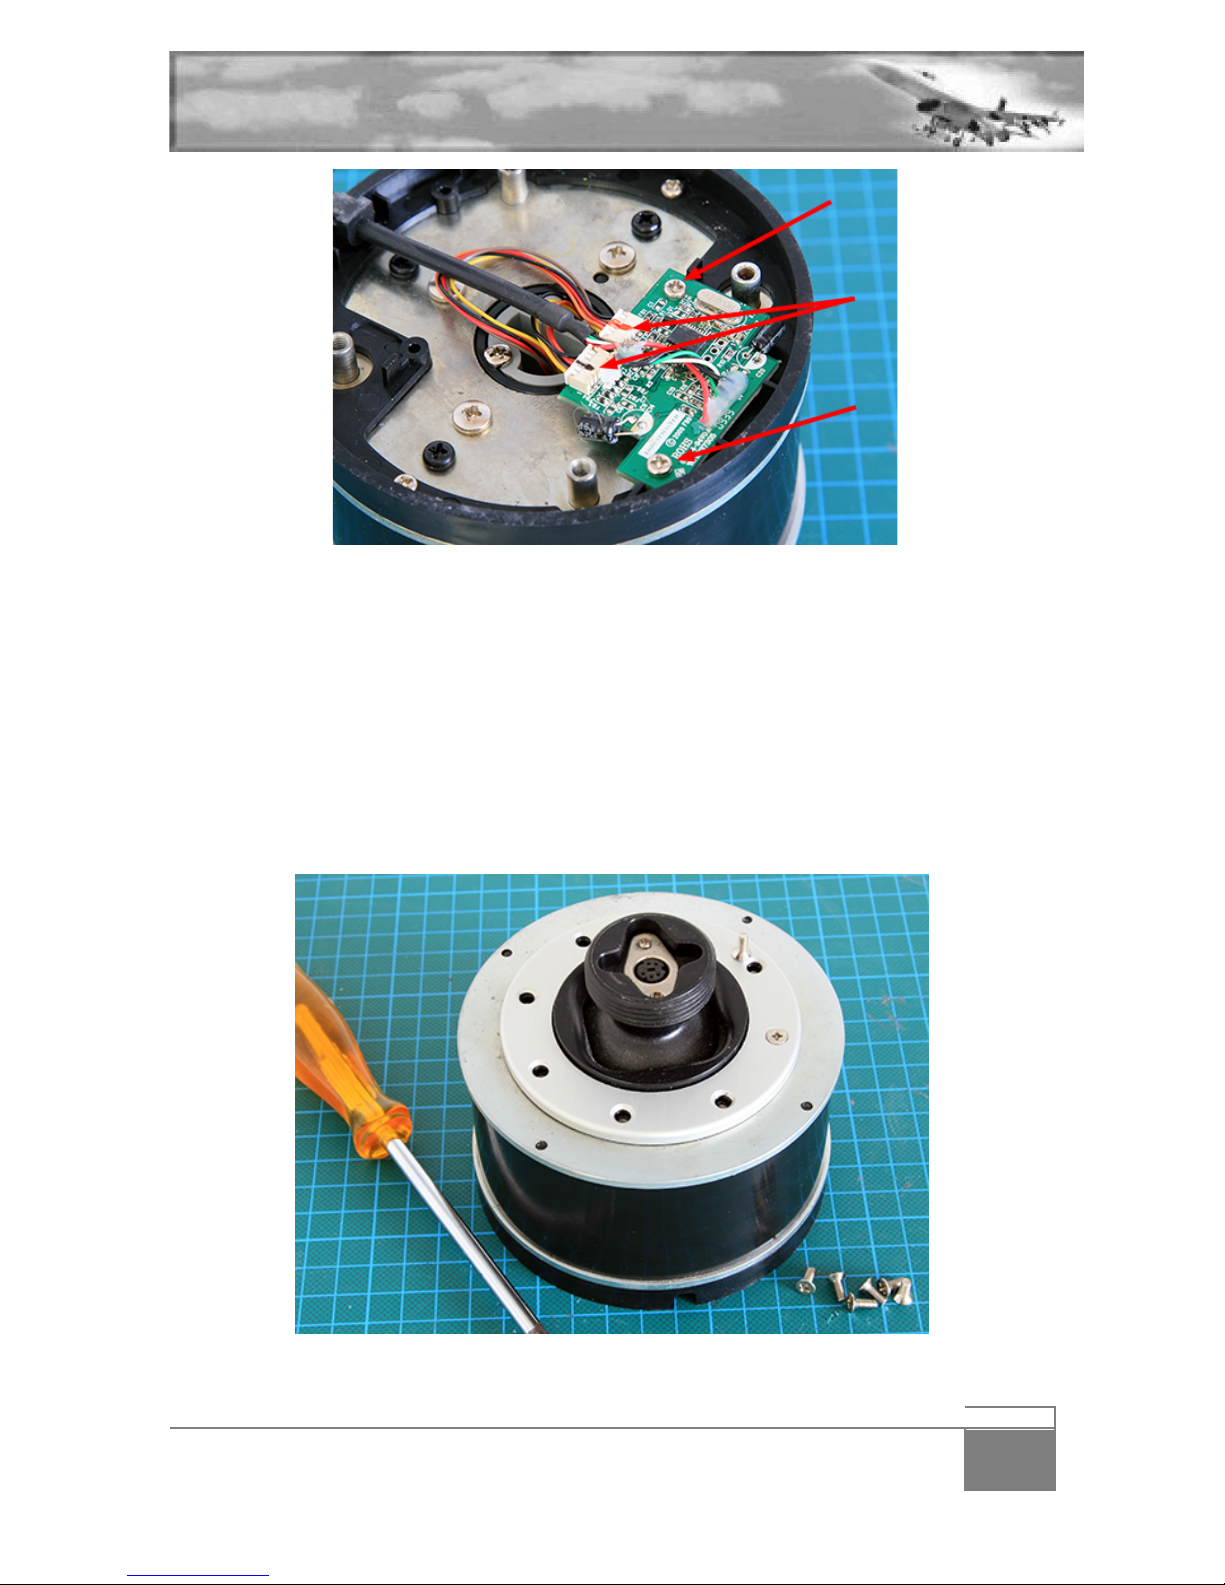
Before#disconnecting#any#connector,#I#advise#to#mark#them#accordingly#so #y o u #ca n #re c o n n e ct#t h e m #a t#
a#later#point.#In#this#case,#I#simply#drew#a#red#line#on#both#part#of#the#first#connector#and#a#black#line#
over#the#second.##
#
Remove#the#connectors#by#gently#separating#with#a#flat#screwdriver#and#pull#them#away.#
#
Unscrew#then#the#2#small#PCB#screws#and#store#them#away,#you#might#need#them#later#on.#You#can#
now#remove#the#Warthog#PCB#and#it’s#cable#from#the#warthog#base.#Needless#to#say,#it’s#precious,#
store#it#securely#away.#
#
Turn#the#base#over#and#unscrew#the#round#metal#plate#held#in#place#with#8#Philips#screws.##
#
#
Page 6

- 6
FORCE CONTROLLED WARTHOG - USER'S MANUAL V1.0
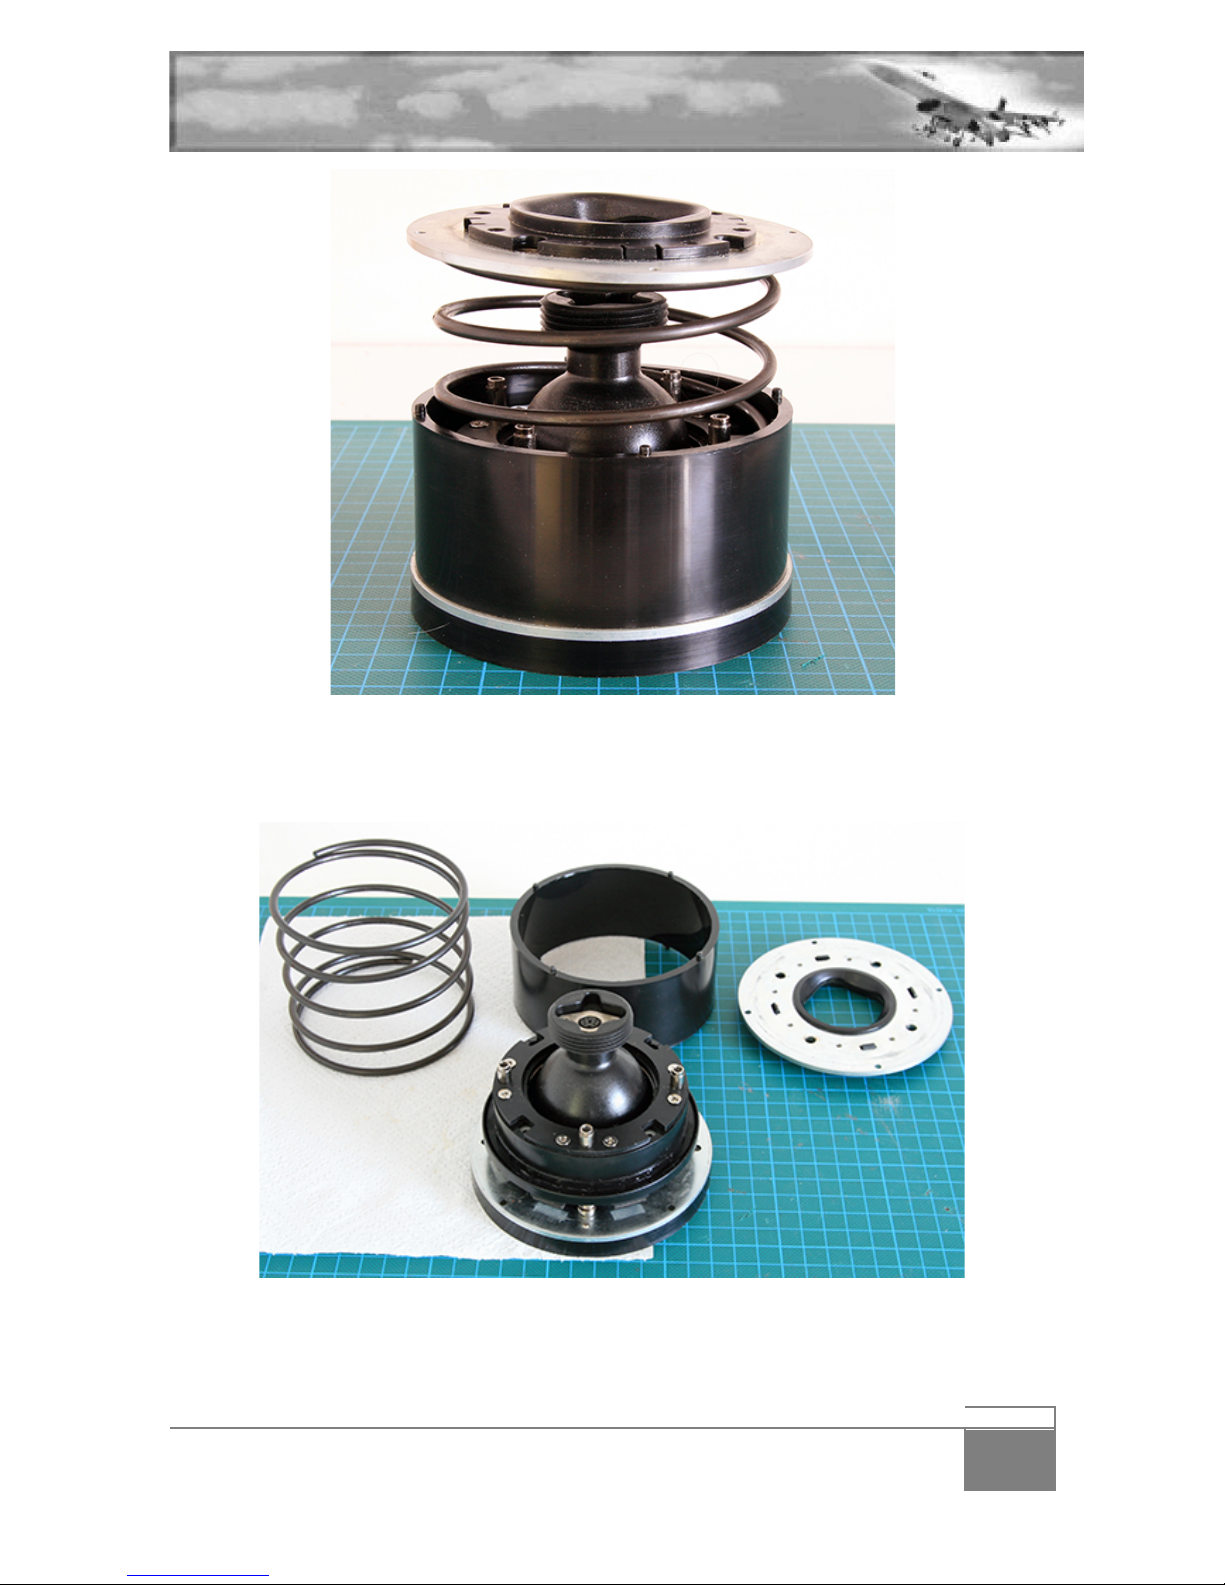
There#is#a#huge#spring#inside#the#Warthog#base.#As#you#unscrew#the#following#plate#(with#the#4#
screws#marked#in#red#on#the#following#picture),#that#spring#will#extend#unless#you#hold#the#plate#
firmly#in#place#until#all#screws#are#out.##
#
Please#make#sure#you#don’t#unscrew#the#last#one#unless#you’re#pushing#the#plate#down.#Failure#to#do#
so#may#damage#the#screw#thread#and#create#problems#when#you#attemp t#to#reassemble#the#base .##
#
#
#
#
Page 7
- 7
FORCE CONTROLLED WARTHOG - USER'S MANUAL V1.0
#
#
I#didn’t#lie#to#you,#that#spring#is#huge!##
Remove#the#top#plate#and#remove#the#spring#by#lifting#it#up#from#the#base.#Be#careful,#the#spring#may#
be#full#of#grease.#You#can#now#lift#the#cylinder#casing.#It’s#simply#pinned#in#the#base#with#4#pins.###
#
#
#
#
#
# #
Page 8
- 8
FORCE CONTROLLED WARTHOG - USER'S MANUAL V1.0
#
#
#
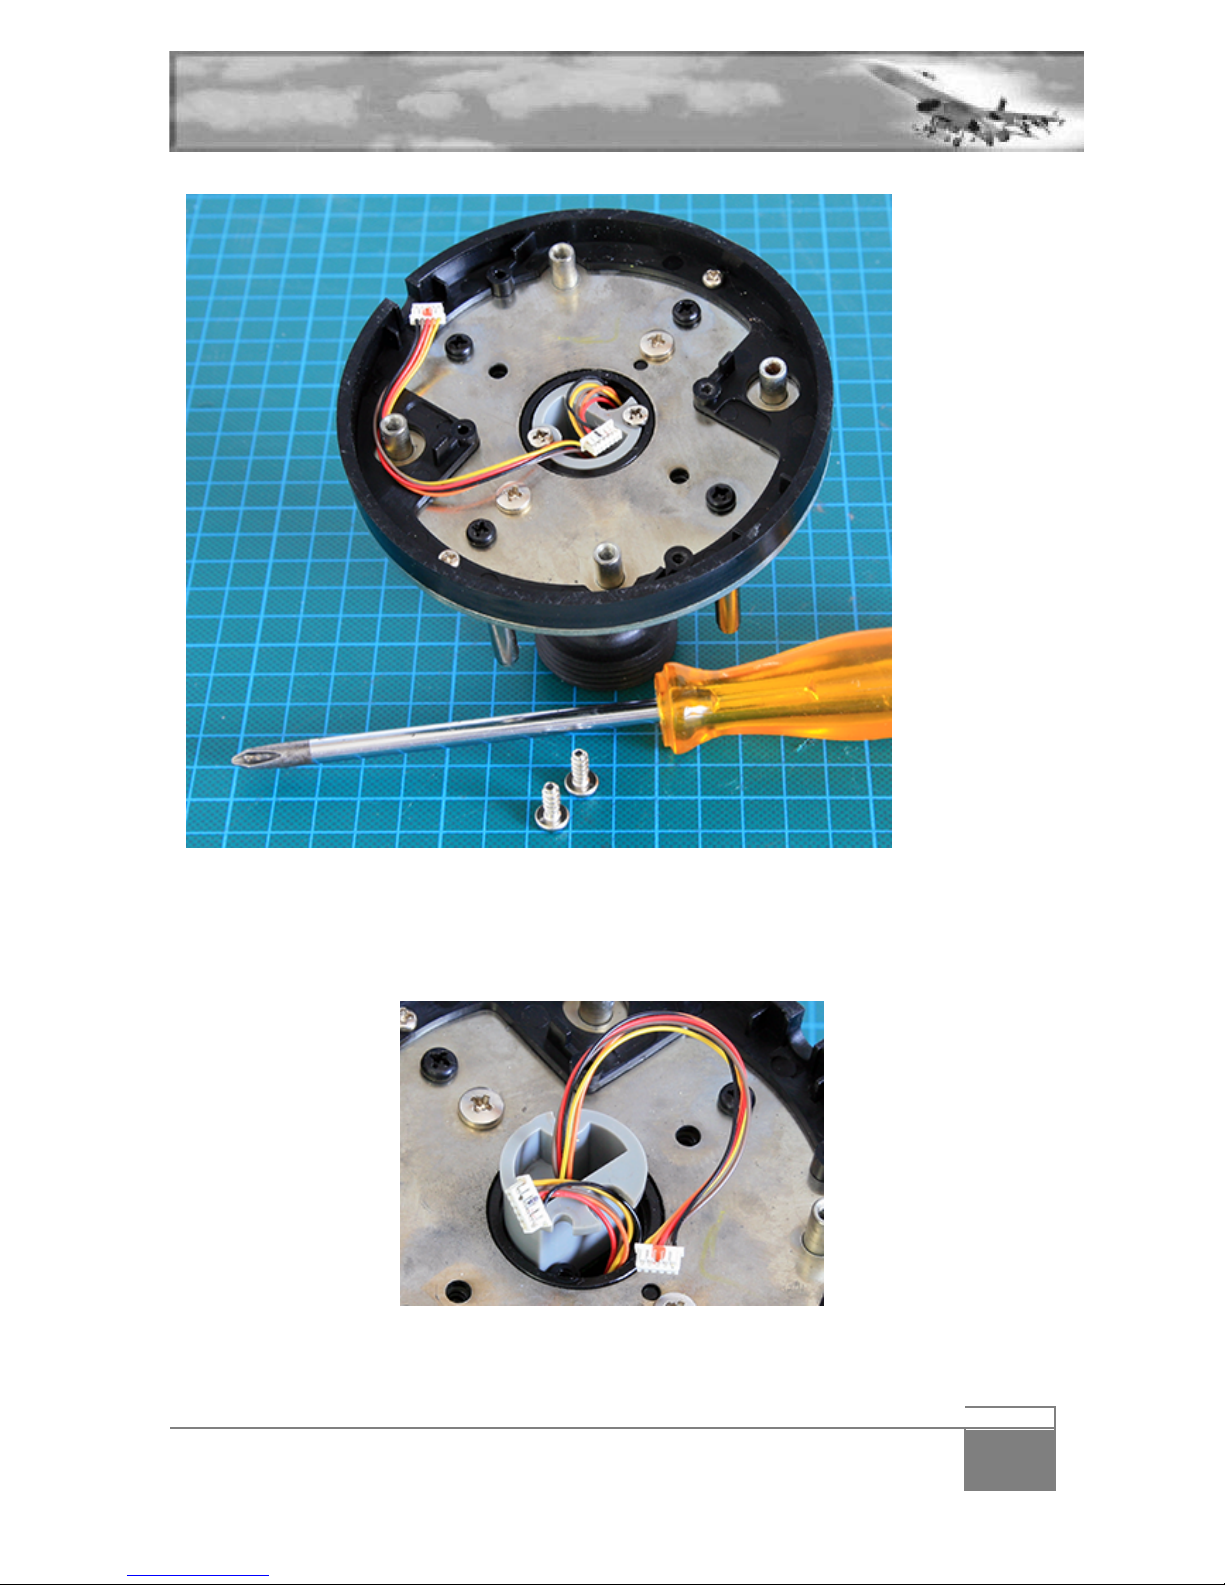
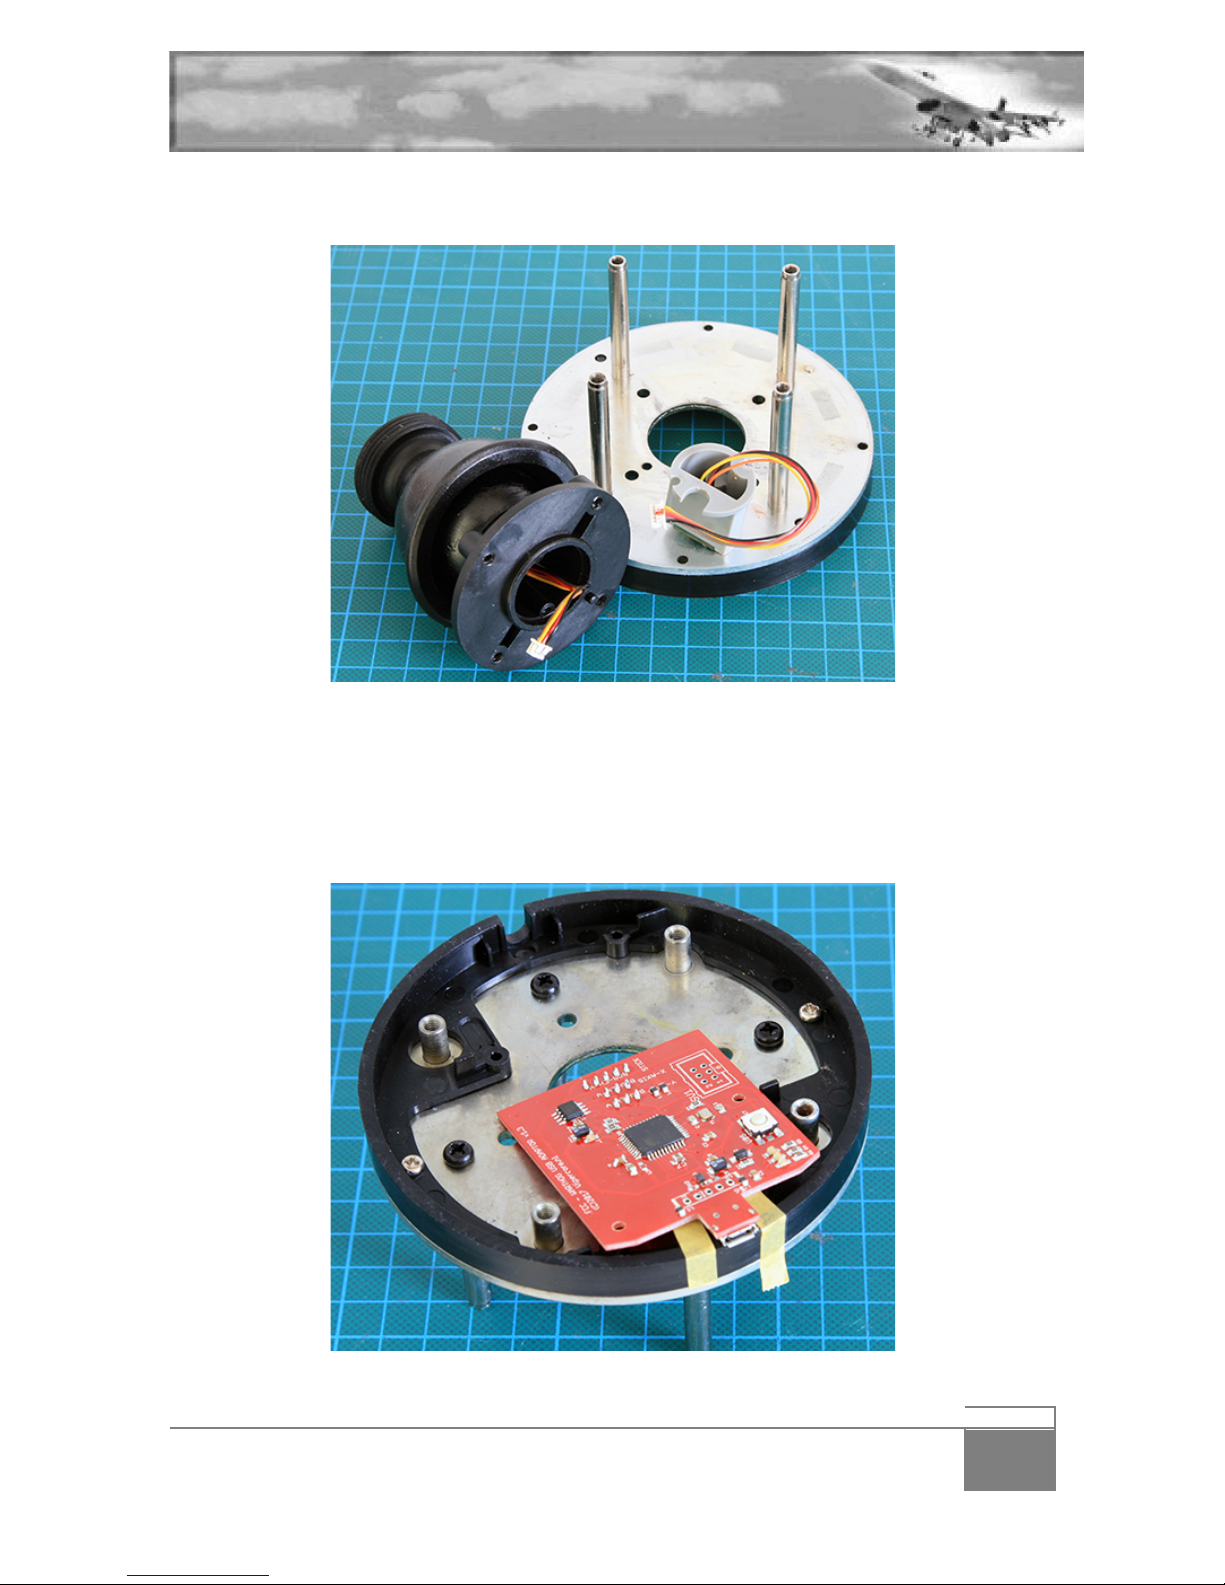
Turn#the#base#over#again#we#will#now#remove#the#gimbals.#They#are#held#in#place#with#the#4#silver#
screws,#of#which#you#may#already#have#unscrewed#2#when#removing#the#ground#w ire#before.##
Before#unscrewing#them#all#4,#you#may#also#unscrew#the#centre#light#grey#piece#held#in#place#with#the#
2#smaller#screws.#The#grey#part#can#be#lifted#up#or#flip#the#base#so#gravity#can#help.###
#
#
Page 9
- 9
FORCE CONTROLLED WARTHOG - USER'S MANUAL V1.0
You#can#now#unscrew#the#last#screws#holding#the#Warthog#gimbals.#Make#sure#you#hold#it#to#avoid#
having#the#precious#fall#on#the#floor.#
#
#
#
That’s#it,#the#warthog#base,#or#what’s#left#of#it,#is#ready#for#the#FCW.##Once#again,#ma ke #su re #yo u #sto w #
securely#away#the#left#over#from#the#warthog,#you#may#need#them#one#day#to#help#a#fellow#virtual#
pilot.##
#
The#next#thing#we#need#to#do#is#to#secure#the#FCW#PCB#inside#the#Warthog#base.#This#is#the#only#
intrusive#modification#to #y o u r#h ard ware.#Although#the#PCB#ta ke s#t h e#p la c e#o f#t he #o ld #T h ru st m a s te r#
PCB#it#does#feature#a#mini#USB#port#that#needs#to#go#through#the#plastic#of#the#base.##
#
Page 10
- 10
FORCE CONTROLLED WARTHOG - USER'S MANUAL V1.0
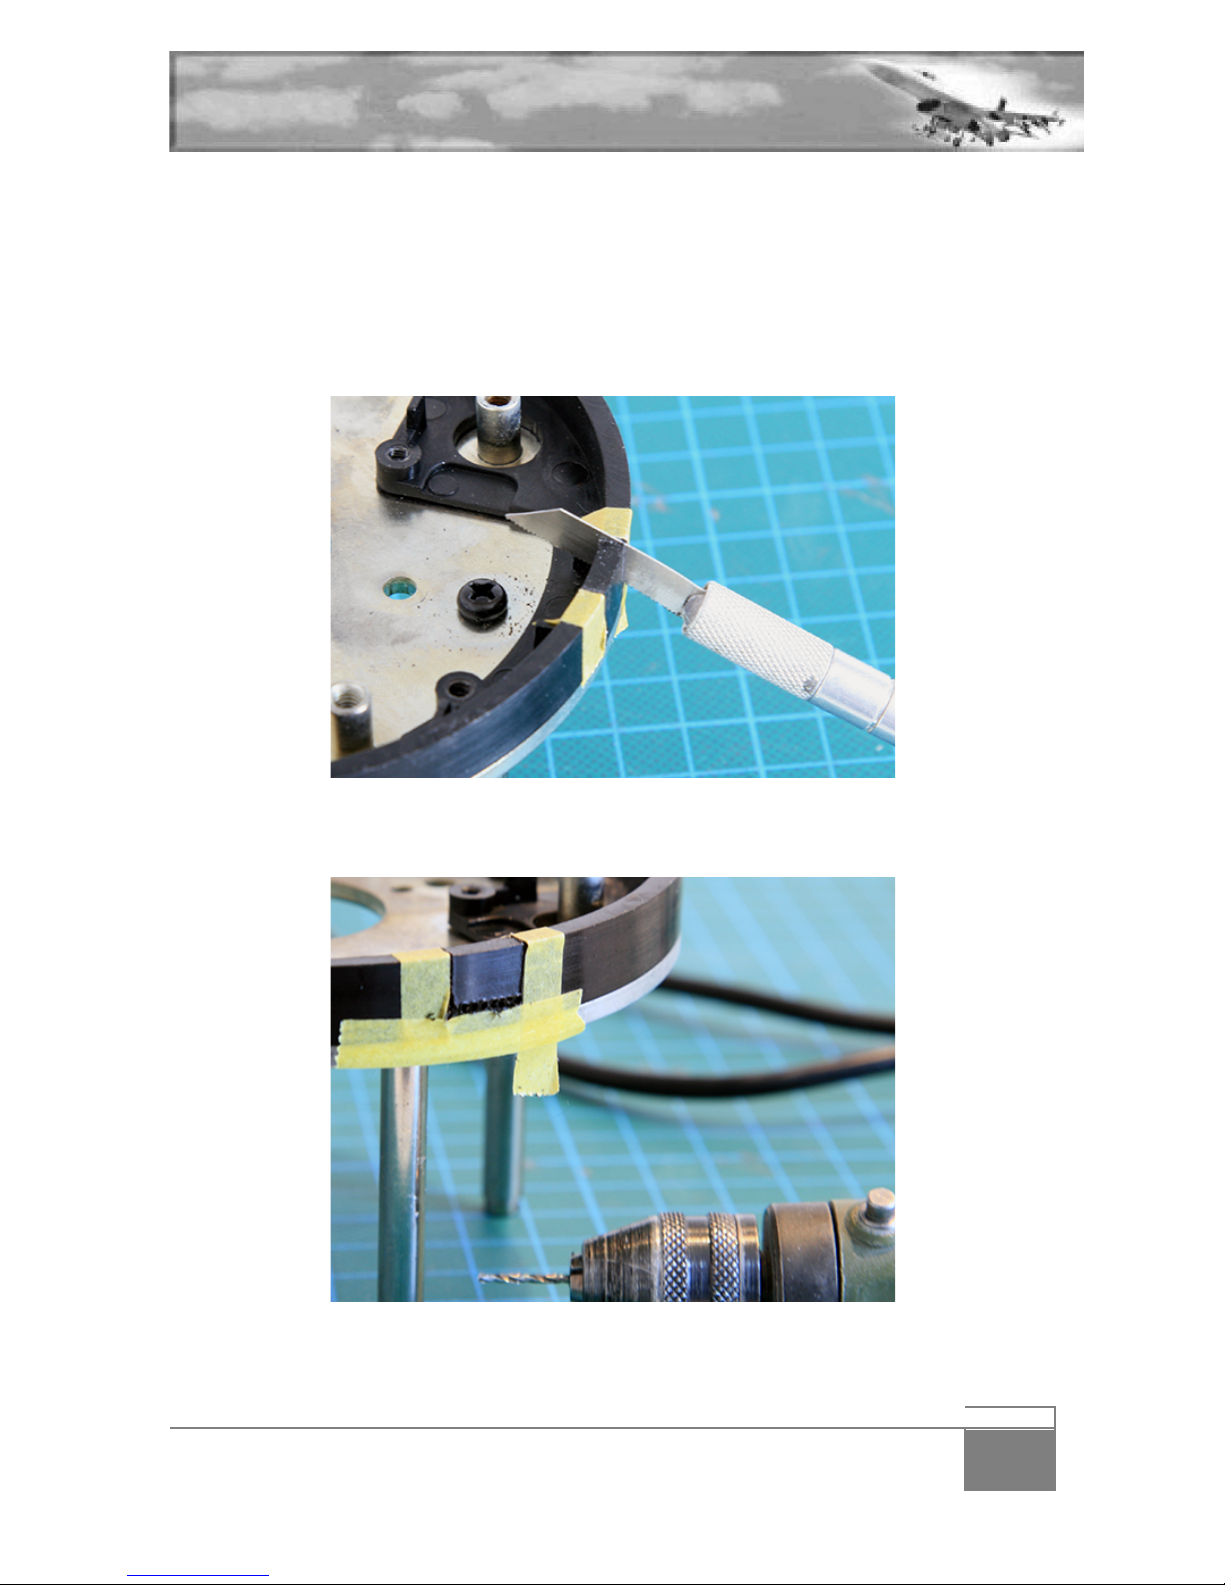
Yep#you#got#it#right,#you’ll#need#to#cut#a#slot#of#your#base#to#let#go#the#connector.#Don’t#worry#your#
warthog#base#will#sport#the#scar#with#pride.#There#is#another#way#to#bypass#that#modification#if#you#
find#it#too#instrusive,#see#below.#(add#page )#
The#first#thing#to#do#is#to#mark#the#cuts.#I#used#tape#but#a#pen#works#equally#fine.##
#
Saw#alongside#the#tape#vertically#until#you#meet#the#flat#bottom#(don’t#go#all#the#way#through#the#
plastic#touching#the#metal)#Stop#when#the#connector#has#enough#room#to#slide#through.#Repeat#on#
the#other#side,#alongside#the#other#piece#of#tape#
#
#
#
Cutting#the#horizontal#part#is#a#bit#more#difficult#but#here#is#a#modalism#trick.#Using#a#precision#drill,#
bore#a#few#small#holes#as#close#to#each#other#alongside#the#horizontal#bit#of#tape.##
#
#
Page 11
- 11
FORCE CONTROLLED WARTHOG - USER'S MANUAL V1.0
Then#hold#the#bit#about#to#be#removed#with#a#pair#of#pliers#and#snap#it#off#the#base#by#successive#
back#and#forth#gentle#motion.#Eventually#the#part#will#separate#from#the#mainframe.#Sand#the#edges#
flat#with#a#small#file#(yes#it#helps#to#do#some#plastic#m o de ls) #
#
#
#
Then#PCB#can#now#be#placed#flat#over#it’s#supporting#holes.#The#FCW#kit#doesn’t#provide#new#screws#
and#expect#you#to#re-use#the#original#ones#to#screw#the#PCB#in#place.#Flip#the#base#and#we’re#ready#to#
reassemble#the#base.##
#
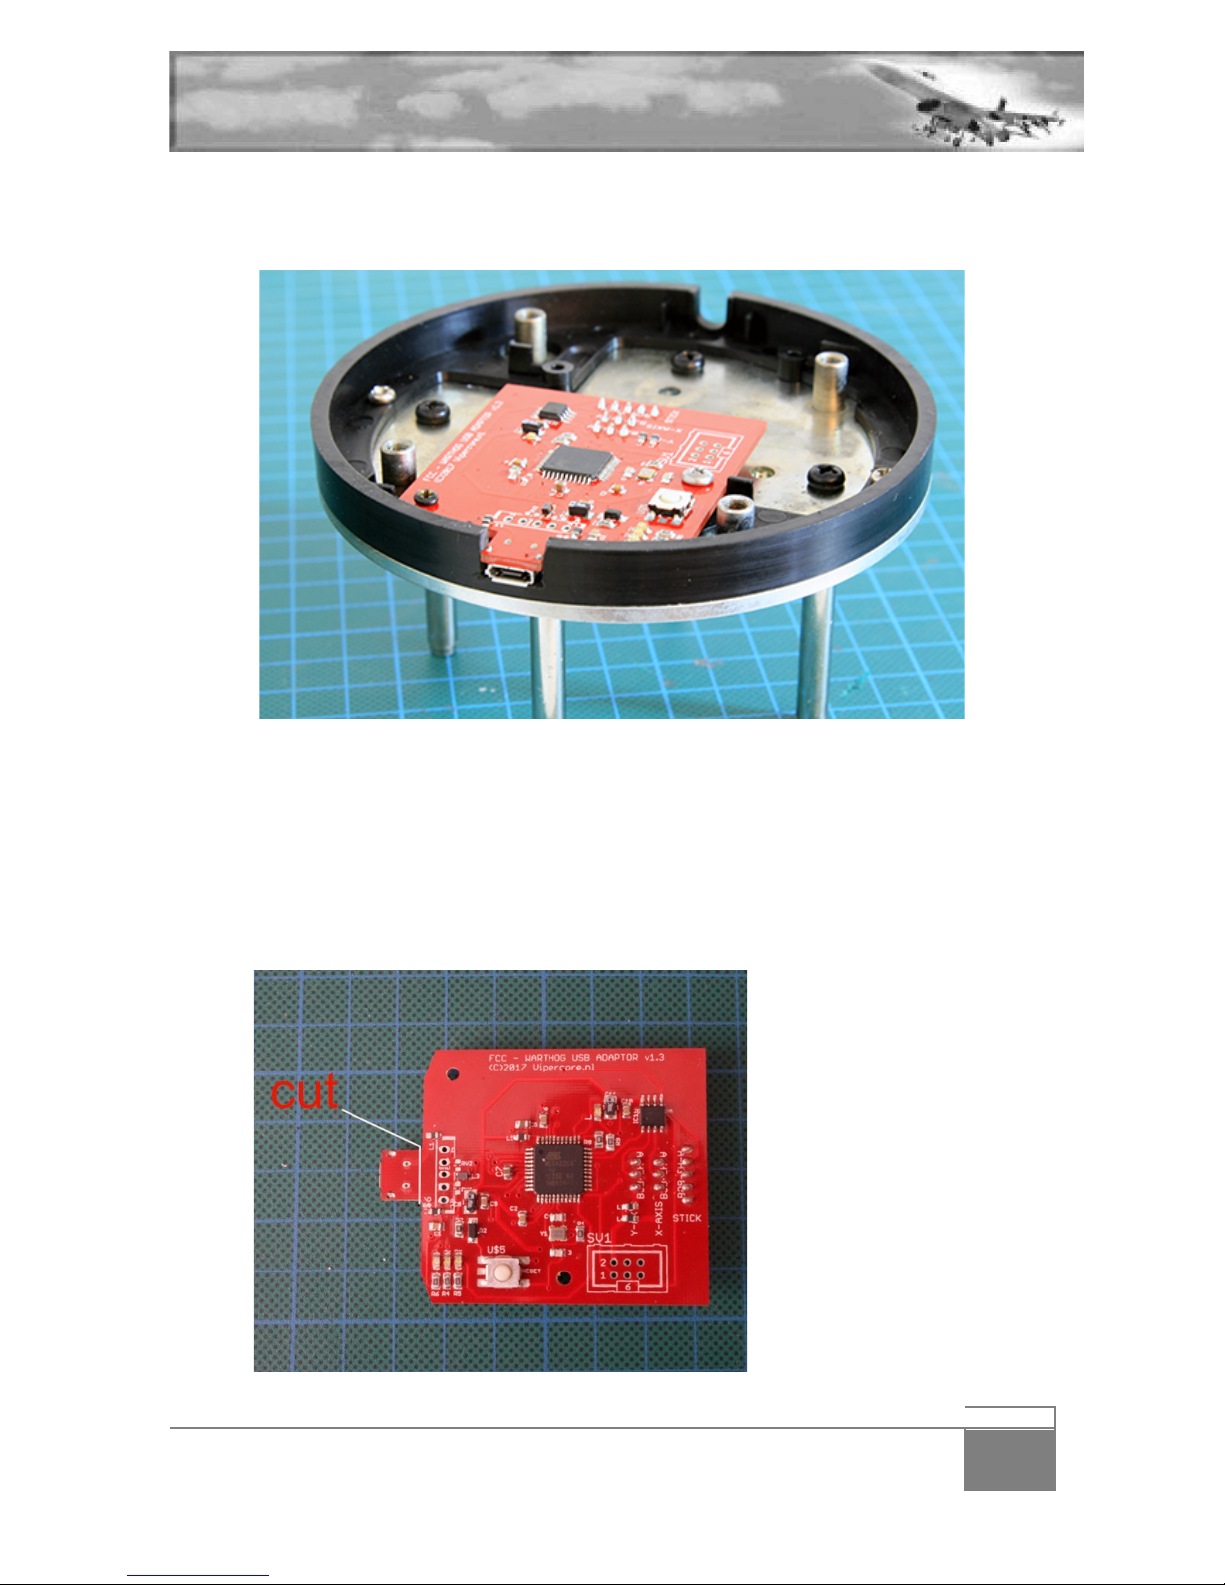
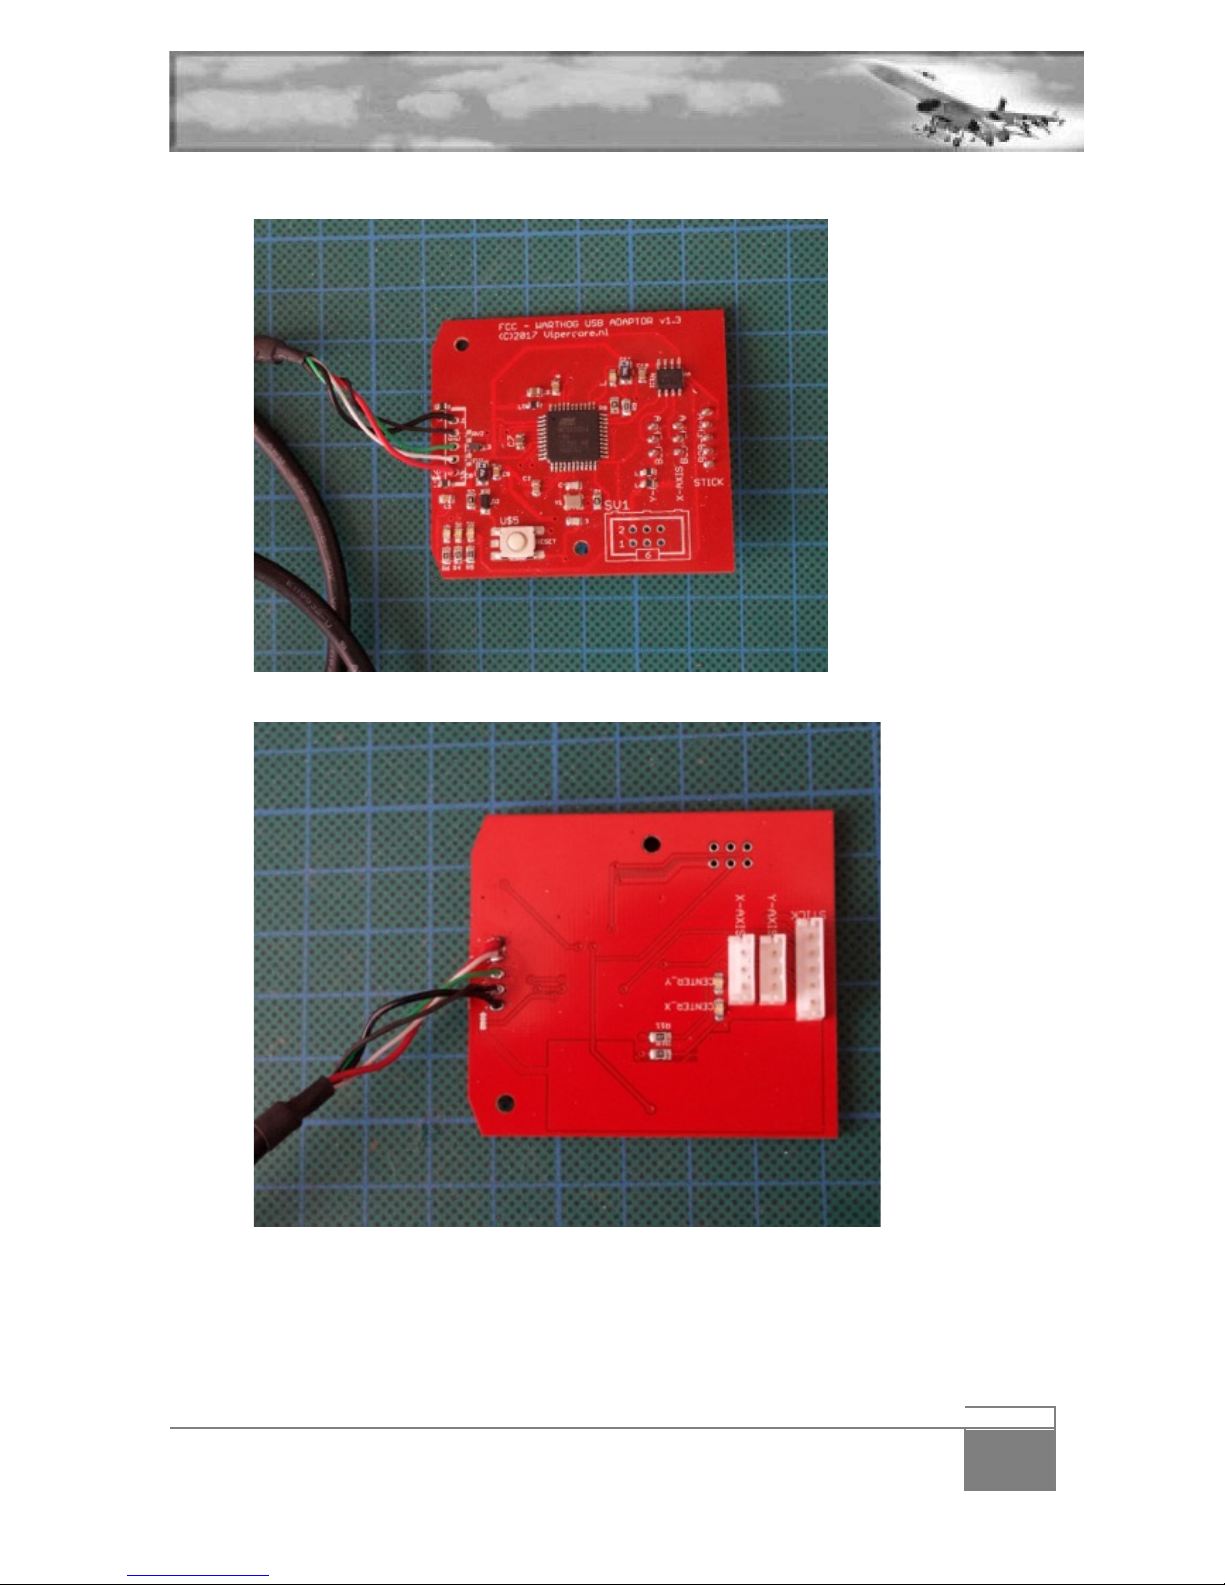
If#you#do#not#want#to #c u t#y o u r#warthog#base,#you#can#modify#the#red#PCB#to#reuse#the#warthog#USB#
cable.#Please#be#aware#this#modification#is#done#at#your#own#risk#and#imply#a#minimum#of#experience#
soldering.#
#
1. Cut#the#mini#usb#connector#away#from#the#red#PCB#
#
Page 12
- 12
FORCE CONTROLLED WARTHOG - USER'S MANUAL V1.0
#
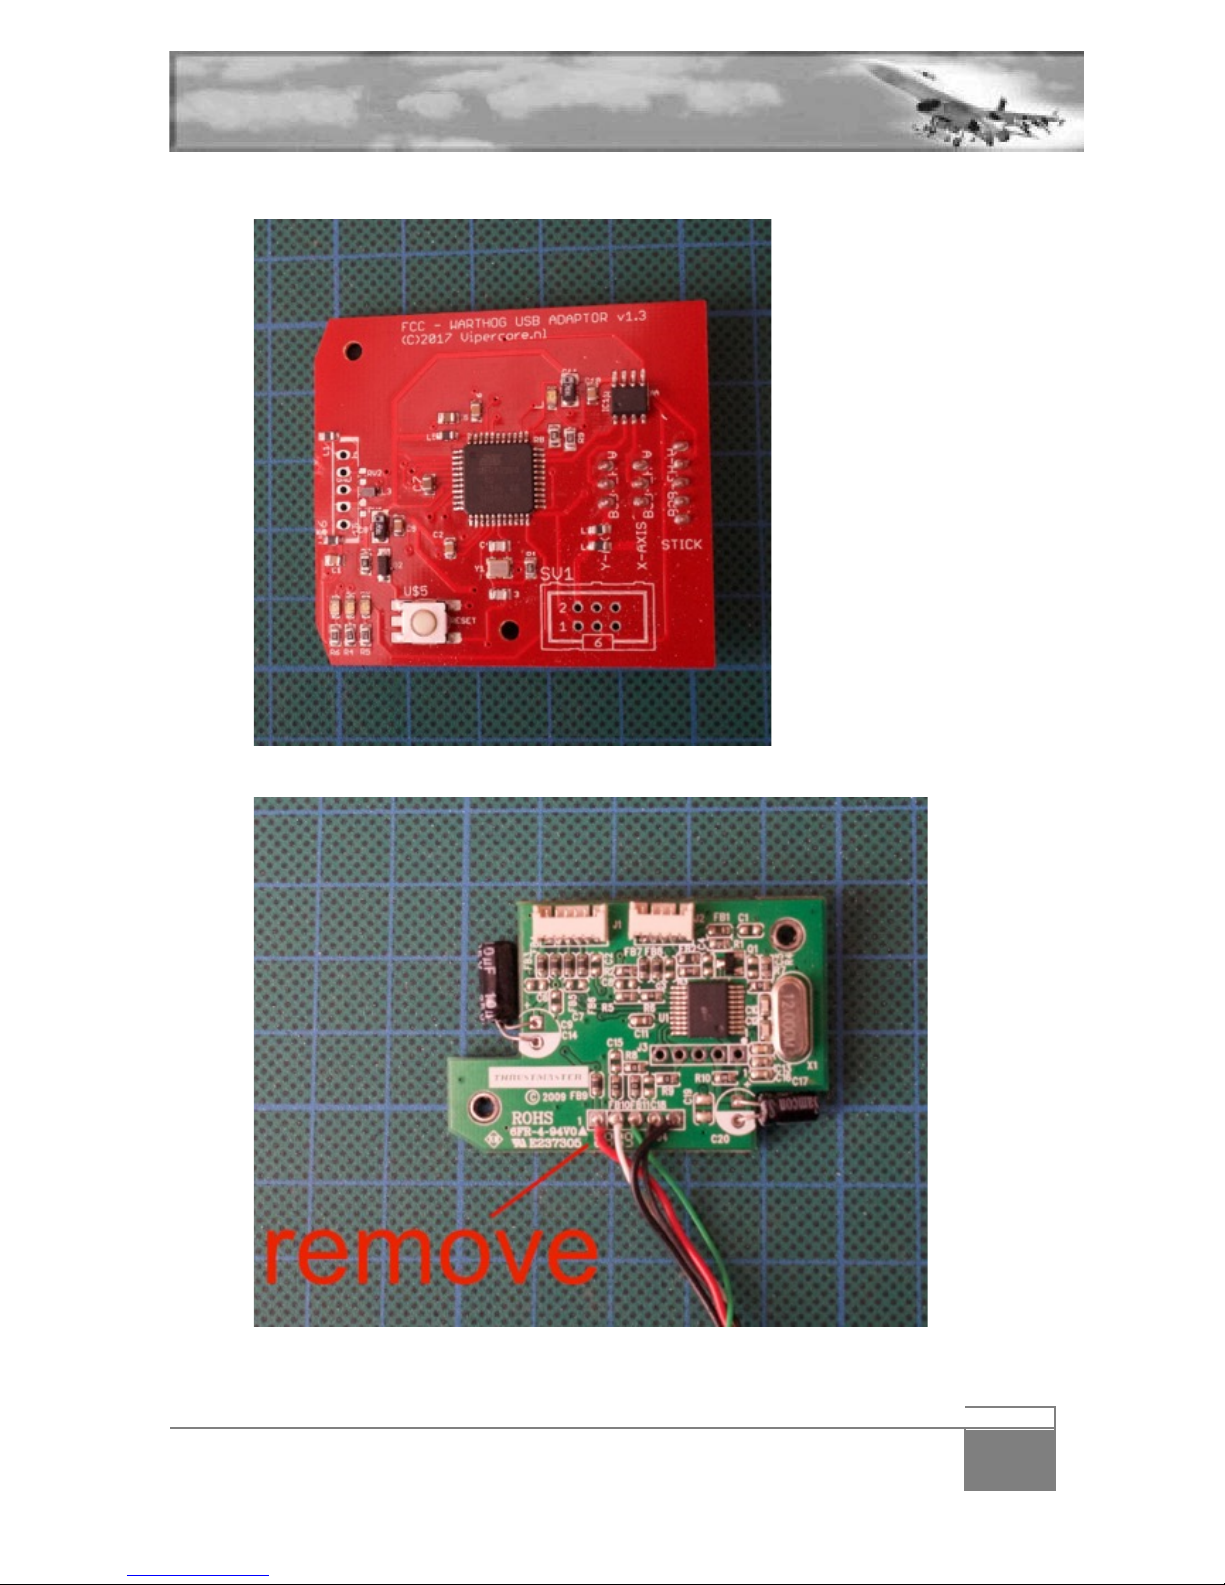
Here#is#the#result#after#the#cut:#
#
#
2. Unsolder#the#USB#cable#5#wires#from#the#original#warthog#PCB:##
#
#
#
#
Page 13
- 13
FORCE CONTROLLED WARTHOG - USER'S MANUAL V1.0
3. Insert#the#5#wires#of#th e#USB#cable#into#the#red#FC W#PCB#following#the#ord e r #se en#in#the#
picture#below:#
#
#
4. Flip#the#PCB#on#the#other#side#and#solder#all#5#wires:#
#
#
#
#
Page 14
- 14
FORCE CONTROLLED WARTHOG - USER'S MANUAL V1.0
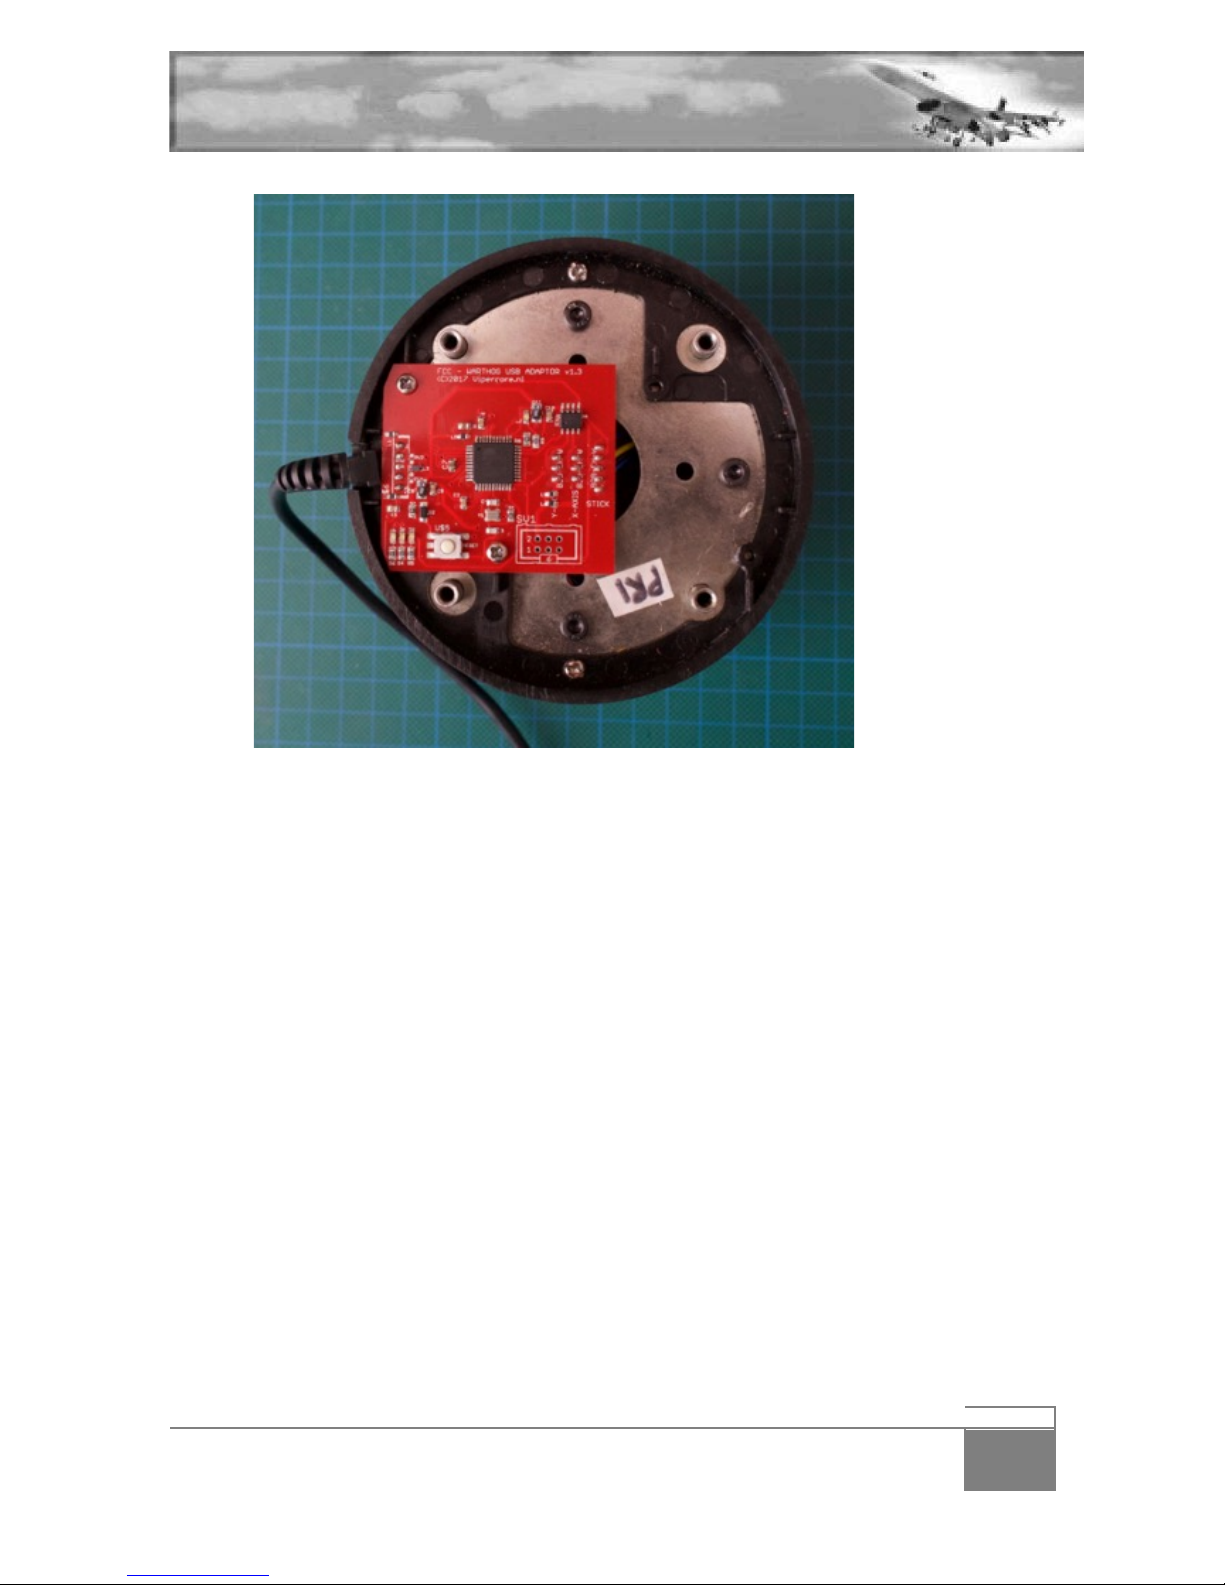
5. Place#the#PCB#into#the#base#with#the#usb#cable#through#the#original#opening:#
#
#
#
#
#
#
# #
Page 15
- 15
FORCE CONTROLLED WARTHOG - USER'S MANUAL V1.0
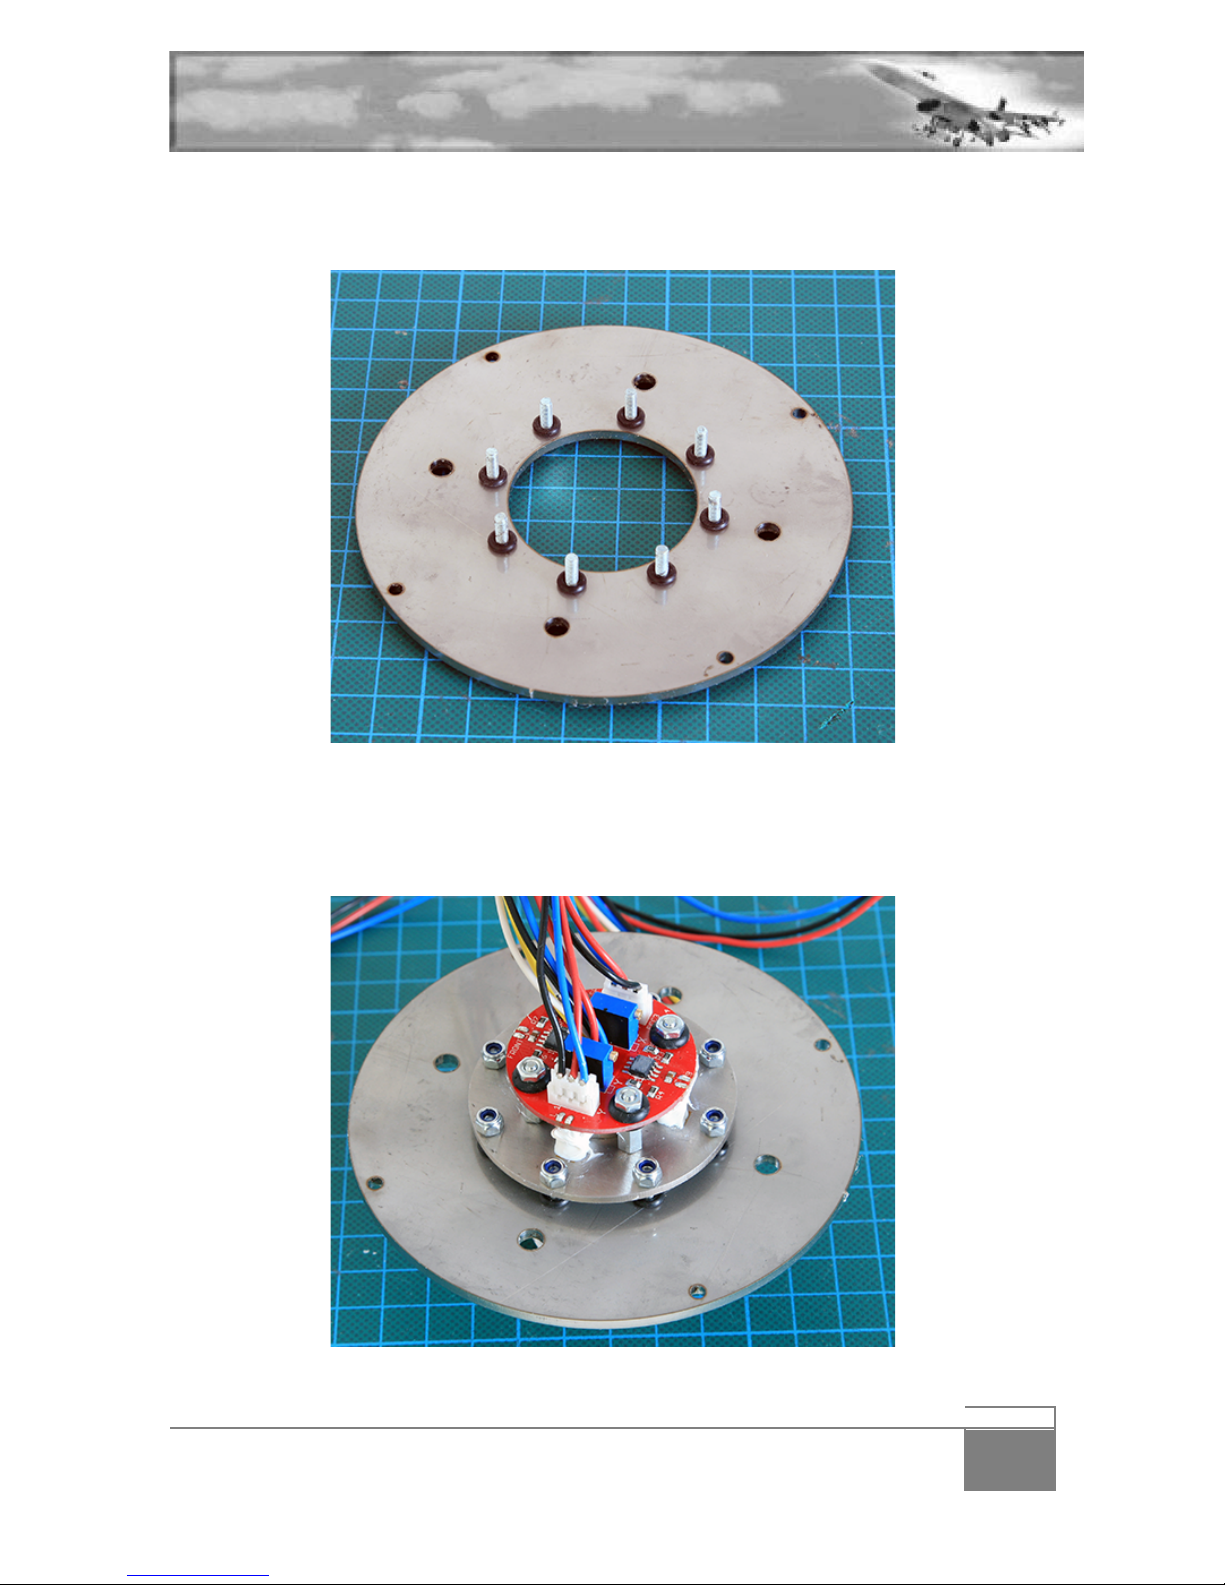
Let’s#now#continue#FCW#install#by#attaching#the#FCW#to#it’s#support#plate.##
Insert#all#8#provided#scr ews#through#the#suppo r t#p la te #centre#screw#holes#and#slide#the#O-rings#on#the#
other#side#of#the#support#plate.##
#
#
#
Then#insert#the#FCW#through#the#hole#on#the#side#of#the#o-rings#and#m a tch #all#screw s#w ith#th e#FCW#
holes.#You#can#now#bolt#each#screw#using#the#provided#nylon#secured#bolts.#Do#not#overtight#them.#
They#have#to#be#secure#but#they#won’t#unscrew#anyway#thanks#to#the#nylon#washer#included#in#the#
bolt.#
#
#
# #
Page 16
- 16
FORCE CONTROLLED WARTHOG - USER'S MANUAL V1.0
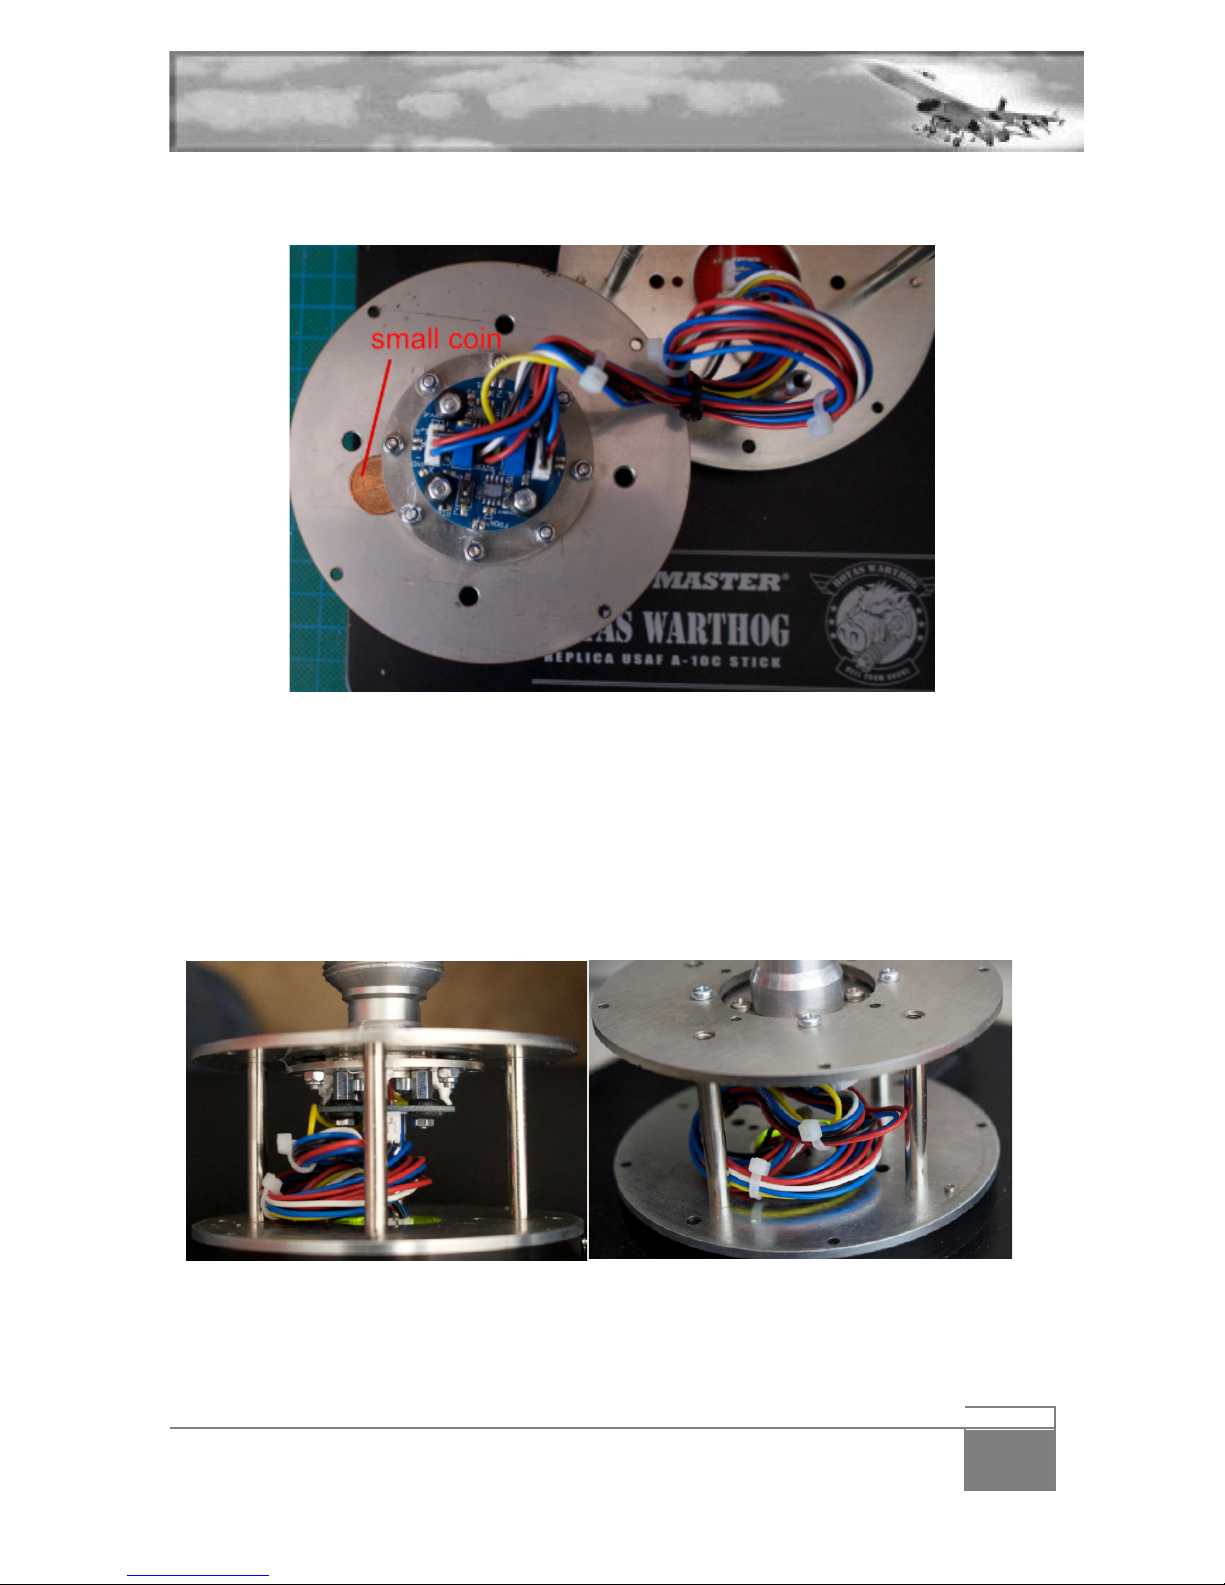
A#good#tip#is#to#insert#a#coin#between#the#two#plates#and#screw#the#nylon#bolts#in.#This#will#give#a#
good#reference#for#tightening#the#bolts#in.#
#
#
#
The#PCB#is#printed#with#the#word#FRONT#this#will#be#very#handy#in#the#next#couple#of#minutes.#Slide#
the#black#cylinder#casing#on#the#base#and#align#it#with #the#4#n otch es .##
Connect#the#3#connectors#to#the#base#PCB#while#supporting#the#PCB#from#under#with#your#finger#as#
you#plug#them#in.#Make#sure#you#match#Y#with#Y#and#X#with#X.#It’s#also#referenced#on#both#PCB#so#if#
you#mess#it#up,#it’s#because#you#didn’t#read# ##
Secure#the#wires#in#place#with#the#supplied#cable#zips,#it’s#important#that#the#cables#are#not#severed#
as#you#screw#the#base#closed.#Here#are#pictures#helping#you#see#how#the#cables#are#supposed#to#be#
placed#inside#the#base:#
#
#
#
#
#
#
Page 17
- 17
FORCE CONTROLLED WARTHOG - USER'S MANUAL V1.0
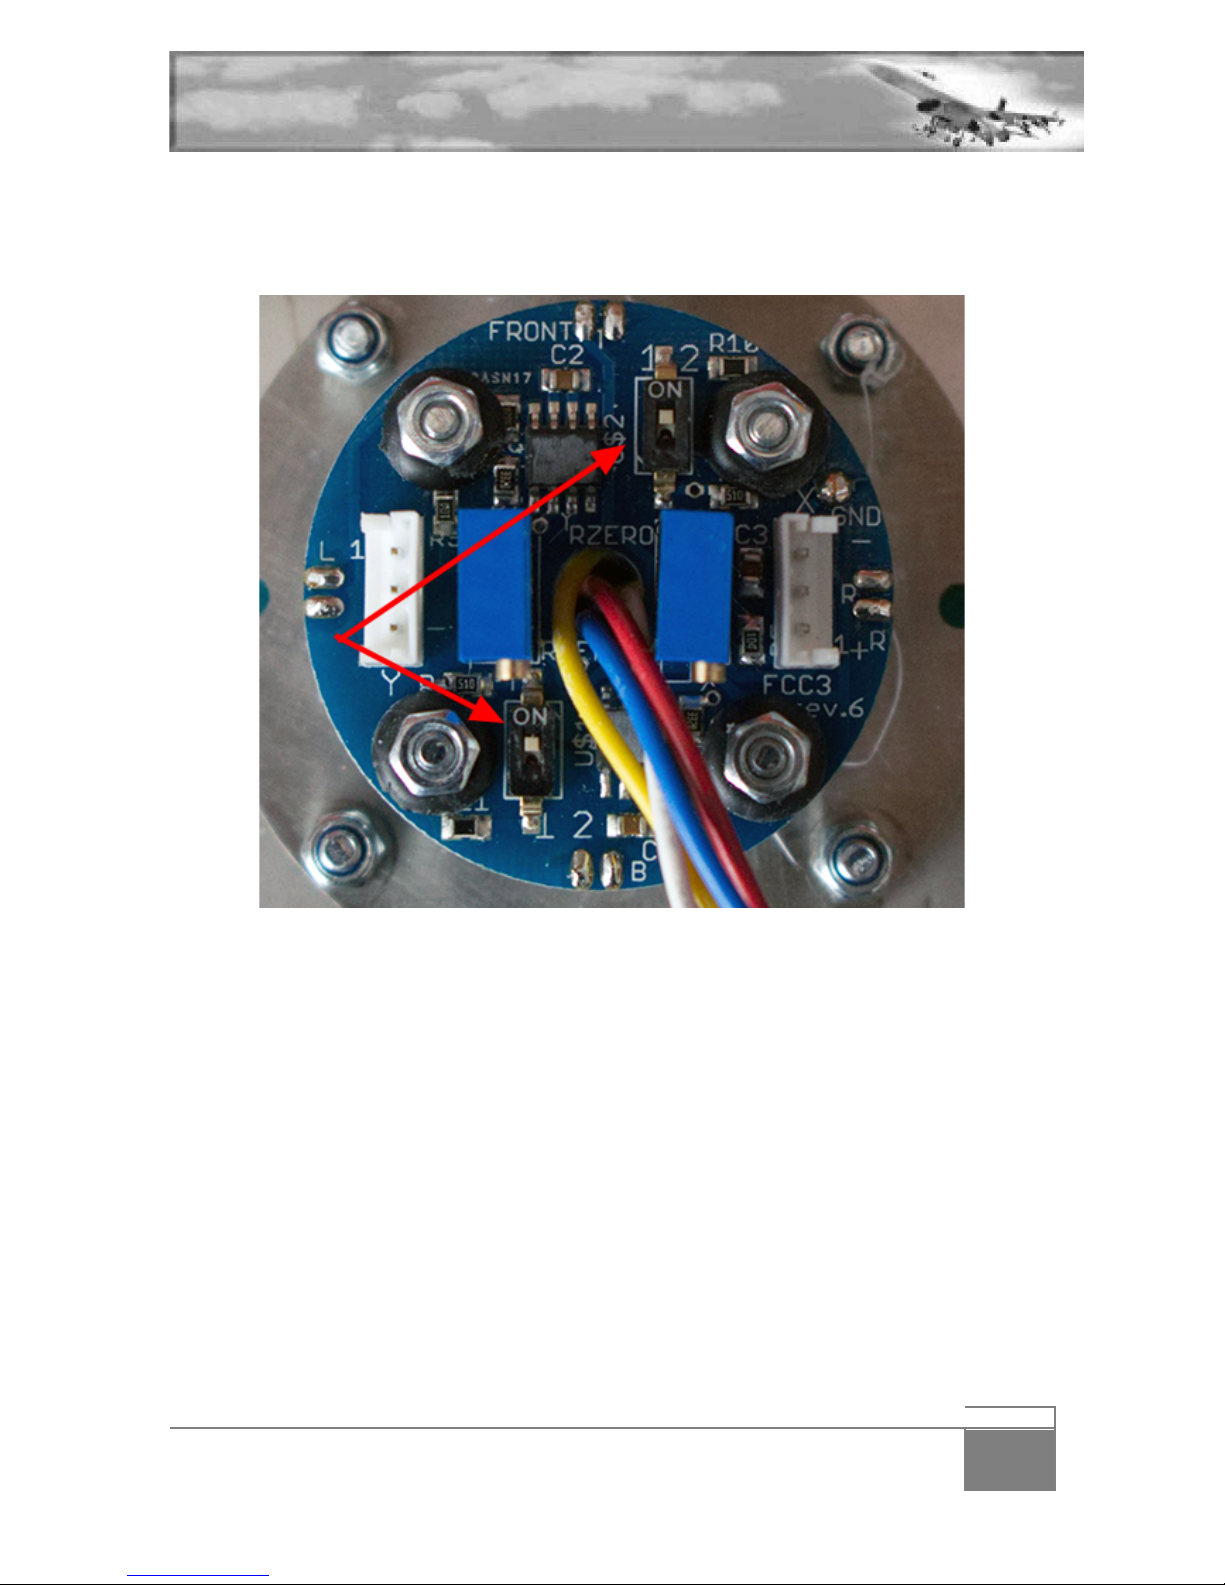
Before#you#place#the#top#plate#on#the#base,#please#mind#a#close#look#at#the#FCW#round#PCB.#There#
are#two#dip#switches#you#can#set#depending#if#you#intend#to#use#the#mod#with#a#cougar#or#a#warthog.#
Set#both#Dip#to#ON#if#you#intend#to#use#a#warthog#stick#and#set#both#dip#to#off#if#you#intend#to#use#the#
mod#with#a#Cougar.#Response#curves#are#slightly#better#with#the#warthog#settings#but#….#
#
#
#
#
You#have#4#possibilities#to#orient#the#base#according#to#your#exit#cable.##The#FCW#PCB#tells#you#where#
the#front#is#(another#option#is#to#screw#the#wartho g#h and le#in#place.#By#rotating#the#top#plate#by#45°#
you#can#make#the#cable#exit#to#the#front,#the#left,#the#right#or#the#rear#of#the#round#base.#Since#the#
stick#is#to#the#right#of#the#computer#I#chose#to#have#the#exit#on#the#left#
#
Page 18
- 18
FORCE CONTROLLED WARTHOG - USER'S MANUAL V1.0
#
#
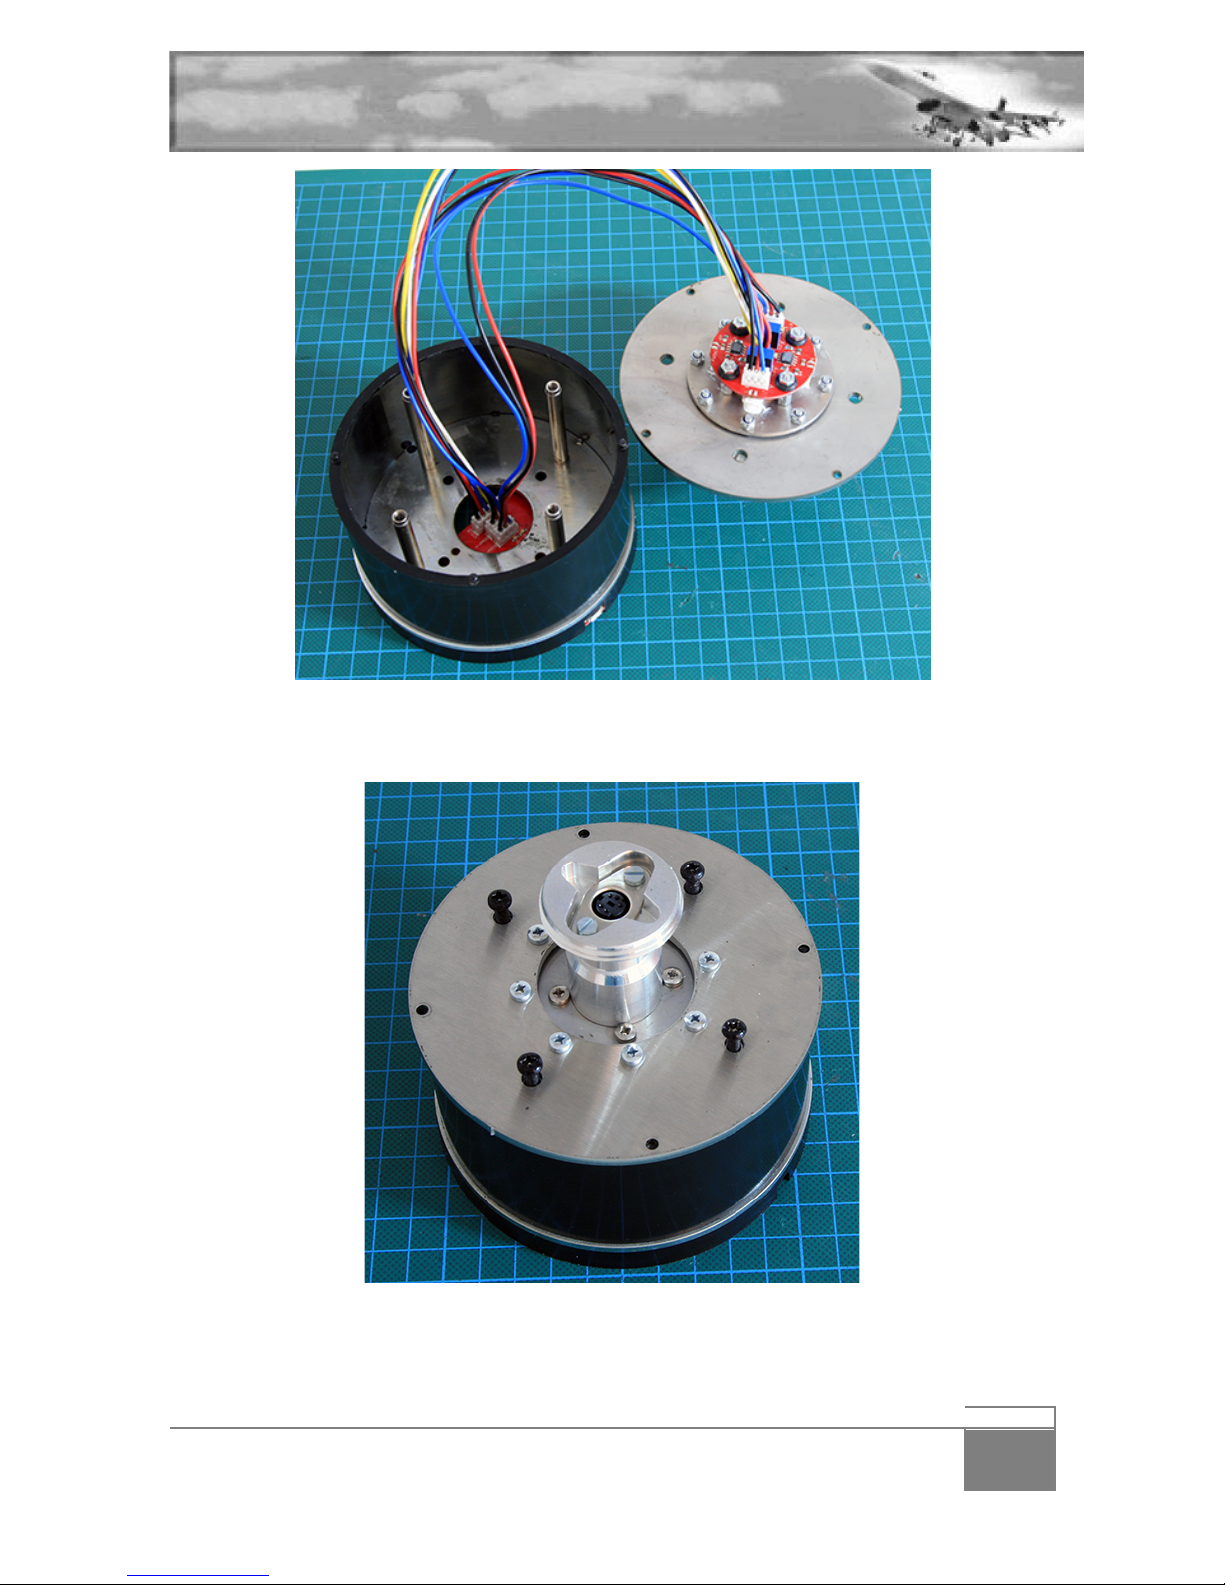
Place#the#FCW#and#it’s#support#plate#over#the#base,#aligned#first#with#the#4#small#notches#then#with#
the#4#supporting#poles#and#screw#it#securely#w ith#the #4#black #origina l#screw s.#
#
#
#
Screw#the#large#flat#plate#from#under#the#base#(you#will#need#it)#and#replace#your#Warthog#handle#in#
place.#Connect#a#mini#USB#cable#to#the#FCW#warthog#PCB.#
That’s#it,#the#FCW#warthog#installation#is#finished
Page 19

- 19
FORCE CONTROLLED WARTHOG - USER'S MANUAL V1.0
3. Installing the Warthog FCW into other bases
$
3.1$Cockpit$base$
The#advantage#of#the#warthog#FCW#mod#is#the#ability#to#mount#the#FCW#into#a#smaller#cockpit#base.##
It’s#a#feature#exclusive#to #th e #FC C /FC W .#The #co c kp it#b a se #bo lte d #on #th e #righ t#a ux ilia ry#co n so le #is#q u ite#
smaller#than#a#warthog#base.##
#
There#is#no#specific#instructions#to#mount#the#FCC#into#a#cockpit#base#as#the#8#holes#in#the#FCW#match#
the#holes#in#the#cockpit#base.#The#support#plate #is#not#us ed#a nd #the#P CB #can #be#p laced #an yw h ere#
under#the#right#auxiliary#console#at#cable#length.#So#installation#is#even#easier#than#in#a#warthog#base.
3.2$Cougar$base$
As#said#earlier#the#FCW#is#backward#compatible#with#the#Cougar.#Installation#in#the#cougar#base#is#
possible#with#the#adapter#plate#which#can#be#ordered#along#the#FCW.#PIX#To#install#the#FCW#into#a#
Cougar#base,#please#refer#to#the#FCC#manual.#
Bear#in#mind#that#if#you#install#a#FCW#in#a#Cougar,#it#will#become#Standalone #D ir ec t#X .##
You#won’t#program#it#as#before#(or#as#with#the#FCC)#with#foxy##
You#won’t#be#able#to#connect#the#TQS#straight#to#the#Cougar#stick#but#you#must#seek#a#solution#to#
make#your#Cougar##throttle#standalone#as#well.#
See#the#throttle#adaptor#from#our#website:#www.vipercore.nl#
#
#
Page 20
- 20
FORCE CONTROLLED WARTHOG - USER'S MANUAL V1.0
4. Setting up your FCW
#
4.1$Electronic$Calibration:$
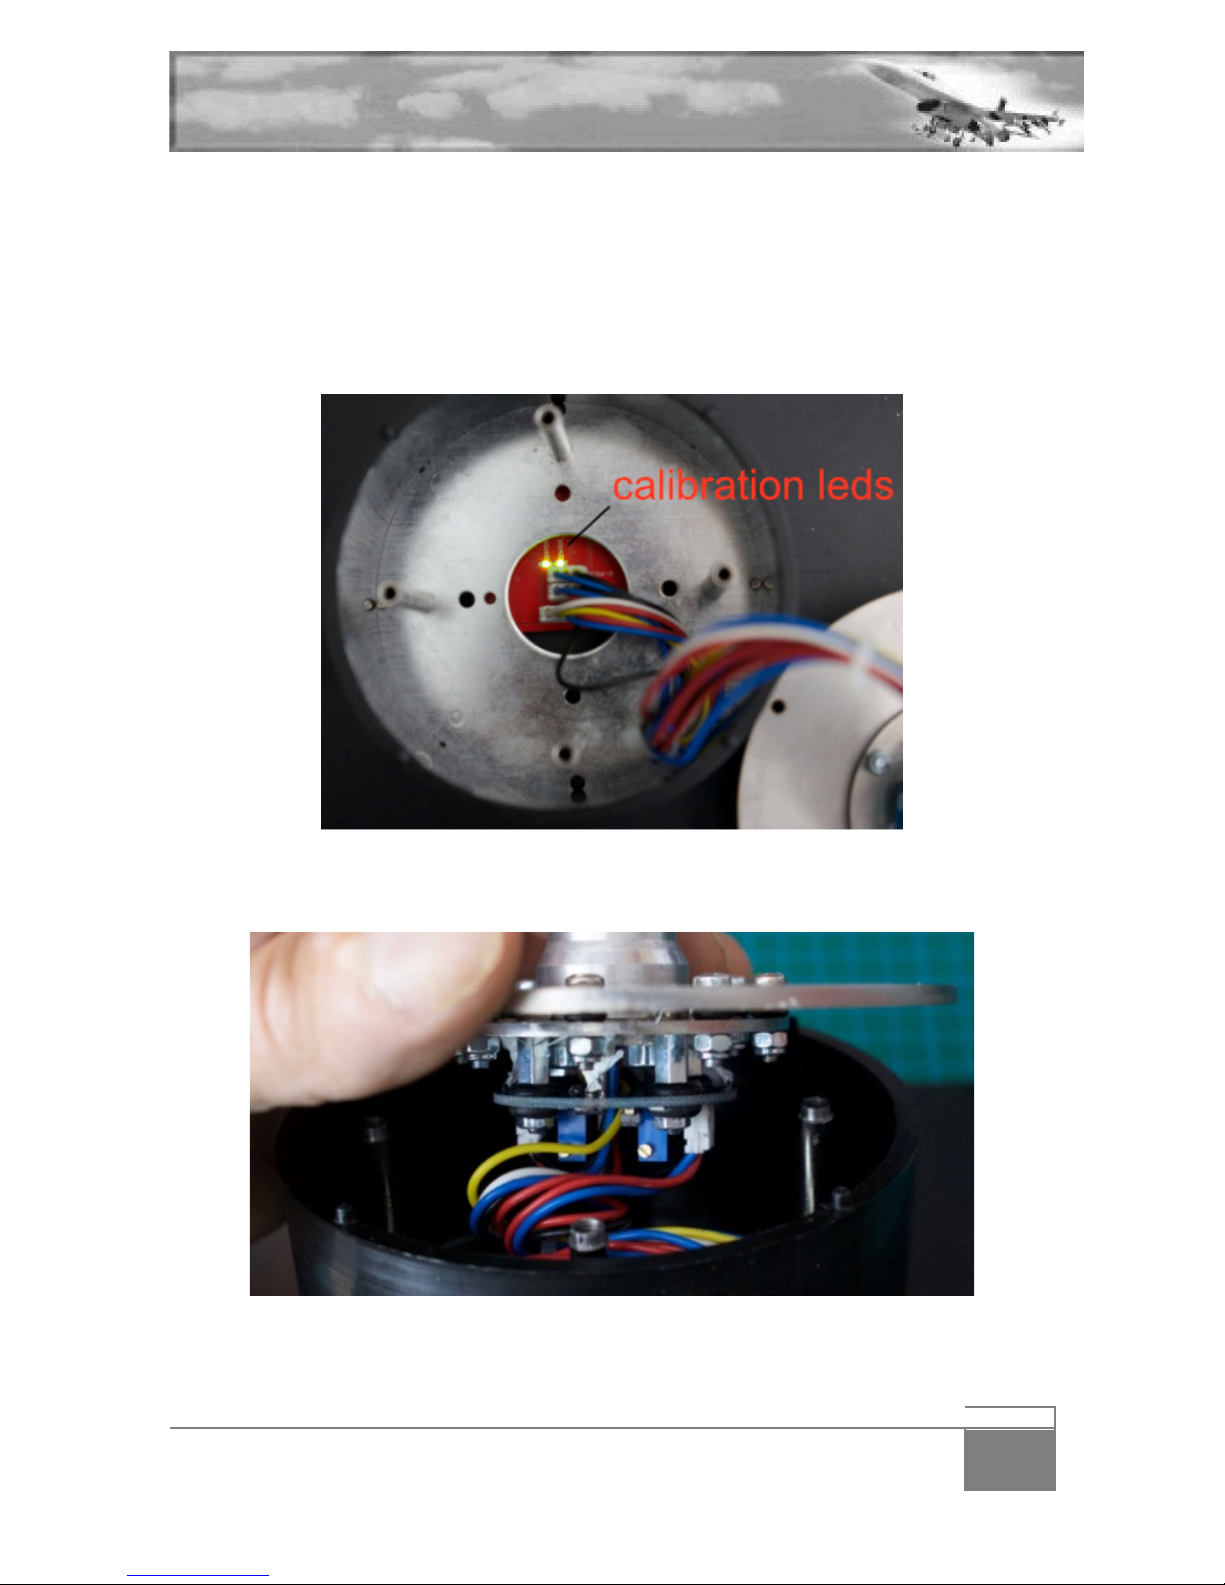
Initial#electronic#calibration#is#required.#The#FCW#PCB#has#two#status#led#that#will#confirm#each#axis#is#
centred.#These#leds#are#placed#on#the#connector#side#and#are#labelled#“Centre_X”#and#“Centre_Y”#
These#leds#are#visible#with#the#PCB#screwed#in#the#base,#by#looking#through#the#warthog#base#from#
the#top:#
#
#
#
Each#axis#also#features#a#potentiometer#with#an#adjustable#screw#on#top.#These#potentiometers#are#
located#on#the#FCW#ro u n d #p cb #a tt ac h ed #t o#t h e#s tic k#b a se .#
#
#
#
Page 21
- 21
FORCE CONTROLLED WARTHOG - USER'S MANUAL V1.0
Connect#the#FCW#to#the#USB#port#of#your#computer.#The#calibration#leds#might#not#be#on,#which#
indicates#a#non-centred#axis.#To#calibrate#the#centre#proceed#with#the#following#steps#for#both#axis:#
#
- Connect#the#FCW#to#the#computer#
- Turn#slowly#the#adjusting#screw#until#the#relevant#led#turns#green#to#indicate#a#centred#axis.##
- Repeat#for#the#other#axis.##
- Once#both#leds#are#on,#the#FCW#is#electronically#centred#
#
Please#note,#it’s#an#electronic#calibration#so#it#does#not#matter#the#position#of#the#weight#applied#to#
the#stick.#You#can#perform#this#calibration#with#the#stick #mo un t#in#an y#po sition #and#no#handle#
installed.#
#
#
#
#
# #
Page 22
- 22
FORCE CONTROLLED WARTHOG - USER'S MANUAL V1.0
4.2$Installing$the$software$
The#Warthog#FCW#is#supplied#with#a#software#which#you#can#dow n loa d #o n #th e #V ip erC o re #website:#
http://www.vipercore.nl/index.php/download/software#
The#warthog#does#not#require#the#use#of#any#software#as#options#can#be#set#with#button#press#
combinations#(for#further#information,#read#the#chapter#“using#your#FCW).#The#supplied#software#is#
mainly#a#Graphic#User#Interface#(GUI)#that#gives#you#another#way#of#setting#up#the #W arth og #FCW#and#
update#it’s#firmware.#
#
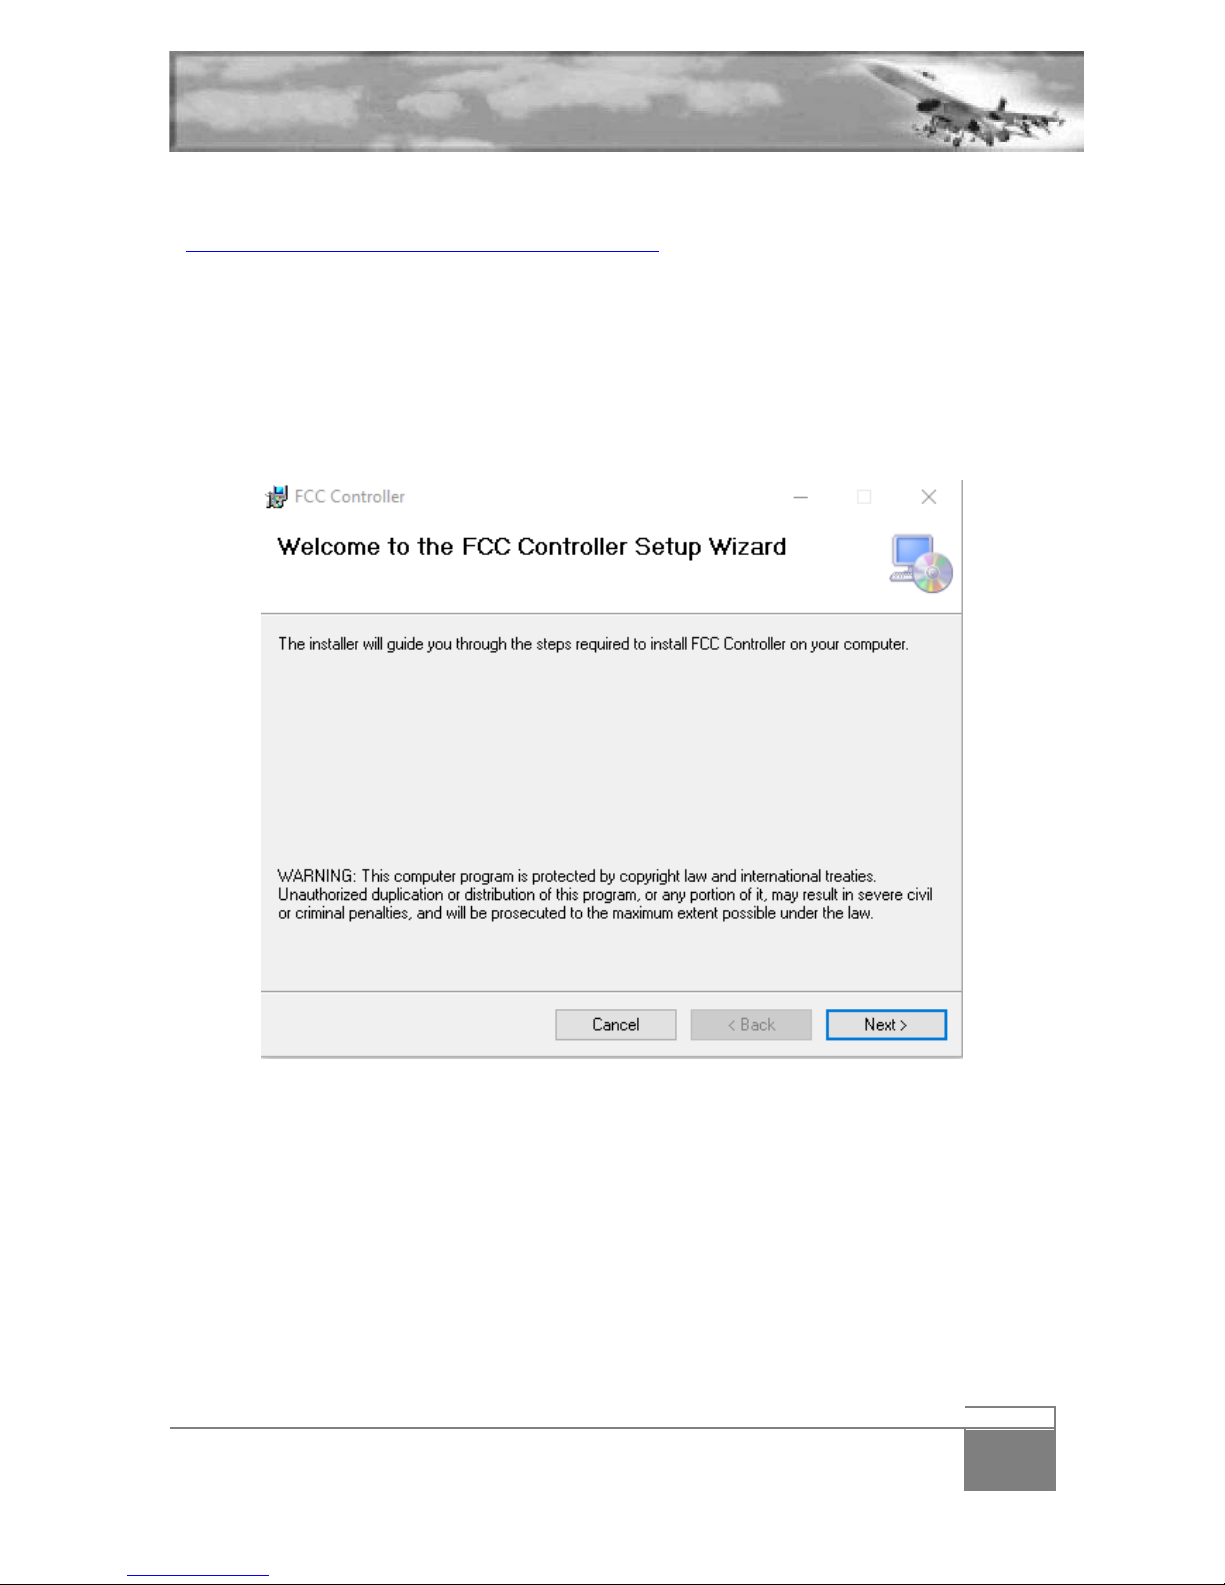
Unzip#de#installer#package#in#a#temporary#folder#and#launch#the#“fcc_configurator_0.1.3.2.msi”#file.#
Windows#may#block#the#execution#of#the#file,#you#may#override#windows#security#and#install#anyway.#
#
#
#
Follow#the#on#screen#instructions#
Page 23
- 23
FORCE CONTROLLED WARTHOG - USER'S MANUAL V1.0
#
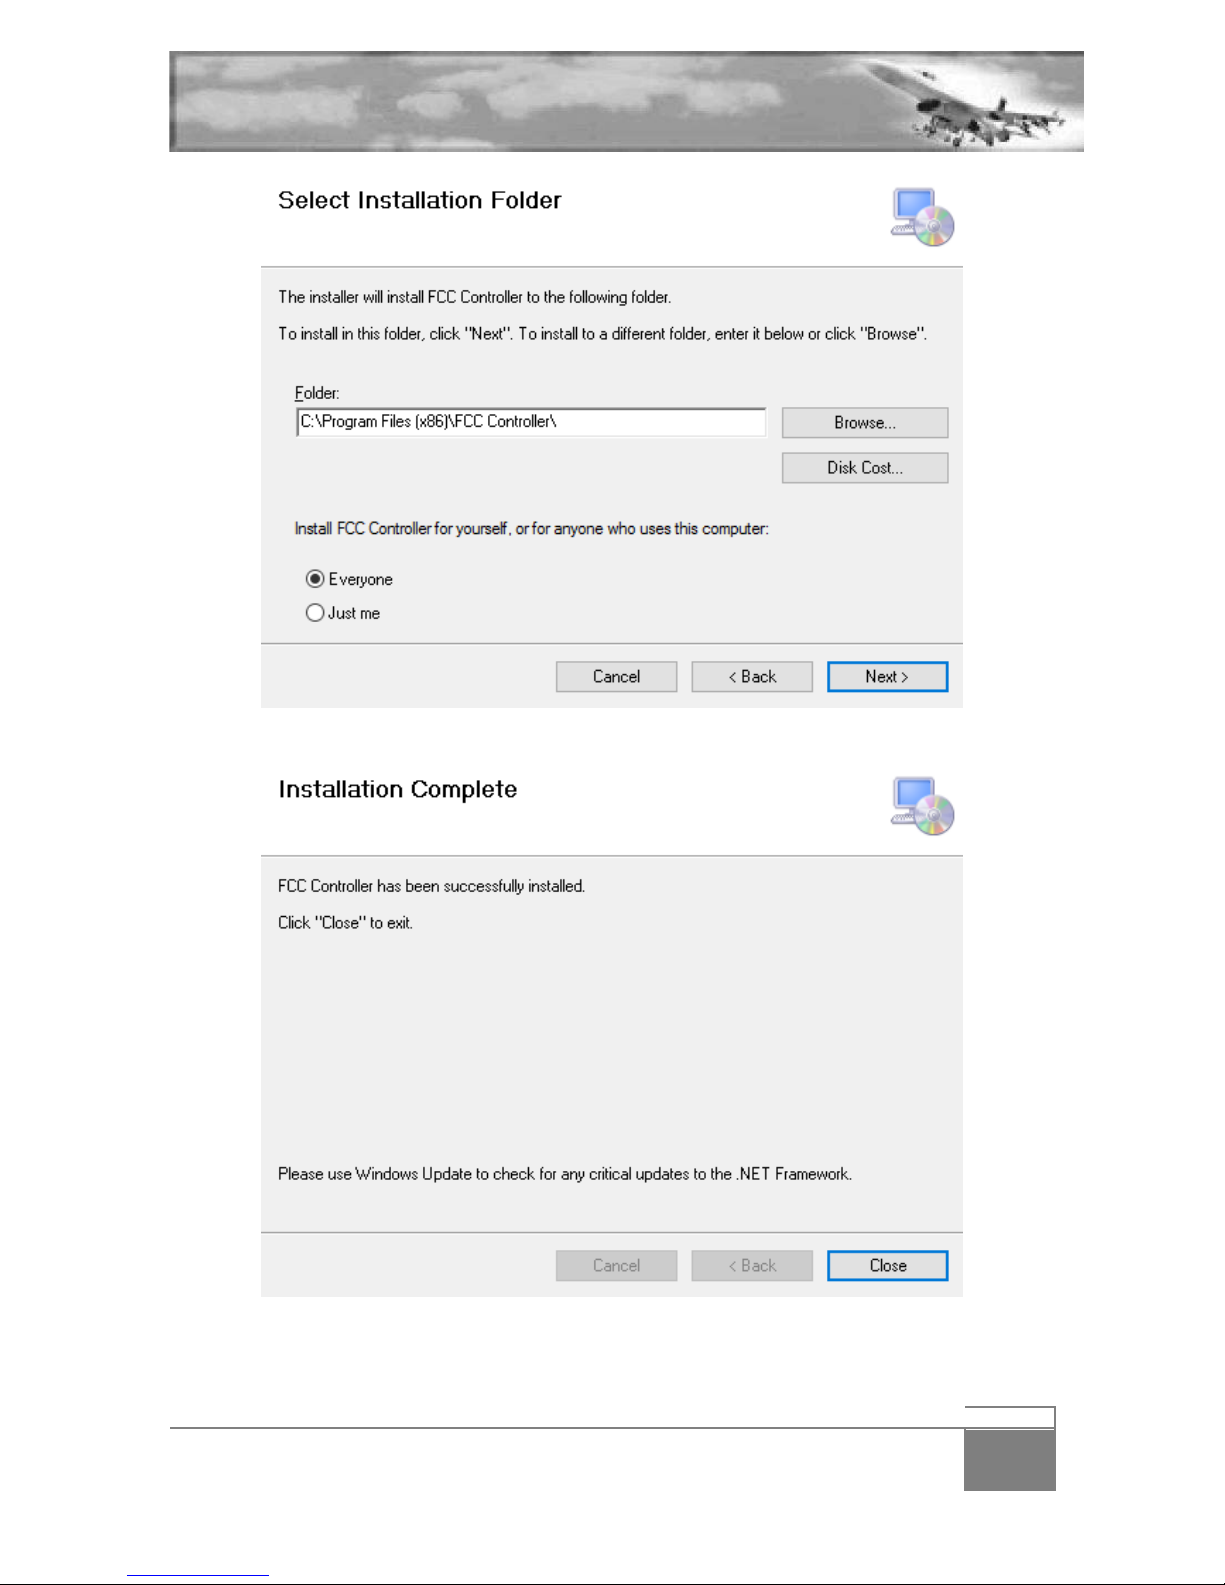
Choose#an#installation#folder#
#
#
Installation#is#complet e#
Page 24
- 24
FORCE CONTROLLED WARTHOG - USER'S MANUAL V1.0
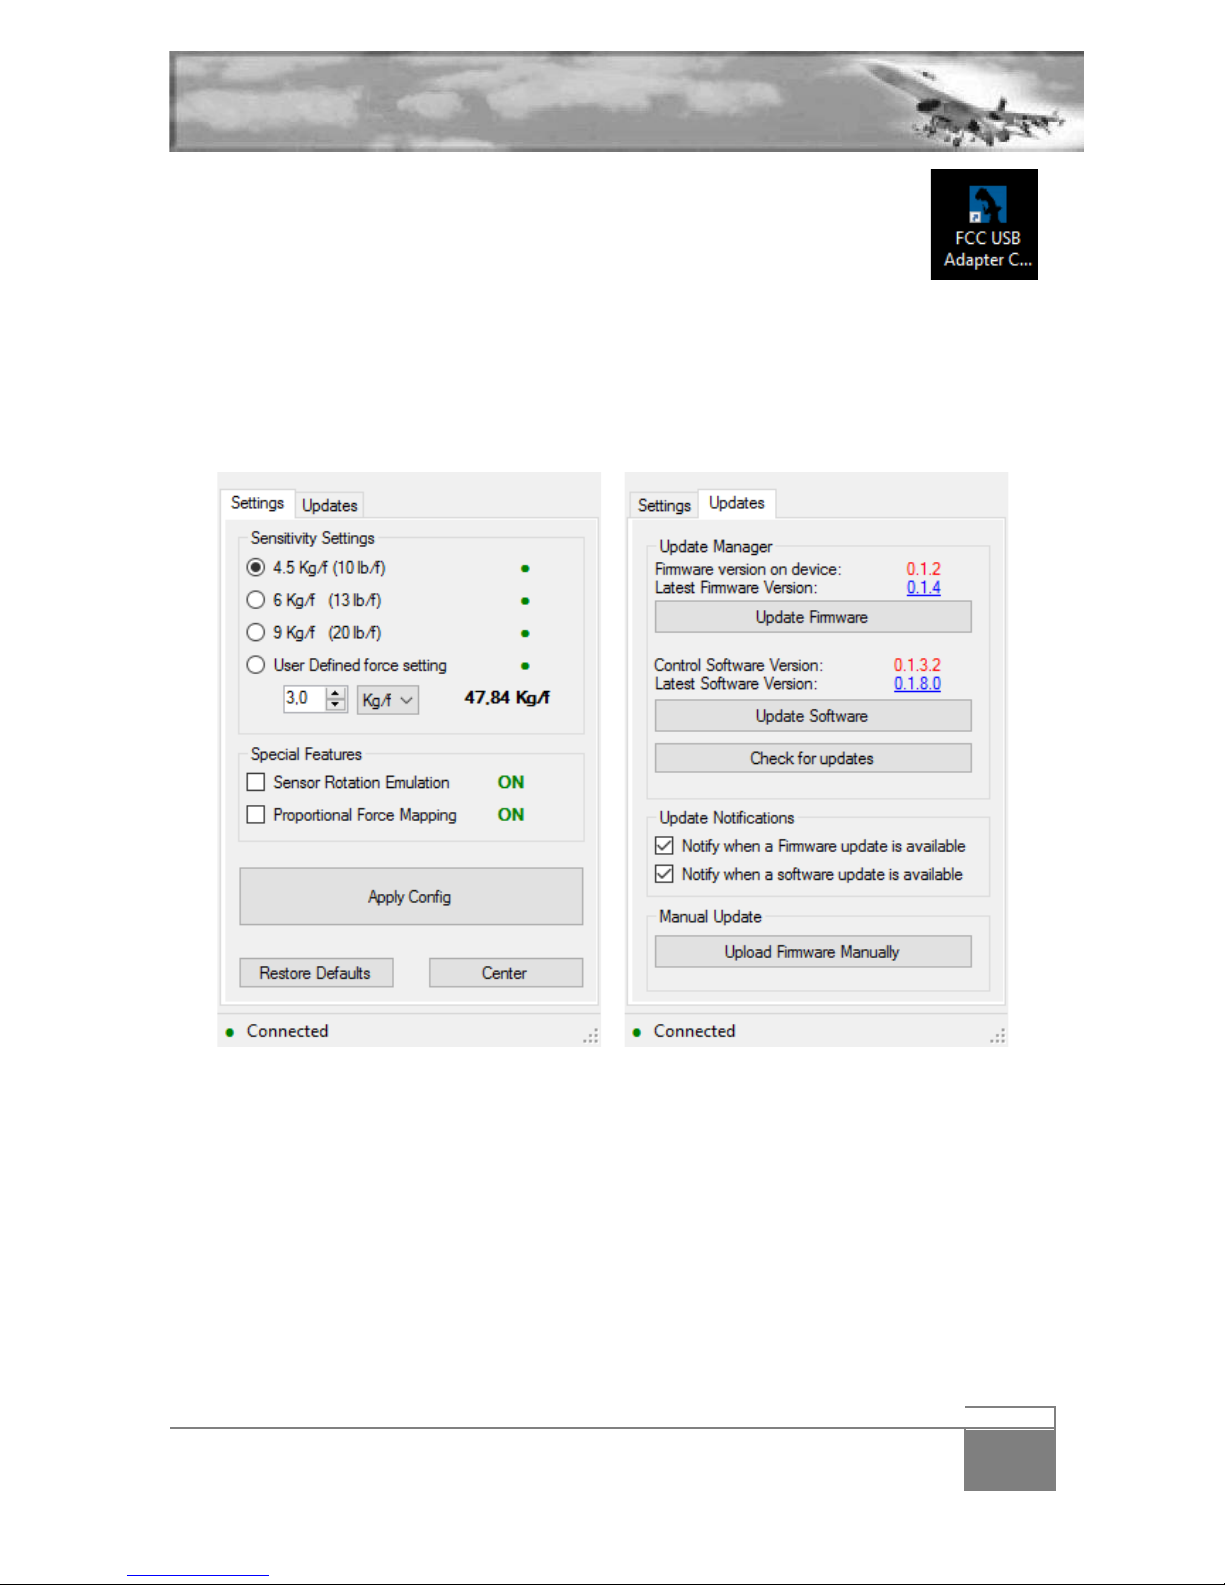
You#can#then#now#launch#the#FCW#configurator#via#the#FCW#icon#placed#on#your#
desktop.##
Please#note#the#same#icon#is#in#your#tray#when#the#FCW#is#connected.#
#
#
#
Upon#launching#the#software#you#will#be#automatically#notified#if#software#or#firmware#updates#are#
available#through#a#message#in#your#windows#taskbar.##
#
Click#on#the#Updates#tab#to#check#the#version#of#the#installed#firmware/software#and#the#availability#
of#a#new#one.#When#you#update#always#update#the#firmware#first#if#both#are#available.##
#
##### #
#
#
• Click#the#Update#firmware#button.#A#DOS#windows#will#open#and#the#firmware#will#be#
automatically#updated.#The#two#versions#number#will#match#after#a#successful#update.#
#
• Click#the#Update#Software#button.#The#software#will#close#and#you#will#prompted#for#a#new#
installation.#Follow#the#in st ru ct io ns #and#restart#the#software#upon#completion.#
check#the#Updates#tab#for#version#match.#
#
It#is#recommended #to #re s ta rt#t h e #d ev ice #a fte r#e ither#a#firmware#or#a#softw a re #u p d a te #b y#s imply#hot#
plugging#the#USB##
#
# #
Page 25
- 25
FORCE CONTROLLED WARTHOG - USER'S MANUAL V1.0
5. Using your FCW
#
5.1$Changing$options$through$software$
#
The#supplied#GUI#allows#you#to#change#a#few#options.#These#options#can#also#be#changed#on#the#fly#
without#the#use#of#the#software#by#pressing#a#few#buttons#combination.#We#will#come#back#to#that#
later.#
#
#
#
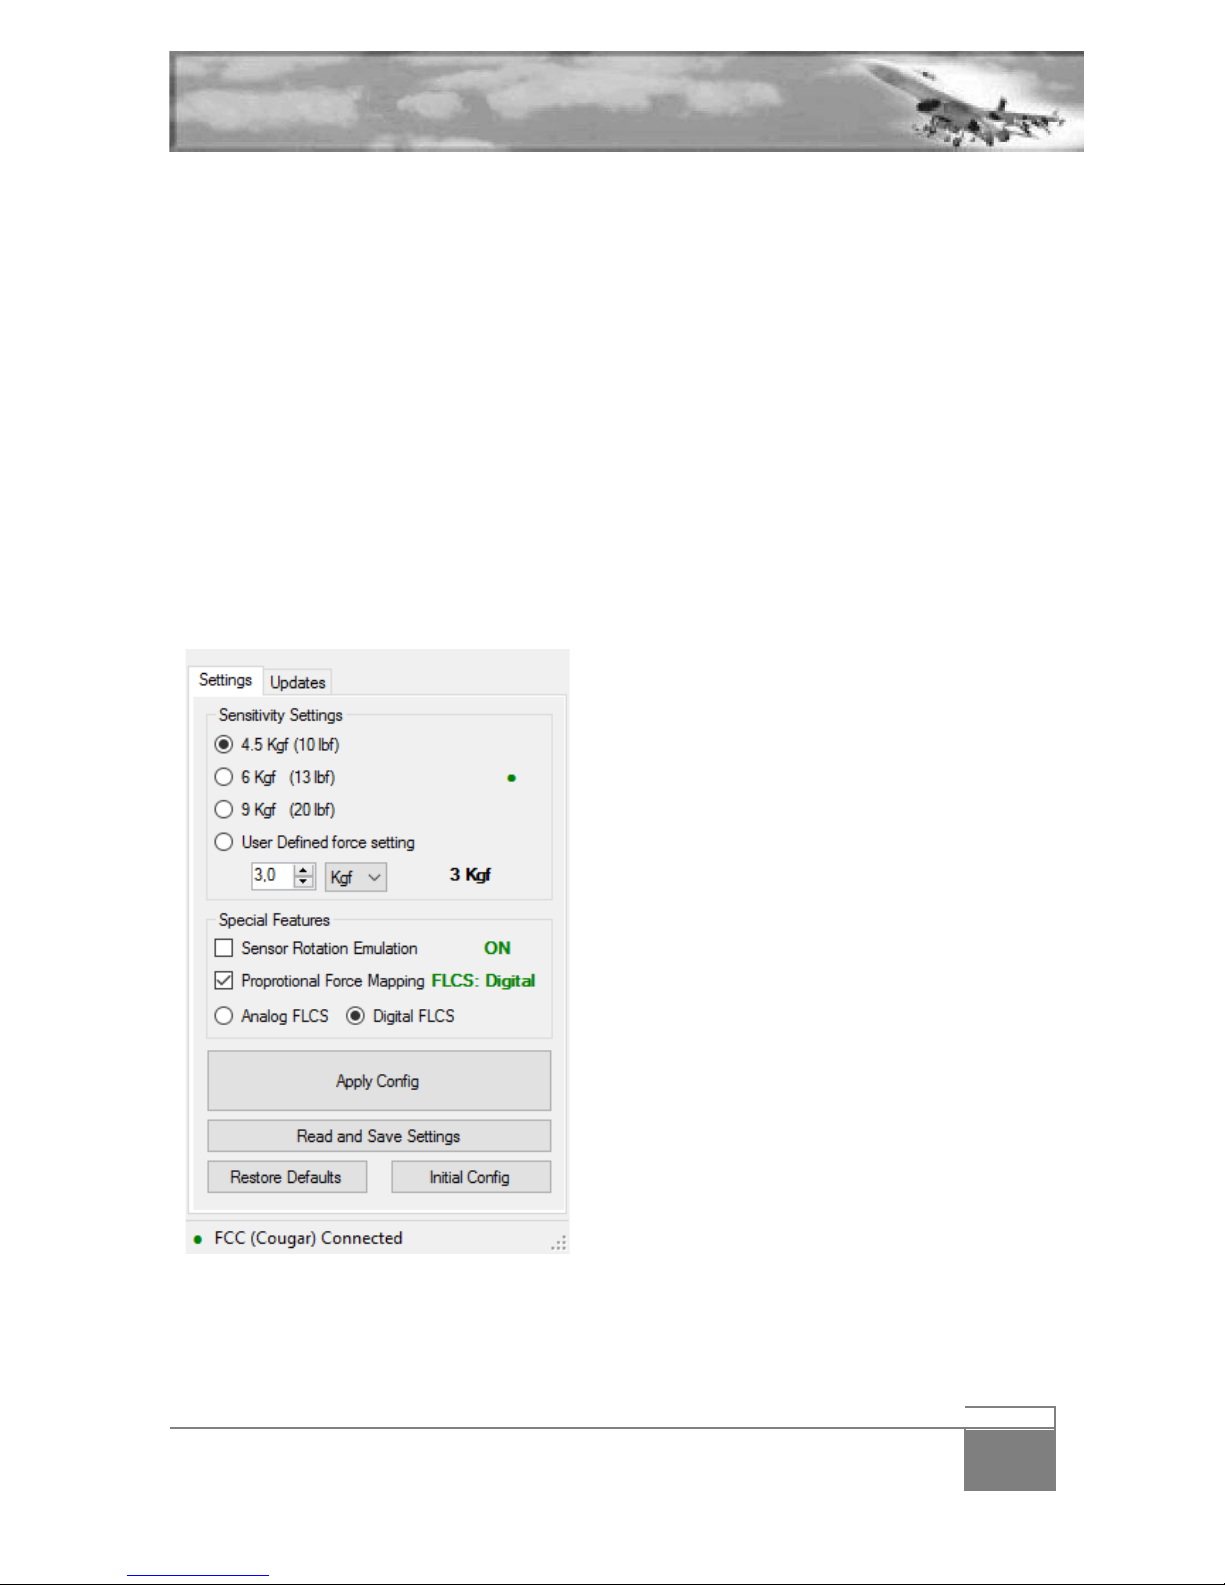
The#Sensitivity#Settings#allows#you#to#either#choose#one#of#three#defined#forces:#
• 4.5#Kgf#(10#Lbf)#
• 6#Kgf#(13#Lbf)#
• 9#Kgf#(20#Lbf)#
• Or#a#custom#setting#which#is#set#through#the#user#defined#force#setting#option#boxes#(mind#
the#unit)#
#
Page 26
- 26
FORCE CONTROLLED WARTHOG - USER'S MANUAL V1.0
Special#features#allow#you#to#further#tweak#the#FCW#according#to#the#real#F-16#blocks#you’re#
simulating.##
• The#Sensor#Rotation#Emulation#rotates#the#FCW#references#axis#12°#outboard#(right)#
#
There#were#a#lot#of#discussions#in#the#cockpit#builder#community#about#the#real#SSC#being#
rotated#outboard#in#the#F-16#cockpit#to#be#perfectly#aligned#with#the#pilot’s#arm#force#
vectors.#Many#denied#it#was#the#case#because#they#couldn’t#see#the#stick#grip#being#offset#to#
the#right#or#because#they#considered#early#bloc ks.#Bu t#if#the#stick#grip#is#no t#offse t,#the#
sensors#inside#are#(at#least#from#the#block#40/42#and#later)#
#
Check#the#Sensor#Rotation#Emulation#box#to#enable#it.##
#
To#see#which#option#suits#best#your#stick#position,#start#your#favourite#sim#and#fly#an#
Immelman#or#a#loo p .#If#y o u #fe e l#th e #air cr af t#ro lls #a t#th e #s ame#time#as#you#pitch#up,#you#
probably#don’t#have#the#right#setting#
#
• Proportional#Force#Mapping#enable#different#force#ratio#in#the#4#directions#according#to#the#
type#of#FLCS#simulated.##Check#the#box#in#fron t#of#Pro po rtion al#m ap ping #and #the n#decide#if#
you#want#to#emulate#an#analog#FLCS #or #a#d ig ita l#F LC S .#
#
There#is#no#one#fits#all#SSC#in#the#real#F-16.#The#sidestick#controller#was#updated#often#along#
the#operational#life#of#the#F-16#and#force#settings#and#ratio#hav e#be en #m o dified #acc ord ing ly.###
#
The#nominal#value#of#the#ratio#is#the#full#pitch#up#command#(maximum#required#force)##
Pitch#down#and#roll#forces#are#emulated#with#a#certain#ratio#of#the#above#pitch#up#reference.##
Please#note,#the#sensitivity#setting#chosen#above#are#the#maximum#force#required#for#pitch#
up.#The#ratio#is#calculated#from#that#set#value.#
#
Analog$FLCS:$
Full#pitch#up#command#is#180#Newtons#(about#18Kgf)##
Full#pitch#down#and#roll#commands#are#80N#(about#8#Kgf)##
#
The#ratio#is#therefore#180/80#=#9/4.##
#
For#example,#if#you#set#9#Kgf#in#the#sens itivit y#s e ttin g s#a n d #h av e #th e #A n alo g #F LC S #en a b led #f or #
the#proportional#force#mapping#then#th e#m ax imu m #pitch #up #com mand#will#be#9#Kgf#and#
maximum#pitch#down#and#maximum#roll#forces#will#be#4#Kgf.#
#
Analog'FLCS'was'implemented'up'to'Block'30'&'32.'Please'note'the'SSC'was'not'rotated'on'
these'blocks'so'if'you'want'to'implement'a'true'early'block 'up'to'30 /32 'you 'can'd isable'the '
sensor'rotation'option.##
#
Digital$$FLCS:$
Full#pitch#up#command#is#25#lbf##(11.34#Kgf)#
Full#pitch#down#is#16#lbf#(7.26#Kgf)#
Full#roll#command#is#17#lbf.#(7.71#Kgf)#
#
The#ratio#is#therefore#25/16#in#pitch#and#25/17#in#roll.#
Page 27
- 27
FORCE CONTROLLED WARTHOG - USER'S MANUAL V1.0
#
For#example,#if#you#set#9#Kgf#in#the#sensitivity#settings#and#have#the#Digital#FLCS#enabled#for#
the#proportional#force#mapping#then#th e#m ax imu m #pitch #up #com m an d#will#be#9#Kgf#and#
maximum#pitch#down#command#will#be#5.76#Kgf#and#maximum#roll#forces#will#be#6.12#Kgf.#
#
Digital'FLCS'was'implemented'from'the'block'40/42'and'beyond.'The'SSC'was'rotated'in'that'
case.'
#
Please#note:#Implementing#high#forces#and#real#force#ratio#might#not#be#practical#according#to#your#
stick#position.#Always#prefer#comfortable#settings#instead#of#realism#settings#which#might#not#suit#a#
the#use#of#the#stick#on#a#desktop#table#which#is#not#representative#of#a#cockpit#position.##
#
Once#you#have#set#all#options#to#your#liking#click#the#Apply#Config#button.#Settings#will#then#be#
transferred#to#the#device.##
#
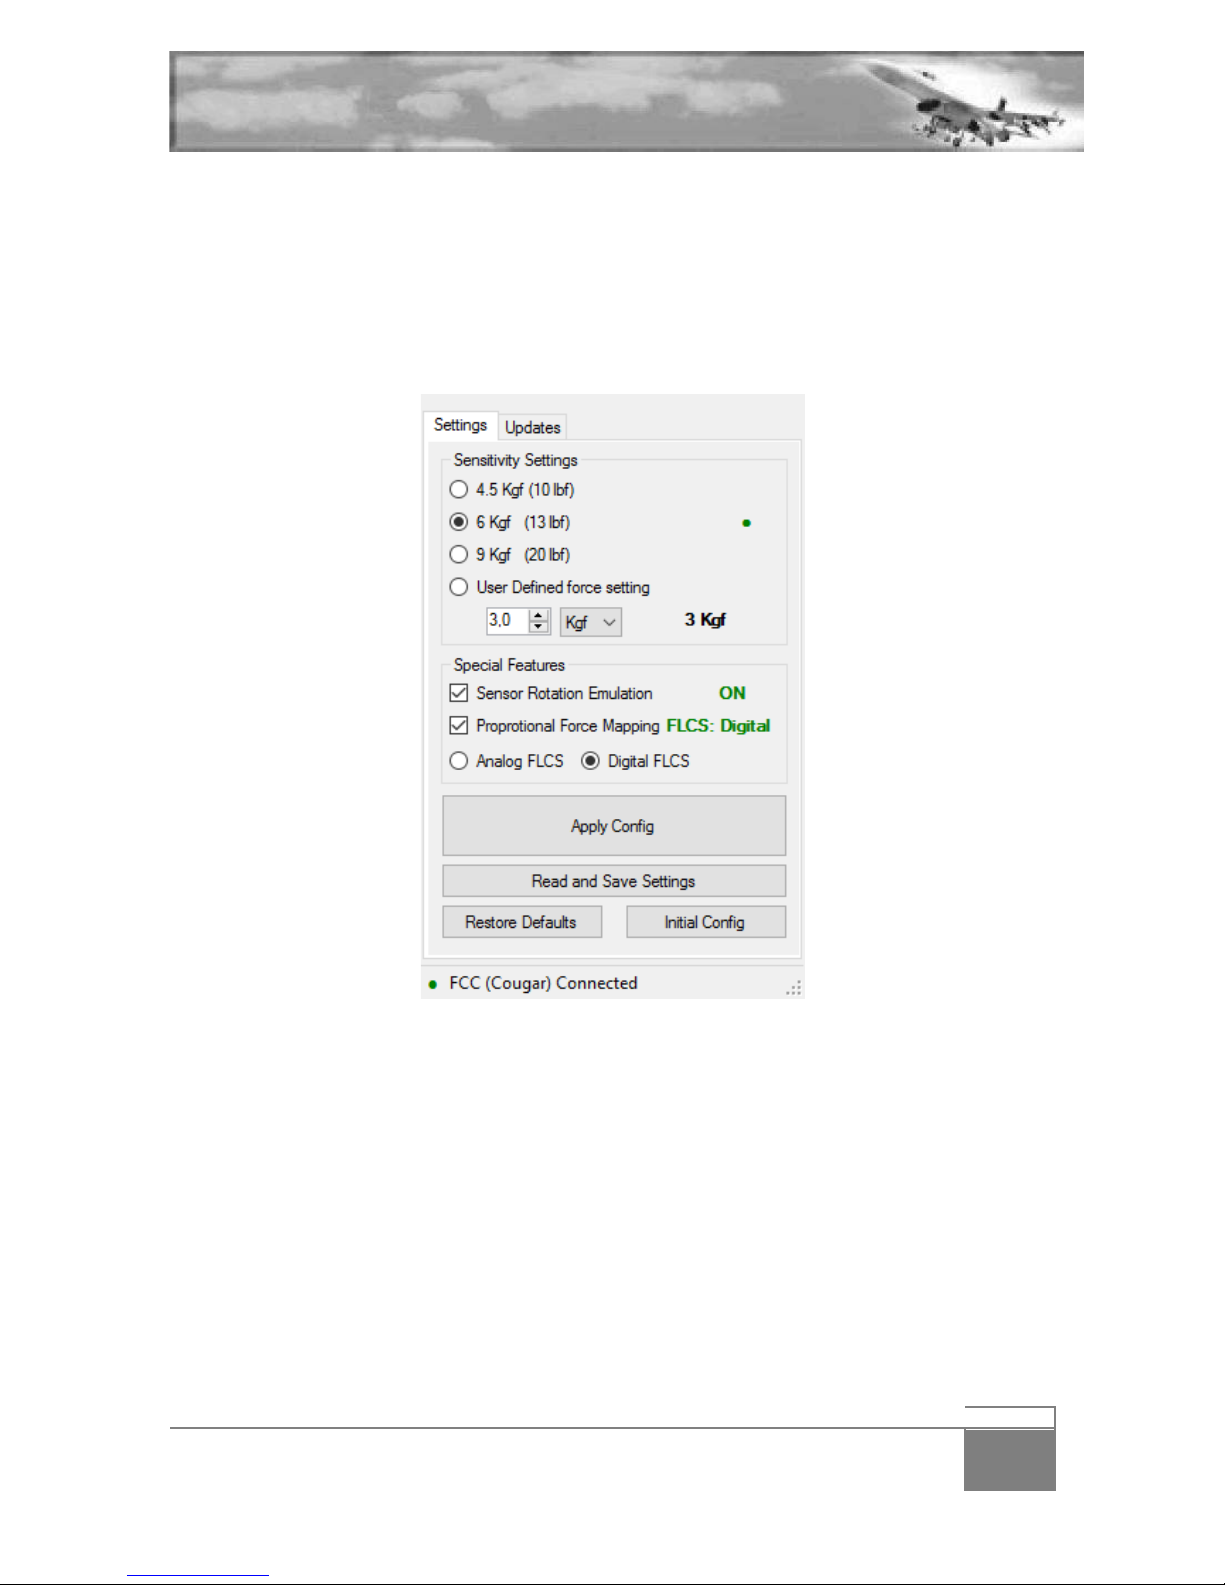
The#Read#and#Save#Settings#button#is#used#to#sync#the#settings#between#the#FCW#and#the#GUI.#It#will#
read#the#settings#from#the#FCW#and#save#them#in#the#GUI.#As#you#may#have#noticed#the#GUI#tells#you#
which#current#setting#is#enabled#in#the#device#with#a#green#dot#or#value.##
#
#
#
As#seen#on#the#left#picture,#some#options#migh t#n ot#
be#synchronized#which#is#normal#as#the#settings#can#
be#changed#with#stick#buttons#combination.##
#
The#green#dots#and#text#report#the#device#settings.##
(6#kgf#and#no#sensor#rotation)##
#
To#sync#the#settings#from#the#GUI#to#the#FCW,##
simply#click#Apply#Config##
#
To#sync#the#settings#from#the#FCW#to#the#GUI,#click#
the#Read#and#Save#Settings#button.###
#
#
The#next#two#buttons#are#self-explanatory:#Restore#
the#default#values#and#restore#initial#config.##
#
# #
Page 28
- 28
FORCE CONTROLLED WARTHOG - USER'S MANUAL V1.0
5.2$Changing$options$through$stick$button$combinations$
#
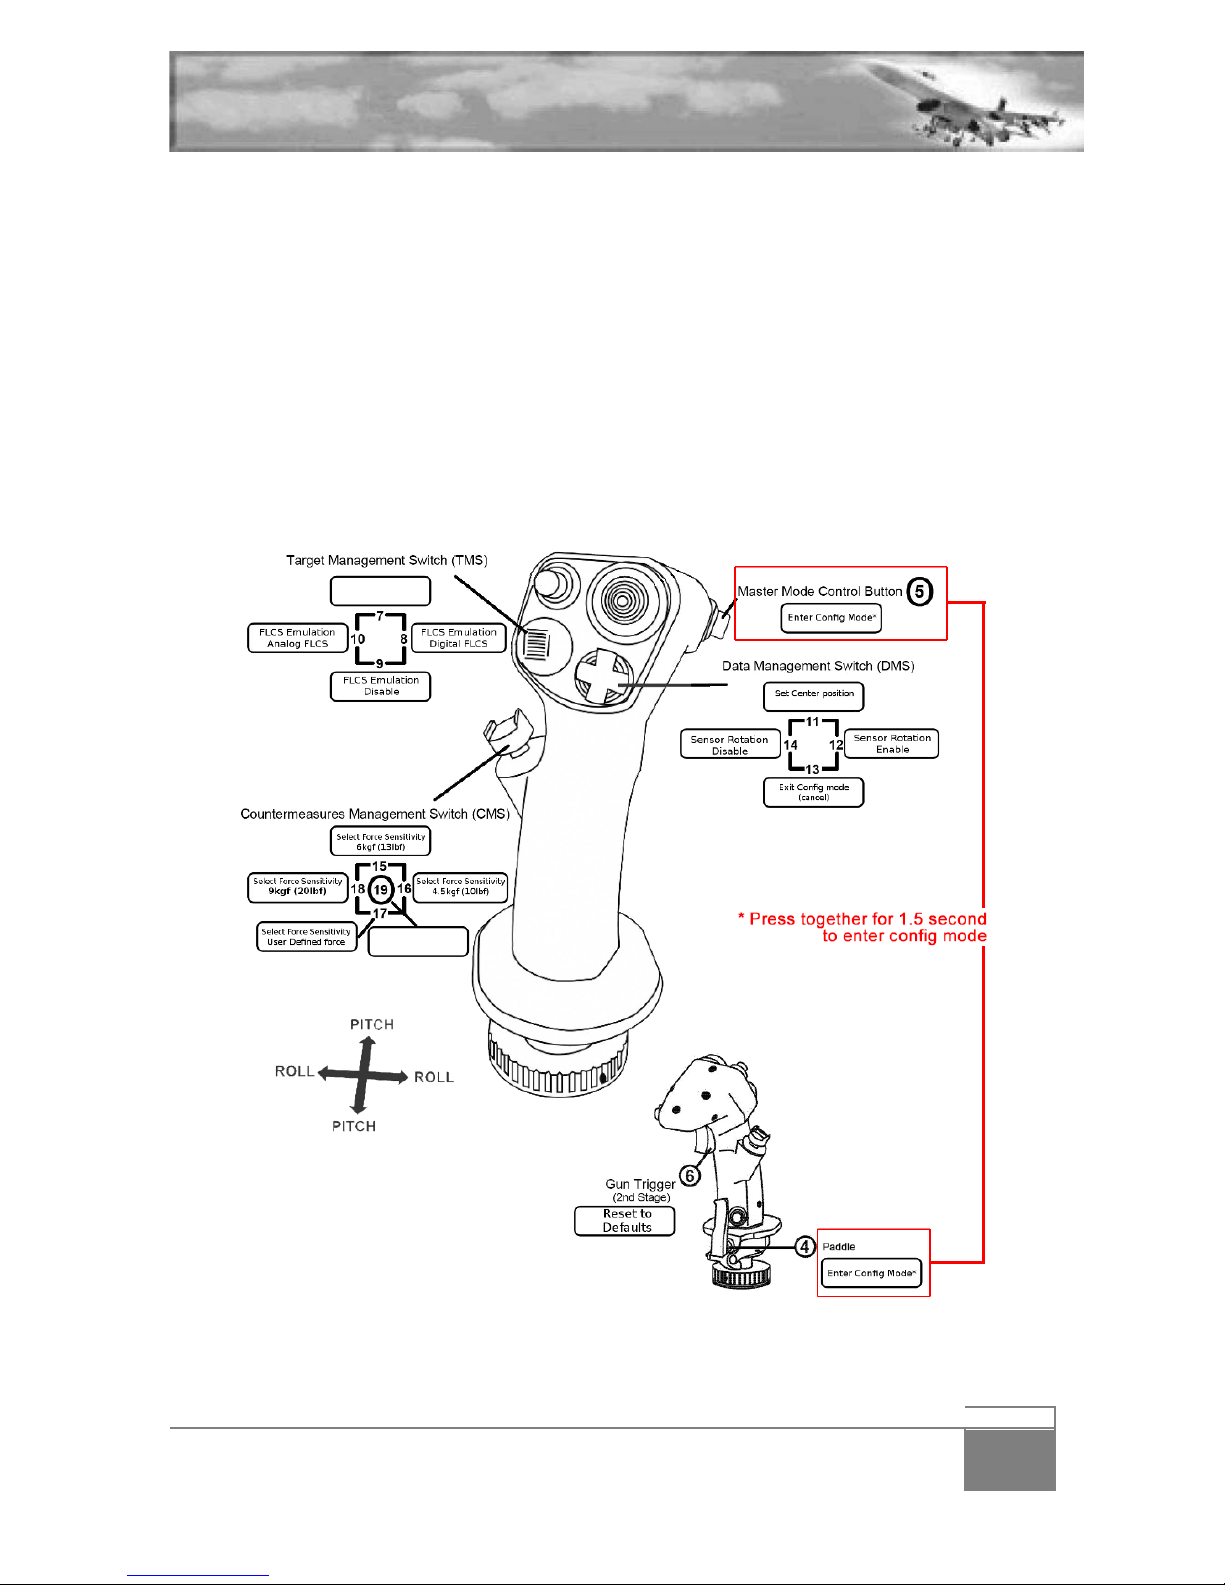
As#mentioned#before#the#force#settings#can#also#be#changed#without#the#GUI#by#pressing#a#
combination#of#buttons#on#the#warthog#stick.##
#
To#enter#configuration#mode,#press#the#Master#mode#control#button#(5)#and#the#paddle#lever#(4)#
together#for#1.5#second.#
Config#mode#is#not#a#toggle.#It#will#exit#right#after#one#button#press.#Basically#you#enter#config#mode#
and#activate#the#option#you#like#with#the#button#press#listed#below.#After#that#config#mode#is#exited#
and#if#you#need#to#set#another#option#you#will#have#to#re-enter#config#mode#again.#Do#not#expect#to#
remain#in#config#mode#until#you#ma nu ally#e xit#it.#The#ide a#is#to#ha ve #in#gam e #acc ess#to #quic k#cha ng e#
of#the#options#in#case#one#of#the#option#is#not#set#to#your#liking.#The#core#of#the#setup#should#be#done#
in#the#GUI#before#flight.#
#
#
#
The$CMS$switch$will$manage$the$force$setting:#
CMS#up#will#set#6Kg/f#(13Lbs/f)#
Page 29
- 29
FORCE CONTROLLED WARTHOG - USER'S MANUAL V1.0
CMS#right#will#set#4.5Kg/f#(10Lbs/f)#
CMS#left#will#set#9Kg/f#(20Lbs/f)#
CMS#down#will#set#whatever#forces#is#set#in#the#user#defined#force#of#the#GUI.#
#
The$TMS$switch$will$manage$the$FLCS$emulation:#
TMS#left#will#set#Analog#FLCS#
TMS#right#will#set#Digital#FLCS#
TMS#down#will#disable#FLCS#emulation#
#
The$DMS$switch$will$manage$the$sensor$rotation:$
DMS#left#will#disable#sensor#rotation#
DMS#right#will#enable#sensor#rotation#
DMS#up#will#set#centre#positions#
DMS#down#will#exit#config#mode#
#
Second$trigger$detent#will#restore#the#settings#to#default#value#
#
#
# #
Page 30
- 30
FORCE CONTROLLED WARTHOG - USER'S MANUAL V1.0
#
6. Programming your FCW
#
As#said#earlier#in#this#manual#the#FCW#is#DirectX#only.##
You#will#lose#Thrustmaster#programming#capability.##
Your#only#way#to#assign#function#to#the#stick#is#to#use#DirectX#programming.##
#
In#most#cases#this#is#ver y#s imple#as#it#all#comes#to#select #a#f u n ct io n #in #th e #s im #u s e r#in te r fac e #an d#press#
the#corresponding#button#on#your#stick.#
#
For#advanced#function#(like#DirectX#shifting#capabilities),#please#refer#to#your#favourite#sim#
documentation.#
Page 31
- 31
FORCE CONTROLLED WARTHOG - USER'S MANUAL V1.0
7. Contacts and credits
All questions about your FCW should be directed to this email address: [email protected]
Project Manager & Designer:
Arend "White Eagle" Van Oosten.
Software Manager:
Uri "Uri_ba" Ben-Avraham.
FCW Manual & Alpha/Beta tester:
Olivier "Red Dog" Beaumont
Beta tester:
Jochen “Sneakpeek” Schmich
Jorge “Mr. Well” Pozo
 Loading...