

Vipercore FORCE CONTROLLED WARTHOG, FCW Installation Manual

- 1
FORCE CONTROLLED WARTHOG - USER'S MANUAL V1.0
FORCE CONTROLLED
WARTHOG (FCW)
Installation's manual

- 2
FORCE CONTROLLED WARTHOG - USER'S MANUAL V1.0
Table of contents
1.#Introduction#........................................................................................................................................#3#
#
2.#FCW#Installation#in#a#Warthog#stick#base#............................................................................................#4#
#
3.#Installing#the#Warthog#FCW#into#other#bases#...................................................................................#19#
3.1$Cockpit$base$....................................................................................................$19#
3.2$Cougar$base$.....................................................................................................$19$
#
4.#Setting#up#your#FCW#..........................................................................................................................#20#
4.1$Electronic$Calibration:$.....................................................................................$20#
4.2$Installing$the$software$.....................................................................................$22$
#
5.#Using#your#FCW#.................................................................................................................................#25#
5.1$Changing$options$through$software$................................................................$25#
5.2$Changing$options$through$stick$button$ combinati ons$.....................................$28$
#
6.#Programming#your#FCW#....................................................................................................................#30#
#
7.#Contacts#and#credits#..........................................................................................................................#31#
- 3
FORCE CONTROLLED WARTHOG - USER'S MANUAL V1.0
1. Introduction
Congratulations#with#the#purchase#of#your#Force#Controlled#Warthog.#
The#FCW#is#a#drop-in#replac e m e n t#fo r #th e#o riginal#w arth og #gimbals.#
#
Unlike#the#FCC#for#the#Cougar#the#Warthog#FCW#replace#completely#the#electronics#of#the#warthog.##
As#a#consequence,#you#will#not#be#able#to#program#the#warthog#stick#with#Thrustmaster#software#
(Target).#Programming#will#only#be#ava ilable #thro ug h#D irect#X . #
Please#refer#to#the#DX#programming#capabilities#and#features#of#your#favourite#sims#to#take#full#
advantages#of#the#DX#programming.#(For#BMS,#please#refer#to#the#DX#Setup#Guide.pdf#located#in#
..\Docs\Key#Files#&#Input\Device#Setup#Guides#&#Profiles)##
#
Although#initially#designed#for#the#Warthog,#there#is#no#reason#that#the#FCW #can no t#be #insta lled#w ith#
a#Cougar.#The#FCW#is#indeed#backwards#compatible#with#the#Cougar.#If#you#do#install#the#FCW#in#a#
cougar#be#aware#that#you#will#lose#the#possibility#to#connect#the#rudder#and#throttle#on#the#cougar#
stick#base.#You#must#seek#a#way#to#connect#the#rudder#and#throttle#independently.#
#
#
I#hope#you#enjoy#usin g #y o u r#F CW#as#much#as#I#enjoyed#designing,#building#and#using#it.#
#
If#you#have#any#comments#or#questions#about#your#FCW#you#can#mail#me#at#info@eaglevision.nu#
Arend#“Eagle”#van#Oosten.#
CAUTION
The Warthog and FCC printed circuit board are electrostatic sensitive device. This
means you can damage the boards if you don’t take precautionary measures. Make
sure you are not electro-statically charged before working on the PCB. You can do
this by grounding yourself and use ESD-approved materials. If you don’t have them at
least discharge yourself by touching a ground wire of your electrical installation.

- 4
FORCE CONTROLLED WARTHOG - USER'S MANUAL V1.0
2. FCW Installation in a Warthog stick base
The#hardest#part#of#the#installation#is#to#disassemble#de#warthog#stick#base.#Most#of#the#warthog#
components#will#not#be#necessary#after#the#FCC#installation.#The#FCW#kit#is#made#of#the#assembled#
FCW,#the#warthog#b a s e #p la t e ,#th e #F C W#PCB#and#a#small#bag#of#screws#and#washer.#
#
#
#
#
#
Let’s#put#all#the#FCW#components#away#for#the#moment#and#concentrate#on#disassembling#the#
warthog#base.##Make#sure#you#place#all#screws#and#components#in#a#small#box#while#you#are#working.#
#
Turn#the#base#over#and#unscrew#the#flat#plate#from#the#warthog#base.#That#will#separate#the#base#
from#the#plate#and#give#you#access#to#the #wa rtho g#T M #pc b.#Le t’s#start#by # re m o ving #this#from #th e#
warthog.#As#you#see#on#the#following#pictures#the#base#I#used#for#this#manual#is#one#of#the#early#
warthog#prototype#and#is#not#grounded.##
#
Chances#are#high#that#your#pcb#is#grounded#and#con ne c te d #to #th e #metal#part#of#your#warthog#b a se .#
Unfortunately,#that#ground#wire#is#soldered#on#the#PCB#and#you#will#have#to#either#unsolder#it#or#cut#
it,#whichever#you#prefer.#We#won’t#need#the#warth o g #PC B #a n ymore#so#cutting#it#is#not#the#finest#
solution#but#it#has#no#consequences.##
- 5
FORCE CONTROLLED WARTHOG - USER'S MANUAL V1.0
# #
#
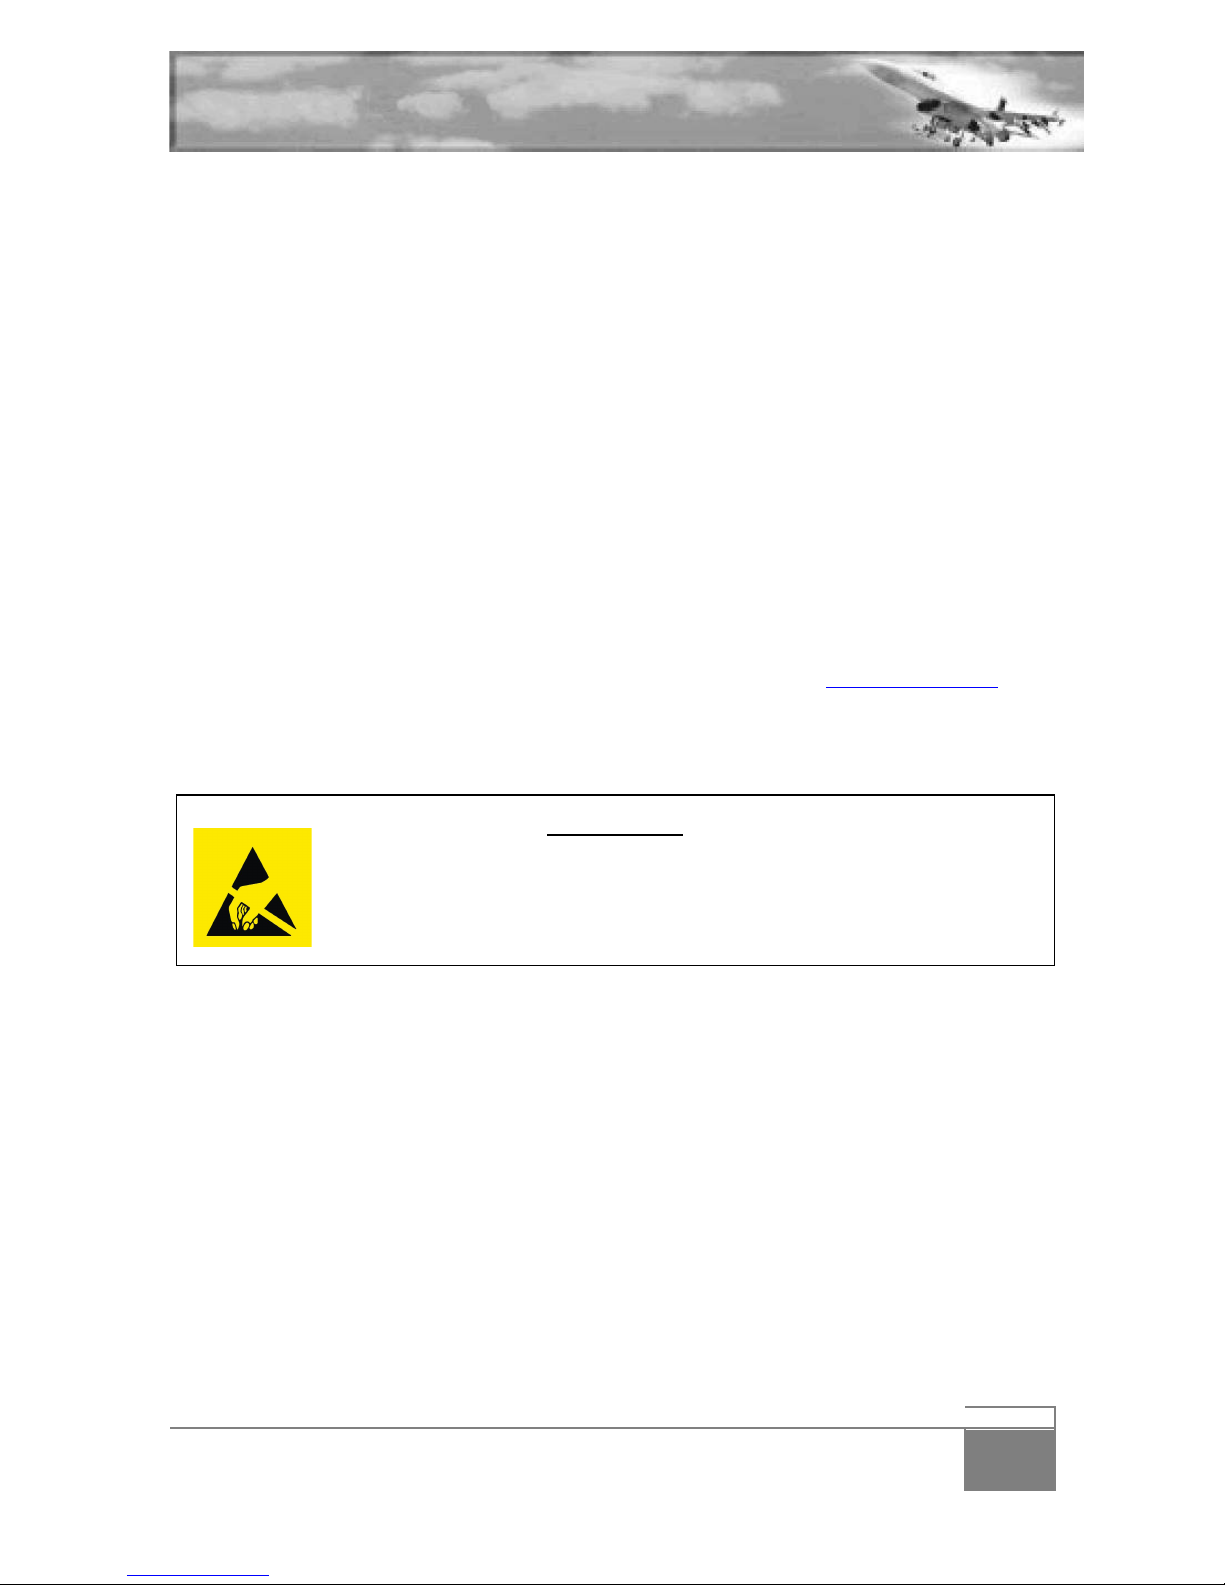
Before#disconnecting#any#connector,#I#advise#to#mark#them#accordingly#so #y o u #ca n #re c o n n e ct#t h e m #a t#
a#later#point.#In#this#case,#I#simply#drew#a#red#line#on#both#part#of#the#first#connector#and#a#black#line#
over#the#second.##
#
Remove#the#connectors#by#gently#separating#with#a#flat#screwdriver#and#pull#them#away.#
#
Unscrew#then#the#2#small#PCB#screws#and#store#them#away,#you#might#need#them#later#on.#You#can#
now#remove#the#Warthog#PCB#and#it’s#cable#from#the#warthog#base.#Needless#to#say,#it’s#precious,#
store#it#securely#away.#
#
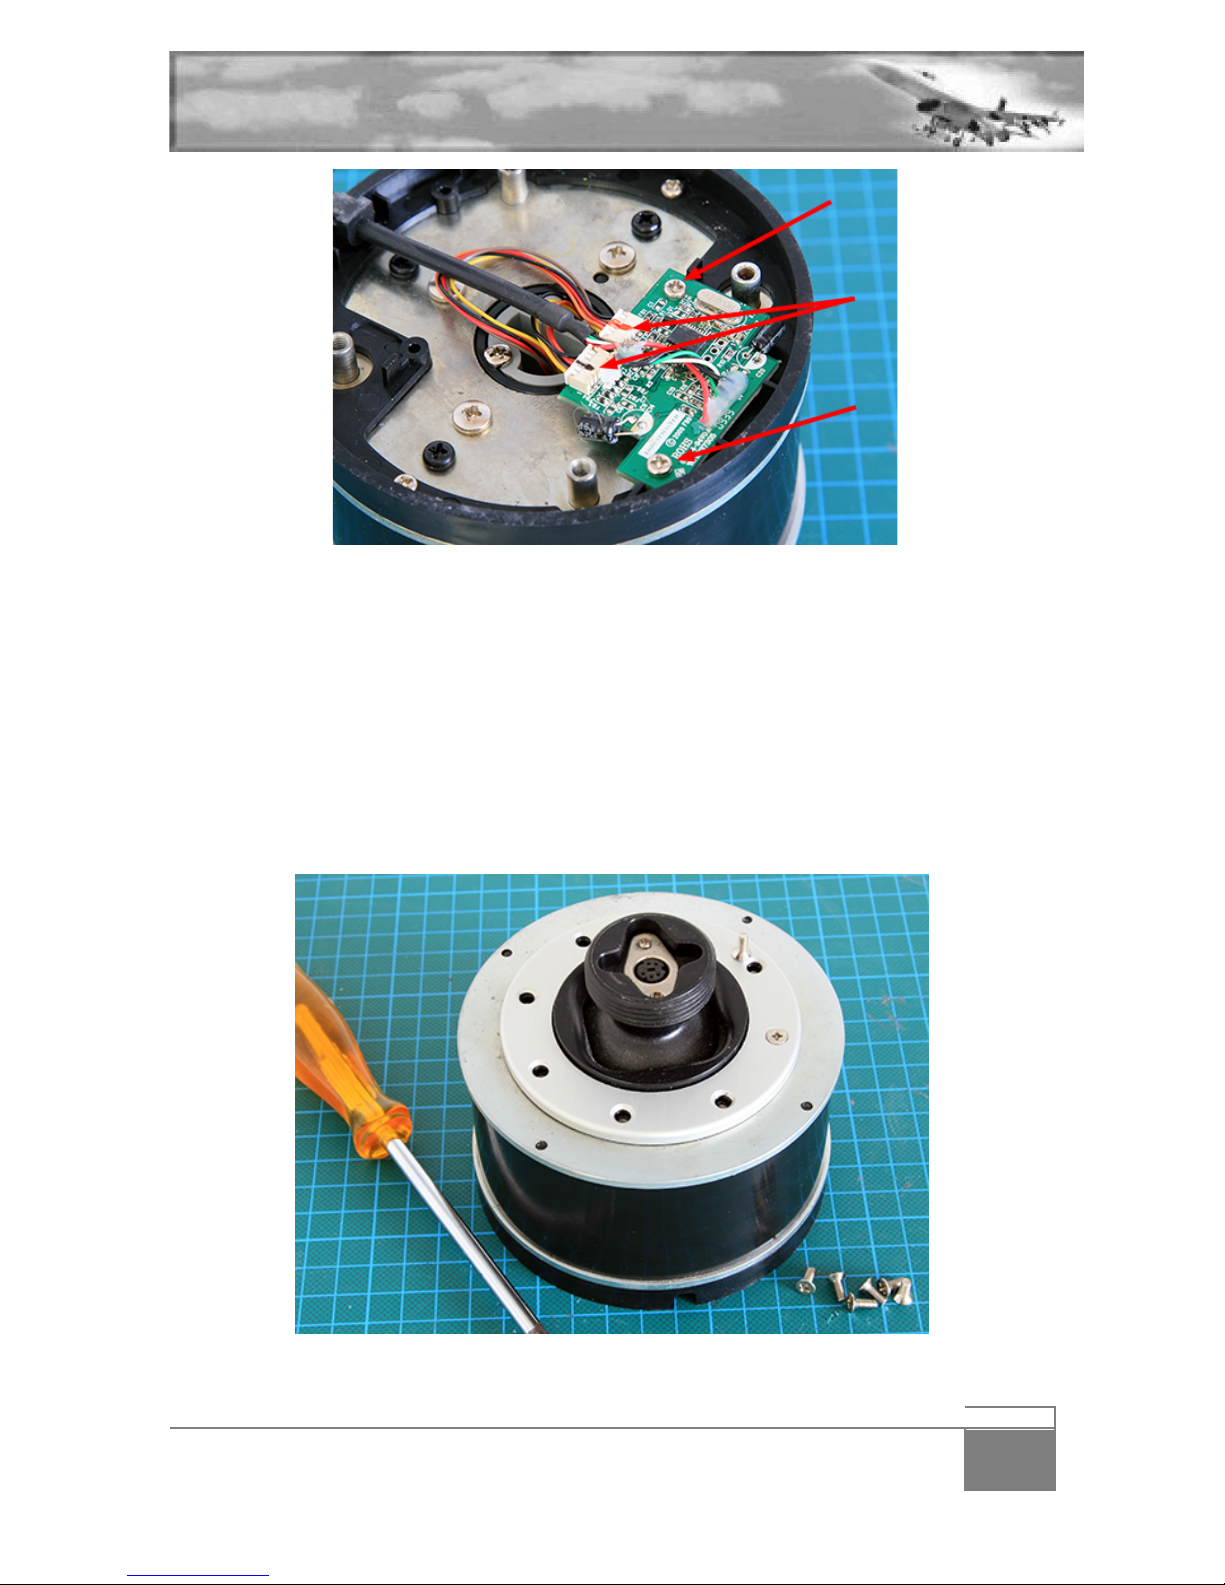
Turn#the#base#over#and#unscrew#the#round#metal#plate#held#in#place#with#8#Philips#screws.##
#
#

- 6
FORCE CONTROLLED WARTHOG - USER'S MANUAL V1.0
There#is#a#huge#spring#inside#the#Warthog#base.#As#you#unscrew#the#following#plate#(with#the#4#
screws#marked#in#red#on#the#following#picture),#that#spring#will#extend#unless#you#hold#the#plate#
firmly#in#place#until#all#screws#are#out.##
#
Please#make#sure#you#don’t#unscrew#the#last#one#unless#you’re#pushing#the#plate#down.#Failure#to#do#
so#may#damage#the#screw#thread#and#create#problems#when#you#attemp t#to#reassemble#the#base .##
#
#
#
#
- 7
FORCE CONTROLLED WARTHOG - USER'S MANUAL V1.0
#
#
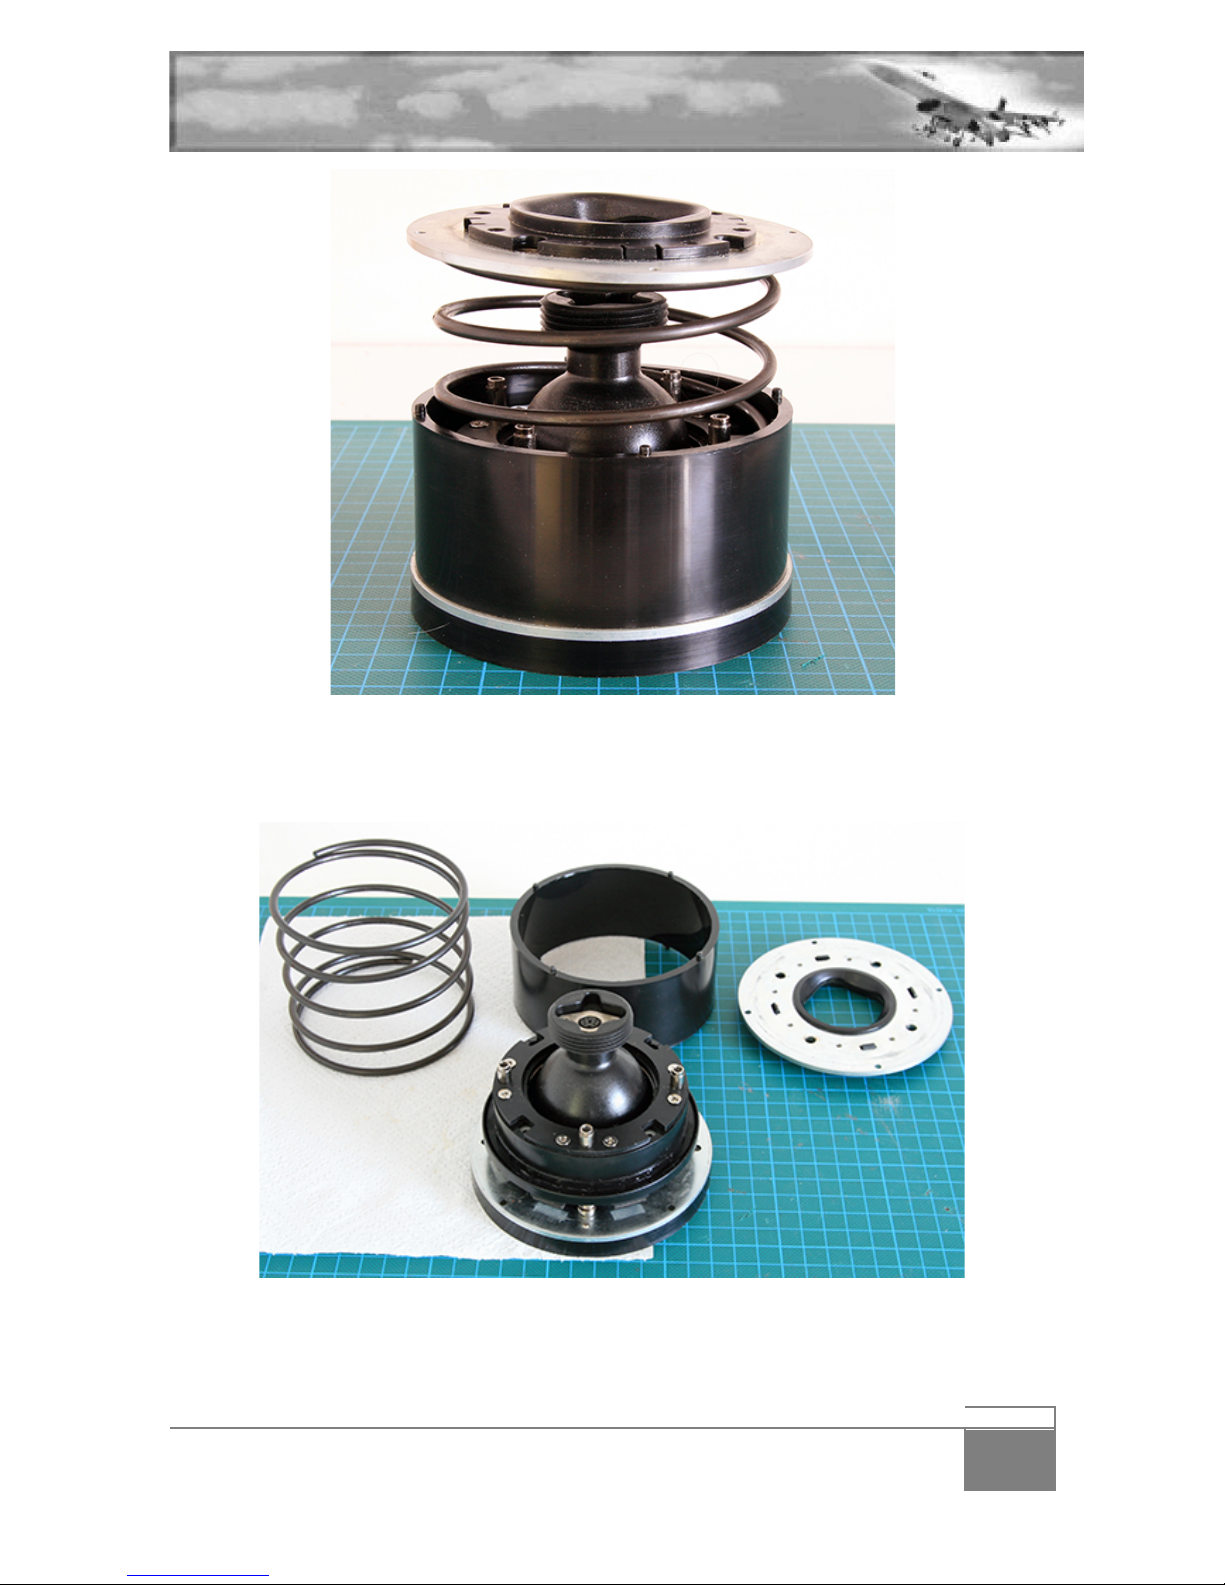
I#didn’t#lie#to#you,#that#spring#is#huge!##
Remove#the#top#plate#and#remove#the#spring#by#lifting#it#up#from#the#base.#Be#careful,#the#spring#may#
be#full#of#grease.#You#can#now#lift#the#cylinder#casing.#It’s#simply#pinned#in#the#base#with#4#pins.###
#
#
#
#
#
# #
- 8
FORCE CONTROLLED WARTHOG - USER'S MANUAL V1.0
#
#
#
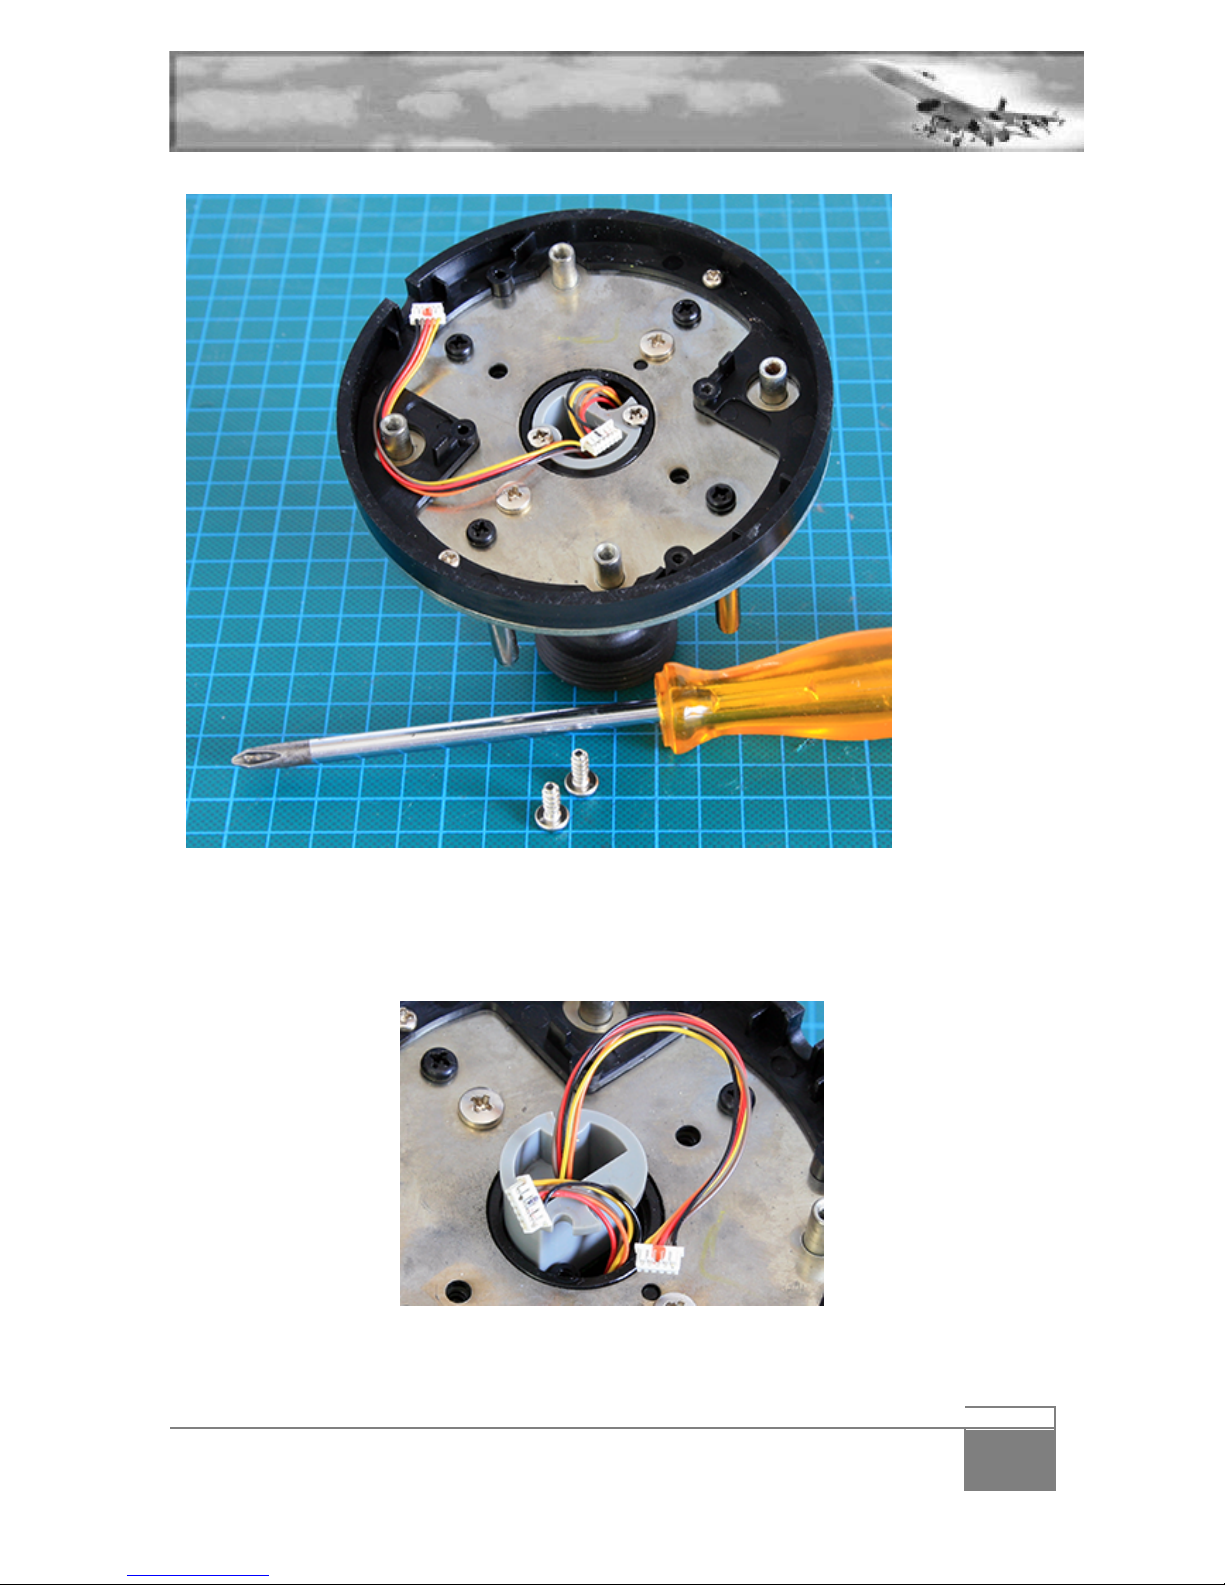
Turn#the#base#over#again#we#will#now#remove#the#gimbals.#They#are#held#in#place#with#the#4#silver#
screws,#of#which#you#may#already#have#unscrewed#2#when#removing#the#ground#w ire#before.##
Before#unscrewing#them#all#4,#you#may#also#unscrew#the#centre#light#grey#piece#held#in#place#with#the#
2#smaller#screws.#The#grey#part#can#be#lifted#up#or#flip#the#base#so#gravity#can#help.###
#
#
- 9
FORCE CONTROLLED WARTHOG - USER'S MANUAL V1.0
You#can#now#unscrew#the#last#screws#holding#the#Warthog#gimbals.#Make#sure#you#hold#it#to#avoid#
having#the#precious#fall#on#the#floor.#
#
#
#
That’s#it,#the#warthog#base,#or#what’s#left#of#it,#is#ready#for#the#FCW.##Once#again,#ma ke #su re #yo u #sto w #
securely#away#the#left#over#from#the#warthog,#you#may#need#them#one#day#to#help#a#fellow#virtual#
pilot.##
#
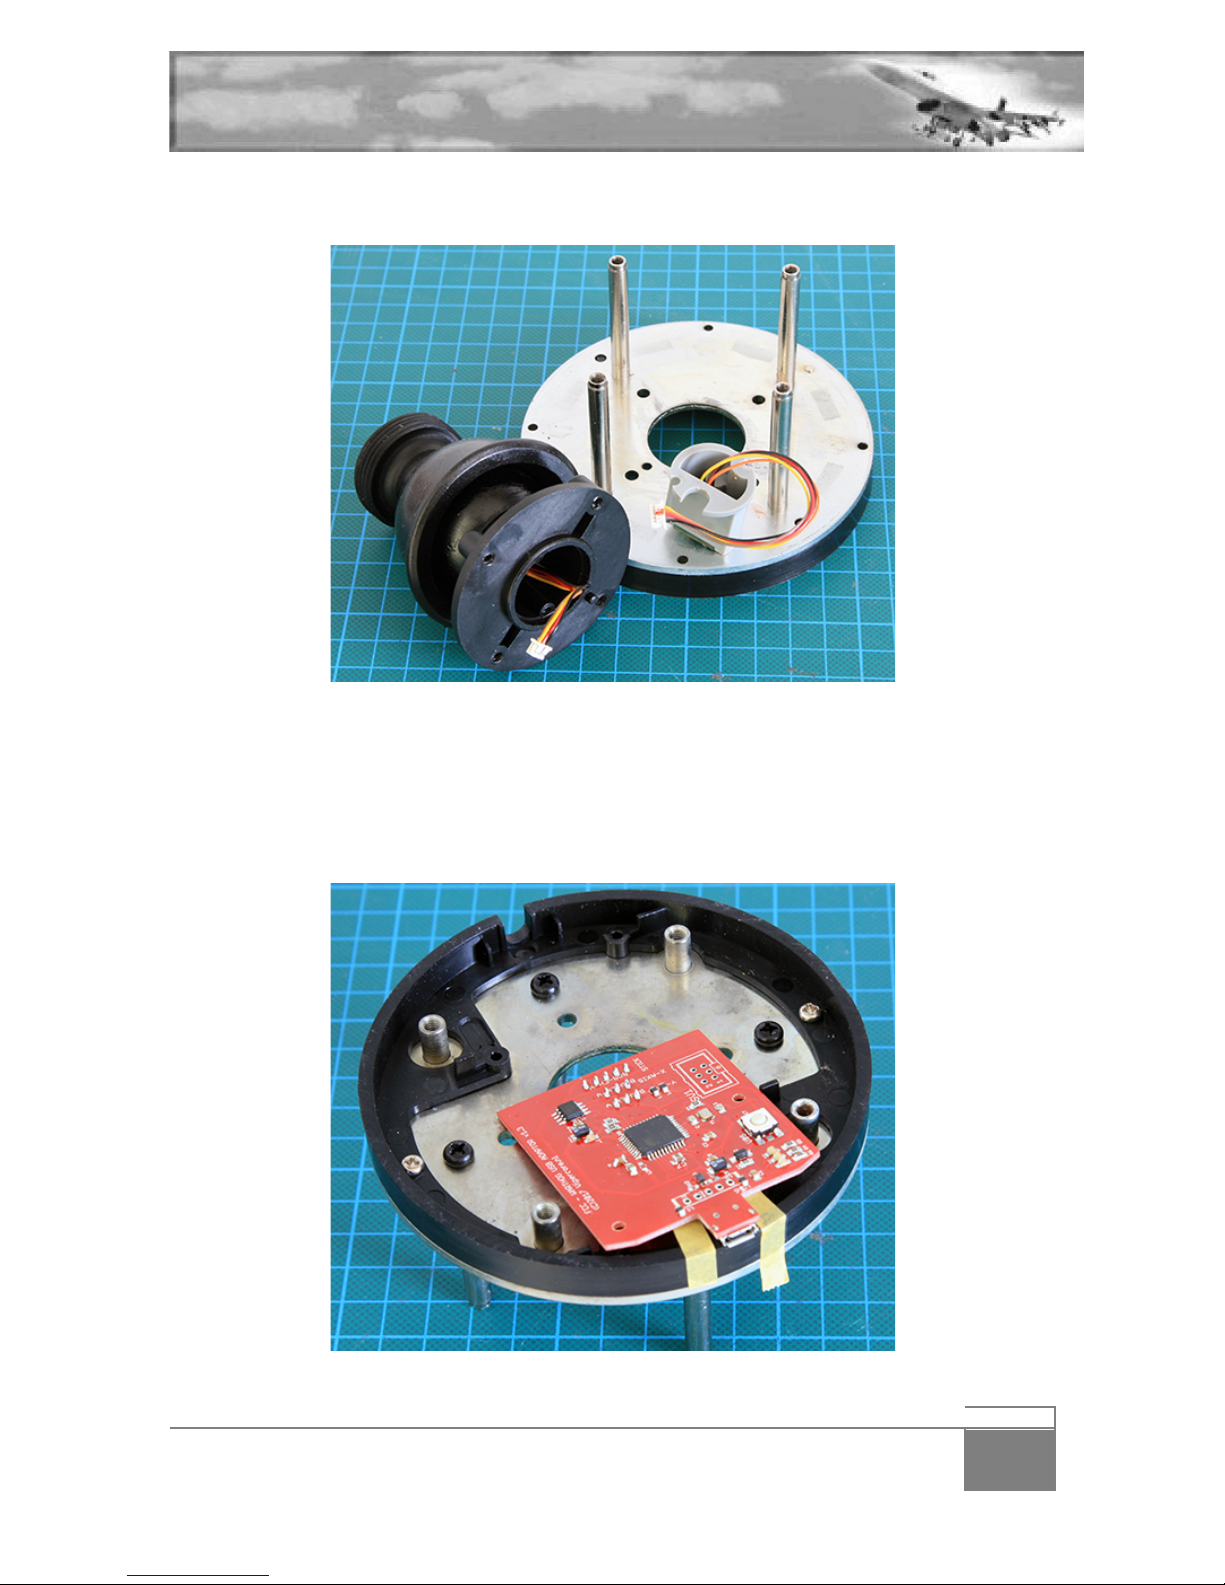
The#next#thing#we#need#to#do#is#to#secure#the#FCW#PCB#inside#the#Warthog#base.#This#is#the#only#
intrusive#modification#to #y o u r#h ard ware.#Although#the#PCB#ta ke s#t h e#p la c e#o f#t he #o ld #T h ru st m a s te r#
PCB#it#does#feature#a#mini#USB#port#that#needs#to#go#through#the#plastic#of#the#base.##
#
- 10
FORCE CONTROLLED WARTHOG - USER'S MANUAL V1.0
Yep#you#got#it#right,#you’ll#need#to#cut#a#slot#of#your#base#to#let#go#the#connector.#Don’t#worry#your#
warthog#base#will#sport#the#scar#with#pride.#There#is#another#way#to#bypass#that#modification#if#you#
find#it#too#instrusive,#see#below.#(add#page )#
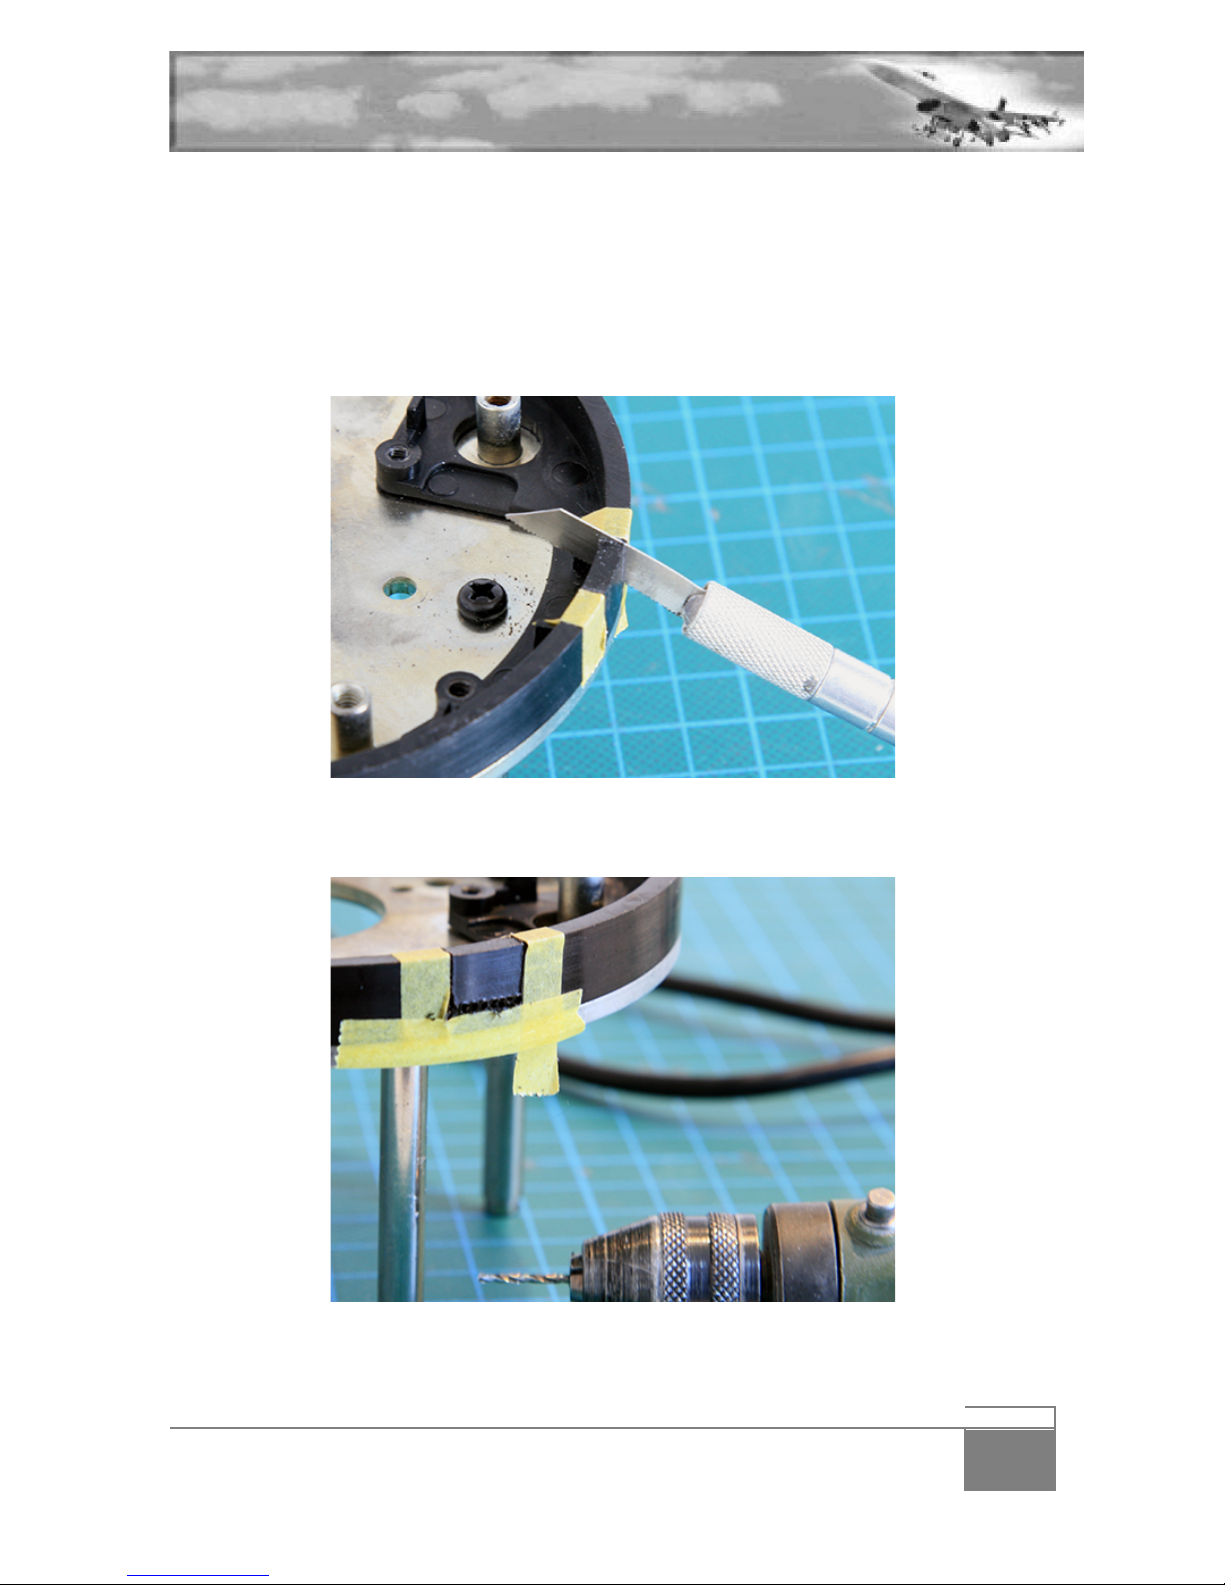
The#first#thing#to#do#is#to#mark#the#cuts.#I#used#tape#but#a#pen#works#equally#fine.##
#
Saw#alongside#the#tape#vertically#until#you#meet#the#flat#bottom#(don’t#go#all#the#way#through#the#
plastic#touching#the#metal)#Stop#when#the#connector#has#enough#room#to#slide#through.#Repeat#on#
the#other#side,#alongside#the#other#piece#of#tape#
#
#
#
Cutting#the#horizontal#part#is#a#bit#more#difficult#but#here#is#a#modalism#trick.#Using#a#precision#drill,#
bore#a#few#small#holes#as#close#to#each#other#alongside#the#horizontal#bit#of#tape.##
#
#
 Loading...