

Page 1

Page 2
INTRODUCTION
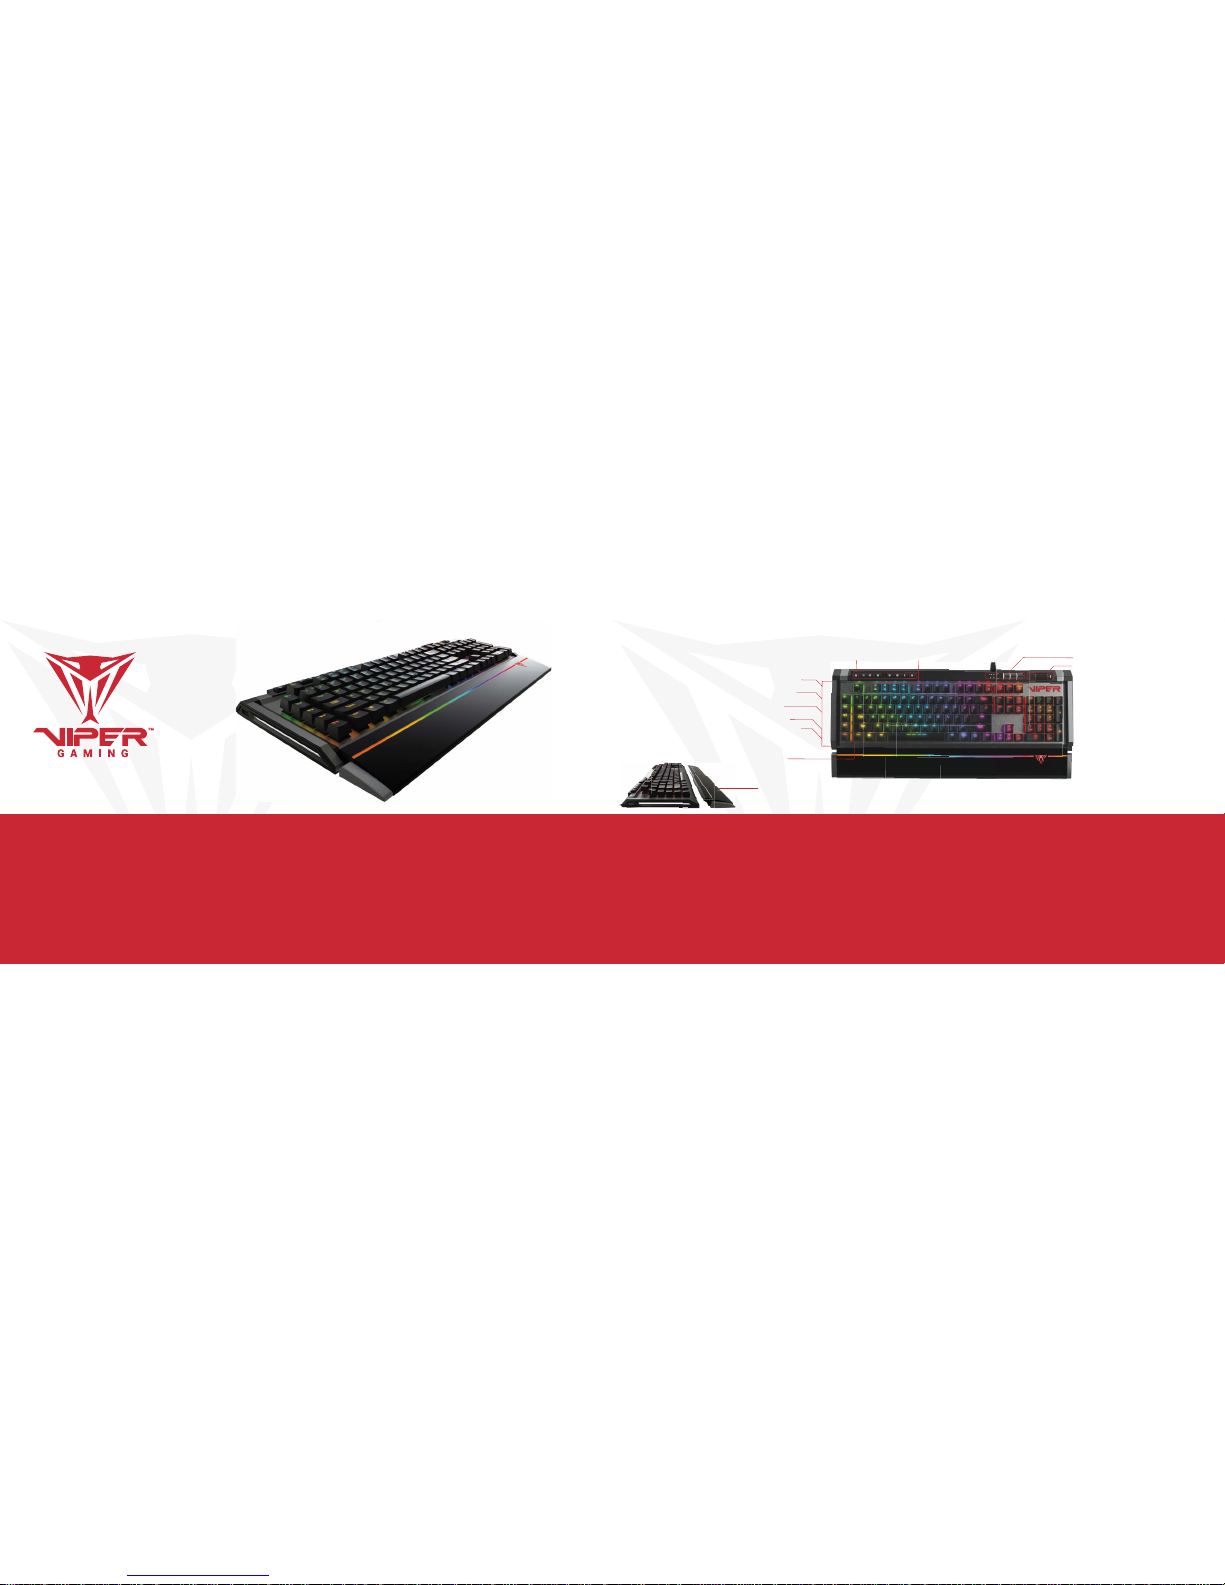
Thank you for purchasing the Viper V770 gaming keyboard. The V770 uses quiet mechanical Kailh Red switches for smooth
linear feel and quick response times. Each key can be customized to 16.8 million colors using the Viper software. The keyboard features a 109 key layout with N-key rollover and anti-ghosting functions, and has 108 programmable macro keys with
5 dedicated macro keys on the side. The onboard controls give you access to light effects, multi-media controls, lighting pro-
les and a dedicated volume/mute wheel.
The V770 is built with an aluminum chassis and illuminated magnetic palm rest for durability and comfort during hours of
game play. Backed by Patriot’s award winning customer service and a two year warranty, the V770 is compatible with nearly
every Windows® operating system, including Windows® 10, Mac® OS X, or higher.
The Viper software adds the ability to program macro, set up custom lighting proles, and congure the keyboard’s settings.
(**Note Viper software is not compatible with MAC® OS).
SPECIFICATIONS
• 100% mechanical Kailh Red switches
• LED illuminated and removable magnetic palm rest
• Full spectrum RGB backlit keys,
individually customizable with 16.8 million colors
• 108 programmable macro keys
• 5 dedicated macro keys
• Aircraft grade aluminum chassis
• USB pass through port
• Audio pass through port
• Dedicated multimedia control keys
• Dedicated volume and mute wheel
• Dedicated light effect control keys
• Game mode
• N-key rollover anti-ghosting
• 5 Prole control key
• 10 level LED reaction management
• Multi-level LED backlit dimming
PACKAGE CONTENTS
• Viper V770 gaming keyboard
• Detachable magnetic palm rest
• Keycap remover
• 3.5mm Y-splitter
• Quick start guide
• Viper sticker
5 LIGHTING
PROFILE KEYS
LIGHT CONTROL
KEYS
MULTIMEDIA KEYS
VOLUME/MUTE WHEEL
AIRCRAFT GRADE
ALUMINUM CHASSIS
USB/AUDIO
PASS THROUGH PORT
108 PROGRAMMABLE
MACRO KEYS
109 KEY ROLLOVER
ANTI-GHOSTING
FULL SPECTRUM RGB
16.8 M ILLION COL ORS FOR
INDIVIDUALLY CUST OMIZABLE
BACKLIT KEY S
5 DEDICATED
MACRO KEYS
REMOVABLE MAGNETIC
LED PALM REST
Page 3

INSTALLATION
HARDWARE INSTALLATION
Connect the keyboard to two available USB ports on the computer. Wait 5-10 seconds for the keyboard to be recognized by the
computer.
SOFTWARE INSTALLATION
Please download the Viper software from the product page at http://www.patriotmemory.com to be able to create and manage
macros, create lighting proles, adjust latency, response time, and more.
Once downloaded, double-click on the software to start the installation. Follow the onscreen instructions to nish the process.
**Viper software is not compatible with Mac® OS.
HARDWARE INSTALLATION
Page 4
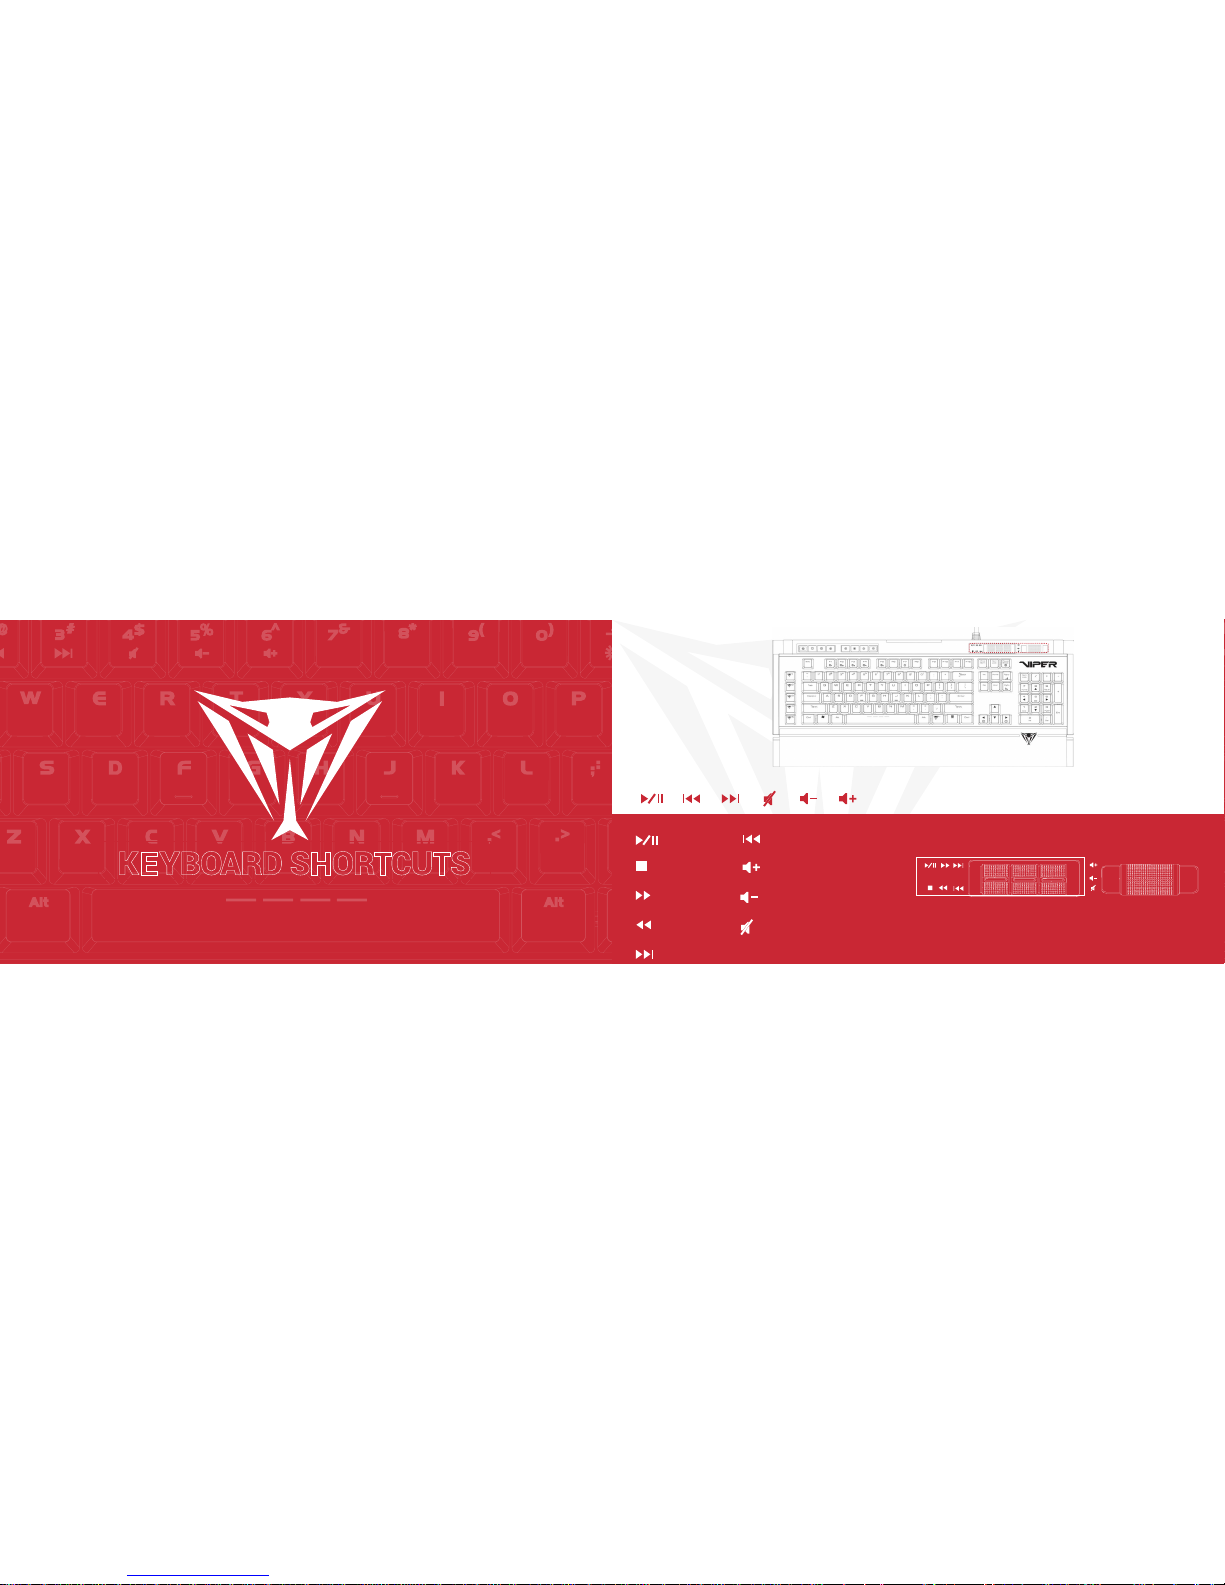
KEYBOARD SHORTCUTS
MULTI-MEDIA KEYS AND VOLUME WHEEL
Play/Pause
Stop
Next Screen
Previous Screen
Next Track
Previous Track
Volume Up
Volume Down
Mute (press wheel)
Page 5
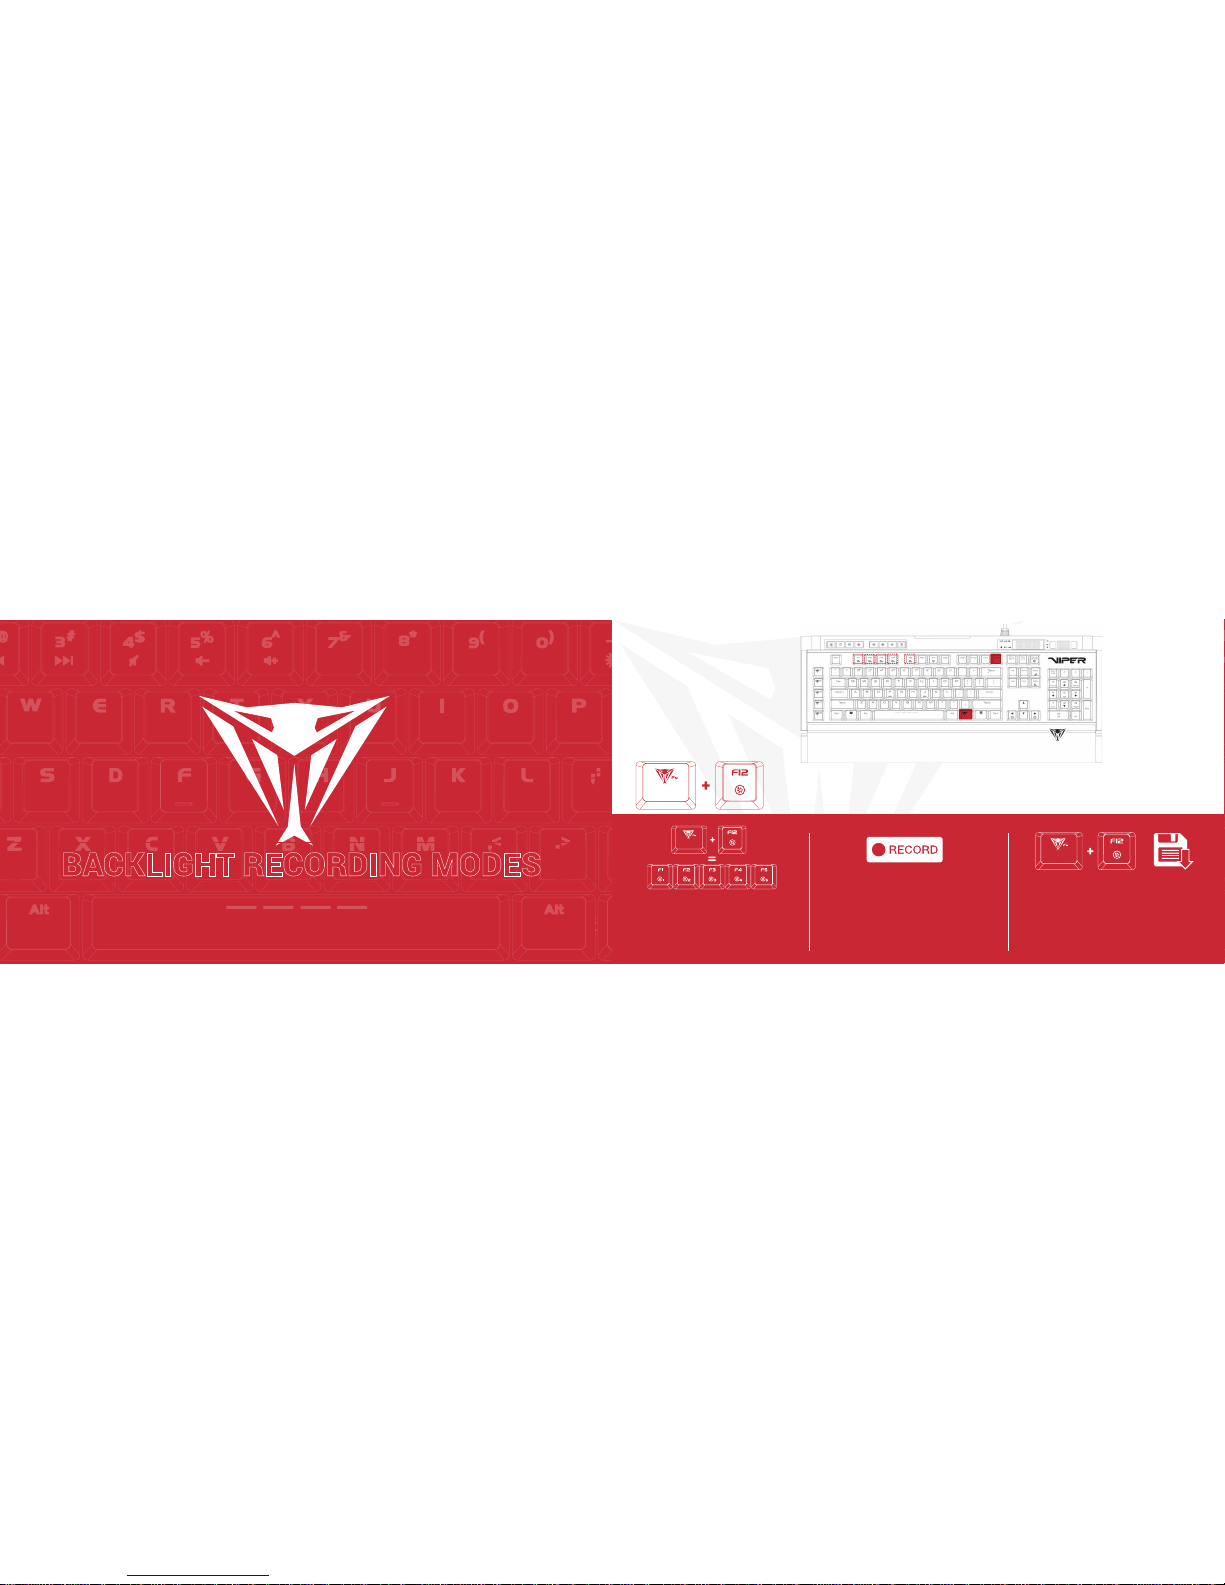
BACKLIGHT RECORDING MODES
Press FN+F12 for F1-F5 to enter a blinking
state in preparation to record a custom key
conguration. Once in this blinking state,
select any of the F1-F5 keys to assign a
conguration.
Press any key in recording mode to illuminate it,
making it part of your customized lighting prole.
I.e. if keys WASD were selected, WASD will be illuminated, indicating that these keys were recorded
and assigned to the selected “F” key.
When recording is complete, then press
FN+F12 again to save your customized
prole.
Repeat the previous steps as needed to
complete the recording of other customized
proles.
Press FN+F1 through F5 key to activate the
custom prole desired.
BACKLIGHT RECORDING MODES
Record and Save custom LED Proles
Page 6
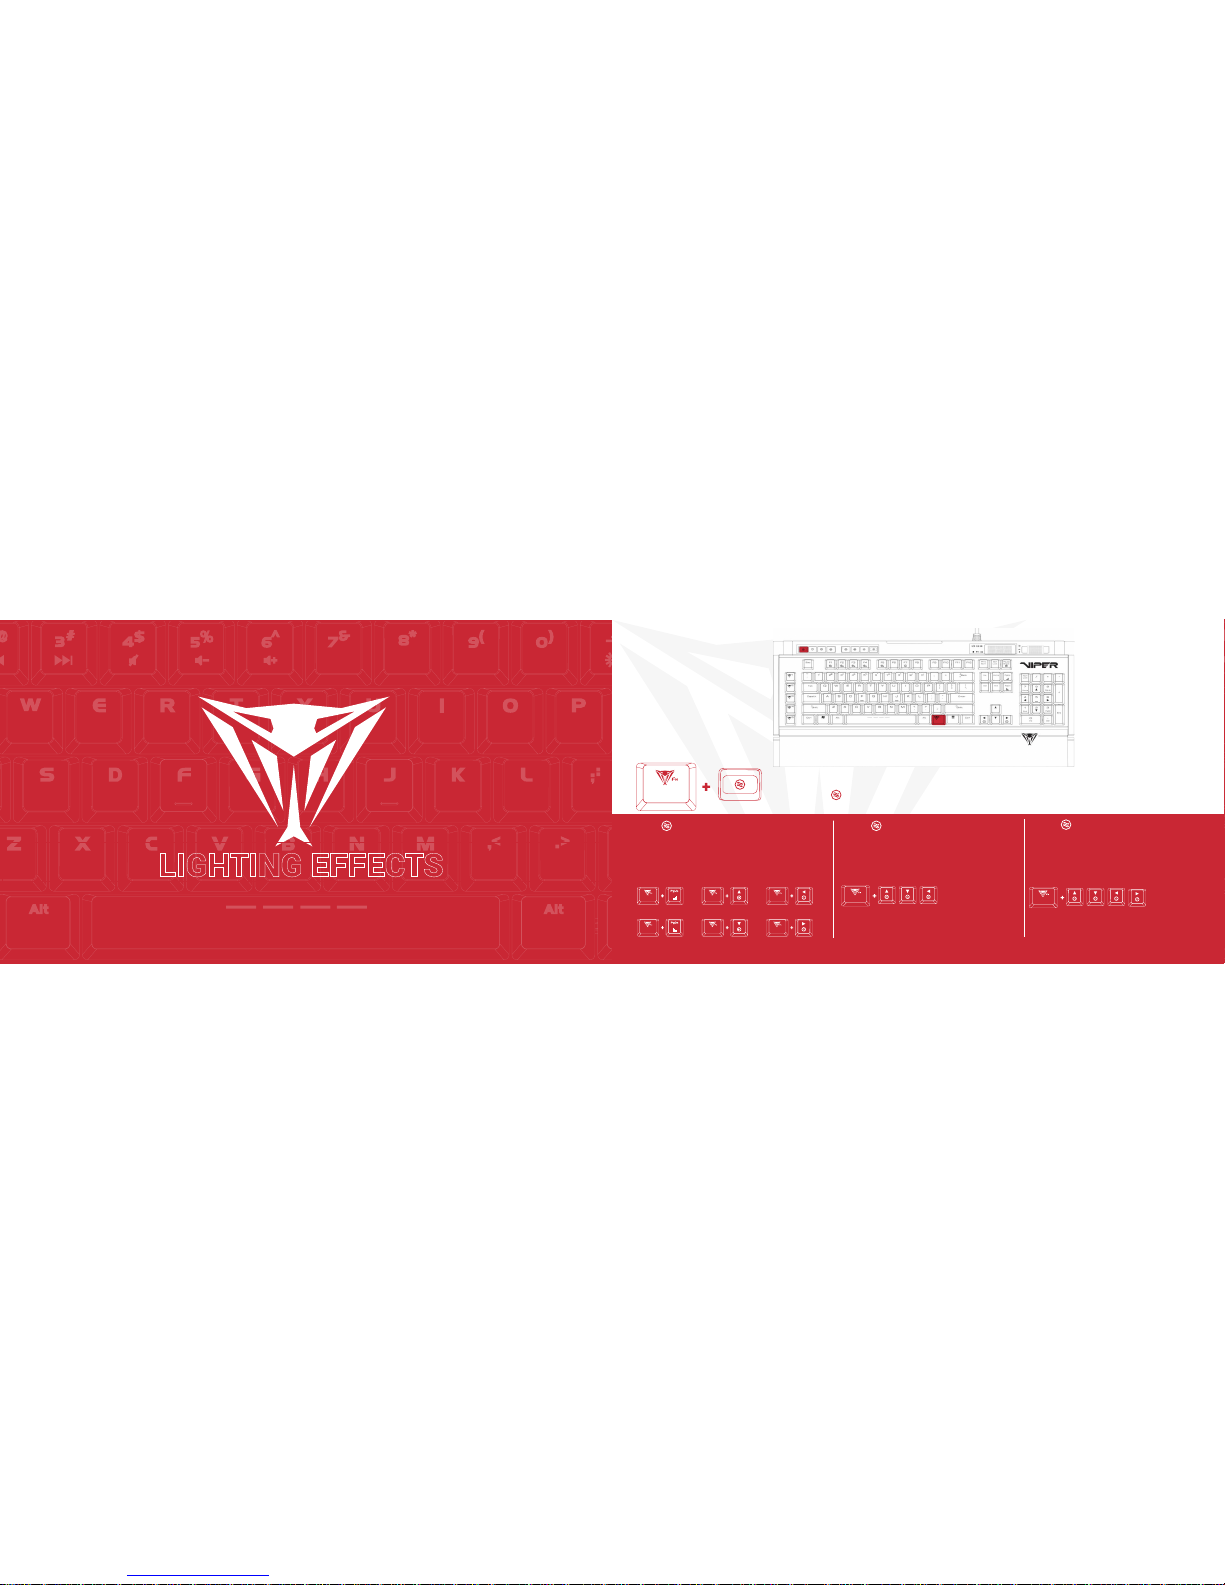
LIGHTING EFFECTS
WAVE/SPOTLIGHT/RADAR MODES
Press FN+ -Continuously to alternate between modes
FN+ -WAVE MODE
A wave of light will travel across the keyboard.
To change the direction of the wave pattern, press
FN + arrow key. The wave will travel from right to
left, left to right, top to bottom, or bottom to top
based on the arrow key you select.
FN+ X2-SPOTLIGHT MODE
Two patterns of light will travel across the keyboard intersecting in the middle. The LED will
change color constantly.
FN+ X3-RADAR MODE
A pattern of light will revolve around the center of
the keyboard. To change the direction of the radar pattern, press FN + arrow key.
FN+ Any Arrow Key
Alternates the direction of the radar
clockwise or counter clockwise
FN+PgUp
Increases Speed of Wave Mode
FN+UpArrow
Increases Speed of Wave Mode
FN+UpArrow
Increases Speed of Wave Mode
FN+PgDn
Decreases Speed of Wave Mode
FN+DownArrow
Decreases Speed of Wave Mode
FN+DownArrow
Decreases Speed of Wave Mode
FN+ Any Arrow Key
Alternates the direction of the radar
clockwise or counter clockwise
Page 7

RIPPLE MODE
Press FN+ -Continuously to alternate between modes
FN+ -RIPPLE MODE
When pressing any key, the light pattern will be spread in all directions; displaying a “ripple” effect.
Pressing FN+ repeatedly will scroll through the different LED colors.
FN+PgUp
Increases Speed of Ripple Mode
FN+PgDn
Decreases Speed of Ripple Mode
SIDEWINDER/VORTEX MODES
Press FN+ -Continuously to alternate between modes
FN+PgUp
Increases Speed of Sidewinder Mode
FN+PgDn
Decreases Speed of Sidewinder Mode
FN+ -SIDEWINDER MODE
The light pattern will wind its way from the top left of the keyboard to the
bottom.
FN+ X2-VORTEX MODE
The light pattern will wind its way from the top left of the keyboard to the center
and then back again.
FN+PgUp
Increases Speed of Sidewinder Mode
FN+PgDn
Decreases Speed of Sidewinder Mode
Page 8

FN+ -RAINDROP MODE
Keys on the keyboard will light up and fade randomly: displaying a
“raindrop” effect.
FN+PgUp
Increases Speed of Sidewinder Mode
FN+PgDn
Decreases Speed of Sidewinder Mode
RAINDROP/REACTIVE MODES
Press FN+ -Continuously to alternate between modes
FN+ 2X- REACTIVE MODE
Key will light up when pressed and fade. Pressing
FN+ repeatedly will scroll through the different
LED colors. FN + Pg Up or Pg Dn will decrease or
increase the interval of the fade.
FN+PgUp
Increases Fading Speed of
Reactive Mode
FN+PgDn
Decreases Fading Speed of
Reactive Mode
BREATHE MODE
Press FN+ Continuously to alternate between modes
FN+ -BREATHE MODE
The entire keyboard brightens then fades. Pressing FN+ repeatedly will scroll through the different LED colors. FN + Pg Up or Pg Dn will decrease
or increase the interval of the fade.
FN+PgUp
Increases Speed of Breathe Mode
FN+PgDn
Decreases Speed of Breathe Mode
Page 9

FN+ X2-STATIC MODE
The entire keyboard remains illuminated. Pressing
FN+ repeatedly will scroll through the different
LED colors.
BRIGHTNESS
STATIC/SPECTRUM
Press FN+ Continuously to alternate between modes
FN+ -SPECTRUM MODE
The entire keyboard will gradually shift through the various colors.
Pressing FN+ repeatedly will scroll through the different LED colors.
FN + Pg Up or Pg Dn will decrease or increase the interval of the fade.
FN+PgUp
Increases Fading Speed of
Reactive Mode
FN+PgDn
Decreases Fading Speed of
Reactive Mode
FN+PgUp
Increases Fading Speed of
Reactive Mode
FN+PgDn
Decreases Fading Speed of
Reactive Mode
Page 10

BRIGHTNESS MODES
Press FN+ -Continuously to alternate between modes
BRIGHTNESS
Press FN+ increase the LED brightness.
FN+ decreases the LED brightness to off.
FN+PgUp
Increases Speed of Light
FN+PgDn
Decreases Speed of
light
FN+ (-/+)
Increases/Decreases Brightness
KEYBOARD SOFTWARE
Page 11

LIGHTING SETTINGS
Keyboard light effects
The V770’s light effects can be set from the Viper software by selecting the effect from the drop down menu. Color
selection, brightness, speed, and pattern direction can all be set, depending on the light effect, from the software.
Click on Apply in the bottom right corner of the software to save settings
PALM REST LIGHT EFFECTS
The lighting effects for the palm rest are controlled exclusively through the Viper software and can be set up in the
same manner as the keyboard lighting. Select the lighting effect from the drop down menu, and set color selection,
brightness, speed and pattern direction from the menu and click on Apply to save the settings.
Page 12

CUSTOM LIGHTING PROFILES
You may create custom lighting profiles by selecting one of the five Lighting Profiles from the drop down menu in
Light Effects.
Check the box next to DIY to access custom color mode.
Select a key or select a group of keys and choose a color from the color pallet. Click OK, then Apply to change and
save the key colors
RESPONSE TIME AND REPORT RATE
You may adjust the response time and report rate for the keyboard from the main menu. A lower response time will
decrease reaction time, while a higher report rate will increase the frequency the keyboard communicates with the
computer, decreasing reaction time.
Page 13

MACROS
You may create and save 32 different macro scripts, of 47 characters in length
that can be assigned to any key (except the Windows® key) of the keyboard.
The V770 has five additional dedicated macro keys for convenience.
Creating a macro-
Click on the Macros button from the main menu to open the macro editor.
Click New to create a new macro. Double click on the macro to rename it.
Click Start Recording to create your macro script. You may create
scripts up to 47 characters long.
Delay between keystrokes – You may add delays between script keystrokes by
checking the box next to Delay between keystrokes. Once you stop recording,
you may edit delay time manually by double clicking on it.
Loop – By checking the box under Loop, you may assign the number of times a
macro script runs when you press macro key.
Saving a Macro
Once you have recorded a macro script, click OK to save and
exit the macro editor.
Deleting a Macro
Open the macro editor, and select a macro from the macro list
and click Delete.
Page 14

KEY ASSIGNMENTS
Select a Lighting Profile and check the box on Keymap. This gives you access to the SELECTED KEY menu.
You may assign specific functions to each key through the SELECTED KEY menu.
• Single/Combine
• Macro
• Basic
• Advance
SINGLE/COMBINE
This allows you to change the output value of a single key or combine two output values into a single keystroke.
Click a key you wish to change the value of or combine two values into (except for the Windows® key).
Click the Single/Combine tab from the SELECTED KEY menu.
Change the value of the keystroke in the single row or combine two values in the combine row.
Click Save, enable GAME MODE, click Apply.
To restore original function disable GAME MODE, and click Apply.
MACRO
This allows you to assign macro scripts you have created and saved to specific keys.
Click a key you wish to assign a macro to on the keyboard image (except for the Windows® key).
Click on the Macro tab from the SELECTED KEY menu and choose the macro you wish to assign from the list.
Click Save, enable GAME MODE, click Apply.
To restore original function disable GAME MODE, and click Apply.
BASIC
This allows you to assign various Windows® functions to various keys making them hot keys, including opening
multi-media functions, internet browser, file access, and more.
Click a key you wish to assign a basic function to on the keyboard image (except for the Windows® key).
Click on the Basic tab from the SELECTED KEY menu and choose the function you wish to assign from the list.
Click Save, enable GAME MODE, click Apply.
To restore original function disable GAME MODE, and click Apply.
Page 15

ADVANCE
This allows you to browse various folders (i.e. music, photos), and assign functions to keys making them hot keys,
including playing music, opening folder, start up function, and more.
Click a key you wish to assign an advance function to on the keyboard image (except for the Windows® key).
Click on the Advance tab from the SELECTED KEY menu and choose the function you wish to assign from the list.
Click Save, enable GAME MODE, click Apply.
To restore original function disable GAME MODE, and click Apply.
DISABLE KEYS
You may disable any number of keys by checking the Disable Keys box on the SELECTED KEY menu, saving, enabling
GAME MODE, and clicking Apply.
Creating and Saving User Proles
The Profiles function allows you to set up and save custom settings for different games, keyboard appearance, or performance, and access them easily.
You may create and save as many different user profiles as your hard disk space availability will allow. You will need
one of the “Lighting Profile” buttons under the Lighting Effect menu to create and save specific user profiles. You may
choose any one of the five “Lighting Profile” buttons for creating and saving user profiles.
Page 16

To create a user prole, follow the steps outlined above to custom color keys,
and select and assign macro scripts. You may also adjust the report rate or response times to your preference. Click Apply to save them to the keyboard’s
memory.
To save a user profile, click on the Profiles button in the lower left corner, then
click on the EXPORT button to access a folder you create on your PC’s storage
device.
Name the profile and Save.
To load a saved profile to the keyboard, simply click on Profiles in the lower left
corner, and click IMPORT.
Double click on the profile you wish to load from your user profile folder and hit
Open.
Once the selected profile has loaded onto the PROFILE window of the IMPORT/
EXPORT screen, hit Apply. The profile is now loaded onto the keyboard memory.
Page 17

GENERAL SETTINGS
WINDOWS KEY LOCK
You may disable the Windows® key during game play by checking
the box next to WINDOWS KEY LOCK, and then clicking Apply.
FACTORY REST
To reset the keyboard to factory default settings, click on the setting icon in the upper right corner and then click Reset settings.
The software will prompt you accordingly.
Page 18

FCC and Legal:
This equipment has been tested and found to comply with the limits for a Class B digital device, pursuant to Part 15 ofthe FCC Rules. These limits are designed to provide reasonable
protection against harmful interference in a residential installation. This equipment generates uses and can radiate radio frequency energy and, if not installed and used in accordance
with the instructions, may cause harmful interference to radio communications.
However, there is no guarantee that interference will not occur in a particular installation. If this equipment does cause harmful interference to radio or television reception, which can be
determined by turning the equipment off and on, the user is encouraged to try to correct the interference by one of the following measures:
• Reorient or relocate the receiving antenna.
• Increase the separation between the equipment and receiver.
• Connect the equipment into an outlet on a circuit different from that to which the receiver is connected.
• Consult the dealer or an experienced radio/TV technician for help.
FCC NOTICE:
This device complies with Part 15 of the FCC Rules. Operation is subject to the following two conditions:
1) This device may not cause harmful interference, and 2) This device must accept any interference received, including interference that may cause undesired operation.
FCC CAUTION:
• Any changes or modi cations not expressly approved by the party responsible for compliance could void the user’s authority to operate this equipment.
• This device and its antenna(s) must not be co-located or operating in conjunction with any other antenna or transmitter.
 Loading...