

Page 1

VA51063
REV.02(08-07)
VIPER ...exceptional
value
www.usviper.com
VIPER NORTH AMERICA
(866) 418-4737
P.O. BOX 104
HAMILTON, MI 49419
(866) 41 - VIPER
IMPORTANT: READ OWNERS MANUAL CAREFULLY
BARRACUDA
SERIAL#
MODEL#
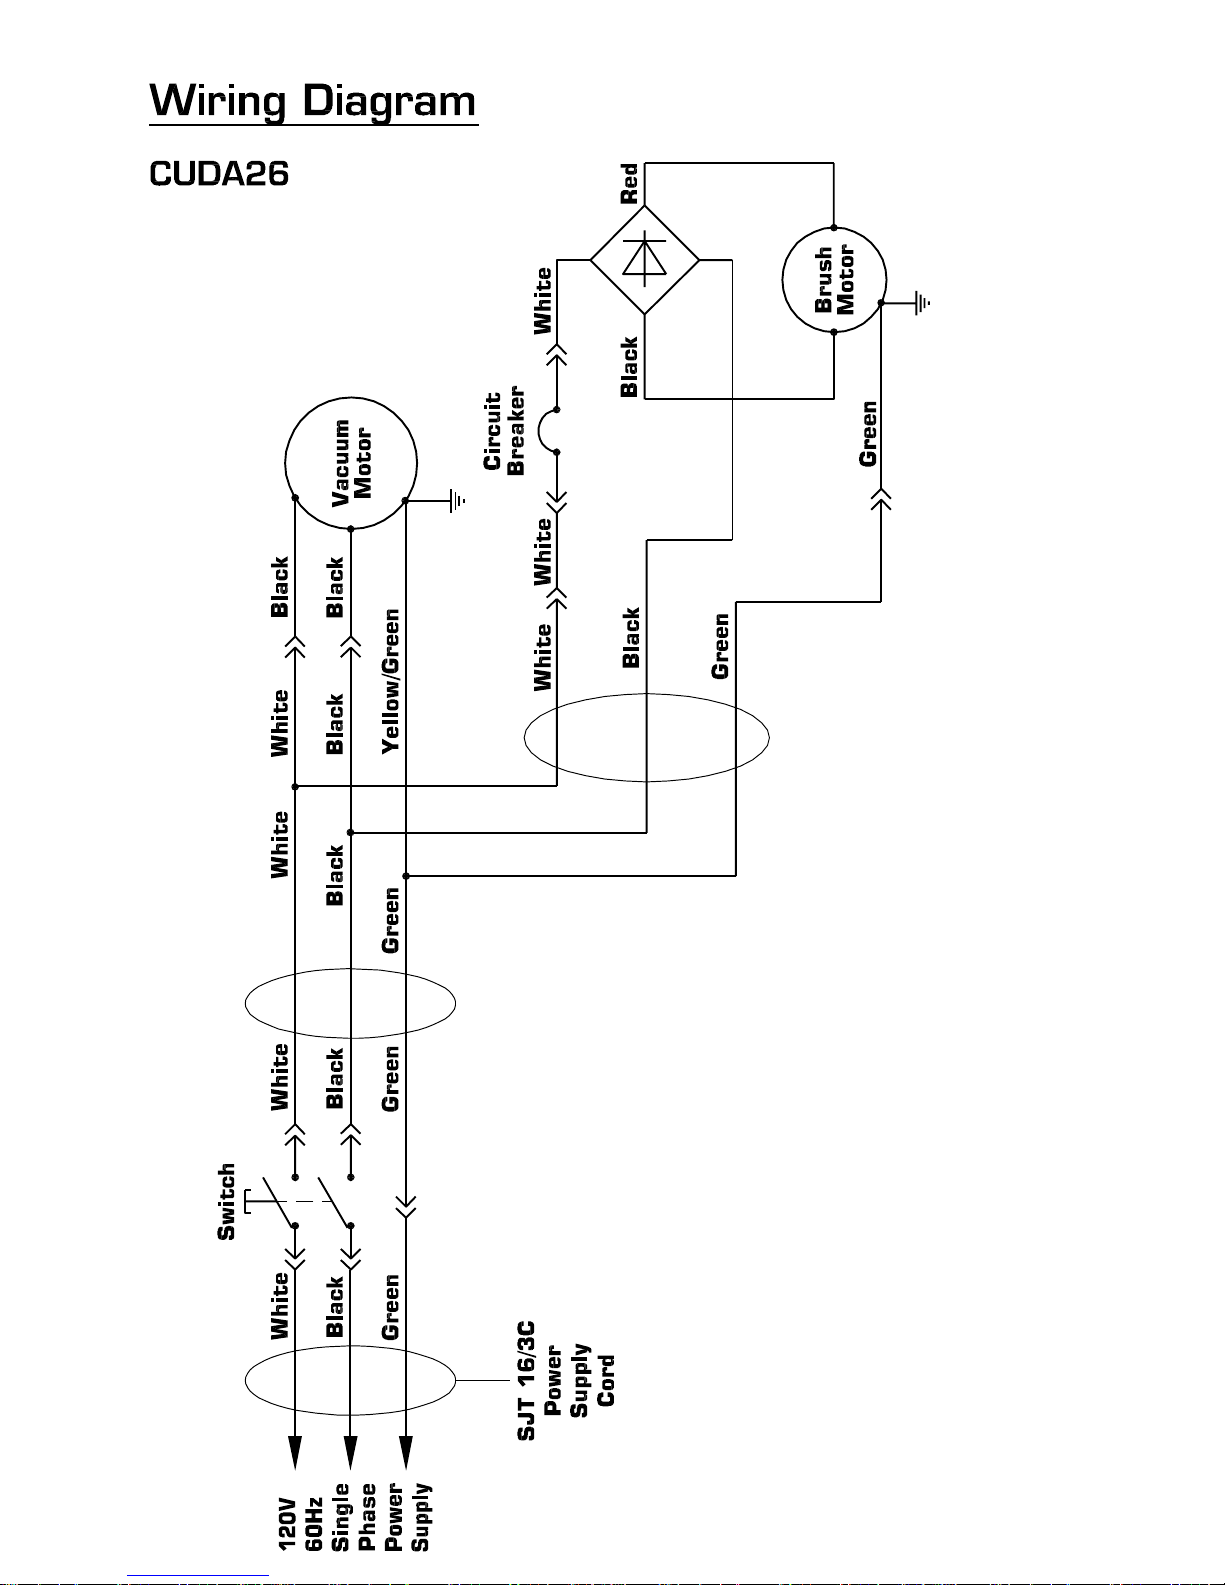
CUDA26
Please fill out & return your warranty card!
OWNERS MANUAL
VIPER
DUAL MOTOR VACUUM
Page 2

CONGRATULATIONS on your purchase of a Viper product,
and welcome to the V.I.P. family. We appreciate your business
and will do everything in our power to keep you happy with
your purchase for many years to come.
As part of the V.I.P. family, you are entitled to the best protection
by one of the most comprehensive warranties in the industry.
Thank-you for purchasing Viper products!
Tom Vander Bie, CEO
TABLE OF CONTENTS
Safety Precautions 1
Machine Components 2
Machine Operation 3-4
Machine Maintenance & Storage 4
Troubleshooting 5
Parts Breakdown 6
Parts Lists 7-8
Accessories 9
Wiring Diagram 10
Page 3
SAFETY PRECAUTIONS
GROUNDING INSTRUCTIONS
General – This carpet vacuum shall be
grounded while in use to protect the
operator from electric shock. The machine
is provided with a three-contact grounding
type attachment plug to fit the proper
grounding type receptacle. The green (or
green & yellow) conductor in the cord is
the grounding wire. Never connect this
wire to other than the grounding pin of the
attachment plug.
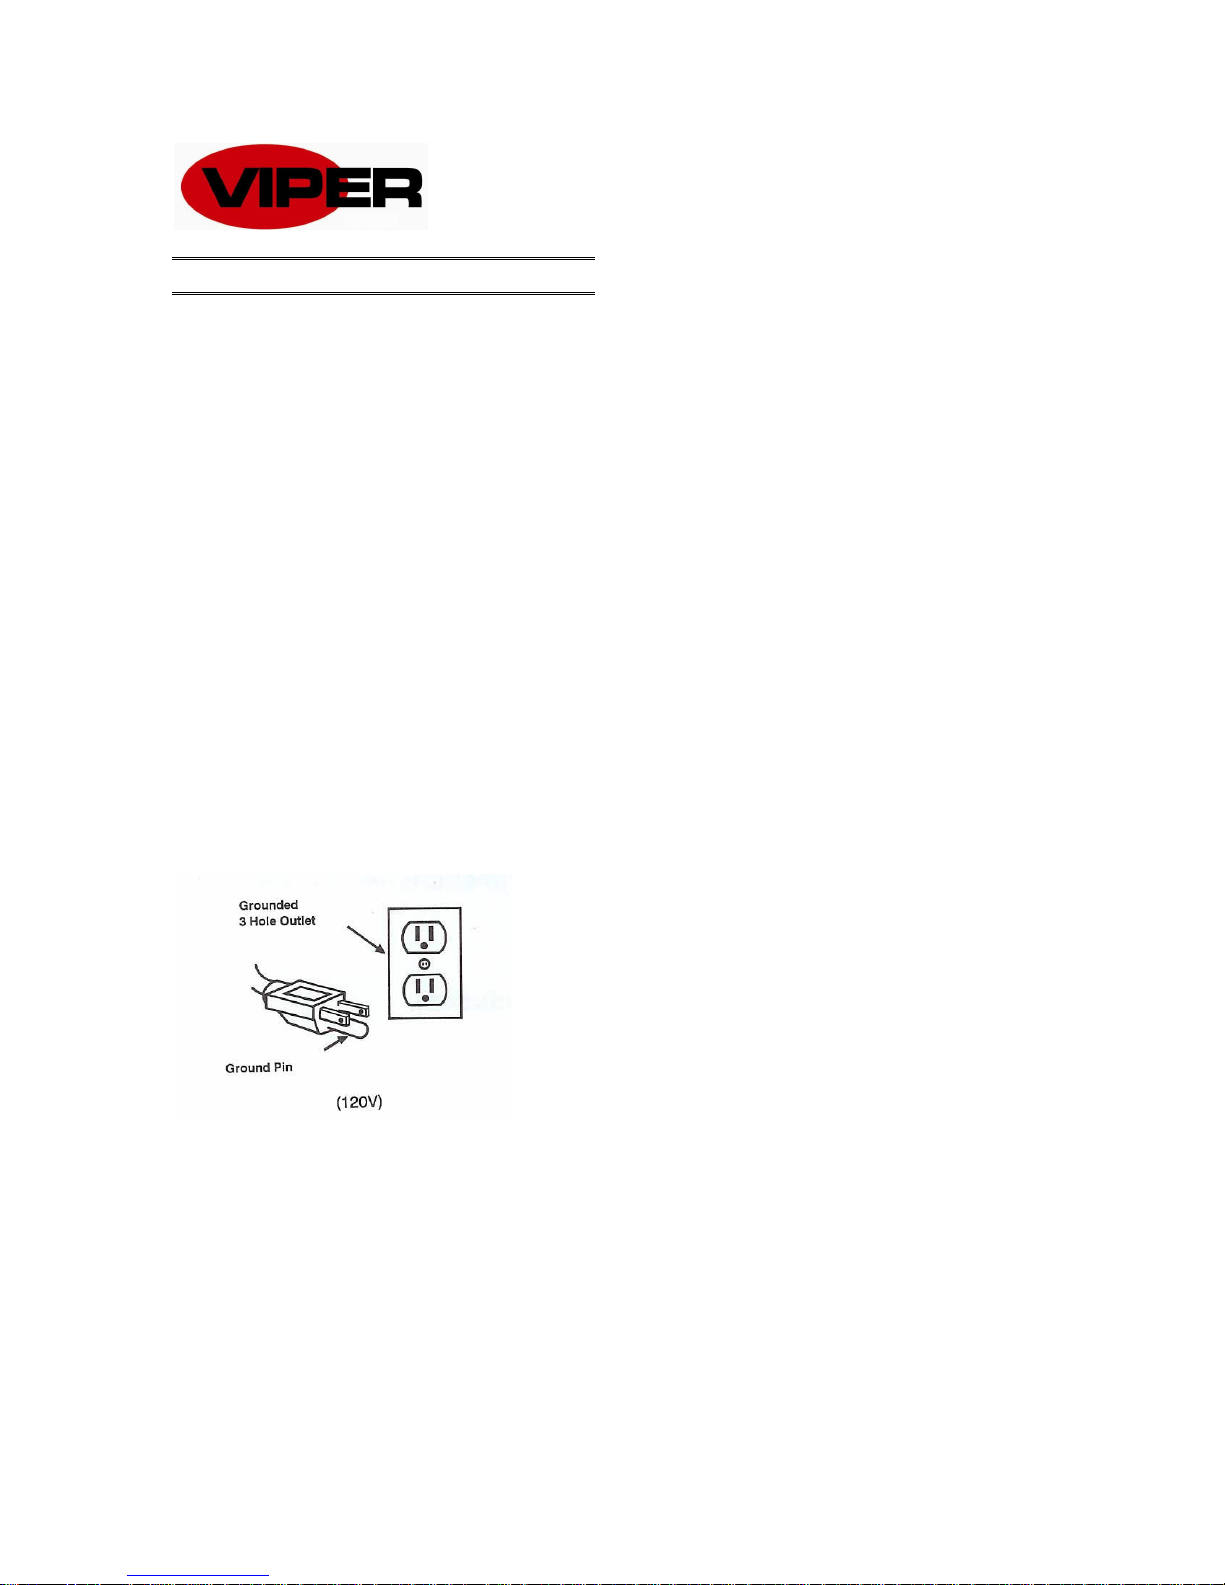
This machine is for use on a nominal 120volt circuit and has a grounding plug that
resembles the plug illustrated in figure
below. Make sure that the machine is
connected to an outlet having the same
configuration as the plug. No adapter
should be used with this machine.
1) Do not operate machine:
- Unless trained and authorized
- Unless you have read and
understand operators manual
- In flammable or explosive areas.
- With damaged or modified cord or
plug.
- If not in proper operating condition.
- In outdoor areas.
- In standing water.
- Without bag / filters in place.
- With the use of unapproved extension
cords.
2) Before operating machine:
- Make sure all safety devices are in
place and operate properly.
3) When using machine:
- Do not run machine over cord.
- Do not pull machine by cord or plug.
- Do not pull cord around sharp edges
or corners.
- Do not unplug by pulling on the cord.
- Do not stretch cord.
- Do not handle plug with wet hands.
- Keep cord away from heated
surfaces.
- Do not pick up flammable materials
or reactive metals.
- Report machine damage or faulty
operation immediately.
- Do not allow children to operate
machine.
This machine is intended for commercial
use. It is constructed for use in an indoor
environment and is not intended for any
other use. Use onlyrecommended
accessories.
All operators shallread, understand and
exercise the following safety precautions:
4) Before leaving or servicing machine:
- Turn off machine.
- Unplug power cord from outlet.
5) When servicing machine:
- Unplug cord from outlet.
- Use manufacturer supplied or
approved replacement parts.
- Avoid moving parts. Do not wear
loose clothing.
Page 4
MACHINE COMPONENTS
12
13
14
1 2 3
4
5
6
7
11
10
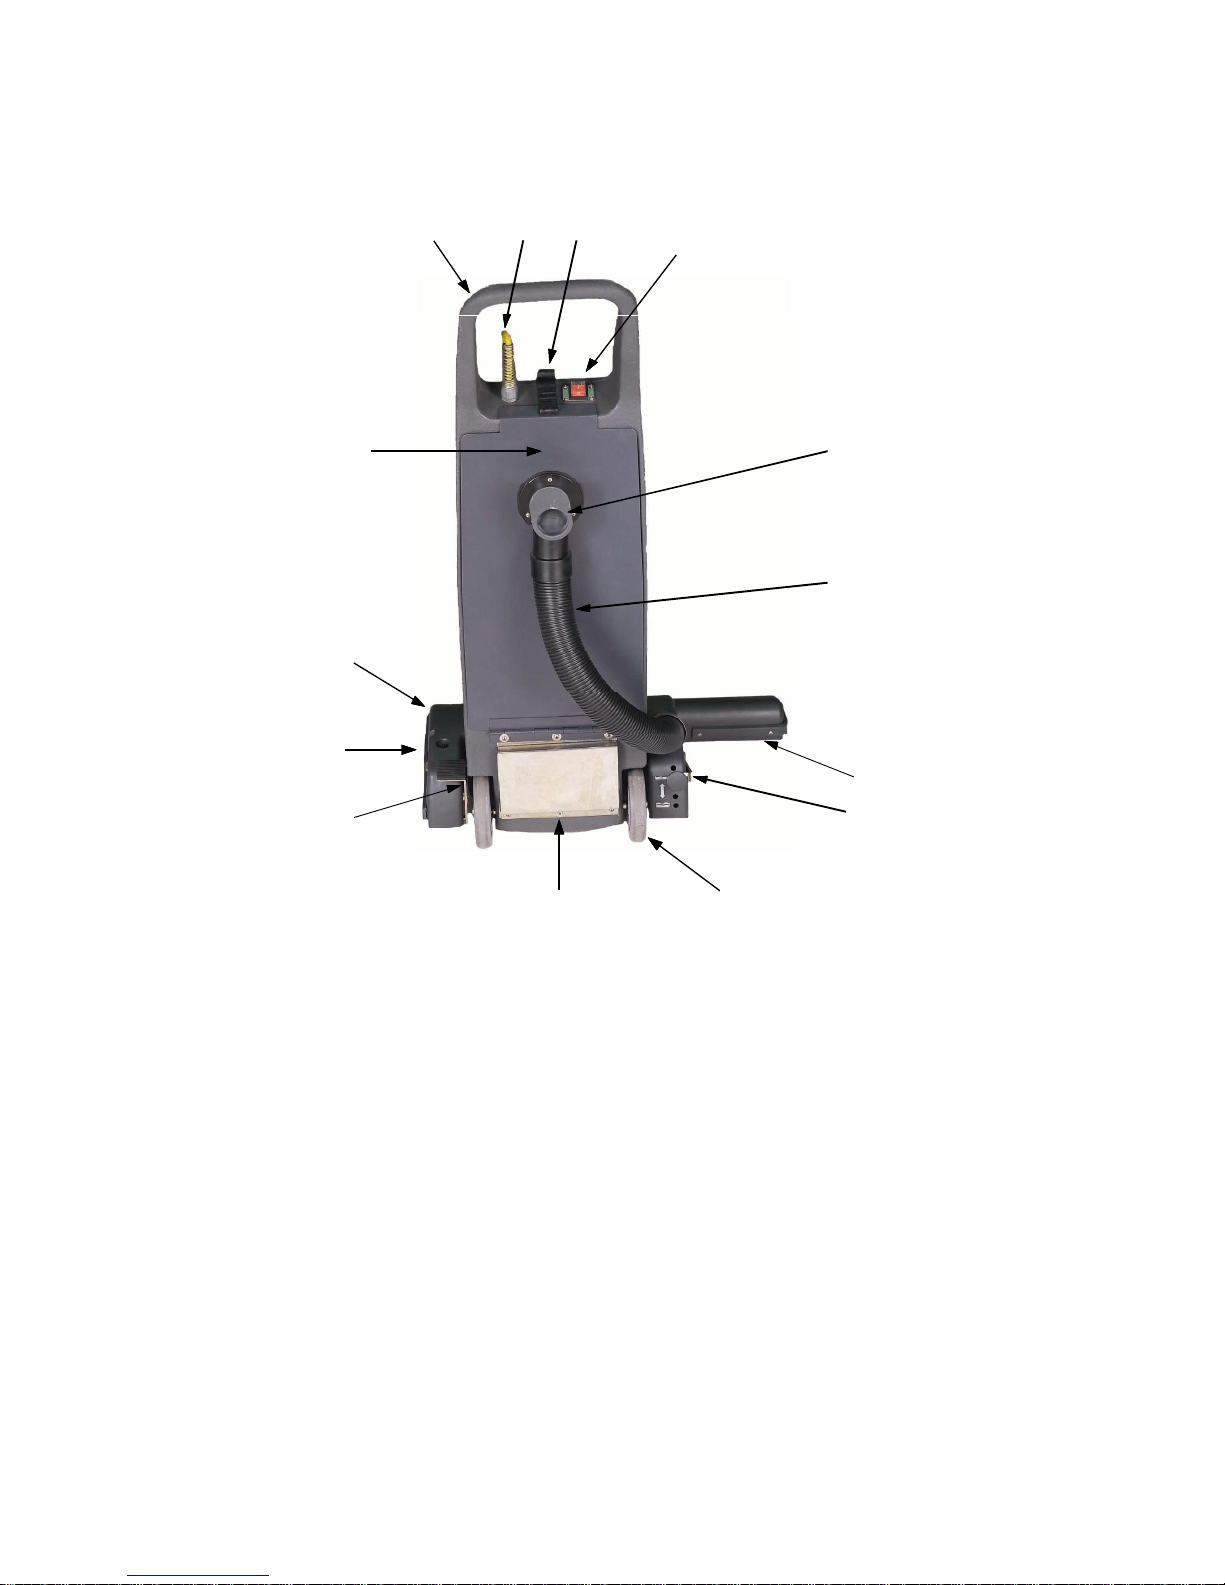
1) Handle
2) Power cord
3) Door latch
4) Power switch
5) Attachment tool intake & cord wrap
6) Vacuum hose
7) Brush housing
8) Brush height adjustment
9) Rear wheels
10) Exhaust vent
11) Handle height adjustment
12) Brush circuit breaker (bottom side)
13) Brush assembly (bottom side)
14) Rear door
8
9
Page 5

MACHINE OPERATION
PRIOR TO VACUUMING CARPETS
1) Inspect power cable and extension
cable for damage. Replace cable if
damage is found.
2) Ensure filter bag is properly installed
NOTE: Never operate machine without
filter bag installed. This could cause
damage to the vacuum motor.
3) Set proper height adjustment for carpet
being cleaned.
CARPET VACUUMING
1) Depress foot pedal and lower vacuum
head to floor.
2) Turn on power switch.
3) Occasionally check the bag for fullness
& replace as necessary.
4) If brush stops spinning, there maybe
an obstruction in the brush. Unplug the
power cable, raise the brush off the
floor and check for an obstruction.
Check & reset the brush circuit breaker
located on the bottom of the brush
housing.
USE OF ACCESSORY TOOLS
NOTE: Accessory tools are available as an
option. Kit VA51061 includes: Dusting
brush, crevice tool, 8’ vacuum hose.
1) Machine must be in upright position
whenever using attachment tools.
2) Remove accessory hose plug on the
vacuum intake port on rear of machine.
3) Connect (optional) vacuum hoses to
intake port & connect desired
accessory tool to end of hose.
4) Turn on vacuum switch and operate
tool using normal vacuuming
procedures.
3) Operate by using standard vacuuming
procedures.
4) Check bag periodically to see if it is
full. Replace if necessary.
5) To clean under desks or other tight
areas, depress the foot pedal an
additional time to lower the handle
even further.
OPERATING HINTS
1) Overlap cleaning path by approx. 2
inches
2) Work away from power outlet and
power cable in order to avoid damage
to the power cable.
VACUUM BAG INSTALLATION &
REMOVAL
1) Unlock rear door latch, and allow door
to hinge open.
2) Place paper bag / filter into tank
opening.
3) On paper bag / filter, slide rubber
vacuum collar onto vacuum intake
spout.
4) Close rear door and lock into place.
Page 6

NOTE: Be sure the bag / filter is
properly placed in bag housing to
ensure proper air flow.
5) To remove bag, simply reverse steps 14 above.
6) Do not re-use paper bag / filter. When
full, dispose of it and replace with a
new one.
9) Inspect gaskets and seals for air leaks
and replace as needed.
10)Check vacuum hose for clogs and holes
and replace as needed.
11)Check vacuum motor carbon brushes
every 250 hours. Replace brushes
when they are 3/8” or less in length.
NOTE: Vacuum motor damage caused
by worn brushes is not covered by
warranty.
MACHINE MAINTENANCE
To keep the machine performing well
for many years, please follow the
following maintenance procedures.
!!! Always confirm that the machine
is unplugged prior to performing
any maintenance or repairs!!!
1) Unplug machine as soon as you are
done using it.
NOTE: When unplugging machine, do not
pull cord around sharp edges or corners &
do not unplug by pulling on the cord.
2) Clean outside of machine with a mild
cleaner.
3) Check power cord for any damage. If
any damage is detected, replace the
cord immediately.
4) Check machine for any loose or
missing nuts and bolts and replace as
necessary.
5) Check paper bag / filter for fullness. If
it is full, replace with a new one.
6) Check vacuum motor filter and exhaust
filter for debris and clean as needed.
NOTE: Do not clean filters with wateror
a cleaning solution. Clean by tapping of
debris or blowing with air.
7) Inspect brush for strands of carpet and
debris and remove as needed.
8) Inspect brush bristles for wear and
damage. Replace brush as needed.
MACHINE STORAGE
1) Prior to storing the machine, wrap up
power cord, check paper bag / filter for
fullness and replace if necessary.
2) Clean and / or replace filters.
3) Store machine in upright position in a
dry area, with the brush head off the
floor.
Page 7

BASIC TROUBLESHOOTING
PROBLEM CAUSE SOLUTION
Machine does not work Power switch not in "on" position Turn power switch "on"
Power cord not plugged into outlet Plug power cord into outlet
Power cord is faulty Replace with approved power cord
Building circuit breaker tripped Reset circuit breaker
Faulty wiring Contact Viper Distributor
Faulty on / off switch Contact Viper Distributor
Brush does not work Brush circuit breaker tripped
Poor brush pickup Incorrect brush height adjustment Adjust brush height
Clogged brush Remove debris from brush
Brush is worn Contact Viper Distributor
Loose brush drive belt Inspect belt and replace as needed
Low suction Vacuum hose clogged
Vacuum hose faulty
Filters clogged
Vacuum bag full
Check brush and belt for obstructions and
remove as needed
Reset circuit breaker
Remove vacuum hose and check for
obstructions
Check vacuum hose for loose cuffs or holes
and replace as needed
Remove vacuum filter and exhaust filter and
clean
Check vacuum bag / filter and relplace as
needed
Page 8

Page 9

PARTS LIST
DIA
NO
PART
NUMBER
DESCRIPTION
REQ'D
1 VA51009 HANDLE HOUSING 1
2 VA51025 BAG,PAPER,DUST,10.5qt. 1
3 VA51007 REAR COVER AND BAG HOLDER 1
4 GT13022 NUT, M5, NYLON INSERT 13
5 VA51034 GASKET,ADAPTER 1
6 VA51008 ELBOW ADAPTER,HOSE 1
7 VA51022 PLUG AND CORD HOOK 1
8 VV20501 SCREW,M5x14 23
9 VA51023-1 HOSE END 2
10 VA51023-2 HOSE, 2" 1
11 VA51029 COVER, EXHAUST FILTER 1
12 VA51030 FILTER,EXHAUST 1
13 VA51028 PLATE,EXHAUST FILTER 1
14 VA51024 LATCH PLATE 1
15 VV13605 SCREW,FLAT, M6x16 2
16 VA51041 NYLON WASHER 4
17 VA51027 AXLE 1
18 VA51059 ECCENTRIC BUSHING 2
19 VV20509 SCREW,M5x10 17
20 VF13520
21 VF50119
22 VF13602
RETAINING RING,EXTERNAL,φ12
WAVE WASHER, φ12
WASHER,PLAIN,φ12xφ18x1
23 VF48202 WHEEL, 5" 2
24 VF13666
WASHER,PLAIN,φ12
25 VF44012 SCREW, M5x12.7 2
26 VF13495 SCREW,HEX, M6x16 4
27 VF13614
WASHER,PLAIN,φ6
28 VA51038 SPRING,LATCH 1
29 VF14214 SCREW,M5x8 1
30 VA51039 SHOULDER BOLT,LATCH 1
31 VV67504 CIRCUIT BREAKER 2AMP 1
32 GT13057 SCREW,SELF-TAPPING, ST5x10 14
33 VA51002 BUMPER,26" 1
34 VF99926-1 RECTIFIER 1
35 VA51065 BLOCK,BRUSH SHAFT,LEFT 1
36 ZD57000 MOTOR,BRUSH,115V 1
37 VA51011 MOUNT PLATE,MOTOR 1
38 VA51019 PULLEY,MOTOR 1
39 VA51021 DRIVE BELT 1
40 VF14254 SCREW,HOLDING, M5x8 1
NO
2
2
2
2
4
Page 10

PARTS LIST
DIA
NO
PART
NUMBER
DESCRIPTION
REQ'D
41 VA51018 PULLEY,BRUSH 1
42 VA51015 BEARING 2
43 VA51035 KNOB,ROLLER ADJUST 1
44 VF13508 SCREW,HOLDING, M4x8 1
45 VA51037 SPRING,ROLLER ADJUST 1
46 VA51036 LOCK PIN,ROLLER ADJUST 1
47 VA51042 ROLLER,1.5" 2
48 VA51013 CLAMP,ROLLER BRACKET 4
49 VA51043 AXLE,ROLLER 2
50 VA14001
RETAINING RING,EXTERNAL,φ10
51 VA51014 ROLLER BRACKET 1
52 VA51004 BOTTOM SHOE PLATE,26" 1
53 VA51005 BRUSH,26" 1
54 VA51047 BRACKET,RECTIFIER 1
55 VA51003 BRUSH HOUSING,26" 1
56 VA51006 SHAFT,BRUSH,26" 1
57 VA51017 STRING GUARD,BRUSH 1
58 VA51016 BLOCK,BRUSH SHAFT,RIGHT 1
59 VV20502 SCREW,FLAT, M5X16 2
60 VA51048 LABEL, "BARRACUDA" 1
61 VA51001 BASE HOUSING,26" 1
62 VA51010 LATCH,HANDLE 1
63 VA13476 SCREW,M5x40 1
64 VA51040 SHULDER BOLT,PIVOT 2
65 VA51052 LABEL 1
66 VA51012 TUBE,BASE HOUSING 1
67 VV13635 SCREW,M5x20 4
68 VA51032 RETAINER RING,VACUUM MOTOR 1
69 VA51033 GASKET,VACUUM MOTOR 1
70 VA41036 VACUUM MOTOR,115V 1
71 VA51049 FILTER,VACUUM MOTOR 1
72 VF82082 LOGO, "VIPER" 1
73 VA65001 POWER CORD,14/3C, SJTW, 50FT 1
74 VA51044 STRAIN RELIEF,CORD 1
75 VF83109 CATCH 1
76 VV13650 SCREW,M4x10 6
77 VA51026 PLATE,SWITCH 1
78 VF91346 SWITCH,ROCKER 1
NO
4
Page 11
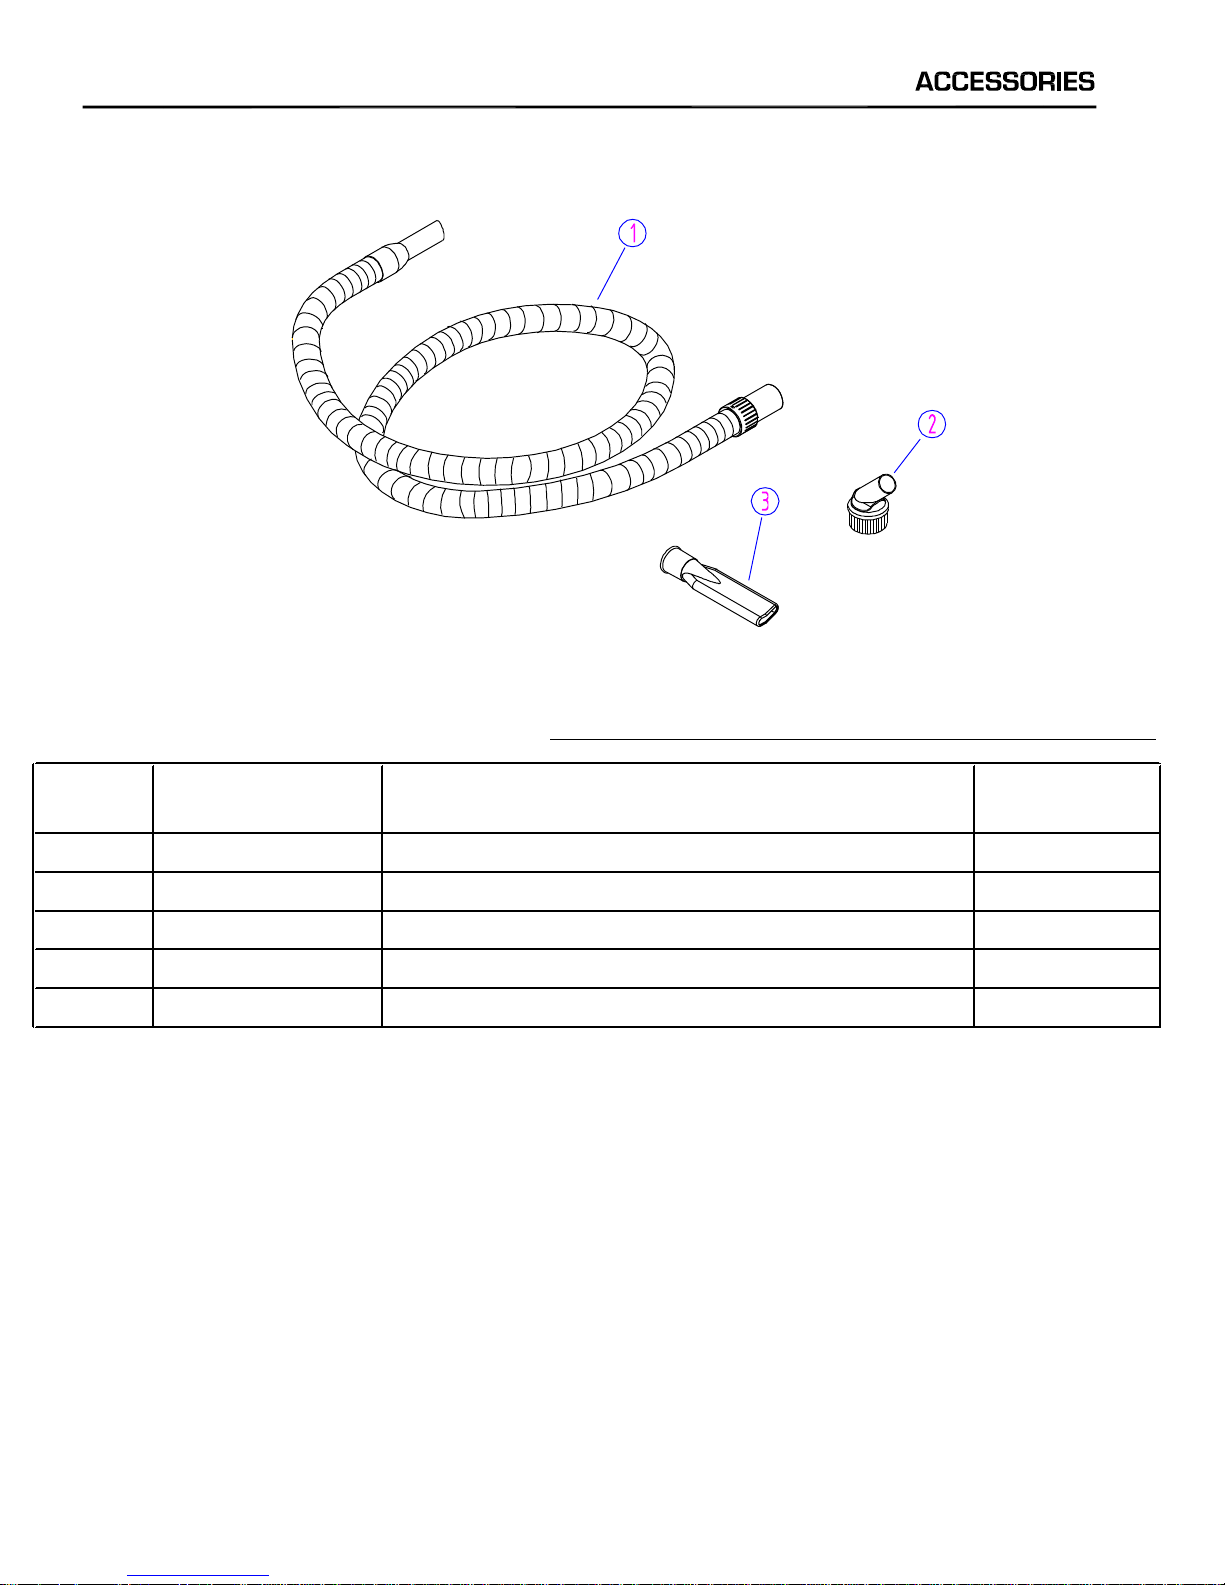
ACCESSORIES PARTS LIST (VA51061)
DIA
PART
DESCRIPTION
NO
NUMBER
REQ'D
1 VA51060 HOSE ASSY 1
2 VA20803 DUSTINGTOOL 1
3 VA20806 CREVICE TOOL 1
NO
Page 12
 Loading...