

Page 1
VF89027C-EU REV:02(2013.6.18)
AS380/15C-UK
User Manual
Original instructions
AS380/15C-EU
ENGLISH USER MANUAL………………………………………………… 1-10
DEUTSCH BETRIEBSANLEITUNG……………………………………….. 11-21
FRANÇAİS MODE D'EMPLOI………………………………………………. 22-31
NEDERLANDS GEBRUIKSAANWIJZING……………………………………… 32-42
ITALIANO MANUALE D’ISTRUZIONI……………………………………. 43-53
ESPAÑOL USER MANUAL………………………………………………… 54-64
PORTUGUÊS MANUAL DO USUÁRIO……………………………………….. 65-74
ΕΛΛΗΝΙΚΆ ΕΓΧΕΙΡΙ∆ΙΟ ΧΡΗΣΤΗ…………………………………………... 75-85
ČESKÝ UŽIVATELSKÝ MANUÁL…………………………………….... 86-95
POLSKI INSTRUKCJA OBSŁUGI……………………………………….. 96-105
MAGYAR FELHASZNÁLÓI KÉZIKÖNYV……………………………….. 106-115
ROMÂNĂ MANUAL DE UTILIZARE…………………………………….. 116-125
РУССКИЙ РУКОВОДСТВО ПОЛЬЗОВАТЕЛЯ…………………………… 126-136
БЪЛГАРСКИ РЪКОВОДСТВО НА ПОТРЕБИТЕЛЯ……………………...… 137-147
Company information:
www.vipercleaning.eu
info-eu@vipercleaning.com
Page 2
USER MANUAL
1
SAFETY PRECAUTIONS
This machne is intended for commercial use.It is constructed for use in an indoor environment and is
Not intended for any other use. Use only with recommended accessories.
All operators shall read, understand and exercise the following safety precautions:
1) DO NOT OPERATE MACHINE:
Unless trained and authorized.
Unless you have read and understand the operators manual.
In flammable or explosive areas.
If not in proper operating condition.
In outdoor areas.
2) BEFORE OPERATING MACHINE:
Make sure all safety devices are in place and operate properly.
3) WHEN USING MACHINE:
Go slow on inclines and slippery surfaces.
Follow all safety guidelines.
Be very careful when using the machine in reverse.
Report and fix any damage to machine prior to operating it.
4) BEFORE LEAVING OR SERVICING MACHINE:
Stop machine on level ground.
Turn machine off.
5) WHEN SERVICING MACHINE:
Read operators manual thoroughly prior to operating or servicing this machine.
Use manufacturer supplied or approved replacement parts.
Secure machine with wheel blocks prior to jacking the machine up.
Use approved jack or hoist to safely elevate the machine.
WHEN SERVICING MACHINE:(con’t)
Disconnect the AC cable.
Avoid contact with corrosive liquids.
Avoid moving parts, Do not wear loose fitting clothing while servicing machine.
WARNING!!!!
Flammable materials can cause an explosion or fire. Do not use flammable materials
In tanks.
WARNING!!!!
Flammable materials or reactive metals can cause explosion or fire .Do not pick up.
MACHINE SET UP&INSTALLATION
UNCRATING MACHINE
Be sure and check packing carton for any damage. Immediately report any damage to carrier.
Check contents of package to ensure that the following items are included:
Page 3
2
1. Machine
2. Squeegee assembly
3. Scrubber-dryer User Manual
4. brush or pad driver
(
if equipped)
MACHINE SET UP
Pre-operation checks
1. Sweep or dust mop the surface to be cleaned.
2. Check that squeegee is properly installed.
3. Lower the squeegee (33) with the lever (26).
4. Ensure that the AC cable is connected to a corresponding voltage power supply.
5. Check that brush/pad is properly installed.
Brush/Pad driver installation and disassembly
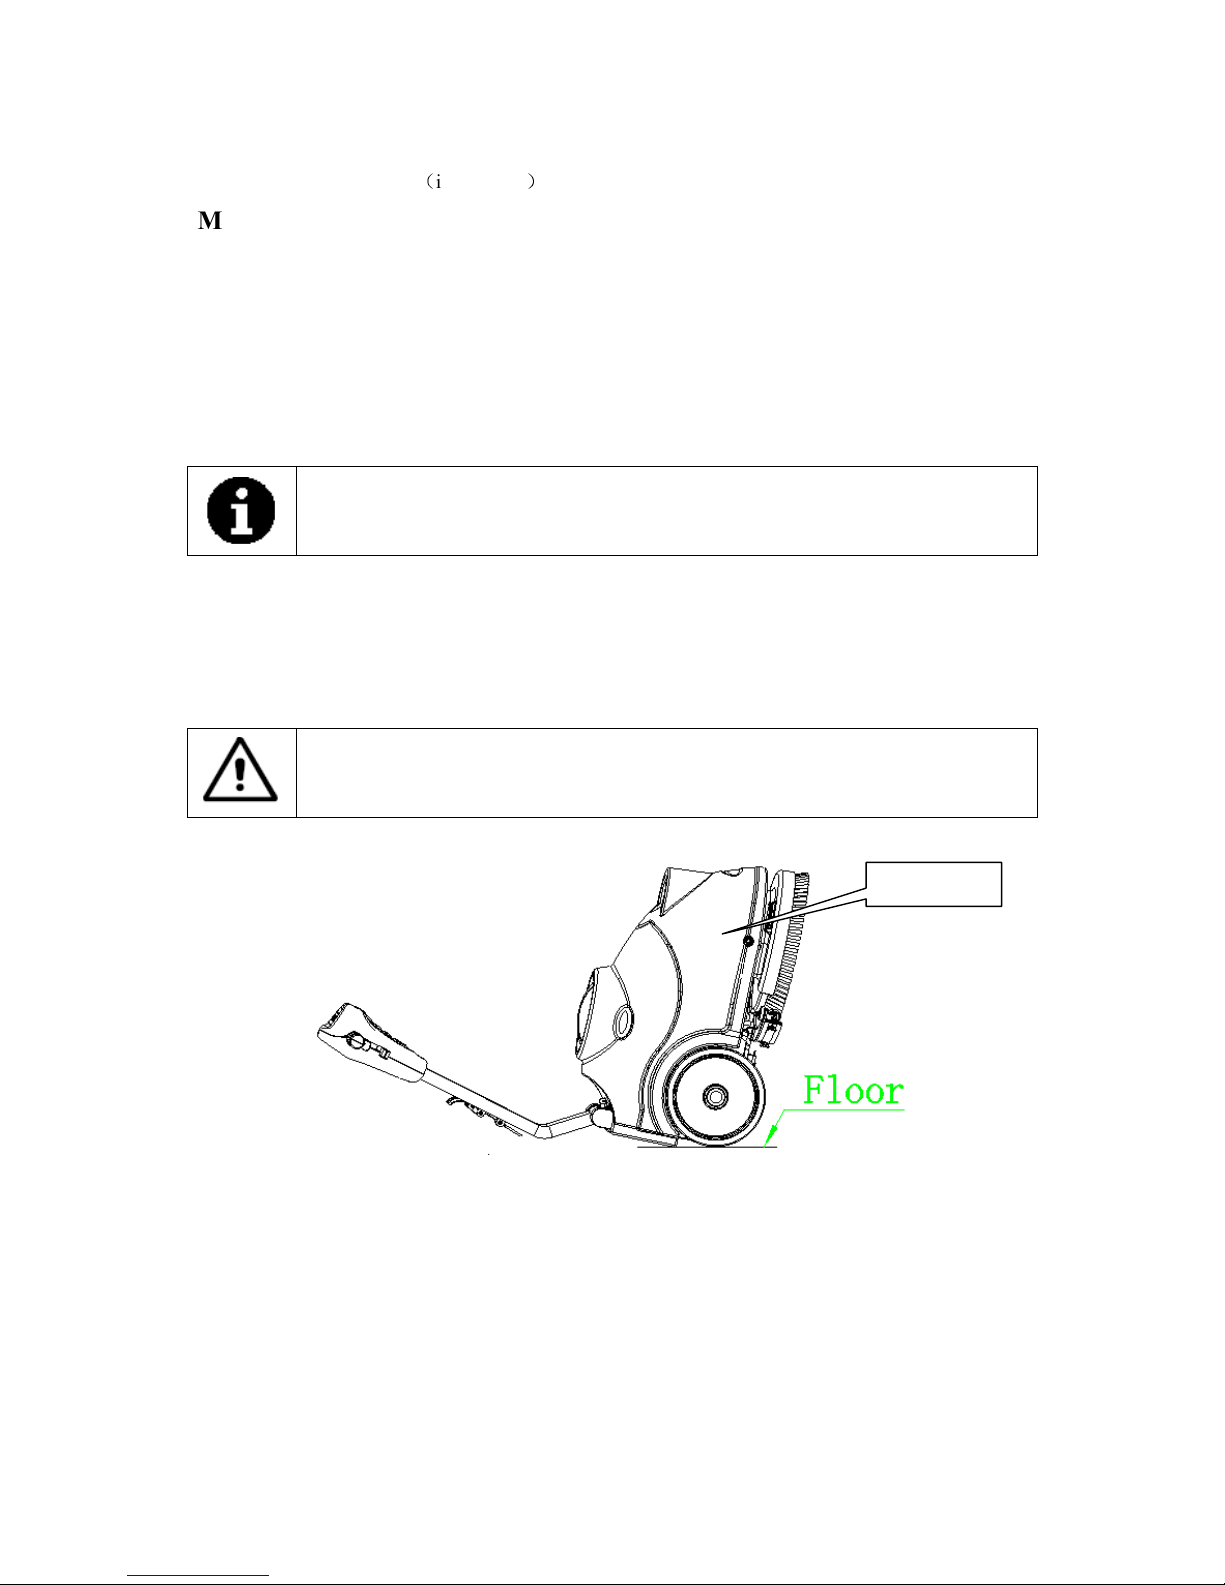
NOTE
Only install manually. If auto-installation, it will wear brush hub.
Make sure that the tanks are empty before disassembling the brush.
1. Disconnect the AC cable(16).
2. Lay down the machine in this position as indicated in the figure2, Pull up the lift lever (26) to raise
the squeegee up (33).
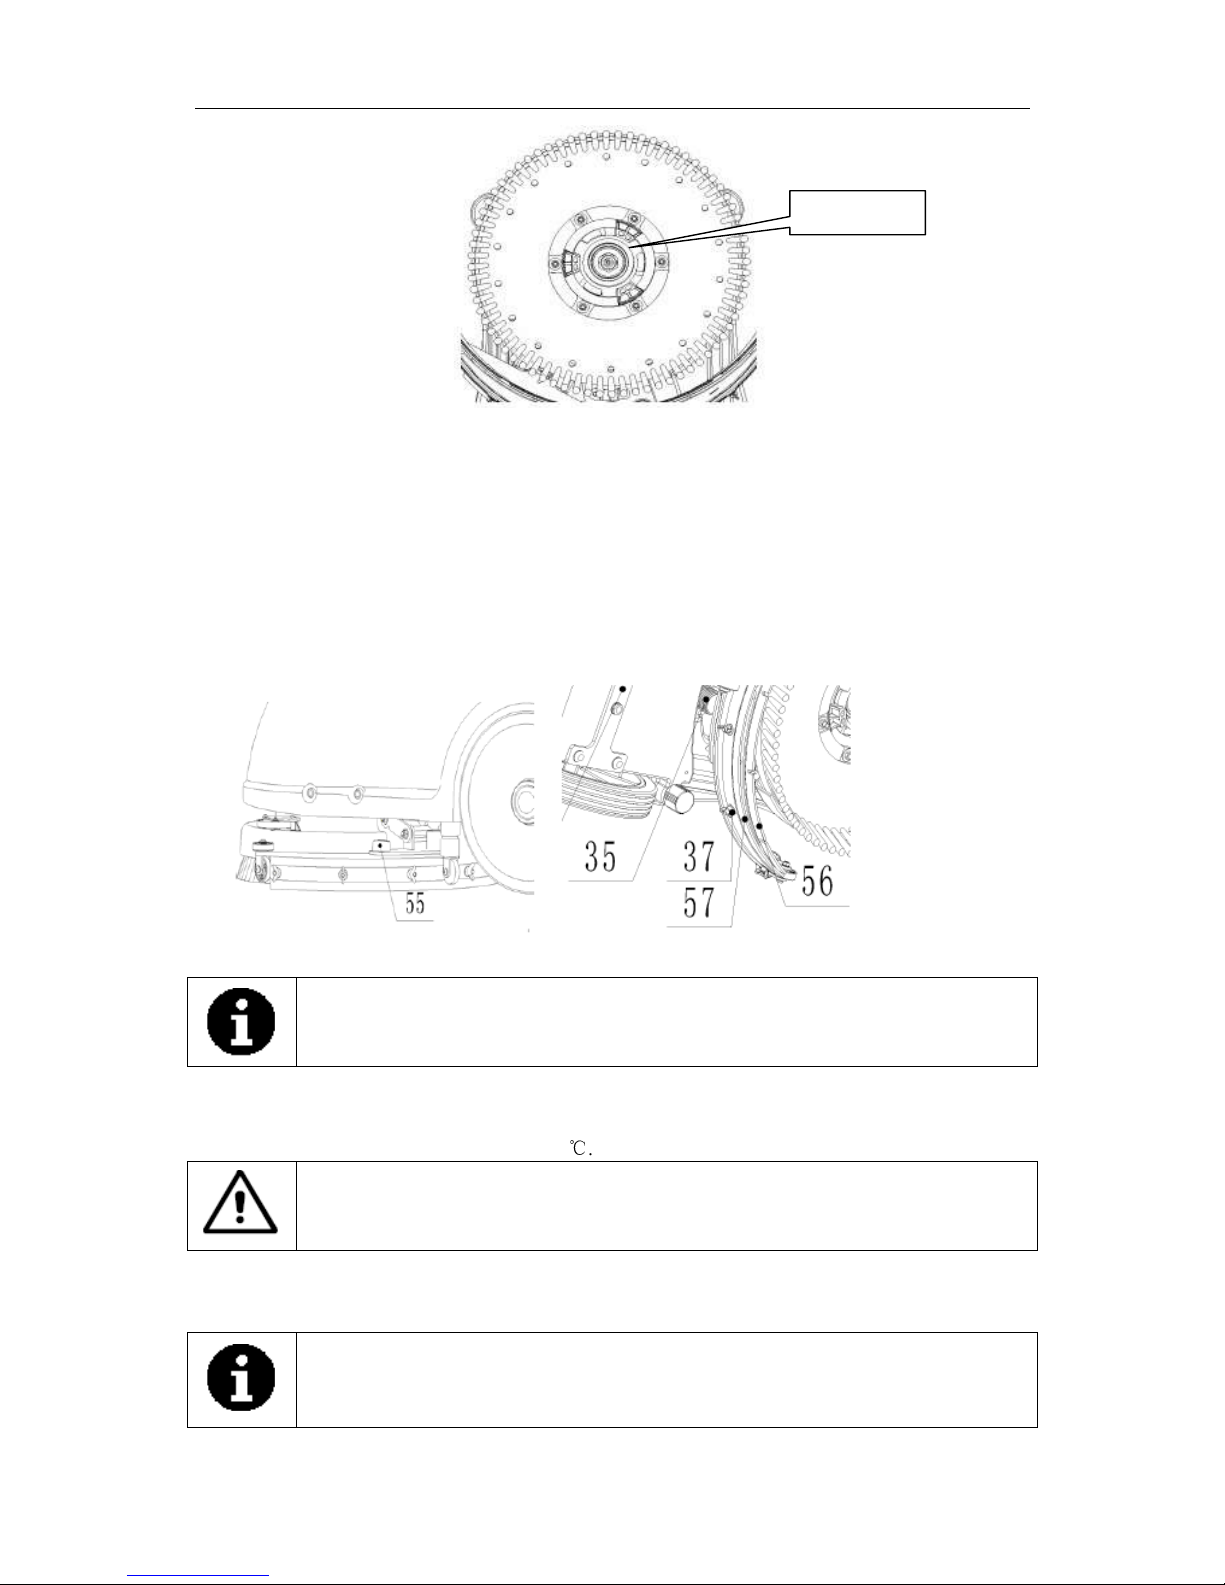
3. Mount the brush or pad driver onto the drive wheel hub and then rotate counterclockwise until it
locks, as indicated in the figure 3.
4. To remove the brush/pad, rotate the brush/pad clockwise until it is released from drive wheel hub.
WARNING
Do not turn on the machine in this position as below. The brush/pad could disengage and cause injury.
Figure 2
Page 4
USER MANUAL
3
Squeegee installation
1. Disconnect the AC cable(16).
2. Pull down the squeegee lift lever (26) to put down the squeegee on the “working” position.
3. Lay down the machine in this position as indicated in the figure2.
4. Loosen the two knobs (55) on the squeegee and slide the squeegee into the slots of squeegee
brackets
Tighten the knobs securely (unscrew the knobs, if disassembly).
5. To replace the front/rear squeegee (56/57), unscrew the thumb nut (37).
Solution tank filling
NOTE
The machine can be filled with a with pipe or bucket. Do not remove the Solution filter (21) while
filling.
1. Fill water into solution tank (3) from the inlet (20) through pipe or bucket
2. Do not fill the solution tank completely, leave a few centimeters from the edge.
3. The water temperature must not exceed 40℃.
CAUTION!
Use only low-foam and non-flammable detergents, intended for automatic scrubber applications
Solution tank draining
NOTE
Solution tank should be drained and cleaned after each scrubber operation is
completed.
Figure 3
Page 5

4
1
.
Unscrew the drain cap (22) on the bottom of solution tank. The solution/water will flow
freely into a bucket or floor drain.
2. Rinse the solution tank with clean water after every use. This will help prevent chemical
build up and clogging of the solution lines.
3. Screw up the drain cap (22).
Recovery tank draining
NOTE
Recovery tank should be drained and cleaned after each scrubber operation is
completed.
1. Turn the latch (17) off the recovery tank, take off the recovery tank from machine by
grasping two grooves of tank. Open the lid (1) and overturn the recovery tank to
drain the dirty water into a container, or unscrew the drain cap (22) to let water pipe
out to a bucket.
2. Clean and Rinse the recovery tank with clean water after every use.
3. Re-place the recovery tank on the machine and turn the latch (17) to lock the tank..
MACHINE OPERATION
1. Set the handle to a comfortable height by pressing lever (25).
2. Lower the squeegee (33) onto the floor by pulling down the lift mechanism (26).
3. Ensure that the AC cable is connected to a corresponding voltage power supply.
4. Turn on the brush motor switch (48) and the solution switch (50), the indicator light will be on.
5. Turn on the vacuum motor switch (49), the indicator light will be on.
6. If necessary, adjust the water flow by turn the ball valve (31) manually
7. Pull one or both operating triggers (24), and then brush will start to spin, solution will begin to flow.
Move the machine and start cleaning.
CAUTION!
Before lifting the brush/pad, please disconnect AC cable from outlet (16).
CAUTION!
When cleaning excessively aggressive floors or others this could cause the machine not to
work, the three switches on the control panel may turn off. It means the machine is being
overloaded. Please press the overload protector(29),then turn on all the switches on the
Control panel (47).
AFTER USING THE MACHINE
After scrubbing, please proceed with below actions before leaving the machine:
1. Remove the brush/pad-holder.
2. Empty the tanks as shown in the previous paragraph.
3. Perform the daily maintenance procedures (see the maintenance chapter).
4. Store the machine in a clean and dry place, with the brush/pad-holder and the squeegee
5. If storing in an area which may reach freezing temperatures, be sure to drain all fluids from the
machine prior to storage. any damage caused by freezing temperatures will not be covered by the
warranty.
Page 6

USER MANUAL
5
MACHINE NOT BEING USED FOR LONG PERIODS
If the machine is not going to be used for more than 30days, please proceed with below actions:
1. Perform the procedures shown in ‘After Using the Machine paragraph’.
2. Disconnect the AC cable(16).
MAINTENANCE
The lifespan of the machine and its maximum operating safety are ensured by correct and regular
maintenance. The following chart provides the scheduled maintenance. The intervals shown may vary
according to particular working conditions, which will be defined by the person in charge of the
maintenance.
WARNING
Maintenance procedures must be sure the cable unplug from outlet .
Moreover, carefully read the instruction in the Safety chapter.
All scheduled or extraordinary maintenance procedures must be performed by qualified personnel, or by
an authorized Service Center.
This Manual describes only the easier and most common maintenance procedures.
For other maintenance procedures shown in the Scheduled Maintenance Table, refer to the Service
Manual that can be consulted at any Service Center.
SCHEDULED MAINTENANCE TABLE
Procedure Daily, after using
the machine
Weekly Every six
mouths
yearly
Squeegee cleaning
Brush cleaning
Tank and vacuum grid with float cleaning, the
cover gasket check
Squeegee blade check and replacement
Solution filter cleaning
Out-water pipe filter cleaning
Screw and nut tightening check (1)
Lubricate rotary parts
(1)
Brush/Pad-holder motor carbon brush check or
replacement
(2)
Vacuum system motor carbon brush check or
replacement
(2)
(1) And after the first 8 working hours.
(2) This maintenance procedure must be performed by an authorized viper Service Center.
SQUEEGEE CLEANING
NOTE
The squeegee must be clean and its blades must be in good condition in order to
getting a good drying performance.
Page 7
6
CAUTION!
It is advisable to wear protective gloves when cleaning the squeegee because there may be sharp debris.
SQUEEGEE BLADE CHECK AND REPLACEMENT
1. Take off the squeegee as shown in the previous paragraph.
2. Check to see if the edge of the front/rear blades are cracked or split, if necessary replace them with
new.
3. Unscrew six the thumb nut (37) to get off the blades.
4. Check the front/rear blades for integrity, cut and tears. If they are not adequate, overturn or replace
them.
5. Install the squeegee in the reverse order of removal.
BRUSH /PAD DRIVER CLEANING
CAUTION!
It is advisable to wear protective gloves when cleaning the brush/pad because there may be sharp debris.
1. Remove the brush/pad as shown in the previous paragraph.
2. Clean and wash the brush/pad with water and detergent.
3. Check the brush bristles for integrity and wearing status; if necessary, replace the brush.
4. Check the pad for wearing status; if necessary, replace the pad driver.
TANK/VACUUM GRID WITH FLOAT CLEANING AND COVER
GASKET CHECK
CAUTION!
It is advisable to wear protective gloves when cleaning the tank and vacuum/suction assembly because
there may be sharp debris.
1. Move the machine to the appointed disposal area.
2. Disconnect the AC cable (16).
3. Take off the recovery tank (2), clean and rinse both solution/recovery tank, and drain out.
4. Take off all vacuum kits, gasket, filter, clean and re-install.
5. Check the recovery tank lids gasket ring and the vacuum rubber connector (18) between two tanks
are integrity or not..
NOTE
The gasket ring of recovery tank and the rubber connector between two tanks create
vacuum in the tank. If necessary, replace them.
MACHINE STRUCTURE
1. Recovery tank lid
2. Recovery tank
3. Solution tank
4. Brush cover
Page 8

USER MANUAL
7
5. Bumper wheels
6. Brush
7. Front handle cover
8. Control panel
9. Rear handle cover
10. Handle sleeve
11. Handle steel tube
12. vacuum assembly
13. Squeegee suction assembly
14. Left gear seat
15. Right gear seat
16. cable
17. Latch
18. Rubber connector
19. Hose joint
20. Inlet
21. Solution filter
22. Drain cap
23. Wheels
24. Left and right trigger
25. Handle lever
26. Squeegee lift lever
27. Squeegee string
28. Electrical Box
29. Overload protector
30. Wheel cover
31. Adjusting valve
32. Solenoid valve
33. Squeegee
34. Squeegee wheels
35. Squeegee hose
36. Axle
37. Thumb nut
38. Vacuum motor
39. Brush motor
40. Drive wheel
41. Belt
42. Squeegee rotation plate
43. Connecting bracket
44. Squeegee bracket
45. Motor mounting plate
Page 9

8
Page 10

USER MANUAL
9
Control panel
47. Control panel
48. Brush motor switch
49. Vacuum motor switch
50. Solution switch
TECHINICAL DATA
Machine length*width*height 770x500x550MM
Solution tank capacity 15L
Recovery tank capacity 15L
Wheel diameter 254MM
Brush motor data 220V-240V 250W
Vacuum motor data 220V-240V 300W
Electromagnetic valve data 220V-240V
Maximum gradient 2%
Sound level 72 dBA
Power cable length 15M
Working capacity, up to 800mm H2O
Cleaning productivity 750m2/hour
Squeegee width 490mm
Brush diameter 380mm
Brush rpm 140rpm
Charger /
Machine weight 39kg
Machine weight(with charger and package) 44kg
Carton spec 780x415x590MM
Page 11

10
TROUBLESHOOTING
Trouble Possible Cause Remedy
The machine does not work
The cable is not connected correctly or
faulty plug or cable
Check cable and plug
Faulty brush motor Check the brush motor
Carbon brushes worn out
Change the carbon
brushes
The brush motor is overloaded
Press the overload
protector according to the
system to restart the machine
The vacuum motor does not work
The wiring is not
connected correctly or
faulty wiring
Check the wiring
Faulty vacuum motor Check the vacuum motor
Carbon brushes worn out Change the carbon brushes
The suction power is insufficient
The recovery tank is full. Empty the recovery tank.
The hose is disconnected from the
squeegee
connect
Vacuum assembly is clogged Clean or check
The squeegee is dirty, or the squeegee
blades are worn or damaged
Clean and check the squeegee
The recovery tank does not limited Lock the latch(17)
The tank cover is not properly closed, or
the gasket is damaged
Close the cover properly or
replace the gasket
Squeegee adjustment piece(58 )not set at
an appropriate position
Adjust the screw nut(59 )to the
appropriate position
The solution flow is insufficient.
The solution is empty Fill the tank
Solution flow control valve(31) is block
up
Clean the valve
The solution is dirty
Empty the solution, clean the tank
and refill with clean solution
The squeegee leaves marks on the
floor.
There is debris under the squeegee blades Remove the debris
The squeegee blades are worn, chipped
or torn
Replace the blades
Page 12

Viper Cleaning Equipment Co., Ltd
EC Declaration of Conformity
The undersigned, representing the following:
Manufacturer and
the authorised representative established within the
European Economic Area:
Company name:
Viper Cleaning Equipment Co., Ltd
Address:
Liang Bian village, Liao Bu town, Dongguan City,
Guangdong Province, China
Business name: Viper Cleaning Equipment Co., Ltd
Name and address of person/Company authorised to compile the technical file established in the EU
Community:
herewith declare that the following machinery:
Description of machinery
Generic denomination: Walk Behind Scrubber
Function: The machines are available for foam generating and floor cleaning for industrial and commercial use
Model/s: AS380/15C-EU/AS380/15C-UK;
Fulfill the relevant provisions of European Directive 2006/42/EC (MD) and 2006/95/EC (LVD). The harmonized
standards used in order to obtain compliance to 2006/42/EC (MD) and 2006/95/EC (LVD) are the following:
EN 60335-1 Safety of household and similar electrical appliances
EN 60335-2-67 Particular requirements for floor treatment and floor cleaning machines, for industrial and
commercial use
EN 60335-2-72 Particular requirements for automatic machines for floor treatment for commercial and industrial
use
Viper EUROPE
Nilfisk-Advance A/S
Viper EUROPE/Nilfisk-Advance A/S Sognevej 25 DK-2605 Brondby,Denmark
2013-6-18
Page 13

Company information:
www.vipercleaning.eu
info-eu@vipercleaning.com
 Loading...