

VIPColor VP485, VP485e, VP495 User Manual
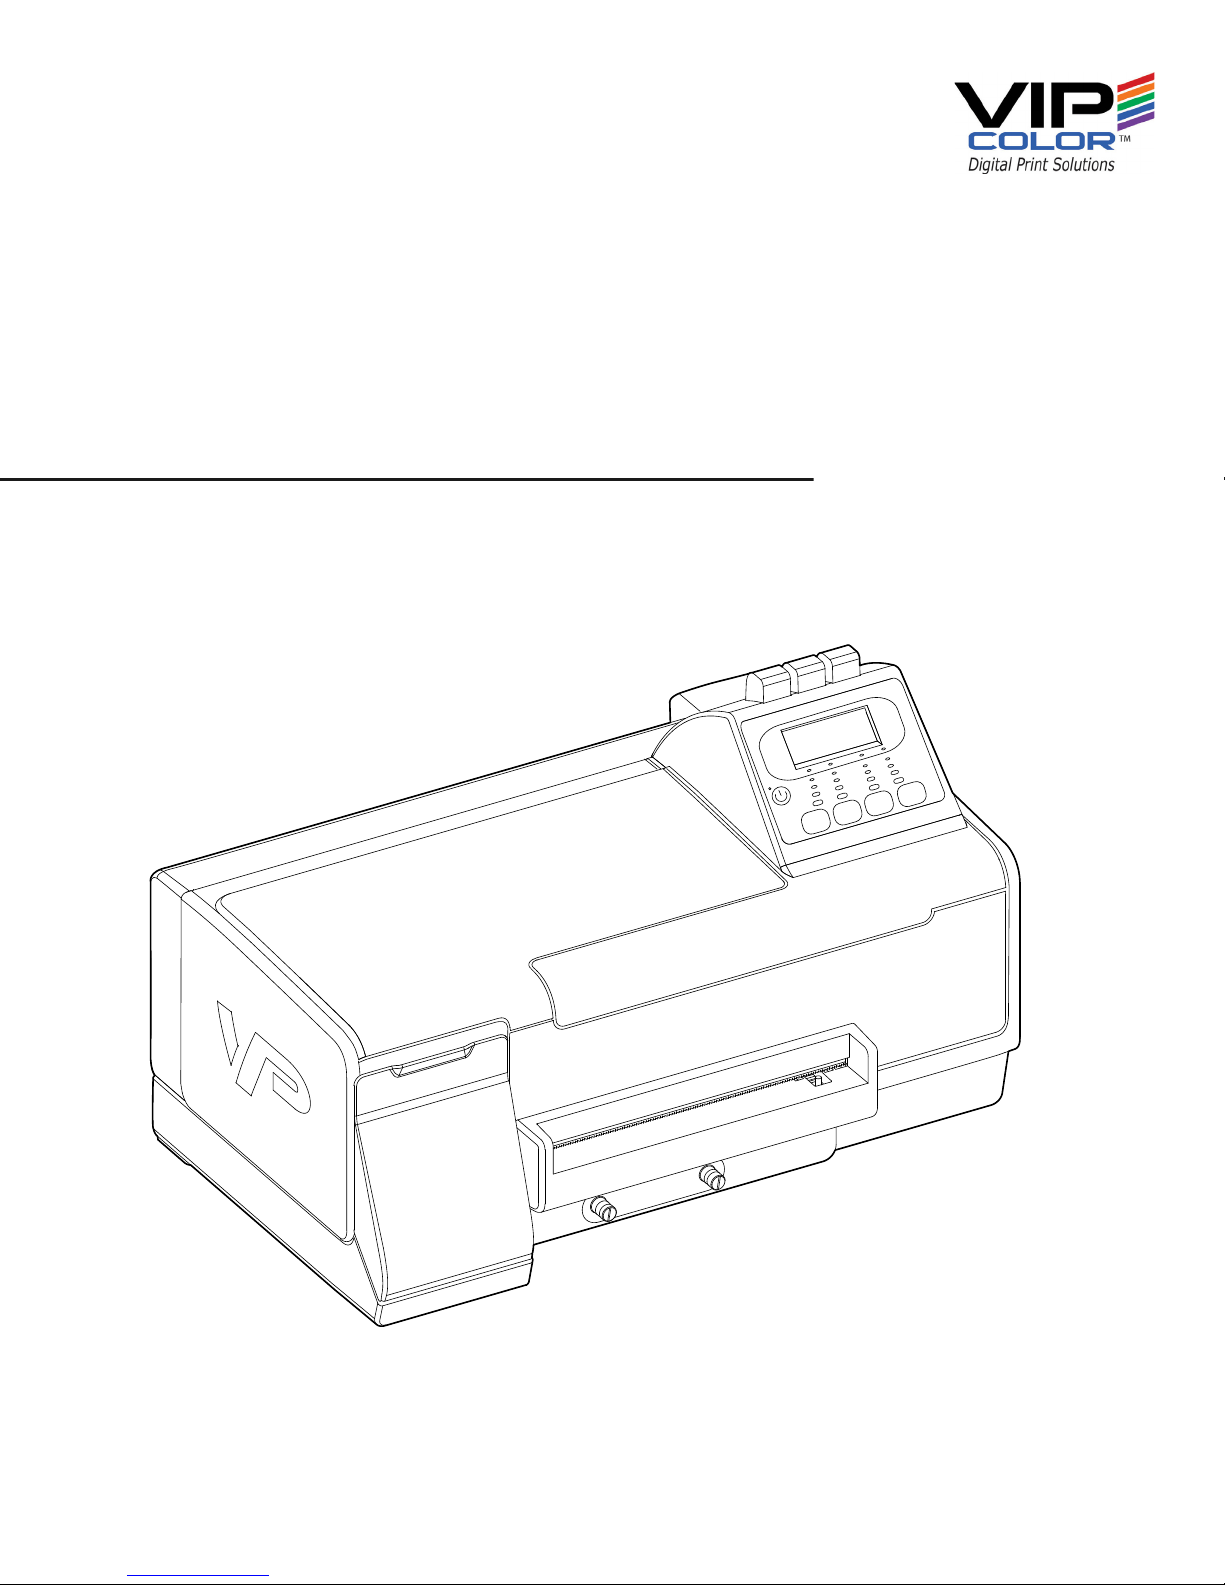
VP485/ VP485e/ VP495
User Guide
Printer

Copyright © 2013 VIPColor Technologies Pte Ltd. All rights reserved.
No part of this document may be photocopied, reproduced, or translated to another language without the
prior written permission of VIPColor Technologies Pte Ltd.
Warranty
VIPColor Technologies Pte Ltd. takes steps to ensure that this user guide is correct; however, errors may
occur. The information in this guide is subject to change without notice. VIPColor Technologies Pte Ltd.
makes no warranty of any kind with regard to this material, including but not limited to, the implied
warranties of merchantability and fitness for a particular purpose.
VIPColor Technologies, Pte Ltd. shall not be liable for errors contained herein or for incidental or
consequential damages in connection with furnishing, performance, or use of this material.
Trade mar ks
Microsoft, Windows, Windows Vista, and Windows Server are registered trademarks of Microsoft
Corporation in the U.S.A. and/or other countries.
VIPColor and VP are trademarks of VIPColor Technologies, U.S.A., Inc
All other company and product names may be the registered trademarks or trademarks of their respective
owners.
VCPHOE-80116 VP485/ VP485e/ VP495 User Guide Edition 2. 04/2013
2

In This Guide
The following symbols and conventions are used in this guide.
WARNING
A WARNING indicates a potentially hazardous situation that could result in an
electric shock/fire and serious injury if you ignore the safety precautions.
CAUTION
A CAUTION indicates a potentially hazardous situation that could result in injury or
damage to the printer if you ignore the safety precautions.
3

Safety Precautions
Read the safety warnings and instructions carefully to ensure that you use your
printer safely. Do not attempt to use your printer in any way other than described in
this guide.
WARNING: Electrical Shock Hazard
Serious shock hazard leading to death or injury may result if you do not take the
following precautions:
• Ensure that the AC power outlet (mains) has a protective earth (ground)
terminal.
• Disconnect the printer from the power source prior to performing any
troubleshooting procedures.
• Prevent water or any other liquids from running onto electrical components or
circuits, or through openings in the enclosure.
• Ensure the power supply source is rated for the printer: AC 100–240 V,
50/60 Hz.
• Never attempt to plug in or unplug the printer from the power supply when your
hands are wet.
• Never plug the printer into a power socket that is shared with other equipment
(extension lead/ cord, 2- or 3- way adapter, etc.).
• Always push the plug all the way into the power outlet.
• Never try to remove the plug by pulling on the cord.
• Never damage, modify, stretch or excessively bend or twist the power cord. Do
not use the printer if the power cord is bundled or knotted.
• Do not place heavy objects on the power cord.
• If you detect smoke, unusual smells or strange noises around the printer,
immediately unplug the printer at the power supply and call for service.
• Periodically, unplug the power cable from the printer and use a dry cloth to wipe
off any dust or dirt collected on the plug and the power outlet.
If the printer is exposed to a lot of dust, smoke, or high humidity, dust collected
on the plug will absorb moisture and may cause insulation failure and fire.
4

Contents
Printer Parts and Functions . . . . . . . . . . . . . . . . . . . . . . . . . . . . . . . 7
Front View . . . . . . . . . . . . . . . . . . . . . . . . . . . . . . . . . . . . . . . . . . . . . . . . . . . . . . . . . . . . . . . . 8
Control Panel . . . . . . . . . . . . . . . . . . . . . . . . . . . . . . . . . . . . . . . . . . . . . . . . . . . . . . . . . . . . . . 9
Status Lights . . . . . . . . . . . . . . . . . . . . . . . . . . . . . . . . . . . . . . . . . . . . . . . . . . . . . . . . . 10
Menu Buttons. . . . . . . . . . . . . . . . . . . . . . . . . . . . . . . . . . . . . . . . . . . . . . . . . . . . . . . . 11
Rear View . . . . . . . . . . . . . . . . . . . . . . . . . . . . . . . . . . . . . . . . . . . . . . . . . . . . . . . . . . . . . . . 12
Setting Up the Printer . . . . . . . . . . . . . . . . . . . . . . . . . . . . . . . . . . . .13
Unpack the Printer. . . . . . . . . . . . . . . . . . . . . . . . . . . . . . . . . . . . . . . . . . . . . . . . . . . . . . . 14
Install the Ink Cartridges. . . . . . . . . . . . . . . . . . . . . . . . . . . . . . . . . . . . . . . . . . . . . . . . . 16
Install the Printheads . . . . . . . . . . . . . . . . . . . . . . . . . . . . . . . . . . . . . . . . . . . . . . . . . . . . 17
Connect the Power Cable. . . . . . . . . . . . . . . . . . . . . . . . . . . . . . . . . . . . . . . . . . . . . . . . . 19
Align the Printheads . . . . . . . . . . . . . . . . . . . . . . . . . . . . . . . . . . . . . . . . . . . . . . . . . . . . . 20
Load Label Media . . . . . . . . . . . . . . . . . . . . . . . . . . . . . . . . . . . . . . . . . . . . . . . . . . . . . . . . 22
Install the Printer Driver . . . . . . . . . . . . . . . . . . . . . . . . . . . . . . . . . . . . . . . . . . . . . . . . . 24
Install the Printer on a Network. . . . . . . . . . . . . . . . . . . . . . . . . . . . . . . . . . . . . . . . . . 25
First Time Setup . . . . . . . . . . . . . . . . . . . . . . . . . . . . . . . . . . . . . . . . . . . . . . . . . . . . . 25
If the Printer Is Already Installed . . . . . . . . . . . . . . . . . . . . . . . . . . . . . . . . . . . . . 27
Choose Display Language . . . . . . . . . . . . . . . . . . . . . . . . . . . . . . . . . . . . . . . . . . . . . . . . 28
Using the Printer. . . . . . . . . . . . . . . . . . . . . . . . . . . . . . . . . . . . . . . . .29
Select Print Media . . . . . . . . . . . . . . . . . . . . . . . . . . . . . . . . . . . . . . . . . . . . . . . . . . . . . . . 30
Label Threshold Setting . . . . . . . . . . . . . . . . . . . . . . . . . . . . . . . . . . . . . . . . . . . . . . 31
Select Print Settings . . . . . . . . . . . . . . . . . . . . . . . . . . . . . . . . . . . . . . . . . . . . . . . . . . . . . 32
Cancel a Print Job . . . . . . . . . . . . . . . . . . . . . . . . . . . . . . . . . . . . . . . . . . . . . . . . . . . . . . . . 33
Create Full-Bleed Labels . . . . . . . . . . . . . . . . . . . . . . . . . . . . . . . . . . . . . . . . . . . . . . . . . 34
Using BarTender UltraLite . . . . . . . . . . . . . . . . . . . . . . . . . . . . . . . . . . . . . . . . . . . 35
Using Other Graphics Software . . . . . . . . . . . . . . . . . . . . . . . . . . . . . . . . . . . . . . . 37
Adjust Alignment for Printing . . . . . . . . . . . . . . . . . . . . . . . . . . . . . . . . . . . . . . . . . . . . 38
Adjust for Media Thickness . . . . . . . . . . . . . . . . . . . . . . . . . . . . . . . . . . . . . . . . . . . . . . 40
Upgrade or Remove Printer Driver . . . . . . . . . . . . . . . . . . . . . . . . . . . . . . . . . . . . . . . 42
Monitor Printer through Web Interface . . . . . . . . . . . . . . . . . . . . . . . . . . . . . . . . . . 42
Printer Maintenance . . . . . . . . . . . . . . . . . . . . . . . . . . . . . . . . . . . . .43
Replacing Ink Cartridges . . . . . . . . . . . . . . . . . . . . . . . . . . . . . . . . . . . . . . . . . . . . . . . . . 44
Cleaning Printheads . . . . . . . . . . . . . . . . . . . . . . . . . . . . . . . . . . . . . . . . . . . . . . . . . . . . . 45
Replacing Printheads . . . . . . . . . . . . . . . . . . . . . . . . . . . . . . . . . . . . . . . . . . . . . . . . . . . . 46
Storing Printing Supplies . . . . . . . . . . . . . . . . . . . . . . . . . . . . . . . . . . . . . . . . . . . . . . . . 48
Cleaning the Printer . . . . . . . . . . . . . . . . . . . . . . . . . . . . . . . . . . . . . . . . . . . . . . . . . . . . . 48
5

Troubleshooting . . . . . . . . . . . . . . . . . . . . . . . . . . . . . . . . . . . . . . . . .49
If the Printer Does Not Print . . . . . . . . . . . . . . . . . . . . . . . . . . . . . . . . . . . . . . . . . . . . . 50
Other Printer Problems . . . . . . . . . . . . . . . . . . . . . . . . . . . . . . . . . . . . . . . . . . . . . . . . . . 51
If Error Messages Appear . . . . . . . . . . . . . . . . . . . . . . . . . . . . . . . . . . . . . . . . . . . . . . . . 53
If Printouts are Incorrect or Print Quality is Poor . . . . . . . . . . . . . . . . . . . . . . . . . 56
BarTender Problems. . . . . . . . . . . . . . . . . . . . . . . . . . . . . . . . . . . . . . . . . . . . . . . . . . . . . 58
If There Is a Media Jam. . . . . . . . . . . . . . . . . . . . . . . . . . . . . . . . . . . . . . . . . . . . . . . . . . . 59
Cleaning the Rear Module . . . . . . . . . . . . . . . . . . . . . . . . . . . . . . . . . . . . . . . . . . . . . . . . 63
Appendix . . . . . . . . . . . . . . . . . . . . . . . . . . . . . . . . . . . . . . . . . . . . . . . .67
Options on Printer Menu. . . . . . . . . . . . . . . . . . . . . . . . . . . . . . . . . . . . . . . . . . . . . . . . . 68
Regulatory Information . . . . . . . . . . . . . . . . . . . . . . . . . . . . . . . . . . . . . . . . . . . . . . . . . . 70
Index . . . . . . . . . . . . . . . . . . . . . . . . . . . . . . . . . . . . . . . . . . . . . . . . . . . .73
6

Chapter 1
Printer Parts and Functions
Front View 8
Control Panel 9
Rear View 12
7
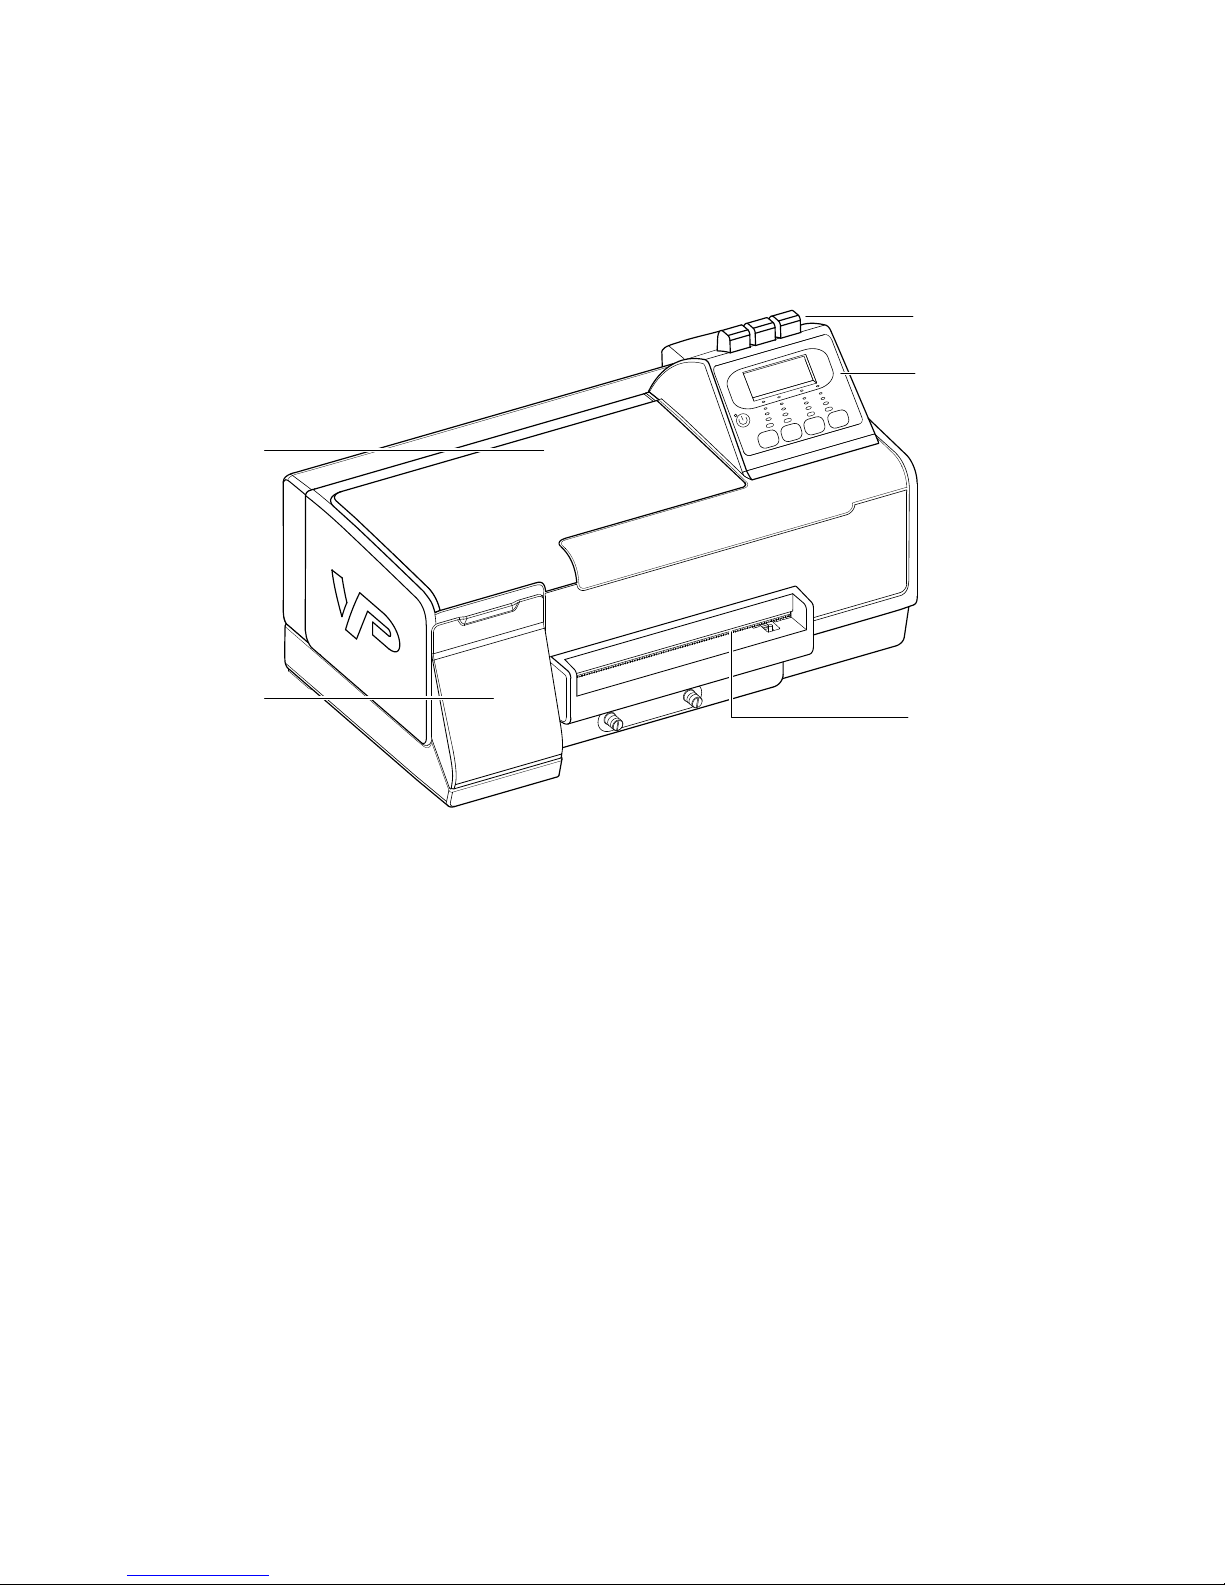
Front View
Status lights
Control panel
Manual cutter
Top cover
Ink cartridge
compartment cover
8 Printer Parts and Functions
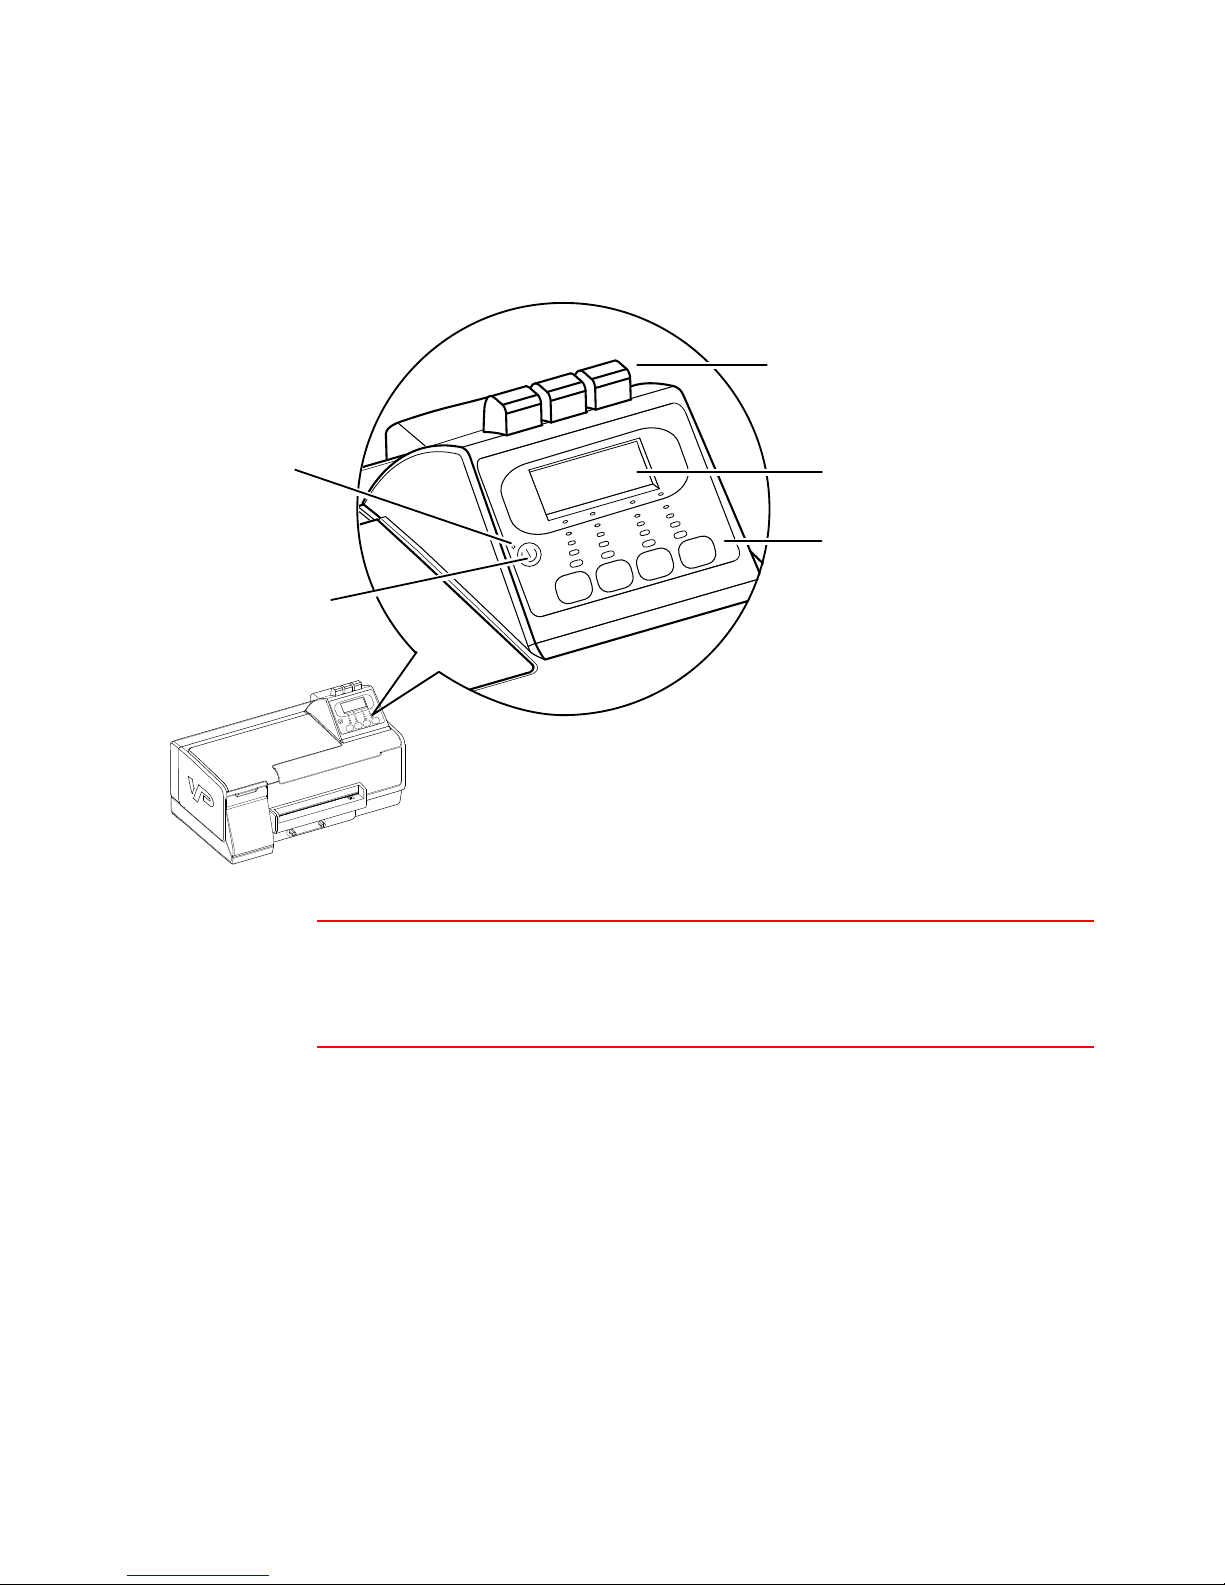
Control Panel
Status lights
LCD display
Menu buttons
Power indicator
Power button
CAUTION
Do not turn off the printer using the Power switch at the rear of the printer. Always turn
it off using the Power button on the control panel, to ensure that the printhead carriage
is returned to its proper position at the right side of the printer.
Printer Parts and Functions 9
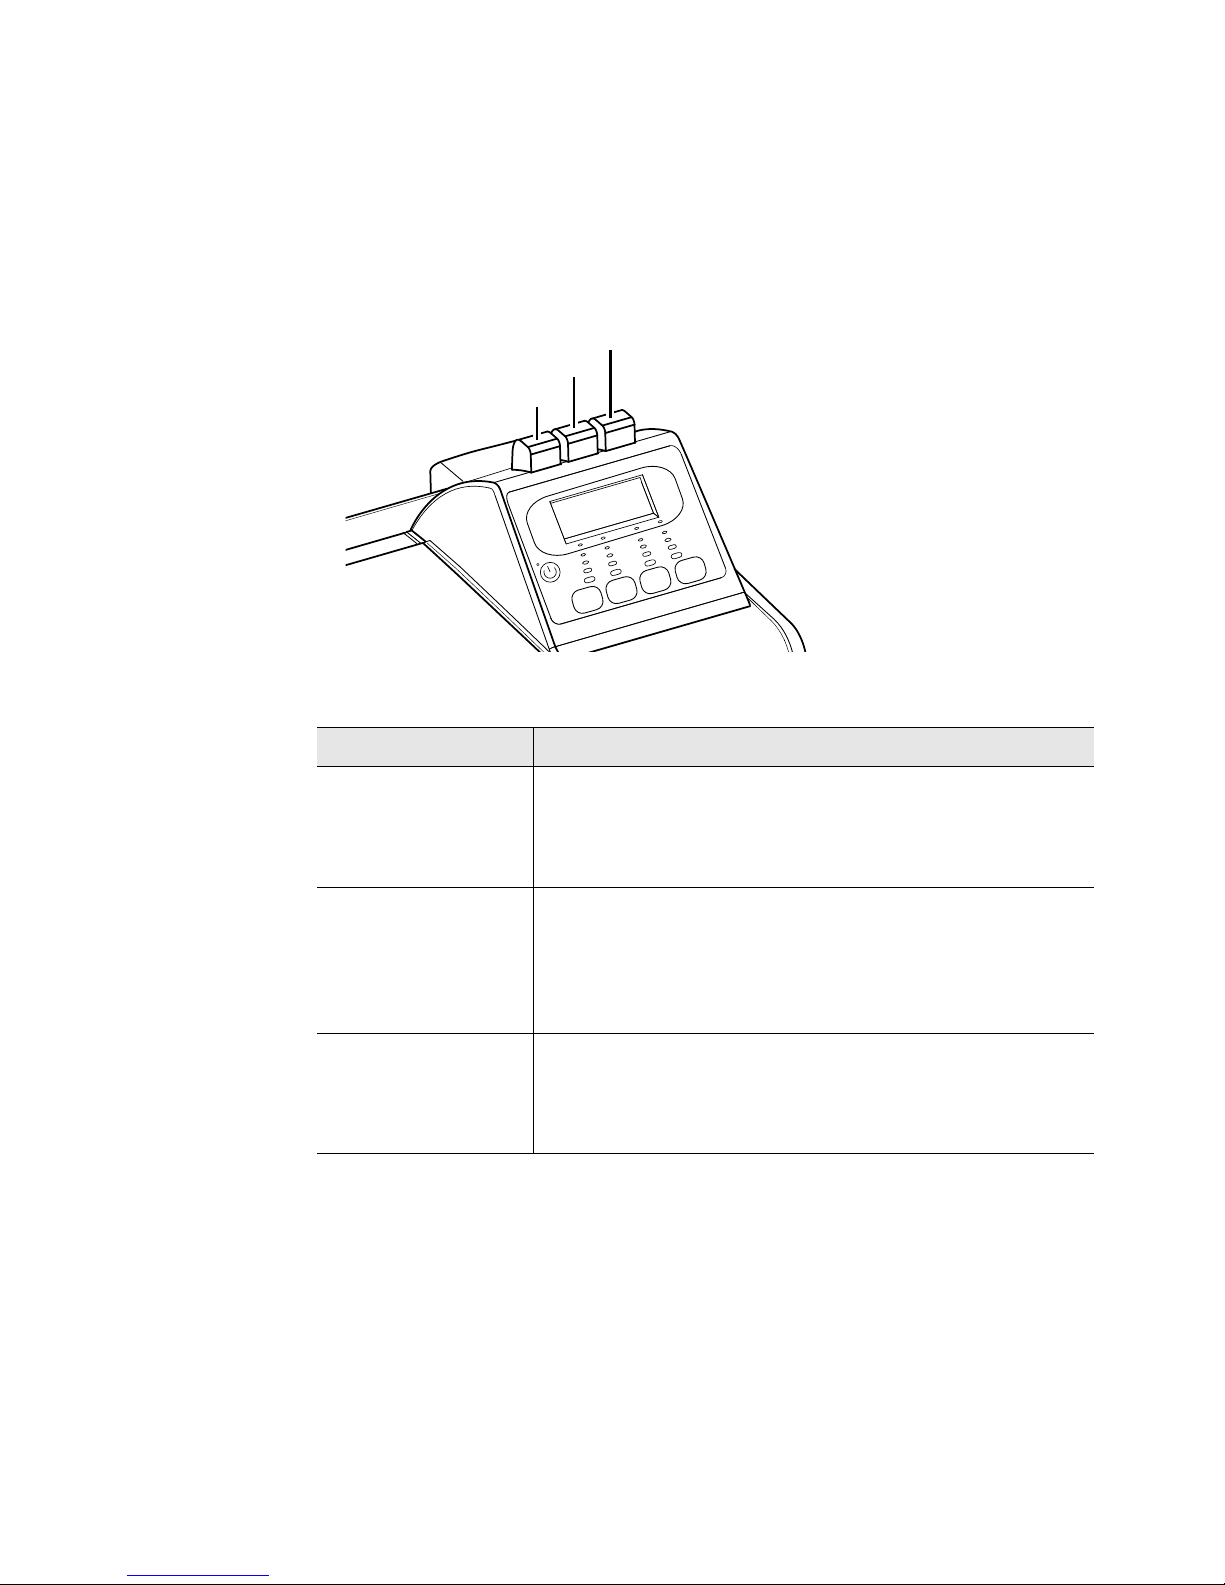
Status Lights
Amber
Red
Green
The lights on the control panel indicate the status of the printer and are also useful
for diagnosing printing problems.
Table 1
Status Light Description
Green
Amber
Red
Status Lights
On Printer is online and ready to print.
Flashing Printer is receiving data from the computer.
Flashing One of the ink cartridges is running low.
On One of the ink cartridges is almost empty and needs
Flashing One of the ink cartridges is empty and needs to be replaced.
On An error has occurred.
replacement soon.
10 Printer Parts and Functions
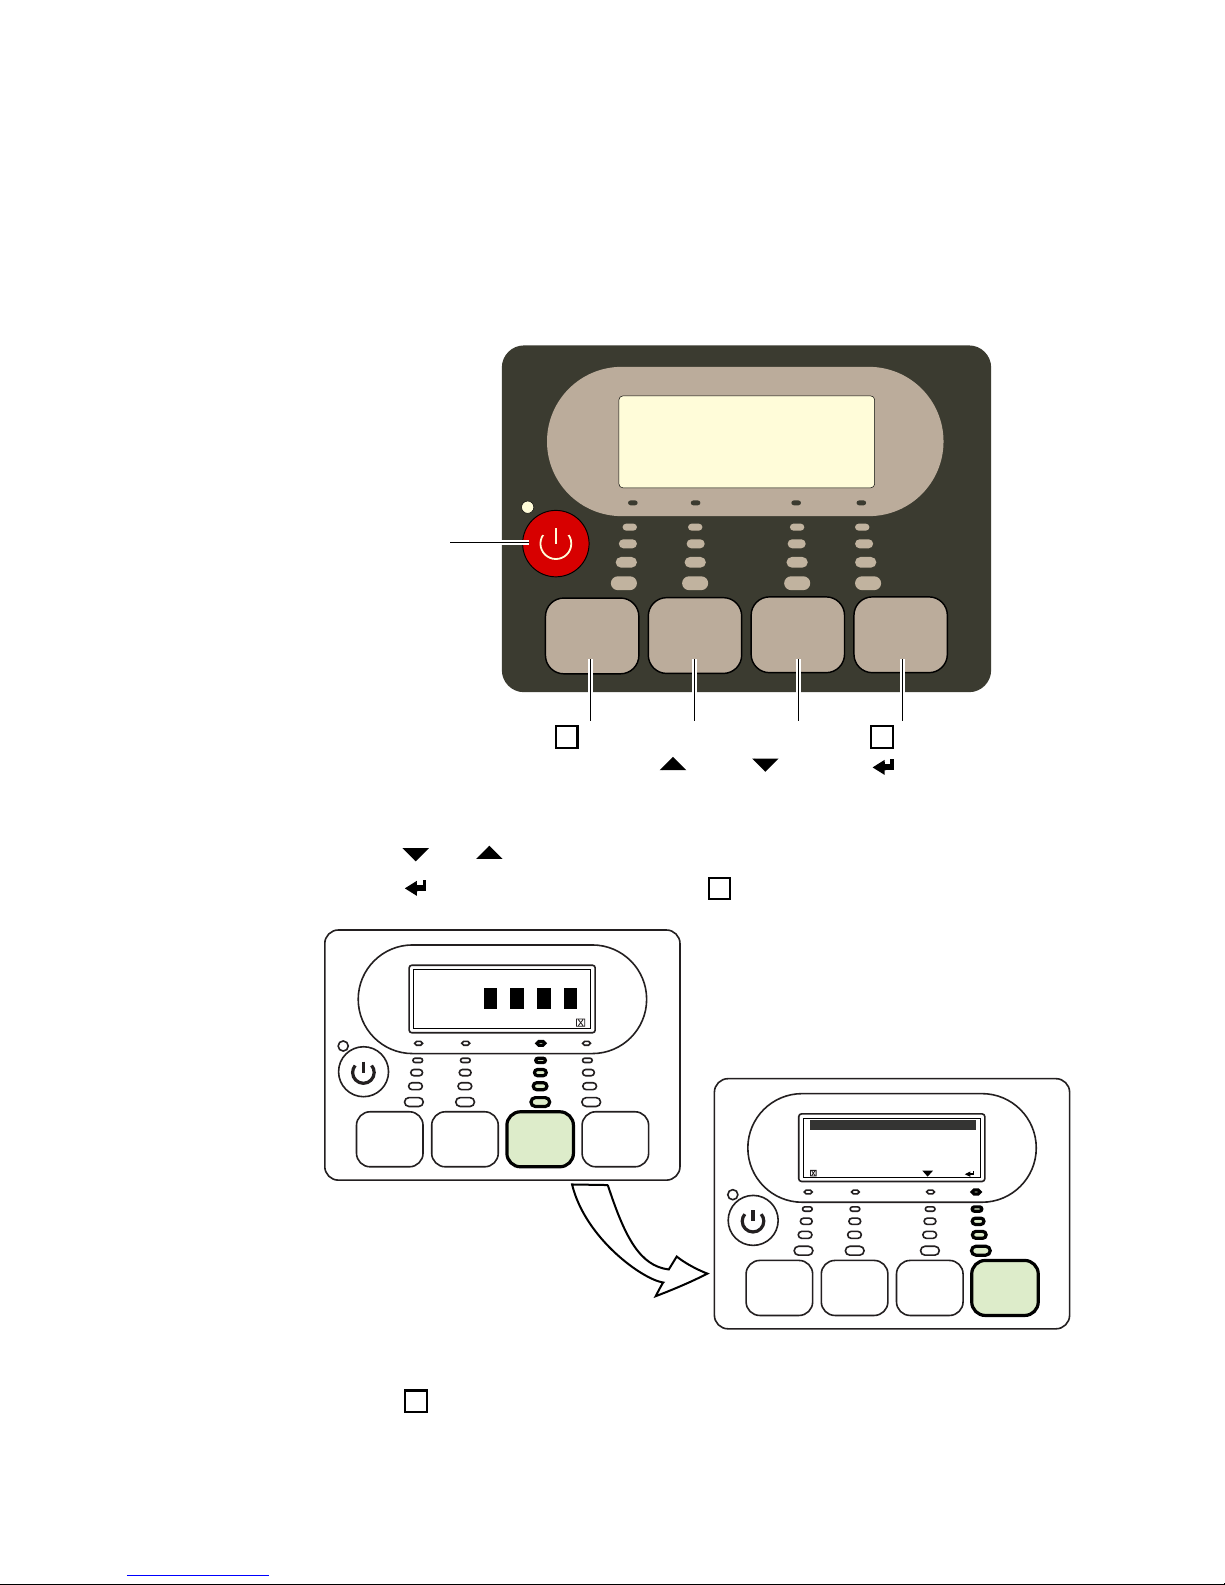
Menu Buttons
Power button
MENU/FEED/(esc)
(down)
(clear)/
(up)
x
(enter)
x
x
FEED MENU
ONLINE
BYMC
0
Test
Eject Media
Maintenance
Printer Setup
x
Use the buttons on the control panel to access various setup and maintenance
functions, or change printer settings. (For a detailed list of menu options, see Options
on Printer Menu on page 68.)
• When the printer is online, press MENU to display the main menu.
• Press and to move through the menu options.
• Press (enter) to select an option or (esc) to cancel.
• Press FEED to feed a single label.
• Press (clear) to cancel the current print job.
Printer Parts and Functions 11
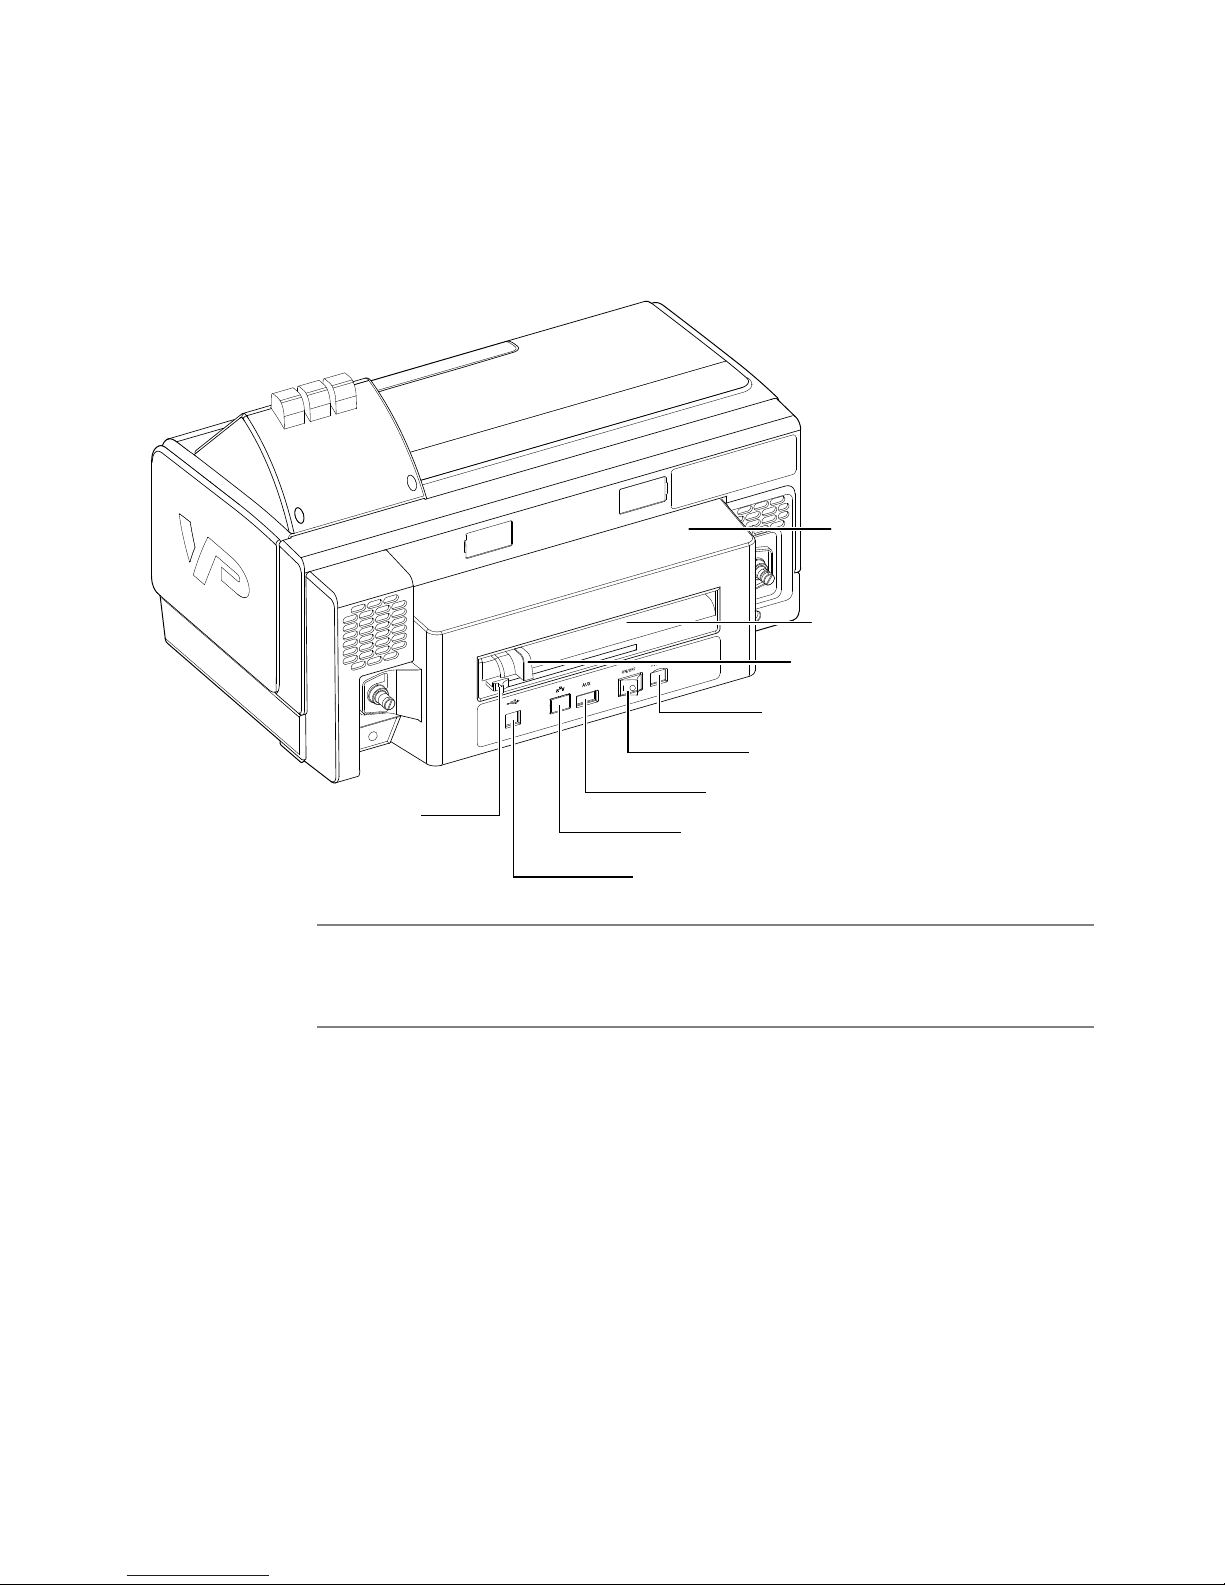
Rear View
Rear module
Media feed slot
Media width guide
Power socket
Power switch
GPIO port
Network port
USB port
Media sensor
NOTE
When you need to power off the printer using the Power switch at the rear of the
printer, make sure you wait about 8 seconds before you turn it on again.
12 Printer Parts and Functions

Chapter 2
Setting Up the Printer
Unpack the Printer 14
Install the Ink Cartridges 16
Install the Printheads 17
Connect the Power Cable 19
Align the Printheads 20
Load Label Media 22
Install the Printer Driver 24
Install the Printer on a Network 25
Choose Display Language 28
13

Unpack the Printer
Choose a Location
Follow these guidelines to select a suitable location for the printer:
• The area must be well ventilated and free from dust.
• Avoid places where the printer will be exposed to direct sunlight, heat source,
liquids, chemicals, or flammable solvents such as alcohol or thinners.
• Avoid places that are subject to excessive vibration or abrupt changes in
temperature and humidity.
• To avoid the risk of fire or electric shock, choose a location that has a constant
temperature range of 5°C to 35°C (41°F to 95°F) and humidity of 10% to 90%
(condensation free).
• Select a surface that is stable and sturdy enough to take the weight of the printer.
• Do not place the printer on a thick rug or carpet.
CAUTION
Be careful when lifting the printer as it is heavy. Get help from another person when
moving the printer.
Always support the printer on both sides. When moving the printer, do not tilt it,
turn it on its side or upside down. Ink may leak.
14 Setting Up the Printer
Unpack the Printer
1. Open the printer box and remove the packing material from the top of the box.
2. Carefully lift the printer out from the box and set it on a level and sturdy surface
at the selected location.
3. Remove the tape and open the top cover of the printer.
4. Remove the packing material inside the printer.
5. Close the printer cover.
NOTE
Do not throw away the printer box and packing materials in case you need to use
them for transporting the printer in the future.
Setting Up the Printer 15
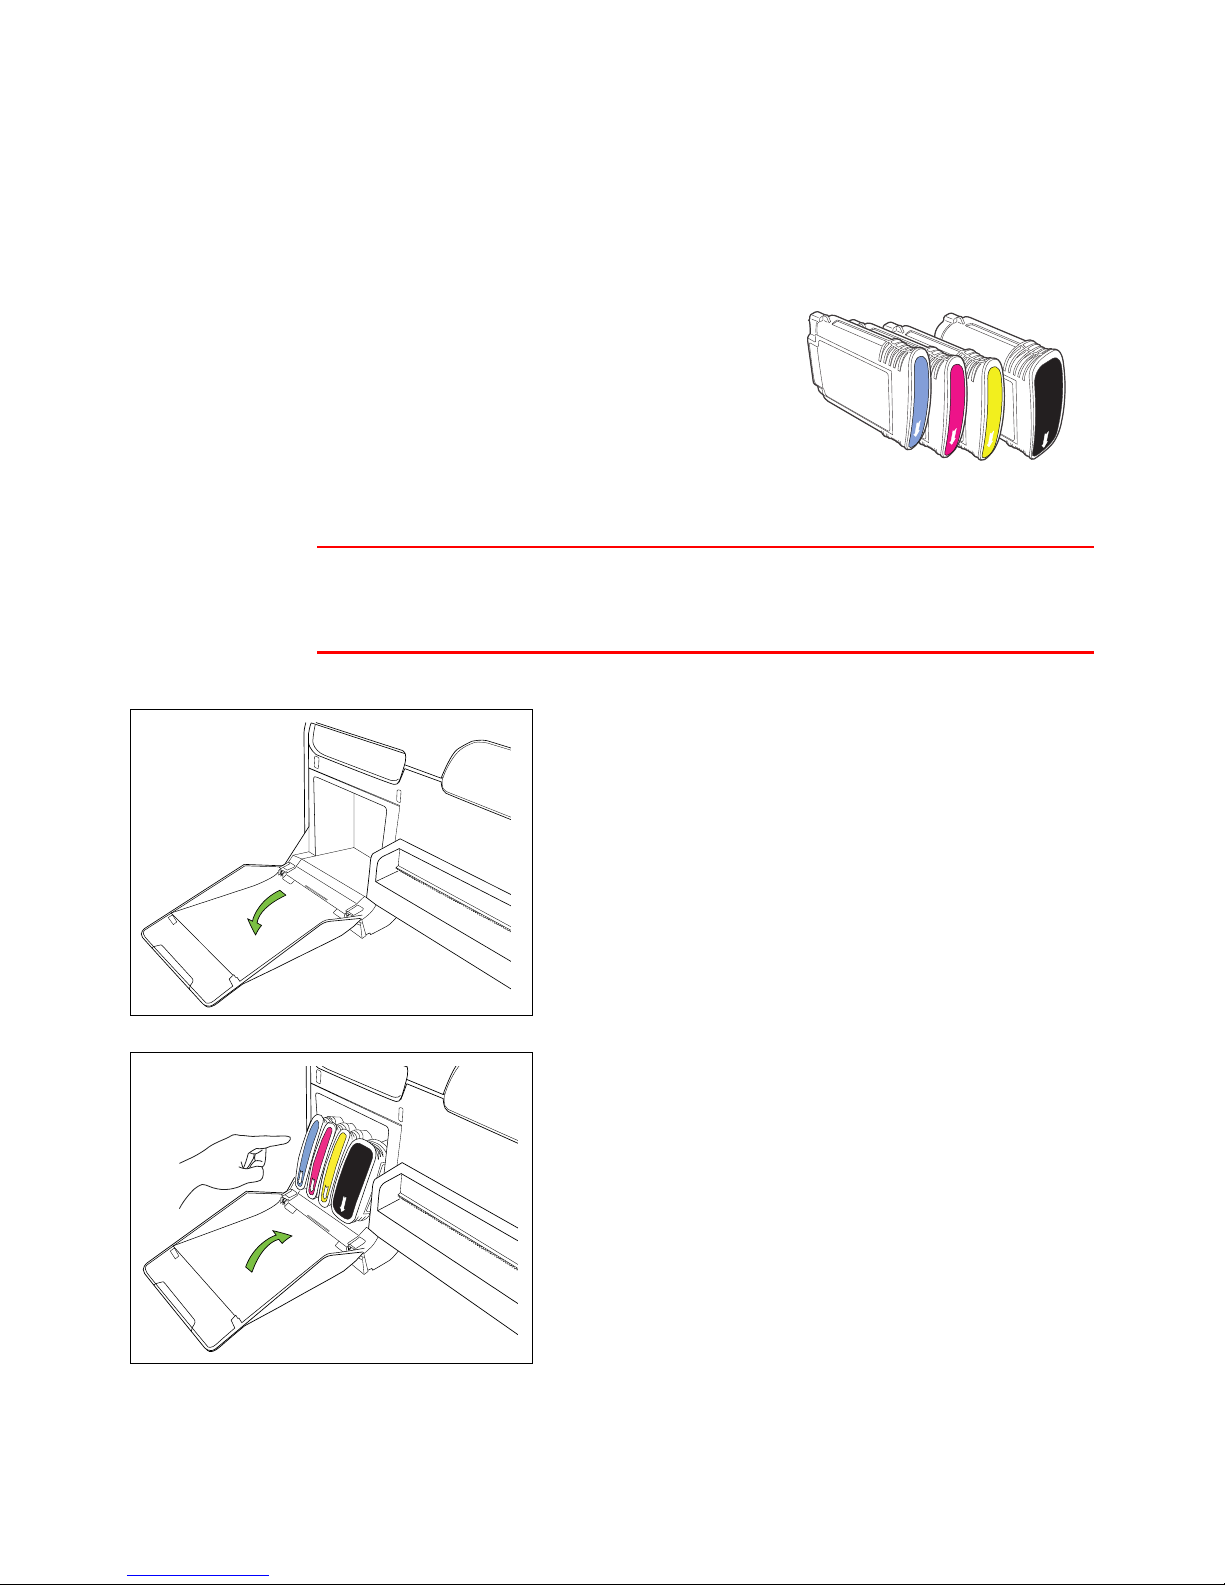
Install the Ink Cartridges
The printer uses four ink cartridges:
cyan, magenta, yellow and black from left to right
in the print cartridge compartment. Colored
labels over the slots indicate where each ink
cartridge should be installed.
The ink cartridges have to be correctly installed
for the printer to function properly.
CAUTION
Handle ink cartridges carefully to avoid staining your clothes or surrounding work
area.
1. Open the ink cartridge compartment cover.
2. Remove an ink cartridge from its packaging.
16 Setting Up the Printer
3. Push the ink cartridge firmly into the correct slot as
indicated by the colored label.
The ink cartridge will not sit properly if it is in the
wrong slot.
4. Repeat steps 2 and 3 to install the other ink
cartridges.
5. Close the ink cartridge compartment cover.
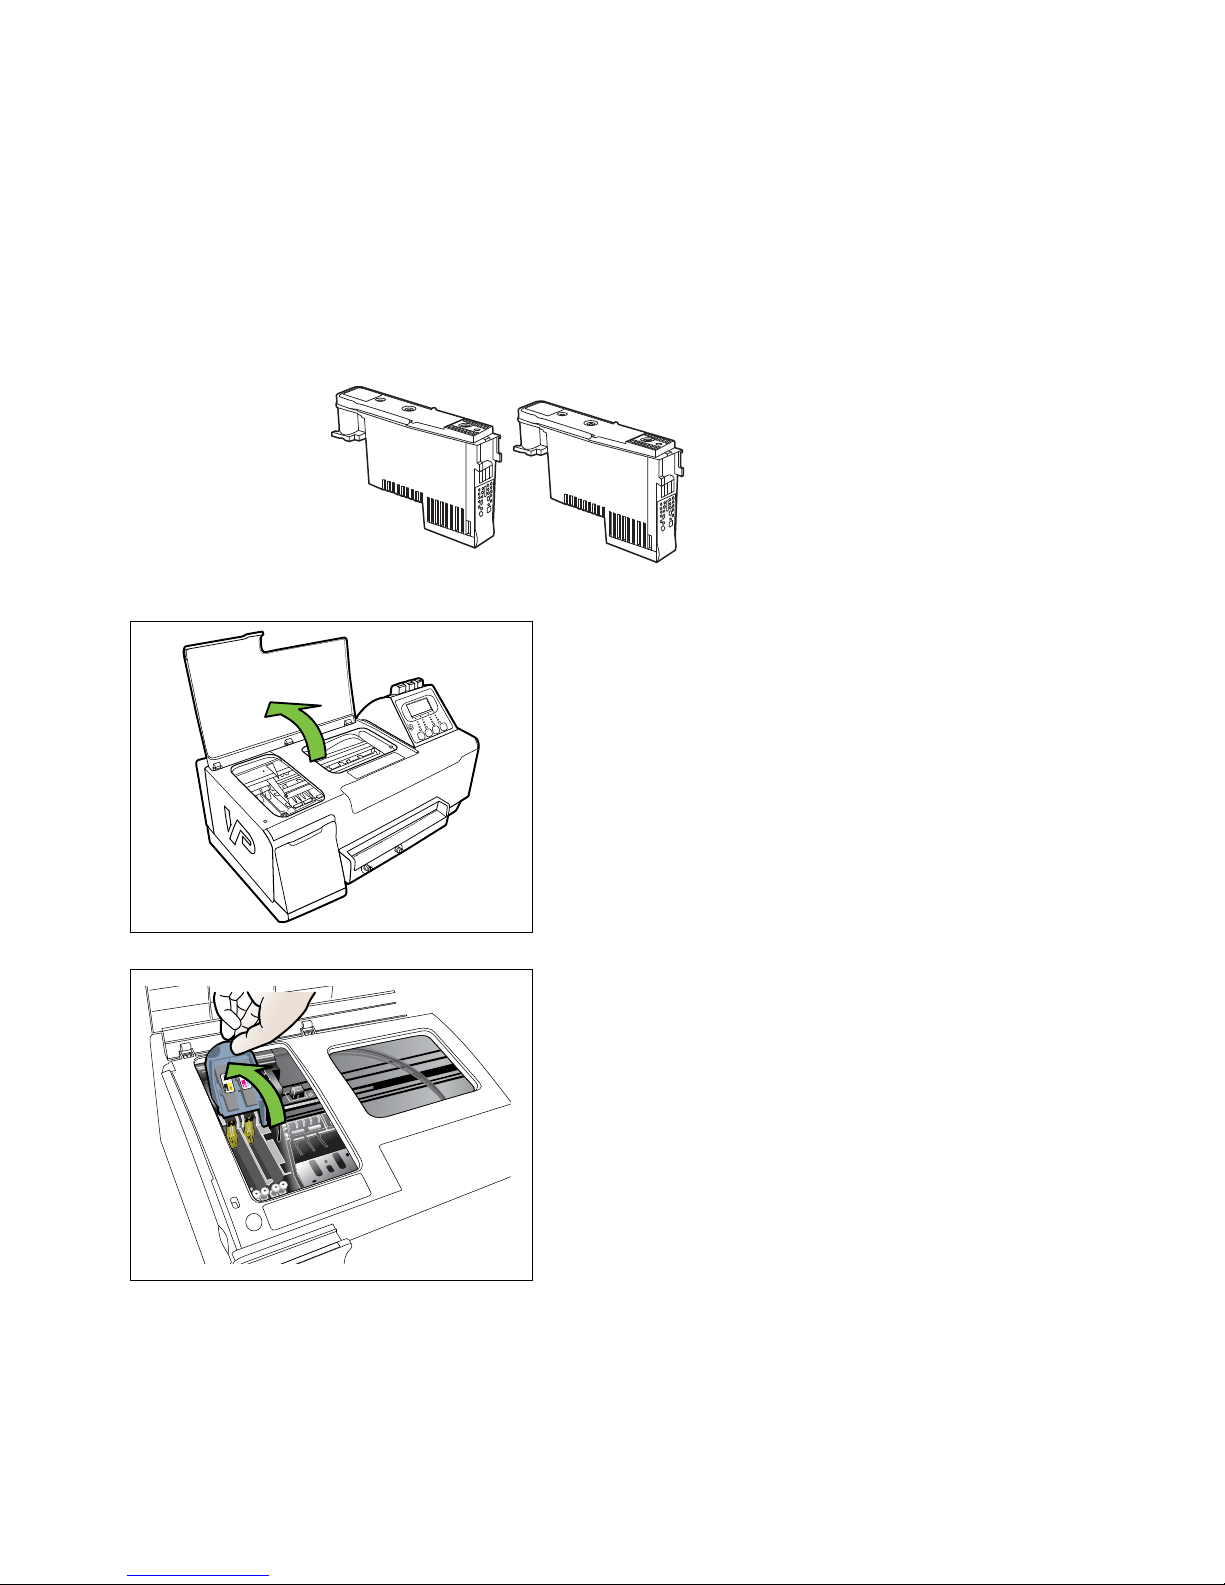
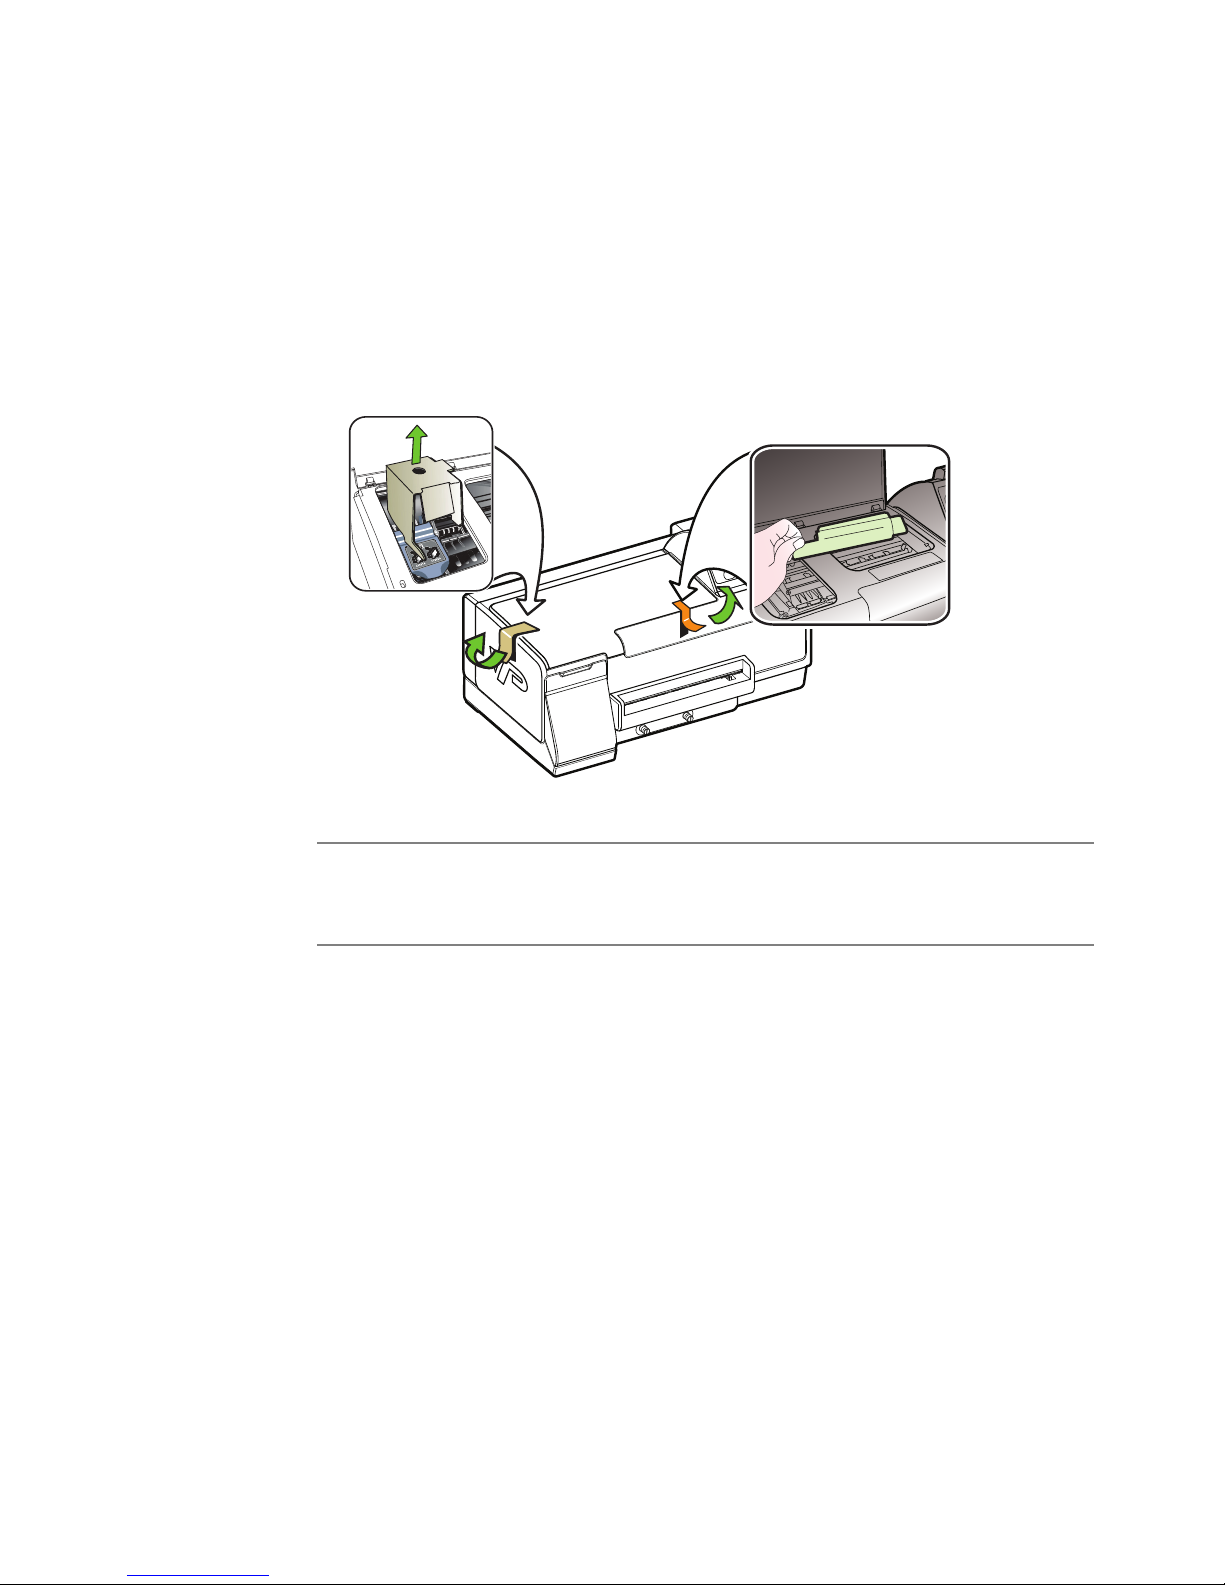
Install the Printheads
The printer uses two printheads. Colored labels over the printhead slots indicate
where each printhead should be installed. The printheads have to be correctly
installed before the printer can function properly.
1. Open the top cover.
The printhead carriage is on the left of the printer.
2. Lift up the printhead latch.
Setting Up the Printer 17
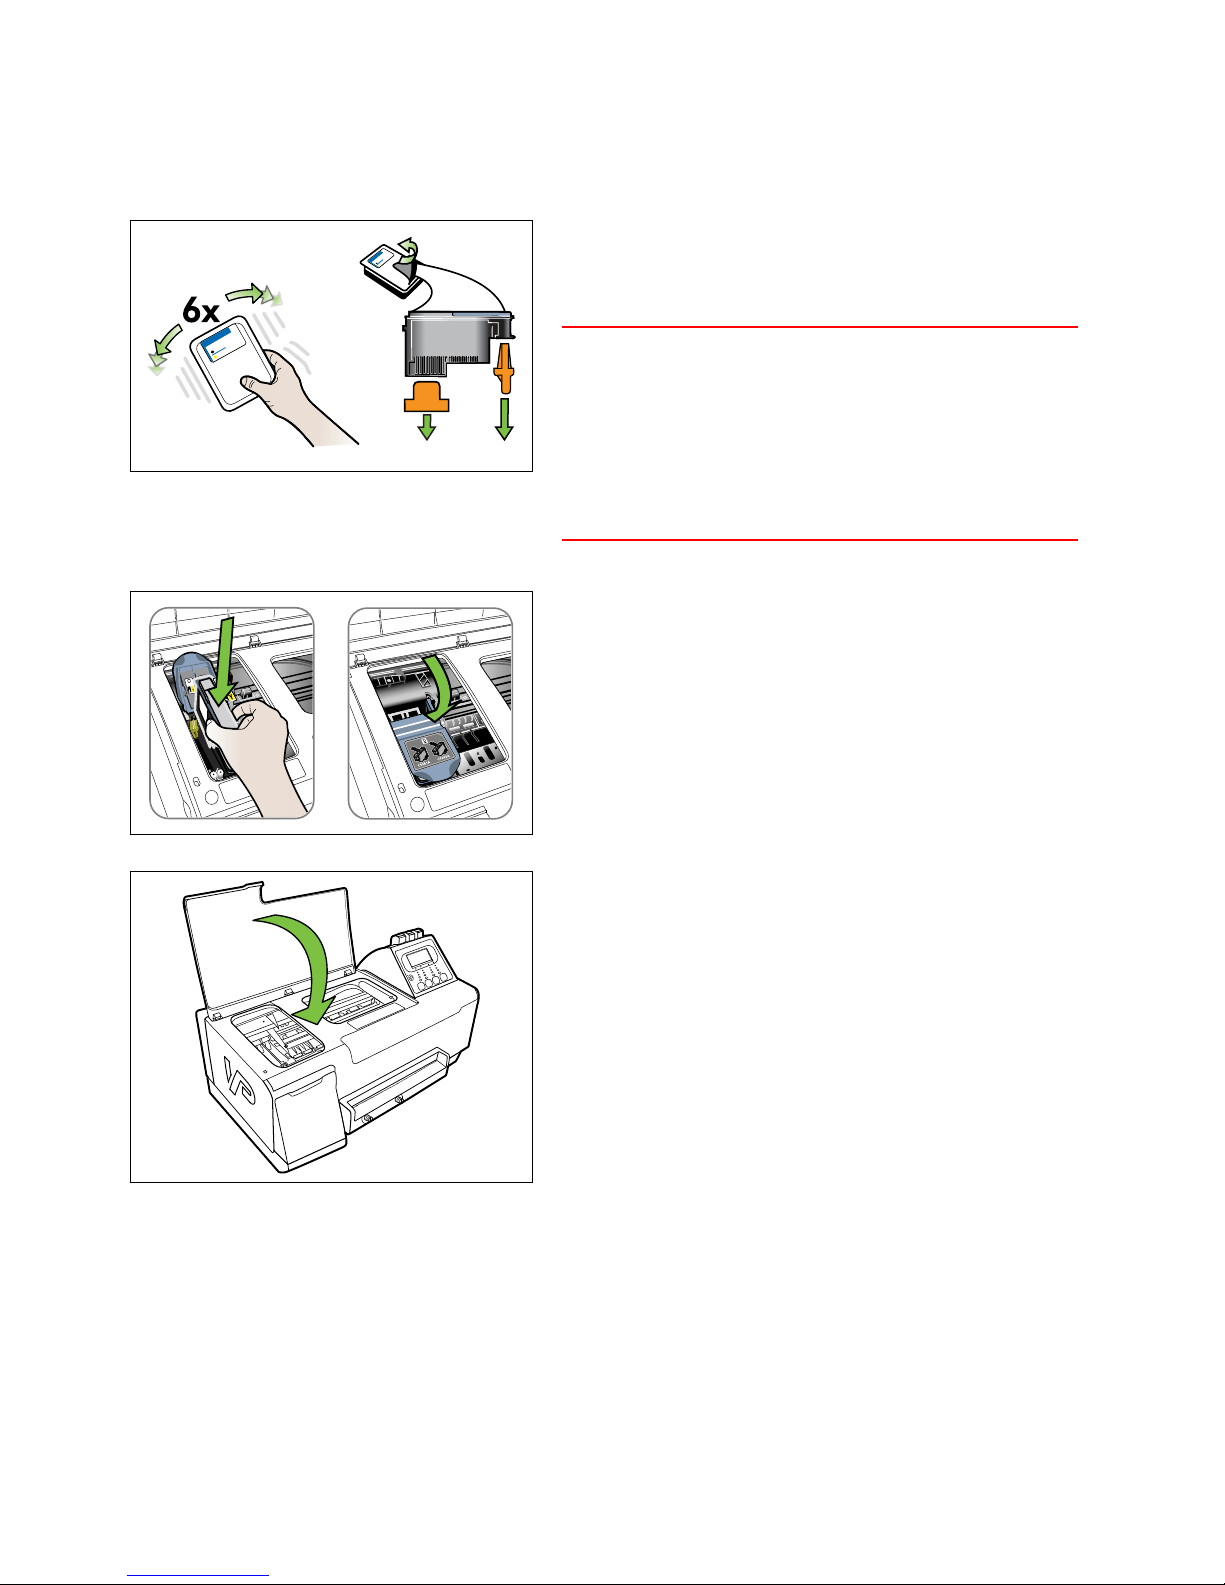
3. Shake the printhead six times as shown.
4. Remove the printhead from its packaging and
remove the protective cap and tape.
CAUTION
Handle the protective cap and tape carefully to avoid
staining your clothes or surrounding work area.
Once the protective cap and tape are removed, do not
touch the electrical contacts or ink nozzles on the
printhead. The printer may not print properly if you
touch them.
5. Push the printhead firmly into the correct slot as
indicated by the colored label.
The printhead will not sit properly if it is in the
wrong slot.
6. Repeat the steps to install the second printhead.
7. Lower the printhead latch to secure the printheads.
8. Close the top cover.
18 Setting Up the Printer
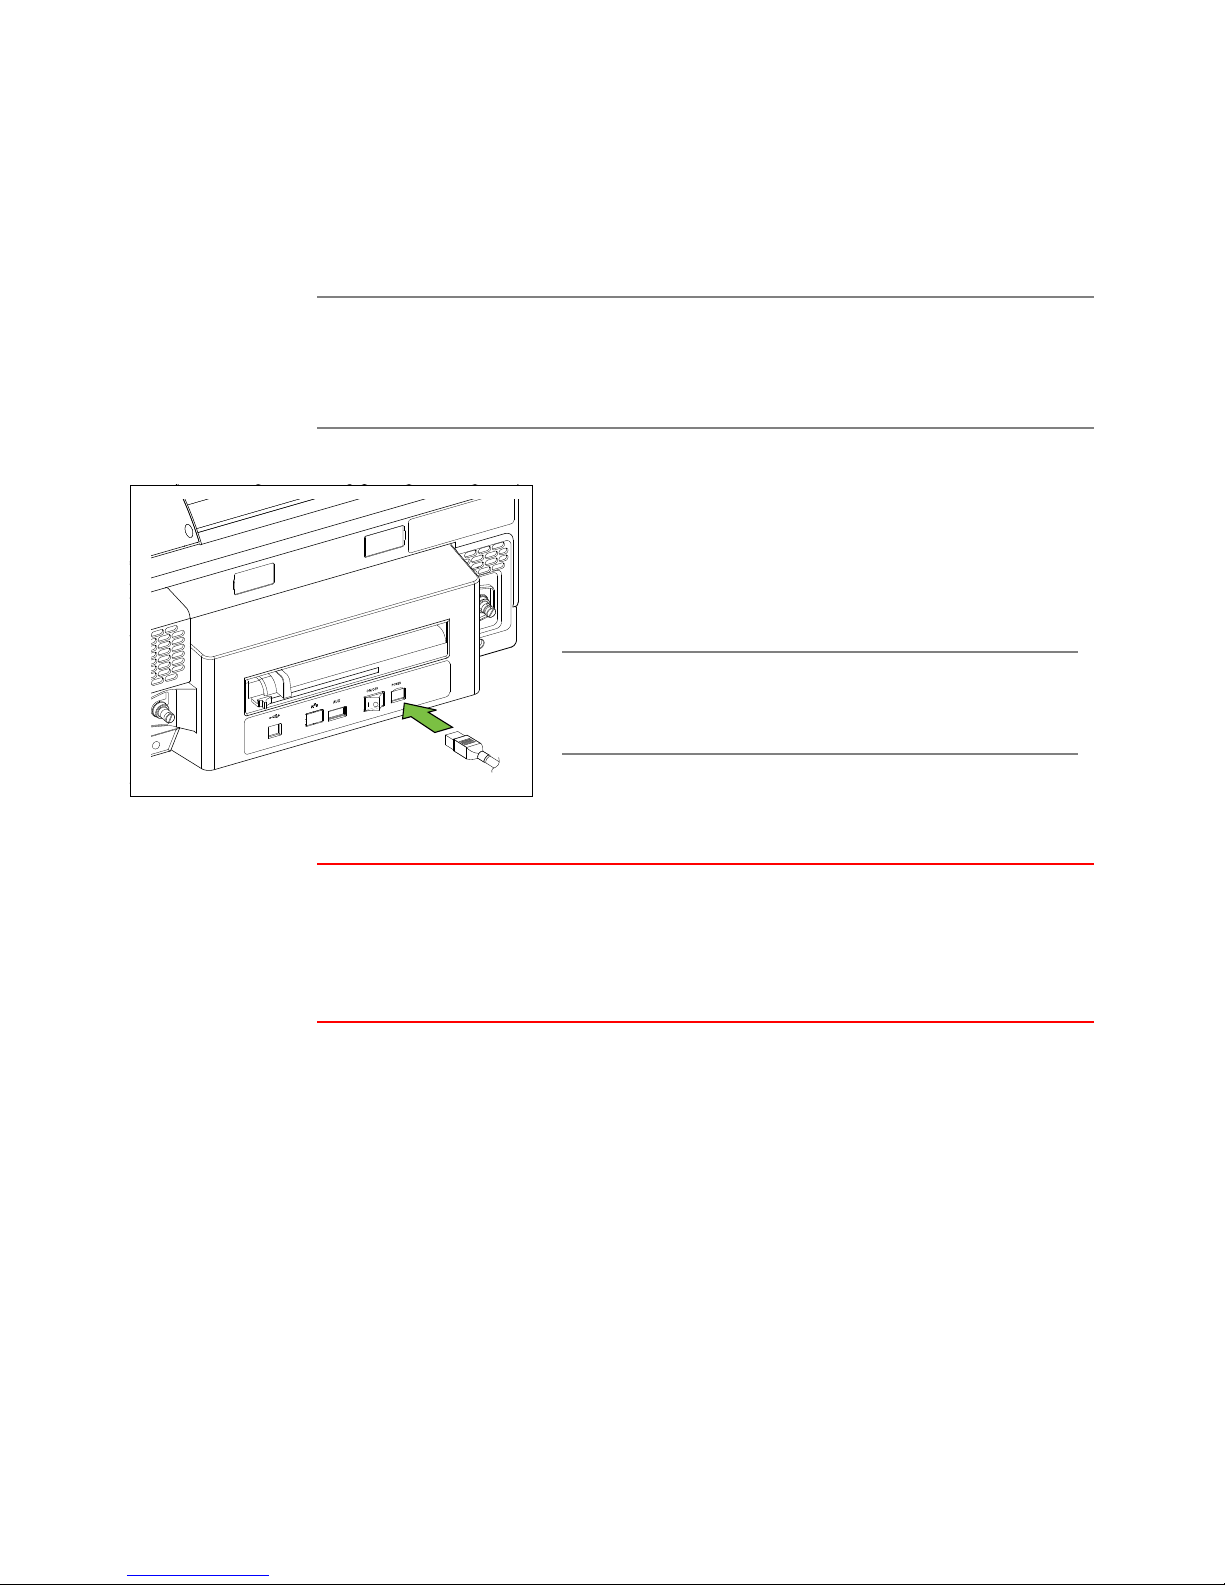
Connect the Power Cable
NOTE
It is recommended that the printer be run on an uninterruptable power supply.
Make sure all packing material has been removed from inside the printer and the
top cover is closed.
1. Attach the power cable securely to the printer.
2. Plug the other end into a power outlet. Do not use an
extension lead or cord.
3. Use the Power switch at the rear of the printer to
turn it on.
NOTE
It takes about a minute for the printer to initialize and
be ready to print.
CAUTION
Do not turn off the printer using the Power switch at the rear of the printer. Always
turn it off using the Power button on the control panel at the front of the printer.
This ensures that the printhead carriage is returned to its proper position at the right
side of the printer which protects the printheads.
Setting Up the Printer 19
Align the Printheads
FEED MENU
ONLINE
BYMC
0
Test
Eject Media
Maintenance
Printer Setup
TOF Alignment
Select Media Thickness
Right Edge Adjust
Align Printheads
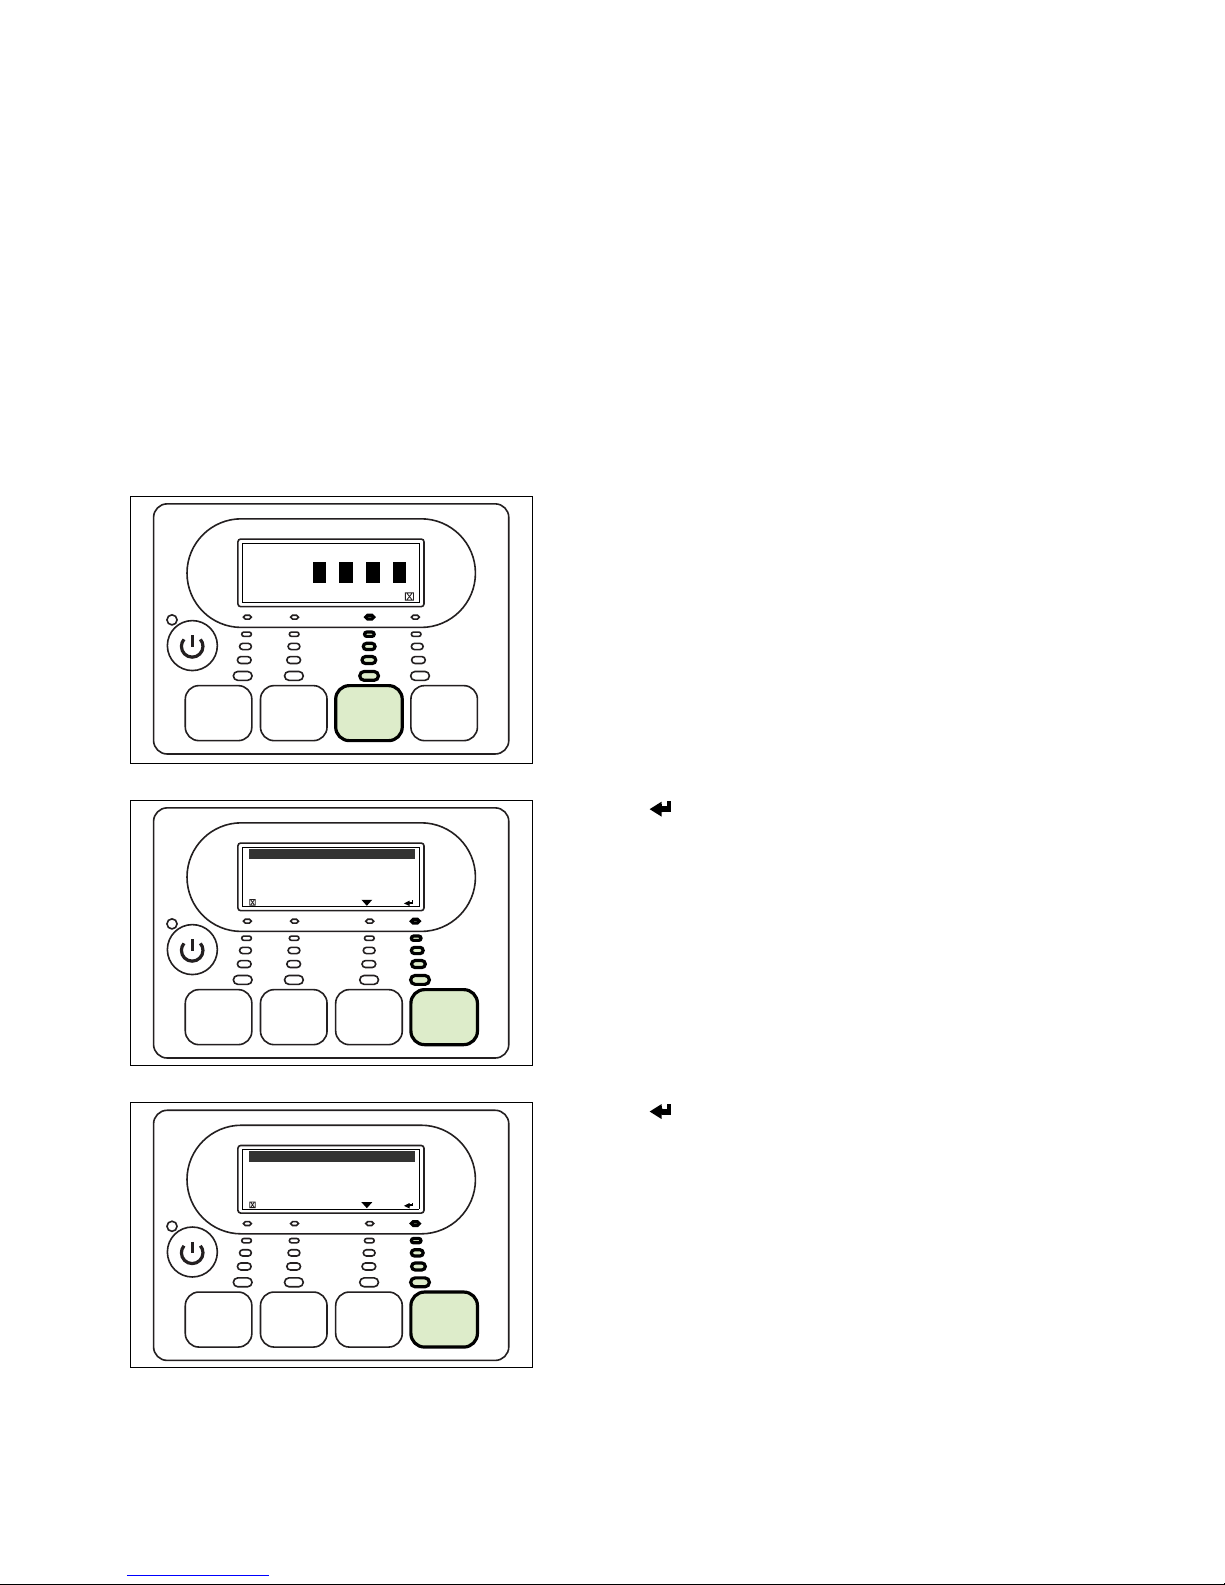
The printhead alignment procedure ensures that the printheads are lined up
properly for optimum print quality. If it is not done, your printouts may be
misaligned and look fuzzy or blurred. The procedure should be performed whenever
new printheads are installed in the printer.
The printhead alignment procedure requires two Letter/A4 sized sheets of paper.
You can use plain paper, but inkjet stock is recommended.
1. On the control panel, press the MENU button.
2. Press (enter) to select Printer Setup.
3. Press (enter) to select Align Printheads.
20 Setting Up the Printer
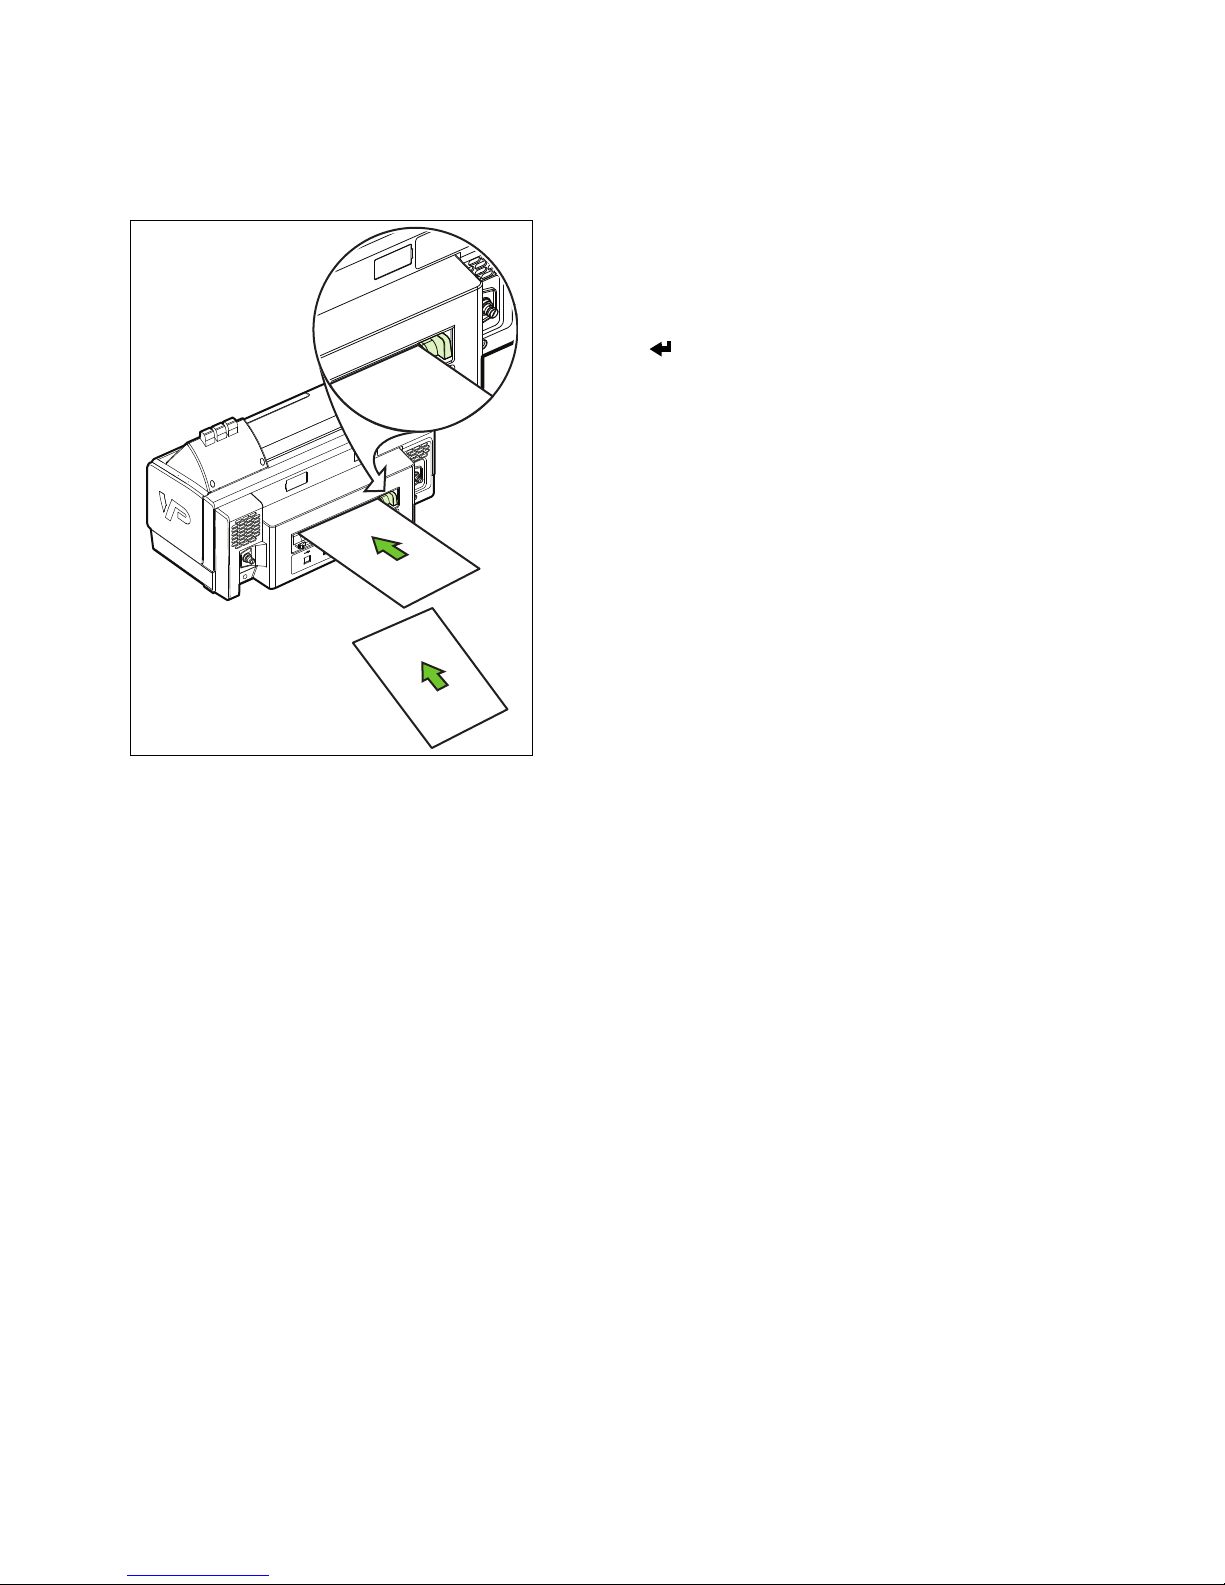
4. Insert a sheet of Letter/A4-sized paper into the
media feed slot at the rear of the printer.
Make sure the media width guide is correctly
positioned against the right side of the paper.
5. Press (enter) to start alignment.
6. Insert the second sheet of paper when prompted.
The procedure will take about two minutes to
complete and the printer will restart.
Setting Up the Printer 21
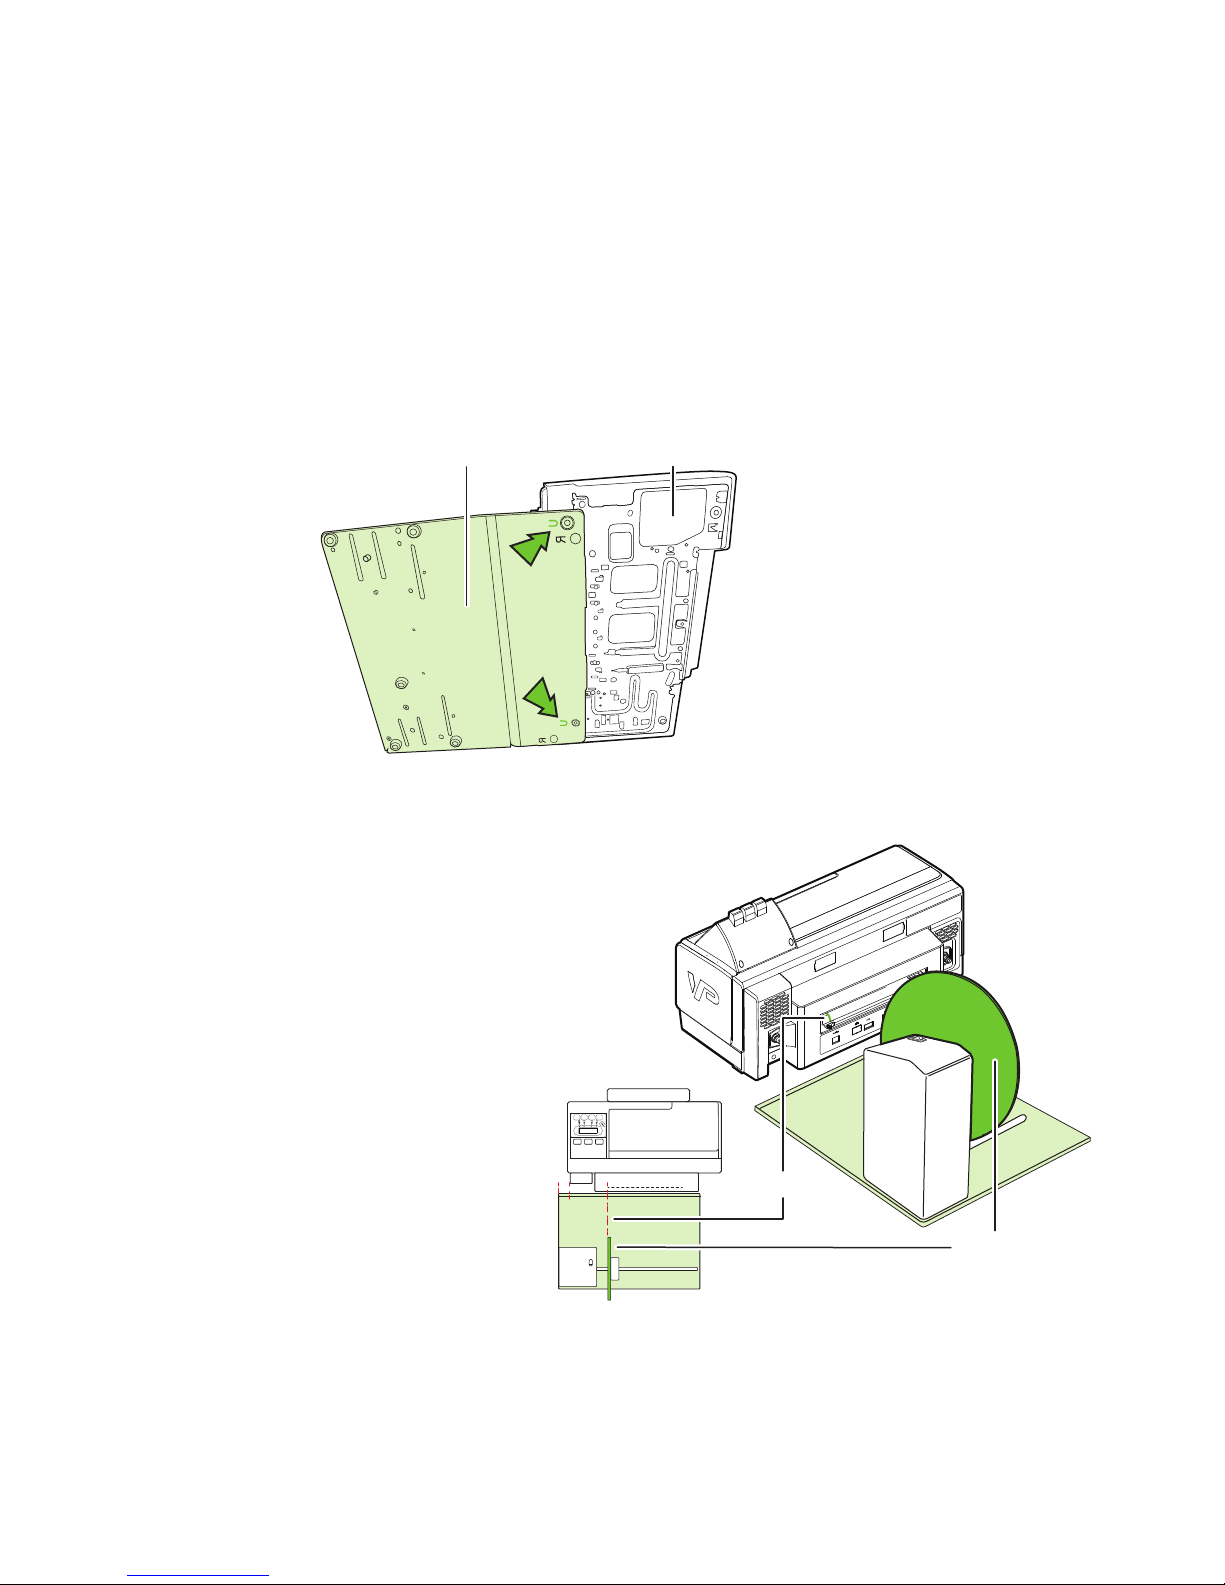
Load Label Media
PrinterUnwinder
Rear rubber feet of printer fit into
the holes marked “U” on the base
of the unwinder.
Make sure the printer sits firmly
on the base.
Inner disk
Left edge
Inner disk on unwinder aligned
with left edge of media feed slot.
(a)
(b) 25 mm
(a)
Distance of 25 mm (0.1”) between left edge
of unwinder and rear left edge of printer.
(b)
(0.1”)
Make sure the unwinder is properly aligned with the printer before you load media.
Refer to the alignment instructions for the VIPColor unwinder model (Type 1 or
Type 2) that you are using.
Type 1
Type 2
22 Setting Up the Printer
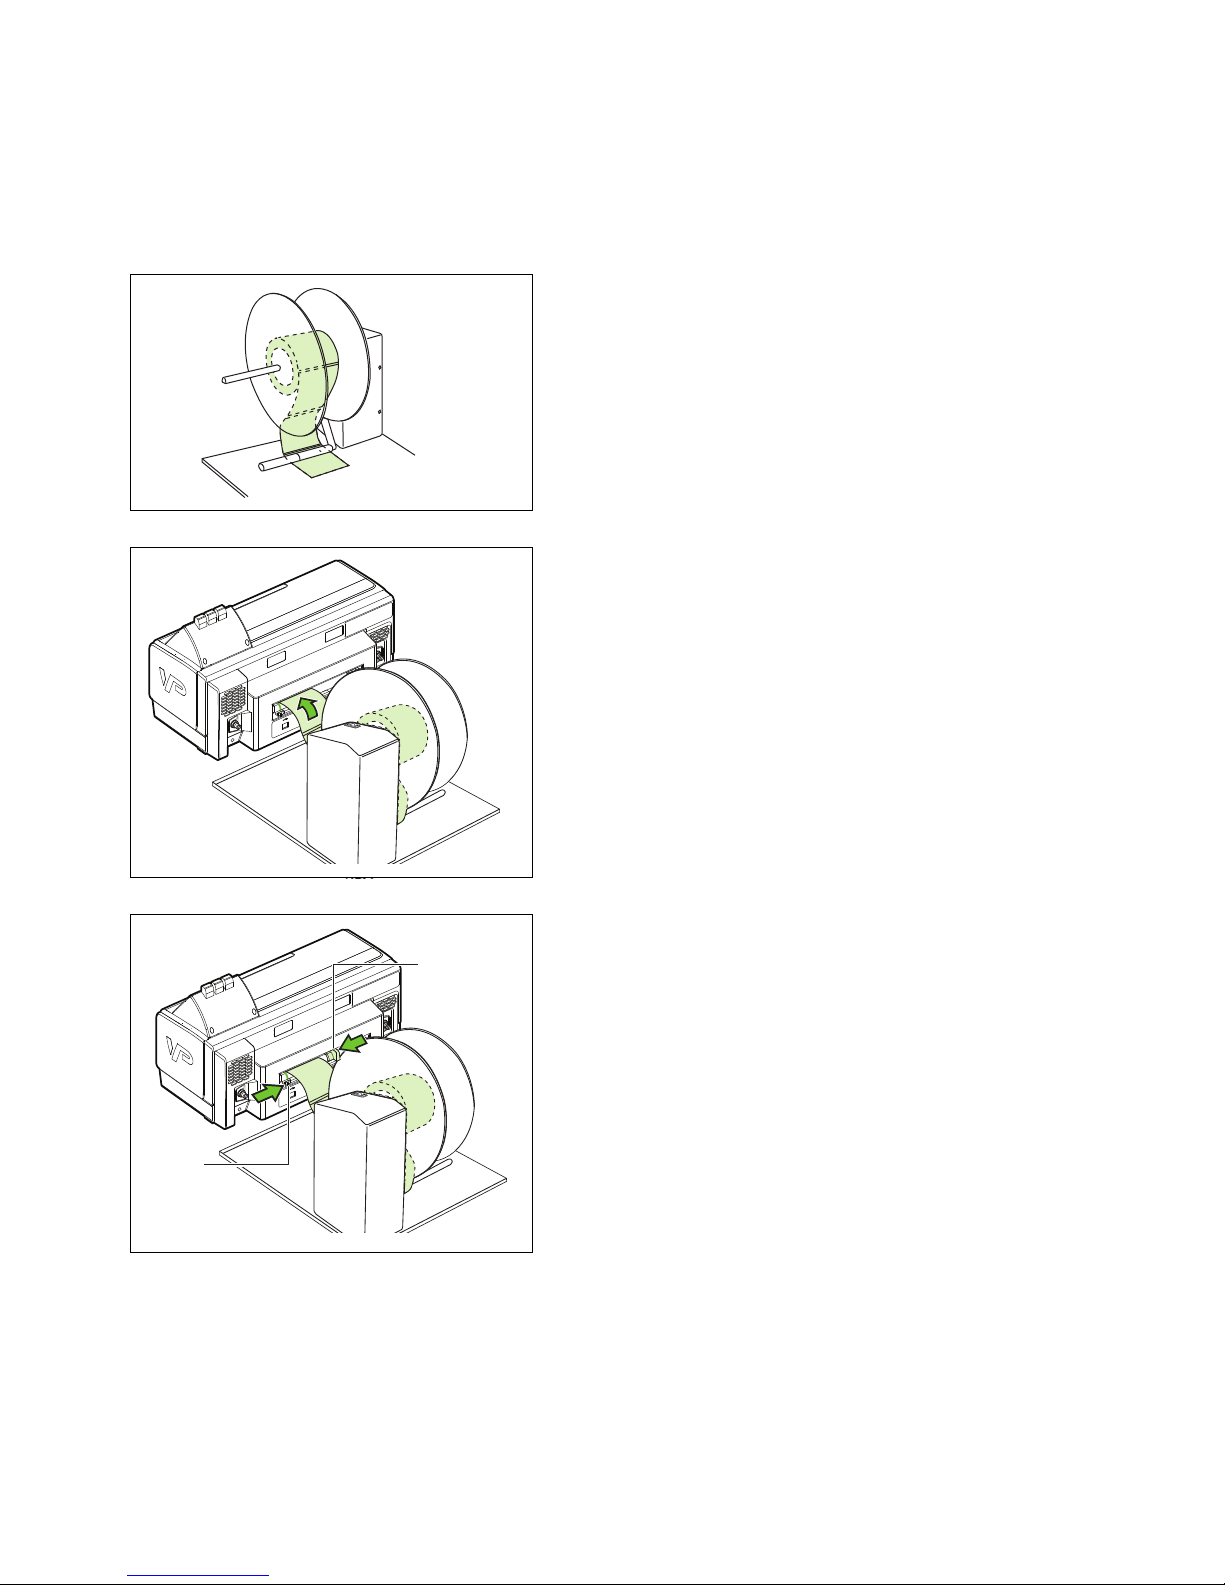
Load Media
Media width g
Media
sensor
Media width
guide
Media
sensor
1. Load a roll of labels in the unwinder and feed it
under the pick-up arm.
Make sure the labels will be face-up as they unwind.
2. Connect power to the unwinder and turn it on.
3. Insert the media along the left edge of the media feed
slot.
The printer will automatically pull in the media and
position it correctly for printing.
4. Move the media width guide gently against the right
edge of the media.
5. Slide the media sensor under the media.
Setting Up the Printer 23
 Loading...