

Page 1

http://www.vip-video-converter.com
VIP Video Converter User Guide
VIP Video Converter
Help Guide © 2012
Page 2

VIP Video Converter User Guide
1
Table of Contents
About VIP Video Converter ............................................................................................................. 3
Overview .......................................................................................................................................... 4
Supported Formats .......................................................................................................................... 5
Supported Video Formats ........................................................................................................... 5
Supported Audio Formats ........................................................................................................... 5
Supported Physical Devices ......................................................................................................... 5
User Interface .................................................................................................................................. 6
Main Window .............................................................................................................................. 6
Main Window - Upper Toolbar ................................................................................................ 7
Main Window - Right Toolbar ................................................................................................. 7
Main Window – Bottom Toolbar ............................................................................................. 8
Main Window – Status Bar ...................................................................................................... 9
Online Video Downloader & Converter ........................................ Error! Bookmark not defined.
Common Screen Captures ................................................................. Error! Bookmark not defined.
Converting Files ............................................................................................................................ 14
Converting To Video Formats .................................................................................................... 14
Converting To AVI Format ..................................................................................................... 14
Converting To MP4 Format ................................................................................................... 18
Converting To VCD Format .................................................................................................... 22
Converting To DIVX Format ................................................................................................... 26
Converting To WMV Format.................................................................................................. 30
Converting To FLV Format ..................................................................................................... 34
Converting To DVD Format .................................................................................................... 38
Converting To MPEG-1 Format .............................................................................................. 42
Converting To MPEG-2 Format .............................................................................................. 46
Converting To 3GP Format .................................................................................................... 50
Converting To 3GPP2 Format ................................................................................................ 54
VIP Video Converter http://www.vip-video-converter.com
Page 3

VIP Video Converter User Guide
2
VIP Video Converter http://www.vip-video-converter.com
Page 4

VIP Video Converter User Guide
3
About VIP Video Converter
VIP Video Converter © was founded in 2009, and since then is committed to provide its'
clients the best end-point software available on the market, without compromises.
we know that in order to be best, you need to focus on what you are good at, and that's
what we are doing. We are developing only one product –VIP Video Converter – and
dedicate our full time, attention and hard work, to make it what it is – the best video
converter on the market.
We believe that our clients should pay the lowest price possible for any software.
Therefore, the price of our product will always be the lowest possible to keep us working
and improving our software, for our clients.
We value all received corporation suggestions. Therefore, if you need any material from
us, such as images, more information about our product, advertising information or
anything else, please contact us via email at [email protected] .
VIP Video Converter http://www.vip-video-converter.com
Page 5

VIP Video Converter User Guide
4
Overview
VIP Video Converter is one of the leading video converters on the market. It’s rich in
useful and easy to use features. Here we present you a short summary of them:
Converts any video / audio file to more than 170 video / audio formats, and
more than 220 devices.
Includes batch conversion support.
Allows previewing the output video file while converting.
Allows adjusting video & audio properties such as: codec, frame rate, bit rate,
video starting time, duration,
Sampling rate, size, audio channels, volume and more (Includes pre-defined
settings as well).
Supports various Windows systems, including XP, Vista, Windows 7 & more.
Allows splitting the converted video / audio file by a specific size.
Allows merging few video files, to one combined converted video / audio file.
Supports audio track extractions, from video files.
Supports drag and drop to add video / audio files
Easy to use with a friendly user interface, which will fits both beginners and
professionals.
Comes with help files, FAQ, online help and live chat support.
High converting speed and superb output video & audio quality.
And the price, as low as it can get, to keep us working on improving VIP Video
Converter for our clients.
VIP Video Converter http://www.vip-video-converter.com
Page 6

VIP Video Converter User Guide
5
Supported Formats
VIP Video Converter supports more than 170 video and audio formats, both as input and
output formats. Here, we listed the most common ones, which you might wish to use in
your daily conversion operations.
Supported Video Formats
AVI, MP4, VCD, SVCD (PAL/NTSC), DiVX, WMV, FLV, DVD (PAL/NTSC), MPEG-1, MPEG-
2, MP4, 3GP, 3GPP2, MOV, SWF, H.263, H.264, MPG, VOB, RM, RMVB, DV, ASF, XViD,
HD Video Formats (AVI HD, MP4 HD etc.).
Supported Audio Formats
MP3, WMA, OGG, WAV, AAC, AC3, MP2, AIFF, FLAC, AU, AMR, RA
Supported Physical Devices
Various Cellphones, iPod, iPhone, BlackBerry, iRiver, Zenvision, Xbox, PlayStation 3, PSP,
Motorola (CLIQ/DROID), Zune, iPad, AppleTV, Archos, Android, Wii, NexusOne, HTC
(G2, Hero, Tattoo), Samsung i7500, HD Video Formats for these devices.
VIP Video Converter http://www.vip-video-converter.com
Page 7
VIP Video Converter User Guide
6
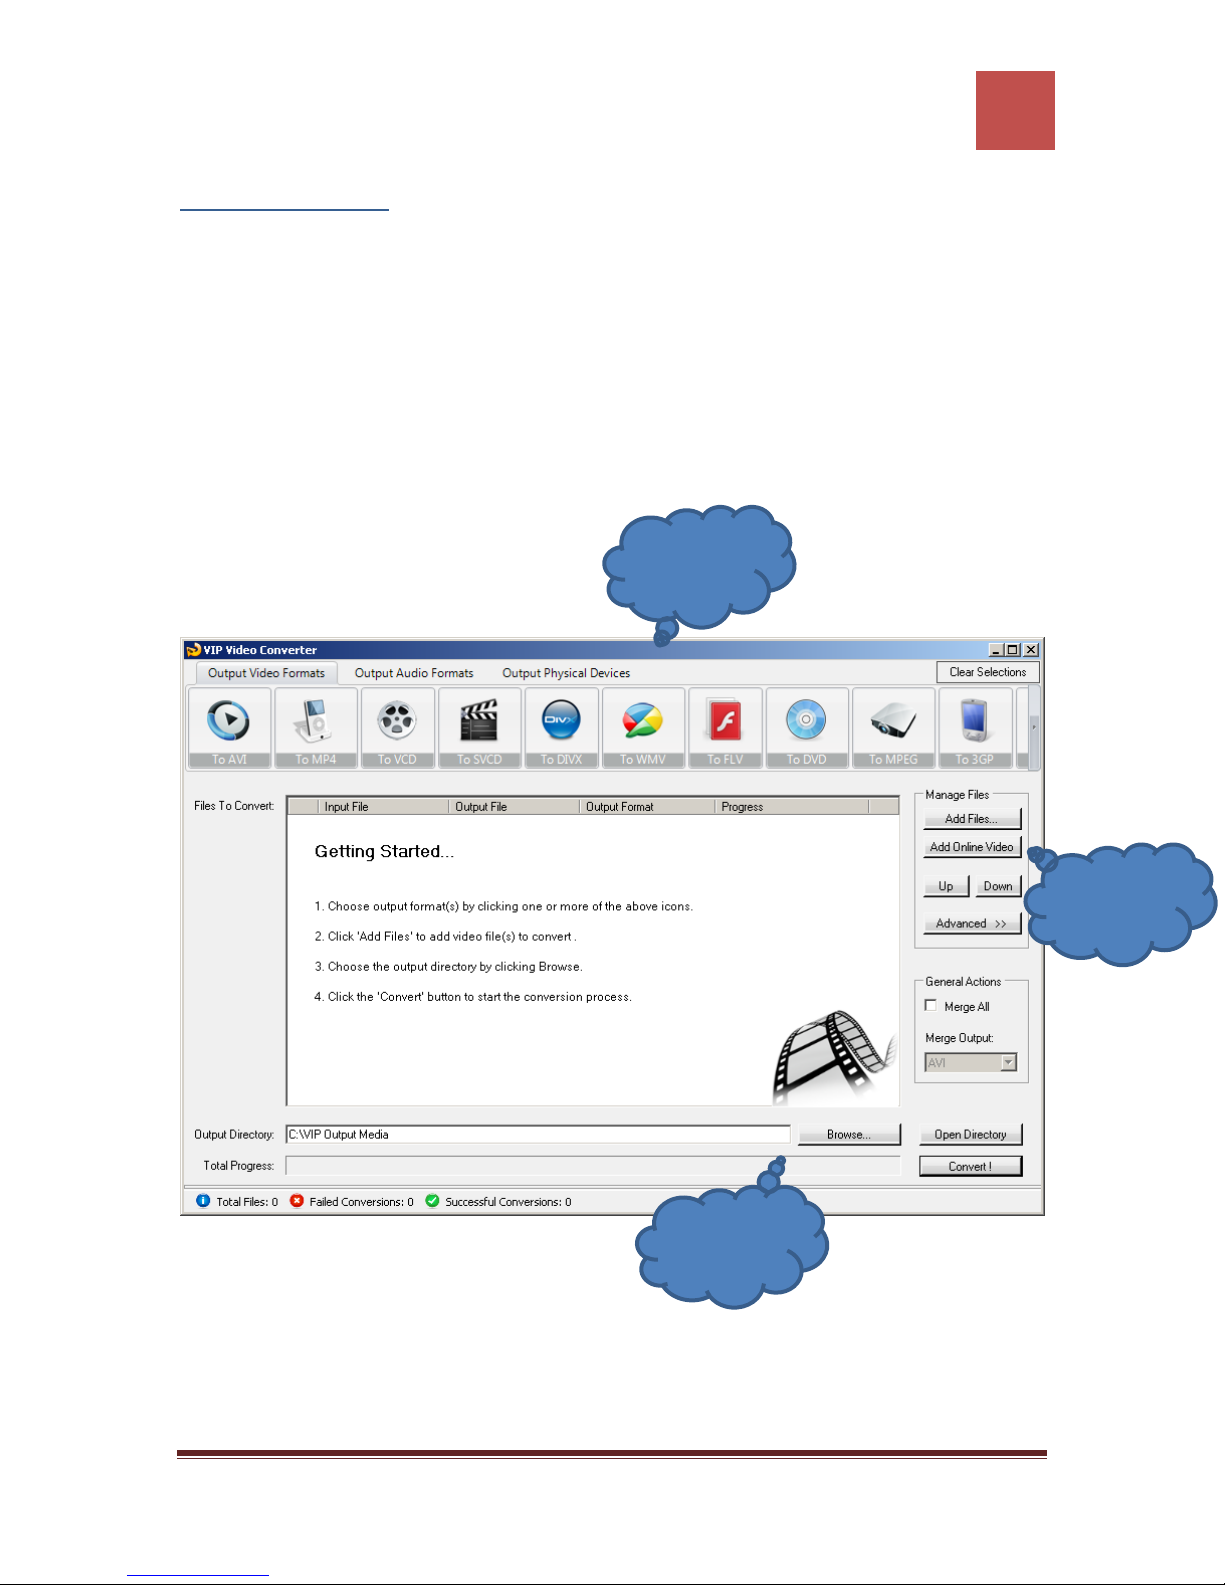
Upper
Toolbar
Right
Toolbar
Bottom
Toolbar
User Interface
This section will provide information about the different forms and windows in VIP Video
Converter. We’ll cover all the features and button you can navigate between and click
on. This section’s goal is to get you to know the software as you know the palm of your
hand.
Main Window
VIP Video Converter http://www.vip-video-converter.com
Page 8

VIP Video Converter User Guide
7
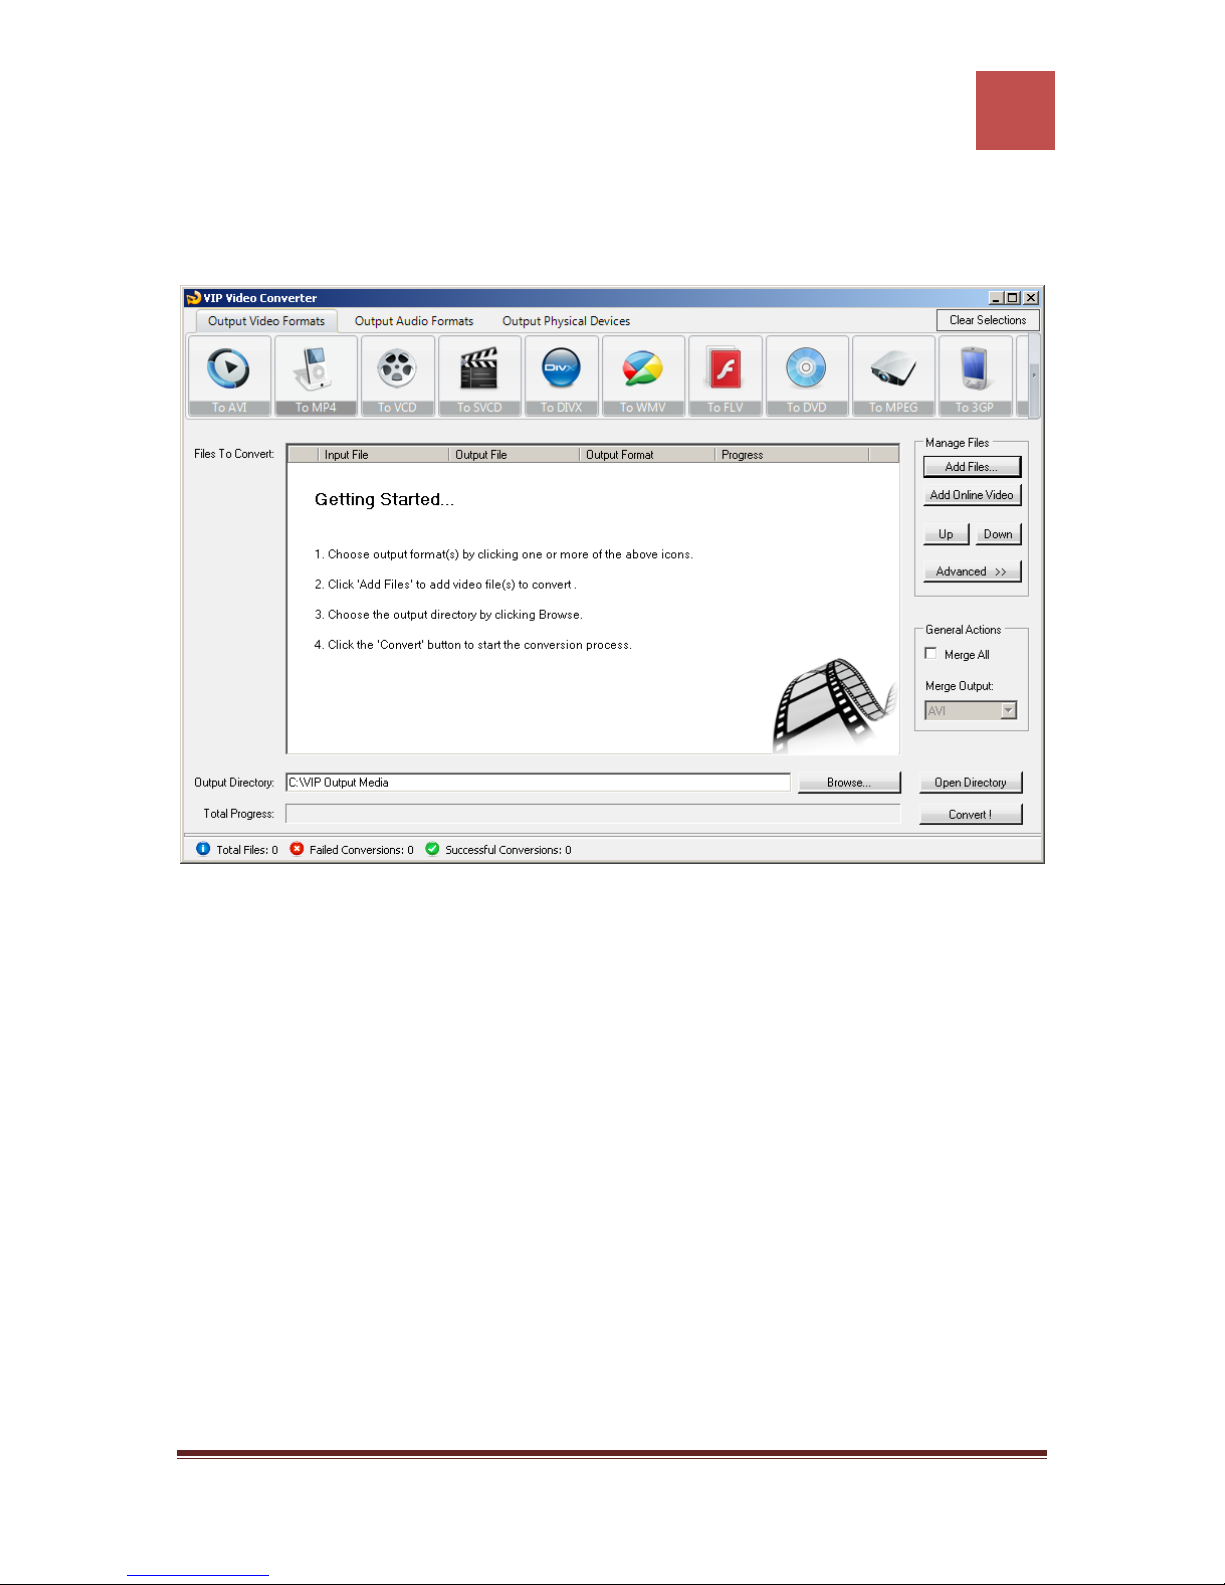
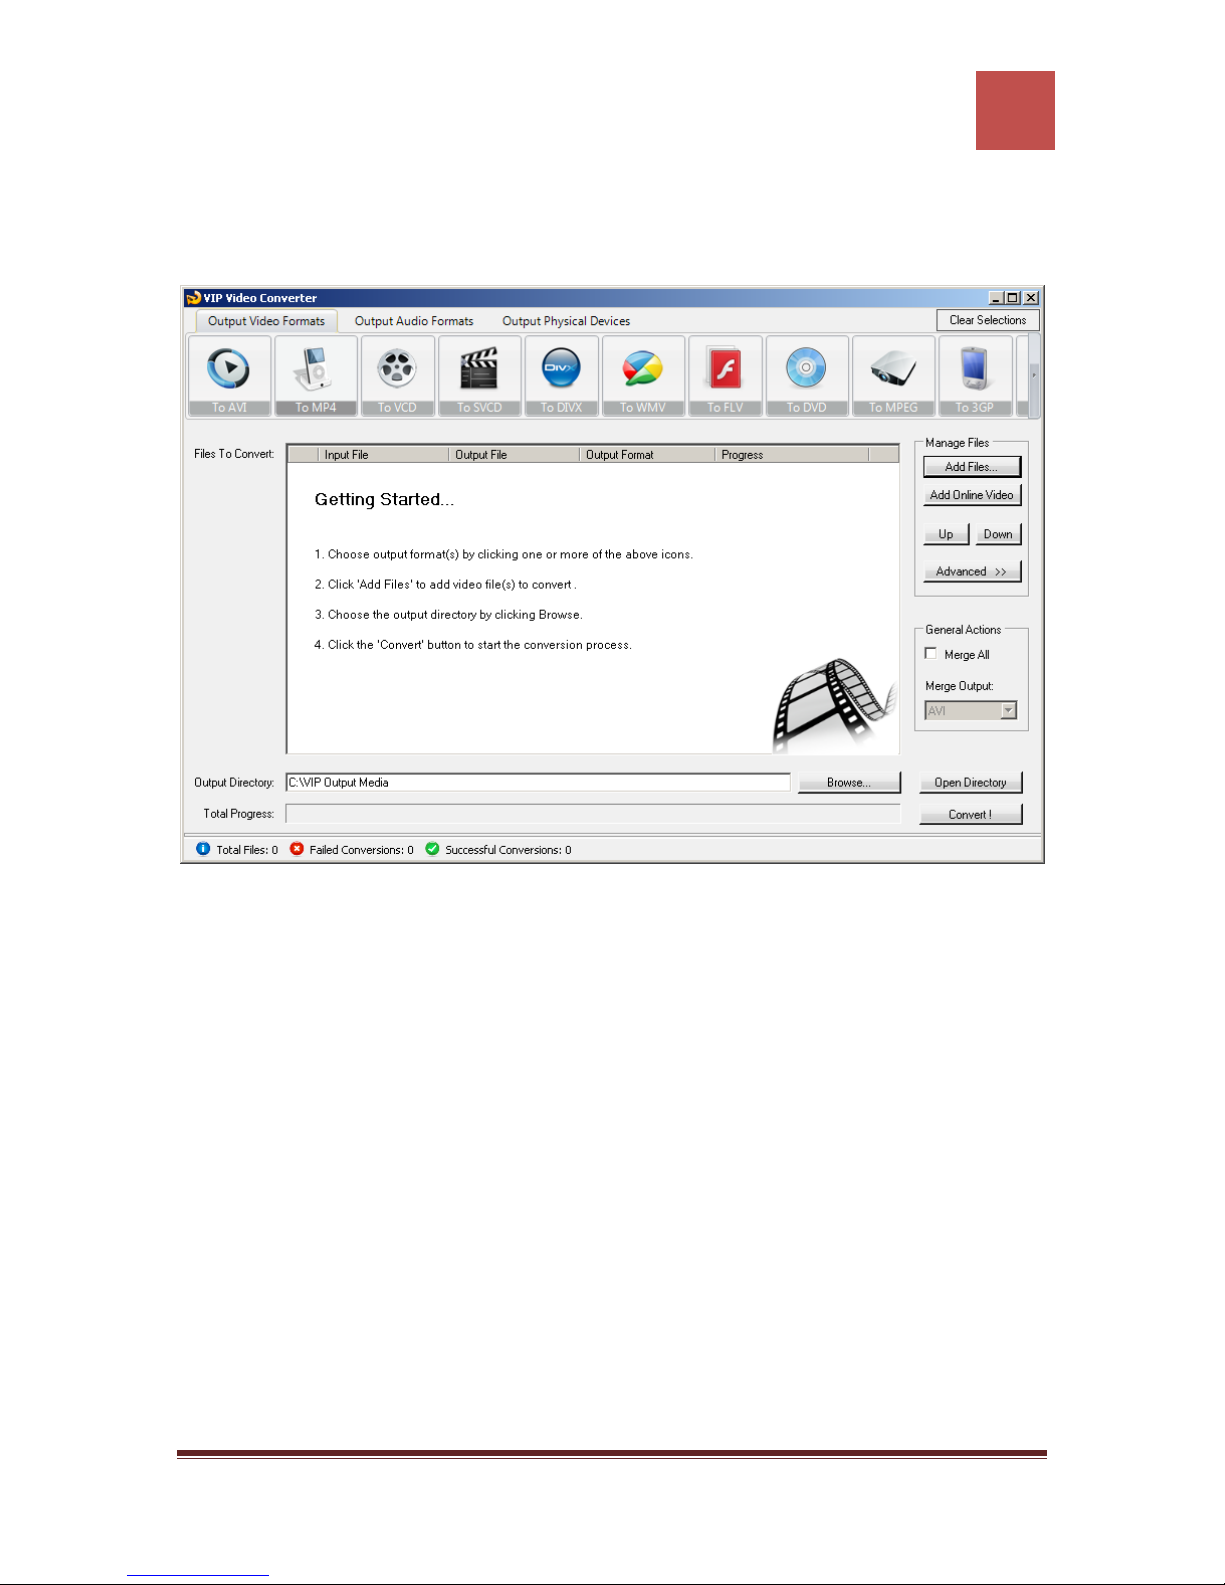
Main Window - Upper Toolbar
The upper toolbar of the main window contains three tabs which you can switch
between, and choose the output video formats you wish to convert to. These formats
can be video formats, audio formats, or physical device (such as iPhone) formats.
1. Output Video Formats – This tab shows all the available output video formats
such as AVI, MP4, FLV, WMV, 3GP etc.
2. Output Audio Formats – This tab shows all the available output audio formats
such as MP3, AAC, AC3, WMA, OGG etc.
3. Output Physical Devices – This tab shows all the supported physical devices
which you can convert your video files to – such as iPhone, iPod, Samsung
Galaxy, Blackberry, PlayStation 3, Xbox etc.
This toolbar also includes a “Clean Selections” button at the top right corner of the
window. When clicked, this button will clear all the output format selections, to get you
started from blank (as if you just now started the software again and didn’t choose
formats for conversion yet).
Main Window - Right Toolbar
The first section in this toolbar is the “Manage Files” section, which allows you to add,
arrange and modify properties of files which are added for conversion. These are the
tasks you can perform by using the buttons in this toolbar:
1. Add Files – Add new files for conversion. These files can be almost any video or
audio files you can think of, which are supported as input files in VIP Video
Converter. Adding files via this action will add them to the main table at the
middle of the main window.
2. Up / Down – Navigation buttons which allow you to set the order of
conversions. Moving up a file in the table of files to convert means to set it
earlier for conversion.
VIP Video Converter http://www.vip-video-converter.com
Page 9

VIP Video Converter User Guide
8
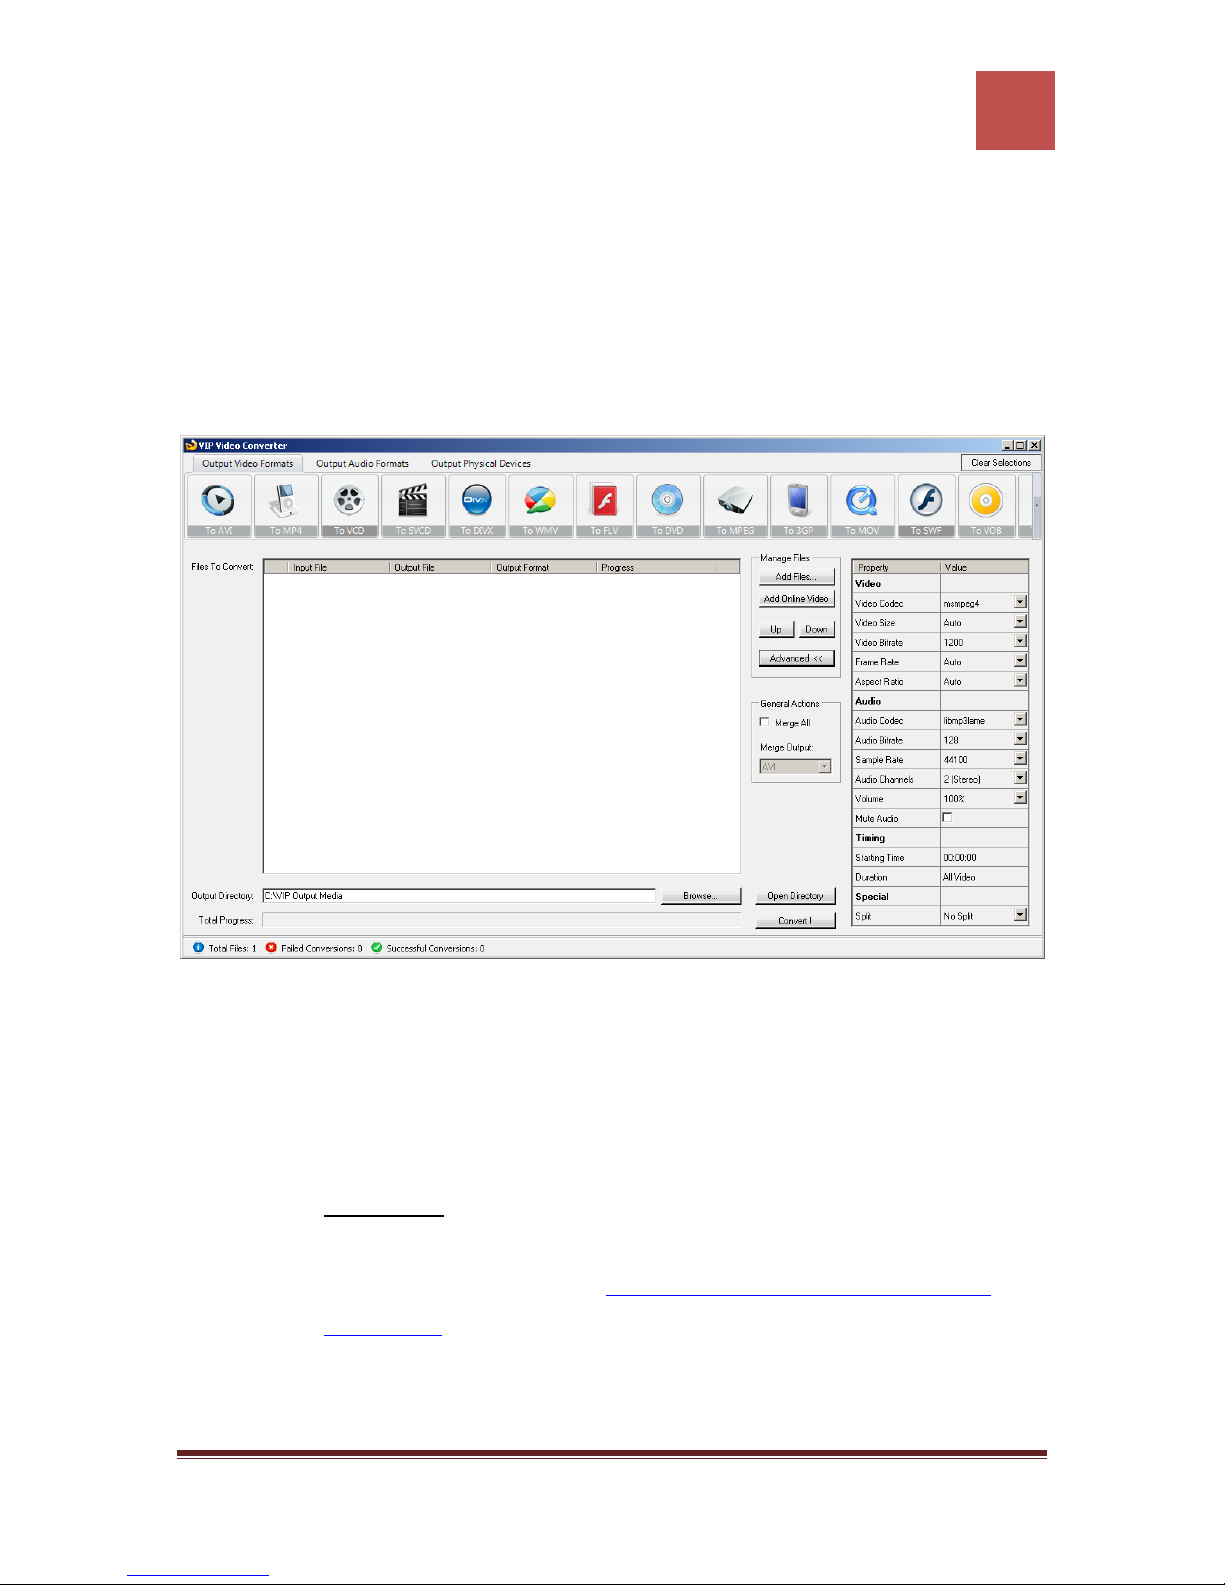
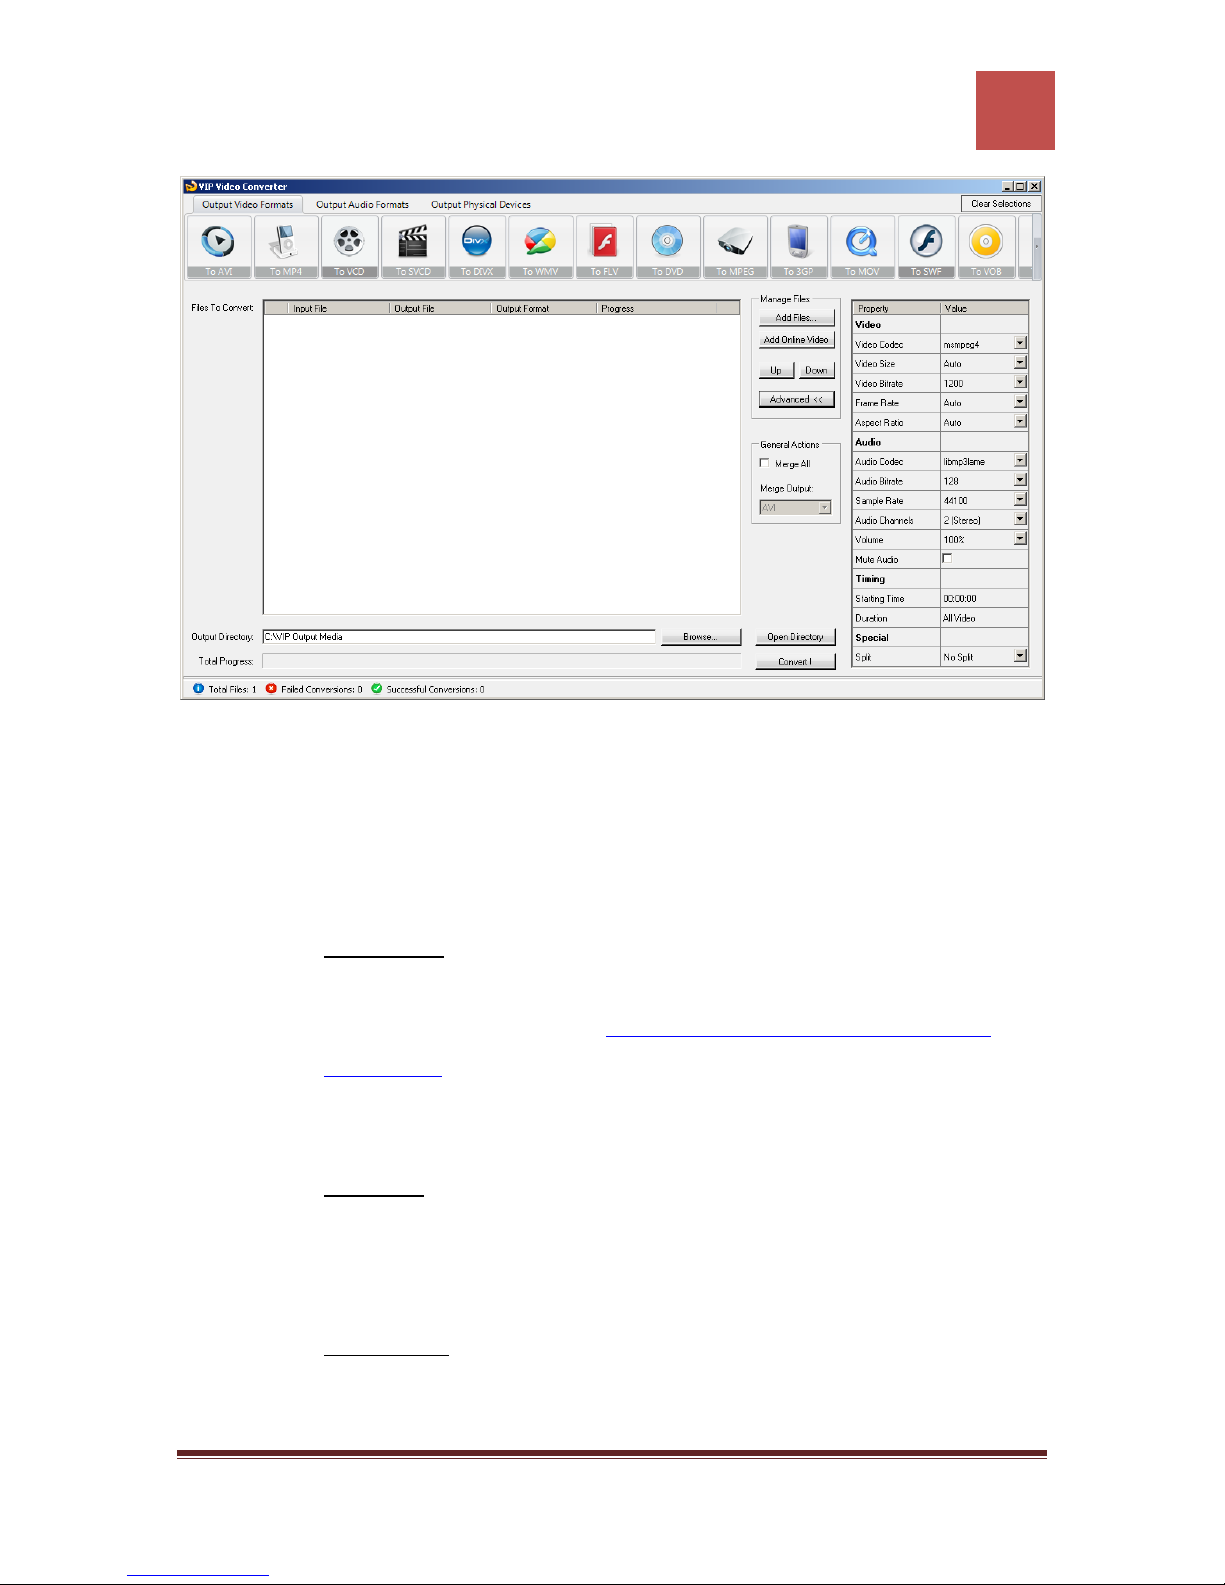
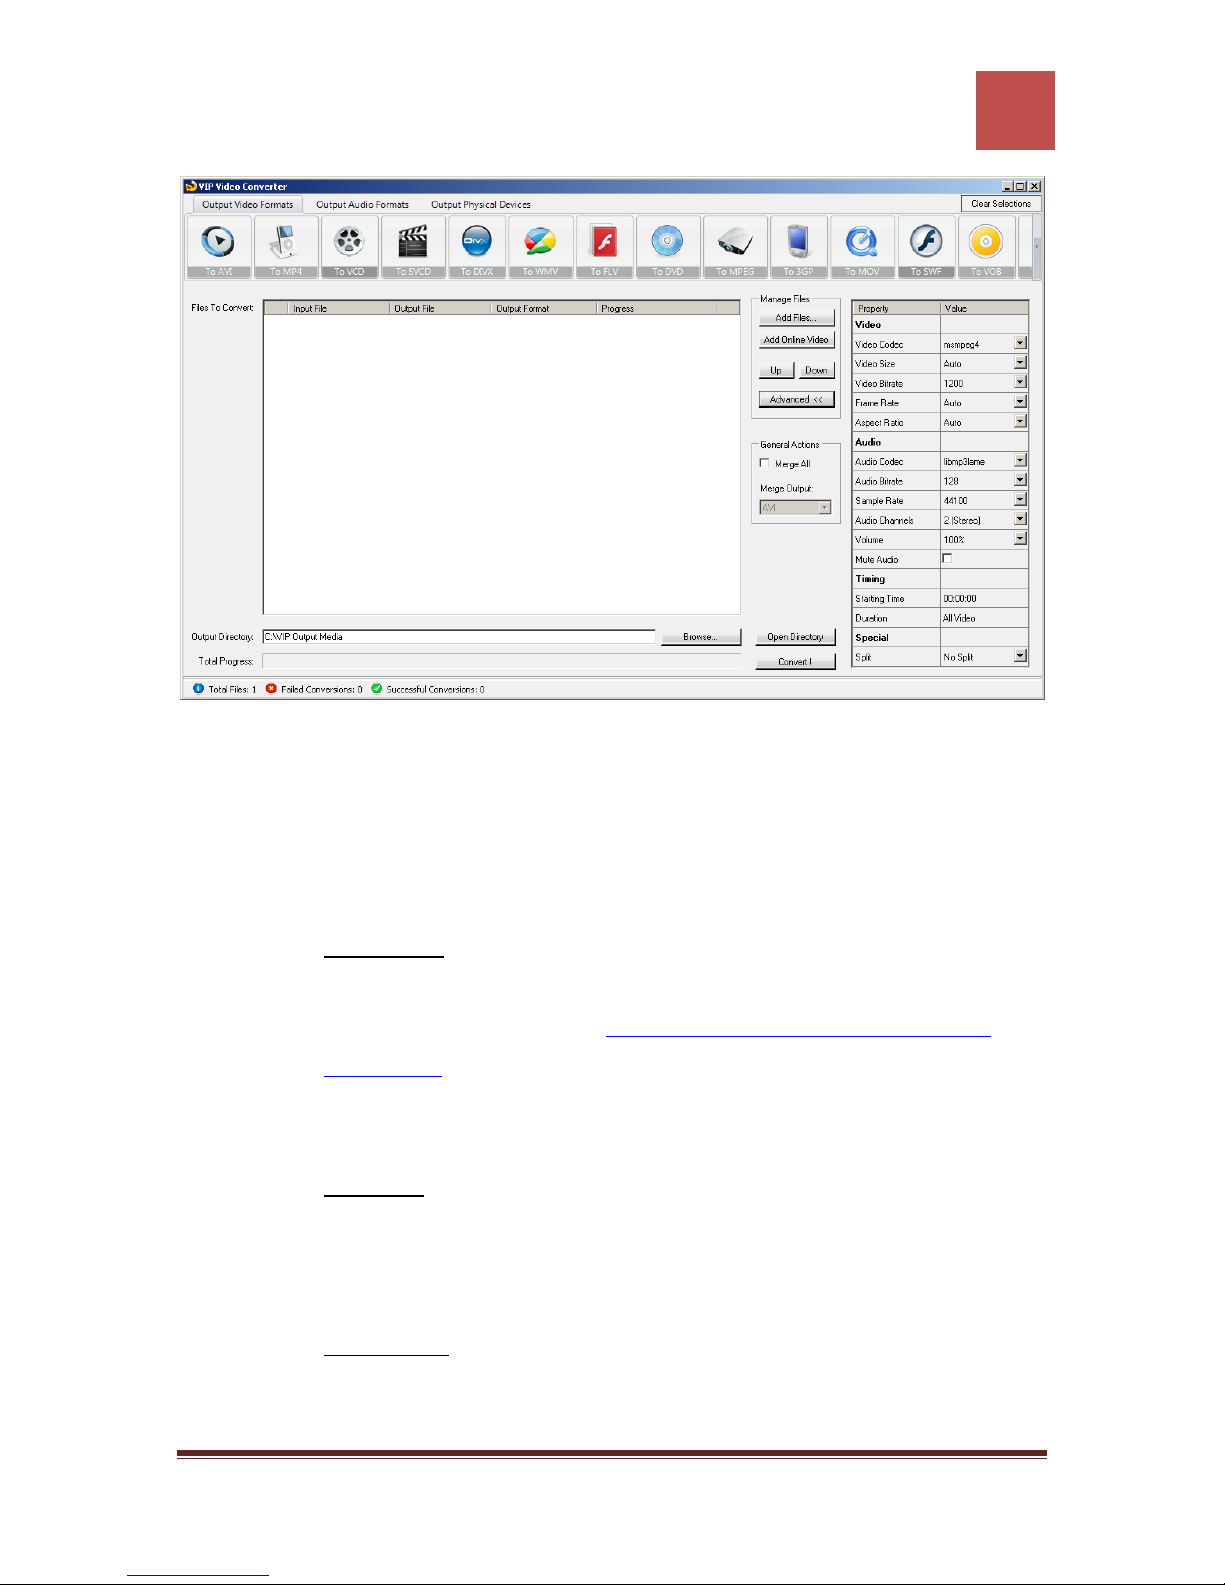
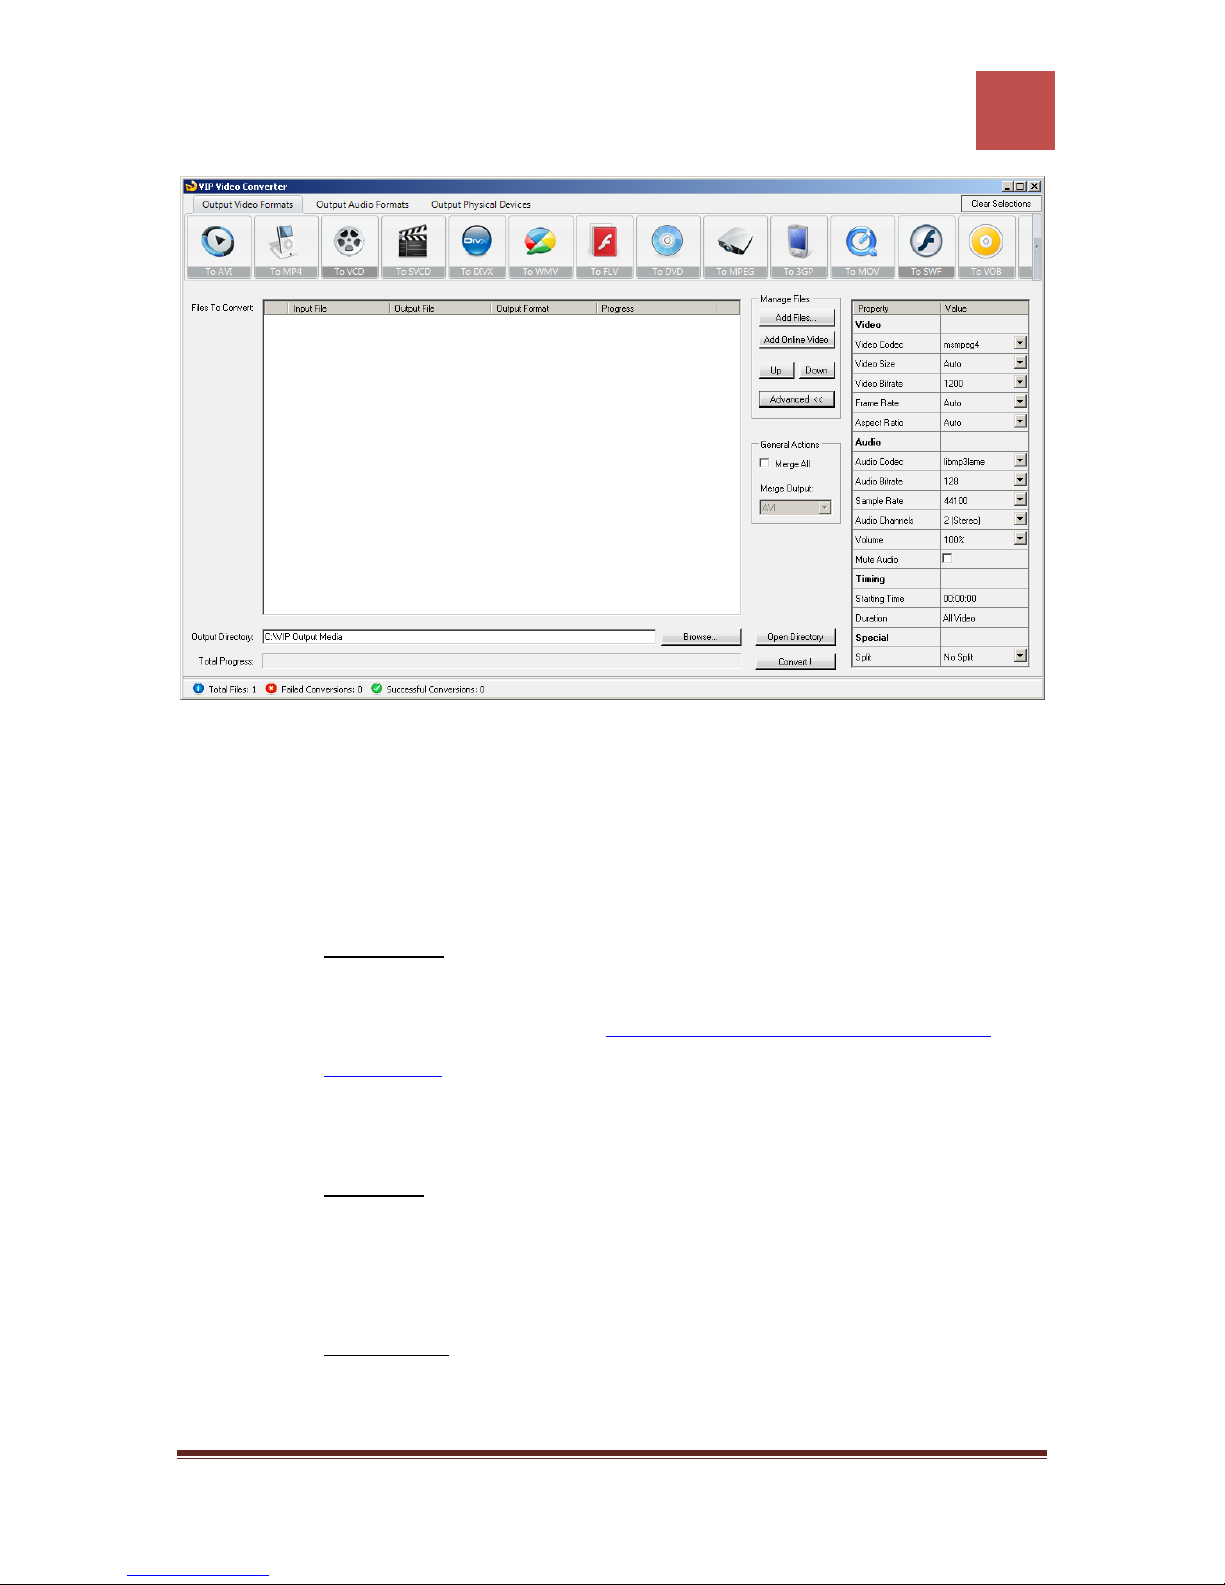
3. Advanced – This button opens a hidden part of the window, which allows you to
set custom and advanced settings for your video conversion. Properties such as
video size, frame rate, bit rate, video and audio codecs, splitting options, timing
options and more.
The second section in the right toolbar is “General Actions”:
1. Merge All – This checkbox allows you to merge all the converted video files to
one video file. Once this checkbox is checked, you can choose the Merge Output.
2. Merge Output – The video / audio format of the merged file. This is the format
all the converted files will be merged to.
Main Window – Bottom Toolbar
The bottom toolbar is responsible of the conversions output directory, the progress
report, and the most important button: “Convert”. These are the tasks which can be
performed by using this toolbar:
1. Output Directory Browse – Use this option to choose the output directory where
your converted video and audio files will be saved to.
2. Open Directory – Allows you to directly open the output directory in order to
fetch and watch the converted video / audio files.
3. Convert – This button starts the conversion of the video / audio files. Once
clicked, it will turn to a “Cancel” button which will allow you to cancel the
conversion while it’s running.
VIP Video Converter http://www.vip-video-converter.com
Page 10

VIP Video Converter User Guide
9
Main Window – Status Bar
The status bar at the bottom of the form shows how many files were converted. As well,
it shows how many of them were converted successfully, and how many of them failed
during conversion.
VIP Video Converter http://www.vip-video-converter.com
Page 11
VIP Video Converter User Guide
10
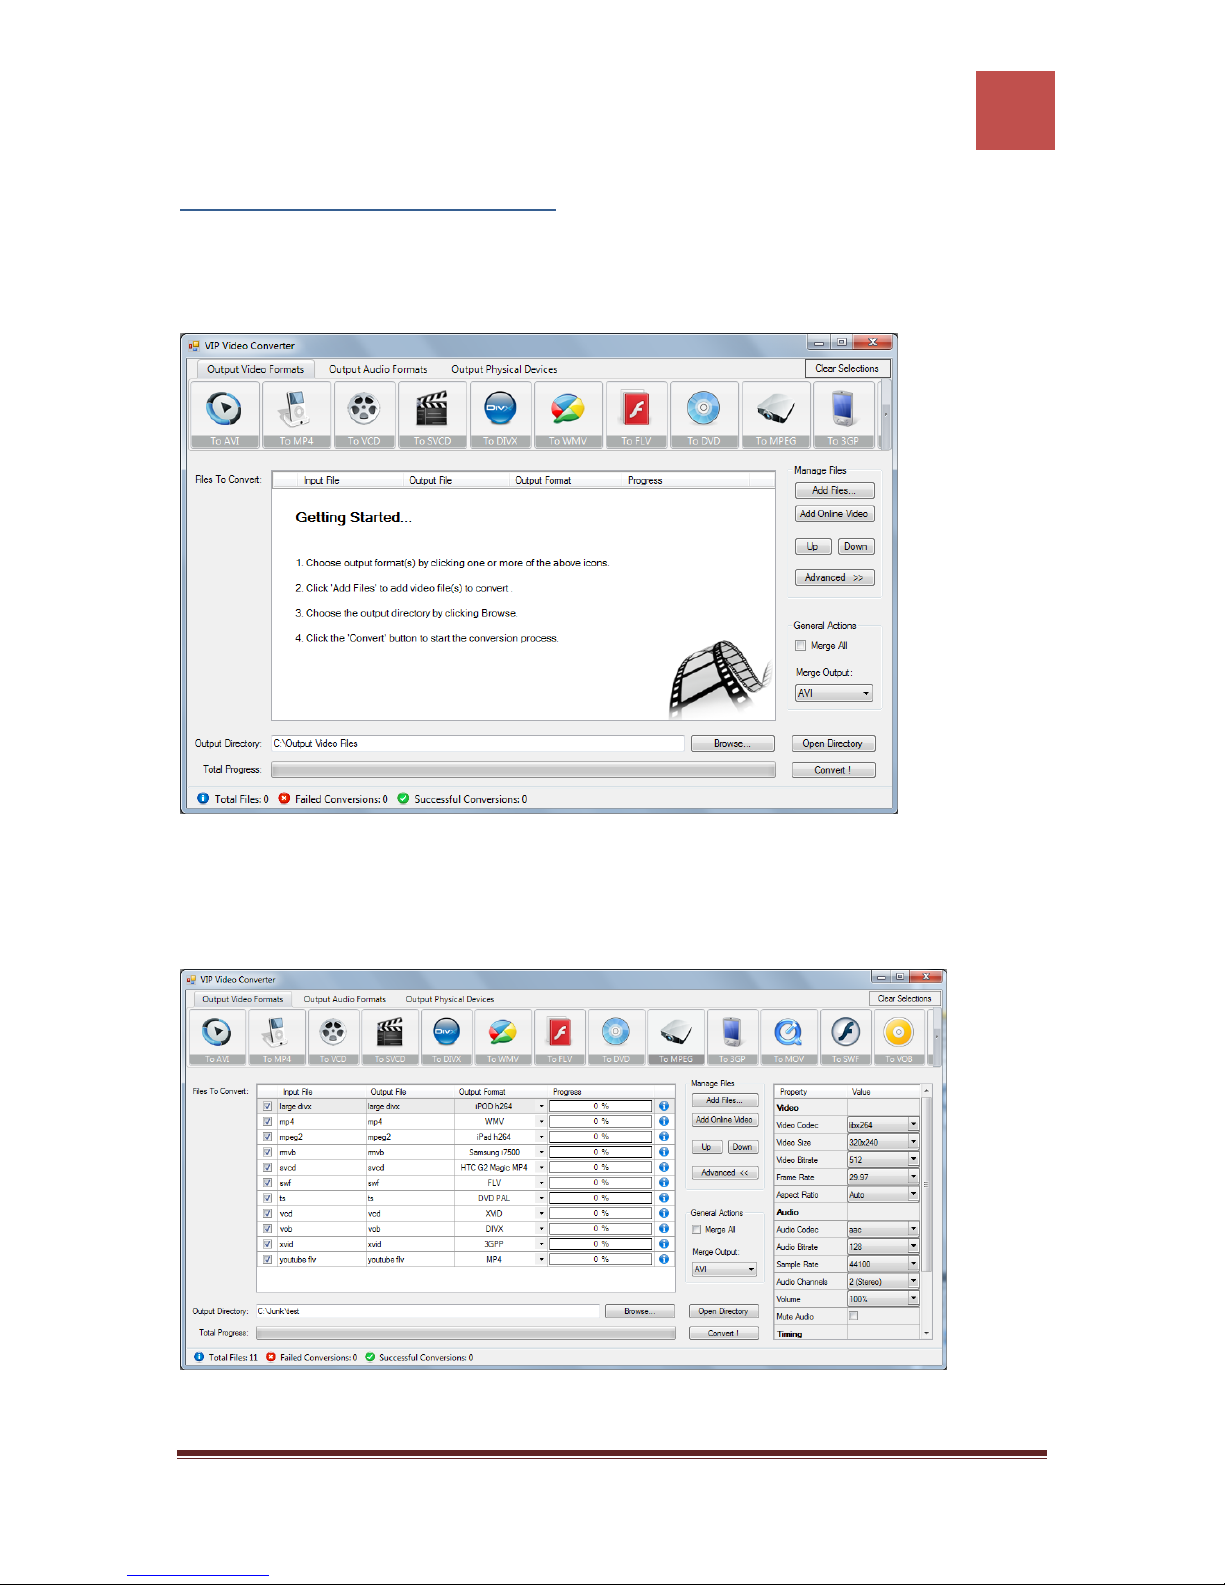
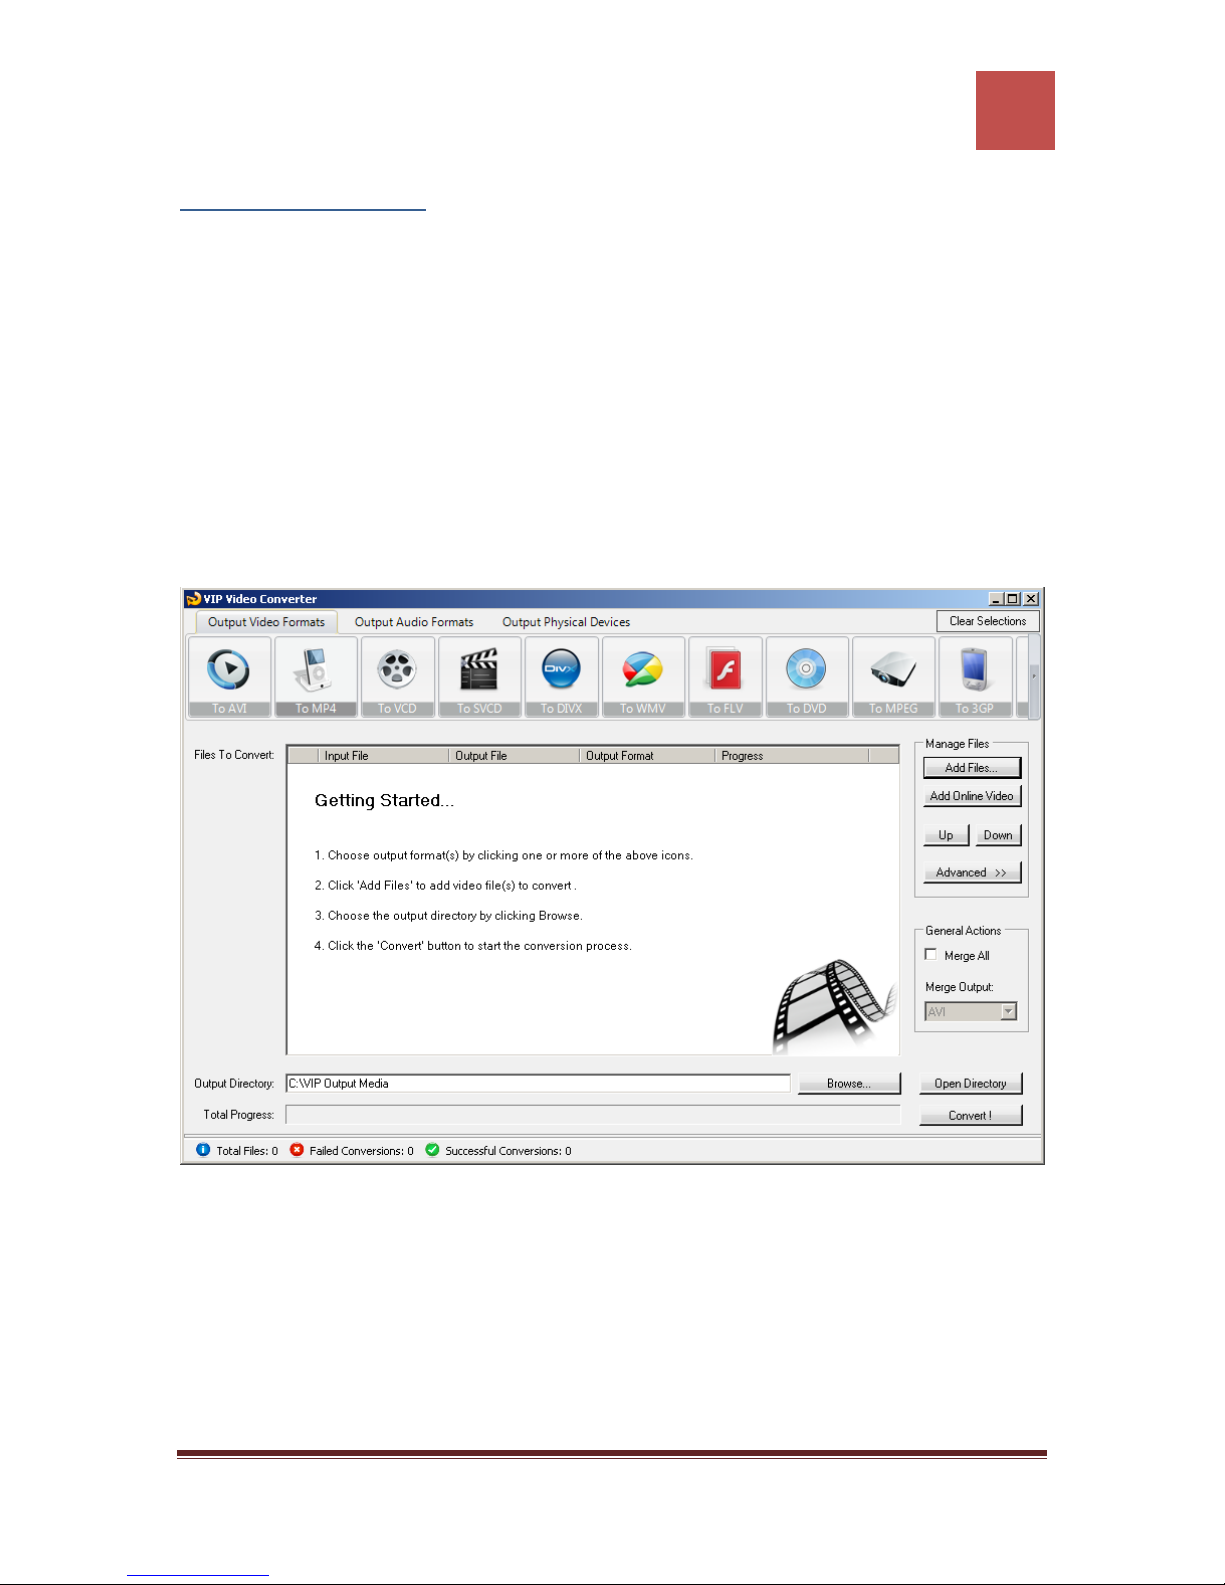
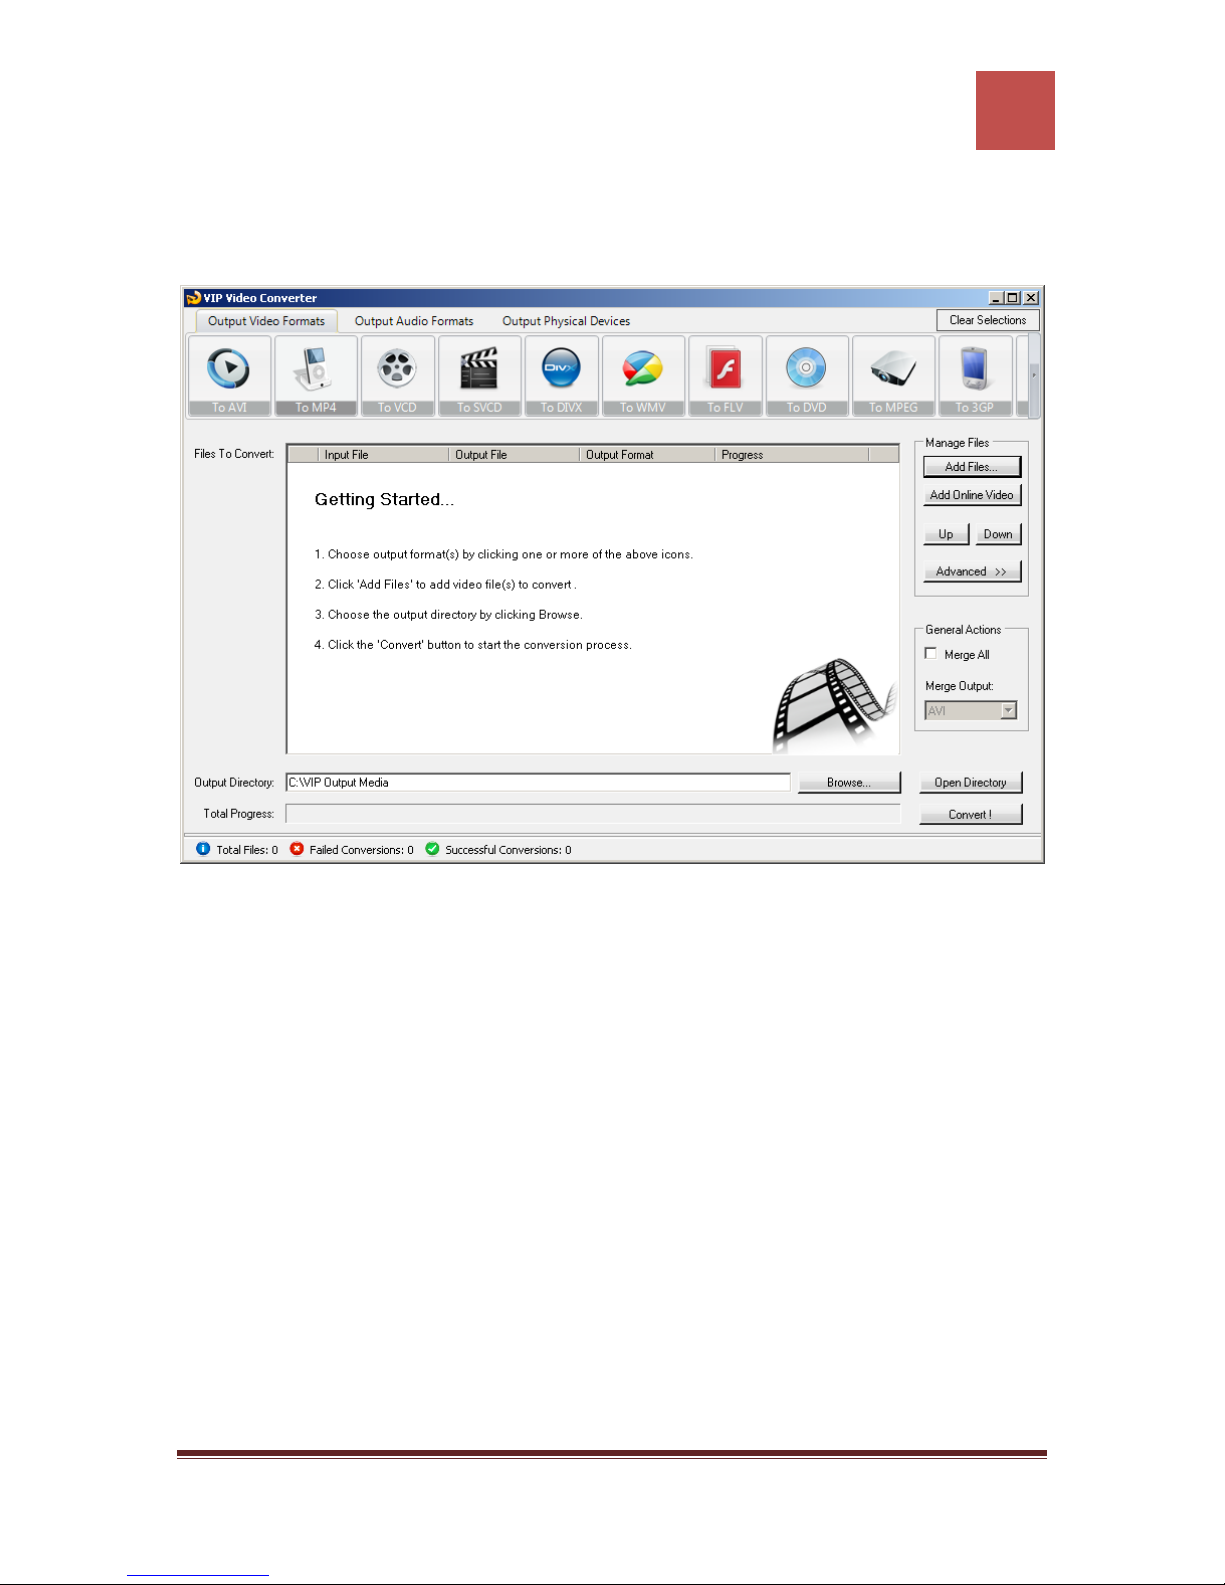
Common Screen Captures
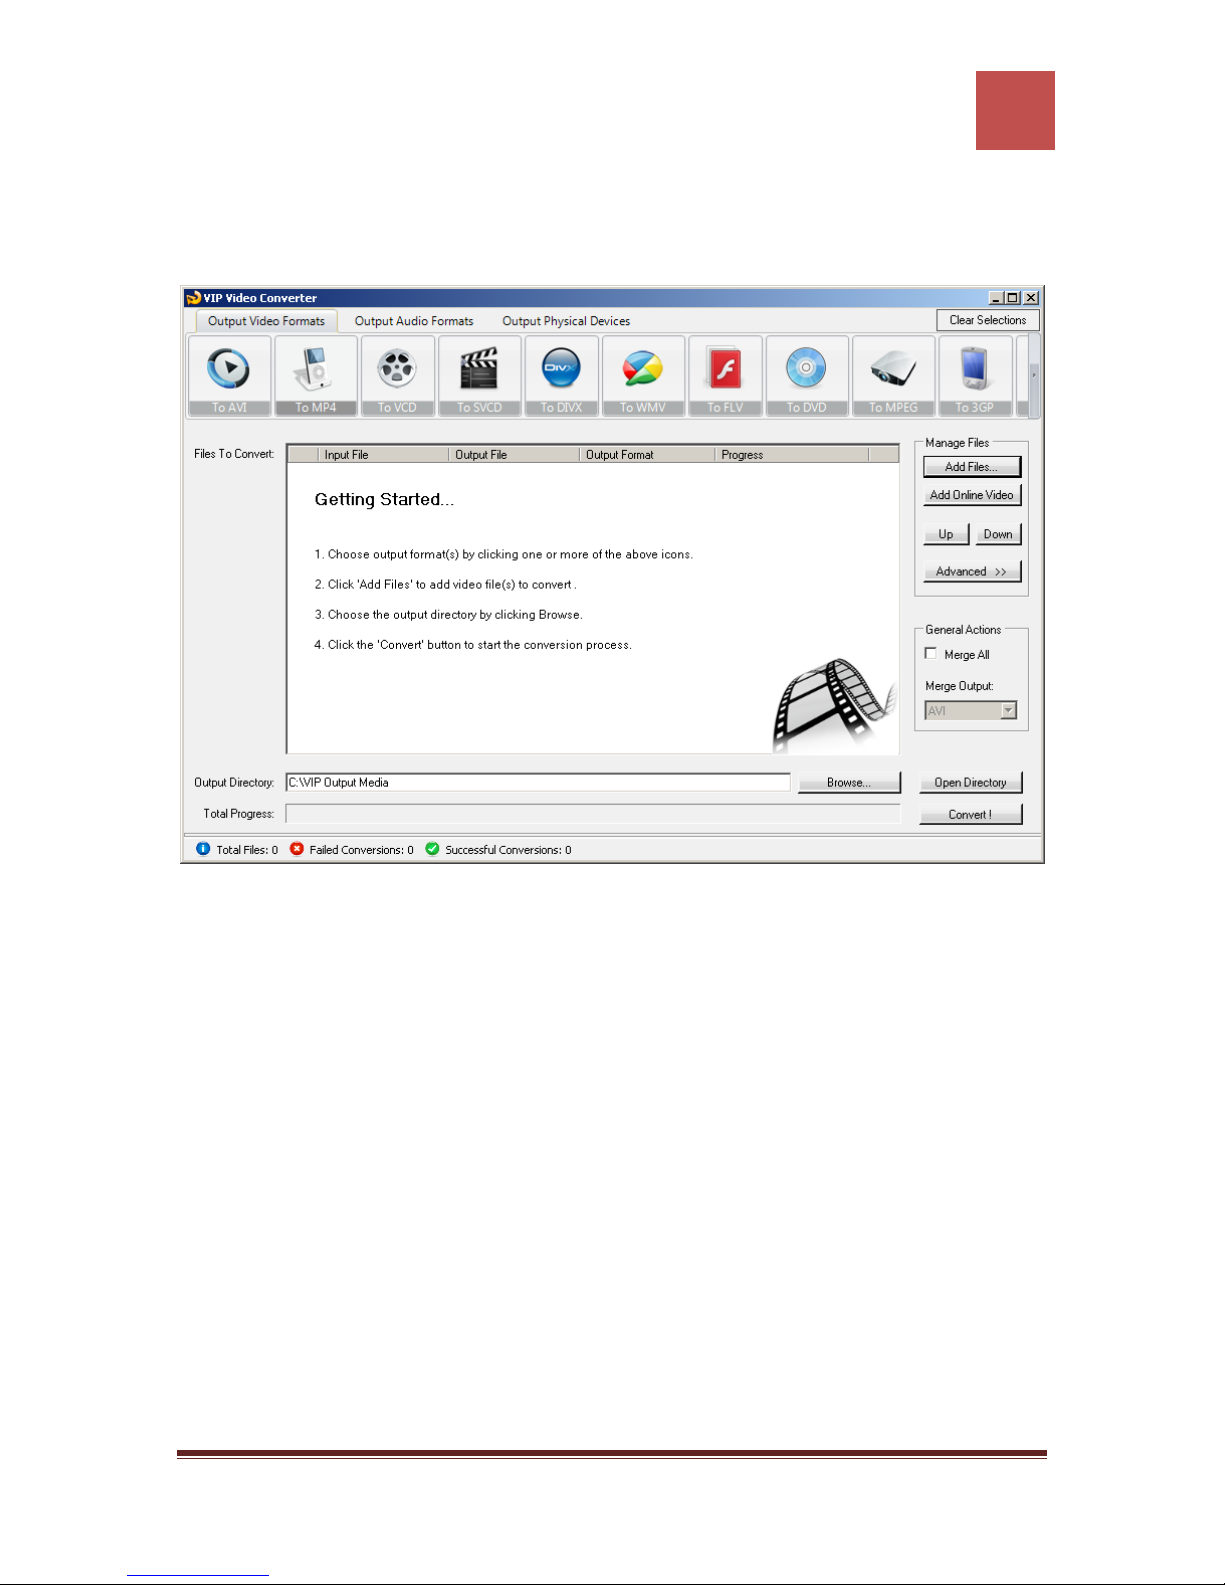
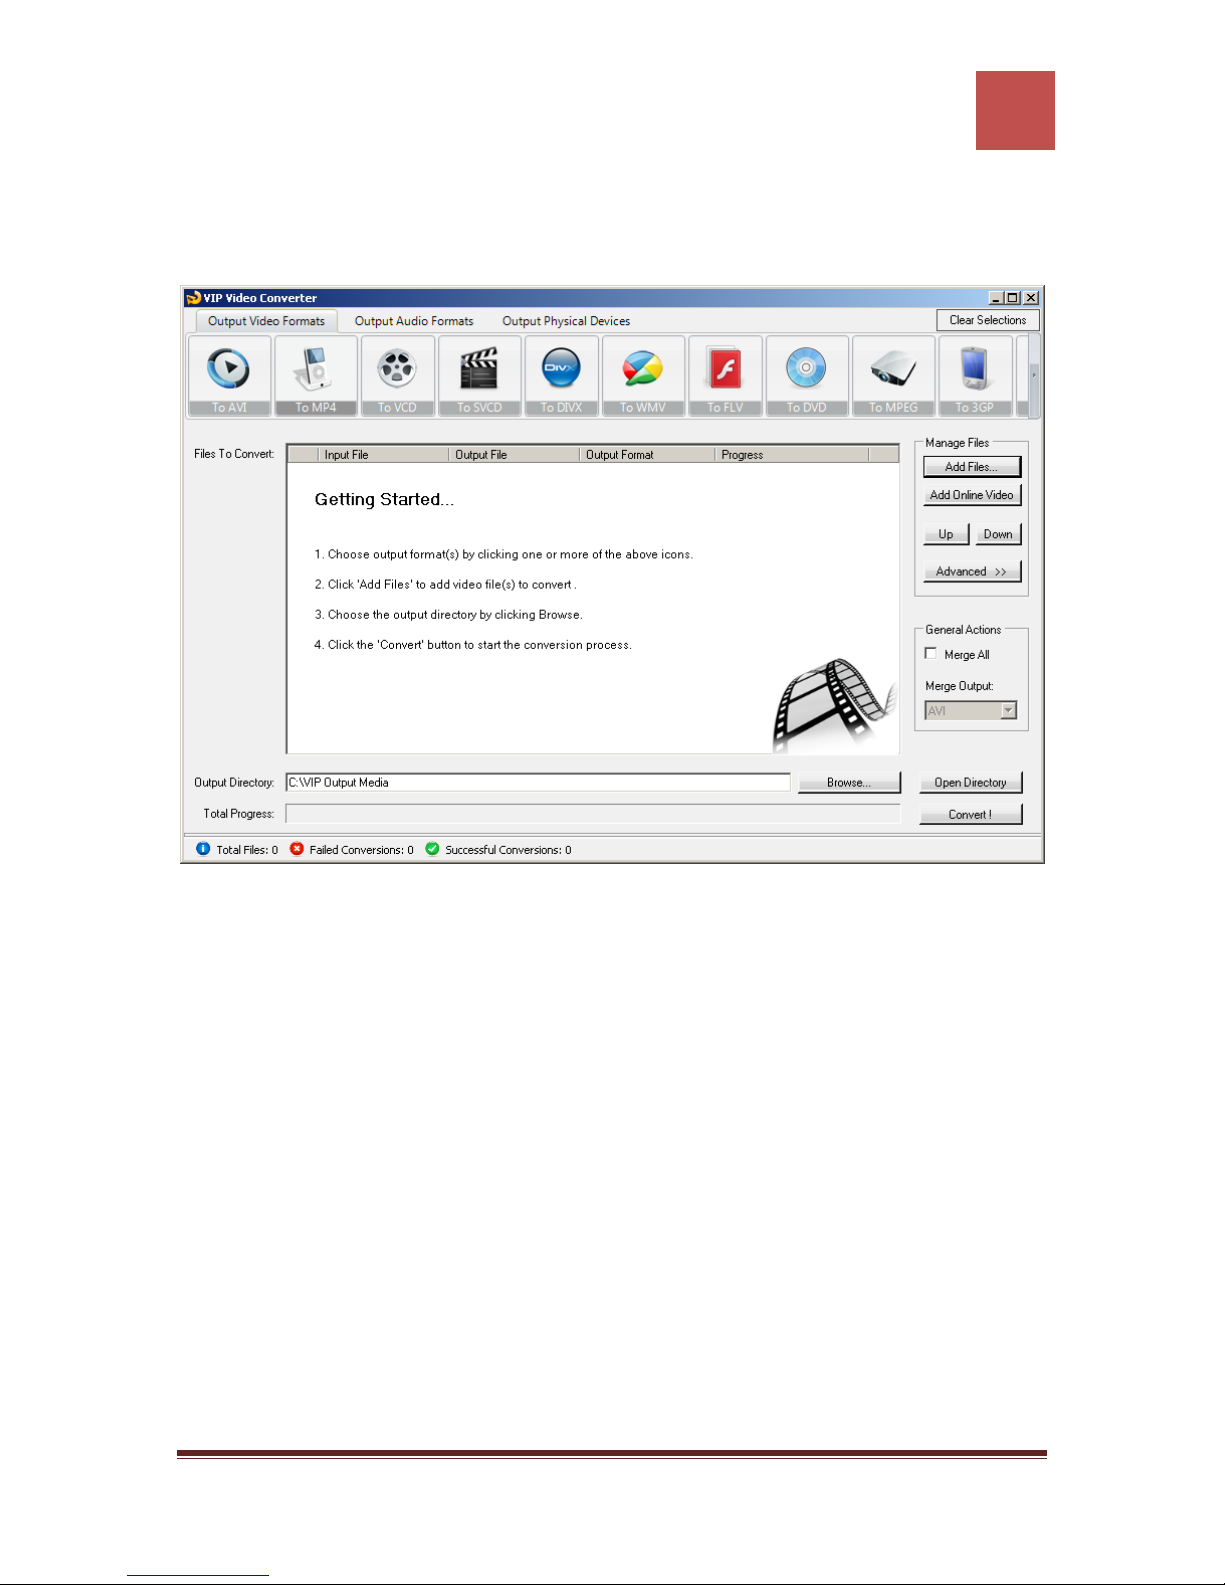
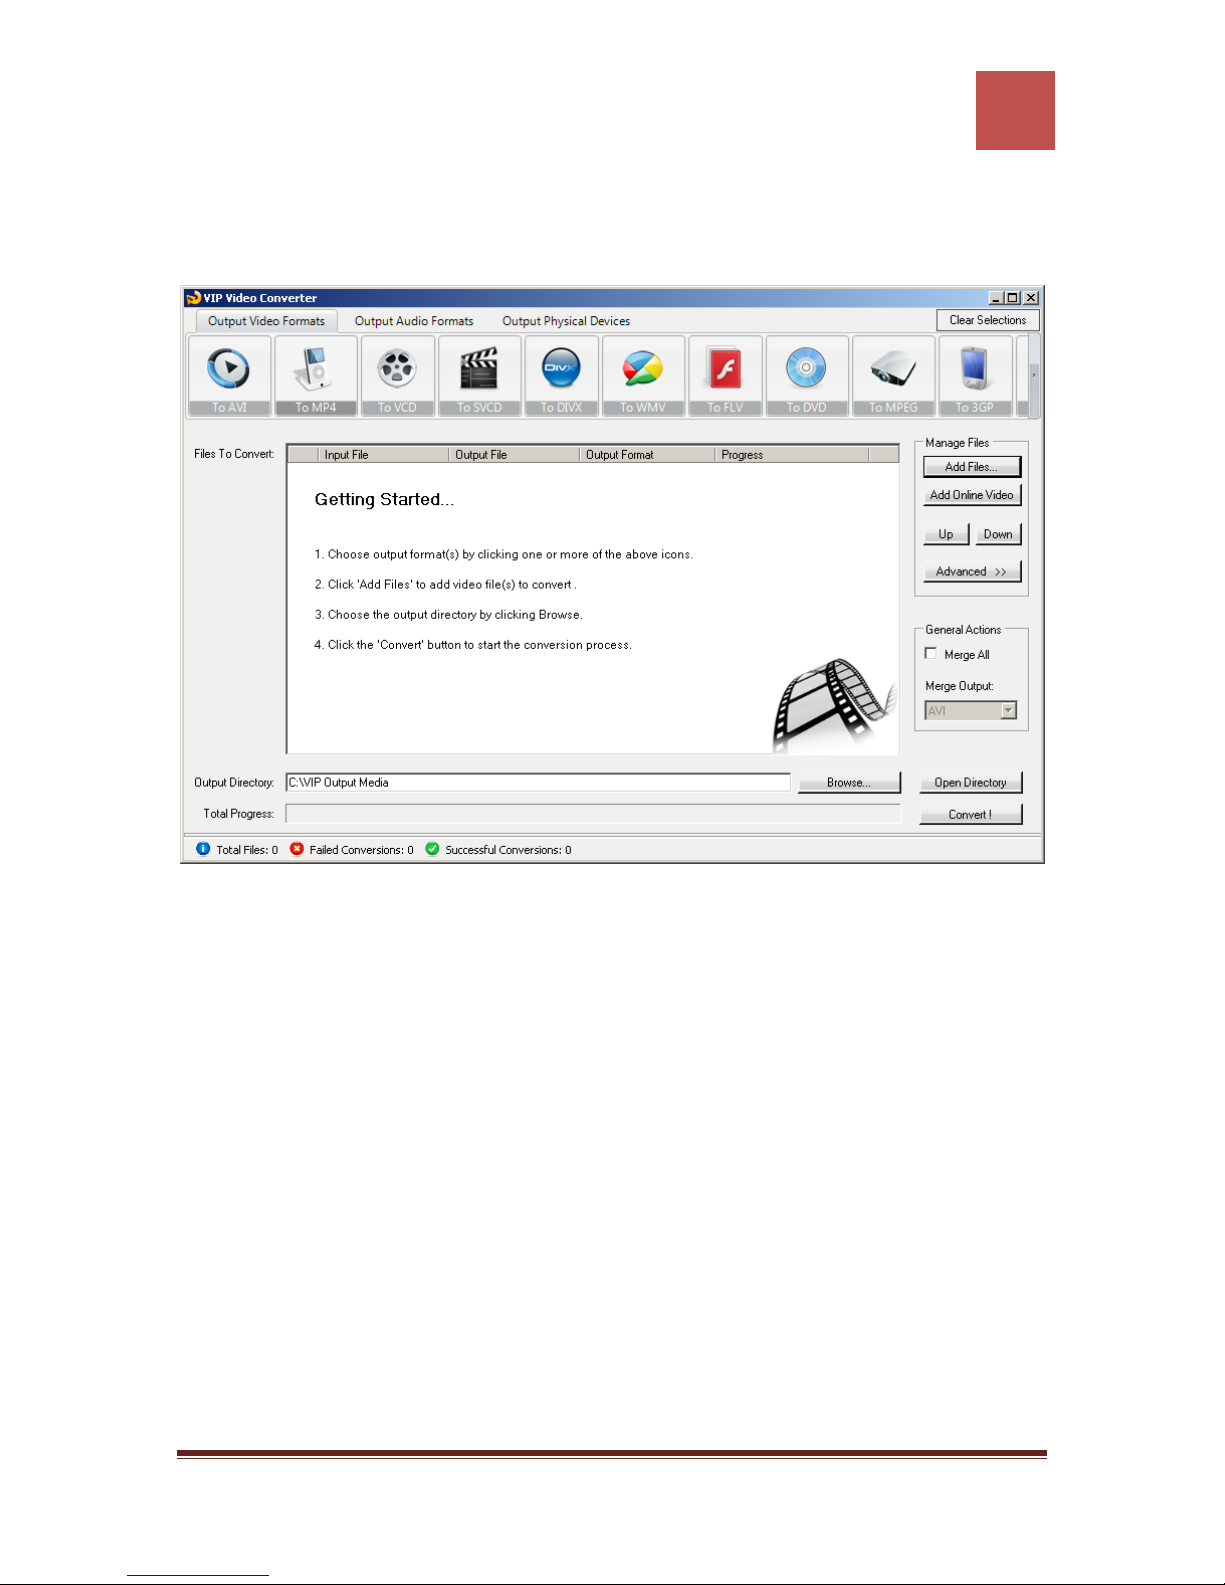
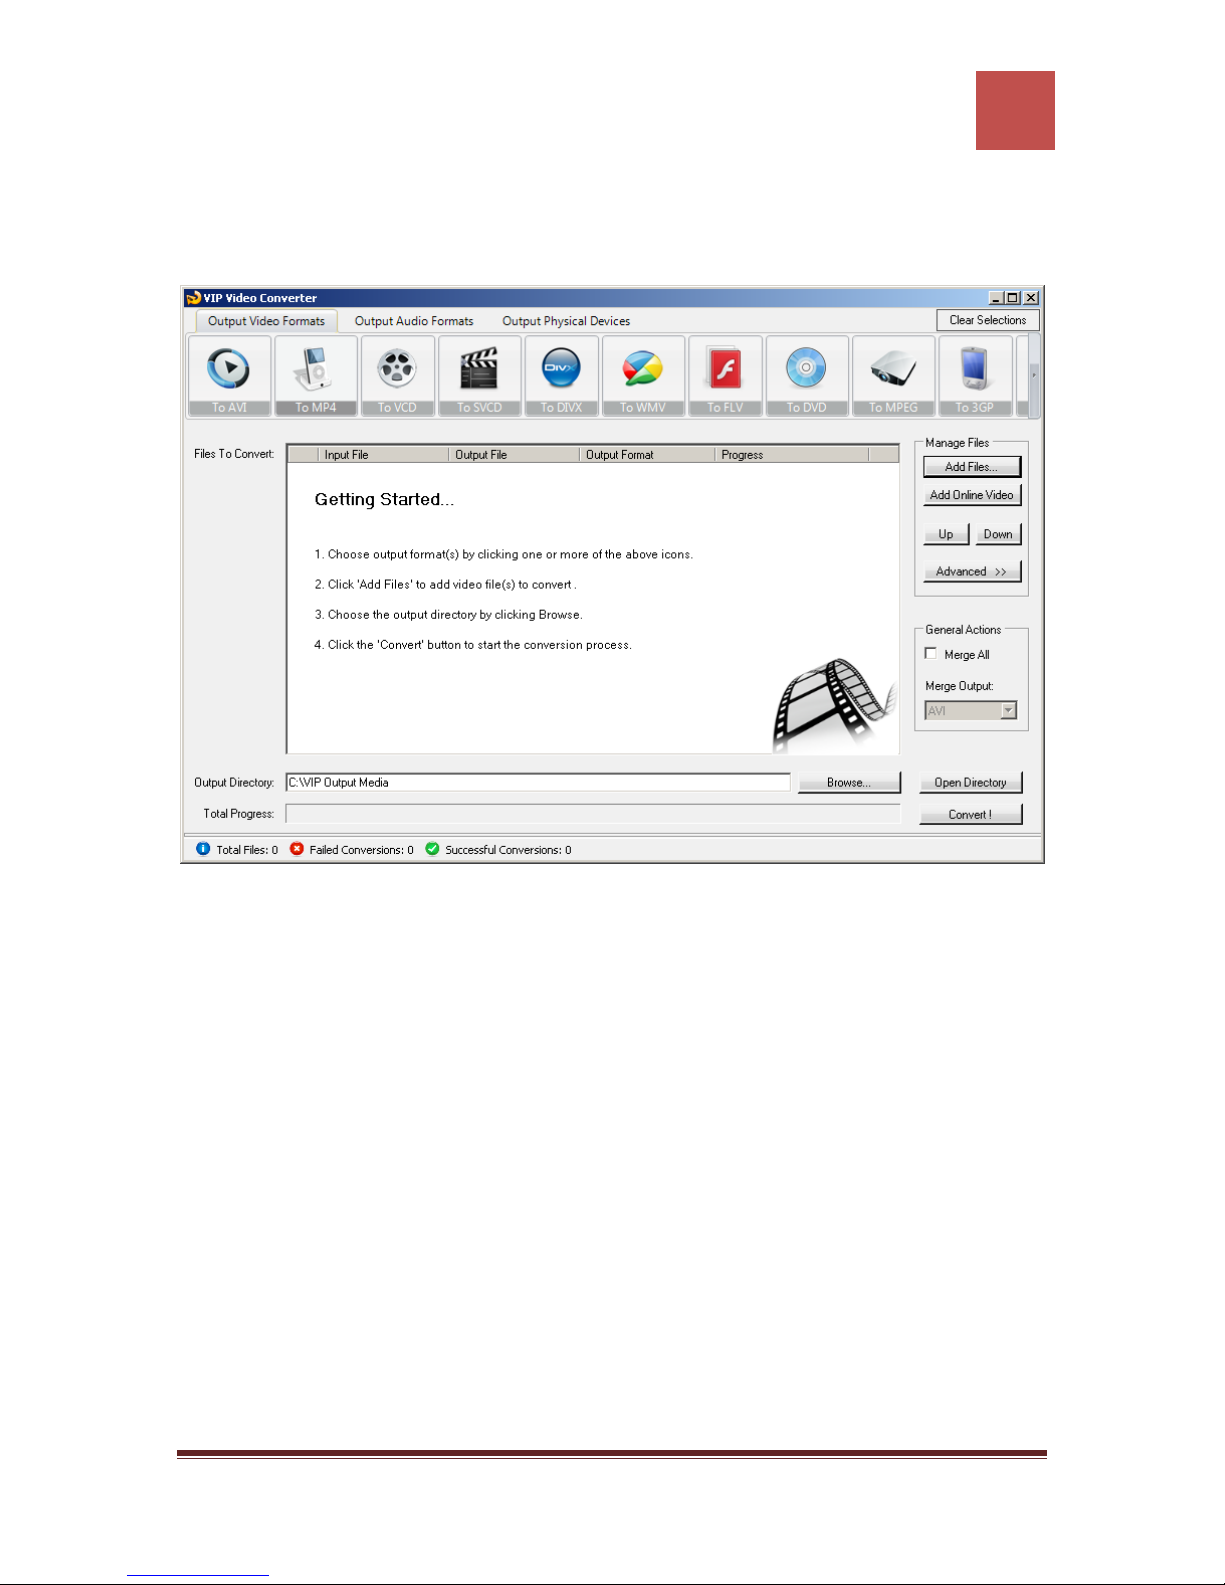
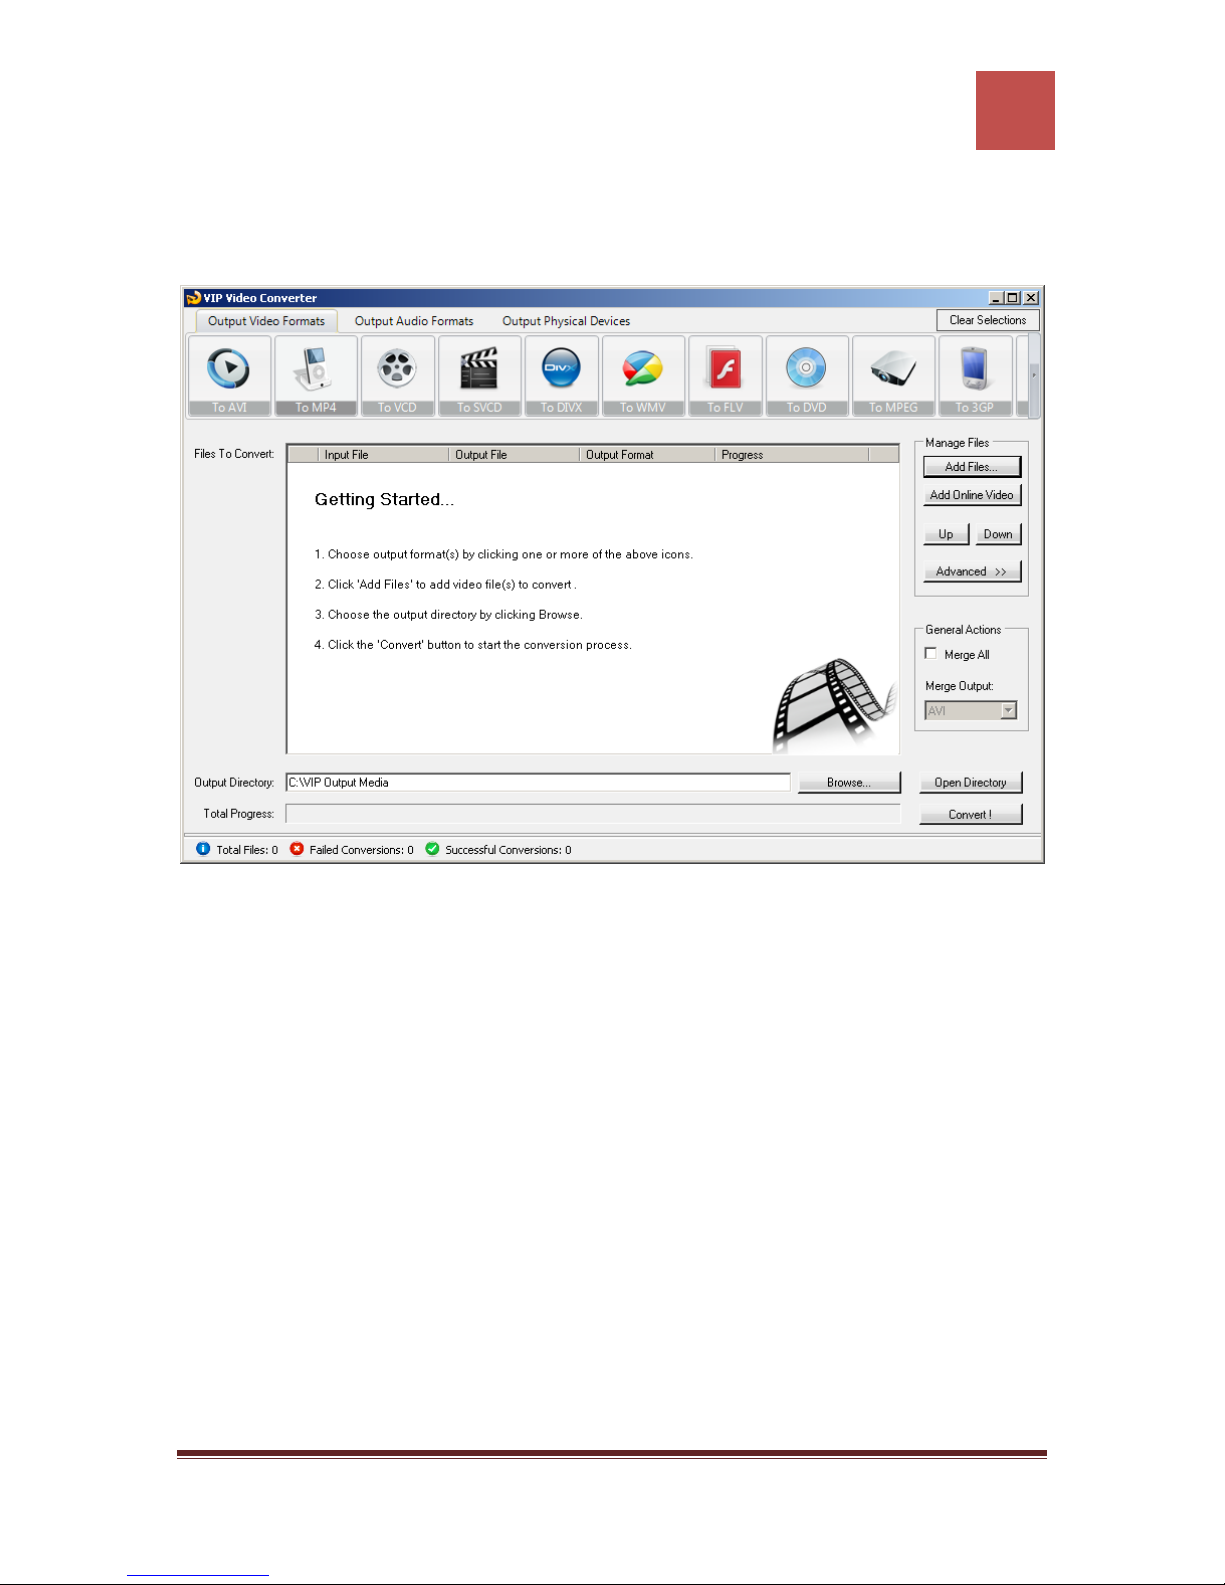
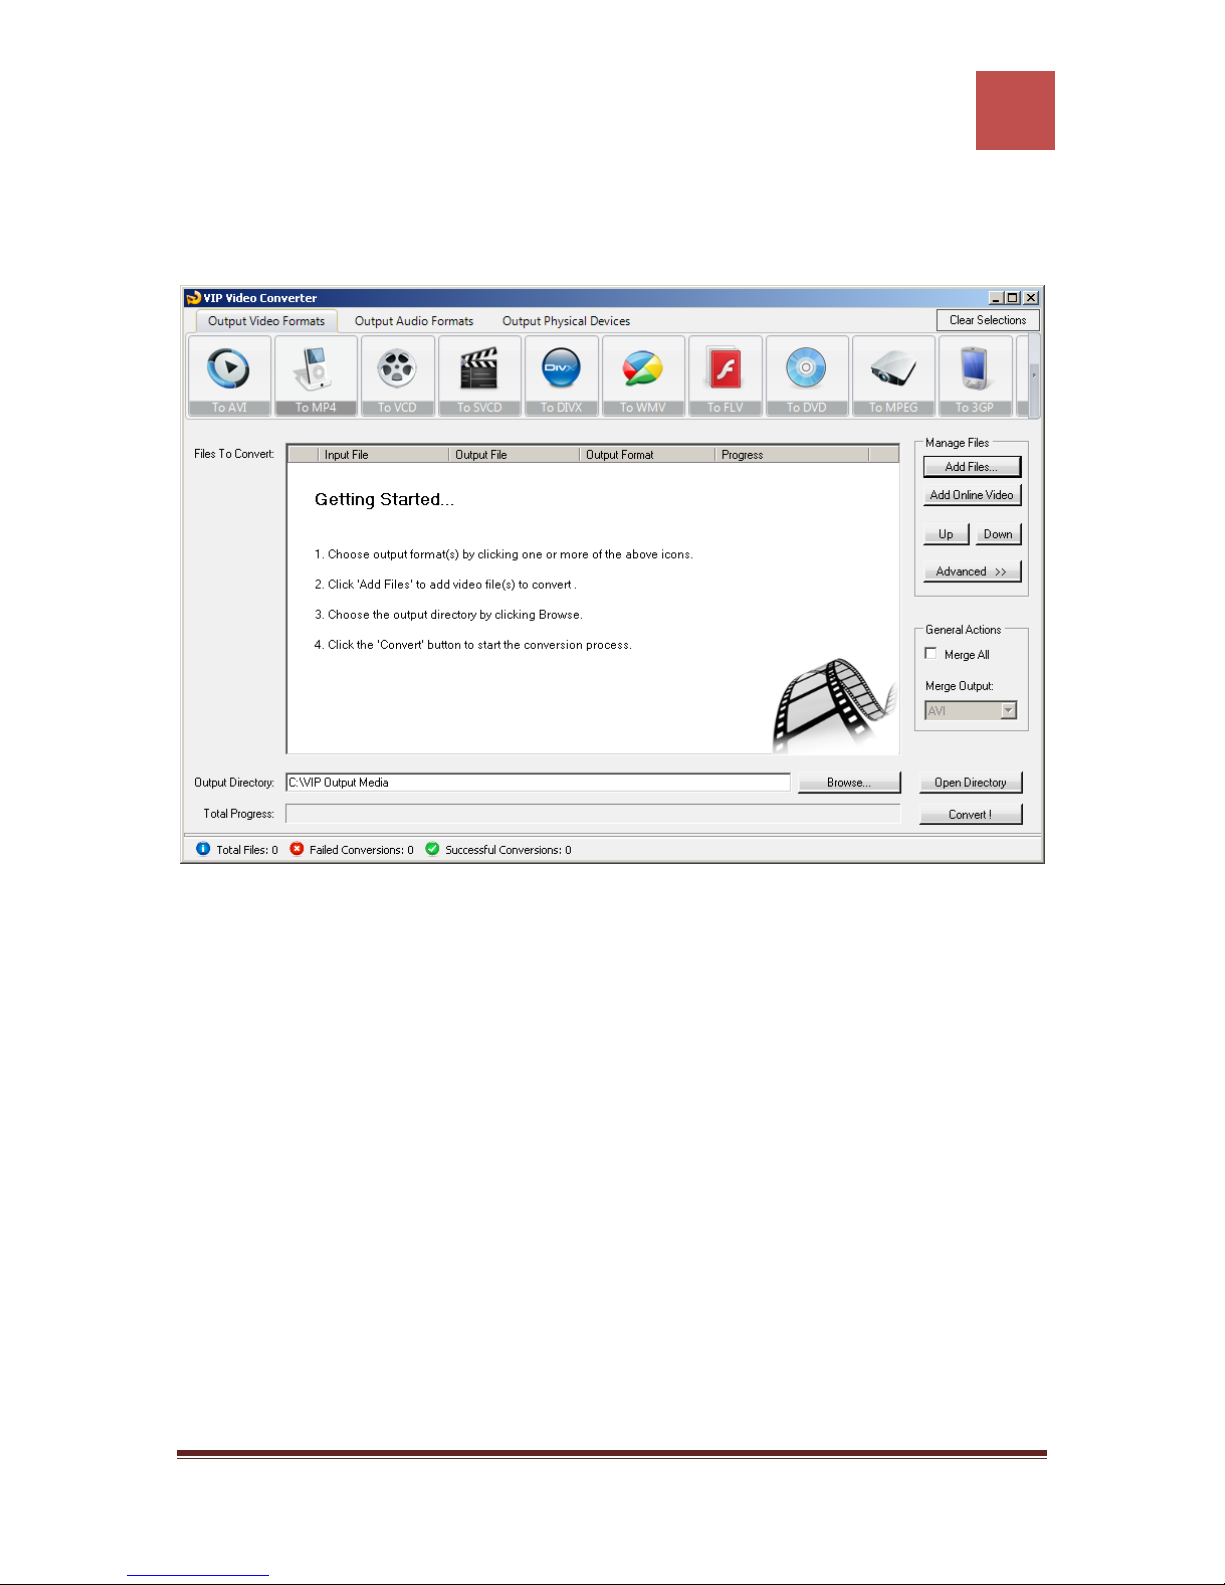
The main form of the VIP Video Converter software.
The main window’s extended form, which contains the right toolbar of the advanced
properties.
VIP Video Converter http://www.vip-video-converter.com
Page 12
VIP Video Converter User Guide
11
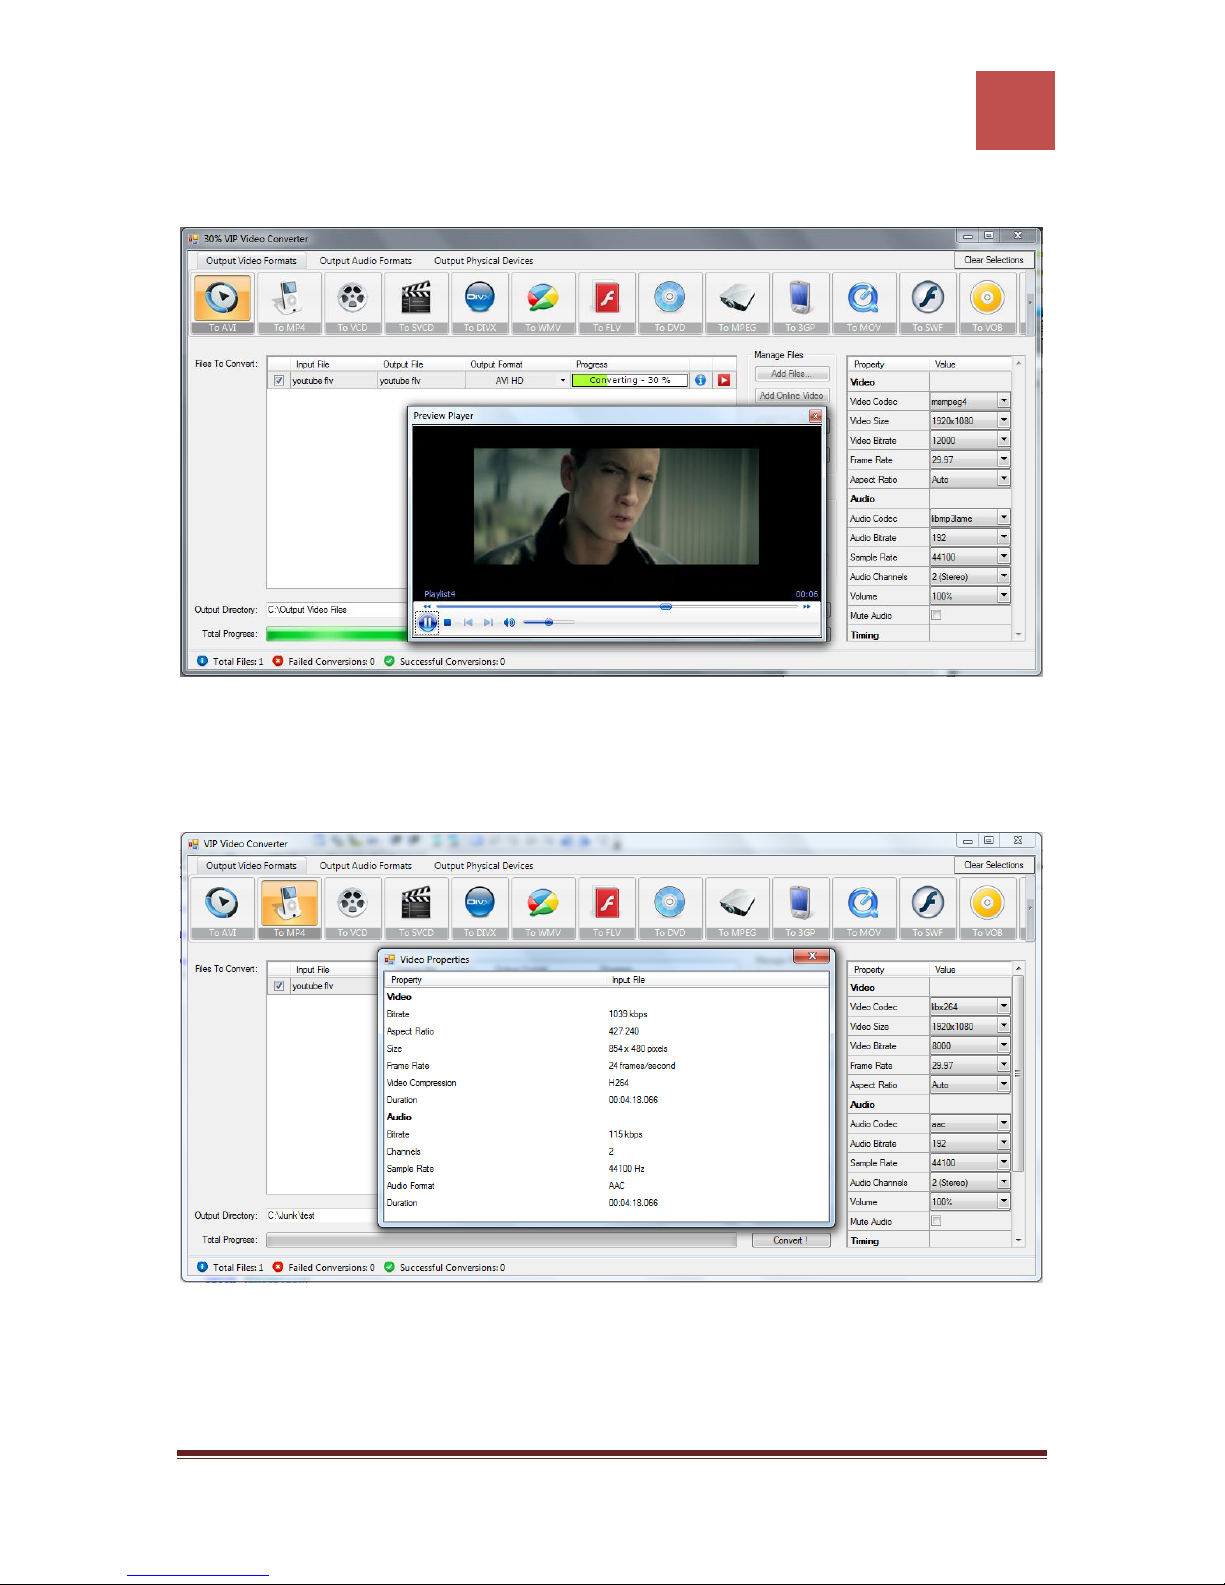
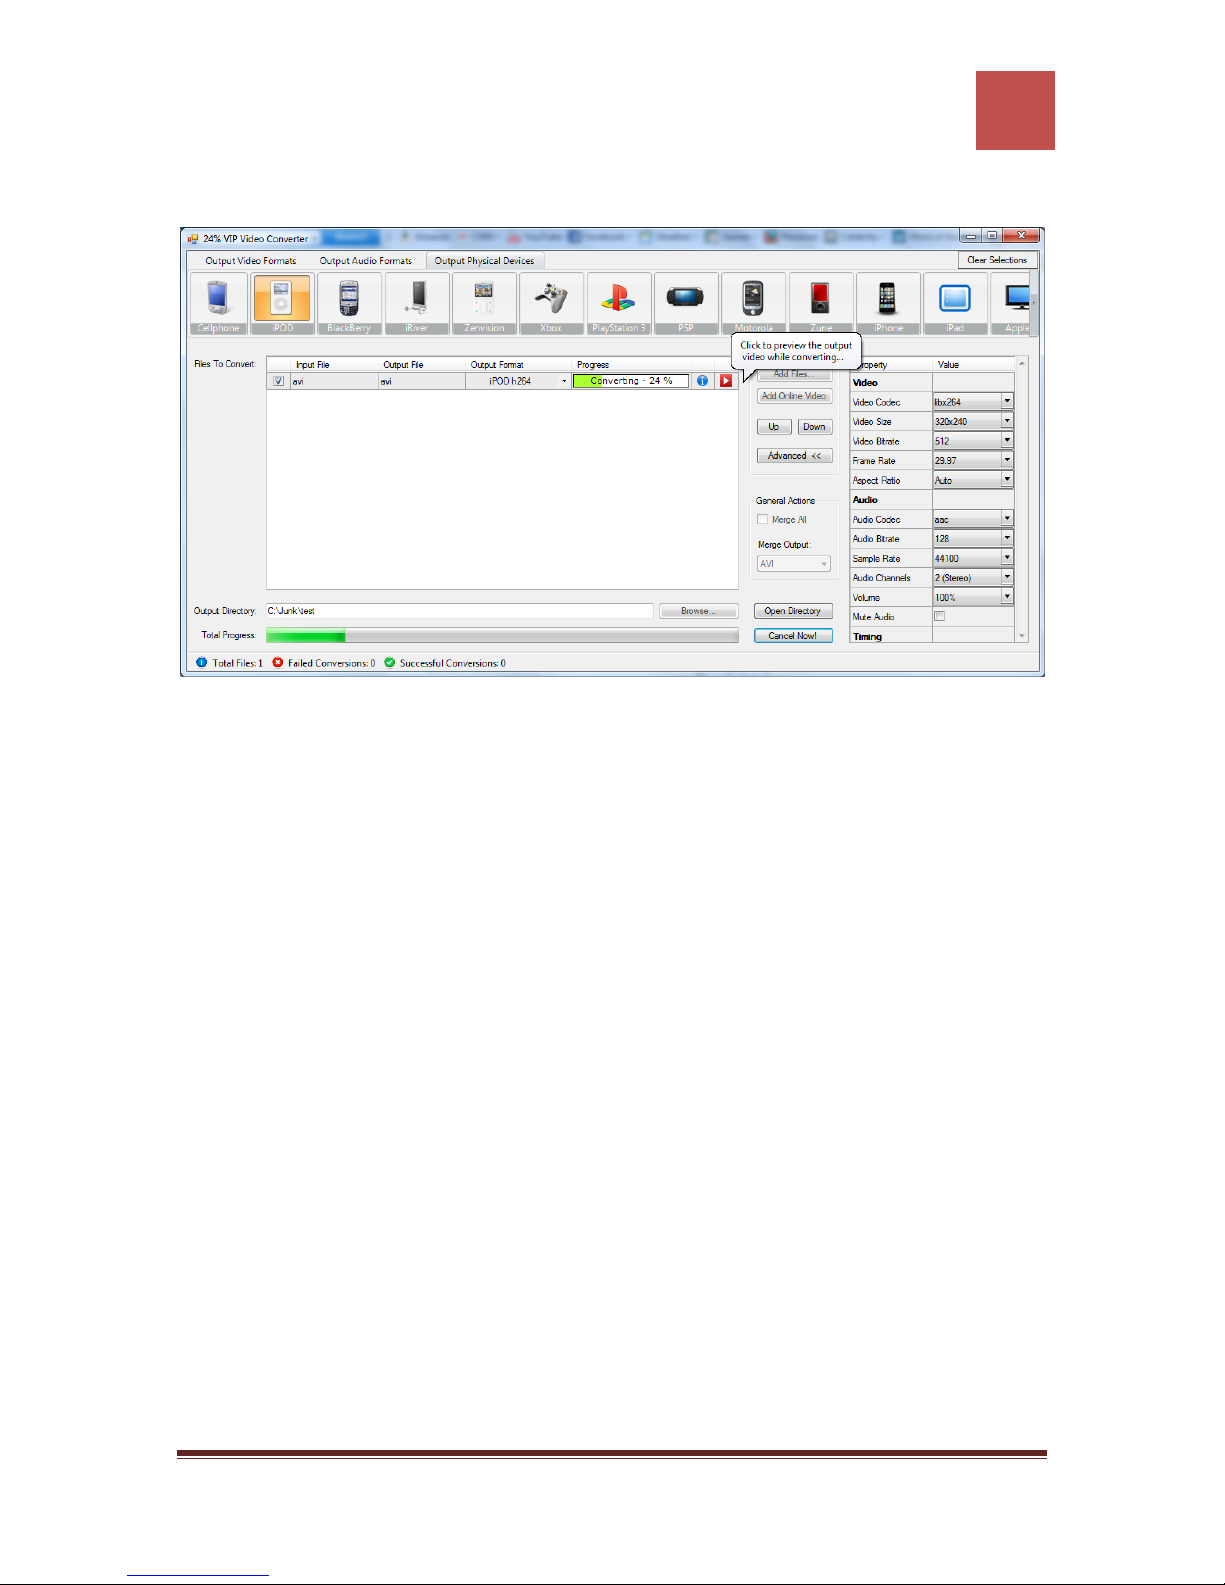
A demonstration of previewing a video file while converting.
A view of the original file’s properties. These are the properties of the file which was
chosen for conversion.
VIP Video Converter http://www.vip-video-converter.com
Page 13
VIP Video Converter User Guide
12
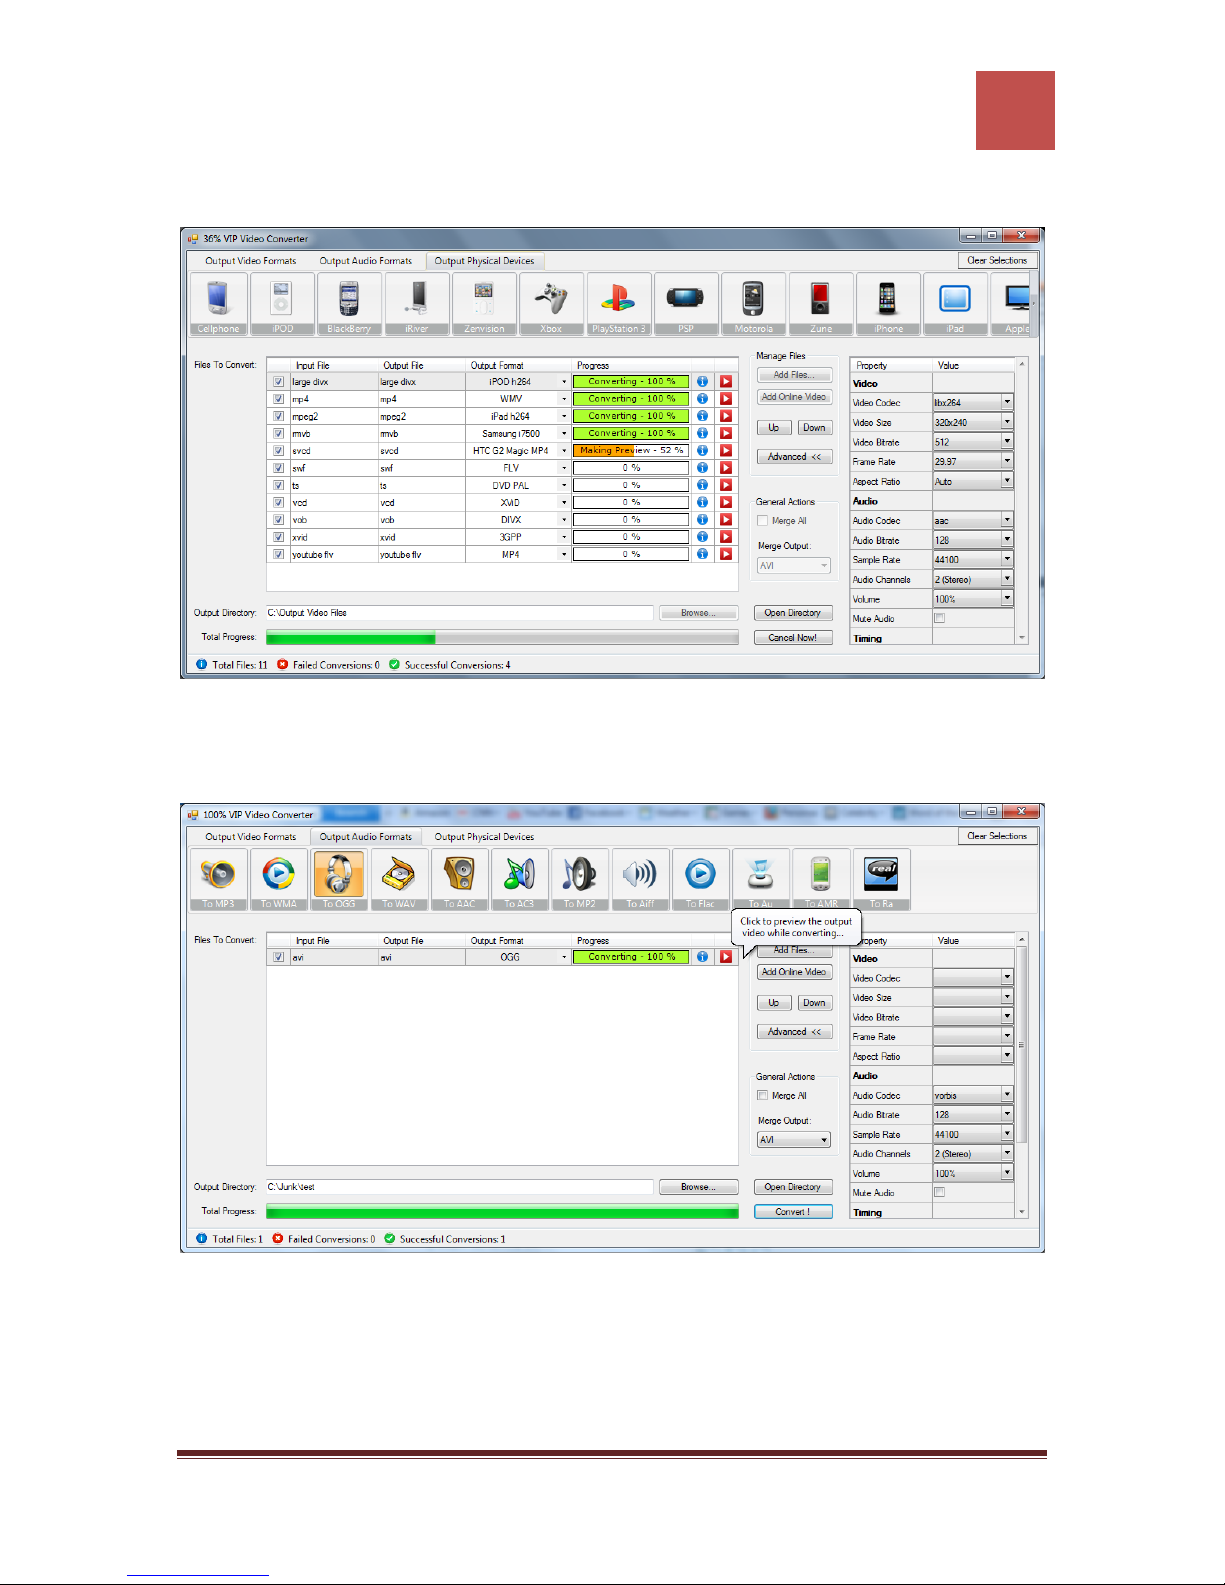
A demonstration of conversion of few video files to other video formats.
A demonstration of a conversion of a video file to an audio format.
VIP Video Converter http://www.vip-video-converter.com
Page 14
VIP Video Converter User Guide
13
A demonstration of a conversion of a video file to a physical device.
VIP Video Converter http://www.vip-video-converter.com
Page 15
VIP Video Converter User Guide
14
Converting Files
Converting To Video Formats
Dozens of video file formats are supported both for input and output in VIP Video
Converter. The supported file formats include: AVI, MP4, VCD, SVCD (PAL/NTSC), DiVX,
WMV, FLV, DVD (PAL/NTSC), MPEG-1, MPEG-2, MP4, 3GP, 3GPP2, MOV, SWF, H.263,
H.264, MPG, VOB, RM, RMVB, DV, ASF, XViD, HD Video Formats (AVI HD, MP4 HD etc.).
Converting To AVI Format
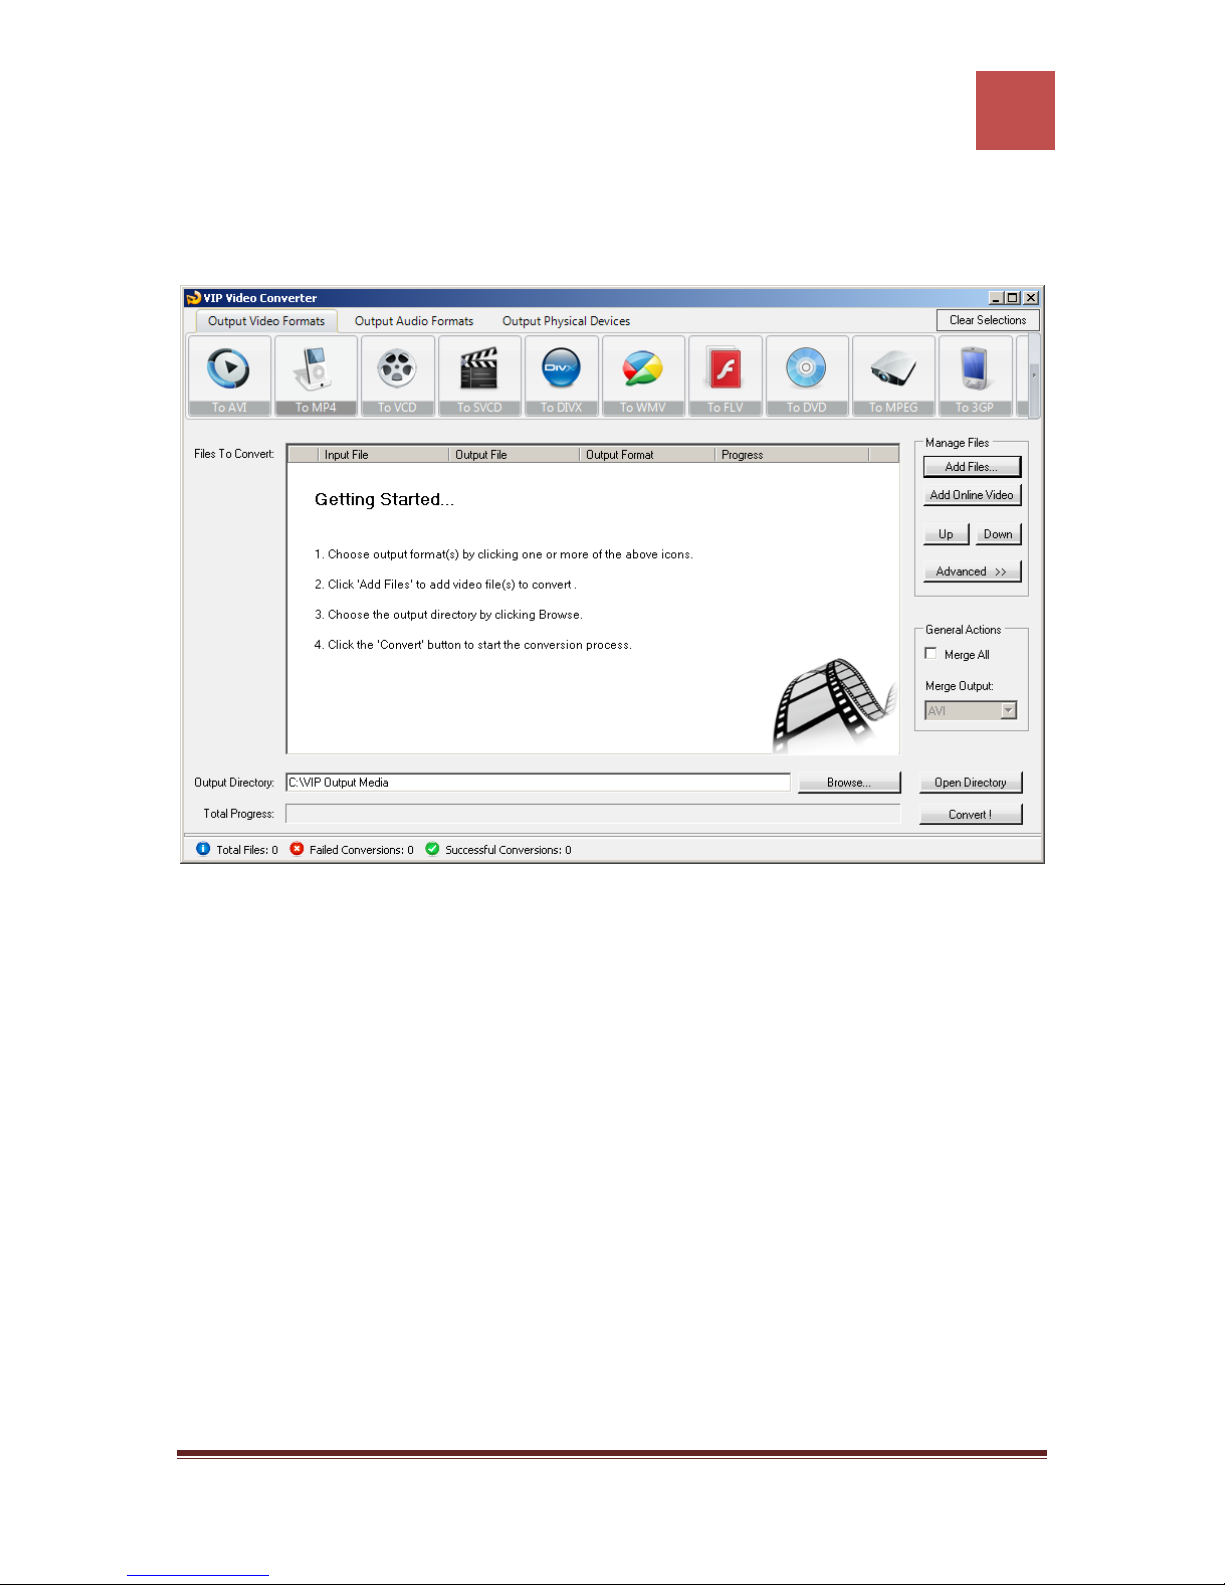
In order to convert your video file to AVI video format, follow these steps:
1. Press the “To AVI” button at the top formats menu. If there is a choice of a
specific format, please choose one (in example, AVI or AVI HD). The output
format you’ve chosen should be now marked in yellow.
VIP Video Converter http://www.vip-video-converter.com
Page 16
VIP Video Converter User Guide
15
2. Click the “Add Files” button at the right pane, and choose file(s) for conversion.
3. At the bottom right, click the “Browse…” button to choose the output directory.
This will be the directory where the converted files will be written to.
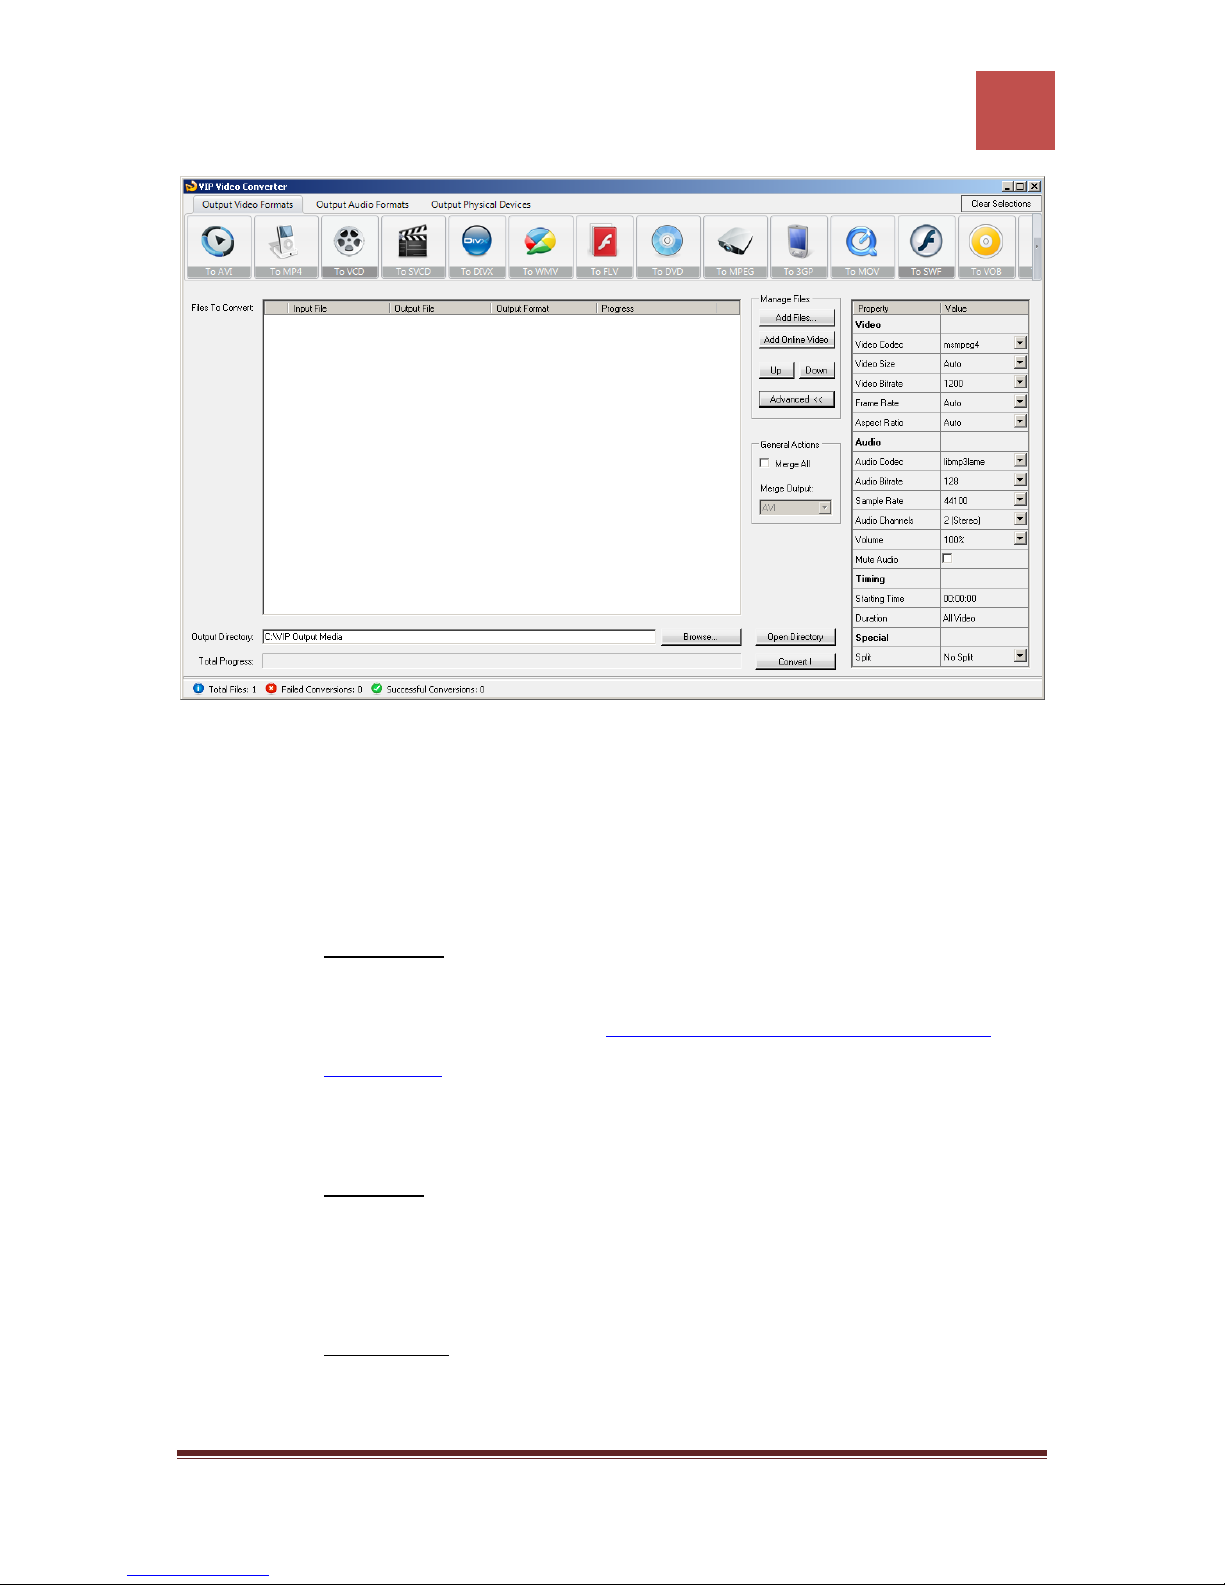
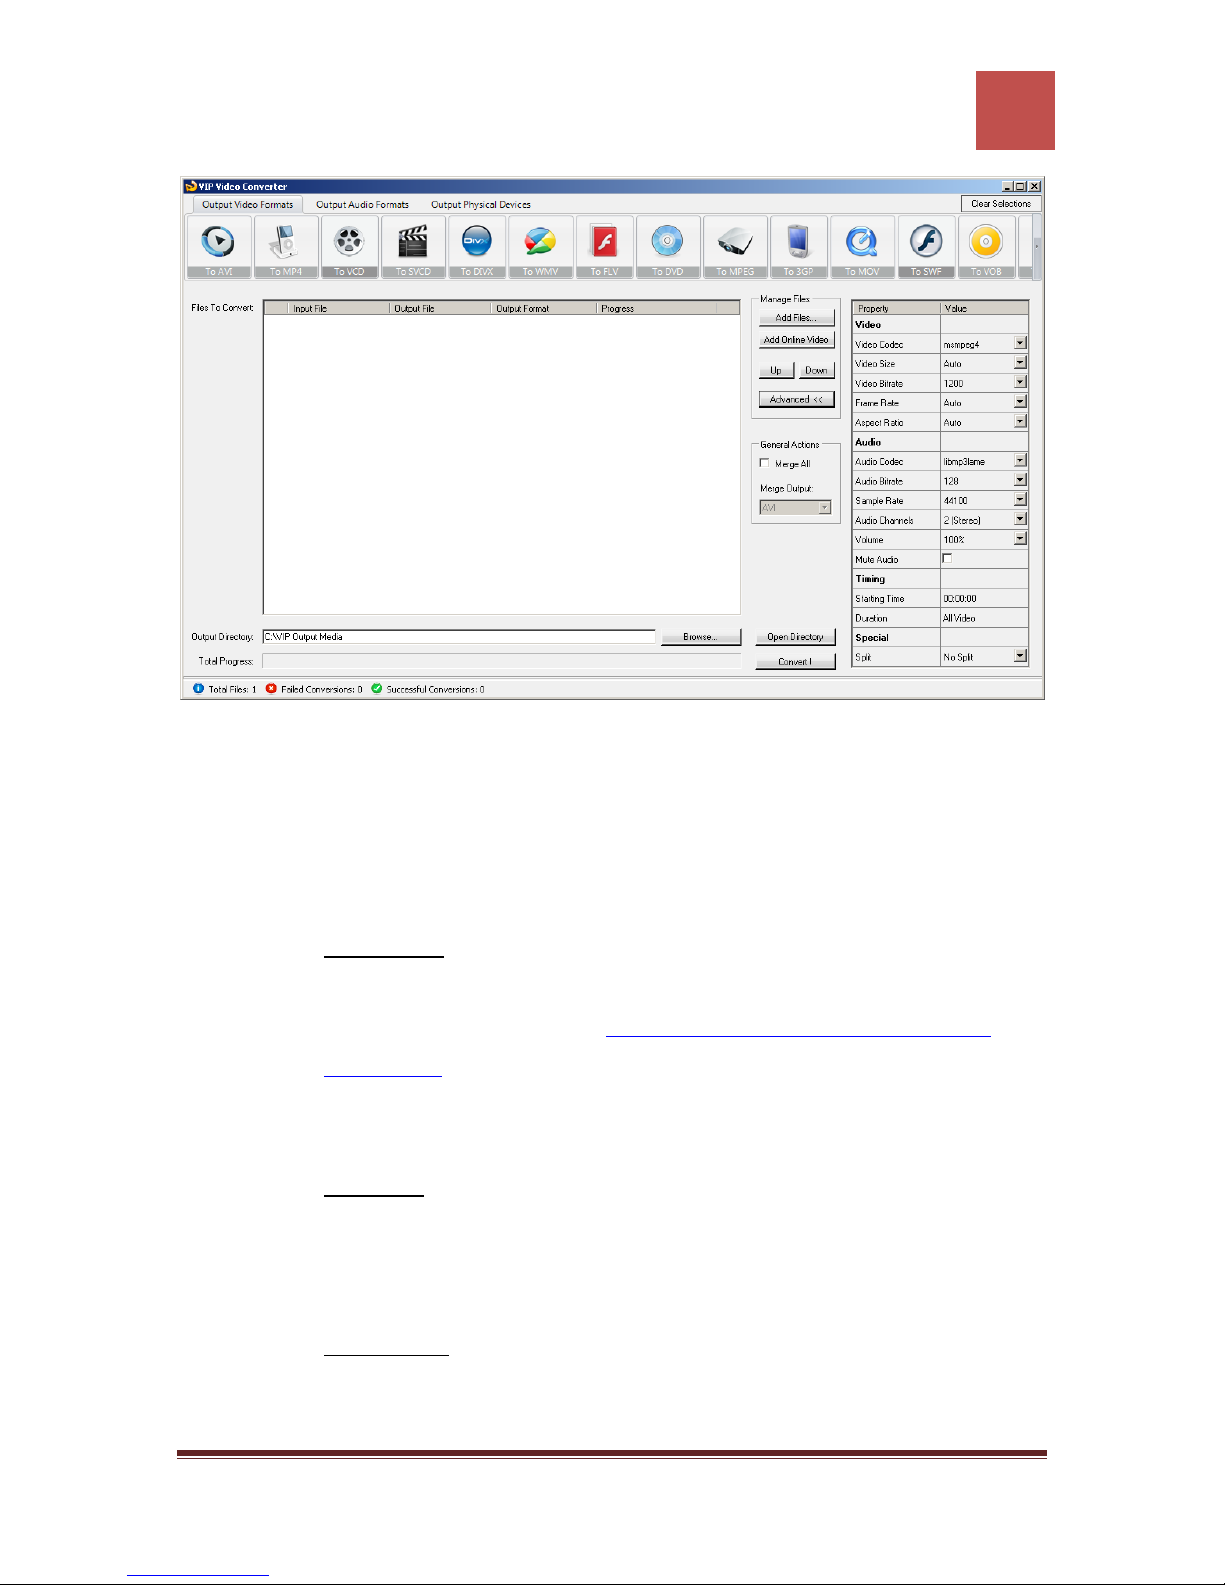
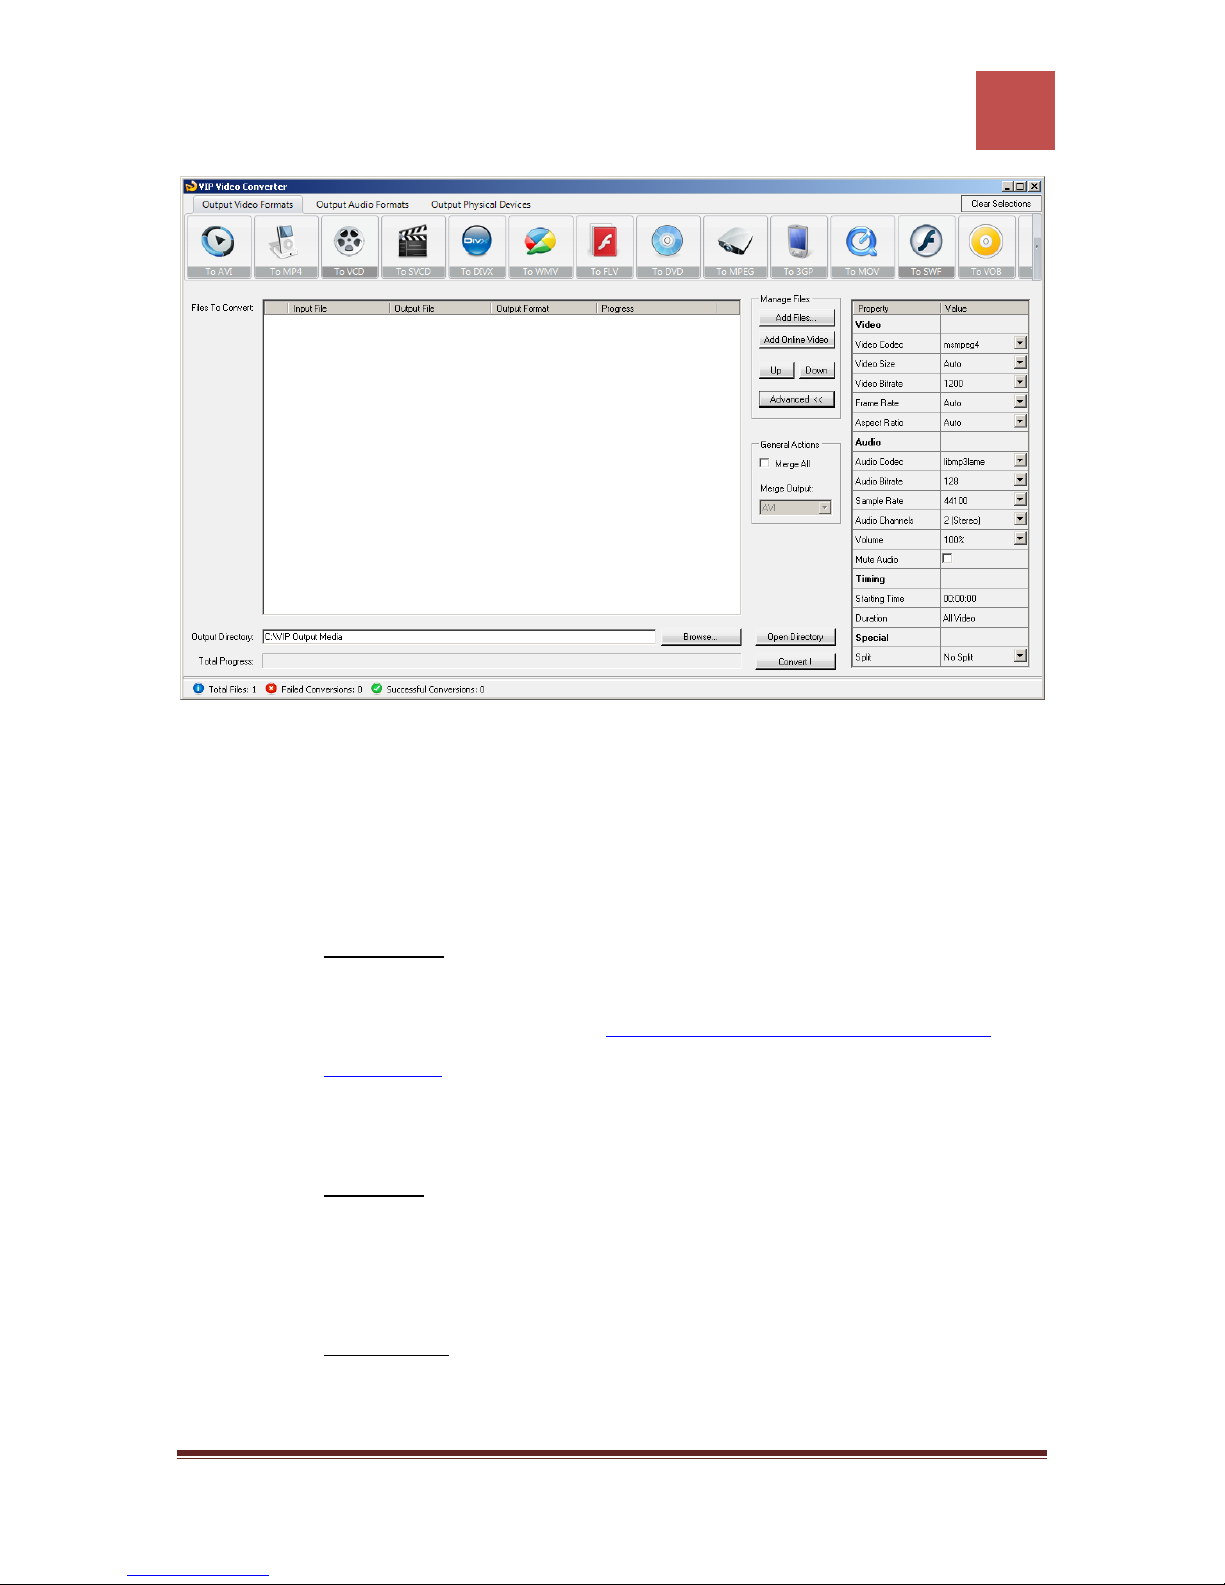
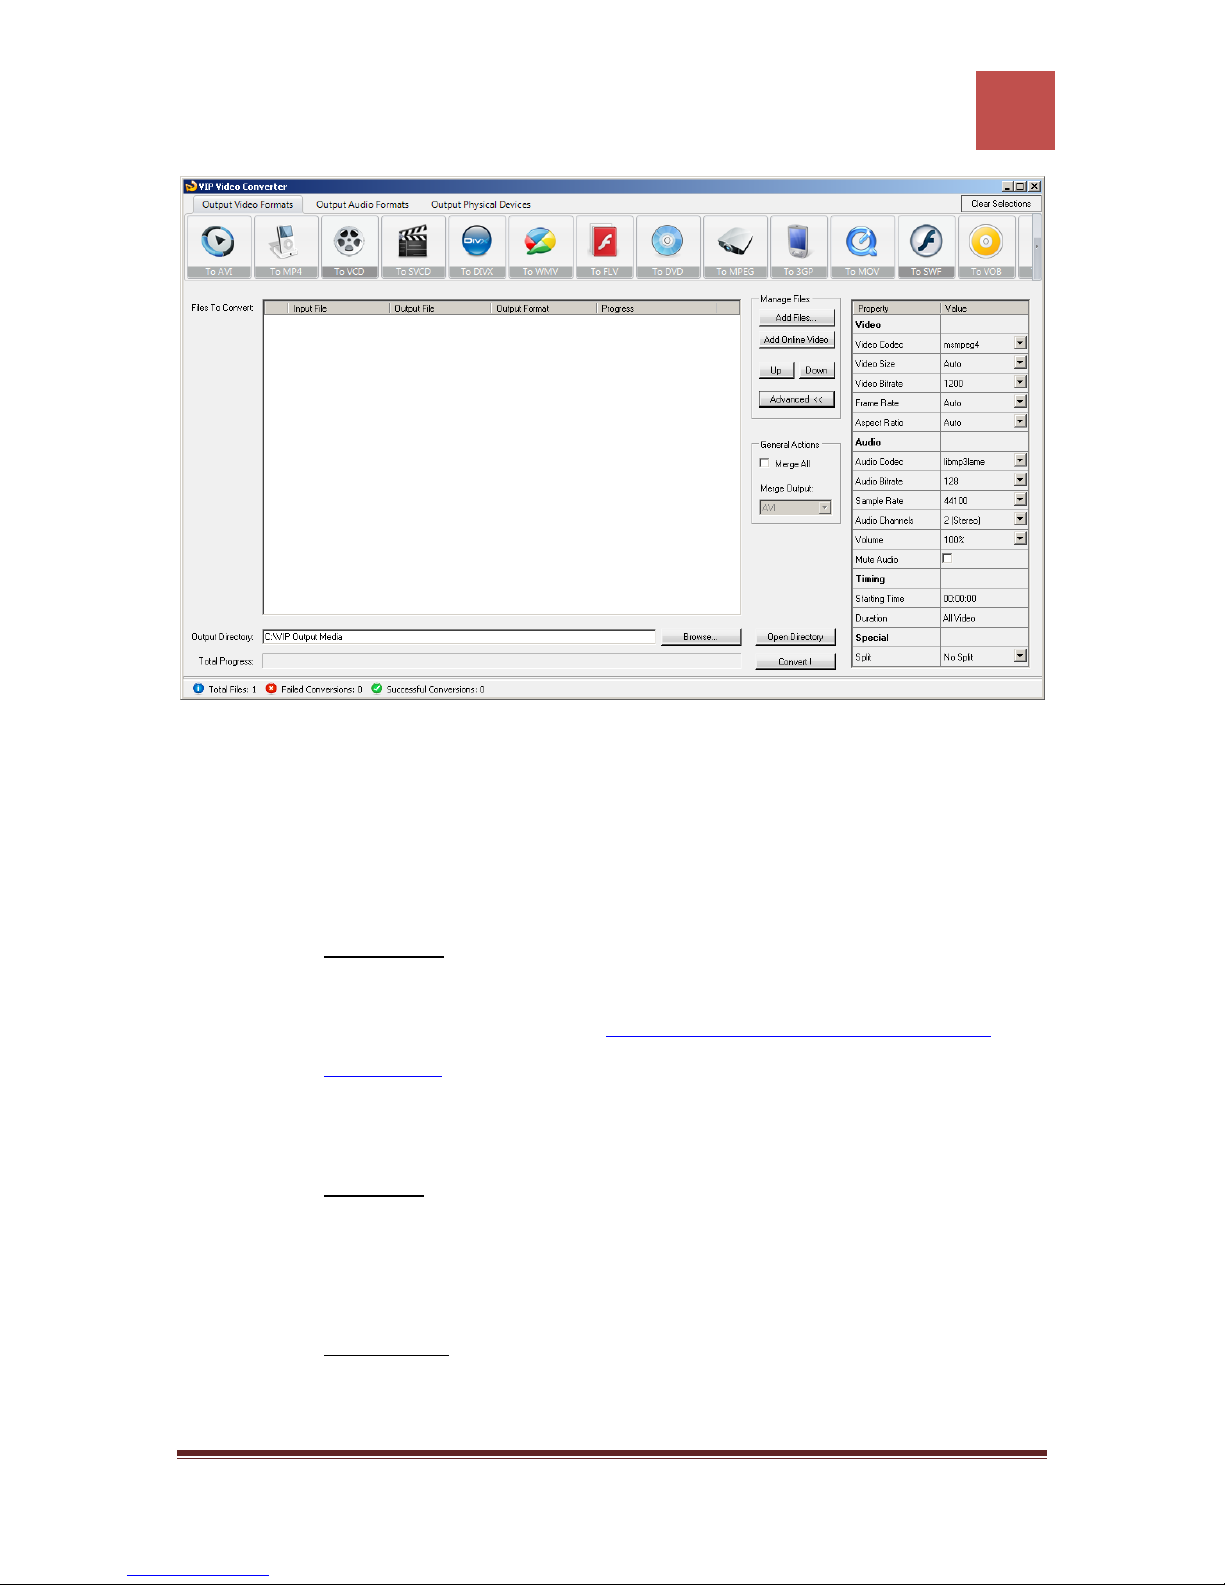
4. If you wish to set custom (advanced) settings, click the “Advanced >>” button to
open the right advanced properties pane.
In the right advanced properties pane you can modify some of the following properties,
which will affect the conversion process:
Video Properties
o Video Codec – The video codec which will be used to convert the video
file. You can choose from variety of codecs which are supported for your
chosen output video format. More information about video codecs at
Wikipedia …
In case you aren’t sure which codec to use, you can choose the “Auto”
option.
VIP Video Converter http://www.vip-video-converter.com
Page 17

VIP Video Converter User Guide
16
o Video Size – You can specify a custom size for the output video file (width
and height). You can choose the “Auto” option if you do not know which
video size you wish to get, or if you would like VIP Video Converter to try
and output the video file at the same size as the original video file.
o Video Bitrate – The higher the bit rate will be, the higher the video quality
will be at the result video file. Increasing it will also result in an increased
file size and higher conversion time.
o Frame Rate – Frames which will be shown per second. Increasing it will
also result in an increased file size and higher conversion time.
o Aspect Ratio – The ratio between width and height. Common values are
16:9 or 4:3. The “Auto” option can be selected when the original aspect
ratio is to be kept.
Audio Properties
o Audio Codec - – The audio codec which will be used to convert the audio
layer of the video file. You can choose from variety of codecs which are
supported for your chosen output format. More information about audio
codecs at Wikipedia.
In case you aren’t sure which codec to use, you can choose the “Auto”
option.
o Audio Bitrate - The higher the bit rate will be, the higher the audio quality
will be at the result video file. Increasing it will also result in an increased
file size and higher conversion time.
o Sample Rate – Amount of samples used to create an audio signal.
Increasing it will also result in an increased file size and higher conversion
time.
o Audio Channels – The number of audio channels used for the audio layer.
Common values are 1 channel (mono), 2 channels (stereo), or 5.1 (6
channels).
o Volume – Set the percentage of the audio volume which will be available
at the converted video file. This is relative to the original video file.
o Mute Audio – This option allows you to mute the audio in the converted
video file.
VIP Video Converter http://www.vip-video-converter.com
Page 18

VIP Video Converter User Guide
17
Timing
o Starting Time – This option allows you to start the conversion at a
specific location (time) in the video file, and not from the beginning.
o Duration – This option allows you to specify a specific duration from the
video file which will be converted. This option actually also acts as an end
time, when combined with the “Starting Time” option. In example, you
can specify the “Starting Time” as 00:01:00, and duration as “00:04:00”
to convert 4 minutes, starting from the first minute of the video file.
Special
o Split – This feature allows you to split the video file to equal sized chunks
of video. This is used commonly used to squeeze video files into media
such as floppies, CD, DVD and more.
5. Now, click the “Convert !” button to start the conversion.
6. While the files are converted, you can preview the output video file by clicking
the red icon at the right part of each conversion line.
7. Once the conversion is done, the converted video files will be at the output
directory you specified at step 3. You can open that directory by clicking the
“Open Directory” button at the bottom pane.
VIP Video Converter http://www.vip-video-converter.com
Page 19
VIP Video Converter User Guide
18
Converting To MP4 Format
In order to convert your video file to MP4 video format, follow these steps:
1. Press the “To MP4” button at the top formats menu. If there is a choice of a
specific format, please choose one (in example, MP4 or MP4 HD). The output
format you’ve chosen should be now marked in yellow.
2. Click the “Add Files” button at the right pane, and choose file(s) for conversion.
3. At the bottom right, click the “Browse…” button to choose the output directory.
This will be the directory where the converted files will be written to.
4. If you wish to set custom (advanced) settings, click the “Advanced >>” button to
open the right advanced properties pane.
VIP Video Converter http://www.vip-video-converter.com
Page 20
VIP Video Converter User Guide
19
In the right advanced properties pane you can modify some of the following properties,
which will affect the conversion process:
Video Properties
o Video Codec – The video codec which will be used to convert the video
file. You can choose from variety of codecs which are supported for your
chosen output video format. More information about video codecs at
Wikipedia …
In case you aren’t sure which codec to use, you can choose the “Auto”
option.
o Video Size – You can specify a custom size for the output video file (width
and height). You can choose the “Auto” option if you do not know which
video size you wish to get, or if you would like VIP Video Converter to try
and output the video file at the same size as the original video file.
o Video Bitrate – The higher the bit rate will be, the higher the video quality
will be at the result video file. Increasing it will also result in an increased
file size and higher conversion time.
VIP Video Converter http://www.vip-video-converter.com
Page 21

VIP Video Converter User Guide
20
o Frame Rate – Frames which will be shown per second. Increasing it will
also result in an increased file size and higher conversion time.
o Aspect Ratio – The ratio between width and height. Common values are
16:9 or 4:3. The “Auto” option can be selected when the original aspect
ratio is to be kept.
Audio Properties
o Audio Codec - – The audio codec which will be used to convert the audio
layer of the video file. You can choose from variety of codecs which are
supported for your chosen output format. More information about audio
codecs at Wikipedia.
In case you aren’t sure which codec to use, you can choose the “Auto”
option.
o Audio Bitrate - The higher the bit rate will be, the higher the audio quality
will be at the result video file. Increasing it will also result in an increased
o Sample Rate – Amount of samples used to create an audio signal.
o Audio Channels – The number of audio channels used for the audio layer.
o Volume – Set the percentage of the audio volume which will be available
o Mute Audio – This option allows you to mute the audio in the converted
Timing
o Starting Time – This option allows you to start the conversion at a
o Duration – This option allows you to specify a specific duration from the
file size and higher conversion time.
Increasing it will also result in an increased file size and higher conversion
time.
Common values are 1 channel (mono), 2 channels (stereo), or 5.1 (6
channels).
at the converted video file. This is relative to the original video file.
video file.
specific location (time) in the video file, and not from the beginning.
video file which will be converted. This option actually also acts as an end
time, when combined with the “Starting Time” option. In example, you
VIP Video Converter http://www.vip-video-converter.com
Page 22

VIP Video Converter User Guide
21
can specify the “Starting Time” as 00:01:00, and duration as “00:04:00”
to convert 4 minutes, starting from the first minute of the video file.
Special
o Split – This feature allows you to split the video file to equal sized chunks
of video. This is used commonly used to squeeze video files into media
such as floppies, CD, DVD and more.
5. Now, click the “Convert !” button to start the conversion.
6. While the files are converted, you can preview the output video file by clicking
the red icon at the right part of each conversion line.
Once the conversion is done, the converted video files will be at the output directory you
specified at step 3. You can open that directory by clicking the “Open Directory” button
at the bottom pane.
VIP Video Converter http://www.vip-video-converter.com
Page 23
VIP Video Converter User Guide
22
Converting To VCD Format
In order to convert your video file to VCD video format, follow these steps:
1. Press the “To VCD” button at the top formats menu. If there is a choice of a
specific format, please choose one (in example, VCD or VCD HD). The output
format you’ve chosen should be now marked in yellow.
2. Click the “Add Files” button at the right pane, and choose file(s) for conversion.
3. At the bottom right, click the “Browse…” button to choose the output directory.
This will be the directory where the converted files will be written to.
4. If you wish to set custom (advanced) settings, click the “Advanced >>” button to
open the right advanced properties pane.
VIP Video Converter http://www.vip-video-converter.com
Page 24
VIP Video Converter User Guide
23
In the right advanced properties pane you can modify some of the following properties,
which will affect the conversion process:
Video Properties
o Video Codec – The video codec which will be used to convert the video
file. You can choose from variety of codecs which are supported for your
chosen output video format. More information about video codecs at
Wikipedia …
In case you aren’t sure which codec to use, you can choose the “Auto”
option.
o Video Size – You can specify a custom size for the output video file (width
and height). You can choose the “Auto” option if you do not know which
video size you wish to get, or if you would like VIP Video Converter to try
and output the video file at the same size as the original video file.
o Video Bitrate – The higher the bit rate will be, the higher the video quality
will be at the result video file. Increasing it will also result in an increased
file size and higher conversion time.
VIP Video Converter http://www.vip-video-converter.com
Page 25

VIP Video Converter User Guide
24
o Frame Rate – Frames which will be shown per second. Increasing it will
also result in an increased file size and higher conversion time.
o Aspect Ratio – The ratio between width and height. Common values are
16:9 or 4:3. The “Auto” option can be selected when the original aspect
ratio is to be kept.
Audio Properties
o Audio Codec - – The audio codec which will be used to convert the audio
layer of the video file. You can choose from variety of codecs which are
supported for your chosen output format. More information about audio
codecs at Wikipedia.
In case you aren’t sure which codec to use, you can choose the “Auto”
option.
o Audio Bitrate - The higher the bit rate will be, the higher the audio quality
will be at the result video file. Increasing it will also result in an increased
o Sample Rate – Amount of samples used to create an audio signal.
o Audio Channels – The number of audio channels used for the audio layer.
o Volume – Set the percentage of the audio volume which will be available
o Mute Audio – This option allows you to mute the audio in the converted
Timing
o Starting Time – This option allows you to start the conversion at a
o Duration – This option allows you to specify a specific duration from the
file size and higher conversion time.
Increasing it will also result in an increased file size and higher conversion
time.
Common values are 1 channel (mono), 2 channels (stereo), or 5.1 (6
channels).
at the converted video file. This is relative to the original video file.
video file.
specific location (time) in the video file, and not from the beginning.
video file which will be converted. This option actually also acts as an end
time, when combined with the “Starting Time” option. In example, you
VIP Video Converter http://www.vip-video-converter.com
Page 26

VIP Video Converter User Guide
25
can specify the “Starting Time” as 00:01:00, and duration as “00:04:00”
to convert 4 minutes, starting from the first minute of the video file.
Special
o Split – This feature allows you to split the video file to equal sized chunks
of video. This is used commonly used to squeeze video files into media
such as floppies, CD, DVD and more.
5. Now, click the “Convert !” button to start the conversion.
6. While the files are converted, you can preview the output video file by clicking
the red icon at the right part of each conversion line.
Once the conversion is done, the converted video files will be at the output directory you
specified at step 3. You can open that directory by clicking the “Open Directory” button
at the bottom pane.
VIP Video Converter http://www.vip-video-converter.com
Page 27
VIP Video Converter User Guide
26
Converting To DIVX Format
In order to convert your video file to DIVX video format, follow these steps:
1. Press the “To DIVX” button at the top formats menu. If there is a choice of a
specific format, please choose one (in example, DIVX or DIVX HD). The output
format you’ve chosen should be now marked in yellow.
2. Click the “Add Files” button at the right pane, and choose file(s) for conversion.
3. At the bottom right, click the “Browse…” button to choose the output directory.
This will be the directory where the converted files will be written to.
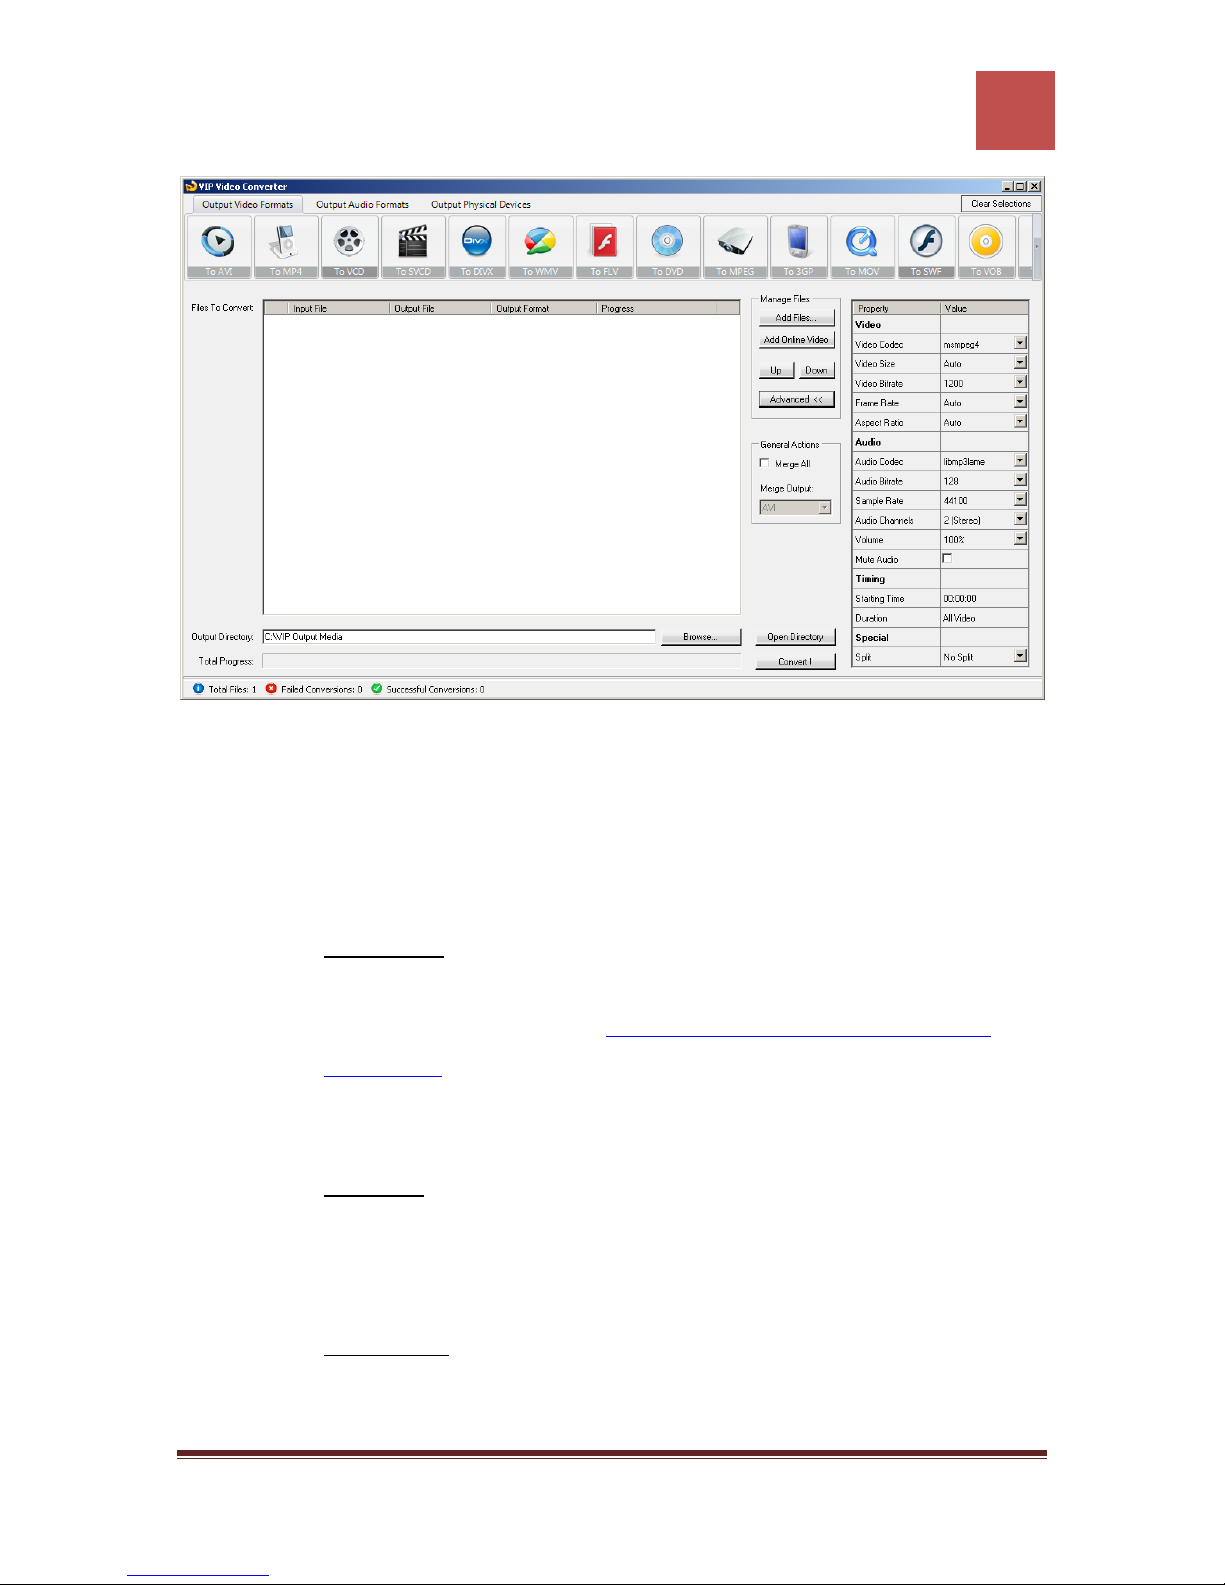
4. If you wish to set custom (advanced) settings, click the “Advanced >>” button to
open the right advanced properties pane.
VIP Video Converter http://www.vip-video-converter.com
Page 28
VIP Video Converter User Guide
27
In the right advanced properties pane you can modify some of the following properties,
which will affect the conversion process:
Video Properties
o Video Codec – The video codec which will be used to convert the video
file. You can choose from variety of codecs which are supported for your
chosen output video format. More information about video codecs at
Wikipedia …
In case you aren’t sure which codec to use, you can choose the “Auto”
option.
o Video Size – You can specify a custom size for the output video file (width
and height). You can choose the “Auto” option if you do not know which
video size you wish to get, or if you would like VIP Video Converter to try
and output the video file at the same size as the original video file.
o Video Bitrate – The higher the bit rate will be, the higher the video quality
will be at the result video file. Increasing it will also result in an increased
file size and higher conversion time.
VIP Video Converter http://www.vip-video-converter.com
Page 29

VIP Video Converter User Guide
28
o Frame Rate – Frames which will be shown per second. Increasing it will
also result in an increased file size and higher conversion time.
o Aspect Ratio – The ratio between width and height. Common values are
16:9 or 4:3. The “Auto” option can be selected when the original aspect
ratio is to be kept.
Audio Properties
o Audio Codec - – The audio codec which will be used to convert the audio
layer of the video file. You can choose from variety of codecs which are
supported for your chosen output format. More information about audio
codecs at Wikipedia.
In case you aren’t sure which codec to use, you can choose the “Auto”
option.
o Audio Bitrate - The higher the bit rate will be, the higher the audio quality
will be at the result video file. Increasing it will also result in an increased
o Sample Rate – Amount of samples used to create an audio signal.
o Audio Channels – The number of audio channels used for the audio layer.
o Volume – Set the percentage of the audio volume which will be available
o Mute Audio – This option allows you to mute the audio in the converted
Timing
o Starting Time – This option allows you to start the conversion at a
o Duration – This option allows you to specify a specific duration from the
file size and higher conversion time.
Increasing it will also result in an increased file size and higher conversion
time.
Common values are 1 channel (mono), 2 channels (stereo), or 5.1 (6
channels).
at the converted video file. This is relative to the original video file.
video file.
specific location (time) in the video file, and not from the beginning.
video file which will be converted. This option actually also acts as an end
time, when combined with the “Starting Time” option. In example, you
VIP Video Converter http://www.vip-video-converter.com
Page 30

VIP Video Converter User Guide
29
can specify the “Starting Time” as 00:01:00, and duration as “00:04:00”
to convert 4 minutes, starting from the first minute of the video file.
Special
o Split – This feature allows you to split the video file to equal sized chunks
of video. This is used commonly used to squeeze video files into media
such as floppies, CD, DVD and more.
5. Now, click the “Convert !” button to start the conversion.
6. While the files are converted, you can preview the output video file by clicking
the red icon at the right part of each conversion line.
Once the conversion is done, the converted video files will be at the output directory you
specified at step 3. You can open that directory by clicking the “Open Directory” button
at the bottom pane.
VIP Video Converter http://www.vip-video-converter.com
Page 31
VIP Video Converter User Guide
30
Converting To WMV Format
In order to convert your video file to WMV video format, follow these steps:
1. Press the “To WMV” button at the top formats menu. If there is a choice of a
specific format, please choose one (in example, WMV or WMV HD). The output
format you’ve chosen should be now marked in yellow.
2. Click the “Add Files” button at the right pane, and choose file(s) for conversion.
3. At the bottom right, click the “Browse…” button to choose the output directory.
This will be the directory where the converted files will be written to.
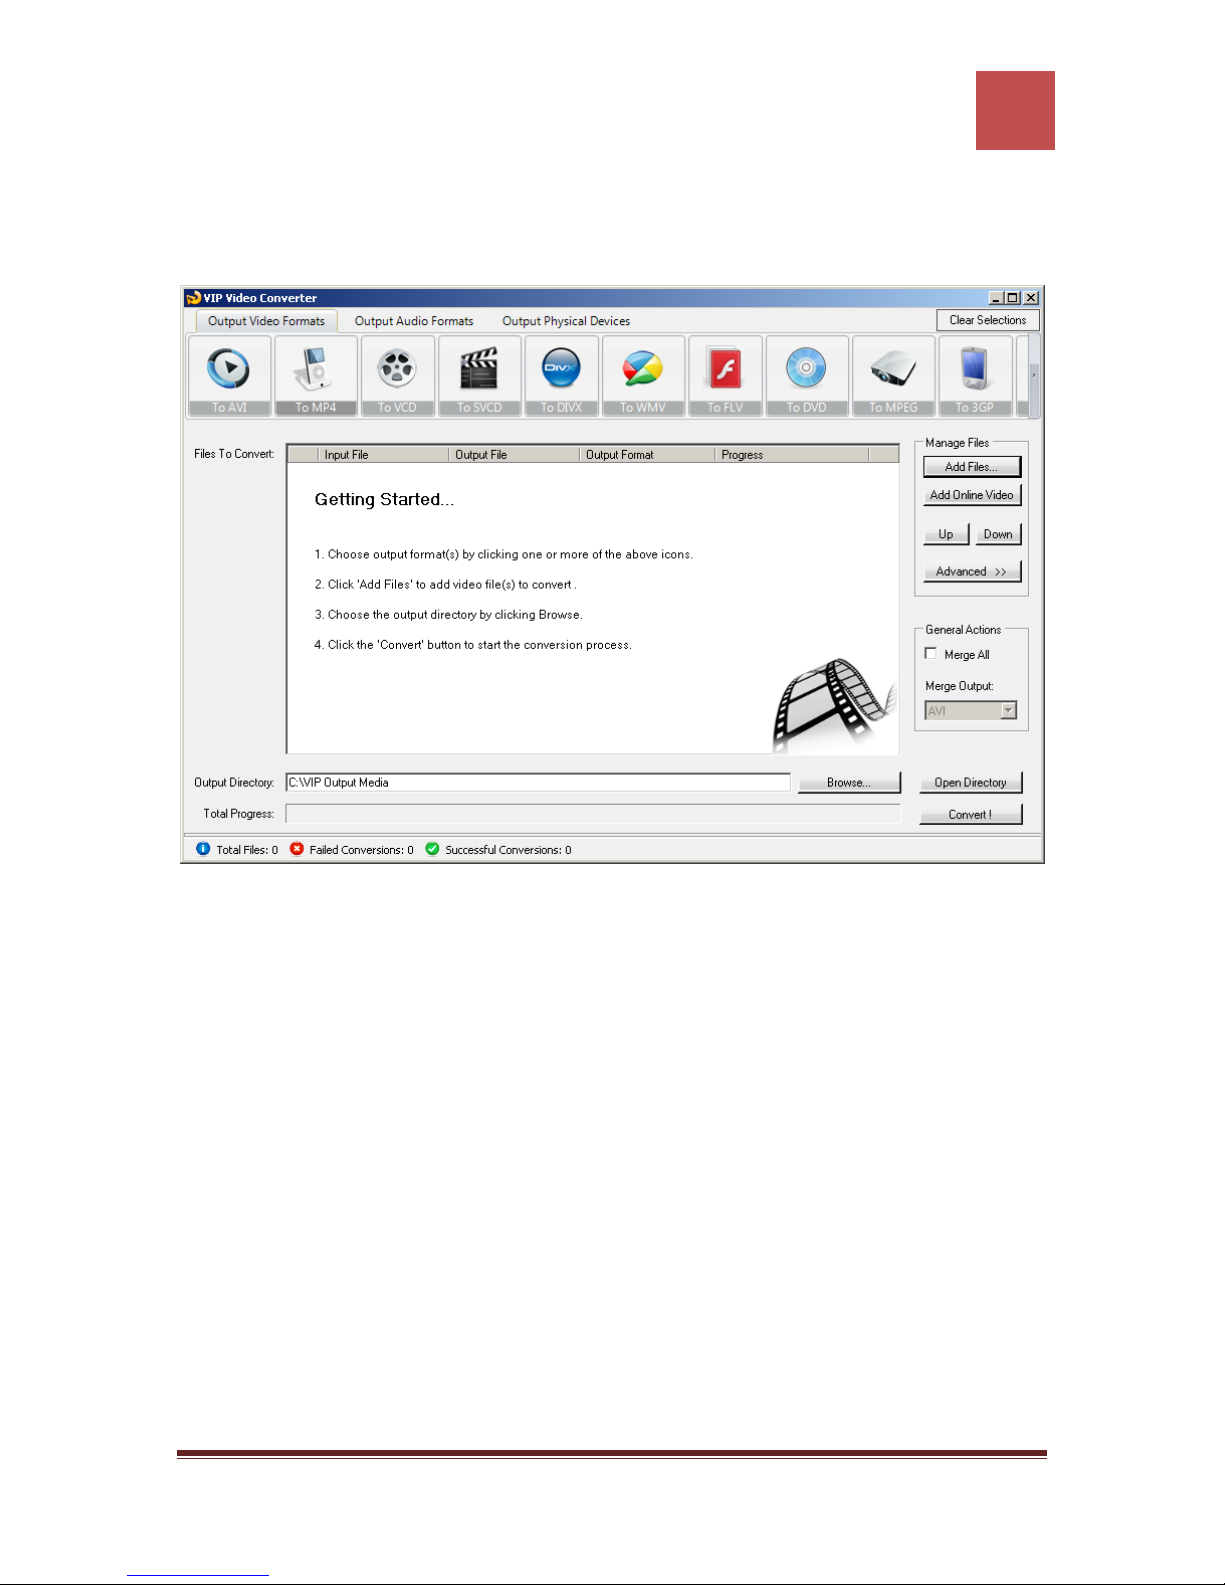
4. If you wish to set custom (advanced) settings, click the “Advanced >>” button to
open the right advanced properties pane.
VIP Video Converter http://www.vip-video-converter.com
Page 32
VIP Video Converter User Guide
31
In the right advanced properties pane you can modify some of the following properties,
which will affect the conversion process:
Video Properties
o Video Codec – The video codec which will be used to convert the video
file. You can choose from variety of codecs which are supported for your
chosen output video format. More information about video codecs at
Wikipedia …
In case you aren’t sure which codec to use, you can choose the “Auto”
option.
o Video Size – You can specify a custom size for the output video file (width
and height). You can choose the “Auto” option if you do not know which
video size you wish to get, or if you would like VIP Video Converter to try
and output the video file at the same size as the original video file.
o Video Bitrate – The higher the bit rate will be, the higher the video quality
will be at the result video file. Increasing it will also result in an increased
file size and higher conversion time.
VIP Video Converter http://www.vip-video-converter.com
Page 33

VIP Video Converter User Guide
32
o Frame Rate – Frames which will be shown per second. Increasing it will
also result in an increased file size and higher conversion time.
o Aspect Ratio – The ratio between width and height. Common values are
16:9 or 4:3. The “Auto” option can be selected when the original aspect
ratio is to be kept.
Audio Properties
o Audio Codec - – The audio codec which will be used to convert the audio
layer of the video file. You can choose from variety of codecs which are
supported for your chosen output format. More information about audio
codecs at Wikipedia.
In case you aren’t sure which codec to use, you can choose the “Auto”
option.
o Audio Bitrate - The higher the bit rate will be, the higher the audio quality
will be at the result video file. Increasing it will also result in an increased
o Sample Rate – Amount of samples used to create an audio signal.
o Audio Channels – The number of audio channels used for the audio layer.
o Volume – Set the percentage of the audio volume which will be available
o Mute Audio – This option allows you to mute the audio in the converted
Timing
o Starting Time – This option allows you to start the conversion at a
o Duration – This option allows you to specify a specific duration from the
file size and higher conversion time.
Increasing it will also result in an increased file size and higher conversion
time.
Common values are 1 channel (mono), 2 channels (stereo), or 5.1 (6
channels).
at the converted video file. This is relative to the original video file.
video file.
specific location (time) in the video file, and not from the beginning.
video file which will be converted. This option actually also acts as an end
time, when combined with the “Starting Time” option. In example, you
VIP Video Converter http://www.vip-video-converter.com
Page 34

VIP Video Converter User Guide
33
can specify the “Starting Time” as 00:01:00, and duration as “00:04:00”
to convert 4 minutes, starting from the first minute of the video file.
Special
o Split – This feature allows you to split the video file to equal sized chunks
of video. This is used commonly used to squeeze video files into media
such as floppies, CD, DVD and more.
5. Now, click the “Convert !” button to start the conversion.
6. While the files are converted, you can preview the output video file by clicking
the red icon at the right part of each conversion line.
Once the conversion is done, the converted video files will be at the output directory you
specified at step 3. You can open that directory by clicking the “Open Directory” button
at the bottom pane.
VIP Video Converter http://www.vip-video-converter.com
Page 35
VIP Video Converter User Guide
34
Converting To FLV Format
In order to convert your video file to FLV video format, follow these steps:
1. Press the “To FLV” button at the top formats menu. If there is a choice of a
specific format, please choose one (in example, FLV or FLV HD). The output
format you’ve chosen should be now marked in yellow.
2. Click the “Add Files” button at the right pane, and choose file(s) for conversion.
3. At the bottom right, click the “Browse…” button to choose the output directory.
This will be the directory where the converted files will be written to.
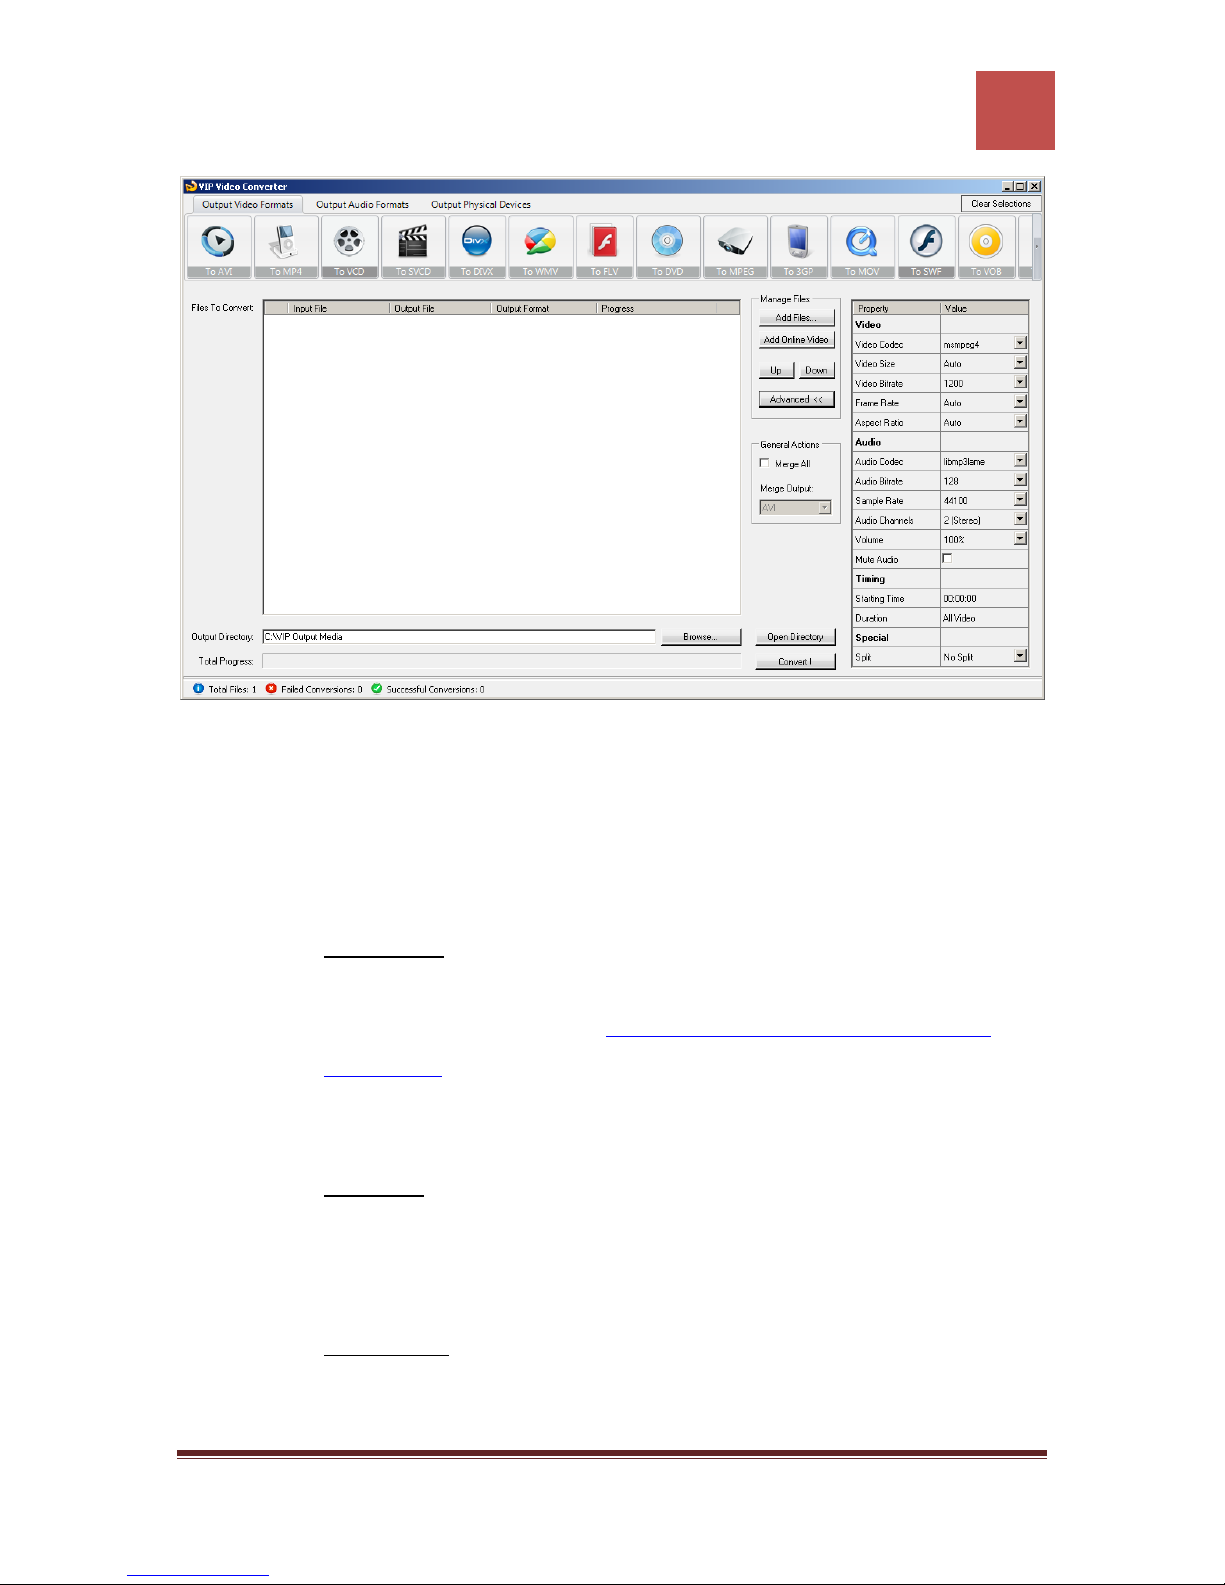
4. If you wish to set custom (advanced) settings, click the “Advanced >>” button to
open the right advanced properties pane.
VIP Video Converter http://www.vip-video-converter.com
Page 36
VIP Video Converter User Guide
35
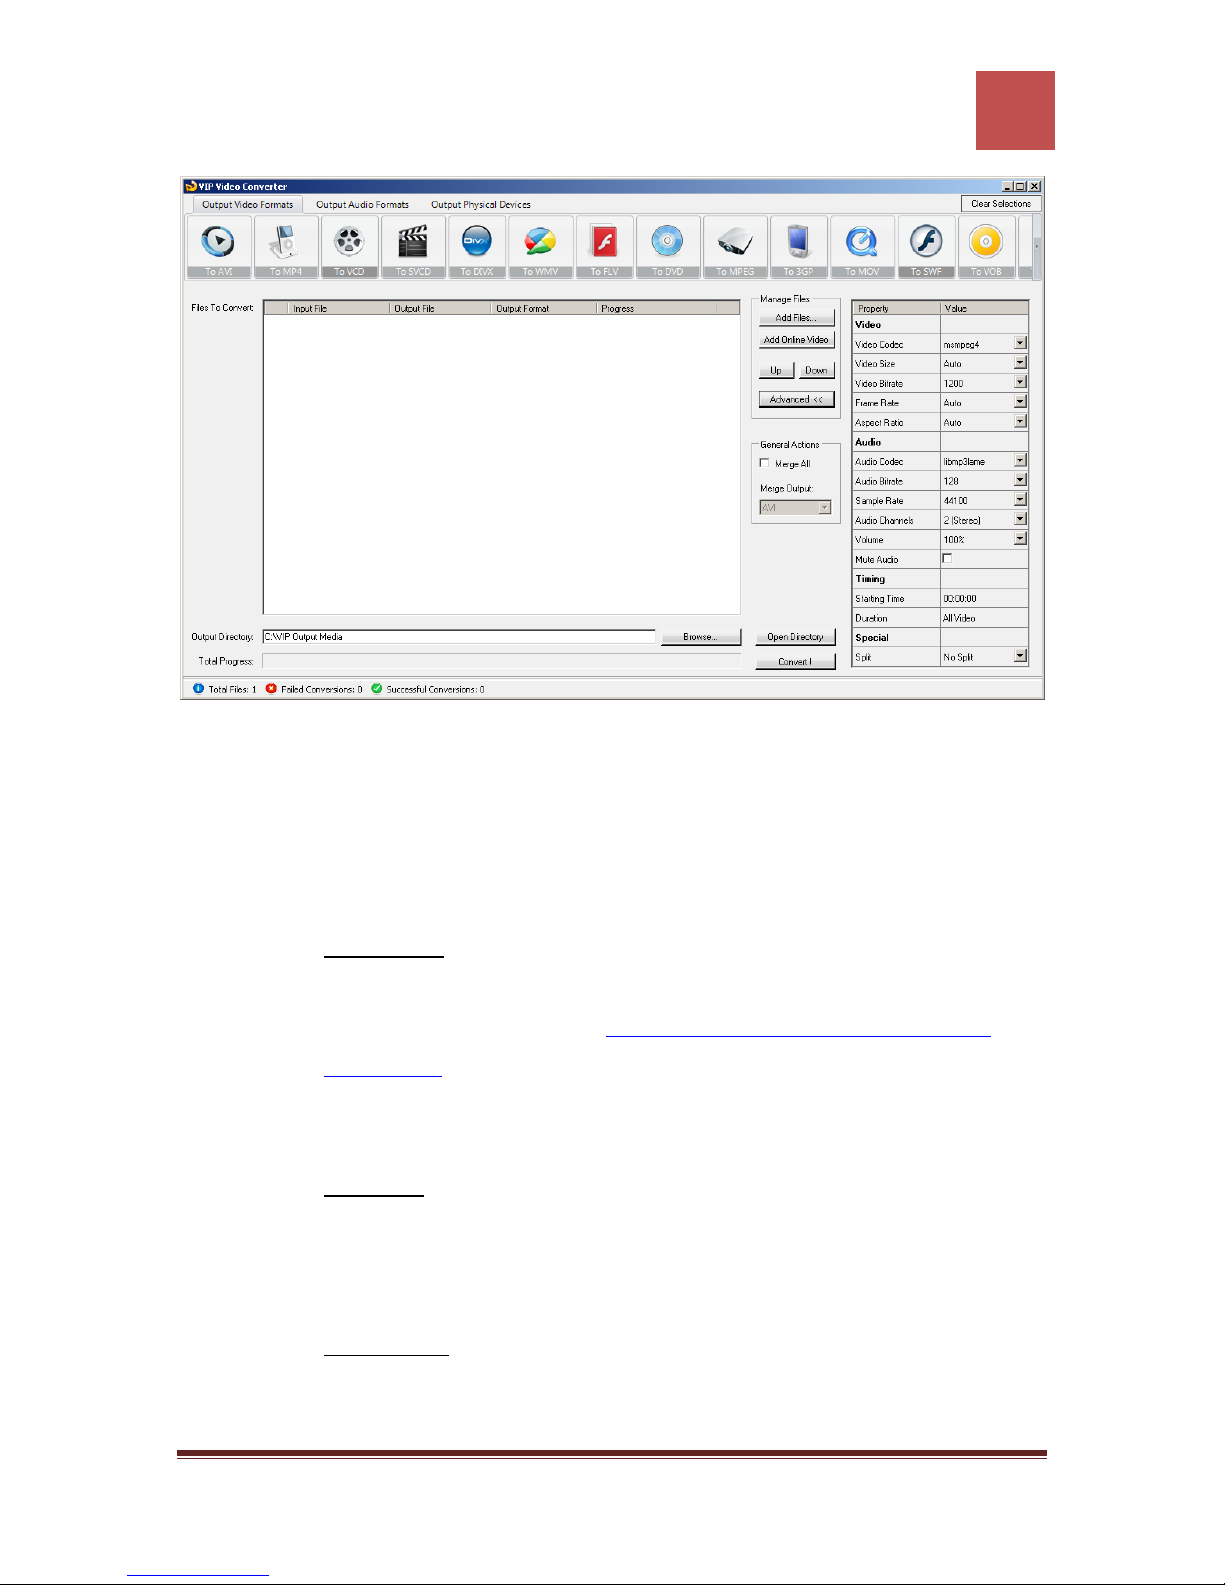
In the right advanced properties pane you can modify some of the following properties,
which will affect the conversion process:
Video Properties
o Video Codec – The video codec which will be used to convert the video
file. You can choose from variety of codecs which are supported for your
chosen output video format. More information about video codecs at
Wikipedia …
In case you aren’t sure which codec to use, you can choose the “Auto”
option.
o Video Size – You can specify a custom size for the output video file (width
and height). You can choose the “Auto” option if you do not know which
video size you wish to get, or if you would like VIP Video Converter to try
and output the video file at the same size as the original video file.
o Video Bitrate – The higher the bit rate will be, the higher the video quality
will be at the result video file. Increasing it will also result in an increased
file size and higher conversion time.
VIP Video Converter http://www.vip-video-converter.com
Page 37

VIP Video Converter User Guide
36
o Frame Rate – Frames which will be shown per second. Increasing it will
also result in an increased file size and higher conversion time.
o Aspect Ratio – The ratio between width and height. Common values are
16:9 or 4:3. The “Auto” option can be selected when the original aspect
ratio is to be kept.
Audio Properties
o Audio Codec - – The audio codec which will be used to convert the audio
layer of the video file. You can choose from variety of codecs which are
supported for your chosen output format. More information about audio
codecs at Wikipedia.
In case you aren’t sure which codec to use, you can choose the “Auto”
option.
o Audio Bitrate - The higher the bit rate will be, the higher the audio quality
will be at the result video file. Increasing it will also result in an increased
o Sample Rate – Amount of samples used to create an audio signal.
o Audio Channels – The number of audio channels used for the audio layer.
o Volume – Set the percentage of the audio volume which will be available
o Mute Audio – This option allows you to mute the audio in the converted
Timing
o Starting Time – This option allows you to start the conversion at a
o Duration – This option allows you to specify a specific duration from the
file size and higher conversion time.
Increasing it will also result in an increased file size and higher conversion
time.
Common values are 1 channel (mono), 2 channels (stereo), or 5.1 (6
channels).
at the converted video file. This is relative to the original video file.
video file.
specific location (time) in the video file, and not from the beginning.
video file which will be converted. This option actually also acts as an end
time, when combined with the “Starting Time” option. In example, you
VIP Video Converter http://www.vip-video-converter.com
Page 38

VIP Video Converter User Guide
37
can specify the “Starting Time” as 00:01:00, and duration as “00:04:00”
to convert 4 minutes, starting from the first minute of the video file.
Special
o Split – This feature allows you to split the video file to equal sized chunks
of video. This is used commonly used to squeeze video files into media
such as floppies, CD, DVD and more.
5. Now, click the “Convert !” button to start the conversion.
6. While the files are converted, you can preview the output video file by clicking
the red icon at the right part of each conversion line.
Once the conversion is done, the converted video files will be at the output directory you
specified at step 3. You can open that directory by clicking the “Open Directory” button
at the bottom pane.
VIP Video Converter http://www.vip-video-converter.com
Page 39
VIP Video Converter User Guide
38
Converting To DVD Format
In order to convert your video file to DVD video format, follow these steps:
1. Press the “To DVD” button at the top formats menu. If there is a choice of a
specific format, please choose one (in example, DVD or DVD HD). The output
format you’ve chosen should be now marked in yellow.
2. Click the “Add Files” button at the right pane, and choose file(s) for conversion.
3. At the bottom right, click the “Browse…” button to choose the output directory.
This will be the directory where the converted files will be written to.
4. If you wish to set custom (advanced) settings, click the “Advanced >>” button to
open the right advanced properties pane.
VIP Video Converter http://www.vip-video-converter.com
Page 40
VIP Video Converter User Guide
39
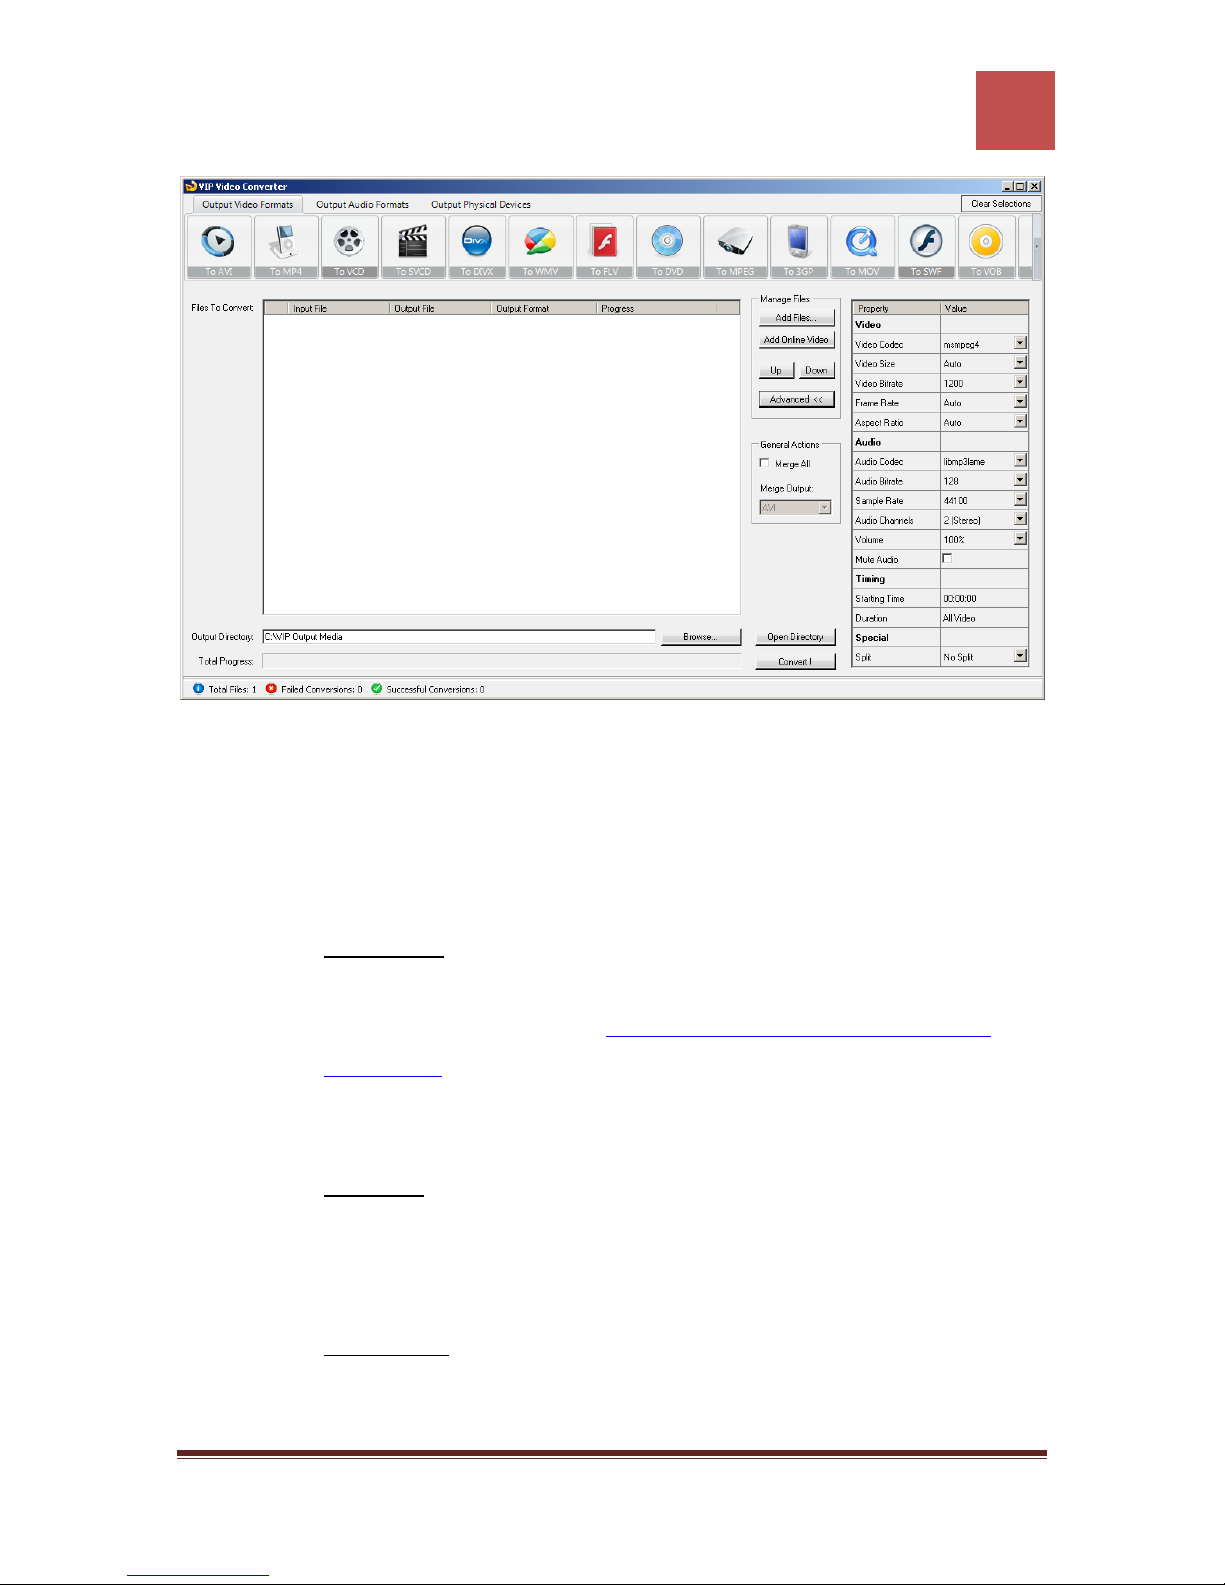
In the right advanced properties pane you can modify some of the following properties,
which will affect the conversion process:
Video Properties
o Video Codec – The video codec which will be used to convert the video
file. You can choose from variety of codecs which are supported for your
chosen output video format. More information about video codecs at
Wikipedia …
In case you aren’t sure which codec to use, you can choose the “Auto”
option.
o Video Size – You can specify a custom size for the output video file (width
and height). You can choose the “Auto” option if you do not know which
video size you wish to get, or if you would like VIP Video Converter to try
and output the video file at the same size as the original video file.
o Video Bitrate – The higher the bit rate will be, the higher the video quality
will be at the result video file. Increasing it will also result in an increased
file size and higher conversion time.
VIP Video Converter http://www.vip-video-converter.com
Page 41

VIP Video Converter User Guide
40
o Frame Rate – Frames which will be shown per second. Increasing it will
also result in an increased file size and higher conversion time.
o Aspect Ratio – The ratio between width and height. Common values are
16:9 or 4:3. The “Auto” option can be selected when the original aspect
ratio is to be kept.
Audio Properties
o Audio Codec - – The audio codec which will be used to convert the audio
layer of the video file. You can choose from variety of codecs which are
supported for your chosen output format. More information about audio
codecs at Wikipedia.
In case you aren’t sure which codec to use, you can choose the “Auto”
option.
o Audio Bitrate - The higher the bit rate will be, the higher the audio quality
will be at the result video file. Increasing it will also result in an increased
o Sample Rate – Amount of samples used to create an audio signal.
o Audio Channels – The number of audio channels used for the audio layer.
o Volume – Set the percentage of the audio volume which will be available
o Mute Audio – This option allows you to mute the audio in the converted
Timing
o Starting Time – This option allows you to start the conversion at a
o Duration – This option allows you to specify a specific duration from the
file size and higher conversion time.
Increasing it will also result in an increased file size and higher conversion
time.
Common values are 1 channel (mono), 2 channels (stereo), or 5.1 (6
channels).
at the converted video file. This is relative to the original video file.
video file.
specific location (time) in the video file, and not from the beginning.
video file which will be converted. This option actually also acts as an end
time, when combined with the “Starting Time” option. In example, you
VIP Video Converter http://www.vip-video-converter.com
Page 42

VIP Video Converter User Guide
41
can specify the “Starting Time” as 00:01:00, and duration as “00:04:00”
to convert 4 minutes, starting from the first minute of the video file.
Special
o Split – This feature allows you to split the video file to equal sized chunks
of video. This is used commonly used to squeeze video files into media
such as floppies, CD, DVD and more.
5. Now, click the “Convert !” button to start the conversion.
6. While the files are converted, you can preview the output video file by clicking
the red icon at the right part of each conversion line.
Once the conversion is done, the converted video files will be at the output directory you
specified at step 3. You can open that directory by clicking the “Open Directory” button
at the bottom pane.
VIP Video Converter http://www.vip-video-converter.com
Page 43
VIP Video Converter User Guide
42
Converting To MPEG-1 Format
In order to convert your video file to MPEG-1 video format, follow these steps:
1. Press the “To MPEG-1” button at the top formats menu. If there is a choice of a
specific format, please choose one (in example, MPEG-1 or MPEG-1 HD). The
output format you’ve chosen should be now marked in yellow.
2. Click the “Add Files” button at the right pane, and choose file(s) for conversion.
3. At the bottom right, click the “Browse…” button to choose the output directory.
This will be the directory where the converted files will be written to.
4. If you wish to set custom (advanced) settings, click the “Advanced >>” button to
open the right advanced properties pane.
VIP Video Converter http://www.vip-video-converter.com
Page 44
VIP Video Converter User Guide
43
In the right advanced properties pane you can modify some of the following properties,
which will affect the conversion process:
Video Properties
o Video Codec – The video codec which will be used to convert the video
file. You can choose from variety of codecs which are supported for your
chosen output video format. More information about video codecs at
Wikipedia …
In case you aren’t sure which codec to use, you can choose the “Auto”
option.
o Video Size – You can specify a custom size for the output video file (width
and height). You can choose the “Auto” option if you do not know which
video size you wish to get, or if you would like VIP Video Converter to try
and output the video file at the same size as the original video file.
o Video Bitrate – The higher the bit rate will be, the higher the video quality
will be at the result video file. Increasing it will also result in an increased
file size and higher conversion time.
VIP Video Converter http://www.vip-video-converter.com
Page 45

VIP Video Converter User Guide
44
o Frame Rate – Frames which will be shown per second. Increasing it will
also result in an increased file size and higher conversion time.
o Aspect Ratio – The ratio between width and height. Common values are
16:9 or 4:3. The “Auto” option can be selected when the original aspect
ratio is to be kept.
Audio Properties
o Audio Codec - – The audio codec which will be used to convert the audio
layer of the video file. You can choose from variety of codecs which are
supported for your chosen output format. More information about audio
codecs at Wikipedia.
In case you aren’t sure which codec to use, you can choose the “Auto”
option.
o Audio Bitrate - The higher the bit rate will be, the higher the audio quality
will be at the result video file. Increasing it will also result in an increased
o Sample Rate – Amount of samples used to create an audio signal.
o Audio Channels – The number of audio channels used for the audio layer.
o Volume – Set the percentage of the audio volume which will be available
o Mute Audio – This option allows you to mute the audio in the converted
Timing
o Starting Time – This option allows you to start the conversion at a
o Duration – This option allows you to specify a specific duration from the
file size and higher conversion time.
Increasing it will also result in an increased file size and higher conversion
time.
Common values are 1 channel (mono), 2 channels (stereo), or 5.1 (6
channels).
at the converted video file. This is relative to the original video file.
video file.
specific location (time) in the video file, and not from the beginning.
video file which will be converted. This option actually also acts as an end
time, when combined with the “Starting Time” option. In example, you
VIP Video Converter http://www.vip-video-converter.com
Page 46

VIP Video Converter User Guide
45
can specify the “Starting Time” as 00:01:00, and duration as “00:04:00”
to convert 4 minutes, starting from the first minute of the video file.
Special
o Split – This feature allows you to split the video file to equal sized chunks
of video. This is used commonly used to squeeze video files into media
such as floppies, CD, MPEG-1 and more.
5. Now, click the “Convert !” button to start the conversion.
6. While the files are converted, you can preview the output video file by clicking
the red icon at the right part of each conversion line.
Once the conversion is done, the converted video files will be at the output directory you
specified at step 3. You can open that directory by clicking the “Open Directory” button
at the bottom pane.
VIP Video Converter http://www.vip-video-converter.com
Page 47
VIP Video Converter User Guide
46
Converting To MPEG-2 Format
In order to convert your video file to MPEG-2 video format, follow these steps:
1. Press the “To MPEG-2” button at the top formats menu. If there is a choice of a
specific format, please choose one (in example, MPEG-2 or MPEG-2 HD). The
output format you’ve chosen should be now marked in yellow.
2. Click the “Add Files” button at the right pane, and choose file(s) for conversion.
3. At the bottom right, click the “Browse…” button to choose the output directory.
This will be the directory where the converted files will be written to.
4. If you wish to set custom (advanced) settings, click the “Advanced >>” button to
open the right advanced properties pane.
VIP Video Converter http://www.vip-video-converter.com
Page 48
VIP Video Converter User Guide
47
In the right advanced properties pane you can modify some of the following properties,
which will affect the conversion process:
Video Properties
o Video Codec – The video codec which will be used to convert the video
file. You can choose from variety of codecs which are supported for your
chosen output video format. More information about video codecs at
Wikipedia …
In case you aren’t sure which codec to use, you can choose the “Auto”
option.
o Video Size – You can specify a custom size for the output video file (width
and height). You can choose the “Auto” option if you do not know which
video size you wish to get, or if you would like VIP Video Converter to try
and output the video file at the same size as the original video file.
o Video Bitrate – The higher the bit rate will be, the higher the video quality
will be at the result video file. Increasing it will also result in an increased
file size and higher conversion time.
VIP Video Converter http://www.vip-video-converter.com
Page 49

VIP Video Converter User Guide
48
o Frame Rate – Frames which will be shown per second. Increasing it will
also result in an increased file size and higher conversion time.
o Aspect Ratio – The ratio between width and height. Common values are
16:9 or 4:3. The “Auto” option can be selected when the original aspect
ratio is to be kept.
Audio Properties
o Audio Codec - – The audio codec which will be used to convert the audio
layer of the video file. You can choose from variety of codecs which are
supported for your chosen output format. More information about audio
codecs at Wikipedia.
In case you aren’t sure which codec to use, you can choose the “Auto”
option.
o Audio Bitrate - The higher the bit rate will be, the higher the audio quality
will be at the result video file. Increasing it will also result in an increased
o Sample Rate – Amount of samples used to create an audio signal.
o Audio Channels – The number of audio channels used for the audio layer.
o Volume – Set the percentage of the audio volume which will be available
o Mute Audio – This option allows you to mute the audio in the converted
Timing
o Starting Time – This option allows you to start the conversion at a
o Duration – This option allows you to specify a specific duration from the
file size and higher conversion time.
Increasing it will also result in an increased file size and higher conversion
time.
Common values are 1 channel (mono), 2 channels (stereo), or 5.1 (6
channels).
at the converted video file. This is relative to the original video file.
video file.
specific location (time) in the video file, and not from the beginning.
video file which will be converted. This option actually also acts as an end
time, when combined with the “Starting Time” option. In example, you
VIP Video Converter http://www.vip-video-converter.com
Page 50

VIP Video Converter User Guide
49
can specify the “Starting Time” as 00:01:00, and duration as “00:04:00”
to convert 4 minutes, starting from the first minute of the video file.
Special
o Split – This feature allows you to split the video file to equal sized chunks
of video. This is used commonly used to squeeze video files into media
such as floppies, CD, MPEG-2 and more.
5. Now, click the “Convert !” button to start the conversion.
6. While the files are converted, you can preview the output video file by clicking
the red icon at the right part of each conversion line.
Once the conversion is done, the converted video files will be at the output directory you
specified at step 3. You can open that directory by clicking the “Open Directory” button
at the bottom pane.
VIP Video Converter http://www.vip-video-converter.com
Page 51
VIP Video Converter User Guide
50
Converting To 3GP Format
In order to convert your video file to 3GP video format, follow these steps:
1. Press the “To 3GP” button at the top formats menu. If there is a choice of a
specific format, please choose one (in example, 3GP or 3GP HD). The output
format you’ve chosen should be now marked in yellow.
2. Click the “Add Files” button at the right pane, and choose file(s) for conversion.
3. At the bottom right, click the “Browse…” button to choose the output directory.
This will be the directory where the converted files will be written to.
4. If you wish to set custom (advanced) settings, click the “Advanced >>” button to
open the right advanced properties pane.
VIP Video Converter http://www.vip-video-converter.com
Page 52
VIP Video Converter User Guide
51
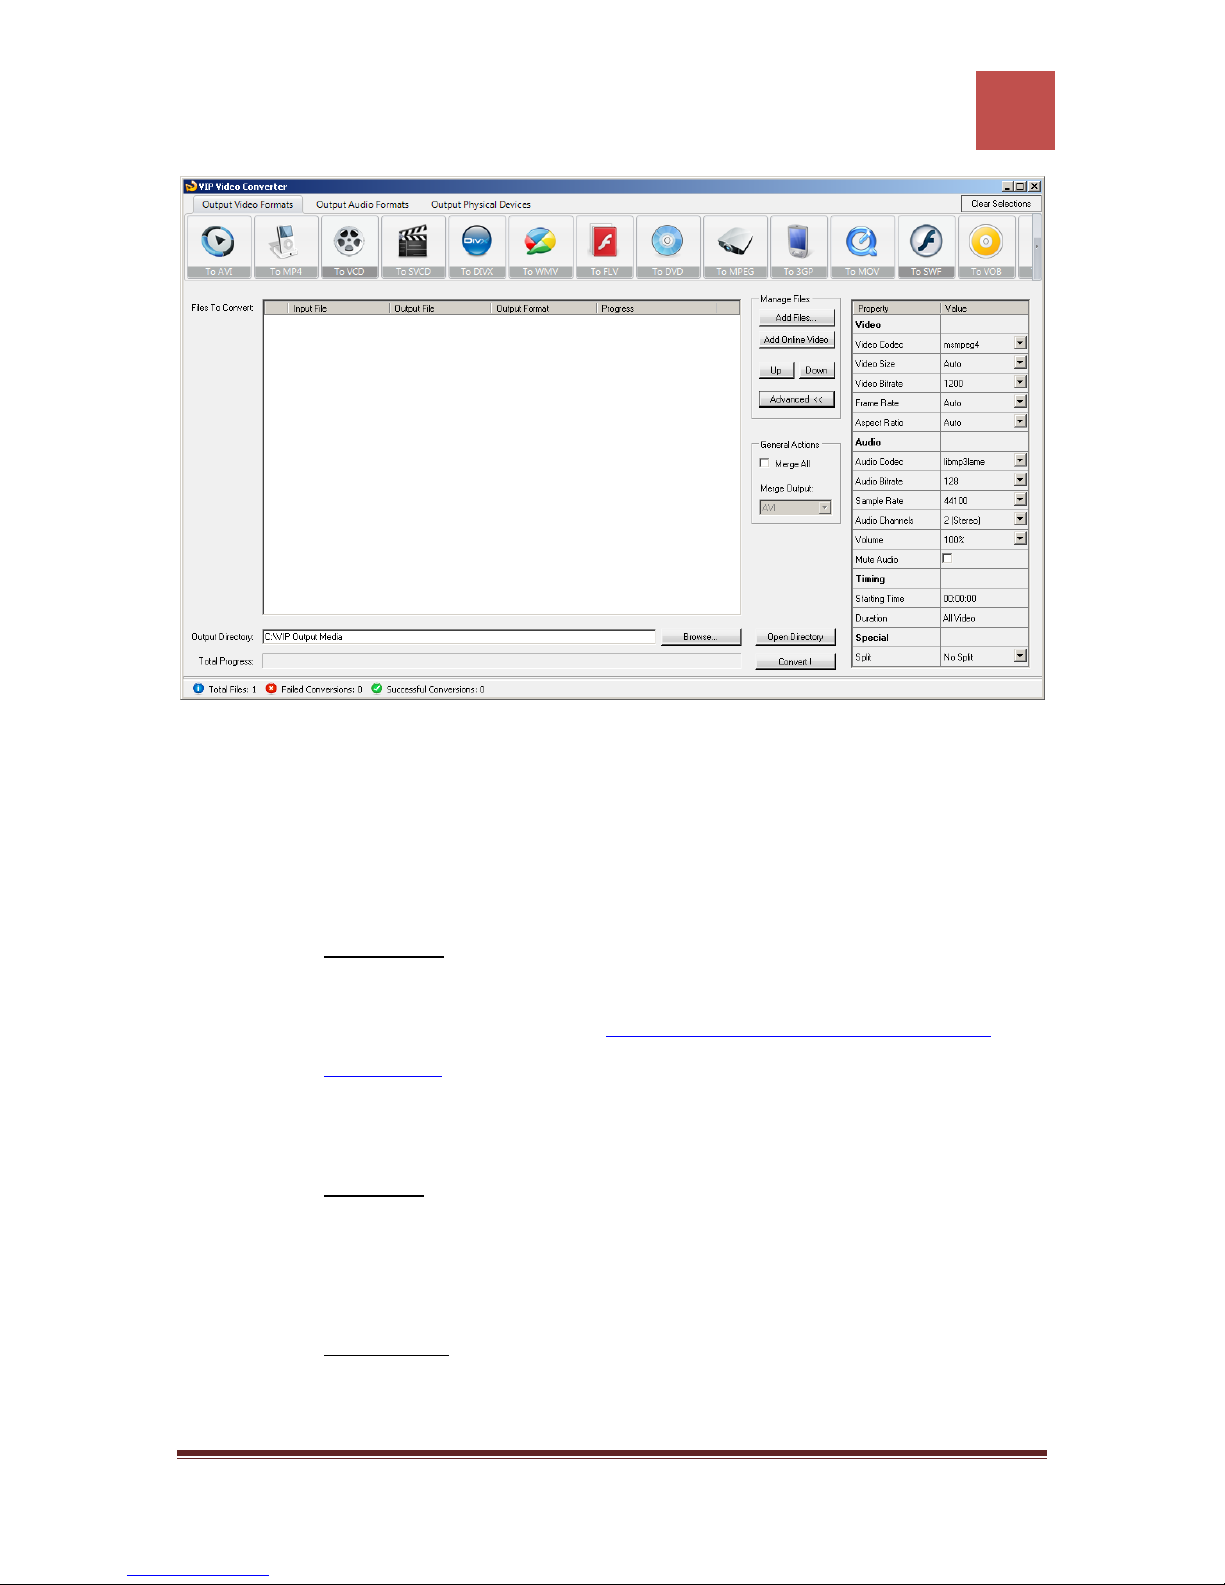
In the right advanced properties pane you can modify some of the following properties,
which will affect the conversion process:
Video Properties
o Video Codec – The video codec which will be used to convert the video
file. You can choose from variety of codecs which are supported for your
chosen output video format. More information about video codecs at
Wikipedia …
In case you aren’t sure which codec to use, you can choose the “Auto”
option.
o Video Size – You can specify a custom size for the output video file (width
and height). You can choose the “Auto” option if you do not know which
video size you wish to get, or if you would like VIP Video Converter to try
and output the video file at the same size as the original video file.
o Video Bitrate – The higher the bit rate will be, the higher the video quality
will be at the result video file. Increasing it will also result in an increased
file size and higher conversion time.
VIP Video Converter http://www.vip-video-converter.com
Page 53

VIP Video Converter User Guide
52
o Frame Rate – Frames which will be shown per second. Increasing it will
also result in an increased file size and higher conversion time.
o Aspect Ratio – The ratio between width and height. Common values are
16:9 or 4:3. The “Auto” option can be selected when the original aspect
ratio is to be kept.
Audio Properties
o Audio Codec - – The audio codec which will be used to convert the audio
layer of the video file. You can choose from variety of codecs which are
supported for your chosen output format. More information about audio
codecs at Wikipedia.
In case you aren’t sure which codec to use, you can choose the “Auto”
option.
o Audio Bitrate - The higher the bit rate will be, the higher the audio quality
will be at the result video file. Increasing it will also result in an increased
o Sample Rate – Amount of samples used to create an audio signal.
o Audio Channels – The number of audio channels used for the audio layer.
o Volume – Set the percentage of the audio volume which will be available
o Mute Audio – This option allows you to mute the audio in the converted
Timing
o Starting Time – This option allows you to start the conversion at a
o Duration – This option allows you to specify a specific duration from the
file size and higher conversion time.
Increasing it will also result in an increased file size and higher conversion
time.
Common values are 1 channel (mono), 2 channels (stereo), or 5.1 (6
channels).
at the converted video file. This is relative to the original video file.
video file.
specific location (time) in the video file, and not from the beginning.
video file which will be converted. This option actually also acts as an end
time, when combined with the “Starting Time” option. In example, you
VIP Video Converter http://www.vip-video-converter.com
Page 54

VIP Video Converter User Guide
53
can specify the “Starting Time” as 00:01:00, and duration as “00:04:00”
to convert 4 minutes, starting from the first minute of the video file.
Special
o Split – This feature allows you to split the video file to equal sized chunks
of video. This is used commonly used to squeeze video files into media
such as floppies, CD, 3GP and more.
5. Now, click the “Convert !” button to start the conversion.
6. While the files are converted, you can preview the output video file by clicking
the red icon at the right part of each conversion line.
Once the conversion is done, the converted video files will be at the output directory you
specified at step 3. You can open that directory by clicking the “Open Directory” button
at the bottom pane.
VIP Video Converter http://www.vip-video-converter.com
Page 55
VIP Video Converter User Guide
54
Converting To 3GPP2 Format
In order to convert your video file to 3GPP2 video format, follow these steps:
1. Press the “To 3GPP2” button at the top formats menu. If there is a choice of a
specific format, please choose one (in example, 3GPP2 or 3GPP2 HD). The
output format you’ve chosen should be now marked in yellow.
2. Click the “Add Files” button at the right pane, and choose file(s) for conversion.
3. At the bottom right, click the “Browse…” button to choose the output directory.
This will be the directory where the converted files will be written to.
4. If you wish to set custom (advanced) settings, click the “Advanced >>” button to
open the right advanced properties pane.
VIP Video Converter http://www.vip-video-converter.com
Page 56
VIP Video Converter User Guide
55
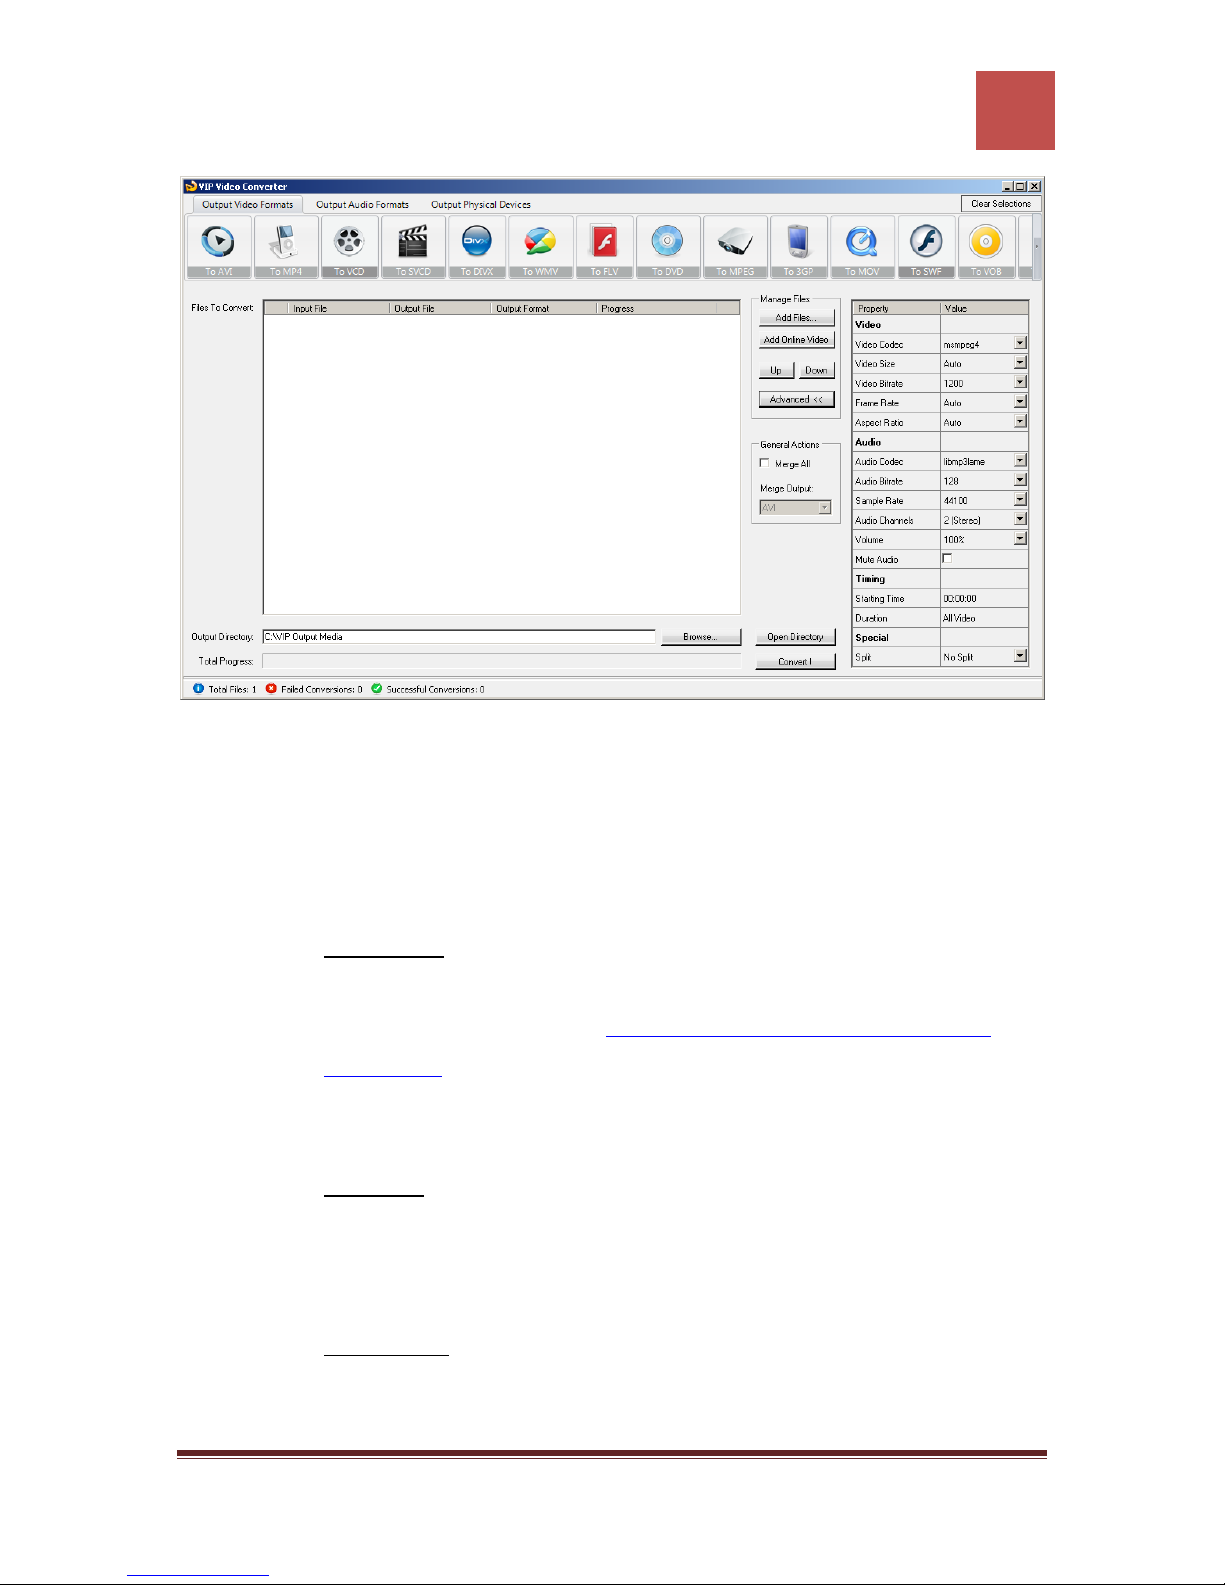
In the right advanced properties pane you can modify some of the following properties,
which will affect the conversion process:
Video Properties
o Video Codec – The video codec which will be used to convert the video
file. You can choose from variety of codecs which are supported for your
chosen output video format. More information about video codecs at
Wikipedia …
In case you aren’t sure which codec to use, you can choose the “Auto”
option.
o Video Size – You can specify a custom size for the output video file (width
and height). You can choose the “Auto” option if you do not know which
video size you wish to get, or if you would like VIP Video Converter to try
and output the video file at the same size as the original video file.
o Video Bitrate – The higher the bit rate will be, the higher the video quality
will be at the result video file. Increasing it will also result in an increased
file size and higher conversion time.
VIP Video Converter http://www.vip-video-converter.com
Page 57

VIP Video Converter User Guide
56
o Frame Rate – Frames which will be shown per second. Increasing it will
also result in an increased file size and higher conversion time.
o Aspect Ratio – The ratio between width and height. Common values are
16:9 or 4:3. The “Auto” option can be selected when the original aspect
ratio is to be kept.
Audio Properties
o Audio Codec - – The audio codec which will be used to convert the audio
layer of the video file. You can choose from variety of codecs which are
supported for your chosen output format. More information about audio
codecs at Wikipedia.
In case you aren’t sure which codec to use, you can choose the “Auto”
option.
o Audio Bitrate - The higher the bit rate will be, the higher the audio quality
will be at the result video file. Increasing it will also result in an increased
o Sample Rate – Amount of samples used to create an audio signal.
o Audio Channels – The number of audio channels used for the audio layer.
o Volume – Set the percentage of the audio volume which will be available
o Mute Audio – This option allows you to mute the audio in the converted
Timing
o Starting Time – This option allows you to start the conversion at a
o Duration – This option allows you to specify a specific duration from the
file size and higher conversion time.
Increasing it will also result in an increased file size and higher conversion
time.
Common values are 1 channel (mono), 2 channels (stereo), or 5.1 (6
channels).
at the converted video file. This is relative to the original video file.
video file.
specific location (time) in the video file, and not from the beginning.
video file which will be converted. This option actually also acts as an end
time, when combined with the “Starting Time” option. In example, you
VIP Video Converter http://www.vip-video-converter.com
Page 58

VIP Video Converter User Guide
57
can specify the “Starting Time” as 00:01:00, and duration as “00:04:00”
to convert 4 minutes, starting from the first minute of the video file.
Special
o Split – This feature allows you to split the video file to equal sized chunks
of video. This is used commonly used to squeeze video files into media
such as floppies, CD, 3GPP2 and more.
5. Now, click the “Convert !” button to start the conversion.
6. While the files are converted, you can preview the output video file by clicking
the red icon at the right part of each conversion line.
Once the conversion is done, the converted video files will be at the output directory you
specified at step 3. You can open that directory by clicking the “Open Directory” button
at the bottom pane.
VIP Video Converter http://www.vip-video-converter.com
Page 59
VIP Video Converter User Guide
58
Converting To MOV Format
In order to convert your video file to MOV video format, follow these steps:
1. Press the “To MOV” button at the top formats menu. If there is a choice of a
specific format, please choose one (in example, MOV or MOV HD). The output
format you’ve chosen should be now marked in yellow.
2. Click the “Add Files” button at the right pane, and choose file(s) for conversion.
3. At the bottom right, click the “Browse…” button to choose the output directory.
This will be the directory where the converted files will be written to.
4. If you wish to set custom (advanced) settings, click the “Advanced >>” button to
open the right advanced properties pane.
VIP Video Converter http://www.vip-video-converter.com
Page 60
VIP Video Converter User Guide
59
In the right advanced properties pane you can modify some of the following properties,
which will affect the conversion process:
Video Properties
o Video Codec – The video codec which will be used to convert the video
file. You can choose from variety of codecs which are supported for your
chosen output video format. More information about video codecs at
Wikipedia …
In case you aren’t sure which codec to use, you can choose the “Auto”
option.
o Video Size – You can specify a custom size for the output video file (width
and height). You can choose the “Auto” option if you do not know which
video size you wish to get, or if you would like VIP Video Converter to try
and output the video file at the same size as the original video file.
o Video Bitrate – The higher the bit rate will be, the higher the video quality
will be at the result video file. Increasing it will also result in an increased
file size and higher conversion time.
VIP Video Converter http://www.vip-video-converter.com
Page 61

VIP Video Converter User Guide
60
o Frame Rate – Frames which will be shown per second. Increasing it will
also result in an increased file size and higher conversion time.
o Aspect Ratio – The ratio between width and height. Common values are
16:9 or 4:3. The “Auto” option can be selected when the original aspect
ratio is to be kept.
Audio Properties
o Audio Codec - – The audio codec which will be used to convert the audio
layer of the video file. You can choose from variety of codecs which are
supported for your chosen output format. More information about audio
codecs at Wikipedia.
In case you aren’t sure which codec to use, you can choose the “Auto”
option.
o Audio Bitrate - The higher the bit rate will be, the higher the audio quality
will be at the result video file. Increasing it will also result in an increased
o Sample Rate – Amount of samples used to create an audio signal.
o Audio Channels – The number of audio channels used for the audio layer.
o Volume – Set the percentage of the audio volume which will be available
o Mute Audio – This option allows you to mute the audio in the converted
Timing
o Starting Time – This option allows you to start the conversion at a
o Duration – This option allows you to specify a specific duration from the
file size and higher conversion time.
Increasing it will also result in an increased file size and higher conversion
time.
Common values are 1 channel (mono), 2 channels (stereo), or 5.1 (6
channels).
at the converted video file. This is relative to the original video file.
video file.
specific location (time) in the video file, and not from the beginning.
video file which will be converted. This option actually also acts as an end
time, when combined with the “Starting Time” option. In example, you
VIP Video Converter http://www.vip-video-converter.com
Page 62

VIP Video Converter User Guide
61
can specify the “Starting Time” as 00:01:00, and duration as “00:04:00”
to convert 4 minutes, starting from the first minute of the video file.
Special
o Split – This feature allows you to split the video file to equal sized chunks
of video. This is used commonly used to squeeze video files into media
such as floppies, CD, MOV and more.
5. Now, click the “Convert !” button to start the conversion.
6. While the files are converted, you can preview the output video file by clicking
the red icon at the right part of each conversion line.
Once the conversion is done, the converted video files will be at the output directory you
specified at step 3. You can open that directory by clicking the “Open Directory” button
at the bottom pane.
VIP Video Converter http://www.vip-video-converter.com
Page 63
VIP Video Converter User Guide
62
Converting To SWF Format
In order to convert your video file to SWF video format, follow these steps:
1. Press the “To SWF” button at the top formats menu. If there is a choice of a
specific format, please choose one (in example, SWF or SWF HD). The output
format you’ve chosen should be now marked in yellow.
2. Click the “Add Files” button at the right pane, and choose file(s) for conversion.
3. At the bottom right, click the “Browse…” button to choose the output directory.
This will be the directory where the converted files will be written to.
4. If you wish to set custom (advanced) settings, click the “Advanced >>” button to
open the right advanced properties pane.
VIP Video Converter http://www.vip-video-converter.com
Page 64
VIP Video Converter User Guide
63
In the right advanced properties pane you can modify some of the following properties,
which will affect the conversion process:
Video Properties
o Video Codec – The video codec which will be used to convert the video
file. You can choose from variety of codecs which are supported for your
chosen output video format. More information about video codecs at
Wikipedia …
In case you aren’t sure which codec to use, you can choose the “Auto”
option.
o Video Size – You can specify a custom size for the output video file (width
and height). You can choose the “Auto” option if you do not know which
video size you wish to get, or if you would like VIP Video Converter to try
and output the video file at the same size as the original video file.
o Video Bitrate – The higher the bit rate will be, the higher the video quality
will be at the result video file. Increasing it will also result in an increased
file size and higher conversion time.
VIP Video Converter http://www.vip-video-converter.com
Page 65

VIP Video Converter User Guide
64
o Frame Rate – Frames which will be shown per second. Increasing it will
also result in an increased file size and higher conversion time.
o Aspect Ratio – The ratio between width and height. Common values are
16:9 or 4:3. The “Auto” option can be selected when the original aspect
ratio is to be kept.
Audio Properties
o Audio Codec - – The audio codec which will be used to convert the audio
layer of the video file. You can choose from variety of codecs which are
supported for your chosen output format. More information about audio
codecs at Wikipedia.
In case you aren’t sure which codec to use, you can choose the “Auto”
option.
o Audio Bitrate - The higher the bit rate will be, the higher the audio quality
will be at the result video file. Increasing it will also result in an increased
o Sample Rate – Amount of samples used to create an audio signal.
o Audio Channels – The number of audio channels used for the audio layer.
o Volume – Set the percentage of the audio volume which will be available
o Mute Audio – This option allows you to mute the audio in the converted
Timing
o Starting Time – This option allows you to start the conversion at a
o Duration – This option allows you to specify a specific duration from the
file size and higher conversion time.
Increasing it will also result in an increased file size and higher conversion
time.
Common values are 1 channel (mono), 2 channels (stereo), or 5.1 (6
channels).
at the converted video file. This is relative to the original video file.
video file.
specific location (time) in the video file, and not from the beginning.
video file which will be converted. This option actually also acts as an end
time, when combined with the “Starting Time” option. In example, you
VIP Video Converter http://www.vip-video-converter.com
Page 66

VIP Video Converter User Guide
65
can specify the “Starting Time” as 00:01:00, and duration as “00:04:00”
to convert 4 minutes, starting from the first minute of the video file.
Special
o Split – This feature allows you to split the video file to equal sized chunks
of video. This is used commonly used to squeeze video files into media
such as floppies, CD, SWF and more.
5. Now, click the “Convert !” button to start the conversion.
6. While the files are converted, you can preview the output video file by clicking
the red icon at the right part of each conversion line.
Once the conversion is done, the converted video files will be at the output directory you
specified at step 3. You can open that directory by clicking the “Open Directory” button
at the bottom pane.
VIP Video Converter http://www.vip-video-converter.com
Page 67
VIP Video Converter User Guide
66
Converting To H.264 Format
In order to convert your video file to H.264 video format, follow these steps:
1. Press the “To H.264” button at the top formats menu. If there is a choice of a
specific format, please choose one (in example, H.264 or H.264 HD). The output
format you’ve chosen should be now marked in yellow.
2. Click the “Add Files” button at the right pane, and choose file(s) for conversion.
3. At the bottom right, click the “Browse…” button to choose the output directory.
This will be the directory where the converted files will be written to.
4. If you wish to set custom (advanced) settings, click the “Advanced >>” button to
open the right advanced properties pane.
VIP Video Converter http://www.vip-video-converter.com
Page 68
VIP Video Converter User Guide
67
In the right advanced properties pane you can modify some of the following properties,
which will affect the conversion process:
Video Properties
o Video Codec – The video codec which will be used to convert the video
file. You can choose from variety of codecs which are supported for your
chosen output video format. More information about video codecs at
Wikipedia …
In case you aren’t sure which codec to use, you can choose the “Auto”
option.
o Video Size – You can specify a custom size for the output video file (width
and height). You can choose the “Auto” option if you do not know which
video size you wish to get, or if you would like VIP Video Converter to try
and output the video file at the same size as the original video file.
o Video Bitrate – The higher the bit rate will be, the higher the video quality
will be at the result video file. Increasing it will also result in an increased
file size and higher conversion time.
VIP Video Converter http://www.vip-video-converter.com
Page 69

VIP Video Converter User Guide
68
o Frame Rate – Frames which will be shown per second. Increasing it will
also result in an increased file size and higher conversion time.
o Aspect Ratio – The ratio between width and height. Common values are
16:9 or 4:3. The “Auto” option can be selected when the original aspect
ratio is to be kept.
Audio Properties
o Audio Codec - – The audio codec which will be used to convert the audio
layer of the video file. You can choose from variety of codecs which are
supported for your chosen output format. More information about audio
codecs at Wikipedia.
In case you aren’t sure which codec to use, you can choose the “Auto”
option.
o Audio Bitrate - The higher the bit rate will be, the higher the audio quality
will be at the result video file. Increasing it will also result in an increased
o Sample Rate – Amount of samples used to create an audio signal.
o Audio Channels – The number of audio channels used for the audio layer.
o Volume – Set the percentage of the audio volume which will be available
o Mute Audio – This option allows you to mute the audio in the converted
Timing
o Starting Time – This option allows you to start the conversion at a
o Duration – This option allows you to specify a specific duration from the
file size and higher conversion time.
Increasing it will also result in an increased file size and higher conversion
time.
Common values are 1 channel (mono), 2 channels (stereo), or 5.1 (6
channels).
at the converted video file. This is relative to the original video file.
video file.
specific location (time) in the video file, and not from the beginning.
video file which will be converted. This option actually also acts as an end
time, when combined with the “Starting Time” option. In example, you
VIP Video Converter http://www.vip-video-converter.com
Page 70

VIP Video Converter User Guide
69
can specify the “Starting Time” as 00:01:00, and duration as “00:04:00”
to convert 4 minutes, starting from the first minute of the video file.
Special
o Split – This feature allows you to split the video file to equal sized chunks
of video. This is used commonly used to squeeze video files into media
such as floppies, CD, H.264 and more.
5. Now, click the “Convert !” button to start the conversion.
6. While the files are converted, you can preview the output video file by clicking
the red icon at the right part of each conversion line.
Once the conversion is done, the converted video files will be at the output directory you
specified at step 3. You can open that directory by clicking the “Open Directory” button
at the bottom pane.
VIP Video Converter http://www.vip-video-converter.com
Page 71
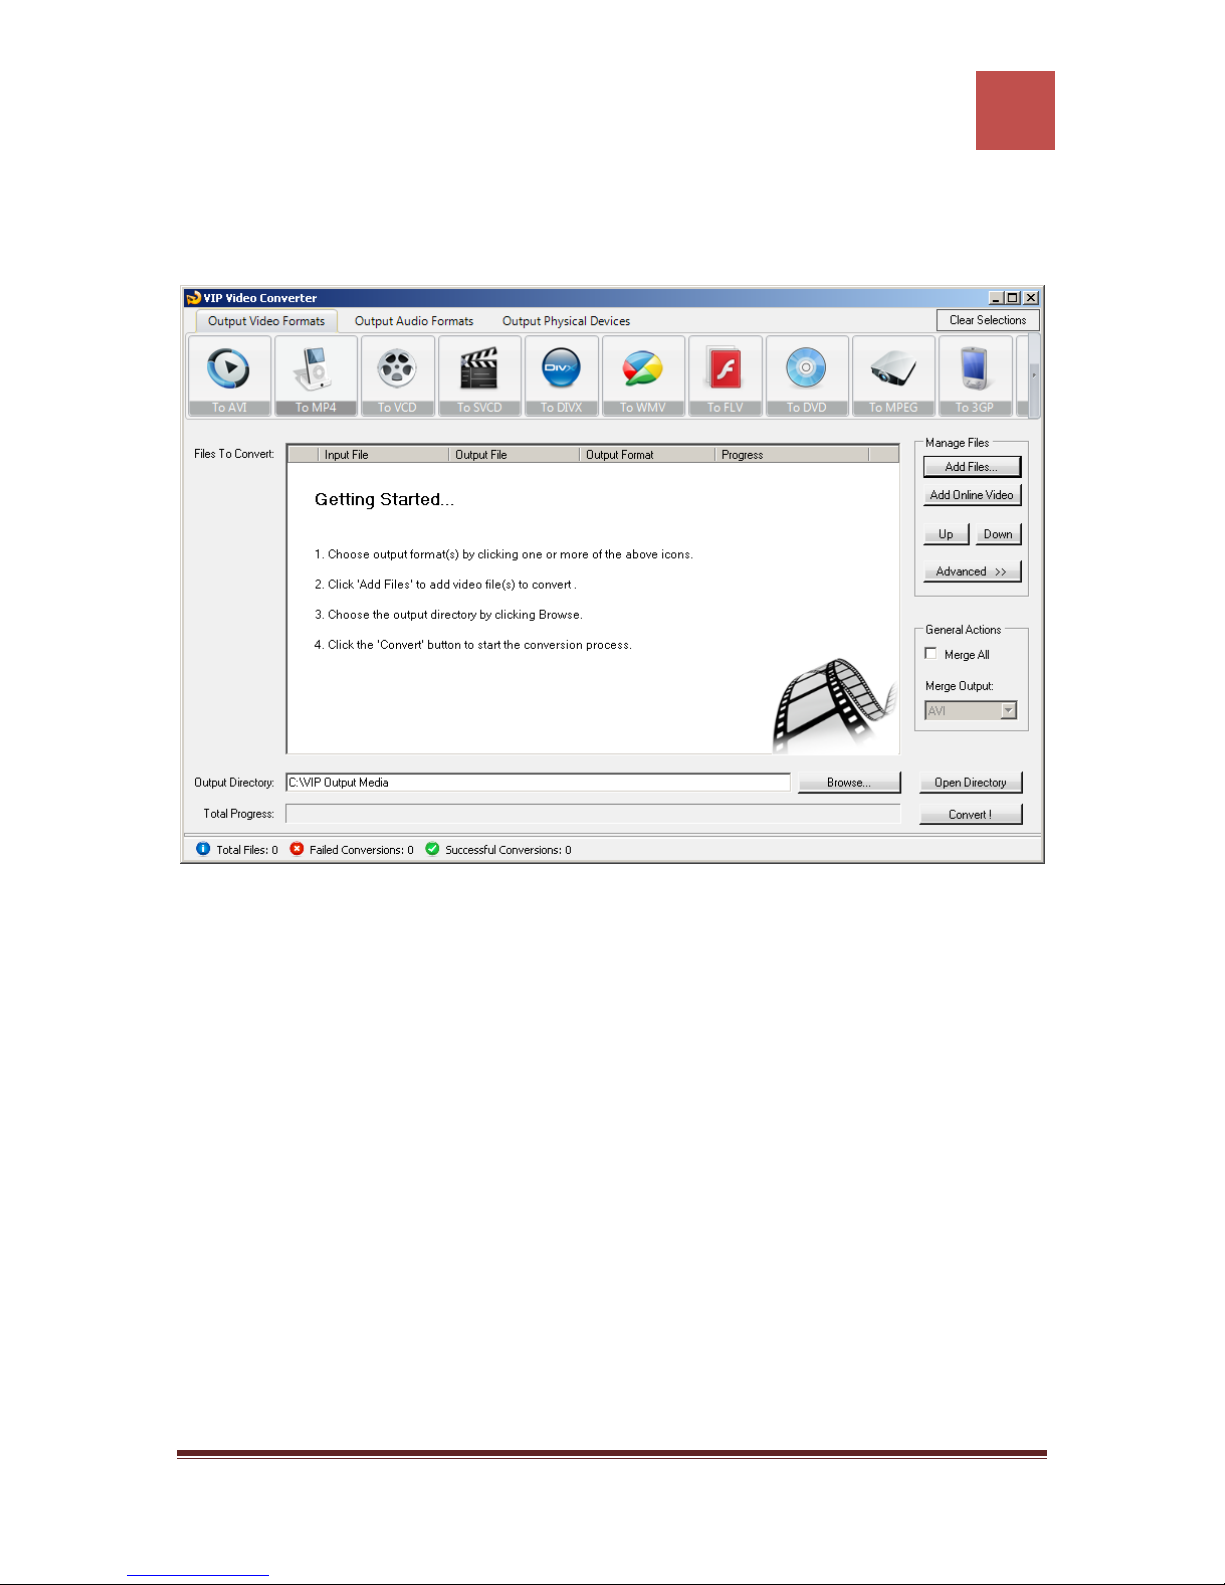
VIP Video Converter User Guide
70
Converting To VOB Format
In order to convert your video file to VOB video format, follow these steps:
1. Press the “To VOB” button at the top formats menu. If there is a choice of a
specific format, please choose one (in example, VOB or VOB HD). The output
format you’ve chosen should be now marked in yellow.
2. Click the “Add Files” button at the right pane, and choose file(s) for conversion.
3. At the bottom right, click the “Browse…” button to choose the output directory.
This will be the directory where the converted files will be written to.
4. If you wish to set custom (advanced) settings, click the “Advanced >>” button to
open the right advanced properties pane.
VIP Video Converter http://www.vip-video-converter.com
Page 72
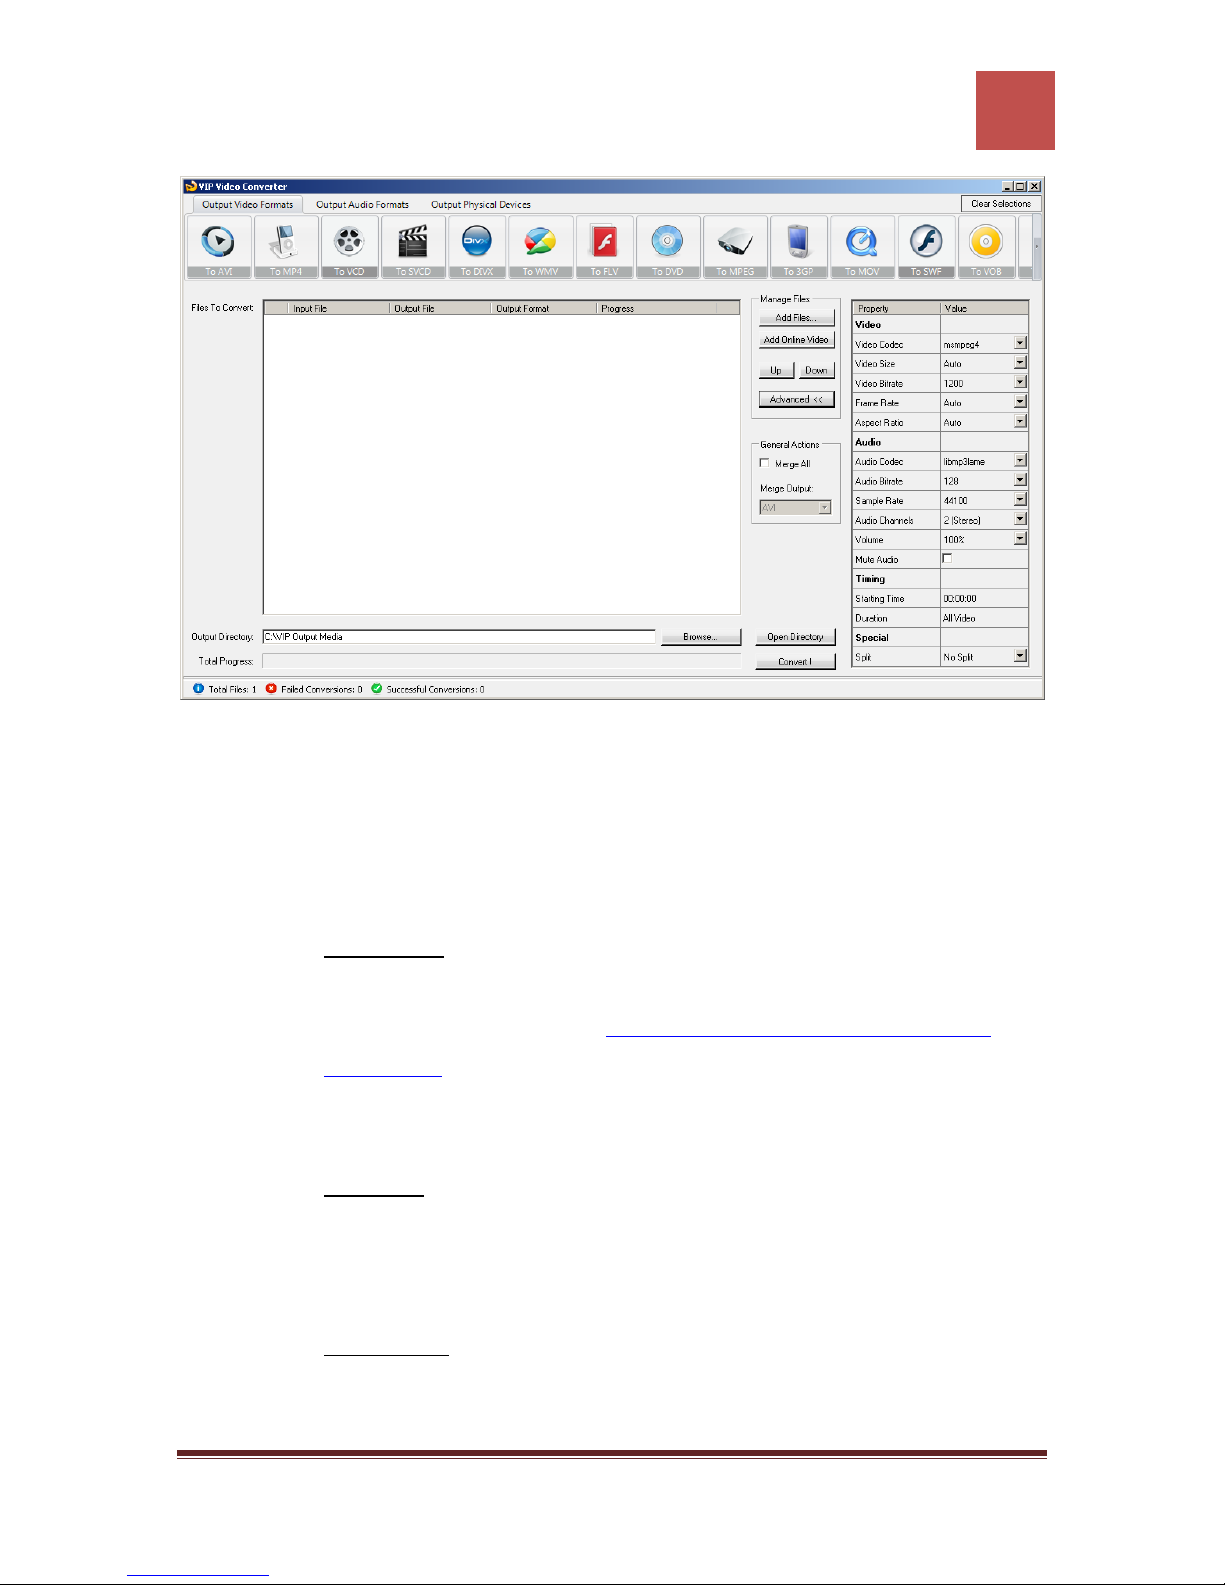
VIP Video Converter User Guide
71
In the right advanced properties pane you can modify some of the following properties,
which will affect the conversion process:
Video Properties
o Video Codec – The video codec which will be used to convert the video
file. You can choose from variety of codecs which are supported for your
chosen output video format. More information about video codecs at
Wikipedia …
In case you aren’t sure which codec to use, you can choose the “Auto”
option.
o Video Size – You can specify a custom size for the output video file (width
and height). You can choose the “Auto” option if you do not know which
video size you wish to get, or if you would like VIP Video Converter to try
and output the video file at the same size as the original video file.
o Video Bitrate – The higher the bit rate will be, the higher the video quality
will be at the result video file. Increasing it will also result in an increased
file size and higher conversion time.
VIP Video Converter http://www.vip-video-converter.com
Page 73

VIP Video Converter User Guide
72
o Frame Rate – Frames which will be shown per second. Increasing it will
also result in an increased file size and higher conversion time.
o Aspect Ratio – The ratio between width and height. Common values are
16:9 or 4:3. The “Auto” option can be selected when the original aspect
ratio is to be kept.
Audio Properties
o Audio Codec - – The audio codec which will be used to convert the audio
layer of the video file. You can choose from variety of codecs which are
supported for your chosen output format. More information about audio
codecs at Wikipedia.
In case you aren’t sure which codec to use, you can choose the “Auto”
option.
o Audio Bitrate - The higher the bit rate will be, the higher the audio quality
will be at the result video file. Increasing it will also result in an increased
o Sample Rate – Amount of samples used to create an audio signal.
o Audio Channels – The number of audio channels used for the audio layer.
o Volume – Set the percentage of the audio volume which will be available
o Mute Audio – This option allows you to mute the audio in the converted
Timing
o Starting Time – This option allows you to start the conversion at a
o Duration – This option allows you to specify a specific duration from the
file size and higher conversion time.
Increasing it will also result in an increased file size and higher conversion
time.
Common values are 1 channel (mono), 2 channels (stereo), or 5.1 (6
channels).
at the converted video file. This is relative to the original video file.
video file.
specific location (time) in the video file, and not from the beginning.
video file which will be converted. This option actually also acts as an end
time, when combined with the “Starting Time” option. In example, you
VIP Video Converter http://www.vip-video-converter.com
Page 74

VIP Video Converter User Guide
73
can specify the “Starting Time” as 00:01:00, and duration as “00:04:00”
to convert 4 minutes, starting from the first minute of the video file.
Special
o Split – This feature allows you to split the video file to equal sized chunks
of video. This is used commonly used to squeeze video files into media
such as floppies, CD, VOB and more.
5. Now, click the “Convert !” button to start the conversion.
6. While the files are converted, you can preview the output video file by clicking
the red icon at the right part of each conversion line.
Once the conversion is done, the converted video files will be at the output directory you
specified at step 3. You can open that directory by clicking the “Open Directory” button
at the bottom pane.
VIP Video Converter http://www.vip-video-converter.com
Page 75
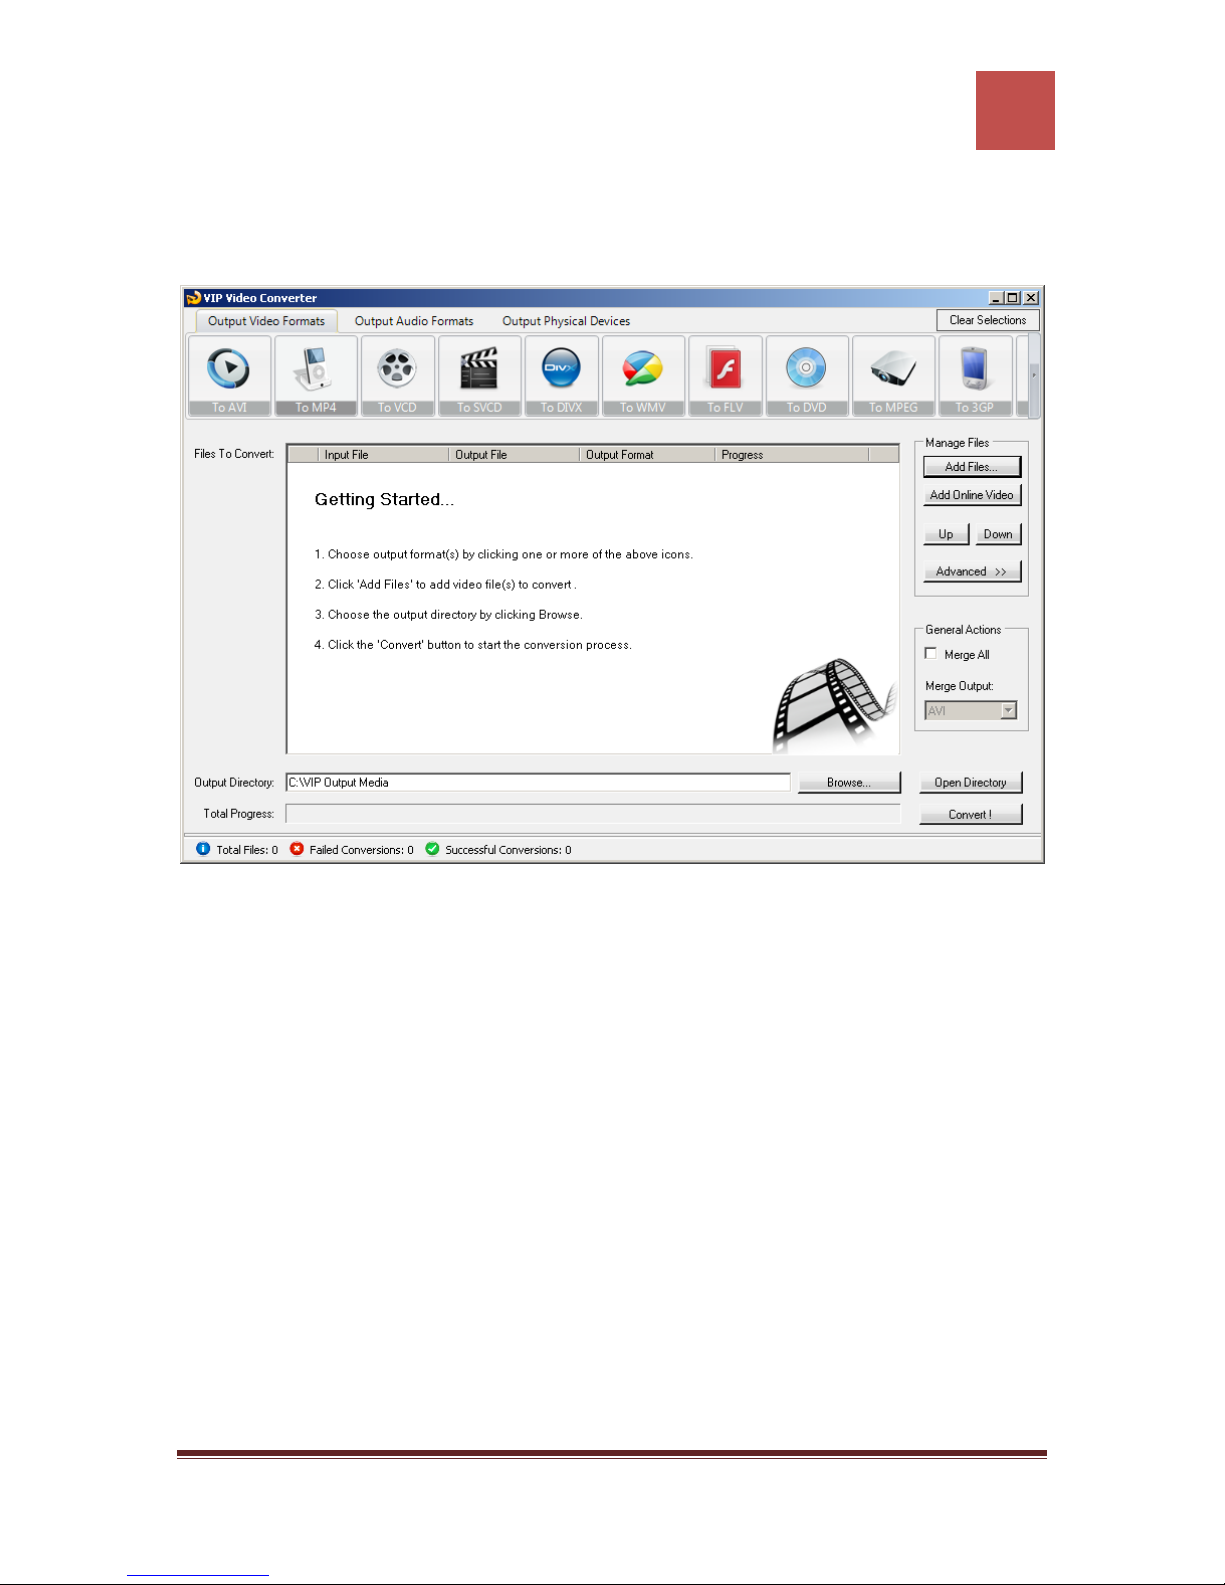
VIP Video Converter User Guide
74
Converting To RMVB Format
In order to convert your video file to RMVB video format, follow these steps:
1. Press the “To RMVB” button at the top formats menu. If there is a choice of a
specific format, please choose one (in example, RMVB or RMVB HD). The output
format you’ve chosen should be now marked in yellow.
2. Click the “Add Files” button at the right pane, and choose file(s) for conversion.
3. At the bottom right, click the “Browse…” button to choose the output directory.
This will be the directory where the converted files will be written to.
4. If you wish to set custom (advanced) settings, click the “Advanced >>” button to
open the right advanced properties pane.
VIP Video Converter http://www.vip-video-converter.com
Page 76
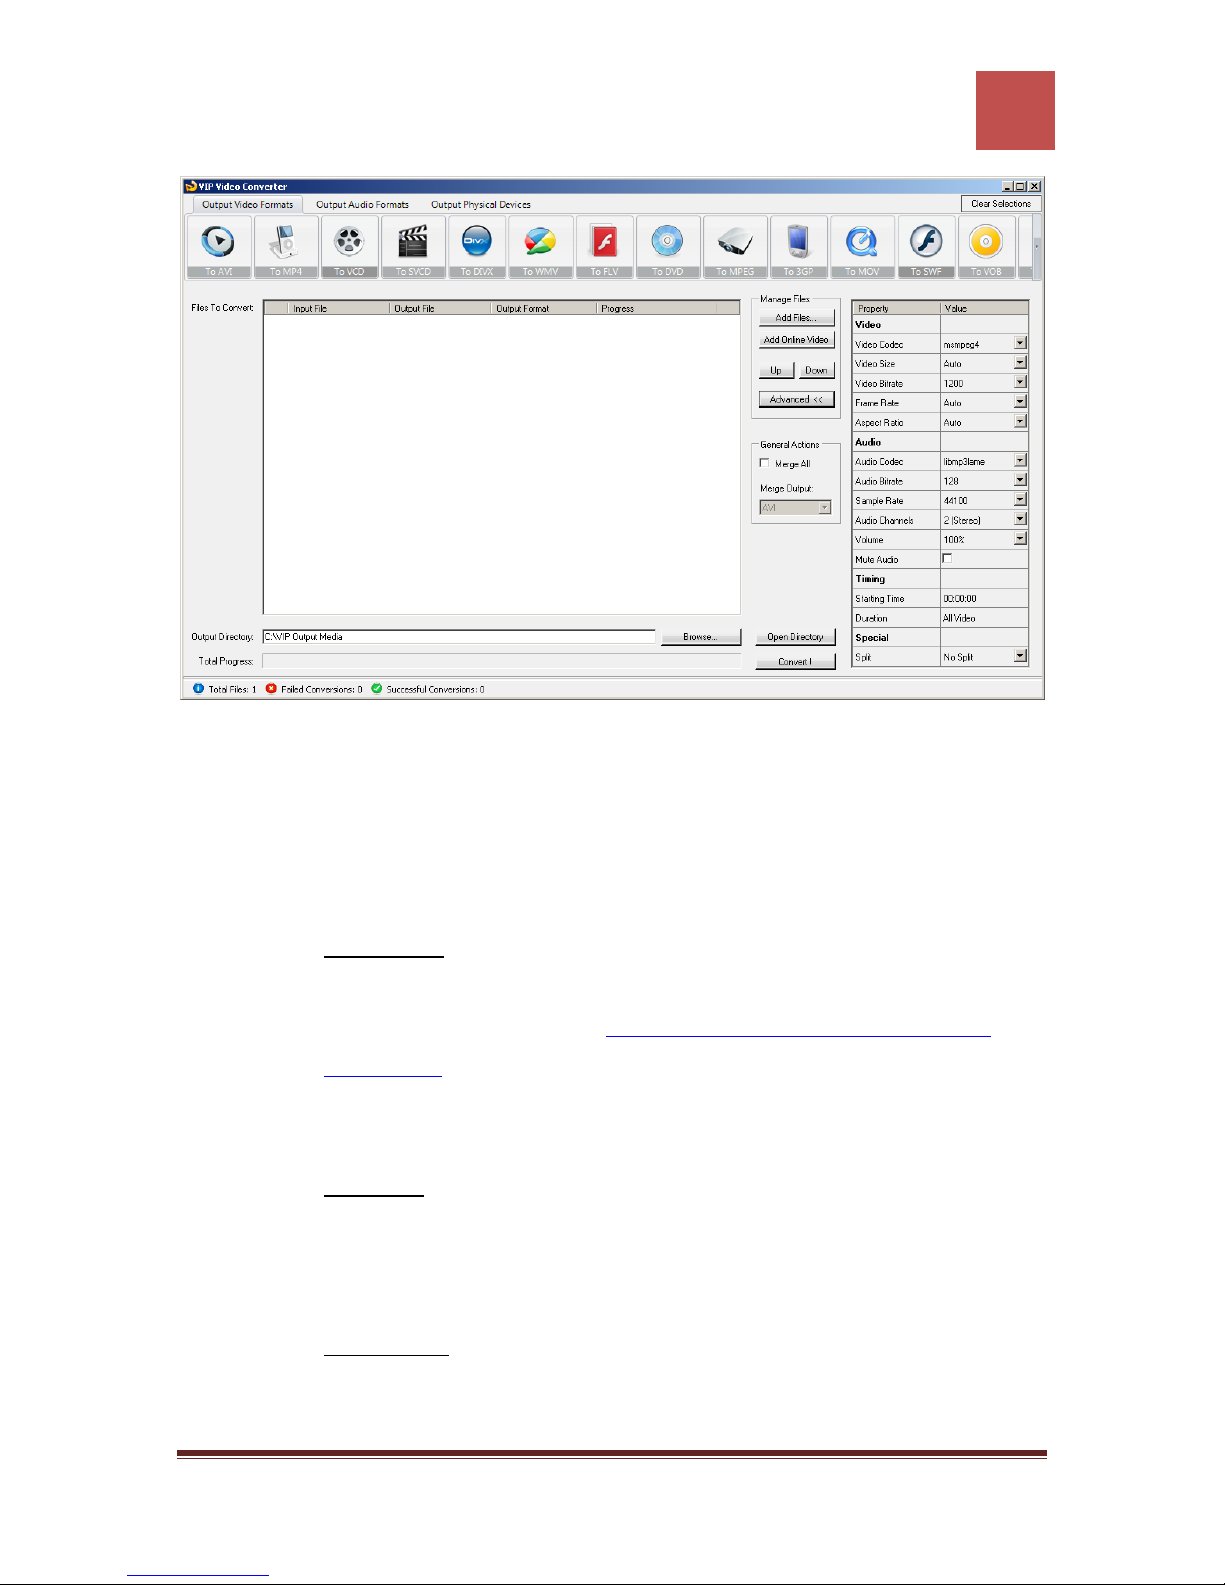
VIP Video Converter User Guide
75
In the right advanced properties pane you can modify some of the following properties,
which will affect the conversion process:
Video Properties
o Video Codec – The video codec which will be used to convert the video
file. You can choose from variety of codecs which are supported for your
chosen output video format. More information about video codecs at
Wikipedia …
In case you aren’t sure which codec to use, you can choose the “Auto”
option.
o Video Size – You can specify a custom size for the output video file (width
and height). You can choose the “Auto” option if you do not know which
video size you wish to get, or if you would like VIP Video Converter to try
and output the video file at the same size as the original video file.
o Video Bitrate – The higher the bit rate will be, the higher the video quality
will be at the result video file. Increasing it will also result in an increased
file size and higher conversion time.
VIP Video Converter http://www.vip-video-converter.com
Page 77

VIP Video Converter User Guide
76
o Frame Rate – Frames which will be shown per second. Increasing it will
also result in an increased file size and higher conversion time.
o Aspect Ratio – The ratio between width and height. Common values are
16:9 or 4:3. The “Auto” option can be selected when the original aspect
ratio is to be kept.
Audio Properties
o Audio Codec - – The audio codec which will be used to convert the audio
layer of the video file. You can choose from variety of codecs which are
supported for your chosen output format. More information about audio
codecs at Wikipedia.
In case you aren’t sure which codec to use, you can choose the “Auto”
option.
o Audio Bitrate - The higher the bit rate will be, the higher the audio quality
will be at the result video file. Increasing it will also result in an increased
o Sample Rate – Amount of samples used to create an audio signal.
o Audio Channels – The number of audio channels used for the audio layer.
o Volume – Set the percentage of the audio volume which will be available
o Mute Audio – This option allows you to mute the audio in the converted
Timing
o Starting Time – This option allows you to start the conversion at a
o Duration – This option allows you to specify a specific duration from the
file size and higher conversion time.
Increasing it will also result in an increased file size and higher conversion
time.
Common values are 1 channel (mono), 2 channels (stereo), or 5.1 (6
channels).
at the converted video file. This is relative to the original video file.
video file.
specific location (time) in the video file, and not from the beginning.
video file which will be converted. This option actually also acts as an end
time, when combined with the “Starting Time” option. In example, you
VIP Video Converter http://www.vip-video-converter.com
Page 78

VIP Video Converter User Guide
77
can specify the “Starting Time” as 00:01:00, and duration as “00:04:00”
to convert 4 minutes, starting from the first minute of the video file.
Special
o Split – This feature allows you to split the video file to equal sized chunks
of video. This is used commonly used to squeeze video files into media
such as floppies, CD, RMVB and more.
5. Now, click the “Convert !” button to start the conversion.
6. While the files are converted, you can preview the output video file by clicking
the red icon at the right part of each conversion line.
Once the conversion is done, the converted video files will be at the output directory you
specified at step 3. You can open that directory by clicking the “Open Directory” button
at the bottom pane.
VIP Video Converter http://www.vip-video-converter.com
Page 79
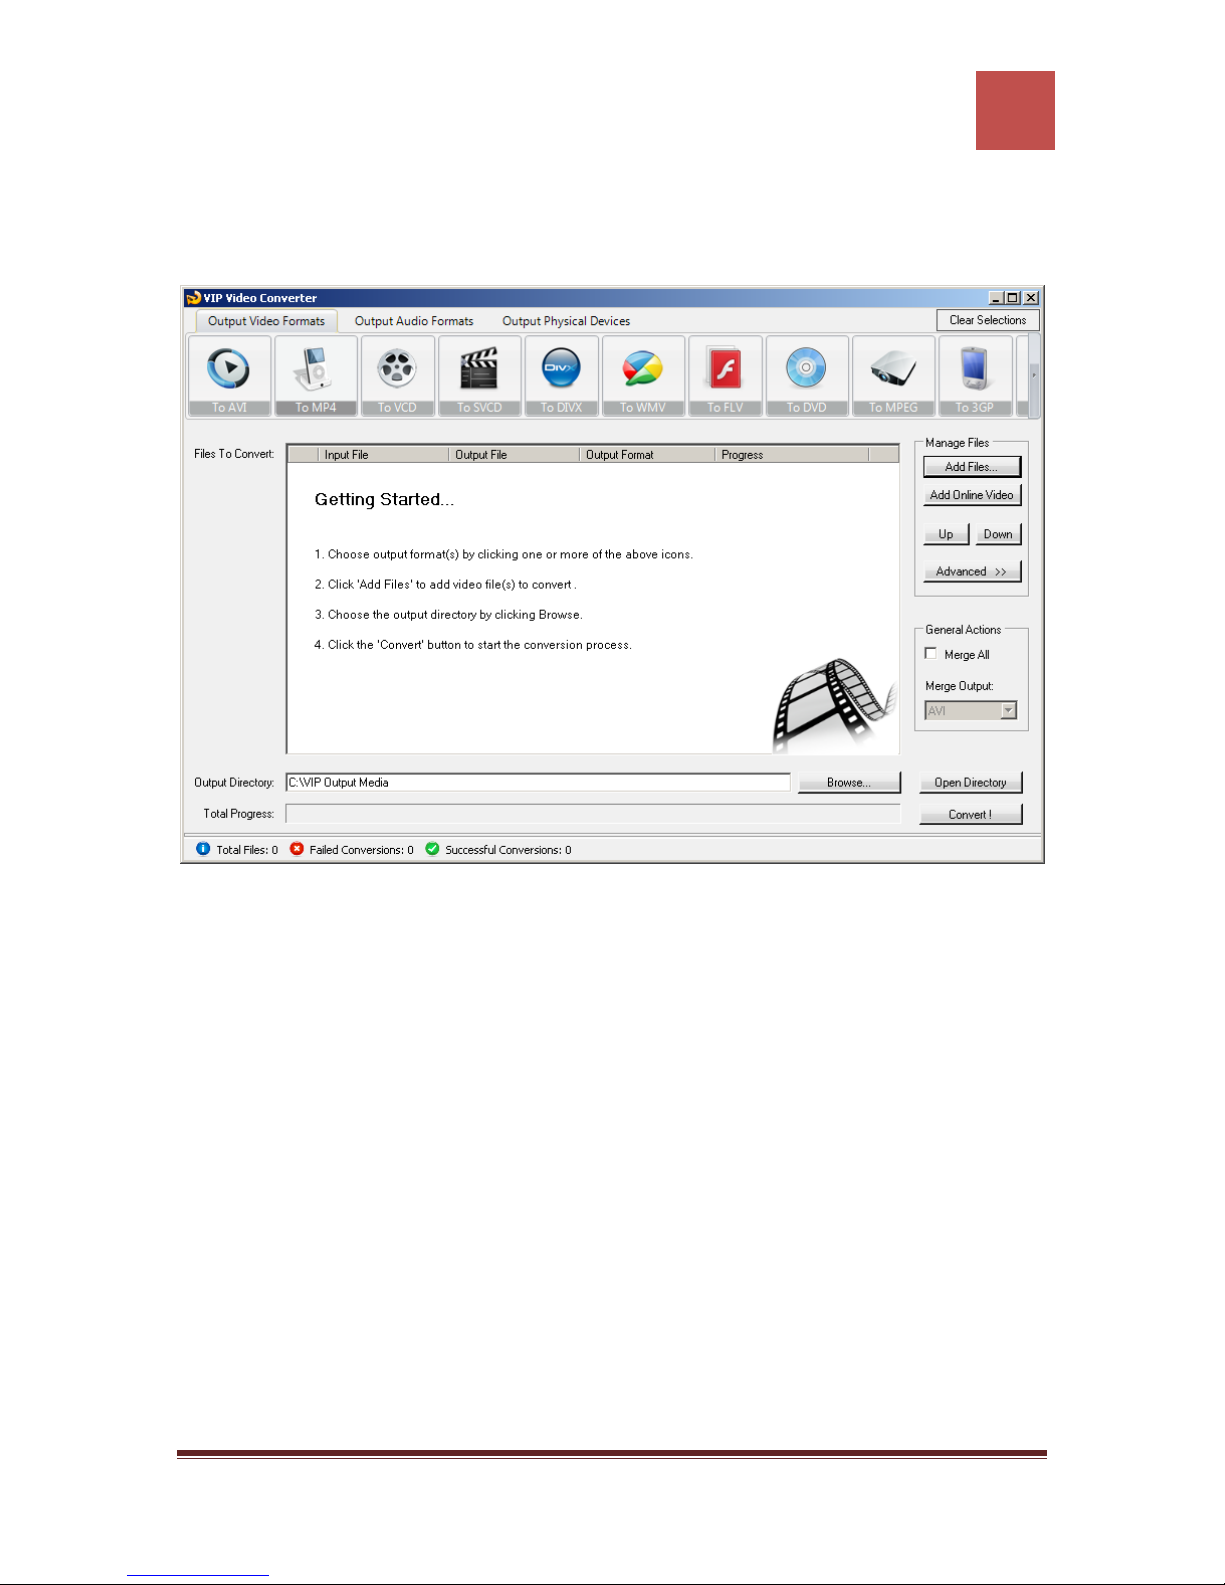
VIP Video Converter User Guide
78
Converting To DV Format
In order to convert your video file to DV video format, follow these steps:
1. Press the “To DV” button at the top formats menu. If there is a choice of a
specific format, please choose one (in example, DV or DV HD). The output
format you’ve chosen should be now marked in yellow.
2. Click the “Add Files” button at the right pane, and choose file(s) for conversion.
3. At the bottom right, click the “Browse…” button to choose the output directory.
This will be the directory where the converted files will be written to.
4. If you wish to set custom (advanced) settings, click the “Advanced >>” button to
open the right advanced properties pane.
VIP Video Converter http://www.vip-video-converter.com
Page 80
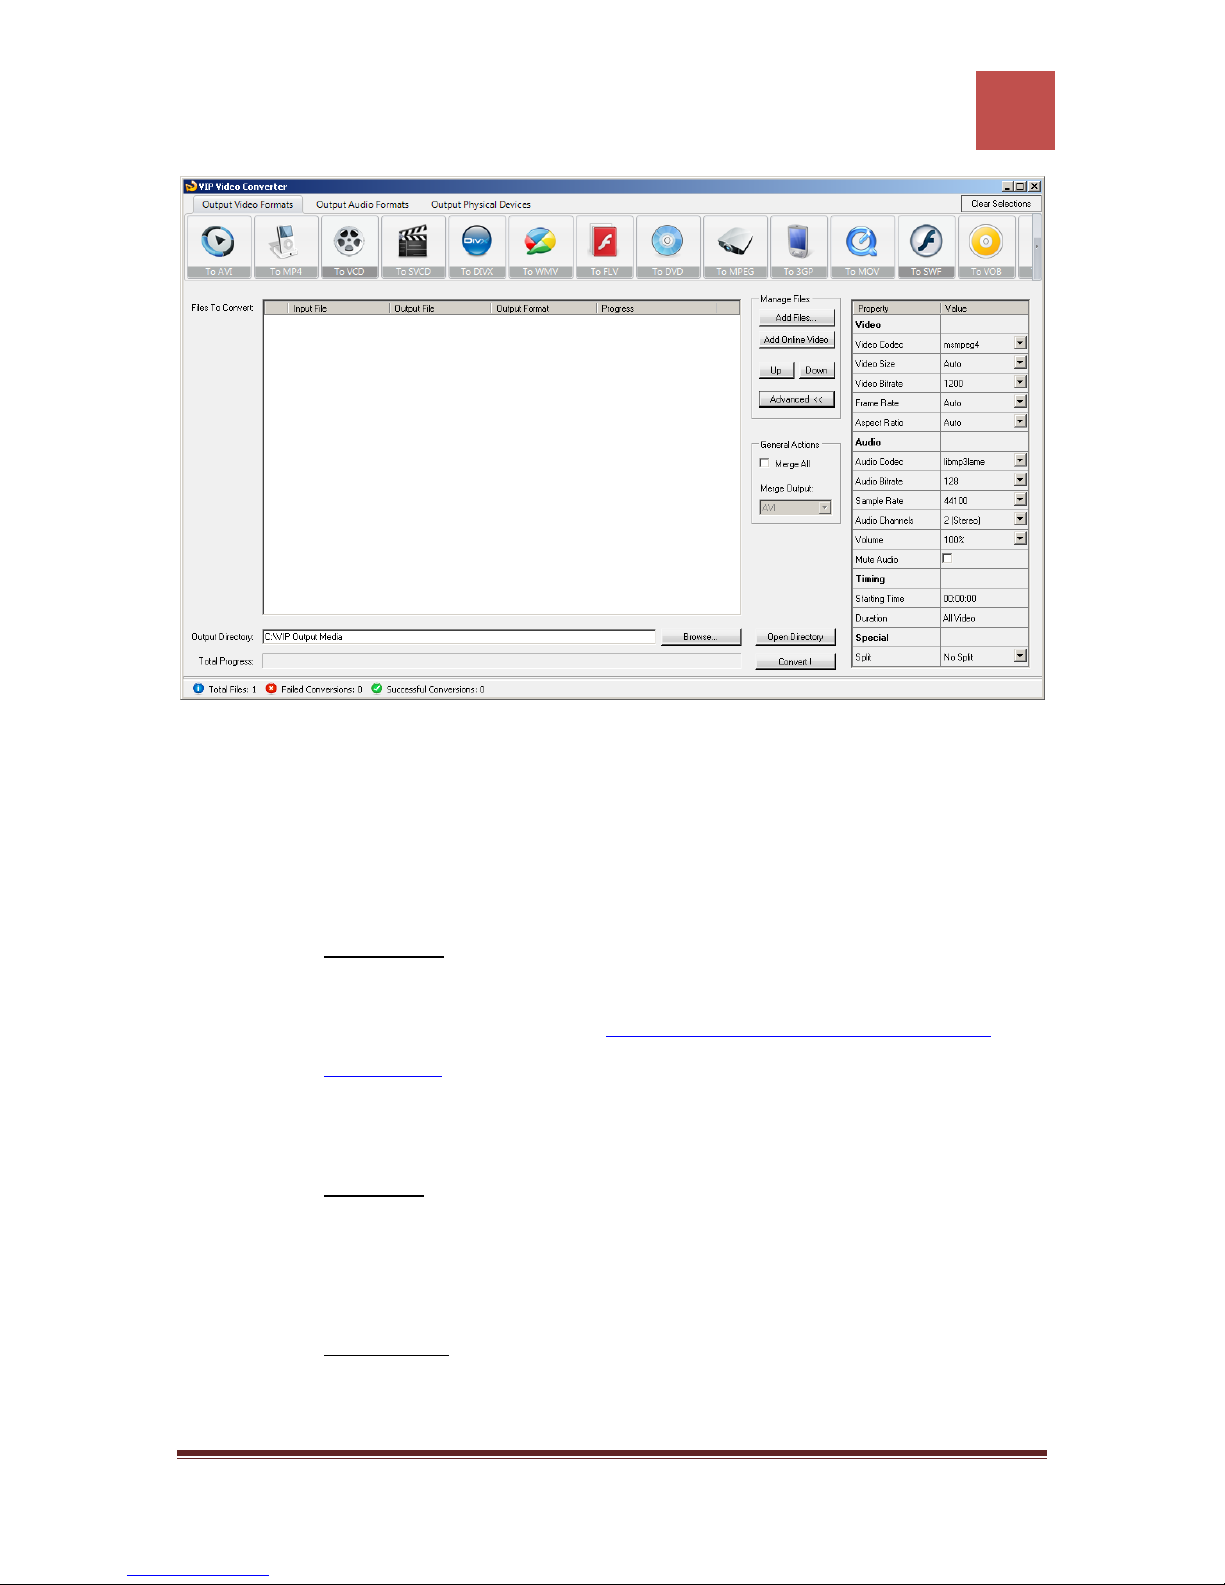
VIP Video Converter User Guide
79
In the right advanced properties pane you can modify some of the following properties,
which will affect the conversion process:
Video Properties
o Video Codec – The video codec which will be used to convert the video
file. You can choose from variety of codecs which are supported for your
chosen output video format. More information about video codecs at
Wikipedia …
In case you aren’t sure which codec to use, you can choose the “Auto”
option.
o Video Size – You can specify a custom size for the output video file (width
and height). You can choose the “Auto” option if you do not know which
video size you wish to get, or if you would like VIP Video Converter to try
and output the video file at the same size as the original video file.
o Video Bitrate – The higher the bit rate will be, the higher the video quality
will be at the result video file. Increasing it will also result in an increased
file size and higher conversion time.
VIP Video Converter http://www.vip-video-converter.com
Page 81

VIP Video Converter User Guide
80
o Frame Rate – Frames which will be shown per second. Increasing it will
also result in an increased file size and higher conversion time.
o Aspect Ratio – The ratio between width and height. Common values are
16:9 or 4:3. The “Auto” option can be selected when the original aspect
ratio is to be kept.
Audio Properties
o Audio Codec - – The audio codec which will be used to convert the audio
layer of the video file. You can choose from variety of codecs which are
supported for your chosen output format. More information about audio
codecs at Wikipedia.
In case you aren’t sure which codec to use, you can choose the “Auto”
option.
o Audio Bitrate - The higher the bit rate will be, the higher the audio quality
will be at the result video file. Increasing it will also result in an increased
o Sample Rate – Amount of samples used to create an audio signal.
o Audio Channels – The number of audio channels used for the audio layer.
o Volume – Set the percentage of the audio volume which will be available
o Mute Audio – This option allows you to mute the audio in the converted
Timing
o Starting Time – This option allows you to start the conversion at a
o Duration – This option allows you to specify a specific duration from the
file size and higher conversion time.
Increasing it will also result in an increased file size and higher conversion
time.
Common values are 1 channel (mono), 2 channels (stereo), or 5.1 (6
channels).
at the converted video file. This is relative to the original video file.
video file.
specific location (time) in the video file, and not from the beginning.
video file which will be converted. This option actually also acts as an end
time, when combined with the “Starting Time” option. In example, you
VIP Video Converter http://www.vip-video-converter.com
Page 82

VIP Video Converter User Guide
81
can specify the “Starting Time” as 00:01:00, and duration as “00:04:00”
to convert 4 minutes, starting from the first minute of the video file.
Special
o Split – This feature allows you to split the video file to equal sized chunks
of video. This is used commonly used to squeeze video files into media
such as floppies, CD, DV and more.
5. Now, click the “Convert !” button to start the conversion.
6. While the files are converted, you can preview the output video file by clicking
the red icon at the right part of each conversion line.
Once the conversion is done, the converted video files will be at the output directory you
specified at step 3. You can open that directory by clicking the “Open Directory” button
at the bottom pane.
VIP Video Converter http://www.vip-video-converter.com
Page 83
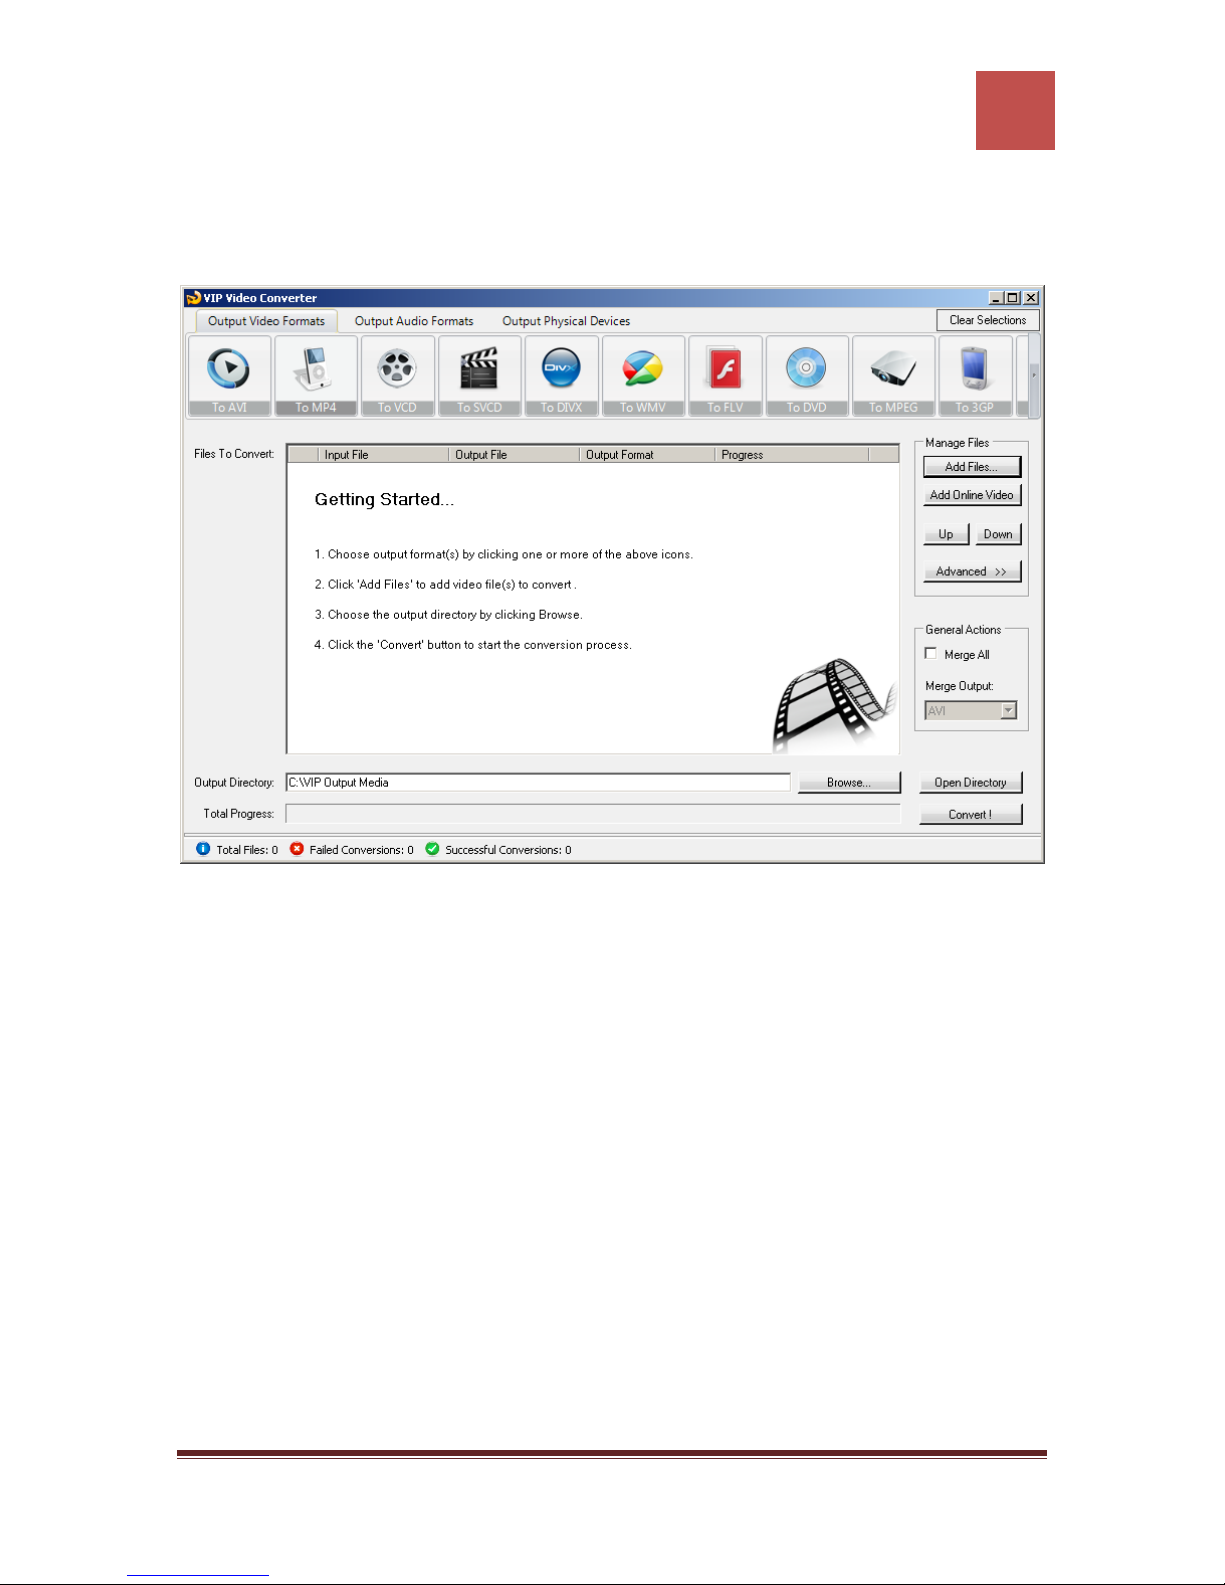
VIP Video Converter User Guide
82
Converting To ASF Format
In order to convert your video file to ASF video format, follow these steps:
1. Press the “To ASF” button at the top formats menu. If there is a choice of a
specific format, please choose one (in example, ASF or ASF HD). The output
format you’ve chosen should be now marked in yellow.
2. Click the “Add Files” button at the right pane, and choose file(s) for conversion.
3. At the bottom right, click the “Browse…” button to choose the output directory.
This will be the directory where the converted files will be written to.
4. If you wish to set custom (advanced) settings, click the “Advanced >>” button to
open the right advanced properties pane.
VIP Video Converter http://www.vip-video-converter.com
Page 84
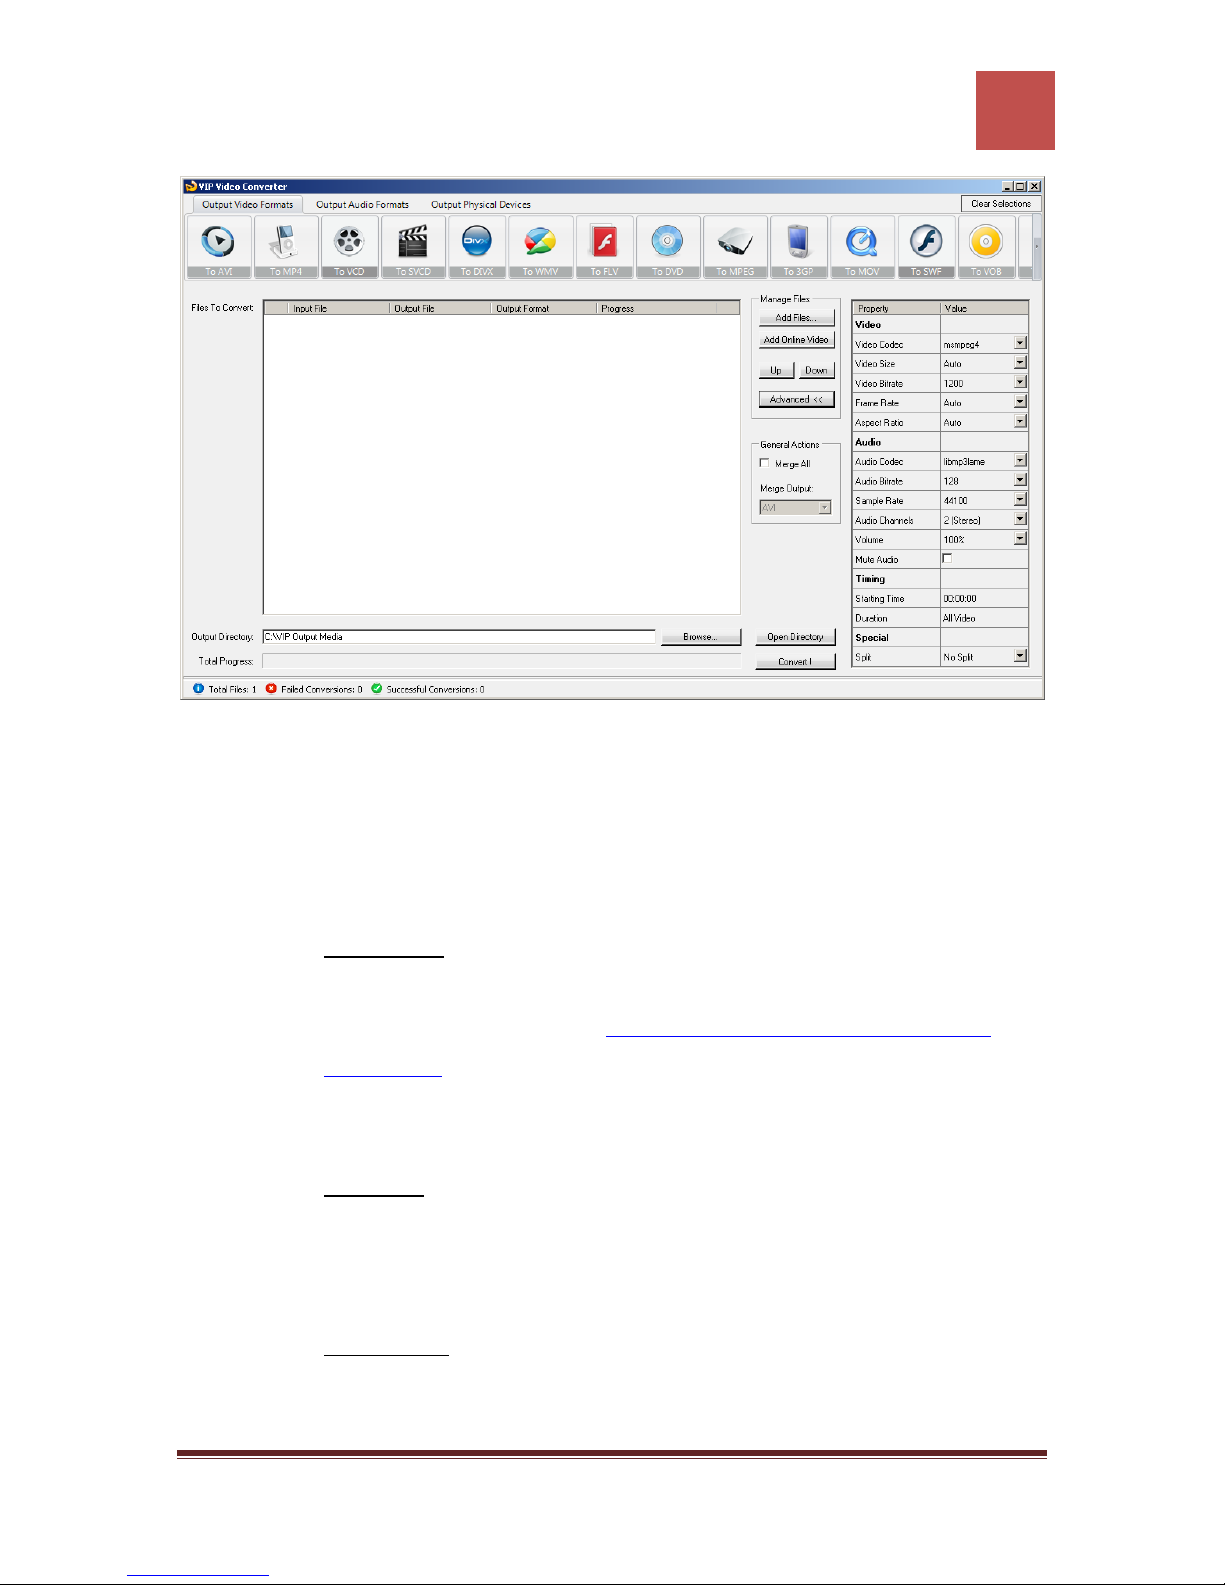
VIP Video Converter User Guide
83
In the right advanced properties pane you can modify some of the following properties,
which will affect the conversion process:
Video Properties
o Video Codec – The video codec which will be used to convert the video
file. You can choose from variety of codecs which are supported for your
chosen output video format. More information about video codecs at
Wikipedia …
In case you aren’t sure which codec to use, you can choose the “Auto”
option.
o Video Size – You can specify a custom size for the output video file (width
and height). You can choose the “Auto” option if you do not know which
video size you wish to get, or if you would like VIP Video Converter to try
and output the video file at the same size as the original video file.
o Video Bitrate – The higher the bit rate will be, the higher the video quality
will be at the result video file. Increasing it will also result in an increased
file size and higher conversion time.
VIP Video Converter http://www.vip-video-converter.com
Page 85

VIP Video Converter User Guide
84
o Frame Rate – Frames which will be shown per second. Increasing it will
also result in an increased file size and higher conversion time.
o Aspect Ratio – The ratio between width and height. Common values are
16:9 or 4:3. The “Auto” option can be selected when the original aspect
ratio is to be kept.
Audio Properties
o Audio Codec - – The audio codec which will be used to convert the audio
layer of the video file. You can choose from variety of codecs which are
supported for your chosen output format. More information about audio
codecs at Wikipedia.
In case you aren’t sure which codec to use, you can choose the “Auto”
option.
o Audio Bitrate - The higher the bit rate will be, the higher the audio quality
will be at the result video file. Increasing it will also result in an increased
o Sample Rate – Amount of samples used to create an audio signal.
o Audio Channels – The number of audio channels used for the audio layer.
o Volume – Set the percentage of the audio volume which will be available
o Mute Audio – This option allows you to mute the audio in the converted
Timing
o Starting Time – This option allows you to start the conversion at a
o Duration – This option allows you to specify a specific duration from the
file size and higher conversion time.
Increasing it will also result in an increased file size and higher conversion
time.
Common values are 1 channel (mono), 2 channels (stereo), or 5.1 (6
channels).
at the converted video file. This is relative to the original video file.
video file.
specific location (time) in the video file, and not from the beginning.
video file which will be converted. This option actually also acts as an end
time, when combined with the “Starting Time” option. In example, you
VIP Video Converter http://www.vip-video-converter.com
Page 86

VIP Video Converter User Guide
85
can specify the “Starting Time” as 00:01:00, and duration as “00:04:00”
to convert 4 minutes, starting from the first minute of the video file.
Special
o Split – This feature allows you to split the video file to equal sized chunks
of video. This is used commonly used to squeeze video files into media
such as floppies, CD, ASF and more.
5. Now, click the “Convert !” button to start the conversion.
6. While the files are converted, you can preview the output video file by clicking
the red icon at the right part of each conversion line.
Once the conversion is done, the converted video files will be at the output directory you
specified at step 3. You can open that directory by clicking the “Open Directory” button
at the bottom pane.
VIP Video Converter http://www.vip-video-converter.com
Page 87
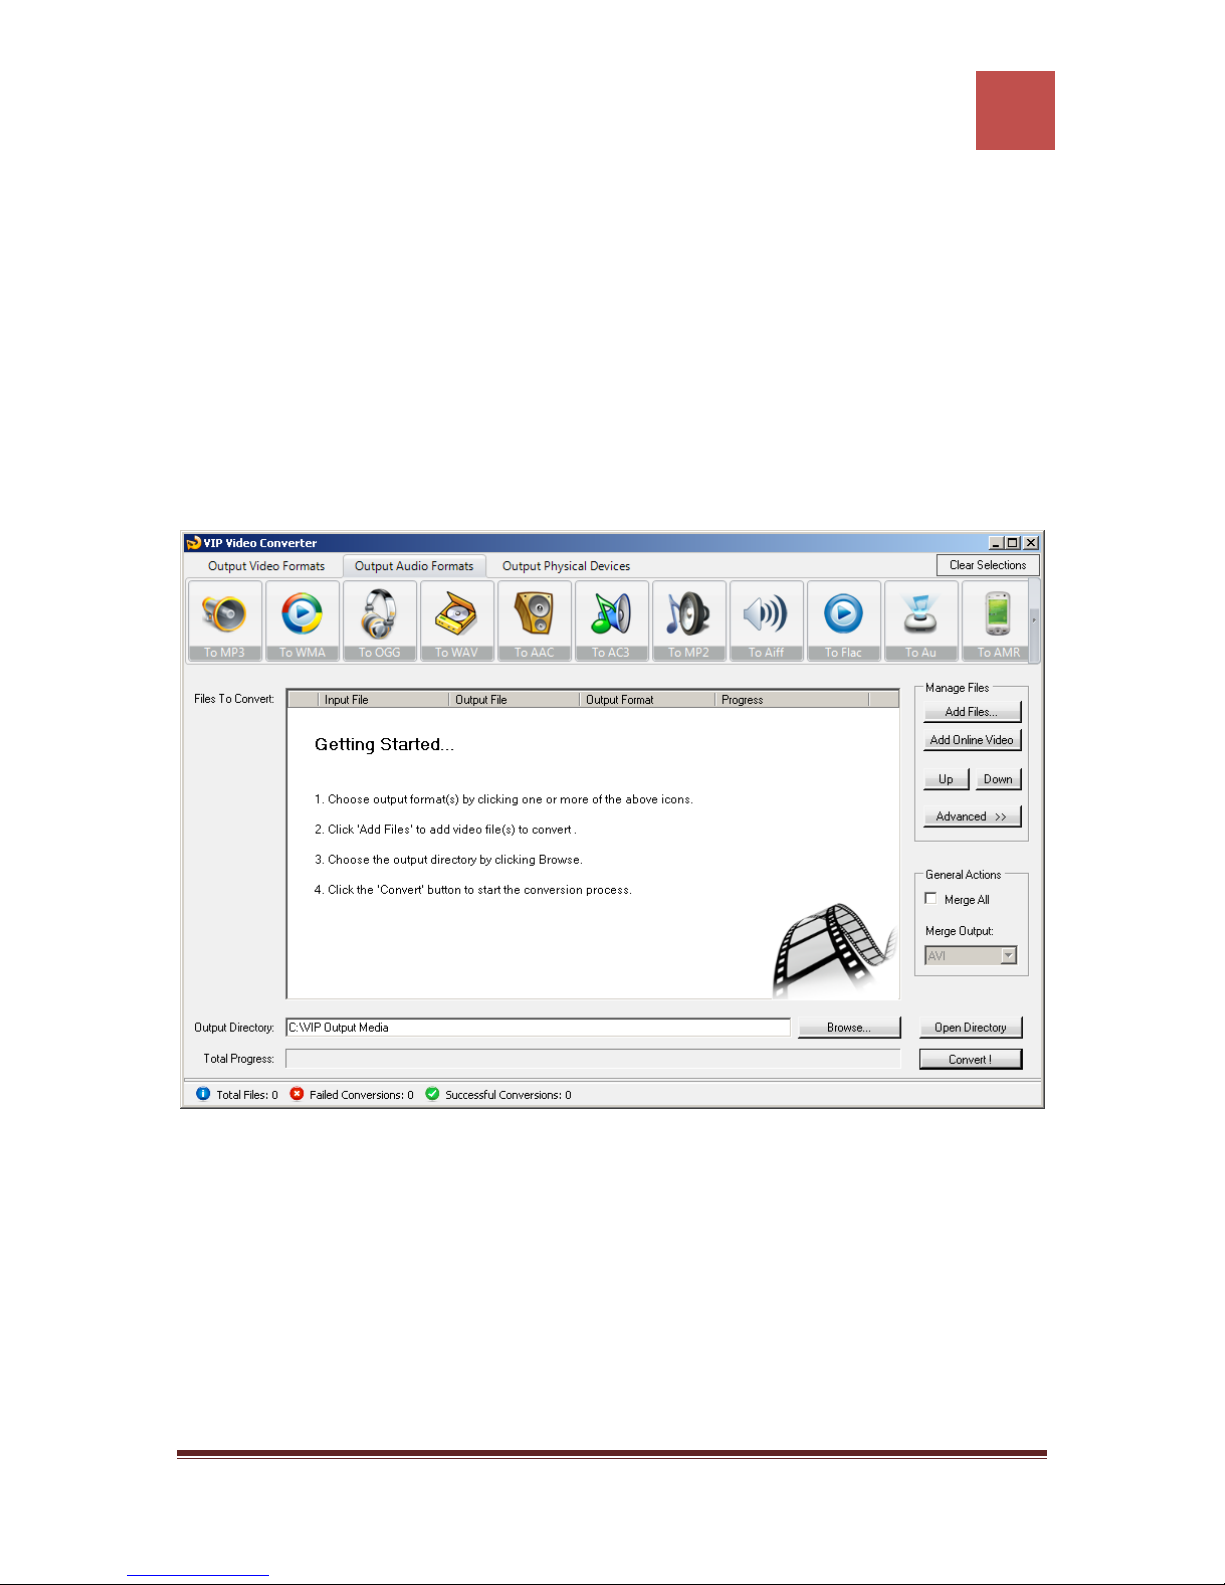
VIP Video Converter User Guide
86
Converting To Audio Formats
Dozens of audio file formats are supported both for input and output in VIP Video
Converter. The supported file formats include: MP3, WMA, OGG, WAV, AAC, AC3, MP2,
AIFF, FLAC, AU, AMR, RA.
Converting To MP3 Format
In order to convert your video file to MP3 video format, follow these steps:
1. Press the “To MP3” button at the top formats menu. If there is a choice of a
specific format, please choose one (in example, MP3 or MP3 HD). The output
format you’ve chosen should be now marked in yellow.
2. Click the “Add Files” button at the right pane, and choose file(s) for conversion.
VIP Video Converter http://www.vip-video-converter.com
Page 88
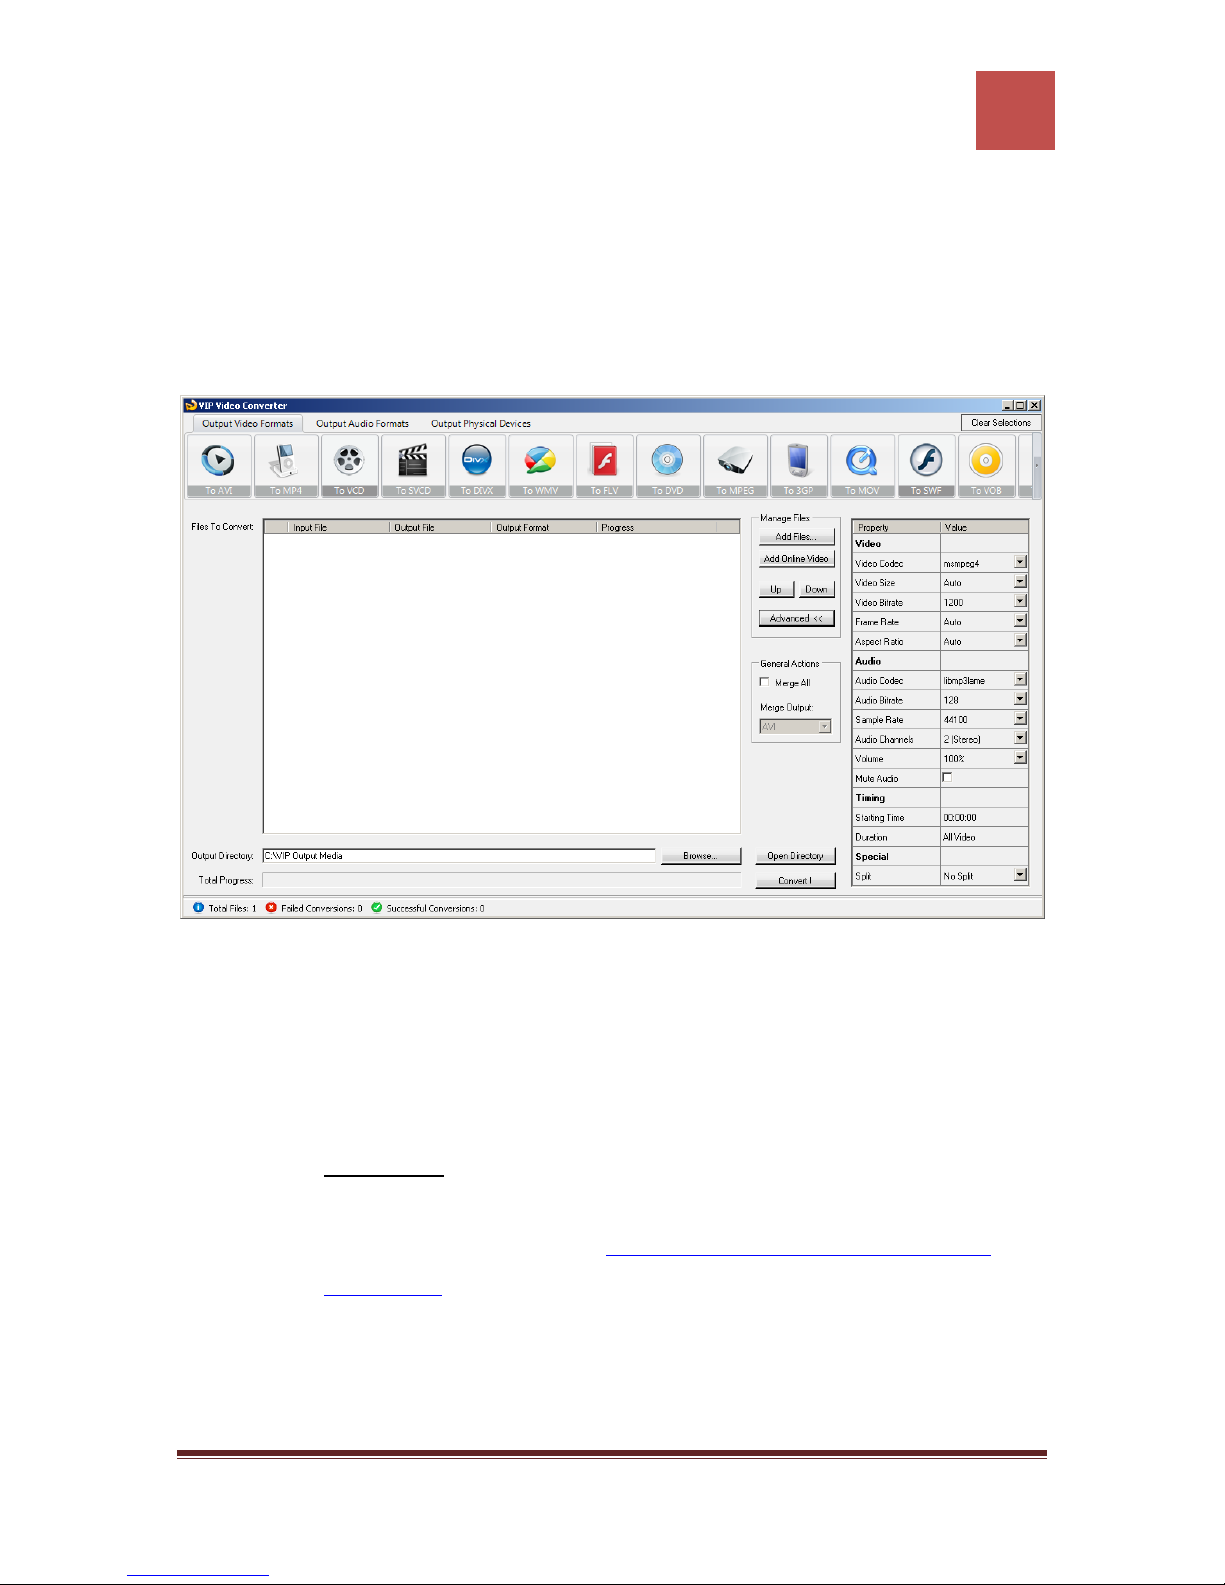
VIP Video Converter User Guide
87
3. At the bottom right, click the “Browse…” button to choose the output directory.
This will be the directory where the converted files will be written to.
4. If you wish to set custom (advanced) settings, click the “Advanced >>” button to
open the right advanced properties pane.
In the right advanced properties pane you can modify some of the following properties,
which will affect the conversion process:
Video Properties
o Video Codec – The video codec which will be used to convert the video
file. You can choose from variety of codecs which are supported for your
chosen output video format. More information about video codecs at
Wikipedia …
In case you aren’t sure which codec to use, you can choose the “Auto”
option.
VIP Video Converter http://www.vip-video-converter.com
Page 89

VIP Video Converter User Guide
88
o Video Size – You can specify a custom size for the output video file (width
and height). You can choose the “Auto” option if you do not know which
video size you wish to get, or if you would like VIP Video Converter to try
and output the video file at the same size as the original video file.
o Video Bitrate – The higher the bit rate will be, the higher the video quality
will be at the result video file. Increasing it will also result in an increased
file size and higher conversion time.
o Frame Rate – Frames which will be shown per second. Increasing it will
also result in an increased file size and higher conversion time.
o Aspect Ratio – The ratio between width and height. Common values are
16:9 or 4:3. The “Auto” option can be selected when the original aspect
ratio is to be kept.
Audio Properties
o Audio Codec - – The audio codec which will be used to convert the audio
layer of the video file. You can choose from variety of codecs which are
supported for your chosen output format. More information about audio
codecs at Wikipedia.
In case you aren’t sure which codec to use, you can choose the “Auto”
option.
o Audio Bitrate - The higher the bit rate will be, the higher the audio quality
will be at the result video file. Increasing it will also result in an increased
file size and higher conversion time.
o Sample Rate – Amount of samples used to create an audio signal.
Increasing it will also result in an increased file size and higher conversion
time.
o Audio Channels – The number of audio channels used for the audio layer.
Common values are 1 channel (mono), 2 channels (stereo), or 5.1 (6
channels).
o Volume – Set the percentage of the audio volume which will be available
at the converted video file. This is relative to the original video file.
o Mute Audio – This option allows you to mute the audio in the converted
video file.
VIP Video Converter http://www.vip-video-converter.com
Page 90

VIP Video Converter User Guide
89
Timing
o Starting Time – This option allows you to start the conversion at a
specific location (time) in the video file, and not from the beginning.
o Duration – This option allows you to specify a specific duration from the
video file which will be converted. This option actually also acts as an end
time, when combined with the “Starting Time” option. In example, you
can specify the “Starting Time” as 00:01:00, and duration as “00:04:00”
to convert 4 minutes, starting from the first minute of the video file.
Special
o Split – This feature allows you to split the video file to equal sized chunks
of video. This is used commonly used to squeeze video files into media
such as floppies, CD, DVD and more.
5. Now, click the “Convert !” button to start the conversion.
6. While the files are converted, you can preview the output video file by clicking
the red icon at the right part of each conversion line.
Once the conversion is done, the converted video files will be at the output directory you
specified at step 3. You can open that directory by clicking the “Open Directory” button
at the bottom pane.
VIP Video Converter http://www.vip-video-converter.com
Page 91
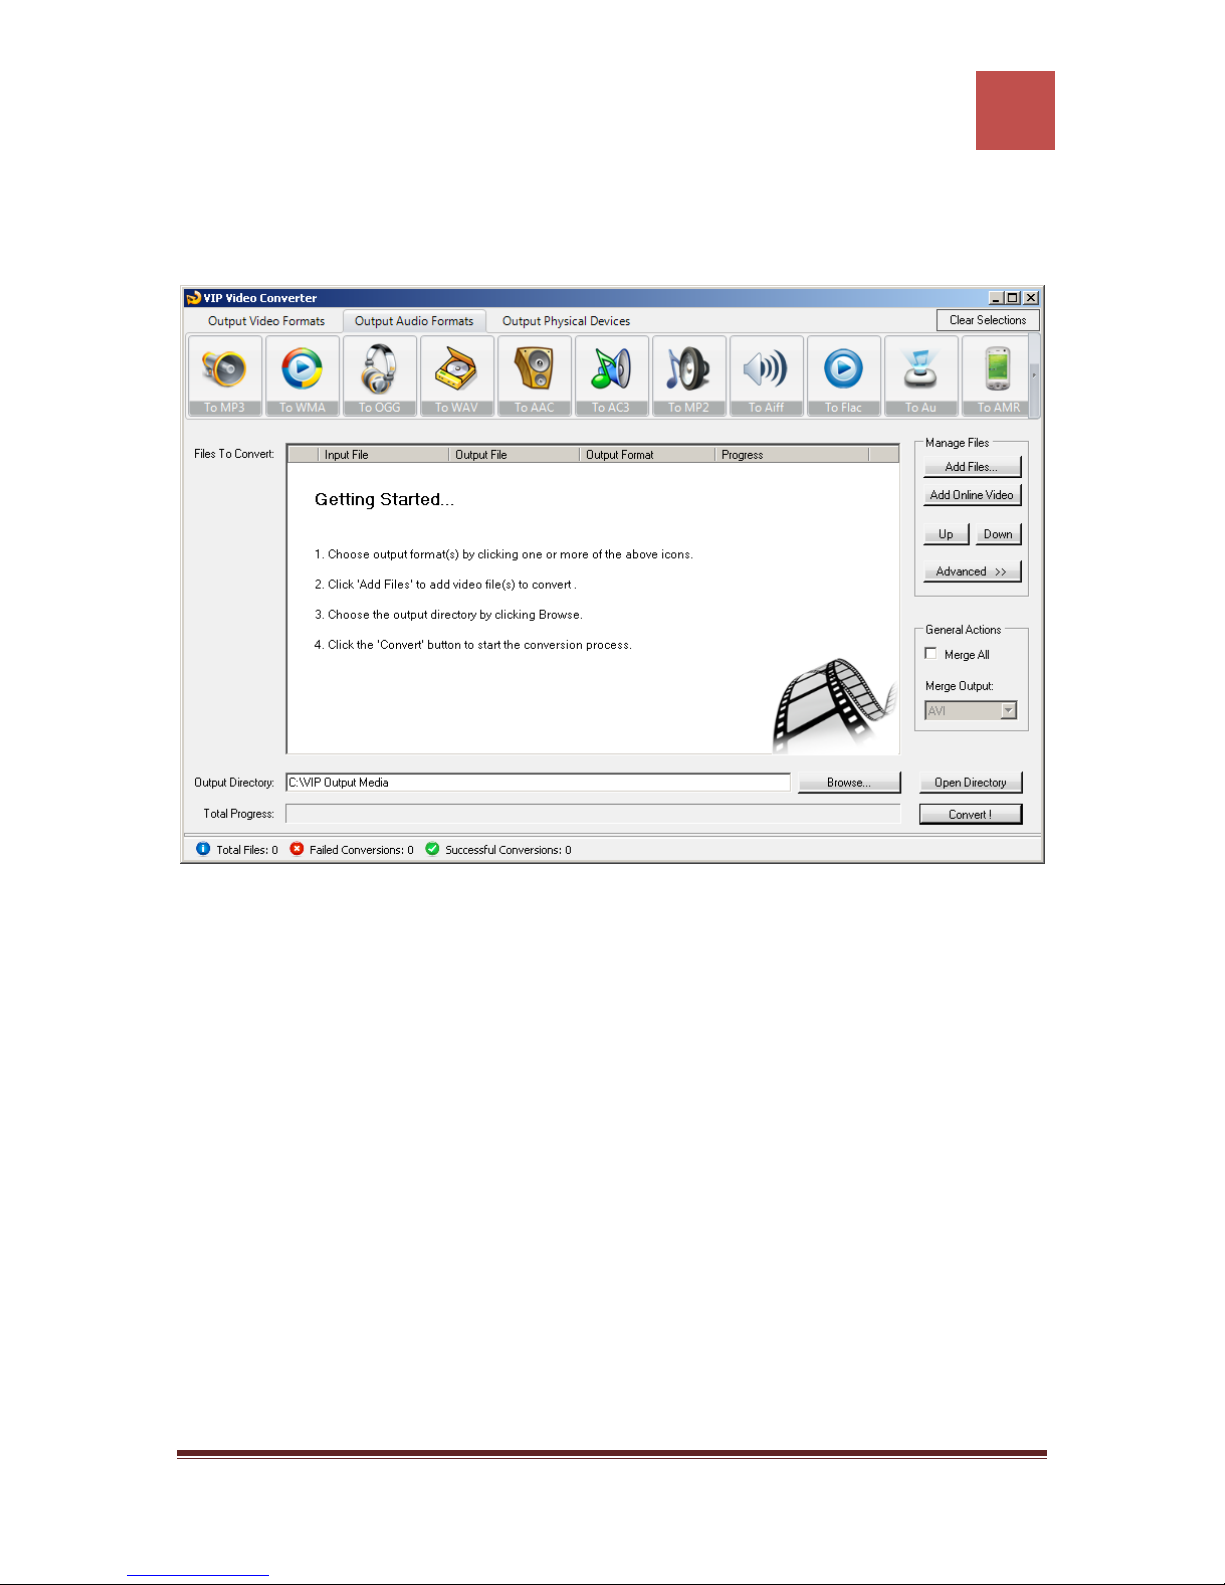
VIP Video Converter User Guide
90
Converting To WMA Format
In order to convert your video file to WMA video format, follow these steps:
1. Press the “To WMA” button at the top formats menu. If there is a choice of a
specific format, please choose one (in example, WMA or WMA HD). The output
format you’ve chosen should be now marked in yellow.
2. Click the “Add Files” button at the right pane, and choose file(s) for conversion.
3. At the bottom right, click the “Browse…” button to choose the output directory.
This will be the directory where the converted files will be written to.
4. If you wish to set custom (advanced) settings, click the “Advanced >>” button to
open the right advanced properties pane.
VIP Video Converter http://www.vip-video-converter.com
Page 92
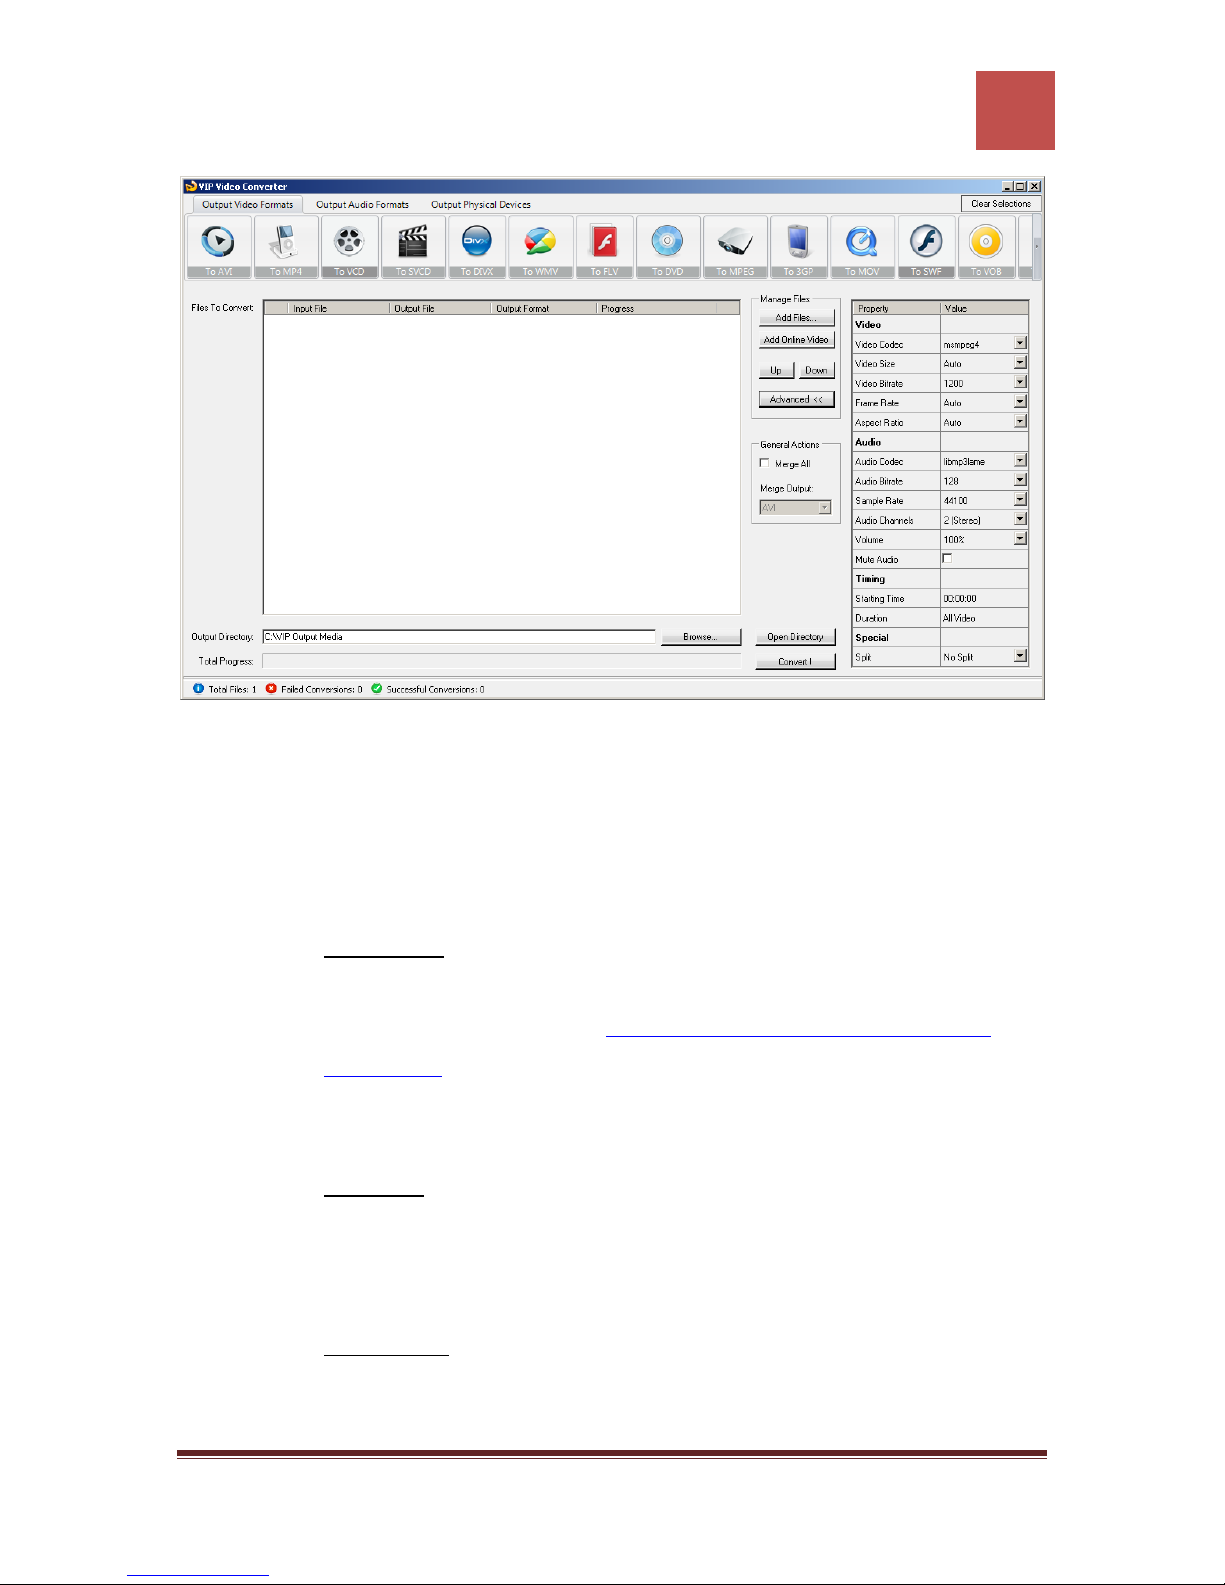
VIP Video Converter User Guide
91
In the right advanced properties pane you can modify some of the following properties,
which will affect the conversion process:
Video Properties
o Video Codec – The video codec which will be used to convert the video
file. You can choose from variety of codecs which are supported for your
chosen output video format. More information about video codecs at
Wikipedia …
In case you aren’t sure which codec to use, you can choose the “Auto”
option.
o Video Size – You can specify a custom size for the output video file (width
and height). You can choose the “Auto” option if you do not know which
video size you wish to get, or if you would like VIP Video Converter to try
and output the video file at the same size as the original video file.
o Video Bitrate – The higher the bit rate will be, the higher the video quality
will be at the result video file. Increasing it will also result in an increased
file size and higher conversion time.
VIP Video Converter http://www.vip-video-converter.com
Page 93

VIP Video Converter User Guide
92
o Frame Rate – Frames which will be shown per second. Increasing it will
also result in an increased file size and higher conversion time.
o Aspect Ratio – The ratio between width and height. Common values are
16:9 or 4:3. The “Auto” option can be selected when the original aspect
ratio is to be kept.
Audio Properties
o Audio Codec - – The audio codec which will be used to convert the audio
layer of the video file. You can choose from variety of codecs which are
supported for your chosen output format. More information about audio
codecs at Wikipedia.
In case you aren’t sure which codec to use, you can choose the “Auto”
option.
o Audio Bitrate - The higher the bit rate will be, the higher the audio quality
will be at the result video file. Increasing it will also result in an increased
o Sample Rate – Amount of samples used to create an audio signal.
o Audio Channels – The number of audio channels used for the audio layer.
o Volume – Set the percentage of the audio volume which will be available
o Mute Audio – This option allows you to mute the audio in the converted
Timing
o Starting Time – This option allows you to start the conversion at a
o Duration – This option allows you to specify a specific duration from the
file size and higher conversion time.
Increasing it will also result in an increased file size and higher conversion
time.
Common values are 1 channel (mono), 2 channels (stereo), or 5.1 (6
channels).
at the converted video file. This is relative to the original video file.
video file.
specific location (time) in the video file, and not from the beginning.
video file which will be converted. This option actually also acts as an end
time, when combined with the “Starting Time” option. In example, you
VIP Video Converter http://www.vip-video-converter.com
Page 94

VIP Video Converter User Guide
93
can specify the “Starting Time” as 00:01:00, and duration as “00:04:00”
to convert 4 minutes, starting from the first minute of the video file.
Special
o Split – This feature allows you to split the video file to equal sized chunks
of video. This is used commonly used to squeeze video files into media
such as floppies, CD, DVD and more.
5. Now, click the “Convert !” button to start the conversion.
6. While the files are converted, you can preview the output video file by clicking
the red icon at the right part of each conversion line.
Once the conversion is done, the converted video files will be at the output directory you
specified at step 3. You can open that directory by clicking the “Open Directory” button
at the bottom pane.
VIP Video Converter http://www.vip-video-converter.com
Page 95
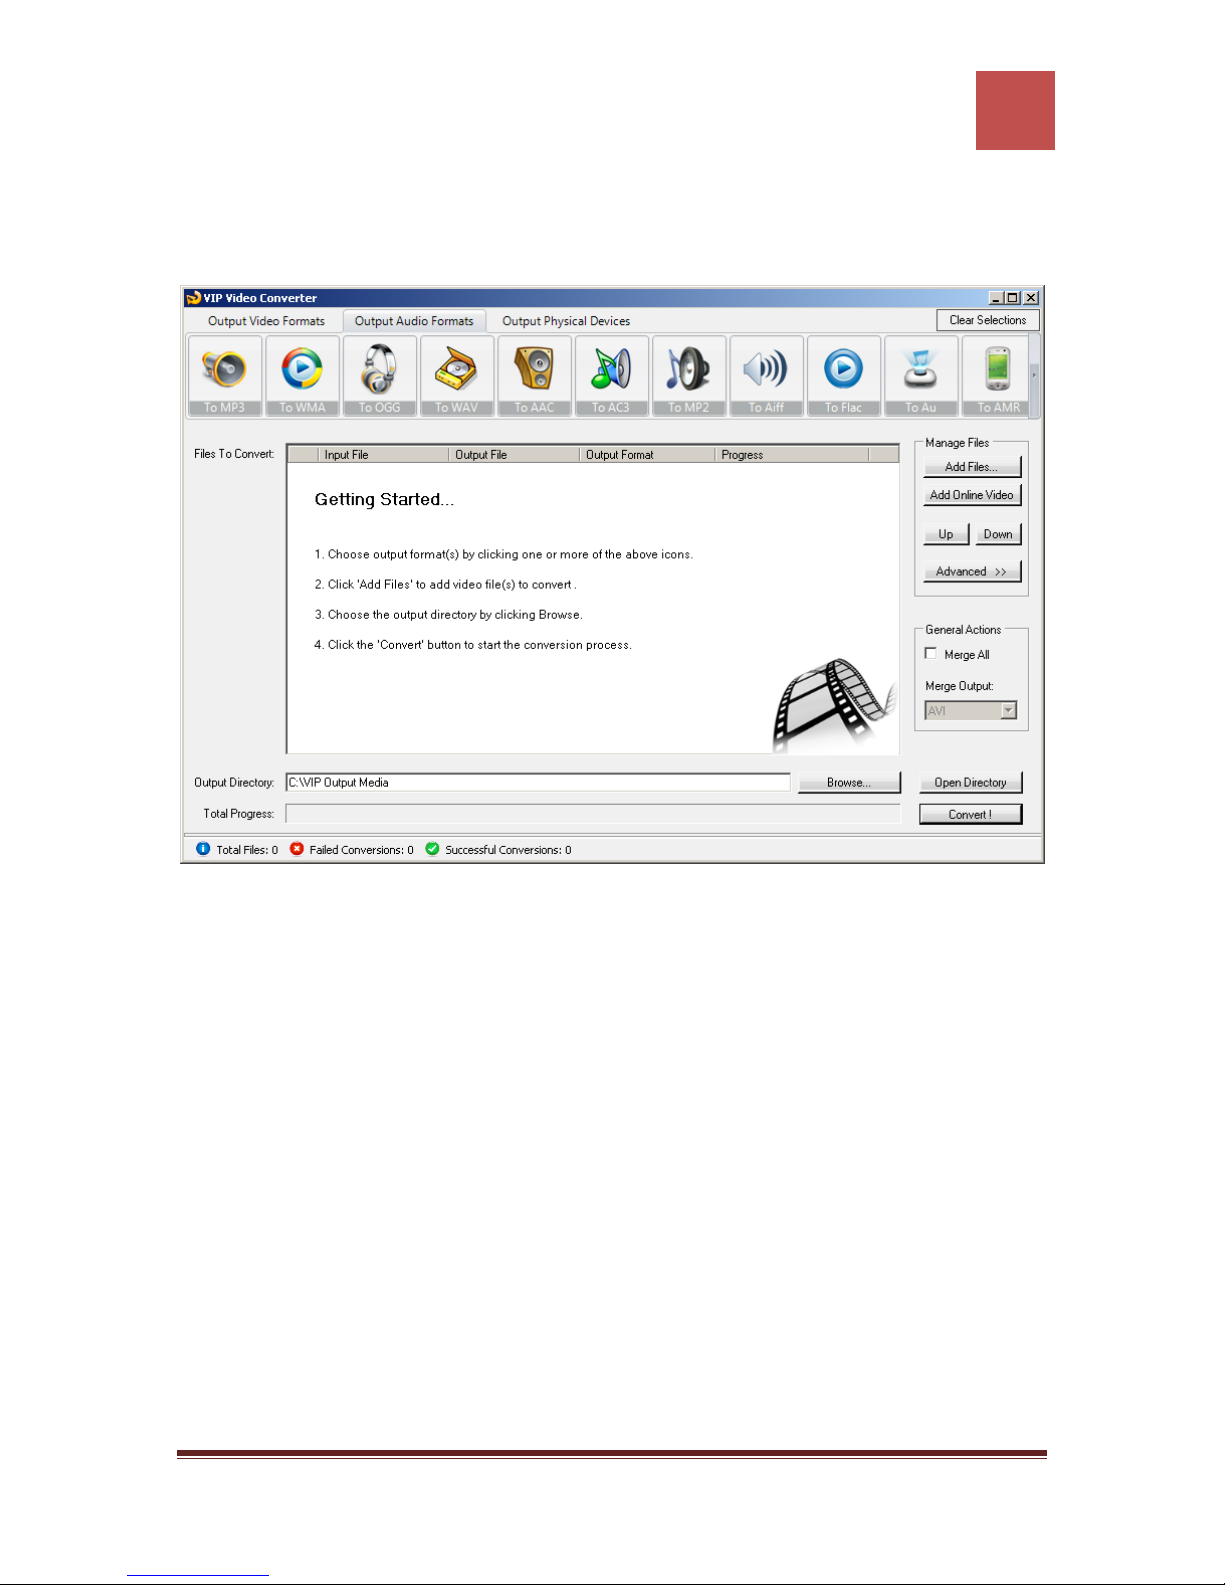
VIP Video Converter User Guide
94
Converting To OGG Format
In order to convert your video file to OGG video format, follow these steps:
1. Press the “To OGG” button at the top formats menu. If there is a choice of a
specific format, please choose one (in example, OGG or OGG HD). The output
format you’ve chosen should be now marked in yellow.
2. Click the “Add Files” button at the right pane, and choose file(s) for conversion.
3. At the bottom right, click the “Browse…” button to choose the output directory.
This will be the directory where the converted files will be written to.
4. If you wish to set custom (advanced) settings, click the “Advanced >>” button to
open the right advanced properties pane.
VIP Video Converter http://www.vip-video-converter.com
Page 96
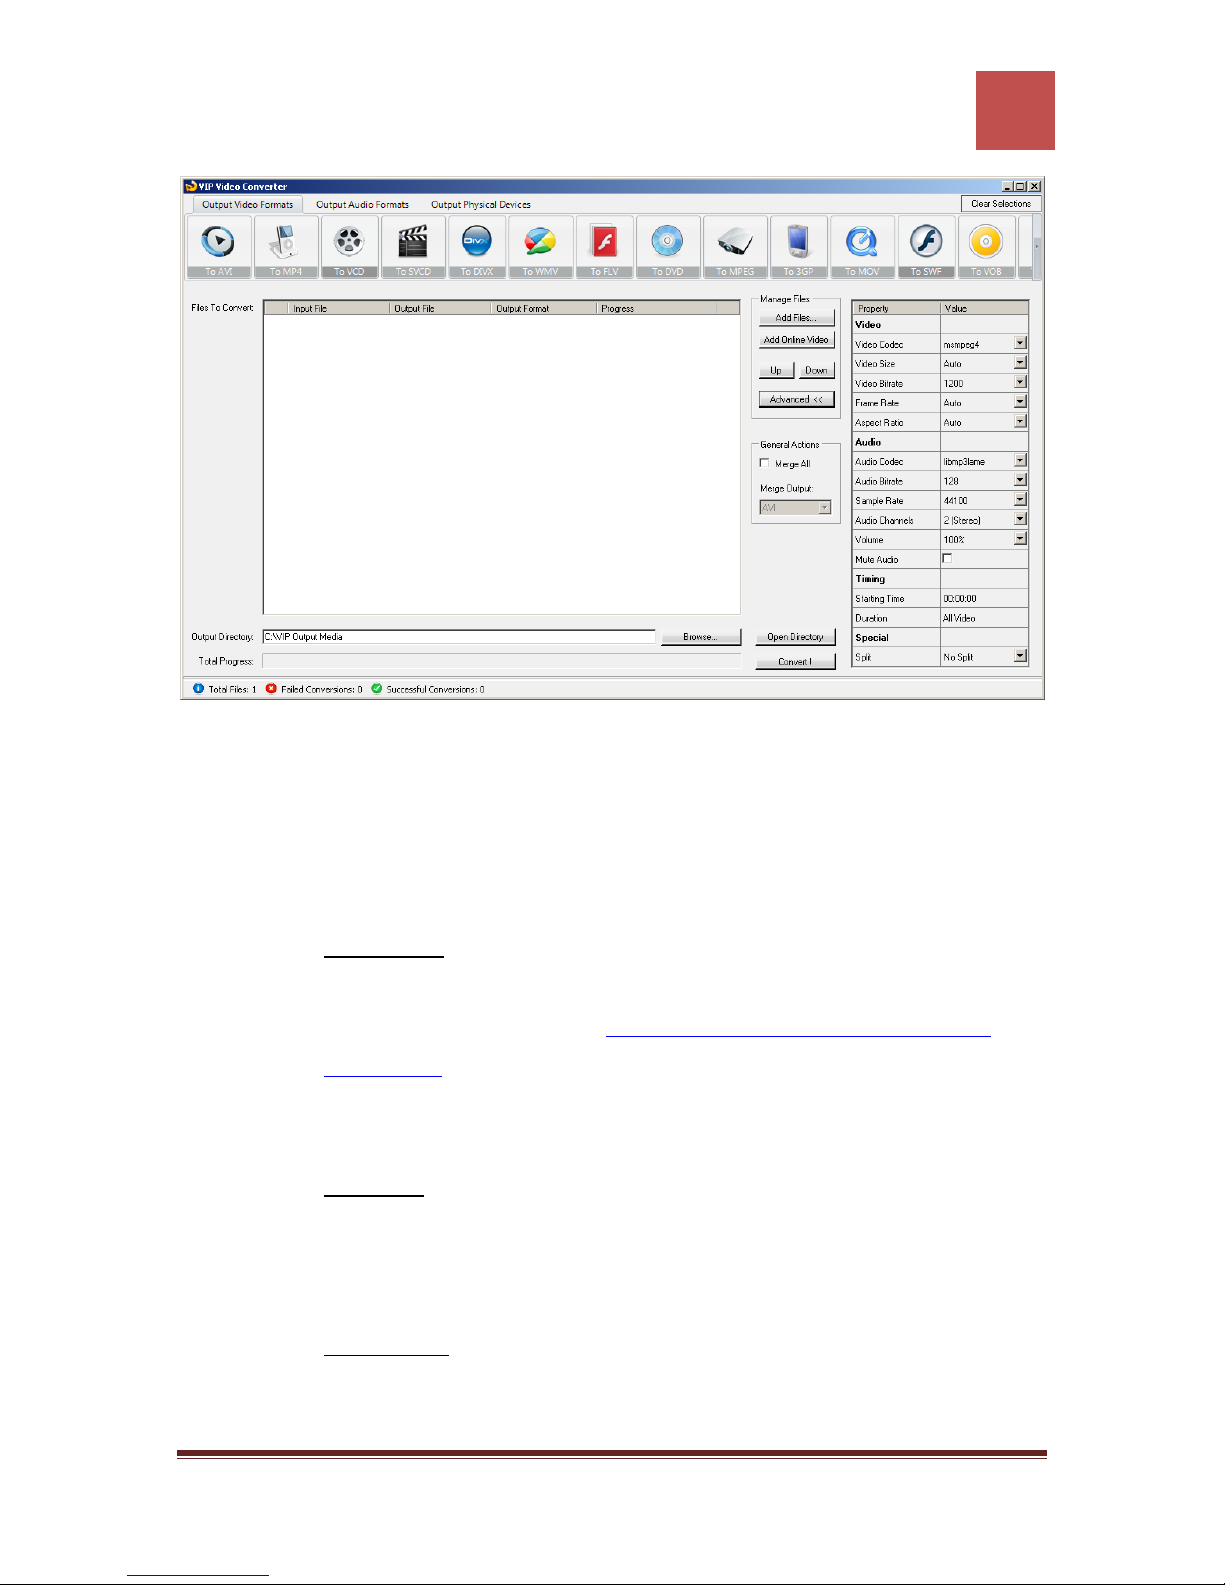
VIP Video Converter User Guide
95
In the right advanced properties pane you can modify some of the following properties,
which will affect the conversion process:
Video Properties
o Video Codec – The video codec which will be used to convert the video
file. You can choose from variety of codecs which are supported for your
chosen output video format. More information about video codecs at
Wikipedia …
In case you aren’t sure which codec to use, you can choose the “Auto”
option.
o Video Size – You can specify a custom size for the output video file (width
and height). You can choose the “Auto” option if you do not know which
video size you wish to get, or if you would like VIP Video Converter to try
and output the video file at the same size as the original video file.
o Video Bitrate – The higher the bit rate will be, the higher the video quality
will be at the result video file. Increasing it will also result in an increased
file size and higher conversion time.
VIP Video Converter http://www.vip-video-converter.com
Page 97

VIP Video Converter User Guide
96
o Frame Rate – Frames which will be shown per second. Increasing it will
also result in an increased file size and higher conversion time.
o Aspect Ratio – The ratio between width and height. Common values are
16:9 or 4:3. The “Auto” option can be selected when the original aspect
ratio is to be kept.
Audio Properties
o Audio Codec - – The audio codec which will be used to convert the audio
layer of the video file. You can choose from variety of codecs which are
supported for your chosen output format. More information about audio
codecs at Wikipedia.
In case you aren’t sure which codec to use, you can choose the “Auto”
option.
o Audio Bitrate - The higher the bit rate will be, the higher the audio quality
will be at the result video file. Increasing it will also result in an increased
o Sample Rate – Amount of samples used to create an audio signal.
o Audio Channels – The number of audio channels used for the audio layer.
o Volume – Set the percentage of the audio volume which will be available
o Mute Audio – This option allows you to mute the audio in the converted
Timing
o Starting Time – This option allows you to start the conversion at a
o Duration – This option allows you to specify a specific duration from the
file size and higher conversion time.
Increasing it will also result in an increased file size and higher conversion
time.
Common values are 1 channel (mono), 2 channels (stereo), or 5.1 (6
channels).
at the converted video file. This is relative to the original video file.
video file.
specific location (time) in the video file, and not from the beginning.
video file which will be converted. This option actually also acts as an end
time, when combined with the “Starting Time” option. In example, you
VIP Video Converter http://www.vip-video-converter.com
Page 98

VIP Video Converter User Guide
97
can specify the “Starting Time” as 00:01:00, and duration as “00:04:00”
to convert 4 minutes, starting from the first minute of the video file.
Special
o Split – This feature allows you to split the video file to equal sized chunks
of video. This is used commonly used to squeeze video files into media
such as floppies, CD, DVD and more.
5. Now, click the “Convert !” button to start the conversion.
6. While the files are converted, you can preview the output video file by clicking
the red icon at the right part of each conversion line.
Once the conversion is done, the converted video files will be at the output directory you
specified at step 3. You can open that directory by clicking the “Open Directory” button
at the bottom pane.
VIP Video Converter http://www.vip-video-converter.com
Page 99
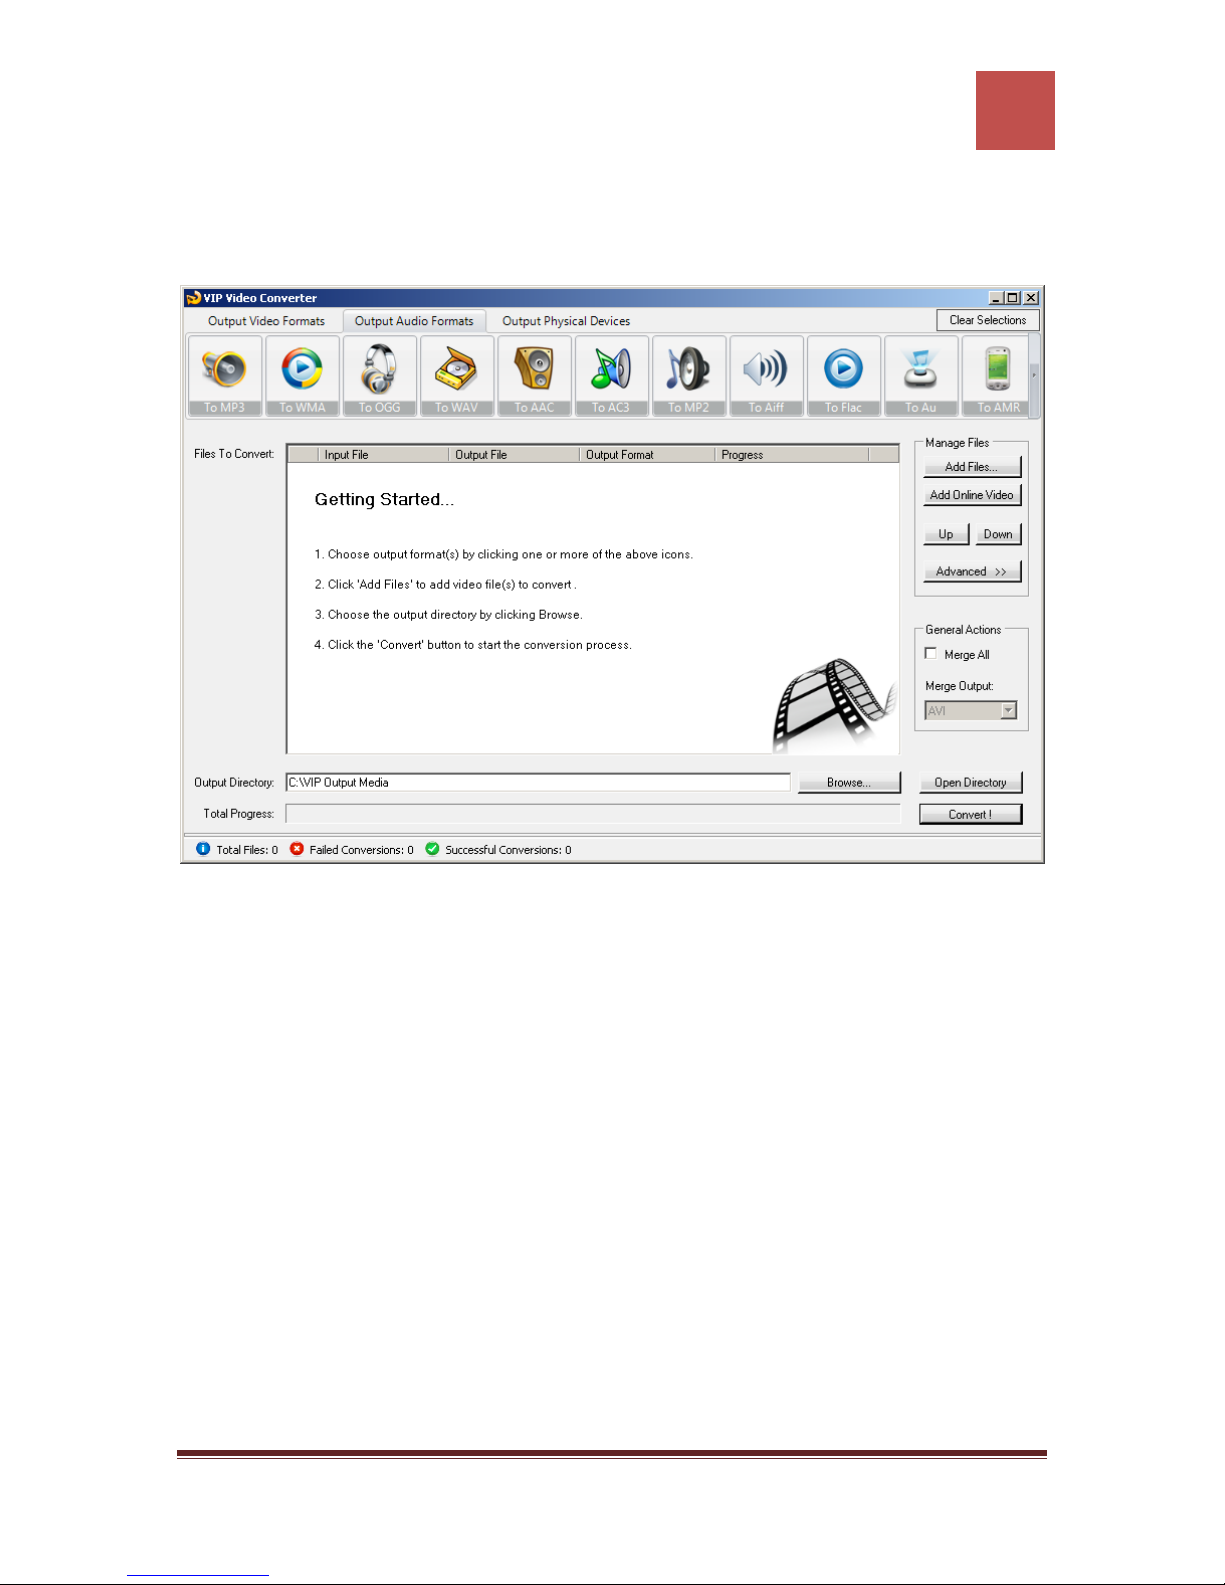
VIP Video Converter User Guide
98
Converting To WAV Format
In order to convert your video file to WAV video format, follow these steps:
1. Press the “To WAV” button at the top formats menu. If there is a choice of a
specific format, please choose one (in example, WAV or WAV HD). The output
format you’ve chosen should be now marked in yellow.
2. Click the “Add Files” button at the right pane, and choose file(s) for conversion.
3. At the bottom right, click the “Browse…” button to choose the output directory.
This will be the directory where the converted files will be written to.
4. If you wish to set custom (advanced) settings, click the “Advanced >>” button to
open the right advanced properties pane.
VIP Video Converter http://www.vip-video-converter.com
Page 100
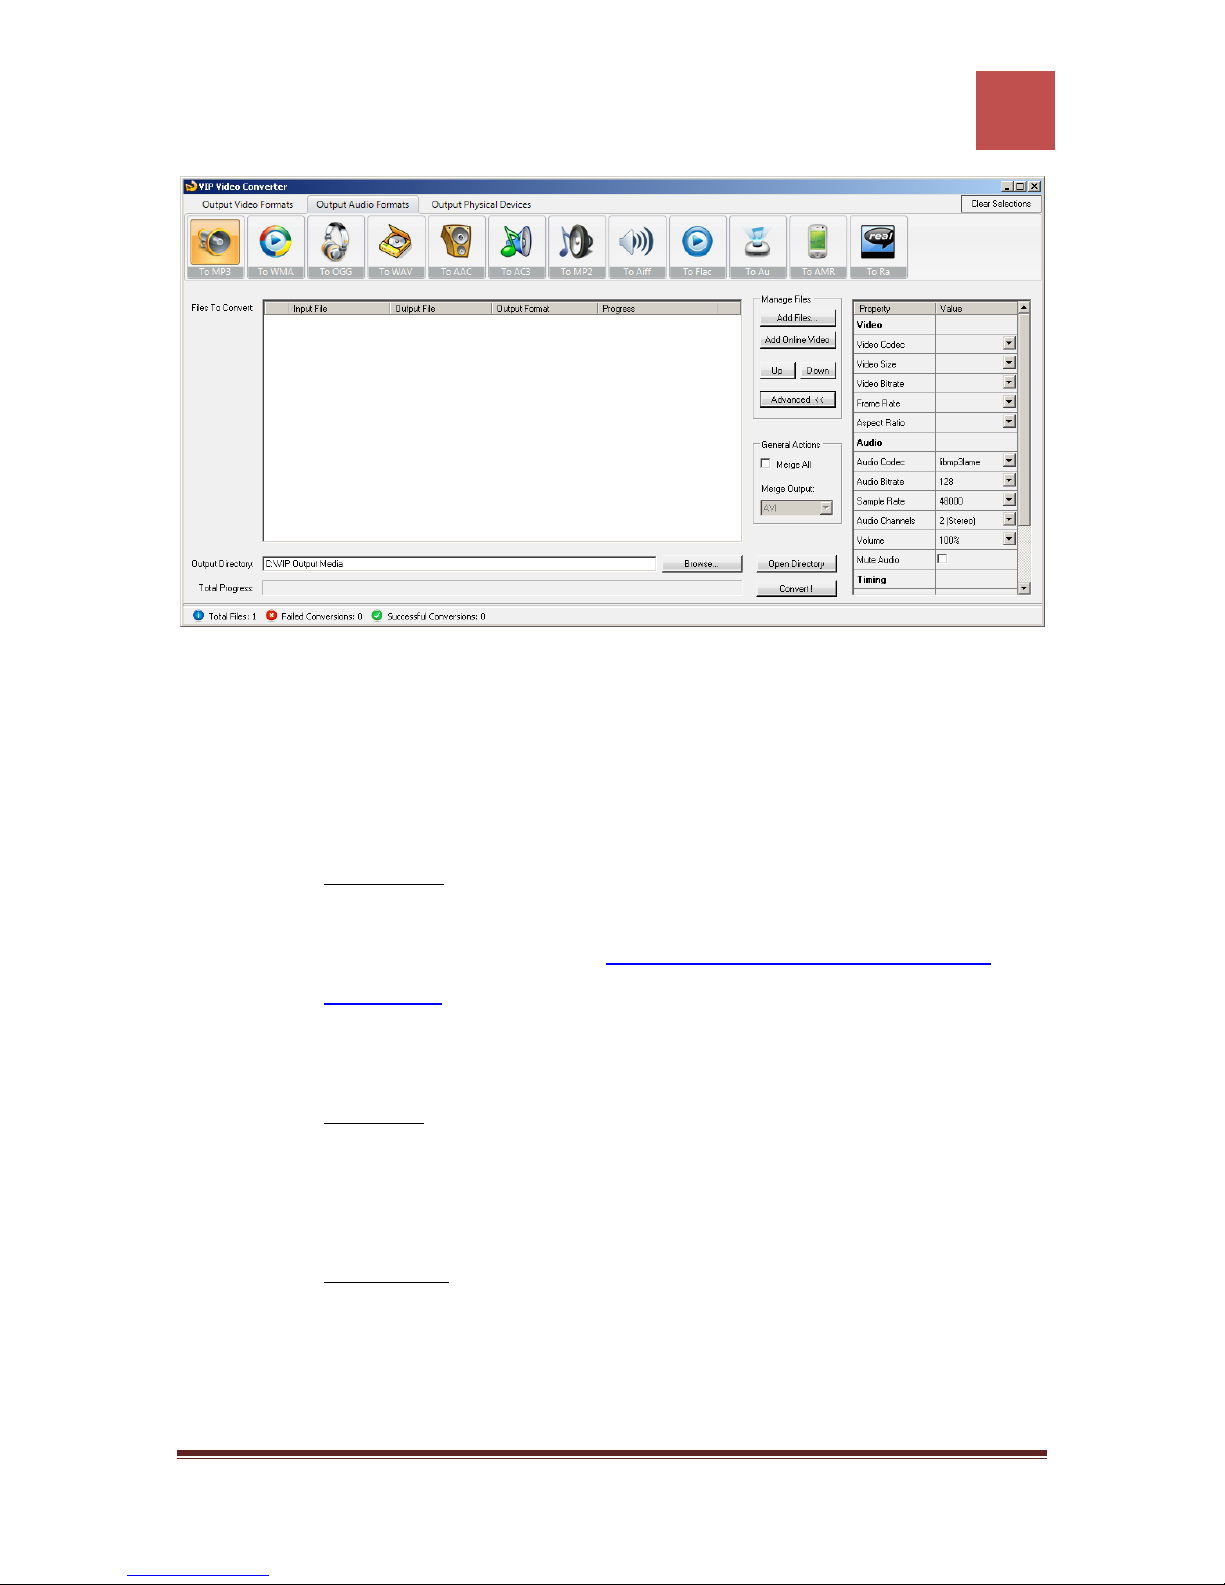
VIP Video Converter User Guide
99
In the right advanced properties pane you can modify some of the following properties,
which will affect the conversion process:
Video Properties
o Video Codec – The video codec which will be used to convert the video
file. You can choose from variety of codecs which are supported for your
chosen output video format. More information about video codecs at
Wikipedia …
In case you aren’t sure which codec to use, you can choose the “Auto”
option.
o Video Size – You can specify a custom size for the output video file (width
and height). You can choose the “Auto” option if you do not know which
video size you wish to get, or if you would like VIP Video Converter to try
and output the video file at the same size as the original video file.
o Video Bitrate – The higher the bit rate will be, the higher the video quality
will be at the result video file. Increasing it will also result in an increased
file size and higher conversion time.
VIP Video Converter http://www.vip-video-converter.com
 Loading...