


Officebox Call&Fax
Users’ manual

Table of Contents
Welcome to the world of Officebox Call&Fax device 3
Setting up and installation 4
Contents of the box 4
LED indicators 5
Backside and how to connect telecommunication equipment 6
SIM card 7
PIN code entering 7
PUK code entering 8
Wall-mounting 8
Telephone and fax 9
Voice calls 9
To make a voice call 9
To take a voice call 9
Call on hold 9
Caller Line Identity Presentation (CLIP) 10
Fax 10
Receiving a test fax message 11
In case of fax alert 11
Additional configuration 12
Selecting the port for incoming telephone calls 12
Report on successful fax transmission 12
Calling line identification restriction (CLIR) 12
Important safety information 13
General use recommendations 13
Specifications 14
2

Welcome to the world of Officebox
Call&Fax device
Congratulations on buying Officebox Call&Fax. This device is a practical solution for your office telephone line, and it
provides the possibility of use of both speaking and fax functions.
The following units can be connected to this device:
- one or more analogue telephone devices for making voice calls
- analogue fax machine.
The Officebox Call&Fax device uses GSM network to communicate to a distant party. The devices connected thereto
function almost as if they were connected to the fixed telephone network. There are minor differences.
More information on these differences and the way Officebox Call&Fax is put into operation is presented in this guide.
This guide also provides basic instructions for use of the Officebox Call&Fax device.
For all further information please visit www.vipnet.hr or call Customer support at 091 77 22.
It is good to know:
When buying the Officebox Call&Fax device, each customer has the right to return it and terminate the subscription
contract within 5 working days from the purchase made, in case of dissatisfaction with the service or coverage of the
area in which the device is to be used.
3
Setting up and installation
Before using this device, make sure to carefully read and follow the enclosed instructions. This device is for indoor use
only.
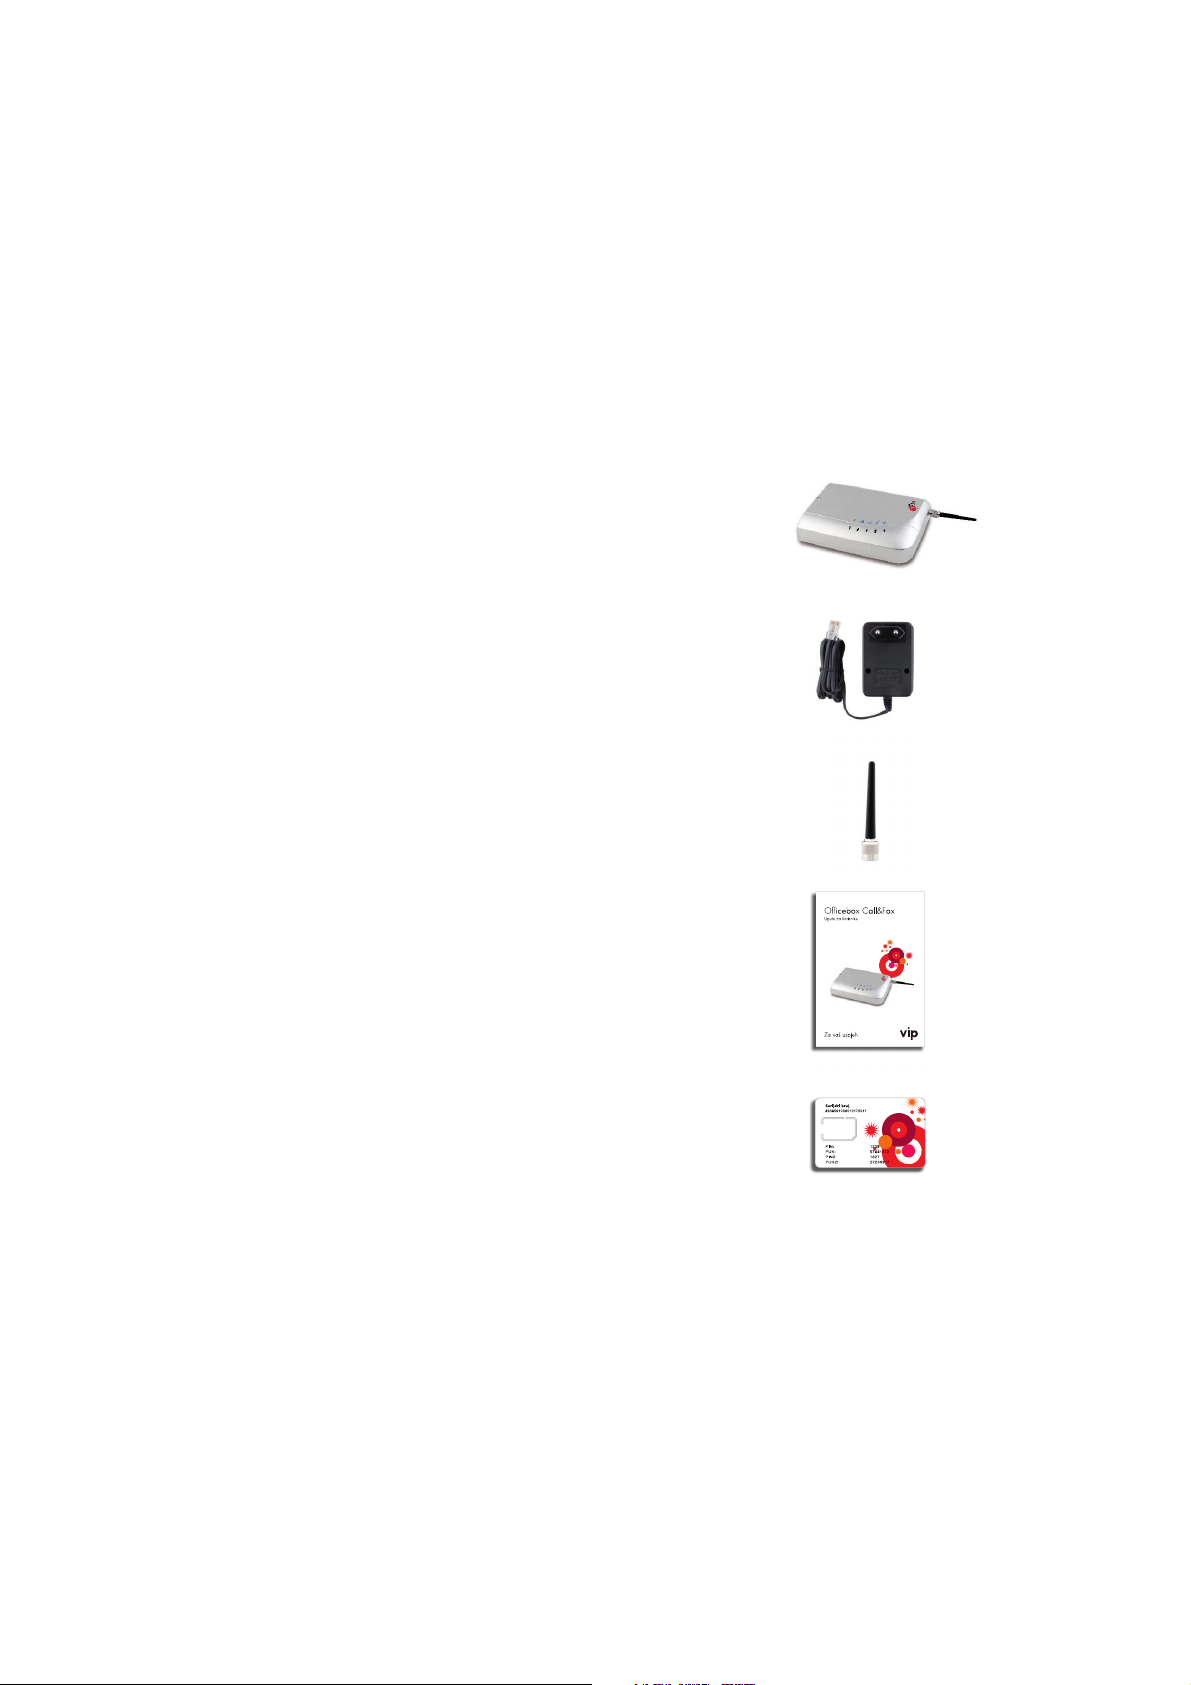
Contents of the box
Officebox Call&Fax device
Network adapter for connecting your device to power mains
Antenna for Officebox Call&Fax
Instructions for use
Plastic card with PIN and PUK codes
4

LED indicators
When the Officebox Call&Fax device is on, the LED indicators signal different functions.
Voice and fax
signal strength
Voice and fax
signal strength
Fax Fast flashing Check the connected fax machine
Fax/Voice
Slow flashing light on
Fast flashing
Rhythmical flashing
Slow flashing
Light on
Light off
Light on
Fast flashing
Network search
High quality of signal
PIN is not entered
Enter puk code
Network search or low quality of signal
Medium or high quality of signal
No signal
Telephone/fax handset off base
Check the connected fax machine
Voltage
Light off
Light red
Light green
No supply/device off
Supply by battery installed/device on
Network supply/device on
5

Backside and how to connect telecommunication equipment
To put Officebox Call&Fax into operation it is required to connect at least:
- electrical power supply
- one analogue telephone device so that PIN code can be entered.
Supply
Supply
RS232
Telephone port
RS232 USB Telephone
Insert network adapter here, then plug in the adapter to the
grounded socket.
Use only the network adapter delivered with the device.
Serial RS-232 interface for special maintenance.
USB
USB interface for special maintenance.
Plug in the analogue phone into the telephone port.
Fax
Fax/telephone
port
6
Plug in analogue fax machine, combined fax machine or analogue
phone to Fax/telephone port.

- The total number of telephone and telecommunication equipment connected to this device should not exceed REN 5
(Ringer Equivalent Number).
Standard analogue telephone has REN 1.
Analogue telephone can be connected either to Telephone port or Fax/telephone port. Each port can receive up to five
devices, but in total not more than five devices are allowed to be connected to this device. Calls can be made or taken
on any telephone device.
- Telecommunication equipment connected to one port of this device switches over in parallel. For example, when two
telephones are plugged into a Telephone port, in case of an incoming call, both telephones start ringing, and you can
answer any of them.
- For safety reasons telephone cables are to be placed indoors, and are not to be taken outdoors. This device and a
classical telephone or fax machine can be at a max. distance of 300 m with 0,4 mm cable thickness, provided that the
total loop impendence, with the phone included, equals maximum of 500 Ù.
- If the network adapter is plugged off, the device turns off. The network adapter is to be plugged into the device even if
the device operates on the battery installed (in case of power outage).
SIM card
PIN code entering
PIN code is to be entered before the device is used.
Your PIN and PUK codes are given on a plastic card inside the Officebox Call&Fax package.
For PIN code entering use a telephone device connected to Telephone port or Fax/telephone port.
Enter PIN code as if dialing a telephone number.
When you lift the handset, you will hear a short beep tone, which signals that the device requires the PIN code to be
entered. Enter PIN code as shown below and replace the handset.
For PIN code entering, please enter:
The symbols above have the following meaning:
Here enter your PIN code.
For PIN code entering use numerical combinations from 0000 to 9999.
Listen for confirmation tone. High beep signal tones indicate the right PIN code entering.
Low frequency beep-beep signals indicate incorrect PIN code entering.
3 seconds will elapse before you hear the confirmation tone.
Lift the handset.
Replace the handset.
In case of incorrect PIN code, LED
indicator will be flashing fast. In case you fail to enter the correct PIN code three times in succession, the SIM card will
get blocked. The SIM card in unblocked by PUK code entering.
7

PUK code entering
In case you enter the incorrect PIN code three times in a row, LED indicator will be flashing rhythmically.
In this case you need to enter PUK code. It will unblock the SIM card. Enter PUK code as shown below and than replace
the handset. For PUK code entering, please enter:
The symbols above have the following meaning:
Enter your PUK code here.
Enter your new PIN code here.
For PIN code entering use numerical combinations from 0000 to 9999.
Wall-mounting
This device is to operate in vertical position, with antenna directed upwards.
This position ensures the best quality of signal.
This device is to be wall-mounted to ensure the best quality of transmission. It can be attached to a
wall by screws.
Prior to wall-mounting, plug off all cables. Especially make sure that the supply cable is plugged off.
8

Telephone and fax
Voice calls
To make a voice call
Lift the handset and dial the telephone number you wish to call.
Your will hear:
- dial tone before dialing the telephone number*
- ringing tone
- or line busy tone (if the telephone of the person your are calling is busy or connection cannot be made)
- if the connection has already been made (fax or another voice connection) and you are trying to make a call, you will
hear line busy signal because another device is currently using the only “cordless“ line.
Replace the handset to end the call.
, dial the telephone number... talk...
* Free dial signal in Officebox Call&Fax differs from the usual fixed telephone line signal by being a flat tone.
To take a voice call
An incoming call is signalled by ringing sound of the telephones connected to the Telephone port or Fax/telephone port.
Lift the handset and talk.
- This device is set in a way that you cannot take two calls at the same time. If another call is attempted during active
connection (fax or voice call), such incoming call will not be signalled to you, and the person attempting the call will
hear line busy tone for the only “cordless“ line is currently used by another device.
...talk...
Call on hold
During call making it is possible to take or make another call.
To activate Hold option please enter:
To deactivate Hold option enter:
This function is not activated by default.
To make another call...
If you want to put on hold a call you have already made, consecutively press these keys:
9

If during a call you want to take another call...
If during a call you receive another call, a sound signal will inform you about a new incoming call.
If the Hold option is activated, you can:
- Put the first call on hold and take the second call by pressing the keys in the following sequence:
By pressing these keys you can by turns switch from one active call to another.
or
- Replace the handset to end the first call.
In this case you do not reject the call on hold which is signalled to you by ringing as any other usual incoming call.
or
- Do not do anything, continue with you first call and the person attempting to call you will hang up, because you are not
answering his/her call.
Caller Line Identity Presentation (CLIP)
In case of incoming calls Officebox Call&Fax can display telephone number of the caller if your telephone supports
number display function.
To activate or deactivate CLIP function enter:
CLIP function activated, caller identity is displayed.
CLIP function deactivated, caller identity is not displayed.
Fax
By using standard analogue fax machine connected to the Fax/telephone port of Officebox Call&Fax device you can
send G3 fax messages. Fax machine is to be installed and used in line with its use instructions.
Note:
This device is equipped with very advanced fax technologies providing the best results of fax transmission
by GSM networks. Still, due to the nature of GSM fax transmission, the proper fax communication cannot
be granted always and on all locations.
“Wireless telephone line” used by Officebox Call&Fax has the following features which you should be familiar with:
Configure the connected fax machine so that the incoming call is answered after the first, second or third ringing tone,
and not later. Otherwise there may be problems with the receipt of fax messages.
In case an error occurs during fax sending, it may happen that your fax machine reports successful fax transmission.
In case of an error in fax transmission the Officebox
Call&Fax device will send your fax machine a message about an error so that you can correct the problem. Only in
case there is no message about an error you can be certain that the transmission has been completed successfully. You
can also activate the operating mode in which after each fax sending you will receive a transmission report (transmission
successful, transmission failed).
10

While fax receiving, it may happen that the sender will already have received a successful transmission report, although
you may have not, for any reason, received the message yet (e.g. you ran out of paper). In this case the undelivered
part of the fax message is stored in the Officebox Call&Fax device and you will be alerted thereof by fast flashing of
both fax LED indicators (see explanation in LED indicators, page 6). The device will make a couple of attempts to deliver
the rest of the message received. In case it fails, fast flashing of both indicators will continue alerting about the pending
fax message.
The delivery of partly stored fax message can be requested by entering a special command (see In case of fax alert,
lower on this page).
Receiving a test fax message
If you want to check whether your fax machine can receive fax message from the OfficeboxCall&Fax device, initiate a
fax message receipt test.
For receiving a test fax message enter:
One page test fax will be sent from the Officebox Call&Fax device to your fax machine.
In case of fax alert
If both fax alert LED indicators are flashing fast, the device is signalling that it could not entirely transfer the received fax
to the connected fax machine. The non-transmitted part is stored in the Officebox Call&Fax device. Please check if your
fax machine is in the proper mode of operation.
Then give your Officebox Call&Fax device an instruction to transmit the stored fax message to your fax machine.
By use of a telephone connected to Telephone or Fax/telephone port, set the following order:
Upon entering the code Officebox Call&Fax will start sending the stored parts of the fax message to your fax machine.
The following instruction will delete partly stored fax message and annul the fax alert.
11

Additional configuration
Your Officebox Call&Fax is a sophisticated device with various operation modes. Chose which operation modes best
suit your needs and activate them by performing device configurations.
For configuration procedure use a telephone connected to Telephone or Fax/telephone port as if you were entering a
number.
Selecting the port for incoming telephone calls
As per initial settings, Telephone port and Fax/telephone port start ringing in case of an incoming call.
For signalling an incoming telephone call at Telephone port only, enter:
For signalling an incoming call at Fax/telephone port only, enter:
For signalling an incoming call at Telephone and Fax/telephone port (initial setup) enter:
Note: the initially set access code is 000000.
Report on successful fax transmission
In case of an error in fax transmission, the Officebox Call&Fax device will inform your fax machine about the error so
that you can fix the problem. You can also activate the operation mode in which after each fax sending you will receive
a transmission report (transmission successful, transmission failed).
To change the setting, enter the following sequence:
Only failed transmission reports are transferred to your fax machine (standard setting)
After each fax sending a transmission report is sent to your device confirming if transmission succeeded or failed.
Calling line identifi cation restriction (CLIR)
When you are making a call, and when the person whom you are calling has the right equipment, your telephone
number will be displayed on his/her telephone.
To change this setting, press the following keys:
The telephone number will not be displayed to the person you are calling:
12

The telephone number will be displayed to the person you are calling.
Regardless of the permanent setting, you can allow or restrict identification of your telephone number for the next call
only. Once you finish that call, the permanent setting reactivates.
<Telephone number > ... make the call
The telephone number is displayed to the person you are calling only during this call.
<Telephone number > ... make the call
The telephone number
is not displayed to the person you are calling only during this call.
Important safety information
General use recommendations
Before using this device, read these instructions carefully and comply with them. This device is intended for indoor use
exclusively.
Keep the device out of reach of children, especially infants. The device must not be exposed to humidity and liquids. Do
not leave diskettes, credit cards or similar objects close to the device to avoid demagnetization.
Purpose: The sole purpose of this device is connecting of telephone and fax machine to GSM radio network. Use of
this devise for any other purpose is prohibited and can be dangerous.
Installation: Due to safety reasons telephone cables are to be kept indoors and must not be taken outdoors. Plug is
never to be removed from the socket by cable pulling, and the cables are not to be laid over things with sharp edges
and angles. The device must not be turned on, if the cable of the device, another cable or the very device is damaged.
Before connecting or disconnecting other cables, the mains supply of the overall equipment is to be disconnected. The
device is never to be used in places where radio transmission is not allowed.
Health: This device contains a radio transmitter which can affect effectiveness of medical electronic devices such
as assistive listening devices or pace makers. More detailed information can be obtained from your physician and
manufacturers of such devices.
Warning! People should keep at least 20 cm distance from the antenna of this device.
Power supply:
stated on the supply device must be compatible with the network supply. During storms networks plugs of all devices
should be disconnected. In case of device failure, disconnect all other cables.
Only use of original power supply devices recommended by the manufacturer is allowed. Voltage
13

Specifications
Two RJ11 interfaces (a/b-lead),one for analogue telephones, one for analogue telephones
Analogue interfaces
Additional services Call on hold, CLIP, CLIR, conference link, depending on the network
Dialing Tone (DTMF) and pulse dialing
Port options Polarity inversion; chargeable impulses (12 kHz; 16 kHz; for voice calls)
Analogue fax Supports Group 3, 9600 bit/s (V.29) fax machines
Voice codec
Supply/transmission
power
Antenna interface
and fax machine
Maximum REN 5 for all telecommunication equipment connected to RT3000
Normal speed, increased normal speed, semi-speed
Electrical supply
Antenna interface Impendency : 50 (nominal); Connector: TNC
Electrical supply
Back up battery
Environment
Compliance
Dimensions
EGSM 900 MHz (2 W), DCS 1800 MHz (1 W),
PCS 1900 MHz (1 W)
Electrical power network: 230 VAC 50 Hz or 110 ... 230 VAC 50/60 Hz Inlet: 12 24 VDC (Back up battery requires min, 17 VDC)
Regular independence version:
Back-up battery: of 2 h operation/8 h stand-by; re-chargeable. High independence
version: Back-up battery: of 4,5 h operation/15 h standby; rechargeable
Temperature range: -10° do +55°C
Humidity 0-95%, no condensation
CE (in-house, commercial, and light industry use); R&TTE (GSM); GSM/GPRS module
with GFC approval, Safety compliant with EN 60950
approx. 195x151x38 mm (DxHxW)
approx. 620 g (with battery and antenna)
14

More information on www.vipnet.hr or dial 091 77 22.
E-mail: business @vipnet.hr
VIPnet d.o.o.
Vrtni put 1, HR-10000 Zagreb
 Loading...