


www.viotek.com
Customer Service: 1-855-229-9472

Table of Contents
Section 1. Safety Information & Guidelines ............................................................................................2
1.1 Information ..........................................................................................................................................2
1.2 Disposal at End-of-Life ........................................................................................................................3
Section 2. Parts & Assembly .....................................................................................................................3
2.1 Package Contents ................................................................................................................................3
2.2 Crescent Diagram ................................................................................................................................ 4
2.3 Laser Keyboard Diagram ....................................................................................................................5
2.4 Port Information ..................................................................................................................................5
2.5 Remote Control Diagram ...................................................................................................................6
2.6 3D Glasses Diagram .............................................................................................................................7
Section 3. Indicator & Charging Information ..........................................................................................7
3.1 Indicator Information ..........................................................................................................................7
3.2 Charging Instructions ......................................................................................................................... 7
3.3 Remote Control Instructions ..............................................................................................................8
Section 4. Powering the Crescent On and O ......................................................................................... 9
Section 5. Adjustment ...............................................................................................................................10
5.1 Focus .....................................................................................................................................................10
5.2 Keystone Correction ............................................................................................................................10
5.3 Throw Distance ....................................................................................................................................10
Section 6. Home Menu Functions ............................................................................................................. 11
6.1 Language Selection .............................................................................................................................11
6.2 Connecting to the Internet .................................................................................................................11
6.3 Casting from Your Phone .................................................................................................................... 12
6.4 Using the File Manager .......................................................................................................................13
6.5 Installing & Uninstalling Applications ...............................................................................................13
6.6 Connecting to Bluetooth .................................................................................................................... 14
Section 7. Additional Functions ...............................................................................................................15
7.1 Speaker.................................................................................................................................................15
7.2 Power Bank ..........................................................................................................................................15
7.3 HDMI .....................................................................................................................................................15
Section 8. 3D Glasses Information ...........................................................................................................15
8.1 Charging Instructions ......................................................................................................................... 15
8.2 3D Glasses Instructions .......................................................................................................................15
Section 9. Laser Keyboard Information & Instructions ..........................................................................16
9.1 Laser Keyboard Features ....................................................................................................................17
Section 10.
Storage & Maintenance .........................................................................................................18
10.1 Storage Instructions & Information .................................................................................................18
10.2 Maintenance Instructions & Information ........................................................................................ 18
Section 11. Basic Troubleshooting ...........................................................................................................19
Section 12. Warranty Information ............................................................................................................ 20
1

Section 1. Safety Information & Guidelines
This user manual will guide you through the functions and usage of your Viotek Crescent Portable Projector. It is
important that you follow all instructions and regard all notes that appear throughout this manual. Consult this
manual before you attempt to use your projector. If you have questions not answered by this manual or are in need of
repair or non-routine service, contact Viotek customer service at 1-855-229-9472. Before contacting customer service,
please have your purchase information ready as it may be needed during the call.
1.1 Information
When reading this manual, note these icons:
Notes with this icon MUST be read, understood, and obeyed to prevent injury or damage etc.
Notes with this icon include relevant information.
Before Using The Crescent
• Please check the voltage of the adapter before use.
• Suitable input voltage range is 100-260V AC while output range is DC 19V 3A.
• Identify suitable surfaces for projection. Surfaces for optimal viewing are clean surfaces like walls or suitable
curtains which are neutral, grey, or dark colors and non-re ective.
• Check the packaging and contents list within this manual to ensure all parts were received. If any part is missing,
contact Viotek customer service.
• Charge the projector at least 6.5hrs before attempting to use it for the rst time.
• If the Crescent will not be used for a long period of time, discharge and recharge the battery once a month and
store in a dry, suitable location.
• If the 3D glasses will not be used for a long period of time, discharge and recharge the battery once a month and
store in a dry, suitable location.
General Safety
• Note, the projector and its accessories are limited to indoor use. Do not expose to direct sunlight or attempt to operate in high temperatures.
• Operating temperature range : 41°F to 95°F with humidity levels from 35% to 60%.
• Clean the outside with dry, non-abrasive cloth only. Do not spray any part of the projector or its accessories with water or liquids.
• If the projector or any of its accessories create abnormal noise, odor, or leakage, etc. immediately stop use and disconnect the product(s)
from all power sources. Do not touch projector or any of its accessories. Contact customer service immediately.
• Do not look directly into the projector lens or laser keyboard especially when either device is on.
• Do not block the projector’s air inlet or outlets. Obstructing ventilation may cause overheating and malfunctions.
• All objects should be at least 50cm from the air outlets and inlets.
• Do not insert anything into any part of the projector especially the ventilation openings.
• Clean the outside with dry, non-abrasive cloth only. Do not spray any part of the projector or its accessories with water or liquids.
• Do not attempt to dissemble the projector or any of its accessories.
• Store the projector indoors at a dry and stable temperature. Do not store in an unheated garage, shed, or other locations with extreme
temperature uctuations.
Battery & Charging
• Use only the adapter included in the original packaging or received from Viotek as a replacement.
• Before storing, fully charge the projector to prevent battery over-discharge due to non-use.
• Cover the projector to protect it from dust. Do not store in a dusty environment as, with all electronic devices, dust may cause damage over
time.
• Please ensure the charger is fully inserted and/or connected to the wall outlet before charging. Improper insertion may result in electric
shock, short circuiting, smoke, or re.
• Refer any non-routine battery maintenance to Viotek.
• Projector may not be used with any type of power other than the one included.
• Use only the chargers included in the original packaging or received from Viotek as a replacement to charge the projector and 3D glasses.
2

1.2 Disposal at End-of-Life
This product must not be disposed of by incineration, land lling, or mixing with household trash. Improper disposal
of the battery contained within this product may result in the battery heating up, rupturing, or igniting which may
cause serious injury. The substances contained inside the battery present chemical risks to the environment. The
recommended disposal for any Viotek Crescent at its end-of-life is to dispose of the entire unit at or through an
e-waste recycling center, program, or facility. Local regulations and laws pertaining to the recycling and disposal of
lithium ion batteries and/or products containing them will vary according to country, state, and local governments.
You must check laws and regulations corresponding to where you live in order to properly dispose of the battery
and/or unit. It is the user’s responsibility to dispose of their waste equipment properly with accordance with local
regulations and laws.
For additional information about where you should drop o your batteries and electrical or electronic waste, please
contact your local or regional waste-management o ce, your household waste disposal service, or your point-of-sale.
Section 2. Parts & Assembly
2.1 Package Contents
1x Crescent Console Projector
1x Projector Charger
1x Remote Control
1x Micro USB Cable 1x Quickstart Guide
1x Pair of 3D Glasses
The projector and 3D glasses come with rechargeable batteries preinstalled. The remote control uses 2x AAA batteries. Remote batteries not
included.
3

2.2 Crescent Diagram
Air Vents
Focusing Dial
FRONT
SIDE
Projector Lens
Front Indicator
Air Vents
USB 2.0 Port
HDMI Port
BACK
USB-C
Charging Port
Rear Indicator
Laser Keyboard
TOP & BOTTOM
Power Button
Air Vents
Speaker
ONOFF
ON/OFF Switch
4

2.3 Laser Keyboard Diagram
Pairing Indicator
Input Indicator
Connection Port
Power Button
Charging Contacts
FRONT
2.4 Port Information
1. HDMI Input Port: This port may be used to connect to
computers, laptops, and other devices. Simply plug and
play.
2. USB 2.0 Port: This port may be used to connect to
external storage or to mobile devices to serve as a power
bank.
3. USB-C Charging Port: This port may only be used for
charging the projector. Use only the cables included
in the original packaging or received from Viotek as a
replacement.
BACK
123
5

2.5 Remote Control Diagram
To ensure full functionality, the remote should be used within range of the projector. The projector’s Remote Control
allows you to control the projector’s functions.
Power
Mute
Up
Conrm / Pause
Left / Rewind
Down
Return
Menu
3D
Right / Fast Forward
Volume Up / Down
Home
6
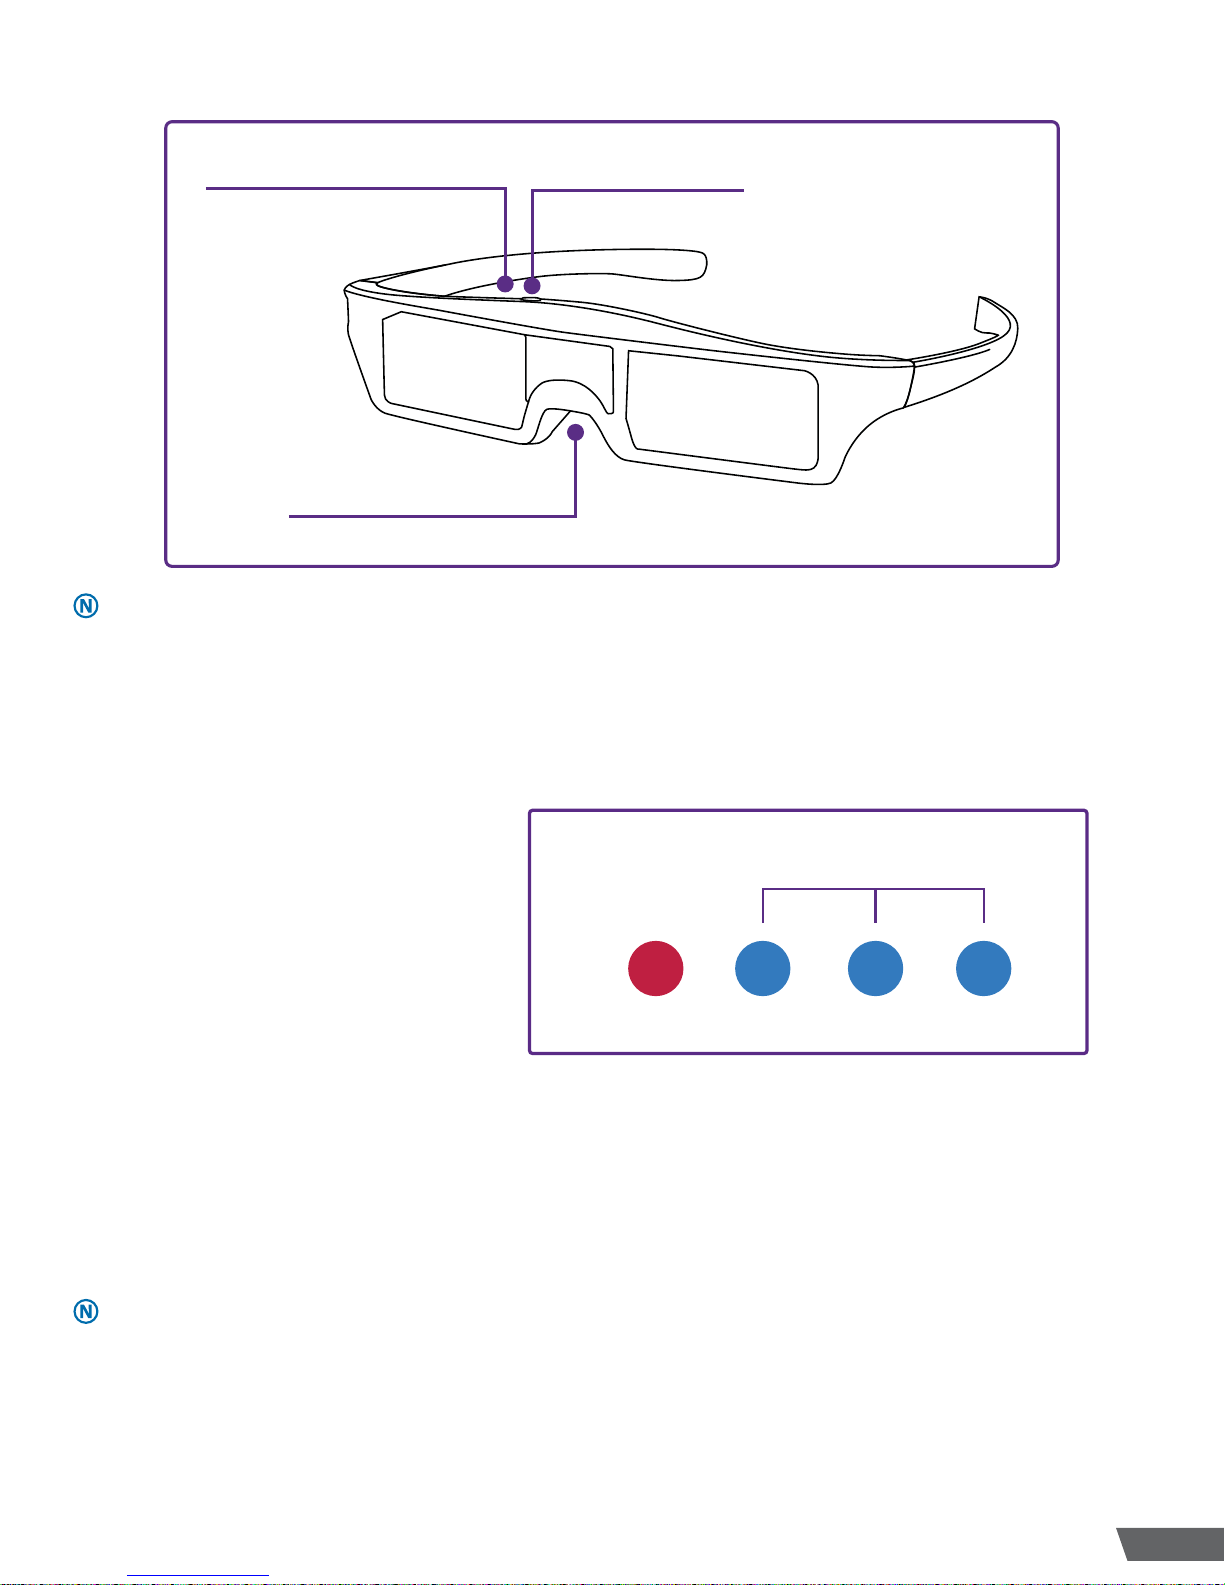
2.6 3D Glasses Diagram
Power Indicator
3D Button
Charging Port
The 3D glasses use a built-in, rechargeable lithium-ion battery.
Section 3. Indicator & Charging Information
3.1 Indicator Information
The Front Indicator shows power and battery status. The rst light is red and indicates power status. This light will turn
on to indicate the projector is on and operating normally. The rest of the lights are blue and indicate battery status.
These lights will turn on and o one at a time to indicate the current level of battery power. When all three lights are
blue, the projector is at or near full power.
Power: Power is on.
Battery 1: Battery at 33% or less.
Battery 2: Battery at 60 - 70%.
Battery 3: Battery at 95 - 100%.
POWER BATTERY
3.2 Charging Instructions
The projector comes with a 15600mAh
capacity rechargeable battery which gives
the projector a run time of about 120
minutes. Before using your projector for
the rst time, it must be charged. See the
following images and instructions.
Step 1. Connect the Charging Adapter to a power source such as a wall outlet then connect the other end to the
charging port.
Step 2. Solid red light indicates power is on and the projector is operating normally. Allow up to 6.5hrs for the battery
to charge for the rst time. After this initial charge, the projector has a 5 hour average charging time. While charging,
the Indicator will blink.
Step 3. When the projector is fully charged, the Indicator will stop blinking and remain on.
• Charge according to these instructions, otherwise the battery may sustain damage.
• Charging time is approximately 5 hours. Charging longer may a ect battery life.
• Batteries perform best after several full charge/discharge cycles.
• If the projector doesn’t charge, check that its Charging Adapter is securely connected.
• Use only the Charging Adapter included in the original packaging or received from Viotek as a replacement.
• Before storing, fully charge the projector to prevent battery over-discharge due to non-use.
• Refer any battery maintenance to Viotek.
123
7

3.3 Remote Control Instructions
The projector’s Remote Control allows you to control the projector’s functions.
Power
Up
Left / Rewind
Mute
Conrm / Pause
Down
Menu
3D
Return
Right / Fast Forward
Volume Up / Down
Home
Power: Press to turn the projector on or o
Mute: Press to silence audio from the speakers
Up/Down: Press to move up or down through menus etc.
Left/Right: Press to move left or right through menus etc. or to rewind or fast forward if available
Con rm/Pause: Press to con rm or select the next option etc. This button pauses the current visual playback. To
resume, press again to unpause.
Menu: Press to open related contextual menus etc. or
double press to open shortcuts
3D: Press to turn 3D on or o as well as cycle through
Infrared Sensor
3D settings
Volume Up/Down: Press to raise or lower audio from
the speakers
Return: Press to return to the previous screen or menu
Home: Press to return to the projector’s home screen
or press and hold to open tabs
The Remote Sensor uses infrared technology to detect
input from the remote. When using the remote, point
it towards this sensor.
8

Section 4. Powering the Crescent On and O
When powering on your projector, there are two di erent options.
Locate the ON/OFF switch on the bottom of the projector and make sure it
is in the ON position. This switch should only be used to reset the projector
and/or for complete power o for safe storage and transportation. See
Section 10 for more information.
Powering On
Push the Power Button on top of the projector. The projector’s
system will take about 40 seconds to start up. Do not press any
other buttons or attempt to operate during this time.
Powering O
Push and hold the Power Button on top of the projector or
the power button on the remote for about 2 seconds. The
projector will power o .
ON/OFF Switch
ONOFF
Do not repeatedly press the Power Button. If the projector doesn’t turn on, check that all cables are properly connected and be sure to wait at
least 40s before trying again.
9

Section 5. Adjustment
5.1 Focus
Depending on the surface you are using for projection and the distance
between the surface and the projector, some adjustment may be
needed. Rotate the wheel slowly to the left or right until the screen is
clear.
5.2 Keystone Correction
Depending on how the projector is positioned, the projection surface,
and other factors, the projection’s shape may distort and appear too
trapezoidal i.e. too narrow or wide at the top or bottom. Typically, the
projector will adjust keystone settings automatically according to
the projector’s orientation. If manual adjustment is needed, see the
following image(s) and steps.
Step 1. From the Home Menu, select “DLP Settings”.
Step 2. Select “Projector Settings”.
Step 3. Select “Keystone Correction”.
Step 4. Use the LEFT and RIGHT remote buttons to adjust as needed.
5.3 Throw Distance
Depending on how the projector is positioned from the actual projection surface, the projection’s size can be
adjusted. For estimates on projection size, see the following image(s) and information.
The maximum distance screen size the projector is capable of showing relatively clearly is 150in.
10

Section 6. Home Menu Functions
After the projector rst turns on and loads, the Home Menu will show. This menu has two screens and can be accessed
by pressing the remote’s Home button.
6.1 Language Selection
Step 1. From the Home Menu, select “Settings”.
Step 2. Select “Language & Input” then “Language”.
Step 3. Choose the desired language and allow time for the projector to adjust
6.2 Connecting to the Internet
Step 1. From the Home Menu, select “Settings”.
Step 2. Navigate to “Device” and select “Network”.
Step 3. Select the desired type of network connection. In most cases this will be “Wi-Fi”.
Device
Network
Wi-Fi
Connected
Ethernet
Not connected
PPPoE
Disconnected
Step 4. Ensure the Wi-Fi feature is turned ON. When the feature is on, available networks will show below.
Step 5. Select the name of your “Wi-Fi” network. If your network does not appear, navigate to “See all” and select it
to see an extended list of available networks. You can also connect a “Wi-Fi” network manually by navigating to and
selecting “Add new network”.
Step 6. Input your password and con rm as needed.
Connected
On/O
On
AVAILABLE NETWORKS
Wi_1
WPA/WPA2 PSK
Network
Wi-Fi
Wi_2
WPA/WPA2 PSK
See all
OTHER OPTIONS
Connect via WPS
Add new network
Wi-Fi Direct
Portable hotspot
Mcast
11
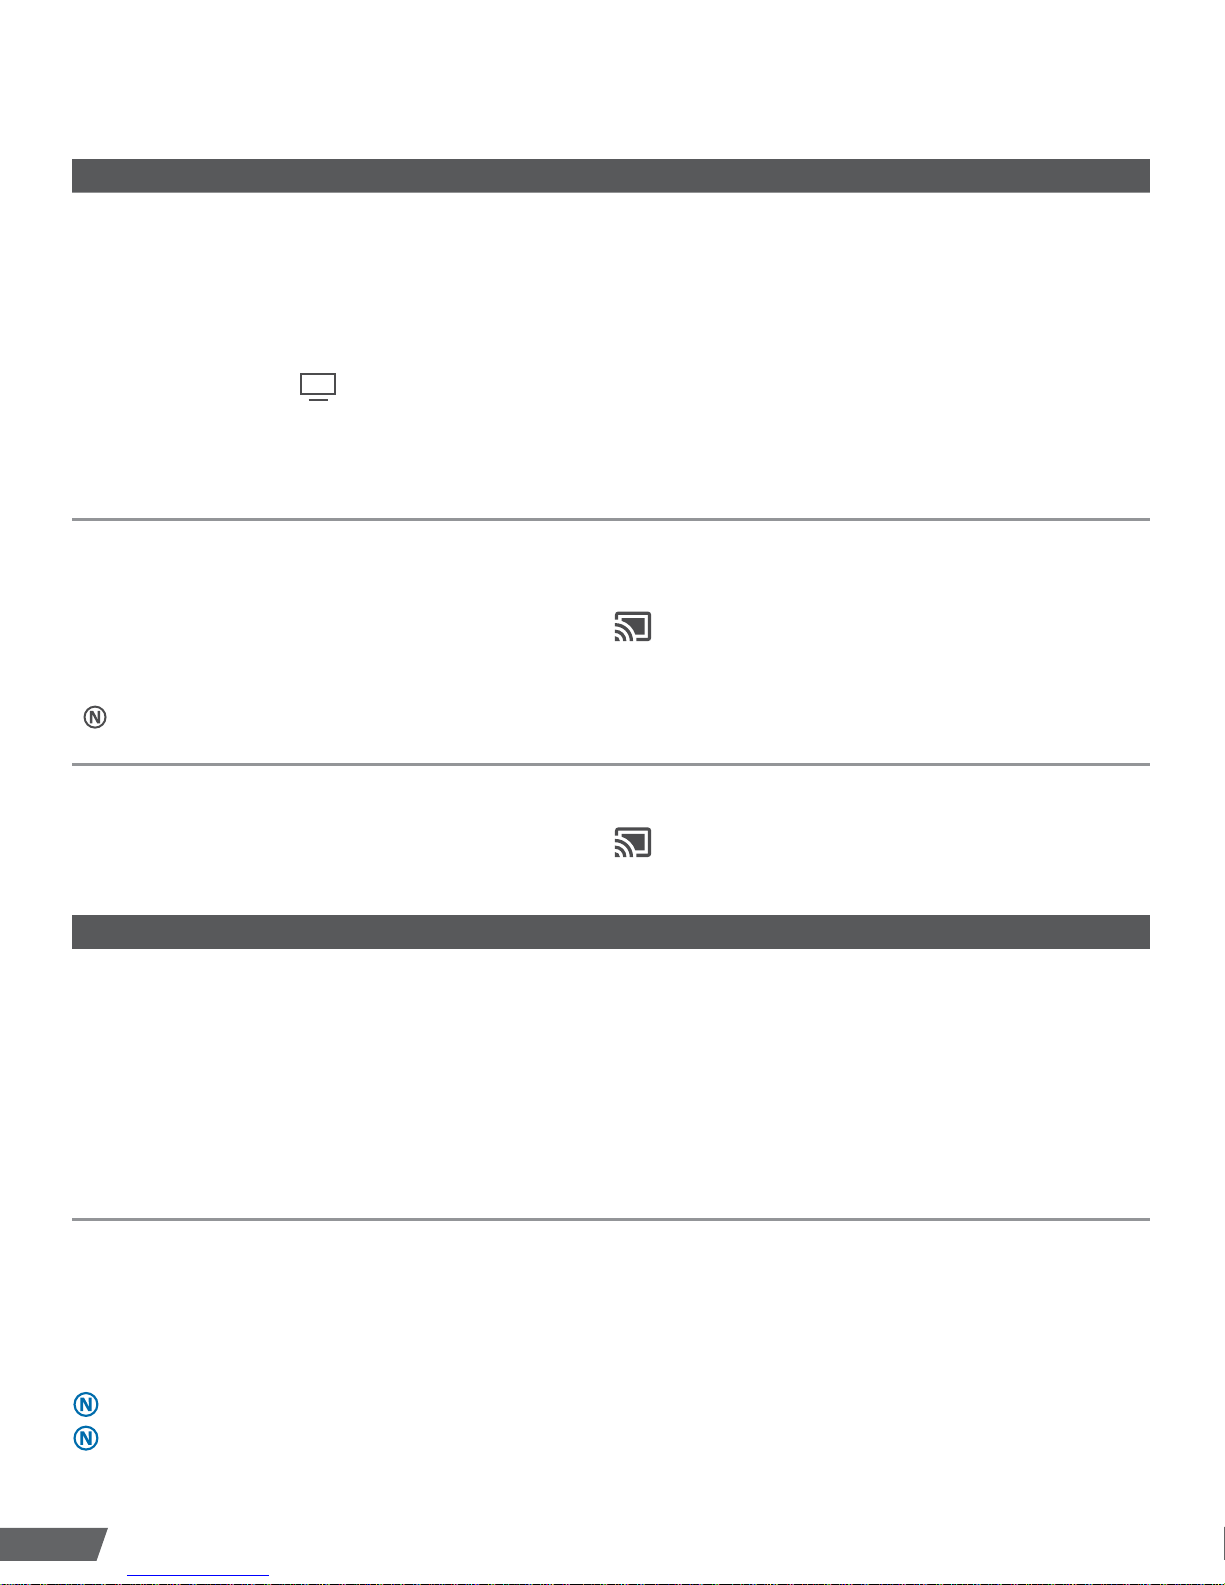
6.3 Casting from Your Phone
The projector is capable of mirroring your phone’s screen or sending information from your phone’s screen if desired.
To use this feature, see the following image(s) and information.
Android
Start Mirroring (AirPinCast):
Step 1. Connect the projector and phone to the same Wi-Fi network.
Step 2. Open the AirPinCast App on your projector.
Step 3. Download the AirPinCast App on your Android device. The app’s full name is “DLNA/UPnP Sender -
AirPinCast”.
Step 4. Install and Open the AirPinCast app.
Step 5. Look for an icon
icon. When the icon displays a number, it has detected the projector.
Step 6. After the pop-up menu shows, select the projector from the menu.
Step 7. Play any video or le through the AirPinCast app
Starting Mirroring (MiraCast):
Step 1. Connect the projector and phone to the same Wi-Fi network.
Step 2. On your Android device, swipe down from the top of your screen to open the Quick Access Menu.
Step 3. From the Quick Access Menu, touch the “Cast” icon
Step 4. Select your projector and allow time to connect.
in the upper right hand corner. Wait for the icon to display a number, then touch the
. The menu will show available devices.
The “Cast” icon may look di erent depending on your Android device.
Ending Mirroring:
Step 1. On your Android device, swipe down from the top of your screen to open the Quick Access Menu.
Step 2. From the Quick Access Menu, touch the “Cast” icon
to disable casting.
iOS
Starting Mirroring (AirPlay):
Step 1. Connect the projector and phone to the same Wi-Fi network.
Step 2. Open the AirPinCast App on your projector.
Step 3. On your iOS device, swipe up from the bottom of your screen to open the menu.
Step 4. For mirroring, select “AirPlay Mirroring” from the menu and skip to Step 7. For AirPlay without mirroring,
continue to the next step.
Step 5. From the menu, swipe horizontally to reach the “Now Playing” screen.
Step 6. Touch the bottom bar to open a new section of the menu then select your projector to connect.
Step 7. Play content as desired.
Ending Mirroring:
Step 1. On your iOS device, swipe up from the bottom of your screen to open the menu.
Step 2. From the menu, swipe horizontally to reach the “Now Playing” screen.
Step 3. Tap the bottom bar to open a new section of the menu then select your iOS device.
The AirPinCast app does not need to be downloaded on your iOS device. For casting via iOS, see the steps above.
When mirroring, your projector uses your mobile device’s screen orientation and aspect ratio. For any projection image issues, you may need to
adjust the projector’s aspect ratio or zoom settings.
12

6.4 Using the File Manager
Once connected to a stable Wi-Fi connection, the projector can be used to download, copy, and use les that are
compatible with the Android OS. If needed, les can also be deleted. To use this feature, see the following information.
Downloading Files:
Step 1.
Step 2. From the Home Menu, select “All Apps”.
Step 3. From the “All Apps” menu, select “ES File Explorer”.
Step 4. Locate and use downloaded les as desired.
Copying Files:
Step 1.
Step 2. If “ES File Explorer” does not automatically open, nd and select it from the “All Apps” menu.
Step 3. Locate and select the desired le.
Step 4. Select “Copy” from the bottom bar.
Step 5. Choose “SD Card” then select “Paste”.
Step 6. Locate and use copied les as desired.
Deleting Files:
Step 1.
Step 2. From the “All Apps” menu, select “ES File Explorer”.
Step 3. Locate and select the le to be deleted
Step 4. Select “Delete” from the bottom bar.
Step 5. Within the pop-up window, select “OK”.
Download les from the internet etc.
Connect the external storage via USB etc.
From the Home Menu, select “All Apps”.
Certain le types may require additional apps to open and/or use. Download accordingly. See the following section for instructions.
6.5 Installing & Uninstalling Applications
Once connected to a stable Wi-Fi connection, the projector can be used to download and install any Android-based
applications. If needed, downloaded applications can be uninstalled. To use this feature, see the following image(s)
and information.
Installing Applications:
Step 1.
Step 2. Use the search feature to search for the desired app.
Step 3. Select “Download”.
Step 4. Allow time for the download to nish. After downloading, the app should automatically begin installing.
Step 5. Find the app under “All Apps” and use as desired.
Uninstalling Applications:
Step 1.
Step 2. Select “Apps”.
Step 3. Select the app to be uninstalled.
Step 4. Select “Uninstall”.
Step 5. Select OK to con rm the uninstallation.
Step 6. Allow time for the app to nish uninstalling.
From the Home Menu, select “Amazon Underground”.
From the Home Menu, select “Settings”.
13

6.6 Connecting to Bluetooth
The projector uses Bluetooth 4.0. To use this feature, see the following image(s) and information.
Bluetooth
Paired devices
Laser Projection Keyboard
Available devices
44:3Q:17:T4:3C:69
JATRPF006
PSAD-URP
RENAME THIS DEVICE SHOW RECEIVED FILESREFRESH
Pairing:
Step 1.
From the projector’s Home Menu, select “Settings”.
Step 2. Navigate down to “Remote & Accessories” then select “Add Accessory”.
Step 3. Using your mobile device, turn on Bluetooth. Most devices will automatically become discoverable.
Step 4. From the projector’s “Remote & Accessories” menu, select the name of your mobile device to begin pairing.
Step 5. A passcode may appear on-screen for your mobile device and the projector.
Step 6. Ensure both passcodes match and select “Pair” to con rm on both devices.
Unpairing:
Step 1.
From the projector’s “Remote & Accessories” menu, select the device you would like to unpair.
Step 2. From the newly-opened menu, select “Unpair”.
Step 3. Con rm as needed.
If unpairing from your device instead of the projector, unpairing steps may vary. Refer to your device’s manufacturer for instructions.
After turning on Bluetooth, most devices will become discoverable by default. If your device does not automatically become discoverable, refer
to the device’s manufacturer for instructions.
If the device has been paired to the projector before, turning on Bluetooth on both devices may prompt the two to reconnect automatically.
14

Section 7. Additional Functions
7.1 Speaker
The projector has built-in speaker functionality. To use this function, simply use the projector to play any content with
audio.
7.2 Power Bank
The projector can be used as a power bank for your
mobile phone or device. To use this function, plug your
device’s charging cable into your device then plug the
other end into the projector’s USB port (2). No other
setup is needed.
123
7.3 HDMI
The projector can be used with other devices that
use HDMI. To use this function, use an HDMI cable to
connect the device to your projector via the HDMI
port (1). Typically, the projector will adjust visual and
audio settings automatically according to the currently
connected device.
The projector’s HDMI settings and functions have been adjusted for optimal viewing. It is not recommended to modify these settings.
Section 8. 3D Glasses Information
The projector includes a pair of 3D glasses for use with 3D movies, games, and more.
8.1 Charging Instructions
Before using your 3D glasses for the rst time, they must be charged. See the following images and instructions.
Charge according to these instructions, otherwise the battery may sustain damage.
Step 1. Connect the Micro USB Cable to
the charging port on the 3D glasses then
connect the other end to a power source.
Connect to a wall outlet via an adapter (not
included), or the projector or other suitable
source via the USB port.
Step 2. Allow up to 1/2hr for the battery
to fully charge. The LED Light will turn red
while charging.
Step 3. When the 3D glasses are fully
charged, disconnect from the Micro USB
Cable and turn them o .
• Batteries perform best after several full
charge/discharge cycles.
• If the glasses don’t charge, check that the
Micro USB Cable is connected securely.
• When the battery is low, the LED light will ash. Recharge as needed.
8.2 3D Glasses Instructions
Once your 3D glasses are fully charged and your 3D content is ready, see the following image(s) and steps.
Step 1. Put the glasses on.
Step 2. Press the 3D button on the remote or the glasses themselves to turn the feature on.
Step 3. Press either button multiple times to cycle between the 3 formats until the 3D e ect is clear.
Step 4. Enjoy your 3D content as desired.
Step 5. Press either button to turn the feature o .
• The 3D glasses have a standby time of approximately 4-5hrs.
• The 3D glasses have a working time of approximately 2.5hrs.
15
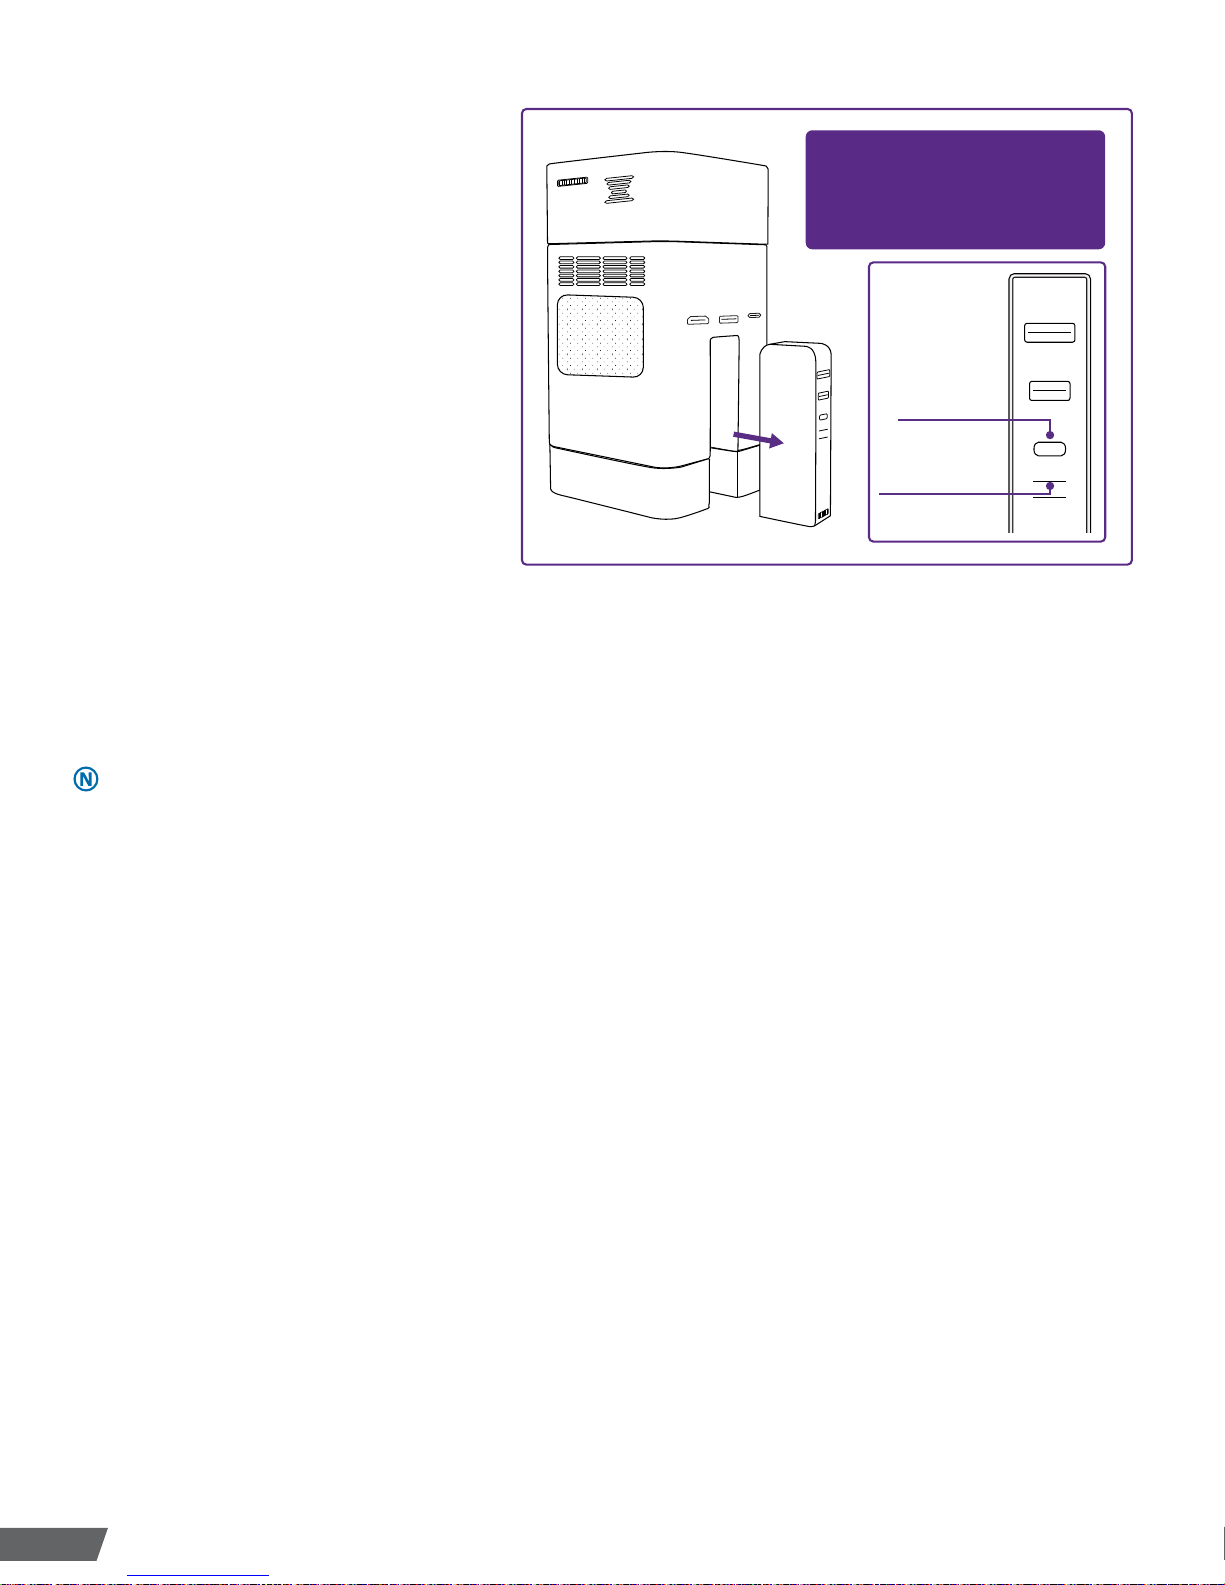
Section 9. Laser Keyboard Information & Instructions
The projector has a built-in laser keyboard. It
is removable and can be used like a mouse
for easier navigation and searching on the
internet etc.
Step 1. Clear the projection area then press
the keyboard’s power button. The Pairing
Indicator will turn BLUE and blink as it searches
for a device to connect to.
Step 2. From the projector’s Home Menu,
select “Settings”.
Step 3. Navigate down to “Remote &
Accessories” then select “Add Accessory”.
Step 4. Select the “Laser Projection Keyboard”.
If it does not appear, navigate to the refresh
button and select it to refresh the Bluetooth®
device list.
Step 5. Con rm as needed. The keyboard’s
Pairing Indicator will stop blinking when
the keyboard and projector are successfully
connected.
Step 6. Use the keyboard as desired. In normal keyboard mode, the keyboard’s Input Indicator will blink each time a
key is pressed. To switch to mouse mode, press the arrow key on the right side of the spacebar. The laser projection
may then be used like a trackpad.
Step 7. To turn o the keyboard, press and hold its Power Button for at least 3 seconds.
To eject the laser keyboard: Use 2
ngers evenly spaced on the top
and bottom of the laser keyboard
and press down until it clicks. The
laser keyboard will pop out of place.
Power Button
Pairing Indicator
• After 30 seconds of non-use, the keyboard’s brightness will dim automatically. After 5 minutes of non-use, the keyboard will automatically
turn o .
• After successfully connecting once, the keyboard will reconnect automatically.
• The Keyboard’s Input Indicator will turn RED and ash during charging and turn o once the keyboard is fully charged.
• If removed, reinsert the keyboard into the projector. It will click into place.
• Even when the keyboard is not in use, it should still be installed within the projector.
• The contacts connect to the inside of the projector to ensure the keyboard charges when the projector charges.
• The keyboard has built-in software. Due to this, inputting commands etc. with the keyboard may cause delays. If there is any error or issue,
wait a few seconds for the software to correct this issue. If it is not corrected, restart the keyboard.
• The projection area around the keyboard must be clear and obstacles cannot be closer than 2in. If obstacles are too close, the keyboard will
beep.
• The keyboard has a standby time of approximately 4hrs and a working time of approximately 2hrs.
16

9.1 Laser Keyboard Features
Locking Shift: The shift key features a locking function. After pressing shift once, the key will not need to be pressed
again to use shift. Press shift again to cancel the function.
Volume: To adjust the keyboard’s volume, press and hold the “FN” key and tap the left or right arrows to lower or raise
volume level. There are 5 levels. After adjusting the sound, it will remain at the selected level until it is adjusted again.
Brightness: To adjust the keyboard’s brightness, press and hold the “FN” key and tap the up or down arrows to
increase or decrease brightness level. There are 4 levels.
Gestures: When the keyboard is in mouse mode, the keyboard’s projection area can be used like a trackpad and
standard computer mouse.
• To move the cursor on-screen, use one nger and move in the desired direction.
• To select something on-screen, use one nger to tap twice. This is similar to clicking the left side of a mouse
twice.
• To select something on screen etc., use two ngers to tap twice. This is similar to clicking the left side of a mouse
twice.
• To scroll and or drag the screen, use two ngers and drag them across the keyboard’s projection area.
Control the cursor
Drag & Scroll
Click
Right Click
17

Section 10. Storage & Maintenance
10.1 Storage Instructions & Information
Before using your projector, ensure the storing environment is suitable. Properly storing your projector will help
improve performance and battery life expectancy.
Step 1. Ensure the projector is fully charged. Charge it if needed.
Step 2. Use the Power Button on top of the projector or the red button on the remote to turn it o .
Step 3. Use the ON/OFF switch on the bottom of the projector to turn o the Power Button.
Step 4. Store the projector indoors at a dry and stable temperature.
Always turn the projector o before transporting or storing.
•
• Before storing, fully charge the projector to prevent battery over-discharge due to non-use.
• Cover the projector to protect it from dust. Do not store in a dusty environment as, with all electronic devices, dust may cause damage over
time.
• If storing for more than one month, discharge and recharge the battery every three months.
• Store the projector indoors at a dry and stable temperature. Do not store in an unheated garage, shed, or other location with extreme
temperature uctuations.
10.2 Maintenance Instructions & Information
As with proper storage, proper maintenance will help improve your projector’s performance. Periodically, the
projector’s dustbin will need to be emptied and its lter changed. Please make sure your projector is completely
powered o before performing any type of maintenance.
If the projector or any of its included parts or accessories need cleaning or maintained, note all of the following
information below applies.
• Make sure the product has been powered o before cleaning.
• Always use a soft, non-abrasive cloth when cleaning.
• Use dry, non-abrasive cloth to gently remove debris or dust.
• Never use any type of liquid or cleaner to clean any part of the product(s) except the projector lens.
• If needed, lightly dampen a non-abrasive cloth with alcohol and gently clean the projector lens surface.
• After cleaning the projector lens, allow at least 30 minutes for the lens to completely dry before using the
projector.
• Never spray liquid directly onto any part of the monitor.
• Before storing, fully charge any product’s battery to avoid over discharging due to non-use.
• Discharge and recharge any product’s battery at least once a month.
• Store indoors at a dry and suitable temperature.
Failure to adhere to the above guidelines may result in damage and is not covered under warranty.
18

Section 11. Basic Troubleshooting
Problem Cause(s) Solution(s)
The projector doesn’t turn on. There’s a connection issue with the
Charging Adapter.
The Power Button may have been
turned o via the ON/OFF Switch.
The projector may have overheated
after a long period of use and
entered cooldown.
The projector wasn’t allowed enough
time to start up.
No picture. The video source has not been
properly selected.
The input source has not been
properly selected.
The projector/keyboard/glasses
There’s a connection issue. Check that all cables are fully inserted
aren’t charging.
Picture is blurry and/or distorted. The projector lens is not focused. Use the focusing dial to adjust.
The projector may not have adjusted
the picture automatically.
The projector/keyboard/glasses
The device isn’t on. Turn the device and projector on for
don’t work.
The device ran out of battery power. Charge the battery as needed.
There’s an obstacle between the
device and projector.
The device is too far from the
projector.
Check that all cables are fully inserted
and/or all contacts are touching.
Check that the ON/OFF Switch on the
bottom of the projector is switched
ON.
Wait until the projector has cooled
down before attempted to use it
again.
Wait approximately 40 seconds.
Turn the video source on and check
that all cables are fully inserted.
Use the remote to return to the
Home Menu then select the correct
input source.
and/or all contacts are touching.
Adjust the projection angle and or
open the projector’s settings and
adjust for keystone correction.
proper functionality.
Remove the obstacle.
Move closer and attempt to use
again.
If the information in Section 11 does not resolve your issue, please visit our website at www.viotek.com or contact customer support 1-855229-9472.
19

Section 12. Warranty Information
ONE YEAR LIMITED HARDWARE WARRANTY
YOUR VIOTEK CRESCENT MINI PC CONSOLE PROJECTOR (“PRODUCT”) INCLUDES A ONE YEAR LIMITED HARDWARE WARRANTY (“WARRANTY”). THE
WARRANTY COVERS PRODUCT DEFECTS IN MATERIALS AND WORKMANSHIP UNDER NORMAL USE. THIS WARRANTY IS LIMITED TO RESIDENTS OF THE
UNITED STATES AND CANADA ONLY AND IS AVAILABLE ONLY TO ORIGINAL PURCHASERS. THIS WARRANTY GIVES YOU SPECIFIC LEGAL RIGHTS AND YOU MAY
ALSO HAVE OTHER RIGHTS WHICH VARY FROM STATE TO STATE.
THIS WARRANTY STARTS ON THE DATE OF YOUR PURCHASE AND LASTS FOR ONE YEAR (THE “WARRANTY PERIOD”). THE WARRANTY PERIOD IS NOT EXTENDED
IF THE PRODUCT IS REPAIRED OR REPLACED. WE MAY CHANGE THE AVAILABILITY OF THIS LIMITED WARRANTY AT OUR DISCRETION, BUT ANY CHANGES WILL
NOT BE RETROACTIVE.
WARRANTY SERVICES ARE PROVIDED BY WARRANTY PRO. IF A HARDWARE DEFECT ARISES AND A VALID CLAIM IS RECEIVED WITHIN THE WARRANTY
PERIOD, AT ITS OPTION AND TO THE EXTENT PERMITTED BY LAW, WP WILL: (1) REPAIR THE HARDWARE DEFECT BY USING NEW OR REFURBISHED PARTS THAT
ARE EQUIVALENT TO NEW IN PERFORMANCE AND RELIABILITY; OR (2) EXCHANGE THE PRODUCT WITH A PRODUCT THAT IS NEW OR REFURBISHED WHICH IS
SUBSTANTIALLY EQUIVALENT TO THE ORIGINAL PRODUCT. THIS WARRANTY IS FOR ONE REPLACEMENT ONLY OF LIKE-ITEMS AND DOES NOT COVER ITEMS OUT
OF PRODUCTION IF THE PRODUCT IS NO LONGER MADE OR STOCKED. THIS WARRANTY IS NOT ASSIGNABLE OR TRANSFERABLE. THE ORIGINAL PURCHASER
MAY CALL WP’S TOLL-FREE NUMBER AT 1-855-229-9472 FOR SERVICE REQUEST.
WHEN A PRODUCT OR PART IS EXCHANGED, ANY REPLACEMENT ITEM BECOMES YOUR PROPERTY AND THE REPLACED ITEM BECOMES WP’S PROPERTY. THIS
WARRANTY ONLY COVERS TECHNICAL HARDWARE DEFECTIVENESS DURING THE WARRANTY PERIOD AND UNDER NORMAL USE CONDITIONS. WP DOES NOT
WARRANT UNINTERRUPTED OR ERROR-FREE OPERATION OF THIS PRODUCT.
THIS WARRANTY DOES NOT COVER ANY DAMAGE DUE TO: (A) TRANSPORTATION; (B) STORAGE; (C) IMPROPER USE; (D) FAILURE TO FOLLOW THE PRODUCT
INSTRUCTIONS OR TO PERFORM ANY PREVENTIVE MAINTENANCE; (E) MODIFICATIONS; (F) UNAUTHORIZED REPAIR; (G) NORMAL WEAR AND TEAR; OR (H)
EXTERNAL CAUSES SUCH AS ACCIDENTS, ABUSE, OR OTHER ACTIONS OR EVENTS BEYOND OUR REASONABLE CONTROL.
IMPORTANT: DO NOT DISASSEMBLE THE PRODUCT. DISASSEMBLING THE PRODUCT WILL VOID THIS WARRANTY. ONLY WP OR A PARTY EXPRESSLY
AUTHORIZED BY WP SHOULD PERFORM SERVICE ON THIS PRODUCT.
DISCLAIMER OF WARRANTY: THE REMEDIES DESCRIBED ABOVE ARE YOUR SOLE AND EXCLUSIVE REMEDIES AND OUR ENTIRE LIABILITY FOR ANY BREACH OF
THIS LIMITED WARRANTY. OUR LIABILITY SHALL UNDER NO CIRCUMSTANCES EXCEED THE ACTUAL AMOUNT PAID BY YOU FOR THE DEFECTIVE PRODUCT, NOR
SHALL WE UNDER ANY CIRCUMSTANCES BE LIABLE FOR ANY CONSEQUENTIAL, INCIDENTAL, SPECIAL OR PUNITIVE DAMAGES OR LOSSES, WHETHER DIRECT
OR INDIRECT.
SOME STATES DO NOT ALLOW THE EXCLUSION OR LIMITATION OF INCIDENTAL OR CONSEQUENTIAL DAMAGES, SO THE ABOVE LIMITATION OR EXCLUSION MAY
NOT APPLY TO YOU.
THE DURATION AND REMEDIES OF ALL IMPLIED WARRANTIES, INCLUDING WITHOUT LIMITATION THE WARRANTIES OF MERCHANTABILITY AND FITNESS FOR
A PARTICULAR PURPOSE ARE LIMITED TO THE DURATION OF THIS EXPRESS LIMITED WARRANTY.
20
 Loading...