

Viola Systems Cadenza Owner's Manual

Revision: 01
---------------------------------------------------------------------------
CADENZA PRE AMPLIFIER
OWNER’S MANUAL
-------------------------------------------------------------------------------
© Viola Audio Laboratories 2005
The information contained in the manual is subject to change without notice. The
most current version of this manual will be posted on our web site at
www.Violalabs.com.
P/N: 91-cadenza manual
Viola Cadenza Manual Rev 1 Page 1 of 16 7th September 2005

TABLE OF CONTENTS
• Safety Instructions 3
• Introduction 4
• Unpacking 4
• Voltage Setting 4
• Location 5
• XLR Connector Pin Assignment 5
• Surround Sound Processor Loop 6
• Cadenza Front Panel Description 7
• Cadenza Rear Panel Description 8
• Cadenza Power Supply Rear Panel 9
• Connecting the Cadenza to your System 9
o Connecting the Inputs 10
o Connecting the Outputs 10
• Connecting the Power Supply 10
• AC Power Cable Connection 10
• Switching on for the First Time 11
• Breaking In 11
• Care and Cleaning 12
• Mains Fuse 12
• Troubleshooting 13
• Warranty 14
• Service 14
• Contacting VIOLA 15
• Specifications 16
Viola Cadenza Manual Rev 1 Page 2 of 16 7th September 2005

IMPORTANT SAFETY INSTRUCTIONS
Please read all of the following instructions carefully before operating your Cadenza.
1. This product contains no user serviceable parts. Never attempt to
repair the unit yourself. Refer all servicing to a VIOLA approved
technician.
2. This product must be connected to the mains supply with a threeconductor AC mains power cord that includes a ground connection.
To prevent shock hazard, all three connections must ALWAYS be
used. NEVER defeat the ground connection.
3. ALWAYS disconnect your entire system from the AC mains before
connecting or disconnecting any cables, or when cleaning any
component.
4. Never operate this unit with any covers removed. Dangerous
voltages may exist within the unit, even when it is disconnected
from the mains supply.
5. NEVER use flammable chemicals for cleaning this product.
6. NEVER wet the inside of this product with any liquid, or operate the
unit in a wet environment.
7. NEVER block airflow through the ventilation slots on either the top
or the bottom of the units.
8. NEVER bypass any fuses.
10. NEVER replace any fuse with a value or type other than those
specified. Suitable replacements are available from your local VIOLA
dealer, national distributor or directly from VIOLA.
11. NEVER expose this product to temperatures outside the range 0°C
to 55°C, non-condensing.
12. ALWAYS disconnect the unit from the mains supply during lightning
storms, or if the unit will not be used for a prolonged period.
Viola Cadenza Manual Rev 1 Page 3 of 16 7th September 2005
INTRODUCTION
100
120
230
240 USE ONLY WITH
Thank you for choosing the VIOLA Cadenza Preamplifier. Great care has gone into
the design and manufacture of the Cadenza and if properly used, it will give a
lifetime of musical enjoyment. We strongly recommend that you read these
instructions before you attempt to use the unit, so that you can be sure it is set up to
give optimum performance.
UNPACKING
Please keep all of the packing materials in case you ever need to ship the unit.
Should you need to return the unit to the factory, you must use the original shipping
carton. The use of any other packing may result in the product sustaining damage in
transit. Such damage is not covered by the warranty. Replacement shipping cartons
may be obtained via your VIOLA dealer, national distributor or directly from the
factory.
After unpacking the unit, please confirm that the following items are present:
1 VIOLA Cadenza preamplifier
1 VIOLA Cadenza preamplifier power supply
1 DC supply cable
1 three-conductor mains cord
1 user manual
If any of the above items are missing, or if the units show any signs of damage,
please contact your VIOLA dealer immediately.
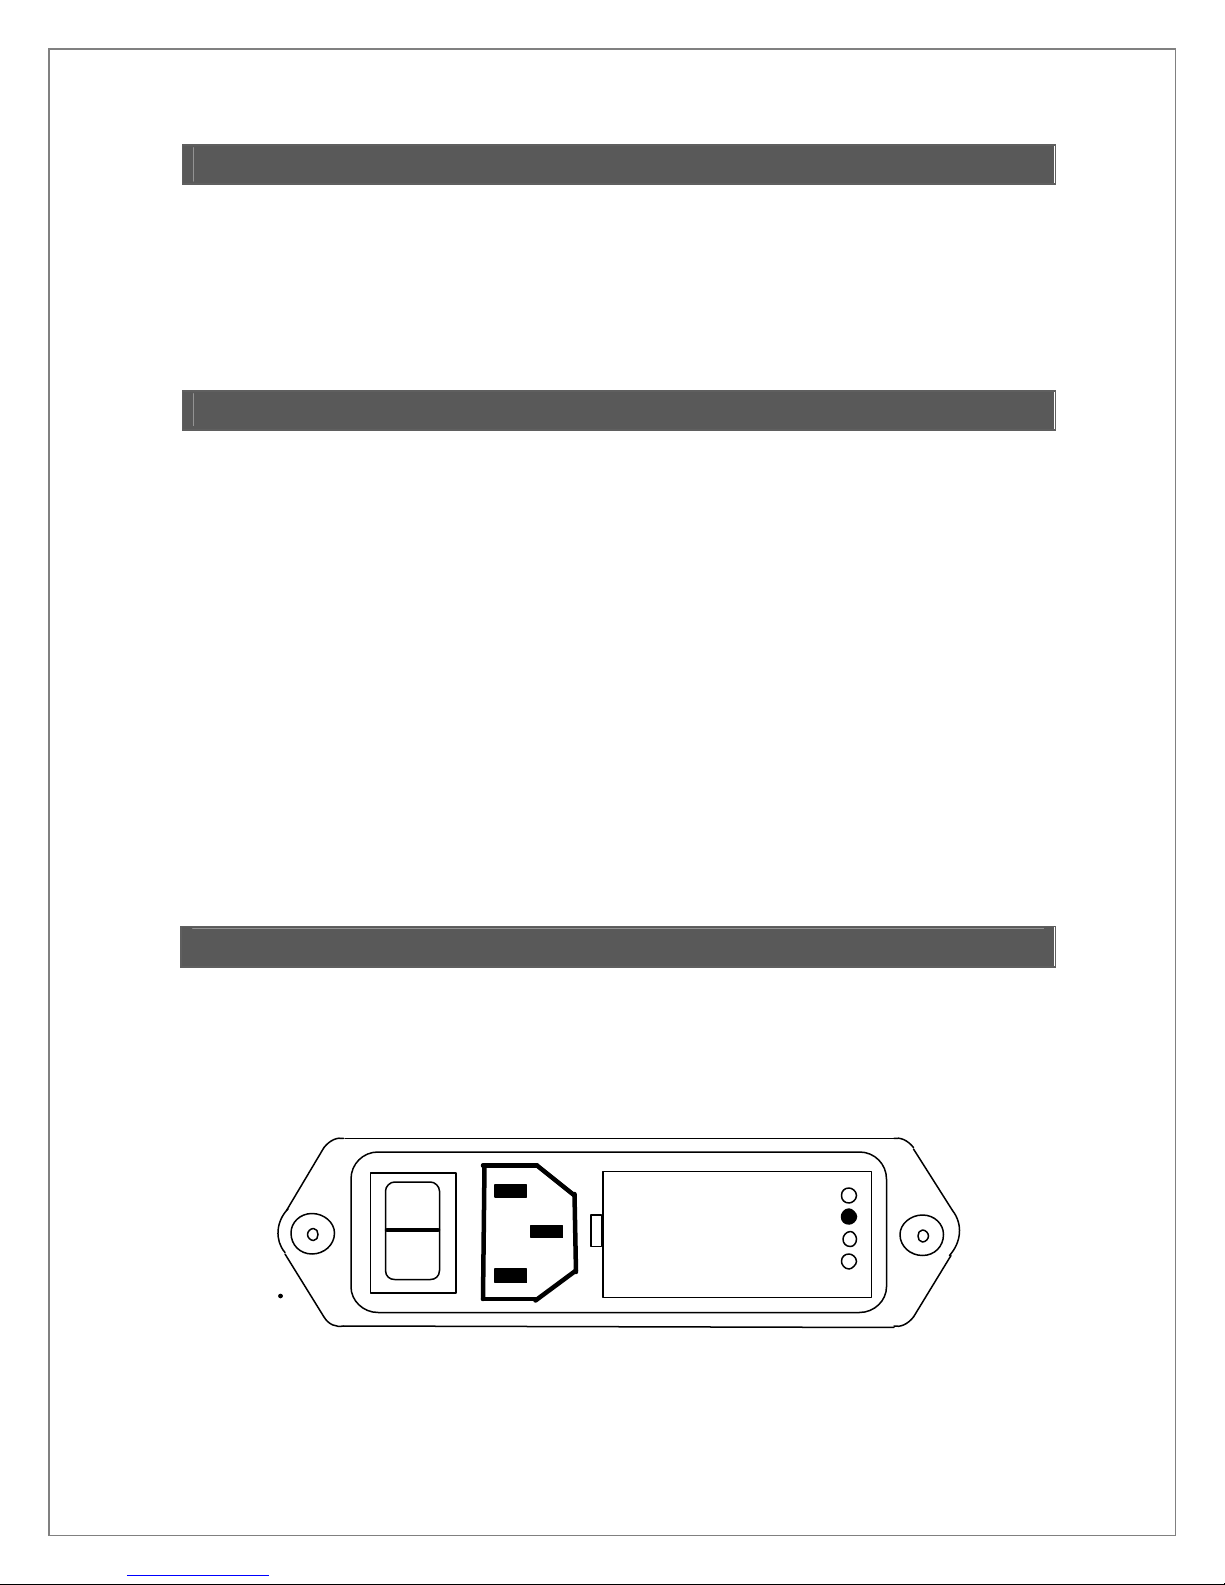
VOLTAGE SETTING
Before going any further please, confirm that the unit is set to operate on the mains
voltage you plan to use. The setting is indicated on the fuse cover on the mains
input receptacle, which is located on the power supply rear panel. In the example
shown in figure 1 below, the unit has been set to operate from 120V.
Viola Cadenza Manual Rev 1 Page 4 of 16 7th September 2005
1
250V FUSES
0
Figure 1. Cadenza power supply mains inlet receptacle.
If the setting on your unit is not correct, contact your VIOLA dealer. Only a VIOLA
approved technician should change the voltage setting. Do not attempt to do this
yourself. Should you set the unit to the wrong voltage, you risk personal injury and
you may also cause serious damage to the unit which will void the warranty.
LOCATION
The pre -amplifier should be placed on a rigid stand or shelf. Do not place it on top of
a power amplifier or any other device that handles a large amount of power or may
generate a significant amount of heat. Whilst the power supply may be located on
the same shelf adjacent to the pre -amplifier, it is better if it is located on a separate
shelf.
Always allow a clearance of at least 3.5” (5cm) above the both units. You must also
allow a clearance of at least 6” (15 cm) behind the units, to enable the cables to be
routed without being subject undue strain.
XLR CONNECTOR PIN ASSIGNMENT
CONNECTOR PIN ASSIGNMENT
The pin assignments on the Cadenza’s XLR connectors conform to the AES 14
standard, which is now commonly used throughout the audio industry. These
assignments are shown below:
Pin 1: Signal ground
Pin 2: Signal + (non-inverting)
Pin 3: Signal - (inverting)
Connector shell: Chassis ground
Some equipment may have the polarity of the signals on pins 2 and 3 of the XLR
connectors swapped over. Please refer to the user manuals of the other equipment
in your signal chain to confirm whether this is the case.
If this is the case, it will not cause any damage, but it may reduce the quality of the
stereo image, as well as the perceived attack of the bass. This situation is easily
remedied by swapping the connections of pins 2 and 3 at either end of one of one set
of balanced cables in the signal chain. Alternatively you can swap over the polarity
of the speaker leads on both channels. Your dealer should be able to advise you on
the best course of action.
Viola Cadenza Manual Rev 1 Page 5 of 16 7th September 2005
 Loading...