

Page 1
Owner’s Manual
Page 2

Table of Contents
Table of Contents
Welcome
Products
How To
Support
Welcome
A note from our President 2
Cam Care & Safety Precautions 3
Products
Adventure Cam 3 4
Adventure Cam H2O 5
S.C.O.U.T. Cam 6
Adventure Cam II 7
Plug Types 8
Power Sources 8
Mounts 8
Lenses 9
Neutral Density Filters 9
Lens & Filter Tool Kit 9
How To
General Connections 10
Connect Cable to Cam 10
Connect Cam to Recording Device 11
Connect Cam to Power Source 12-13
Connect LANC to Recording Device 13
Connect Cam to Television 14
Change the Neutral Density Filters 14
Change the Lenses 15
Focus the Lens 16
Support
Mounting Tips 17
Videography Tips 17
Cam Comparison 18
Troubleshooting 18-19
Glossary 20-21
Customer Service 22
Warranty/Returns 23
1 | Table of Contents
Page 3

Welcome: A note from our President
Welcome: A note from our President
Thank you for choosing V.I.O. - dba Viosport and Viotac - cameras and accessories; I am
confident you will find our equipment to be of the highest quality in the industry. We are
committed to the success of your video pursuits and take great pride in our products and
professional level of customer service and support.
The art of capturing video is best achieved when you’re familiar with your equipment; therefore,
we ask that you read this manual in its entirety and retain for future reference.
Visit our websites regularly for new product releases, shooting techniques and industry news. Be
sure to check out our video gallery – how do your videos compare?
Enjoy your new equipment.
David Ollila
President
V.I.O., Inc.
www.viosport.com
www.viotac.com
2 | Welcome
Page 4

Welcome: Cam Care & Safety Precautions
Welcome: Cam Care & Safety Precautions
Viosport 12v Rechargeable Battery Pack
Viosport Helmet Cam
PLEASE READ THE INFORMATION AND FOLLOW ALL INSTRUCTIONS BEFORE USING
THIS PRODUCT.
Viosport Helmet Cam
CARE:
• Clean and inspect after every use. Be sure to use a non-abrasive cloth when cleaning the lens.
• Inspect all plug terminals to make sure that they are clean and in proper alignment.
• Never force a connection.
• Always hold the cable end to connect and disconnect.
• Store your equipment in a cool, dry place.
• Check all cables for cracks or exposed wires; if a cable is suspect, discard and replace.
• Cameras are not serviceable – do not attempt to open the case as this will void any possible
warranty. The Adventure Cam 3 and S.C.O.U.T. Cam have replaceable lenses, removing the front
lens cover will not cause damage and will not void your warranty.
Viosport 12v Rechargeable Battery Pack
IMPORTANT WARNING:
Charge the Li-Ion battery with the charging unit and power adapter included in the package only!
Inserting any other power adapters may damage the device, destroy the battery pack, void the
warranty, and/or cause injury to the user.
CAUTIONS:
• Always unplug the charger when not in use.
• Always replace frayed or damaged wires and broken plugs immediately.
• Always use the charger with the original AC adapter.
• Always unplug your AC power adapter from the wall outlet before cleaning.
• Do not store, place, or use the AC power adapter where it could come into contact with water or
moisture.
• Do not recharge the battery under direct sun light.
• Do not short-circuit the metal contacts of the battery pack.
• Do not disassemble, deform, or reconstruct any part of the battery and charger kit.
NOTES:
• It is normal for the AC adapter, charging unit, and battery to become warm during regular
operation or when charging.
• If the charger does not charge the battery, check to see if the battery is already fully charged, dead,
faulty, or worn out. All rechargeable batteries will eventually wear out after being charged for a
certain numbers of cycles.
• Always keep metal contacts clean by wiping the surfaces with a dry, soft, and clean cloth.
• Remove the battery from the camcorder, Viosport Adventure Camera, and/or charger after use.
These devices will continue to drain a small current from your battery even if they are turned off.
• All batteries will naturally discharge over time even if they are not in use. Be sure to recharge the
battery on the same day or the day before you plan to use it.
3 | Welcome
Page 5
Products: Adventure Cam
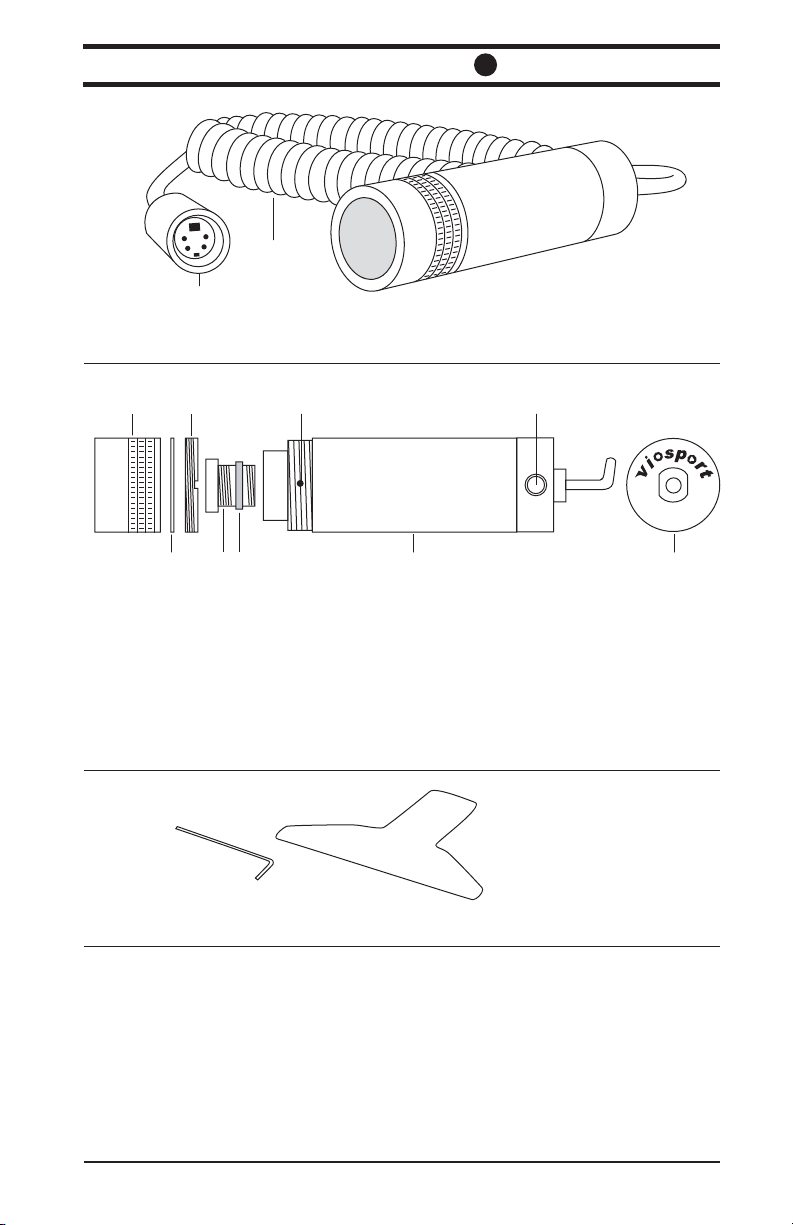
Products: Adventure Cam
Figure 1
B
A
A. Viosport custom 4-pin plug
B. Coiled cable
Figure 2
C
A
D
B
E
F
G
A. Lens cover
B. Neutral density filter
C. Retaining ring
D. Lens
E. Tension device
F. Set screw
G. Main body
H. 1/4-20 female thread
I. Rear of camera
3
H
I
Figure 3
A
B
A. Allen wrench
B. T wrench
Resolution 520 TV Lines Light Sensitivity 0.2 Lux F 2.0
CCD Chip Sony Ex-View ® 1/3” Power Supply 12 VDC (+/- 10%)
Lens 3.6mm Power Consumption 1.2 W (+/- 10%)
Field of View 72.5 degrees Weight 105g
H x V (pixels) NTSC: 811 x 508 Dimensions 23mm (Ø)
PAL: 752 x 582 x 80mm (L)
Outer Casing Silver
4 | Products
Page 6
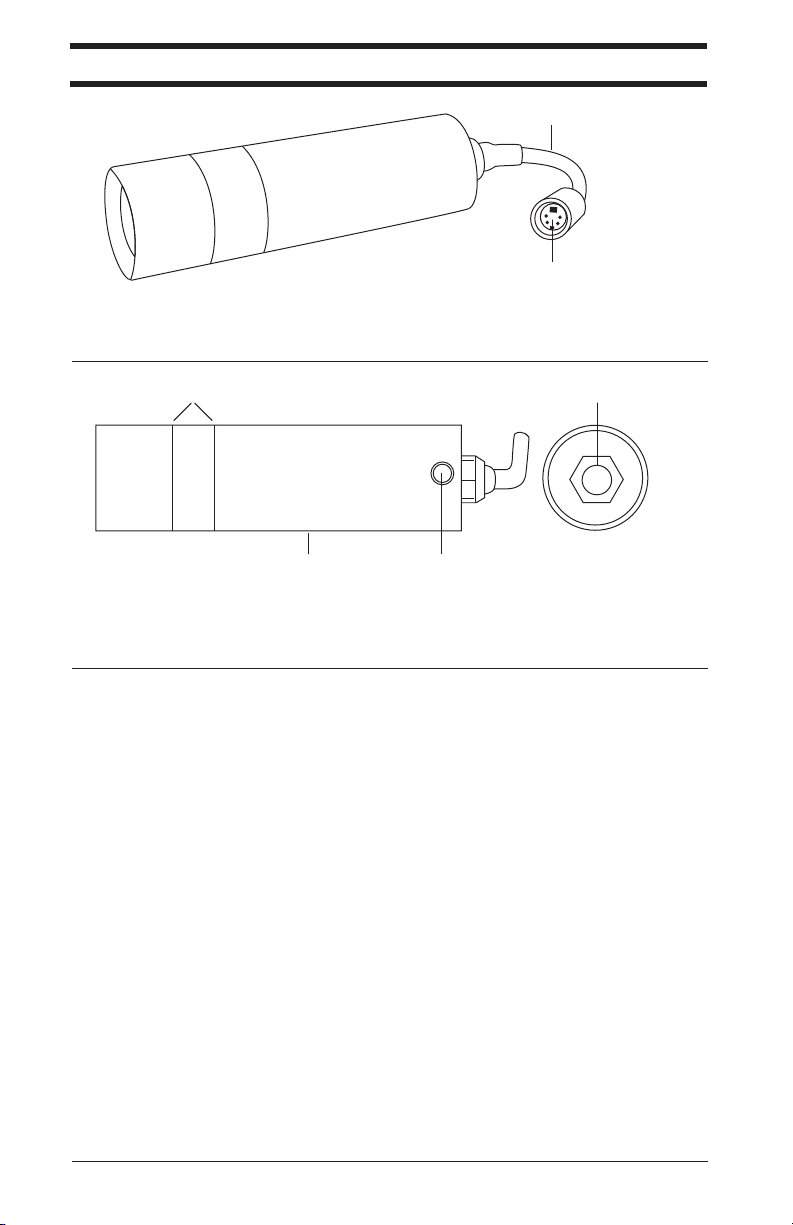
Products: Adventure Cam H2O
Products: Adventure Cam H2O
Figure 1
B
A
A. Viosport custom 4-pin plug
B. 4.5” pigtail cable
Figure 2
A
B
C
D
p
r
r
e
o
t
o
a
f
W
H
i
g
h
R
e
s
a
r
e
m
a
C
n
o
o
i
l
t
u
A. Warranty seal
B. Main body
C. 1/4-20 female thread
D. Rear of camera
Resolution 480 TV Lines Light Sensitivity 0.05 Lux F 2.0
CCD Chip Sony Hyper HAD ® 1/3” Power Supply 12 VDC (+/- 10%)
Lens 3.6mm Power Consumption 3 W (+/- 10%)
Field of View 93 degrees Weight 196g
H x V (pixels) NTSC: 510 x 492 Dimensions 32mm (Ø)
PAL: 500 x 582 x 110mm (L)
Outer Casing Silver
5 | Products
Page 7
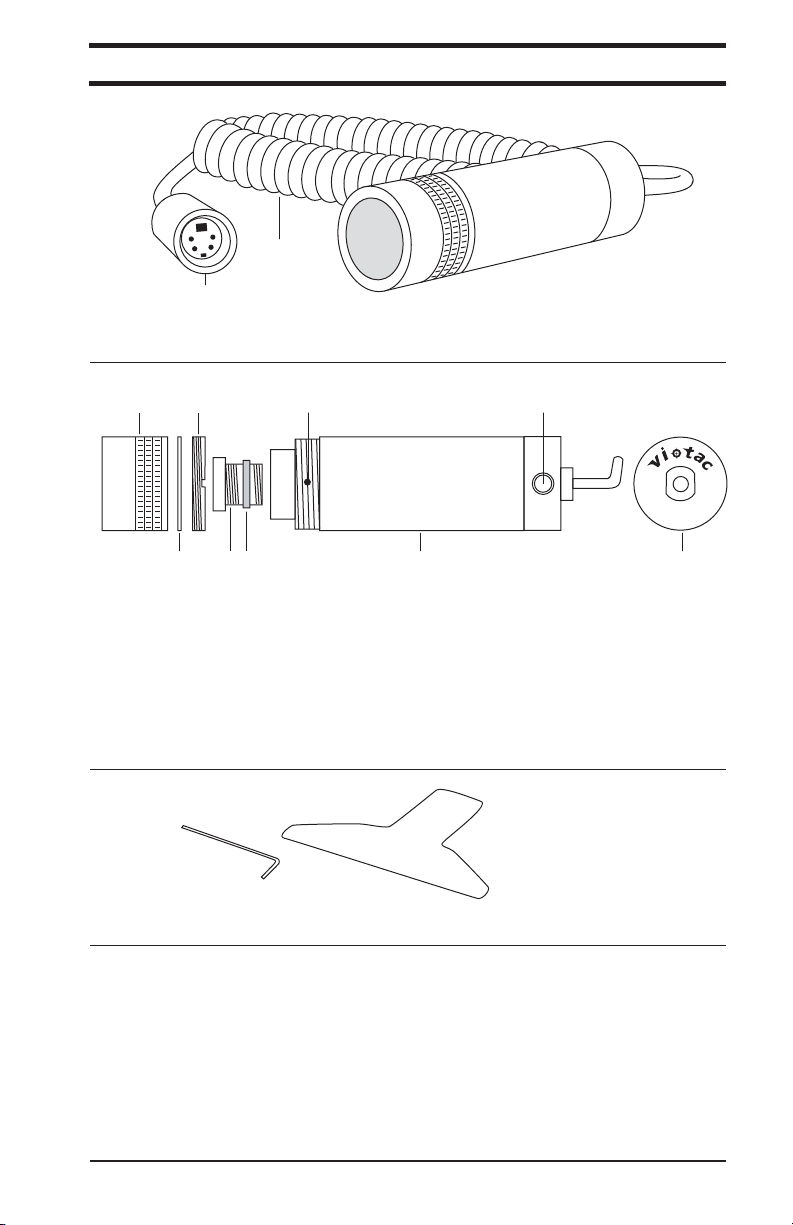
Products: S.C.O.U.T. Cam
Products: S.C.O.U.T. Cam
Figure 1
B
A
A. Viosport custom 4-pin plug
B. Coiled cable
Figure 2
C
A
D
B
E
F
G
A. Lens cover
B. Neutral density filter
C. Retaining ring
D. Lens
E. Tension device
F. Set screw
G. Main body
H. 1/4-20 female thread
I. Rear of camera
H
I
Figure 3
A
B
A. Allen wrench
B. T wrench
Resolution 520 TV Lines Light Sensitivity 0.2 Lux F 2.0
CCD Chip Sony Ex-View ® 1/3” Power Supply 12 VDC (+/- 10%)
Lens 3.6mm Power Consumption 1.2 W (+/- 10%)
Field of View 72.5 degrees Weight 105g
H x V (pixels) NTSC: 811 x 508 Dimensions 23mm (Ø)
PAL: 752 x 582 x 80mm (L)
Outer Casing Matte Black
6 | Products
Page 8

Products: Adventure Cam II
Products: Adventure Cam II
Figure 1
A
B
A. Viosport custom 4-pin plug
B. 3” pigtail cable
Figure 2
A
B
C
D
A. Warranty seal
B. Main body
C. 1/4-20 female thread
D. Rear of camera
Resolution 380 TV Lines Light Sensitivity 1 Lux F 2.0
CCD Chip Panasonic 1/4” Power Supply 12VDC (+/- 10%)
Lens 2.9mm Power Consumption 130mA (+/- 10%)
Field of View 90 degrees Weight 80g
H x V (pixels) NTSC: 510 x 492 Dimensions 22mm (Ø)
PAL: 500 x 582 x 76mm (L)
Outer Casing Black
7 | Products
Page 9
Products: Mounts
Products: Power Sources
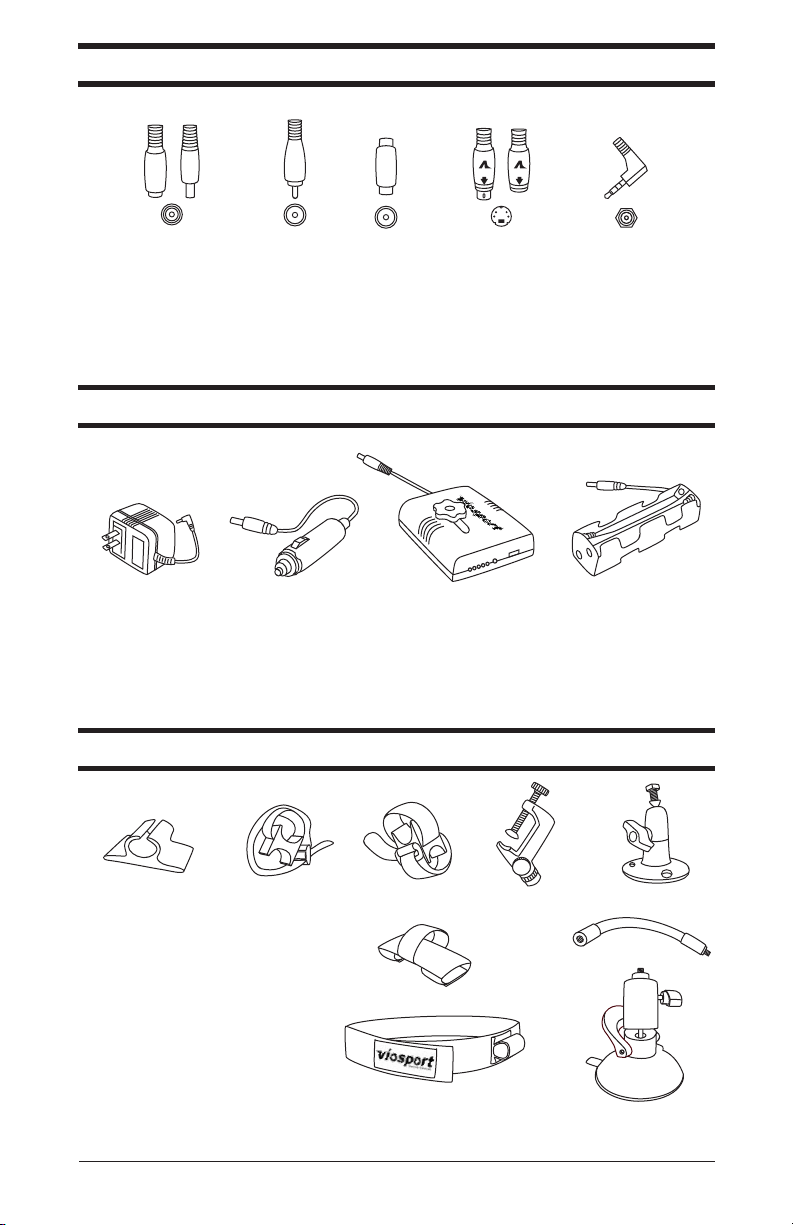
Products: Plug Types
Products: Plug Types
Figure 1
BC D EA
A. 2.1mm power source plug
B. RCA plug
C. RCA female/female adapter
D. Viosport custom 4-pin plug
E. 3.5mm A/V plug
Products: Power Sources
Figure 1
A. AC 12V power supply
B. 12V cigarette lighter power cord
C. 12V rechargeable battery
D. 8 “AA” battery holder
O
N
/O
F
F
CDBA
Products: Mounts
Figure 1
A
B
C
D
A. Universal Mount
B. Double Hook & Loop Mount
C. RT Angle Hook & Loop Mount
D. ClamperPod 2
F
E. Stationary Mount
F. Google Mount
G. Flex Mount
H. Headstrap Mount
I. Vacuum Suction Mount
H
Please visit Viosport.com or Viotac.com for updates on new mounts and how to use them.
E
G
I
8 | Products
Page 10

Products: Lens and Filter Tool Kit
Products: Neutral Density Filters
Products: Lenses
Products: Lenses
Figure 1
A B C D E Side View
A. 2.5mm: 92.5°
B. 2.9mm: 88°
C. 6.0mm: 47.5°
D. 8.0mm: 36.5°
E. 12.0mm: 24.5°
*Lenses are only compatible with the Adventure Cam 3 and S.C.O.U.T. Cam.
Products: Neutral Density Filters
Figure 1
A B C D
A. 100% (clear glass replacement)
B. 80%
C. 50%
D. 30%
E. 10%
*Density percentages are the amount of light let into the camera.
*Neutral density filters are only compatible with the Adventure Cam 3 and S.C.O.U.T. Cam.
Products: Lens and Filter Tool Kit
Figure 1
A
A. Allen wrench
B. T wrench
B
E Side View
9 | Products
Page 11
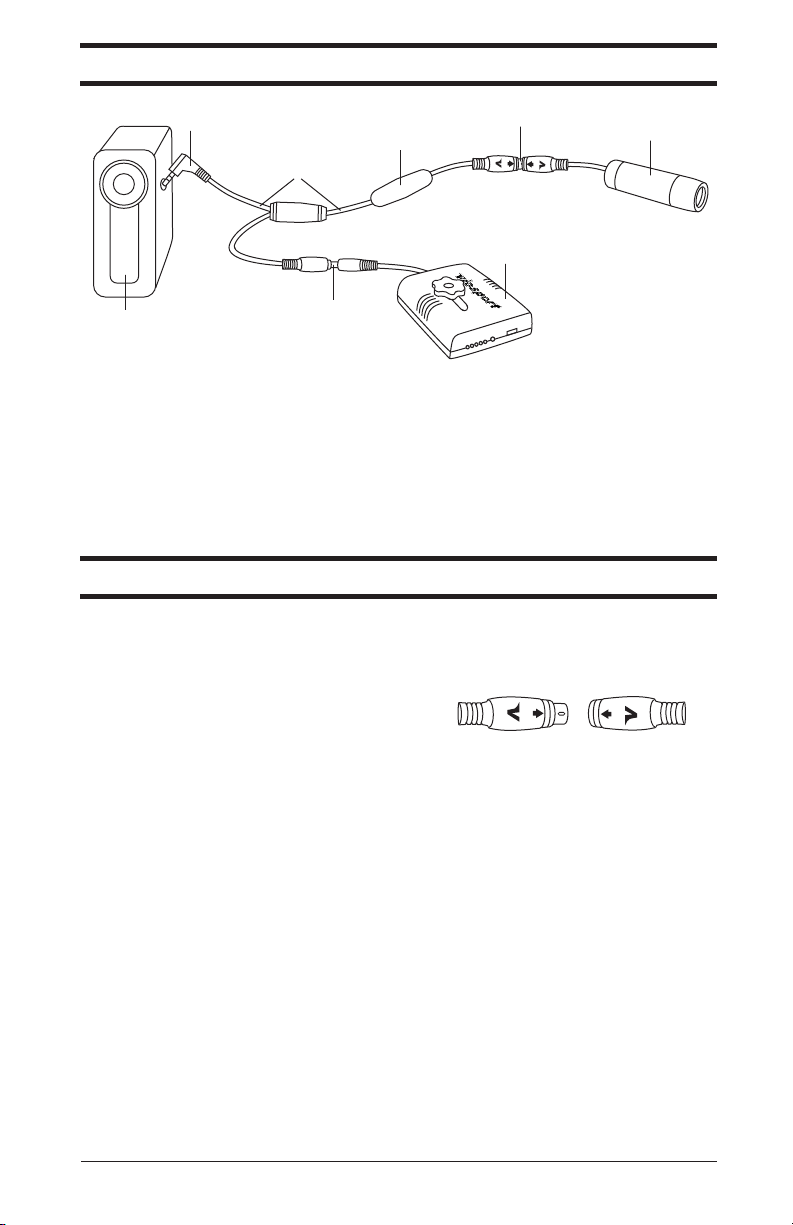
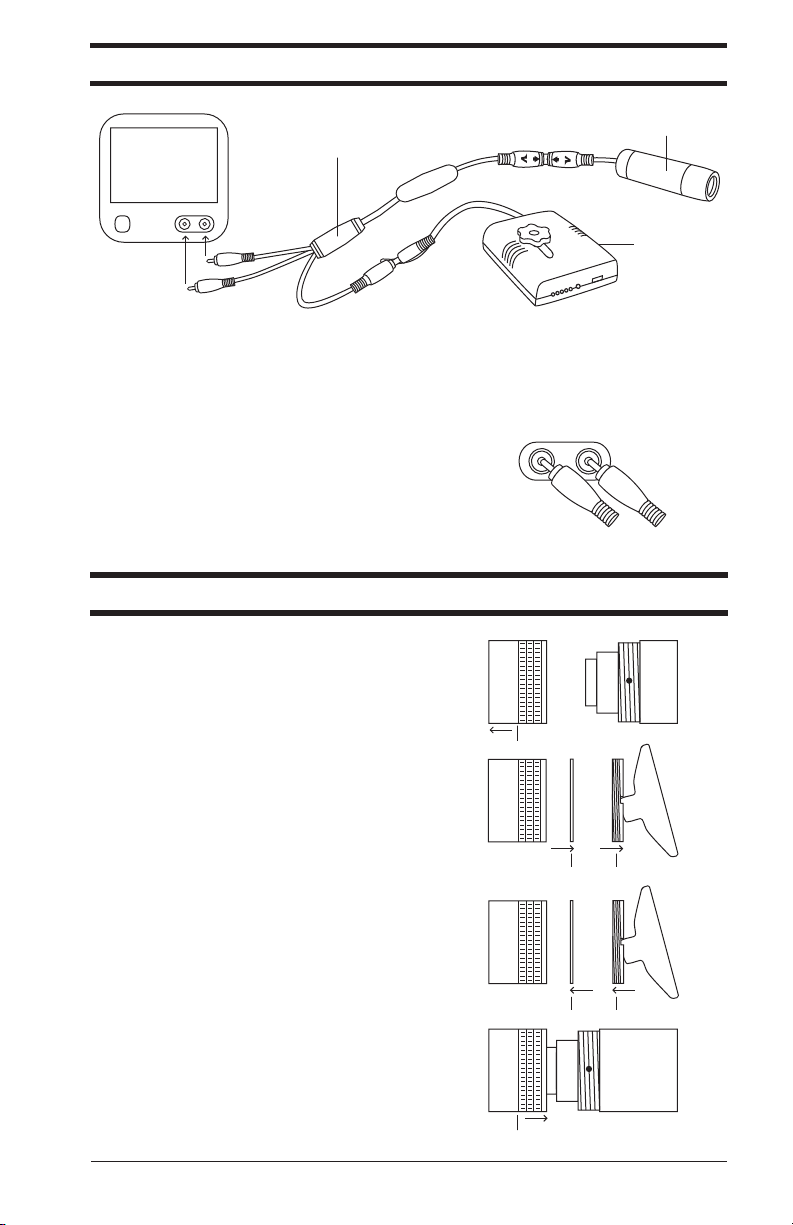
How To: Connect Cable to Cam
How To: General Connections
How To: General Connections
Figure 1
A
B
D
C
G
E
H
O
N
/O
F
F
F
A. Recording device
B. A/V plug (3.5mm plug shown)
C. Patent-pending A/V cable
D. Integrated microphone
E. Viosport custom 4-pin plug connection
F. Viosport helmet camera
G. 2.1mm power source plug connection
H. Power source (rechargeable battery shown)
*Images are not to scale. Individual products may vary.
How To: Connect Cable to Cam
All models of the Viosport Adventure Cams have interchangeable cables and follow the same
procedure.
To plug the male mini-din 4-pin connection from
the Viosport audio/video (A/V) cable into the
female connection on the Adventure Cam.
1. Line up the arrows on the connectors and push
together. Be sure the connectors ‘click’ into place to
ensure a secure, waterproof connection.
10 | How To
Page 12
How To: Connect Cam to Recording Device
How To: Connect Cam to Recording Device
There are several types of audio/video (A/V) input plugs into recording devices. Use the manual
from your recording device to find the location of the input, as well as what type of input is on
the device.
Devices with Composite Mini-plug input:
Use either the 2.5mm or 3.5mm Viosport A/V Cable
to connect directly to recording device.
1. Plug the male mini-plug on the Viosport A/V
Cable into the A/V input terminal on the recording
A/V
IN/OUT
A/V
IN/OUT
device.
Devices with RCA inputs:
Use the RCA Viosport A/V Cable to connect
directly to the recording device.
1. Plug the yellow, (male) RCA plug into the yellow
or VIDEO input terminal on the recording device.
2. Plug the white, (male) RCA plug into the white,
red or AUDIO input terminal on the recording
device.
Devices with inputs not described above:
Use the RCA Viosport A/V Cable in conjunction with
two RCA female/female adapters to connect to the A/V
Cable supplied with the recording device (for clarity,
we’ll refer to this cable as the RD A/V Cable).
1. Attach the RCA female/female adapters to the male
RCA ends on the Viosport A/V Cable.
2. Plug the yellow RCA plug into the yellow RCA plug
on the RD A/V cable and plug the white RCA plug into
the white RCA plug on the RD A/V cable.
3. Plug the RD A/V cable into the A/V input on your
recording device.
*Some RD A/V cables may have connections that are not used.
VIDEO
YELLOW
AUDIO
WHITE
YELLOW
WHITE
11 | How To
Page 13
How To: Connect Cam to Power Source
How To: Connect Cam to Power Source
Viosport Battery Holder
Viosport Rechargeable Battery Pack
Your Adventure Cam runs on 12 volts of power.
Viosport Battery Holder
1. Properly place 8 “AA” batteries into the battery
holder.
2. Plug the male power connector from the battery
holder into the female power connector on the
Viosport A/V Cable.
Depending on conditions of use, the Viosport Battery Holder could give you up to 12 hours of run
time. In order to conserve battery power, unplug the Adventure Cam from the battery holder when
not in use.
Viosport Rechargeable Battery Pack
Use:
1. Plug the male power connector on the battery into
the female power connector on the Viosport A/V
Cable.
2. Turn the Power Switch to the “ON” position.
If desired, attach the Li-Ion battery to the bottom of your recording device with the tripod bolt
built in the battery pack.
In order to conserve the battery power, turn the power switch to the “OFF” position and unplug
the Viosport Adventure Cam from the battery when not in use.
Depending on conditions of use, the Viosport Rechargeable Battery could give you up to 6 hours
of run time. In order to conserve battery power, unplug the Adventure Cam from the battery
holder when not in use.
Charging:
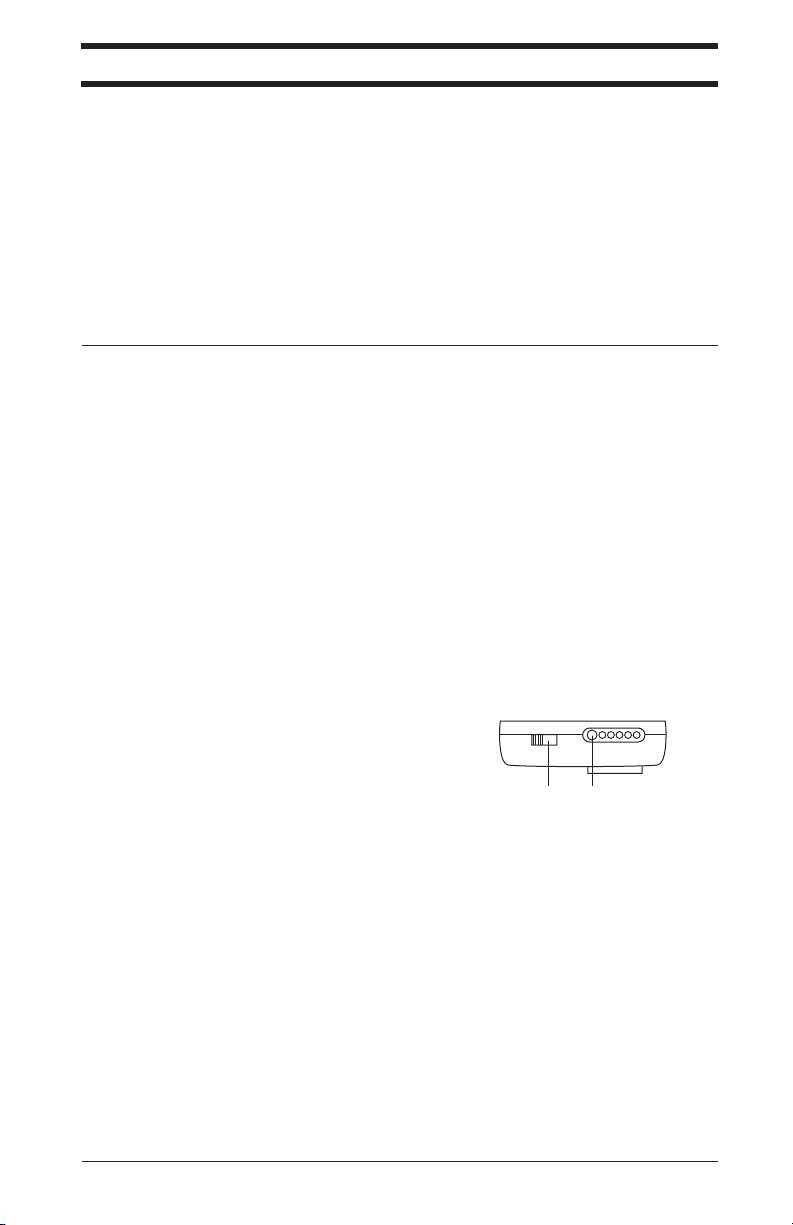
1. Push the CHECK button, located next to the 5-LED
fuel gauge (B). The number of lit LED lights indicates
the remaining power level in the battery from Low
(one LED) to High (five LED’s).
2. Turn the power switch to the “OFF” position (A).
3. Insert the output plug of the AC power adapter into
the charging unit and plug into an AC outlet. The
GREEN LED indicator on the charging unit will light
up to indicate it is powered properly and ready for use.
4. Plug the cable of charging unit into the socket of the
battery. The LED indicator on the charging unit will
turn RED to indicate the battery is receiving charge.
As soon as the battery is fully charged, the same LED
indicator will turn GREEN to indicate your battery is
fully charged and ready for use. Disconnect the
charger from the battery after the battery is charged.
The battery will take approximately 2.5 hours to charge.
ON/OFF
BA
12 | How To
Page 14

How To: Connect LANC to Recording Device
How To: Connect Cam to Power Source
How To: Connect Cam to Power Source
Viosport Cigarette Lighter
Viosport Cigarette Lighter
Use:
1. Plug the male power connector on the cigarette
lighter power cable into the female power connector
on the Viosport A/V Cable.
2. Plug the cigarette lighter power cable into a 12v
cigarette lighter.
In order to conserve power, unplug the Viosport Adventure Cam from the cigarette lighter when
not in use.
Charging Rechargeable Battery:
1. Push the CHECK button, located next to the 5-LED
fuel gauge. The number of lit LED lights indicates the
remaining power level in the battery from Low (one
LED) to High (five LED’s).
2. Turn the power switch to the “OFF” position.
3. Insert the output plug of the cigarette lighter power
cable into the charging unit and plug into a cigarette
lighter outlet. The GREEN LED indicator on the
charging unit will light up to indicate it is powered
properly and ready for use.
4. Plug the cable of charging unit into the socket of the
battery. The LED indicator on the charging unit will
turn RED to indicate the battery is receiving charge. As
soon as the battery is fully charged, the same LED
indicator will turn GREEN to indicate your battery is
fully charged and ready for use. Disconnect the charger
from the battery after the battery is charged.
How To: Connect LANC to Recording Device
1. Locate the LANC terminal on the camcorder.
Plug the LANC remote into the LANC terminal.
2. Make sure your camcorder is in VCR, VTR, or
PLAY mode to use it in conjunction with the LANC
remote control and Viosport Adventure Cam.
13 | How To
Page 15
How To: Change the Neutral Density Filters
How To: Connect Cam to Television
How To: Connect Cam to Television
Helmet Cam
Viosport RCA A/V Cable
TV
Power Source
O
N/O
FF
1. To connect your cam to your TV you must use the Viosport RCA A/V cable (shown above).
* Your television must accept RCA input or be connected to a VCR or DVD player with RCA
input in order to connect the Viosport camera system.
2. Plug the yellow (male) RCA plug into the yellow
VIDEO AUDIO
or video input terminal on the television and plug
YELLOW
the white (male) RCA plug into the white, red, or
WHITE
audio input terminal on the television.
*Be sure to have the Television on the AUX or A/V input channel.
How To: Change the Neutral Density Filters
1. Remove the lens cover by twisting it counter
clockwise (A).
2. Inside the lens cover is a retaining ring. Insert the
T wrench from the Tool Kit into the notches of the
retaining ring and turn it counterclockwise until the
retaining ring is completely removed. Once the ring
A
is loosened, it may be faster to use your fingers (C).
3. Safely remove the filter by turning the lens cover
upside down into the palm of your hand or on a soft,
flat surface (B).
4. Before inserting a new filter, use a soft cloth to
BC
clean off any dirt or fingerprints. Carefully place the
clean filter into the lens cover (D).
5. Insert the retaining ring into the lens cover and turn
clockwise with the T wrench. Be careful to avoid
cross threading. The retaining ring should be tight
enough to hold the filter in place, but not too tight
that the filter cracks or chips (E).
DE
6. Return the lens cover to the main body by turning
clockwise (F).
Please Note: The Neutral Density Filters are not
compatible with the Wide Angle Lens Cover.
F
14 | How To
Page 16

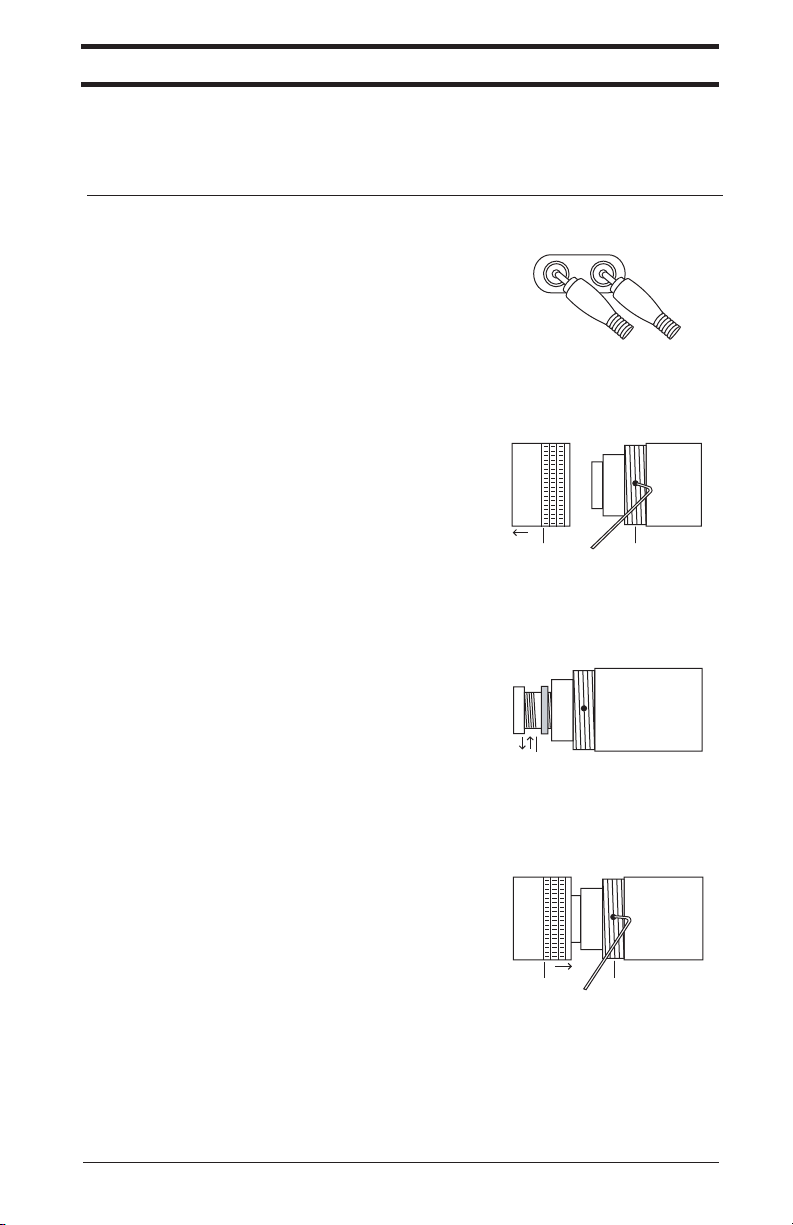
How To: Change the Lenses
How To: Change the Lenses
Before you begin changing the lenses, we recommend hooking your cam to a television or
recording device to check the focus. Please refer to the How To: Connect Cam to Television on
page 14 of this manual for proper hookup instructions.
Removal:
1. Remove the lens cover by twisting it
counterclockwise (A).
2. On the threaded section of the main body of the cam,
there are two sets of screw holes. DO NOT completely
remove the set screws – as they are very small and
easily misplaced. With the Allen wrench from the Tool
A
B
Kit, turn the set screws counterclockwise to loosen (B).
3. Remove the lens and tension device, if applicable) by
turning it counterclockwise (C).
Replacement*:
4. Choose the lens that fits your Field of View
C
requirements (see Lenses on page 9). Insert the new lens
and tension device into the main body and turn
clockwise (D). Be careful to avoid cross threading.
5. Find a point of reference that is the approximate
distance that you will be recording. Refer to your
D
television or recording device display to focus the new
lens. Turn the lens either clockwise or counterclockwise
to ensure that the image is focused clearly.
6. With the Allen wrench from the Tool Kit, turn the set
screws clockwise to tighten (F).
7. Return the lens cover to the main body by turning
clockwise (E).
EF
*If using the 2.5mm: 92.5° Wide Angle lens please see
the special notice below before returning the lens cover.
Special Notice: Using the Wide Angle Lens
Because the 2.5mm: 92.5° (wide angle) lens is
slightly larger than our other lenses, an additional lens
cover was developed to ensure optimal performance.
The new Wide Angle Lens Cover accomodates the
longer lens to eliminate the shadowing on the corners
of your footage. Please use the Wide Angle Lens
Cover whenever using the Wide Angle Lens.
E
Please Note:
The Wide Angle Lens Cover is not compatible with the neutral density filters. If you wish to
use the filters with the Wide Angle Lens you will have to use the original lens cover.
Tightening the regular lens cover while using the Wide Angle Lens may cause the glass to
break. Also, shadowing may occur on the corners of your footage. Viosport / Viotac will not
be responsible for any damage incurred if customers choose to use this method for using the
Wide Angle Lens.
15 | How To
Page 17
How To: Focus the Lens
How To: Focus the Lens
We recommend plugging your cam into a television to check the focus, as the TV will provide
you with a large precise view of the image. If you choose to focus the lens using your recording
device; please connect your cam to the device using the appropriate connection on page 11 of this
manual, turn your camcorder on in VCR, VTR or PLAY/EDIT mode, and continue to step 2.
1. Connect the Helmet Cam system to your television
using the Viosport RCA A/V cable.
*Please refer to the How To: Connect Cam to
Television on page 14 of this manual for proper
hookup instructions.
2. Remove the lens cover by twisting it counterclockwise (A). Be careful not to touch the glass or
the lens in this process as the oils in your skin that
come in contact with the glass on the lens cover or
the lens itself can make the image blurry.
3. On the threaded section of the main body of the
cam, there are two sets of screw holes. DO NOT
completely remove the set screws – it is best to
loosen them slightly, so they continue to have a very
slight bit of pressure on the lens. With the Allen
wrench from the Tool Kit, turn the set screws
counterclockwise to loosen (B).
4. Find a point of reference that is the approximate
distance that you will be recording (4-5 feet is
generally a good distance). For best results, find a
subject to focus on. A friend / family member works
well here, or you can also focus on a piece of text.
Refer to your television or recording device display
to focus the new lens. Turn the lens either clockwise
or counter-clockwise to ensure that the image is
focused clearly (C).
5. With the Allen wrench from the Tool Kit, turn the
set screws clockwise to tighten (E). Do not
overtighten the set screws. Overtightening the screws
could cause the lens to come out of focus.
6. Return the lens cover to the main body by turning
clockwise (D). Make sure the lens cover is tight to
ensure a water resistant seal.
*If using the Wide Angle Lens please see page 17 of
the manual before returning the lens cover.
VIDEO AUDIO
YELLOW
WHITE
AB
C
DE
SPECIAL NOTE: If your model of lens has a tension spring instead of foam tension rings and
it’s causing issues, try focusing the lens without the spring. If it will remain in focus without the
spring, then it is ok to use only the set screws to hold the lens in place. If it will not focus
without the spring, widen the circumference of the spring at the bottom.
16 | How To
Page 18
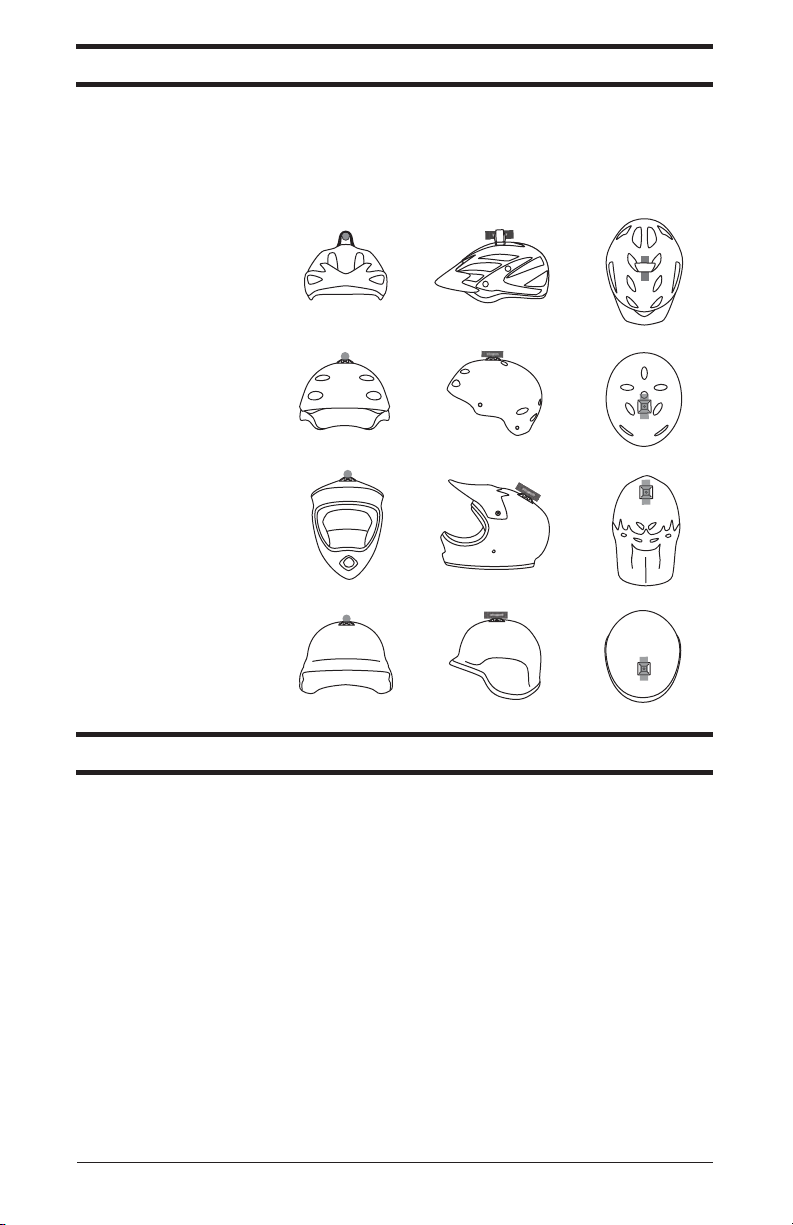
Support: Mounting Tips
Support: Mounting Tips
Support: Videography Tips
There are several ways to mount your Viosport camera to your helmet. In most cases, the best
mounting position is to have the camera parallel to the ground; however, since most of your
filming will be done while you are in an action-forward position (example: riding a bike), the
camera may point slightly upward when your helmet is resting on a flat surface.
Here are some examples of different helmets and various mounting positions.
Deep-vented bike helmet
Smooth-surfaced
ski/snowboard helmet
Smooth-surfaced
full-face helmet
Smooth-surfaced
military/tactical helmet
Support: Videography Tips
• When the Viosport Camera is mounted to your helmet, keep your head steady and try not to
rotate rapidly from side to side. Keeping steady will create video that is easier to watch. Most
riders choose to film from their helmet. Mounting the cam to your head provides smoother video,
as you act as a shock absorber.
• For compelling video, use a frame of reference, such as another person in front of you.
• When possible, keep the sun at your back.
• If you want to push your videos to the next level, try switching up your views. Our various
mounting systems allow you to put the helmet cam on just about any surface you can think of.
• If you have the need for speed and lead the pack – mount the camera facing behind you to
capture the agony as your friends try to catch up. You can accomplish this by mounting the
Viosport Camera to your helmet pointing behind you or by mounting it using our ClamperPod2
and Flex Mount.
• For sports involving handlebars try the RT Angle Hook and Loop Mount. Set up the camera
using this mount so that the camera is pointed back at you from your handlebars.
• The lower you mount the camera the faster the shot will look. Try mounting the camera on your
shoe, your pedal, a ski, a snowboard or low on your vehicles frame. It’s never looked faster.
To see a variety of creative views check out our Action Productions video gallery at Viosport.com.
17 | Support
Page 19
Support: Cam Comparison
Support: Cam Comparison
Support: Toubleshooting
Adventure
CCD Chip Sony Ex-View® 1/3” Sony Hyper HAD® 1/3” Sony Ex-View® 1/3” Panasonic® 1/4”
TV Lines 520 480 520 380
Low Light Lux Rating 0.2 0.05 0.2 1
Optional Lenses 5 0 5 0
Replacement Glass yes no yes no
Sun Filters 5 0 5 0
Outer Casing Silver Silver Matte Black Black
Quick Release Cable Coil Pigtail Coil Pigtail
Support: Toubleshooting
Cam 3
Adventure
Cam H2O
S.C.O.U.T.
Cam
Adventure
Cam II
Problem Possible Cause Possible Solution
I see an image from my
camcorder lens on my LCD
– not from the helmet cam.
Camera not in the
correct mode
1. Switch your camcorder to VCR (aka VTR
or PLAY/EDIT) mode.
2. Refer to the owner’s manual to set up the
device to accept input from an outside source.
You can generally find the instructions in a
section entitled “How to record from a TV or
VCR”.
I can’t plug the Adventure
Cam into a recording
device with the Viosport
cables.
Proprietary input
plug type
No A/V input
If you have a recording device that has an A/V
input plug that does not match the plug-type
of the Viosport A/V Cable (this applies to
several Sony Cameras); follow the instructions
on page 11 of this manual to connect your cam
to the recorder.
If you cannot find an A/V input plug on your
recording device, your recording device is not
compatible and will not work with the
Viosport helmet cams.
18 | Support
Page 20

Problem Possible Cause Possible Solution
My LCD is showing a blue
screen
My LCD screen shows a
blinking red tape.
My LANC Remote powers
the camera into CAMERA
mode.
My LANC lights are
flashing uncontrollably.
Recording device
needs to be set up to
accept input from
an outside source.
Adventure Cam not
sending video signal
Tape not present in
the camcorder
LANC Remote
incompatibility
Tape not advanced
1. Be sure your recording device is in VCR
(aka VTR or PLAY/EDIT) mode.
2. Refer to the owner’s manual to set up the
device to accept input from an outside source.
You can generally find the instructions in a
section entitled “How to record from a TV or
VCR”.
Call Viosport at 888.579.2267 for technical
support. If they cannot assist in getting your
helmet cam working, they will issue an RMA
for you to return the camera for further
testing.
Load a tape into your recording device.
You are using a camera with an electronic toggle
to switch modes. Our LANC v.1.6 solves this
incompatibility. It is designed to only work in
VCR mode and will automatically put your
camera in the correct mode.
Record just a second (or even less) and the
tape will move out from its top position and
the lights on the remote will return to normal.
It's always recommended that you move the
tape out of its top position before recording as
the image quality in the first frames might be
degraded.
My LCD is showing a black
screen
Helmet cam is not
getting power
1. If using the rechargeable battery, make sure
the battery is turned on and has a charge.
2. If using the “AA” battery holder, make sure
you properly install the batteries and that they
are new.
The image from my helmet
cam is recording to the
memory card and not to the
tape.
Pressing the main
record button
When recording from an outside source in
VCR mode, you must refer to your recorder’s
owner’s manual. You can generally find the
instructions in a section entitled “How to
record from a TV or VCR”.
*Additional support can be achieved by visiting www.viosport.com or calling 888.579.2267
*Check out our Education Productions in the Viosport video gallery for in depth tutorials on
getting your camera sytem set up, how to record, and many more helmet cam topics.
19 | Support
Page 21

Support: Glossary
Support: Glossary
Lens
12v (12 Volts)
A / V
Input (Audio/Video)
AC (Alternating Current)
Adventure Cam
Camcorder
CCD (Charge Coupled Device)
Composite
DC (Direct Current)
Field of View
LANC (Lan-cee)
3.5mm Mini Plug
12v (12 Volts)
Amount of power needed to operate all Viosport Adventure Cams. Too much or too little voltage
may damage the camera.
3.5mm Mini Plug
A terminal in the camcorder which is 3.5mm. Generally, this is the size of the A/V terminal, which
is where external audio and video sources connect to the camcorder. It looks similar to a classic
headphone jack.
A / V
Input (Audio/Video)
This is necessary to connect external audio and video sources, such as our Adventure Cams. Also
known as analog input.
AC (Alternating Current)
Basically: A wall outlet. Officially: Occurs when charge carriers in a conductor or semiconductor
periodically reverse their direction of movement. The voltage of an AC power source changes
from instant to instant in time.
Adventure Cam
Viosport Camera’s with the following model names: II, H20, 3 and S.C.O.U.T. Also known as
helmet cam, bullet cam, head cam, POV (point-of-view) cam or mini cam, just to name a few.
Camcorder
A portable electronic recording device capable of recording live-motion video/audio for later
replay through VCRs, TVs, and, in some models, a personal computer. The most popular
recording device for the Viosport Cameras.
CCD (Charge Coupled Device)
One of the two main types of image sensors used in digital cameras. When a picture is taken, the
CCD is struck by light coming through the camera's lens. Each of the thousands or millions of tiny
pixels that make up the CCD converts this light into electrons. The number of electrons, usually
described as the pixel's accumulated charge, is measured, and then converted to a digital value.
This last step occurs outside the CCD, in a camera component called an analog-to-digital converter.
Composite
Standard A/V lead for many devices such as DVD players, VCR's, camcorders. Generally 3.5mm
in size.
DC (Direct Current)
Basically: Battery powered. Officially: The unidirectional flow or movement of electric charge
carriers, usually electron. Direct current is produced by electrochemical and photovoltaic cells and
batteries.
Field of View
The horizontal range of view of the camera lens. Adventure Cam II: 90 degrees, Adventure Cam
H2O: 93 degrees, Adventure Cam 3: 72.5 degrees, S.C.O.U.T. Cam: 72.5 degrees.
LANC (Lan-cee)
A Sony remote control protocol which is built into various camcorder models. This is found only
on select Canon and Sony models.
Lens
A piece of glass or other transparent material used to converge or diverge transmitted light and
form optical images.
20 | Support
Page 22

Lithium Ion Battery
Lithium Ion Battery
LUX
MD4 Extension
Mini DV (Digital Video)
Mount
Neutral Density Filter
NTSC (National Television Standards Committee)
PAL (Phase Alternation Line)
Sony Proprietary Cable
VCR/VTR mode
POV
RCA
Resolution
A lithium ion (Li-Ion) battery is a rechargeable battery with twice the energy capacity of a
nickel-cadmium battery. It also offers greater stability and safety. The battery has no memory.
LUX
A unit of illumination equal to the direct illumination on a surface that is everywhere one meter
from a uniform point source of one candle intensity or equal to one lumen per square meter.
Note: lower LUX value cameras work better in low light.
MD4 Extension
Viosport's 12-foot extension cable for Adventure Cam II, H20, 3, and S.C.O.U.T. models.
Mini DV (Digital Video)
A type of camcorder recording media format. Implies recording, manipulating, storing and
playing back video images digitally.
Mount
Device used to hold Viosport's Adventure Cams in a desired place.
Neutral Density Filter
Basically: Sun shades. Officially: A thin sheet or disc of glass, plastic or gelatin having plane and
parallel faces, toned to some uniform and specific shade of gray, and intended to be used over the
camera lens during exposure for the purpose of reducing the intensity of the exposing light
without changing its color.
NTSC (National Television Standards Committee)
Standard protocol for television (TV) broadcast transmission and reception in North America.
North American camcorders require NTSC version of Viosport Adventure Cams.
PAL (Phase Alternation Line)
The analog television display standard that is used in Europe and certain other parts of the world.
If you are using a European model camcorder you would need a PAL-version Adventure Cam.
POV
Point of view.
RCA
An RCA connector is designed for use with coaxial cable. The yellow connection is for video
and the red and the white are for audio. Viosport's cams offer only one channel of audio.
Resolution
Resolution is the number of pixels (individual points of color) contained on a display monitor
expressed in terms of the number of pixels on the horizontal axis and the number on the vertical
axis. The sharpness of the image depends on the resolution and the size of the monitor. The
Adventure Cam II offers 380 TV lines of resolution. The Adventure Cam H2O offers 480 TV
lines of resolution. The Adventure Cam 3 and S.C.O.U.T. Cam both offer 520 TV lines.
Sony Proprietary Cable
A cable that is specific to Sony devices. The current Sony proprietary A/V cable has a half-moon
shape on one-end and RCA male and S-Video ends on the other.
VCR/VTR mode
This mode allows the camcorder to record from an external device such as Viosport Adventure
Cams.
21 | Support
Page 23
Support: Customer Service
Support: Customer Service
E-mail
Phone
Postal Mail
Have a question or comment regarding V.I.O., Inc. or our products? There are several ways to get
in touch with us.
E-mail
General Information:
Sales Information:
Customer Service:
Catalog Requests:
Warranty/Returns:
Resellers:
Rentals:
Government:
Production:
Website Technical:
Submit Tips:
Submit Video:
Phone
Our Customer Service lines are open Monday-Friday 8:00 am - 6:00 (EST). You may leave a
voicemail message during non-business hours. We strive to return each call within 24 business
hours.
Toll-free: 888.579.CAMS (2267)
Local: 906.226.9393
Fax: 906.228.6566
Postal Mail
V.I.O., Inc.
Viosport / Viotac
100 North Front Street
Marquette MI 49855
info@viosport.com
sales@viosport.com
customerservice@viosport.com
catalog@viosport.com
warranty@viosport.com
dealer@viosport.com
rentals@viosport.com
government@viosport.com
production@viosport.com
viosites@viosport.com
tips@viosport.com
video@viosport.com
info@viotac.com
sales@viotac.com
customerservice@viotac.com
catalog@viotac.com
warranty@viotac.com
government@viotac.com
Toll-free: 877.423.8678
Local: 906.226.9343
Fax: 906.228.6566
22 | Support
Page 24

Support: Warranty/Returns
Support: Warranty/Returns
30-Day Return
Warranty
Lifetime Return
Warranty
V.I.O. warrants all merchandise against defects in material or workmanship for one year from date
of purchase unless otherwise specified. The V.I.O. warranty is limited to the replacement or repair
of the defective item at no charge if we determine such item to be defective. This warranty shall
not apply to any item subject to misuse including static discharge, failure by Buyer to follow
instructions, product modification, ordinary wear and tear, negligent or improper operation, or
which has been installed or soldered or altered during assembly or use and is not capable of being
tested or resold. Modification, repair, or attempted repair by anyone other than V.I.O. without the
written permission of V.I.O. will void this limited warranty. Warranty is also voided on any
product that is found to have an altered or tampered with serial number.
Defective items must be shipped prepaid. V.I.O. will ship the return or replacement item to the
customer using UPS Ground services. If the customer shipped the item to V.I.O. using express
services, V.I.O. will match the level of service for the return. If the customer did not use express
shipping, but wishes to have the item express shipped to them, V.I.O. will charge the customer for
the upgraded shipping charges.
30-Day Return
Within 30 days of purchase, you may return any item purchased from V.I.O. for any reason for a
refund, exchange, or credit towards another V.I.O. purchase. The returned items must be in
original condition and packaging.
If parts are to be returned to V.I.O. due to Buyer error, Buyer may be subjected to a 15%
restocking fee. If parts are to be returned to V.I.O. and merchandise is damaged or returned in
non-resalable condition, Buyer may be subjected to 15-100% restocking fee. Including failure to
return accessories and/or owner's manuals. No exceptions. This includes duplicate shipments,
refused/unclaimed shipments, etc., items ordered by mistake, not shipped, not fitting application,
unsuitability for particular application or design. No refunds on lenses, special or custom orders.
Lifetime Return
If your camera does not qualify for warranty due to:
• outside of one-year time frame
• failure not considered a defect by V.I.O.
• camera was not manufactured by V.I.O.
Return your camera to Viosport and we will offer you a 15% discount on the purchase of a new
V.I.O. Adventure Cam.
23 | Support
Page 25

Notes
Notes
24 | Notes
Page 26

V.I.O. Inc.
Viosport / Viotac
100 N. Front Street | Marquette, MI 49855
Website: www.viosport.com
Email: info@viosport.com
Toll-free: 888.579.CAMS (2267)
Local: 906.226.9393
Fax: 906.228.6566
Website: www.viotac.com
Email: info@viotac.com
Toll-free: 877.423.8678
Local: 906.226.9343
Fax: 906.228.6566
wearable video technology
© 2005 V.I.O., Inc. All rights reserved. Viosport, the Viosport logo, the VioTac logo, Adventure Cam 3, S.C.O.U.T. Cam, Adventure Cam H2O, and Adventure Cam II are
trademarks or registered trademarks of V.I.O., Inc.
 Loading...