

Vinyl Works 2008CE COMBO Assembly Instructions Manual
MODEL 2008CE
MODEL 2008CE
MODEL 2008CEMODEL 2008CE
POOL ENTRY SYSTEM with GATE
POOL ENTRY SYSTEM with GATE
POOL ENTRY SYSTEM with GATEPOOL ENTRY SYSTEM with GATE
IMPORTANT INSTRUCTIONS
IMPORTANT INSTRUCTIONS: Read all instructions carefully & completely to become familiar with all
IMPORTANT INSTRUCTIONSIMPORTANT INSTRUCTIONS
parts, assembly, safety and proper use of this product. Failure to follow these instructions may
parts, assembly, safety and proper use of this product. Failure to follow these instructions may
parts, assembly, safety and proper use of this product. Failure to follow these instructions may parts, assembly, safety and proper use of this product. Failure to follow these instructions may
result in serious personal injury. SWIM RESPONSIBLY & SAFELY !
result in serious personal injury. SWIM RESPONSIBLY & SAFELY !
result in serious personal injury. SWIM RESPONSIBLY & SAFELY !result in serious personal injury. SWIM RESPONSIBLY & SAFELY !
TOOLS REQUIRED
TOOLS REQUIRED: 7/16" socket, nut driver or wrench, measuring tape, Phillips (star) screwdriver,
TOOLS REQUIREDTOOLS REQUIRED
1/4" & 1/8" drill bits & drill, pencil or marker & level. PAD LOCK REQUIRED.
1/4" & 1/8" drill bits & drill, pencil or marker & level. PAD LOCK REQUIRED.
1/4" & 1/8" drill bits & drill, pencil or marker & level. PAD LOCK REQUIRED.1/4" & 1/8" drill bits & drill, pencil or marker & level. PAD LOCK REQUIRED.
SAFETY INSTRUCTIONS & PROPER USE
SAFETY INSTRUCTIONS & PROPER USE ---- ASSEMBLY & INSTALLATION
This pool entry system has a 300 lb load capacity (one person) when properly assembled & installed
This pool entry system has a 300 lb load capacity (one person) when properly assembled & installed
•
This pool entry system has a 300 lb load capacity (one person) when properly assembled & installedThis pool entry system has a 300 lb load capacity (one person) when properly assembled & installed
•
Your above ground pool has shallow water
Your above ground pool has shallow water ---- absolutely NO DIVING or NO JUMPING into the pool
Your above ground pool has shallow water Your above ground pool has shallow water
•
This product conforms to the latest revisions of the ANSI/APSP recommended standards for
This product conforms to the latest revisions of the ANSI/APSP recommended standards for
This product conforms to the latest revisions of the ANSI/APSP recommended standards forThis product conforms to the latest revisions of the ANSI/APSP recommended standards for
above ground / on ground swimming pool ladders / entry systems. DO NOT use for other purpose
above ground / on ground swimming pool ladders / entry systems. DO NOT use for other purpose
above ground / on ground swimming pool ladders / entry systems. DO NOT use for other purpose above ground / on ground swimming pool ladders / entry systems. DO NOT use for other purpose
•
This entry is designed for use with flat bottom pools. Use of a ladder / step pad is recommended
This entry is designed for use with flat bottom pools. Use of a ladder / step pad is recommended
This entry is designed for use with flat bottom pools. Use of a ladder / step pad is recommendedThis entry is designed for use with flat bottom pools. Use of a ladder / step pad is recommended
•
For entry & exit of the pool, face steps or ladder at all times. Use handrails to assist climbing
For entry & exit of the pool, face steps or ladder at all times. Use handrails to assist climbing
For entry & exit of the pool, face steps or ladder at all times. Use handrails to assist climbingFor entry & exit of the pool, face steps or ladder at all times. Use handrails to assist climbing
•
This system is designed for use by one person only at all times
This system is designed for use by one person only at all times
This system is designed for use by one person only at all timesThis system is designed for use by one person only at all times
•
This system is designed with a protecting gate system
This system is designed with a protecting gate system ---- NEVER use system without gate
This system is designed with a protecting gate system This system is designed with a protecting gate system
•
When pool is not in use, make certain gate is securely closed, latched & LOCKED to restrict access
When pool is not in use, make certain gate is securely closed, latched & LOCKED to restrict access
When pool is not in use, make certain gate is securely closed, latched & LOCKED to restrict accessWhen pool is not in use, make certain gate is securely closed, latched & LOCKED to restrict access
•
Locate entry system on a solid base and free from high traffic areas around the pool
Locate entry system on a solid base and free from high traffic areas around the pool
Locate entry system on a solid base and free from high traffic areas around the poolLocate entry system on a solid base and free from high traffic areas around the pool
•
This entry system MUST be secured to top rail of pool for greater stability and safety
This entry system MUST be secured to top rail of pool for greater stability and safety
This entry system MUST be secured to top rail of pool for greater stability and safetyThis entry system MUST be secured to top rail of pool for greater stability and safety
•
Keep top platform and treads free from obstructions to avoid possible injury. Do not secure any items to the entry system.
Keep top platform and treads free from obstructions to avoid possible injury. Do not secure any items to the entry system.
Keep top platform and treads free from obstructions to avoid possible injury. Do not secure any items to the entry system. Keep top platform and treads free from obstructions to avoid possible injury. Do not secure any items to the entry system.
Such objects (e.g. thermometers, play toys, ropes) may create a potential for tripping or entrapment
Such objects (e.g. thermometers, play toys, ropes) may create a potential for tripping or entrapment
Such objects (e.g. thermometers, play toys, ropes) may create a potential for tripping or entrapmentSuch objects (e.g. thermometers, play toys, ropes) may create a potential for tripping or entrapment
•
NEVER ALLOW CHILDREN TO SWIM UNATTENDED
NEVER ALLOW CHILDREN TO SWIM UNATTENDED ---- Nothing replaces parental supervision
NEVER ALLOW CHILDREN TO SWIM UNATTENDED NEVER ALLOW CHILDREN TO SWIM UNATTENDED
•
Assemble and install this pool entry system as per the manufacturer’s instructions. Do not deviate from these instructions
Assemble and install this pool entry system as per the manufacturer’s instructions. Do not deviate from these instructions
Assemble and install this pool entry system as per the manufacturer’s instructions. Do not deviate from these instructions Assemble and install this pool entry system as per the manufacturer’s instructions. Do not deviate from these instructions
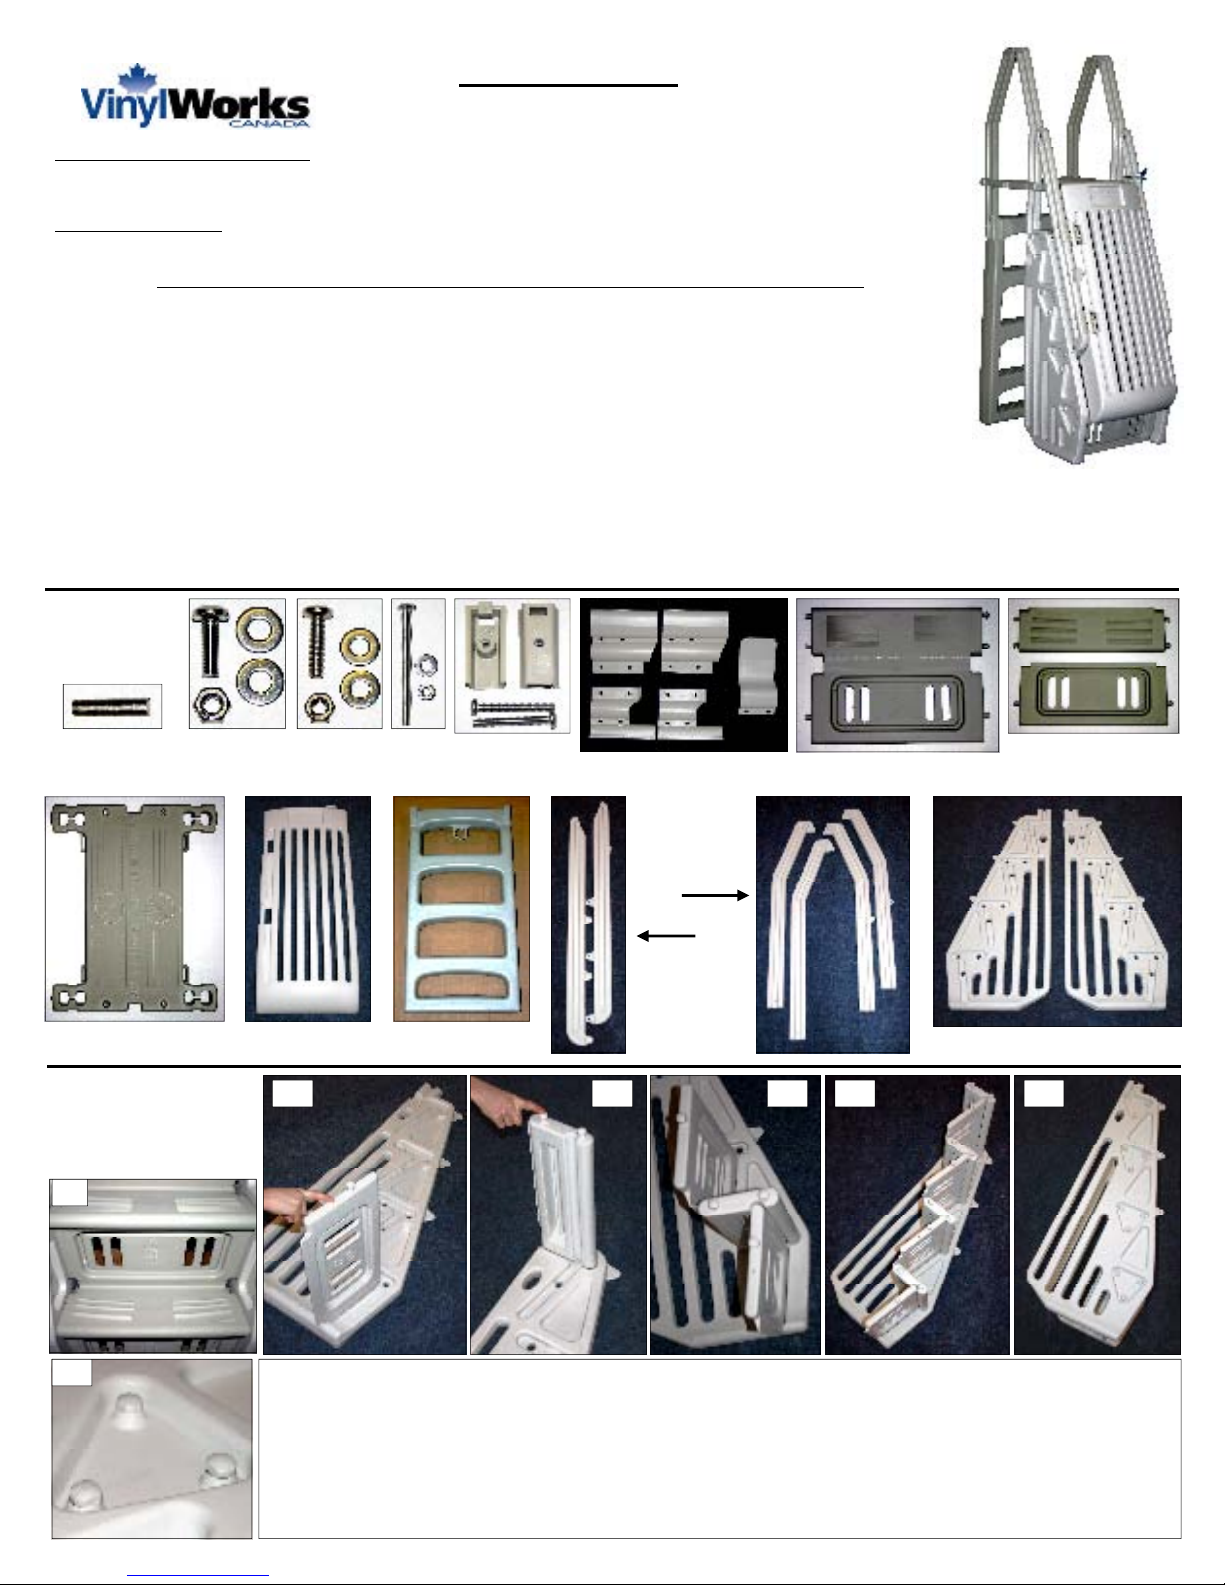
IDENTIFY
IDENTIFY
IDENTIFYIDENTIFY
PARTS
PARTS
PARTSPARTS
SAFETY INSTRUCTIONS & PROPER USE SAFETY INSTRUCTIONS & PROPER USE
: 7/16" socket, nut driver or wrench, measuring tape, Phillips (star) screwdriver,
: 7/16" socket, nut driver or wrench, measuring tape, Phillips (star) screwdriver, : 7/16" socket, nut driver or wrench, measuring tape, Phillips (star) screwdriver,
: Read all instructions carefully & completely to become familiar with all
: Read all instructions carefully & completely to become familiar with all : Read all instructions carefully & completely to become familiar with all
ASSEMBLY & INSTALLATION
ASSEMBLY & INSTALLATION ASSEMBLY & INSTALLATION
absolutely NO DIVING or NO JUMPING into the pool
absolutely NO DIVING or NO JUMPING into the pool absolutely NO DIVING or NO JUMPING into the pool
NEVER use system without gate
NEVER use system without gate NEVER use system without gate
Nothing replaces parental supervision
Nothing replaces parental supervision Nothing replaces parental supervision
---- COMBO
COMBO
COMBO COMBO
Stainless
Pins
FIT TREADS &
FIT TREADS &
FIT TREADS &FIT TREADS &
RISERS INTO
RISERS INTO
RISERS INTORISERS INTO
STRINGERS
STRINGERS
STRINGERSSTRINGERS
2.6
3/4" Bolt
3" Bolt
1" Bolt
Gate - 1 pc Ladder - 1 pc Top Platform - 1 pc
Handrail
Fillers
Gate Hinges & Stop
Upper
Handrails
2-Right
& 2-Left
Lower
Handrails
1 - Left
&
1 - Right
2.2 2.1
Tread-Riser - 3 pcs
Stringers - 1 Left & 1 Right
2.3 2.4 2.5
Top Tread - 1 pc
Bottom Riser - 1 pc
2.7
Lay stringer on flat surface with indentations to accept treads/risers facing up (as shown above in
“Parts”). Fit single bottom riser into bottom indentation (2.1) & snap into place making certain the button
lock tab of riser passes through hole in stringer. Fit top tread into top indentation (2.2) & snap into place.
Fold tread-riser & fit into indentations above single riser (2.3). Make certain when folding that the antiskid surface is facing upwards (2.6). Repeat for remaining two tread-risers (2.4) making certain all
button lock tabs protrude & lock in place (2.7). Place opposite stringer on top of treads-risers (2.5)
aligning indentations in stringer & button lock tabs with holes in stringer. Snap stringer in place locking
all tabs. Double check to make certain ALL tabs protrude through holes & lock in place.
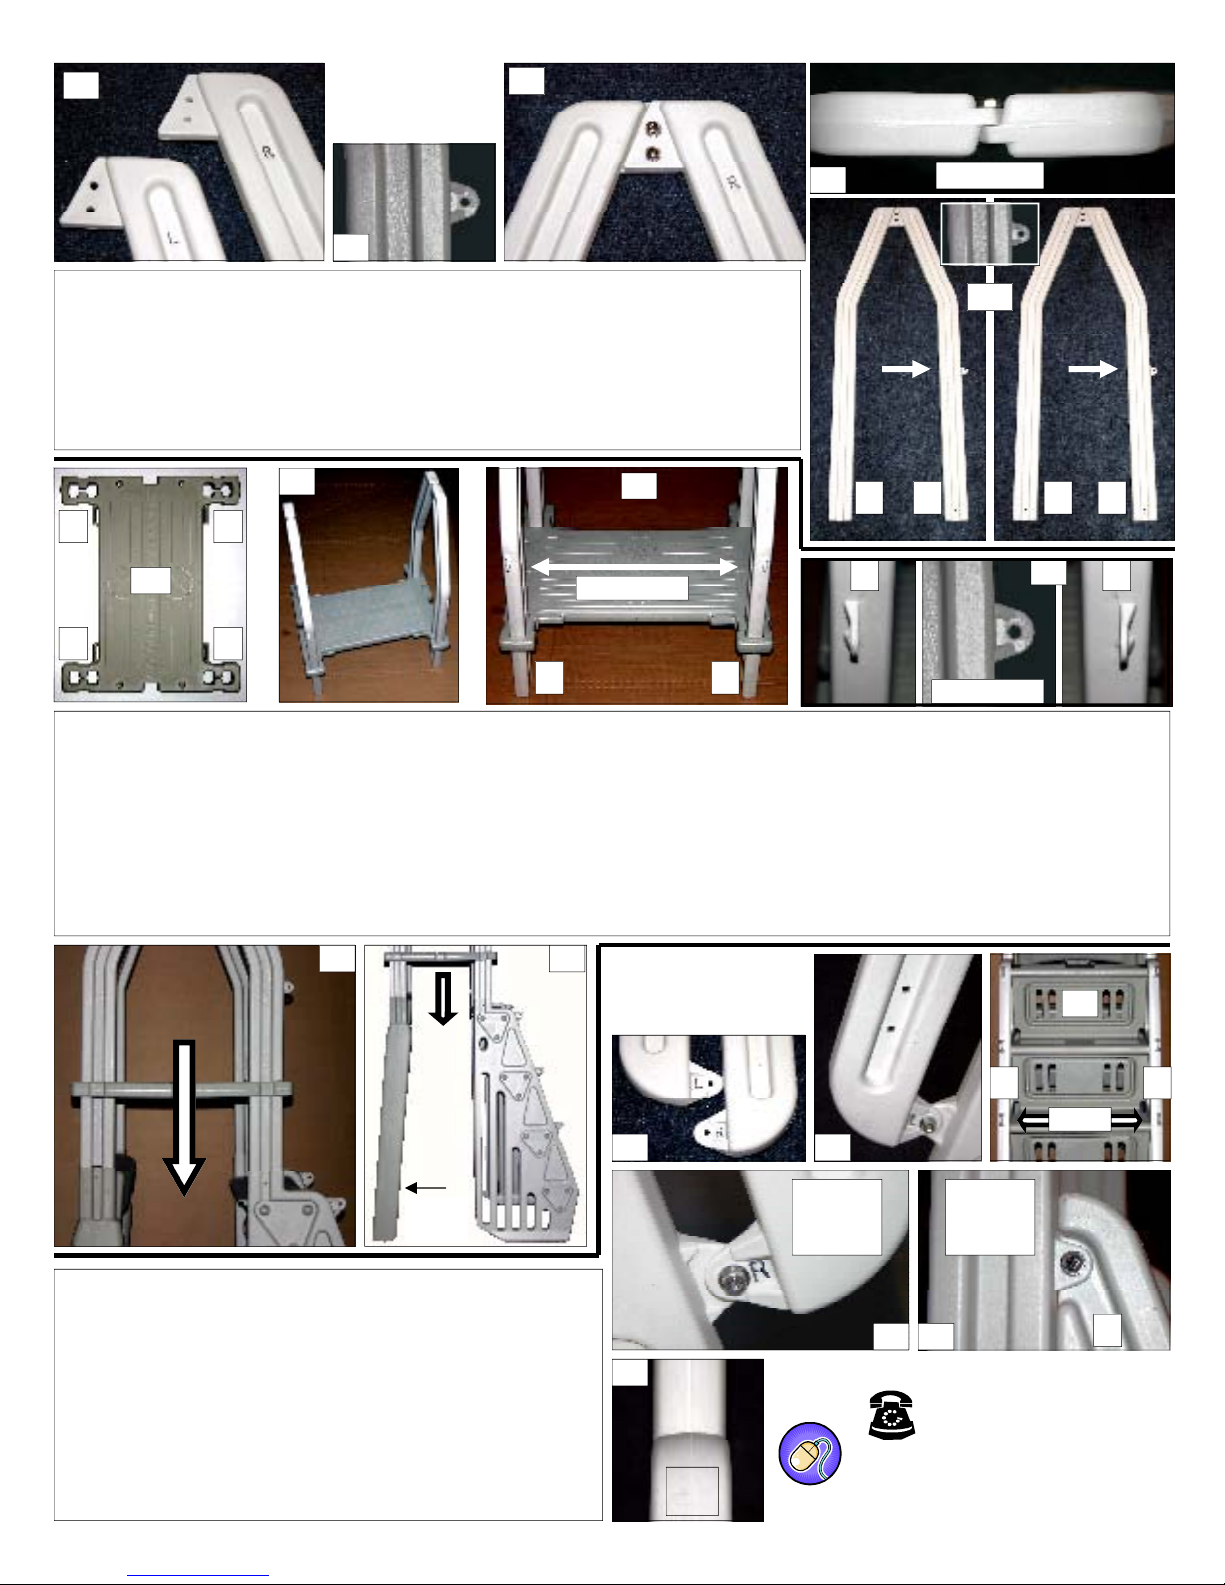
3.1
ASSEMBLE
ASSEMBLE
ASSEMBLEASSEMBLE
HANDRAILS
HANDRAILS
HANDRAILSHANDRAILS
3.3
3.4
3.2
Identify the upper RIGHT (R) & LEFT (L) handrails (small stamp in part - as shown in
3.1). NOTE
NOTE: one left & one right handrail have a small bolt flange molded on the side
NOTENOTE
(Detail 3.2). These handrails will be used for the exterior portion with the gate (step
portion - both handrails with flanges on same side of entry). Fit handrail pairs
together as shown in 3.3, 3.4 & 3.5. Align bolt holes and secure using 1" bolts,
washers both sides and nuts . Tighten all hardware. Repeat for both sets of upper
handrails. Make certain each set of joined handrails has a bolt flange (Detail 3.5) DO NOT
DO NOT have the handrails with bolt flanges joined together as one set.
DO NOTDO NOT
R
L
4.2
L
4.1
R
4.3
BOLT FLANGE
R L
Identify top platform, and with anti-skid surface facing up, fit handrail pairs through platform as shown in 4.1 - 4.3. Repeat for
both sets of upper handrail pairs on both sides of top platform. NOTE
on the same side of the top platform (Detail 4.3 - 4.5) as they are used for the step portion of the entry (to connect the lower
handrails). Fit assembled handrail pairs & platform into top openings of assembled step and ladder section as shown in Detail
4.5. Make certain the correct handrail fits into the appropriate hole in the step assembly and ladder. Note that the ladder has a
slight angle when fitting the handrails into the open sockets (see Detail 4.6). The ladder section will angle out, away from step
at bottom. This will make your ladder section inside the pool easier to climb. The ends of the handrails fit tightly into the openings at the top of each stringer and the ladder section. Make certain to push them all the way down into the opening until they
bottom out. FOR THE STEP PORTION ONLY
both handrails fitting into the step. Tighten hardware. DO NOT FASTEN HANDRAILS & LADDER SECTION UNTIL STEP 7.
FOR THE STEP PORTION ONLY, align bolt holes & secure using 3/4" bolt, washers on both sides & nut. Repeat for
FOR THE STEP PORTION ONLYFOR THE STEP PORTION ONLY
DO NOT FASTEN HANDRAILS & LADDER SECTION UNTIL STEP 7.
DO NOT FASTEN HANDRAILS & LADDER SECTION UNTIL STEP 7.DO NOT FASTEN HANDRAILS & LADDER SECTION UNTIL STEP 7.
NOTE: the left and right handrails with the bolt flanges MUST
NOTENOTE
TOP VIEW
3.5
BOLT FLANGE
L R L R
4.4
L R
MUST be
MUSTMUST
4.5 4.6
ANGLE
OUT
Identify the RIGHT (R) & LEFT (L) lower handrails (Detail 5.1).
NOTE:
NOTE: the left handrail has holes drilled in it to accept the
NOTE: NOTE:
gate hardware (see 5.2). Facing the step section, the lower
left handrail attaches on the left & lower right handrail
attaches on the right (5.3). Make certain the handrails are
inside the three bolt flanges on the stringers and inside the
bolt flanges on the upper handrails (see 5.3 - 5.5). When on
the inside of the tab on upper handrail, the upper & lower
handrails will be perfectly in line (see 5.6). Align holes and
fasten using a 3/4" bolt, washers both sides and nut at all four
locations. Tighten all hardware.
ATTACH LOWER
ATTACH LOWER
ATTACH LOWERATTACH LOWER
HANDRAILS
HANDRAILS
HANDRAILSHANDRAILS
5.1 5.2
INSIDE
OF
FLANGE
5.6
IN
LINE
5.3
L R
INSIDE
INSIDE
OF
FLANGE
5.4 5.5
L
877-VINYL WK
www.vinylworkscanada.com
 Loading...