

Page 1
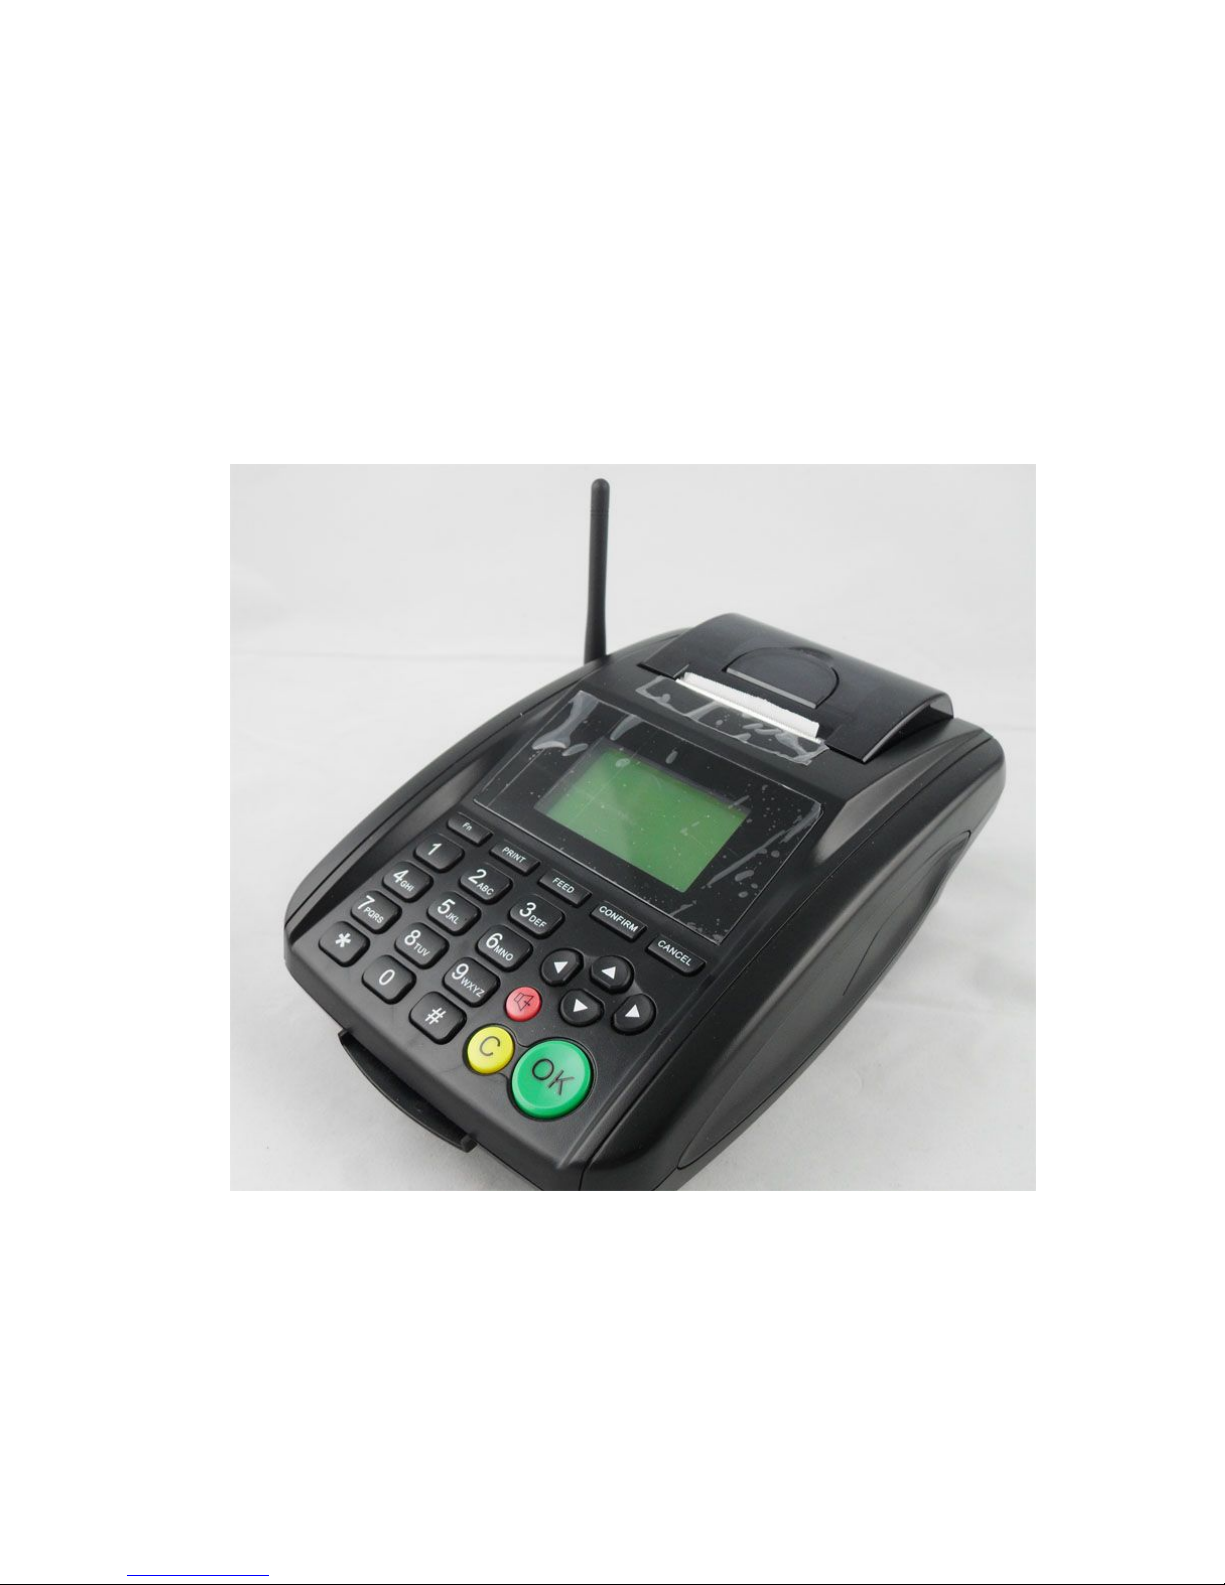
1
SMS/GPRS
Printer
Use
r
Manual
V2.0
www.vintelecom.net
Page 2

2
Cont
ents
1. Product introduction.....................................................................................................................3
1.1 Application about SMS/GPRS Printer ..................................................................................3
1.2 Main functions and properties...............................................................................................3
1.3 Package list ...........................................................................................................................3
1.4 Specification..........................................................................................................................4
1.5 Button function introduction .................................................................................................5
2. Installation.....................................................................................................................................6
2.1 Insert SIM card......................................................................................................................6
2.2 Install the thermal print paper ...............................................................................................6
2.3 Install antenna .......................................................................................................................6
2.4 Power on ...............................................................................................................................6
2.5 Screen Display in Standby Mode ..........................................................................................6
3. Menu and its configuration .........................................................................................................7
3.1 Configurations for SMS Users ..............................................................................................7
3.2 Configurations for GPRS Users ............................................................................................7
3.3 Menu details..........................................................................................................................8
4. Order receiving and processing...............................................................................................13
4.1 Order receiving and processing flow ..................................................................................13
4.2 Order printing......................................................................................................................14
Send new order to printer by SMS or..........................................................................................1
4.3 Prompt for a new order .......................................................................................................14
4.4 Order processing .................................................................................................................15
4.5. Order management .............................................................................................................15
4.6. Order processing when out of paper ..................................................................................15
5. Order format example ...............................................................................................................16
6. How To Use
Parameters T
ools....................................................................................................17
6.1 Parameters making and downloading .................................................................................17
6.2 How to print Page Header and Page Footer .....................................................................18
7. Downloading firmware and settings by air .............................................................................19
8 Phone Function ...........................................................................................................................20
8.1 Making a call.......................................................................................................................20
8.2 Receiving a call ...................................................................................................................20
Page 3

3
1. Productintr
oduction
1.1
Application
about SMS/GPRS Printer
As a fast growing industry, buy via internet today is attracting more clients because of
its many advantages such as convenience and time saving etc. as computer and mobile
communication industry become more perfect technically and their application more
popular. For example, if we deploy GSM wireless terminals with a built in thermal
printer in takeaway shops and restaurants located in lanes and streets, customers can
send food order information with computer or mobile, these information will be easily
and quickly delivered to restaurants through computer networks and GSM wireless
networks. Restaurants print out order contents, make and deliver food to customers in
time as required. This not only brings much convenience for customers, but also
makes a new sales channel for restaurants without increase of cost. Except food
ordering, this internet buy can also be extended to other applications such as flower
ordering and groceries ordering, bank services etc. We call this device SMS PRINTER.
1.2 Main
functions
and
prop
erties
Print SMS automatically:Set "Auto Print", when it receives a SMS, it will print the
message automatically.
Print SMS manually:Set "Manual Print",when it receives a SMS,operator
can print the message by pressing a button.
Print GPRS order:The SMS Printer can take away a new order from server via GPRS,
then print it out.
Phone function:you can make and receive a call.
1.3 Packagelis
t
Number
Size
Remarks
SMS Printer
1
27cm*24cm*11cm
Antenna
1
11.2cm
User manual
1
For VIP clients
AC adapter
1
9V,3A
Battery
1
1500MAH
USB cable
1
Thermal print paper
1
Page 4

1.4 Specificati
on
Item
Specs
1
Access mode
GSM
4
Frequency
GSM850 869-894MHz
E-GSM900
925-960MHz DCS1800
1805-1880MHz PCS1900
5
Sensitivity
-104dbm
6
RF transmitting
frequency
GSM850 824-849MHz
E-GSM900
880-915MHz DCS1800
1710-1785MHz PCS1900
7
Transmitting power
GSM850 33 dBm ±2 dBm
E-GSM900 33 dBm ±2 dBm
DCS1800 30 dBm ±2 dBm
PCS1900 30 dBm ±2 dBm
8
Antenna gain
2.5dbm
9
Temperature
0℃~50℃
10
Print
Thermal printing (57*50)
12
Printing speed
At least 60mm/sec.(480 dot line/sec.)
13
Printing range
48mm
14
Printing vertical row
16(Chinese)、32(English)
15
Printing longevity
50 Km
4
Page 5
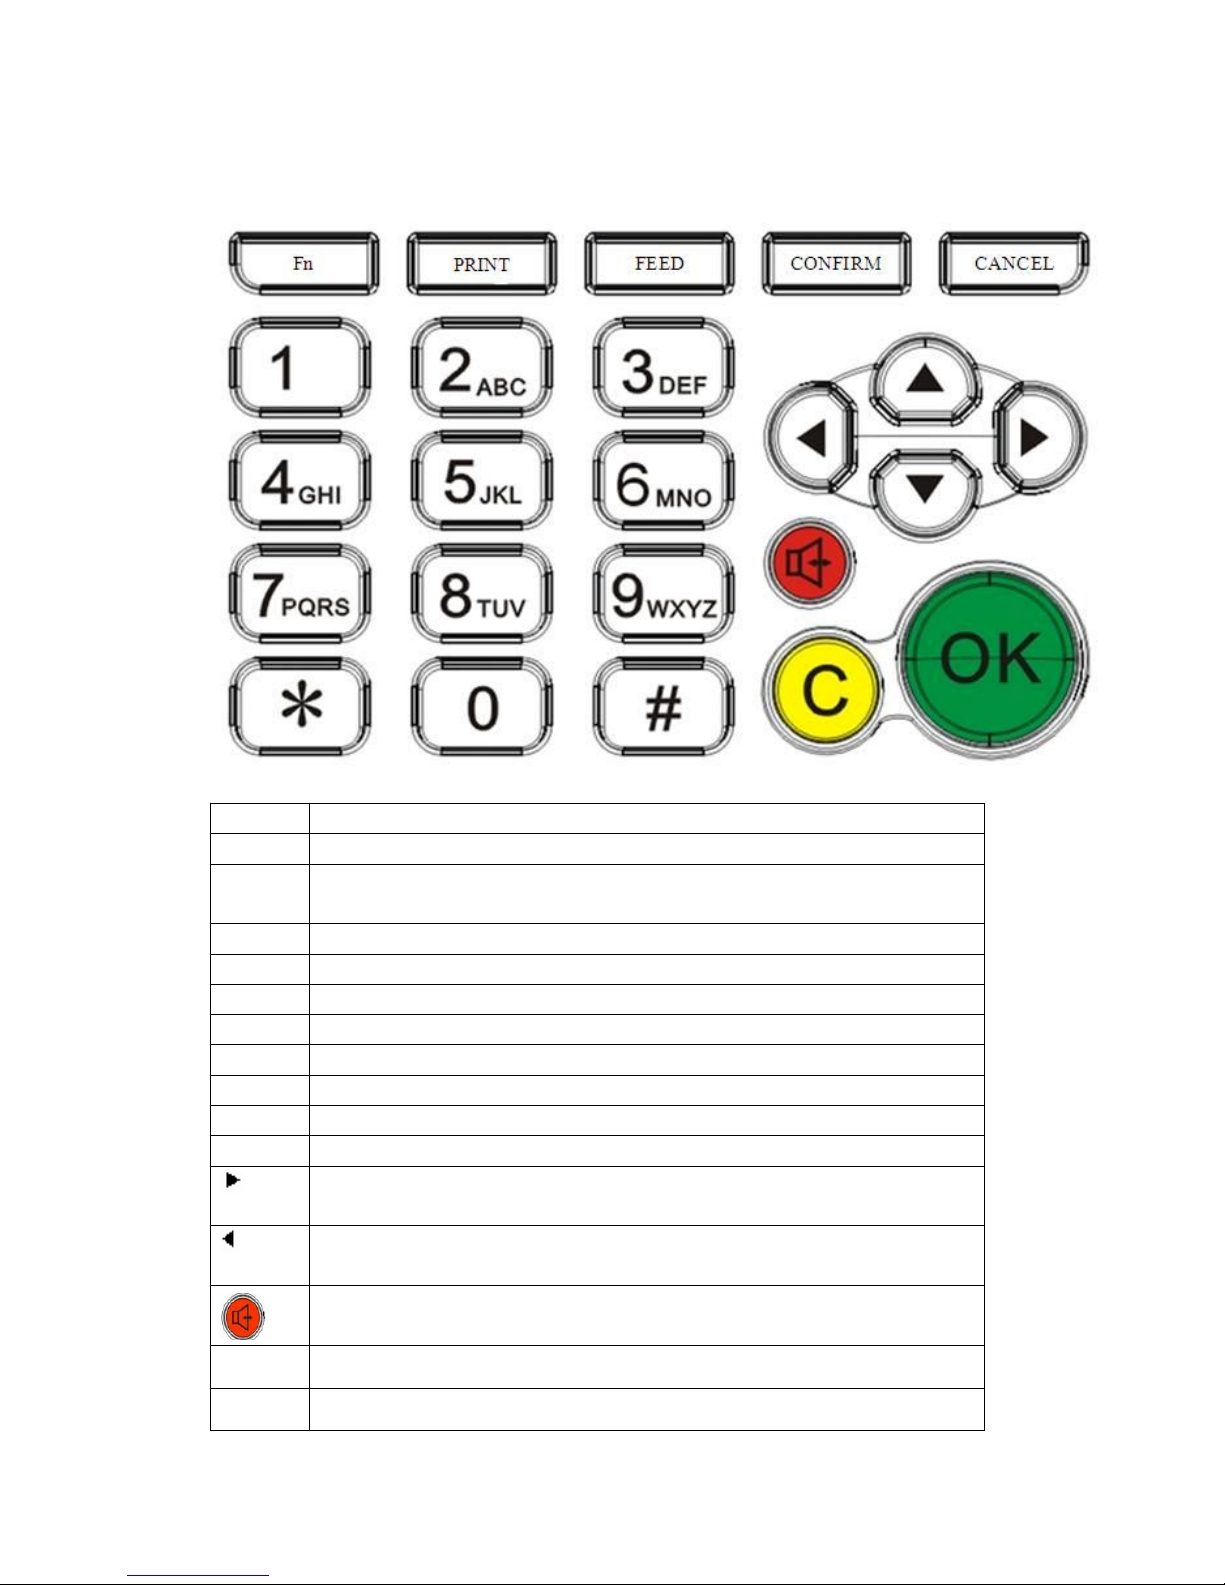
1.5 Button
functionintr
oduction
Button
Function description
Fn
Fast key,press the key to enter into menu "order management".
Print
In idle status, press the key3 seconds, it will print test page. When it is set "manual
print" and receives an order, press the button to print a new order.
Feed
Move the paper forward
Confirm
Press the key to confirm last operation or enter into next menu.
Cancel
Cancel the last operation or return to last level of the menu.
0-9
Digital keys,used to dial, edit message etc.
*
* key, you can input different symbol, such as ? /,﹨( ) etc. when setting up
#
#key. Used to change input method when editing message.
▲
move the cursor up in operation to select the last item of menu.
▼
move the cursor down in operation to select the next item of menu.
Move the cursor back in operation to add or delete, also used to adjust volume
during call connection.
Move the cursor forward in operation to add or delete, also used to adjust volume
during call connection.
Hand free button. Used to make or receive a call
C
Function key. Usually used to reject an order.
OK
Function key. Usually used to accept an order.
5
Page 6
6
2. Installati
on
2.1 Insert SIMcard
Open the small cover in shape of “凸”at the bottom of the SMS Printer, insert the
valid SIM card.
2.2 Install the thermal printpape
r
Open the dome cover at the top, install the thermal paper.
2.3 Installantenna
Connect the antenna to the antenna interface at the left side of the sms printer,
screw it clockwise.
2.4 Power
on
Connect one end of AC adapter to the device and another end to 220V AC socket,
move the switch at the back of the device at the position of "ON", the device is on and
display version number, then it will search wireless network, when succeeds, it will
enter into idle state and display company's logo.
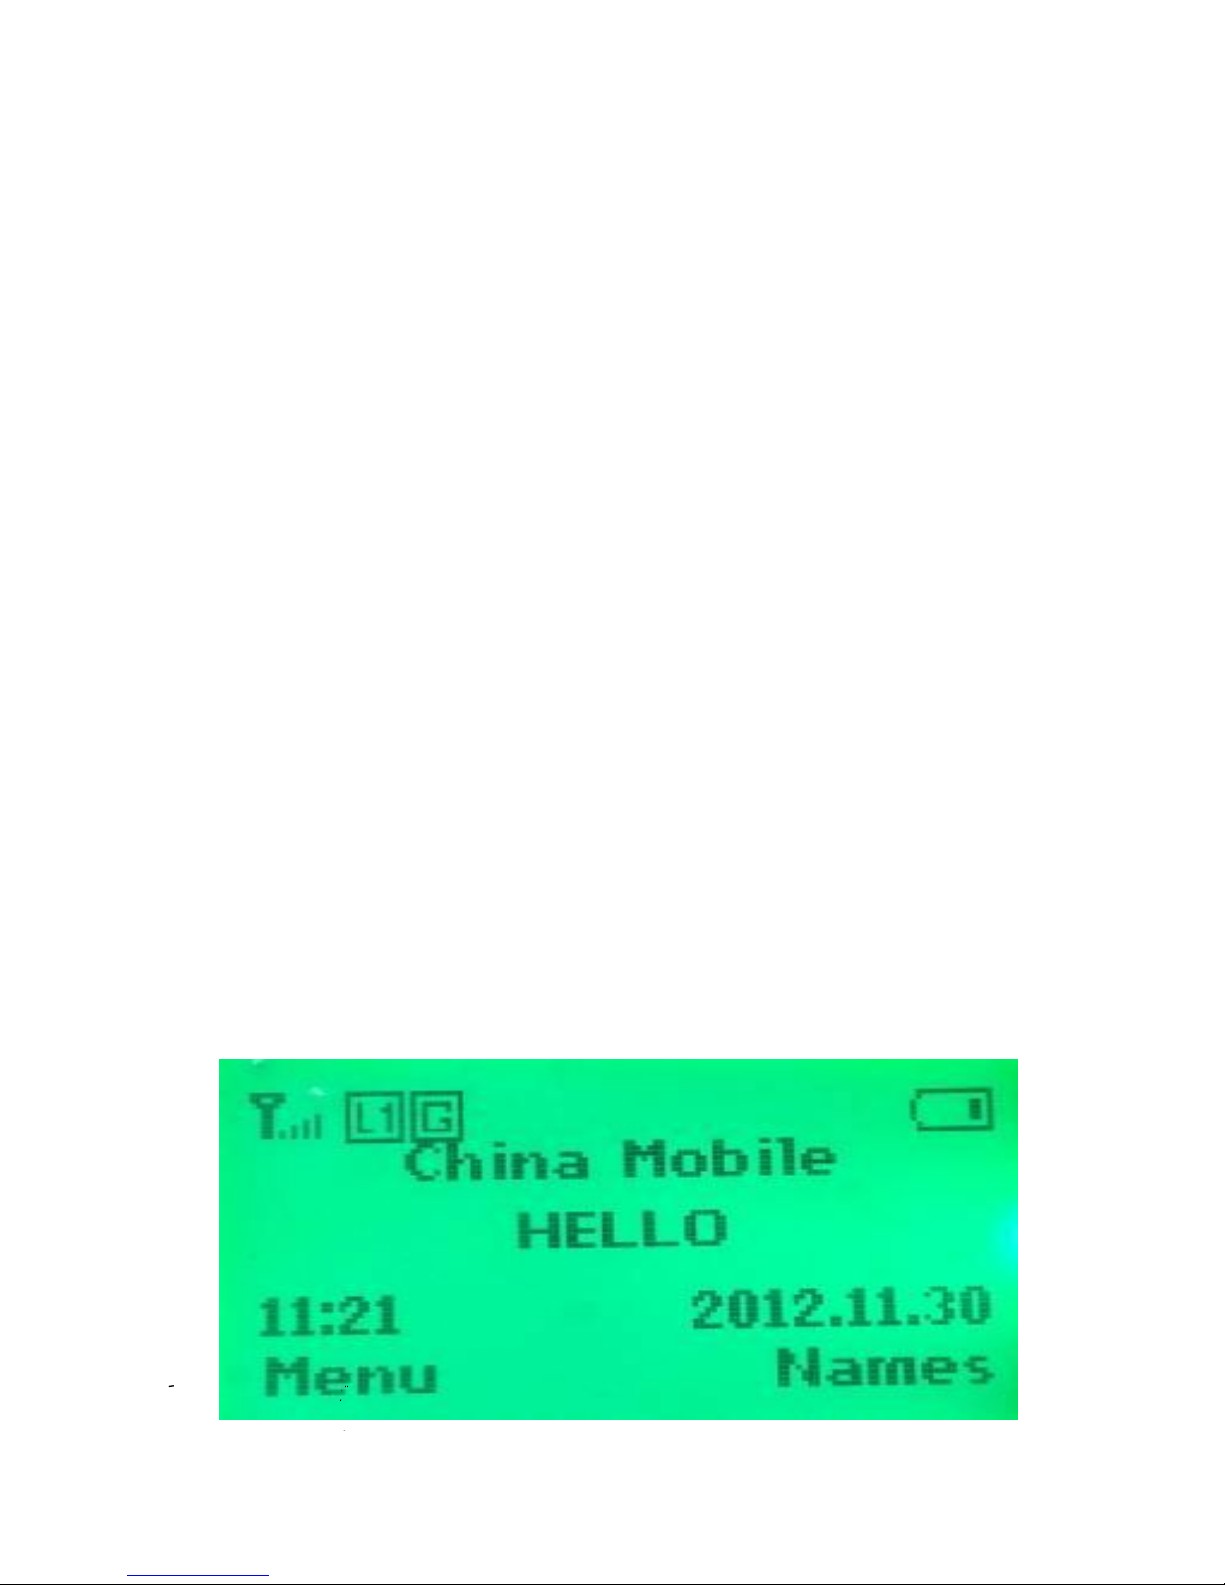
2.5 Screen Display in Standby
Mode
SIM1
GPRS
Signal Strength
Battery
Indicator
Date and time
Telecom
Carrier
LOGO
Display
Menu
Contacts
Page 7

7
3. Menu and its
configuration
In standby mode, press “confirm” , then press ▲▼ to select:
SMS Printer-Phone book—Messaging—Call Center-organizer-settings
-
User Profiles.
Select “settings” and press “confirm”, you can change “time and date”.
Select “SMS Printer” and press “confirm”, input password 123456, you can enter
into menu of sms printer.
The SMS Printer menu includes:
(1) Display Setting: Includes “Logo” and “Idle Screen” display. (2)
Print Setting: Page Header, Page Footer, etc.
(3) System Setting: Set ResID, select SMS or GPRS mode.
(4) SMS Orders: Must set SMS center number, that is order sender’s number. (5)
GPRS Orders: Set GPRS parameters
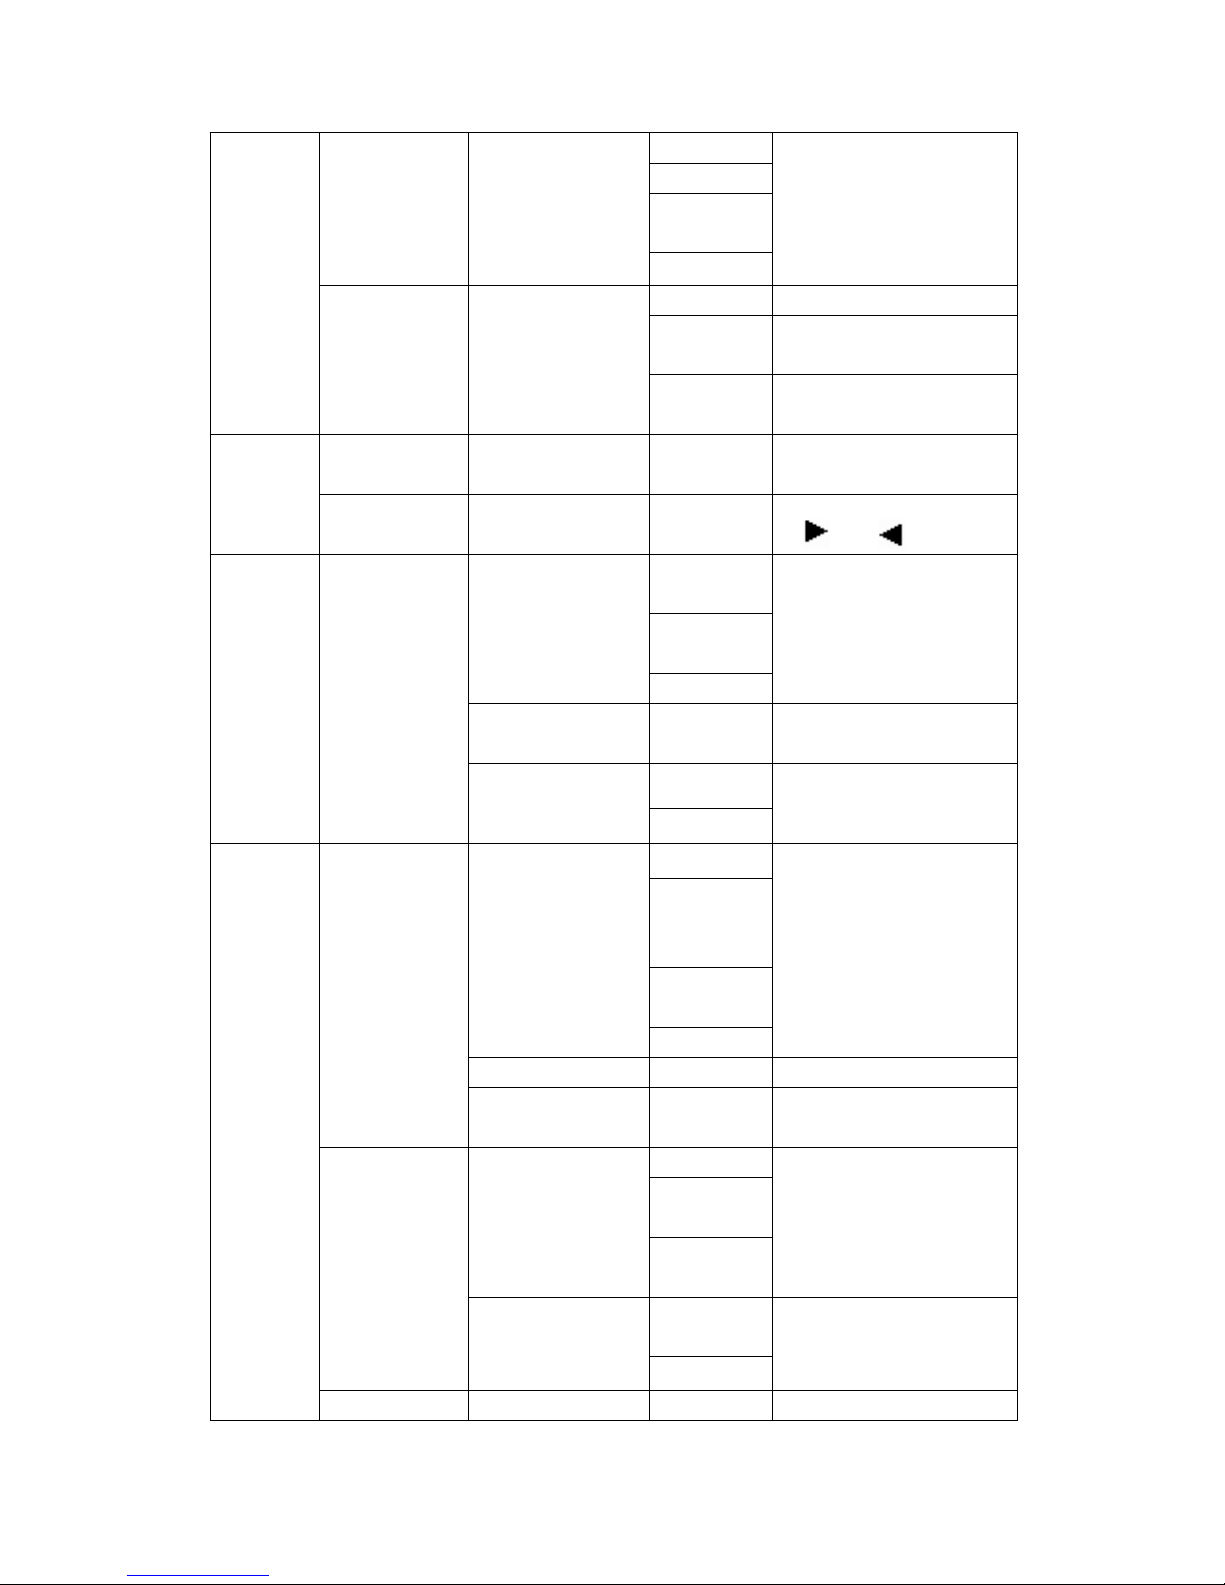
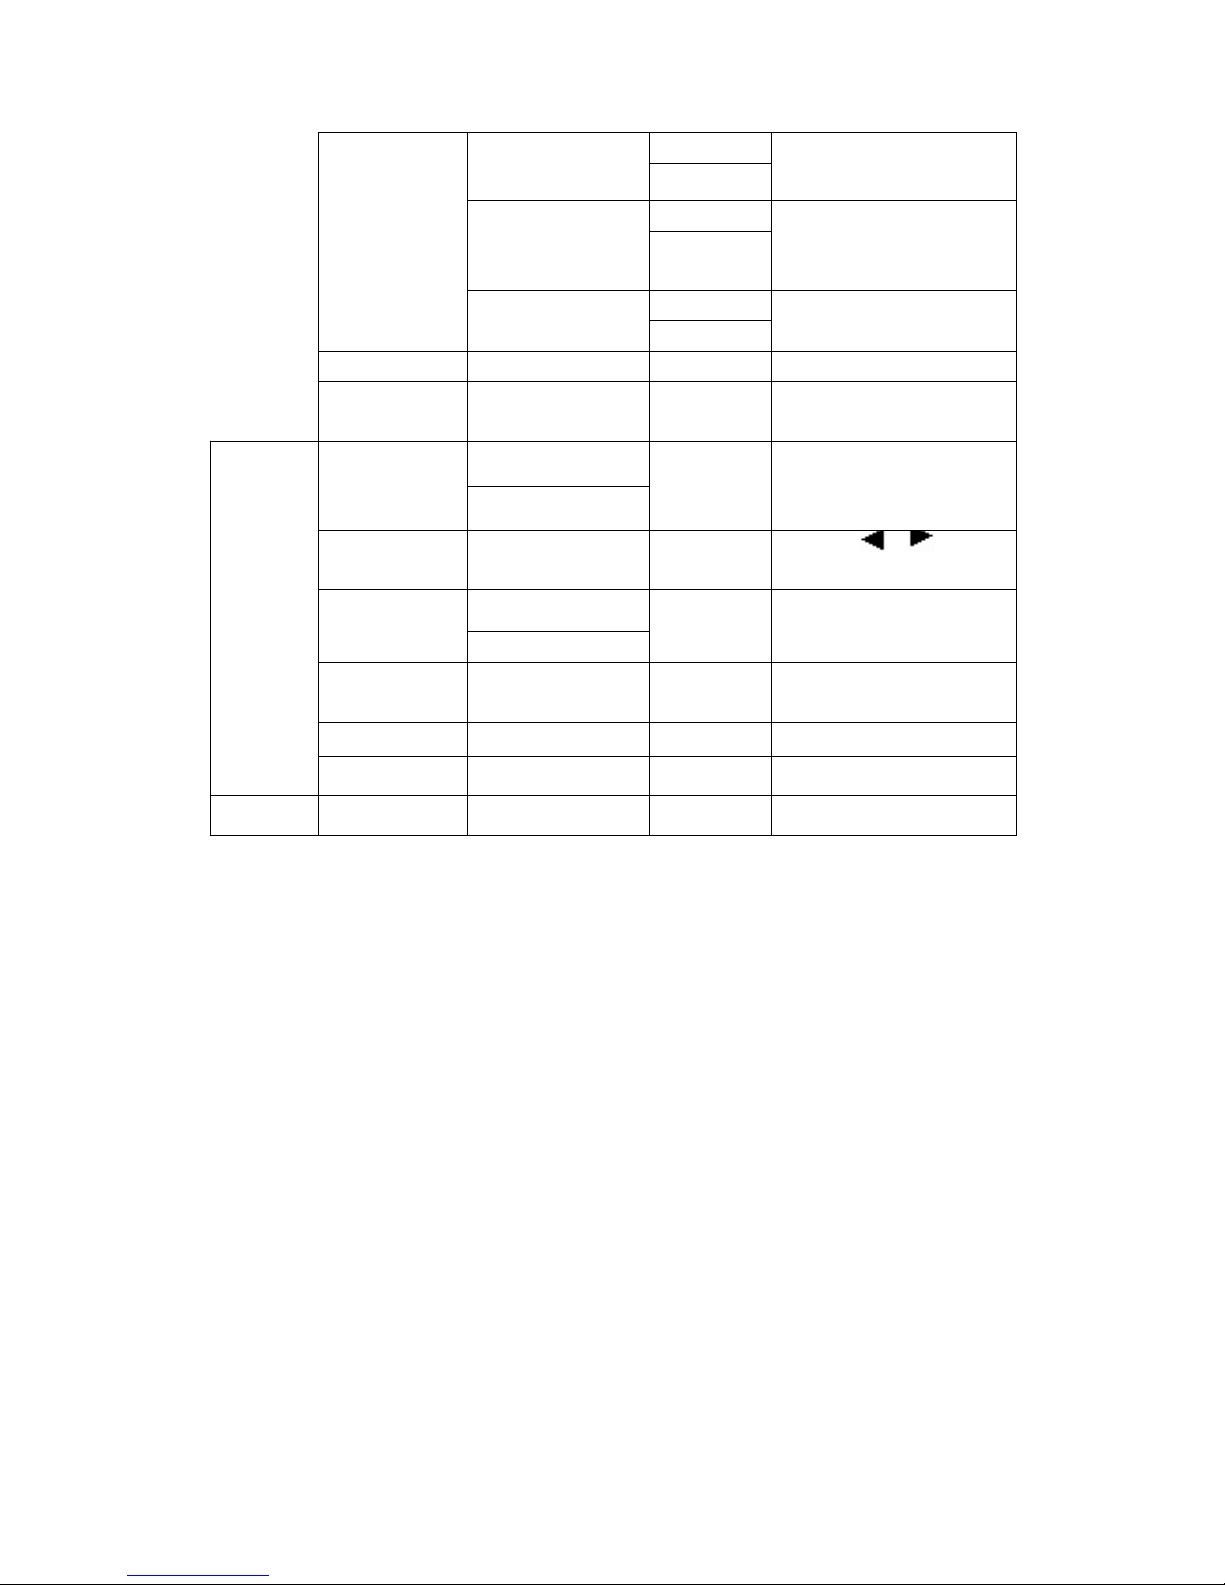
The following table is detailed description of menus.
3.1
Configurations
for SMSUser
s
For SMS users which use SMS to deliver food order, select SMS mode. Configure
SMS center number in the menu which is order sender’s number, that is SMS
gateway number.
If you use your mobile to do the test, then your mobile’s number is SMS center
number. With this configuration, the SMS printer will only accept the short message
from SMS center to prevent receiving growing garbage messages.
3.2
Configurations
for GPRSUser
s
For GPRS users which use GPRS to deliver food order, select SMS mode. GPRS
parameters include:
(1) GPRS open time: You can set 9:00, GPRS will work from this time. (2)
GPRS end time: You can set 22:00, GPRS will end after this time.
(3) GPRS check interval 30s,40s,60s:The device will send commands to
server to fetch order data with this interval.
(4) IP address: Server’s fixed IP address or WAP Proxy IP of local operator. (5)
PORT number.
(6) APN: For China Mobile, it is CMNET.
(7) GPRS UserName: In China, not necessary. (8)
GPRS Password: In China, no password.
(9) FILE PATH: File path of new orders in your server.
(10) Call Back URL:File path of order reply in your server.
Page 8

8
Note:
Press “#” button to change input method such as “ABC”, “abc”,”123”.
Press “*” to input special symbols such as ⁄﹕?
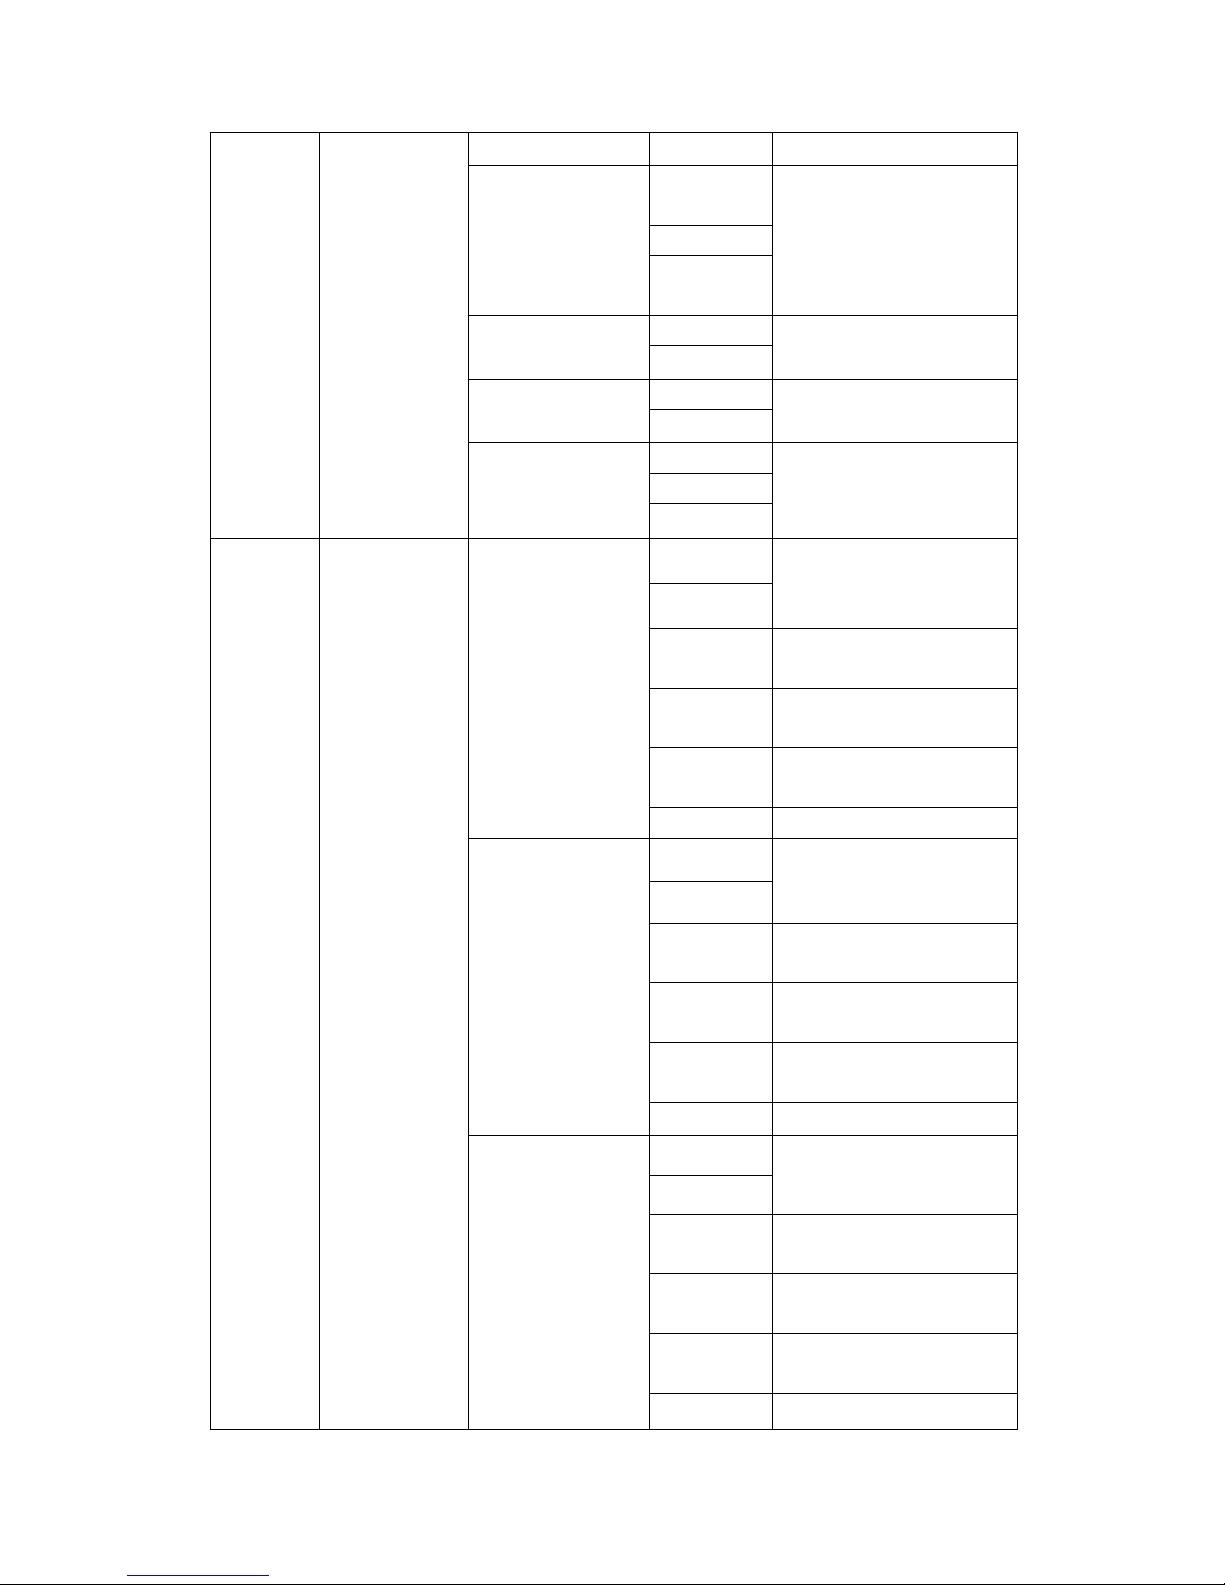
3.3 Menudetails
Menu
Menu 1
Menu2
Menu3
description
SMS
Printer
Display Setting
Logo Setting
Logo display when
power on,32 letters at most.
Idle Screen Display
Logo display in idle status,
14 letter at most.
Print Setting
Page Header
Set up ticket header.
64
Page Footer
Set up ticket footer,up to
64 letters.
Auto Print
Auto
Auto print when receiving a
new order.
Manual
When receiving an
order,
Print Date
Enable
Print date and time.
Disable
Not print date and time.
Print Sender
Number
Enable
Print sender's number.
Disable
Not print sender's number.
Print Count
1,2,3,4
Set bill number
to be
System Setting
RES ID
Set device ID or restaurant
ID (shop ID);
when RES_ID=*, this is a
general sms printer
Enable Dial
Enable
Disable
Password
Password to enter
into
Menu. Initial
Connection Mode
SMS mode
GPRS mode
SMS Setting
SMS
Center
Number
SMS Printer only
receive and print the
message from this number.
It is usually the number of
SMS gateway, or your
mobile's number when
Page 9

SMS Printer from receiving
many garbage message.
If set *, it will
receive sms
GPRS Setting
GPRS Open Time
09:00
Starting time when a sms
printer begins to get new
order from server
via
GPRS End Time
22:00
Ending time when sms
printer will stop to take
orders from server
via
Telephone Number
Back up
GPRS check
interval
30s 、40s 、
60s
The time interval with
which the sms printer tries
to take new orders from
server periodically. For
example, 30s, this
means sms printer will
try to get orders from
server every
IP
IP address of server
Port
Server's port
APN
Server's gateway
UserName
GPRS user name
Password
GPRS password
File Path
New order path in server
Callback Path
File path in server for reply
message
Order Manage
Confirmed [N]
Order 1
[N] mean the total number
of accepted orders
Order 2
Order 3…
Rejected [N]
[N] mean the total number
of rejected orders
Phonebook
Add
new contact
Select
Name
Add contacts name
Number
Contacts' phone number
Caller
ring
Ring tone for incoming call.
Phonebook settings
Preferred
storage
Prefer to store
phone
My number
Extra
numbers
Set some
prohibited
9
Page 10

Memory
status
Copy
contacts
Copy phone number
from
SIM to phone or
Move
contacts
Move phone number
from
SIM to fixed phone or from
Delete
all contacts
Delete all number in
SIM
and fixed phone
Messaging
Write message
Send to
Input method
Advanced
Save to Drafts
Inbox
View
Reply by SMS
Call sender
Forward
Save to Phonebook
Delete
Delete all
Drafts
View
Send
Edit
Delete
Delete all
Outbox
Sent messages
View
Forward
Delete
Delete all
Delete
messages
Inbox
Drafts
Outbox
Sent messages
All messages
Message
settings
Profile settings
Profile 1
Profile 2
Profile 3
Profile 4
10
Page 11
Common settings
Delivery
report
Reply path
Save
sent
Memory status
SIM
phone
Preferred storage
SIM
phone
Preferred
connection
PreferGPRS
PreferGSM
GSM Only
Call center
Call history
Missed calls
View
Call
Send
text
Save to
phonebook
Edit
before
Delete
Dialled calls
View
Call
Send text
message
Save to
phonebook
Edit before
Call
Delete
Received calls
View
Call
Send text
message
Save to
phonebook
Edit before
Call
Delete
11
Page 12
Delete call logs
Dialled calls
Missed calls
Received
calls
All calls
Call settings
Advanced settings
IP dial
Call time
Remind…
Answer
mode
Organizer
Alarm
00:00
Calculator
【▲】(+)、【▼】(-)、
【 】(×)、【 】(/)
Settings
Phone settings
Time and date
Set
home
Set time/
date
Set format
Schedule power on
/off
00:00
00:00
Language
English
Chinese
Pref.inputmethod
ABC,abc
Simplified
Chinese
stroke
Smart
Pinyin
Numeric
Contrast
Misc. settings
LCD
backlight
Network
settings
Network selection
New search
Select
network
Selection
mode
GPRS connection
When
needed
Always
Security
SIM security
PIN lock
12
Page 13
13
settings
ChangePIN
ChangePIN2
Phone security
Phone lock
Change
password
Auto keypad lock
Off
5sec-5min
Connectivity
Restore factory
Settings
User
profiles
Caller ringtone
change
save
Ringtone
volume
To use 【 】【 】to adjust
volume.
Message
change
save
Message
volume
Key Tone
on
System Tone
on
Services
4. Order
receiving
and
proce
ssing
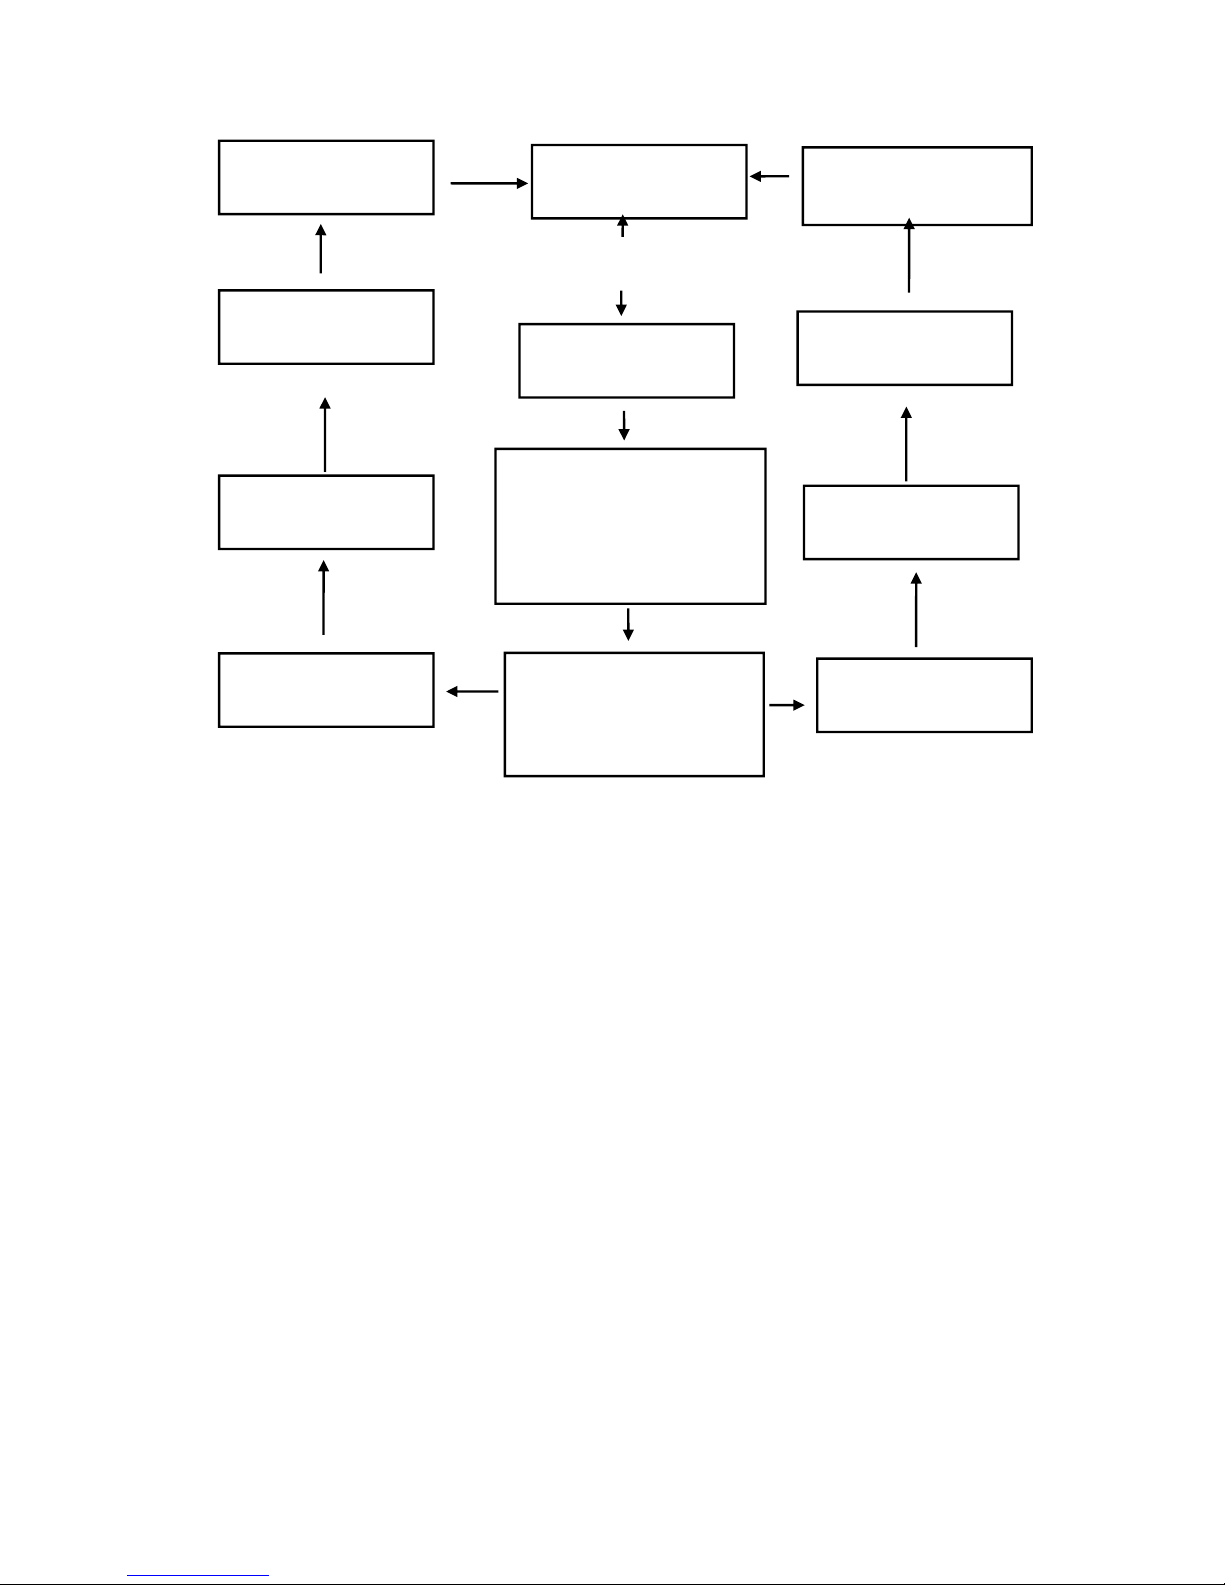
4.1 Order
receiving
and
processingflow
Page 14
14
Send confirmation to
server
SMS server
(WEB server)
Send rejection message
to server
Send new order to printer by SMS or
printer get new order from server via GPRS
Print phone number
and delivery time
Receiving new order
by SMS or GPRS
Print rejection info
Input delivery time
Print order automatically
or press "OK" to print,
not print
customer's
phone
Select rejection reason
Press "OK" to accept
Printer will show:
"please press 'OK' to
accept or 'C' to reject
the order"
Press "C" to reject
4.2 Orderprinti
ng
If setting "auto print", the sms printer will automatically print a received order. If
setting "manual print", when receiving a new order, the sms printer will print it after
operator press the button "PRINT".
4.3 Prompt for a neworde
r
When an order comes:
(1) Usually you are supposed to select “auto print”, when a new order comes, it will
print automatically, the voice is large enough to prompt you to process the new order.
(2) It will ring to push you to deal with the order. The time interval between ring can be
adjusted by imputing #*20ttt#. For example, input #*20010#, this means the ring plays
every 10 seconds which includes ring time. Press any key to stop the ring.
Furthermore the ring tone and its volume can be adjusted, press “Confirm”, press
▲▼ key to select “User Profiles”, select “Message” tone and message
volume.
Page 15

15
4.4 Orderprocessing
When an order comes to the device, if the device are processing other orders ahead of
it, it will line. When it is at its turn, usually it prints out automatically, and wait for
you to process.
1. If you accept the order, press the button 'OK', input delivery time. For example,
delivery time is 12:20, then input 1220. Then press “confirm”. The
SMS printer will reply a message automatically:
“status=accepted&restid=20&ordernumber=123&deliverytime=12:20” to
server.
2. If you reject the order, press the button “C”, select or input “reject reason”
(1)“OUT OF DELIVERY REGION”
(2)"BUSY"
(3)"NO INGREDIENTS"
(4)"UNKNOWN ADDRESS"
(5)OUT OF DELIVERY TIME REQUIIRED
(6)TRAFFIC JAM
(7)Reason defined by
customer
(not more than 16letters
)
Press the”confirm”
, the device will reply a message automatically:
“
sta
t
u
s=rejected&restid=20&O
rderNumber=123&Reje
ctRea
son=12:20
”
If you press a wrong button, for example, you press “C” for accepted order by
mistake, then you can press “cancel” to return. Then press “OK” to accept. The reply
contents to server can be customized based on your requirements.
Some clients don’t like to input “delivery time”, or “reject reason”, only press
“OK” to accept or “C” to reject, we have another version to support this
requirements.
4.5. Ordermanagement
Restaurant guy can inquire the processed orders by pressing the button Fn at the top
left side of the device.
1. Confirmed[N]: mean there are total [N] accepted orders.
2. Rejected[N]: mean there are total [N] rejected orders.
The maximum number of accepted orders reserved in device is 30. The
maximum number of rejected orders reserved in device is 20. For more
processed orders, new orders will replace old orders.
4.6. Order
processing
when out ofpape
r
(1) When a red bar comes on thermal paper, it means the paper will be finished,
Page 16

16
you can install a new roll of paper.
(2) When out of paper, the device alerts by honking. If you have not pressed “OK’ or
“C”, you can switch off printer, install thermal paper, switch it on, the printer will
reprint the order, you can continue to process; if you have pressed
‘OK” or “C”, wish to print one more copy, press the button ”Fn” to find the processed
order in the menu “order management”, print it out by pressing the button “PRINT”.
Don’t forget to press the button “CANCEL” to quit the menu after finished.
(3) Change thermal paper with a new one when printer is on, but the ticket is not
continuous.
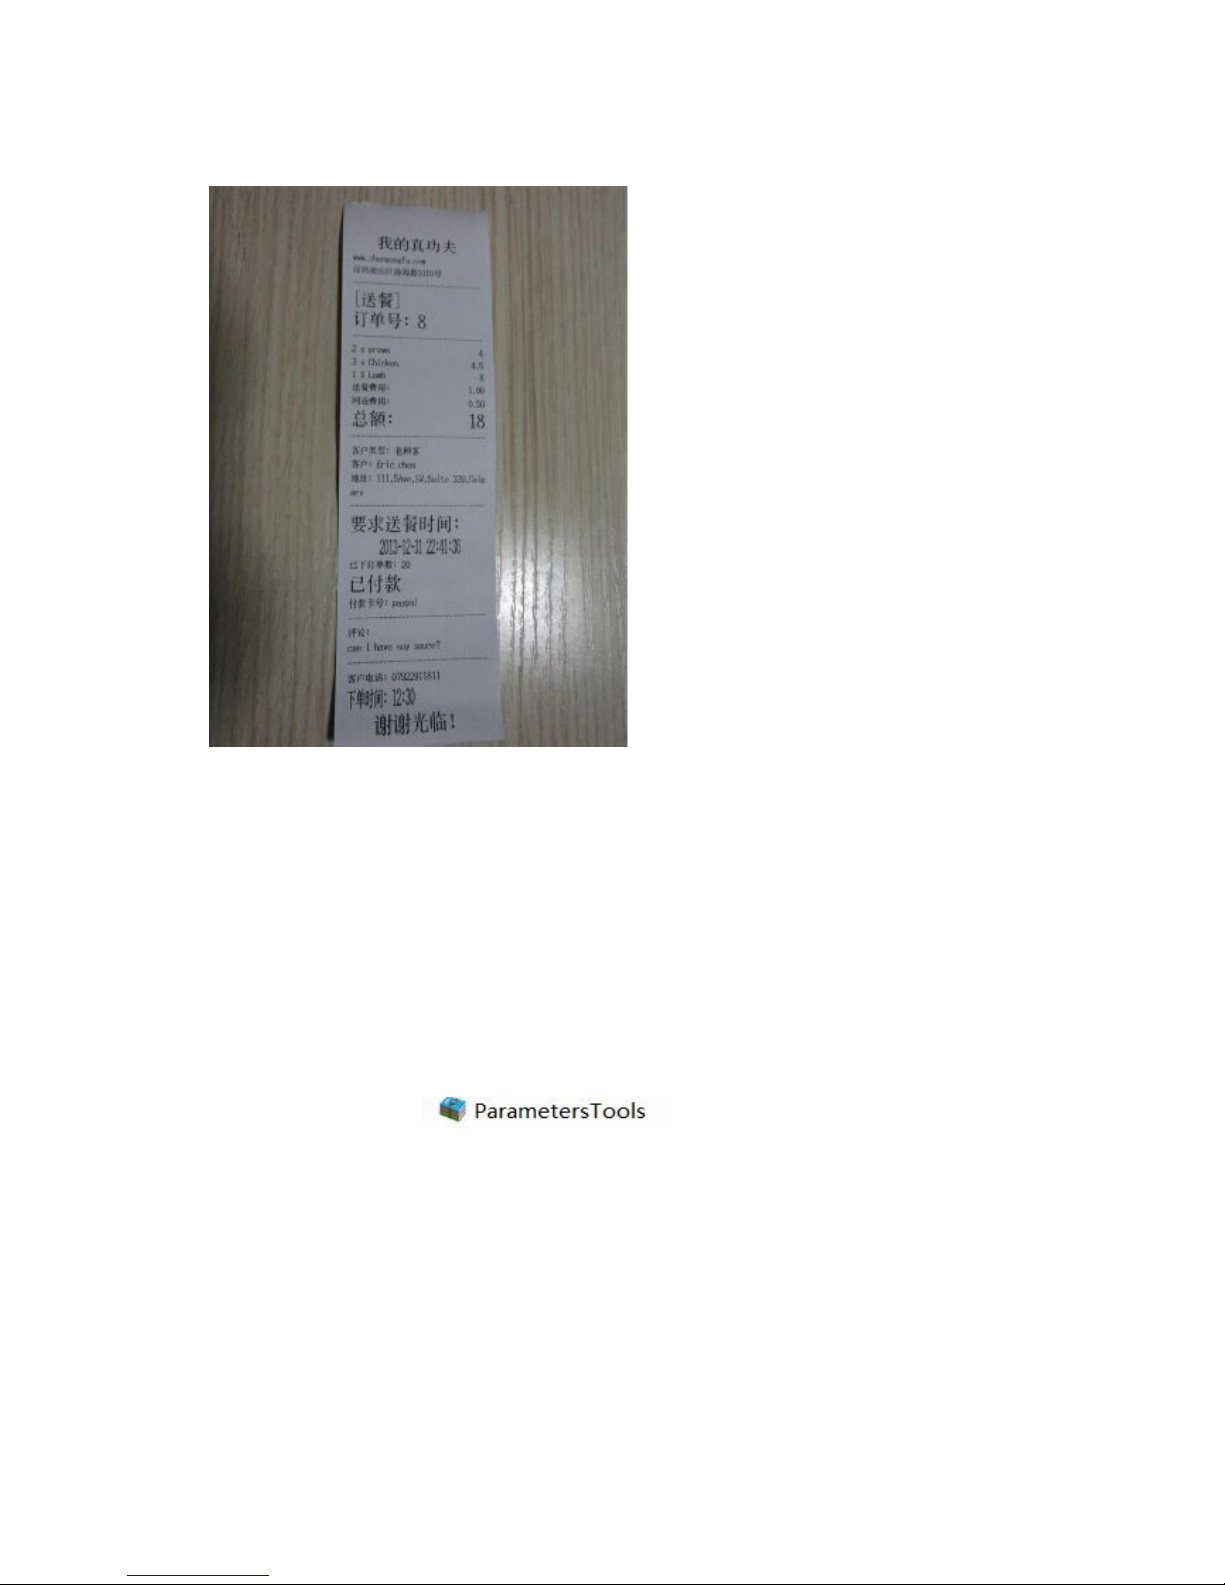
5. Order format example
The following is order format sample for reference.
# Rest_id *Order Type*Order No*Quantity,Food1, Amount; Quantity,Food2, Amount;
Quantity,Food3, Amount*Delivery Chg; CC+Handeling fees;Total; Customer Type;Customer
Name; Customer Address;Requested For; Previous Number of orders;Payment Status;
Payment Card No;Customer Phone* customer comments# Order Type=1, Delivery; Order
Type=2, Collection.
Customer Type=4, Verified; Customer Type=5, Not Verified. Payment
Status =6, Order paid; Payment Status=7, Order not paid
The following is one of the examples of contents of a practical order for a
restaurant with Rest_id=5, Order type is 1, Order number=123
#5*1*123*
2,prawn,8;3,Chicken,4.5;1,lamb,8
*1.0
0;0.50;22;4;eric_c
hen;
111,5
Ave,SW,Suite 339,Calgary;20:15 16-09-2012;20;6;paypal;07922911811*ca
n
I have soysauce?
#
New order path in server:
http://www.fatcom.com/gprsorderfile/php?restid=5&password=345678
Order reply (confirmed/rejected) path in server:
http://www.fatcom.com/confirm.php?
In device, you only need to set http://www.fatcom.com/confirm.php?
(1) For accepted order, the final call back path URL is
http://www.fatcom.com/confirm.php?status=accepted&restid=5&ordernumber=123&de
liverytime=12:20
(2) For rejected order reply path in server, the call back URL is:
http://www.fatcom.com/confirm.php?status=rejected&restid=5&ordernumber=123&rea
son=busy
The part after “?” in red color is automatically added by device.
The printed ticket is as follows:
Page 17
17
6. How To Use
ParametersTools
6.1 Parameters making and
download
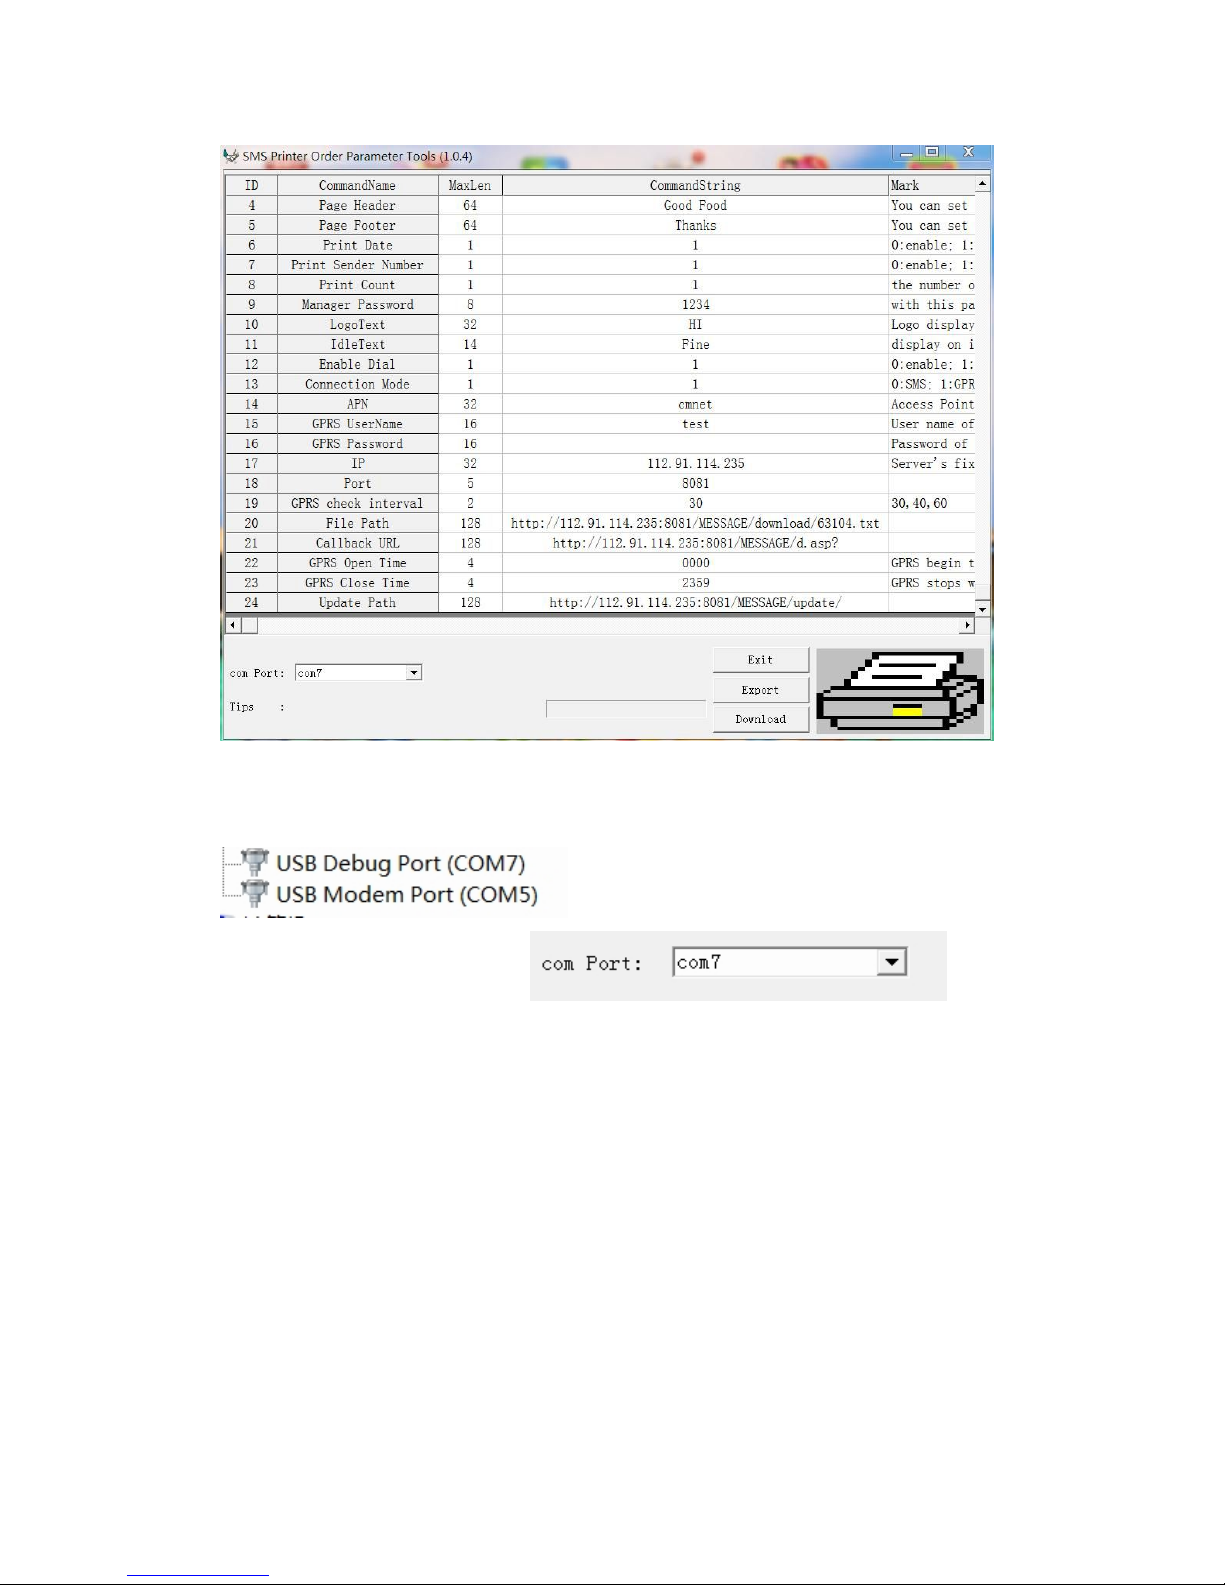
(1) Decompress file
(2) Click into folder “Parameters Tools”
(3) Click “SMS Printer setting Parameters Tools.exe”
Page 18
18
(4) Fill in parameters
(5) Connecting SMS Printer to computer with USB cable and switch on printer.
(6) In device management of your computer, check USB port number, for example
In this case, select COM port as
(6) If Click “Export”, the parameters will be exported and stored in a file “Config”.
(7) If Click “Download”, the setting parameters will be downloaded to SMS Printer.
6.2 How to print Page Header and PageFoote
r
Assuming the following is the ticket header you have designed :
WWW.GOODFOOD.COM
PizzaPlace
123
North Loa
d
ShenZhe
n
Then you can fill in the following contents in the item of page header in the parameter
tools:
Page 19

20
WWW.GOODFOOD.COM/r/s/LPizza Place/r/s/L123 North Load/r/s/LShen
Zhen
/r: change line
/s:small fonts
/l: big fonts
/L: Alignment at Left
/R:Alignment at Right
/C: Alignment in Center
7.
Downloading
firmware and
settings
by air
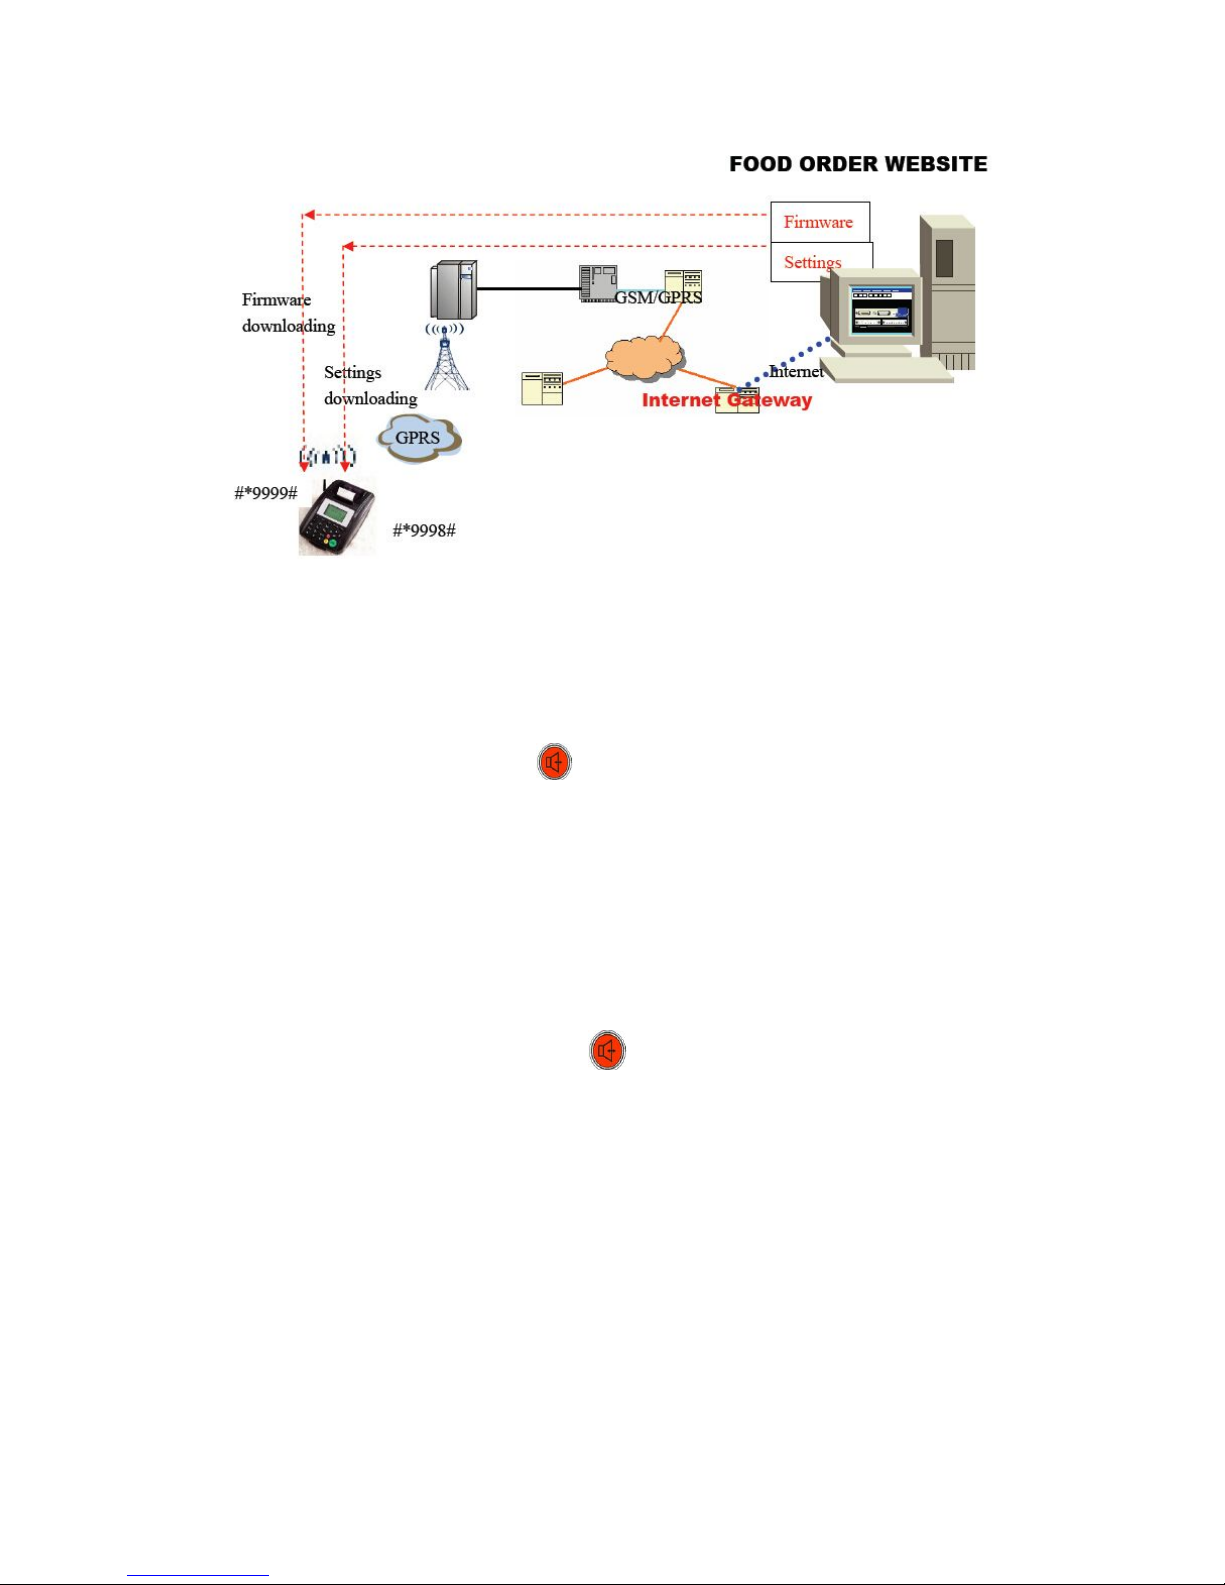
Until now, SMS Printers from other suppliers can only download orders in server
via GPRS, but have no functions to download firmware and settings parameters via
GPRS. This may cause problems when you have deployed hundreds of SMS
printers in restaurants and wish to update their firmware.
With our printers, what you need to do is:
(1) Make GPRS settings correctly. For GPRS users, the printer has the correct
settings inside, this step can be canceled.
(2) Put new firmware mre.vxp or config.ini in your update file path. For example, if
order file path is http://www.abc.com/gprsprinter/5.txt, then you can set update
file path is http://www.abc.com/gprsprinter/update/ CONFIG.INI can be
created by parameter tools by clicking “export”.
(3) Press #*9999# on printer, the screen will pop up your
update file path http://www.abc.com/gprsprinter/update/, then press
“confirm”, it will automatically download firmware via air from the server. For
sample test, the default update path is our server’s path,
http://112.91.114.235:8081/smsprinter/update/ , you can change to your file path for
the first time. After that, it will keep your file path. For quantity orders, we
can put your update file path in printer as default.
(4) Press #*9998# on printer, the printer will download config.ini.
So what you need to do is just put new firmware or new config in update file path,
then press #*9999# to download firmware or #*9998# to download config.
Page 20
21
8 Phone Functi
on
8.1 Making aca
ll
Method 1:Press Hand free button ,dial phone number, after finished, waiting
for 3 S, the device will automatically send the number.
Method 2:Dial phone number,click "CONFIRM" button, select“Call” in menu
。
8.2 Receiving aca
ll
When there is a incoming call, it rings, and displays caller's number on screen (If the
caller's number is in phonebook, it displays caller's name). There are two ways to pick
up the call.
Method 1:press the hand free button to connect.
Method 2:click "CONFIRM" button, select “Answer” in menu.
 Loading...