

Page 1

CLOCK C100 – Vacuum tube clock VFD
_____________________________________________________________________________________
CLOCK C100
Vacuum tube clock VFD
User Manual EN
www.vintech-technology.com/en/c100
User Manual - EN 1
Page 2

CLOCK C100 – Vacuum tube clock VFD
1. SAFETY INSTRUCTIONS ………………….………………………………………………………………………………..…………………………….
3
2. PACKAGING ………………..…..…………………………………………………………………………………………………………………………….
3
3. TECHNICAL CHARACTERISTICS ……………………………………………………………………………………………..….……………………
3
4. DESCRIPTION OF THE CLOCK …………………………………………………………………………………………………………………………
4
5. INSTALLATION ………………………………………………………………………………………………………………………………..……………..
4
6. STARTUP ………………………………………………………………………..……………………………………………………………………………..
4
7. CONFIGURATION OF THE CLOCK ……………………………………………………………………………………………….………………….
4 7.1 Display modes …………………………………………………………………………………………………………………..………………….
4 7.2 Activate / deactivate the alarm ………………………………………………………………………………………….…………………
4 7.3 Settings of the different parameters ………………………………………………………………………….……….………………..
5
Menu 1 : Setting the time ……………………………………………………………………………………….…………………………..
5
Menu 2 : Setting the date ……………………………………………………………………………………………………….…………..
5
Menu 3 : Setting the alarm time …………………………………………………………………………………………...…………….
5
Menu 4 : 12 / 24H mode display……………………………………………………………………………………………….………….
5
Menu 5 : Date display DMY or MDY ………………………………………………………………………………………….…………
5
Menu 6 : Configuration of the type of alarm ……………………………………………………………………………………….
5
Menu 7 : Configuring the separator type ………………………………………………………………………..…………………..
5
Menu 8 : Tube brightness mode ………………………….…………………………………………………………..………………….
6
Menu 9 : Backlight brightness mode ………………………………………………..………………………………………………….
6
Menu 10 : Backlight color …………………………………………………………………………………………………………………….
6
8. MAINTENANCE ………………………………………………………..……………………………………………………………….…………………..
7
9. IN CASE OF PROBLEM ………………………………………………………………………………………………………………….…………………
7
_____________________________________________________________________________________
Contents
User Manual - EN 2
Page 3

CLOCK C100 – Vacuum tube clock VFD
1. Safety instructions
Read the instructions: All instructions should be read
carefully before the clock is turned on.
Caution: All warnings on the device and in the operating
instructions must be observed.
Vacuum tubes are very fragile, handle the clock
carefully to avoid breaking a vacuum tube.
If one of the vacuum tubes is damaged, immediately
turn off the clock by unplugging the power supply from
the main.
Moisture and water: The clock should be used and/or
kept in a dry place, protected from moisture and dust.
Temperature: The clock must be used and/or kept in a
room at room temperature between 0 and 40°C (32°F
to 104°F). The clock must not be exposed in direct
sunlight.
Object and liquid: The clock must not come in contact
with a liquid. No object should enter the clock. Switch
off the clock immediately if one of the two cases arises.
Do not use the clock for anything other than the
intended use as described in the manual.
If the clock does not work properly (for example, no
more display), turn off the clock immediately and
contact customer service.
This clock is not a toy, keep this clock out of the reach
of children.
This clock should only be operated by people who have
read and understood the user manual.
The clock has a double electrical isolation, do not
connect the power supply or the clock to the ground.
2. Packaging
Carton content:
1x Clock VFD C100
1x Power supply 12V
1x USB stick containing the instructions for use
Special care was taken on the packaging to protect
the clock tubes from shocks. Check in particular if
the tubes are in good condition: No breakage or
crack. If the dome at the top of one of the tubes is
light in color (bleached), then it is damaged. In this
case, contact customer service.
Check if the power supply does not appear to be
physically damaged (for example, the twisted mains
connector, broken wire). If the power supply
appears to be damaged, do not connect the unit and
contact customer service.
3. Technical characteristics
Visual aspect :
Types of tube : 6 VFD tube + 2 separators
Aluminum, wood and glass materials mainly
Large bright tubes of 20x25mm
More than 2000 backlight colors
Adjustable light output
Economic mode possible
Functions :
Model: C100
Time, date and alarm management
12-24H Mode
Date DDMMYY or MMDDYY
Audible, visual or both alarms
Parameter settings by 4 buttons
Clock counter by a RTC
Automatic backup of the configuration
Save the time, the date for 12 hours after a
power failure.
Supply :
Consumption: 2W to 6W
Power supply voltage: 110 to 240V
Mains frequency: 50-60Hz
European standard socket (Other connector on
request)
Weight of the clock: 300g
Size of the clock: 210x55x90mm
_____________________________________________________________________________________
User Manual - EN 3
Page 4
CLOCK C100 – Vacuum tube clock VFD
4. Description of the clock
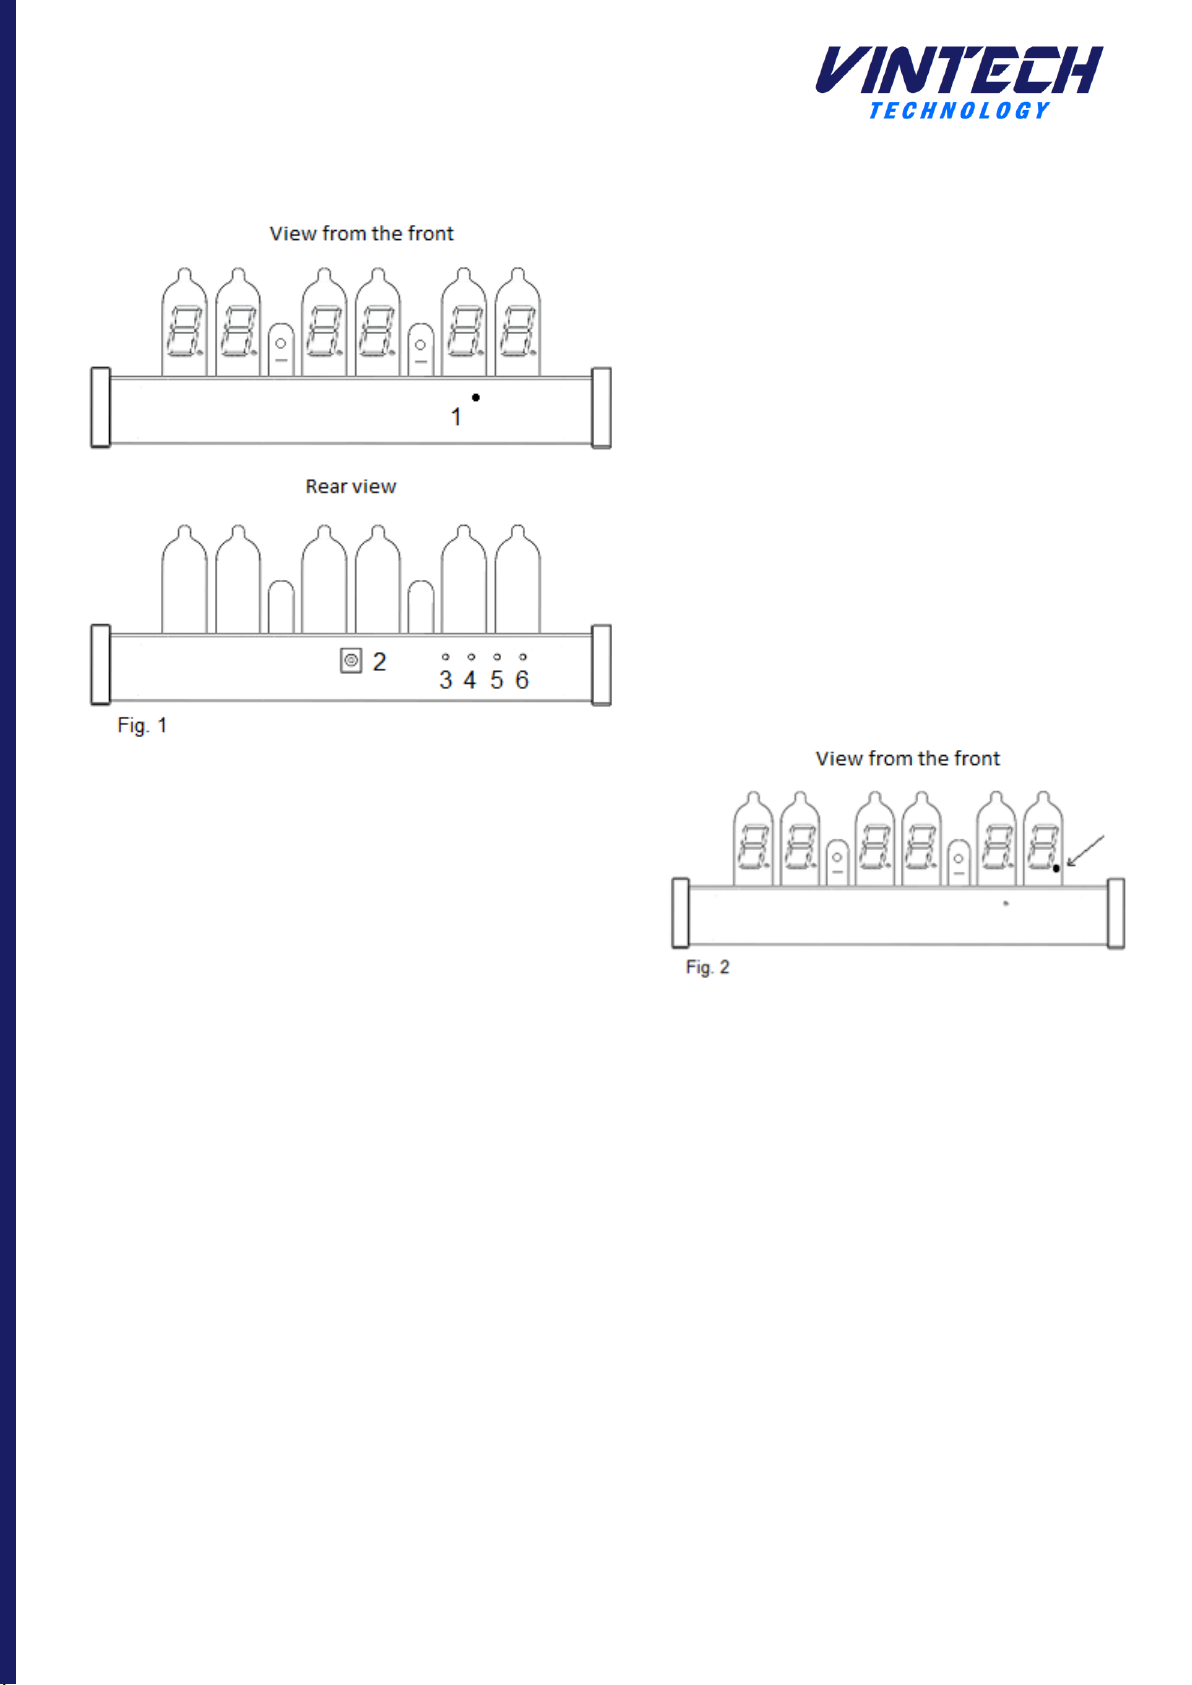
1 : Light sensor
2 : Power connector
3 : "configuration" button
4 : "+" button
5 : "-" button
6 : "OK" and / or "Alarm" button
5. Installation
The clock must be installed in a dry and dust free place.
Observe safety instructions.
In use, the tubes and the clock housing heat up slightly. It
must be installed in a sufficiently ventilated room and at a
temperature between 0°C and 40°C (32°F to 104°F). Do not
cover the clock during operation.
6. Getting started
The power supply unit supplied with the clock is compatible
for all types of electrical networks, between a voltage of
110V and 230V, 50Hz to 60Hz.
Connect the power supply cable to the connector on the
back of the clock. Connect the power supply to the mains.
The clock displays a welcome message "Hello" and a beep
indicating its initialization phase. By default, the clock
displays the time at "00H00M00".
7. Clock configuration
7.1 Display modes
There are 3 display modes:
• Mode 1: Time display
• Mode 2: Date Display
• Mode 3: Alternate time display
By default, mode 1 is selected. Pressing the "+" and
"-" keys changes the display mode. Each time you
press one of the two buttons, a number is displayed
for one second indicating the selected display mode.
7.2 Activation / deactivation of the alarm
By default, the alarm is disabled. Activation or
deactivation of the alarm is done by pressing the
"ALARM" key.
An indicator at the bottom of the last tube indicates
the state of the alarm (Fig. 2). If the alarm is
activated, the indicator is lit. If the alarm is disabled,
the indicator is off.
If the alarm is activated, if the alarm time is the
same as the clock time, the alarm will sound. By
default, the backlighting of the tubes flash at their
maximum power in white for 30 seconds. This mode
can be changed in the parameter setting (Menu 6).
Pressing any button will turn off the alarm if it is
triggered.
_____________________________________________________________________________________
User Manual - EN 4
Page 5

CLOCK C100 – Vacuum tube clock VFD
7.3 Settings of the different parameters
The various parameters are set by pressing the "CONFIG"
key. The configuration menu is displayed. The backlight
flashes in the adjustment mode. Pressing the "+" and "-"
keys navigates the menus.
There are 10 menus available:
Menu 1: Setting the time
Menu 2: Setting the date
Menu 3: Setting the alarm time
Menu 4: 12H/24H mode display
Menu 5: DMY or MDY date display
Menu 6: Configuring the alarm type
Menu 7: Setting the flashing type
Menu 8: Type of luminosity of the vacuum tubes
Menu 9: Backlight brightness type
Menu 10: Backlight color
Pressing the "OK" button validates the selected menu.
Pressing the "CONFIG" button exits the setting menu and
returns to the initial display mode of the clock.
Menu 1 : Setting the time
By default, the time is set to 00H00M00. The "+" key
quickly advances the time, the "-" key slowly decreases the
time. Pressing the "OK" button confirms the setting,
pressing the "CONFIG" button exits the menu without
validating the setting.
Menu 2 : Setting the date
By default, the date is set to 01/01/2017. The "+" key
quickly advances the date, the "-" key slowly decreases the
date. Pressing the "OK" button confirms the setting,
pressing the "CONFIG" button exits the menu without
validating the setting.
Menu 3 : Setting the alarm time
By default, the alarm time is set to 00H00M00. The
"+" key quickly advances the time of the alarm, the
"-" key slowly decreases the time of the alarm.
Pressing the "OK" button confirms the setting,
pressing the "CONFIG" button exits the menu
without validating the setting.
Menu 4 : 12H/24H mode display
By default, the "24H" mode is active. The "+" key
changes from "24H" mode to "12H" mode. The "-"
key changes from "12H" mode to "24H" mode.
Pressing the "OK" button confirms the setting,
pressing the "CONFIG" button exits the menu
without validating the setting.
Menu 5 : DMY or MDY date display
By default the mode "DD/MM/YY" is active. The "+"
key changes from "DD/MM/YY" mode to
"MM/DD/YY" mode. The "-" key changes from
"MM/DD/YY" mode to "DD/MM/YY" mode. Pressing
the "OK" button confirms the setting, pressing the
"CONFIG" button exits the menu without validating
the setting.
Menu 6 : Configuring the alarm type
There are 3 types of alarms:
Mode 1: The backlight is flashing white.
Mode 2: A sound signal sounds
Mode 3: The backlight flashes and an audible
signal sounds.
By default, mode 3 is selected. The "+" key increases
the mode to 3. The "-" key decreases the mode until
1. Pressing the "OK" button confirms the setting,
pressing the "CONFIG" button leaves the menu
without validating the setting.
Menu 7 : Configuration of the flashing type
The separators can flash or stay fixed in 3 different
ways:
Mode 1: Fast flashing, 1Hz
Mode 2: Slow flashing, 0.5Hz
Mode 3: No blinking, stays on.
_____________________________________________________________________________________
User Manual - EN 5
Page 6

CLOCK C100 – Vacuum tube clock VFD
By default, mode 2 is selected. The "+" key increases the
mode to 3. The "-" key decreases the mode until 1. Pressing
the "OK" button confirms the setting, pressing the
"CONFIG" button leaves the menu without validating the
setting.
Mode 8 : Type of the luminosity of the vacuum tubes
There are 2 types of brightness:
Mode 1: Variable brightness, depending on the
ambient brightness.
Mode 2: Fixed brightness, to be adjusted.
By default, mode 2 is selected, the brightness of the tubes
is fixed at 70%. The "+" key increases the mode to 2. The "-"
key decreases the mode until 1. Pressing the "OK" button
confirms the setting, pressing the "CONFIG" button exits
the menu without validating the setting.
If mode 2 is selected, a number appears corresponding to
the light output of the tubes. The "+" key increases the light
output up to 99%. The "-" key decreases the light output by
up to 1%. Pressing the "OK" button confirms the setting,
pressing the "CONFIG" button exits the menu without
validating the setting.
Mode 9 : Type of backlight brightness
There are 2 types of backlight brightness:
Mode 1: Variable brightness, depending on the
ambient brightness.
Mode 2: Fixed brightness, to be adjusted.
By default, mode 2 is selected, the brightness of the
backlight is fixed at 30%. The "+" key increases the mode to
2. The "-" key decreases the mode until 1. Pressing the
"OK" button confirms the setting, pressing the "CONFIG"
button exits the menu without validating the setting.
If mode 2 is selected, a number appears corresponding to
the backlight's light output. The "+" key increases the light
output up to 99%. The "-" key decreases the light output by
up to 1%. Pressing the "OK" button confirms the setting,
pressing the "CONFIG" button exits the menu without
validating the setting.
Mode 10 : Backlight color
There are 2 types of settings available:
Mode 1: Variable colors
Mode 2: Fixed color, to be adjusted.
By default, mode 1 is selected. The "+" key increases
the mode to 2. The "-" key decreases the mode until
1. Pressing the "OK" button confirms the setting,
pressing the "CONFIG" button exits the menu
without validating the setting.
If mode 2 is selected, a number appears
corresponding to the color of the backlight. The "+"
key increases the color number up to 48. The "-" key
decreases the color number to 1. The color appears
according to the chosen number. Pressing the "OK"
button confirms the setting, pressing the "CONFIG"
button exits the menu without validating the
setting.
_____________________________________________________________________________________
8. Maintenance
User Manual - EN 6
Page 7
CLOCK C100 – Vacuum tube clock VFD
Problem
Cause
Solution
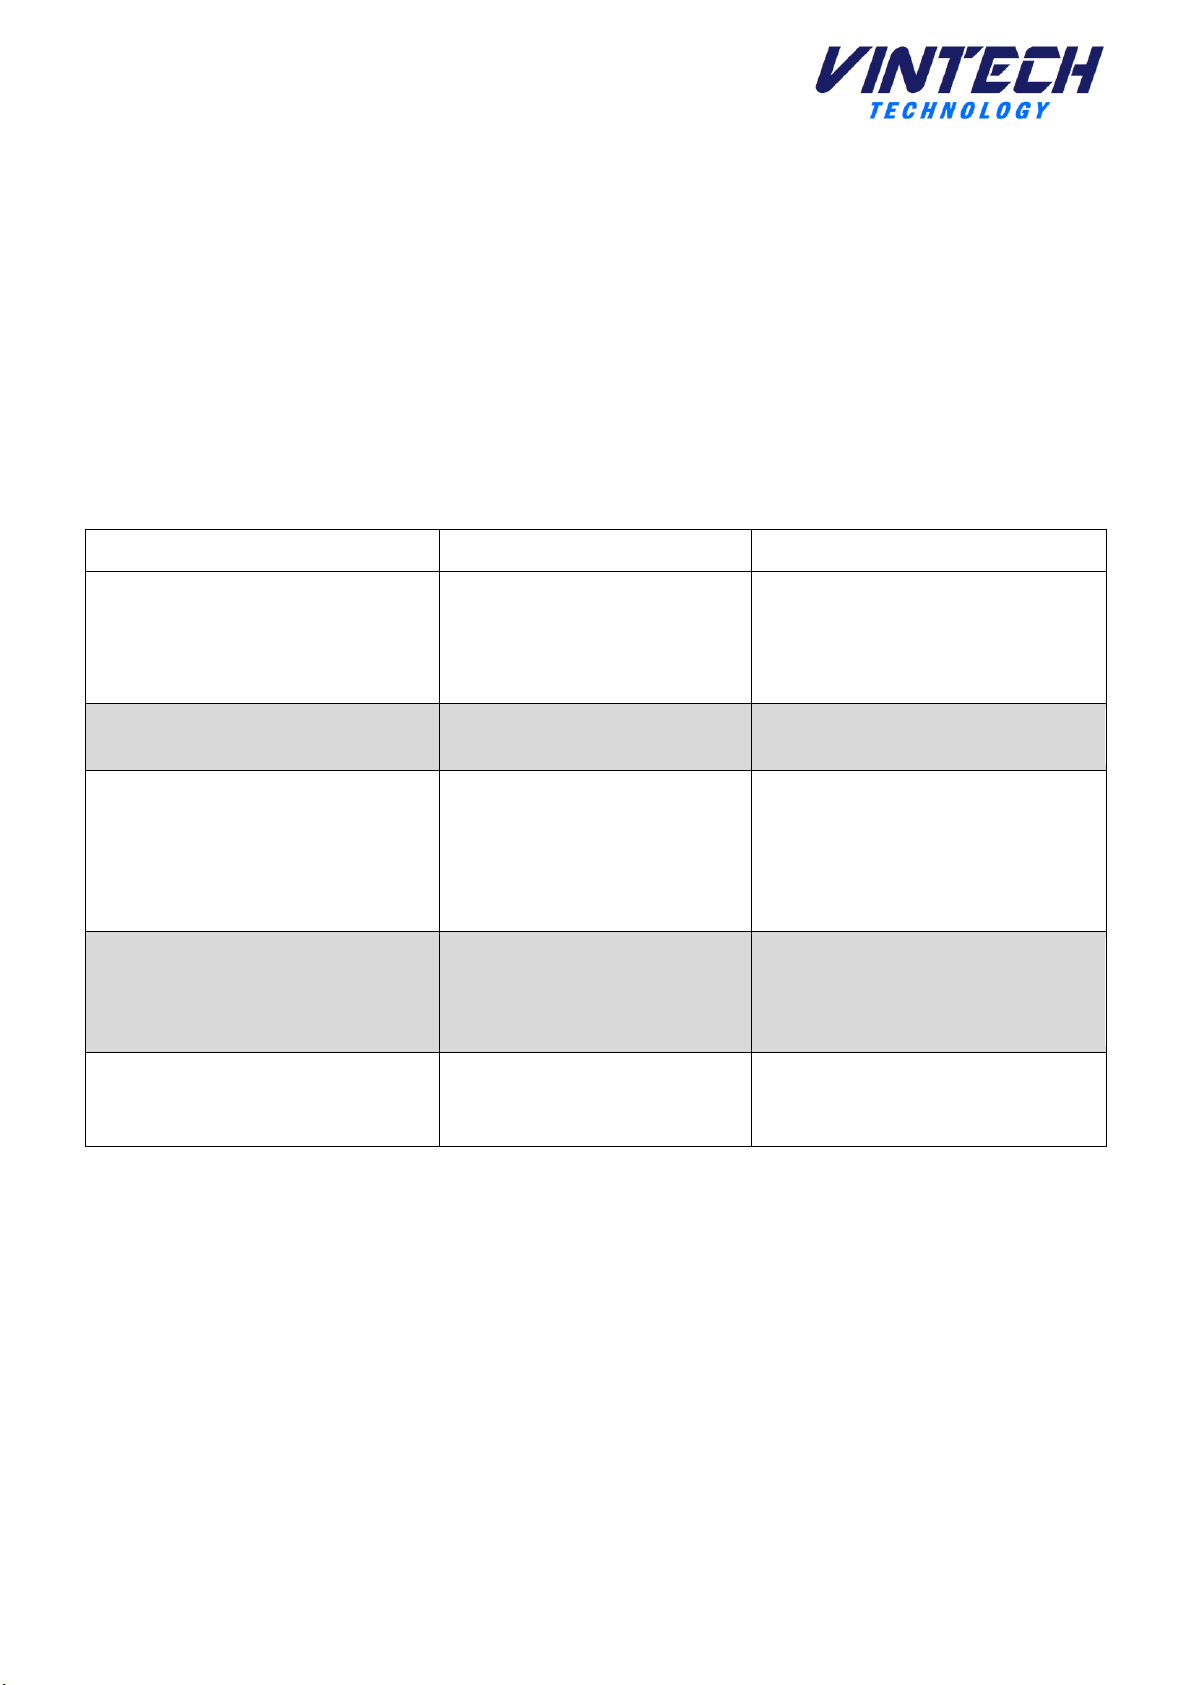
The clock does not start.
No power
Check if the mains unit is
working (green led on)
Check that the power cord is
connected to the clock.
One of the vacuum tube does not
light up or not.
Broken or cracked vacuum
tube
Unplug the clock and contact
customer service.
The brightness of the vacuum tube
are too weak
The brightness setting of
the tubes is too low
(manual brightness)
The room is dark (automatic
brightness)
Change the brightness setting of
the tubes in manual mode and
increase the brightness to the
desired power.
The clock does not save the time or
date.
The clock has been off for
more than 12 hours
Reprogram the time and date,
let the clock connect at least
30min while it can charge the
backup capacitor
Time tends to drift over time
Clock usage temperature
too low or too high.
Set the clock in an environment
where the temperature is
between 0 and 40 ° C.
_____________________________________________________________________________________
Before cleaning, turn off the clock by unplugging the power cord or unplugging the AC power supply. Damage
resulting from improper maintenance of the clock will not be covered by the warranty. The clock saves all
parameters in memory when it is off.
Once disconnected, wait a few minutes for the clock to cool down.
Never immerse the clock in water.
It is imperative that no water or any other liquid enters the clock.
Use a slightly dry microfiber cloth to clean the tubes and cabinet.
Do not use detergents, abrasives, or chemicals (alcohol, gasoline, etc.).
9. In case of problem…
User Manual - EN 7
www.vintech-technology.com/en/
 Loading...