

Vintage Cellars VintageView 7 User Manual
7’ Island Display Rack (IDR7)
Wine storage system
Wine Master Cellars, LLLP • 10645 E 47th Ave, Denver, CO 80239 • phone: 866.650.1500 • fax: 866.650.1501
Please feel free to contact us regarding the assembly of this product.
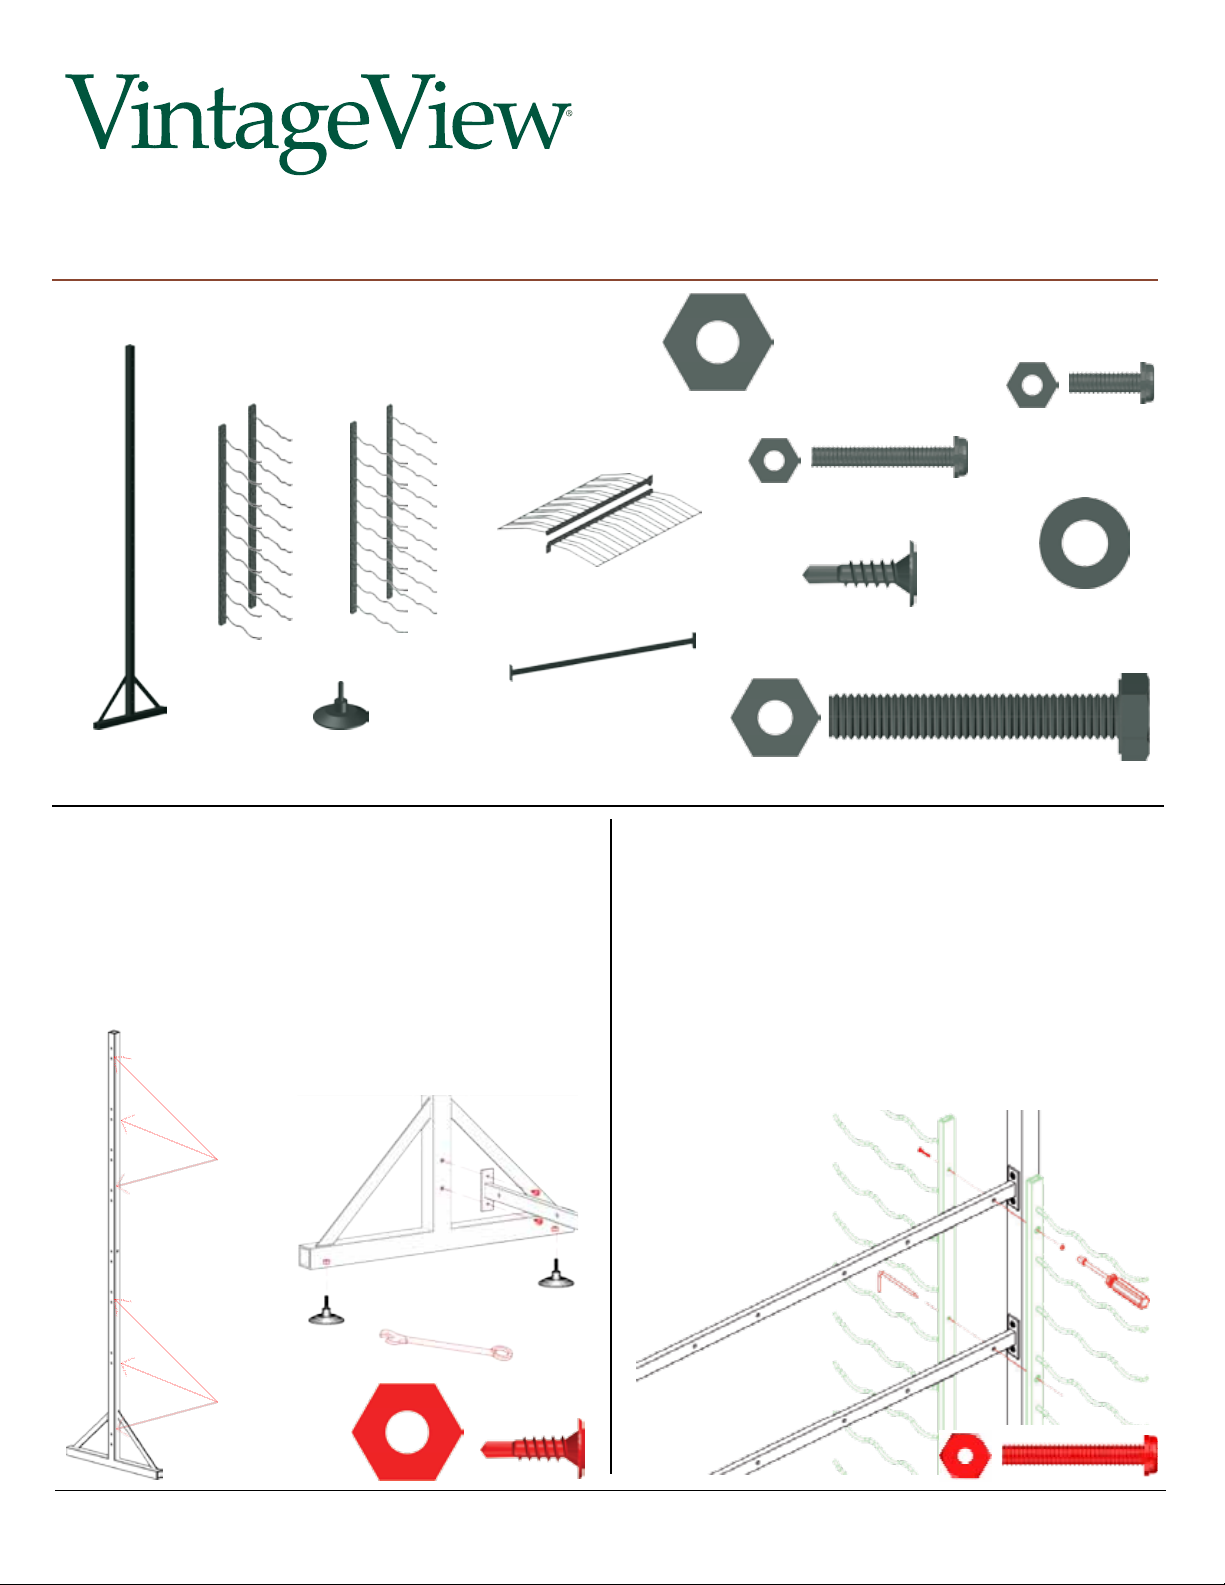
Required tools: 2 X 14mm (or adjustable) Wrench
Electric Screw Driver with #2 Phillips Bit
IDR-AK - included with IDR and contains an
8mm Nut Driver and Alignment Tool
†
4 X
Footer Pad
6 X
1 X
WS33
6 X
6 X
†
2 X
WS32
IDR7-UPRIGHT
†
IDR Extension packages contain only 1/2 the quantity of noted items.
Assembly Instructions
Hardware shown
4 X
IDR-PR
IDR-CR3
†
Footer
Pad Nut
36 X
†
2 X
24 X
Crossrail Assembly
actual size
WS Assembly
Screw
Screw
IDR-PR Assembly Bolt
3 X
IDR-PR Assembly
†
4 X
IDR-PR Assembly
Screws
Washer
1. Assemble frame - Insert and hold a footer pad nut inside the tube,
aligned with the pre-drilled hole, and thread the footer pad into the
nut. Tighten all of the footer pads with a 14mm wrench. Lay down
one upright and attach all six crossrails using the provided crossrail
assembly screws in the predrilled mounting holes noted below. Do not
fully tighten at this point to allow for adjustments during assembly.
Stand up the rst upright and attach the second upright to crossrails.
Attach
Crossrails Here
2. Attach racks to frame - Using two 3 bottle deep base cradling
racks, and starting with the bottom three cross rails at the left side
of the assembled frame, align the mounting holes in the racks with
the holes on crossrails. Temporarily place alignment tool through
center hole in rst rack, crossrail and the center hole in second
rack, as shown. Attach racks to crossrails as shown. After securing
top and bottom of racks, remove alignment tool and replace with
assembly screw. Repeat for each rack set, alternating between
base and neck sets. Then, move on to the upper three crossrails
and install the 2 bottle deep racks in the same fashion.
Attach
Crossrails Here
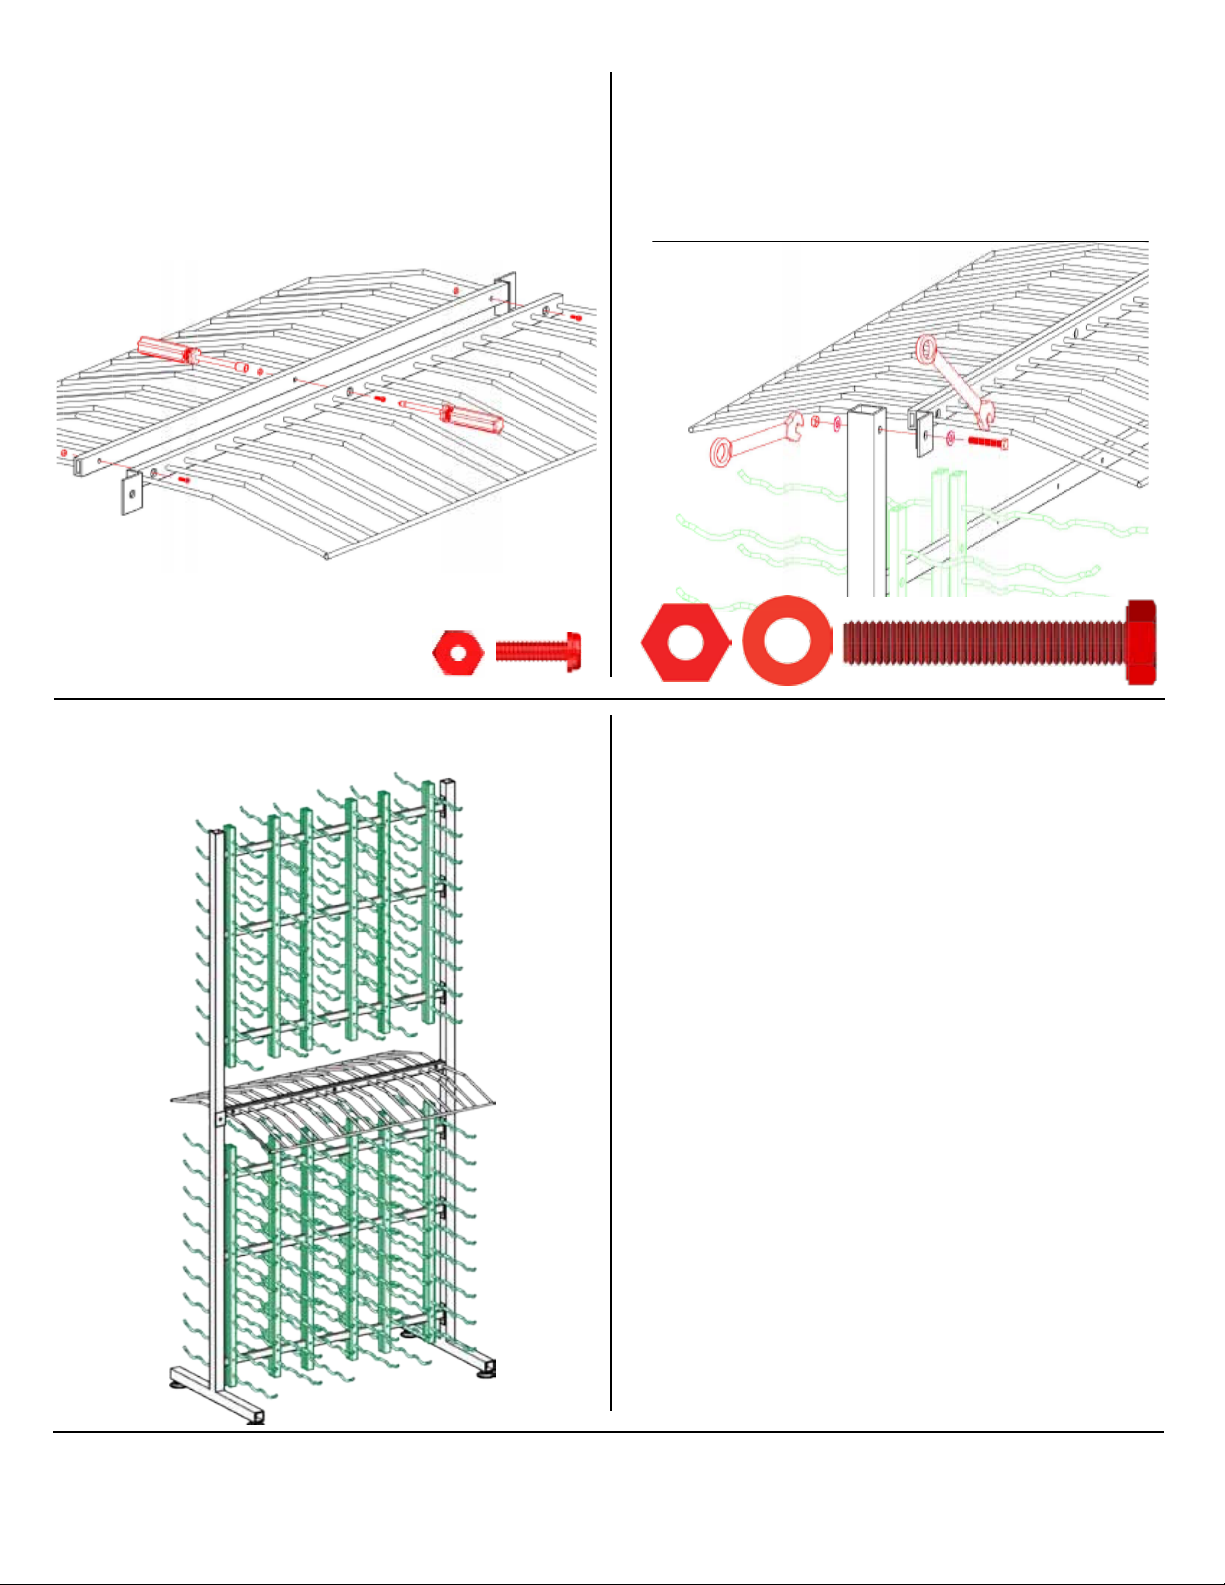
3. Assemble presentation rack – Position presentation racks
back to back as shown. Using the nut driver (included) and a Phillips
head screwdriver, attach presentation racks with presentation rack
assembly screws and fully tighten.
4. Mount presentation rack to frame – Align presentation rack
mounting plate to the mounting hole on upright. Place a washer
over a presentation rack assembly bolt and insert the bolt through
presentation rack and upright. Complete by placing a second
washer and nut over the exposed end and tighten with 14mm
open end wrench (not included). Repeat for second side.
5. Finishing steps – Fully tighten all screws (especially Crossrail
Assembly Screws) and snap mounting hole covers in place. Fill with
wine and enjoy!
Lifetime Warranty
Wine Master Cellars, LLLP (WMC) warrants to the original consumerpurchaser that this product shall be free from defects in workmanship
and materials under normal and reasonable use for the lifetime of the
product. WMC will, at its option, renish or replace any product or
part found to be defective during the warranty period and excludes
installation charges, shipping costs, and the cost of removal and
reinstallation. WMC may require you to return the part(s) claimed to be
defective, for its inspection - freight or postage prepaid.
This warranty does not include the cost of any inconvenience or
property damage due to the failure of the product and does not cover
damage due to Devine Act, third party act out of the control of WMC,
misuse, abuse, accident, or damage arising out of transportation of
this product. THIS WARRANTY IS EXCLUSIVE AND IN LIEU OF ALL
OTHER OBLIGATIONS, LIABILITIES OR WARRANTIES AND THERE IS
NO WARRANTY OF MERCHANTABILITY OR FITNESS FOR A PARTICULAR
PURPOSE.
In no event shall WMC be liable or responsible for INCIDENTAL OR
CONSEQUENTIAL DAMAGES or for any other direct or indirect damage,
loss, cost, expense, or fee. Neither the WMC distributor nor the retail
establishment selling this product has any authority to make any
warranties or to promise remedies in addition to or inconsistent with
those stated above. WMC’s maximum liability, in any event, shall not
exceed the purchase price of the product paid by the original consumerpurchaser.
All matters regarding the sale of the product or this warranty shall
be governed by the laws of the state of Colorado and the exclusive
jurisdiction of and venue for any warranty claims or claims directly
or indirectly related to the sale of the product shall be Colorado. Any
claim, or action relating the purchase of the product or this warranty
must be led no more than six (6) months after the date the claim
arose. All statute of limitations to the contrary are waived.
Some states do not allow the exclusion or limitation of incidental
or consequential damages. In such case, the above limitations or
exclusions may not be applicable. This warranty gives you specic legal
rights and you may also have other rights which vary from state to
state.
Please call us toll free at 866-650-1500 for assembly assistance or to request replacement parts.
www.VintageView.com
 Loading...