

Page 1
Gamme PRESTIGE
PRESTIGE range
Mode d’emploi - User Manual - Mode d’emploi - User Manual
Mode d’emploi - User Manual - Mode d’emploi - User Manual
Page 2

TRANSTHERM
24, rue Francis de Pressensé - 69628 Villeurbanne Cedex - France
info@transtherm.net
Page 3

gB
Welcome
You have just purchased a Transtherm product – thank you for your custom. We take particular care in manufacturing our
products in terms of their design, ergonomics and ease of use.
We hope that you will be completely satisfied with this product.
pleAse note
The information contained in this document may be changed without warning.
Transtherm offers no guarantee for this appliance when it is used for purposes other than those for which it was designed.
Transtherm shall not be held responsible for any errors contained in this manual or for any damage linked to or resulting
from the supply, performance or use of this appliance.
This document contains original information, which is protected by copyright. All rights are reserved. Photocopying,
reproducing or translating this document, whether partially or completely, is strictly forbidden, without Transtherm’s prior
written consent.
This appliance is intended solely for storing wine.
It is not designed to be used by people (including children) with reduced mental, sensorial or physical abilities, or by people
who have no experience or knowledge, unless they have first received instructions on how to use the machine or are
supervised by a person responsible for their safety.
Children must be supervised to ensure that they do not play with the appliance.
If the power lead is damaged, it must be replaced by a special cable or unit available from the manufacturer or its customer
service department.
WARNING:
- Ensure that the air vents in the appliance’s cavity and the flush-fitting structure are unobstructed.
- Do not use mechanical devices or other means to speed up the defrosting process other than those recommended by
the manufacturer.
- Do not damage the refrigeration circuit.
- Do not use electrical appliances inside the wine storage compartment, unless they have been recommended by the
manufacturer.
- Do not store explosive substances in this appliance such as aerosols containing flammable propellant gas.
This appliance is intended for domestic and similar applications such as:
- kitchenettes reserved for staff of shops, offices and other professional environments;
- gites and use by guests of hotels, motels and other environments which are residential in nature
- hotel rooms;
- the food service industry and other similar applications except for retail sale.
Page 4
contents
1 - Description of your wine cabinet 5
2 - Power supply 6
3- Protecting the environment and saving energy 6
4 - Installing your wine cabinet 7
Door reversibility 8
5 - Layout – Storage 9-10
6 - Commissioning your wine cabinet 11
I - Connection 11
II-A - Description (I-temperature model: Loft Vintage, Manoir, Ermitage) 11
III-A - Temperature setting 11
II-B - Description (3-temperature model: Castel) 12
III-B - Temperature setting 12
II-C - Description (multi-temperature model: Réserve) 13
III-C - Temperature setting 13
IV - Setting the lighting mode 14
7 - Everyday maintenance 14
8 - Operating faults 14
9 - Energy and technical features 15
10 - Storage simulation 16-19
Standard wine serving temperatures
French wines Australian wines
GB
Alsace
Beaujolais
Sweet white Bordeaux
Dry white Bordeaux
Bordeaux reds
Burgundy whites
Burgundy reds
Champagne
Jura
Languedoc-Roussillon
Provence Rosé
Savoie
Dry white Loire wines
Sweet white Loire wines
Loire reds
Rhône wines
Sweet wines from the South-West
4
Reds from the South-West
10 °C/50 °F Cabernet franc 16 °C/61 °F
13 °C/55 °F Cabernet sauvignon 17 °C/63 °F
6 °C/43 °F Chardonnay 10 °C/50 °F
8 °C/46 °F Merlot 17 °C/63 °F
17 °C/63 °F Muscat à petit grain 6 °C/43 °F
11 °C/52 °F Pinot noir 15 °C/59 °F
18 °C/64 °F Sauvignon blanc 8 °C/46 °F
6 °C/43 °F Semillon 8 °C/46 °F
10 °C/50 °F Shiraz 18 °C/64 °F
13 °C/55 °F Verdhelo 7 °C/45 °F
12 °C/54 °F
9 °C/48 °F Other wines
13 °C/55 °F Californie 16 °C/61 °F
7 °C/45 °F Chilean 15 °C/59 °F
14 °C/57 °F Spanish 17 °C/63 °F
15 °C/59 °F Italian 16 °C/61 °F
7 °C/45 °F
15 °C/59 °F
Page 5
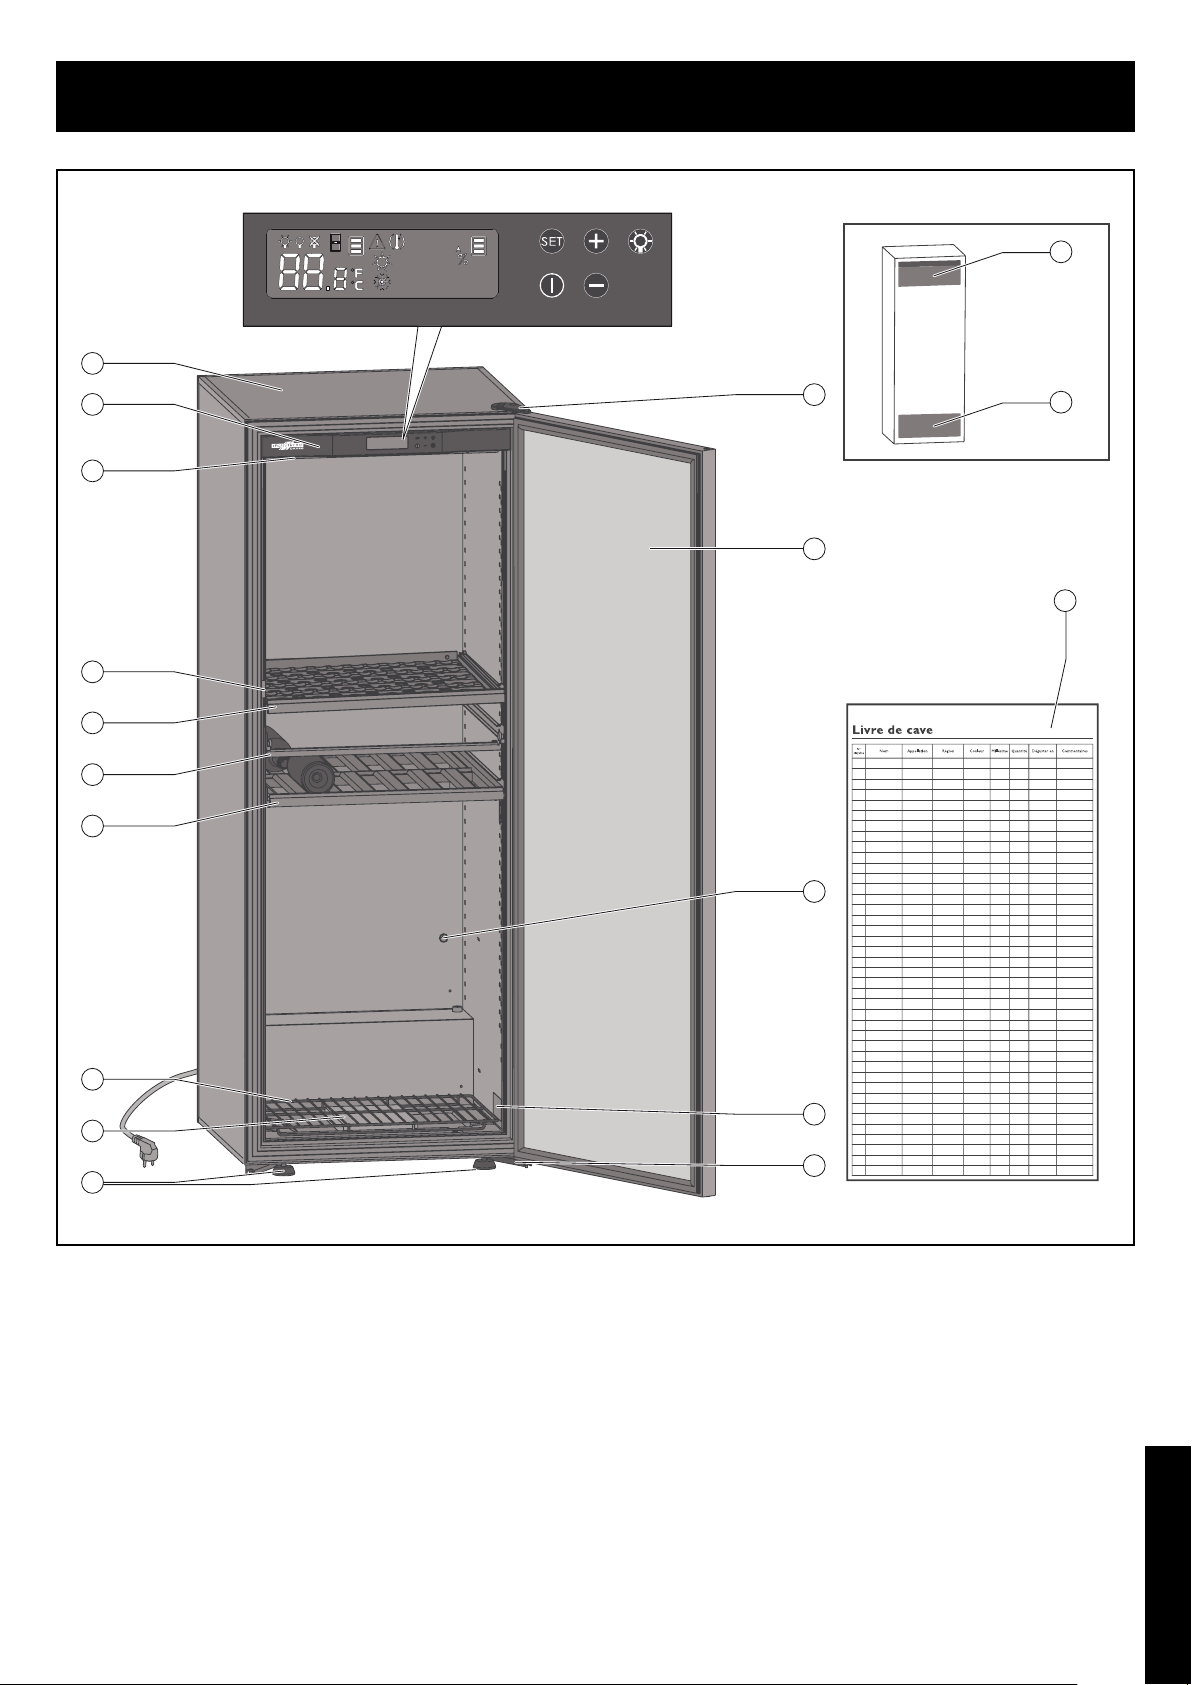
1 - Description oF your Wine cABinet
A
B
C
D
P
O
N
Q
R
E
F
G
H
I
J
A Cabinet body
B Setting and control panel
C Lighting (2 LEDs)
D Door catch
E Sliding shelf
F Cabinet stiffener (do not remove) – large model only
G Storage shelf
H Grill
I Humidity cartridge
(1 temperature model only)
J 2 adjustable feet for levelling
M
L
K
K Lower hinge (x2)
L Product identification label
M Thermodynamic pump aperture
N Door (fitted with a removable handle and
a dual-action lock)
O Upper hinge
P Red service temperature compartment
(3 temperatures model)
Q Chilled wine compartment
(3 temperatures model)
R Cellar board (solid door only)
5
GB
Page 6
2 - poWer supply
The wine cabinet’s power lead has a plug, to be plugged into a standard earthed outlet to prevent
any risk of electric shock.
For your personal safety, the wine
cabinet must be correctly earthed.
Ensure that the socket is correctly
earthed and that your installation
is protected by a circuit breaker
(30 mA*)
*Not applicable to some countries.
Have the power supply socket checked by a qualified electrician who will check that it is
correctly earthed and will carry out, if necessary, work to ensure that the socket
complies with current standards.
If you are moving to a foreign country, check that the supply characteristics of the cabinet
correspond to the country (voltage, frequency).
3 - cAring For the environment AnD energy sAving
Disposal of packaging
All packaging used by Transtherm is made from
recyclable materials.
After unpacking your cabinet, take the packaging to
a refuse collection point. For the most part, it will be
recycled.
Recycling: a caring gesture
Electrical and electronic equipment can have a harmful effect on the
environment and human health owing to the presence of hazardous
substances.
You should never therefore trash electronic and electrical equipment with
unsorted municipal waste.
When purchasing a new Transtherm product, you can entrust recycling of
your old appliance to your Transtherm retailer.
Speak to your Transtherm retailer. He will explain the removal and
collection arrangements set up in the Transtherm network.
In compliance with legislation relating to protecting and caring for the
environment, your wine cabinet does not contain C.F.C.s or H.C.F.Cs.
To save energy
•Install your wine cabinet in a suitable location (see following page) and
observe the recommended temperature ranges.
• Keep the door open for as short a time as possible.
•Ensure that the door seal is in good working order and that it is not
damaged. If it is, contact your Transtherm retailer.
Disable any unusable appliances by unplugging them and cutting off the
power lead.
GB
6
Page 7
4 - instAllAting your Wine cABinet
Unpacking
• When your cabinet is delivered, check the outside for signs of damage
(impact, warping…).
• Open the door and check that the various elements inside are intact
(walls, hinges, bottle support…).
• Remove the protective elements inside your cabinet.
•
If there is a problem, contact your Transtherm retailer.
When moving your cabinet, never tilt it more
than 45°, and always on its side (on the
opposite side of the flexible lead).
Precautions
• Do not place your cabinet in an area liable to flood.
• Do not place your cabinet close to a source of heat or expose it to
direct sunlight
• Prevent water from splashing on any parts of the rear of the machine.
• If you are installing your cabinet under a work surface, leave a minimum
space of 5 cm at the sides and at the top of your cabinet. We recommend
that you create an air vent in the work surface.
• Arrange the power lead so that it is accessible and does not come into
contact with any of the appliance’s components.
• Tilt the cabinet slightly backwards in order to adjust the front feet (by
screwing or unscrewing them) so that you can level your cabinet (spirit
level recommended).
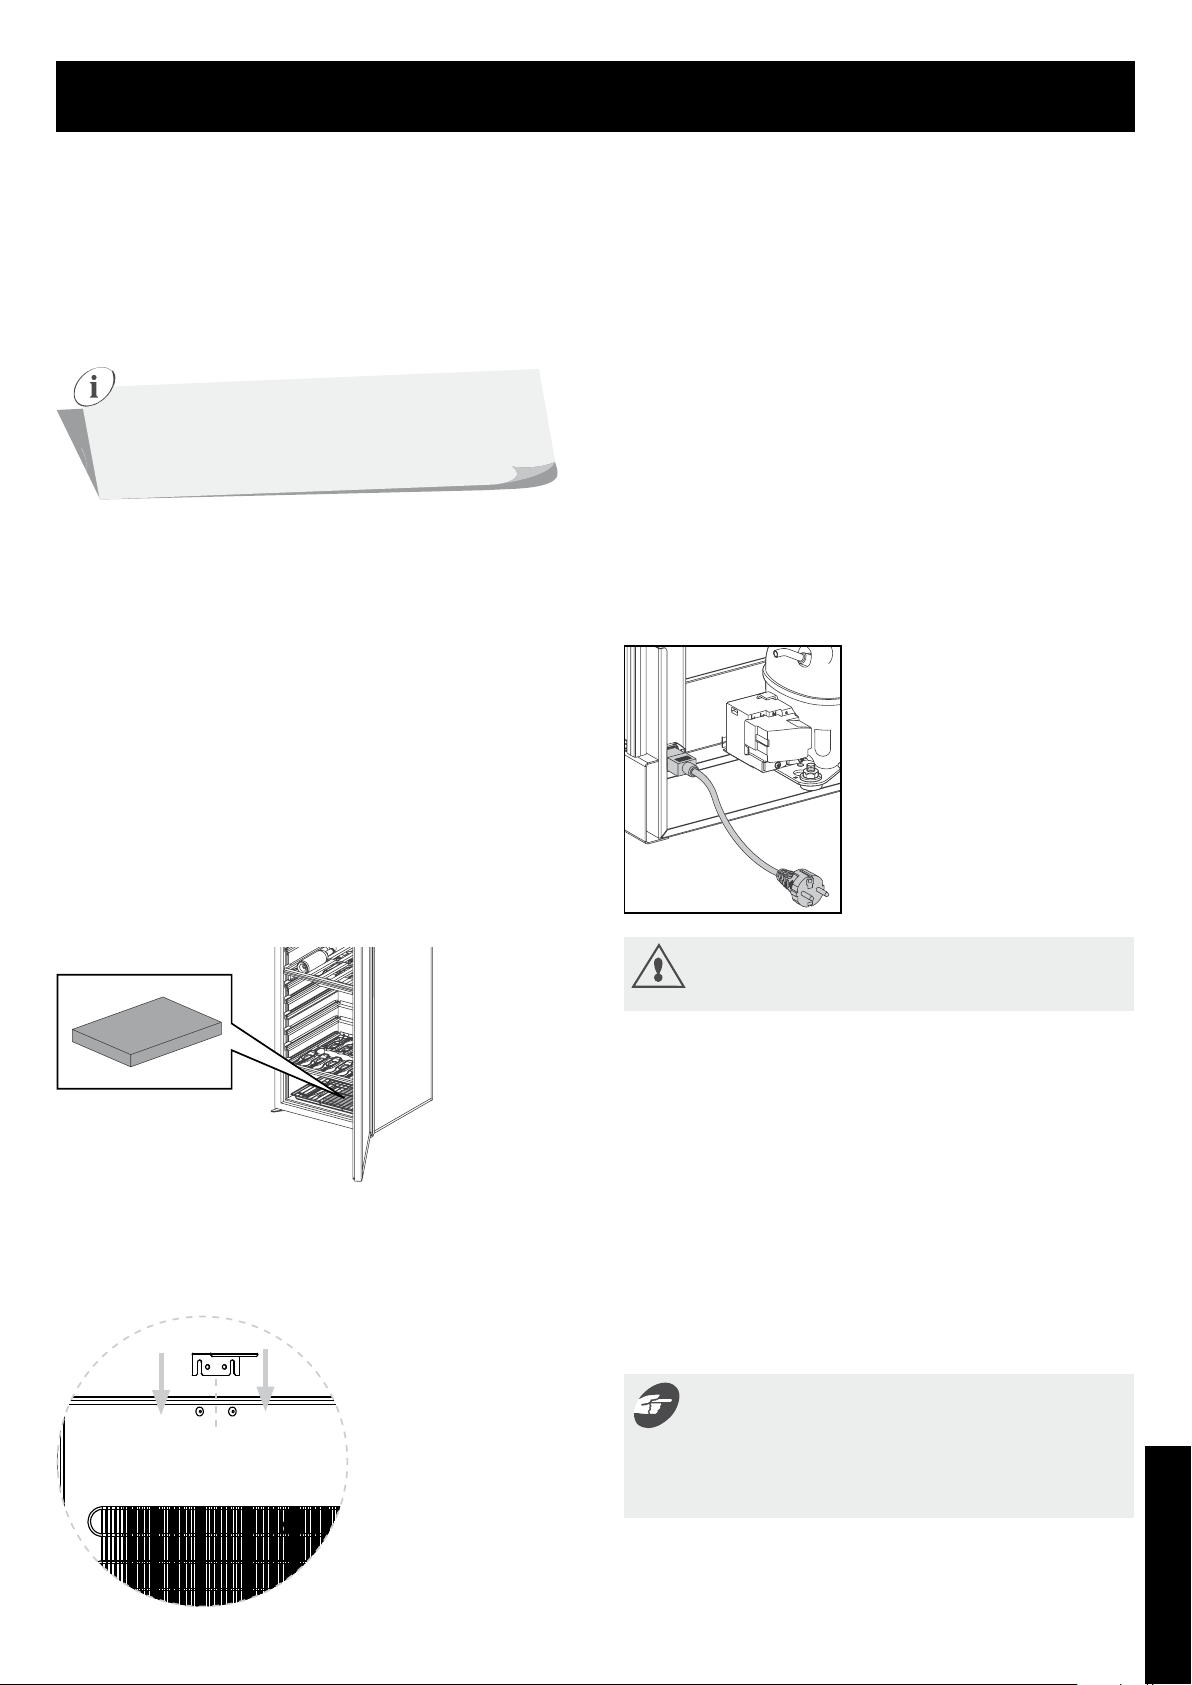
• Place the humidity cartridge (which you will find in your cabinet’s
“accessories” bag) at the bottom of the cabinet, under the grill, in the
specially provided tray (see diagram below). When using for the first time,
immerse the entire cartridge in water for a few minutes to saturate it then
drain it thoroughly.
Installation
Place your cabinet in the desired location.
It must:
• be open to the outside and well ventilated (not in an enclosed
cupboard, for example),
• not be too damp (utility room, laundry room, bathroom...),
• have a flat, stable floor,
• be supplied with power (standard outlet, 16 A, earthed with 30mA*
circuit breaker). (* not applicable to some countries).
• Take the lead (which you will find in your cabinet’s “accessories” bag)
and plug it into the connector, located at the back of the cabinet, on the
bottom left-hand side (see diagram below).
• Wait 48hrs before plugging in your cabinet
Replacement of the LEDs on the control panel must
only be carried out by a qualified electrician.
• Install the stop (which is located in the accessories bag) at the back of
the cabinet (see diagram).
• This allows a space of 7 cm to be maintained between the wall and the
rear of the cabinet. This space allows your cabinet’s power consumption to
be optimised.
• Place the 2 caps in
the 2 holes at the top of the
cabinet.
• Do not push the caps
all the way in, in order to
allow the rear stop to be
installed.
• Slide the rear stop
between the caps and the
wall of the cabinet, then push
the 2 caps all the way in.
• Place your cabinet in
the desired location.
Bottles must be arranged so that they do not come into contact
with the back wall. If this happens, the condensation created on
the wall may trickle onto the shelves and damage the bottle
labels. In addition, contact with the cold wall may create a frost point,
which is harmful to your wine.
7
GB
Page 8

10
11
9
4 - instAllAting your Wine cABinet
Door reversibility
x3 x4x3
This allows you to change the direction in which the door opens. Follow
the instructions below (example for changing a right-hand door into a left-
4
hand door):
x3
C E
DB GF H JA
x2
1
2
3
1 Unscrew the three screws using a "T25" Torx wrench.
2 Remove the upper hinge.
3 Carefully remove the caps using a thin blade.
4 Remove the cabinet door by opening it slightly, then lifting it upwards.
A Upper hinge
B Caps
C Caps
D Torx screw
E Phillips screw
F Door catch
G Lower hinge
9 Unscrew the handle.
10 Turn the door through 180°.
11 Screw the handle.
Warning: the door is very heavy. Take any necessary
precautions to ensure that you do not injure yourself or drop it.
12 Put the door back on its pin.
H Door pin
J Door pin cap
180°
15
5 Unscrew the door pin.
6 Carefully remove the cap using a thin blade and assemble the pin in its
place. Reposition the cap on the opposite side
8
7
7 Unscrew the four screws.
8 Fasten the door catch on the opposite side of the cabinet using the screws.
8
GB
14
13
13 Put in place the upper hinge.
14 Screw the hinge so that the door is completely parallel to the cabinet.
Check that the door seal adheres well to the cabinet (by closing the door),
to ensure that it is completely air-tight.
15 Put in place the caps.
NB : The handle of your wine cabinet is removable. If you
wish to remove it, just unscrew the 4 screws (see drawing 9)
and obturate the 2 holes at the top of the door with the 2
plastic caps you could find into the accessories ‘sack.
Page 9

5 - lAyout - storAge
Different types of storage
Universal storage shelf
Ref.: AXUHT
Capacity: 77 bottles
Max weight: 100 kg
Universal sliding shelf
Ref.: ACUPHT
Capacity: 12 bottles
The layout of your cabinet can be modified
according to your requirements.
Refer to pages 16-19 to see storage
simulations.
Layout advice
Your Transtherm wine cabinet has been designed to safely hold a maximum
number of bottles. We recommend that you observe the following advice
to optimize loading.
• Distribute your bottles as uniformly as possible over the various cabinet
shelves, in order to spread the weight. Also ensure that none of the bottles
is touching the rear wall of the cabinet.
• Spread the load over the entire cabinet rather than placing bottles all at
the top or all at the bottom.
• Observe the loading instructions for the specific storage layout of your
cabinet and never stack bottles on a sliding shelf.
• In the same way, place one or two bottles of each of your
different wines on the sliding shelves and keep spare bottles on
the storage shelves. You then simply replace bottles when they
are consumed.
• When using your wine cabinet, never pull out more than one
sliding shelf at a time.
NB: Never modify the position of the stiffener in your wine
cabinet (see description page 5) without first consulting your
retailer and never handle this part when the cabinet is loaded.
• If you have sliding shelves, it is preferable to position them in the upper
section of your cabinet to facilitate daily access.
Adding sliding shelves
When you purchase your cabinet, the sliding shelves are already adjusted to ideally suit the internal dimensions of your appliance. If you purchase a new
sliding shelf, you may have to carry out this adjustment. To do so, unscrew the screws
runner at the desired width and tighten the screws. Repeat this process for the second runner (if necessary).
1
22
1
of the first right or left runner 2 (2 screws) then position the
1
2
Changing the position of a sliding shelf
• Completely unload the sliding shelf.
• Then remove the sliding shelf by sliding it towards you whilst lifting the front section.
• Remove the slide guides from the walls, marking off the right guide and the left guide.
• Refit them (see diagram below).
A. Putting in place the back section of the
guide
Wall
Guide
Wall
Guide
B. Putting in place the front section of the
guide
Guide
Wall
Guide
Wall
9
GB
Page 10

5 - lAyout - storAge
C. Then replace the sliding shelf
Sliding shelf
Guide
The cellar board
A cellar board is provided with all solid door models to keep track of each
bottle located within the cabinet. You can write on the cellar board thanks
to the pencil given in the accessories bag (all doors types).
Livre de cave
N°
Nom Appellation Région Couleur Millésime Quantité Déguster en Commentaires
clayette
10
GB
Page 11

6 - commissioning your Wine cABinet
1. Connection
Have your socket checked (presence of correct sized fuses and 30 mA
circuit breaker).
Do not plug several cabinets into an adaptor.
1I. Description (I-temperature model: Loft Vintage, Manoir, Ermitage)
EDCBA F G H
For optimal performance, we recommend that you
fill your cabinet to at least 75% of its capacity.
The tactile keys are very sensitive.
There is no need to apply force, only a
light touch is required to register the
command.
Remember to remove your finger from
the panel between each press.
M L
A Lighting mode
B Open door alarm
C Temperature zone
D Sensor fault alarm
E Temperature alarm
K IJ
I Standby key
J Humidity level alarm
K Hot circuit in-use indicator
L Cold circuit in-use indicator
M Temperature display
F Confirmation and setting access key
G Setting and selection keys
H Lighting mode confirmation and access key
III. Temperature setting (I - temperature modell)
The value shown on the display is the actual temperature inside
the cabinet. It is therefore necessary to wait before your new
setting takes effect.
5 sec.
Press and hold down the key for 5 seconds to start up.
1 Press and hold down the key for approximately 5 seconds.
The display will start to flash
• The default setting is 12°C / 54°F (ideal maturing temperature).
However, you can set the temperature from 6 to 18°C / 43 to 64°F.
• Recommended temperature setting range for maturing wine: 10 - 14°C
/ 50 - 57°F.
• Recommended temperature setting range for serving wine:
- White wines: 6 - 10°C / 43 - 50 °F
- Red wines: 15 - 18°C / 59 - 64°F
2 Press the or keys to set the desired temperature
3 Press the button to confirm
Transforming your wine maturing cabinet into a wine serving
cabinet: you can use your 1-temperature cabinet as a wine
serving cabinet to bring your white or red wines to the
correct serving temperature:
• for white wine: recommended setting range: 6° - 10 °C /
43 - 50°F.
• for red wine: recommended setting range: 15° - 18 °C /
59 - 64°F.
This cabinet can therefore be used as a red or white
wine serving cabinet
11
GB
Page 12

6 - commissioning your Wine cABinet
II-B. Description (3-temperatures model: Castel)
FEDCBA G H I
The tactile keys are very sensitive.
There is no need to apply force, a light
touch is sufficient to register the
command. Remember to remove your
finger from the panel between presses.
N M
A Lighting mode
B Open door alarm
C Maturing compartment temperature zone
(main compartment of the cabinet)
D Sensor fault alarm
E Temperature alarm
L K J
I Lighting mode access and confirmation key
J Standby key
K Red serving compartment temperature display
L Hot circuit in-use indicator
M Cold circuit in-use indicator
N Maturing compartment temperature display
F Red serving temperature compartment temperature
zone (upper compartment of the cabinet)
G Confirmation and setting access key
H Setting and selection keys
III-B. Temperature setting (3-temperatures model)
Maturing compartment recommended temperature setting range: 10 à 14 °C / 50 to 57 °F.
Red serving temperature compartment recommended temperature setting range: 16 à 20 °C / 61 to 68 °F.
The chilling compartment temperature is determined by the temperature set in the maturing compartment.
5 sec.
Press and hold down the key for 5 secs to power up.
1 Press and hold down the key for approximately 5 secs.
The display will start to flash.
2 Press the or keys to set the desired temperature
in the maturing compartment.
3 Press the button to confirm.
The red serving temperature compartment temperature display
will flash.
In 3-temperature models, the chilling compartment
temperature is determined by the temperature set in the
maturing compartment.
Therefore, if you want to obtain a temperature lower than
8°C / 46°F in the chilling compartment, it will be necessary
to set a temperature lower than 12°C / 54°F in the maturing
zone.
For the red serving temperature zone, it is impossible to
12
GB
obtain a temperature below 17°C / 63°F for models fitted
with glass doors.
4 Press the or keys to set the temperature of the red
serving temperature compartment.
5 Press the button to confirm.
The value shown on the display is the actual temperature inside
the cabinet. It is therefore necessary to wait before your new
setting takes effect.
• For the maturing compartment, the default setting is 12°C / 54°F (ideal
maturing temperature). However you can set the temperature between
9 - 15°C / 48 - 59°F.
• For the red serving temperature compartment, the default setting is
18°C / 64°F (ideal temperature for bringing red wine to the correct
serving temperature). However you can set the temperature between 15
- 20°C / 59 - 68°F.
N.B: in order to operate correctly, your cabinet must be placed in a room
with a temperature of 12 - 30°C / 54 - 86°F.
Page 13

6 - commissioning your Wine cABinet
II-C. Description (multi-temperatures model: Réserve)
CEDCBA F G H
The tactile keys are very sensitive.
There is no need to apply force, a light
touch is sufficient to register the
command. Remember to remove your
finger from the panel between presses.
M L
A Lighting mode
B Open door alarm
C Temperature zones concerned
D Sensor fault alarm
E Temperature alarm
F Confirmation and setting access key
K J I
I Standby key
J Display of the temperature on the top of the cabinet
K Hot circuit in-use indicator
L Cold circuit in-use indicator
M Display of the temperature on the bottom
of the cabinet
G Setting and selection keys
H Lighting mode access and confirmation key
III-C. Temperature setting (multi-temperatures model)
Recommended temperature setting range for the lowest temperature: 7 - 9 °C / 45°F - 48°F.
Recommended temperature setting range for the highest temperature: 17 - 20 °C / 63°F - 68°F.
5 sec.
Press and hold down the
key for 5 secs to power up.
1 Press and hold down the key for approximately 5 secs.
The display will start to flash.
3 Press the button to confirm.
The right-hand display will flash.
The value shown on the display is the actual temperature inside
the cabinet. It is therefore necessary to wait before your new
setting takes effect.
2 Press the or keys to set the desired temperature.
4 Press the or keys to set the desired temperature.
5 Press the button to confirm.
• For the lowest temperature, the default setting is 8°C / 46°F. However
you can set the temperature between 6 - 12°C / 43 - 54°F.
• For the highest temperature, the default setting is 18 °C / 64°F.
• However you can set the temperature between 15 - 20 °C / 59 - 68°F.
N.B: in order to operate correctly, your cabinet must be
placed in a room with a temperature of 12 - 35 °C / 54 - 95°F.
13
GB
Page 14

6 - commissioning your Wine cABinet
IV. Setting the lighting mode (all models)
1 Press the key approximately 5 seconds.
The indicator of the active mode will flash
There are 3 setting options for lighting:
Permanent lighting (mood lighting for a cabinet fitted with a glass
door, for example).
Lighting which comes on when the door opens (it is switched off
when the cabinet door is closed).
Lighting disabled
2 Press the or keys to select the desired mode.
3 Press the key to confirm
Precaution : bright light, never look directly at the LED beam.
7 - everyDAy mAintenAnce
Your Transtherm cabinet is a tried and tested appliance.
Maintenance operations to be carried out approximately once a year
• Unplug and unload the appliance.
• Regularly vacuum the condenser at the back of the appliance.
• Clean the inside of the compartments with water and a gentle cleaning product.
• Rinse thoroughly.
• Check that the seals are in good condition.
Regular monitoring of your
cabinet and reporting any faults
to your retailer will ensure
that your appliance provides
you with many years of faithful
service.
8 - operAting FAults
Possible incidents Causes Corrective actions
The pictogram is displaying
The
even though I have taken the corrective
actions above
The
The
The
14
GB
pictogram is still displaying
pictogram is displaying
pictogram is flashing
pictogram is displaying
If your appliance does not seem to be working correctly,
contact your Transtherm retailer.
The temperature
has not returned to
within the ±4°C / 39°F
threshold
Operating fault Unplug the cabinet and contact your Transtherm retailer.
Open door alarm Make sure that the door is correctly closed.
The level of relative
humidity has been <
50 % for over 72 hrs
Temperature sensor
fault alarm
Check that the door is correctly closed.
Check the condition of the door seal.
If you placed a large amount of bottles in your cabinet in the last few hours,
wait a while then check again. If the alarm is still displaying, contact your
Transtherm retailer.
• Pour a glass of water into the duct of the tray (see chapter 7, § IV).
• In order to know how often to add water, count the number of days
separating the 1st day you added water and the day when the pictogram was
displayed
After a few hours, the pictogram will disappear.
Contact your Transtherm retailer.
The use of glass doors can alter your wine cabinet’s performance
in some extreme temperature conditions.
Page 15

9 - energy AnD technicAl FeAtures
Prestige
Reference Temperatures Dimensions Weight when
H x W x D (mm) empty kg T° mini °C / °F T° maxi °C / °F
1 temperature
Loft Vintage Glass door LOXXPV3 1T 960 x 680 x 690 57 0 / 32 30 / 86
Manoir Glass door MA1TMV3 1T 1479 x 680 x 690 78 0 / 32 30 / 86
Manoir Solid door MA1TMV3 1T 1479 x 680 x 695 63 0 / 32 35 / 95
Ermitage Glass door ER1TGV3 1T 1825 x 680 x 690 88 0 / 32 30 / 86
Ermitage Solid door ER1TGV3 1T 1825 x 680 x 695 73 0 / 32 35 / 95
3 temperatures
Castel Glass door CA3TGV3 3T 1825 x 680 x 690 96 12 / 54 30 / 86
Castel Solid door CA3TGV3 3T 1825 x 680 x 695 81 12 / 54 30 / 86
Multi-temperatures
Reserve Glass door REMTGV3 MT 1825 x 680 x 690 88 12 / 54 30 / 86
Reserve Solid door REMTGV3 MT 1825 x 680 x 695 73 12 / 54 30 / 86
Data relating to energy consumption
Recommended temperature range
Reference Type of door Energy
efficiency
(1)
rating
1 temperature
Loft Vintage Glass door B 176 292 225 - 37 38
Manoir Glass door B 198 329 355 - 37 38
Manoir Solid door A+ 125 238 355 - 37 38
Ermitage Glass door B 227 365 460 - 37 38
Ermitage Solid door A+ 132 256 460 - 37 38
3 temperatures
Castel Glass door B 227 329 450 18°C / 64°F 37 38
Castel Solid door A 165 256 450 18°C / 64°F 37 38
Multi-temperatures
Reserve Glass door B 227 329 460 - 37 38
Reserve Solid door A 165 256 460 - 37 38
1. Only for R600a models.
2. Power consumption calculation based on the result obtained over 24 hrs in standard test conditions (25°C / 77°F). Actual power consumption depends
on the appliance’s location and operating conditions.
This appliance is intended exclusively for wine storage.
Category of all models: 2
Climate class: Our appliances are designed for use at an ambient temperature of between 10°C and 32°C (50°F and 90°F) (Class SN). Nevertheless, refer to
the technical properties tables for the optimal performance levels of your product..
These appliances cannot be built-in.
3. red serving temperature
Annual energy
consumption AEc
(kWh/year)
R600a R134a R600a R134a
(2)
Useful volume
(liters)
Temperature
of the other
compartments
(3)
Acoustic
emissions
(dB(A))
Standards
Your product complies with the following standards:
1 SAFETY DIRECTIVE 2006/95/EC
Standards EN60335-1: Version 5 - 2010 +A1 + A2 + A11 + A12 + A13
EN60335-2-24: Version 7 - 2010 + A1 + A2 + A11
2 EMC DIRECTIVE 2004/108/EC
Standard EN55014-1/2
3 ENVIRONMENT DIRECTIVE 2010/30/EU
Regulation 1060/2010
15
GB
Page 16

14
AXUH 77
91
92
14
AXUH 66
ACMS 12
ACMS 12
14
74
ACMS 12
ACMS 12
ACMS 12
ACMS 12
92
14
AXUH 66
ACMS 12
AXUH 22
AOPRESAR
14
ACMS 12
14
74
ACMS 12
ACMS 12
ACMS 12
ACMS 12
AXUH 22
AOPRESAR
14
68
ACMS 12
14
74
ACMS 12
ACMS 12
ACMS 12
ACMS 12
10 - loFt vintAge
- ACUPHT - 12
- AXUHT - 77
- 14
- AXUHT - 66
- 14
91 bouteilles - 91 bottles * 92 bouteilles - 92 bottles *
Stockage - Storage Mixte - Mixed
- ACUPHT 12
- ACUPHT 12
- ACUPHT 12
- ACUPHT 12
- ACUPHT 12
- 14
74 bouteilles - 74 bottles *
Coulissante - Sliding
*Les capacités des armoires sont calculées en configurations usine, avec des bouteilles Bordeaux Tradition.
16
*The cabinet capacities are calculated in factory configuration using traditional Bordeaux bottles.
16
Page 17

10 - mAnoir
- ACUPHT 12
- ACUPHT 12
- AXUHT - 33
- AXUHT - 44
- AXUHT - 77
- 14
- AXUHT - 66
- AXUHT - 66
- 21
168 bouteilles - 168 bottles * 177 bouteilles - 177 bottles *
Stockage - Storage Mixte - Mixed
- ACUPHT 12
- ACUPHT 12
- ACUPHT 12
- ACUPHT 12
- ACUPHT 12
- ACUPHT 12
- ACUPHT 12
- ACUPHT 12
- ACUPHT 12
- ACUPHT 12
- 21
141 bouteilles - 141 bottles *
Coulissante - Sliding
*Les capacités des armoires sont calculées en configurations usine, avec des bouteilles Bordeaux Tradition.
*The cabinet capacities are calculated in factory configuration using traditional Bordeaux bottles.
17
17
Page 18

10 - ermitAge - reserve
- AXUHT - 44
- AXUHT - 66
- AXUHT - 77
- AXUHT - 77
- 14
- ACUPHT - 12
- ACUPHT - 12
- ACUPHT - 12
- AXUHT - 44
- AXUHT - 77
- 14
234 bouteilles - 234 bottles * 215 bouteilles - 215 bottles *
Stockage - Storage Mixte - Mixed
- ACUPHT 12
- ACUPHT 12
- ACUPHT 12
- ACUPHT 12
- ACUPHT 12
- ACUPHT 12
- ACUPHT 12
- ACUPHT 12
- ACUPHT 12
- ACUPHT 12
- ACUPHT 12
- ACUPHT 12
- ACUPHT 12
- ACUPHT 12
- 14
182 bouteilles - 182 bottles *
Coulissante - Sliding
*Les capacités des armoires sont calculées en configurations usine, avec des bouteilles Bordeaux Tradition.
*The cabinet capacities are calculated in factory configuration using traditional Bordeaux bottles.
18
Page 19

10 - cAstel
- 11
- AXUHT - 33
- AXUHT - 55
- 30
- 14
- 11
- ACUPHT 12
- ACUPHT 12
- ACUPHT 12
- AXUHT - 44
- AXUHT - 22
- AXUHT - 33
- 30
- 14
209 bouteilles - 209 bottles * 190 bouteilles - 190 bottles *
Stockage - Storage Mixte - Mixed
- 11
- ACUPHT 12
- ACUPHT 12
- ACUPHT 12
- ACUPHT 12
- ACUPHT 12
- ACUPHT 12
- ACUPHT 12
- ACUPHT 12
- ACUPHT 12
- ACUPHT 12
- 20
- 14
165 bouteilles - 165 bottles *
Coulissante - Sliding
*Les capacités des armoires sont calculées en configurations usine, avec des bouteilles Bordeaux Tradition.
*The cabinet capacities are calculated in factory configuration using traditional Bordeaux bottles.
19
Page 20

notes
______________________________________________________________________________
______________________________________________________________________________
______________________________________________________________________________
______________________________________________________________________________
______________________________________________________________________________
______________________________________________________________________________
______________________________________________________________________________
______________________________________________________________________________
______________________________________________________________________________
______________________________________________________________________________
______________________________________________________________________________
______________________________________________________________________________
______________________________________________________________________________
______________________________________________________________________________
______________________________________________________________________________
______________________________________________________________________________
______________________________________________________________________________
______________________________________________________________________________
______________________________________________________________________________
______________________________________________________________________________
______________________________________________________________________________
______________________________________________________________________________
______________________________________________________________________________
______________________________________________________________________________
______________________________________________________________________________
______________________________________________________________________________
______________________________________________________________________________
______________________________________________________________________________
______________________________________________________________________________
______________________________________________________________________________
______________________________________________________________________________
______________________________________________________________________________
______________________________________________________________________________
______________________________________________________________________________
______________________________________________________________________________
______________________________________________________________________________
______________________________________________________________________________
______________________________________________________________________________
Page 21

notes
______________________________________________________________________________
______________________________________________________________________________
______________________________________________________________________________
______________________________________________________________________________
______________________________________________________________________________
______________________________________________________________________________
______________________________________________________________________________
______________________________________________________________________________
______________________________________________________________________________
______________________________________________________________________________
______________________________________________________________________________
______________________________________________________________________________
______________________________________________________________________________
______________________________________________________________________________
______________________________________________________________________________
______________________________________________________________________________
______________________________________________________________________________
______________________________________________________________________________
______________________________________________________________________________
______________________________________________________________________________
______________________________________________________________________________
______________________________________________________________________________
______________________________________________________________________________
______________________________________________________________________________
______________________________________________________________________________
______________________________________________________________________________
______________________________________________________________________________
______________________________________________________________________________
______________________________________________________________________________
______________________________________________________________________________
______________________________________________________________________________
______________________________________________________________________________
______________________________________________________________________________
______________________________________________________________________________
______________________________________________________________________________
______________________________________________________________________________
______________________________________________________________________________
______________________________________________________________________________
Page 22

02/2013 - 200 - 10002132 // Groupe EuroCave - 24 rue Francis de Pressensé - 69628 Villeurbanne cedex - RCS Lyon B320316995
 Loading...