

Vintage Cellars Transtherm Bastide Glass Door Wine Cellar Black User Manual

MODE D’EMPLOI
TECHNICAL MANUAL
BEDIENUNGSANLEITUNG
MODO DE EMPLEO
GEBRUIKSAANWIJZING
ISTRUZIONI PER L’USO
Caves à vin
Wine cabinets
Weinklimaschränke
Armarios para vinos
Wijnkasten
Armadi climatizzati per vini
Gamme-Range-Aufbewahrungsserie-Gama-Gamma
Loft
Villa
Bastide
Elégance

Welcome
You have just purchased an TRANSTHERM product – thank you for your custom. We take particular care in
manufacturing our products in terms of their design, ergonomics and ease of use.
We hope that you will be completely satisfied with this product.
Please note
The information contained in this document may be changed without warning.
Photos are not contractually binding.
TRANSTHERM offers no guarantee for this product when it is used for purposes other than those for which it
was designed.
TRANSTHERM shall not be held responsible for any errors contained in this manual or for any damage linked to
or resulting from the supply, performance or use of this appliance.
This document contains original information, which is protected by copyright. All rights are reserved.
Photocopying, reproducing or translating this document, whether partially or completely, is strictly forbidden,
without TRANSTHERM’s prior written consent.
This appliance is intended solely for storing wine.
It is not designed to be used by people (including children) with reduced mental, sensorial or physical abilities,
or by people who have no experience or knowledge, unless they have first received instructions on how to use
the machine or are supervised by a person responsible for their safety.
Children must be supervised to ensure that they do not play with the appliance.
If the power lead is damaged, it must be replaced by a special cable or unit available from the manufacturer or
its customer service department.
WARNING:
-Ensure that the air vents in the appliance’s cavity and the flush-fitting structure are unobstructed.
- Do not use mechanical devices or other means to speed up the defrosting process other than those recommended by the manufacturer.
- Do not damage the refrigeration circuit.
- Do not use electrical appliances inside the wine storage compartment, unless they have been recommended
by the manufacturer.
- Do not store in this appliance explosive substances such as aerosols containing flammable propellant gas. This
appliance is intended for domestic and similar applications such as:
- kitchenettes reserved for staff of shops, offices and other professional environments;
- gites and use by guests of hotels, motels and other environments which are residential in nature
- hotel rooms;
- the food service industry and other similar applications except for retail sale.
TRANSTHERM
24, rue Francis de Pressensé - 69628 Villeurbanne cedex - France
P 2

Contents
Description of your wine cabinet ..................................................... P 4
Power supply .................................................................................... P 5
Installing your wine cabinet .......................................................... P 5/6
Layout and loading recommendations ......................................... P 7/8
Commissioning and temperature settings .................................. P 9/10
Important wine information ............................................................ P 10
Wine service temperatures............................................................. P 11
Everyday wine cabinet maintenance.............................................. P 12
Operating anomalies ...................................................................... P 13
Energy and technical features ........................................................ P 14
Frequently asked question ......................................................... P15/16
Protecting the environment ............................................................. P17
GB
English - P 3
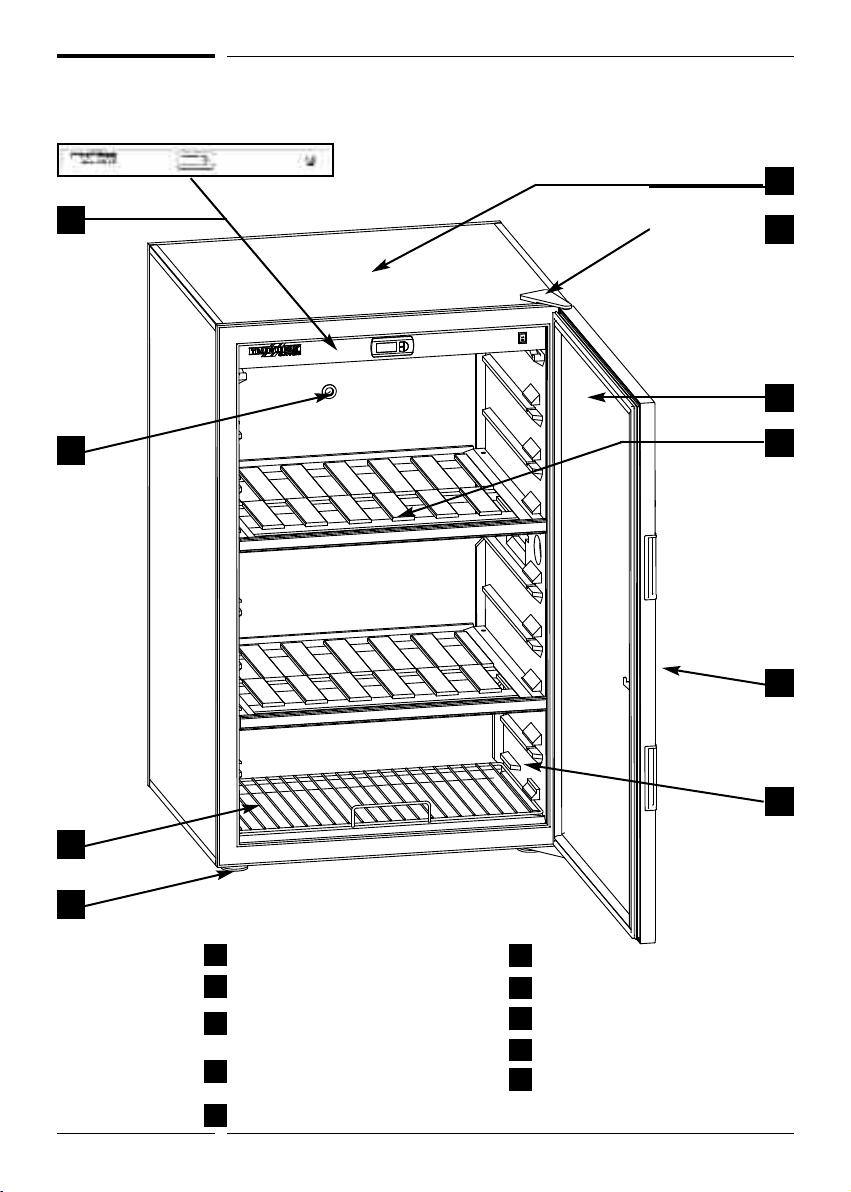
Description of your wine cabinet
1
5
8
2
3
4
6
10
7
P 4
1
Cabinet body
2
Hinge
Glass door or solid door (depending
3
on model)
Storage shelf (type version) or
4
universal sliding shef
5
Setting strip
6
Lock
Adjustables feet (4)
7
Thermodynamic pump orifice
8
Maker’s label
9
Rack shelf
10
9

Power supply
ecommendation
important
For your personal safety, the wine cabinet should be properly earthed.
that the plug is earthed and that the installation's circuit is protected by a 30 mA*
fuse.
*not applied to certain countries
Make sure
Any intervention should be carried out by a
qualified electrician.
Installing your wine cabinet
When unpacking your cabinet, make sure that there are no traces of
impact or deformation and that there are no surface defects.
Carefully remove all of the protections and adhesive strips from the
packaging around your wine cabinet.
Open the door and make sure all components are intact.
Release the electrical lead.
Move your cabinet to its final location.
The place you have selected for your cabinet should:
- Be unencumbered and well ventilated,
- Enable a minimum 10 cm space between the wall and the back of the cabinet,
- Be well away from any heat source,
- Not be too damp (laundry, pantry, bathroom, etc.),
- Have a solid and flat floor,
- Have a standard and accessible electricity supply (standard socket to
country standards, linked to ground with differential trip),
- It is NOT recommended to use a multi-socket or extension lead.
GB
English - P 5
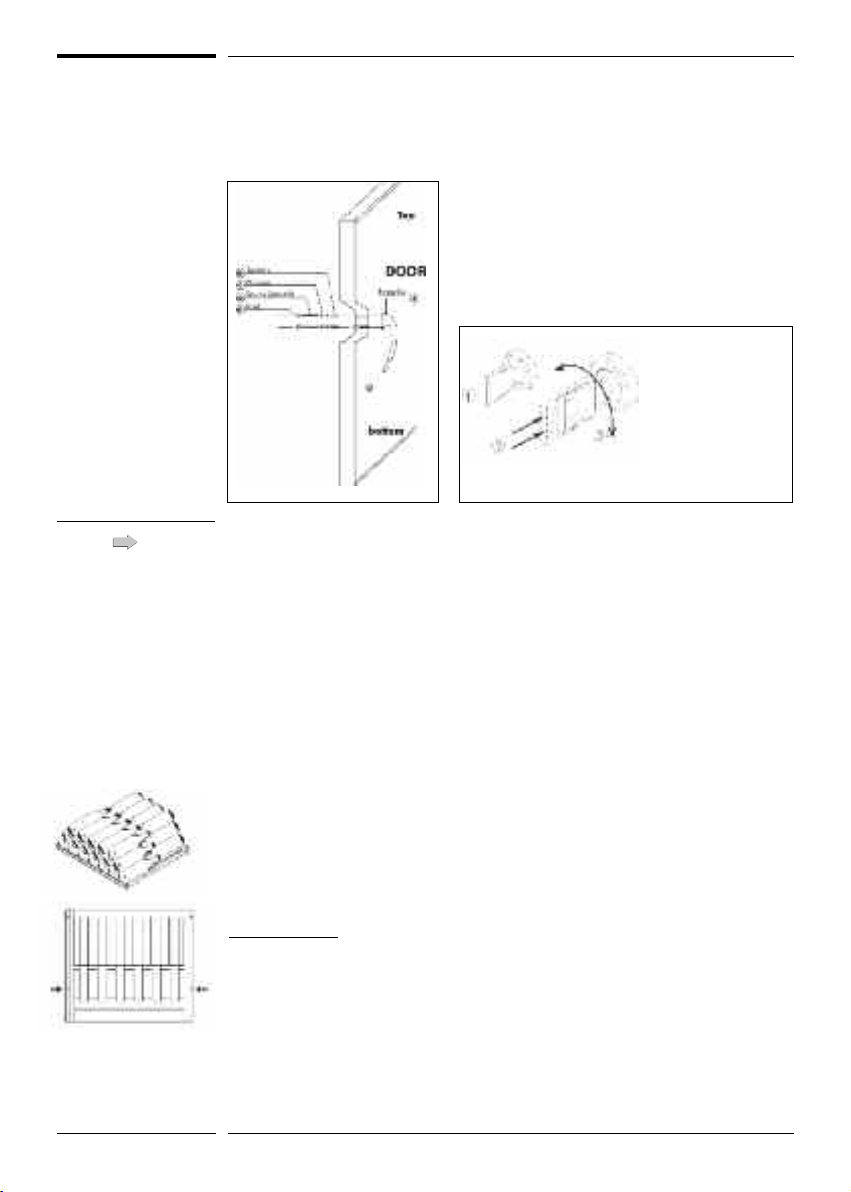
important
Installing the handle
Installing the handle of your wine cabinet is carried out in the following
manner:
- Introduce the two spacers (B) into the
holes on the inside panel of the door.
- Add the two washers (C)
- Using a screwdriver, secure the handle
(A) with the two screws (D).
- Clip the two knobs (E) onto the washers.
As a security
measure, the lock
works on a
double movement
system. The key
should be pushed
inward and
turned at the
same time.
In order for you to level off your cabinet as easily as possible, it is
equipped with 4 adjustable feet. However, we do recommend that
you tighten the back feet to the maximum and use the front feet
to create a level (a spirit level is recommended for this operation).
WAIT 48 HOURS BEFORE PLUGGING IN THE CABINET
Should you need to move your cabinet, never tilt it more than 45° and
always sideways, on the side that the electrical cable comes out (right
hand side when looking at the cabinet).
Layout and loading recommendations
All shelves can be used as storage, sliding or presentation shelves. Your
cabinet’s shelves have 13 recesses allowing you to store your bottles in
complete safety.
Storage rack
To install bottles on a storage shelf:
- Insert the shelf at the desired position.
- Place a wooden locking pin in each of the 2 holes located on the right
and left side of the upper face approximately 15 cm to the front of the shelf
(see diagram): these pins secure the shelf to the thermoformed wall and
prevent any inappropriate movement.
P 6
 Loading...