

Page 1
INSTRUCTIONS FOR WINE & SPIRITS CABINET
SAFETY TIPS
• Ensure that the cabinet is positioned square and firm on the floor so that it will not fall over.
Some cabinets are equipped with adjustable floor levelers. Adjust the levelers for
maximum stability and proper alignment (Figure 1).
• Some cabinets include a Safety Strap. Follow the instructions included with the Safety
Strap to ensure maximum stability (See step #3 in Cabinet Set Up Instructions
• Some cabinets are illuminated. Combustible materials or those adversely affected by
drying or fading from the heat should not be placed close to the lamp.
• Some cabinets include a cabinet door lock. Lock the cabinet door to keep the contents
secure and away from minors.
• Some cabinets include a location for a cooler. Follow the cooler manufacturer’s installation
instructions for clearance and caution issues.
• Keep plastic bags and small parts away from children.
CABINET SET UP INSTRUCTIONS:
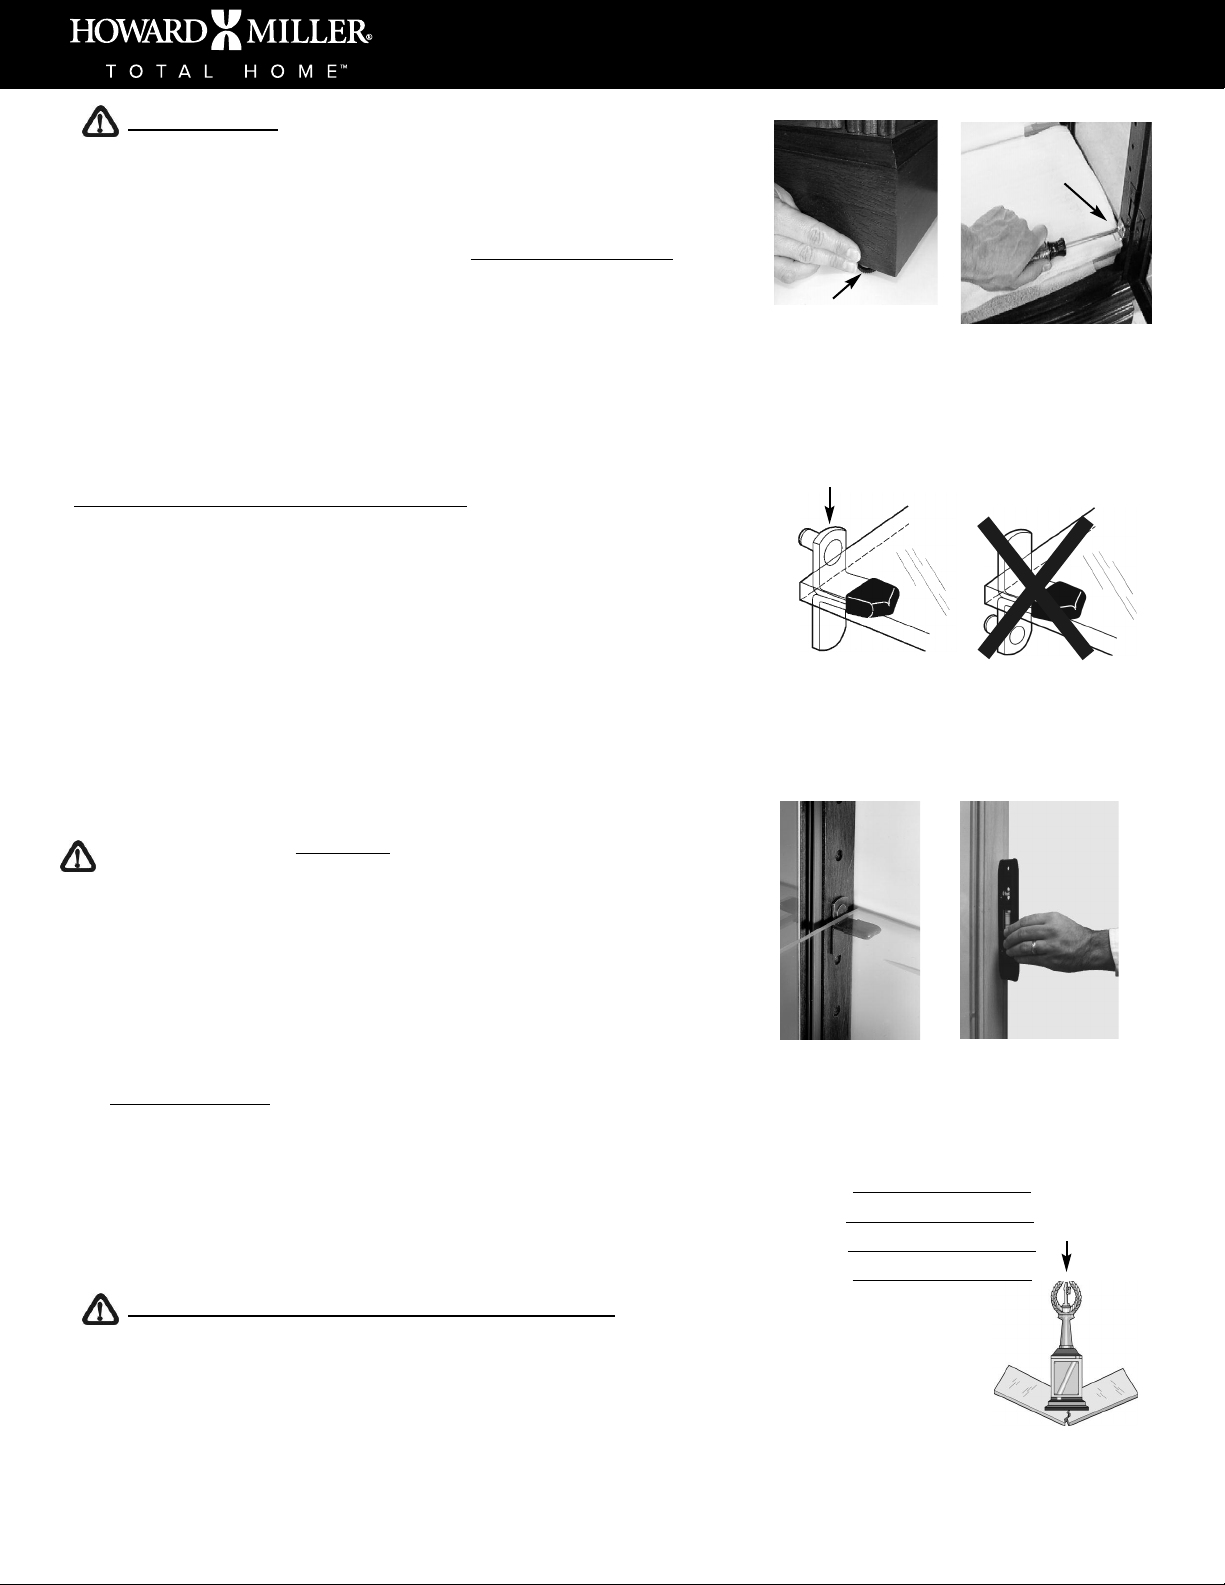
1. Turn the adjustable floor levelers, located on the bottom of the cabinet, all the way in
(up) (Figure 1).
2. Inspect the inside of the cabinet, carton and packaging to make sure you have removed
all separately packed parts. Do NOT dispose of any packing material until the set up is
complete.
If your cabinet has shelves, they may be secured inside the cabinet with shipping clips.
To remove the shipping clips, you will need a Phillips screwdriver (Figure 2). The shelves
may also be packed on top, underneath, or along side of the cabinet. You may need to
lay the cabinet on it’s backside to remove the shelves from underneath the cabinet. Use
caution when removing these shelves.
3. Move the cabinet to its final location.
Locate any electrical cords that may be exiting the back or bottom of the cabinet. Move
them out of the way as you move the cabinet to its final location.
Some cabinets include a Safety Strap
with your cabinet, review the instructions included with the Safety Strap at this time and
choose the assembly option which best fits your application. The cabinet should be
attached to the wall for maximum stability. If your cabinet does not have this feature,
proceed to the next step.
to prevent tipping. If a Safety Strap was included
).
Leveler
Nivelador
Patin de réglage
Nivellierfuß
FIGURE 1
FIGURA 1
FIGURE 1
ABBILDUNG 1
Pad-Lock™ Shelf Clip
T
M
Pad-Lock
Soporte de repisa
Cornière Pad-Lock™
TM
Pad-Lock
Regalklemme
CORRECT
O
CORRECT
CORRECT
RICHTIG
Shipping Clip
A
juste del sujetador
A
ttache de transport
Transportklemme
FIGURE 3
FIGURA 3
FIGURE 3
ABBILDUNG 3
FIGURE 2
FIGURA 2
FIGURE 2
ABBILDUNG 2
INCORRECT
INCORRECT
INCORRECT
FALSCH
O
4. Install the Shelves, Racks, and other separately packed parts.
T put any items onto the shelves or racks until completely finished with the set up
Do NO
instructions.
The shelves may not all be the same size. Please use care to install each shelf in it’s
proper location within the cabinet. The shelves will rest on Shelf Clips or wood rails
inside the cabinet.
ad-Lock™ Shelf Clips: Securely place the Shelf Clips into the desired holes inside the
P
cabinet (Figures 3 and 4). There may be several holes that can be used for shelf height
adjustment. P
osition the shelves onto the Shelf Clips as shown in Figures 3 and 4.
5. Close and secure the door(s) using the lock or latch provided with your cabinet.
6. Level the Cabinet. Place a level alongside the cabinet from front-to-back and side-to-side
igure 5). There are adjustable levelers under the cabinet (Figure 1) that can be turned
(F
in (up) or out (down) to make adjustments. Adjust the levelers until the cabinet is level
in all directions, and is square and firm on the floor.
UTIONS FOR USE OF GLASS SHEL
CA
o prevent breakage of glass shelves and/or items placed on the glass shelves, good judgement must be used
T
VES:
FIGURE 4
FIGURA 4
FIGURE 4
ABBILDUNG 4
Distribute L
Do NO
Distribuya el peso sobre la repisa por igual.
NO exceda de 25 libras (11.35 Kg
Répartir la charge de façon uniforme sur l’étagère.
AS dépasser 11,35 kg (25 lb).
NE P
ast gleichmäßig auf dem Regal verteilen.
L
Darf 11 kg NICHT überschreiten.
during the installation and loading of glass shelves.
Sudden shock from any size item can result in broken glass, personal injury, or damage to valuable items. Care
should be taken when placing items onto each glass shelf.
The weight of items placed on the shelves must be evenly distributed and must not exceed 25 pounds.
The end use of this cabinet is beyond our control and therefore, the Howard Miller Company can not assume
responsibility for broken shelves or personal effects.
FIGURE 5
FIGURA 5
FIGURE 5
ABBILDUNG 5
oad Evenly on Shelf
T exceed 25 pounds.
ABBILDUNG 6
.
.)
FIGURE 6
FIGURA 6
FIGURE 6
Page 2
ILLUMINATED CABINETS (Available on some models):
Some cabinets are illuminated. Determine which lighting option is provided
with your cabinet.
TOUCH-LITE™:
The light is activated by touching the door hinge with the wire attached to it.
(Typically this is the upper right door hinge on the cabinet.)
The light begins in the OFF position. The operation is sequential and will advance
to the next light illumination level with each subsequent touch to the hinge.
UTO-ON:
A
The light will automatically turn ON when the door is opened,
and turn OFF when the door is closed.
1st touch = Low Light Illumination Level
2nd touch = Medium Light Illumination Level
3rd touch = High Light Illumination Level
4th touch = Turns light off
Regal zum Zubereiten von Getränken
Drawer
Cajón
Tiroir
S
chublade
FIGURE 7
FIGURA 7
FIGURE 7
ABBILDUNG 7
Prep Shelf
Repisa preparada
Étagère indépendante
Pull drawer open
Jale el cajón para abrir
Ouvrir le tiroir
Die Schublade herausziehen
Lift shelf up
Levante la repisa
Soulever l’étagère
Das Regal aufklappen
Push in on pin
Empuje la clavija
Enfoncer l’ergot
Den Stift hineindrücken
Lift shelf up and out
Levante la repisa hacia
arriba y afuera
Dégager l’étagère
D
as Regal anheben und
herausnehmen
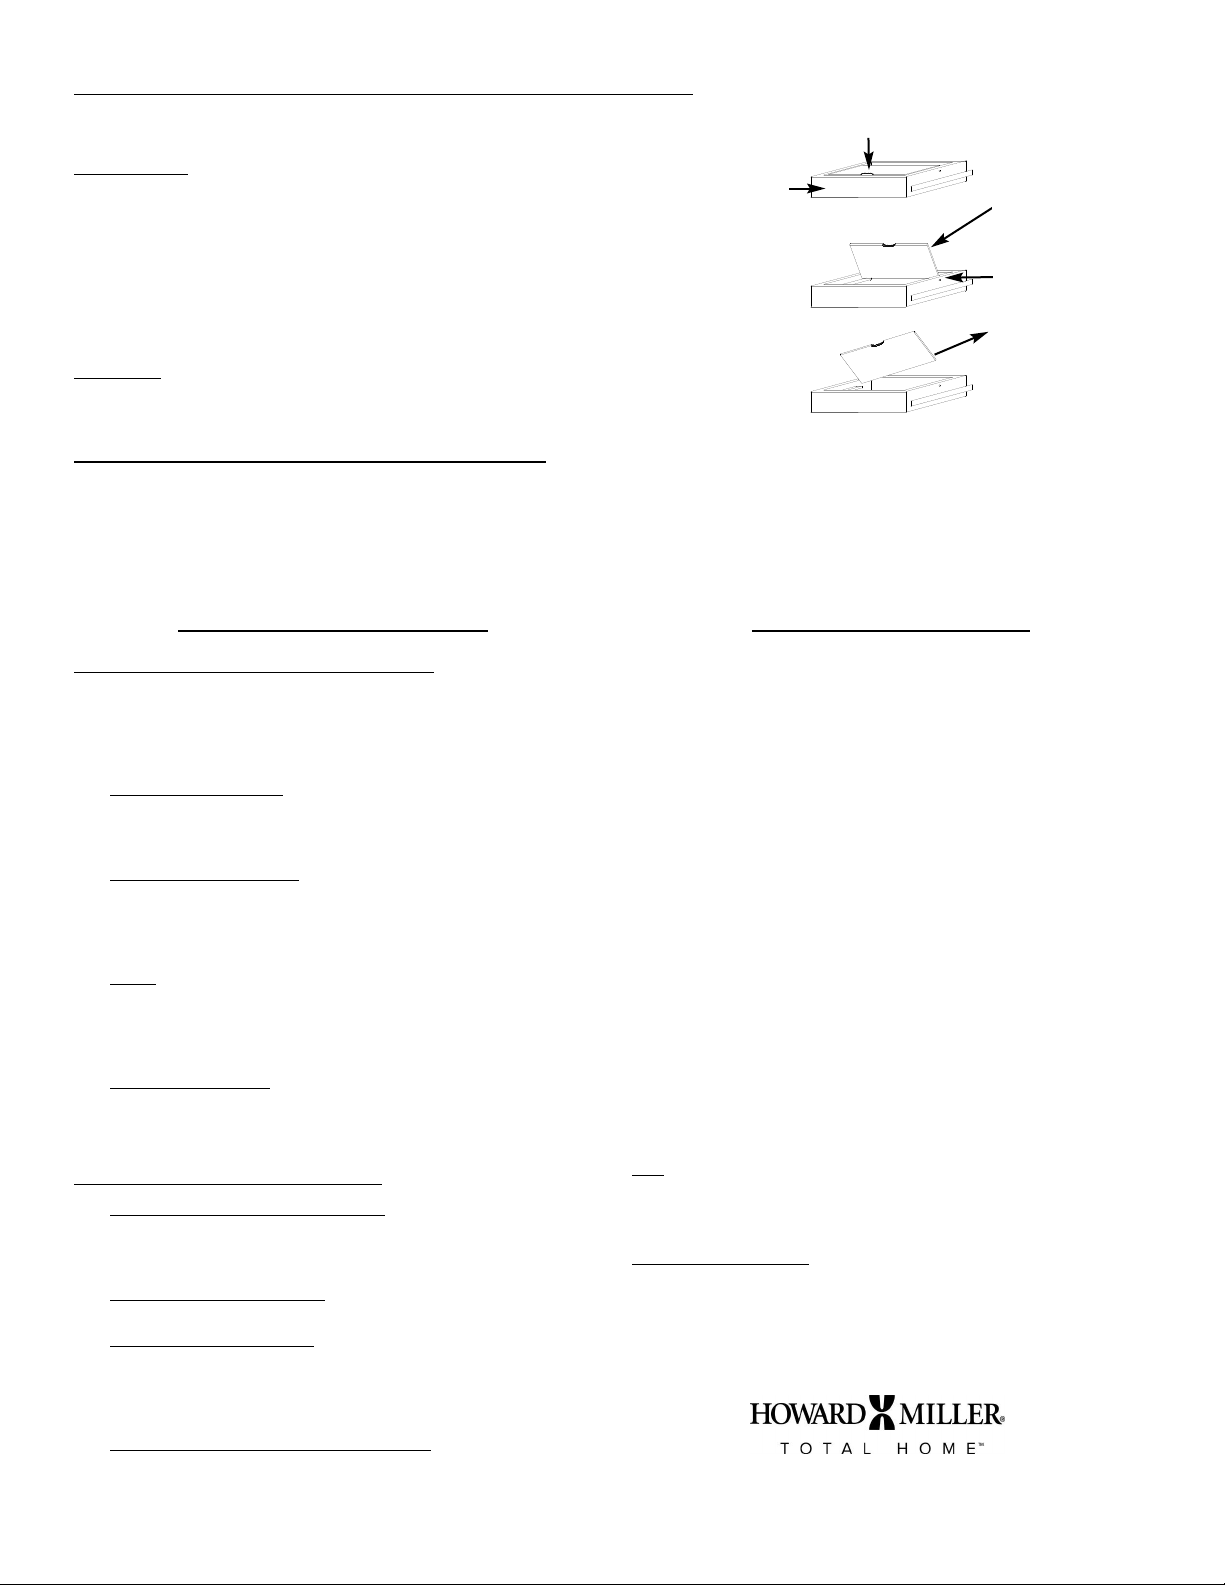
PREP SHELF (Available on some models):
Some cabinets have a hinged, lift-up prep shelf on the inside of the drawer (Figure 7). If you would like to remove this shelf, pull the drawer all the
way open. Locate the pins on each side of the drawer that hold the shelf in position. Push one of the pins in using a narrow object. Once the pin
is pushed in far enough to clear the inside edge of the drawer, lift up on that side of the shelf. Lift the shelf out at an angle, up and away from the
drawer. It is not necessary to remove the drawer from the cabinet in order to perform this operation. (Reverse these instructions in order to
reinstall the shelf into the drawer.)
CARE AND MAINTENANCE
GENERAL GUIDELINES FOR STONE SURFACES:
Contact a stone restoration specialist regarding specific care and any
questions you might have regarding the stone surfaces (i.e. granite,
marble, etc.) that your cabinet may have. You may consider contacting
Stone Care International at 1-800-839-1654 or visit their website at
www.stonecare.com
Clean the stone surface
specifically designed for use on stone surfaces. General scouring
powders or creams may contain abrasives that can scratch the
stone surface.
rotect the stone surface from condensation or spills. (Coasters
P
under drink glasses and bottles can help prevent glass rings or
stains from occurring.) Products that contain lemon, vinegar or
any fluid that contains an acid or alkali, may damage stone
surfaces.
Pick up or blot spills immediately to prevent staining or
Spills:
etching. Blot the spill with a clean paper towel or cloth. Don’t wipe
the area, as this will spread the spill (and possibly increase the
stain area). Flush the area with plain water. Use a cleaner or stain
remover that is specifically designed for use on stone surfaces.
Scratches and Nicks:
surfaces to prevent scratching. Minor surface scratches may be
buffed out with a polishing or restoration product specifically
designed for use on stone surfaces.
GENERAL GUIDELINES FOR CABINETRY
P
rotect wood & leather surfaces from scratches, dents,
condensation or spills. Use cutting boards and coasters to protect
the surfaces. (Coasters under drink glasses and bottles can help
prevent glass rings or stains from occurring.)
ax and polish your cabinet as frequently as you do your other
W
furniture. Use a non-
void exposing the cabinet to direct sunlight and protect it from
A
extreme temperatures and humidity changes. Prolonged
exposure to direct sunlight may fade the finish while extreme
temperature and humidity changes may cause the wood to split
or crack.
Check periodically that your cabinet is level and rests firmly on all
four levelers. This is especially important the first few months if
the cabinet settles into carpet (Figures 1 and 5).
on a regular basis with cleaning products
Remove any loose debris from the stone
:
silicone liquid or paste wax.
SERVICE INFORMATION
his product has been manufactured using only the very finest of materials and
T
has been thoroughly inspected prior to leaving our manufacturing facility.
Before pursuing service, ensure that all instructions provided with your Howard
Miller product have been carefully followed. These instructions will provide
detailed information to answer most questions. Contact the Howard Miller web
site (www.howardmiller.com) for a list of frequently asked questions that may
conveniently resolve your problem or answer your questions.
In the unlikely event that your cabinet appears to need service, in NORTH
AMERICA please call one of our Customer Service Representatives at (616) 7727277 (extension #386). OUTSIDE NORTH AMERICA please call your distributor
or agent.
Before calling, please have the following information available. The model
number and serial number can be found on the Product Information Label, which
is typically found on the backside of the cabinet.
Model Number: ______________ Serial Number: ______________
Date Purchase: ______________ Where Purchased: __________________
Brief Description of Problem:______________________________________
Please have these instructions and the sales receipt or other comparable proof of
original purchase available at the time of your call. Most problems can be
quickly resolved without returning the cabinet for service.
Return Authorization is required for all returns to Howard Miller. If you have been
given authorization to return the product to Howard Miller, you will be provided
with a Return Authorization number (RGA#). Please include this Return
Authorization number
(original receipts should never be submitted as they can not be returned) of
copy
the sales receipt or other comparable proof of original purchase. Returns without
prior authorization or proof of purchase may be subject to additional charges and
delays.
FREIGHT DAMAGE It is the responsibility of the consignee to claim any
freight loss or damage directly with the carrier. If the carton indicates signs of
"visible damage", instruct the driver to note the damage on the freight bill. If the
carton contains "concealed damage", notify the carrier and request in writing
within 14 days of product receipt a carrier inspection and damage report. Failure
to notify the carrier within 14 days of product receipt may waive your rights to a
damage claim.
860 East Main Avenue Zeeland, Michigan 49464-1300
, above your name, on the address label. Also include a
www.howardmiller.com
© Copyright Howard Miller
Page 3

INSTRUCTIVO DEL GABINETE PARA VINOS Y LICORES
CONSEJOS DE SEGURIDAD
•
Asegúrese de que el gabinete esté nivelado y firme en el piso para evitar que se caiga. Algunos gabinetes
están equipados con niveladores de piso ajustables. Ajuste los niveladores para obtener una máxima
stabilidad y alineación adecuada (Figura 1).
e
• Algunos gabinetes incluyen una Correa de Seguridad. Siga las instrucciones que se incluyen con la
Correa de Seguridad para asegurar la máxima estabilidad (Vea el paso #3 en las Instrucciones de Ajuste
del Gabinete).
Algunos gabinetes tienen iluminación. No se deberán colocar cerca de la lámpara materiales
•
c
ombustibles o aquellos que puedan ser afectados al secarse o ponerse frente a la fuente de calor).
• Algunos gabinetes incluyen una puerta con cerradura. Ponga bajo llave la puerta para mantener el
contenido fuera del alcance de los menores de edad.
• Algunos gabinetes incluyen un espacio para enfriador. Siga las instrucciones del fabricante del enfriador
en cuanto a aspectos de espacio y seguridad.
• No deje las bolsas de plástico y las partes pequeñas al alcance de los niños.
Instrucciones de Instalación del Gabinete
1. Gire los niveladores ajustables, localizados en la parte de abajo del gabinete, hasta que lleguen hasta
adentro (arriba) (Figura 1).
2. Inspeccione el interior del gabinete, el cartón y el empaque para asegurarse de que ha retirado todas las
partes empacadas por separado. NO deseche ningún material empacado hasta que termine de hacer la
instalación.
Si su gabinete tiene repisas, pueden ser que estén aseguradas dentro del gabinete con sujetadores de
embalaje. Para retirar los sujetadores, necesitará un destornillador Phillips (Figura 2). Las repisas
también pueden estar empacadas en la parte superior, inferior o a los lados del gabinete. Puede
necesitar recostar el gabinete por la parte de atrás para retirar estas repisas de la parte de abajo del
gabinete. Tenga cuidado cuando retire estas repisas.
3. Mueva el gabinete a su ubicación final.
Localice cualquier cable eléctrico que pueda salir de la parte posterior o inferior del gabinete. Quítelos
del camino mientras mueve el gabinete a su ubicación final.
Algunos gabinetes incluyen una Correa de Seguridad
con una Correa de Seguridad, revise en este momento las instrucciones que vienen con ésta y escoja
la opción de ensamblado que se ajuste mejor a su aplicación. El gabinete deberá pegarse a la pared
para una máxima estabilidad. Si su gabinete no tiene este aditamento, proceda con el siguiente paso.
4. Instale las repisas, botelleros y otras partes empacadas por separado.
NO ponga ningún artículo en las repisas o botelleros hasta que haya terminado con la instalación por
completo.
Puede ser que no todas las repisas sean del mismo tamaño. Por favor, tenga cuidado de instalar cada
repisa en su lugar correcto en el gabinete. Las repisas se apoyarán en los Soportes de Repisa o rieles
de madera dentro del gabinete.
Soportes de Repisa P
desee dentro del gabinete (Figuras 3 y 4). Hay muchos orificios que se pueden utilizar para el ajuste de
la altura de la repisa. Coloque las repisas sobre los Soportes de Repisa como se muestra en las figuras
3 y 4.
5. Cierre y asegure la(s) puerta(s) utilizando la cerradura o el pasador que se proporciona con su gabinete.
6. Nivele el Gabinete. Coloque un nivel a lo largo del gabinete, de lado a lado y de atrás hacia delante
(Figura 5). Hay niveladores ajustables en el gabinete (figura 1) que se pueden girar hacia adentro
(arriba) o hacia fuera (abajo) para hacer ajustes. Ajuste los niveladores hasta que el gabinete esté
nivelado en todas direcciones y esté bien plantado y firme en el piso.
PRECAUCIONES SOBRE EL USO DE REPISAS DE VIDRIO:
Para prevenir que se rompan las repisas de vidrio o los artículos puestos en ellas, debe utilizar su sentido
común durante la instalación y carga de las repisas de vidrio.
os golpes repentinos de artículos de cualquier tamaño pueden provocar la ruptura del cristal, heridas o
L
daños a artículos valiosos. Se debe tener cuidado cuando se colocan artículos en cada repisa de vidrio.
El peso de los artículos que se pongan sobre las repisas se debe distribuir de manera uniforme y no debe
ceder de 25 libras (11.35 Kg
x
e
El uso final que se dará a este gabinete va más allá de nuestro control y
Miller no puede asumir ninguna responsabilidad sobre las repisas rotas o los efectos personales.
GABINETES CON ILUMINACIÓN (Disponible sólo en algunos modelos)
Algunos gabinetes tienen iluminación. Determine si su gabinete tiene la opción de iluminación.
T
OUCH LITETM:
Las luces se activan al tocar las bisagras de la puerta con el cable que está agregado. (Por lo general,
es la bisagra superior derecha de la puerta del gabinete).
a luz inicia en la posición apagado (OFF). L
L
iluminación con cada toque adicional a la bisagra.
1er toque: nivel de iluminación bajo 3er toque: nivel de iluminación alto
2º toque: nivel de iluminación medio 4º toque: luz apagada
ENCENDIDO A
a luz se encenderá de forma automática cuando se abra la puerta y se apagará cuando la puerta
L
se cierre.
REPISA PREPARADA (Disponible en algunos modelos):
Algunos gabinetes tienen una repisa preparada con bisagras en el interior del cajón (F
retirar esta repisa, jale el cajón a todo lo largo. Localice las clavijas que sostienen la repisa en su posición a cada
lado del cajón. Empuje una de las clavijas utilizando un objeto delgado. Cuando la clavija se empuja lo
suficientemente lejos para liberar la orilla de adentro del cajón, levántelo de ese lado de la repisa. Levante la
repisa en ángulo, hacia fuera del cajón. No es necesario retirar el cajón del gabinete para llevar a cabo esta
operación (Repita estas instrucciones en sentido contrario para reinstalar la repisa en el cajón).
CUIDADO Y MANTENIMIENTO
INSTRUCCIONES GENERALES PARA SUPERFICIES DE PIEDRA:
Contacte a un especialista en restauración de piedra para cuidados específicos y cualquier pregunta que
usted tenga relacionada con superficies de piedra (por ejemplo, granito, mármol, etc.) que su gabinete
pudiera tener. Quizás desee comunicarse con Stone Care International al 1-800-839-1654 o visite su sitio
web en www
Limpie la superficie de piedra
utilizarse en superficies de piedra. L
dañar la superficie de piedra.
P
roteja la superficie de piedra de la condensación y derrames. (Colocar portavasos bajo los vasos de
bebidas y botellas puede ayudar a prevenir la aparición de marcas por presión o vidrio). Los productos que
contienen limón, vinagre o cualquier fluido que tenga ácido o álcalis, pueden dañar las superficies de piedra.
Derrames
: limpie o seque los derrames de inmediato para prevenir manchas o marcas. Seque el derrame
con una toalla de papel o un trapo limpio. No escurra el área, pues esto extenderá el derrame
(y posiblemente incremente el área dañada). Enjuague el área con agua limpia. Utilice un limpiador o
removedor de manchas que esté diseñado específicamente para su uso en superficies de piedra.
Raspones y cortes
pueden pulir los raspones pequeños mediante una sustancia para pulir o un producto restaurador
diseñado específicamente para usarse en superficies de piedra.
INDICACIONES GENERALES PARA LA VITRINA
Proteja las superficies de madera y piel de raspaduras, marcas, condensación o derrames. Utilice manteles
y portavasos para proteger las superficies (Colocar portavasos bajo los vasos y botellas puede ayudar a
prevenir marcas y manchas).
Encere y pula su gabinete
líquido sin silicón o cera en pasta.
Evite exponer el gabinete
a exposición prolongada a los rayos solares puede decolorar el acabado, mientras que las temperaturas
L
extremas y los cambios de humedad pueden provocar que la madera se rasgue o rompa.
Revise en forma periódica que su gabinete esté nivelado
niveladores. Esto es especialmente importante durante los primeros meses si el gabinete está apoyado en
una alfombra (Figuras 1 y 5).
ad-LockTM. Coloque con firmeza los Sujetadores de Gabinete en los orificios que
.)
UTOMÁTICO
.stonecare.com
:
de forma regular con productos limpiadores diseñados específicamente para
os polvos o cremas de limpieza pueden contener abrasivos que podrían
: Retire cualquier pedazo suelto de las superficies de piedra para prevenir raspones. Se
con la misma frecuencia con que lo hace con sus otros muebles. Utilice un
a la luz solar directa y protéjalo de temperaturas extremas y cambios de humedad.
para prevenir rasgaduras. Si su gabinete cuenta
, por lo tanto, la Compañía Howard
a operación es secuencial y avanzará al siguiente nivel de
igura 7). Si le gustaría
y se apoye con firmeza sobre los cuatro
INSTRUCTIONS POUR LE MEUBLE À VINS ET SPIRITUEUX
CONSEILS DE SÉCURITÉ
•
Assurez-vous que le meuble se tient droit et ferme sur le sol afin qu’il ne tombe pas. Certains meubles
sont équipés de patins réglables. Ajustez-les afin de donner le maximum de stabilité et un alignement
orrect (figure 1).
c
• Certains meubles sont munis d’une sangle de sécurité. Suivez les instructions qui accompagnent cette
sangle pour assurer le maximum de stabilité (voir l’étape 3 dans la section “Intructions d’installation du
meuble”.
Certains meubles sont pourvus d’éclairage. Les matériaux combustibles ou pouvant être affectés par le
•
d
essèchement ou la présence de chaleur ne doivent pas être placés près de la lampe.
• Certains meubles sont munis d’une serrure de porte. Verrouillez la porte du meuble afin de maintenir son
contenu hors d’atteinte de mineurs.
• Certains meubles comportent un emplacement pour une glacière portable. Suivez les instructions
d’installation de son fabricant pour les questions de dégagement et de précautions à prendre.
• Éloignez les sacs en matière plastique et les petites pièces des enfants.
INSTRUCTIONS D’INSTALLATION DU MEUBLE :
1. Tournez les patins réglables, situés sous le meuble, à fond jusqu’à ce qu’ils se bloquent (vers le haut)
(figure 1)
2. Inspectez l’intérieur du meuble, le carton et l’emballage afin d’être certain d’avoir retiré toutes les pièces
emballées séparément. NE jetez aucun matériau d’emballage tant que l’installation n’est pas terminée.
Si votre meuble est muni d’étagères, il se peut qu’elles soient fixées à l’intérieur du meuble à l’aide
d’attaches de transport. Pour retirer les attaches, vous aurez besoin d’un tournevis cruciforme (figure 2).
Les étagères peuvent être aussi entassées sur le dessus, sur le dessous ou sur un côté du meuble. Il est
possible que vous deviez coucher le meuble sur le dos pour retirer les étagères qui auraient été placées
sur le dessous. Faites attention lorsque vous détachez ces étagères.
3. Déplacement du meuble vers son emplacement définitif.
Localisez les cordons électriques pouvant sortir de l’arrière ou du fond du meuble. Éloignez-les de votre
chemin alors que vous amenez le meuble à son emplacement définitif.
Certains meubles sont munis d’une sangle de sécurité afin d’empêcher tout basculement. Si une sangle
de sécurité a été incluse avec votre meuble, consultez à ce stade les instructions jointes à la sangle et
choisissez l’option d’assemblage qui convient le mieux à votre application. Le meuble devrait être
attaché au mur afin d’assurer le maximum de stabilité. Si votre meuble n’est pas ainsi équipé, passez à
l’étape suivante.
4. Installation des étagères, râteliers et autres pièces emballées séparément.
NE placez aucun objet sur les étagères ou râteliers avant d’en avoir terminé avec les instructions
d’installation.
Les étagères peuvent ne pas être toutes de la même taille. Faites bien attention d’installer chaque
étagère à l’emplacement qui lui convient dans le meuble. Les étagères reposeront sur des cornières ou
rails en bois à l’intérieur du meuble.
Cornières P
(figures 3 et 4). Il se peut que plusieurs trous soient disponibles pour le réglage des étagères en hauteur.
Placez les étagères sur les cornières comme indiqué aux figures 3 et 4.
ermez et verrouillez la ou les portes
5. F
6. Mettez le meuble de niveau. Placez un niveau sur la paroi du meuble, de l’avant vers l’arrière, d’un côté
vers l’autre (figure 5). Le dessous du meuble comporte des patins de réglage (figure 1) qui peuvent être
tournés vers le haut ou vers le bas pour effectuer des ajustements. Ajustez les patins de réglage jusqu’à
ce que le meuble soit de niveau dans tous les sens, droit et ferme sur le sol.
PRÉCAUTIONS CONCERNANT L’USA
Pour éviter de briser des étagères en verre et/ou des objets posés dessus, faites preuve de bon sens durant
l’installation et le chargement de ces étagères.
Un choc brutal causé par un objet de n
blessures ou des objets de valeur endommagés. Des précautions doivent être prises lors de la pose
d’objets sur des étagères en verre.
Le poids des objets placés sur les étagères doit être réparti de façon uniforme et ne doit pas dépasser
11,35 kg (25 lb).
L’usage final de ce meuble est hors de notre contrôle et en conséquence, la société Howard Miller ne peut
assumer aucune responsabilité pour des étagères ou effets personnels brisés.
MEUBLES AVEC ÉCLAIRAGE (disponible sur certains modèles) :
Certains meubles sont pourvus d’éclairage. Déterminez quelle option d’éclairage est livrée avec votre meuble.
TOUCH-LITE™ :
L’éclairage est activé en touchant la charnière de porte comportant un fil attaché. (Normalement il
s’agit de la charnière supérieure de la porte de droite du meuble).
’éclairage est d’abord éteint. L
L
d’illumination suivant de l’éclairage avec chaque entrée en contact subséquente de la charnière.
er
1
contact = bas niveau d’illumination 3
ème
2
contact = niveau moyen d’illumination
ALL
UMAGE A
L’éclairage s’allumera automatiquement lorsque la porte sera ouverte et s’éteindra lorsque la porte sera
fermée.
ÉTAGÈRE INDÉPENDANTE (disponible sur certains modèles) :
Certains meubles sont munis d’une étagère indépendante à charnière qui se relève pour dégager l’intérieur
du tiroir (figure 7). Si vous désirez enlever cette étagère, ouvrez le tiroir à fond. Trouvez les ergots de chaque
côté du tiroir qui maintiennent l’étagère en place. Faites pression sur l’un des ergots à l’aide d’un objet étroit.
Lorsque l’ergot est suffisamment enfoncé pour dégager le bord intérieur du tiroir, soulevez ce côté de
enchez l’étagère en la soulevant et dégagez-la du tiroir. Il n’est pas nécessaire de retirer le tiroir
l’étagère. P
du meuble pour effectuer cette opération. (Inversez ces instructions pour réinstaller l’étagère dans le tiroir.)
SOINS ET ENTRETIEN
DIRECTIVES GÉNÉRALES POUR LES SURF
Contactez un spécialiste de la restauration des pierres concernant les soins spécifiques et toutes questions que
vous pourriez avoir au sujet de surfaces en pierre (par ex., granit, marbre, etc.) dont votre meuble pourrait être
ous pouvez considérer contactant la Stone Care International à 1-800-839-1654 ou visite leur site web à
équipé. V
www.stonecare.com
Nettoyez la surface en pierre
usage sur des surfaces en pierre. L
abrasifs qui pourraient rayer la surface de la pierre.
P
rotégez la surface en pierre de toute condensation ou des produits renversés. (Des sous-verres placés sous les
verres et bouteilles peuvent contribuer à éviter les ronds de verres ou taches.) L
citron, du vinaigre ou tout liquide contenant un acide ou alcali, peut endommager la surface de la pierre.
Produits renversés : nettoyez ou séchez immédiatement les produits renversés afin d’éviter les taches et
décapages. Séchez le produit renversé avec une serviette en papier ou un chiffon propre. N’essuyez pas la
surface, ce qui étendrait le produit renversé (et augmenterait probablement l’étendue de la tache). Rincez
l’endroit à l’eau claire. Servez-vous d’un produit de nettoyage ou à enlever les taches spécialement conçu pour
un usage sur les surfaces en pierre.
Rayures et entailles : enlevez tous les débris des surfaces en pierre afin d’éviter les rayures. L
peuvent être polies à l’aide d’un produit à polir ou de restauration spécialement conçu pour un usage sur les
surfaces en pierre.
DIRECTIVES GÉNÉRALES CONCERNANT LES MEUBLES :
Protégez les surfaces en bois et en cuir des égratignures, des coups, de la condensation ou des produits
renversés. Utilisez des planches à découper et des sous
placés sous les verres et bouteilles peuvent contribuer à éviter les ronds de verres ou taches.)
Cirez et polissez votre meuble
liquide sans silicone ou de l’encaustique.
Évitez d’exposer le meuble
d’humidité. Une exposition prolongée à la lumière directe du soleil peut faire perdre l’éclat du fini alors que des
changements extrêmes de température et d’humidité peuvent faire que le bois se fende ou se fissure.
Vérifiez périodiquement si votre meuble est de niveau
est particulièrement important pendant les quelques premiers mois si le meuble est posé sur une moquette
(figures 1 et 5).
: Placez solidement les cornières dans les trous désirés à l’intérieur du meuble
ad-Lock™
à l’aide de la serrure ou du loquet fourni avec votre meuble.
GE D’ÉTAGÈRES EN VERRE :
’importe quelle taille peut se terminer par une étagère brisée, des
e fonctionnement est séquentiel et progresse vers le niveau
ème
contact = haut niveau d’illumination
ème
4
UTOMATIQUE
:
contact = extinction de l’éclairage
ACES EN PIERRE :
de façon régulière avec des produits de nettoyage spécifiquement conçus pour un
es poudres ou crèmes de récurage générales peuvent contenir des produits
es produits qui contiennent du
-verres pour protéger les surfaces. (Des sous
aussi fréquemment que vous le faites pour le reste de votre mobilier
à la lumière directe du soleil et protégez-le des changements extrêmes de température et
et repose fermement sur tous les patins de réglage. Ceci
es rayures mineures
-verres
. Utilisez un
Page 4

INSTALLATIONSANLEITUNG FÜR DIE WEIN- UND SPIRITUOSENVITRINE
T
IPPS ZU SICHERHEIT
tellen Sie die Vitrine mit allen vier Füßen eben auf einen festen Untergrund, um ein Umkippen zu vermeiden.
• S
Einige Vitrinen sind mit justierbaren Nivellierfüßen ausgestattet. Justieren Sie die Nivellierfüße, um die Vitrine
eben auszurichten und für stabilen Halt zu sorgen (Abbildung 1).
• An manchen Vitrinen ist ein Sicherheitsriemen angebracht. Befolgen Sie die dem Sicherheitsriemen beiliegende
nstallationsanweisung, um eine maximale Standfestigkeit zu gewährleisten (siehe Schritt 3 in den
I
Anweisungen zum Aufstellen der Vitrine).
inige Vitrinen sind mit Innenbeleuchtung ausgestattet. Aus diesem Grund sollten brennbare Materialien oder
• E
Objekte, die durch den Wärmekontakt austrocknen oder verbleichen können, nicht in unmittelbarer Nähe der
ampe positioniert werden.
L
• Einige Vitrinen sind mit ein Türverriegelung versehen. Schließen Sie die Vitrinentür ab, damit deren Inhalt für
inder und Jugendliche nicht zugänglich ist.
K
• Einige Vitrinen können mit einem Kühlschrank ausgestattet werden. Befolgen Sie die Installationsanweisungen
des Kühlschrankherstellers hinsichtlich der erforderlichen Sicherheitsabstände.
• Plastikbeutel und kleine Teile von Kindern fern halten.
ANWEISUNGEN ZUM AUFSTELLEN DER VITRINE:
1. Drehen Sie die justierbaren Nivellierfüße unten an der Vitrine ganz hinein (nach oben) (Abbildung 1).
2. Inspizieren Sie den Kachelschrank, den Karton und die Verpackung, um sicherzustellen, dass Sie alle separat
verpackten Teile herausgenommen haben. Das Verpackungsmaterial ERST entsorgen, wenn die Vitrine
ufgestellt ist.
a
Wenn Ihre Vitrine mit Regalen ausgestattet ist, können diese eventuell im Innern der Vitrine mit
ransportklemmen gesichert sein.
T
Zum Entfernen der Transportklemmen ist ein Kreuzschlitzschraubenzieher erforderlich (Abbildung 2). Die
egale können sich aber auch auf der Ober- oder Unterseite bzw. an der Seitenwand der Vitrine befinden. Um
R
die Regale von der Unterseite der Vitrine herauszunehmen, müssen Sie diese eventuell umlegen (Rückseite
nach unten). Seien Sie beim Herausnehmen der Regale bitte vorsichtig.
3. Bringen Sie die Vitrine an die gewünschte Stelle.
Achten Sie beim Aufstellen darauf, ob Kabel an der Rück- oder der Unterseite der Vitrine herausragen und
verstauen Sie diese.
Einige Vitrinen sind mit einem Sicherheitsriemen ausgestattet, um ein Umkippen zu vermeiden. Wenn dies
der Fall ist, lesen Sie jetzt bitte die dem Sicherheitsriemen beiliegende Anweisung und wählen Sie den
Bausatz, der sich am besten für Ihre Anwendung eignet. Für maximale Standfestigkeit sollte die Vitrine an der
Wand befestigt werden. Wenn Ihre Vitrine nicht mit dieser Option ausgestattet ist, fahren Sie bitte mit dem
nächsten Schritt fort.
4. Installieren Sie Regale, Gestelle und andere separat verpackte Teile.
Stellen Sie KEINE Gegenstände auf die Regale oder Gestelle, bis Sie mit der Installation komplett fertig sind.
ie Regale können evtl. unterschiedliche Größen haben. Installieren Sie jedes Regal in der Vitrine vorsichtig
D
in seiner richtigen Position. Die Regale liegen in der Vitrine nicht auf Regalklemmen oder Holzschienen auf.
TM
P
d-Lock
Regalklemmen:Stecken Sie die Regalklemmen fest in die gewünschten Löcher im Inneren der
a
Vitrine ein (Abbildung 3 und 4). Es sind evtl. mehrere Löcher vorhanden, die zum Einstellen der
gewünschten Höhe dienen. Positionieren Sie die Regale auf den Regalklemmen wie in Abbildung 3 und 4
gezeigt
. Schließen Sie die Tür/en und sichern Sie die Vitrine je nach Ausführung mit einem Schloss oder Riegel.
5
6. Justieren Sie die Waagerechte der Vitrine. Legen Sie eine Wasserwaage von vorne nach hinten und von Seite
u Seite an der Vitrine an (Abbildung 5). Unten an der Vitrine befinden sich verstellbare Nivellierfüße
z
(Abbildung 1), die zum Justieren hinein- (nach oben) bzw. herausgedreht werden können. Justieren Sie die
Nivellierfüße, bis die Vitrine in allen Richtungen eben ist und mit alle vier Füßen fest auf dem Boden steht.
VORSICHTIGE HANDHABUNG DER GLASREGALE
Um ein Brechen der Glasregale und/oder Gegenstände zu vermeiden, sollten Sie während der Installation und
dem Beladen der Glasregale stets vorsichtig vorgehen.
Durch einen plötzlichen Aufprall eines Gegenstands kann das Glas zerbrechen sowie V
und wertvolle Objekte beschädigen. Seien Sie bitte vorsichtig, wenn Sie Objekte auf die Regale stellen.
Das Gewicht der auf die Regale gestellten Gegenstände muss gleichmäßig verteilt sein und darf 11 kg nicht
überschreiten.
Da wir über den letztendlichen Gebrauch dieser Vitrine keine Kontrolle haben, kann die Howard Miller Company
keine Haftung für zerbrochene Regale oder persönliche Gegenstände übernehmen.
VITRINEN MIT INNENBELEUCHTUNG (nur bei bestimmten Modellen erhältlich):
Einige Vitrinen sind mit Innenbeleuchtung ausgestattet. Stellen Sie zunächst die Beleuchtungsoption Ihrer Vitrine fest.
REGAL ZUM ZUBEREITEN DER GETRÄNKE (nur bei bestimmten Modellen erhältlich):
Die Schubladen einiger Vitrinen sind mit einem aufklappbaren Regal zum Zubereiten der Getränke ausgestattet
(Abbildung 7). Zum Herausnehmen dieses Regals müssen Sie die Schublade zunächst ganz herausziehen.
Suchen Sie dann an beiden Seiten der Schublade die Arretierungsstifte, die das Regal in seiner Position halten.
Drücken Sie mit einem schmalen Gegenstand einen der Stifte. Sobald dieser so weit eingedrückt ist, dass er die
Innenkante der Schublade frei gibt, das Regal an dieser Seite anheben. Anschließend das Regal schräg anheben
und nach oben aus der Schublade herausnehmen. Um das Regal zu entfernen, muss die Schublade nicht aus der
Vitrine herausgenommen werden. (Um das Regal wieder in der Schublade einzubauen, führen Sie die Schritte in
umgekehrter Reihenfolge aus.)
PFLEGE- UND WARTUNGSHINWEISE
ALLGEMEINE RICHTLINIEN ZUR PFLEGE VON OBERFLÄCHEN AUS NATURSTEIN:
Wenn Ihre Vitrine mit Naturstein ausgestattet ist (d. h. Granit, Marmor usw.), sollten Sie sich bei spezifischen
Fragen hinsichtlich der Pflege oder der Steinoberfläche an einen Experten für Steinrestautrationen wenden. Rufen
Sie Stone Care International unter der Nummer 1-800-839-1654 an oder besuchen Sie die Webseite
www.stonecare.com.
Reinigen Sie die Steinoberfläche
Herkömmliche Scheuerpulver oder -cremes enthalten eventuell Schleifmittel, die die Steinoberfläche zerkratzen
können.
Schützen Sie die Steinoberfläche vor K
Gläsern und Flaschen kann Wasserringe oder Flecken verhindern.) Zitronensaft- oder essighaltige Produkte bzw.
Flüssigkeiten auf Säure- oder Alkalibasis können die Oberfläche des Steins beschädigen.
erschüttungen
V
Um Flecken oder Verätzungen auf der Oberfläche zu vermeiden, sollten Sie Verschüttungen sofort mit einem
sauberen Küchen- oder Stofftuch aufnehmen. Nicht über die verschmutze Fläche reiben, da dadurch die
Verschüttung verteilt wird (und der Fleck möglichweise größer wird.) Anschließend die Fläche mit klarem Wasser
spülen. Verwenden Sie nur ein speziell für Steinoberflächen geeignetes Reinigungs- oder Fleckenmittel.
Kratzer und Kerben: Um ein Verkratzen zu vermeiden, sollten Sie lose Reste von der Steinoberfläche entfernen.
Kleine Oberflächenkratzer können eventuell mit einem speziell für Steinoberflächen geeignetem Polier- oder
Retaurationsmittel poliert werden.
ALLGEMEINE RICHTLINIEN ZUR MÖBELPFLEGE:
Schützen Sie Holz- oder Lederoberflächen vor Kratzern, Kerben, Kondensation oder Verschüttungen. Verwenden
Sie Schneidbretter und Untersetzer, um die Oberflächen zu schützen. (Die Verwendung von Untersetzern bei
Gläsern und Flaschen kann Wasserringe oder Flecken verhindern.)
Wachsen und polieren Sie die Vitrine so oft wie Ihre anderen Möbel. Verwenden Sie ein silikonfreies Mittel oder
Möbelwachs.
Schützen Sie die Vitrine vor
eine längere Aussetzung an direktes Sonnenlicht kann das Finish verblassen. Extreme Temperaturen und hohe
Luftfeuchtigkeit können ein Splittern des Holzes bzw. Risse im Holz verursachen.
Überprüfen Sie regelmäßig, ob Ihre Vitrine eben auf allen vier Nivellierfüßen steht. Das ist ganz besonders in den
ersten Monaten wichtig, bis sich die Vitrine auf dem weichen Teppichboden gesetzt hat (Abbildung 1 und 5).
TM
TOUCH-LITE
Die Lampe wird durch Berührung des Türscharniers (normalerweise das rechte Scharnier oben) aktiviert.
Dabei muss das K
Der Lampenbetrieb beginnt in der ausgeschalteten Position. Der Betrieb erfolgt sequenziell, d. h mit jeder
Berührung des Scharniers wird die Helligkeit der L
Erste Berührung = niedrige Helligkeitsstufe
Zweite Berührung = mittlere Helligkeitsstufe
TISCHE EINSCHALTUNG:
A
UTOMA
Die Lampe leuchtet beim Öffnern der Tür automatisch auf und erlischt beim Schließen der Tür.
:
rletzungen verursachen
e
abel angeschlossen sein.
ampe um eine Stufe höher gestellt.
Dritte Berührung = hohe Helligkeitsstufe
Vierte Berührung = schaltet die L
regelmäßig mit einem speziell dafür geeigneten Reinigungsmittel.
ondensation oder Verschüttungen (die Verwendung von Untersetzern bei
direktem Sonnenlicht, extremen Temperaturen und hoher Luftfeuchtigkeit. Durch
ampe aus
INFORMACIÓN DE SERVICIO
E
ste producto ha sido fabricado utilizando sólo los más finos materiales y ha sido inspeccionado por
c
ompleto antes de dejar las instalaciones de nuestra fábrica.
Antes de solicitar servicio, asegúrese de que se hayan seguido con cuidado todas las instrucciones
p
roporcionadas junto con su producto Howard Miller. Estas instrucciones proporcionarán información
d
etallada para responder la mayoría de las preguntas. Visite el sitio de Internet de Howard Miller en
.
w
howardmiller.compara consultar una lista de las preguntas más frecuentes y encontrar
ww
r
espuestas a ellas.
En el caso poco probable de que su gabinete necesite servicio, en ESTADOS UNIDOS, contacte por
f
avor a uno de nuestros Representantes de Servicio al Cliente al (616) 772-7277 (extensión #386).
FUERA DE ESTADOS UNIDOS, por favor llame a su distribuidor o agente.
Antes de llamar, por favor tenga a la mano el número de modelo y el número de serie, los cuales se
pueden encontrar en la Etiqueta de Información del Producto, que por lo general se encuentra en el
lado inferior del gabinete.
Número de Modelo: _______________ Número de Serie:______________________
Fecha de Compra: ________________ Lugar de Compra: ________________________
B
reve Descripción del Problema: __________________________________________
Por favor tenga a la mano en todo momento durante su llamada estas instrucciones y el recibo de venta
o cualquier otra prueba de compra equivalente. La mayoría de los problemas se pueden resolver con
rapidez sin regresar el gabinete para su servicio.
Se requiere una Autorización de Retorno para todos los retornos a Howard Miller. Si se le ha
otorgado una autorización para regresar el producto a Howard Miller, se le dará un número de
Autorización de Retorno (RGA#). Incluya por favor este número de autorización arriba de su nombre,
en la etiqueta de dirección. También incluya una copia
de la compra original (los recibos originales nunca se deben enviar pues no se pueden regresar). Los
retornos sin previa autorización o prueba de compra estarán sujetos a cargos adicionales y retrasos.
DAÑO DURANTE EL TRANSPORTE. Es responsabilidad de los consignatarios reclamar cualquier
daño o pérdida por transporte directamente al transportista. Si el cartón muestra “señales visibles de
daños”, dé instrucciones al conductor para que registre el daño en la nota de transporte. Si el cartón
c
ontiene “daños ocultos”, notifique al transportista y solicite por escrito dentro de los 14 días después
de la recepción del producto, una inspección y un reporte de daños por parte del transportista. Las
f
allas al notificar al transportista dentro de estos 14 días a la recepción del producto, pueden hacer que
pierda su derecho a reclamar.
RENSEIGNEMENTS D’UTILISATION
Ce produit a été fabriqué en utilisant uniquement les matériaux les plus fins et a été entièrement
i
nspecté avant de quitter notre établissement de fabrication.
A
vant d’entreprendre son utilisation, assurez-vous que toutes les instructions fournies avec votre
p
roduit Howard Miller ont été soigneusement observées. Ces instructions fourniront des
r
enseignements détaillés pour répondre à la plupart des questions. Visitez le site Web de Howard Miller
.howardmiller.com) pour consulter la liste des questions fréquemment posées qui pourraient
(www
r
ésoudre votre problème de façon pratique ou répondre à vos questions.
Dans le cas peu probable où il semblerait que votre meuble ait besoin d’une réparation, en AMÉRIQUE
DU NORD veuillez appeler un de nos représentants du service à la clientèle au (616) 772-7277 (poste
nº 386). EN DEHORS DE L’AMÉRIQUE DU NORD
A
vant d’appeler, prenez soin d’avoir les informations suivantes à votre disposition. Le numéro de
m
odèle et le numéro de série se trouvent sur l’étiquette d’informations sur le produit, laquelle est
n
ormalement placée à l’arrière du meuble.
N
uméro du modèle : _________________ Numéro de série : ______________
Date d’achat : ________________________Lieu d’achat : __________________
B
rève description du problème : _______________________________________
Veuillez être en possession de ces informations et du reçu d’achat ou de toute autre preuve
comparable de l’achat initial au moment de votre appel. La plupart des problèmes peuvent être
rapidement résolus sans renvoyer le meuble à réparer
U
ne autorisation de retour est exigée pour tout renvoi à Howard Miller
a
utorisation pour renvoyer le produit à Howard Miller, un numéro d’autorisation de retour (nº RGA)
vous sera donné. Veuillez indiquer ce numéro d’autorisation de retour aul
’étiquette d’adresse. Joignez également une copie
du fait qu’ils ne seront pas restitués) du reçu d’achat ou autre preuve comparable de l’achat initial. L
retours sans autorisation préalable ou sans preuve d’achat peuvent subir des frais et délais
supplémentaires.
DOMMAGES DE TRANSPORT. Il relève de la responsabilité du destinataire de faire une réclamation
pour perte ou dommage durant le transport auprès du transporteur. Si le carton montre des signes de
« dommages visibles », demandez au conducteur de noter ces dommages sur le bon de livraison. Si le
carton indique des « dommages cachés », signalez le cas au transporteur et demandez par écrit dans
les 14 jours de la réception du produit une inspection par le transport et un compte-rendu des
dommages. L
abroger vos droits à déposer une réclamation pour dommages.
REPARATURINFORMATIONEN
Dieses P
Fertigungswerks sorgfältig überprüft.
Bevor Sie sich an den Reparaturservice wenden, stellen Sie bitte sicher, dass die mit dem Howard Miller
rodukt gelieferte Anleitung genau befolgt wurde. Darin werden häufig gestellte Fragen ausführlich
P
beantwortet. Besuchen Sie die Howard Miller W
häufig gestellten Fragen, die Ihnen ggf. beim Lösen Ihres Problems helfen und Ihre Fragen beantworten
können.
In dem unwahrscheinlichen Fall, dass Ihre Vitrine repariert werden muss, wenden Sie sich bitte in
NORDAMERIKA an den Kundendienst unter der Nummer: (616) 772-7277 (Durchw. 386). AUSSERHALB
NORDAMERIKAS wenden Sie sich bitte an einen Distributor oder Vertreter.
Halten Sie bitte die folgenden Informationen bereit, bevor Sie sich mit dem Kundendienst in
Verbindung setzen. Die Modell- und Seriennummer befindet sich auf dem Produktetikett (in der Regel
auf der Rückseite der Vitrine).
Modellnummer: ______________________
Kaufdatum: __________________________ Verkaufshändler: _____________________
Kurze Beschreibung des Problems:____________________________________________
Halten Sie bitte die Anleitung und den Kaufbeleg oder einen anderen Nachweis für den Erstkauf
bereit, wenn Sie sich mit dem K
Rücksenden der Vitrine behoben werden.
Für alle Rücksendungen an Howard Miller ist eine Rücksendegenehmigung einzuholen. Mit der
Rücksendegenehmigung für Ihr Howard Miller Produkt wird Ihnen auch eine RücksendegenehmigungsNr
im Adressenetikett ein. Legen Sie auch eine Kopie des Kaufbelegs oder eines anderen Nachweises für
den Erstkauf bei (niemals Originalbelege einsenden, da diese nicht zurückgesendet werden. Bei
Rücksendungen ohne vorherige Genehmigung oder Kaufbeleg können zusätzliche Kosten und
Verzögerungen entstehen.
FRACHTSCHADEN Der Empfänger muss ein verlorengegangenes Produkt oder etwaige
Transportschäden direkt dem Transportunternehmen melden. Bei einer „offensichtlichen
Beschädigung“ des Kartons bitten Sie den Fahrer, dies auf der Frachtrechnung zu vermerken. Bei
„versteckten Versandschäden“ unterrichten Sie bitte das Transportunternehmen innerhalb von 14
agen nach Erhalt des P
T
Schadensbericht an. Wenn Sie das Transportunternehmen nicht innerhalb von 14 Tagen nach Erhalt
des Produkts informieren, können Ihre Schadensansprüche erlöschen.
’absence de notification au transporteur dans les 14 jours de la réception du produit peut
rodukt wurde unter Verwendung feinster Materialien hergestellt und vor Verlassen unseres
Seriennummer: ______________________
undendienst in Verbindung setzen. Die meisten Probleme können ohne
. (RGA-Nr.) zugeteilt. Tragen Sie die Rücksendegenehmigungsnummer (RGA-Nr.) über Ihrem Namen
rodukts und fordern Sie einen ordnungsgemäßen Inspektions
del recibo de compra u otra prueba equivalente
, veuillez appeler votre distributeur ou agent.
.
(
les reçus originaux ne devraient jamais être soumis
ebsite (www
.howardmiller.com) für eine Liste mit
. Si vous avez reçu une
dessus de votre nom, sur
- und
860 East Main Avenue Zeeland, Michigan 49464-1300
www.howardmiller.com © Copyright Howard Miller
497081R2
es
 Loading...