

Vintage Cellars CellarPro Owners Manual
Control the Elements
Owner’s Manual
Fine Furniture for Fine Wines

C O N G R A T U L A T I O N S !
Thank you for purchasing a new CellarPro cooling system.
Please take a minute to read through this Owner’s Manual before you install and turn on
your Cooling Unit.
If you have any questions about your new cooling unit, it is likely that you will find the
answers in this Owner’s Manual. We also have more information on our website,
including the latest version of the Owner’s Manual, at www.cellarpro.com/customer-
service .
If you still have questions, please don’t hesitate to contact your dealer or CellarPro
directly. We can be reached during normal business hours at 1.877.726.8496. You also
may contact us anytime via email at info@cellarpro.com.
Contact Information:
CellarPro Cooling Systems
531 Mercantile Drive
Cotati, CA 94931
877.726.8496
Email: info@cellarpro.com
Website: www.cellarpro.com
Serial Number*: ____________________
*We recommend that you take a minute to fill-in your CellarPro serial number above. The
serial number has seven-digits and can be found on the printed label on the left side of
your cooling unit.
Don’t forget to register your cooling unit warranty at www.cellarpro.com/register
1

Table of Contents
I. Important Notes 3
II. Overview 4
III. Replacement Instructions 9
IV. Operating Instructions 15
V. Normal Operation 21
VI. Troubleshooting 23
VII. Limited Warranty 25
2
Important Notes
• Before plugging in and operating your CellarPro cooling unit, remove any
materials that have been packed inside the exhaust cavity.
• Wait 24 hours before plugging in and operating your CellarPro cooling unit.
• Before installing the cooling unit, make sure it works by plugging it in and letting it
run on a hard, flat surface. Check that cold air is being produced by the unit.
• NEVER turn the cooling unit on its side or upside down
• The cooling unit should be plugged into an outlet connected to a 15-amp circuit
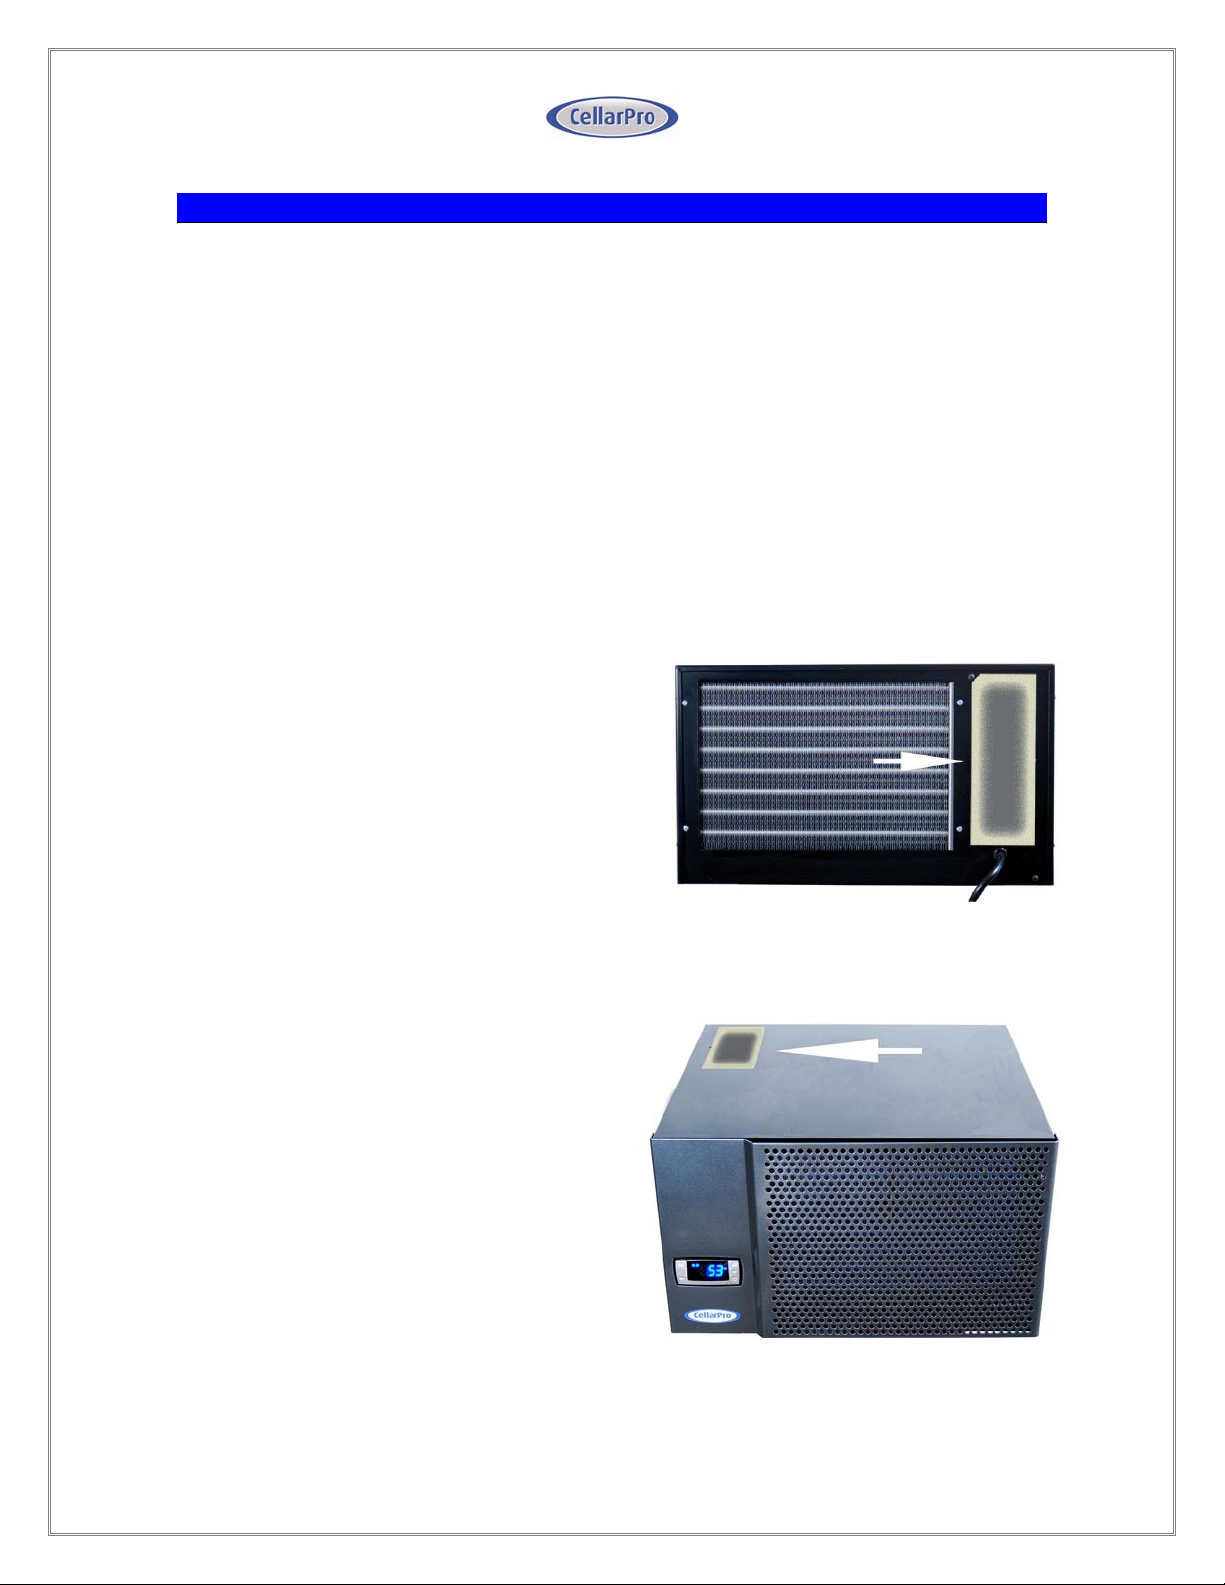
• Before installing the cooling unit, make sure that the exhaust panel is installed in
the correct position – it MUST cover
either the TOP or the REAR exhaust
vent:
o TOP VENT CONFIGURATION::
If the hot air will be discharged
through the TOP of the cellar,
install the exhaust panel on the
BACK of the cooling unit (as
shown in the Picture A). In this
configuration, the cavity on TOP
of the cooling unit is OPEN. Picture A
Top Vent Configuration
o REAR VENT CONFIGURATION:
If the hot air will be discharged
through the REAR of the cellar,
use the exhaust panel to seal
the TOP of the cooling unit (as
shown in the Picture B). In this
configuration, the cavity at the
REAR of the CellarPro is OPEN.
Picture B
Rear Vent Configuration
3
Overview
CellarPro cooling units are engineered to maintain optimal wine storage conditions
inside wine cellars.
• Temperature
Proper temperatures are maintained by transferring heat from inside wine cellars
and exhausting the heat through the top (top-vent) or rear (rear-vent) of the cooling
units.
CellarPro cooling units are designed to turn on when the temperature inside the
cellar exceeds the Minimum Set Point plus the Temperature Differential, and turn off
when the temperature inside the cellar drops below the Minimum Set Point. For
example, if the Minimum Set Point is 55°F and the Temperature Differential is 4°F,
the cooling unit will turn on when the temperature inside the cellar rises above 59°F,
and turn off when the temperature falls below 55°F.
A number of variables, including the temperatures of the ambient environment, the
insulation of the cellar and the thermal mass inside the cellar, will affect the speed
with which the temperature inside the cellar rises during the cooling unit’s “off” cycle.
It is normal for the cooling unit to run up to 75 percent of the time in order to
maintain proper conditions inside the cellar.
CellarPro cooling units are designed to cool up to 30°F below the ambient
temperature in the space outside the condenser coils, and are designed to operate in
environments ranging in temperature from 50°F to 85°F.
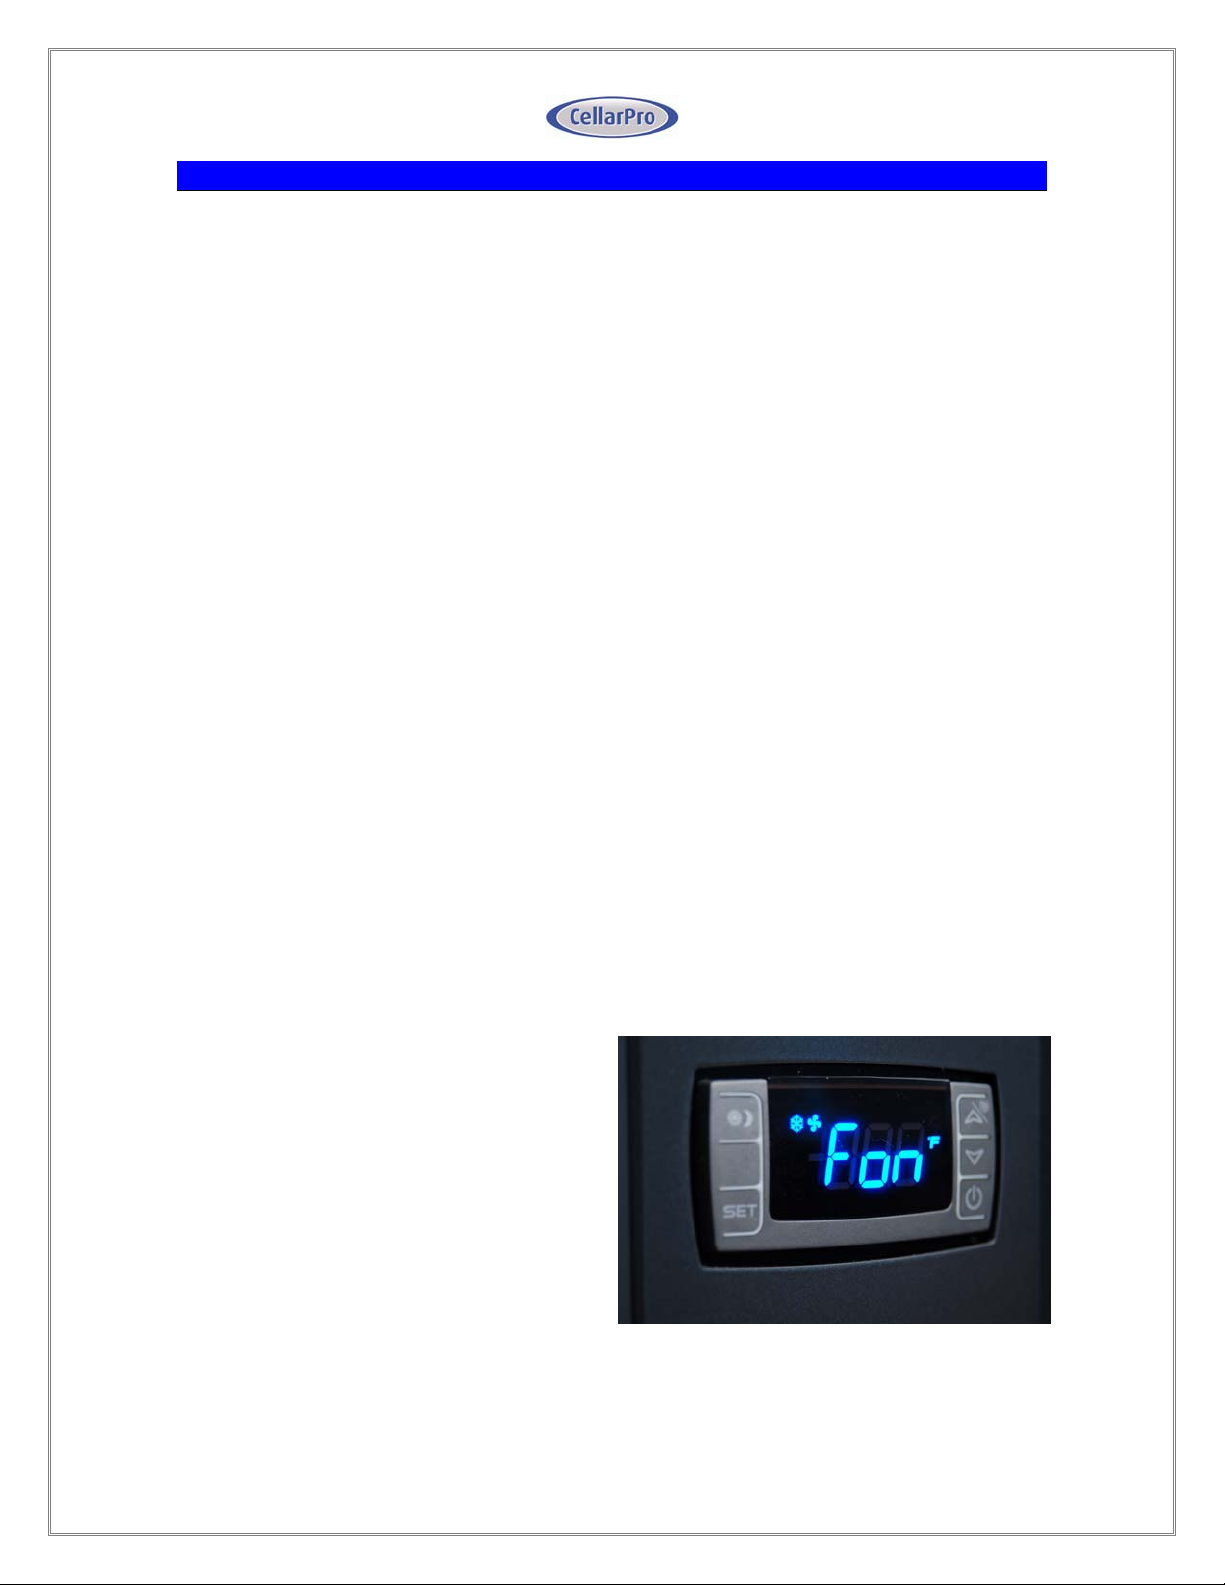
• Humidity
Relative humidity is maintained by gently
cooling the cellar without removing
moisture from the environment.
Although the relative humidity in the
ambient environment will affect the level
of humidity inside the cellar, CellarPro
cooling units can be adjusted to increase
the level of relative humidity inside a
cellar,. The Fon setting (shown at right)
controls the amount of moisture
circulated inside the cellar. To increase
humidity inside the cellar, change the Fon setting per the instructions in Chapter III.
4
• Installation
CellarPro cooling units are designed to be installed inside wine cellars that have
proper insulation, moisture barriers and airtight seals from the environment outside
the cellar.
Interior walls and floor should have a minimum of R-11 insulation, and a vapor
barrier on the warm side of the insulation. The ceiling should have a minimum of R19 insulation and a vapor barrier on the warm side of the insulation. Doors also
should be insulated and tightly sealed with weather stripping around the perimeter of
the door. Surface-mounted fixtures are recommended over recessed lighting, which
can allow air to leak into the cellar.
It is critical that all walls, joints, doors and windows, electrical outlets and/or
switches, pipes, vents and light fixtures be sealed to prevent air and moisture from
entering the cellar. If there is a leak in the cellar, the cooling unit will build up excess
condensation that eventually may damage the internal components and shorten the
life of the cooling unit, and may cause water to leak from the cooling unit.
CellarPro cooling units should be mounted in the upright position and located as
close to the ceiling as possible inside the cellar. Optional mounting clips for
attaching the front of the cooling unit to the ceiling are available for purchase from
CellarPro. As warm air rises to the top of the cellar, the cooling unit pulls the warm air
through the evaporator coils and removes the heat from the warm air. Once cooled,
the cold air is discharged from the bottom of the cooling unit and dissipates
downward through the cellar.
In most cases, the rear of the cooling unit will be flush with the outside wall, and
assuming 4 1/2 inch interior wall thickness, the front 12 inches will be inside the
cellar. At a minimum, the front 8” of the cooling unit must be located inside the
cellar, because the cold air discharge is located underneath the cooling unit.
The cooling unit should be mounted in a hole through the wall that is cut 1/4 inch
larger than the dimensions (W x H) of the cooling unit. Horizontal 2 x 4 inch braces
should be installed between the studs below and above the cooling unit. If the studs
in the wall must be cut to accommodate the width of the cooling unit, vertical braces
also should be installed on either side of the cooling unit. A shelf with a diagonal
brace should be installed inside the cellar below the cooling unit. The shelf should
be 13 inches wide, and should be positioned on the right side of the cooling unit so
that it doesn’t restrict the exhaust vent below the cooling unit.
Once the cooling unit is installed, all cracks and gaps between the cooling unit and
the cellar should be sealed. We provide butyl tape (shipped in the cavity of the
exhaust vent) for sealing these gaps. The butyl tape becomes pliable by rolling it in
your hands. Pay particular attention to the seams on the back of the cellar (top and
rear vent configurations) and the seams at the top of the cellar (top-vent
configuration).
5

We offer a Wine Cellar Modification for cooling units that will be installed in wine
cellars (as opposed to wine cabinets.) The Wine Cellar Modification provides a fitting
and condensate tube at the back of the cooling unit to relieve excess moisture that
may condense inside the cooling unit. For installations in warm environments and/or
cellars without airtight seals, we strongly recommend this modification. However, the
modification does not replace the requirement for a cellar to have proper insulation,
moisture barriers and airtight seals from the environment outside the cellar.
CellarPro cooling systems should be plugged into an outlet connected to a 15-amp
circuit. The cooling unit uses approximately 3 amps during its “on” cycle. The cooling
unit also offers a grounded 115V AC outlet, which is rated for 3 amps.
We recommend plugging your CellarPro cooling unit into a surge protector (minimum
of 15-amps) to protect the electrical components from power surges or spikes. If
using an extension cord, use a grounded 14-gauge or heavier cord, and keep the
length to a minimum to avoid voltage drop.
• Ventilation
Proper ventilation is critically important for the proper operation of your CellarPro
cooling unit. The CellarPro cooling unit creates a significant amount of hot air, which
must be exhausted into an appropriately-sized space in order for the heat to
dissipate. If the space is constrained and/or too small, the heat will not dissipate
and the cooling unit will end up recirculating hot air. If this happens, the cooling
unit’s ability to create cold air inside the cellar will be compromised.
CellarPro cooling units have interchangeable vent panels that can be swapped
between the top and the rear of the cooling unit to match the configuration of your
cellar and exhaust space.
• Top-vent configuration: in this configuration, the panel is attached to the rear
of the cooling unit and hot air is freely exhausted from the top of the cooling
unit into the exhaust space.
- If the cellar’s air intake comes from BEHIND the cellar, the cooling unit
will require 3-4” of unobstructed clearance behind the cellar; and 8-9”
of clearance above the cellar;
- If the cellar’s air intake comes from the TOP of the cellar, the cooling
unit will require 18” of unobstructed clearance above and to both sides
of the cellar, unless:
1. The hot air exhaust is ducted away from the cellar; or
2. The hot air exhaust is evacuated via an exhaust fan.
6
• Rear vent configuration: in this configuration, the panel is attached to the top
of the cooling unit and hot air is freely exhausted from the rear of the cooling
unit into the exhaust space. This configuration requires 3-4” of unobstructed
clearance behind the cellar.
Under both configurations, access to the intake coils (either at the top or the back of
the cellar) is required for periodic maintenance.
• Ambient Environment.
CellarPro cooling units are designed to operate in ambient temperatures between
50°F and 85°F. They are designed for internal use only, and are not designed for
exposure to the exterior.
CellarPro cooling units cannot maintain temperatures inside the cellar that are more
than 30°F below the ambient temperature in the space outside the condenser coils.
For example, if the ambient temperature in the space outside the condenser coils is
85°F, the cooling unit should be able to maintain temperatures of 55°F inside the
cellar.
CellarPro cooling units do not have heating elements, so if temperatures inside the
cellar drop below proper wine storage temperatures, the cooling unit cannot create
heat inside the cellar.
• Cooling Capacity (Cubic Feet)
The cooling capacity for each of our products is shown in the table below. These
capacities are estimates and are based on certain assumptions, including sufficient
insulation, adequate clearance and airflow, and proper ambient temperatures in and
around the cellar.
Model Dimensions (inches)
W x D x H
Operating
Amps
Cellar Capacity
(cubic feet)
1800QT 18 x 16.5 x 10.5 3 200
1800XT 18 x 16.5 x 10.5 3 300
7
 Loading...