

Vintage Cellars 1800 User Manual

Control the Elements
Owner’s Manual
Fine Furniture for Fine Wines

C O N G R A T U L A T I O N S !
Thank you for purchasing a new CellarPro cooling system.
Please take a minute to read through this Owner’s Manual before you unpack, install and
turn on your Cooling Unit.
If you have any questions about your new cooling unit, it is likely that you will find the
answers in this Owner’s Manual. We also have more information on our website,
including the latest version of the Owner’s Manual, at www.cellarpro.com/customer-
service .
If you still have questions, please don’t hesitate to contact your dealer or CellarPro
directly. We can be reached during normal business hours at 1.877.726.8496. You also
may contact us anytime via email at info@cellarpro.com.
Contact Information:
CellarPro Cooling Systems
531 Mercantile Drive
Cotati, CA 94931
877.726.8496
Email: info@cellarpro.com
Website: www.CellarProCoolingSystems.com
Serial Number*: ____________________
*We recommend that you take a minute to fill-in your CellarPro serial number above. The
serial number has seven-digits and can be found on the printed label on the left side of
your cooling unit.
Don’t forget to register your cooling unit warranty at www.cellarpro.com/register
1

Table of Contents
I. Prior to Installation 4
II. Overview 5
III. Installation Instructions – Wine Cellars 8
IV. Replacement Instructions – Wine Cabinets 14
V. Operating Instructions 17
VI. Troubleshooting 25
VII. Limited Warranty 28
3

I. Prior to Installation
Test the unit before installing it.
1. Remove the unit from the box. SAVE THE BOX AND PACKING MATERIALS.
2. Remove any materials that have been packed inside the exhaust cavity
3. Plug in the power cord. The cooling system is programmed with a 3-Minute
Delay at Startup to protect its internal components
4. Let the unit run on a hard, flat surface for no more than 10 minutes.
5. Make sure that all fans in the cooling unit are spinning.
6. Check that the cooling unit is discharging cold air from the bottom (it should
be approximately 10°F colder than the temperature on the digital display)
7. Turn the unit “off”, install the unit, and wait 24 hours before operating your
CellarPro cooling unit. This will protect the unit from internal damage that
could arise if the unit was shipped, stored or tilted on its side.
Make sure that the exhaust panel is installed in the correct position – it should
cover either the TOP or the REAR exhaust vent:
o TOP VENT CONFIGURATION: If
the hot air will be discharged
through the TOP of the cellar,
install the exhaust panel on the
BACK of the cooling unit (as
shown in the Picture A). In this
configuration, the cavity on TOP
of the cooling unit is OPEN.
Picture A
Top Vent Configuration
o REAR VENT CONFIGURATION: If
the hot air will be discharged through the
REAR of the cellar, use the exhaust panel to
seal the TOP of the cooling unit (as shown in
the Picture B). In this configuration, the
cavity at the REAR of the CellarPro is OPEN.
Picture B
Rear Vent Configuration
4
II. Overview
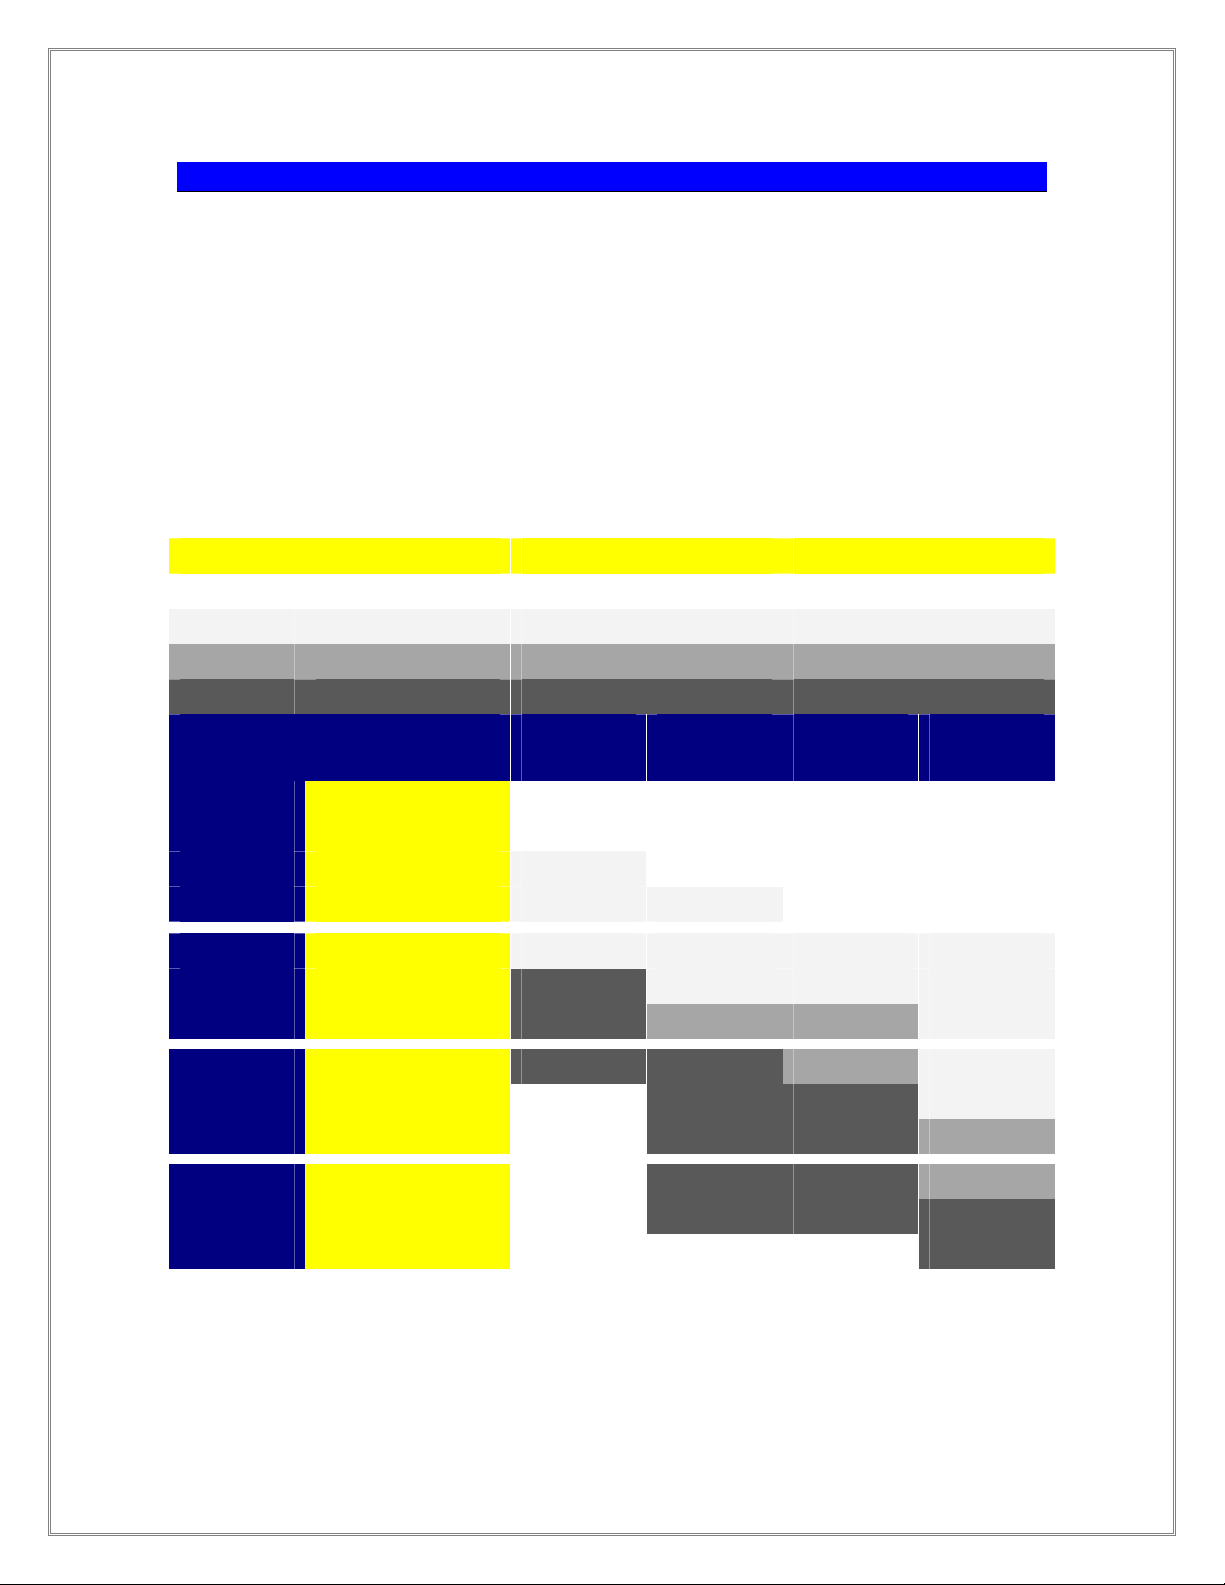
CellarPro Cooling Capacity*
Estimated thermal loads for various size cellars, with various insulations, various
ambient temperatures and various cellar temperatures, are shown in the table below.
To figure out whether a CellarPro unit will work in your space, make sure that the
cooling unit’s BTUH for a given cellar temperature (at the top of the table) is equal or
greater than the thermal load shown in the body of the table. The non-bold,
unshaded numbers are within the capacity of all units. The unbold, lightly shaded
numbers are within all units except the 1800QTL. The bold numbers are beyond the
capacity of the 1800QTL and 1800QT. The italicized numbers are appropriate only
for the 1800XTS / XTSx. “X” indicates conditions beyond the capacity of all units.
Cellar Temp
BTUH 1800QTL
BTUH 1800QT
BTUH 1800XT
BTUH 1800XTS / XTSx
Cellar Insulation –
Walls, ceiling & floor*:
Cellar Size Ambient Temp
75 Degrees
100 Cu Ft. 85 Degrees
95 Degrees
75 Degrees
200 Cu Ft. 85 Degrees
95 Degrees
75 Degrees
300 Cu Ft. 85 Degrees
55 Degrees 60 Degrees
1065 1154
1380 1479
1456 1558
1886 2031
R-12
R-19
R-12
R-19
1068 979 940 862
1180 1046 1038 920
1291 1114 1136 980
1380 1253 1214 1103
1538 1349 1353 1187
1699 1446 1495 1272
1700 1542 1496 1357
X 1562 1672 1463
95 Degrees
75 Degrees
400 Cu Ft. 85 Degrees
X 1909 2003 1558
X 1744 1690 1535
X 1879 1888 1654
95 Degrees X X X 1773
*Please note: Glass panels, windows and doors have much lower insulation (at most
R-3) and therefore heat loads will increase dramatically when glass is used in cellars.
5

Size & Electrical Specifications
Model
1800 QTL/QT/XT/XTS 18 x 16.5 x
1800 XTSx 18.1 x 22 x
Dimensions
W” x D” x H”
10.5
10.6
Weight
(lbs)
Operating
Amps
Required
Circuit
60 3 15-Amp
Dedicated
70 3 15-Amp
Dedicated
Ambient Environment
CellarPro cooling units are designed to operate in ambient temperatures between
45°F and 95°F. Except for the 1800XTSx cooling unit, all cooling units are designed
for internal use only, and are not designed for exposure to the exterior.
CellarPro cooling units are not designed to generate heat inside the cellar, so if
temperatures inside the cellar drop below proper wine storage temperatures, the
cooling unit cannot increase the temperature inside the cellar.
Proper temperatures are maintained by transferring heat from inside wine cellars
and exhausting heat through the top (top-vent) or rear (rear-vent) of the cooling units.
Insulation
CellarPro cooling units are designed to be installed inside wine cellars that have
proper insulation, moisture barriers and an airtight seal from the environment
outside the cellar.
Interior walls and floor
should have a minimum of
R-11 insulation, and a
vapor barrier on the warm
side of the insulation. The
ceiling should have a
minimum of R-19 insulation
and a vapor barrier on the
warm side of the insulation.
Doors also should be
insulated and tightly sealed
with weather stripping
around the perimeter of the
door. Surface-mounted
fixtures are recommended
over recessed lighting,
which can allow air to leak
6

into the cellar. Please note: The R-values above are the MINIMUM recommended
amounts of insulation. It is advisable to use as much insulation as possible inside
your walls, ceiling and floor.
It is critical that all walls, joints, doors and windows, electrical outlets and/or
switches, pipes, vents and light fixtures be sealed to prevent air and moisture from
entering the cellar. If there is a leak in the cellar, the cooling unit will build up excess
condensation that eventually may damage the internal components and shorten the
life of the cooling unit, and may cause water to leak from the cooling unit.
We offer a Wine Cellar Modification for cooling
units that will be installed in wine cellars (as
opposed to wine cabinets.) The Wine Cellar
Modification provides a fitting and condensate
tube at the back of the cooling unit to relieve
excess moisture that may condense inside the
cooling unit. For installations in warm
environments and/or cellars without airtight
seals, we strongly recommend this
modification. However, the modification does
not replace the requirement for a cellar to have proper insulation, moisture barriers
and airtight seals from the environment outside the cellar.
If your cooling unit has the wine cellar modification, please make sure that the tube
has a condensate trap that is slightly filled with water, as follows:
As shown above, the drain line should drop, then rise (but stay below the height of
the fitting), and then drop again into a drain or bucket. Then, fill the trap with water.
The condensate trap will allow any excess moisture inside the cooling unit to
overcome the static pressure and flow out of the drain line. Please note: If you do
not use a trap, you will see little – if any – condensation, for the same reason that
water stays inside a straw when one end is sealed.
7

III. Installation Instructions – Wine Cellars
CellarPro cooling units are designed to be installed THROUGH THE WALL. A hole
should be cut 1/4 inch larger than the dimensions (W x H) of the cooling unit.
Horizontal 2 x 4 inch braces should be installed between the studs below and above
the cooling unit. If the studs in the wall must be cut to accommodate the width of the
cooling unit, vertical braces also should be installed on either side of the cooling unit.
CellarPro cooling units must always be mounted in the upright position and located
as close to the ceiling as possible inside the cellar. As warm air rises to the top of the
cellar, the cooling unit pulls the warm air through the evaporator coils and removes
the heat from the warm air. Once cooled, the cold air is discharged from the bottom
of the cooling unit and circulates downward through the cellar.
The rear of the cooling unit should be slightly lower than the front of the cooling unit
(ie the cooling unit should be tilted backwards slightly), so that excess condensation
won’t drip through the evaporator fan cavity. The rear of the cooling unit should be
supported by the wall through which it is installed, and should be flush with the wall.
Assuming 4 1/2 inch interior wall thickness, the front 12 inches will be inside the
cellar.
The rear of the cooling unit must be installed in a space that is at least as large as
the wine cellar unless the rear intake and exhaust are ducted. The rear of the
cooling unit requires a minimum clearance of 8 inches in an open (ie non-enclosed,
non-recessed) environment.
The front of the cooling unit requires a minimum of 3 inches of clearance inside the
cellar, and the bottom of the cooling unit requires clearance of 8 inches below the
cold air discharge.
The front of the cooling unit can be mounted using optional mounting clips (available
for purchase from CellarPro), as follows:
8

Alternatively, the front of the cooling unit can be supported by a shelf and a diagonal
brace. The shelf can be up to 13.25” inches wide, and should be positioned on the
right side of the cooling unit so that it doesn’t restrict the exhaust vent below the
cooling unit, as follows:
9
 Loading...