

Vinpower Hard Drive V 1.0, Hard Drive Duplicator 1.0 User Manual

User Manual
For Hard Drive Duplicator
V 1.0

WARNING!
THIS FLASH MEMORY DUPLICATOR IS MEANT FOR BACK UP AND
DISTRIBUTION OF ORIGINAL DATA AUTHORED OR OWNED BY THE USER. ANY
COPIES MADE FROM THIS FLASH MEMORY DUPLICATOR ARE THE COPYRIGHT,
OWNERSHIP OF THE AUTHOR OR COMPANY WHO OWNS THE SOURCE DATA.
ANY UNAUTHORIZED COPYING, EDITING, OR ANY PART THEREOF OF
COPYWRITTEN MATERIAL IS STRICTLY PROHIBITED. WE DISCOURAGE THE USE
OF ANY SUCH ACTION THAT GIVES RISE TO CRIMINAL INTENT AND
PROSECUTION.
THE SELLER OF THIS PRODUCT IS NOT RESPONSIBLE FOR ANY POTENTIAL
ILLEGAL ACTIONS OF THE USER DUE TO ACTIVITIES BEYOND THE SCOPE OF
THE PRODUCTS INTENDED USE.
Copyrights and Trademarks
ALL RIGHTS RESERVED. NO PART OF THIS PUBLICATION MAY BE
REPRODUCED IN ANY MEDIUM, PRINTED OR ELECTRONIC, WITHOUT THE
PRIOR WRITTEN PERMISSION FROM VINPOWER INC. COPYRIGHT©2000-2012.
ALL RIGHTS RESERVED.

Table of Contents
Chapter 1: Introduction & Manual Overview ............................................................... 1
Before getting started: ................................................................................................. 1
Package List: ............................................................................................................... 2
Chapter Overview: ....................................................................................................... 2
Chapter 2: Getting to know the system ....................................................................... 3
System Overview ......................................................................................................... 3
LCD Display & Operation Panel .................................................................................. 4
HDD Bay Status LED Reference ................................................................................. 4
Menu Navigation .......................................................................................................... 5
Chapter 3: Basic Operation Tutorials .......................................................................... 6
Making Copies of a Hard Drive .................................................................................... 6
Chapter 4: Device Menu Overview ............................................................................. 12
Appendix A: Troubleshooting .................................................................................... 17
Common Concerns .................................................................................................... 17
Error Codes ............................................................................................................... 18
Appendix B: Safety & Regulatory information ......................................................... 20

1
Chapter 1: Introduction & Manual Overview
This system is a reliable, high performance, high speed, standalone manual duplication system.
With its professional industrial design and simple user interface, it will make the duplicating
experience easier than ever.
Before getting started:
Before starting to use this system, please read the following to ensure proper operation:
1. Temperature Warning:
If the system was stored in a location where the temperature dropped below 32⁰F (0⁰C)
within the past 24 hours, please leave the system in a warm room with a temperature of at
least 65⁰F (19⁰C), for 4 hours prior to powering on the unit for the first time. Failure to do so
may cause irreparable harm and prevent the system from functioning properly.
2. Maintenance:
It is very important to operate and keep the system in a dust free, clean environment since
dust is the number one killer of electronic devices. Failure to do so may severely damage
the system. It is strongly suggest that an Air Cleaner be placed next to the system and that
an air duster (canned air) be used consistently to clear off any dust, which may accumulate
on the surface of the system.
3. Proper Shutdown:
To avoid possible system failures, the system needs to be shutdown properly. To shutdown
the system, press the Up or Down Arrow button until the “Shutdown” menu is appears and
then press the “ENT” button. Follow the instructions on the screen to shutdown the system
properly. Turning off the system without performing this function will increase the risk of
damage to the system.

2
Package List:
Hard Drive Duplicator, 1pc
System Power Cord, 1pc
Hard Drive Trays for 2.5” HDD/SSD
System Operation Manual, 1pc
Chapter Overview:
Chapter 2: Getting to know the system
This chapter describes the physical features and instructions of how to operate the
system.
Chapter 3: Basic Operations Tutorials
This chapter describes how to perform basic operations like Making Copies, etc.
Chapter 4: Menu Overview
This chapter describes what each function/setting does.
Appendix A: Troubleshooting
This section provides many solutions to frequently asked questions and provides
insights on system error codes.
Appendix B: Safety & Regulatory information
This section provides environment, health, safety and other regulatory information.

3
Chapter 2: Getting to know the system
System Overview
The image below is a representation of the flash duplicator casing. The design of
the casing may vary but the unit continues to operate using similar principles.
Figure 1-1 System Controls and Display
The components shown in Figure 1-1 are:
1. System Power On/Off Button
2. Control Panel
3. Source HDD Bay
4. Target HDD Bay
5. HDD Bay Activity LED/Power Button
6. HDD Bay Fan Status LED
7. System Ventilation Vents
8. Power Supply Fan
9. Power Cord Input
4
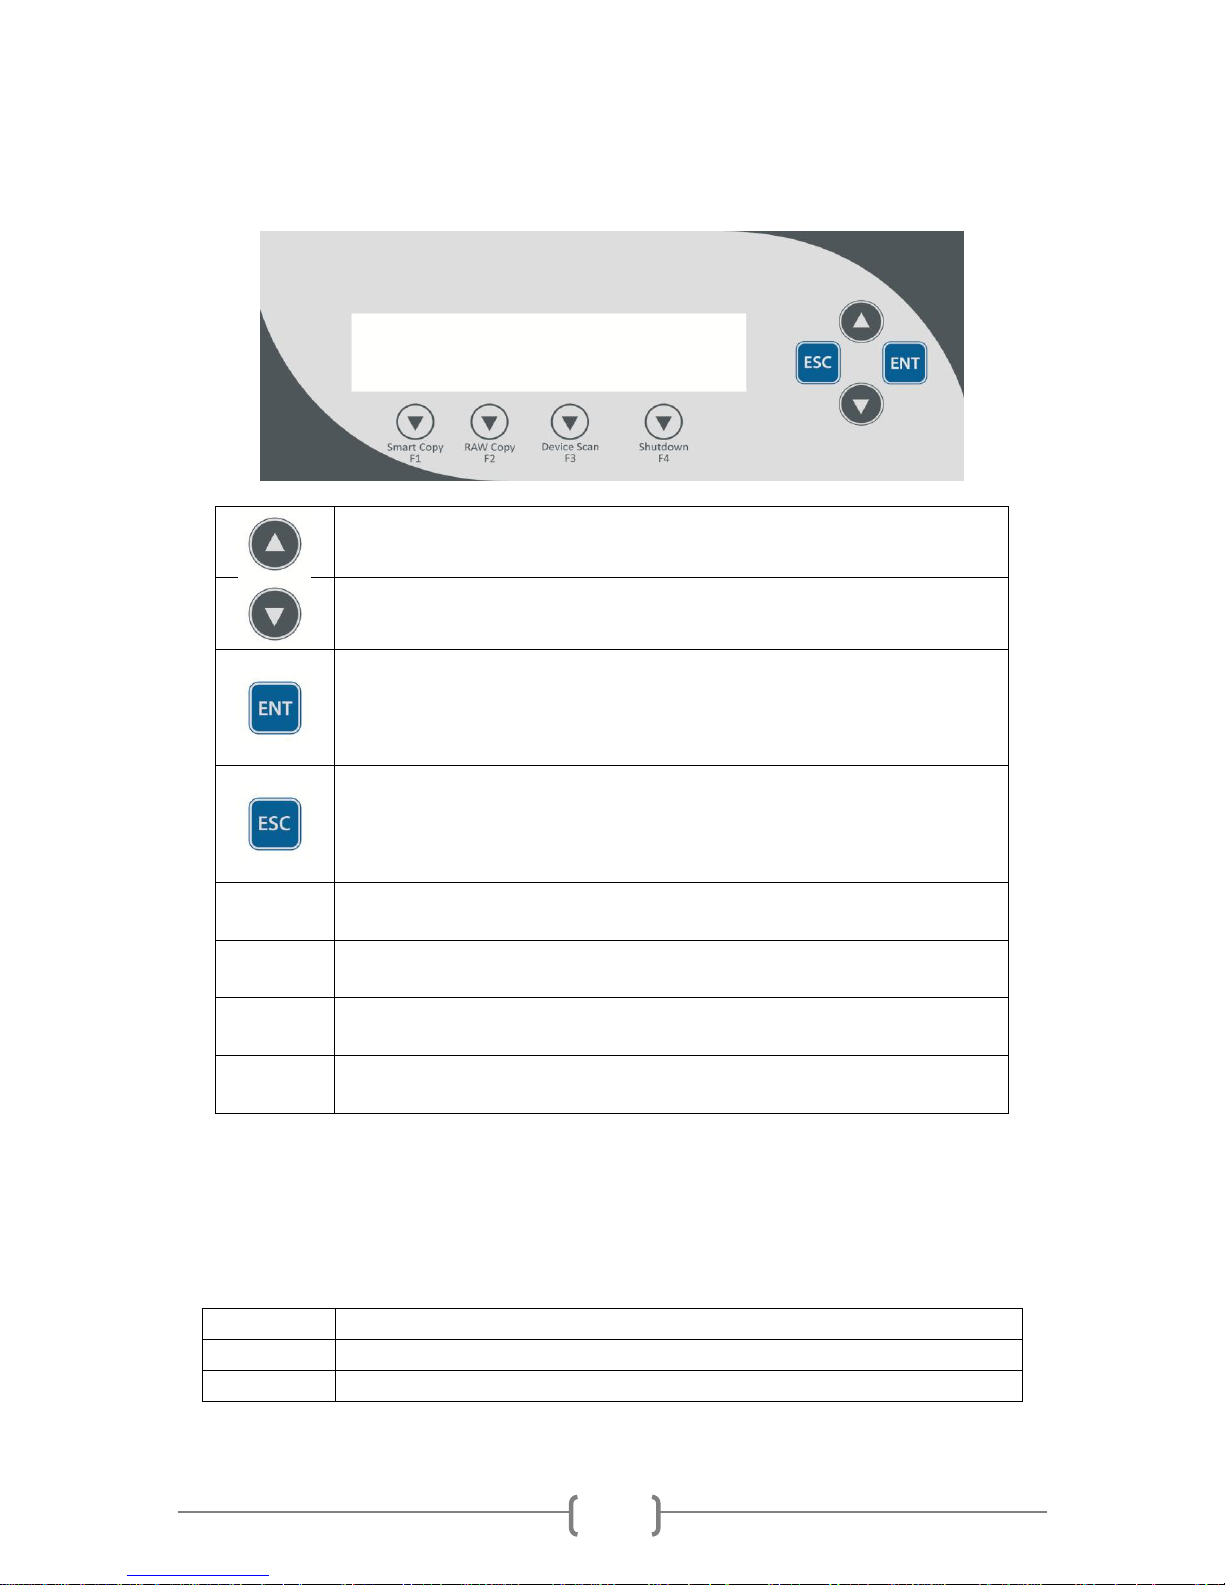
LCD Display & Operation Panel
Up Arrow Button
Menu/Option Scroll Up
Down Arrow Button
Menu/Option Scroll Down
Enter/OK Button
Enter into the Menu
Execute the Function
Submit the Setting change
Escape Button
Go back to the previous Menu
Abort the current Function.
Cancel the Setting change
F1
Smart Copy Button
Shortcut to make a copy under Smart mode
F2
RAW Copy Button
Shortcut to make a copy under RAW mode
F3
Device Scan Button
Shortcut to detect available devices
F4
Shutdown Button
Shortcut to perform Shutdown function of the system
LED Color
DESCRIPTION
Green
Such HDD Bay has power.
Orange
HDD in such bay has Read/Write activity.
*The below image is for reference only. (Actual screen may vary. )
HDD Bay Status LED Reference
Every HDD bay has a corresponding Status LED next to it with Bay # labeled on top. Below is
the reference to the colors

5
Menu Navigation
Menu/Option Scroll Up
Menu/Option Scroll Down
Enter into the Menu
Execute the Function
Submit the Setting change
Go back to the previous Menu
Abort the current Function
Cancel the Setting change
DUPLICATOR H.01
1.Copy (Smart)
DUPLICATOR H.01
5.Setup
Setup
1.Language
Setup
2.Buzzer
Buzzer:
On
Buzzer:
Off
Setup
2.Buzzer
DUPLICATOR H.01
5.Setup
The system is essentially composed of various functions and settings that organized into a
menu tree structure ease of operation. User normally uses four primary navigation buttons on
the Control Panel to navigate through the menu chart and select the desired function or setting:
Example: Adjust the “Buzzer” setting in the “Setup” menu:
Step 1. Turn on the system by pressing the Power button.
After it has booted up, the main menu screen will
appear (root menu) that signifies the system is ready.
Step 2. Consecutively press the UP or DOWN arrow button
until “Setup” appears.
Step 3. Press the “ENT” button once to enter into the
“Setup” menu.
Step 4. Consecutively press the UP or DOWN arrow button
until “Buzzer” appears.
Step 5. Press the “ENT” button once to enter into the
“Buzzer” menu.
Step 6. Press the UP or DOWN arrow button to change the
option from “On” to “Off”
Step 7. Press the “ENT” button once to submit the setting
change. The menu will change back to the previous
menu, “Setup”.
Step 8. Press the “ESC” button once to go back to the
previous menu, the root menu.
 Loading...