

Page 1

WINE CABINET
OWNER’S MANUAL
FOR CABINETS EQUIPPED WITH:
WhisperKOOL 2500
WhisperKOOL 1500
WhisperKOOL 1200
Advanced QT
Page 2

Copyright © 2010, Vinothèque Wine Cellars. All rights reserved.
This manual, the product design and the design concepts are copyrighted by Vinothèque Wine Cellars, with
all rights reserved. Your rights with regard to the hardware and manual are subject to the restrictions and
limitations imposed by the copyright laws of the United States of America. Under copyright laws, this manual
may not be copied, reproduced, translated, transmitted or reduced to any printed or electronic medium or to
any machine-readable form, for any purpose, in whole or in part, without the written consent of Vinothèque
Wine Cellars.
Every eort has been made to ensure that the information in this manual is accurate. Vinothèque Wine Cellars
is not responsible for printing or clerical errors.
Vinothèque Wine Cellars reserves the right to make corrections or improvements to the information provided
and to the related hardware at any time, without notice.
Vinothèque and WhisperKOOL are registered trademarks, and ECE is a trademark of Vinothèque Wine Cellars.
All rights reserved.
Mention of third-party products is for informational purposes only and constitutes neither an endorsement
nor a recommendation. Vinothèque Wine Cellars assumes no liability with regard to the performance or use
of these products.
GCM-01 030110
Page 3

TABLE OF CONTENTS
Note to Customer ........................................................................................................................................pg. 1
Cabinet Installation ....................................................................................................................................pg. 2
System Operation (WhisperKOOL 2500 & 1500) ..............................................................................pg. 7
System Operation (Advanced QT & WhisperKOOL 1200) .............................................................pg. 11
Testing the Refrigeration Unit ................................................................................................................pg. 14
Loading Bottles & Cool Down Period ...................................................................................................pg. 14
Normal Operation & Maintenance ........................................................................................................pg. 15
Troubleshooting ..........................................................................................................................................pg. 16
Cooling Unit Repairs...................................................................................................................................pg. 19
Testing a Return Unit..................................................................................................................................pg. 20
Warranty Information ................................................................................................................................pg. 22
Vinothèque Wine Cellars
1738 E. Alpine Ave.
Stockton, CA 95205
800.393.9463
www.vinotheque.com
Page 4
NOTE TO CUSTOMER
Thank you for purchasing a Vinothèque wine cabinet. Our main goals are customer satisfaction and providing the best wine storage solutions on the market. If you have any questions or comments, please feel free to
contact us at 1.800.343.9463 or info@vinotheque.com.
It is mandatory that you do not plug in or start your new
Vinothèque cabinet for 24 hours after its delivery.
Units are sometimes placed on their side during shipping, which might cause compressor oil to escape the
reservoir. Starting the unit before the oil has had a chance to settle again can cause damage to the compressor
and negatively aect cooling.
A dedicated 20-amp circuit is highly recommended for optimum operation. Tripped breakers
and decient performance if other devices are pulling power from the same circuit.
Do not use a Ground Fault Interrupter (GFI) with this product. The cooling unit will draw more
amperage than the GFI will allow.
It is recommended that you plug your unit into a surge protector or power conditioner. Just like with any
sensitive electrical equipment, the unit’s circuitry may be damaged by power surges and spikes — which are
not covered by the warranty.
For cabinets with PDT and PDT Jr. systems, upon plugging the unit in and turning it on, there will be a veminute delay before it starts.
Page 1 GCM-01 050410
Page 5

CABINET INSTALLATION
Cabinet installation is a very simple process, spending a small amount of time ne tuning the cabinet will
ensure cabinet aesthetics and longevity.
These are the simple steps for installation (further explained on the indicated pages):
1. Inspect the cabinet (below)
2. Unpack the cabinet and clean up the debris
3. Place the cabinet in a suitable location in your home (below)
4. Level the cabinet (pg. 4)
5. On QT Series, remove the protective panel from the rear of the cabinet (do not remove the panel on
front venting cabinets)
6. Adjust the doors (pg. 7)
7. Attach the door handles
INSPECTING YOUR CABINET
When the cabinet arrives, inspect the unit to make sure that no damage has occurred during shipping.
Look for any marks, tears or damage, which might aect the cabinet. If you notice any damage, remove the
packaging and see if the unit was aected in any way.
On QT Series cabinets, specically inspect the compressor pan, located at the bottom rear of the unit. Note if
any oil has leaked into the pan.
In the event that damage has occurred, you need to identify the extent of the damage on the shipping
document. This document will then be used to le a freight claim. Immediately notify Vinothèque or your
distributor to le a claim. You can accept or deny the delivery if the unit is damaged. Any damage must be
noted by yourself and the installation crew on the shipping receipt, which you both will be required to sign.
Based on the extent of the damage, the cabinet may be returned to the factory and repaired or replaced. For
minor scratches, the moving company will send a qualied furniture repair company representative for touchup work.
PLACING THE CABINET
There are many considerations that have to be made in order to receive the best performance results from
your Vinothèque cabinet:
Weight
You will need to take into account that the weight of the unit fully loaded with wine bottles can be
substantial, as bottles weigh roughly 3 pounds each.
Ambient temperature
The cooling system in the cabinet has the ability to cool a maximum of 30°F below the ambient temperature
in the room. Since the optimal temperature for wine storage is 55°F, make sure that the temperature of the
room in which the cabinet will be placed does not exceed 85°F.
On the other hand, to ensure a consistent temperature, make sure the room doesn’t dip below 55°F.
Customer Service - 1.800.343.9463 Page 2
Page 6
PLACING THE CABINET CONT.
Ventilation
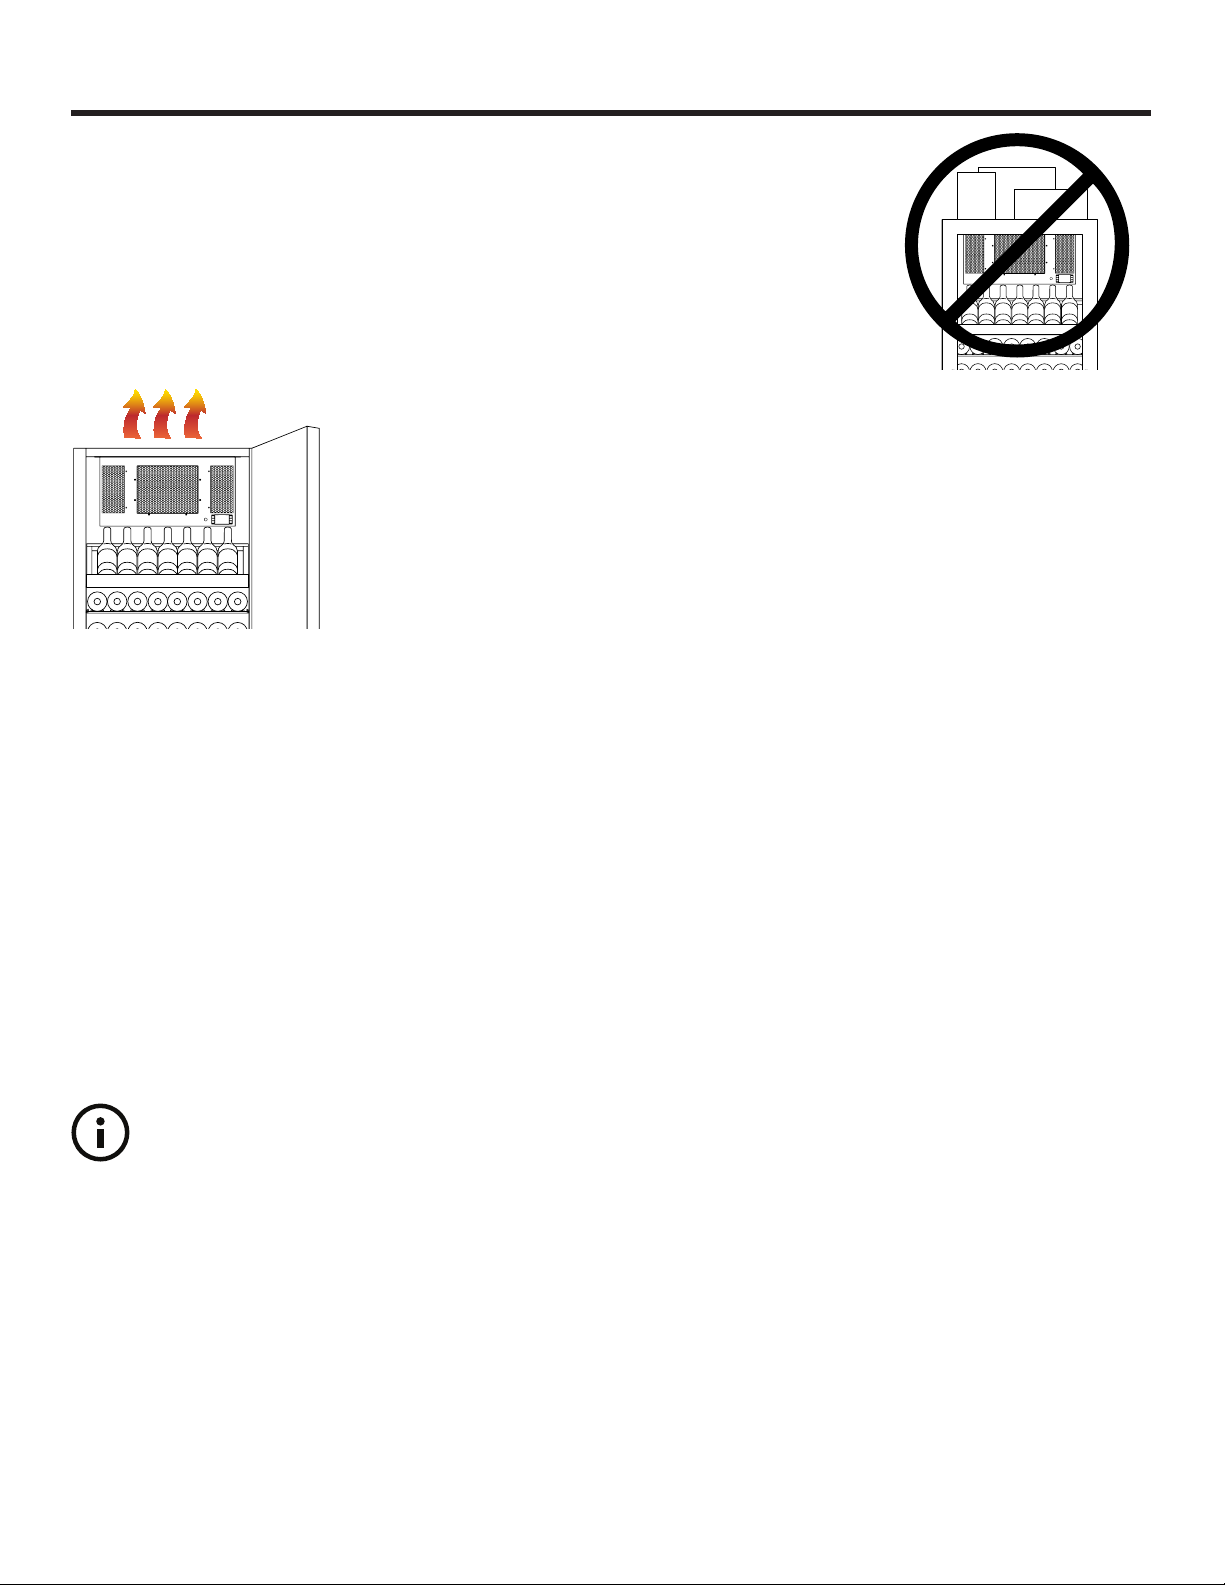
The cabinet must have adequate ventilation to allow the exhaust side of the cooling unit to operate correctly. As the unit cools on the inside, condensing refrigerant creates heat, which will need to dissipate away from the unit on the outside.
Some units have an exhaust fan mounted on top of the cabinet, which forces air
away from the unit vertically. In order to avoid disrupting the ventilation, do not
place anything on top of the cabinet.
If your cabinet is not equipped with a front vent, the unit must be placed in an
open room. Do not install it in a cabinet. The rear of the unit should be placed
about 2” from the wall. There should also be about 12” of clearance above the top
of the unit and 6” of free space on each side. This will assure proper dissipation of
heat and sustained cooling of your wines.
Noise
Although we believe that our QT and WhisperKOOL systems are the quietest cooling units available for cabinets, they do produce a nominal amount of noise. It is comparable to the noise a refrigerator emits during
normal operation, though the cooling unit may operate more often. Keep this in mind when placing the unit.
The unit will run continually during the initial cool down period when the wine has rst been introduced to
the cabinet. After that, the cooling unit will run as needed in order to maintain optimal relative humidity levels
and a precise temperature, based on the ambient temperature.
`If the unit is placed on a hard surface such as tile or hardwood oors, it is recommended that you place a small
piece of carpeting underneath the cabinet to prevent noise from echoing against the hard surface.
Humidity control
The cabinets are designed to maintain relative humidity between 50 and 70%. This is accomplished through
the design and engineering of the cooling systems. There are no special controls for this function.
The unit does not create humidity. If you live in a dry climate, you can add to the humidity of the cabinet
by installing a humidistat.
Page 3 GCM-01 050410
Page 7
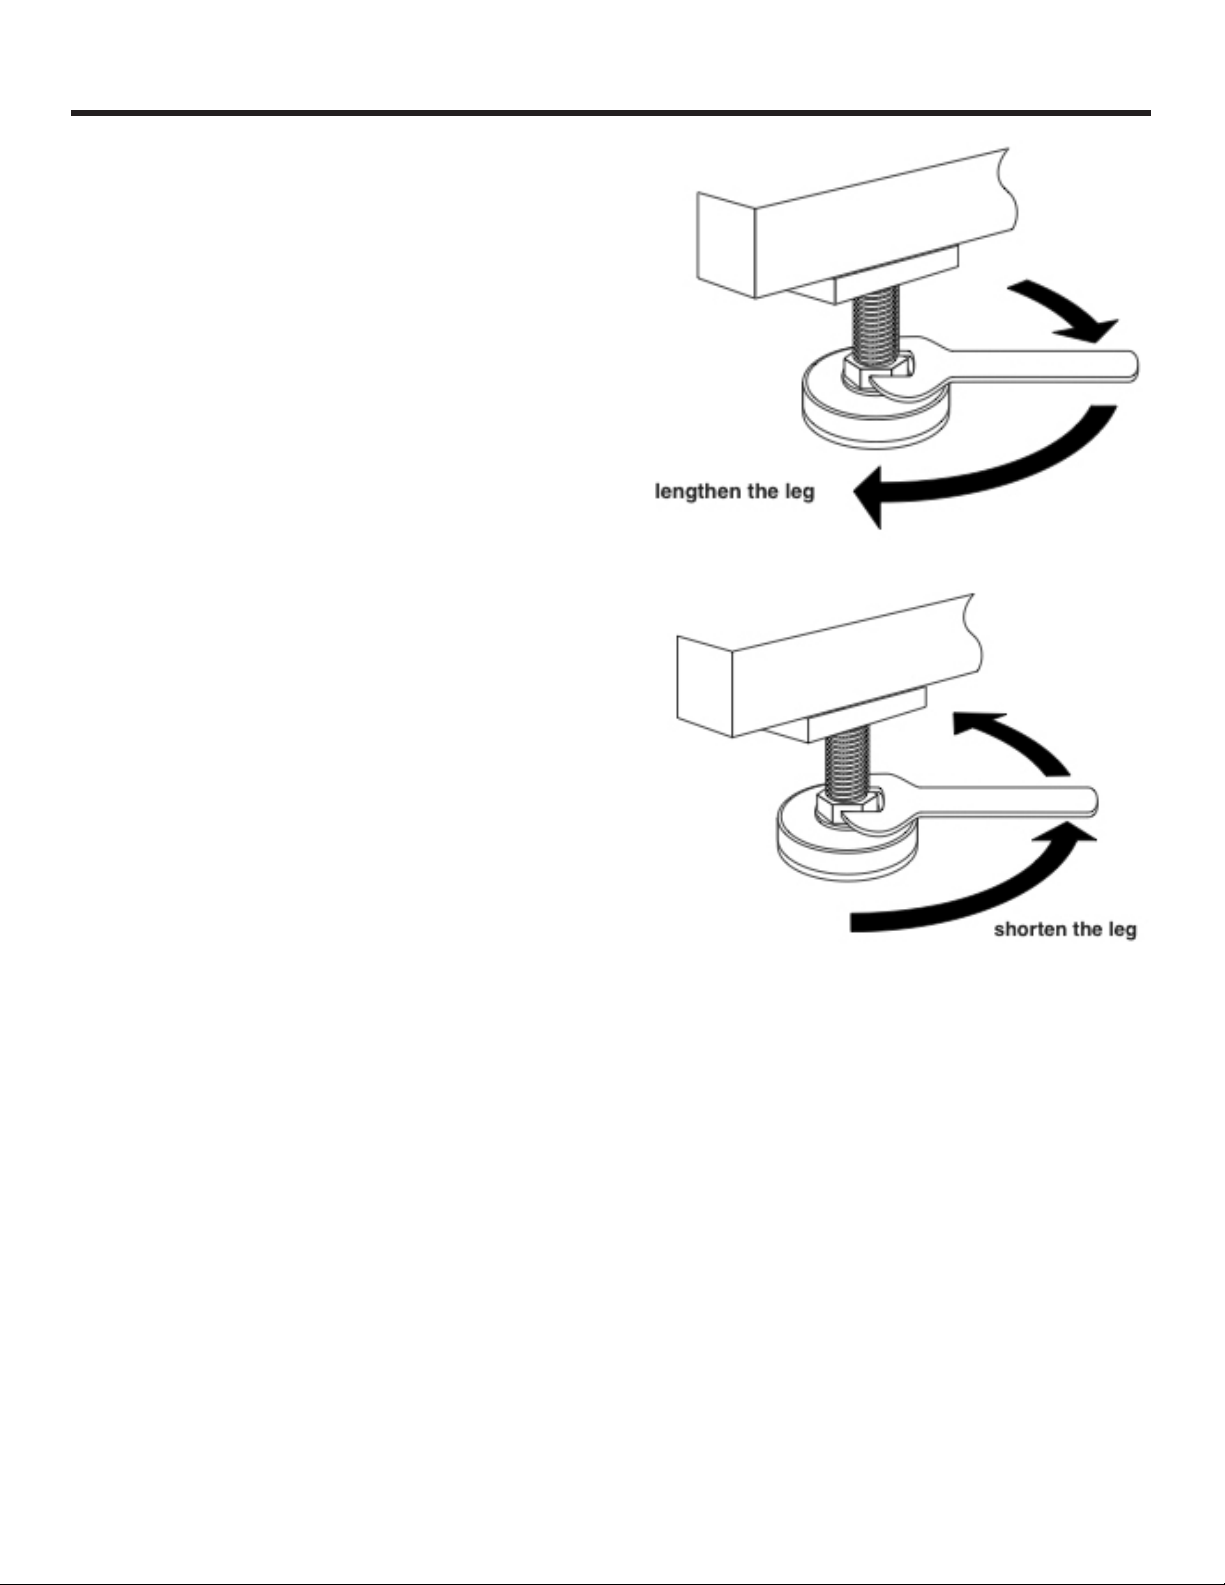
LEVELING THE CABINET
The cabinets have leveling legs that can be adjusted up or
down with a wrench (provided with unit) as needed. There
are two primary reasons for leveling the cabinet:
— To assure that the unit stands solidly on the oor
without rocking back and forth
— To adjust the doors and make sure they are ush with
one another, providing a tight seal
These leveling legs are pre-adjusted at our factory, but
they may need to be tweaked to t your specic install
location. To level the unit, slowly adjust the legs using the
wrench. Work in a clockwise motion to lengthen the leg
or a counter-clockwise motion to shorten it.
Do not try to level the cabinet with a leveling device.
The unit is designed to stand slightly o plumb, tilting
backward acutely so the doors will close rmly. This will
compensate for the weight of the doors.
Once you have completed leveling the cabinet, check the
unit to determine whether or not the doors are ush and
sealing properly.
Customer Service - 1.800.343.9463 Page 4
Page 8
DOOR ALIGNMENT
To assure the best performance from your Vinothèque wine cabinet, the doors must seal properly in order to
prevent cool air from escaping. Check the alignment of the doors before lling it with bottles of wine.
The doors are aligned at the factory and no additional special door alignment is needed for Credenzas.
If adjustments are necessary, compensate for this problem by adjusting the two front and/or outside legs. The
high side of the cabinet should be adjusted down while the low side should be adjusted up. Rock the unit
side-to-side as it may aid the adjustment.
On single-door units, as you face the cabinet, check to see if the door is higher than the cabinet on one side. If
the door is angled lower than the cabinet, slightly raise the side to which it is leaning.
Front view: Two door unit
Page 5 GCM-01 050410
Front view: Single door unit
Page 9
LIQUID MEASURING THERMOMETER
All cabinets come with our Precision Digital Technology liquid temperature measuring thermostat system.
With this technology, a bottle probe relays information back to the thermostat, giving you a reading of the
wine, not of the air around it. Aside from the probe, the system oers other advantages:
— A built-in defrost cycle: The unit is designed to shut o for ve minutes every 90 minutes in order to
prevent frost. This allows the cooling unit to cool eectively in demanding environments.
— Heavy-duty circuitry: The system is resistant to power surges, which can play havoc on electrical
components. This improvement will ensure years of trouble-free use. However, we still recommend that you
install a surge protector specically for the unit.
— Fahrenheit and Celsius readouts: The thermostat has the ability to produce the readout in both
Fahrenheit and Celsius, for overseas users.
By measuring the temperature of the liquid, the temperature reading will be consistent and the unit will only
run when it needs to.
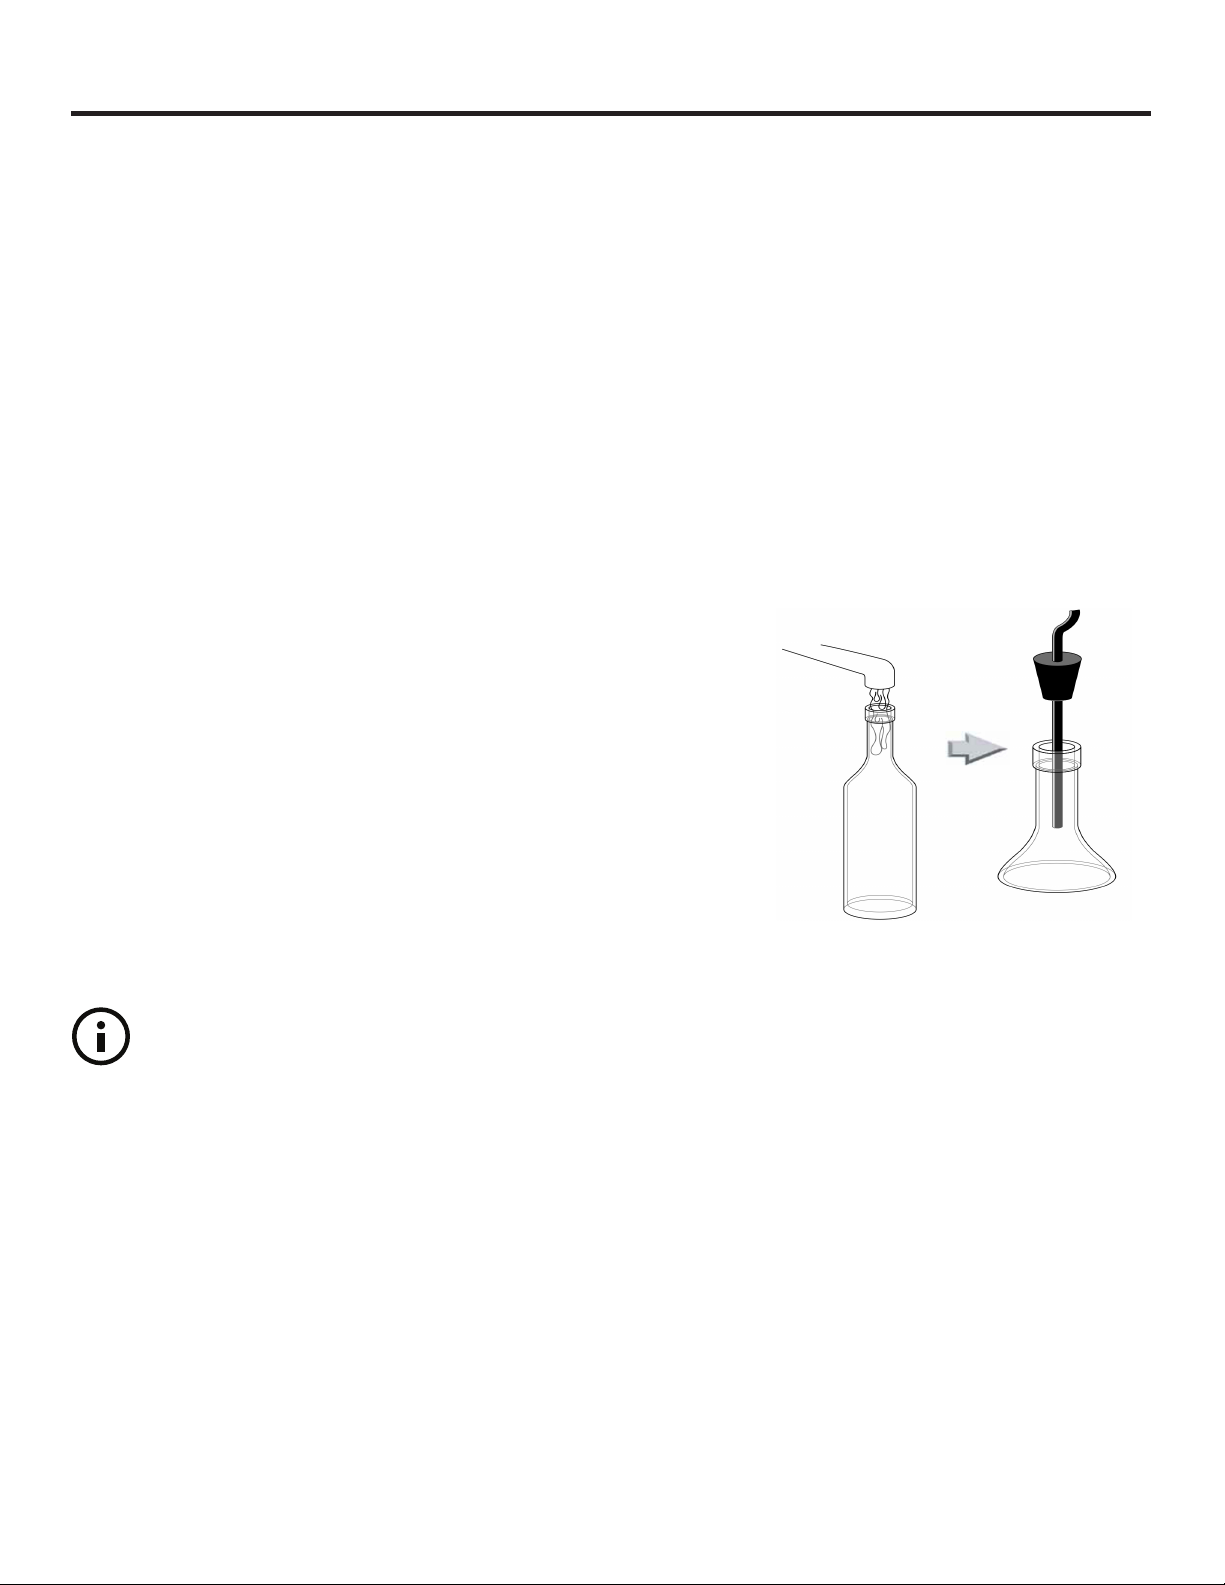
To install the thermostat:
1. Fill an empty wine bottle to its neck with room temperature water.
2. Press bottle probe securely into bottle
3. Place the bottle with probe into a level rack space. Avoid pulling
too much on the probe cord as it may become disconnected, which
would lead to inaccurate temperature readings.
The WhisperKOOL system is based on the temperature of the wine (It is ideal to place the probed bottle
lower in the racking, so that it is not near cold supply air).
Customer Service - 1.800.343.9463 Page 6
Page 10

SYSTEM OPERATION WHISPERKOOL 2500 & 1500
This section applies to cabinets equipped with the WhisperKOOL 1500 cooling system. If your cabinet is
equipped with a PDT or PDT Jr. thermostat, please refer to the next sections.
Initial start-up
When the unit is rst turned on, the control will briey display all symbols, and the green snowake symbol
will show up if the unit is calling for cooling. There may be a brief delay prior to the evaporator fan turning on,
as it will not start until the probe temperature drops to below 70°F. When the fan is activated, the fan symbol
will be displayed. The Advance Product Safety Technology (APST), which ensures that in the possible event of
a cooling deciency, the heat from the in-cabinet fan will not raise the temperature of the wine cellar, which
could otherwise have an adverse eect on the wine aging process.
Normal system cycle
After the bottle probe has reached the set point (all units are shipped with the set point of 55°F and a
dierential of 1 degree), the compressor and the condenser fan will turn o, but the in-cabinet evaporator
fan will continue to run for about 1 minute (This is a feature of the WhisperKOOL Humidity Management
(WHM) system). The WHM is an adjustable feature that allows the customer the convenience of managing the
humidity enhancement of their wine cellar. It is one of the many customer preference selection features that
allow the customer the ability to ne-tune the controls.
Anti-Frost Cycle
The Anti-Frost Cycle is a precautionary measure, as icing or frosting of the coil does not occur during normal
operation. The system will go through a defrost cycle every 4 hours. During the defrost cycle, the in-cabinet
fan will provide airow across the coil, which will evaporate any frost accumulation.
Bottle probe failure protection
Should a bottle probe fail, the Advance Product Safety Technology (APST) will automatically transition the
refrigeration compressor cycles to a pre-determined time series (based on laboratory testing), which will
ensure that the temperature is kept within the safe range.
Control panel
The control panel is designed to give the user the ability to monitor and change cellar conditions when the
evaporating unit is placed in a remote location.
Page 7 GCM-01 050410
Page 11

WHISPERKOOL SERIES ADVANCED CONTROLLER
Defrost
Energy Reduction
Button 1
Energy Reduction
Set Button
- View set point 1
- Change set point 3-5
- SET + Down = CPSM 5-7
- Reset Hi & Lo Button 3-5
Alarm
Compressor
Cellar Pre-Chill Button 3-5
Evaporator Fan
High Bottle Temp
History & Scroll Button 1
Low Bottle Temp History
& Scroll Button 1
“ON/OFF” button 1
Condenser Fan
Pre-Chill Display
Note: The 1 or the 3-5 stands for the amount of time (in seconds) that the button must be held.
Button Functions
ON/OFF • The ON/OFF button turns the refrigeration system on or o. This feature does not
disconnect power from the unit. The condenser fan will continue to run in the OFF position.
In order for the power to be shut o from the unit, the power cord must be unplugged from
the wall.
Up and Down
• Use these buttons to scroll through the control panel menu.
buttons
• These also display the highest and lowest temperature sensed by the bottle probe. This
feature allows the customer instant access to the recorded data applicable to the bottle
probe temperatures, it can be easily reset to reect current temperatures.
1. Press the “Up” arrow, or the “Down” arrow once, and the highest or lowest temperature
(Hi/Lo) sensed by the bottle probe, will be displayed.
2. To reset the Hi/Low, press and hold the “Set” button when the Hi/Low value is displayed
on the digital display, continue to hold the “Set” button until “RST” appears on the digital
display and then blinks. This will erase the past recorded temperature data history and start
recording, from the current time and temperature, forward. Temperatures displayed would
reect bottle probe temperatures from that point in time and beyond.
3. The Hi/Low feature should be reset at initial start-up and after the cellar or cabinet has
obtained normal operating temperatures — generally 55°F.
Cellar Pre-Chill • Activate the Cellar Pre-Chill feature by pressing the “Up” button for 3 to 5 seconds, and
the CPC logo (a yelowsnowake inside a semicircle) will be displayed on the digital display.
Terminate the CPC by pressing the “Up” button again for 3 to 5 seconds or the feature will
self-terminate after 6 hours.
1. The CPC feature may be used to pre-chill the cellar prior to loading it with warm bottles.
The feature will shift the set point down to a lower setting of 52°F, for the next 6 hours. After
the 6-hour time period, the set point will automatically return to the original set point.
Customer Service - 1.800.343.9463 Page 8
Page 12

WHISPERKOOL SERIES ADVANCED CONTROLLER CONT.
Cellar Pre-Chill
(cont.)
Set 1. Press the “Set” button once and it will display the set point. After about 5 seconds, the
Customer
Preference
Selection
Menu (CPSM)
2. The CPC feature can be adjusted to the customer’s specic needs by accessing the control
panel menu.
Note: This feature is not available on the remote keypad application.
display will return to normal operation and display the bottle probe temperature.
2. Press and hold the “Set” button for 3 to 5 seconds until the set point is displayed and the
°F symbol starts blinking. Then, press the “Up” or “Down” arrow to change the set point.
Next, press the “Set” button once and the set point numbers and the temperature on the
display will blink to conrm the new set point.
3. Press the “Up” button to display the high temperature data history, or press the “Down”
button to see the low temperature history. Once the high/low data history is displayed, it
can be reset by holding the set button (“RST” will blink on the display). It will then erase the
past recorded data le and start recording from the current time and temperature.
4. Press the “Set” and the “Down” buttons simultaneously for 3 to 5 seconds and you will
access the customer preference selection menu. The menu allows the customer to tweak
the control system to their applicable choice.
To access the CPSM, press the Set and Down buttons simultaneously for 5-7 seconds. This
will display “CF”, now press the Set and Down buttons simultaneously for another 5-7 seconds. The display will briey show “Pr2” signifying you have accessed the CPSM.
The following CPSM options are available for adjustment:
Fon — Humidity management: This parameter is normally set at 5, which should provide
adequate relative humidity for the cellar.
o An increase in this parameter will increase the humidity (%RH), and a decrease in the
parameter will decrease humidity.
o Adjustments should be made in increments of 5, with a maximum of 15, and a
minimum of 0.
oAfter any adjustment to Humidity Enhancement, you should wait a minimum of three
days before making any additional adjustments. This will allow the cellar sucient time
to acclimate to the new setting.
Fof — Humidity Management Enhancement: This parameter is normally set at 5. This
parameter usually should not be adjusted, as it provides an o cycle time for the fan during
the compressor o cycle.
CCS — Cellar Pre-Chill Set Point: This parameter is set at 52°F, but can be adjusted to a set
point between 45°F and 67°F.
bLL/Act — Compressor o or on for low (bLL) or high (Act) temperature alarm: These
parameters are set at “n.” With this parameter set at “n,” the refrigeration system will continue
to operate normally if there is a high or low temperature alarm. To change this parameter,
change the setting to “y,” and the compressor/refrigeration system will shut o during a
high or low temperature alarm.
Page 9 GCM-01 050410
Page 13

WHISPERKOOL SERIES ADVANCED CONTROLLER CONT.
Customer
Preference
Selection
Menu
(cont.)
CON/COF — Compressor on time (CON) and o time (COF) with a Probe 1 failure alarm:
These parameters are set at CON 40 minutes and COF 10 minutes. In the event that there
is a Probe 1 failure alarm, the compressor /refrigeration system automatically starts a
predetermined ON/OFF cycle, which is controlled by the CON and the COF parameters.
The customer can adjust these parameters to maintain the desired bottle probe temperature. During a Probe 1 failure alarm, the bottle probe temperature can be monitored by
pressing the “Up” or “Down” arrow to view the temperature history.
HES — Dierential for Energy Reduction: This parameter is set at 4, which results in a set
point of 58°F during energy reduction. A decrease in this setting will decrease the set point,
and an increase in this feature will increase the set point.
ALARM CODES
Message Cause Output
“P1” Room probe failure Toggle “Con” and “COF” depending
on your temperature needs, if
necessary, or replace room probe
“P2” Evaporator probe failure Defrost end is timed
“HA” High temperature alarm Outputs unchanged
“LA” Low temperature alarm Outputs unchanged
“EA” External alarm Outputs unchanged
Customer Service - 1.800.343.9463 Page 10
Page 14

SYSTEM OPERATION ADVANCED QT & WHISPERKOOL 1200
Condensate evaporator switch
The QT’s condensate evaporator is a heating element that evaporates excess condensate that accumulates in
the cooling system as a byproduct of refrigeration.
Vinothèque units are equipped with sophisticated heating elements that automatically sense the presence of
water and work until the water is gone.
— “On”: Turning the condensate evaporator on causes the heating element to operate whenever water is
present in the compressor pan.
— “O”: If your wine cellar is located in a dry climate, there is a good chance that the unit will not accumulate
excessive water. Therefore, save electricity by switching the condensate evaporator to the “O” position.
Temperature equalizer
The temperature equalizer switch controls the fan, which is mounted on top of the evaporator plate. It is designed to keep air moving throughout the cabinet in order to maintain consistent temperature between its
upper and lower half.
— “Auto”: During normal operation, set the switch to the “Auto” position. The fan will operate whenever the
cooling system is running.
— “Continuous”: This feature runs the fan continuously, similar to WHM (see pg. 10)
—“O”: Shuts o the fan for noise reduction.
Do not become overly concerned about air emperature variations. Remember, the unit measures liquid temperature, not air temperature. The unit will operate when the liquid temperature varies.
Page 11 GCM-01 050410
Page 15

PDT JR. OPERATING INSTRUCTIONS
Operating instructions for the Vinothèque PDT Jr. Thermostat for the QT Series cabinets:
Indicators
There are three colored lights on the left side of the thermostat:
— PWR (Green): The unit is powered.
— RUN (Yellow): The compressor is running. If the light is ashing, the unit is in the ve-minute lockout.
— SET (Red): This light ashes when the set point temperature is changed by pressing one of the three
control buttons. It ashes once for each press of the Up or Down button and twice when the 55 button is
pressed.
When the unit is rst turned on, all three lights ash slowly while the thermostat starts up. Once the unit
completes its start-up check, the compressor is locked out for ve minutes. During this time, the RUN light
will ash slowly.
All three lights will ash rapidly if there is no probe connected to the thermostat.
Buttons
To change the set point temperature, press either the Up or Down button. The SET light will ash once for each
1°F dierence. This set point will remain in memory until you change it.
If you forget where the unit is set, pressing the 55 button will reset the set point to 55°F and the set light will
ash twice. The temperature cannot be adjusted below 50°F or above 76°F. Attempting to set the unit outside
of this range will cause the SET light to rapidly ash.
Operation
Whenever the compressor shuts o normally, a ve-minute lockout period begins and the RUN light will ash
slowly.
If the compressor runs for 90 continuous minutes, a ve-minute defrost cycle is forced, during which time the
compressor will not run. During this defrost cycle, the RUN light will ash rapidly.
Customer Service - 1.800.343.9463 Page 12
Page 16

PDT OPERATING INSTRUCTIONS
1
WINE Temperature Indicator
2
Wine Temperature Reading
3
LED Screen
WINE
ON
SET
4
Temperature SET
Indicator Button
5 6
Unit ON Indicator Button
55F
Precision Digital Technology Thermostat
Temperature
SET
7
UP Arrow Button
SET Temperature Button
PDT
8
DOWN Arrow Button
The unit is set at 55°F at the factory. To raise or lower the set temperature, press the set button and either the
up or down arrow at the same time.
1. Wine temperature indicator: A red LED bar will light up when the thermostat is reading the liquid
temperature in the bottle via the probe. This will remain lit and the temperature you see displayed is what the
probe is reading.
2. LED screen: Displays your thermostat readings.
3. Wine temperature reading: The temperature that the bottle probe is registering to the thermostat.
4. Temperature SET indicator: A red LED bar will light up when you are setting the temperature.
5. Unit ON indicator: A red LED bar will light up every time the unit turns on to run a cooling cycle.
6. SET button: Used to set the temperature you want the unit to maintain.
7. UP arrow button: Used with the SET button to set temperature higher. In addition, by pressing and holding
the button, it will allow you to see the ve-minute countdown.
8. DOWN arrow button: Used with the SET button to set temperature lower.
Up and Down arrow buttons used simultaneously will change the temperature readout from Fahenheit
to Celsius.
Page 13 GCM-01 050410
Page 17

TESTING THE REFRIGERATION UNIT
Remember, do not start or plug in your unit for 24 hours after delivery. Many units are placed on their sides
during shipping, which may allow compressor oil to escape their reservoirs. Premature starting before the oil
has had a chance to resettle can cause damage to the compressor and result in a lack of cooling.
Before you ll the cabinet with wine, you’ll want to check the operation of the unit. All cabinets successfully
pass quality control at the Vinothèque facility.
However, periodically a unit’s cooling system is damaged in transport. Simply turn the unit on for about one
hour and conrm that the temperature is cooling down. This will prevent the inconvenience of stocking and
restocking a damaged unit.
If the unit is not working correctly, contact Vinothèque’s customer service department at (800) 343-9463. We
will work with you to diagnose the problem and promptly resolve it.
LOADING BOTTLES & COOL DOWN PERIOD
Loading bottles
The cabinet may settle slightly based on the weight of all the bottles. It is best to spread the loading of
bottles evenly throughout the cabinet, starting on the bottom rst. This will prevent the unit from shifting and
potentially knocking the doors out of alignment. In the QT Series, there is a bulk area on the bottom for oddsized bottles. In the WhisperKOOL series, the bulk area is on top.
Cool down period
When the time comes for you to begin loading wine bottles into your unit, there are some considerations to
be made. The cabinet should be loaded in stages. We recommend 1/4 of the cabinet per day. This will allow
the unit to achieve more rapid temperature stabilization. Loading all of the wine at once might overwhelm
the cooling system.
Set the switches as follows:
Thermostat 55°F or desired temperature
Condensate evaporator On
Temperature equalizer Automatic
During the cool down period, the system will run constantly, depending on the size of the collection. Slow
cooling maintains correct humidity within the cabinet.
Customer Service - 1.800.343.9463 Page 14
Page 18

NORMAL OPERATION & MAINTENANCE
The cooling unit will cycle on and o as needed once the temperature has stabilized and the initial “cooldown” has been completed. The condensate evaporator and temperature equalizer switches may be turned
o for normal operation.
— Thermostat: Should be 55°F or desired wine temperature.
— Condensate evaporator: Switch “On” or “O” as ambient humidity requires. In areas of high humidity,
leave the switch “On” to evaporate excess condensation. In environments of low humidity, leave the switch in
the “O” position.
— Temperature equalizer: Turn on whenever a temperature dierence is noted between the top and
bottom bottle rows.
Maintenance
Vinothèque recommends vacuuming of the condenser ns located in the rear of the cabinet every three
months. A partially obstructed condenser dramatically reduces the eciency of the cooling unit.
Monthly:
— Check lters
— Check for unusual noise or vibration
Quarterly:
— Clean lters
o Remove grille/ducting on the evaporator
o Remove the lter covering the coil
o Wash with warm water
o Dry o lter by shaking o excess water
Page 15 GCM-01 050410
Page 19

TROUBLESHOOTING
Problem Likely Cause Solution
Door gasket not sealing
properly
Will not start Thermostat delay Allow enough time for thermostat
Runs constantly Thermostat setting It may be set too cool — raise the
Not cooling Thermostat setting May be set too warm, lower the
Temperature variation Temperature equalizer fan
Icing up Unit running constantly See above section on units
Clicking noise during start-up Outlet power Assure 15 amp outlet and not on
Door gasket is twisted See next page
Lost its exibility See next page
startup delay
Tripping circuit breaker Reset breaker, verify dedicated
15-amp outlet and not on ground
fault interrupter
Temperature setting is wrong Adjust your set temperature
Wine probe disconnected Assure probe line is in a bottle of
water and is not stretched
set temperature
Cabinet recently loaded with wine Wait. It may take several weeks to
reach optimal storage
temperature.
Ambient room temperature Adjust the temperature in the
room. Units are designed to cool
30°F below room temperature.
Inadequate ventilation Assure proper space above,
behind and on the side of the unit.
Do not set anything on top.
Door gasket not sealing properly See next page
set temperature
Thermostat not operating correctly
Low on refrigerant or Freon Unit may need service. Contact
malfunction
Low on refrigerant or Freon Unit may need service. Contact
Test unit with bypass plug, see
next page
Customer Service.
See section on temperature
equalizer on pg. 14
running constantly
Customer Service.
a GFI
Vinothèque customer service: 800.343-9463
8 a.m. to 4 p.m. PST, Monday through Friday
support@vinotheque.com
Customer Service - 1.800.343.9463 Page 16
Page 20

TROUBLESHOOTING CONT.
Door gasket not sealing correctly
If the cabinet’s cooling system is running continually without reaching the desired
temperature, the problem may lie with the door gaskets not sealing correctly.
Examine the door gasket around the entire unit.
You can also check this by turning on the cabinet’s interior light and turning o the
lighting in the room. Determine if there is an area that is not sealing properly.
If a problem exists, use the following guidelines to resolve the problem:
• Heat up the gasket with a hair dryer while using your
ngers to pull the gasket outward. Doing this for several minutes will
loosen the gasket material and increase its exibility.
• Close the door and determine if the magnetic strip within the gasket
will seal with the metal strip on the door.
• Repeat steps until gasket seals correctly. Once it has reseated itself,
leave the doors closed for two to three hours. The seal should retain
the new shape after this process.
Door realignment
The door can be adjusted by loosening the three Allen
head bolts (easier done from the outside), securing the
top and bottom pivot hinges through slotted mounting holes and moving the hinge(s) in the appropriate
direction. Re-tighten the bolts after the adjustment is
completed only after checking the level of the cabinet.
Page 17 GCM-01 050410
Page 21

TROUBLESHOOTING CONT.
Unnished wood cabinets are NOT warranted against warpage
Although the nest craftsmanship and materials are always used to make Vinothèque products, unnished
wood cabinets are not warranted against warpage. Because the grain of the wood is not sealed against
potential warpage that can occur through dierent kinds of climates, it is not recommended to request yours
in this style.
The Vinothèque panel construction is a “sandwich” of rigid insulating foam between two outside veneer
panels. This construction will only deform if the moisture content of one panel is at variance with that of the
other. A warpage condition, which is reversible, might develop during transportation or after installation in
an ambient environment substantially dryer or substantially more humid than that in which the unit was
manufactured and packaged with the doors closed (only exterior panel of door exposed to ambient).
For example, a unit manufactured in California during the rainy season (winter) and installed in an eastern
heated room will tend to develop a concave warp as the outside exposed veneer panel dries up; while the
same unit built in the dry summer weather and installed in Florida will develop a convex warp as the exposed
panel absorbs outside moisture.
How to correct a warped door
Leave the door open to expose both door surfaces to the same outside condition for 24 to 48 hours. To
accelerate the process, wet the contracted (dry) door panel with a damp towel or sponge and allow drying
with both door sides exposed.
How to prevent future warpage
Thoroughly seal both sides of a straight door with two coats of high quality moisture proof wood sealant to
prevent any further moisture exchange.
Never seal a warped door, as it might be impossible to correct the condition after treatment. Vinothèque is not
responsible for reversible moisture induced warpage of unnished doors or for door stained, and/or sealed
after shipment from the factory.
Freight damage claims
If damage has occurred to your cabinet during the course of shipping, it is the responsibility of the
distributor from which you bought the unit to work directly with you and the freight company to arrange for
repairs or replacement. It is imperative to inspect the unit thoroughly at the time of delivery to assure that any
damage is observed and noted on the shipping document. The freight company will not accept liability for
damage without documentation on the delivery paperwork.
Customer Service - 1.800.343.9463 Page 18
Page 22

COOLING UNIT REPAIRS
If repairs are needed to the cooling unit, it must be returned to the factory for evaluation and repair.
1. Contact our customer service department — (800) 343-9463 — and describe the problems you are
experiencing with the unit. The customer service department will rst seek to determine that no external
factors are contributing to the improper operation of your cooling unit.
2. Once it is determined that the unit is operating incorrectly, the customer service department will issue
an RMA (return merchandise authorization) number. This number must be included on the package of the
returned cooling unit.
3. Remove the cooling unit from the cabinet by unscrewing the mounting screws located on the top and rear
of the cabinet.
4. Loosen the seals by sliding a screwdriver between the cabinets and cooling unit housing, then remove the
cooling unit.
5. The cooling unit should then be bubble-wrapped and insulated for the shipment back to the factory.
6. Once the cooling unit arrives at the factory, it will be tested in a controlled environment. An evaluation will be
done and a customer service representative will call you with the corresponding information. The turnaround time is
usually about 3 to 5 business days.
7. If the unit is repaired under warranty, the factory will pay for shipping the unit back to the customer and in
addition will reimburse the customer for the initial shipping charges (shipping ground charges).
8. If the unit is determined to be working correctly, the customer will be responsible for paying the freight
to have the unit returned.
Page 19 GCM-01 050410
Page 23

TESTING A RETURN UNIT
All units sent in for repair are tested thoroughly. They undergo a complete line of testing that includes
amperage load for electrical malfunctions, thermostat graph testing to document the units ability to cool
suciently, and if needed the unit will be tested on its ability to hold a Freon charge.
If the unit checks out as running correctly, the customer will be responsible for paying an inspection
fee and the freight charges associated with returning the unit.
After the warranty period, you must pay for all labor charges. In the event that your cabinet is not located
within a 20-mile range of the Vinothèque authorized service center in Stockton, Calif., you will be responsible
for charges arising out of travel time to and from the cabinet’s location. The Factory Authorized Replacement
unit comes with a complete 90-day warranty for both parts and labor and a 5-year warranty on the compressor. Please follow the correct guidelines when installing the replacement unit.
The replacement unit has undergone the following refurbishment process, using only new replacement parts:
• Compressor and condenser coil
• High and low pressure tubing
• Thoroughly clean unit inside and out
• Vacuum, charge and test the system
• Unit includes new thermostat
If you have any further questions, please contact Customer Service.
This warranty does not cover cosmetic damage caused during installation or damage because of acts of God,
accident, misuse, abuse, negligence, commercial use, or modication of, or to any part of the product. This
warranty does not cover damage due to improper operation or maintenance, connection to improper voltage
supply, or attempted repair by anyone other than a facility authorized by The Convenience Series to service
the product. This warranty does not cover products sold AS IS or WITH ALL FAULTS. This warranty is valid only
in the United States.
Proof of purchase in the form of a bill of sale or receipted invoice, which is evidence that the unit is within the
warranty period, must be presented to obtain warranty service.
This warranty is invalid if the factory-applied serial number has been altered or removed from the product.
REPAIR OR REPLACEMENT AS PROVIDED UNDER THIS WARRANTY IS THE EXCLUSIVE REMEDY OF
THE CONSUMER. VINOTHÈQUE SHALL NOT BE LIABLE FOR ANY INCIDENTAL OR CONSEQUENTIAL
DAMAGES FOR BREACH OF ANY EXPRESS OR IMPLIED WARRANTY ON THIS PRODUCT, EXCEPT TO THE
EXTENT PROHIBITED BY APPLICABLE LAW, ANY IMPLIED WARRANTY OF MERCHANTABILITY OR FITNESS
FOR A PARTICULAR PURPOSE ON THIS PRODUCT IS LIMITED IN DURATION TO THE DURATION OF THIS
WARRANTY.
Customer Service - 1.800.343.9463 Page 20
Page 24

TESTING A RETURN UNIT CONT.
Some states do not allow the exclusion or limitation of incidental or consequential damages, or allow
limitations on how long an implied warranty lasts, so the above limitations or exclusions may not apply to you.
In addition, if you enter into a service contract with The Convenience Series Partnership within 90 days of the
date of sale, the limitation on how long an implied warranty lasts does not apply to you. This warranty gives
you specic legal rights, and you may have other rights, which vary from state to state.
The Convenience Series has established a Customer Service telephone number for frequently asked questions.
To locate a service technician or sales dealer in your area, for service resolution assistance, for any questions
on product information, and/or technical support, call (800) 343-9463.
Page 21 GCM-01 050410
Page 25

WARRANTY INFORMATION
Labor
For the period of two years from the date of purchase, if the product is determined to be defective, the
manufacturer will repair or replace the unit, at its option, at no charge.
Parts
Once it is determined that the unit is operating incorrectly, the customer service department will issue an RMA
(Return Merchandise Authorization) number. This number must be included on the package of the returned
cooling unit.
Cabinet integrity
Remove the cooling unit from the cabinet by unscrewing the mounting screws located on the top and rear of
the cabinet.
Warranty service
To obtain warranty service you must make arrangements to have the unit shipped to the manufacturer’s
facility, freight prepaid. You must contact our Customer Service Department to receive a Return Merchandise
Authorization number (RMA) and prepaid return tag. Package the cooling unit in a well-equipped box for
necessary protection. Mark the box with the return address and RMA number.
Items not covered under warranty:
• Removal and installation of cooling unit into the cabinet
• Unauthorized repairs made on the unit
• Damage resulting from shipping
• Inadequate ventilation on the exhaust side of the unit
• Constricted airow to and from the unit
• Insucient power source to draw
• Internal clogged drain line
For your convenience, Vinothèque Wine Cellars has telephone numbers for frequently asked questions.
To locate the service facility or dealer nearest you, for service assistance and resolution of a service problem,
or for product information and operation, call
Customer Service at (800) 343-9463.
Vinothèque Wine Cellars
1738 East Alpine Ave.
Stockton, CA 95205
www.vinotheque.com
Freight
Freight for repairs will be limited to 90 days on the cabinet and one year on cooling units and parts.
Customer service
Vinothèque is sold exclusively through a nationwide network of distributors. These distributors are trained to
be your primary resource for all customer service situations. Through the sales process, they have developed a
thorough understanding of the environment the unit has been designed to operate within. They are the best
suited to address your individual needs and customized situation.
Customer Service - 1.800.343.9463 Page 22
Page 26

WARRANTY INFORMATION CONT.
Refrigeration referral services
You can call Customer Service for refrigeration referral services — (800) 343-9463.
In case repair is needed for refrigeration:
QT Series: Contact Customer Service for refrigeration technician referrals in your area.
WhisperKOOL Series: Either follow the directions for the QT Series or contact Customer Service and
purchase a replacement unit under terms of our Consumer Care program.
Page 23 GCM-01 050410
Page 27

Vinothèque Wine Cellars
1738 E. Alpine Ave.
Stockton, CA 95205
800.393.9463
www.vinotheque.com
 Loading...