

Page 1
COMPACT DISC PLAYER
Operating Instructions
Page 2
Consumer Guide
Thank you for your purchasing of Vincent product.
Please read this manual carefully to obtain the best performance of the
CD-S6MK on your system.
Warning .............................................................................................. 1
Function introduction
Front panel controls ............................................................................. 2
Display controls .................................................................................. 4
Rear panel controls ............................................................................. 5
Remote controls .................................................................................. 7
Precautions ........................................................................................ 8
Troubleshooting ................................................................................. 9
Technical specifications ...................................................................... 10
Warning
CAUTION: TO REDUCE THE RISK OF FIRE OR
ELECTRIC SHOCK , DO NOT EXPOSE THIS
CAUTION
RISK OF ELECTRIC SHOCK
DO NOT OPEN
APPLIANCE TO RAIN OR MOISTURE.
DAGEROUS HIGH VOLTAGES ARE PRESENT
INSIDE THE ENCLOSURE.DO NOT OPEN THE
CABINET .REFER SERVICING TO QUALIFIED
PERSONNEL ONLY.
1
The lightning flash with arrowhead symbol,
within an equilateral triangle is intended to
alert the user to the presence of uninsulated
"dangerous voltage" within the product's
enclosure that may be of sufficient magnitude
to constitute a risk of electric shock to persons.
The exclamation point within an equilateral
triangle is intended to alert the user to the
presence of important operating and
maintenance(servicing)instructions in the
literature accompanuying the appliance.
Page 3
Function introduction
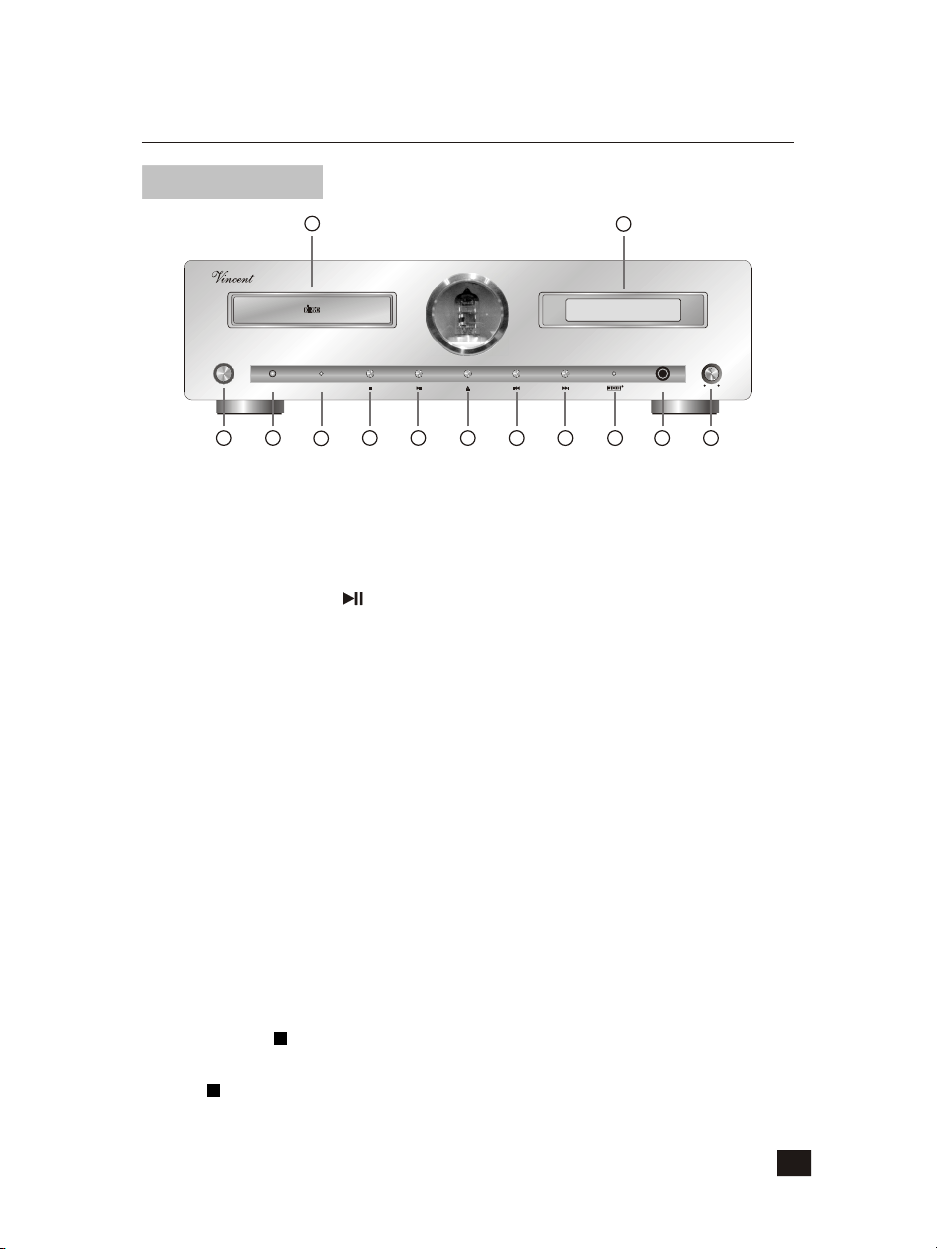
Front Panel Controls
POWER
3
1
COMPACT DISC PLAYER CD-S6MK
COMPACT
DIGITAL AUDIO
WARM UP
SR
4
5
7
6
8
10
9
2
LEVEL
PHONES
12
11
13
1. Disc Tray
Set a disc on this tray with its label side up.The tray slides out toward you when the
OPEN/CLOSE button is pressed in any operation mode. When the OPEN/CLOSE
button, PLAY/PAUSE " " button is pressed, the disc tray will move in.
2 . Multi-Function Display Window
This display shows the state of play and each operation mode, as described below.
( In the pause mode , these indicators remain as they are , but in the stop mode, they
will go off.)
3. Power Switch
Press to turn the power to unit ON ; the display window will light. Pressing it again
turns the power OFF; the display window will go out.
4. Incept Windows
5. Warm Up
This indicator light flashing when turned the power on, after 20 seconds it lights up
that the compact disc player is in stand by mode.
6. Stop Button ( )
Press the button to stop playback . This button is also used for deleting a program.
The " " indicator will light while the disc is being stopped.
2
Page 4
Function introduction
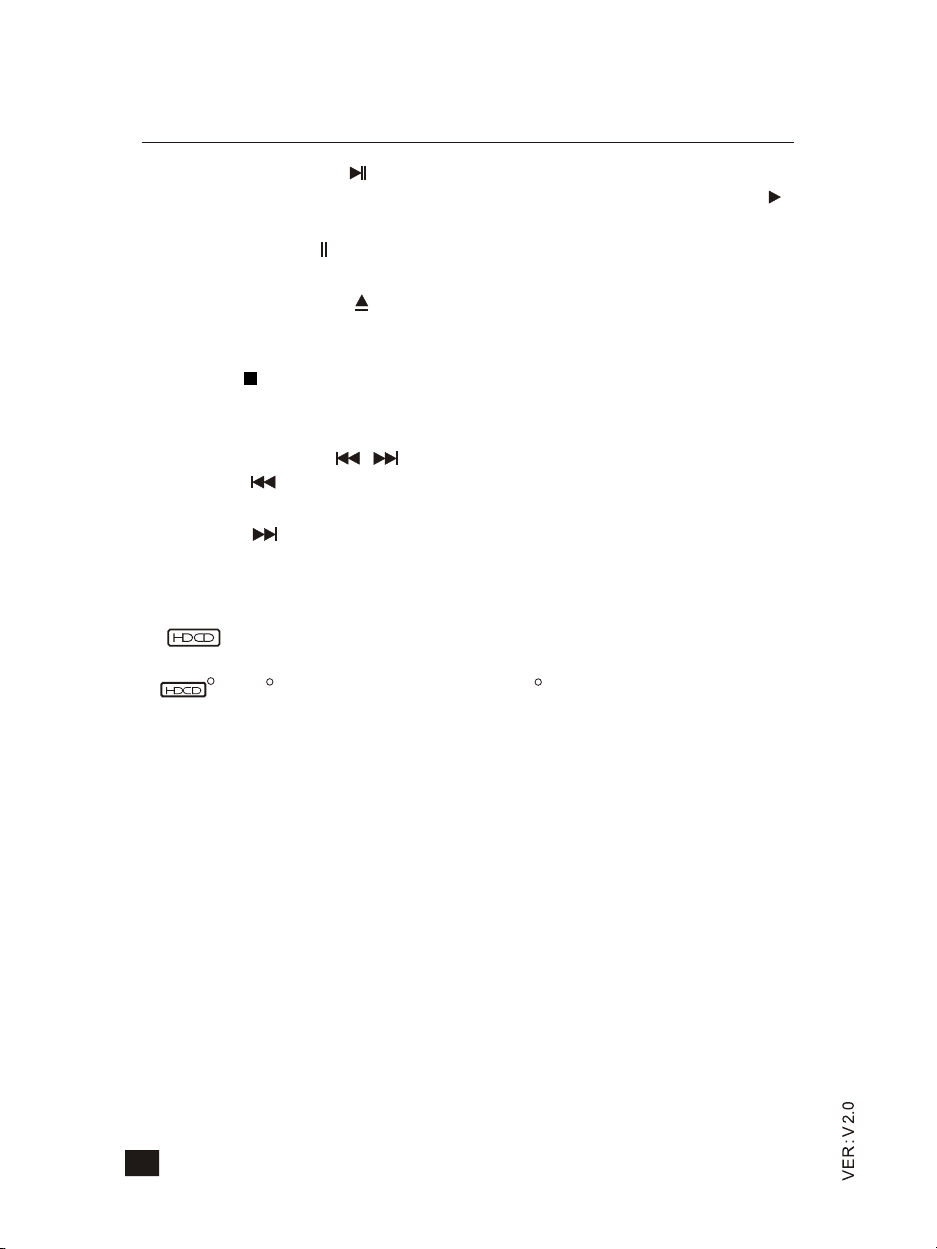
7. PLAY/PAUSE Button ( )
Press this button first time to start normal play, or programmed play. The " "
indicator will light while the disc is being played . Press this button second time to
suspend play . The " " indicator will light while the disc is being suspend played.
8. OPEN/CLOSE Button ( )
When this button is pressed , the disc tray will slide out. When it is pressed again ,
the disc tray will slide back into the player. During opening and closing of the disc
tray , the " " indicator blinks ; the indicator lights continuously when the loading
operation is complete.
9,10. Back/Next Button( , )
When the " " button is pressed during playback , play restarts at the beginning
of the Back or a preceding track.
When the " " button is pressed, play restarts at the beginning of the next or a
Subsequent track . The same number of tracks as the number of times the button is
pressed can be skipped.
11. HDCD Indicator
When the disc has HDCD message, the indicator will light.
RR
HDCD High Definition Compatible Digital and pacific Microsonics are either
RR
RR
TM
registered trademarks or trademarks of Pa citic Microsonics , Inc. in the United States and /or
other counuies. HDCD system manufactured under license from Pacific Micr osonics , Inc.
This product is covered by One or more of the followin g : In the USA ; 5,479,168,5,638,074,
5,640,161,5,808,574,5,838,274,5,854,600,5,864,311,5,872,531, and in Australia : 669114 .
Other patents pending.
12.Headphone Jack
Stereo headphones can be plugged into this jack for private listening.
13.Headphone Level Control
Turn headphone level control clockwise to increase the headphone level and
counterclockwise to decrease it.
3
Page 5
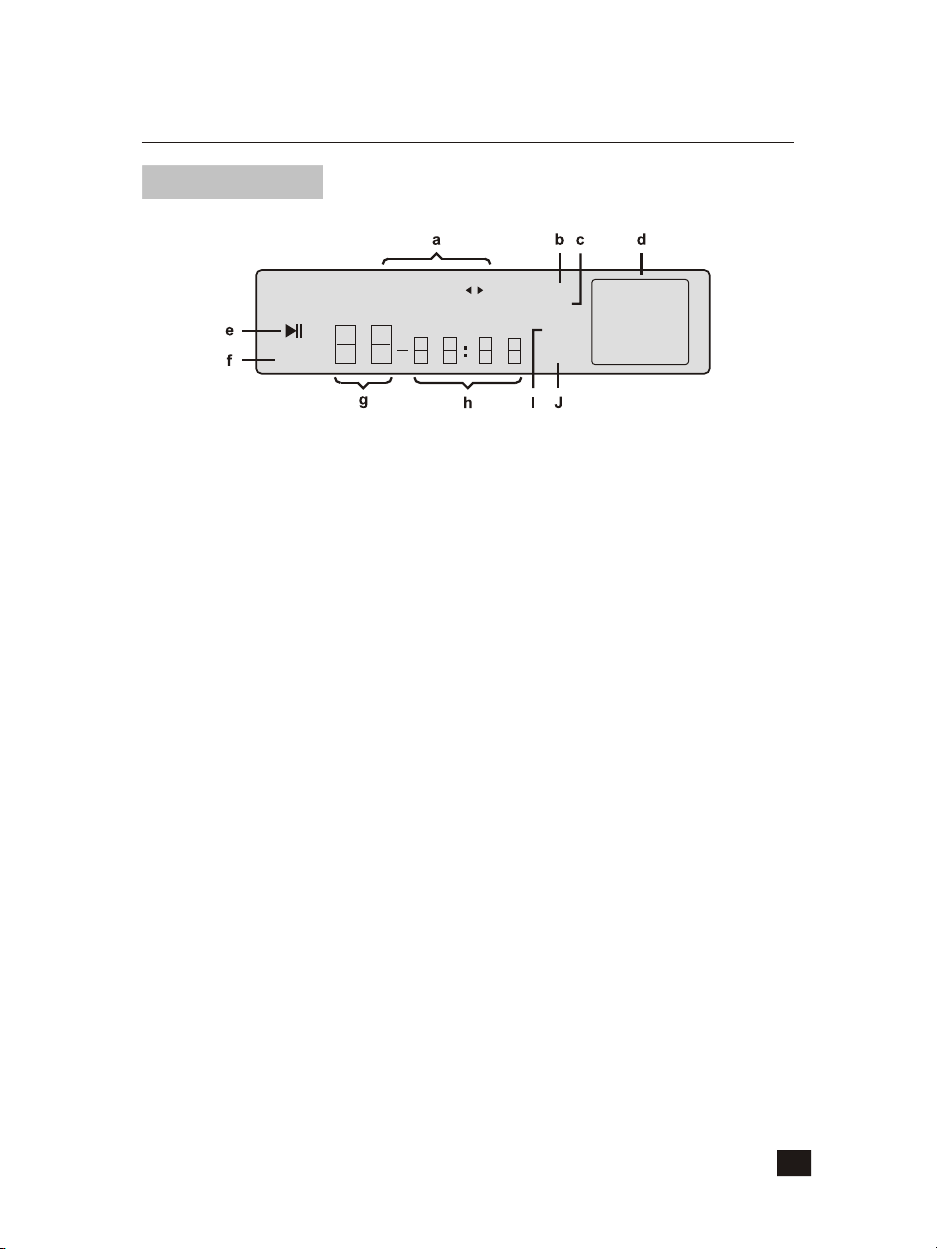
Function introduction
Display Controls
REPEAT 1 ALL A
REMAIN
a. Repeat indicators
Program indicator
b.
c.Random indicator
d.
Track number indicator
e.Play/Pause indicator
f.Remain indicator
g.Track indicator
h.Elapsed playing time
i.Intro indicator
B
MIN
PGM
RAN
INTRO
OVER
1 2 3 4
5 6 7 8
9 10 11 12
13 14 15 16
j.Over track number indicator
when the disc has over 16 tracks, the indicator will light.
4
Page 6
Function introduction
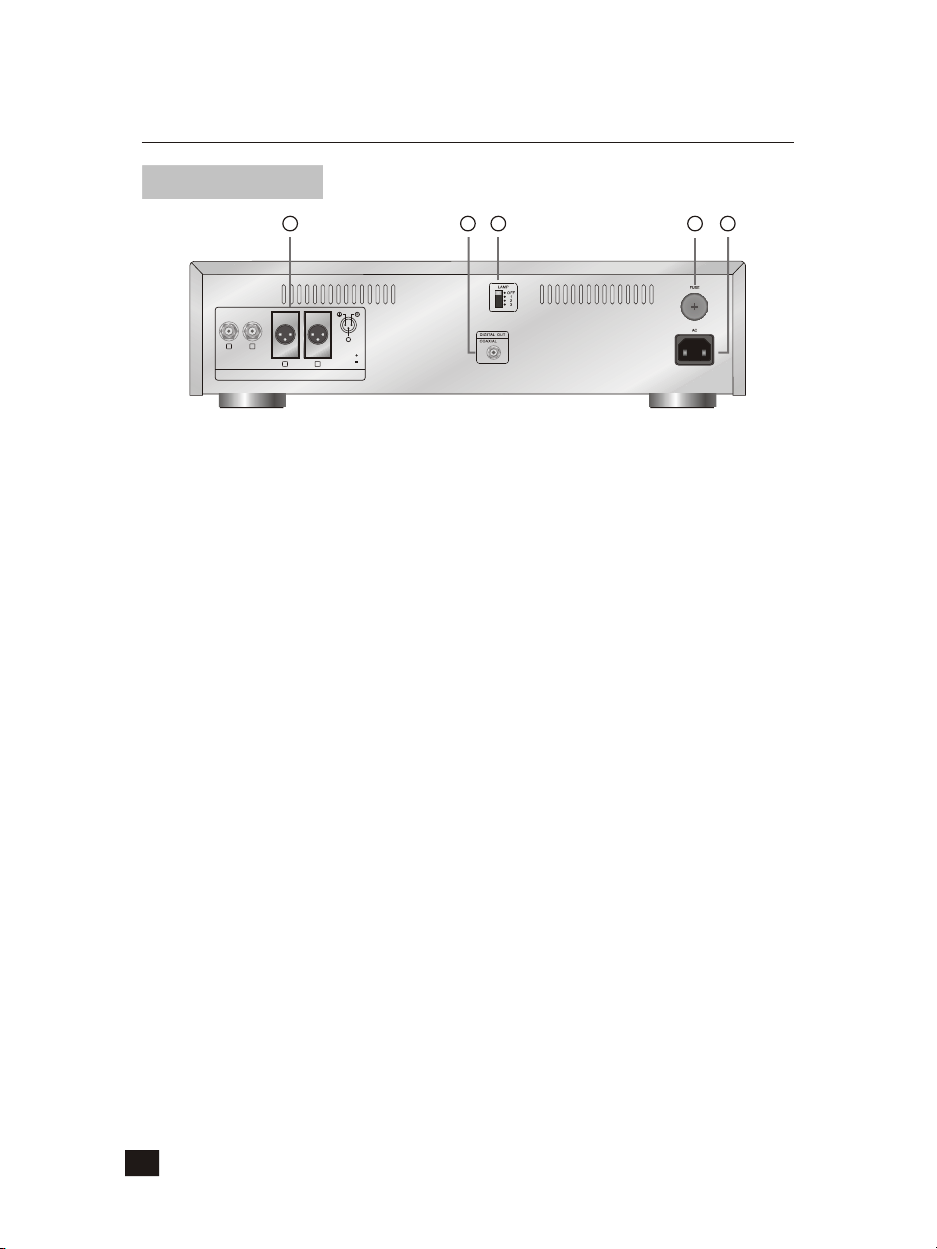
Rear Panel Controls
3
1 4
+
R
L
R
AUDIO OUTPUTS
__
1.COMMON
2.HOT ( )
3.COLD ( )
L
2
5
1. Analog Output RCA / XLR Jacks
These jacks connect the power amplifier input RCA /XLR jacks.
2. Digital Output RCA Jack
This jack connect the D/A coverter input RCA jacks.
3. Lamp Switch
Press to adjust the tube windows brightness of front panel.
4. Fuse Box
The compact disc player overloads as soon as fuse melting up at once A replacement
of fuse by the authorized serviceman is required.
5. AC Inlet
Plug the supplied power cord into this AC Inlet and then into the power outlet on the
wall.
5
Page 7
Function introduction
Remote Controls
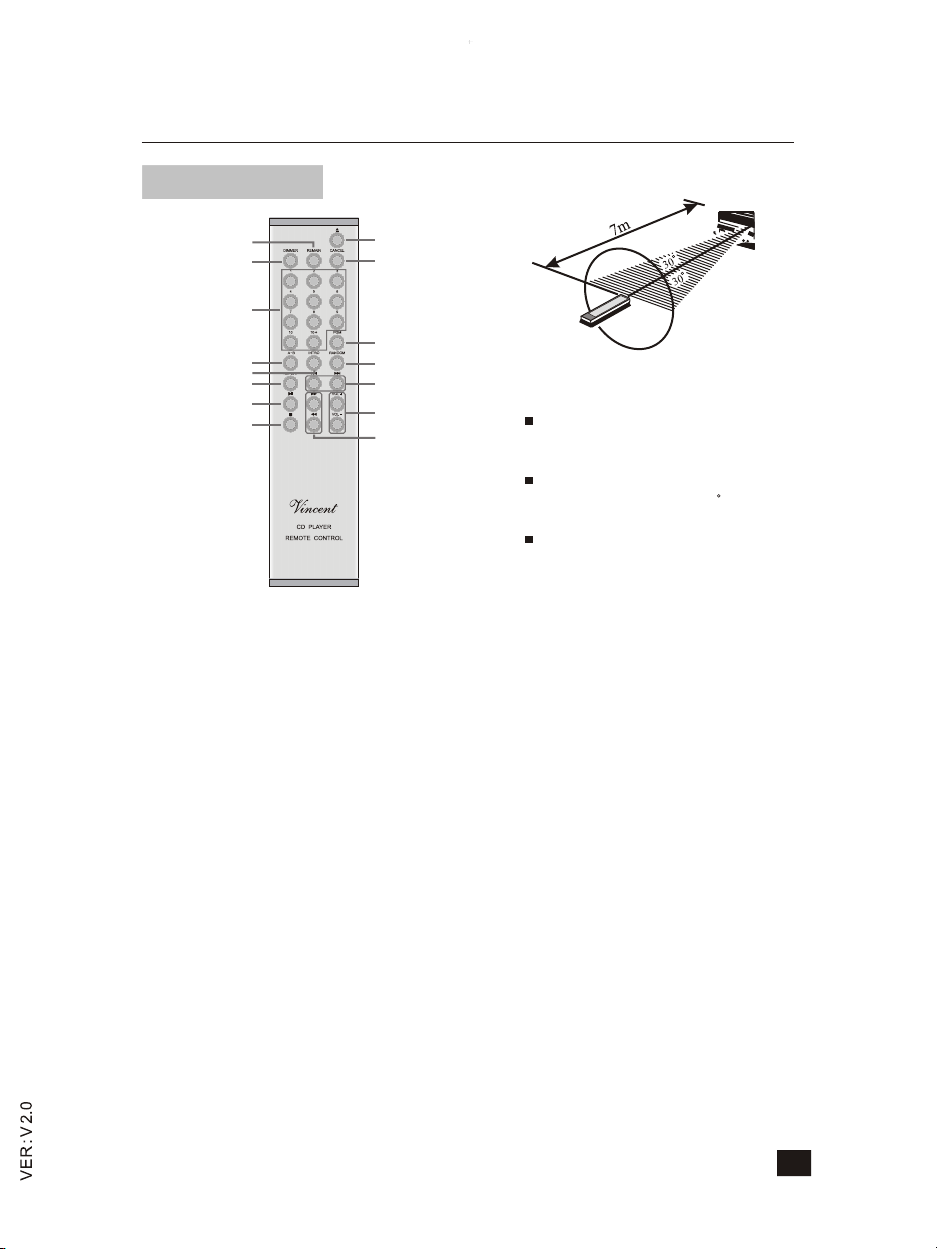
1
2
3
4
REPEAT Button
PLAY/PAUSE Button
5
STOP Button
OPEN/CLOSE Button
6
7
8
BACK/NEXT Button
9
10
Remote Control
When Operating the remote control, point it
at the remote sensor located on the amplifier
is front panel.
The remote control can be used up to 7 m
from the amplifier and within a 30 angle on
each side of the sensor.
Notes : Exposing the remote sensor to direct
sunlight or strong light may cause faulty
operation.
Incept Windows
1. REMAIN Button
Switches the time shown on the display to the remaining time of the current track
( REMAIN )or the remaining time of the entire disc ( TOTAL REMAIN).
2. DIMMER Button
Press to adjust the display illumination brightness. the illumination is at its brightest
when the power is switched ON. Each time this button is pressed, the brightness dim
until the fourth press, after which the illumination returns the original brightness.
3. Numeric Button(0~10,10+)
These buttons are used to designate the track ( tune ) numbers for programming
playback or " direct access " play.
4. REPEAT A-B Button
Usud to activate repeat play of the section between two designated poing ( block
repat play).
5. INTRO A-B Button
When this button is pressed , the player automatically plays the first part of each
track in the disc for 10 seconds.
6
Page 8
Function introduction
6. CANCEL Button
In the stop mode, this button is used to cancel tunes which have been programmed.
7. PGM (Program) Button
Press this button in the stop mode, to activate the programming operation. When
this button is pressed, the " PGM " indicator lights in the display of the unit. To
release the programming mode, press this button again.
8. RANDOM Button
When this button is pressed , the player enters random play mode ( tracks in the disc
are selected and played in a random order ). When pressed it again, random play
is canclled.
9. VOL Button
Press to adjust the ANALOG OUTPUT volume between 0 and 26 level.
10. SEARCH Buttons ( / )
When one of these buttons was pressed during play or in the pause mode, the
pickup is moved quickly in the forward or reverse direction while slightly muted
sound is output(audible cueing).
Use the button to move the pickup in the forward direction, and the button to move
it in the reverse direction.
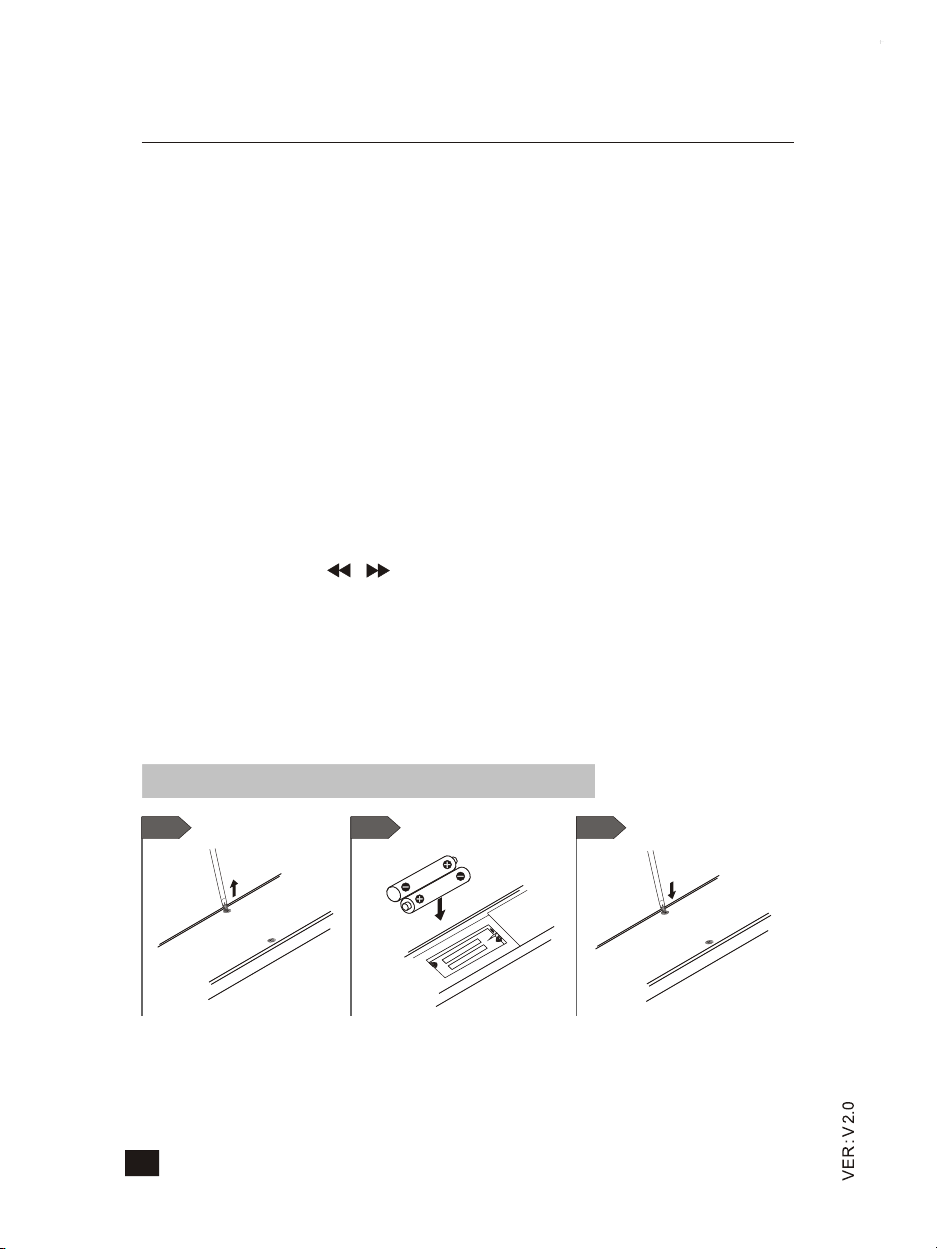
Installing the remote controller batteries
21 3
1. To loose screw in the back of remote control, then open the cover.
2. Insert two AA ( R6 or UM-3 ) batteries into the battery compartment. Carefully follow the
polarity diagram ( positive (+) and negative (-) symbols ) inside the battery compartment.
3. Replace the cover, put screw in .
7
Page 9
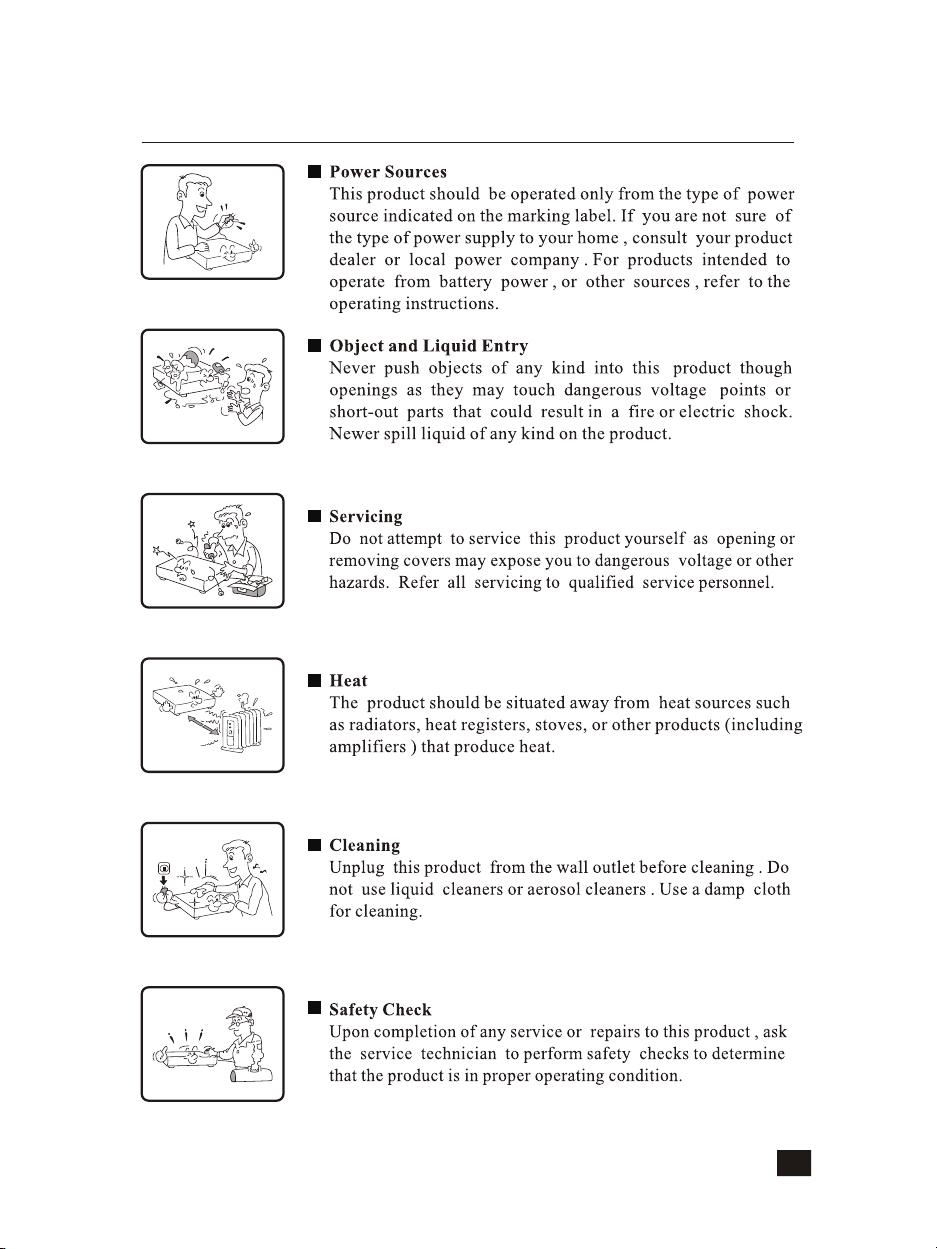
Precautions
8
Page 10
Troubleshooting
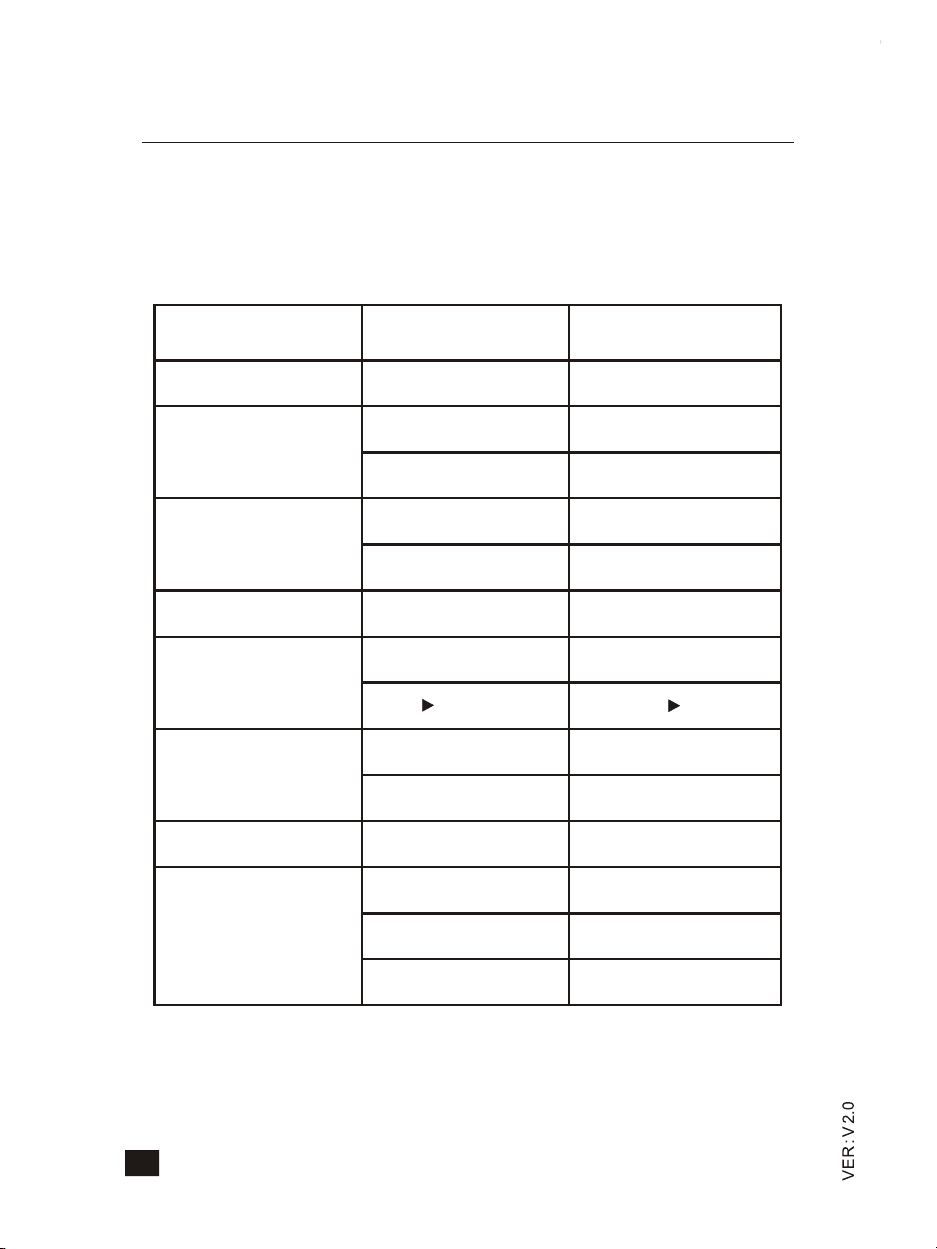
Basic troubleshooting of a CD player is similar to troubleshooting any other electronic
equipment.
Always check the most obvious possible causes first.
To give you a few ideas of what to look for, check the following:
Problem
No power when POWER is
pressed
No playback when disc is
loaded
No sound(or too low level
output)
Play starts when power is
switched ON
Program playback impossible
Mistracking (sound jumping)
HUM
Remote control operation
impossible
Probable Cause
Power plug not inserted
securely.
Disc loaded upside down.
Disc dirty.
Connections are made
incorrectly or imperfectly.
Misoperation of amplifier.
A disc has been left in the player.
PGM button not pressed.
PLAY( )button not pressed.
The unit is subject to vibrations
or shocks.
Disc dirty.
Connection cord not connected
securely.
POWER switch of the unit is
set to OFF.
No battery installed in remote
control unit.
Batteries in the remote control
unit are exhausted.
Remedy
Plug in securely.
Load with label side up.
Clean disc surface.
Check connections.
Check amplifier's control/switch
setting.
Remove the disc.
Press PGM so "PROGRAM"
Indicator lights.
Press PLAY( )button.
Change the installation position.
Clean disc surface.
Re-connect plug securely.
Turn switch to ON.
Insert batteries.
Replace with new ones.
9
Page 11

Technical Specifications
1. Frequency Response ........................................
Audio Output Voltage .................................. ...
2.
3
Dynamic Range .............................
. ........................................
S/N Ratio ...............................................
4. .................................
5. Frequency Distortion .....................................
6. Channel Separation .....................................
7. Outer Dimension ...........
8. Weight ....................................................
NOTE :
Information in this document is subject to change without notice .
(W x H x D) .....................................
........................
... ......................
..........................
.............................
.................................
: 10Hz-20kHz 0.5dB
: 2V 1.6dB
: 100dB
>
: 95dB
< 0.003%
:
>
90dB
:
: 430 x 125 x 330 (mm)
: 9kg
10
Page 12

 Loading...