

Page 1
Manuale installatore - Installer guide
Manuel installateur - Technisches Handbuch
Instrucciones instalador - Manual do instalador
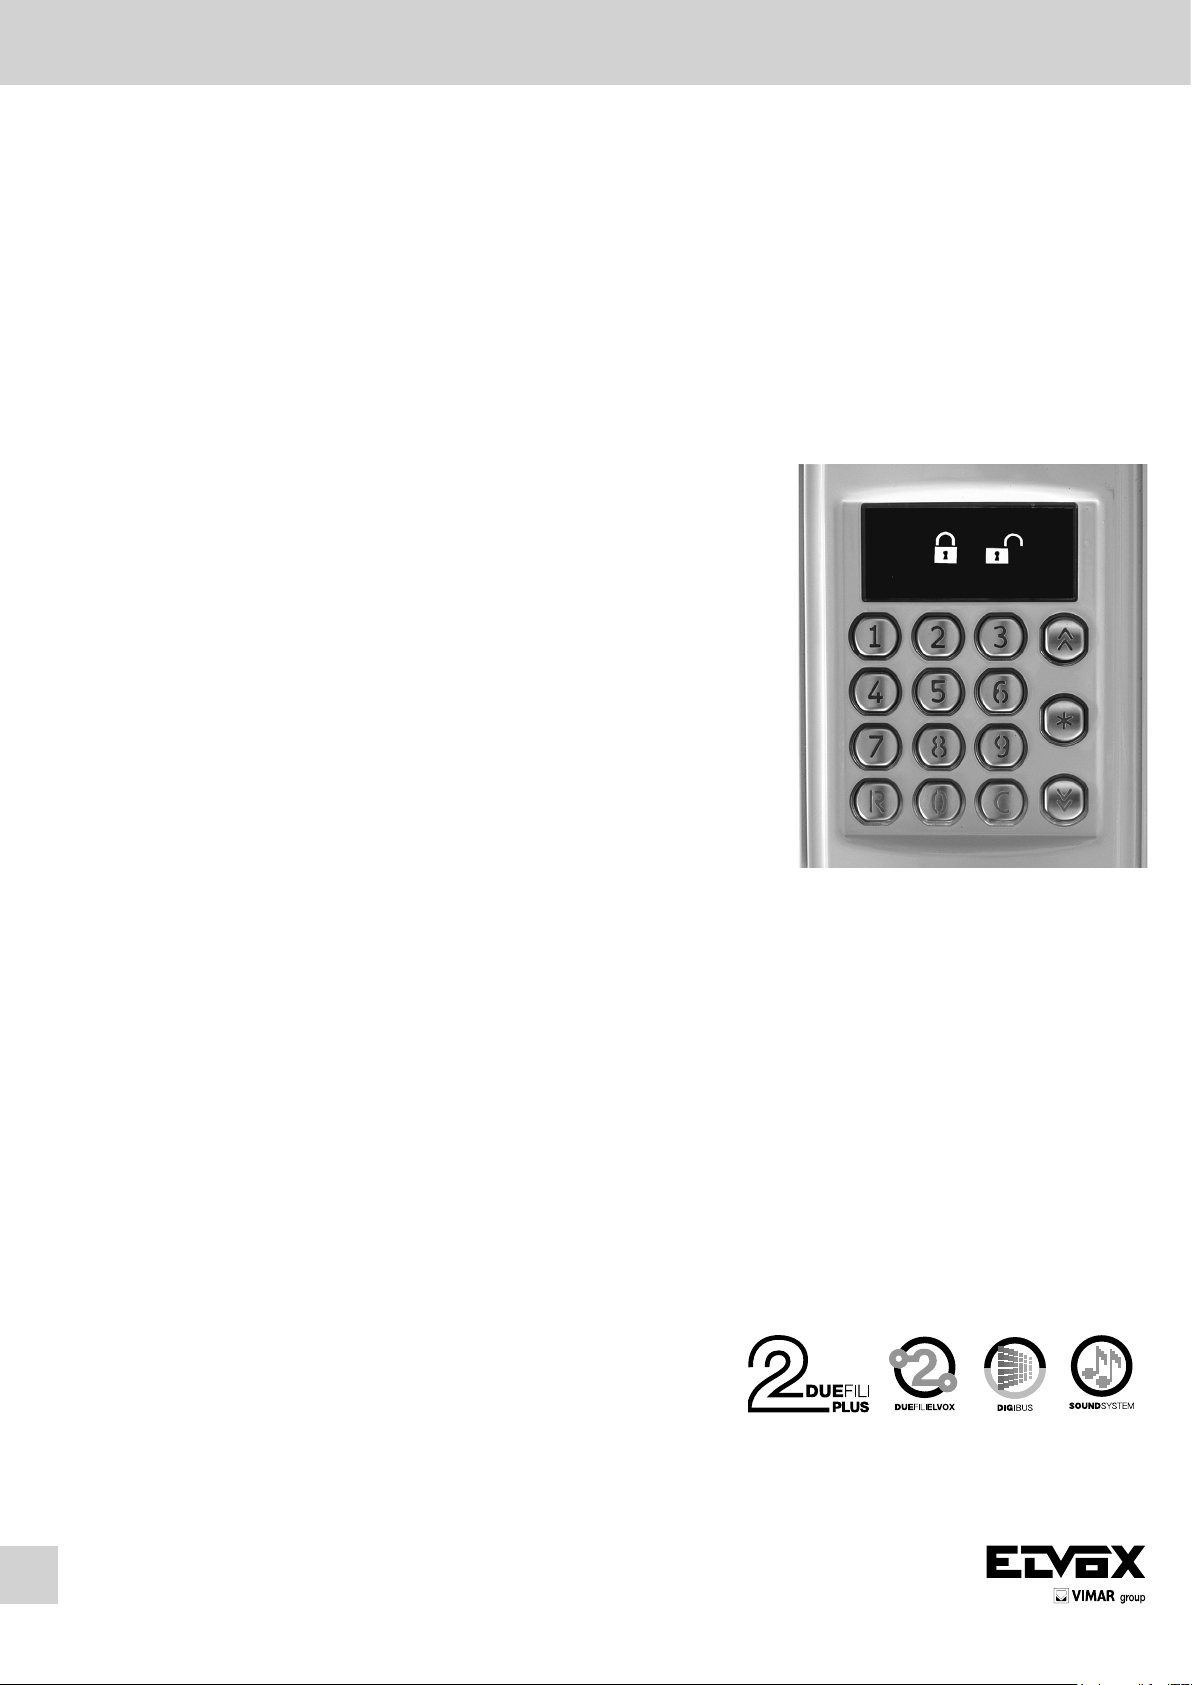
Art. 8016
Modulo tastiera per serratura
Keypad module for lock
Module clavier gâche
Tastatur-Modul fur Schloss
Módulo teclado para cerradura
Módulo teclado para trinco
Page 2
8000
IT
Descrizione
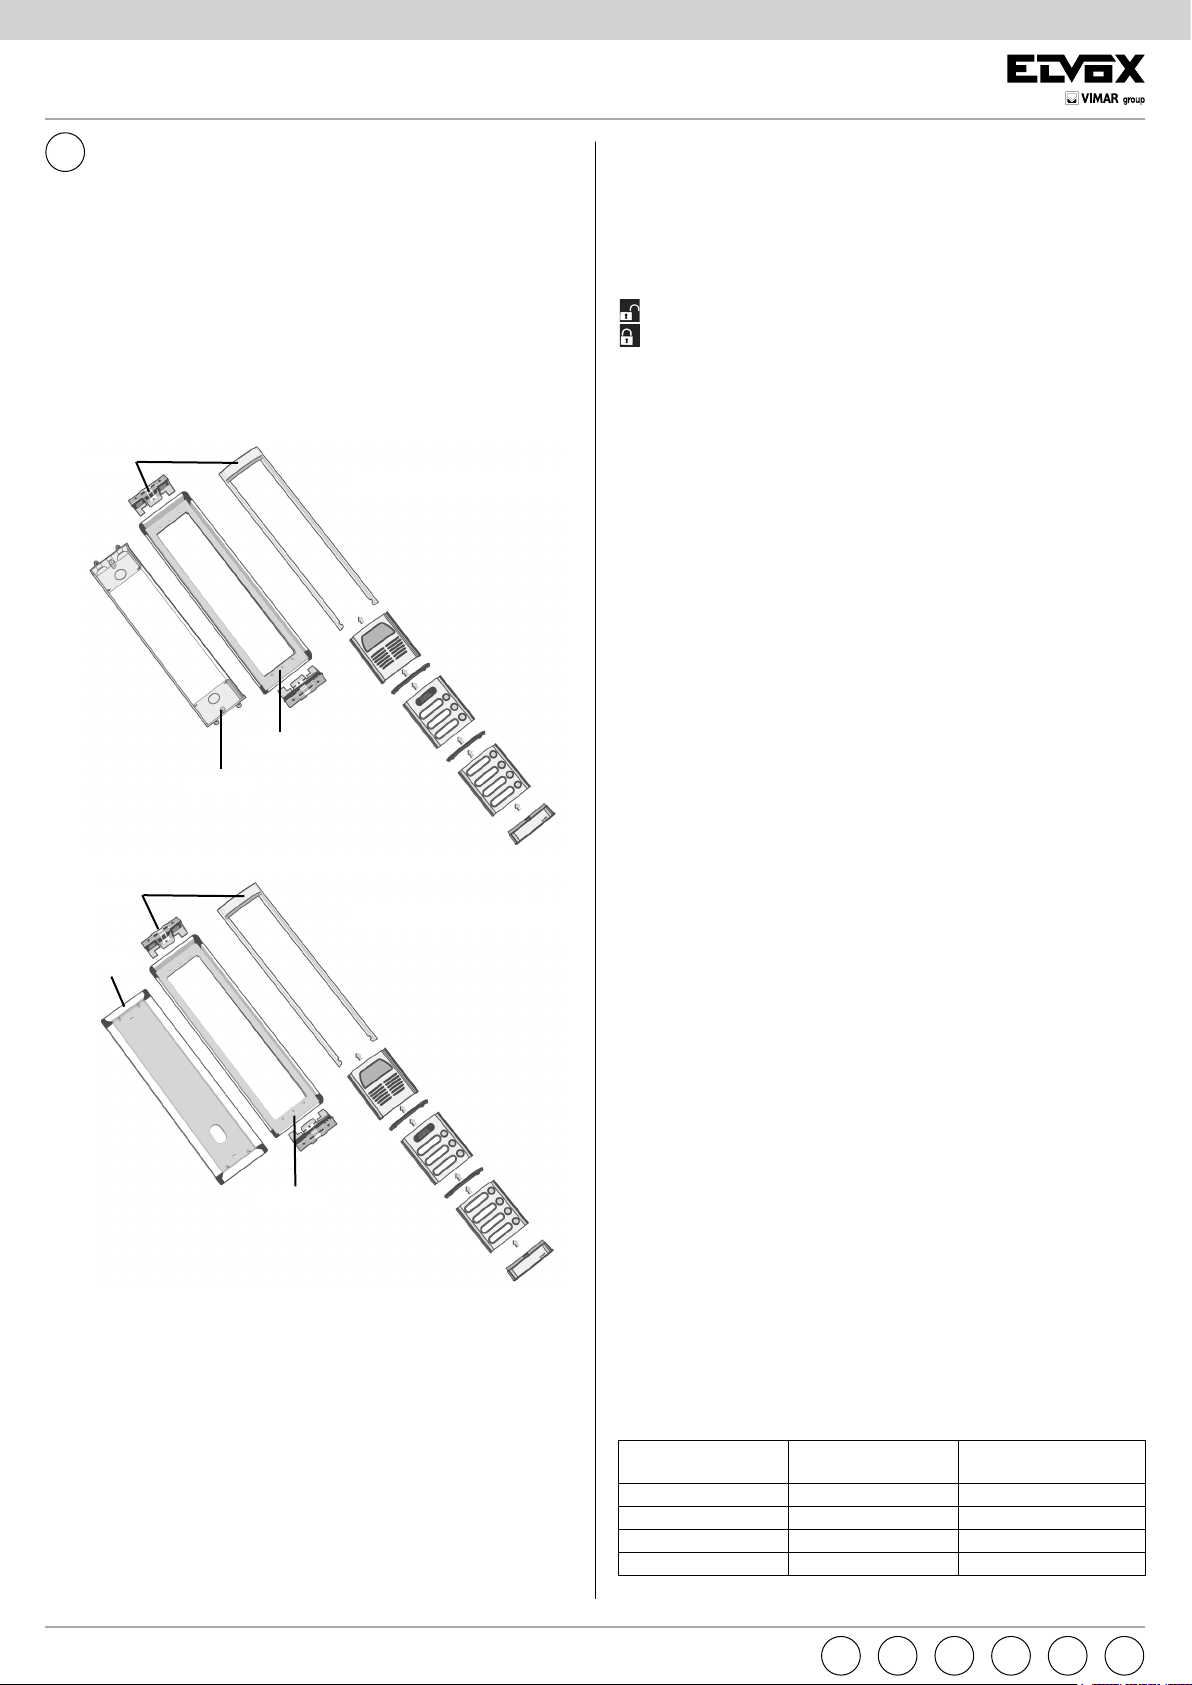
Il modulo di comando Art. 8016 è un componente del sistema modulare
delle targhe della serie 8000.
Le targhe possono essere predisposte per l’installazione da incasso o
esterno parete, eventualmente munite di cornice con protezione antipioggia.
La targa può essere installata nella versione da incasso parete utilizzando
i telai portamoduli Art. 8081, 8082, 8083, 8084, come da esterno parete
utilizzando oltre i suddetti telai portamoduli, l’apposita scatola da esterno
parete (Art. 9311, 9312, 9314). (vedi Fig. 1A, 1B)
L’Art. 8016 è fornito di un uscita a relè per apertura serratura e di un uscita
supplementare open-collector per pilotaggio di relè tipo 170/001. Il modulo
richiede l’alimentatore Art. 6582.
Art. 808x
Targa serie 8000 versione da
Fig. 1A
incasso parete
le attivano
Numero di codici programmabili: 100
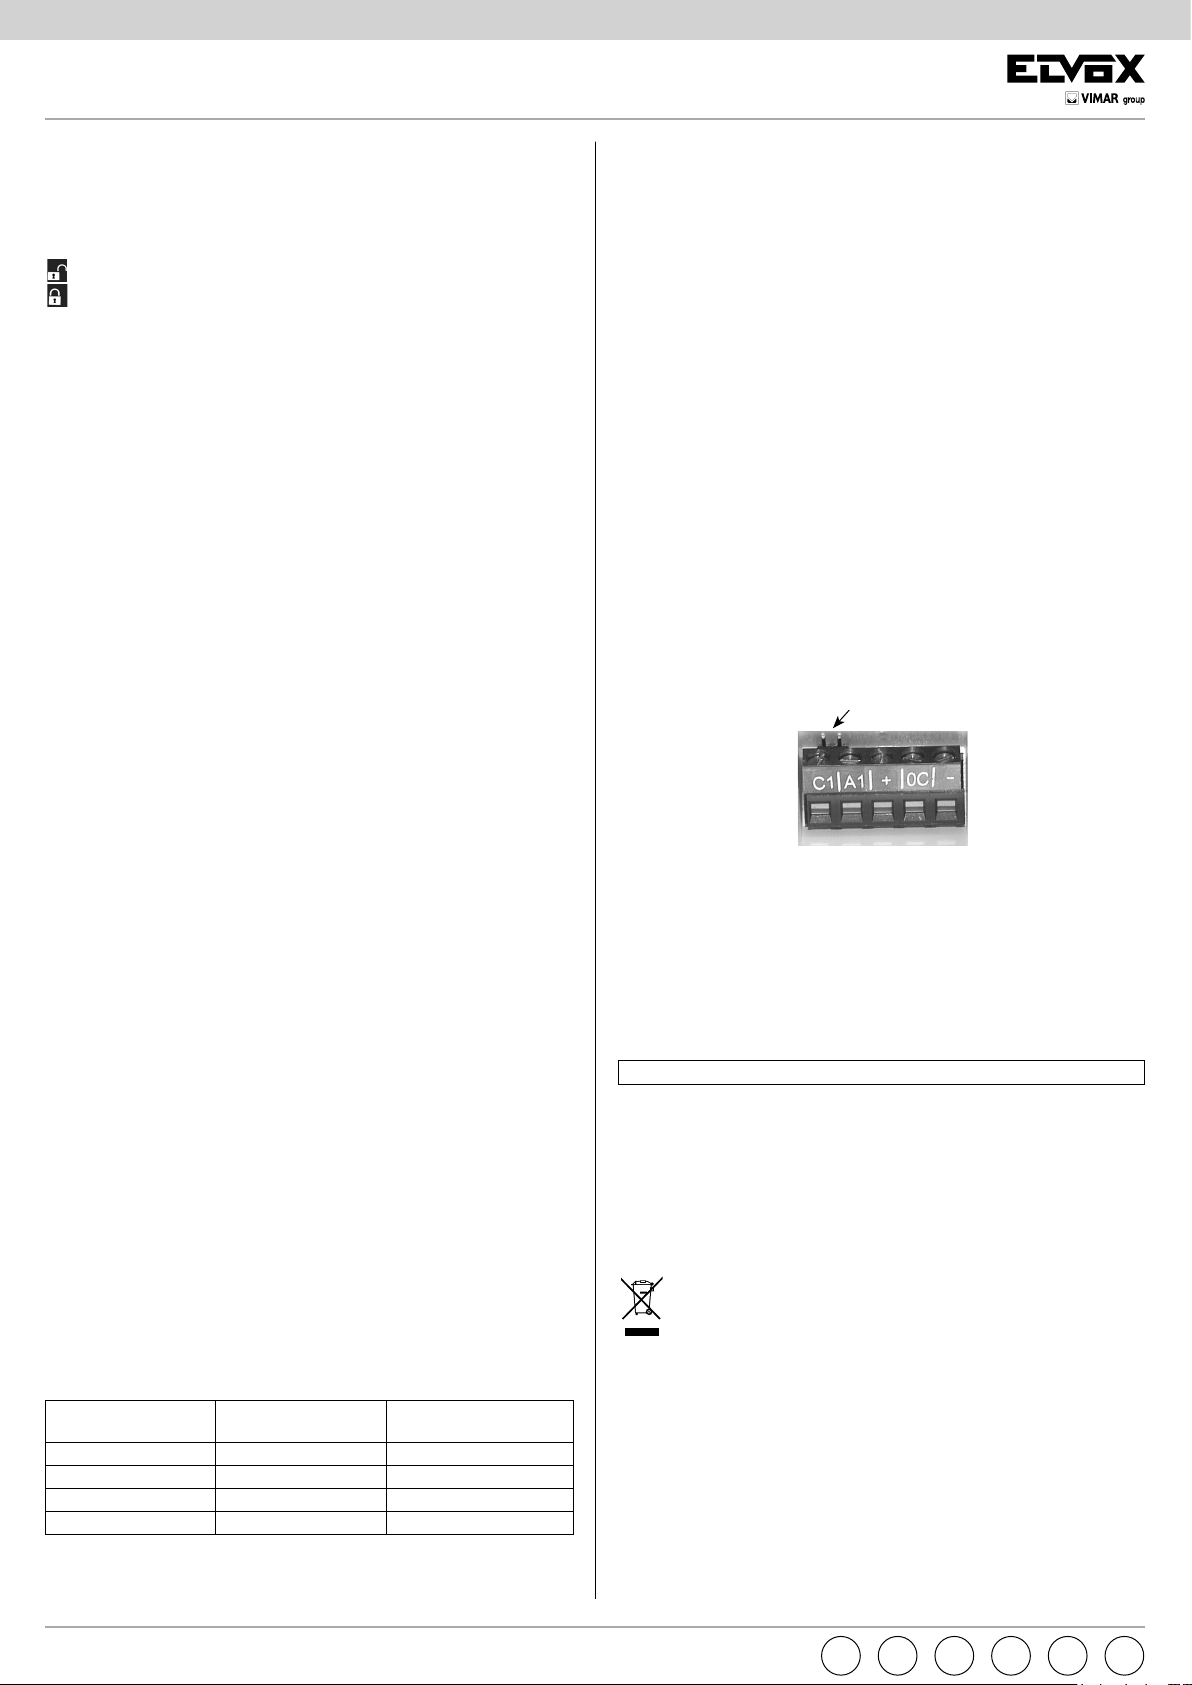
Descrizione Tastiera e Morsettiera:
+ positivo alimentazione (11V DC forniti dall’alimentatore 6582)
- negativo alimentazione
C1 ingresso contatto relè di potenza (uscita 1)
A1 uscita contatto relè di potenza (uscita 1)
OC uscita open collector per pilotare un eventuale relè esterno (uscita 2)
led verde (acceso per conferma codice)
led rosso (acceso per codice errato)
0-9: Tasti per composizione codici
R: Tasto per annullamento operazione
C: Tasto per conferma codice
Programmazione
Procedura di programmazione CODICE attivazione uscite:
1. Premere R e il tasto 5 contemporaneamente, fino all’accensione alter-
nata del led verde e rosso
2. Comporre la Password (123 di default) entro 10 secondi.
3. Premere “C”, con l’accensione intermittente e contemporanea del led
verde e rosso.
4. Comporre il Numero dell’uscita/e da attivare (1 = uscita 1 ; 2 = uscita
2 ; 3 = uscita 1 e 2)
5. Premere “C”
6. Comporre il codice da programmare
7. Premere “C”
Per la programmazione di altri codici ripetere l’operazione dal punto 1. Il
tempo massimo per le fasi dalla 4 alla 7 è di 60 secondi.
Art. 93xx
Art. 909x
Art. 808x
Targa serie 8000 versione da
Art. 93xx
Art. 93xx
Fig. 1B
esterno parete
Funzionamento
Tastiera per controllo accessi in grado di comandare due uscite anche contemporaneamente tramite la composizione di un codice segreto.
L’utente compone il codice (massimo 8 cifre) e poi, premendo C, attiva
l’uscita corrispondente per un tempo programmabile.
Il funzionamento (v. Procedura di programmazione FUNZIONAMENTO DISPOSITIVO) può essere anche di tipo On / Off: l’uscita programmata resta
attiva finché non si compone nuovamente lo stesso codice oppure un codice
valido per la medesima uscita..
Non ci possono essere due codici uguali tra loro, se durante la procedura di
programmazione si compone un codice già presente, ci sarà una segnalazione di errore e si dovrà ripetere la procedura. Le due uscite hanno tempi
di attivazione programmabili e distinti fra loro ma uguali per tutti i codici che
Procedura di programmazione PASSWORD ( max 8 cifre):
1. Premere R e il tasto 1 contemporaneamente, fino all’accensione alter-
nata del led verde e rosso
2. Comporre la vecchia password entro 10 secondi
3. Premere “C”, con l’accensione intermittente e contemporanea del led
verde e rosso.
4. Comporre la nuova password entro 60 secondi
5. Premere “C”
Procedura di programmazione TEMPO di attivazione USCITA 1:
1. Premere R e il tasto 3 contemporaneamente, fino all’accensione alter-
nata del led verde e rosso
2. Comporre la Password (123 di default) entro 10 secondi
3. Premere “C”, con l’accensione intermittente e contemporanea del led
verde e rosso.
4. Comporre il tempo di attivazione in secondi (max 9999 secondi)
5. Premere “C”
Il tempo massimo per le fasi dalla 4 alla 5 è di 60 secondi.
Procedura di programmazione TEMPO di attivazione USCITA 2:
1. Premere R e il tasto 4 contemporaneamente, fino all’accensione alter-
nata del led verde e rosso
2. Comporre la Password (123 di default) entro 10 secondi.
3. Premere “C”, con l’accensione intermittente e contemporanea del led
verde e rosso.
4. Comporre il tempo di attivazione in secondi (max 9999 secondi)
5. Premere “C”
Il tempo massimo per le fasi dalla 4 alla 5 è di 60 secondi.
Procedura di programmazione FUNZIONAMENTO DISPOSITIVO:
1 Premere R e il tasto 6 contemporaneamente
2 Comporre la Password (123 di default) entro 10 secondi
3 Premere “C”
4 Comporre il numero secondo la Tabella 1
5 Premere “C”
Tabella 1. Programmazione funzionamento. (*valore di default)
Uscita Relè 1 Uscita Relè 2 Numero da Program-
mare
Temporizzata Temporizzata 1*
Temporizzata On / Off 2
On / Off Temporizzata 3
On / Off On / Off 4
Il tempo massimo per le fasi dalla 4 alla 5 è di 60 secondi.
2
ENFRDEESPT IT
Page 3

8000
Procedura di CANCELLAZIONE di 1 codice:
1. Premere R e il tasto 2 contemporaneamente, fino all’accensione alternata del led verde e rosso
2. Comporre la Password (123 di default) entro 10 secondi.
3. Premere “C”, con l’accensione intermittente e contemporanea del led
verde e rosso.
4. Comporre il codice da cancellare
5. Premere “C”
Per la programmazione di altri codici ripetere l’operazione dal punto 1. Il
tempo massimo per le fasi dalla 4 alla 5 è di 60 secondi.
Procedura di CANCELLAZIONE di TUTTI i codici:
1. Premere R e il tasto 2 contemporaneamente, fino all’accensione alternata del led verde e rosso
2. Comporre la Password (123 di default) entro 10 secondi.
3. Premere “C”, con l’accensione intermittente e contemporanea del led
verde e rosso.
4. Tenere premuto R + 2 per 10 secondi (la tastiera lampeggerà) finchè
la tastiera non si spegne.
Il tempo massimo per la fase 4 è di 60 secondi.
Entrata in Programmazione SENZA PASSWORD:
1. Ponticellare i due contatti PIN_P posti dietro la morsettiera (Fig. 2) (il
ponticello non viene fornito)
2. Premere R ed il tasto 7 (contemporaneamente fino all’accensione con
lampeggio del led rosso)
3. Premere la combinazione di tasti opportuna per la programmazione
desiderata come indicato
nei passi 1 delle voci precedenti (es. R + 5 per programmare un’uscita)
4. Premere C senza comporre la password
5. Seguire le procedure descritte precedentemente dai passi 4 in poi.
6. Togliere il ponticello tra i due contatti PIN_P alla fine della programmazione.
Pin_P
EN
Description
The control module type 8016 is a component for the modular system
of panels series 8000. The entrance panels may be preset for the flushmounted or surface wall-mounted installation, possible provided with rainproof cover. The entrance panel may be installed in the flush-mounted
version by using the module holder frames type 8081, 8082, 8083, 8084,
and in the surface-wall mounted version using, besides the abovementioned
module holder frames, the proper surface wall-mounted back box (type
9311, 9312, 9314) (See fig. 1A, 1B).
The 8016 module is equipped with an output with relay for the lock release
and an additional open-collector output for the control of relay type 170/001.
Module require an power supply Art. 6582
Art. 808x
Entrance panel series 8000,
flush-mounted version.
Art. 93xx
Art. 909x
Fig. 1A
Fig. 2
Esempio: programmazione attivazione uscita 1 con il numero 11223344
per sei secondi
Premere R ed il tasto 5 contemporaneamente, comporre la password e
premere C, premere il tasto 1 e poi C, comporre il numero 11223344 e poi
premere C. Premere R ed il tasto 3 contemporaneamente, comporre la
password e premere C, premere il tasto 6 e poi C.
Il manuale istruzioni è scaricabile dal sito www.vimar.com
REGOLE DI INSTALLAZIONE.
L’installazione deve essere effettuata con l’osservanza delle disposizioni
regolanti l’installazione del materiale elettrico in vigore nel Paese dove i
prodotti sono installati.
CONFORMITÀ NORMATIVA.
Direttiva EMC
Norme EN 61000-6-1, EN 61000-6-3.
INFORMAZIONE AGLI UTENTI AI SENSI DELLA DIRETTIVA
2002/96 (RAEE)
Al ne di evitare danni all’ambiente e alla salute umana oltre che
di incorrere in sanzioni amministrative, l’apparecchiatura che ripor-
ta questo simbolo dovrà essere smaltita separatamente dai riuti urbani
ovvero riconsegnata al distributore all’atto dell’acquisto di una nuova. La
raccolta dell’apparecchiatura contrassegnata con il simbolo del bidone barrato dovrà avvenire in conformità alle istruzioni emanate dagli enti terri-
torialmente preposti allo smaltimento dei riuti. Per maggiori informazioni
contattare il numero verde 800-862307.
Art. 808x
Entrance panel series 8000,
surface wall-mounted version.
Art. 93xx
Art. 93xx
Fig. 1B
Operation
Keypad for access control able to control of two outputs also simultaneously
by entry of a secret code.
The user enters the code (maximum 8 digits) and then, pressing C, activates
the corresponding output for a programmable time interval. The operation
(see “Programming procedure “DEVICE OPERATION”) may be also of type
ON / OFF: the programmed output is kept active until the same code or a
code valid for the same output is dialled. No two codes can be the same;
during programming, if an existing code is entered, an error signal is activated and the procedure will need to be repeated. The two outputs have
programmable activation times, independent from one another but the same
for all codes that activate them.
Number of programmable codes: 100.
PTESDEFRENIT
3
Page 4
8000
Description of Keypad and Terminal Board:
+ positive power supply (11V DC provided by power supply 6582)
- negative power supply
C1 power relay contact input (output 1)
A1 power relay contact output (output 1)
OC open collector output to pilot possible external relay (output 2)
green Led (lit to confirm code)
red Led (lit to indicate code error)
0-9: Keys for entry of codes
R: Key to cancel operation
C: Key to confirm code
Programming
Output activation CODE programming procedure:
1. Press R and key 5 at the same time until the green and red leds illumi-
nate alternately
2. Enter the Password (123 by default) within 10 seconds.
3. Press “C”, with intermittent and simultaneous activation of the green
and red leds.
4. Enter the number of the output to be activated (1 = output 1; 2 = output
2; 3 = output 1 and 2)
5. Press “C”
6. Enter the code to be programmed
7. Press “C”
To program other codes, repeat the operation from point 1.
The maximum time for the phases from 4 to 7 is 60 seconds.
PASSWORD ( max 8 digits) programming procedure:
1. Press R and key 1 at the same time until the green and red leds illumi-
nate alternately
2. Enter the previous password within 10 seconds.
3. Press “C”, with intermittent and simultaneous activation of the green
and red leds.
4. Enter the new password within 10 seconds.
5. Press “C”
1. Press R and key 2 at the same time until the green and red leds illuminate alternately
2. Enter the Password (123 by default) within 10 seconds.
3. Press “C”, with intermittent and simultaneous activation of the green
and red leds.
4. Enter the code to be deleted
5. Press “C”
To program other codes, repeat the operation from point 1. The maximum
time for the phases from 4 to 5 is 60 seconds.
Procedure for DELETING ALL codes:
1. Press R and key 2 at the same time until the green and red leds illuminate alternately
2. Enter the Password (123 by default) within 10 seconds.
3. Press “C”, with intermittent and simultaneous activation of the green
and red leds.
4. Press and hold R + 2 for 10 seconds (the keypad flashes)
The maximum time for phase 4 is 60 seconds.
Enter Programming mode WITHOUT PASSWORD:
1. Wire in a jumper on the two PIN_P contacts at the back of the terminal
board (Fig. 2)
2. Pres R and key 7 (simultaneously until the red led starts flashing)
3. Press the key combination for programming as described in step 1 of
the above procedures
(e.g. R + 5 to program an output)
4. Press C without entering the password
5. Follow the above-described procedures from step 4 onwards.
6. Remove the jumper from the two PIN_P contacts at the end of programming.
Fig. 2
Pin_P
OUTPUT 1 activation TIME programming procedure:
1. Press R and key 3 at the same time until the green and red leds illuminate alternately
2. Enter the Password (123 by default) within 10 seconds.
3. Press “C”, with intermittent and simultaneous activation of the green
and red leds.
4. Enter the activation time in seconds (max 9999 seconds)
5. Press “C”
The maximum time for the phases from 4 to 5 is 60 seconds.
OUTPUT 2 activation TIME programming procedure:
1. Press R and key 4 at the same time until the green and red leds illuminate alternately
2. Enter the Password (123 by default) within 10 seconds.
3. Press “C”, with intermittent and simultaneous activation of the green
and red leds.
4. Enter the activation time in seconds (max 9999 seconds)
5. Press “C”
The maximum time for the phases from 4 to 5 is 60 seconds.
Programming procedure for the “DEVICE OPERATION”
1 Press R and push-button 6 at the same time.
2 Dial the Password (default value: 123) within 10 seconds
3 Press “C”
4 Dial the number according to table 1
5 Press push-button “C”
Table 1. Operation programming (* default value).
Relay output 1 Relay output 2 Number to be program-
med
Timed Timed 1*
Timed On/Off 2
On / Off Timed 3
On / Off On / Off 4
Example: programming of activation of output 1 with number 11223344 for
six seconds
Press R and key 5 at the same time, enter the password and press C, press
key 1 and then C, enter the number 11223344 and then press C. Press R
and key 3 at the same time, enter the password and press C, press key 6
and then C.
The instruction manual is downloadable from the site www.vimar.com
INSTALLATION RULES.
Installation should be carried out observing current installation regulations
for electrical systems in the Country where the products are installed.
CONFORMITY.
EMC directive
Standards EN 61000-6-1, EN 61000-6-3.
INFORMATION FOR USERS UNDER DIRECTIVE 2002/96
(WEEE)
In order to avoid damage to the environment and human health as
well as any administrative sanctions, any appliance marked with
this symbol must be disposed of separately from municipal waste, that is it
must be reconsigned to the dealer upon purchase of a new one. Appliances marked with the crossed out wheelie bin symbol must be collected in
accordance with the instructions issued by the local authorities responsible
for waste disposal.
The maximum time for phases 4 and 5 is of 60 seconds.
Procedure for DELETING 1 code:
4
ENFRDEESPT IT
Page 5

8000
FR
Description
Le module de commande Art. 8016 est un composant du système modulaire des plaques de rue de la série 8000. Les plaques de rue peuvent être
prédisposées pour l’installation à encastrer ou pour le montage mural en
saillie, éventuellement fournies de cadres avec protection anti-pluie.
La plaque de rue peut être installée dans la versions murale à encastrer
en utilisant, les châssis porte-modules Art. 8081, 8082, 8083, 8084, et
dans la version murale en saillie en utilisant, au-delà des susdits châssis
porte-modules, le boîtier approprié pour montage mural (Art. 9311, 9312 et
9314) (voir Fig. 1A, 1B).
Ce module 8016 est fourni avec une sortie type relais pour l’ouverture de
la gâche et avec une sortie supplémentaire pour le contrôle du relais Art.
170/001.
Le module demande l’emploi d’une alimentation Art. 6582
Art. 808x
Plaque de rue série 8000,
version pour montage à
Art. 93xx
Art. 909x
Fig. 1A
encastrer.
Description du Clavier et de la Plaque à bornes:
+ positif alimentation (11 Vcc fournis par l’alimentateur 6582)
- négatif alimentation
C1 entrée contact relais de puissance (sortie 1)
A1 sortie contact relais de puissance (sortie 1)
OC sortie “open collector” pour piloter un éventuel relais extérieur
(sortie 2)
del verte (allumée pour la confirmation du code)
del rouge (allumée pour code erroné)
0-9 : Touches pour la composition des codes
R: Touche pour l’annulation de l’opération
C: Touche pour la confirmation du code
Programmation
Procédure de programmation du CODE d’activation des sorties :
1. Appuyer simultanément sur R et sur la touche 5 jusqu’à l’allumage
alterné de la del verte et rouge
2. Composer le mot de passe (123 par défaut) dans les 10 secondes.
3. Appuyer sur “C” avec l’allumage intermittent et simultané de la del verte
et rouge.
4. Composer le numéro de la ou des sortie(s) à activer (1 = sortie 1 ; 2 =
sortie 2 ; 3 = sortie 1 et 2)
5. Appuyer sur “C”
6. Composer le code à programmer
7. Appuyer sur “C”
Pour la programmation d’autres codes, répéter l’opération du point 1. La
durée maximum des phases 4 à 7 est de 60 secondes.
Procédure de programmation du MOT DE PASSE (8 chiffres maximum) :
1. Appuyer simultanément sur R et sur la touche 1 jusqu’à l’allumage
alterné de la del verte et rouge
2. Composer l’ancien mot de passe dans les 10 secondes
3. Appuyer sur “C” avec l’allumage intermittent et simultané de la del verte
et rouge.
4. Composer le nouveau mot de passe dans les 60 secondes
5. Appuyer sur “C”
Art. 808x
Plaque de rue série 8000,
version pour montage en saillie.
Art. 93xx
Art. 93xx
Fig. 1B
Fonctionnement
Clavier de contrôle des accès en mesure de commander jusqu’à deux sorties en même temps en composant un code secret.
L’utilisateur compose le code (8 chiffres maximum) et active, en appuyant
sur C, la sortie correspondante pendant une durée programmable.
Le fonctionnement (voir Procédé de programmation “FONCTIONNEMENT
DISPOSITIF”) peut être même du type On / Off: la sortie programmée reste
active jusqu’à ce que le même code ou un code valable pour la même sortie
est composé. Il ne peut pas y avoir deux codes identiques; si un code déjà
présent est composé pendant la procédure de programmation, il y aura une
signalisation d’erreur et il faudra répéter la procédure. Les deux sorties ont
des temps d’activation programmables et distincts mais identiques pour
tous les codes qui les activent Nombre de codes programmables: 100
Procédure de programmation du TEMPS d’activation de la SORTIE 1 :
1. Appuyer simultanément sur R et sur la touche 3 jusqu’à l’allumage
alterné de la del verte et rouge
2. Composer le mot de passe (123 par défaut) dans les 10 secondes
3. Appuyer sur “C” avec l’allumage intermittent et simultané de la del verte
et rouge.
4. Composer le temps d’activation en secondes (9999 secondes maxi-
mum)
5. Appuyer sur “C”
La durée maximum des phases 4 à 5 est de 60 secondes.
Procédure de programmation du TEMPS d’activation de la SORTIE 2 :
1. Appuyer simultanément sur R et sur la touche 4 jusqu’à l’allumage
alterné de la del verte et rouge
2. Composer le mot de passe (123 par défaut) dans les 10 secondes.
3. Appuyer sur “C” avec l’allumage intermittent et simultané de la del verte
et rouge.
4. Composer le temps d’activation en secondes (9999 secondes maxi-
mum)
5. Appuyer sur “C”
La durée maximum des phases 4 à 5 est de 60 secondes.
Procédé de programmation “FONCTIONNEMENT DISPOSITIF”:
1. Appuyer sur le boutons-poussoirs R et 6 simultanément.
2. Composer le mot d’entrée (valeur par défaut: 123) d’ici le 10 secondes.
3. Appuyer sur le bouton-poussoir “C”
4. Composer le numéro selon la table.
5. Appuyer sur le bouton-poussoir “C”.
Table 1. Programmation fonctionnement (valeur par défaut: 123).
Sortie relais 1 Sortie relais 2 Numéro à program-
mer
Temporisée Temporisée 1*
Temporisée On / Off 2
On / Off Tempriiisée 3
On / Off On / Off 4
PTESDEFRENIT
5
Page 6

8000
Le temps maximum pour les phases 4 et 5 est de 60 secondes.
Procédure d’ANNULATION d’1 code :
1. Appuyer simultanément sur R et sur la touche 2 jusqu’à l’allumage
alterné de la del verte et rouge
2. Composer le mot de passe (123 par défaut) dans les 10 secondes.
3. Appuyer sur “C” avec l’allumage intermittent et simultané de la del verte
et rouge.
4. Composer le code à annuler
5. Appuyer sur “C”
Pour la programmation d’autres codes, répéter l’opération du point 1. La
durée maximum des phases 4 à 5 est de 60 secondes.
Procédure d’ANNULATION de TOUS les codes :
1. Appuyer simultanément sur R et sur la touche 2 jusqu’à l’allumage
alterné de la del verte et rouge
2. Composer le mot de passe (123 par défaut) dans les 10 secondes.
3. Appuyer sur “C” avec l’allumage intermittent et simultané de la del verte
et rouge.
4. Appuyer sur R + 2 pendant 10 secondes (le clavier clignotera)
La durée maximum de la phase 4 est de 60 secondes.
Accès à la Programmation SANS MOT DE PASSE :
1. Établir une connexion entre les deux contacts PIN_P situés derrière la
plaque à bornes (Fig. 2)
2. Appuyer simultanément sur R et sur la touche 7 (simultanément jusqu’à
l’allumage avec
clignotement de la del rouge)
3. Appuyer sur la combinaison de touches adéquate pour la programmation voulue comme
indiqué au point 1 des options précédentes (par exemple, R + 5 pour
programmer une
sortie)
4. Appuyer sur C sans composer le mot de passe
5. Suivre les procédures préalablement décrites à partir du point 4.
6. Enlever la connexion entre les deux contacts PIN_P à la fin de la programmation.
Fig. 2
Pin_P
DE
Beschreibung
Die Codetastatur Art. 8016 ist eine Komponente des Modulsystems der
Klingeltableaus Baureihe 8000. Die Klingeltableaus können für die UPoder AP-Montage, eventuell mit Regenschutzrahmen, zusammengestellt
werden. Das Klingeltableau wird als UP-Version unter Verwendung der
Modulträger Art. 8081, 8082, 8083, 8084 installiert, für die AP-Version wird
zusätzlich zu den vorgenannten Modulträgern das entsprechende AP-Gehäuse (Art. 9311, 9312, 9314) verwendet (siehe Abb. 1A, 1B). Der Art. 8016
ist mit einem Relaisausgang für die Türöffnung und einem Zusatzausgang
für die Steuerung des Relais Art. 170/001 ausgerüstet. Dieses Modul benötigt ein Netzgerät Art. 6582.
Art. 808x
Klingeltableau Baureihe 8000,
Art. 93xx
Art. 909x
Art. 808x
Klingeltableau Baureihe 8000,
Art. 93xx
Abb. 1A
UP-Version.
Abb. 1B
AP-Version.
Exemple : programmation de l’activation de la sortie 1 avec le nombre
11223344 pendant six secondes
Appuyer simultanément sur R et sur la touche 5, composer le mot de passe
et appuyer sur C, appuyer sur la touche 1 puis sur C, composer le nombre
11223344 et appuyer ensuite sur C. Appuyer simultanément sur R et sur
la touche 3, composer le mot de passe et appuyer sur C, appuyer sur la
touche 6 puis sur C.
Télécharger le manuel d’instructions sur le site www.vimar.com
RÈGLES D’INSTALLATION.
L’installation doit être effectuée dans le respect des dispositions régulant
l’installation du matériel électrique en vigueur dans le Pays d’installation
des produits.
CONFORMITÉ AUX NORMES.
Directive EMC
Normes EN 61000-6-1, EN 61000-6-3.
COMMUNICATION AUX UTILISATEURS CONFORMÉMENT À
LA DIRECTIVE 2002/96 (RAEE)
Pour protéger l’environnement et la santé des personnes et éviter
toute sanction administrative, l’appareil portant ce symbole ne de-
vra pas être éliminé avec les ordures ménagères mais devra être coné au
distributeur lors de l’achat d’un nouveau modèle. La récolte de l’appareil
portant le symbole de la poubelle barrée devra avoir lieu conformément
aux instructions divulguées par les organisms régionaux préposés à l’élimination des déchets.
Art. 93xx
Betrieb
Codetastatur für Zutrittskontrolle, mit der zwei Ausgänge, auch gleichzeitig, gesteuert werden können. Nach Eingabe des Codes (höchstens acht
Ziffern) und Bestätigung mit der Taste C wird der entsprechende Ausgang
für eine programmierbare Zeit aktiviert. Der Betrieb (siehe Programmiervorgang für den “Betrieb der Vorrichtung”) kann auch vom Typ On / Off
sein: der programmierte Ausgang bleibt aktiv bis derselbe Code oder ein
für denselben Ausgang gültiger Code erneut eingegeben wird. Ein Code
kann nicht zweimal gespeichert werden. Eine Fehleranzeige weist darauf
hin, falls während der Programmierung ein bereits vorhandener Code eingegeben wird. Das Verfahren muss dann wiederholt werden. Die Aktivierungszeiten der zwei Ausgänge können separat und mit unterschiedlichen
Werten programmiert werden, sie sind jedoch für alle Codes, die sie aktivieren, identisch. Anzahl der programmierbaren Codes: 100
Beschreibung der Tastatur und Klemmenleiste:
6
ENFRDEESPT IT
Page 7

8000
+ Plus Versorgungsspannung (10,5 VDC mit Netzgerät Art. 6582)
- Minus Versorgungsspannung
C1 Kontakteingang Leistungsrelais (Ausgang 1)
A1 Kontaktausgang Leistungsrelais (Ausgang 1)
OC “Open Kollektor”-Ausgang für die Ansteuerung eines externen Relais
(Ausgang 2)
Grüne LED (Leuchtet zur Bestätigung des Codes)
(Leuchtet bei falscher Codeeingabe)
0-9: Tasten für Codeeingabe
R: Taste für Annullierung der Eingabe
C: Taste für Bestätigung des Codes
Programmierung
Programmierung des CODES zur Aktivierung der Ausgänge:
1. Tasten R und 5 gleichzeitig drücken, bis die rote und die grüne LED
abwechselnd blinken.
2. Das Passwort innerhalb von zehn Sekunden eingeben (Standardwert:
123).
3. Taste “C” drücken, bis die rote und die grüne LED gleichzeitig blinken.
4. Die Nummer des/der zu aktivierenden Ausgangs/Ausgänge eingeben (1
= Ausgang 1; 2 = Ausgang 2; 3 = Ausgang 1 und 2).
5. Taste “C” drücken.
6. Den zu programmierenden Code eingeben.
7. Taste “C” drücken. Um weitere Codes zu programmieren, die obigen
Schritte ab Punkt 1 wiederholen.
Die Eingabe der Werte in den Programmierschritten 4 bis 7 muss innerhalb
von 60 Sekunden erfolgen.
Programmierung des PASSWORTS (max. acht Ziffern):
1. Tasten R und 1 gleichzeitig drücken, bis die rote und die grüne LED
abwechselnd blinken.
2. Das alte Passwort innerhalb von zehn Sekunden eingeben.
3. Taste “C” drücken, bis die rote und die grüne LED gleichzeitig blinken.
4. Das neue Passwort innerhalb von 60 Sekunden eingeben.
5. Taste “C” drücken.
Programmierung der AKTIVIERUNGSZEIT von AUSGANG 1:
1. Tasten R und 3 gleichzeitig drücken, bis die rote und die grüne LED
abwechselnd blinken.
2. Das Passwort innerhalb von zehn Sekunden eingeben (Standardwert:
123).
3. Taste “C” drücken, bis die rote und die grüne LED gleichzeitig blinken.
4. Die Aktivierungszeit in Sekunden eingeben (max. 9999 Sekunden).
5. Taste “C” drücken. Die Werteingaben der Programmierschritte 4 bis 5
müssen innerhalb von höchstens 60 Sekunden erfolgen.
Programmierung der AKTIVIERUNGSZEIT von AUSGANG 2:
1. Tasten R und 4 gleichzeitig drücken, bis die rote und die grüne LED
abwechselnd blinken.
2. Das Passwort innerhalb von zehn Sekunden eingeben (Standardwert:
123).
3. Taste “C” drücken, bis die rote und die grüne LED gleichzeitig blinken.
4. Die Aktivierungszeit in Sekunden eingeben (max. 9999 Sekunden).
5. Taste “C” drücken. Die Eingabe der Werte in den Programmierschritten
4 bis 5 muss innerhalb von 60 Sekunden erfolgen.
Programmiervorgang für die Funktionsweise der Codetastatur:
1. Tasten R und 6 gleichzeitig drücken, bis die rote und die grüne LED
abwechselnd blinken.
2 . Das Passwort innerhalb von zehn Sekunden eingeben (Standardwert:
123).
3. Taste “C” drücken, bis die rote und die grüne LED gleichzeitig blinken.
4. Den Wert nach Tabelle 1 wählen
5. Taste “C” drücken.
Tabelle 1. Programmierung der Funktionsweise (* Standardwert).
Ausgang Relais 1 Ausgang Relais 2 Wert Zeitgesteuert
Zeitgesteuert Zeitgesteuert 1*
Zeitgesteuert On / Off 2
On / Off Zeitgesteuert 3
On / Off On / Off 4
Die Eingabe der Werte in den Programmierschritten 4 bis 5 muss innerhalb
von 60 Sekunden erfolgen.
LÖSCHEN eines Codes:
1. Tasten R und 2 gleichzeitig drücken, bis die rote und die grüne LED
abwechselnd blinken.
2. Das Passwort innerhalb von zehn Sekunden eingeben (Standardwert:
123).
3. Taste “C” drücken, bis die rote und die grüne LED gleichzeitig blinken.
4. Den zu löschenden Code eingeben.
5. Taste “C” drücken. Um weitere Codes zu löschen, die obigen Schritte ab
Punkt 1 wiederholen.
Die Eingabe der Werte in den Programmierschritten 4 bis 5 muss innerhalb
von 60 Sekunden erfolgen.
LÖSCHEN ALLER Codes:
1. Tasten R und 2 gleichzeitig drücken, bis die rote und die grüne LED
abwechselnd blinken.
2. Das Passwort innerhalb von zehn Sekunden eingeben (Standardwert:
123).
3. Taste “C” drücken, bis die rote und die grüne LED gleichzeitig blinken.
4. Tasten R + 2 zehn Sekunden lang gedrückt halten (die Tastatur blinkt).
Schritt 4 muss innerhalb von 60
Sekunden ausgeführt werden.
Zugriff auf die Programmierung OHNE PASSWORT:
1. Die beiden Kontakte PIN_P hinter der Klemmenleiste (Abb. 2) überbrücken.
2. Tasten R und 7 gleichzeitig drücken, bis die rote LED blinkt.
3. Das für die gewünschte Programmierung vorgesehene Tastenpaar drücken (vgl. obige Anleitungen, jeweils Punkt 1, z.B. R + 5, Programmierung eines Ausgangs).
4. Taste C drücken, ohne das Passwort einzugeben.
5. Die obigen Anleitungen jeweils ab Punkt 4 ausführen.
6. Nach Abschluss der Programmierung die Steckbrücke von den Kontakten PIN_P entfernen.
Abb. 2
Beispiel: Programmierung der Aktivierung von Ausgang 1 für sechs Sekunden mit der Nummer 11223344. Tasten R und 5 gleichzeitig drücken, das
Passwort eingeben, der Reihe nach erst C, dann 1 und wieder C drücken.
Die Nummer 11223344 eingeben und erneut mit C bestätigen. Tasten R und
3 gleichzeitig drücken, das Passwort eingeben und der Reihe nach erst C,
dann 6 und schließlich wieder C drücken.
Die Bedienungsanleitung ist auf der Website www.vimar.com zum
Download verfügbar
INSTALLATIONSVORSCHRIFTEN.
Die Installation hat gemäß den im jeweiligen Verwendungsland der Produkte geltenden Vorschriften zur Installation elektrischer Ausrüstungen zu
erfolgen.
NORMKONFORMITÄT.
EMC-Richtlinie
Normen DIN EN 61000-6-1, EN 61000-6-3.
VERBRAUCHERINFORMATION GEMÄSS RICHTLINIE 2002/96
(WEEE)
Zum Schutz von Umwelt und Gesundheit, sowie um Bußgelder
zu vermeiden, muss das Gerät mit diesem Symbol getrennt vom
Hausmüll entsorgt oder bei Kauf eines Neugeräts dem Händler zurückgegeben werden. Die mit dem Symbol der durchgestrichenen Mülltonne
gekennzeichneten Geräte müssen gemäß den Vorschriften der örtlichen
Behörden, die für die Müllentsorgung zuständig sind, gesammelt warden.
Pin_P
PTESDEFRENIT
7
Page 8

8000
ES
Descripción
El módulo de mando Art. 8016 es un componenete del sistema modular de
las placas de la serie 8000.
Las placas pueden ser predispuestas para la instalación de empotre o de
superficie, eventualmente provistas de marco con protección antilluvia.
La placa puede ser instalada en la versión de empotre pared utilizando
los bastidores portamódulos Art. 8081, 8082, 8083, 8084, y también en
la versión de externo pared utilizando, además de los sobredichos chasis
portamódulos, la caja apropiada de superficie (Art. 9311, 9312, 9314) (Ver
Fig. 1A, 1B).
Dicho módulo viene suministrado con una salida tipo relé para la apertura
de la cerradura y de una salida suplementaria para el control del relé tipo
170/001.
El módulo 8016 requiere el uso de un alimentador Art. 6582
Art. 808x
Placa serie 8000, versión de
Fig. 1A
empotre.
Número de códigos programables: 100
Descripción del teclado y la bornera
+ positivo alimentación (11 V c.c. suministrados por el alimentador
6582)
- negativo alimentación
C1 entrada contacto relé de potencia (salida 1)
A1 salida contacto relé de potencia (salida 1)
OC salida de colector abierto para pilotar un posible relé externo (salida 2)
piloto verde (encendido: confirma el código)
piloto rojo (encendido: código equivocado)
0-9: Teclas para marcar los códigos
R: Tecla para anular la operación
C: Tecla para confirmar el código
Programación
Programar el CÓDIGO de activación de las salidas
1. Pulse las teclas R y 5 al mismo tiempo hasta que los pilotos verde y
rojo parpadeen.
2. Escriba la contraseña (123 por defecto) en el término de 10 segundos.
3. Pulse C mientras los pilotos verde y rojo parpadean.
4. Escriba el número de la/s salida/s que desee activar (1 = salida 1; 2 =
salida 2; 3 = salidas 1 y 2).
5. Pulse C.
6. Escriba el código que desee programar.
7. Pulse C.
Para programar otros códigos, repita la operación desde el punto 1. El
tiempo máximo para realizar las operaciones desde el punto 4 hasta el 7
es de 60 segundos.
Art. 93xx
Art. 909x
Art. 808x
Placa serie 8000, versión de
Art. 93xx
Art. 93xx
Fig. 1B
superficie.
Funcionamiento
Teclado para controlar los accesos; puede gobernar dos salidas, incluso al
mismo tiempo, previa escritura de un código secreto.
El usuario marca un código de ocho dígitos como máximo y pulsa C, tras
lo cual la salida correspondiente se activa durante un tiempo programable.
El funcionamiento (ver Procedimiento de programación “FUNCIONAMIENTO DEL DISPOSITIVO”) puede ser también de tipo On / Off: la salida
programada queda activa hasta que se compone nuevamente el mismo
código o un código valido para la misma salida. No puede haber dos códigos iguales; si durante la programación se marca un código ya presente,
se activa una indicación de error y hay que repetir la operación. Las dos
salidas tienen tiempos de activación programables y distintos entre sí pero
iguales para todos los códigos que las activan.
Programar la CONTRASEÑA (máx. 8 dígitos)
1. Pulse las teclas R y 1 al mismo tiempo hasta que los pilotos verde y
rojo parpadeen.
2. Marque la contraseña existente en el término de 10 segundos.
3. Pulse C mientras los pilotos verde y rojo parpadean.
4. Marque la nueva contraseña en el término de 60 segundos.
5. Pulse C.
Programar el TIEMPO de activación de la SALIDA 1
1. Pulse las teclas R y 3 al mismo tiempo hasta que los pilotos verde y
rojo parpadeen.
2. Escriba la contraseña (123 por defecto) en el término de 10 segundos.
3. Pulse C mientras los pilotos verde y rojo parpadean.
4. Escriba el tiempo de activación en segundos (máx. 9999).
5. Pulse C.
El tiempo máximo para realizar las operaciones desde el punto 4 hasta el
5 es de 60 segundos.
Programar el TIEMPO de activación de la SALIDA 2
1. Pulse las teclas R y 4 al mismo tiempo hasta que los pilotos verde y
rojo parpadeen.
2. Escriba la contraseña (123 por defecto) en el término de 10 segundos.
3. Pulse C mientras los pilotos verde y rojo parpadean.
4. Escriba el tiempo de activación en segundos (máx. 9999).
5. Pulse C.
El tiempo máximo para realizar las operaciones desde el punto 4 hasta el
5 es de 60 segundos.
Procedimiento de programación FUNCIONAMIENTO DISPOSITIVO:
1 Presionar el pulsador R y el pulsador 6 simultáneamente.
2 Componer el password (valor por defecto: 123) dentro de 10 segundos.
3 Pulsar “C”
4 Componer el número según el prospecto 1
5 Pulsar “C”
Prospecto 1. Programación funcionamiento. ( * valor por defecto).
Salida Relé 1 Salida relé 2 Número para program-
mar
Temporizada Temporizada 1*
Temporizada On / Off 2
On / Off Temporizada 3
On / Off On / Off 4
El tiempo máximo para las fases 4 y 5 es de 60 segundos.
8
ENFRDEESPT IT
Page 9

8000
BORRAR un código
1. Pulse las teclas R y 2 al mismo tiempo hasta que los pilotos verde y
rojo parpadeen.
2. Escriba la contraseña (123 por defecto) en el término de 10 segundos.
3. Pulse C mientras los pilotos verde y rojo parpadean.
4. Escriba el código que desee borrar.
5. Pulse C.
Para programar otros códigos, repita la operación desde el punto 1. El
tiempo máximo para realizar las operaciones desde el punto 4 hasta el 5
es de 60 segundos.
BORRAR TODOS los códigos
1. Pulse las teclas R y 2 al mismo tiempo hasta que los pilotos verde y
rojo parpadeen.
2. Escriba la contraseña (123 por defecto) en el término de 10 segundos.
3. Pulse C mientras los pilotos verde y rojo parpadean.
4. Mantenga presionadas las teclas R y 2 durante 10 segundos (el teclado parpadea).
El tiempo máximo para realizar la operación 4 es de 60 segundos.
Entrar en la programación SIN CONTRASEÑA
1. Puentee los dos contactos PIN_P situados detrás de la bornera (Fig.
2).
2. Pulse las teclas R y 7 al mismo tiempo hasta que el piloto rojo parpadee.
3. Pulse la combinación de teclas correspondiente a la programación que
desee realizar,
según lo indicado en los puntos 1 de los apartados anteriores (por
ejemplo R + 5 para
programar una salida).
4. Pulse C sin escribir la contraseña.
5. Siga las instrucciones dadas anteriormente del punto 4 en adelante.
6. Una vez concluida la programación, saque el puente de los contactos
PIN_P.
Pin_P
PT
Descrição
O módulo de comando Art. 8016 é um componente do sistema modular de
botoneiras da série 8000.
As botoneiras podem ser preparadas para a instalação de embeber ou
saliente, eventualmente fornecidas de aro con proteção antichuva.
A botoneira pode ser instalada quer na versão mural de embeber utilizando
os caixilhos portamódulos Art. 8081, 8082, 8083, 8084, quer na versão
mural saliente utilizando, para além dos sobreditos caixilhos portamódulos,
a caixa apropriada para montagem mural saliente (Art. 9311, 9312, 9314)
(Ver Fig. 1A, 1B).
Este módulo é equipado duma saída tipo relé para a abertura do trinco e de
uma saída suplementar para a pilotagem do relé tipo 170/001.
O módulo 8016 requer o uso de um alimentador Art. 6582.
Art. 808x
Botoneira da série 8000, versão
Art. 93xx
Art. 909x
Fig. 1A
de embeber
Fig. 2
Ejemplo: programar la activación de la salida 1 con el número 11223344
durante seis segundos
Pulse las teclas R y 5 al mismo tiempo, marque la contraseña y pulse C,
pulse la tecla 1 y después C, marque el número 11223344 y pulse C. Pulse
las teclas R y 3 al mismo tiempo, marque la contraseña y pulse C, pulse la
tecla 6 y después C.
El manual de instrucciones se puede descargar en la página web www.
vimar.com
NORMAS DE INSTALACIÓN.
El aparato se ha de instalar en conformidad con las disposiciones sobre
material eléctrico vigentes en el País.
CONFORMIDAD NORMATIVA.
Directiva EMC
Normas EN 61000-6-1 y EN 61000-6-3.
INFORMACIÓN A LOS USUARIOS DE CONFORMIDAD CON LA
DIRECTIVA 2002/96 (RAEE)
Para evitar perjudicar el medio ambiente y la salud de las personas,
así como posibles sanciones administrativas, el aparato marcado
con este símbolo no deberá eliminarse junto con los residuos urbanos y
podrá entregarse en la tienda al comprar uno nuevo. La recogida del aparato marcado con el símbolo del contendedor de basura tachado deberá
realizarse de conformidad con las instrucciones emitidas por las entidades
encargadas de la eliminación de los residuos a nivel local.
Art. 808x
Botoneira da série 8000, versão
Art. 93xx
Art. 93xx
Fig. 1B
saliente.
Funcionamento
Teclado para controlo dos acessos capaz de comandar duas saídas em
simultâneo através da introdução de um código secreto. O utente introduz
o código (máximo 8 dígitos) e depois, premindo C, activa a saída correspondente durante um tempo programável. O funcionamento (ver Procedimento
de programação “FUNCIONAMENTO DO DISPOSITIVO”) pode ser também de tipo On / Off: a saída programada permanece hasta que se compôr
o mesmo código ou um código válido para a mesma saída. Não podem
existir dois códigos iguais. Se, durante o procedimento de programação, se
introduz um código já existente, obter-se-á uma sinalização de erro e será
necessário repetir a operação. As duas saídas têm tempos de activação
programáveis e distintos entre si mas iguais para todos os códigos que os
activam. Número de códigos programáveis: 100
PTESDEFRENIT
9
Page 10

8000
Descrição do Teclado e Régua de bornes:
+ positivo alimentação (11V DC fornecidos pelo alimentador 6582)
- negativo alimentação
C1 entrada contacto do relé de potência (saída 1)
A1 saída contacto relé de potência (saída 1)
OC saída “open collector” para comandar um eventual relé externo (saída
2)
led verde (aceso para confirmação do código)
led vermelho (aceso para códigos errados)
0-9: Botões para introdução dos códigos
R: Botão para anular a operação
C: Botão para confirmação do código
Programação
Procedimento de programação dos CÓDIGOS de activação das saídas:
1. Premir R e o botão 5 simultaneamente, até ao acendimento alternado
dos leds verde e vermelho
2. Introduzir a Palavra-chave “Password” (123 por defeito) dentro de 10
segundos.
3. Premir “C”, com o acendimento intermitente e simultâneo dos leds
verde e vermelho.
4. Introduzir o Número da saída/s a activar (1 = saída 1 ; 2 = saída 2 ; 3
= saídas 1 e 2)
5. Premir “C”
6. Introduzir o código a programar
7. Premir “C”
Para a programação de outros códigos, repetir a operação a partir do ponto
1. O tempo máximo para as fases do ponto 4 ao 7 é de 60 segundos.
Procedimento de programação da PALAVRA-CHAVE (PASSWORD) ( máx
8 dígitos):
1. Premir R e o botão 1 simultaneamente, até ao acendimento alternado
dos leds verde e vermelho
2. Introduzir a Palavra-chave antiga dentro de 10 segundos
3. Premir “C”, com o acendimento intermitente e simultâneo dos leds
verde e vermelho.
4. Introduzir a Palavra-chave nova dentro de 60 segundos
5. Premir “C”
Procedimento de programação do TEMPO de activação da SAÍDA 1:
1. Premir R e o botão 3 simultaneamente, até ao acendimento alternado
dos leds verde e vermelho
2. Introduzir a Palavra-chave (123 por defeito) dentro de 10 segundos
3. Premir “C”, com o acendimento intermitente e simultâneo dos leds
verde e vermelho.
4. Introduzir o tempo de activação em segundos (máx 9999 segundos)
5. Premir “C”
O tempo máximo para as fases do ponto 4 ao 5 é de 60 segundos.
Procedimento de programação do TEMPO de activação da SAÍDA 2:
1. Premir R e o botão 4 simultaneamente, até ao acendimento alternado
dos leds verde e vermelho
2. Introduzir a Paalavra-chave (123 por defeito) dentro de 10 segundos.
3. Premir “C”, com o acendimento intermitente e simultâneo dos leds
verde e vermelho.
4. Introduzir o tempo de activação em segundos (máx 9999 segundos)
5. Premir “C”
O tempo máximo para as fases do ponto 4 ao 5 é de 60 segundos.
Procedimento de programação FUNCIONAMENTO DO DISPOSITIVO:
1. Premir o botão R e o botão 6 simultáneamente.
2. Compôr a password (valor por defeito: 123) dentro de 10 segundos.
3. Premir “C”
4. Compôr o número conforme a tabela 1
5. Pulsar “C”
Tabela 1. Programação do funcionamento. ( * valor por defeito).
Saída Relé 1 Saída relé 2 Número para progra-
mar
Temporizada Temporizada 1*
Temporizada On / Off 2
On / Off Temporizada 3
On / Off On / Off 4
O tempo máximo para as fases 4 e 5 é de 60 segundos.
Procedimento de CANCELAMENTO de 1 código:
1. Premir R e o botão 2 simultaneamente, até ao acendimento alternado
dos leds verde e vermelho
2. Introduzir a Palavra-chave (123 por defeito) dentro de 10 segundos.
3. Premir “C”, com o acendimento intermitente e simultâneo dos leds
verde e vermelho.
4. Introduzir o códido a cancelar
5. Premir “C”
Para a programação de outros códigos, repetir a operação a partir do ponto
1. O tempo máximo para as fases do ponto 4 ao 5 é de 60 segundos.
Procedimento de CANCELAMENTO de TODOS os códigos:
1. Premir R e o botão 2 simultaneamente, até ao acendimento alternado
dos leds verde e vermelho
2. Introduzir a Palavra-chave (123 por defeito) dentro de 10 segundos.
3. Premir “C”, com o acendimento intermitente e simultâneo dos leds
verde e vermelho.
4. Manter pressionado R + 2 durante 10 segundos (o teclado ficará intermitente)
O tempo máximo para a fase 4 é de 60 segundos.
Entrada em Programação SEM PALAVRA-CHAVE:
1. Efectuar uma ponte entre os dois contactos PIN_P situados por trás da
régua de bornes (Fig. 2)
2. Premir R e o botão 7 simultaneamente até ao acendimento intermitente do led vermelho)
3. Premir a combinação dos botões adequados para a programação pretendida conforme o indicado
nos passos 1 das fases anteriores (ex. R + 5 para programar uma
saída)
4. Premir C sem introduzir a palavra-chave
5. Seguir os procedimentos descritos anteriormente dos passos 4 em
diante.
6. Retirar a ponte entre os dois contactos PIN_P no final da programação.
Fig. 2
Exemplo: programação da activação da saída 1 com o número 11223344
durante seis segundos
Premir R e o botão 5 simultaneamente, introduzir a palavra-chave e premir
C, premir o botão 1 e depois C, introduzir o número 11223344 e depois
premir C. Premir R e o botão 3 simultaneamente, introduzir a palavra-chave
e premir C, premir o botão 6 e depois C.
É possível descarregar o manual de instruções no site www.vimar.com
REGRAS DE INSTALAÇÃO
A instalacao deve ser efectuada de acordo com as disposicoes que regulam a instalacao de material electrico, vigentes no Pais em que os produtos
sao instalados.
CUMPRIMENTO DE REGULAMENTAÇÃO
Directiva EMC
Normas EN 61000-6-1, EN 61000-6-3.
INFORMAÇÃO AOS UTILIZADORES NOS TERMOS DA DIRECTIVA 2002/96 (REEE)
Para evitar danos ao meio ambiente e à saúde humana, e evitar
incorrer em sanções administrativas, o equipamento que apresenta
este símbolo deverá ser eliminado separatamente dos resíduos urbanos
ou entregue ao distribuidor aquando da aquisição de um novo. A recolha
do equipamento assinalado com o símbolo do contentor de lixo barrado
com uma cruz deverá ser feita de acordo com as instruções fornecidas
pelas entidades territorialmente previstas para a eliminação de resíduos.
Pin_P
10
ENFRDEESPT IT
Page 11

8000
SCHEMA DI COLLEGAMENTO SISTEMA DI APERTURA SERRATURA ELETTRICA E UN SERVIZIO SUPPLEMENTARE CON TASTIERA CODIFICATA ART. 8016.
CIRCUIT DIAGRAM FOR CONNECTION OF ELECTRIC LOCK RELEASE SYSTEM AND ADDITIONAL SERVICE WITH CODED
KEYPAD TYPE 8016.
SCHÉMA DE CONNEXION DU SYSTÈME D’OUVERTURE DE LA SERRURE ÉLECTRIQUE ET UN ASSERVISSEMENT SUPPLÉMENTAIRE AVEC CLAVIER CODIFIÉ ART. 8016.
ANSCHLUSSPLAN VON TÜRÖFFNER UND ZUSATZFUNKTION MITTELS CODETASTATUR ART. 8016.
ESQUEMA DE CONEXIÓN DEL SISTEMA DE APERTURA DE LA CERRADURA ELÉCTRICA Y DE UN SERVICIO SUPLEMENTARIO
CON TECLADO CODIFICADO ART. 8016.
ESQUEMA DE LIGAÇÃO DO SISTEMA DE ABERTURA DO TRINCO ELÉCTRICO E UM SERVIÇO SUPLEMENTAR COM O TECLADO
CODIFICADO ART. 8016.
Sezione conduttori - Conductor section
Sections des conducteurs-Leiterquerschnitt Leitungslänge
Secciones conductores-Secção condutores
Conduttori-Conductors Ø fino a 50m-Ø up to 50m Ø fino a 100m-Ø up to 100m Ø fino a 200m-Ø up to 200m
Conductors-Leitungslänge Ø jusqu’à 50m-Ø bis 50m Ø jusqu’à 100m.-Ø bis 100m Ø jusqu’à 200m.-Ø bis 200m
Conductores-Condutores Øhasta 50m - até 50m Ø hasta 100m - até 100m Ø hasta 200m - Ø até 200m
-, +, OC, C1, A1 1 mm
Altri-Others-Autres
Andere-Otros-Outros 0,35 mm
2
1,5 mm2 2,5 mm
2
0,5 mm2 1 mm2
2
TRASFORMATORE
TRANSFORMER
TRANSFORMATEUR
TRANSFORMATOR
TRASFORMADOR
Art. 832/030
RETE-MAINS
RÉSEAU-NETZ
RED-REDE
PRI
015
Serratura elettrica
Electric lock
Gâche électrique
Elektrischer Türöffner
Cerradura eléctrica
Trinco eléctrico 12V~ 3A
TRASFORMATORE
TRANSFORMER
TRANSFORMATEUR
TRANSFORMATOR
TRASFORMADOR
Art. 832/030
RETE-MAINS
RÉSEAU-NETZ
RED-REDE
PRI
RELÉ - RELAY
RELAIS - RELÉ
Art. 170/001
RETE-MAINS
RÉSEAU-NETZ
RED-REDE
PRI
15 013245-+I+U BADC
Lampada o servizio ausiliario
Lamp or auxiliary service
Lampe ou service auxiliare
Lampe oder Zusatzfunktion
Lámpara o servicio auxiliario
Lâmpara o serviço auxiliar
Carico massimo
Max. load
Charge max.
Max Last
Carga máxima
3A - 230V
ALIMENTATORE
POWER SUPPLY
ALIMENTATION
NETZGERÄT
ALIMENTADOR
Art. 6582
TASTIERA
C1
KEYPAD
A1
CLAVIER
+
TASTATUR
OC
TECLADO
-
ART. 8016
2
1
5
4
78
0
R
3
6
*
9
C
N° p4708
PTESDEFRENIT
11
Page 12

Vimar SpA: Viale Vicenza, 14
36063 Marostica VI - Italy
Tel. +39 0424 488 600 - Fax (Italia) 0424 488 188
Fax (Export) 0424 488 709
www.vimar.com
S6I.801.600 06 1403
VIMAR - Marostica - Italy
 Loading...