

Page 1
Guida rapida
Quick Guide
Telecamera Wi-Fi Cube - Telecamera Wi-Fi Pan Tilt
46238.036 - 46239.036
Wi-Fi Cube video camera - Wi-Fi Pan Tilt video camera
Page 2
46238.036 - 46239.036
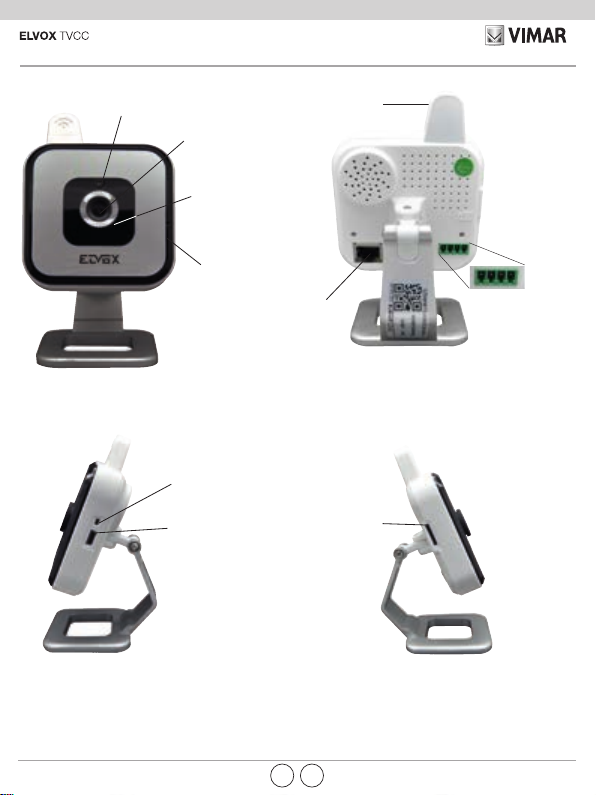
Caratteristiche - Characteristics
Fotoresistore
Photoresistor
Obiettivo HD
HD Lens
Luce LED visione
notturna agli infrarossi
Infrared LED light for
night vision
Microfono
Microphone
Fig. 1 - Fronte e retro / Front and rear sides
Tasto di reset
Reset button
Alimentazione
Power supply
Antenna Wi-Fi
Wi-Fi antenna
Porta di rete
Network port
Slot per scheda di
memoria TF
TF memory card slot
1 2 3 4
Morsetti I/O allarme
Alarm I/O terminals
Fig. 2 - Lato destro e sinistro - Right and left side
2
IT
EN
Page 3

46238.036 - 46239.036
Caratteristiche - Characteristics
Fotoresistore
Photoresistor
Obiettivo HD
HD Lens
Luce LED visione
notturna agli infrarossi
Infrared LED light for
night vision
Microfono
Microphone
Fig. 3 - Fronte e retro / Front and back
Slot per scheda di
TF memory card slot
Tasto di reset
Reset button
memoria TF
Uscita audio
Audio output
Porta di rete
Network port
Alimentazione
Power supply
46238.036, 46239.036
Morsetti/Terminals
Uscita (5 V 0,5 A)
1 - 2
Output (5 V 0.5 A)
3 - 4
Ingresso
Input
Antenna Wi-Fi
Wi-Fi antenna
1 2 3 4
Morsetti I/O
allarme
Alarm I/O
terminals
Fig. 4 - Fondo della telecamera - Video camera bottom
IT
EN
1
Page 4

46238.036 - 46239.036
Disclaimer funzionamento per telecamere Wi-Fi
Le telecamere Wi-Fi (art. 46238.036 e 46239.036) consentono la visualizzazione delle immagini sullo smartphone e/o tablet dell’acquirente (di seguito "Cliente"), tramite
la semplice installazione dell’App Vimar Wi-Fi Cam.
La visualizzazione delle immagini è consentita solo
tramite la presenza, nell’abitazione/edicio in cui viene
installata, di una connessione ad una rete Wi-Fi domestica con accesso ad Internet che deve avere le seguenti
caratteristiche:
• Standard IEEE 802.11 b/g/n (2,4 GHz)
Modalità operative:
• Reti: WEP, WPA e WPA2.
• Per reti WPA e WPA2 sono supportati i ciphers TKIP e
AES.
• Non supportate reti “nascoste” (hidden SSID).
Per utilizzare il servizio Il Cliente deve dotarsi di apparecchiature tecniche che consentono il collegamento
alla rete internet e sottoscrivere un accordo con un ISP
(Internet Service Provider); tale accordo può comportare dei costi legati. Vimar rimane estranea dalla scelta
delle apparecchiature tecniche e dall’accordo con l’ISP
(Internet Service Provider). Il consumo dei dati tramite
l’utilizzo dell’App Vimar Wi-Fi Cam, sia nell’abitazione/
edicio sia fuori dalla rete Wi-Fi di cui il Cliente si è dotato per l’installazione, rimane a carico del Cliente.
L’interazione e il corretto funzionamento da remoto tramite l’App Vimar Wi-Fi Cam, attraverso la rete Internet
del proprio gestore di telefonia/dati mobile, con la telecamera Wi-Fi installata dal Cliente (art. 46238.036 e
46239.036) possono dipendere da:
a) tipologia, marca e modello dello smartphone o del
tablet;
b) qualità del segnale Wi-Fi;
c) tipologia del contratto di accesso alla rete internet
dell’abitazione;
d) tipologia del contratto dati sullo smartphone e tablet.
Le telecamere (art. 46238.036 e 46239.036) supportano il collegamento tramite la tecnologia P2P, è quindi
necessario vericare che il proprio ISP (Internet Service
Provider) non ne preveda il blocco.
Vimar è esente da qualsiasi responsabilità per eventuali
malfunzionamenti dovuti a non conformità alle speciche tecniche minime necessarie per il funzionamento
del prodotto che vengono sopra indicate e citate nella
presente guida rapida nella sezione “Soluzioni a possi-
2
bili problematiche e consigli” e nel “manuale per il col-
legamento e l’uso telecamera P2P IP Wi-Fi” disponibile
nella scheda di prodotto al seguente indirizzo Internet:
faidate.vimar.com.
Il Cliente dovrà inserire una propria password. In caso
di richiesta di assistenza da parte del Cliente al centro
di assistenza Vimar, per poter accedere al sistema,
verranno richieste le credenziali di accesso. A chiusura
dell’intervento la password DOVRA’ ESSERE MODIFICATA. I dati raccolti durante il periodo di assistenza
saranno trattati in base a quanto previsto dalla nostra
informativa trattamento dati personali prodotto consulta-
bile al sito www.vimar.com e solo per i ni di assistenza
del Cliente.
Conformità Normativa
Direttiva RED
Norme EN 301 489-17, EN 300 328, EN 62311,
EN 60950-1, EN 55032, EN 55024, EN 61000-3-2, EN
61000-3-3
Vimar SpA dichiara che l’apparecchiatura radio è conforme alla direttiva 2014/53/UE. Il testo completo della
dichiara- zione di conformità UE, il manuale di istruzio-
ne e il software di congurazione sono disponibili nella
scheda di prodotto al seguente indirizzo Internet:
faidate.vimar.com
RAEE - Informazione agli utilizzatori
Il simbolo del cassonetto barrato riportato sull’apparecchiatura o sulla sua confezione indica che
il prodotto alla ne della propria vita utile deve
essere raccolto separatamente dagli altri riuti.
L’utente dovrà, pertanto, conferire l’apparecchiatura
giunta a ne vita agli idonei centri comunali di raccolta dierenziata dei riuti elettrotecnici ed elettronici. In
alternativa alla gestione autonoma, è possibile consegnare gratuitamente l’apparecchiatura che si desidera
smaltire al distributore, al momento dell’acquisto di una
nuova apparecchiatura di tipo equivalente. Presso i di-
stributori di prodotti elettronici con supercie di vendita
di almeno 400 m2 è inoltre possibile consegnare gratuitamente, senza obbligo di acquisto, i prodotti elettronici
da smaltire con dimensioni inferiori a 25 cm. L’adeguata
raccolta dierenziata per l’avvio successivo dell’apparecchiatura dismessa al riciclaggio, al trattamento e allo
smaltimento ambientalmente compatibile contribuisce
ad evitare possibili eetti negativi sull’ambiente e sulla
salute e favorisce il reimpiego e/o riciclo dei materiali di
cui è composta l’apparecchiatura.
IT
Page 5

46238.036 - 46239.036
Installazione
1. Scaricare l’applicazione "Vimar Wi-Fi cam" nel proprio smartphone da Google Play (per
versione Android) o App Store (versione iOS).
In alternativa è possibile scaricare l’Applicazione al seguente indirizzo:
Versione Android: https://play.google.com/store/apps/details?id=com.vimar.elvox.wi_cam&hl=it
Versione iOS: https://itunes.apple.com/it/app/elvox-wi--cam/id1052793959?mt=8
2. Collegare l’alimentazione.
Eettuare i collegamenti della telecamera IP con l'alimentatore, vedi esempio sotto:
C/
Dopo avere collegato l’alimentazione elettrica, viene emessa una segnalazione acustica.
3. Setup rapido e collegamento rete.
Accertarsi che il proprio smartphone sia connesso al router di casa in dotazione e lanciare l’applicazione.
Per funzionare correttamente l’impostazione “DHCP” (protocollo di congurazione IP dinamica) del
proprio router deve essere attiva (vericare facendo riferimento al manuale del router in dotazione).
3.1 fare clic su "clicca qui per aggiungere camera" (per Android) oppure "Aggiungi" (per iOS)
3.2 fare clic su "Setup Rapido".
3.3
Il nome identicativo della propria rete, appare in automatico (service set identier, o SSID).
Immettere la password della propria rete Wi-Fi.
3.4 Attendere la ne della connessione della telecamera segnalata dalla ne della segnalazione acustica, questa fase dura circa 40 secondi.
N.B.
se entro il tempo indicato la telecamera non smetterà di suonare ripetere nuovamente dal
passo 3.2.
3.5 Se la connessione con “setup rapido WiFi" (per Android) “setup rapido” (per iOS) avesse esito
negativo passare alla connessione tramite cavo: collegare la telecamera al proprio router tramite
il cavo rete in dotazione, vedi gura 1 e 3 (porta di rete). Per utilizzare la telecamera tramite la
rete Wi-Fi, prima di scollegare il cavo è necessario aggiungere il dispositivo (vedi par. 4.1 successivo preferendo opzione A) inserire i dati della propria rete Wi-Fi, accedere al menù dedicato
IT
3
Page 6

46238.036 - 46239.036
Online
alla telecamera e cliccare in successione, per versione Android: "Modica camera", "Avanzato"
e "Gestione reti Wi-Fi". Per versione iOS: "Impostazioni Avanzate" e "WiFi" selezionando il
nome identicativo della propria rete e successivamente inserire la password, cliccare "OK" per
Android e "Connetti" per iOS.
3.6 Connessione solo via cavo: collegare la telecamera al proprio router tramite il cavo rete in do-
tazione, vedi gura 1 e 3 (porta di rete), per aggiungere il dispositivo vedi par. 4.1 successivo,
preferendo opzione A.
4 Aggiungere il dispositivo
4.1 fare clic su "AVANTI" (per Android), "Salta" (per iOS) dopo aver congurato correttamente la telecamera al router (passi 3.1, 3.2 e 3.3 oppure passi 3.5 e 3.6 precedenti).
4.2 Aggiungere un dispositivo tramite una delle seguenti tre opzioni:
Opzione A (consigliata): selezionare "Scansione" per eettuare la scansione del codice QR
riportato sul lato inferiore della telecamera.
Opzione B: selezionare "Ricerca" per eettuare la ricerca nella rete LAN e selezionare il disposi-
tivo da aggiungere.
Opzione C: inserire manualmente i dati, inserire i dati UID disponibili sul lato inferiore della teleca-
mera (sotto al QR code).
4.3. Inserire la password della telecamera: digitare "admin" e cliccare su ‘’OK’’ per salvare.
Se ci sono più telecamere ripetere da 4.1.
1
4.4 Cambio Password
Alla prima visualizzazione on line viene chiesto di cambiare la password di accesso (la vecchia
password è "admin").
4.5 Visualizzazione immagini
Tornare alla schermata principale dell’Applicazione, il dispositivo viene visualizzato ‘’on line’’. sele-
zionare la telecamera per accedere alla pagina di visualizzazione dell'immagine video.
4
ITIT
Page 7

46238.036 - 46239.036
Online
Per la gestione degli allarmi (notiche) e registrazioni, consultare i manuali disponibili nella scheda prodotto al seguente indirizzo internet: faidate.vimar.com
Soluzioni a possibili problematiche e consigli:
* Nella fase di congurazione della connessione in Wi-Fi, accertarsi dell'intensità del segnale, tenere la
telecamera il più vicino possibile al router.
* Se il vostro router consente la connessione a 2,4 GHz oppure a 5 GHz assicurarsi che nella fase di
congurazione lo smartphone sia connesso alla rete 2,4 GHz.
* Se non si riesce ad eettuare la congurazione Wi-Fi tramite il ‘’Setup Rapido’’, vericare la corretta
digitazione della password di connessione alla rete Wi-Fi (il campo della password di connessione WiFi non può essere lasciato vuoto).
* Se si desidera cambiare le impostazioni per un'altra (o nuova) rete Wi-Fi, è necessario ripristinare il
dispositivo alle impostazioni predenite di fabbrica (vedi sotto).
* Dopo circa 30 secondi dal collegamento dell’alimentazione, la telecamera PT articolo 46239.036 ruo-
terà compiendo un test di movimentazione.
* Se si dimentica la password, è possibile ripristinare le impostazioni predenite di fabbrica e reimpostar-
la (vedi sotto).
* I tempi di connessione possono essere dovuti alla banda di upstream della propria rete di casa (che
deve essere almeno 1 Mbps, consigliata 2 Mbps.) o alla banda di download del proprio dispositivo
mobile (per un corretto funzionamento la connessione deve essere Wi-Fi o 4G con buona copertura).
Ripristino delle impostazioni di fabbrica
Individuare il tasto di “RESET”, vedi immagine 2 e 4 a pagina 3 e assicurarsi che l'alimentazione elettrica
sia collegata. Tenere premuto per almeno 30 secondi il tasto reset, al rilascio la telecamera si riavvia
automaticamente.
Caratteristiche tecniche
Range di frequenza: 2412-2472 MHz
Potenza RF trasmessa: < 100 mW (20 dBm)
IT
5
Page 8

46238.036 - 46239.036
Disclaimer for operation of Wi-Fi video cameras
Wi-Fi video cameras (art. 46238.036 and 46239.036)
allow images to be displayed on the purchaser's (hereinafter the "Customer's") smartphone and/or tablet by
simply installing the Vimar Wi-Fi Cam App.
Image display is dependent on the provision, in the
home/building of installation, of a domestic Wi-Fi network with Internet access, which must have the following characteristics:
• IEEE 802.11 b/g/n standard (2.4 GHz)
Operating mode:
• Networks: WEP, WPA and WPA2.
• TKIP and AES ciphers are supported for WPA and
WPA2 networks.
• Hidden SSIDs are not supported.
In order to use the service, the Customer must obtain
the technical equipment necessary for the Internet connection and sign a contract with an ISP (Internet Service
Provider), which may involve costs. Vimar has absolute-
ly no involvement in the choice of technical equipment
or the ISP (Internet Service Provider) contract. The cost
of the data trac necessary for use of the Vimar Wi-Fi
Cam App, both inside the home/building and beyond the
Wi-Fi network created by the Customer for its installation, will be payable by the Customer.
Remote interaction and correct operation via the Vimar
Wi-Fi Cam App, using the Internet network of the cho-
sen telephone/mobile data service provider and the Cus-
tomer-installed Wi-Fi video camera (art. 46238.036 and
46239.036), may depend on:
a) type, brand and model of smartphone or tablet;
b) Wi-Fi signal quality;
c) type of domestic Internet access contract;
d) type of data contract on the smartphone and tablet.
Video cameras (art. 46238.036 e 46239.036) use a P2P
connection, and Customers must therefore check that
their chosen ISP (Internet Service Provider) does not
block connections of this type.
Vimar has no liability for any malfunctions due to failure to
comply with the minimal technical specications necessary for operation of the product, as specied above and
as referred to in the "Problem-Solving and Advice" section of this quick guide, and in the "Manual for Connection
and Use of the P2P IP Wi-Fi Video Camera" available in
the product information at faidate.vimar.com.
The Customer must enter a password of his own choice.
In the event that the Customer requests after-sales
service from the Vimar Service Centre, the access
credentials will be requested in order to enable the
service to access the system. The password MUST BE
CHANGED after any such operation. Data acquired during the after-sales period will be processed in accordance with the provisions of our product personal data
processing policy, available at www.vimar.com, for the
sole purpose of providing the service requested by the
Customer.
Regulatory Compliance
RED Directive
Standards: EN 301 489-17, EN 300 328, EN 62311,
EN 60950-1, EN 55032, EN 55024, EN 61000-3-2,
EN 61000-3-3
Vimar SpA declares that the radio equipment complies
with Directive 2014/53/EU. The full text of the EU declaration of conformity, the instruction manual and the con-
guration software are available on the product sheet at
the following Internet address: faidate.vimar.com
WEEE - User information
The crossed bin symbol on the appliance or on its packaging indicates that the product at the end of its life must
be collected separately from other waste. The user must
therefore hand the equipment at the end of its life cycle
over to the appropriate municipal centres for the
dierentiated collection of electrical and electronic waste. As an alternative to independent
management, you can deliver, free of charge, the
equipment you want to dispose of to the supplier when
purchasing a new appliance of an equivalent type. You
can also deliver electronic products to be disposed of
that are smaller than 25 cm for free, with no obligation to
purchase, to electronic products suppliers with a sales
area of at least 400 m
for subsequent recycling, processing and environmentally conscious disposal of the old equipment helps to
prevent any possible negative impact on the environment and human health while promoting the practice of
reusing and/or recycling materials used in manufacture.
2
. Proper sorted waste collection
6
EN
Page 9

46238.036 - 46239.036
Installation
1. Download the "Vimar Wi-Fi cam” application in your smartphone from Google Play (for
Android version) or App Store (iOS version).
Alternatively, it is possible to download the Application at the following address:
Android version: https://play.google.com/store/apps/details?id=com.vimar.elvox.wi_cam&hl=it
iOS version: https://itunes.apple.com/it/app/elvox-wi--cam/id1052793959?mt=8
2. Connect the power supply.
Make the connections of the IP video camera with the power supply, see example below:
C/
After connecting the power supply, an acoustic signal is emitted.
3. Quick setup and network connection.
Make sure that your smartphone is connected to the home router supplied and launch the application.
To operate correctly, the "DHCP" (dynamic IP conguration protocol) setting of your router must be
active (check referring to the manual of the router supplied).
3.1 click on "click here to add video camera" (for Android) or "Add" (for iOS)
3.2 click on "Quick Setup".
3.3
The identication name of your network appears automatically (service set identier, or
SSID).
3.4 Wait for the end of the connection of the video camera indicated by the end of the acoustic
signalling, this phase lasts about 40 seconds.
N.B.
3.2.
3.5 If the connection with "quick WiFi setup" (for Android) "quick setup" (for iOS) fails carry out the
connection through the cable: connect the video camera to your router through the network cable
supplied, see gures 1 and 3 (network port). To use the video camera through the Wi-Fi network,
the device must be added before disconnecting the cable (see par. 4.1 below preferring option
A) enter the data of your Wi-Fi network, access the menu dedicated to the video camera and
Enter the password for your Wi-Fi network.
if within the time indicated the video camera will not stop sounding repeat again from step
EN
7
Page 10

46238.036 - 46239.036
Online
click in succession, for Android version: "Modify camera", "Advanced" and "Wi-Fi network
management". For iOS versions: "Advanced Settings" and "WiFi" selecting the identication
name of your network and then entering the password, click"OK" for Android and "Connect" for
iOS.
3.6 Connection through cable only: connect the video camera to your router using the network cable
supplied, see gure 1 and 3 (network port), to add the device see par. 4.1 below, preferring
option A.
4 Add the device
4.1 click "NEXT" (for Android), "Skip" (for iOS) after correctly conguring the video camera to the router
(steps 3.1, 3.2 and 3.3 or steps 3.5 and 3.6 above).
4.2 Add a device using one of the following three options:
Option A (recommended): select "Scan" to scan the QR code located on the bottom of the video
camera.
Option B: select "Search" to search the LAN and select the device to add.
Option C: enter the data manually, enter the UID data available on the bottom of the video camera
(under the QR code).
4.3. Enter the video camera password: type "admin" and click on ‘’OK’’ to save.
If there are several video cameras repeat from 4.1.
1
4.4 Change password
At the rst viewing online you are asked to change the login password (the old password
is"admin").
4.5 Pictures displaying
Return to the main screen of the Application, the device is displayed '' online ''. select the video
camera to access the video image display page.
8
EN
Page 11

46238.036 - 46239.036
Online
For the alarms (notications) and registrations management, consult the manuals available in the
product sheet at the following internet address: faidate.vimar.com
Solutions to possible problems and advice:
* When conguring the Wi-Fi connection, check the signal strength, keep the video camera as close as
possible to the router.
* If your router allows a 2.4GHz or 5GHz connection, make sure that the smartphone is connected to the
2.4GHz network during the conguration phase.
* If the Wi-Fi conguration has not been successful using the ''Quick Setup'', check that to have correctly
entered the password to connect to the Wi-Fi network (the Wi-Fi connection password eld can not be
left blank).
* If it is necessary to change the settings for another (or new) Wi-Fi network, it is required to reset the
device to the factory default settings (see below).
* After about 30 seconds from the power supply connection, the PT camera 46239.036 will rotate carrying
out a movement test.
* If you forget your password, it is possible to restore the factory default settings and reset it (see below).
* Connection times may be due to the upstream band of the home network (which must be at least 1
Mbps, recommended 2 Mbps.) or to the download band of the mobile device (for a correct operation
the connection must be Wi- Fi or 4G with good coverage).
Restoring the factory settings
Identify the "RESET" button, see image 2 and 4 on page 3 and make sure that the power supply is connected. Press and hold the reset button for at least 30 seconds; when released, the video camera restarts
automatically.
Technical characteristics
Frequency range: 2412-2472 MHz
RF transmission power: < 100 mW (20 dBm)
EN
9
Page 12

49400878A0 02 1803
Viale V icenza , 14
3606 3 Marosti ca VI - Ital y
www.vimar.com
 Loading...