

Page 1
46226.312DMS
MENU
MENU
IPC
IPC
Network Cable Network Cable
Network Cable
Switch
Router
Computer
Computer
F
o
c
u
s
Zoom
F
o
cus
Zoo
m
MENU
IPC
IPC
Network Cable Network Cable
Network Cable
Switch
Router
Computer
Computer
DeviceNetworkSearch
ImmediateRefresh
name
name
name
IPC
IPC
IPC
unknown
unknown
unknown
192.168.226.201
192.168.1.2
192.168.1.3
80
80
80
9008
9008
9008
255.255.
255.255.
255.255.
Modify Network Parameter
Mac Address
IP Address
Modify
CE :98 :23 :75 :35 :22
192168226. 201
255 255255. 0
192168226. 1
i
Tip: Enter the administrator password, and
then modify the network parameters.
Total Device: 3
Local IP Address:19216814
Subnet Mask:255255255 0Gateway: 1921681 1DNS21021196 6
Device Name Device Type IP AddressHttp Port Data Port
Subnet
Product Model
About
Subnet Mask
Gateway
Restore IPC Default Configuration
Fo
cus
Zoom
F
o
c
u
s
Zoom
F
o
cu
s
Zoo
m
Telecamera Dome IP a colori Day & Night, sensore CMOS 1/3", risoluzione 4 Mpx
(2592x1520), obiettivo varifocale motorizzato 3,3-12 mm, filtro IR meccanico, H.265
e H.264 Multistream, alimentazione PoE o 12 Vdc, IR 20- 30 m, funzioni WDR,
ROI, 3DNR, Mask, Motion, DC-Iris, Smart IR, RTSP, protocollo ONVIF, grado di
protezione IP66. Dimensioni: Ø 130x115 mm. Peso 710 g.
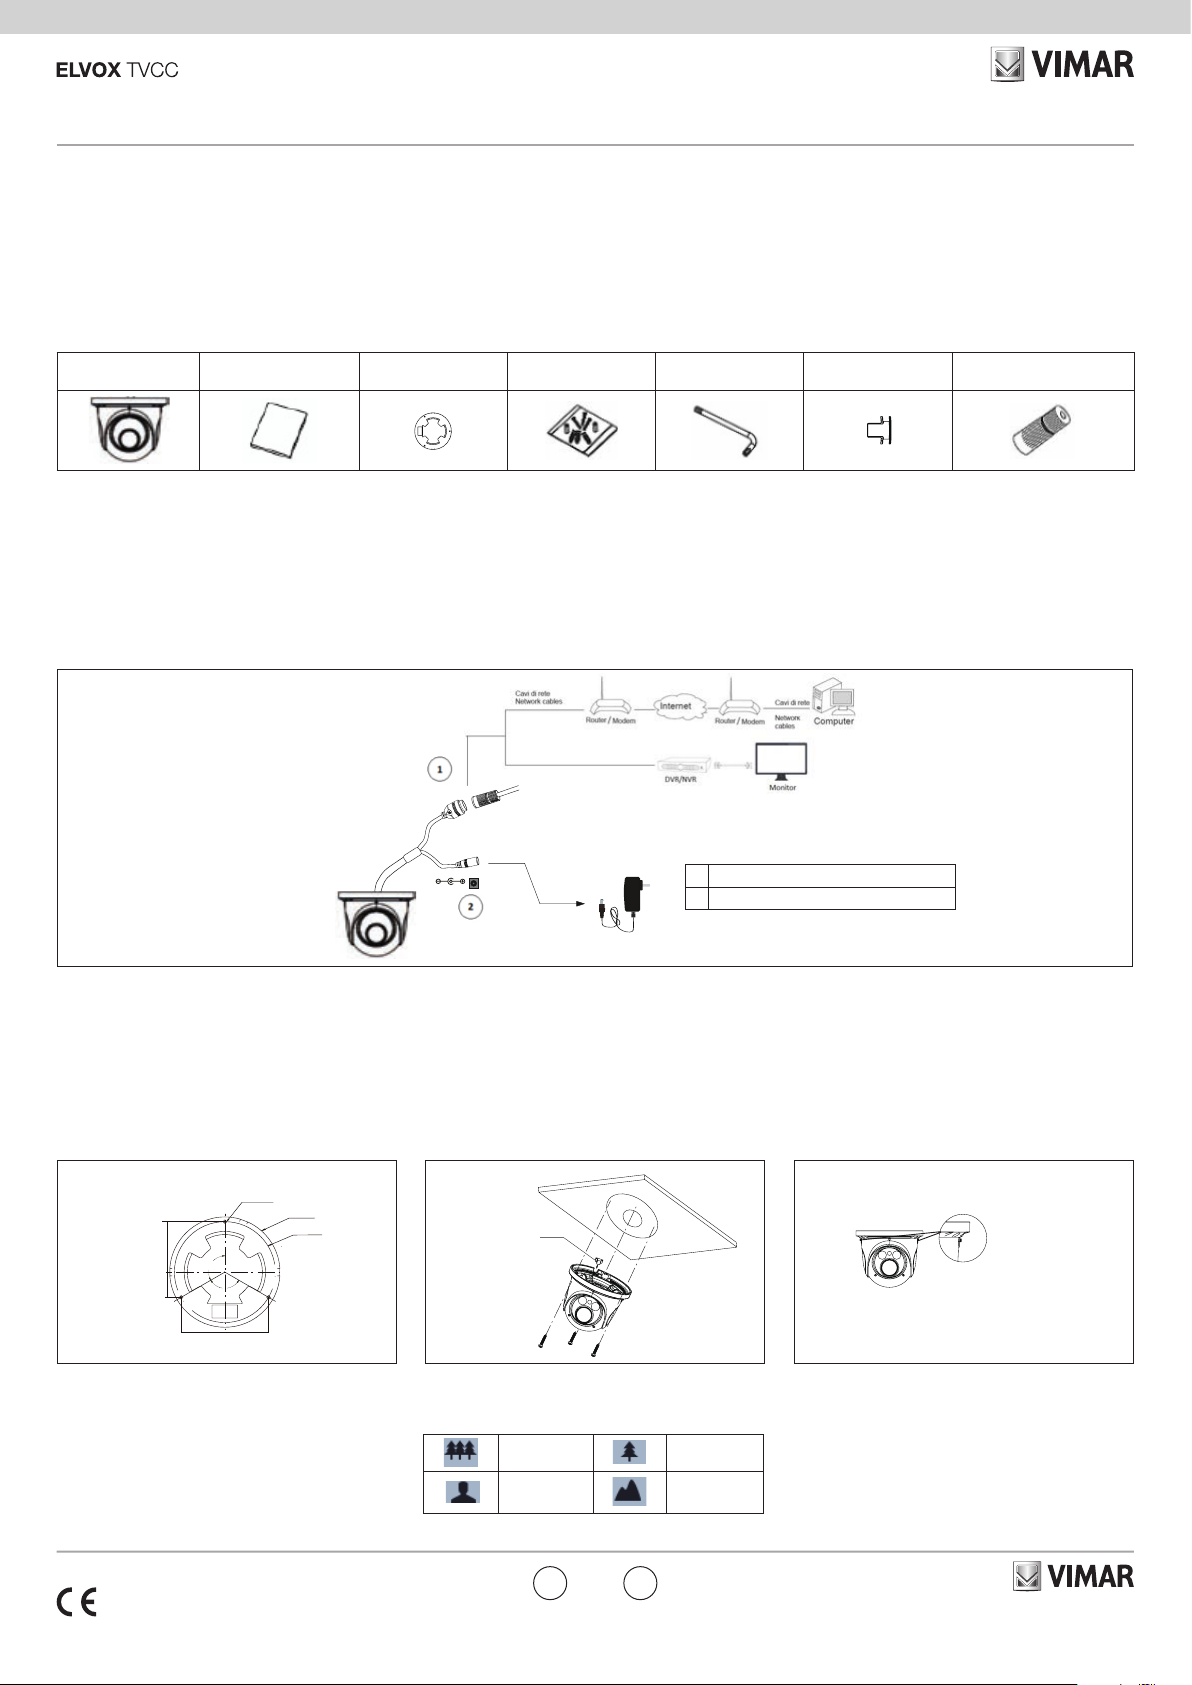
Contenuto della confezione
Una volta ricevuto il dispositivo, controllare gli accessori indicati di seguito. Le illustrazioni sotto riportate hanno solo funzione di riferimento. Far riferimento all'apparecchiatura in dotazione.
Telecamera
Camera
Istruzioni per l’uso
Quick and start guide
Dima di foratura
Drill template
Screws & spiles
Introduzione
Questa telecamera IP (abbreviato in IP-CAM) è stata progettata per fornire soluzioni
TVCC ad elevate prestazioni. Adotta chip di elaborazione video allo stato dell'arte.
Utilizza le tecnologie più avanzate, di codica e decodica video ed è conforme al
protocollo TCP/IP, SoC.(System on chip) ecc. per assicurare la stabilità e l'adabilità
del sistema. I manuali completi e i software CVM.exe, Iptool.exe e Diskcalculator.exe
sono disponibili nella scheda prodotto consultabile nel sito www.vimar.com.
Connessioni
Di seguito sono riportate le principali connessioni della telecamera.
IP Dome Day&Night colour camera, CMOS 1/3" sensor, 4 Mpx (2592x1520) resolution, 3.3-12 mm motorized varifocal lens, mechanic IR filter, H.265 and H.264
Multistream, PoE or 12 Vdc supply, IR 20- 30 m, WDR, ROI, 3DNR, Mask, Motion,
DC-Iris, Smart IR, RTSP functions, ONVIF protocol, IP66 protection degree. Dimensions: Ø 130x115 mm. Weight 710 g.
Package content
After you receive your device, please check the following accessories. The pictures
here are for reference only.
Viti
Cacciavite
Screw-driver
Gommino
Rubber plug
Cappuccio impermeabile
Water-proof Cap
Introduction
This IP-camera (short for IP-CAM) is designed for high performance CCTV solutions.
It adopts state of the art video processing chips. It utilizes most advanced technologies, such as video encoding and decoding technology, complies with the TCP/IP
protocol, SoC (System on chip), etc to ensure this system more stable and reliable.
Complete manuals and CVM.exe, Iptool.exe e Diskcalculator.exe software are available to download in the Product info sheet section of www.vimar.com website.
Connections
Here below the main connections of the camera.
Installazione
Prima di iniziare, assicurarsi che la parete o il sotto siano sucientemente solidi
per sopportare tre volte il peso della telecamera. Installare e utilizzare la telecamera
in ambiente asciutto. La procedura di montaggio è la seguente:
1) Praticare i fori per le viti e per il cavo sulla parete utilizzando la dima di foratura.
2) Passare i cavi e collegare il cavo di alimentazione e il cavo di rete.
3) Regolare attraverso la vite di ssaggio la telecamera in modo da ottenere un
angolo di ripresa ottimale. Prima della regolazione, visualizzare un'anteprima
dell'immagine su un monitor. Serrare le viti di ssaggio dopo aver completato la
regolazione dell'angolo di ripresa della telecamera.
1 - 2
59.7mm
29.9mm
4) Regolazione della messa a fuoco e dello zoom.
Questo modello di telecamera, è dotato di lente motorizzata. Utilizzare i controlli
dell'interfaccia web per modicare le impostazioni di Fuoco e Zoom.
120°
120°
103.5 mm
3
∅4.5
∅130.7
∅119.5
Gommino
Rubber plug
Zoom - Zoom +
1 Cavo di rete / Network Cable
2 Cavo alimentazione / Power Cable
Installation
Before start, please make sure that the wall or ceiling is strong enough to withstand
3 times the weight of the camera. Please install and use the camera in the dry
environment. The mounting steps are as follows:
Drill the screw holes and the cable hole on the wall according to the drill template
1)
2) Route the cables and connect the power cable and video cable.
3) Adjust the camera's xing screw to obtain an optimal shooting angle. Before
adjustment, preview the image of the camera on a monitor and then loosen the
xed ring to adjust the view angle of the camera.
3
Focu
m
s
Zoo
Vite di ssaggio
Lock screw
Fo
cus
Zoom
6) Adjustment the focusing and zoom. This type of camera is supplied of motorized
lens, it is necessary to connect to the web interface for setting the zoom and
focusing.
.
49401238A0 00 1711
Focus - Focus +
5) Remove the protective lm to complete the installation procedure.5) Per completare l'installazione rimuovere delicatamente la pellicola di protezione.
ENIT
Viale Vicenza, 14
36063 Marostica VI - Italy
www.vimar.com
Page 2

46226.312DMS
Connessione alla rete Ethernet
Come esempio, accediamo alla telecamera IP attraverso la LAN. In una LAN è
possibile accedere in due modi:
1. Accesso tramite IP-Tool
2. Accesso diretto tramite Internet Explorer
Accesso alla telecamera tramite IP-Tool
1) Assicurarsi che la telecamera e il PC siano connessi alla LAN.
2) Eseguire il download di IP-Tool dalla sezione prodotto del sito www.vimar.com e
installarlo sul computer. Inne, avviare IP-Tool come mostrato di seguito.
Network Connections
Here we take accessing IP camera via LAN for example. In LAN, there
are two ways to access.
1. Access through IP-Tool
2. Directly Access through IE Browser
Access the camera through IP-Tool
1) Make sure that the camera and the PC are well connected to the LAN.
2) download IP-Tool Product info sheet section of www.vimar.com website and then
install it in the computer. After that, run the IP-Tool as shown below.
3) Modicare l'indirizzo IP. L'indirizzo IP predenito di questa telecamera è
192.168.226.201. Fare click sulle informazioni della telecamera elencate nella
tabella sopra riportata per visualizzare le informazioni di rete sulla destra. Mo-
dicare l'indirizzo IP e il gateway della telecamera e assicurarsi che l'indirizzo
di rete si trovi nello stesso segmento della rete locale del computer. Modicare
l'indirizzo IP del dispositivo in base alla situazione specica.
Ad esempio, l'indirizzo IP del computer in uso è 192.168.1.4. Di conseguenza l'indirizzo della telecamera deve essere cambiato in 192.168.1.X.
Dopo la modica inserire la password di amministratore e fare clic sul pulsante
"Modica" per modicare l'impostazione.
La password predenita dell'amministratore è 123456.
4) Fare doppio clic sull'indirizzo IP, il sistema aprirà Internet Explorer per collegare l'IP-CAM. Internet Explorer scarica automaticamente i controlli ActiveX. Dopo il
download viene visualizzata la nestra di accesso. Immettere User Name (Nome
utente) e Password per accedere.
Il Nome Utente predenito è admin, la Password è 123456
3) Modify the IP address. The default IP address of this camera is 192.168.226.201.
Click the information of the camera listed in the above table to show the network information on the right hand. Modify the IP address and gateway of
the camera and make sure its network address is in the same local network
segment as the computer’s. Please modify the IP address of your device according to the practical situation
For example, the IP address of your computer is 192.168.1.4. So the IP address of
the camera shall be changed to 192.168.1.X.
After modication, please input the password of the administrator and click “Modify”
button to modify the setting.
The default password of the administrator is 123456.
4) Double-click the IP address and then the system will pop up the IE browser to connect
IP-CAM.
IE browser will automatically download the Active X control.
After downloading, a login window will pop up. Input the user name and password to login.
The default password of the administrator is 123456.
6.2 Accesso alla telecamera tramite Internet Explorer
Le impostazioni di rete predenite sono indicate di seguito:
- Indirizzo IP: 192.168.226.201 HTTP:80
- Subnet Mask: 255.255.255.0 Porta Dati:9008
- Gateway: 192.168.226.1
Il Nome Utente predenito è admin, la Password è 123456
49401238A0 00 1711
6.2 Directly Access Through IE
The default network settings are as shown below:
IP address: 192.168.226.201 HTTP:80
Subnet Mask: 255.255.255.0 Data Port:9008
Gateway: 192.168.226.1
The default user is admin, password of the administrator is 123456.
ENIT
Viale Vicenza, 14
36063 Marostica VI - Italy
www.vimar.com
Page 3

46226.312DMS
Speciche / Specications
46226.312DMS
Sensore/ Sensor 1/3" CMOS
Pixel immagine/Pixel image 2592 X 1520
Otturatore elettronico/Electonic
Telecamera
Cam
Immagine
Image
Connessioni
Connections
Funzioni
Functions
Altro
Other
shutter
Sensibilità/ Sensitivity 0.05 lux@F1.2, AGC ON; 0 Lux (IR led ON)
Obiettivo/Lens 3,3 - 12 mm motorizzato / motorized 3,3 - 12 mm
Diaframma automatico/Automa-
tic screen
Tipo di attacco/Fixing type Attacco / Fixing ø14
Compressione Video/Video
compression
Risoluzione/Resolution 4 MP (2592x1520), 2K (2560×1440),3 MP (2304×1296),1080P (1920×1080),720P (1280×720), D1, CIF, 480×240
Bit Rate 128Kbs ~ 8Mbs
Frame rate primario
Primary frame rate
Frame rate secondario
Secondary frame rate
Codica/ Codication VBR/CBR
Qualità/Quality Livello/Level VBR 5, CBR illimitato/unlimited
Network RJ45
Uscita Video CVBS/CVBS video
output
SD card No
RS485 No
Audio In / out 0/0
Allarme/Alarm In/ out 0/0
Funzioni/Fucntions WDR, smart IR, ROI, 3DNR, mask, motion, defog
Sorveglianza remota/remote
control
Utenti online/Online users 4 utenti, supporta la trasmissione su più ussi in tempo reale / 4 users, transmission supported on more ux in real time
Protocollo di rete/Network
protocol
Compatibilità/Compatibility Onvif
Archiviazione/Storage Archiviazione remota / Remote storage
Giorno/Notte / Day&Night ICR
PoE Sì / YES
Range IR 20-30 m
Grado/Degree IP IP66
Range temperatura/Temperatu-
re range
Alimentazione/Power supply 12 Vdc - 640mA / PoE
Consumi/Consumptions 7,7W
Dimensioni/Dimensions (mm) Ø 130x115
Peso/Weight (g) 710
Note RTSP, multi-stream, Staa inclusa / Bracket included
1/25s ~ 1/100000s / AUTO
DC IRIS automatico / automatic DC IRIS
H264 -H265
20 Fps (2592 X 1520)
20 Fps (2560 X 1440)
30 Fps (2304 X 1296)
30 Fps (1920 X 1080)
30 Fps (1280X 720)
30 Fps (1280X 720)
30 Fps (D1)
30 Fps (CIF)
30 Fps (480 X 240)
No
Browser IE, CMS per controllo da remoto / CMS for remote control
TCP/IP, UDP, DHCP, NTP, RTSP, PPPoE, DDNS, SMTP, FTP
-10° C / + 50°C con umidità/ with humidity 10% - 90%
49401238A0 00 1711
ENIT
Viale Vicenza, 14
36063 Marostica VI - Italy
www.vimar.com
Page 4

46226.312DMS
Avvertenze
- Prima di utilizzare il prodotto si raccomanda vivamente di leggere il manuale e di
conservarlo in un luogo sicuro per consultazione futura.
- Utilizzare l'alimentazione specicata per il collegamento.
- Evitare di azionare il prodotto in modo improprio, sottoporlo a urti o vibrazioni, forti
pressioni che possono danneggiarlo.
- Non utilizzare detergenti corrosivi per pulire il corpo principale della telecamera. Se
necessario, utilizzare un panno morbido e asciutto per pulirla; in caso di sporco resistente utilizzare un detergente neutro. È possibile utilizzare detergenti per mobili di
qualità.
- Non puntare la telecamera direttamente verso oggetti estremamente luminosi, ad
esempio il sole, in quanto si potrebbe danneggiare il sensore d'immagine.
- Seguire le istruzioni per installare la telecamera. Non rovesciare la telecamera, altrimenti riceverà un'immagine rovesciata.
- Non azionarla se temperatura, umidità e alimentazione non corrispondono ai limiti o
valori specicati.
Tenere lontano da fonti di calore quali radiatori, bocchette dell'aria calda, stufe e simili.
-
- Il presente documento contiene le istruzioni per l'uso del prodotto. Non è la garanzia
di qualità. Ci riserviamo il diritto di correggere errori di stampa, incongruenze con la
versione più recente, aggiornamenti del software e miglioramenti, interpretazione e
modiche al prodotto. Tali cambiamenti saranno pubblicati nella versione più recente
senza previa notica.
- Quando il prodotto è in uso, sono applicabili i contenuti di Microsoft, Apple e Google.
Le immagini e le schermate di questo manuale hanno lo scopo di spiegare l'utilizzo
del prodotto. La proprietà dei marchi commerciali, dei logo e altre proprietà intellettuali relative a Microsoft, Apple e Google appartengono alle suddette aziende.
Regole di installazione
L’installazione deve essere eettuata con l’osservanza delle disposizioni regolanti
l’installazione del materiale elettrico in vigore nel Paese dove i prodotti sono installati.
Conformità normativa
Direttiva EMC
Norme EN 55032, EN 55024
RAEE - Informazioni agli utilizzatori
Il simbolo del cassonetto barrato riportato sull’apparecchiatura o sulla sua confezione
indica che il prodottto alla fine della propria vita utile deve essere raccolto separata
mente dagli altri rifiuti. L'utente dovrà , pertanto, conferire l'apparecchiatura giunta a
-
fine vita gli idonei centri comunali di raccolta differenziata dei rifiuti elettrotecnici ed
elettronici. In alternativa alla gestione autonoma è possibile consegnare l'apparecchiatura che
si desidera smaltire al rivenditore, al momento dell'acquisto di una nuova apparecchiatura di
tipo equivalente. Pressso i rivenditori di prodotti elettronici con superficie di vendita di almeno
2
è inoltre possobile consegnare gratuitamente, senza obbligo di acquisto, i prodotti elet-
400 m
tronico da smaltire con dimensioni inferiori a 25 cm. L'adeguata raccolta differenziata per l'avvio
successivo dell'apparecchiatura dismesssa al riciclaggio, al trattamento e allo smaltimento
ambientalmente compartibile contribuisce ad evitare possibili effetti negativi sull'ambiente e
sulla salute e favorisce il reimpiego e/o riciclo dei materiali di cui è composta l'apparecchiatura.
Cautions
- Before operation, we strongly advise users to read this manual and keep it properly for using later.
- Please use the specied power supply to connect.
- Avoid from in correct operation, shock vibration, heavy pressing which can cause
damage to product.
- Do not use corrosive detergent to clean main body of the camera. If necessary,
please use soft dry cloth to wipe dirt; for hard contamination, use neutral detergent. Any cleanser for high grade furniture is applicable.
- Avoid aiming the camera directly towards extremely bright objects, such as, sun,
as this may damage the image sensor.
- Please follow the instructions to install the camera. Do not reverse the camera,
or the reversing image will be received.
- Do not operate it incase temperature, humidity and power supply are beyond the
limited stipulations.
- Keep away from heat sources such as radiators, heat registers, stove., etc.
- This is product instructions not quality warranty. We may reserve the rights of
amending the typographical errors, inconsistencies with the latest version, sof-
tware upgrades and product improvements, interpretation and modication. These changes will be published in the latest version without special notication.
- When this product is in use, the relevant contents of Microsoft, Apple and Google
will be involved in. The pictures and screenshots in this manual are only used
to explain the usage of our product. The ownerships of trademarks, logos and
other intellectual properties related to Microsoft, Apple and Google belong to the
above-mentioned companies.
Installation rules
Installation should be carried out in compliance with the current regulations regar-
ding the installation of electrical equipment in the country where the products are
installed.
Conformity to Standards
EMC Directive
Standards EN 55032, EN 55024
WEEE - User information
The crossed bin symbol on the appliance or on its packaging indicates that the
product at the end of its life must be collected separately from other waste. The
user must therefore hand the equipment at the end of its life cycle over to the
appropriate municipal centres for the differentiated collection of electrical and elec
tronic waste. As an alternative to independent management, you can deliver the equipment
-
you want to dispose of to the dealer when purchasing a new appliance of an equivalent
type. You can also deliver electronic products to be disposed of that are smaller than 25 cm
for free, with no obligation to purchase, to electronics retailers with a sales area of at least
2
. Proper sorted waste collection for subsequent recycling, processing and environ-
400 m
mentally conscious disposal of the old equipment helps to prevent any possible negative
impact on the environment and human health while promoting the practice of reusing and/
or recycling materials used in manufacture.
49401238A0 00 1711
ENIT
Viale Vicenza, 14
36063 Marostica VI - Italy
www.vimar.com
 Loading...