

Page 1
Manuale per il collegamento e l’uso
Installation and operation manual
46910.H10A
46910.H20A
46910.H24A
46910.H32A
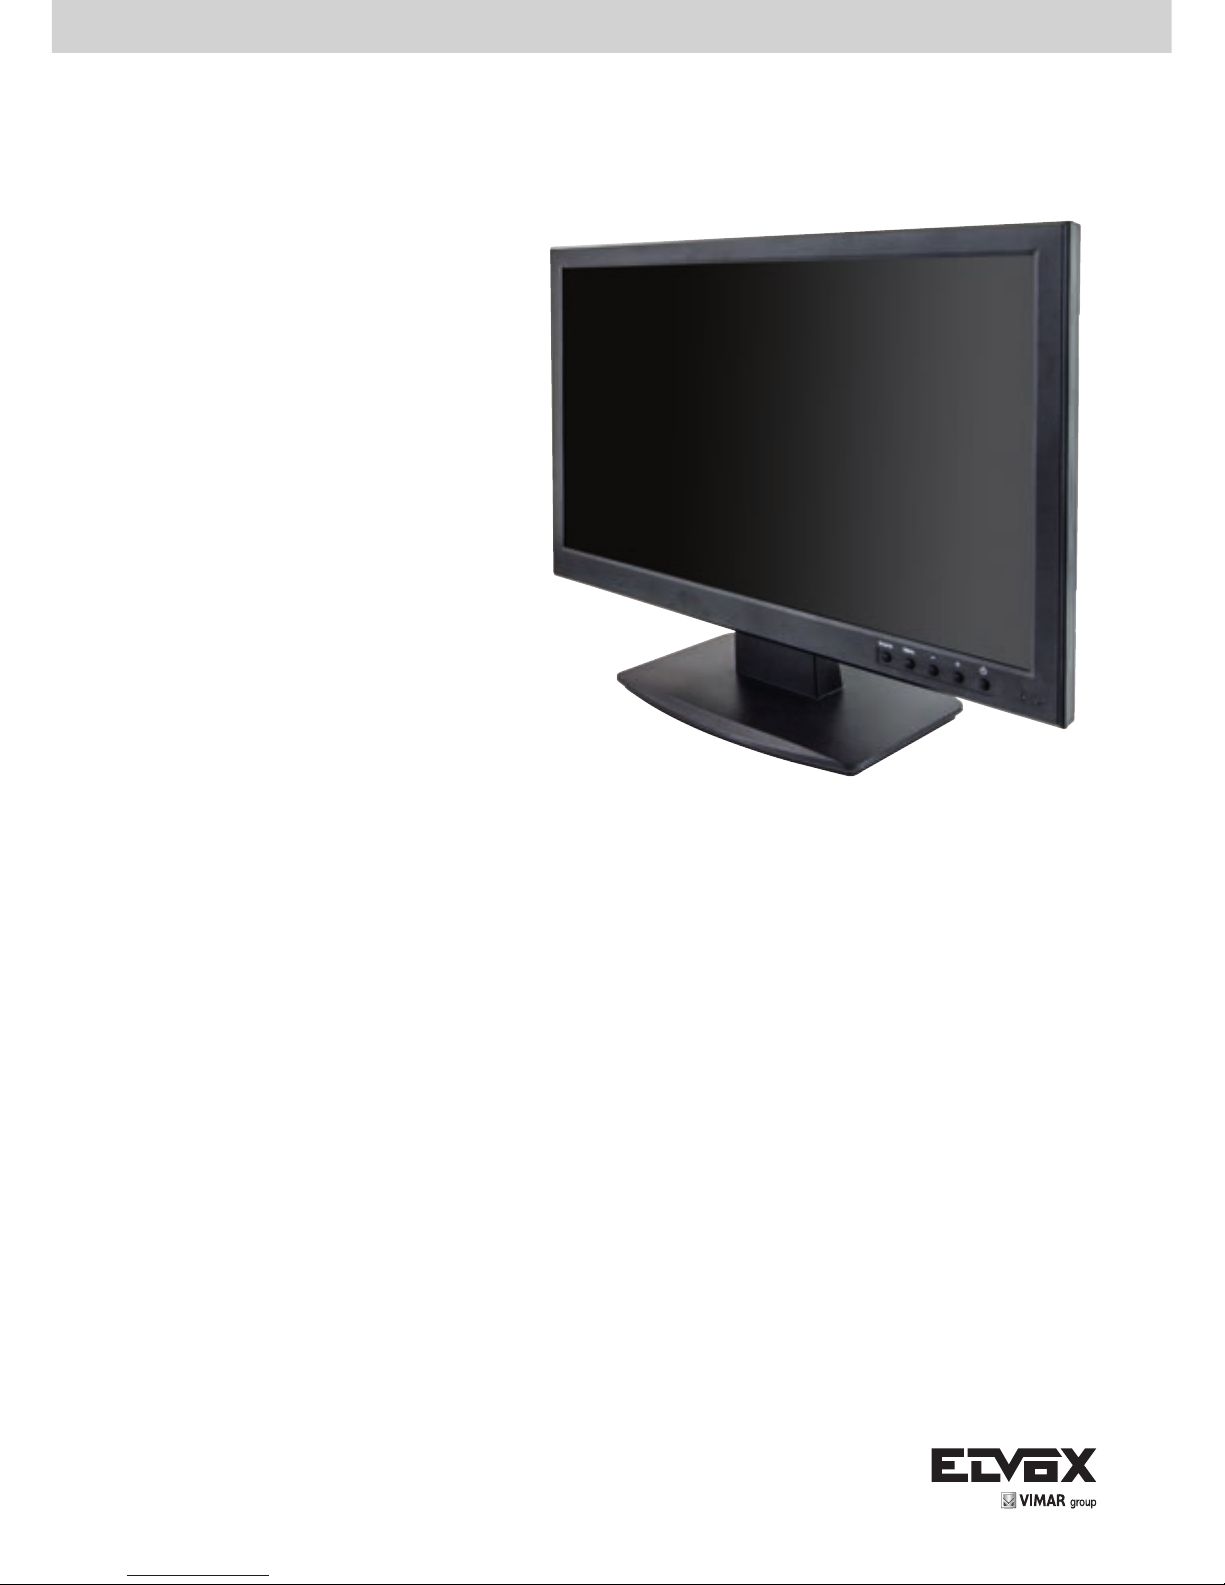
Monitor LCD
LCD Monitor
Page 2
2
IT
Indice: Pagina
1. Collegamento ................................................................................................................................................... 1
2. Disposizione comandi....................................................................................................................................... 1
3. Congurazione di base con OSD ..................................................................................................................... 1
4. AV/HDMI - Congurazione ingresso ................................................................................................................. 2
5. VGA - Congurazione ingresso ....................................................................................................................... 3
6. Speciche display ............................................................................................................................................. 4
ATTENZIONE
- Leggere attentamente questo manuale dell'utente per accertarsi di poter utilizzare il dispositivo correttamente e in
modo sicuro.
- Il manuale potrebbe contenere indicazioni tecniche non corrette ed errori di stampa. Gli aggiornamenti verranno
aggiunti alla nuova versione del manuale. Il contenuto del manuale è soggetto a modica senza preavviso.
- Utilizzare il dispositivo esclusivamente con il tipo alimentatore indicato sulla targhetta. Prima dell'uso vericare la
tensione dell'alimentazione. Se il dispositivo non deve essere utilizzato per un lungo periodo di tempo, scollegare
la spina dalla presa.
- Non installare il dispositivo vicino a fonti di calore, quali radiatori, bocchette di aria calda, stufe o altri dispositivi che
producono calore.
- Non installare il dispositivo vicino all'acqua. Pulire esclusivamente con un panno asciutto.
- Collocare il dispositivo in un'area ben ventilata.
- Questo dispositivo è un'apparecchiatura per utilizzo in ambienti chiusi. Non esporre l'apparecchiatura a pioggia
o ambienti umidi. Nel caso in cui materiali solidi o liquidi penetrino all'interno dell'apparecchiatura, disconnettere
immediatamente l'alimentazione e rivolgersi a un tecnico qualicato per far controllare il dispositivo prima di
riavviarlo.
- Non tentare di riparare il dispositivo senza l'ausilio o l'approvazione di un tecnico.
Questo prodotto è destinato esclusivamente all’utilizzo in impianti di videosorveglianza TV a circuito
chiuso. Vimar SpA non risponde per la manomissione del prodotto e per l’uso diverso da quello previsto.
Page 3
1
VIMAR group
IT
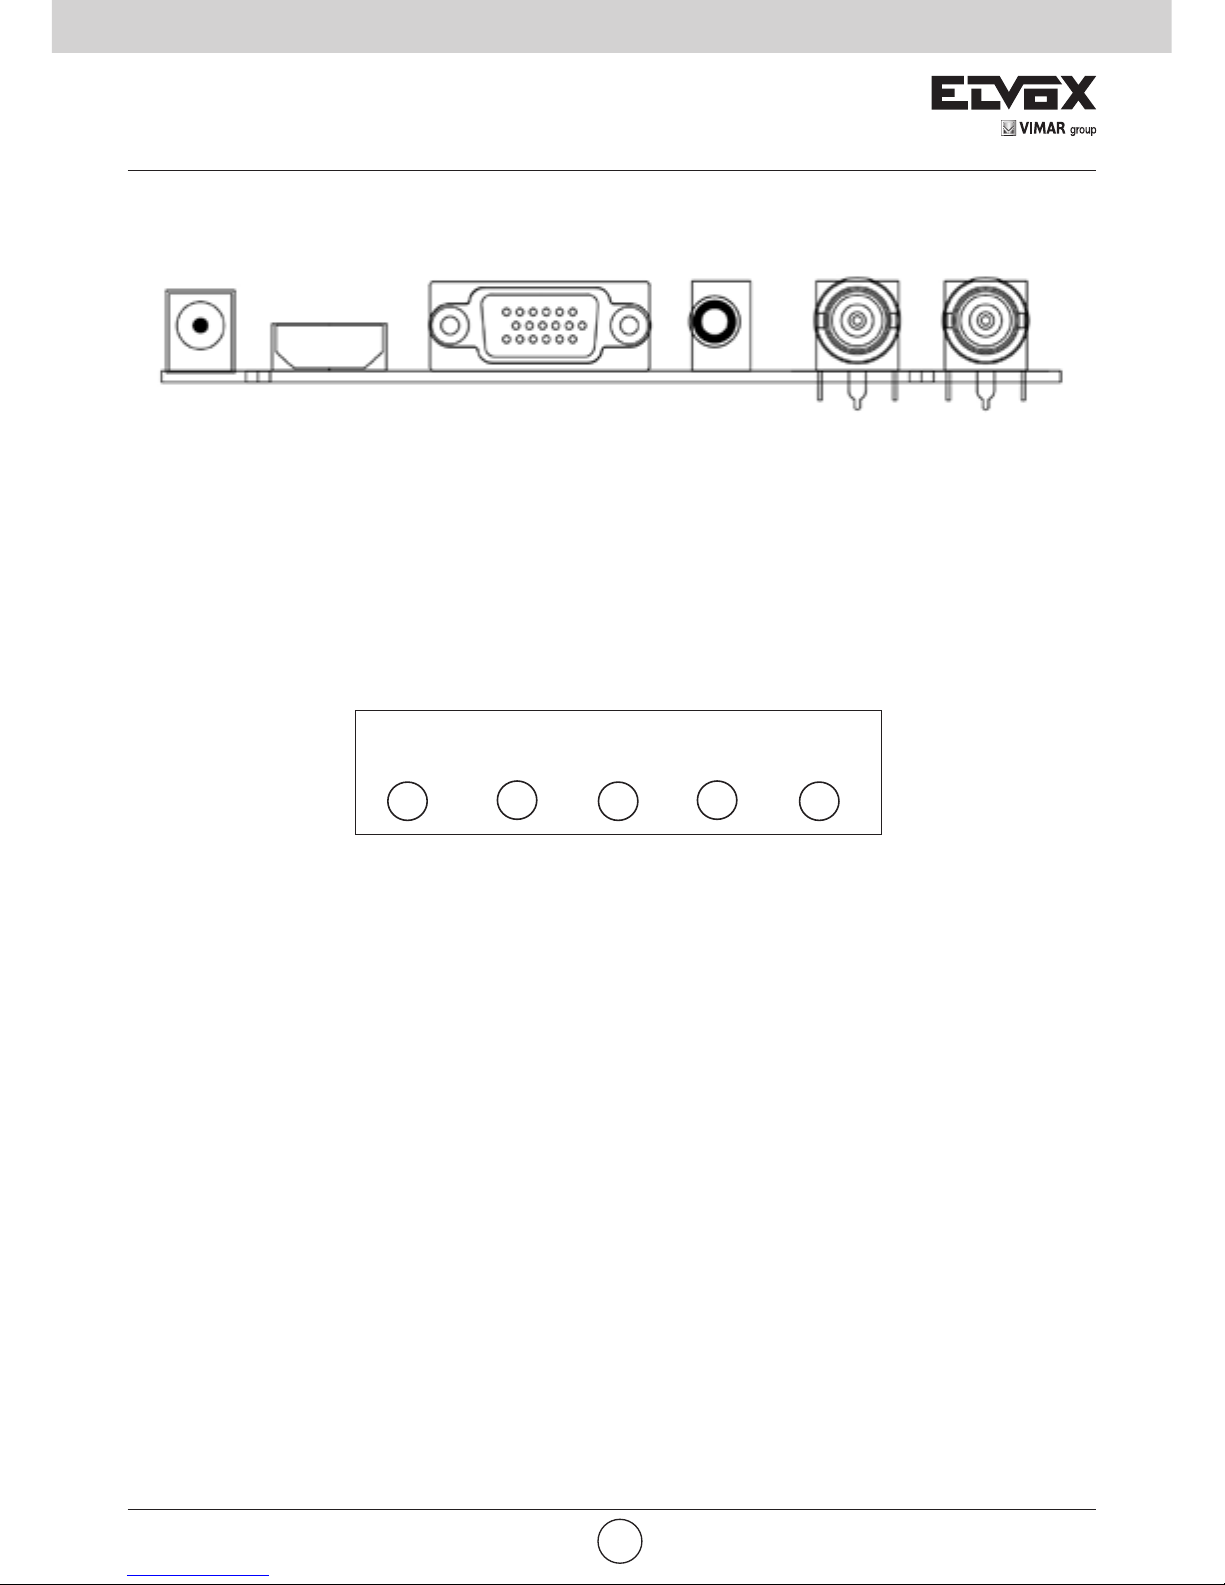
1. Collegamenti
Interfaccia posteriore
DC HDMI VGA AUDIO IN VIDEO IN VIDEO OUT
DC: usare esclusivamente l'alimentatore a 12V DC incluso con il monitor.
HDMI: (High-Denition Multimedia Interface, interfaccia multimediale ad alta denizione) supporta video digitali e
collegamenti audio.
VGA: cavo D-sub a 15 pin per connessione VGA standard.
Audio IN: collegamento con jack stereo da 3,5 mm per l'ingresso audio quando si usa il connettore VGA/AV.
VIDEO/AV IN: collegamenti BNC compatibili con ingressi video compositi da apparecchi quali telecamere o DVR.
VIDEO/AV OUT: uscita loop per segnali video compositi, collegamento a un secondo monitor.
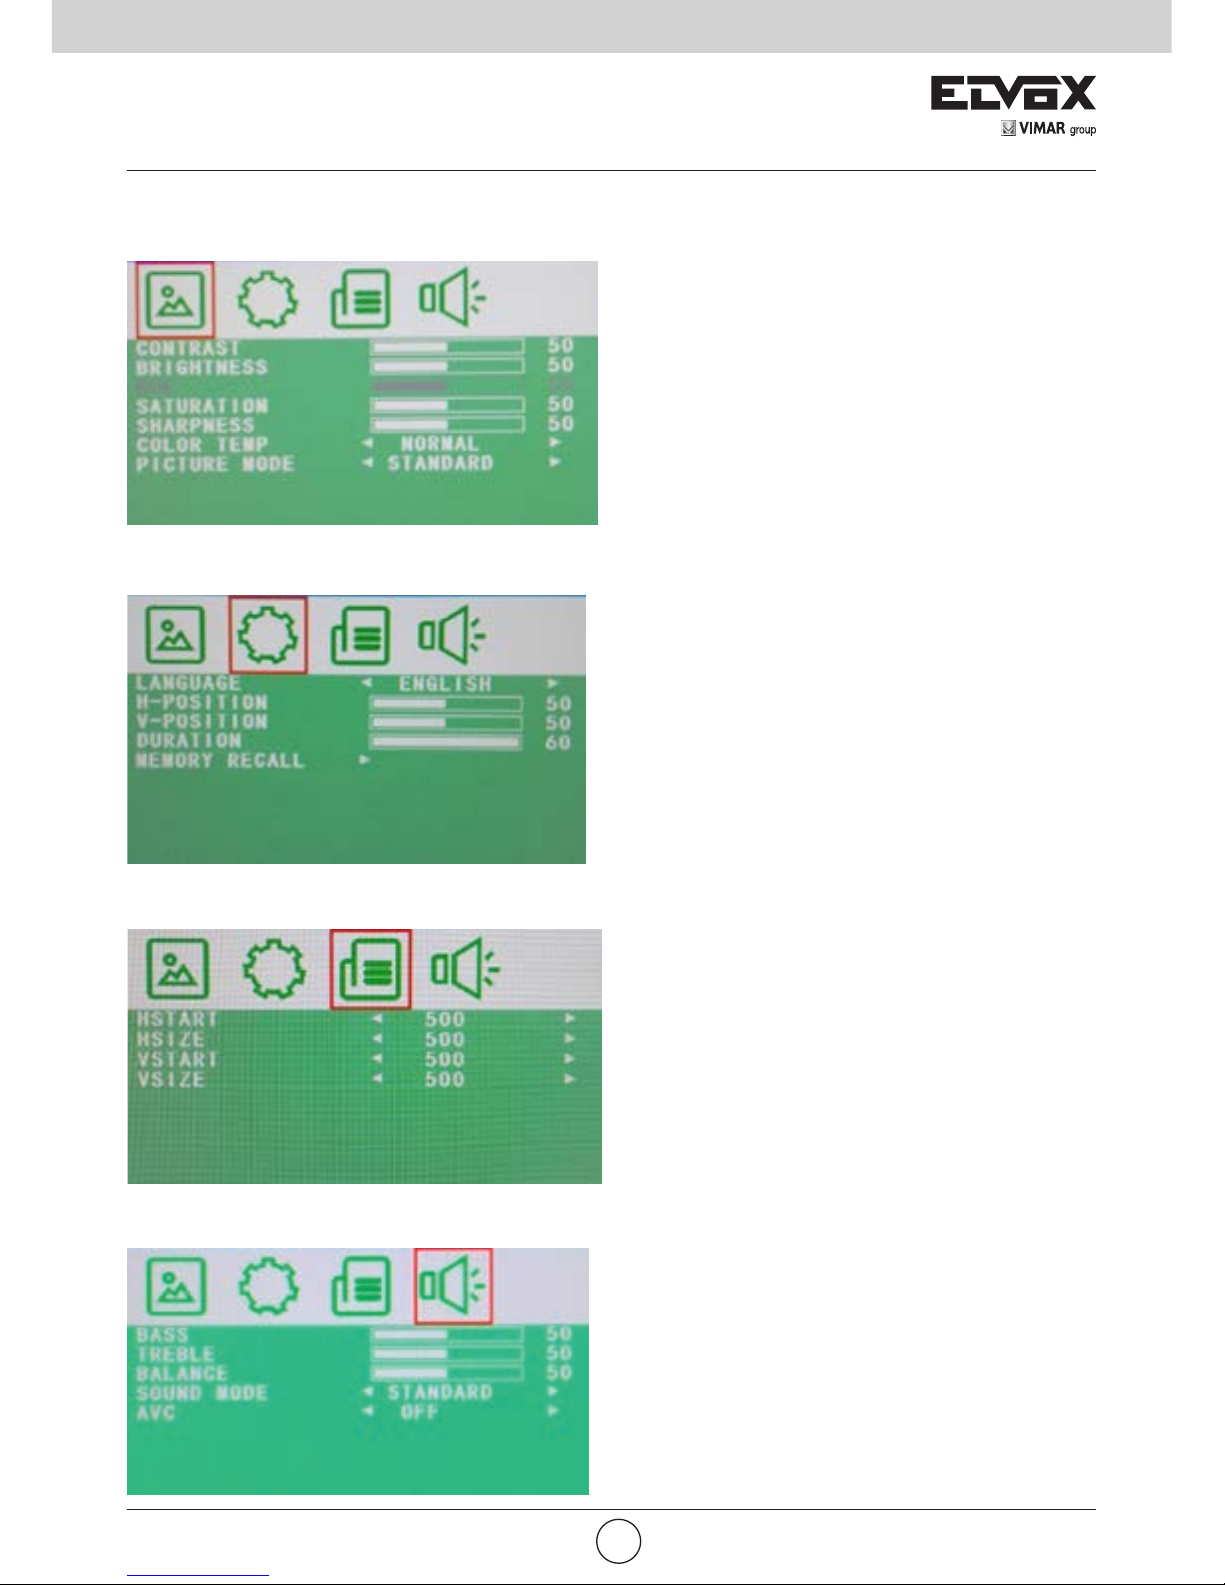
2. Disposizione comandi
Source Menu - + Power
Source: consente di selezionare il tipo di segnale di ingresso: AV, HDMI, VGA.
Menu: consente di accedere al menu visualizzato sullo schermo (OSD, On Screen Display).
+ e -: comandi per alzare/abbassare il volume, confermare la selezione del segnale in ingresso e navigare nell'OSD.
Alimentazione: consente di accendere o spegnere il monitor.
3. Congurazione di base con OSD
1- Per accedere al menu OSD premere "MENU".
2- Usare i tasti "+" o "-" per selezionare la voce di menu desiderata, quindi premere il tasto "SOURCE" per selezionare
il sottomenu.
3- Continuare a usare il tasto "SOURCE" per evidenziare il campo desiderato, quindi regolare l'impostazione con i tasti
"+" o "-".
4- Premere il tasto "MENU" per tornare al menu precedente.
5- Premere di nuovo il tasto "MENU" per uscire denitivamente dal menu OSD.
6- N.B. Per bloccare o sbloccare le impostazioni OSD dopo la congurazione. Tenere premuto il tasto "menu" per 5
secondi.
L'aspetto dell'OSD cambia in funzione dell'ingresso selezionato
Page 4
2
IT
4. AV/HDMI - Congurazione ingresso
4.1 Immagine
CONTRAST (Contrasto): (0–100) imposta la
differenza tra le aree chiare e scure dell'immagine.
BRIGHTNESS (Luminosità):( 0–100) imposta la
luminosità del video.
HUE (Tonalità): da -50 a +50 (disponibile solo per NTSC)
SATURATION (Saturazione): (0-100)
SHARPNESS (Nitidezza): (0-100)
COLOR TEMP (Temperatura colore): consente di
selezionare la temperatura del colore. (Normal/Warm/
Cool [normale/caldo/freddo])
PICTURE MODE (Modo immagine): consente di
selezionare i valori predeniti o salvare le impostazioni
personalizzate. (User/Standard/Soft/Vivid [utente/
standard/soft/vivace])
4
.2 OSD
LANGUAGE (Lingua): imposta la lingua preferita per
l'OSD. (En/Ch/Ger/Fr/Sp/It/Pt/Pl/Ru [inglese, cinese,
tedesco, francese, spagnolo, italiano, portoghese,
polacco, russo])
H POSITION (Posizione h): (0-100) posiziona
orizzontalmente l'OSD.
V-POSITION (Posizione v): (0-100) posiziona
verticalmente l'OSD.
DURATION (Durata): (5-60) specica dopo quanti
secondi l'OSD si chiude automaticamente.
MEM-RECALL (Richiama memoria): ripristina tutte
le impostazioni predenite di fabbrica.
4.3 Funzione
HSTART: imposta il punto di allineamento sinistro
dell'immagine.
HSIZE: imposta la dimensione orizzontale
dell'immagine.
VSTART: imposta il punto di allineamento inferiore
dell'immagine.
VSIZE: imposta la dimensione verticale dell'immagine.
4.4 Audio
BASS (Bassi): (0-100)
TREBLE (Alti): (0-100)
BALANCE (Bilanciamento): (da -50 a +50)
SOUND MODE (Modalità audio): consente di
impostare le congurazioni audio predenite o
personalizzate. (User/Standard/Movie/Music [utente/
standard/cinema/musica])
AVC: (ON/OFF) Automatic Volume Control (Controllo
automatico del volume)
Page 5

3
VIMAR group
IT
CONTRAST (Contrasto): (0–100) imposta la differenza
tra le aree chiare e scure dell'immagine.
BRIGHTNESS (Luminosità) ( 0–100) imposta la
luminosità del video.
COLOR TEMP (Temperatura colore): consente di
selezionare il menu della temperatura del colore.
COLOR TEMP (Temperatura colore): consente di
selezionare il preset della temperatura colore.
USER - R (Utente - rosso): imposta il livello di Rosso
personalizzato.
USER - G (Utente - verde): imposta il livello di Verde
personalizzato.
USER - B (Utente - blu): imposta il livello di Blu
personalizzato.
LANGUAGE (Lingua): imposta la lingua preferita per
l'OSD. (En/Ch/Ger/Fr/Sp/It/Pt/Pl/Ru [inglese, cinese,
tedesco, francese, spagnolo, italiano, portoghese,
polacco, russo])
H POSITION (Posizione h): (0-100) posiziona
orizzontalmente l'OSD.
V-POSITION (Posizione v): (0-100) posiziona
verticalmente l'OSD.
DURATION (Durata): (5-60) specica dopo quanti
secondi l'OSD si chiude automaticamente.
MEM-RECALL (Richiama memoria): ripristina tutte le
impostazioni predenite di fabbrica.
H POSITION (Posizione h): imposta la posizione
orizzontale dell'immagine.
V-POSITION (Posizione v): imposta la posizione verticale
dell'immagine.
CLOCK: consente di regolare manualmente la
sincronizzazione del clock.
Se l'impostazione del clock dell'immagine non è sincronizzata si potrebbero vedere periodicamente barre verticali
dovute a rumore video sull'immagine. Le barre di rumore
in genere si risolvono con una congurazione automatica.
Se le barre di rumore continuano a essere presenti, si può
usare questa impostazione per rimuoverle.
PHASE (Fase): se la fase del monitor non è regolata, l'immagine potrebbe apparire instabile sull'asse orizzontale.
Usare questa opzione per correggerla manualmente.
AUTO ADJUST (Autoregolazione): consente di eseguire
la regolazione automatica di fase, clock, posizione
orizzontale e verticale.
5. VGA - Congurazione ingresso
5.2 OSD
5.3 Geometria
5.1 Immagine
Page 6

4
IT
Specica del display
Modello 46910.H10A 46910.H20A 46910.H24A 46910.H32A
Tipo di pannello
Monitor 10,1'' (16:9)
con retroilluminazione
a LED
Monitor 19,5''/23,6" (16:9) con
retroilluminazione a LED
Monitor da 32'' (16:9)
con retroilluminazione
a LED
Tipo di case Metallo Plastica Metallo
Risoluzione migliore 1280 (H) x 800 (V) 1920 (H) x 1080 (V)
Colori 16,7 milioni
Passo pixel 0,294 (H) x 0,294(V) mm
Rapporto contrasto 800:1 500:1 3000:1
Luminosità 330 Cd/m
2
250 Cd/m
2
400 Cd/m
2
Tempo di risposta 12 ms 5 ms
Angolo di visione 160/160 80/80 178/178
Compatibilità video Multi-Standard per NTSC/PAL
Rapporto d'aspetto 16:9
Diffusori 1 x 2,5 W 2 x 2,5 W
Muto Sì
Umidità di esercizio 20 - 70 %
Temperatura di esercizio Da 10°C a +50°C
Interfaccia IN/OUT
Interfaccia video HDMI x1, VGA x 1 BNC In x1, BNC Out x1
Interfaccia audio Audio in x 1
Interfaccia alimentazione DC In x 1 AC In x 1
Certicazione Energy Star/CE/FCC/ROHS
Tipo supporto Tavolo
Colore Nero
Posizione tasti Lato anteriore Lato posteriore
Dimensioni (mm) LxAxP 250x175x35 485x300x50 570x355x50 745x440x55
Dim. (mm) LxAxP +Staffa 250x175x35 485x375x50 570x425x50 745x495x55
Peso netto/lordo 1,3 Kg / 2 Kg 2,8 Kg / 4 Kg 3,8 Kg / 6 Kg 10,5 Kg / 15 Kg
ALIMENTAZIONE
Tensione 12 VCC 100 – 240 VAC
Assorbimento <12W <30W <65W
6. Specica del display
5.4 Audio
BASS (Bassi): (0-100)
TREBLE (Alti): (0-100)
BALANCE (Bilanciamento): (da -50 a +50)
SOUND MODE (Modalità audio): consente di impo-
stare le congurazioni audio predenite o personalizzate. (User/Standard/Movie/Music [utente/standard/
cinema/musica])
AVC: (ON/OFF) Automatic Volume Control (Controllo
automatico del volume)
Page 7

5
VIMAR group
Index: Page
1. Connections......................................................................................................................................................... 6
2. Control layout ...................................................................................................................................................... 6
3. Basic on-screen display setup ............................................................................................................................. 6
4. AV / HDMI - Input Conguration ......................................................................................................................... 7
5. VGA - Input Conguration.................................................................................................................................... 8
6. Display specication ............................................................................................................................................ 9
EN
CAUTION
- Please read this user manual carefully to ensure that you can use the device correctly and safely.
- There may be several technically incorrect places or printing errors in this manual. The updates will be added into
the new version of this manual. The contents of this manual are subject to change without notice.
- This device should be operated only from the type of power source indicated on the marking label. The voltage of
the power must be veried before using. If the device doesn’t work for a long time, pull out the plug from the socket.
- Do not install this device near any heat sources such as radiators, heat registers, stoves or other device that
produce heat.
- Do not install this device near water. Clean only with a dry cloth.
- Place the device in a well-ventilated area.
- This machine is indoor using equipment. Do not expose the machine in rain or moist environment. In case any solid
or liquid get into the machine’s case, please cut off the power supply immediately, and ask for qualied technicians
to check the machine before restart
- Do not try to repair the device by yourself without technical aid or approval.
This product is intended for use solely in CCTV video surveillance systems. Vimar SpA is not responsible
for any tampering with the product or for any use other than the intended use.
Page 8

6
EN
1. Connections
Rear Interface
DC HDMI VGA AUDIO IN VIDEO IN VIDEO OUT
DC: Only use the 12V DC power supply included with the monitor.
HDMI: (High-Denition Multimedia Interface) Supports digital video and audio connections.
VGA: 15 pin D-sub cable for standard VGA connection.
Audio IN: 3.5 mm stereo jack connection for audio input when using VGA /AV connector.
VIDEO/AV IN: BNC connections supporting composite video inputs from equipment such as Cameras or DVR’s.
VIDEO/AV OUT: Composite video loop though output – connect a second monitor.
2. Control layout
Source Menu - + Power
Source: Selects input mode – AV,HDMI , VGA.
Menu: Access to the On Screen Display (OSD) menu.
+ and -: Volume controls up/down, conrm input source selecton and navigation in the OSD.
Power: Turns the monitor on or off.
3. Basic on-screen display setup
1- To access the OSD Menu press ‘MENU’.
2- Use the ‘+’ or ‘-’ buttons to select the required menu item, then press the ‘SOURCE’ button to select the Sub menu.
3- Continue to use the ‘SOURCE’ button to highlight the required eld, then press ‘+’ or ‘-’’ to adjust the setting.
4- Press the ‘MENU’ button to return to previous menu.
5- Press the ‘MENU’ button again to exit the OSD Menu completely.
6- N.B. To Lock or Unlock OSD settings after set up. Press and hold "menu" button for 5 seconds.
The layout of the OSD will change depending on the input that is selected
Page 9

7
VIMAR group
4. AV / HDMI - Input Conguration
4.1 Picture
CONTRAST: (0–100) Set the difference between the
light and dark areas of the picture.
BRIGHTNESS:( 0–100) Set how bright the display is.
HUE: -50 to +50 (only available if NTSC)
SATURATION: (0-100)
SHARPNESS: (0-100)
COLOR TEMP: Select the color temperature.
(Normal/Warm/Cool)
PICTURE MODE:Select defaults or save user setting.
(User/Standard/Soft/Vivid)
4
.2 OSD
LANGUAGE: Select preferred language for OSD.
(En/Ch/Ger/Fr/Sp/It/Pt/Pl/Ru)
H-POSITION: (0-100) Set the horizontal position of
the OSD.
V-POSITION: (0-100) Set the vertical position of the
OSD.
DURATION: (5-60) Set seconds for the OSD to
automatically close.
MEM-RECALL: Restore all factory defaults.
4.3 Function
HSTART: Set left alignment point of image.
HSIZE: Set horizontal size of image.
VSTART: Set lower alignment point of image.
VSIZE: Set vertical size of image.
4.4 Audio
BASS: (0-100)
TREBLE: (0-100)
BALANCE: (-50 to +50)
SOUND MODE: Set user or preset audio
congurations. (User/Standard/Movie/Music)
AVC: (ON/OFF) Automatic Volume Control
EN
Page 10

8
EN
CONTRAST: (0–100) Set the difference between the
light and dark areas of the picture.
BRIGHTNESS: (0–100) Set how bright the display is.
COLOR TEMP: Select the color temperature Menu.
COLOR TEMP: Select color temperature preset.
USER - R: Set RED color level.
USER - G: Set GREEN color level.
USER - B: Set BLUE color level.
LANGUAGE: Select preferred language for OSD.
(En/Ch/Ger/Fr/Sp/It/Pt/Pl/Ru)
H-POSITION: (0-100) Set the horizontal position of
the OSD.
V-POSITION: (0-100) Set the vertical position of the
OSD.
DURATION: (5-60) Set seconds for the OSD to
automatically close.
MEM-RECALL: Restore all factory defaults.
5. VGA - Input Conguration
5.1 Picture
5.2 OSD
H-POSITION: Set horizontal image position.
V-POSITION: Set vertical image position.
CLOCK: Manually adjust clock synchronisation.
(If the clock setting of your image is not ne-tuned, you
may observe periodic vertical bars of video noise on
your image. These bars of noise are usually adjusted
out when an Auto Conguration is performed. If the
bars of noise are still present, this setting can be used
to remove them.
PHASE: If the phase of your monitor is not ne-tuned,
you may observe the image being unstable in the
horizontal axis. Use this option to manually correct.
AUTO ADJUST: Perform an automatic conguration
of the Phase, Clock, vertical and horizontal position.
5.3 Geometry
Page 11

9
VIMAR group
EN
6. Display specication
5.4 Audio
BASS: (0-100)
TREBLE: (0-100)
BALANCE: (-50 to +50)
SOUND MODE: Set user or preset audio
congurations. (User/Standard/Movie/Music)
AVC: (ON/OFF) Automatic Volume Control
Display Specication
Model 46910.H10A 46910.H20A 46910.H24A 46910.H32A
Panel Type
10.1'' (16:9) LED
Backlight Monitor
19.5”/23,6” (16:9) LED Backlight Monitor 32'' (16:9) LED
Backlight Monitor
Case Type Metal Plastic Metal
Best Resolution 1280 (H) x 800 (V) 1920 (H) x 1080 (V)
Colors 16,7M
Pixel Pitch 0.294 (H) x 0.294(V) mm
Contrast Ratio 800:1 500:1 3000:1
Brightness 330 Cd/m
2
250 Cd/m
2
400 Cd/m
2
Response Time 12 ms 5 ms
Viewing Angle 160/160 80/80 178/178
Video Compatiblity Multi-Standard for NTSC / PAL
Aspect Ratio 16 : 9
Speakers 1 x 2,5 W 2 x 2,5 W
Mute Yes
Work Humidity 20 - 70 %
Work Temperature - 10 to +50 °C
IN/OUT Interface
Video Interface HDMI x1, VGA x 1 BNC In x1 , BNC Out x1
Audio Interface Audio In x 1
Power Interface DC In x 1 AC In x 1
Certication Energy Star / CE / FCC / ROHS
Stand Type Desktop
Colour Black
Button Position Front Rear
Dimensions (mm) LxAxP 250x175x35 485x300x50 570x355x50 745x440x55
Dim. (mm) LxAxP +Bracket 250x175x35 485x375x50 570x425x50 745x495x55
Net/Gross Weight 1,3 Kg / 2 Kg 2,8 Kg / 4 Kg 3,8 Kg / 6 Kg 10,5 Kg / 15 Kg
POWER
Voltage 12 Vdc 100 – 240 Vac
Power Consumption <12W <30W <65W
Page 12

Viale Vicenza, 14
36063 Marostica VI - Italy
www.vimar.com
49401115A0 00 1610
 Loading...