

Page 1

Manuale istruzioni - Instructions manual
21848
20848.1
19848.1
14848.1
Touch screen a colori 4,3" per controllo e comando, Well-contact Plus
4.3” colour touchscreen for monitoring and control, Well-contact Plus
Page 2
Page 3

Well-contact Plus
ITALIANO
Touch screen a colori 4,3" per controllo e comando, Well-contact Plus, 8 moduli ............................................... 1
ENGLISH
4.3” colour touchscreen for monitoring and control, Well-contact Plus, 8 modules. .........................................11
Page 4

Page 5

1
Well-contact Plus
IndiceIndice
INDICE
1. Descrizione ……………………………………………………………………………………………………… 2
2. Menù principale ………………………………………………………………………………………………… 2
Data e ora ………………………………………………………………………………………………………… 3
Display ……………………………………………………………………………………………………………… 3
Tono Tasti ………………………………………………………………………………………………………… 4
Unità Temperatura ………………………………………………………………………………………………… 4
Protezione…………………………………………………………………………………………………………… 4
Informazioni ………………………………………………………………………………………………………… 5
3. Gestione ambienti ……………………………………………………………………………………………… 6
4. Screen Saver ……………………………………………………………………………………………………… 8
5. Pulizia del touch screen ……………………………………………………………………………………… 9
6. Conformità normativa …………………………………………………………………………………………… 9
Page 6
2
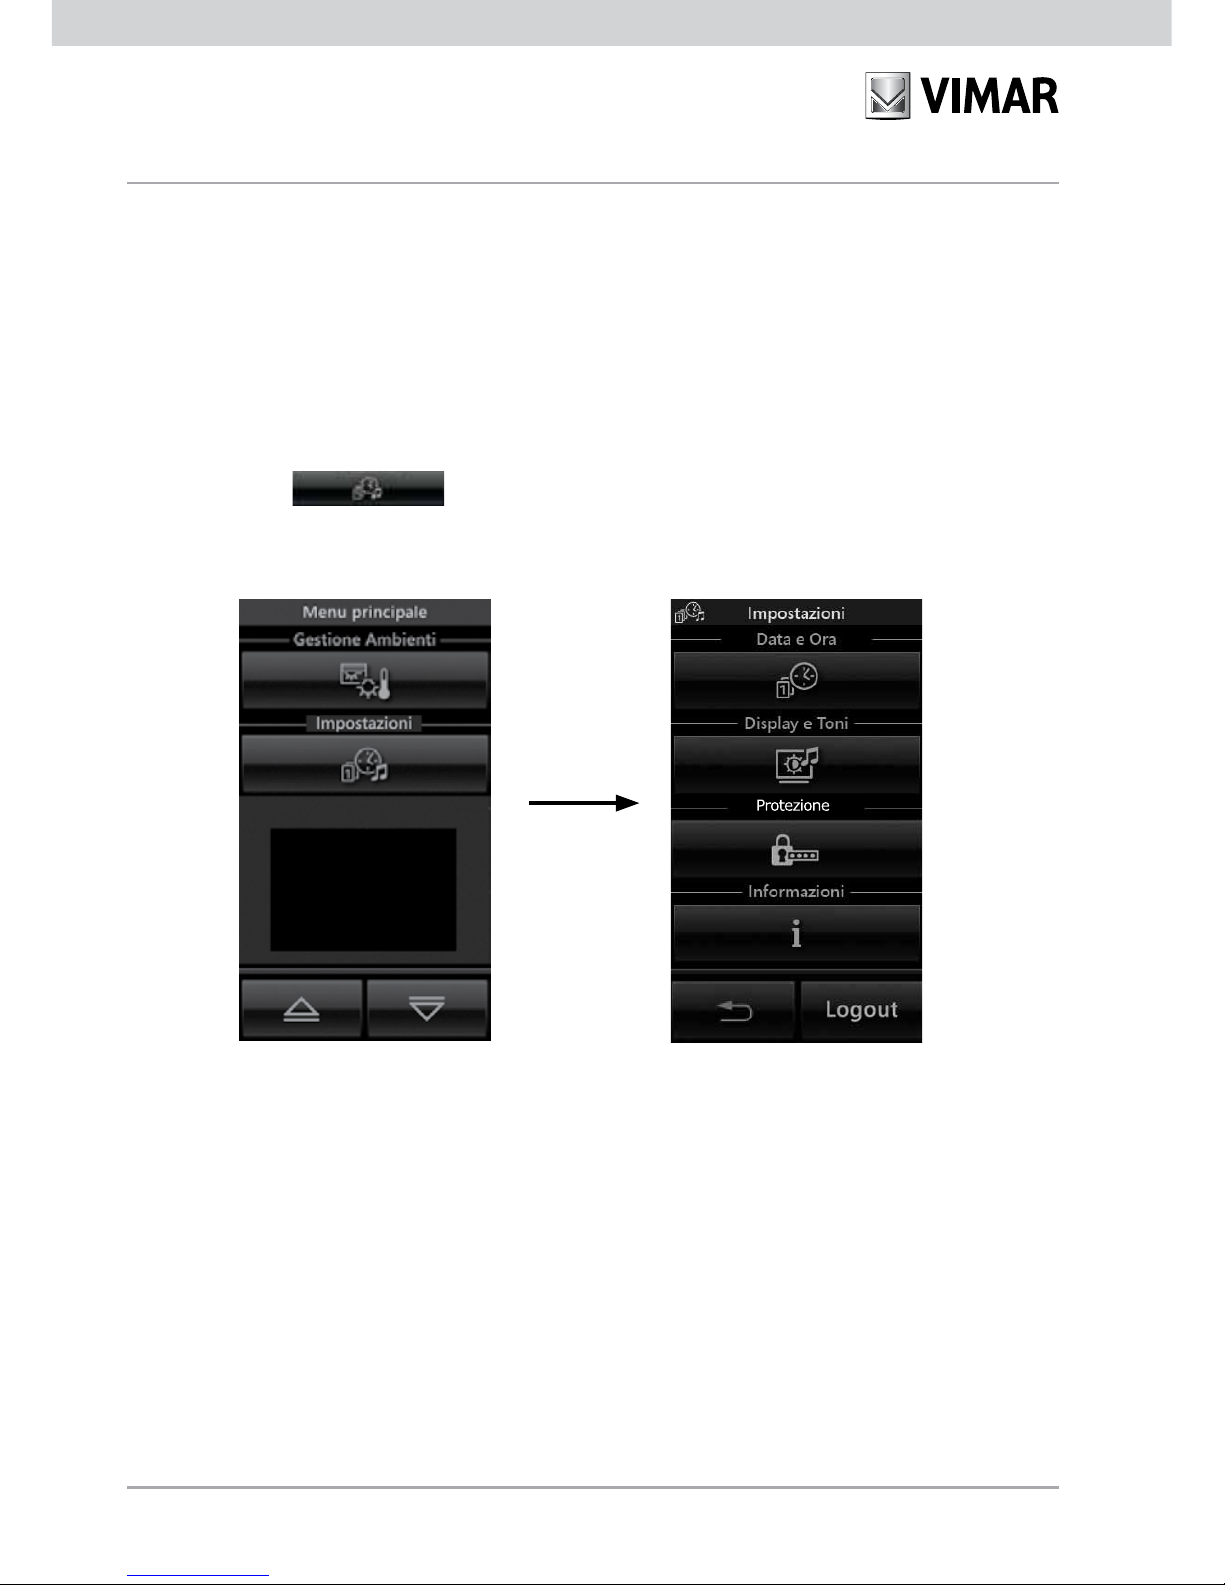
2. MENU’ PRINCIPALE.
Una volta che il touch screen è stato configurato attravero il software Configuratore Touch Screen, viene visualizzata la schermata iniziale contenente le varie sezioni per il controllo/comando di tutto l’impianto.
Toccando l’icona
si accede al menù Impostazioni.
1. DESCRIZIONE
Touch screen a colori 4,3" per controllo e comando, Well-contact Plus, completo di supporto per installazione in
scatole 8 moduli.
Descrizione - Menù principale
Page 7
3
Well-contact Plus
Menù principale
• Data e Ora
Toccando l’icona è possibile effettuare la regolazione dell’ora e della data visualizzata. Mediante
le icone e impostare il valore evidenziato fino a portarlo al giorno, mese, anno e orario desiderato.
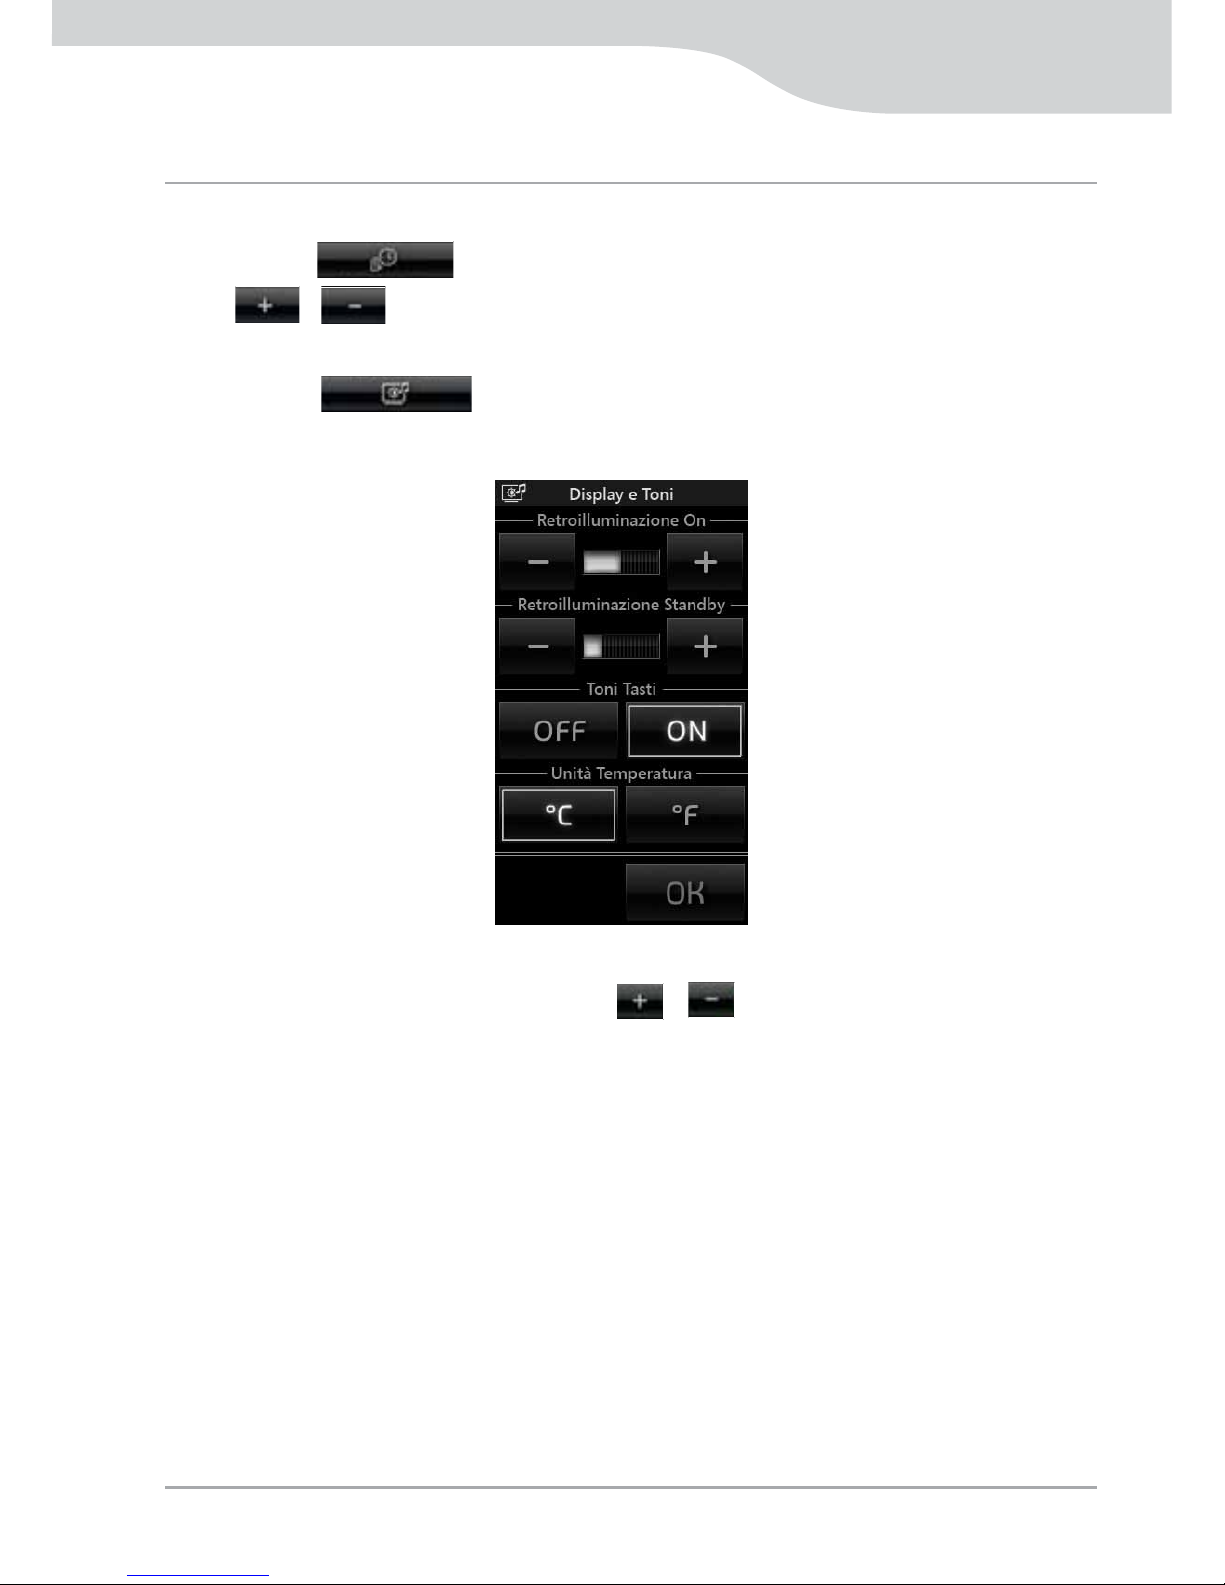
• Display
Toccando l’icona il display visualizza la videata che consente di regolare la retroilluminazione
e il contrasto del display.
L’impostazione avviene mantenendo il dito sulle icone e fino a raggiungere il livello desiderato.
Page 8

4
Menù principale
• Tono Tasti
Attraverso le icone e è possibile abilitare o disabilitare la segnalazione acustica (beep) che
accompagna il tocco delle icone visualizzate dal touch screen.
• Unità Temperatura
Attraverso le icone e è possibile selezionare l’unità di misura con la quale il touch screen
visualizzerà la temperatura dei vari ambienti dell’impianto.
Per confermare le impostazioni effettuate si tocca infine l’icona .
Per tornare alla schermata precedente toccare l’icona .
• Protezione
Toccando l’icona può essere impostata una password mediante la quale si sceglie se inibire l'accesso a tutti i menù o soltanto a quello Impostazioni.
Attraverso l'icona si attiva o disattiva la protezione di tutti i menù.
Attraverso l'icona si accede alla finestra che permette di impostare la password desiderata.
Page 9

5
Well-contact Plus
Menù principale
Una volta concluse le impostazioni desiderate (Protezione menù e/o Cambio PIN) è sufficiente toccare l'icona OK
del menù Protezione.
• Informazioni
Toccando l’icona viene visualizzata la videata che riporta la realase software e le principali
caratteristiche del touch screen.
Page 10

6
3. GESTIONE AMBIENTI.
Dal menù principale, toccando l’icona , si visualizza la videata che permette di selezionare i
diversi ambienti dell’impianto ed effettuare il comando dei dispositivi ad essi associati (luci, tapparelle, clima, ecc.).
Ad esempio, toccando l’icona in corrispondenza dell’ambiente denominato “Piano terra”, il
touch screen visualizza la seguente schermata (che ovviamente dipende dalla configurazione effettuata):
Gestione ambienti
Page 11

7
Well-contact Plus
• Toccando l’icona si effettua l’accensione/spegnimento e regolazione dell’illuminazione deno-
minata “Luce corridoio”.
• Toccando l’icona si alza e si abbassa la tapparella denominata “Tapparelle”.
• Toccando l’icona
si accede alla videata che permette la regolazione della temperatura dell’ambiente
denominato “Piano terra”. Il contenuto della videata dipende dal tipo di impianto utilizzato nel quale può essere
presente oppure no il fancoil.
La temperatura può essere variata soltanto all'interno di un determinato intervallo di valori che viene definito nel
termostato mediante il software ETS.
Quanto sopra è valido sia nel caso di funzionamento in modalità protetta che non protetta.
oppure
Gestione ambienti
Page 12

8
Gestione ambienti - Screen saver
• Toccando l’icona si visualizza la videata che consente di impostare il funzionamento (Comfort,
Standby, ecc.) dell’impianto di riscaldamento/condizionamento per l’ambiente denominato “Piano terra”.
Nel caso di funzionamento in modalità protetta sarà possibile impostare soltanto le opzioni Comfort e OFF.
• Toccando l’icona si attiva lo scenario denominato “Entrata”; lo stesso dicasi per tutte le altre icone
associate ai diversi scenari visualizzati.
• Toccando le icone e si scorre la tutta videata relativa ai gruppi e scenari relativi all’ambiente sele-
zionato.
• Toccando l’icona si accede alle videate relative a tutti gli altri ambienti dell’impianto.
4. SCREEN SAVER
Toccando l'icona che rappresenta il titolo di alcune pagine quali, ad esempio, il menù principale, le pagine degli
ambienti ecc. viene visualizzata la schermata che consente di scegliere se impostare la pagina selezionata come
pagina preferita o come screensaver (vedi figura di pagina seguente).
Page 13

9
Well-contact Plus
Pulizia del touch screen - Conformità normativa
Una volta visualizzata la videata che si desidera impostare come "preferita" ed aver toccato il titolo di tale pagina
(ad esempio "Selezione ambiente"), si hanno le seguenti possibilità per la scelta dello screensaver:
• toccando l'icona in corrispondenza di "Come Pagina preferita" si otterrà, dopo circa un minuto, lo spegnimento
dello schermo del touch screen e la visualizzazione di data e ora.
• toccando l'icona in corrispondenza di "Come Salvaschermo" si otterrà, dopo circa un minuto e indipendentemente dalla posizione all'interno dei menù, il caricamento della pagina preferita e l'abbassamento della retroilluminazione del touch screen al valore impostato come "Retroilluminazione Standby".
5. PULIZIA DEL TOUCH SCREEN
Pulire periodicamente il touch screen con un panno morbido asciutto. Non utilizzare solventi e detergenti.
6. CONFORMITÀ NORMATIVA.
Direttiva EMC
Norma EN 50428, EN 50090-2-2.
Page 14

10
Page 15

11
Well-contact Plus
TABLE OF CONTENTS
1. Description ……………………………………………………………………………………………………… 12
2. Main menu ……………………………………………………………………………………………………… 12
Date and time …………………………………………………………………………………………………… 13
Display …………………………………………………………………………………………………………… 13
Keys Tone ……………………………………………………………………………………………………… 14
Temperature Unit ………………………………………………………………………………………………… 14
Protection ………………………………………………………………………………………………………… 14
Information ……………………………………………………………………………………………………… 15
3. Area management ……………………………………………………………………………………………… 16
4. Screen saver …………………………………………………………………………………………………… 18
5. Cleaning the touch screen …………………………………………………………………………………… 19
6. Compliance with regulations ………………………………………………………………………………… 19
Table of Contents
Page 16

12
2. MAIN MENU’.
Once the touch screen has been configured with the Touchscreen Configurer software, the opening screen is
displayed containing the various sections for the control/command of the whole system.
Touching the icon
gives access to the Settings menu.
Description - Main menù
1. DESCRIPTION.
Colour 4.3" touchscreen for control and command, Well-contact Plus, complete with mounting frame for installation in boxes of 8 modules.
Page 17

13
Well-contact Plus
Main menù
• Date and Time
By touching the icon it is possible to set the time and date to be displayed. With the icons
and set the blinking value until the desired day, month, year and time are shown.
• Display
When the icon is touched the display shows the screen that allows you to adjust the back-
lighting and the contrast of the display.
This is set by holding your finger on the and icons until the desired level is reached.
Page 18

14
Main menù
• Keys Tone
With the and icons it is possible to enable or disable the acoustic signal(beep) which accom-
panies the touching of the icons displayed by the touchscreen.
• Temperature Unit
With the and icons it is possible to select the unit of measurement with which the touchscreen
will display the temperature in the various areas of the system.
To confirm the settings made, touch the icon.
To return to the previous screen touch the icon.
• Protection
By touching the icon you can set a password with which you select whether to inhibit access to all
the menus or only to the Settings menu.
With the icon you activate or deactivate protection of all the menus.
With the icon you access the window that allows you to set the desired password.
Page 19

15
Well-contact Plus
Main menù
After making the desired settings (Menu Protection and/or PIN change) simply touch the OK icon of the Protection
menu.
• Information
Touching the icon on the screen shows the softwarerelease and the main characteristics of the
touchscreen.
Page 20

16
3. AREA MANAGEMENT.
From the main menu, when the icon , is touched the display is shown which allows you to
select the different areas of the system and to control the devices associated with them (lights, roller shutters,
HVAC, etc.).
For example, when the icon is touched that corresponds to the area called “Ground Floor”,
the touch screen displays the following screen:
Area management
Page 21

17
Well-contact Plus
• Touching the icon switches on/off and adjusts the lighting called “Corridor Light”.
• Touching the icon lifts and lowers the roller shutter called “Roller shutters”.
• Touching the icon
gives access to the screen which allows you to adjust the temperature in the area
called “Ground floor”. The screen content depends on the type of system used in which there may or may not
be a fancoil.
The temperature can be varied only in a certain range of values that is defined in the thermostat via the ETS
software.
The above also applies in the case of operation in protected and non-protected modes.
Area management
or
Page 22

18
Area management - Screen saver
• Touching the icon displays the screen which allows you to set the operation (Comfort, Standby,
etc.) of the heating/air-conditioning system for the area called Ground Floor.
In the case of operation in protected mode it will be possible to set only the Comfort and OFF options.
• Touching the icon activates the scenario called Entrance; the same applies to all the other icons associated with the different scenarios displayed.
• Touching the and icons scrolls through the whole screen for the groups and scenarios of the
selected area.
• Touching the icon gives access to the screens for all the other areas of the system.
4. SCREEN SAVER
When you touch the icon for some pages, e.g. the main menu, pages for the areas, etc., a screenshot appears
that lets you choose whether you want to set the page you have selected as your home page or as your screensaver (see figure on following page).
Page 23

19
Well-contact Plus
Cleaning the touch screen - Conformity
On viewing the screen that you want to set as “home” and touching the title of this page (for instance “Area
Selection”), the following possibilities are available for selecting the screensaver:
• touching the icon on “As Home Page” will, after approximately one minute, turn off the touchscreen and the
date and time display.
• touching the icon on “Come Salvaschermo” (As Screensaver) will, after approximately one minute and regardless
of the position in the menus, load the home page and lower the backlighting of the touchscreen to the value set
as “Retroilluminazione Standby” (Standby Backlighting).
5. CLEANING THE TOUCH SCREEN.
Periodically clean the touchscreen with a soft, dry cloth. Do not use any solvents or detergents.
6. CONFORMITY.
EMC directive
Standard EN 50428, EN 50090-2-2.
Page 24

Page 25

Page 26

Viale Vicenza, 14
I 36063 Marostica VI
Tel. +39 0424 488 600
Fax (Italia) 0424 488 188
Fax (Export) 0424 488 709
http://www.vimar.com
49400484A0 02 1212
VIMAR - Marostica - Italy
 Loading...