

Villeroy & Boch A8, A8L, A6L, A5L, R8 Quick Reference
...
1
QUICK REFERENCE
To assist you with the installation and maintenance
service of your new spa, please ll out the following
information and keep it on hand for future reference.
Spa Information
Spa
Model:
Serial Number:
Dealership:
Dealer’s Phone Number:
Date Purchased:
Date Installed:
Contractor Information
General
1. Name:
Telephone:
2. Name:
Telephone:
Electrician
1. Name:
Telephone:
2. Name:
Telephone:
Concrete, Decking, and Masonry
1. Name:
Telephone:
2. Name:
Telephone:
Landscaping
1. Name:
Telephone:
2. Name:
Telephone:
2016 V&B Owners Manual.indd 1 3/3/2016 1:44:05 PM

2
TABLE OF CONTENTS
Quick Reference:
Table of Contents:
Important Overview:
Safety Instructions:
Getting to Know Your Spa:
Equipment Compartment:
Filling Your Spa:
STIL/A Series Touch:
A Series Spas (A900):
R Series Spas (R600):
X Series Spas:
Jetpaks and Jets:
Water Care and Chemistry:
Spa Maintenance:
RCD Wiring Diagrams:
Display and Error Messages:
Troubleshooting Guide:
1
2
3
4
7
9
10
11
15
20
24
26
28
30
42
43
48
2016 V&B Owners Manual.indd 2 3/3/2016 1:44:05 PM

3
IMPORTANT OVERVIEW
Congratulations on your purchase of a Villeroy & Boch Premium
Series, Comfort Series, Design Series, or X Series hot tub†.
NOTE: In this document, the terms “Spa” and “Hot Tub” are
used interchangeably. Take a moment to read this manual carefully
as you set up and use your new spa. Following the instructions in
this manual will ensure the safe, secure, and timely installation and
operation of your new spa.
Carefully read this Owner’s Manual before you install your spa.
Your Villeroy & Boch Limited Warranty will be void if damage
is caused by failure to install, maintain, and operate your spa in
accordance with the recommendations contained in this Owner’s
Manual or any other printed instruction, notice or bulletin from
Villeroy & Boch. Your spa’s serial number is located both on the
base under the equipment door and the Manufacturing ID Label
located inside the equipment compartment of your spa.
For the safety of all those who utilize your spa and its surroundings, please make sure your spa and any adjoining installations,
including the electrical hook-up, are completed only after acquiring any necessary approvals and permits from your local city and/
or country. Follow all local and national safety and wiring rules.
Some jurisdictions require certain fencing and/or self-closing and
self-latching gates to prevent accidental drowning in a pool or
spa. Your spa cover comes with a locking system which must be
utilized to ensure proper spa safety.
U.S. Patents: 7,908,684, 8,661,576, 8,881,321,
8,689,370, 8,869,469, 5,754,989, 5,987,663,
6,000,073, 6,092,246, 6,256,805, 6,543,067.
New Zealand Patent: 555112, 334,093
Australia Patent: 737,335
Canada Patents: 2,588,884, 2,260,237,
Other patents pending worldwide
† Villeroy & Boch are available in four dierent series
that include the following models:
Premium Series: A8, A8L, A8D, A7, A7L, A6L, &
A5L
Comfort Series: R8, R8L, R7, R7L, R6L & R5L
Design Series: S7L
X Series: X8, X8L, X7, X7L, X6L, X5L, & X6R
Villeroy & Boch reserves the right to change features,
specications & design without notication and
without incurring any obligation
2016 V&B Owners Manual.indd 3 3/3/2016 1:44:54 PM

4
IMPORTANT SAFETY INSTRUCTIONS
Safety Instructions
When installing and using this electrical equipment, basic safety
precautions should always be followed, including the following:
1. Read and follow all instructions:
2. WARNING: To reduce the risk of injury, do not permit children to
use this product unless closely supervised at all times.
3. A wire connector is provided on this unit to connect a solid copper
conductor between this unit and any metal equipment, metal enclosures
of electrical equipment, metal water pipe, or conduit within 1.5m of the
unit.
4. WARNING: For products provided with a cord-connected,
ground-fault circuit-interrupter, the RCD must be tested before each
use. If the RCD fails to operate properly, disconnect the power until
the fault has been identied and corrected.
5. DANGER: Risk of Accidental Drowning. Extreme caution must be
exercised to prevent unauthorized access by children. To avoid
accidents, ensure that children cannot use this spa unless they are
supervised at all times.
6. DANGER: Risk of Injury. e suction ttings in the spa are sized
to match the specic water ow created by the pump. Should the need
arise to replace the suction ttings or the pump, be sure that the ow
rates are compatible. Never operate the spa if the suction ttings are
broken or missing. Do not replace a suction tting with one rated less
than the ow rate marked on the original suction tting.
7. DANGER: Risk of Electric Shock. Install spa at least 1.5m from all
metal surfaces. A spa may be installed within 1.5m of metal surfaces if
each metal surface is permanently connected by a minimum of 8.4mm2
solid copper conductor to the wire connector on the terminal box that is
provided for this purpose.
8. DANGER: R isk of Electric Shock. Do not permit any electrical
appliances, such as a light, telephone, radio, or television within 1.5m of the
spa. ese units DO NOT have an integral ground fault circuit interrupter.
e installation of an integral ground fault circuit interrupter MUST be
completed by a qualied Electrician and must meet all applicable electrical
codes.
9. WARNING: To Reduce the Risk of Injury:
a. Water temperature in a spa should never exceed 40
˚
C. Water
temperatures bet ween 38˚C and 40˚C are considered safe for a
healthy adult. Water temperature in excess of 40˚C may be injurious
to your health. Lower temperatures are recommended for young
children and/or when spa use exceeds 10 minutes.
b. Since excessive water temperatures have a high potential for causing
fetal damage during the early months of pregnancy, pregnant, or
possibly pregnant, women should limit spa usage when temperatures
are in excess of 38˚ C.
c. Before entering the spa, measure the water temperature with an
accurate thermometer since the tolerance of water temperature
regulating devices varies.
d. e use of alcohol, drugs, or medication before or during spa use may
lead to unconsciousness with the possibility of drowning.
e. Persons suering from obesity or a medical history of heart disease,
low or high blood pressure, circulatory system problems, and/or
diabetes should consult a physician before using a spa.
f. Persons using medication should consult a physician before using a spa.
Some medications may induce drowsiness while other medication may
aect heart rate, blood pressure, and/or circulation.
10. WARNING: PEOPLE WITH INFECTIOUS DISEASES
SHOULD NOT USE A SPA OR HOT TUB.
11. WARNING: TO AVOID INJURY, EXERCISE CARE WHEN
ENTERING OR EXITING THE SPA OR HOT TUB.
12. WARNING: DO NOT USE A SPA OR HOT TUB
IMMEDIATELY FOLLOWING STRENUOUS EXERCISE.
13. WARNING: PROLONGED IMMERSION IN A SPA OR
HOT TUB MAY BE INJURIOUS TO YOUR HEALTH.
14. CAUTION: MAINTAIN WATER CHEMISTRY IN
ACCORDANCE WITH MANUFACTURER’S INSTRUCTION.
15. CAUTION: TEST THE RCD BEFORE EACH USE OF THE
SPA .
16. CAUTION: ADEQUATE DRAINAGE MUST BE PROVIDED IF
THE EQUIPMENT IS TO BE INSTALLED IN A PIT O R I NDOO RS.
17. WARNING: Risk of Fatal Hyperthermia. Hyperthermia occurs
when the internal temperature of the body reaches a level several degrees
above the normal body temperature of 37˚ C. e symptoms of
Hyperthermia include dizziness, lethargy, drowsiness, and fainting. e
use of alcohol, drugs, and/or medication can greatly increase the risk of
fatal Hyperthermia. e eects of Hyperthermia include:
• Unawareness of impending hazard
• Failure to perceive heat
• Failure to recognize the need to exit the spa
• Physical inability to exit the spa
• Fetal damage in pregnant women
• Unconsciousness and danger of drowning
18. WARNING: Risk of Children Drowning. Your spa cover is not
rated as a safety cover. It is always wise to keep the spa cover securely
fastened when not in use. is will help discourage children from
attempting to enter the spa unsupervised.
19. WARNING: Risk of Drowning. Use caution when bathing alone.
Overexposure may cause nausea, dizziness, and fainting.
20. CAUTION: Risk of Injury. Young children should be supervised so
that they do not play with the appliance.
21. WARNING: Risk of Injury: To avoid injury, exercise care when
entering or exiting the spa. Surfaces can be slippery when wet. Do not
step or sit on headrests or FilterCap
™
. Also, keep all breakable objects
away from the spa area.
22. WARNING: Risk of Injury: Short-term inhalation of high
concentrations of ozone and long-term inhalation of low concentrations
of ozone can cause serious physiological eects.
23. CAUTION: Unauthorized Access. Secure the spa area against
unauthorized access. Make sure all spa barriers (fences, enclosures, etc.)
meet all applicable national and local codes. Keep spa cover on and
locked when it is not being used.
24. CAUTION: Risk of Damage to Spa or Equipment. By performing
maintenance as described in this manual, the chance of damage to your
spa and its equipment will be reduced. Never block the air vents that
lead to the spa’s equipment compartment, doing so may cause the spa to
overheat.
25. WARNING: Risk of Electric Shock or Death. Do not operate spa
during severe weather conditions (e.g. lightning, storms, etc.).
26. CAUTION: Non-Approved Accessories. Using accessories not
approved by Villeroy & Boch could void your warranty or cause other
problems. Please consult your authorized Villeroy & Boch Spa
dea ler.
2016 V&B Owners Manual.indd 4 3/3/2016 1:45:02 PM

5
27. CAUTION: Location of Your Spa. Locate your spa on a foundation
that can support the maximum lled weight of your spa along with the
weight of all the occupants
using the spa (see Site Selection and
Preparation). Also, locate your spa in an environment that can
withstand repeated exposure to water and the possibility of a major
spill.
28. CAUTION: Cordage shall be replaced only with a special cordage
assembly available from the Manufacturer, its Service Agent, or
similarly qualied persons in order to avoid a hazard.
29. WARNING: is appliance is not intended for use by young
children or inrm persons without supervision.
30. WARNING: Before obtaining access to supply terminals, all supply
circuits must be disconnected.
31. WARNING: Risk of Injury or Accidental Drowning: Do not use
spa without lters and FilterCaps™ installed. e lters and FilterCap
serve as a barrier against bodily entrapment against the lter suction
tti ng (s).
32. WARNING: Risk to Infants, Elderly, and Women Planning
or Experiencing Pregnancy. Please consult your physician if the
above applies to you or anyone using the spa.
2016 V&B Owners Manual.indd 5 3/3/2016 1:45:02 PM

6
2016 V&B Owners Manual.indd 6 3/3/2016 1:45:09 PM
7
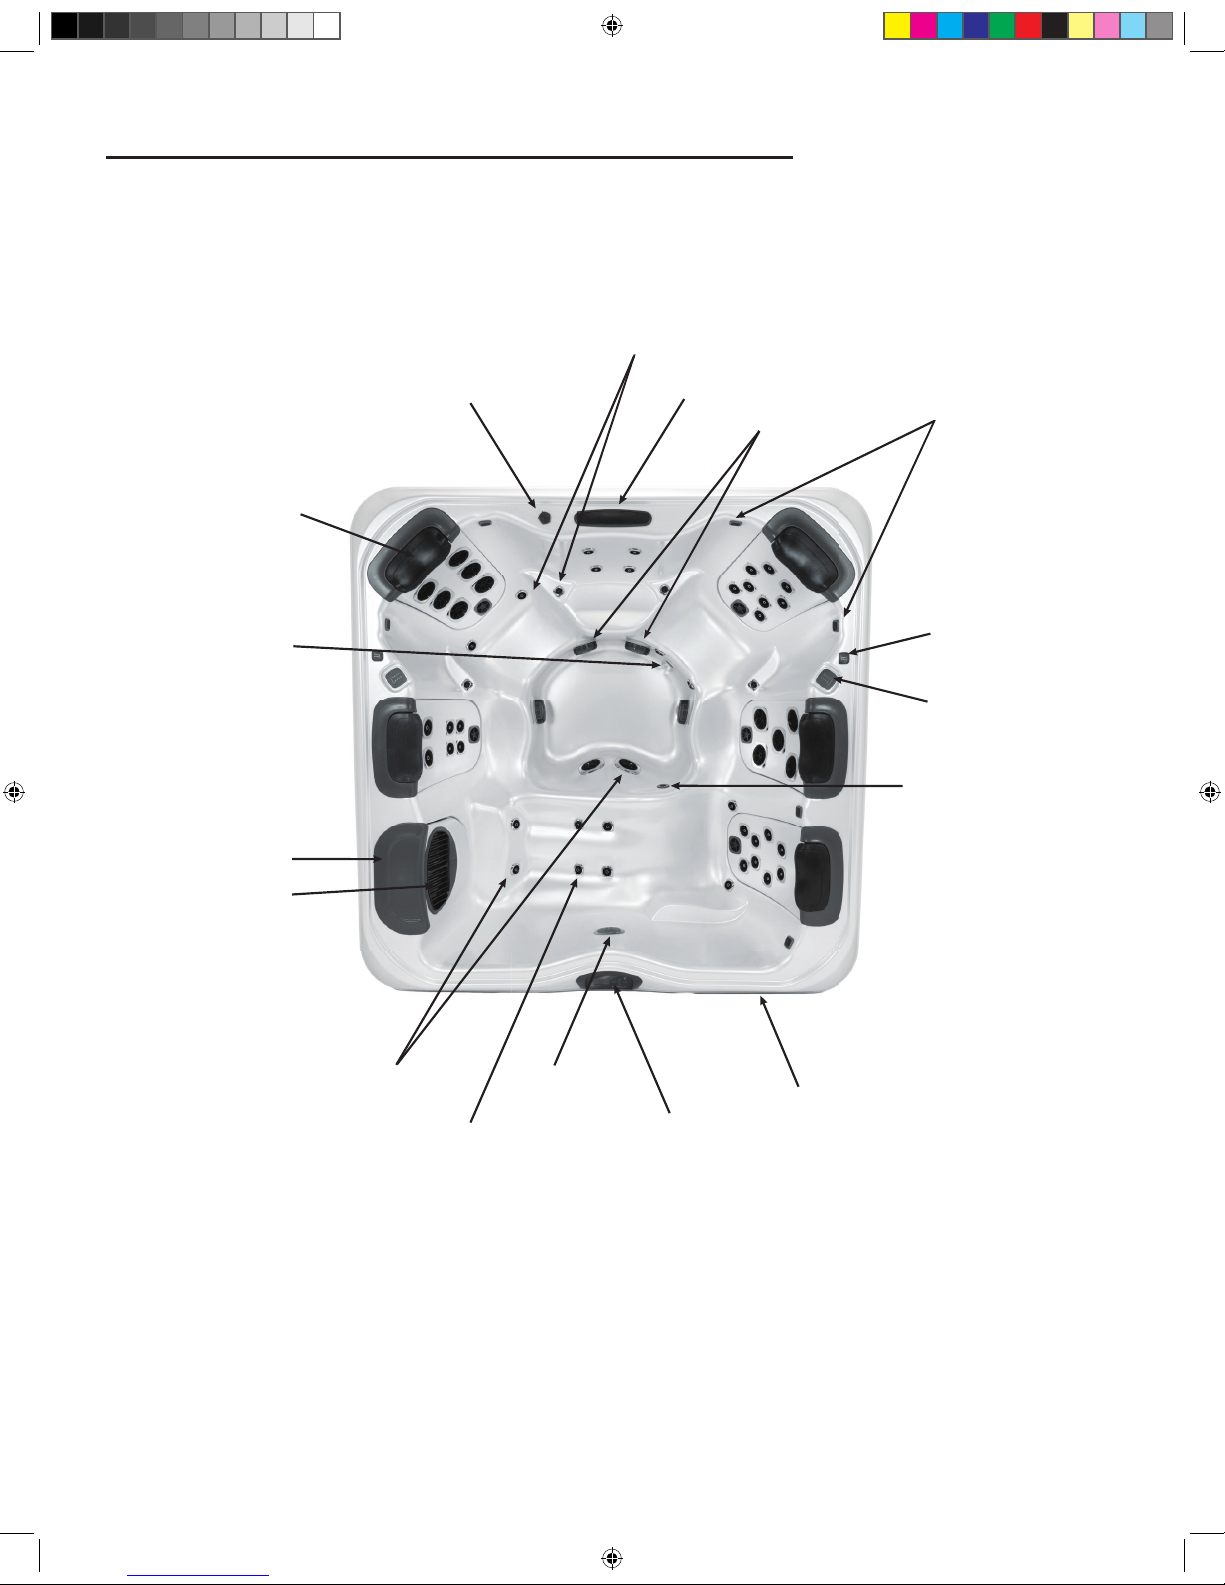
GETTING TO KNOW YOUR SPA
Spa Overview
[A7L Pictured]
Comfort Pillow
Water Feature Control Valve
Hip & Wrist Jets
Water Feature
Suction Fitting
Stereo Speakers (Optional)
Auxilliary Control Pad
(A Series Only)
Lighted Cup holder
(A Series Only)
Ozone Jet
Equipment Compartment
Control Pad
Light
Calf Jets
Floor Jets
SnapCap
Drain
Filter SnapCap
Weir Door/Filter Plate
2016 V&B Owners Manual.indd 7 3/3/2016 1:45:20 PM
8
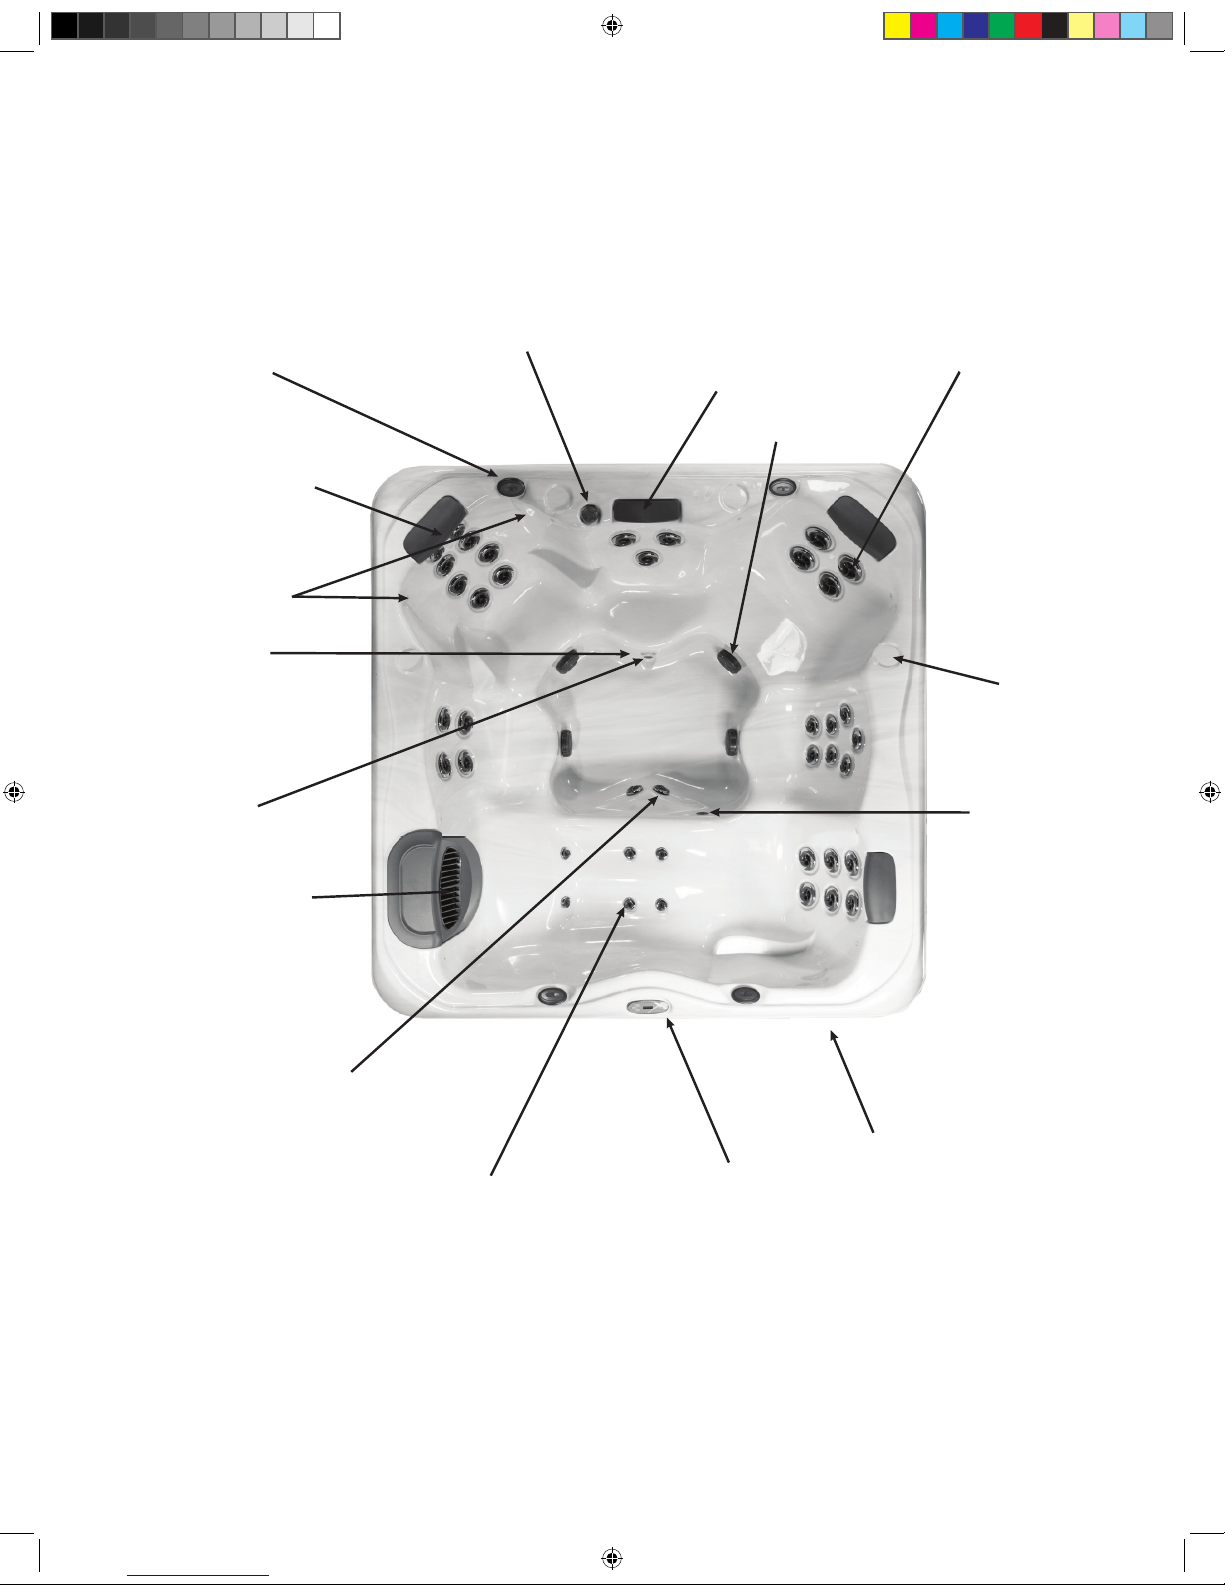
Spa Overview
[X Pictured]
Comfort Pillow
Water Feature Control Valve
Therapy Jets
Water Feature
Suction Fitting
Stereo Speakers
(Optional)
Cup Holder
Ozone Jet
Equipment Compartment
Control Pad
Light
Calf Jets
Foot Jets
Perimeter Lights
Drain
Weir Door/Filter Plate
2016 V&B Owners Manual.indd 8 3/3/2016 1:45:27 PM
9
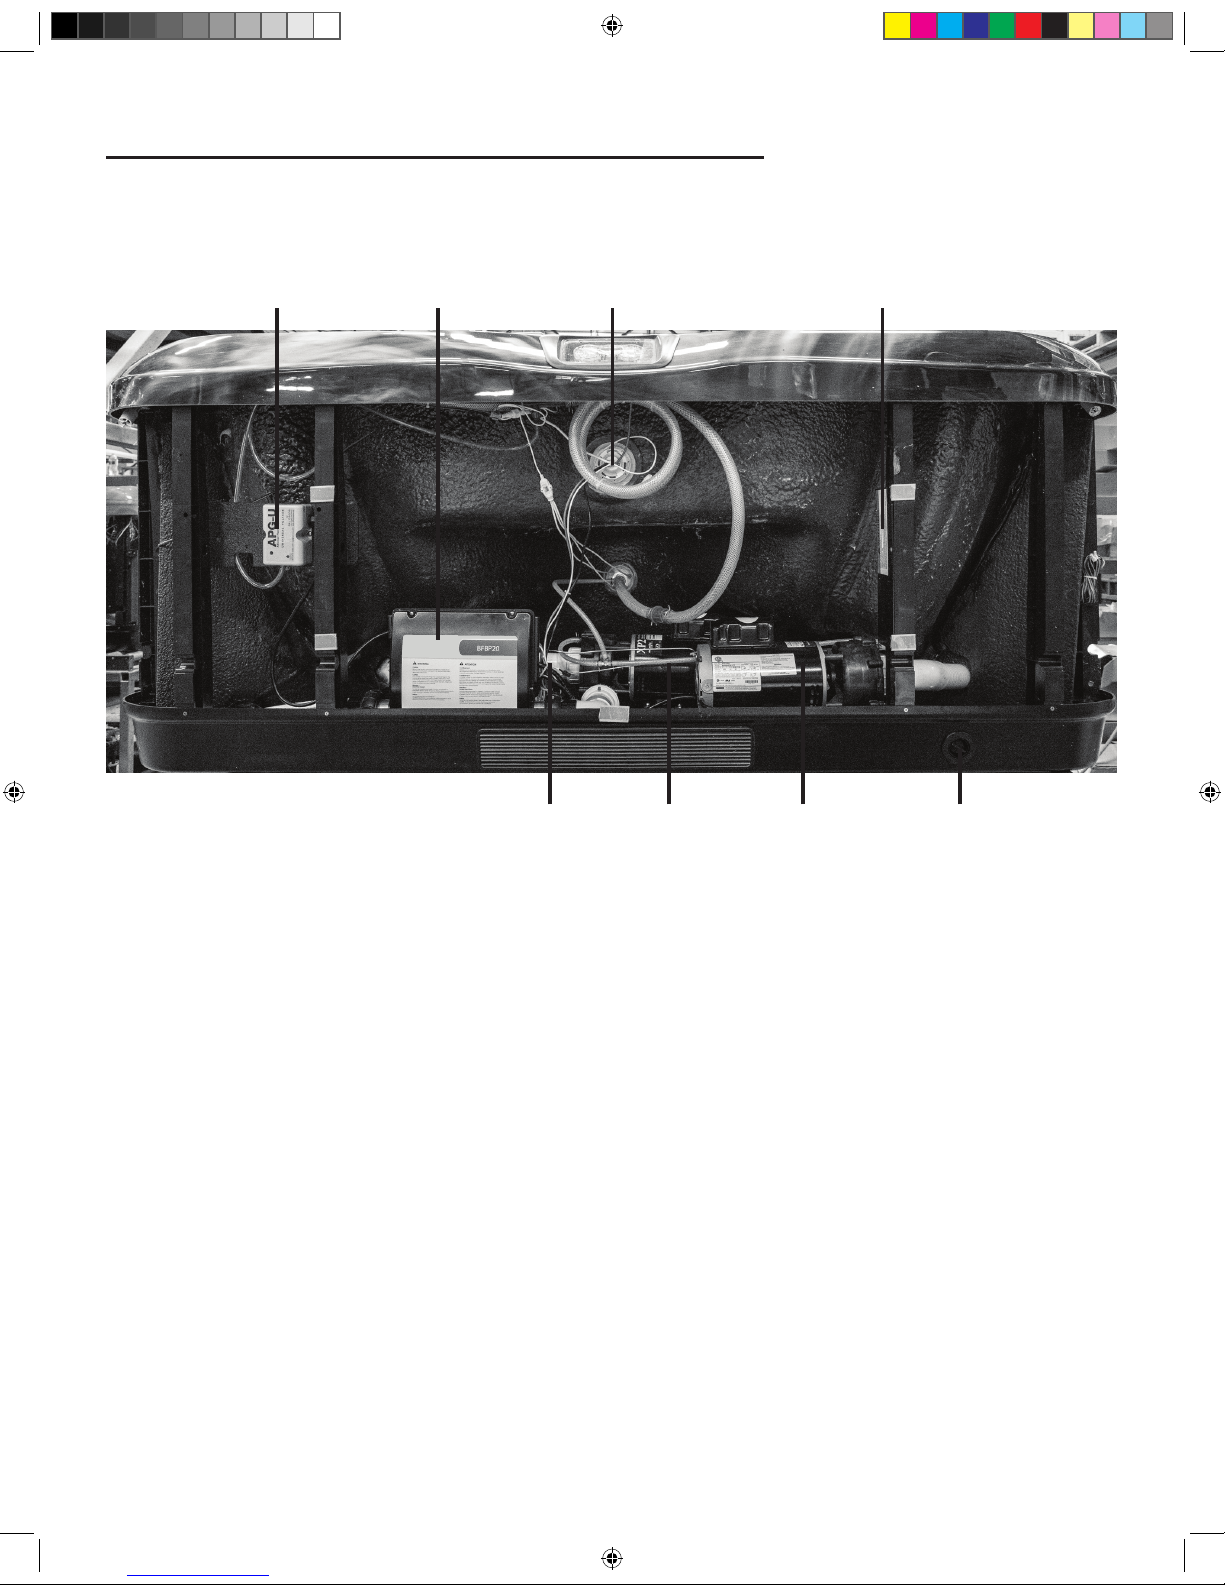
EQUIPMENT COMPARTMENT
Ozone* Control Center Light
Water Heater Pump 1 Pump 2 Drain Outlet
Safety Certificate
*Optional
2016 V&B Owners Manual.indd 9 3/3/2016 1:45:31 PM
10
WARNING:
An empty spa (spa without water in it) must not
be left exposed to sunlight as shell damage may occur. Once the spa
is unwrapped, ll spa with water immediately or shade the spa with
cover or wrapping to prevent direct exposure to sunlight.
IMPORTANT: Do not turn power on to the spa without water
in the spa. Serious damage to the pump and heater may occur.
Step 1: Fill the Spa: Use a garden hose to ll the spa to the water
level indication mark on the faceplate of the lter weir assembly.
Be sure to open all valves and jets in the plumbing system before
lling to allow as much air as possible to escape from the plumbing
during the lling process.
NOTE: For complete lling instructions, refer to Changing Spa
Water (page 30).
IMPORTANT: Never ll the spa with soft water unless an
appropriate mineral supplement is immediately added (see your
authorized Villeroy & Boch Dealer). If your water is extremely
hard, it is preferable to either dilute the water’s hardness by
blending the water with water from a water softener, or by the
addition of a special water softening chemical (see your authorized
Villeroy & Boch Dealer).
Step 2: Check for Leaks: After the spa is lled, check all ttings
and equipment in equipment compartment for signs of leakage
before turning on the spa. Turn on pump(s), once again, check for
leakage. If a leak is detected, tighten the tting by hand. If the leak
persists contact your authorized Villeroy & Boch Dealer.
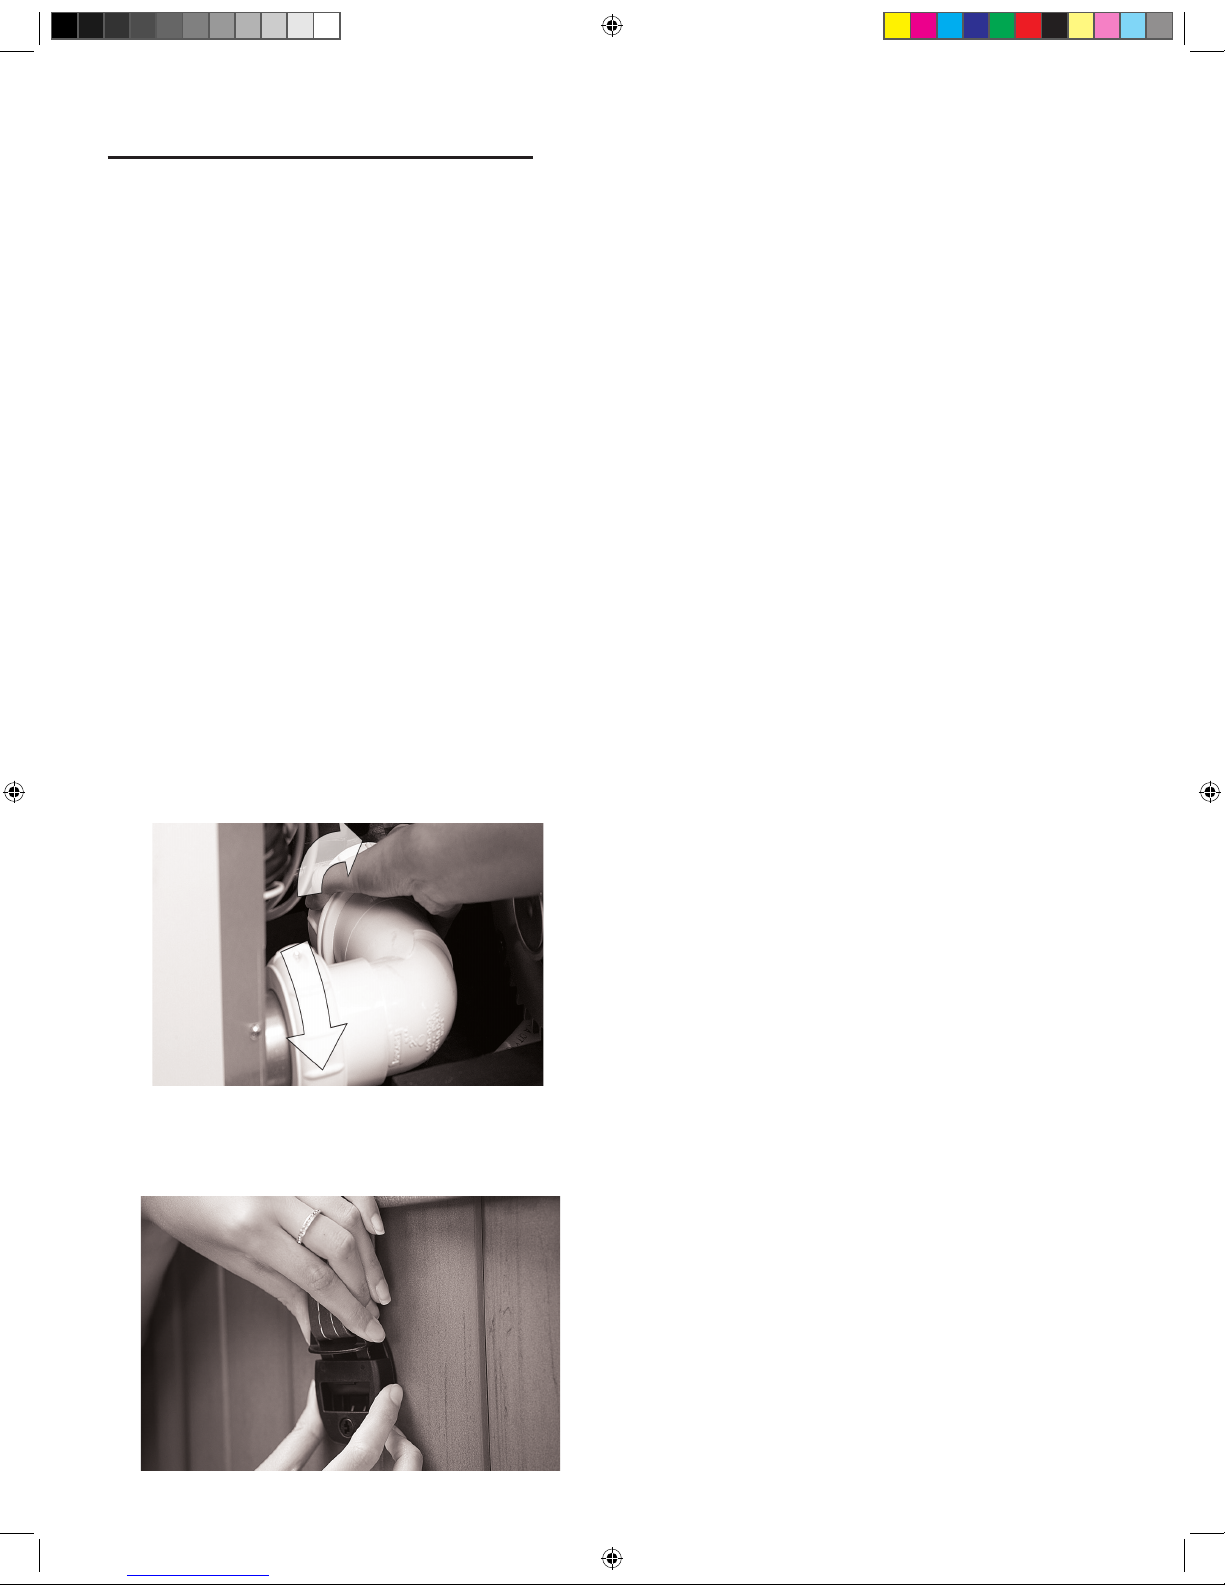
Step 3: Install Cover: e spa cover comes with tie down
straps and locking hardware that attaches the cover to the spa or
decking. If your dealer did not install the cover, refer to the Cover
Installation Instructions included with the cover.
Cover locks are an essential component for compliance with the
safety standard for spa covers.
Control System
IMPORTANT : Your Villeroy & Boch Spa is equipped with
one of 4 types of control pads: A900 (5 Button), R600 (5 or 6
Button), X300 (3 or 4 Button)or Touch Screen. Locate the control
system on your spa by matching it with the photo provided under
each control panel section and follow the specic instructions for
operation of your specic control system.
Your spa is pre-programmed with default lter cycles and
temperature settings. e following control panel instructions will
detail the procedures to alter such default settings.
FILLING YOUR SPA
2016 V&B Owners Manual.indd 10 3/3/2016 1:45:32 PM

11
Preparation
To operate:
Ensure the spa is lled to its
correct operating level. After
turning the power on at the
main power panel, the control
panel will display a splash,
or startup screen. As you
begin to operate the control, push each icon (button) slowly and
deliberately with your nger.
Priming the Pumps
As soon as the spa has power, it will enter “Priming Mode.” If
your spa is equipped with two pumps, two icons will appear in the
touch screen. Press
“Prime Jets” button once to start Pump
1 in low-speed, and then a second time to set it to high speed. If
your spa is equipped with a second pump, follow the procedure
again for that pump. All pumps should be running in at their
highestspeed to facilitate priming.
IMPORTANT: A pump should not be allowed to run
without priming (water owing out of the jets) for more than 2
minutes. Under NO circumstances should a pump be allowed to
run without priming beyond the end of the 4-5 minute priming
mode. Doing so may cause damage to the pump and cause the
system to energize the heater and go into an overheat condition.
NOTE: Turning the power o and back on again will initiate a
new pump priming session. Sometimes momentarily turning the
pump o and on will help it to prime. Do not do this more than 5
times. If the pump(s) will not prime, shut o the power to the spa
and call for service. Once the system has exited Priming Mode,
the control panel will display the Main Screen. e temperature
will not be displayed but will show four dashes as pictured below.
e system requires approximately 1-2 minutes of water owing
through the heater to determine and display the correct water
temperature.
The Main Screen
Important information about spa operation can be seen quickly
from the main screen. Push icon from any screen to return to
the main menu.
2:15pm
0
3
IR
39
°
The Settings Screen
e “Settings” screen is accessed by pressing the icon. e
Settings menu is where spa settings and programming are
controlled.
Settings
Heat
Lock Filter
Time Reminders
Light Settings
Temp Settings
To adjust the temperature of your spa, use the up and down
arrows on the main screen. Set temperature will temporarily
display when setting. Actual water temperature will return to
the display several seconds after you are nished adjusting the set
temperature, and water has been running through the pumps.
Dual Temperature Range
Your spa comes equipped with two pre-programmed temperature
ranges, High and Low. When a temperature range is selected, the
spa will heat to the temperature associated with that range and
remain at that temperature. High Range can be set between 80°F
(26.7°C) and 104°F (40°C). Low Range can be set between 50°F
(10°C) and 99°F (37.2°C). e most common use for the low
range is during vacations or extended periods of inactivity. Freeze
Protection is active in either range.
DESIGN & PREMIUM TOUCH SPAS
2016 V&B Owners Manual.indd 11 3/3/2016 1:45:36 PM
12
Heat Mode Ready vs. Rest
When in “Ready” mode, the pump that circulates water through
the heater (heater pump)will turn on every 1/2 hour to measure
water temperature, heat if needed, and refresh the temperature
display. When in Ready mode your spa will continually maintain
its set temperature.
“Rest” mode is an economy mode in which the spa only
circulates and heats water during designated lter cycles. As a
result, in the time period between ltration cycles the control may
not display the correct water temperature unless the heater pump
is on and has been running for up to two minutes. When in
Rest mode your spa will heat to its set temperature twice per day
during programmed lter cycles.
Ready-in-Rest Mode
When the spa is in Rest mode and a “Jet” button is manually
pressed, the spa will enter Ready-in-Rest mode and heat up to
the selected temperature, allowing for use in periods outside of
scheduled lter cycles.
Light Settings
The spa lights are activated by pressing the icon. Pressing
this icon turns o or on your interior or exterior lights manually.
By turning the light o and then on again, you can choose the
light color and display properties. Each time the light is turned
o and on it will advance according to the following sequence:
1. Color wheel: Color changes quickly through available
solid colors.
2. Color fade: Colors fade through spectrum A colors.
3. Random Color Change: Random color changes occur in
quick succession.
4. Spectrum fade: Colors fade through spectrum B colors.
5. Solid Color: Red
6. Solid Color: Green
7. Solid Color: Blue
8. Solid Color: Yellow
9. Solid Color: Indigo
10. Solid Color: Orange
11. Solid Color: Violet
12. Solid Color: White
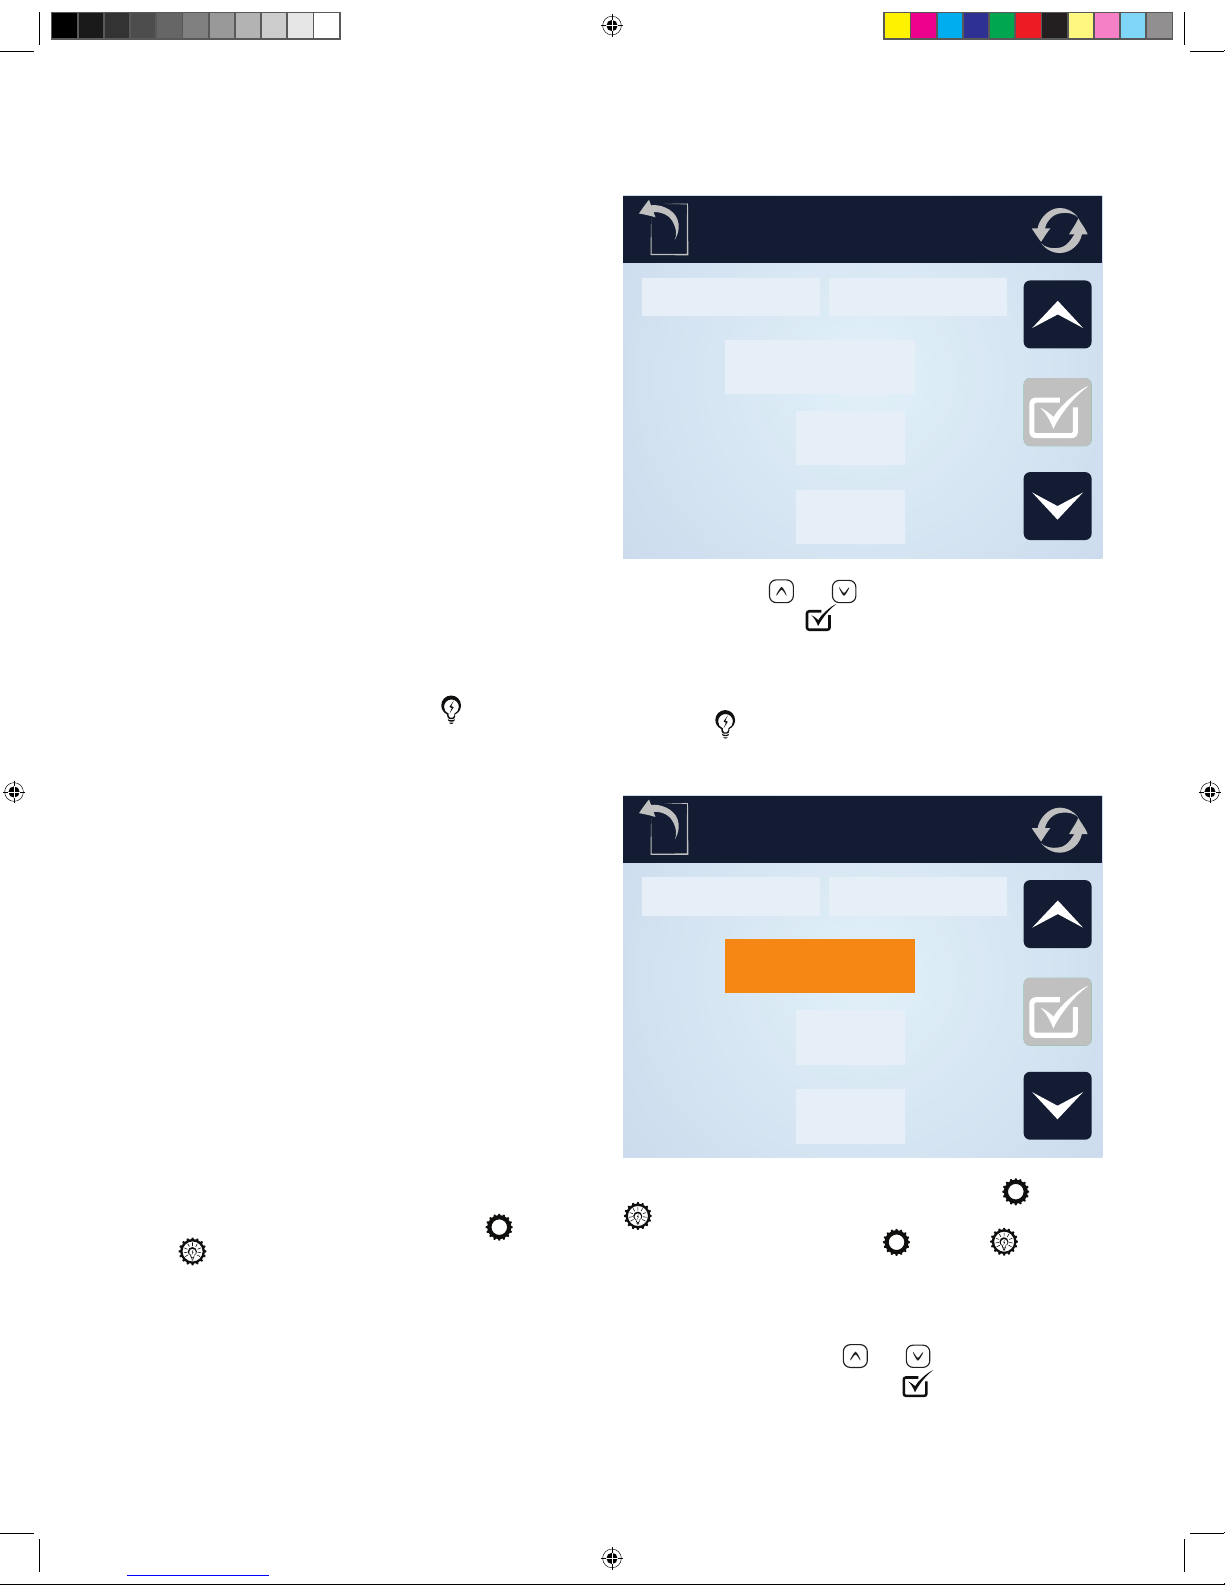
Light Settings (Premium Series)
Premium Series spas come equipped with a light timer.
To set the light timer, from the main menu, select
and then
. To enable the timer, press the [Disabled]
icon. Set the desired time and duration or the timer by
pressing on the pad above the time you wish to adjust
Light Settings
Interior
Light Timer
Exterior
Start
End
10:45 am
10:45 am
and then using the and icons to choose the desired time
and duration. Press the
icon to conrm your selections.
Light Settings (Design Series)
Design Series spas come equipped with the ability to
independently control the interior and exterior lights with a light
timer. e
button on the main control screen will operate
the interior and exterior lights according to setting designated in
the Light Settings screen.
Light Settings
Interior
Light Timer
Exterior
Start
End
10:45 am
10:45 am
To set the light timer, from the main menu, select and then
. To change the interior/exterior setting or to set the light
timer, from the main menu, select
and then
To engage the interior lights press the Interior button. To engage
the exterior lights press the Exterior button. To enable the timer,
press the [Disabled] icon. Set the desired time and duration
or the timer by pressing on the pad above the time you wish
to adjust and then using the
and icons to choose the
desired time and duration. Press the
icon to conrm your
selections. e light timer will turn on the interior and exterior
lights according to the current Interior and Exterior button
positions.
2016 V&B Owners Manual.indd 12 3/3/2016 1:45:39 PM

13
Time Settings
Setting the time of day
Setting the time is important for ltration settings and other
background settings to function as expected. To set the time, from
the main menu, press the
icon, followed by the icon.
is will bring you to the “Time of Day” menu. Select the correct
time by pressing on the hour or minutes, and then using the
and buttons to select the correct time. Holding the or
buttons will allow you to more quickly move through time.
Press the icon to conrm your changes.
Filtration Cycles
Your Spa comes factory programmed to run two cycles in each 24
hour period.
Filter Cycle 1: Begins at 6:00pm (18:00) and runs for 2
hours. (3 hours for spas equipped with the optional WellSpring
Filtration Pump.)
Filter Cycle 2: Begins at 8:00am (8:00) and runs for 1 hour.
ese factory set ltration cycles should be adequate for light to
normal spa use (spas used once to twice per week). For cases of
more frequent to heavy spa usage, you may need to increase the
lter cycle durations to maintain water clarity.
Changing Filter Cycles:
To change lter 1 cycle:
From the main menu, press “Settings” followed by . is
will take you to the “Filtration” menu. Select the “Filter Cycle 1”
by pressing [1]. Adjust the time and duration by pressing on the
hour or minutes, and then using the
and buttons to select
the correct time and duration. Press the
icon to conrm your
changes.
To change lter 2 cycle:
Select the “Filter Cycle 2” by pressing [2]. Adjust the time and
duration by pressing on the hour or minutes, and then using the
and buttons to select the correct time and duration. Press
the icon to conrm your changes.
Purge Cycles
In order to maintain sanitary conditions and protect against
freezing, your spas pumps will purge water from their respective
plumbing by running all pumps at the beginning of each lter
cycle. If the Filter Cycle 1 is set for 24 hours, enabling Filter
Cycle 2 will initiate a purge when Filter Cycle 2 is scheduled to
begin.
To Change Preferences
To change temperature display between Fahrenheit (F) and
Celsius (C), 24 or 12 hour clock :
From the main menu, press . In the Settings menu press the
key to move to the second page of the menu. Press the
icon. e “Units” menu will then be displayed. To change the
temperature setting, press the temperature unit which is currently
displayed. is will change it from C° to F° or vice versa.
To change the time display press on the currently selected hour
unit.
To Set Reminders
From the main menu, press , then in the “Settings” menu,
press the
icon. Next, press the portion of the panel where
“Yes” or “No” is displayed. is will toggle the reminders to
trigger, or turn them o.
Hold
e “Hold” function prevents the jets from running to allow
JetPaks to be swapped out. By default, a hold lasts 60 minutes, or
until the button is pressed.
Restricting Operation
e control panel can be restricted to prevent unwanted use or
temperature adjustments. “Panel Lock” prevents most functions
on the controller from being used, while all automatic functions
remain active. “Lock Settings” in contrast, allows the jets and
lighting to be adjusted, while other features are inactive.
To lock the settings, from the Main Menu
Press , followed by . e “Settings” lock and ”Panel” lock
options will be displayed in the menu. Press
to lock the
settings in their current conguration, or
to lock the panel.
While the panel is locked, the only buttons that will function are
the buttons that lead to the locking screen.
To cancel either of the lock settings, navigate to the Lock menu
by pressing followed by . Press the corresponding icon
to release the lock.
Invert Display
To inver the display, from any screen press the icon.
Fault Log
To access the fault log, press . In the Settings menu press the
key to move to the second page of the menu. Press the
icon. In the Utilities menu, press the icon. Events recorded
in the log can be accessed by pressing or buttons.
Panel Sleep
Your touch panel comes pre-programmed to go to sleep after
30 minutes of disuse. To change this setting, press
. In the
Settings menu press the key to move to the second page of
the menu. Press the
icon to enter the Utilities menu. Press
the
icon. You can adjust the length of time before your
panel goes into sleep mode by pressing the
or icons.
Press the
to conrm your setting.
2016 V&B Owners Manual.indd 13 3/3/2016 1:45:42 PM
14
Language
To change the display language, press the menu. In the
Settings menu press the key to move to the second page
of the menu. Press the
icon. You can scroll through the
available language selections by pressing the
or keys.
Select your preferred language by pressing its name in the menu.
Press
to conrm your selection.
Stereo Controls (Optional)
If your spa is equipped with an “Elite” Audio system, refer to its
separate manual for operating instructions. If your spa has “Life”
Audio system, the spa’s Touch control pad will control various
functions of Bluetooth connected devices.
e rst time you use your Bluetooth device with a Life Audio
system you must rst “pair” your device to the spa audio system.
Each device must be paired separately.
Turn on your Bluetooth device and place within 20 feet (6
meters) of your spa. e device must have “line of sight” to the
spa control panel/equipment door area.
NOTE: Certain house construction materials and other
obstructions can impair Bluetooth connectivity. You may need to
experiment with where to place your BT device for best results.
From the main menu, press and hold the
icon. After
approximately 15-20 seconds, “PPGME60” will appear in your
Bluetooth devices list. Select “PPGME60” from your device’s list
to connect and “pair” your device to a Life Audio system.
After a few seconds the pairing will complete and audio from
your device will start playing on the spa audio system. Your
Bluetooth devices need only be paired the rst time you use a
new device. After that your device will connect automatically.
2016 V&B Owners Manual.indd 14 3/3/2016 1:45:49 PM
15
Preparation
Ensure the spa is lled to its correct operating level. After turning
the power on at the main power panel, the control panel will
display a splash, or startup screen.
Priming Mode
As soon as the spa has power, it
will enter Priming enter “Priming
Mode.” If your spa is equipped
with two or more pumps, two
icons labeled “Jets 1” and Jets 2”
will appear in the display window.
Press to select “Jets 1” press
to activate pump 1 on low.
Press again to move the
pump into high mode. If your pump is equipped with a second
pump, press to select the “Jets 2” icon. Press twice to put
the pump on high speed. All pumps should be running in at their
highest speed to facilitate priming.
IMPORTANT: A pump should not be allowed to run
without priming (water owing out of the jets) for more than 2
minutes. Under NO circumstances should a pump be allowed to
run without priming beyond the end of the 4-5 minute priming
mode. Doing so may cause damage to the pump and cause the
system to energize the heater and go into an overheat condition.
NOTE: Turning the power o and back on again will initiate a
new pump priming session. Sometimes momentarily turning the
pump o and on will help it to prime. Do not do this more than 5
times. If the pump(s) will not prime, shut o the power to the spa
and call for service. Once the system has exited Priming Mode,
the control panel will display the Main Screen. e temperature
will not be displayed but will show four dashes as pictured below.
e system requires approximately 1-2 minutes of water owing
through the heater to determine and display the correct water
temperature.
– – –°F– – –°C
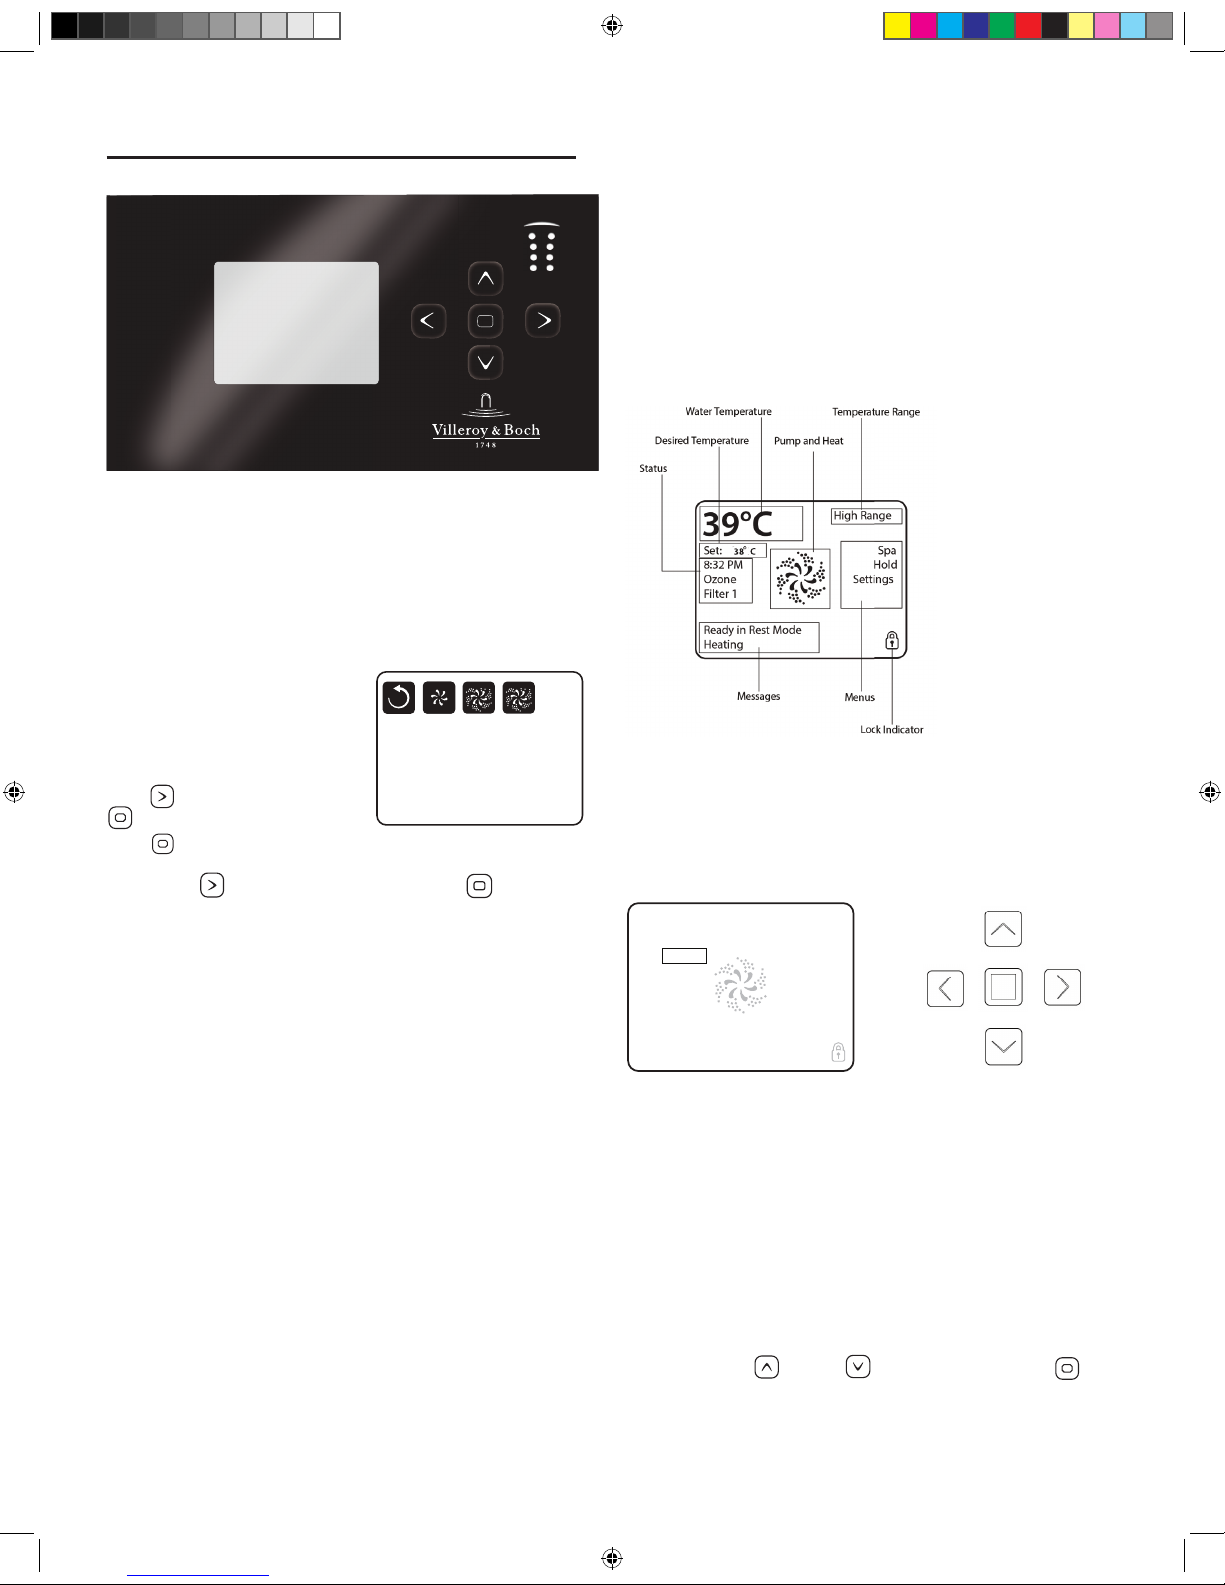
The Main Screen
Important information about spa operation can be seen quickly
from the Main Screen. e most important features, including
Set Temperature adjustment, can be accessed from this screen.
e actual water temperature can be seen in large text and the
desired, or Set Temperature, can be selected and adjusted. Time of
day, ozone operation, and lter operation status is available, along
with other messages and alerts. High temperature Range vs. Low
temperature Range is indicated in the upper right corner. e
Jets Icon in the center will spin on if any pump is running and
changes color when the heater is on. A Lock icon is visible if the
panel or setting is locked.
e menu choices on the right can be selected and the screen
will change to show more detailed controls or programming
functions.
Navigation
Navigating the entire menu structure is done with the 5 buttons
on the control panel. When a text item changes to white
during navigation, that indicates the item is selected for action.
Operating or changing a selected item is generally done with the
center or “Select” button. e only item that can be changed on
the left side of the Main Screen is the Set Temperature. Press
the Left Arrow button to change the Set Temperature number
to white. e Set Temperature can then be adjusted with the up
and down buttons. Pressing the Select button or the Right Arrow
button will save the new set temperature.
On the right side of the screen, the menu selections can be
selected with the
Up and Down Buttons. Use the
Select Button to choose an item. Selecting one of these items will
change to a di erent screen with additional controls.
PREMIUM LINE SPAS
38 C
The Main Screen
Navigation
Navigating the entire menu structure is done with the 5 buttons on the control panel.
When a text item changes to white during navigation, that indicates the item is selected for action.
Operating or changing a selected item is generally done with the center or “Select” button.
The only item that can be changed on the left side of the Main Screen is the Set Temperature. Press the Left Arrow button
to change the Set Temperature number to white. The Set Temperature can then be adjusted with the up and down buttons.
Pressing the Select button or the Right Arrow button will save the new set temperature.
On the right side of the screen, the menu selections can be selected with the Up and Down Buttons. Use the Select Button
to choose an item. Selecting one of these items will change to a dierent screen with additional controls.
Set: 38°C
8:
Ozone
Filter 1
Spa
Hold
Settings
High Range
39°C
Ready in Rest Mode
Heating
Exit Jets 1 Jets 2Circ
Priming Mode
2016 V&B Owners Manual.indd 15 3/3/2016 1:45:55 PM
16
Press-and-Hold
If an Up or Down button is pressed and held when the
Set Temperature is selected, the temperature will continue to
change until the button is released, or the Temperature Range
limits are reached.
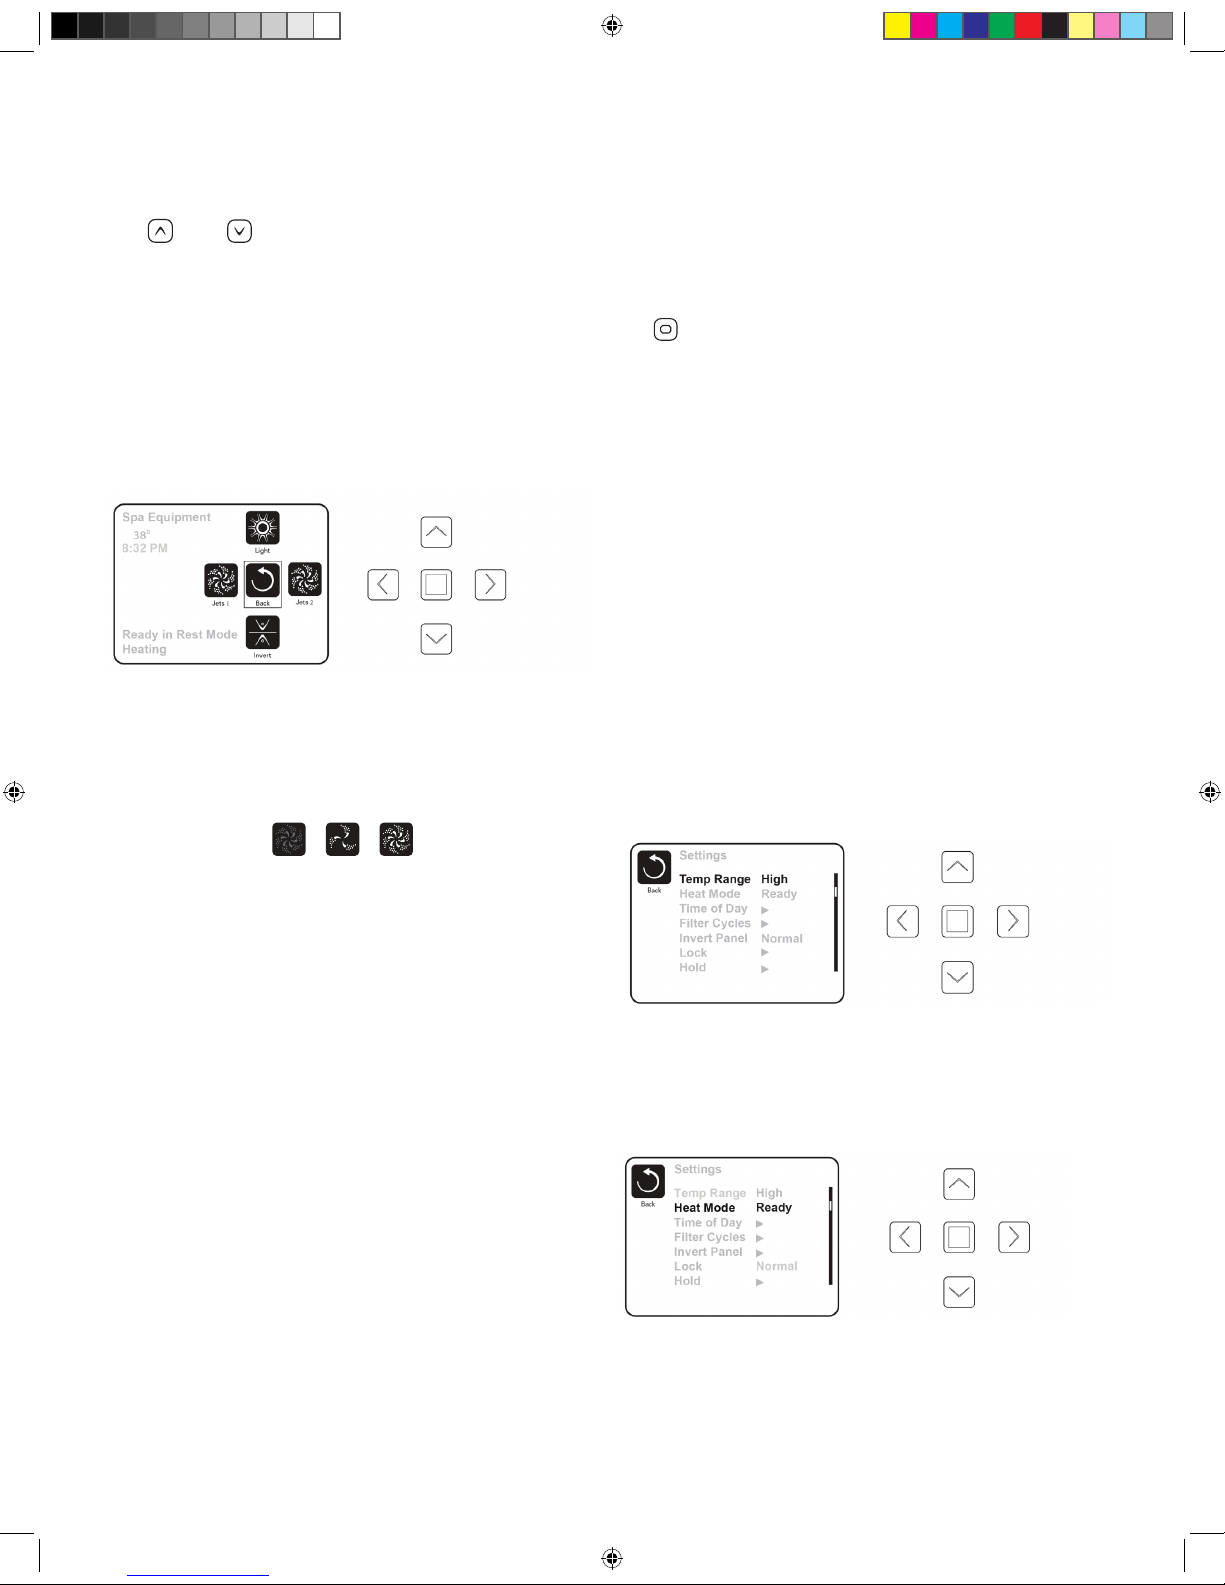
The Spa Screen
One Press Activation
e Spa Screen shows all available equipment to control, as well
as Invert, in one easy-to-use screen. Each button is xed on a
specic function and can be used as a very simple user interface
for the spa. e display shows icons that are related to the
equipment installed on a particular spa model, so this screen may
change depending on the conguration.
e pumps have more than one ON state, so the icon will change
to reect the state that the equipment is in. Below are some
examples of 2-speed Pump indicators:
NOTE: e icon for the pump that is associated with the
heater (Filtration Pump) will have a red glow in the center when
the heater is running.
Light Operation
By turning the light on and o, it will change the sequence of
colors from ashing, to fading, to solid color in the following
sequence:
1. Color wheel: Color changes quickly through available
solid colors.
2. Color fade: Colors fade through spectrum A colors.
3. Random Color Change: Random color changes occur in
quick succession.
4. Spectrum fade: Colors fade through spectrum B colors.
5. Solid Color: Red
6. Solid Color: Green
7. Solid Color: Blue
8. Solid Color: Yellow
9. Solid Color: Indigo
10. Solid Color: Orange
11. Solid Color: Violet
12. Solid Color: White
The Settings Screen
e Settings Screen is where all programming and other spa
behaviors are controlled. is screen has several features that can
be acted on directly. ese features include Temp Range, Heat
Mode, and Invert Panel. When one of these items is highlighted,
the Select Button is used to toggle between two settings. All
other menu items (with an arrow pointing to the right) will take
you to another level in the menu.
Press-and-Hold
If an Up or Down button is pressed and held when an item in a
Menu List is highlighted, the list can be scrolled quickly from top
to bottom. e scroll bar on the right side of the screen indicates
the relative position of the highlighted item in the list.
Dual Temperature Range
(High vs. Low)
Your spa comes equipped with two temperature range settings
with independent set temperatures. e specic range can be
selected on the Settings screen and is visible on the Main Screen
in the upper right corner of the display. High Range can be set
between 80°F (26.7°C) and 104°F (40°C). Low Range can be
set between 50°F (10°C) and 99°F (37.2°C). e most common
use for the low range is during vacations or extended periods of
inactivity. Freeze Protection is active in either range.
Heat Mode – Ready vs. Rest
When in “Ready” mode, the pump that circulates water through
the heater will turn on every 1/2 hour to measure water
temperature, heat if needed, and refresh the temperature display.
When in Ready mode your spa will continually maintain its set
temperature. REST mode is recommended for most economic
performance.
Ready-in-Rest Mode
READY/REST appears in the display if the spa is in Rest Mode
and the Jets 1 Button is pressed. It is assumed that the spa is
being used and will heat to set temperature. While Pump 1
High can be turned on and o, Pump 1 Low will run until
set temperature is reached, or 1 hour has passed. After 1
The Spa Screen
The pumps have more than one ON state, so the icon will change to refl ect the state that the equipment is in.
Below are some examples of 2-speed Pump indicators.
Jets HighJets LowJets Off
One-Press Activation
Ready in Rest Mode
Heating
Spa Equipment
Jets 1
Jets 2
Light
Back
The Spa Screen shows all available equipment to control, as well as Invert, in one easy-to-use screen. Each button is
fixed on a specific fuction and can be used as a very simple user interface for the spa The display shows icons that are
related to the equipment installed on a particular spa model, so this screen may change depending on the installation.
Invert
8:32 PM
104°F
2016 V&B Owners Manual.indd 16 3/3/2016 1:45:57 PM
 Loading...