

Page 1
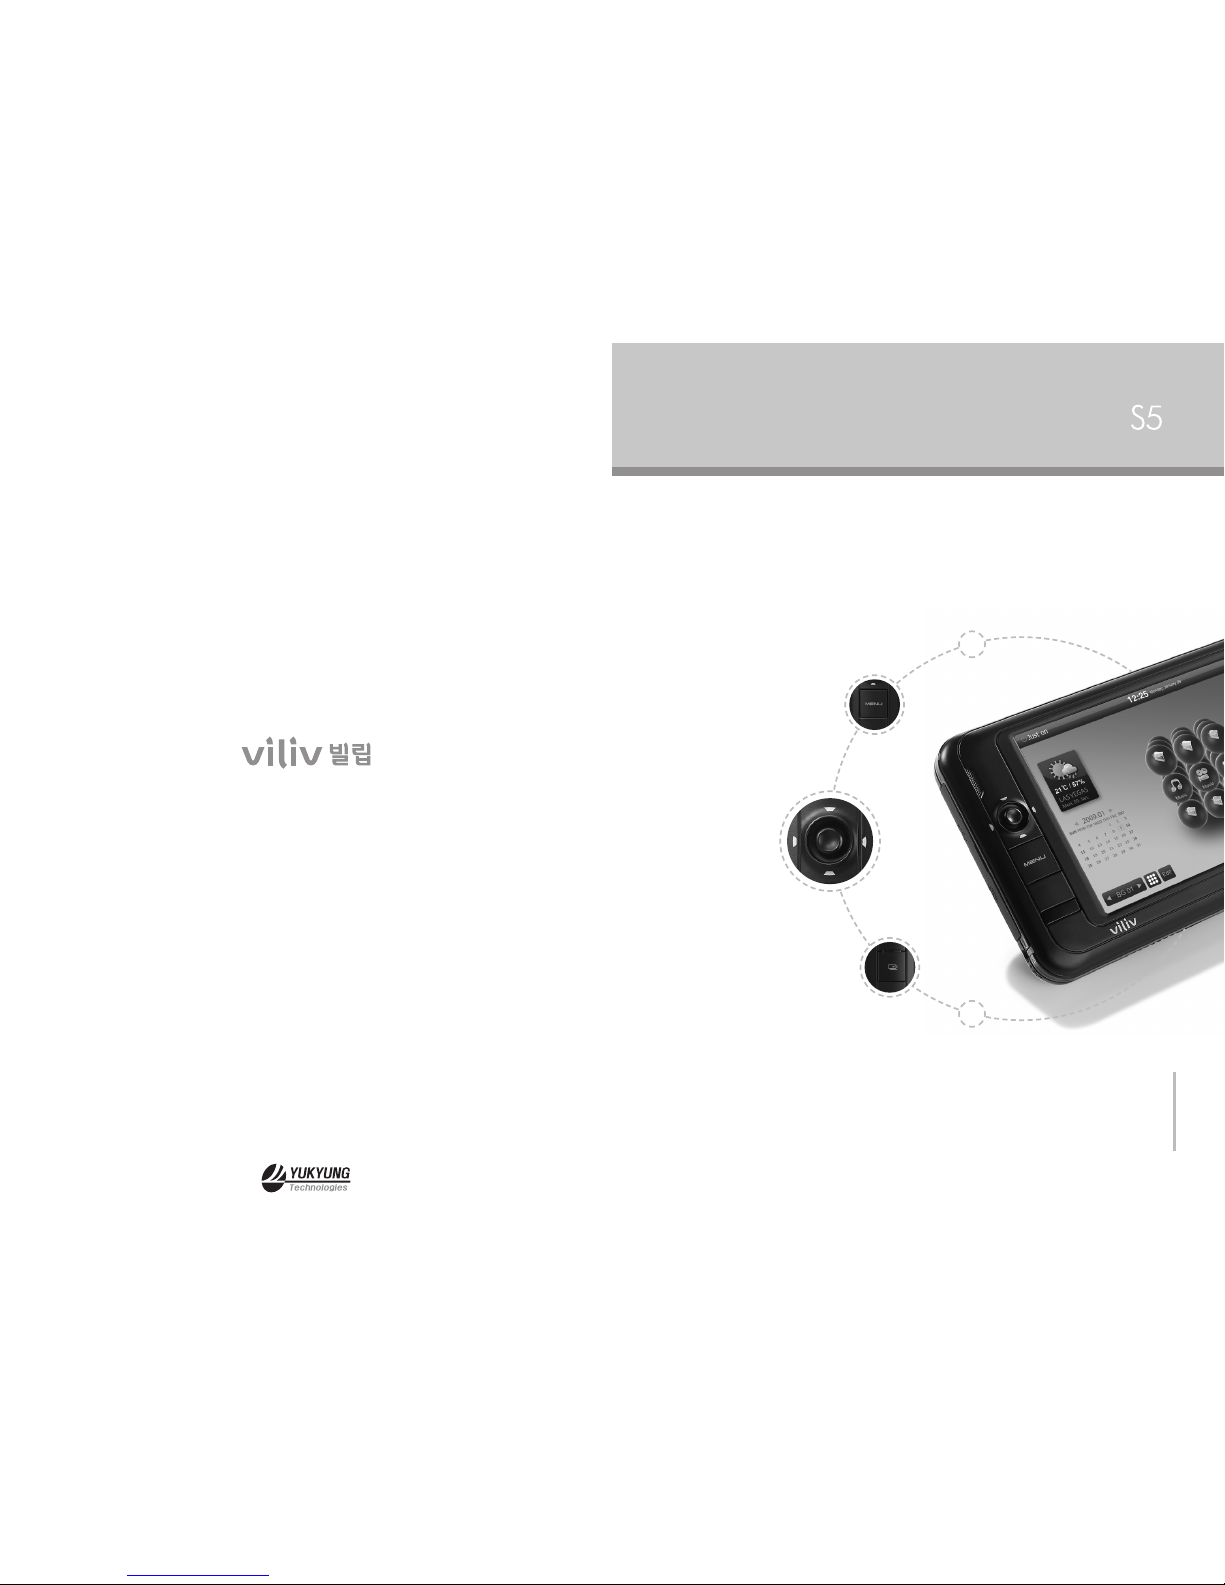
Quick Start Guide
This guide is subject to change for product improvement without prior notice.
Intel Atom Silverthorne 1.33Ghz
Superne 4.8” Touch LCD with Virtual Haptic Keyboard
200 hours Standby Time
6 hours continuous movie Playback
Bluray HD Video Playback
HDD 30G/60G, Windows XP
200-11 Anyang-dong, Manan-gu, Anyang-si,
Gyeonggi-do, South Korea
E-mail : [email protected]
Page 2
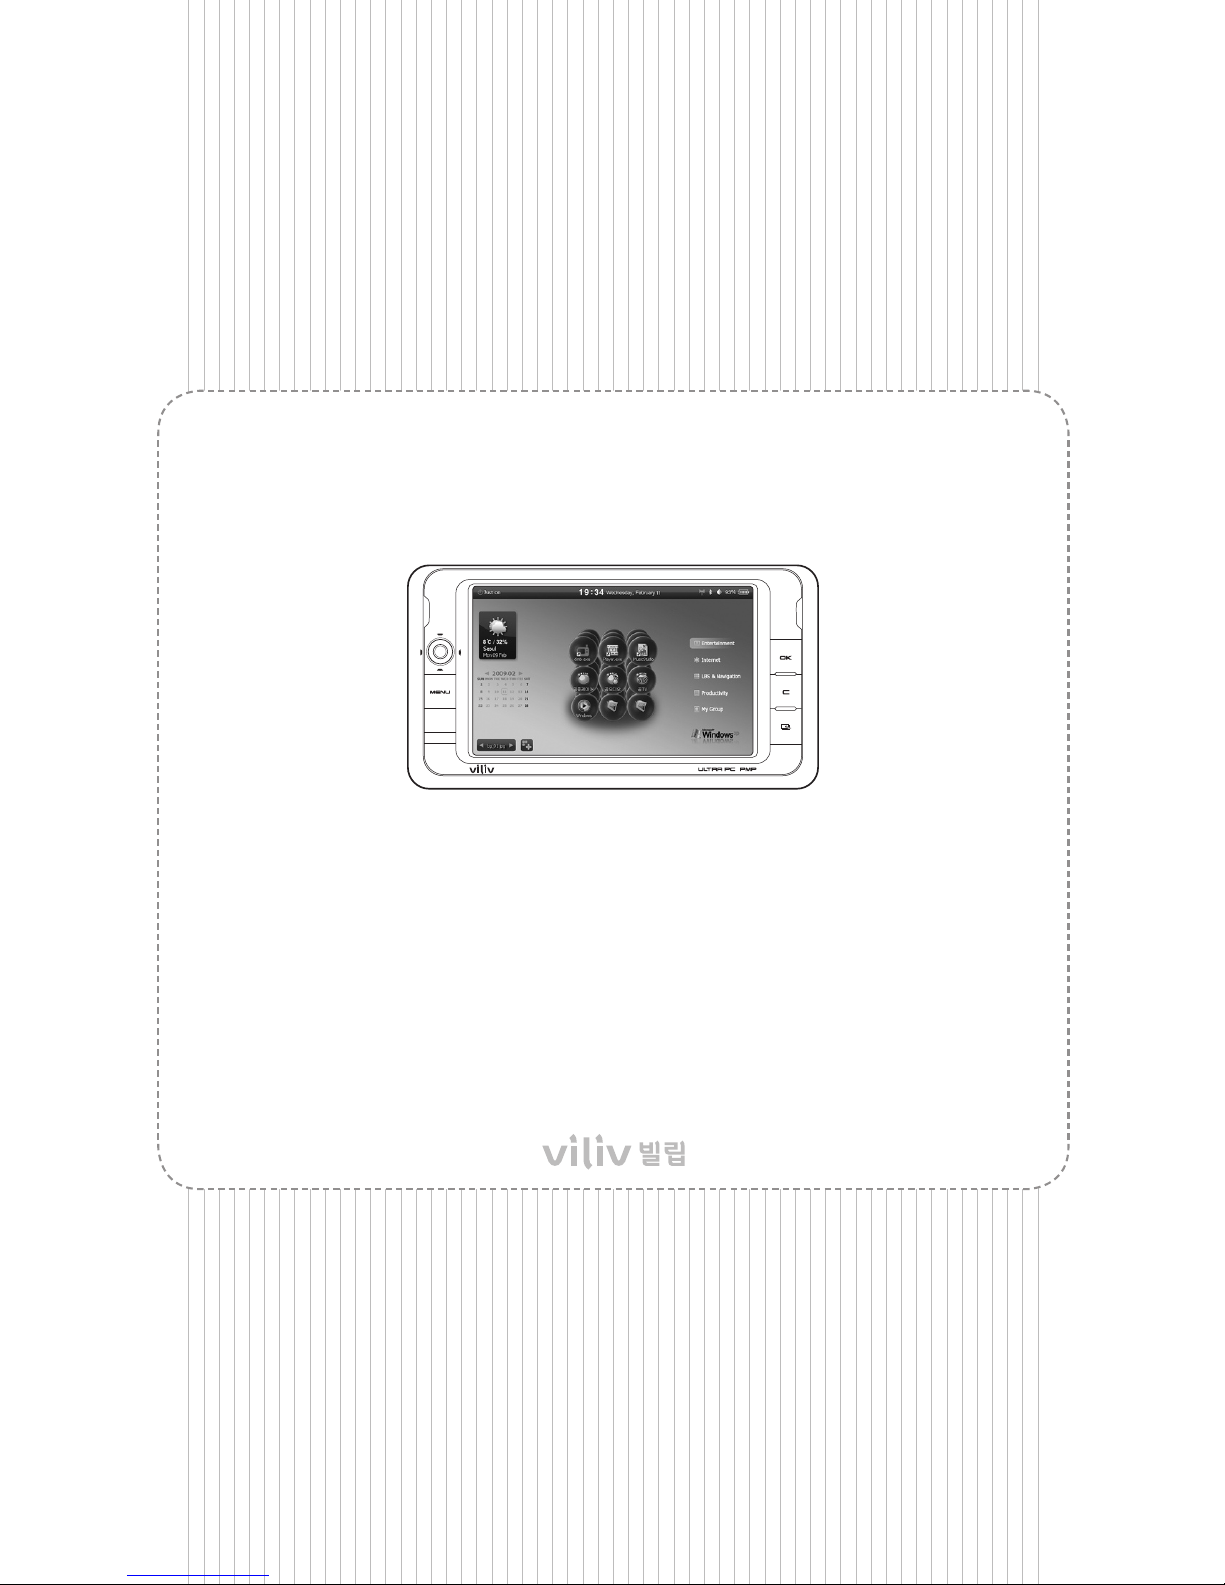
Thank you for purchasing viliv.
Please read the Precautions before using the product.
Page 3
Safety Precautions for Use......................4
Names of Parts...............................6
Basic Components .................................. 6
Front View ......................................... 7
Top View .......................................... 8
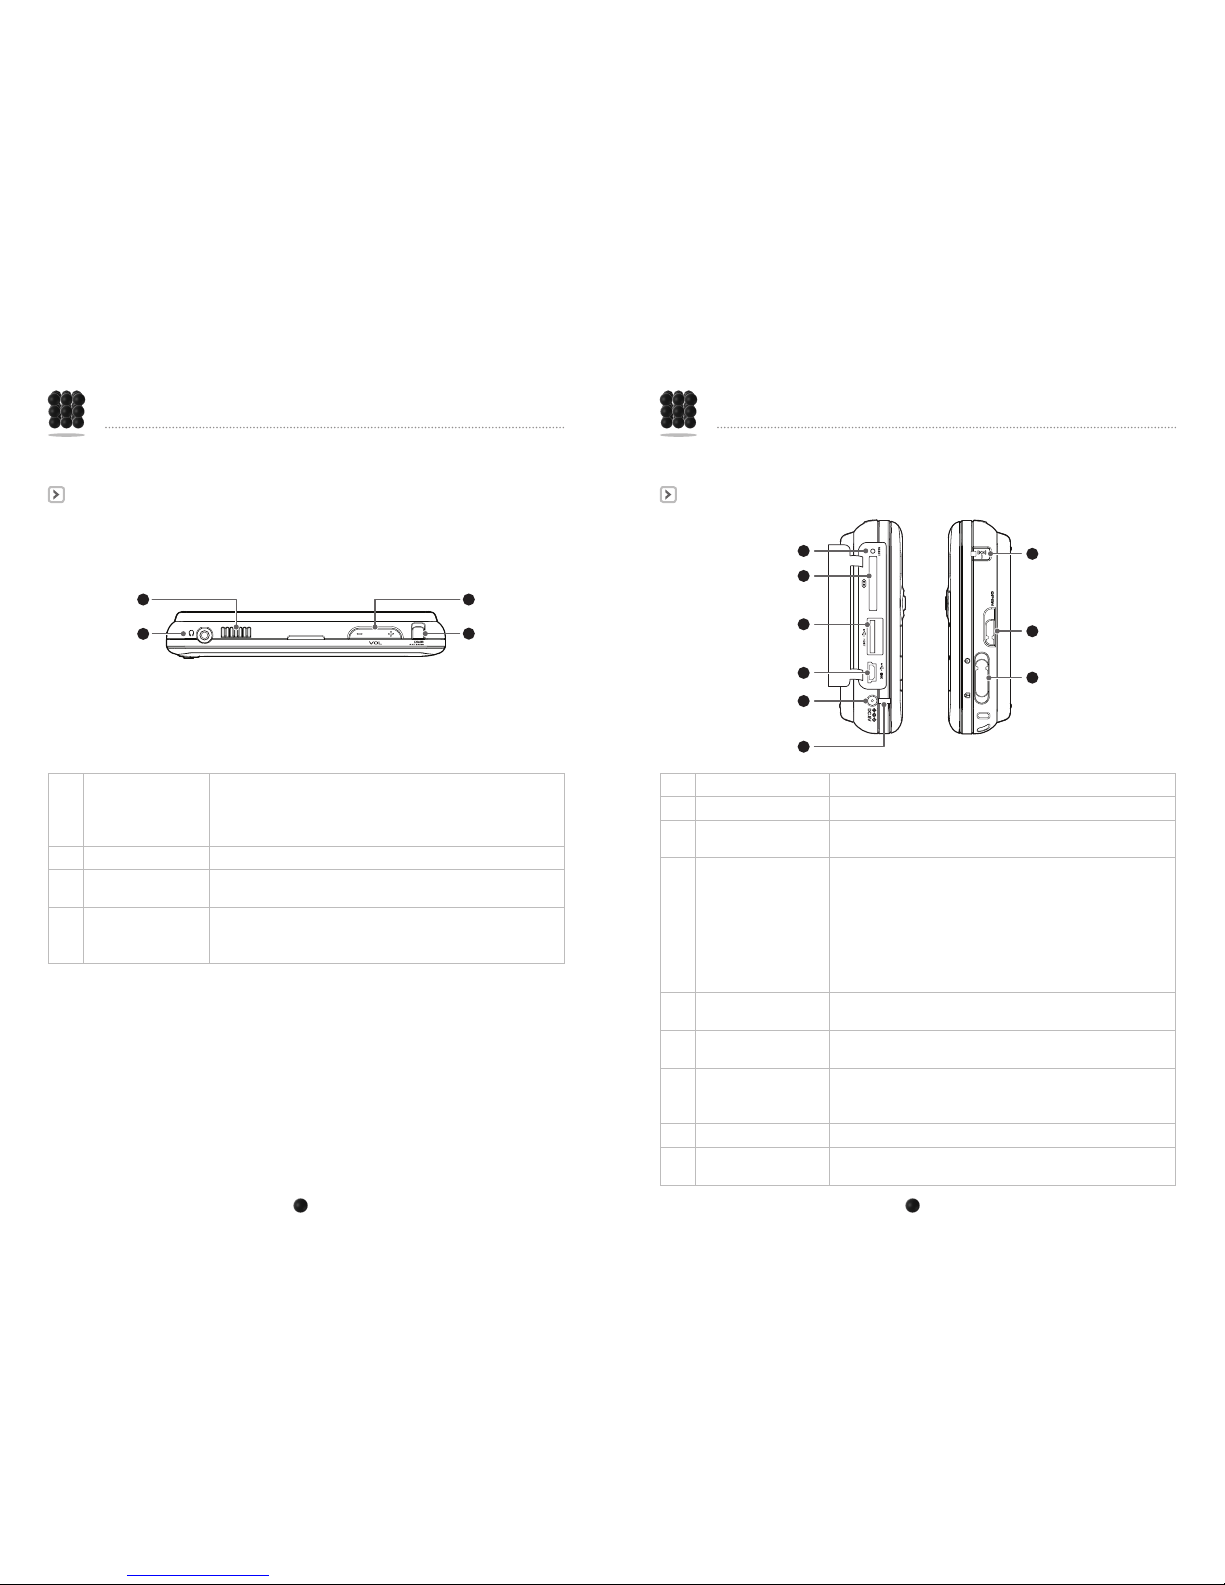
Left/Right View ..................................... 9
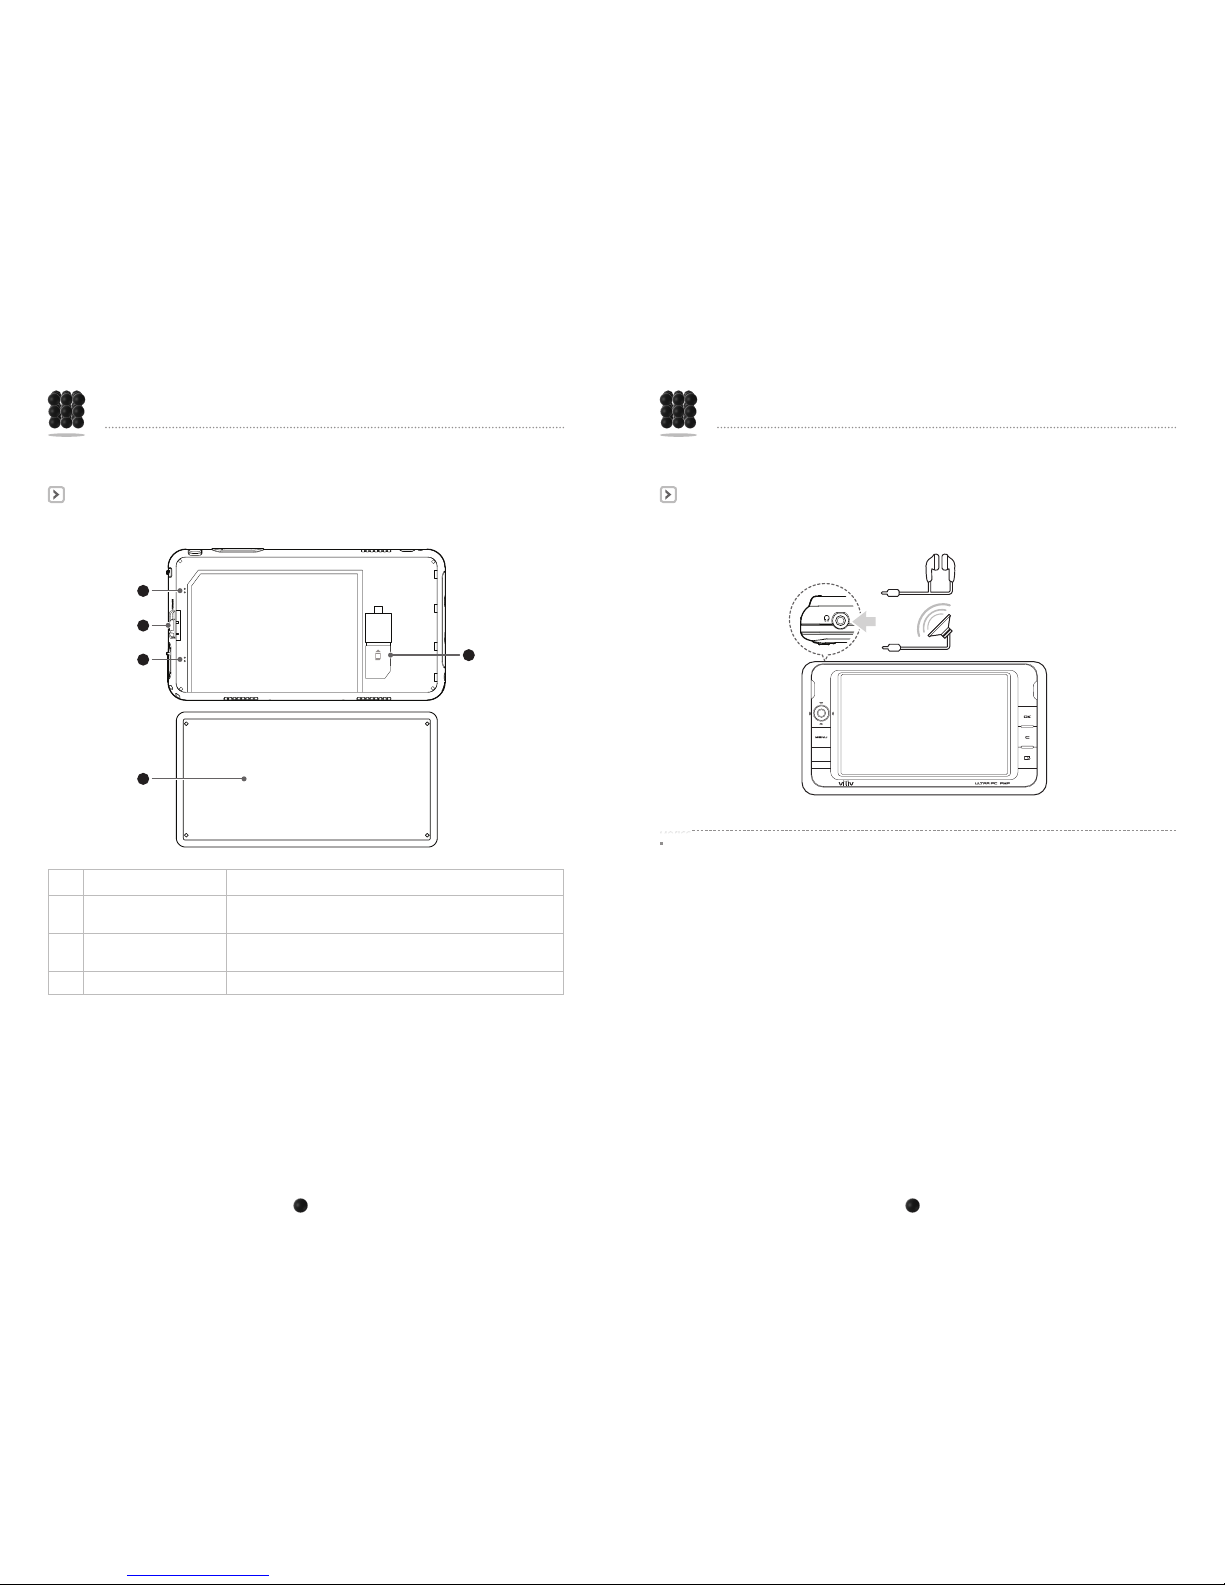
Back View ........................................ 10
Installation and Cable Connection ...............11
Connection of Earphones and External Speakers ..........11
Multi-I/O Jack...................................... 12
USB Host Connection . . . . . . . . . . . . . . . . . . . . . . . . . . . . . . . 13
USB Link Connection ............................... 13
Power Connection (with Rechargeable Adapter for Home)... 14
Battery Separation/Placement ..................15
Battery Separation.................................. 15
Battery Placement .................................. 15
Directions to Insert/Remove USIM Card ................. 16
Basic Operations ............................17
Power On/Off...................................... 17
Setting/Cancelling Hold Function ...................... 17
Volume Control .................................... 18
Mute............................................. 18
Resetting ......................................... 18
Turning On/Off the LCD Screen ....................... 19
Touch Screen...................................... 19
Virtual Keyboard ................................... 20
FAQ ......................................21
Specications ..............................23
Yukyung Technologies Corp. has the copyright for this guide.
The contents of this guide may not be copied for use in any way without prior authorization
from Yukyung Technologies Corp.
©2009 Yukyung Technologies Corp. All rights reserved.
Copyright
This device is properly registered for home use (Grade B) and is
designed for use not only in residential areas but also anywhere else.
Certicate
viliv is Yukyung Technologies’ registered trademark.
Windows 2000, Windows XP and Windows CE are Microsoft Corporation’s registered trademarks.
Registered Trademark
Infringement of Intellectual Property Rights: Playing, copying, or distributing any part or all
of any copyrighted content such as software, music, and video, using this device, may infringe
on a third party’s legitimate intellectual property rights or violate the copyright law. All legal
responsibilities for infringement of copyright or intellectual property rights arising from the use of
this device lie with the user.
Improper Use: The manufacturer of this device will not be held responsible for any damage caused
by user’s improper use, operation of the device under inappropriate environments, infringement
of copyright, or right of likeness by the user.
Data Loss: Any audio, video and photo le can be deleted due to damage, operational error,
or malfunction caused by the user’s neglect, or when the device is turned in for warranty repair.
Please make back-up les elsewhere. The manufacturer of the device will not be held responsible
for loss of or damage to the data stored in the device.
Specications Change: The dimensions of, the accessories to, the embedded software in and
the manual for this device may be changed or modied without the user’s prior consent or prior
notice to the user.
Exemption
Contents...
Grade B Device
(Broadcast Communication Device for Residential Area)
Page 4

ULTRA PC PMP 4 www.myviliv.com ULTRA PC PMP 5 www.myviliv.com
Safety Precautions for Use Safety Precautions on Use
The following precautions are provided to protect you from possible danger and to prevent any
damage to property. Please observe them.
Different models have different features.
Read the precautions related to the features included before using the device.
Precautions on Power
• Do not touch the power cord with wet hands.
• Be sure to plug the power cord in an outlet with a grounded jack.
• Be sure the plug goes in all the way so that it is not loose.
• If the device is damaged, including the power cord being worn out or
damaged, do not use the device.
• In case of a thunderstorm, or in case you will be away for a long time,
unplug it from the outlet.
Precautions on Battery
•
Do not let it receive a strong impact, or strike it, or make a hole with a sharp object.
• Do not take it to or leave it at a hot place like a sauna.
• Do not let it get wet.
• Do not let the battery charging terminal contact a metal substance.
• Do not allow children or pets bite it or play with it.
• When you dispose of the battery, do not burn it or throw in the garbage can.
Take it to your nearest battery disposal place. (Call the local agency for locations.)
Precautions on the
Device
• Do not leave it in a location where the temperature is either too high
(above 35℃) or too low (below -5℃).
• Do not leave it in direct sunlight or in a closed car.
• Do not leave it in a dusty or humid place, or a bathroom.
• Do not leave credit cards (or any other materials with magnetic strip on) near it.
• Do not use accessories that are not provided with this device.
• Do not touch the LCD screen with a sharp object.
Precautions on Use
• Do not listen to music at a high volume for a long period.
• Do not watch video for too long at a time.
• Do not use the headphones/earphones while driving, walking or using
public transportation.
• Do not allow the LCD screen to receive any impact.
• If the device begins to smoke, or if it becomes heated and looks deformed,
stop using it immediately, and contact your nearest Customer Service.
• Do not use it while driving or on a plane.
• Turn it off while filling your fuel tank.
• Do not use it in a hospital.
• Do not leave the device or the power adapter on your bare skin for a long
time when in use. The device can heat up in normal use; touching your
bare skin for a long period when in use will make you uncomfortable and
could even cause burns.
Other Precautions
• If the device is wet, do NOT turn on the power. Separate the battery and dry it
with a soft, dry cloth and contact Customer Service.
• When cleaning the device, use a soft, dry cloth. Do not use benzene or thinners.
• Do not repair, disassemble or alter the device on your own.
• Take care not to let any liquid or foreign matter get inside the device.
• Do not drop the device.
Precautions for GPS
• For initial operation of the device, it is recommended to warm it up for over 15
minutes in a wide open place.
• If the automobile with this device installed is not used for over 7 days, the data
storage recharger inside the GPS may be discharged, and may require over
15 minutes of warming up.
• GPS signals are high frequency at 1575 MHz, and can be affected by weather
conditions like rain or fog or some other electromagnetic disruption, in which
case the reception may be bad.
• Under an overpass, inside a tunnel, in an area densely occupied by tall
buildings, and near high-tension wires, the reception can be bad.
• The GPS receiver may not work properly in some vehicles with UV coating,
sun-block coating, or electromagnetic disruption.
• The GPS receiver works well between 0℃ and 50℃. In the middle of summer
or in the dead of winter, problems may occur, so try to keep the temperature
from 0℃ to 50℃ to use the device.
•
On some roads running parallel to other roads or on an overpass, the information
on speed limits and on dangerous areas for speeding may not be accurate.
Precautions for
Bluetooth
• Don’t try to operate Bluetooth while driving. The driver shall be held responsible
for any accident arising from trying to operate Bluetooth.
• Turn off the Bluetooth setting where its use is not allowed for prevention of
electromagnetic problems or other dangers.
• If you use a certain medical device (such as a pacemaker or a hearing aid),
contact its manufacturer and make sure that it is cut off from an energy source
before using it. You may need some assistance from your doctor.
• Our product meets Bluetooth Standards 2.0. Some Bluetooth devices may not
be compatible with our product. For more information on compatibility, contact
the manufacturer of the pertinent Bluetooth device or our Customer Service.
• This wireless equipment may experience electromagnetic interruption, so it
cannot be used for services related to saving lives.
Precautions When
Using Navigation
• Placing the device where it blocks the driver’s view or where it gets in the way of
driving a vehicle can cause accidents.
• Adjust the volume to an appropriate level so that it won’t interfere with driving.
• Fix the device rack securely so that it won’t fall or move while driving.
• If you fix the rack onto the windshield, the adhesion may become weak after
a long time, and the device rack may fall. So, if you are not using it over a long
period, separate the device and keep it in a safe place.
• Do not disassemble the device on your own and fix it inside the vehicle.
It can affect the electrical system and the GPS reception, and may cause a fire.
• Be careful not to unplug the device from the cigarette jack while it is on. It can
cause a malfunction.
• Set it up where it does not block the driver’s view or where it is not in the way of
an air bag.
Page 5
ULTRA PC PMP 6 www.myviliv.com ULTRA PC PMP 7 www.myviliv.com
Basic Components Front View
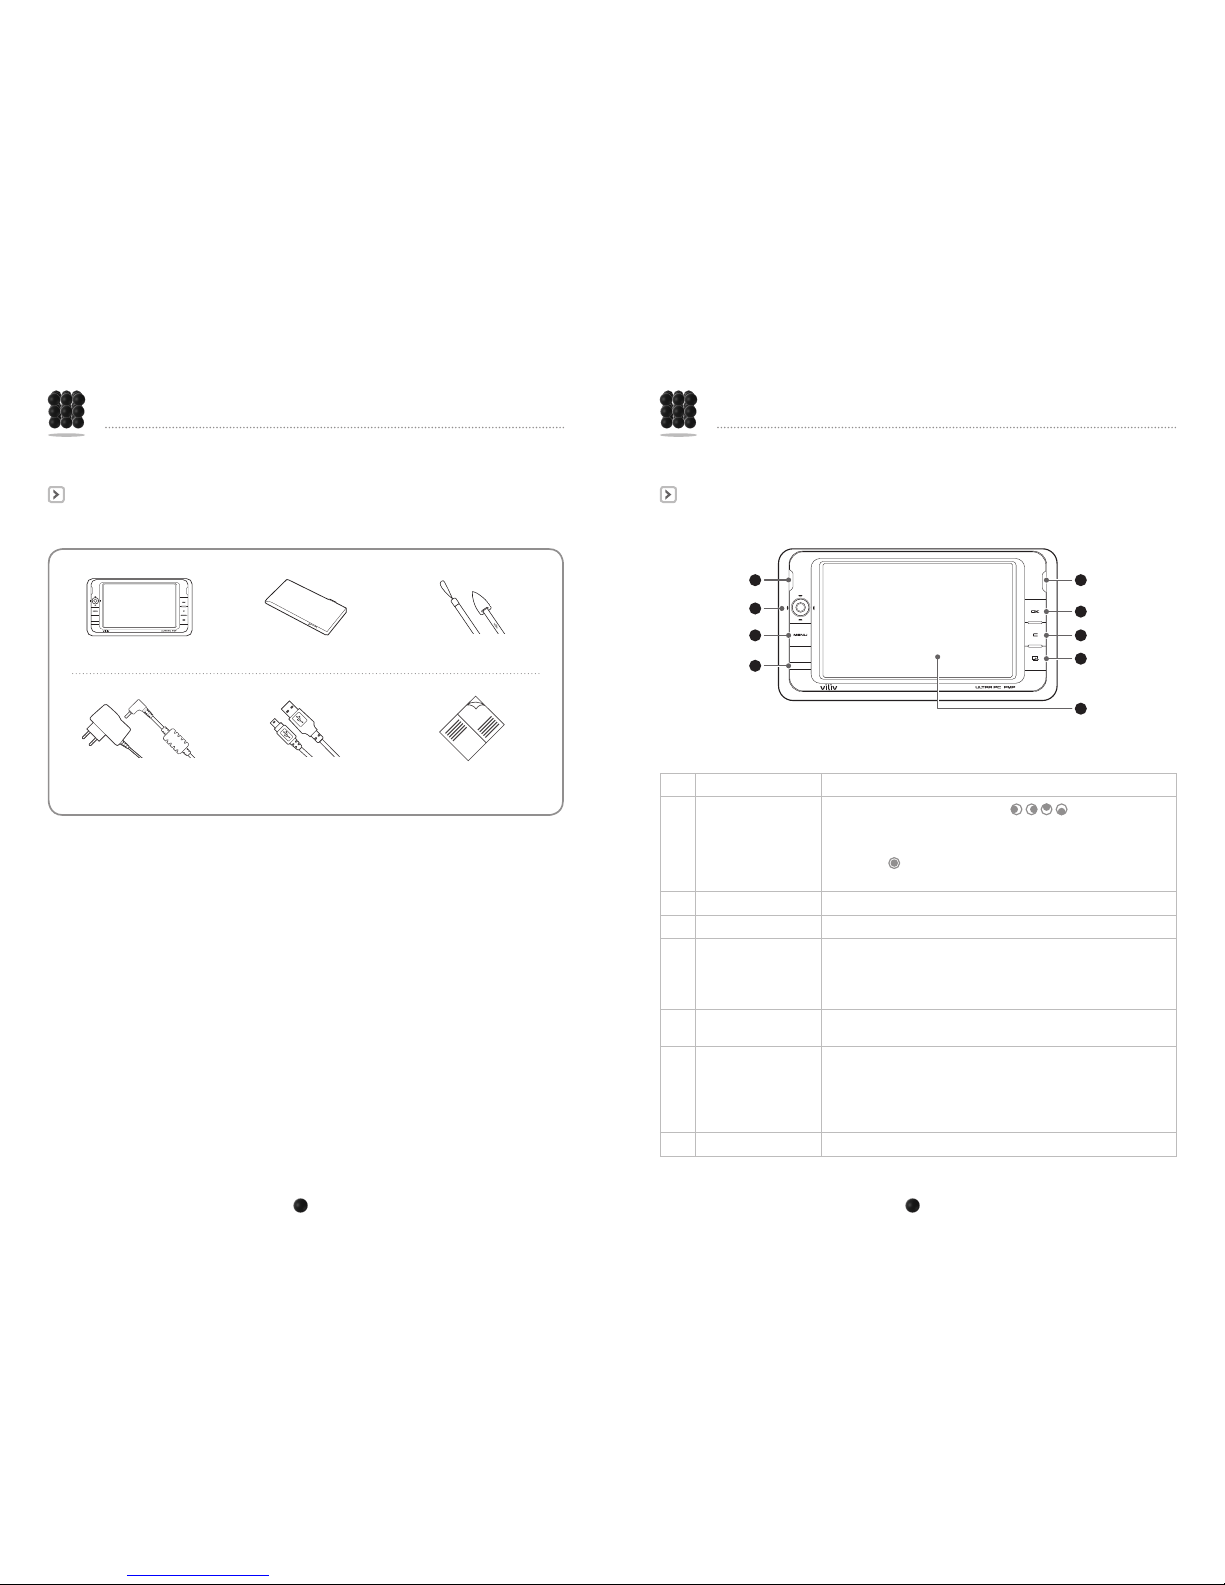
1 Built-in speakers
Stereo speakers are built in.
2 Jog dial
Dial to move Left/Right/Top/Bottom ( / / / )
To move Left/Right/Top/Bottom on screen.
(If it is pressed, continuous movement occurs on the screen.)
Tab button ( )
When pressed, the status bar appears.
3 Menu button
Displays the menu.
4 IR Receiver
Used when the wireless remote control is used.
5 OK (Run) button
With a quick click
The selected menu item or the icon function is executed.
When pressed for a bit longer
The LCD comes on or goes off.
6 Right-Click button
Displays the properties.
(the same function as the right-click of a PC mouse.)
7 Shortcut button
The initial value is set to the virtual keyboard.
User can make shortcuts to programs.
※ Same as pressing Ctrl+Alt+h at the same time on a keyboard.
※ For detailed information how to make shortcuts, refer to the detailed
User’s guide.
8
TFT LCD/Touch Screen
User can operate the device on the touch screen.
1
2
3
4
1
5
6
7
8
Names of PartsNames of Parts
The pictures of the components below may differ from the actual components, and some components
may be changed depending on the situation.
The main body
The standard slip-in/out battery
Ab AC/DC power adapter A USB cable Quick Start Guide
A hand strap and a stylus
pen in one
Page 6
ULTRA PC PMP 8 www.myviliv.com ULTRA PC PMP 9 www.myviliv.com
Left/Right View
1 Reset button
Pressing this with a pointed object turn off the device.
2 Multi-I/O jack
Used for Component/ S-VIDEO output.
3 USB host jack
Used to connect an external device to the device through USB
connection.
4 USB link jack
Used to connect the device to a computer.
(It will work as an external storage device.)
※ For details on connection, refer to the detailed guide.
※ Do not use this before reading the detailed guide carefully.
(This port is for advanced users only. Other users are not
recommended to use this feature because it may not work properly
with a regular USB cable. We recommend you to use the data link
cable for PC to PC connection instead.)
5 Power adapter jack
Used when connecting a power adapter to the advice or when
recharging the battery
6 Power indicator
Displays the battery status.
(When charging: red; when fully charged: blue)
7
External DMB
antenna jack
Used when connecting an external DMB antenna.
※
Some models may not have this.
※ Only available in Korea
8 Battery separation/lock
Separates/ Holds in the battery.
9 Power/lock switch
Used when locking the power on / off (locking all the functions)
status.
8
7
9
1
2
3
4
5
6
Names of Parts
Top View
1 Heat emission hole
Emits heat generated by the device.
※ If the heat emission hole is blocked, the device can overheat,
which can be dangerous. Take care not to allow this to be blocked.
※ Take care not to allow water into this hole.
2 Earphone jack
Connect the earphone or speakers through this.
3 Volume button
- Adjust the volume with this.
Pressing the center of the volume button turns on the Mute function.
4 Built-in DMB antenna
This is a built-in antenna for terrestrial DMB reception.
※ Some models do not have this built in.
※ Only available in Korea
2
31
4
Names of Parts
Page 7
ULTRA PC PMP 10 www.myviliv.com ULTRA PC PMP 11 www.myviliv.com
Connection of Earphones and External Speakers
Connect earphones and external speakers to the earphone jack at the top of the device.
Notice
When connecting external speakers, be sure to connect the standard 3.5-pi stereo cable of the speakers to
the earphone jack.
Installation and Cable Connection
Back View
The picture above shows the main body without the battery.
(Refer to page 15 for the battery separation/ placement.)
1
Battery recharging contact
Battery jack’s contact area.
2 Battery separation/ Hold
Lift the battery up in the direction indicated in the picture; then the
battery is separated.
3 UISM card slot (Optional)
USIM card insertion slot.
(Refer to page 16 for USIM card insertion/separation.)
4 Battery
2
1
1
4
3
Names of Parts
Page 8
ULTRA PC PMP 12 www.myviliv.com ULTRA PC PMP 13 www.myviliv.com
USB Host Connection
This is used when connecting an external device such as a digital camera or an external HDD.
USB Link Connection
Connect a USB cable to the USB Link jack on the left side of the device.
※ Do not use this before reading the detailed guide carefully.
(This port is for advanced users only. Other users are not recommended to use this feature
because it may not work properly with a regular USB cable. We recommend you to use the
data link cable for PC to PC connection instead.)
Installation and Cable Connection
External devices may have different connecting parts depending on products.
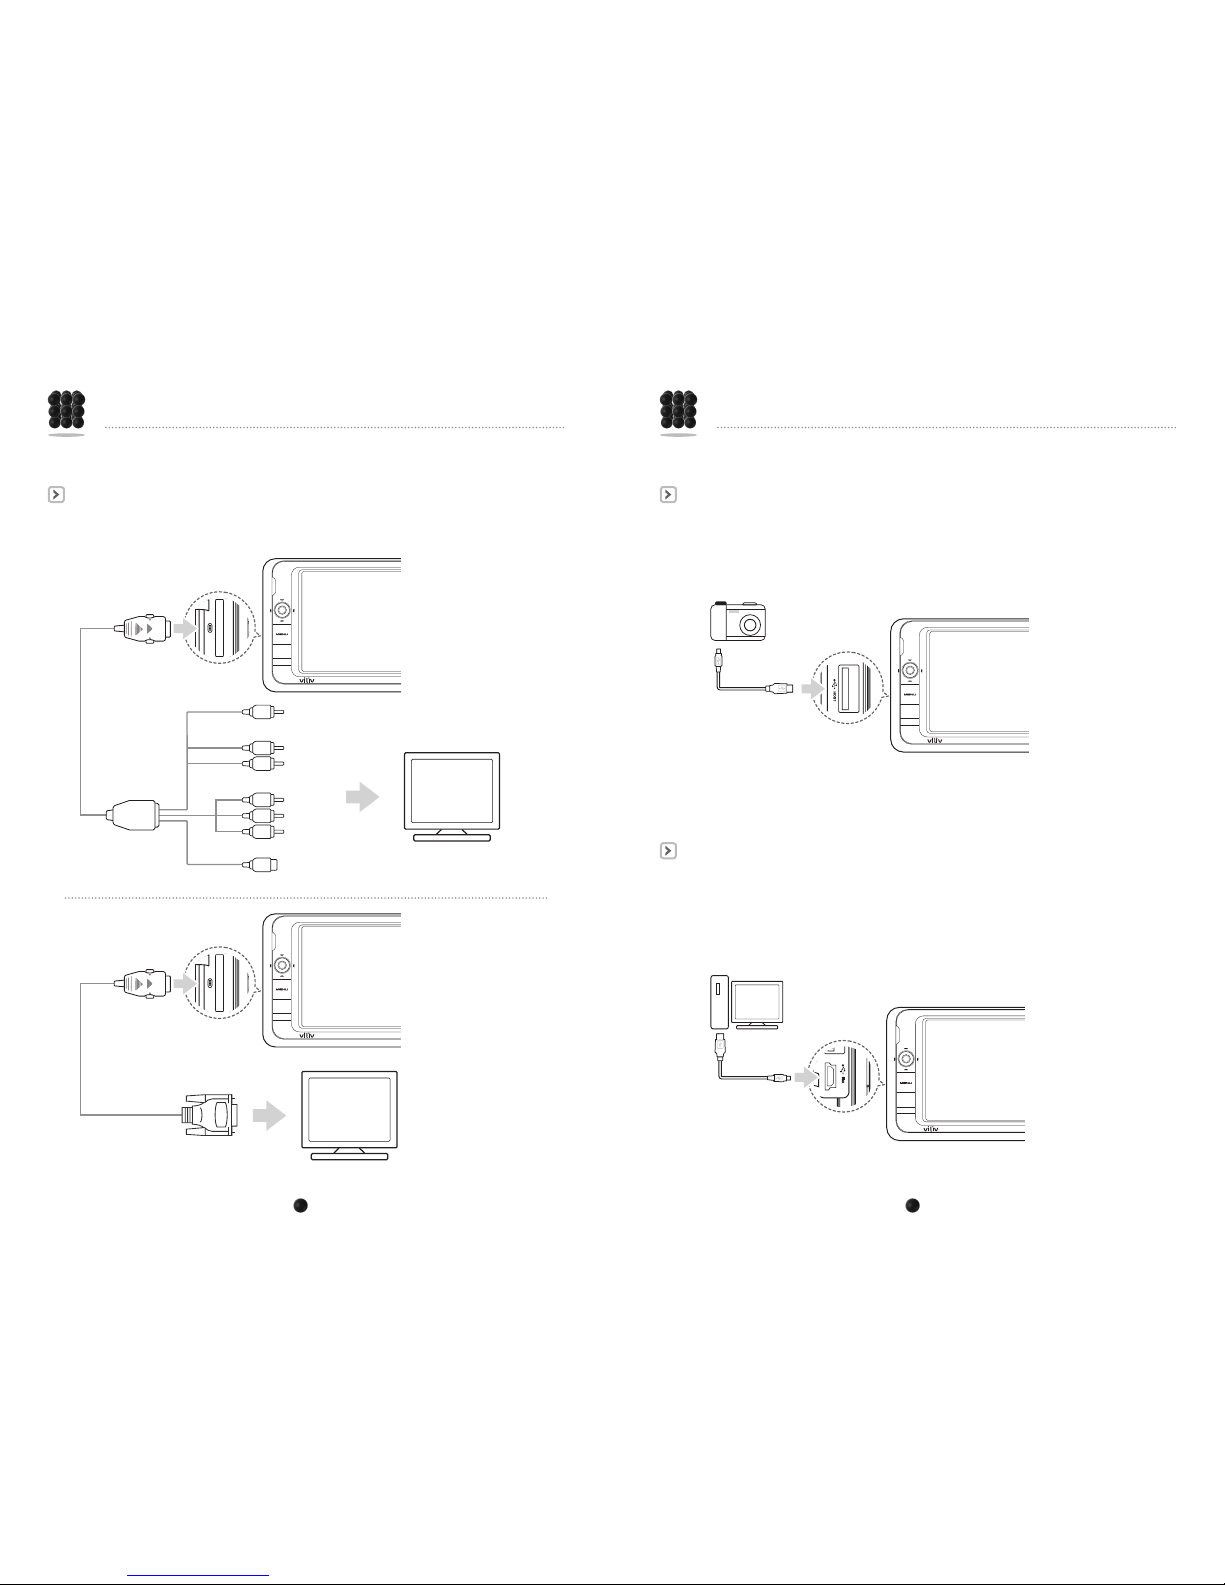
Multi-I/O Jack
This can be used to connect an LCD monitor or a digital TV.
(The icon on the back of a monitor may be different depending on the product.)
Installation and Cable Connection
Composite (Audio)
Composite (Video)
White
Red
Yellow
Blue
Green
Red
Component
Black
S-VIDEO
Page 9
ULTRA PC PMP 14 www.myviliv.com ULTRA PC PMP 15 www.myviliv.com
Battery Separation
Turn the battery separation/placement button on the right side of the device toward Open as
in the illustration below. Then, separate the battery.
Notice
Make sure that the power of the device is off before separating the adapter. You could get an electric shock
due to the area around the battery’s power being short-circuited.
Battery Placement
Adjust the battery into the groove as in the illustration below, and press it until it clicks.
Notice
If you do not insert the battery properly and place it by force, the device can be damaged.
Battery Separation/Placement
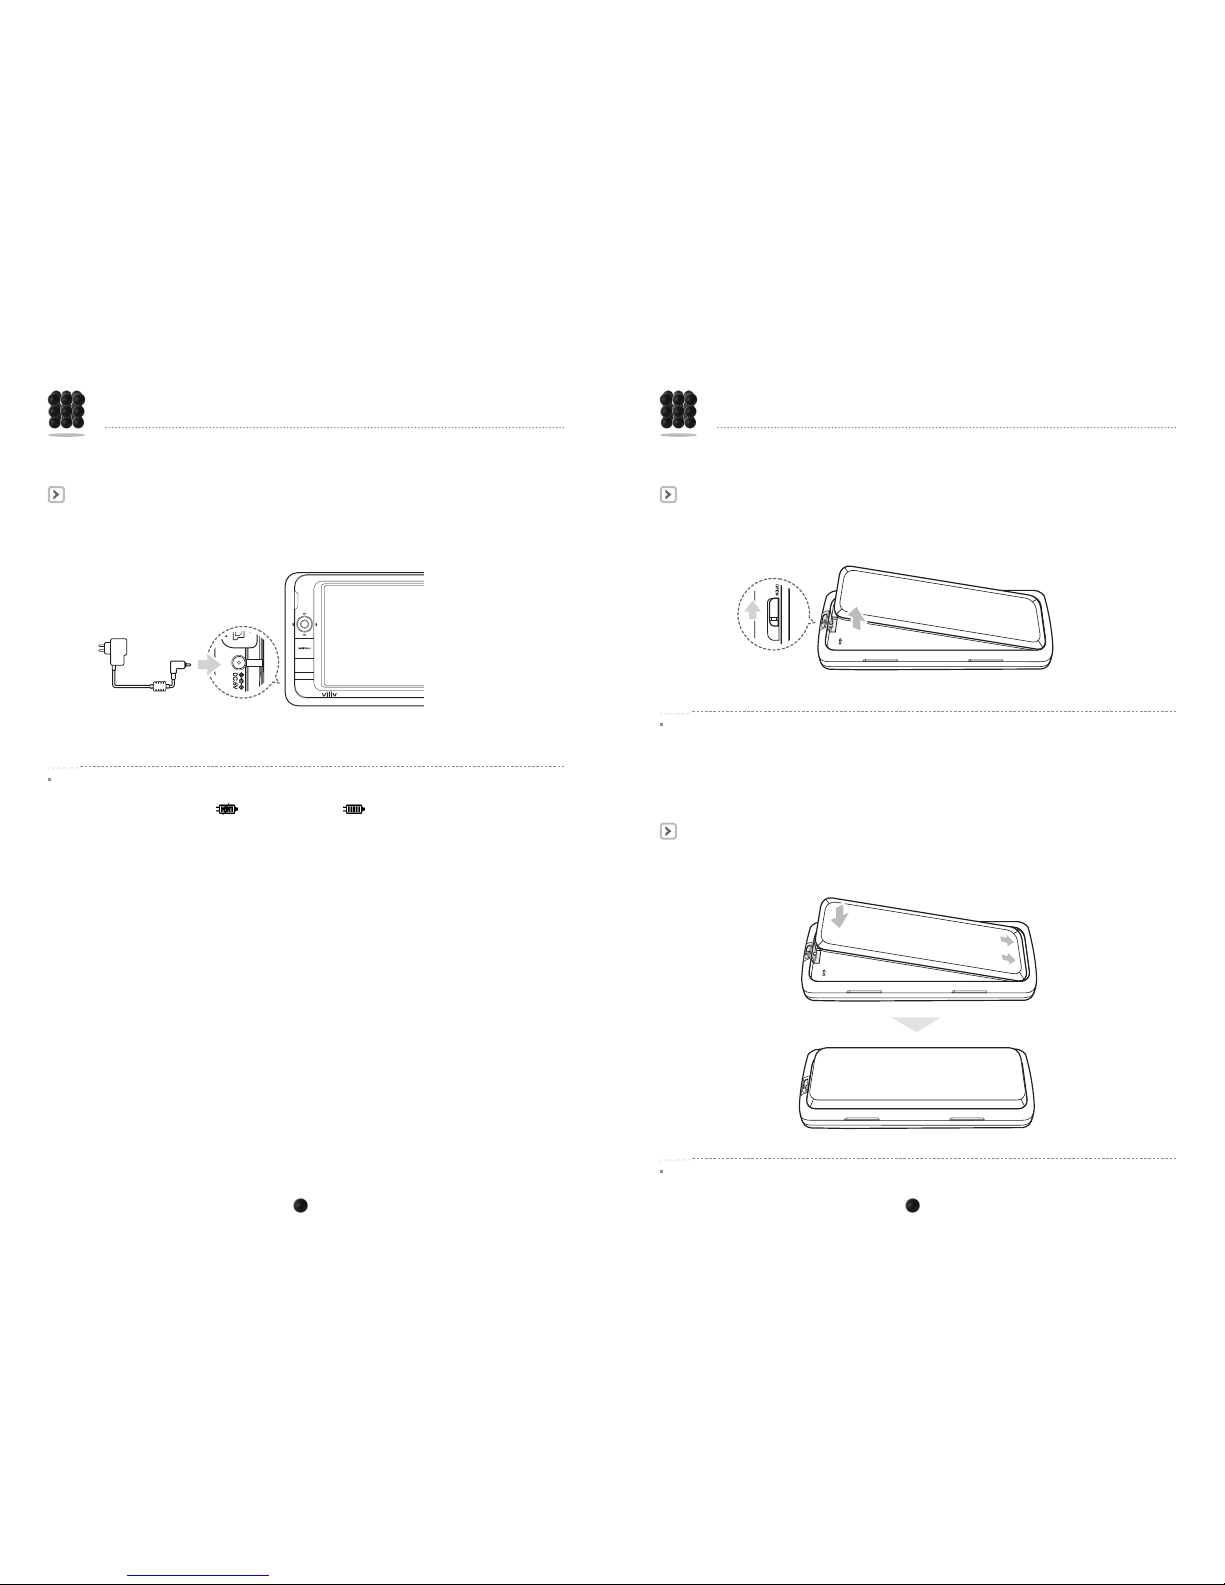
Power Connection (with Rechargeable Adapter)
Connect the rechargeable adapter to the power adapter jack on the left side
of the device.
Notice
The recharging status of the battery is as follows:
The device’s power indicator: When charging - red, When fully charged - blue.
The battery icon: When charging - , When fully charged -
Rechargeable Adapter
Installation and Cable Connection
Page 10
ULTRA PC PMP 16 www.myviliv.com ULTRA PC PMP 17 www.myviliv.com
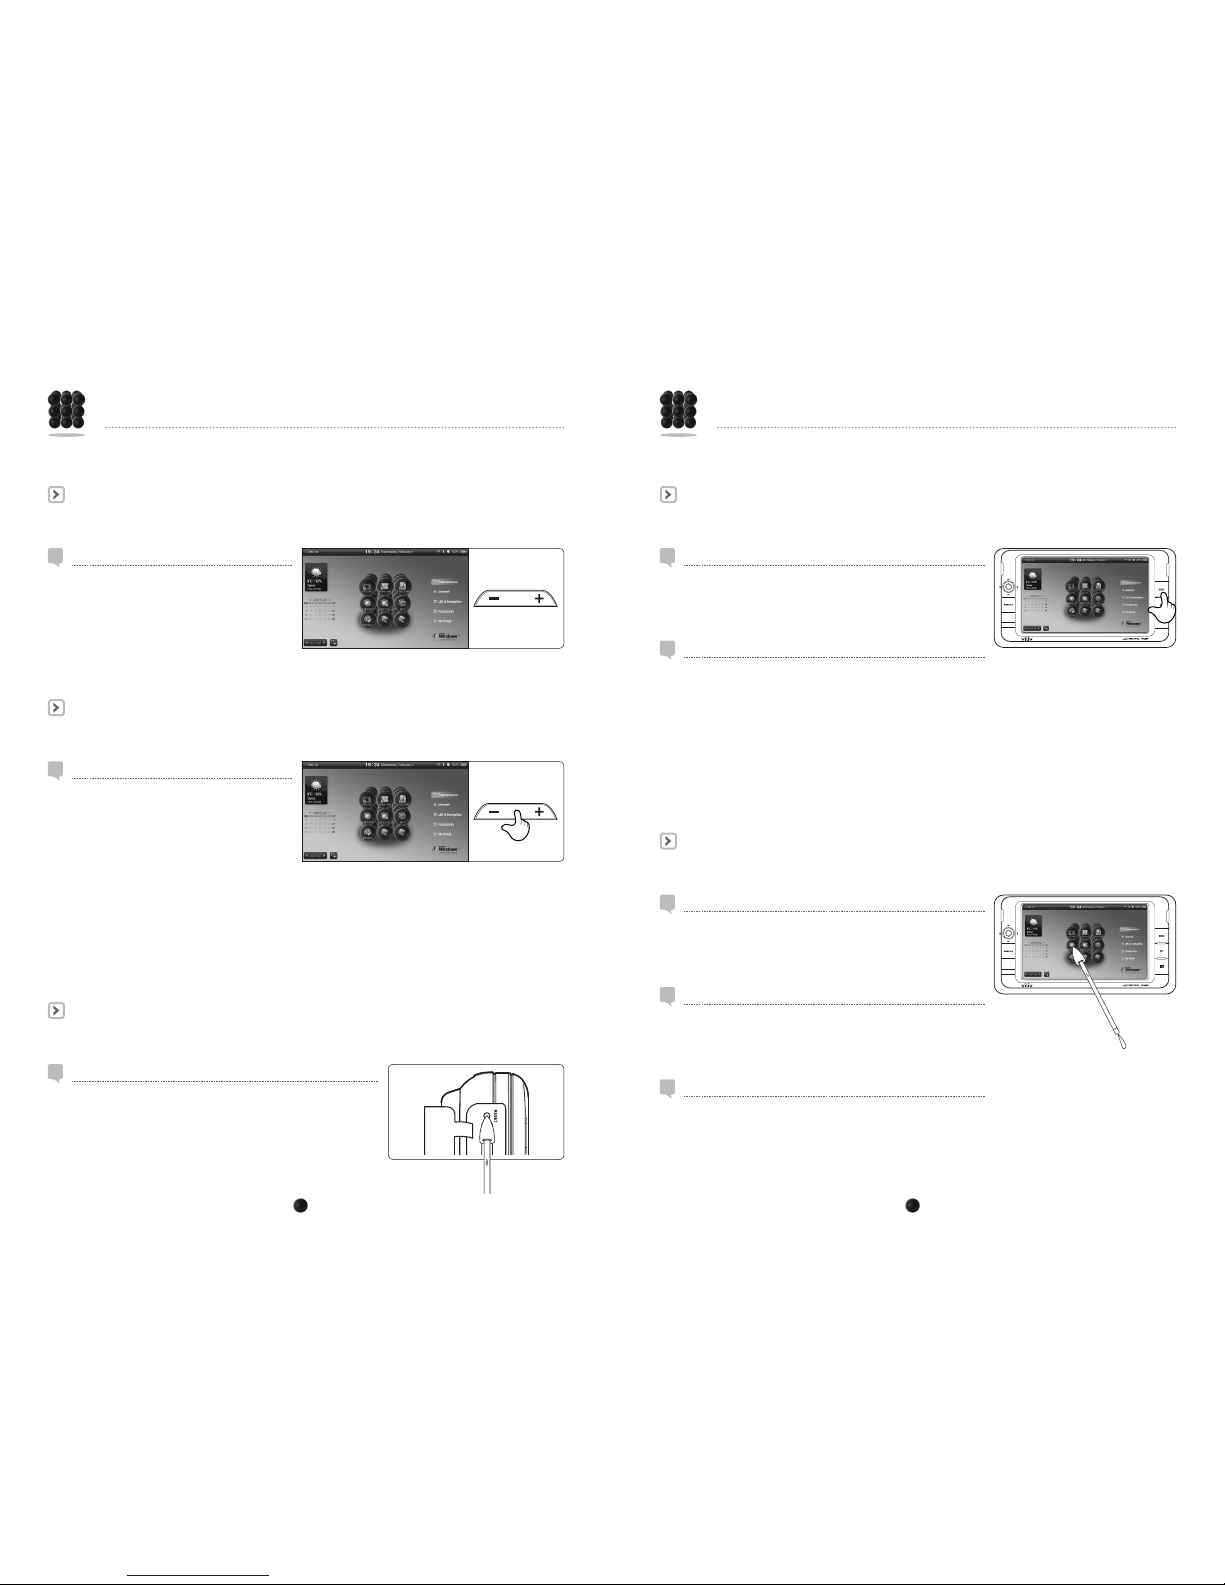
Setting the Hold Function
Push down the Hold button on the right side of
the device.
Once it is set to Hold, none of the buttons
including the touch screen functions will work
except for the Hold button.
Cancelling the Hold Function
Push up the Hold button on the right side of the
device to the middle.
Once the Hold setting is cancelled, all of the
buttons, including the touch screen functions,
will work.
Turning the Power Off
From the On position, push the power button
on the right side of the device up all the way to
turn it off.
Setting/Cancelling Hold Function
Power On/Off
All
the
way
Basic Operations
Turning the Power On
With the power off, push the power button on
the right side of the device up to turn it on.
The main screen displays on the LCD screen.
1
1
2
2
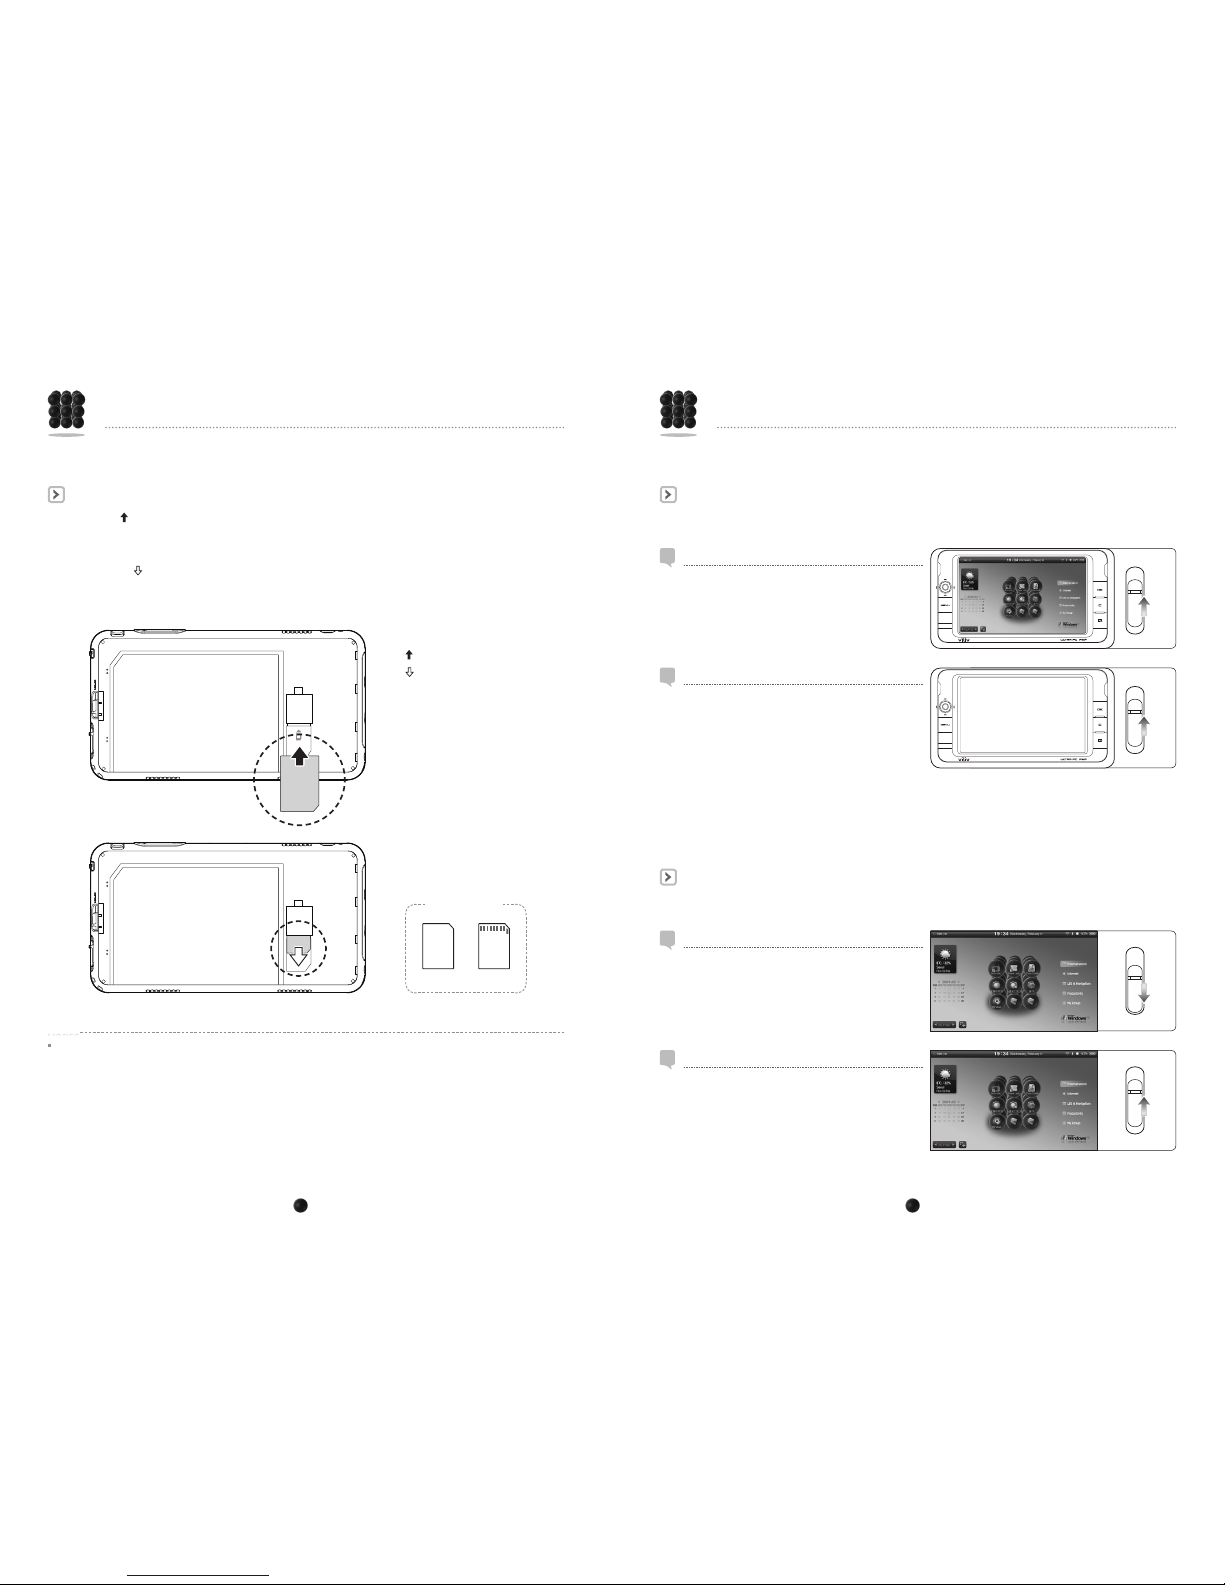
Directions to Insert/Remove USIM Card
To insert : Place the front part of the USIM card into the USIM card slot, and insert it in
the direction of the arrow until it clicks.
(When inserting a USIM card, pushing it too hard may damage the card.)
To take out : It is one-touch type, so pressing the end of a USIM card lightly will eject it.
(When part of the USIM card is ejected out, remove the card in the direction
of the arrow.)
Notice
Be sure to turn the power off before removing the USIM card.
Battery Separation/Placement
: Direction of insertion
: Direction of removal
USIM card
Front side Back side
Page 11
ULTRA PC PMP 18 www.myviliv.com ULTRA PC PMP 19 www.myviliv.com
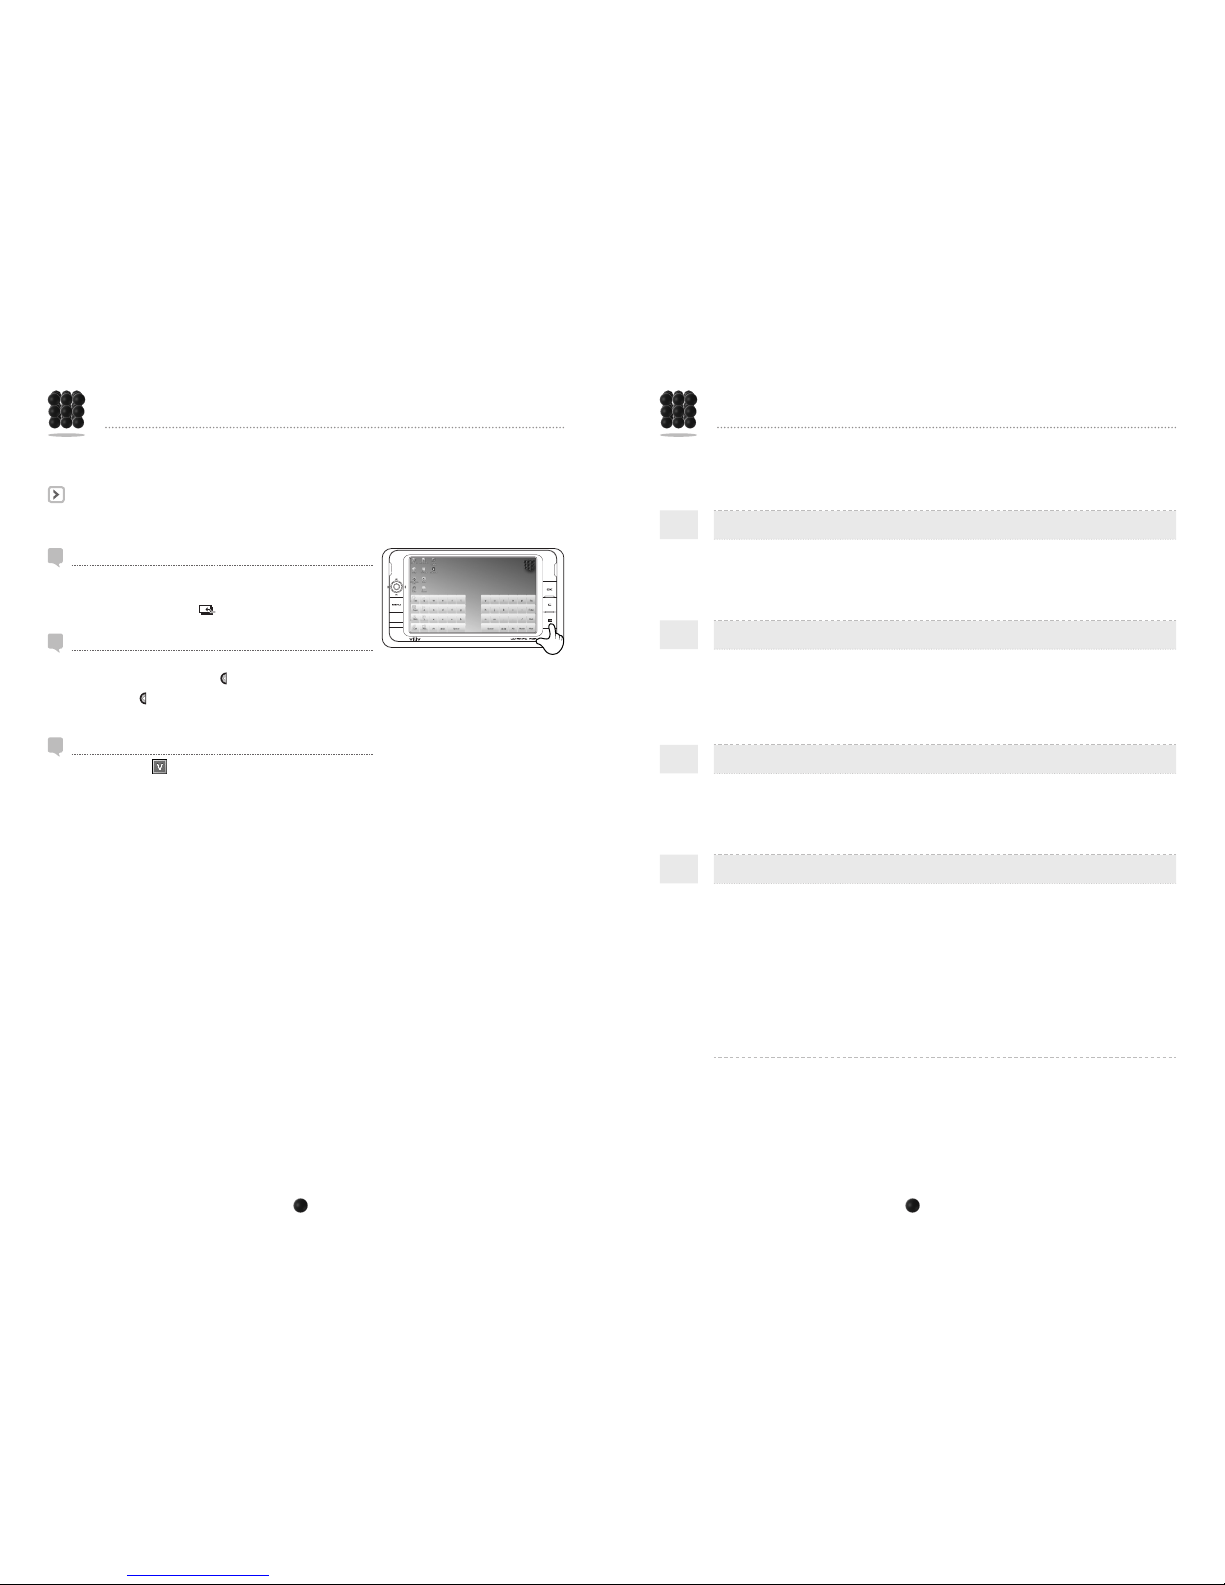
Turning On/Off the LCD Screen
Touch Screen
Turning off the LCD Screen
When it is on, press and hold the [OK] button; then the
screen goes off.
Touch
Click any place on the LCD screen with the Touch Pen.
(If you keep it pressed, it will work like a right click.)
Turning on the LCD Screen
When it is off, press and hold the [OK] button; then the
screen comes on.
Double Touch
This works the same way as the double-click with a PC
mouse.
Just double-touch any place on the LCD screen.
Drag
With the Touch Pen, press any place on the screen and
drag it to the nal destination on the screen.
(It works the same way as dragging with a PC mouse.)
Basic Operations
1
1
2
2
3
Volume Control
Mute
Resetting
Use the Reset button if the touch screen and/or the buttons on the device do not work.
Basic Operations
Volume Control
Adjust volume by pressing the VOL button
on the upper area of the device.
1
Mute
Press the middle of the VOL button on the
upper area of the device.
The MUTE function is on.
1
Reset
Lightly press the Reset button on the left side of the device
with the Touch Pen.
1
Page 12
ULTRA PC PMP 20 www.myviliv.com ULTRA PC PMP 21 www.myviliv.com
FAQ
The following are Frequently Asked Questions and the answers to them concerning viliv usage.
Check them before contacting Customer Service.
Q
The power does not come on, and nothing appears on the LCD screen.
A
Check that the power is connected. If it is not connected, check the charge status of
the battery. If the battery is completely discharged, it will take more than 10 minutes to
recharge it.
Q
During use, the power or the LCD screen goes off on its own.
A
Check that the power is connected. If it is not connected, check the charge status of the
battery.
If the battery is completely discharged, even if the power cable is connected, it can run
erratically, or it may not work at all. Charge it for more than 10 minutes.
Q
The buttons do not work.
A
Check if there is the Hold icon on the screen. If it is ‘locked’ (i.e., there is the Hold icon on
the screen), ‘unlock’ it (i.e., cancel the Hold status). If it is not ‘locked’ and still no buttons
work, press the Reset button with a pointed pin.
Q
Video subtitles do not appear.
A
If the format of the video subtitle is SMI, the extension on the le name that is the same as
the video le being played should be ‘SMI’ or ‘smi’. If the le name is long or if the video is
divided into several les, the le names should be in order.
For example, if there is a le name like “This video le name is very long,” the following
should be in the directory:
This le name is very long_1.avi
This le name is very long_1.smi
This le name is very long_2.avi
This le name is very long_2.smi
Virtual Keyboard
Running the Virtual Keyboard
Click the [vilivSoftKeyboard] icon on the screen to run the
Virtual Keyboard.
(You can also press the [ ] button.)
Hiding the Virtual Keyboard
Clicking the [Hide] icon on the virtual keyboard will minimize
the virtual keyboard into the [ ] icon.
Pressing the [ ] icon brings it back to its original form.
Ending the Virtual Keyboard
Right-click the [ ] icon on the task bar and select ‘Exit’.
Basic Operations
1
2
3
Page 13

ULTRA PC PMP 22 www.myviliv.com ULTRA PC PMP 23 www.myviliv.com
Device Name
S5
CPU & Chipset
Intel® AtomTM 1.33GHz(Z520) + SCH US15W
LCD
4.8" WVGA(800x480) / WSVGA(1024x600)
Form Factor
Touch-panel display with Virtual Haptic Keyboard
RAM
1GB
Storage
HDD 30/60GB
WWAN(Optional)
Wimax; HSDPA
LAN
IEEE 802.11b/g
Bluetooth
Bluetooth Ver2.0 + EDR
GPS(Optional)
SiRF Star3
DMB(Optional)
RF+BASEBAND Chipset built-in H/W module
Connector
Audio x1, USB x1, USB(Link) x1, Multi I/O for cradle x1
Audio
Stereo speakers
Battery
Lithium Polymer(Slip On/Off Type)
Voltage : 3.7V
Capacity : 6,200mAh
Dimension
154(W) X 84(H) X 24.4(T) mm
OS
Windows XP Home
Operating Temperature
0℃ ~ 60℃
Device Name (Model
Name)
Specified Low Power Wireless Device for Wireless Data Communication
System
Certificate Number
YPK-S5(B)
Transmission Frequency
2412~2472MHz / 2402~2480MHz
Reception Frequency
2412~2472MHz / 2402~2480MHz
Output of Antenna
BT = 0.00001W/MHz , WLAN=0.01W/MHz
Electric Wave Type
G1D, D2D, F1D
Communication Method
Semi-duplex Operation
Number of Channels
13 (WLAN) , 79 (BT)
Modulation Method
CCK, DQPSK, DBPSK, 64QAM, 16QAM, GFSK
Environment
Temperature: -10 ~50 / Humidity: ~95%
Power
DC 5V
Specifications
The device specications below may be changed without prior notice for performance improvement.
FAQ
Q
There is no sound when playing video/audio.
A
Check that the earphones or the wired remote control is plugged in.
Check if the volume is set at 0, using the volume control button.
If the volume is set too low, you may not hear anything.
Q
When the PC is connected to the USB port of the product, this cannot be
detected as a virtual CD drive.
A
Check that the power of the device is on. It will not work with the power off.
Check the cable connection.
Check the charge status of the battery. When the battery is charged to a very low level,
the device may not be recognized or the les in the device cannot be moved.
Check the setting of the USB Link mode.
(For details on this setting, refer to the detailed guide.)
General Specications
Wireless Specications
Page 14

 Loading...