

Page 1
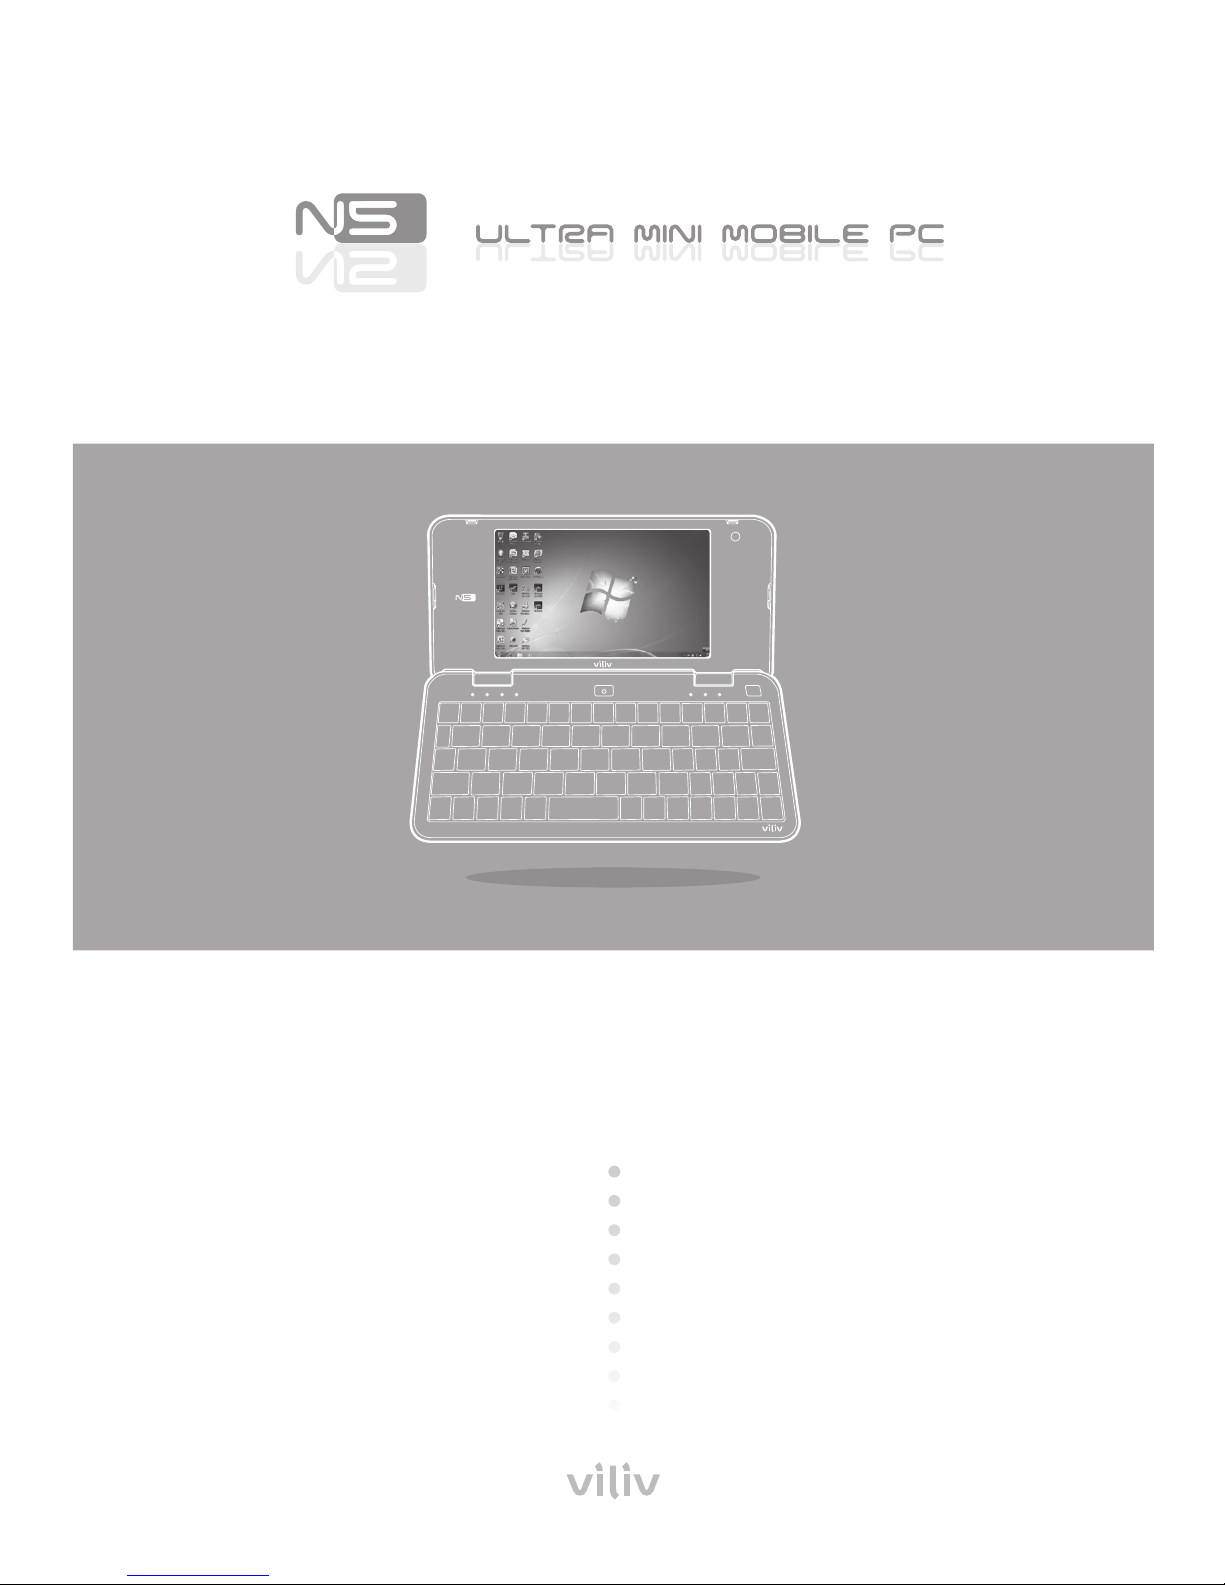
Thanks for purchasing viliv.
Please read the precautions
throughly before using the product.
Page 2
Yukyung Technologies Corp. has the copyright for this guide.
Contents of this manual may not be copied or produced in any form or means without prior authorization
from Yukyung Technologies Corp.
©2010 Yukyung Technologies Corp. All rights reserved.
This device has acquired EMC certication for home use (Class B)
and is designed not only for use in residential area but anywhere.
viliv is the registered trademark of Yukyung Technologies Corp.
Windows7, Windows Vista, Windows XP, Windows 2000, Windows CE are the registered trademarks of
Microsoft Corporation.
Infringement of Intellectual Property Rights:
Playing, copying or distributing any part or all of any
copyrighted contents such as software, music or video with this device may infringe on a third party’s
legitimate intellectual property rights or violate copyright law. All legal responsibilities for the infringement
of copyright or intellectual property rights from the use of this device lie with the user.
Improper Use:
The manufacturer of this device is not liable for any damage or improper use and
operation by using this device and infringement of copyright and portrait right by user when taking
photos In addition, the manufacturer is not liable for bodily injury or property damage that may occur
arising from inappropriate use other than operation standards or conditions.
Data Loss:
Any audio, video or photo les stored in this device may be deleted due to damage or
operational error caused by user’s careless handling or unknown failure or when the device undergoes
warranty repair. Therefore, the les must be backed up in a separate place.
In these cases, the manufacturer is not liable for the loss or damage of data stored in the device.
Specication Change:
The standards, accessories, embedded software and manual contents of this
device may be changed without user's prior consent or prior notice to the user.
Grade B Device
(Broadcast Communication Device for Residential Area)
Certication
Registered Trademark
Liability Disclaimer
Copyright
Page 3

Safety Precautions for Use ...............................................................4
Names of Parts ...................................................................................7
Basic Components ..........................................................................................................7
Front View ..........................................................................................................................8
Keyboard ............................................................................................................................9
Left / Right View ...............................................................................................................10
Lower Side .........................................................................................................................11
Rear View ............................................................................................................................11
Installation and Cable Connection .................................................12
Connecting Earphone ...................................................................................................12
USB HOST Connection...................................................................................................12
Power Connection (Charging Adaptor) ...................................................................13
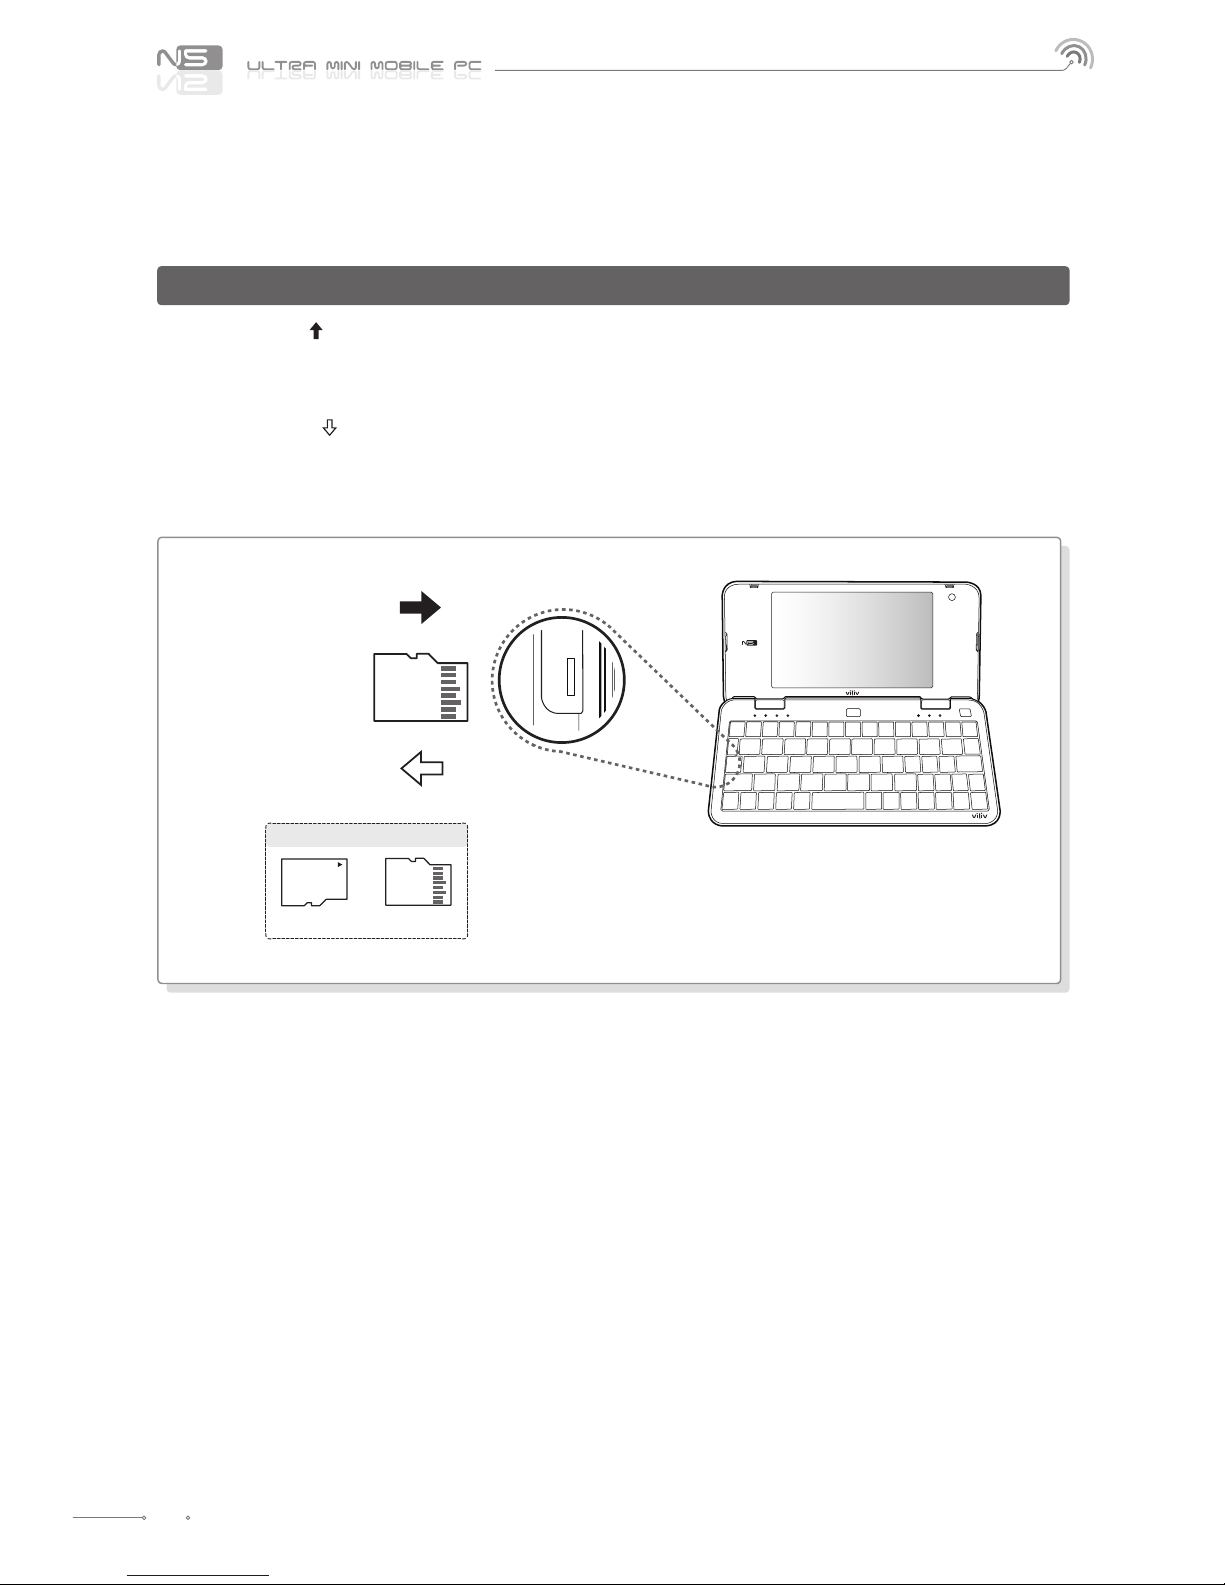
Inserting · Extracting MicroSD Memory Card .......................................................14
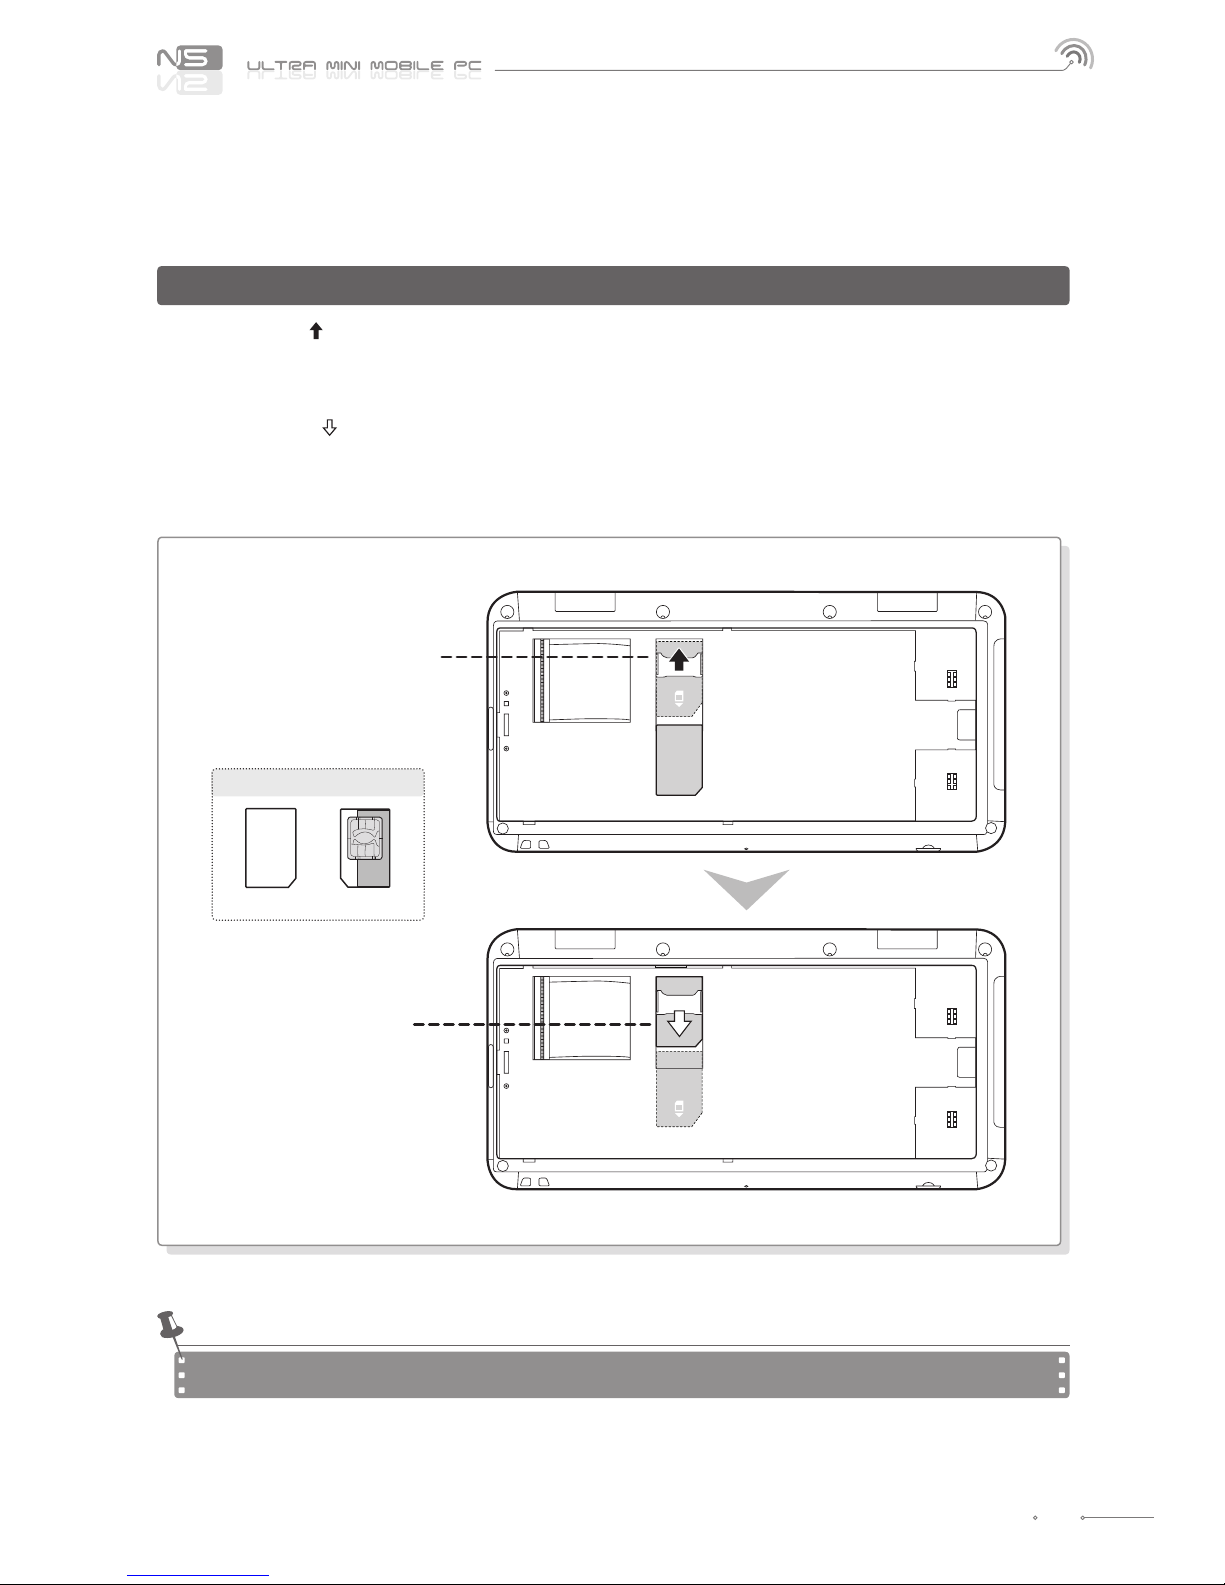
Inserting · Extracting USIM Card (Optional) ...........................................................15
Separating · Attaching Battery .......................................................16
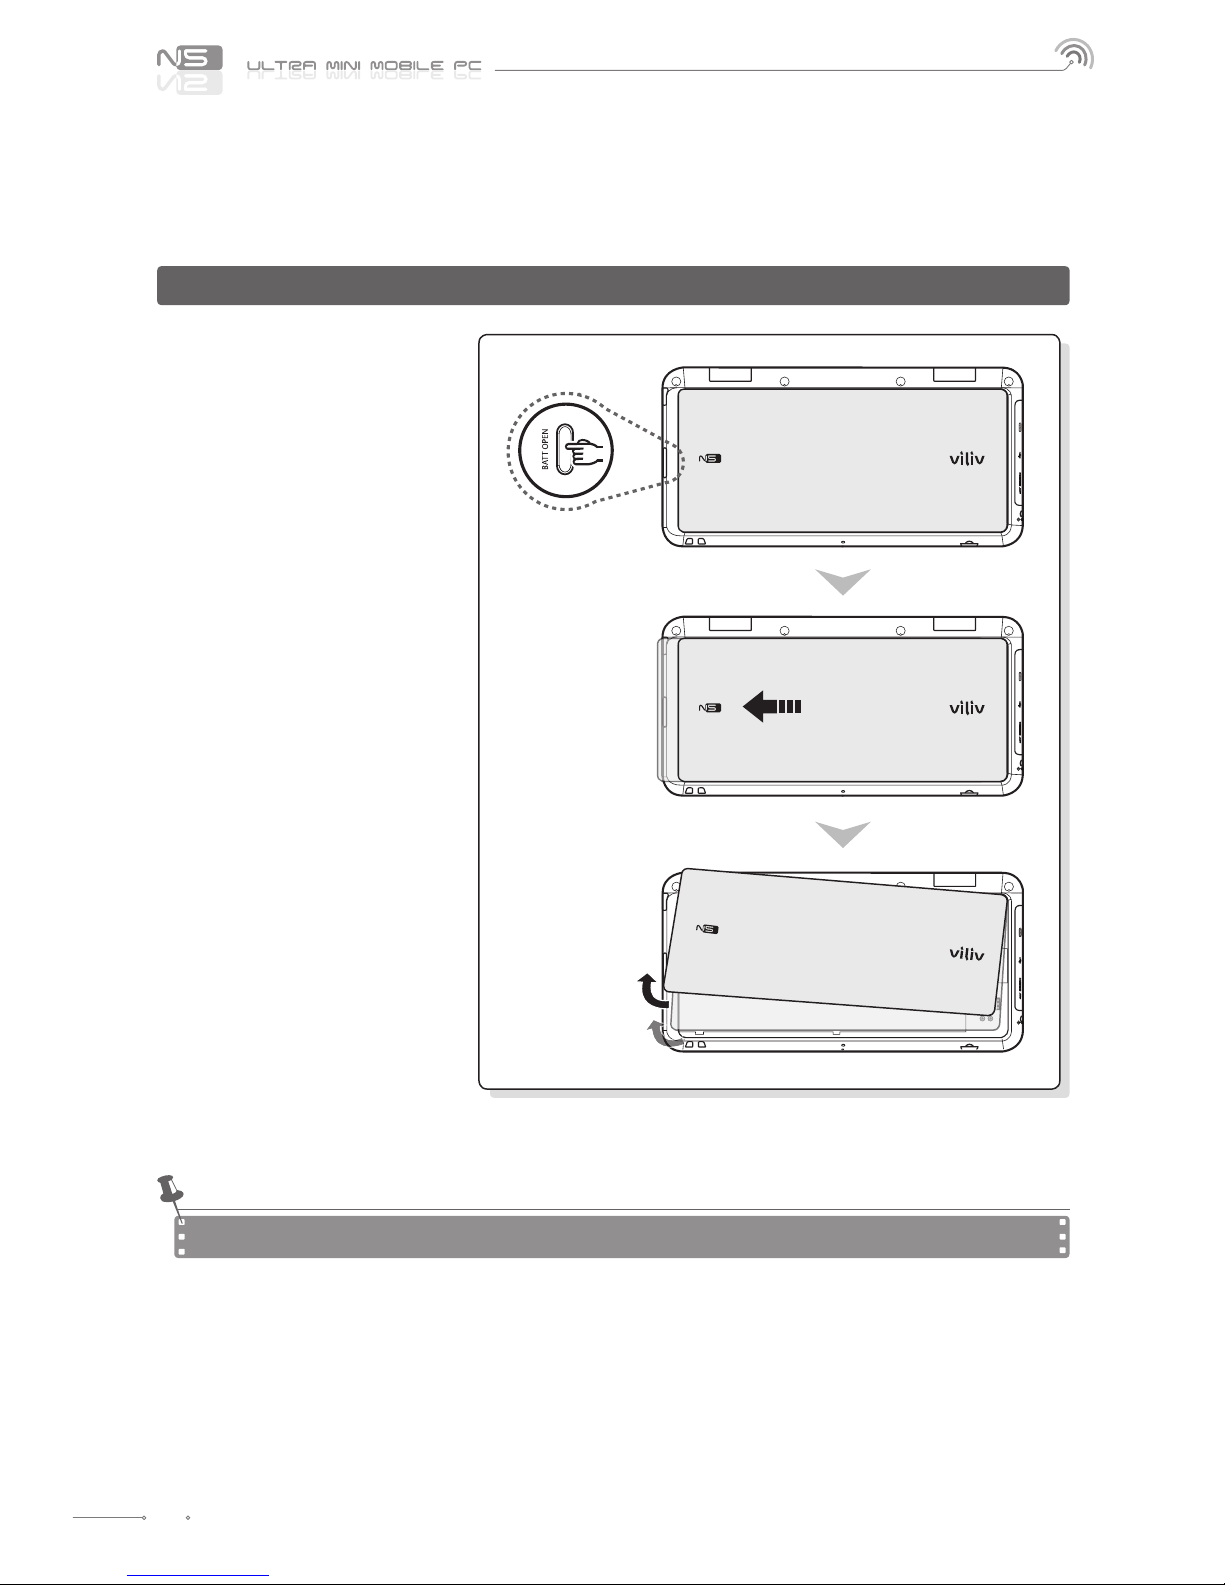
Separating Battery ..........................................................................................................16
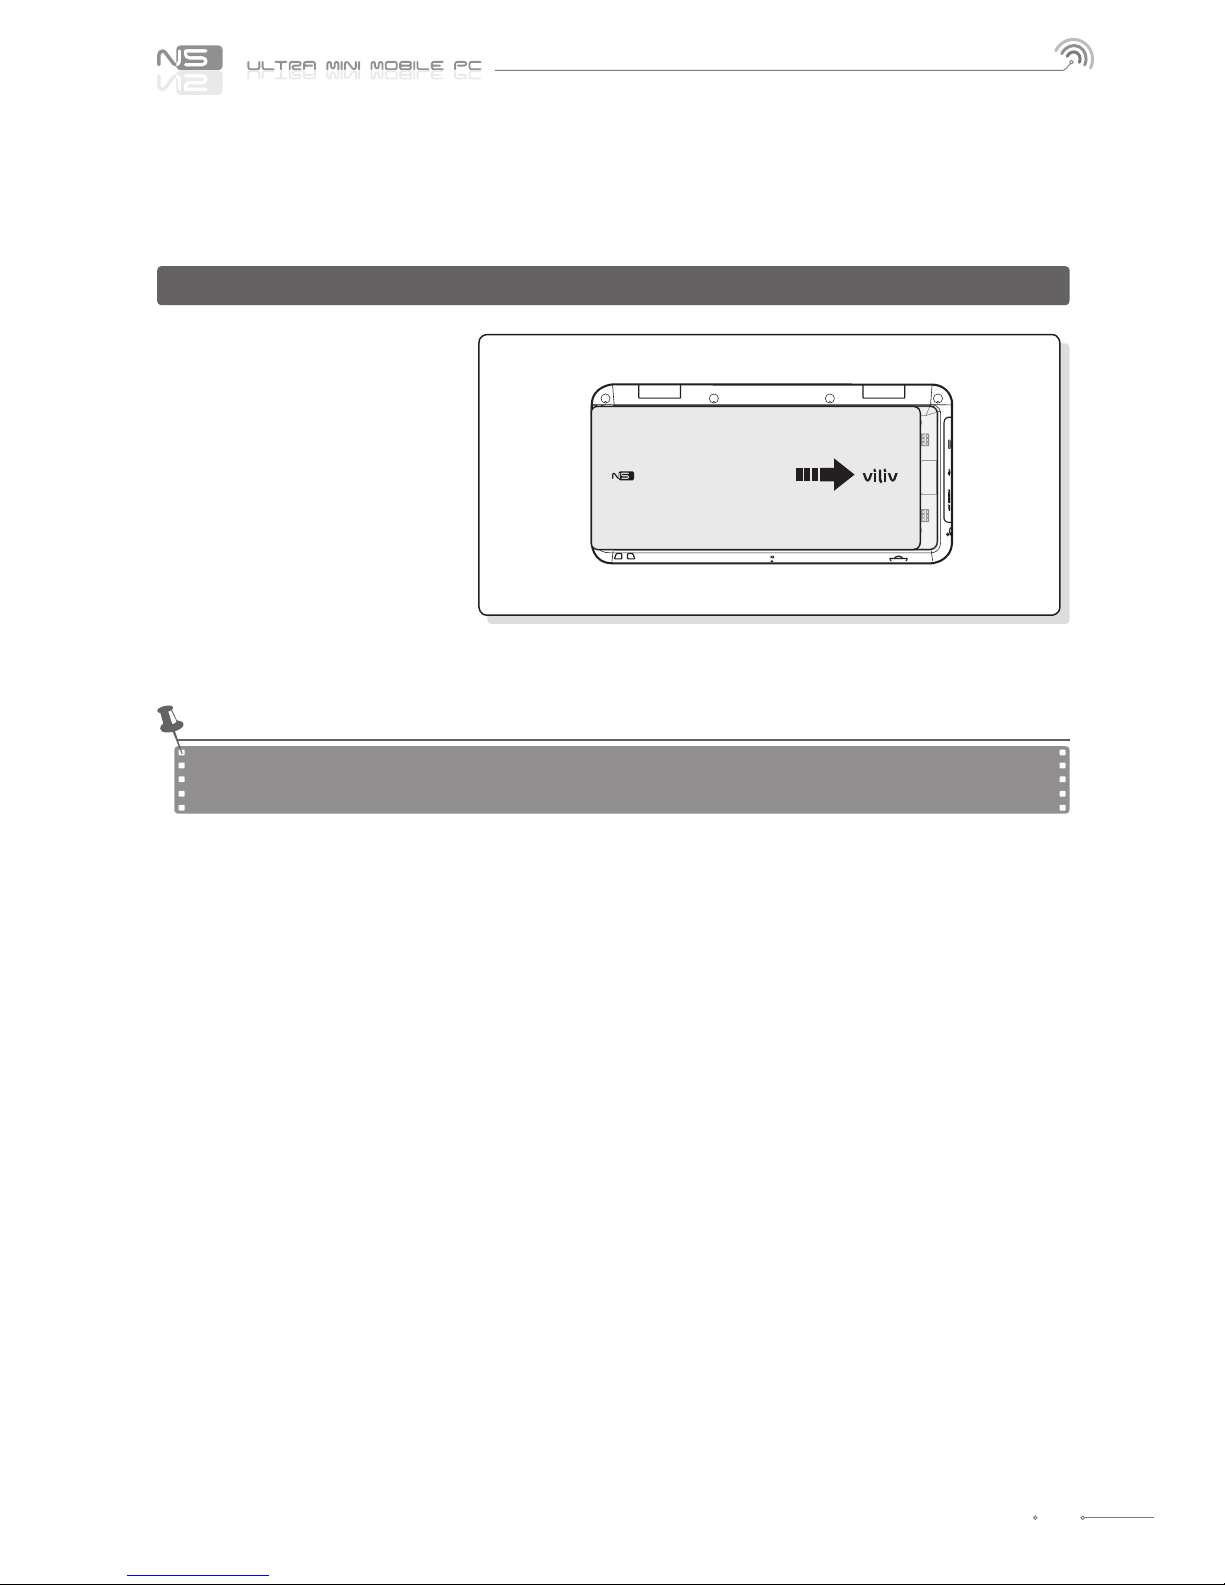
Attaching Battery ............................................................................................................17
Basic Operation ..................................................................................18
Turning the Power On/Off ............................................................................................18
Touch Screen .....................................................................................................................18
Set Up for viliv Manager ...............................................................................................19
Recovery Solution (AMI Rescue) Guide .........................................20
Way to Use Recovery Solution (AMI Rescue) .........................................................20
Specications .....................................................................................21
General Specifications ...................................................................................................21
Contents
Page 4
English
4
Safety Precautions for Use
This device complies with Part 15 of FCC Rules.
Operation is subject to the following two conditions:
(1) This device may not cause harmful interference, and
(2) This device must accept any interference received.
Including interference that may cause undesired operation.
FCC Compliance Information
Modications not expressly approved by the party
responsible for compliance could void the user’s
authority to operate the equipment.
Caution
If the battery can be seen to be swollen, there may ■
be imminent danger. Immediately contact the
manufacturer or sales representative.
Only use an eligible specied charger. ■
Keep the device away from open ames. (Do not put it ■
in a microwave.)
Do not leave the device in a car in summer. ■
Do not store or use the device in a hot and wet place ■
like a bathroom.
Do not put the device on bedclothes, electric mattress ■
or carpet and use it for a long time.
Do not store the device powered on in a closed space. ■
Do not allow metal products, such as a necklace, coil, ■
key or watch, to touch the battery port.
Use a lithium secondary battery guaranteed by a ■
portable device manufacturer.
Do not disassemble or pierce the device and do not ■
apply excessive strength.
Do not apply excessive impact like dropping the device ■
from a high place.
Do not expose the device to temperatures of 60°C or ■
higher.
Avoid humidity. ■
Warning
Please observe the instructions below. Failure to do may cause heating, re, explosion, etc.
This equipment has been tested and found to comply with the limits for a Class B digital device, pursuant to part 15 of the
FCC Rules. These limits are designed to provide reasonable protection against harmful interference in a residential
installation. This equipment generates, uses and can radiate radio frequency energy and, if not installed and used in
accordance with the instructions, may cause harmful interference to radio communications. However, there is no guarantee
that interference will not occur in a particular installation. If this equipment does cause harmful interference to radio or
television reception, which can be determined by turning the equipment o and on, the user is encouraged to try to
correct the interference by one or more of the following measures:
- Reorient or relocate the receiving antenna.
- Increase the separation between the equipment and receiver.
- Connect the equipment into an outlet on a circuit dierent from that to which the receiver is connected.
- Consult the dealer or an experienced radio/ tv technician for help.
Information to User
In August 1996 the Federal Communications Commission(FCC) of the United States with its action in Report and order
96-326 adopted an updated safety standard for human exposure the ra-dio frequency electromagnetic energy emitted
by FCC regulated transmitters. Those guidelines are consistent with the safety standard previously set by both U.S. and
international standards bodies. The design of ‘N5’ complies with the FCC guidelines and those international standards.
Use only the supplied or an approved antenna. Unauthorized antennas, modications, or attachments could impair call
quality, damage your ‘N5’, or result in violation of FCC regulations.
‘N5’ was tested for typical body-wom operation using the optional belt-clip / holster placed touch(0cm) from the body.
The use of non-tested accessories or other body-wom operations may not comply with FCC exposure requirements and
should be avoided.
FCC RF Exposure Information
Page 5
English
5
Safety Precautions for Use
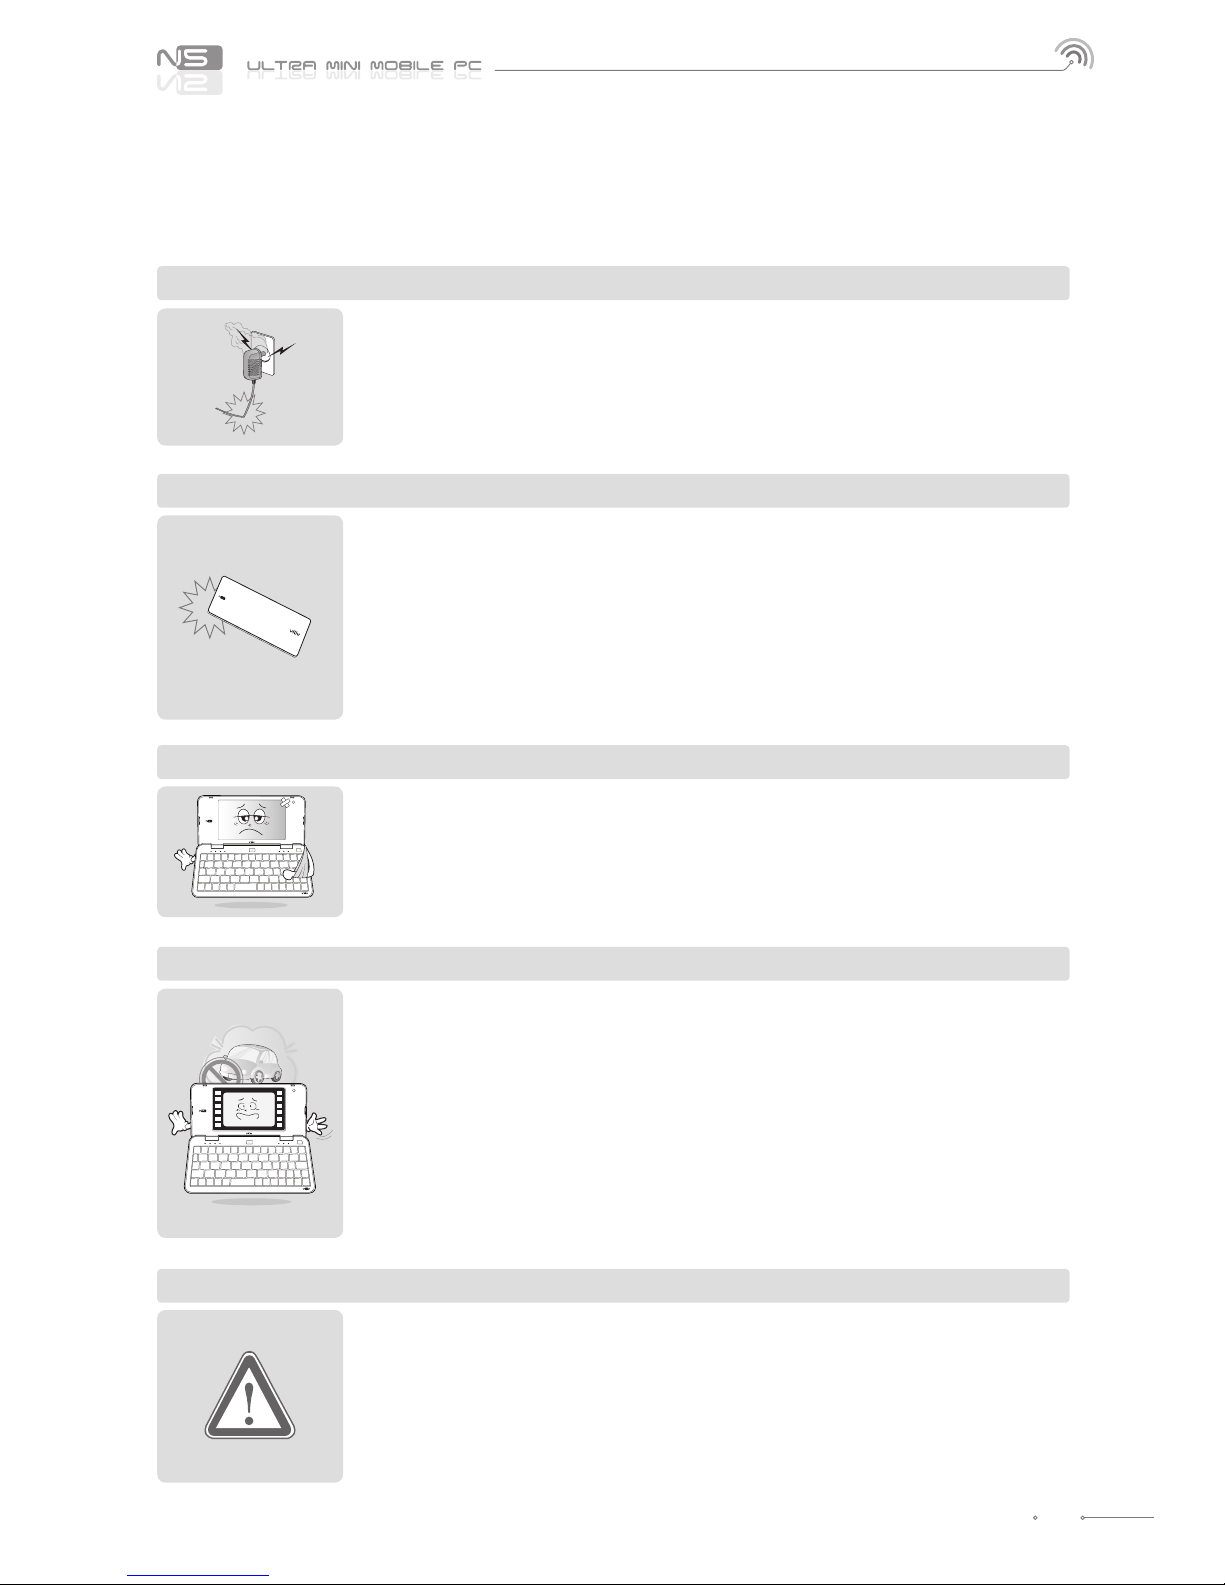
The precautions below are provided to prevent bodily injury or property damage by using this product correctly.
Please observe the precautions.
Do not touch the power adaptor with wet hands. ■
Plug the power cord into an outlet with grounded jack. ■
Be sure the plug goes in all the way and is not loose. ■
Do not use your device if it is damaged, including an exposed or peeled power cord. ■
If lightning occurs nearby or if you are absent for a long time, unplug the plug from the outlet. ■
Precautions on Power
Do not apply strong impacts or make a hole with a sharp object. ■
Do not leave the battery in a hot place such as sauna or bathroom or otherwise heat it. ■
Do not let the battery become wet or immersed in liquid. ■
Do not allow children or pets to bite or suck the battery. ■
Keep the battery charging port away from metals. ■
When disposing of the battery, do not burn it or throw it away in domestic trash. ■
Dispose of the
battery at the nearest disposal place for batteries after contacting your local water
disposal agency.
Precautions on Battery
Avoid exposing to direct sunlight and do not leave in a closed car. ■
Do not leave the device in a dusty place or a humid place such as a bathroom. ■
Keep the device away from credit cards, bankbooks, or a communication ticket. ■
Do not use accessories that are not provided with this device. ■
Do not touch the LCD screen with a sharp object. ■
Precautions for the Device
Do not listen to music at a high volume for a long time. ■
Do not watch the video for too long a time. ■
Do not apply strong impacts on the LCD. ■
If the device begins to smoke or become deformed by heating, stop using it immediately and ■
contact your nearest Customer Service.
Do not use the device in a hospital, on board a plane or while driving. ■
Do not directly put and use the device frame or the power adaptor on your bare skin for a long ■
time. The temperature of the station may rise even during normal operation.
If you continue to use the device on your bare skin (in particular, when the adaptor is
connected), you may feel uncomfortable or receive a burn.
Precautions in Use
If the device is wet, do NOT turn on the power. Separate the battery and wipe it with a soft dry ■
cloth. After that, contact Customer Service.
When cleaning the device, wipe it with a soft dry cloth and do NOT use chemicals, such as ■
benzene or thinner.
Do not repair, disassemble or alter in any manner. ■
Do not allow any liquid or foreign materials to get inside the device. ■
Do not drop the device. ■
Other Precautions
Page 6
English
6
Safety Precautions for Use
The device functions vary depending on model.
Read the relevant precautions for the provided function before using the device.
WiFi and 3G Modem (or HSDPA, HSUPA) do not operate simultaneously.
Do not attempt to operate the Bluetooth while driving. Accidents caused by such improper ■
handling are the sole responsibility of driver.
To prevent electromagnetic problems or other dangers, turn o the Bluetooth setting wherever ■
the use of Bluetooth is prohibited.
If you use a certain medical device, such as a pacemaker or a hearing aid, ask the manufacturer ■
of the relevant device if it is correctly cut o from energy sources before using it. If necessary,
you may ask for some assistance from your regular doctor.
This device satises Bluetooth standards 2.0. Some Bluetooth devices may not be fully ■
compatible with this device. For detailed information on compatibility, contact the
manufacturer of the relevant device or our Customer Service.
This wireless equipment may experience electromagnetic interference, so it is not permitted ■
for use by a life-saving service.
Precautions for the Bluetooth
When initially operating this device, it is recommended you warm it up for over 15 minutes ■
under a clear open sky and open area.
If the vehicle equipped with this device is not used for 7 days or longer, the data storage ■
recharger inside the GPS may be discharged and require warming up time of over 15 minutes.
GPS signals are high frequencies around 1575 MHz so they may be aected by bad weather, ■
such as rain and fog, and electromagnetic interference and the reception rate of the GPS may
deteriorate.
When the GPS receiver is under an elevated road, inside a tunnel, in a densely built-up area or ■
near a high-voltage line, it is dicult to receive radio waves so GPS reception may fail.
The GPS receiver may not work normally in some vehicles with UV coating, sun-block coating or ■
electromagnetic interference.
The operational temperature of the GPS receiver is between 0°C and 50°C. Problems may occur ■
in midsummer or severe winter so maintain an appropriate temperature.
On some roads running parallel to a driveway or an elevated road, the information on speed ■
limits or dangerous sections for speeding may not be accurate.
Precautions for GPS
Page 7
English
7
Names of Parts
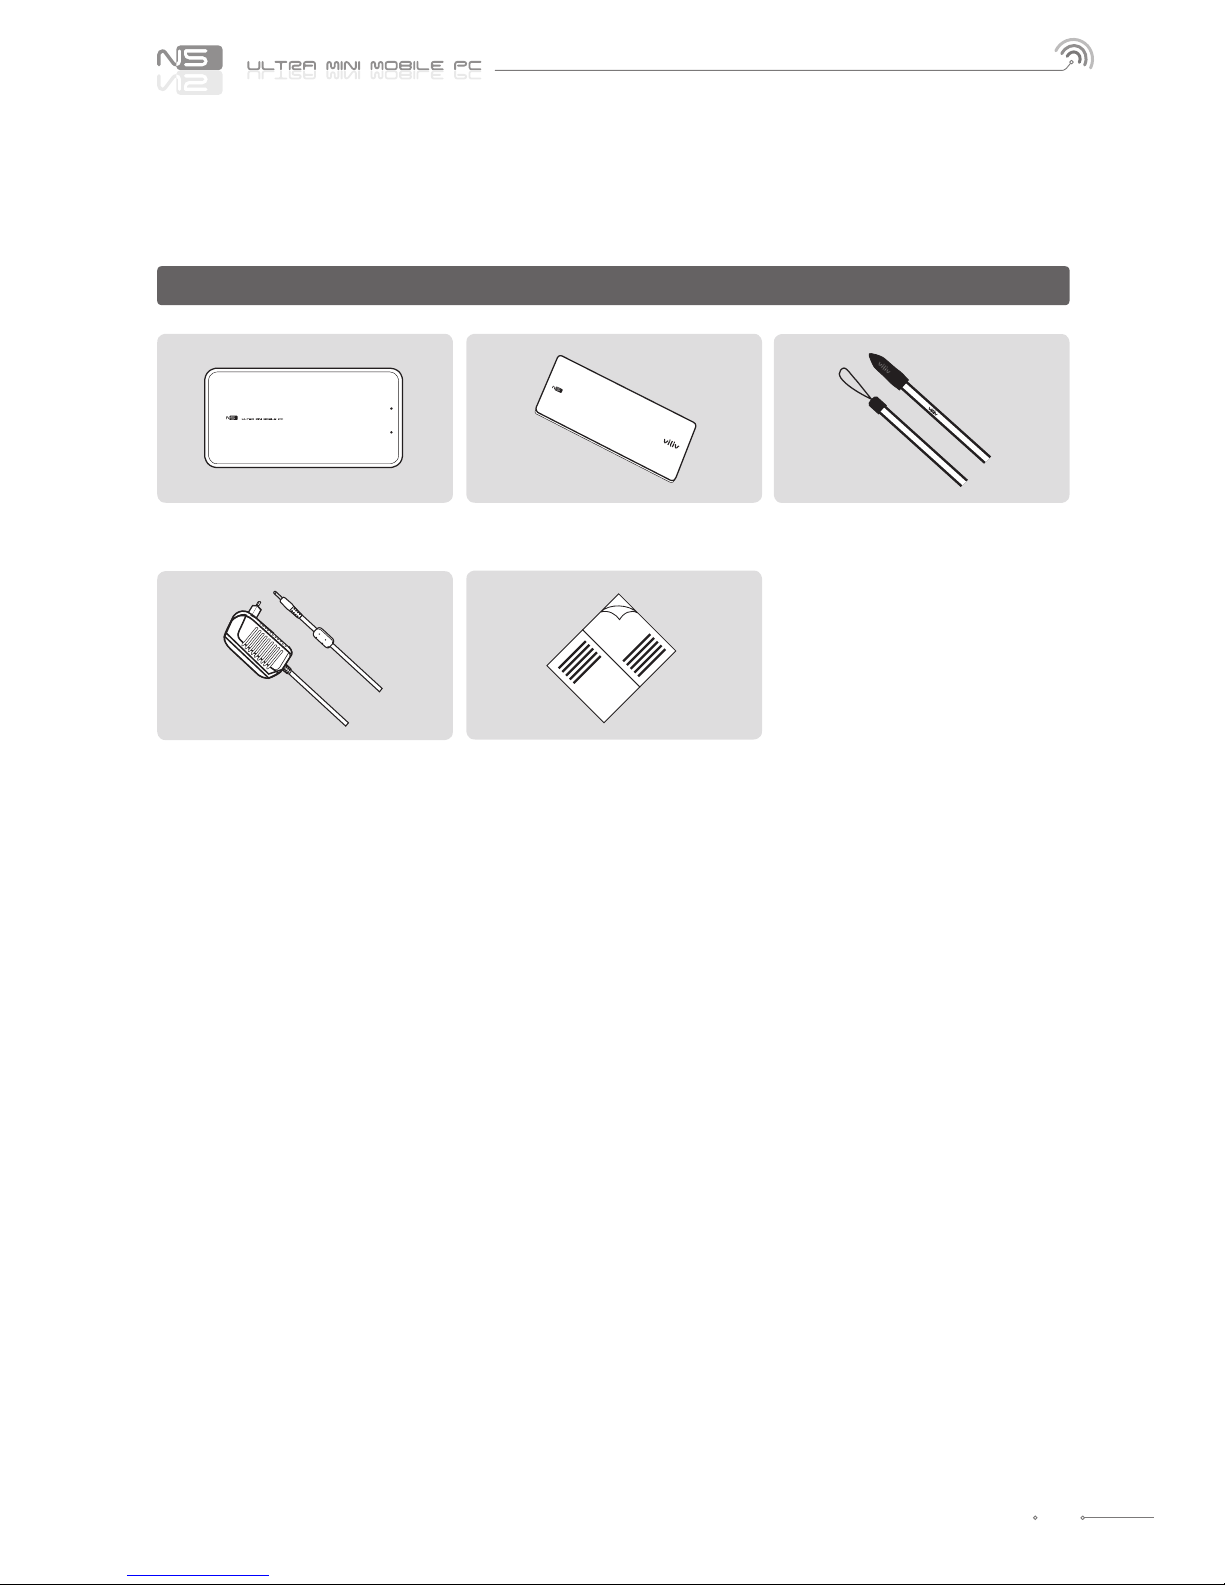
The appearance of the components below may dier from the actual components and some components are subject to
change.
Main Body
Hand strap
User’s Manual
Battery
AC/DC Power Adaptor
Basic Components
Page 8
English
8
Names of Parts
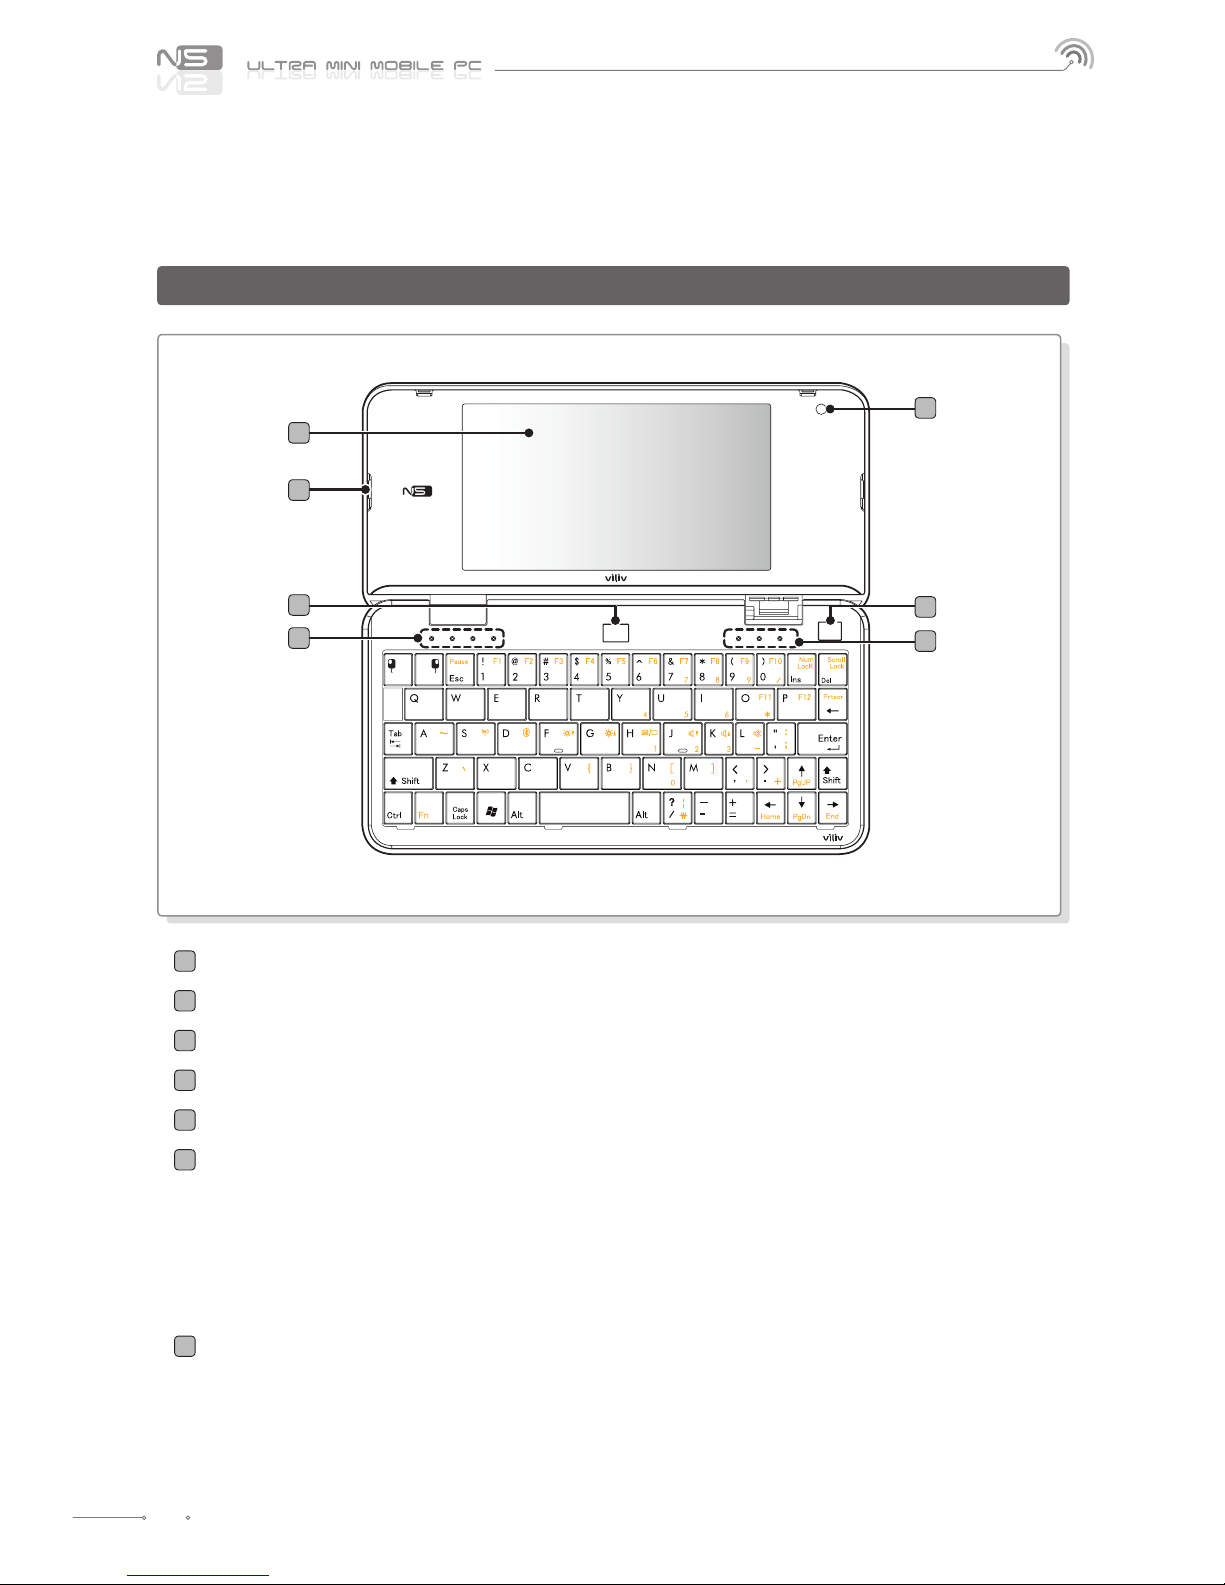
1
WEBCAM Equipped with webcam.
2
TFT LCD/Touch Screen Users can operate the device using the touch screen.
3
Speaker Speaker is built in.
4
Power Button/Power Lamp For turning the power on/o, and checking the status of power.
5
Optical Joystick For moving the mouse pointer.
6
Operation Status Indicator
Power Save Mode Indicator/Disk Device Indicator/
Battery Charging Status Indicator/Wireless LAN Indicator
Power Save Mode Indicator
This light is turned on while the device is in power save mode.
Disk Device Indicator This light is turned on while the disk drive is being accessed.
Battery Charging Status Indicator Indicates the battery charging status
Wireless LAN indicator Indicates the operation status of the wireless LAN device.
7
Keyboard Status Indicators Indicates the status of Num Lock, Caps Lock, and Scroll Lock.
2
3
6
4
1
5
7
Front View
Page 9
English
9
Names of Parts
Keyboard
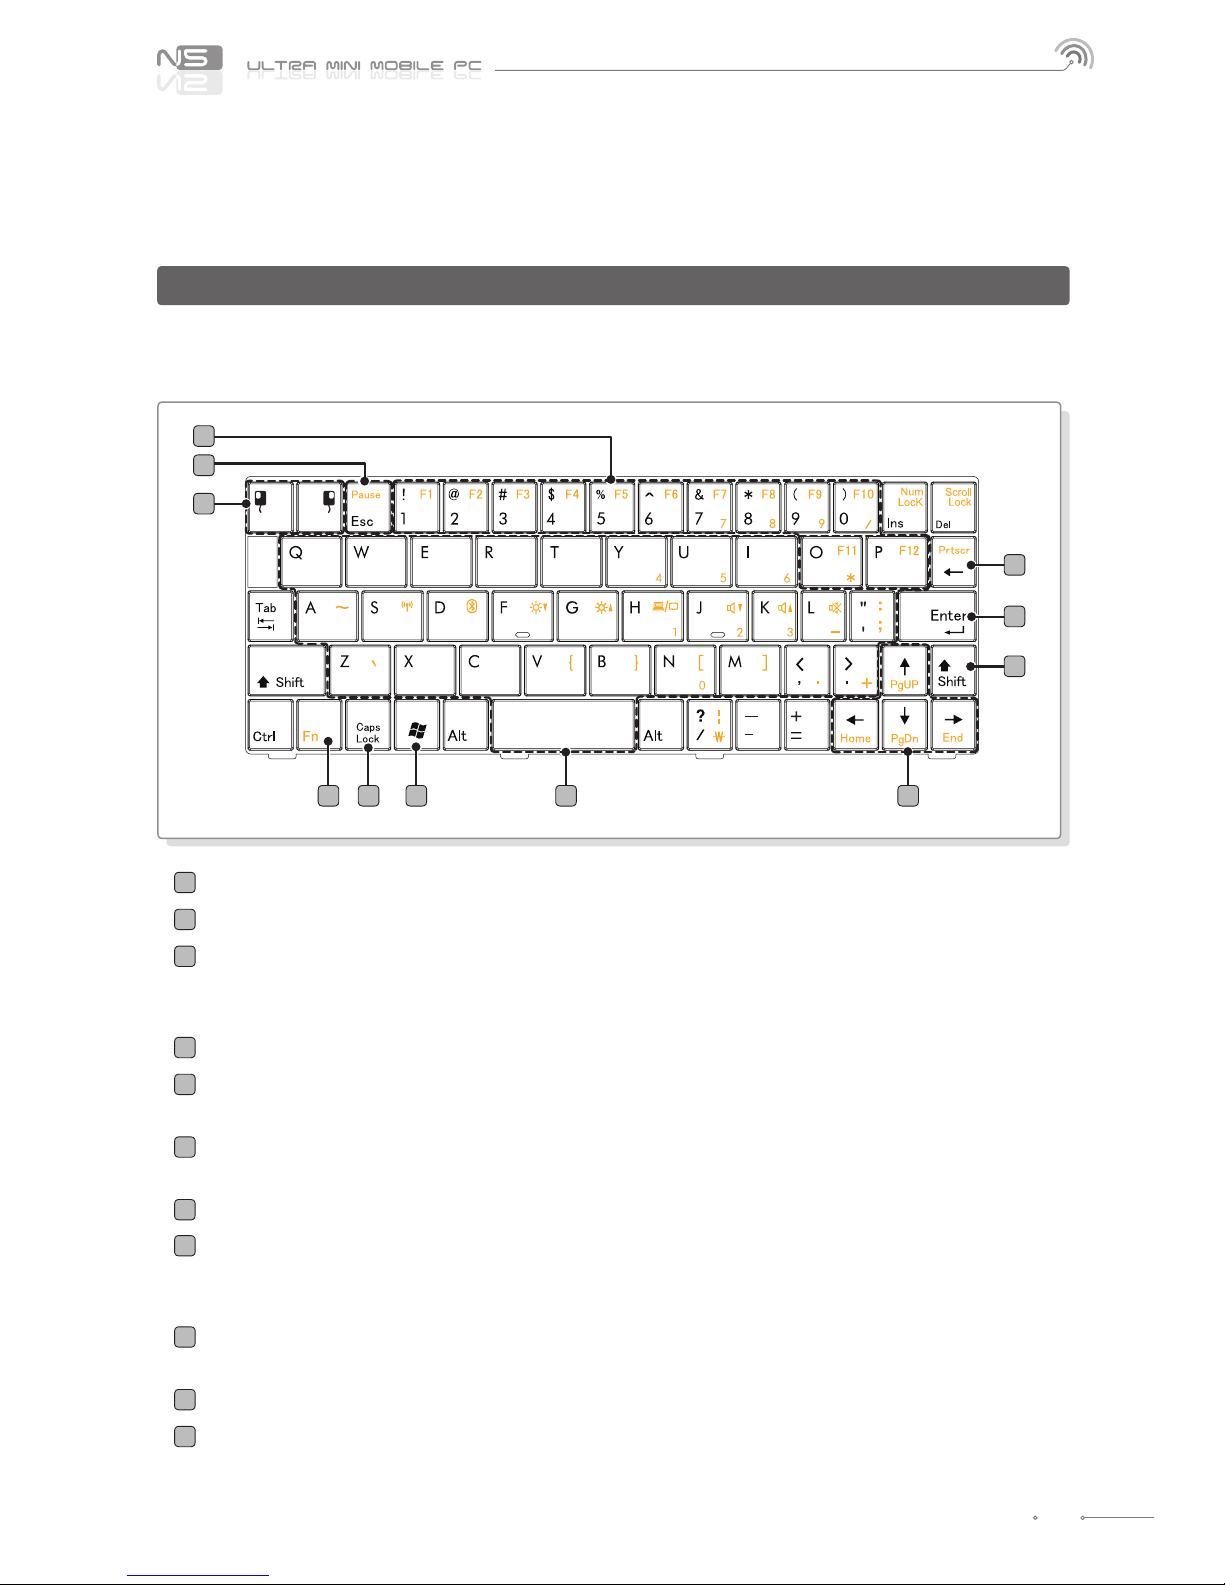
The keyboard may be dierent for each country.
In order to use the orange colored keys on the keyboard, press the keys and the Fn key together.
1
Optical Joystick Key Use these keys for left or right mouse click.
2
Esc Key It is usually used for terminating or interrupting programs.
3
Function Keys (F1~F12) and Number Keys Usages are dierent depending on the operating
system used and application program. Function
keys and numbers from 0 to 9.
4
PrtSc Key (Print Screen) This key is used for printing the screen or temporarily saving the screen.
5
Enter Key Enter key is used to indicate to the computer that one command input is completed,
and it is also used for making a new line.
6
Shift Key This key is used when entering the character shown on the upper part of each key,
upper or lower case of English characters, or hot keys.
7
Fn Key This key is used together with function keys.
8
Caps Lock Key English characters will be in upper case when entered with Caps Lock light on.
Pressing this key one more time will turn o the light. This key has no eect
when entering Korean.
9
Windows Key It is a Start Menu button provided by Microsoft Windows, and pressing the
button will display Start Menu.
10
Text Keys Includes text entry keys, space key for entering space, and keys for other special symbols.
11
Cursor Moving Keys These are to move the cursor while using programs.
Edit Keys PgUP/Home/PgDn/End Keys for moving pages while using programs.
7 98 10 11
2
3
4
5
6
1
Page 10
English
10
1
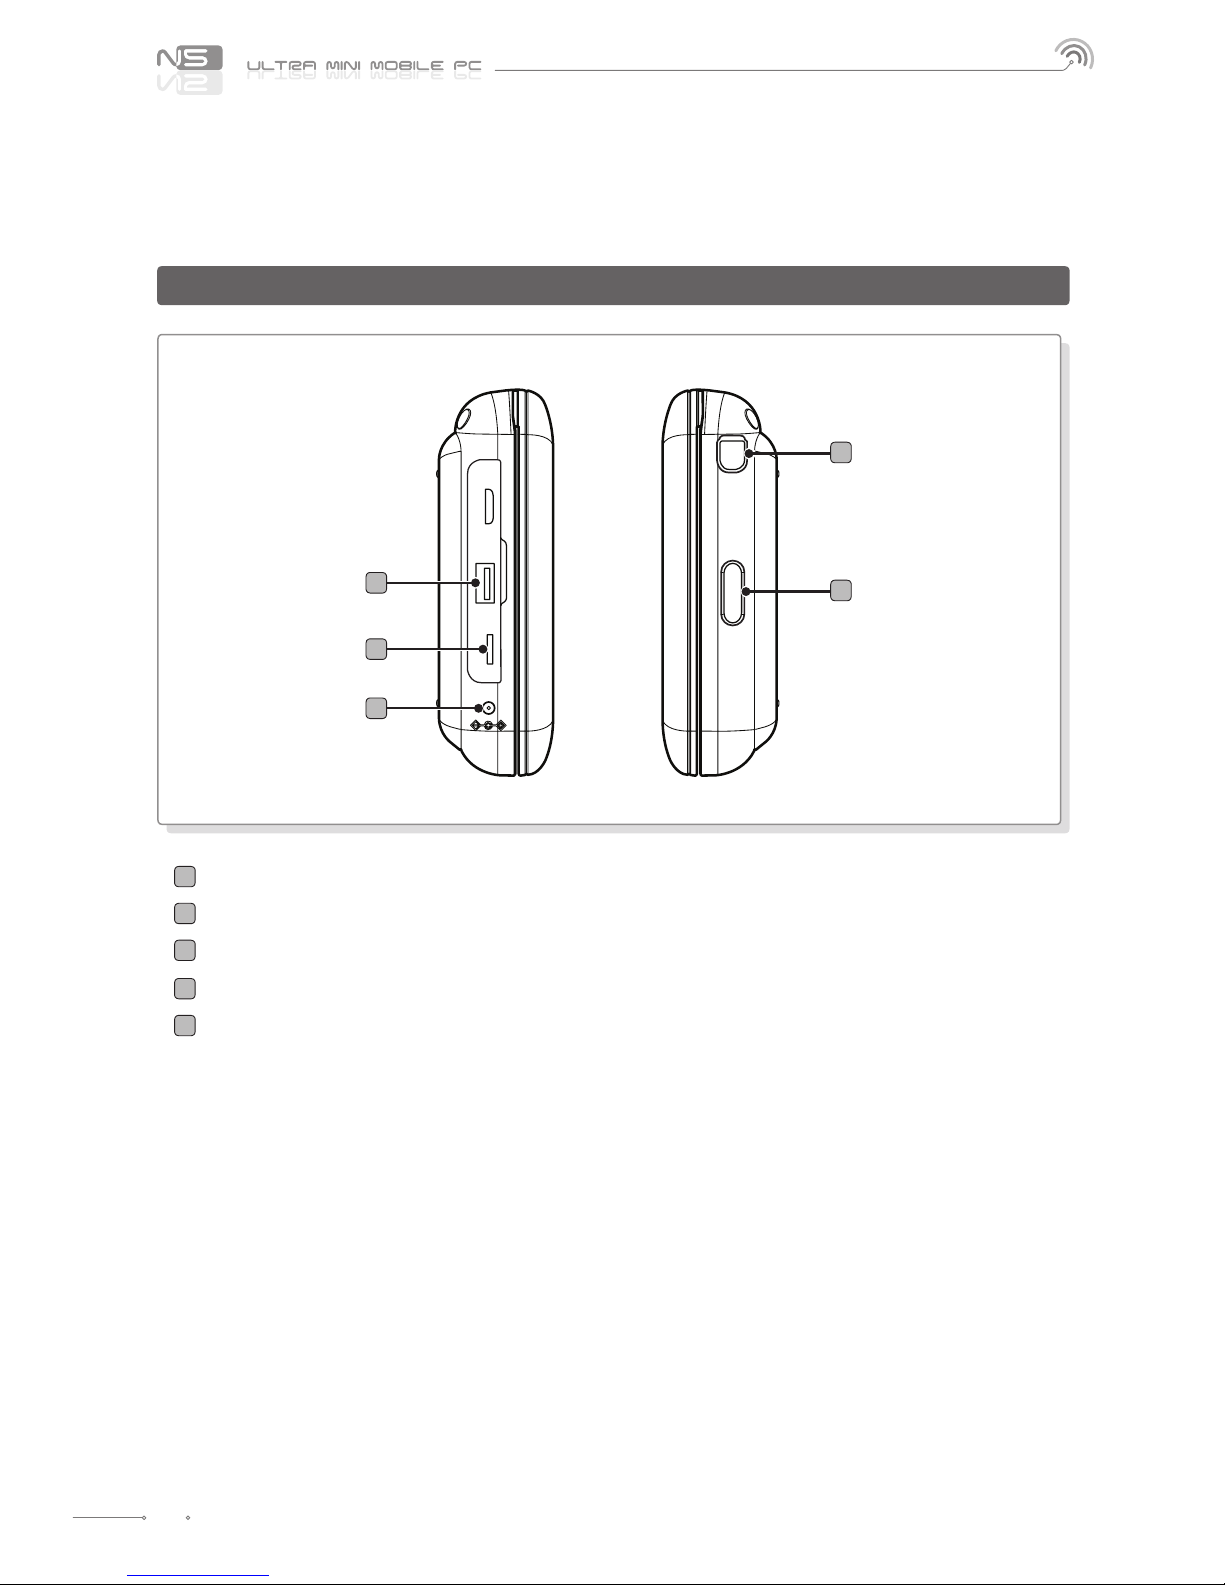
USB HOST Port For connecting to external devices with USB port.
2
MicroSD Port This port is for using MicroSD memory device.
3
Power Adaptor Port For connecting power adaptor or charging the battery.
4
Antenna This antenna is for 3G. (3G model only )
5
Battery Removal Button Press this button to remove the battery.
Names of Parts
1
2
3
4
5
Left / Right View
Page 11
English
11
Names of Parts
1
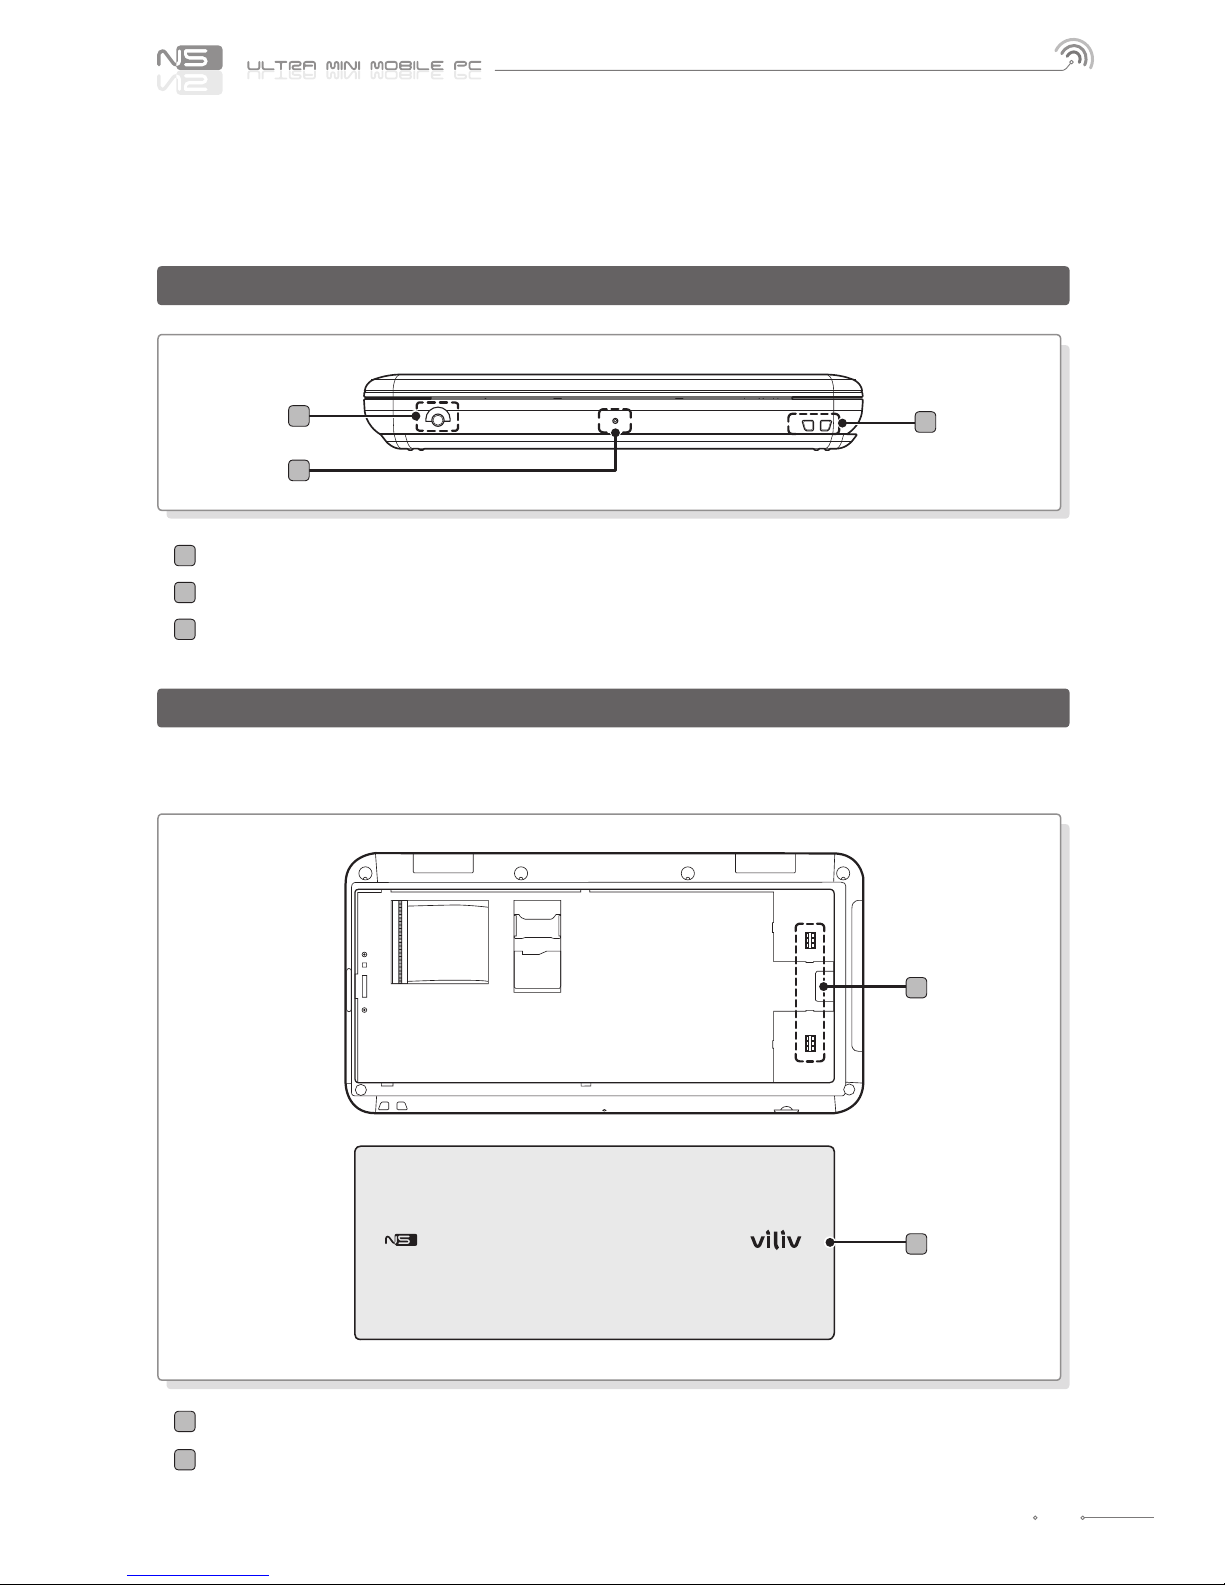
Earphone Port For connecting earphone
2
Built-in Microphone Internal microphone is built in.
3
Hand Strap Loop
Lower Side
Rear View
1
2
3
1
2
The gure below shows the rear side of the main body without the battery. (Refer to Page 16~17 for
Separating/Attaching battery.)
1
Battery Charging Port Connection part of battery terminal.
2
Battery
Page 12
English
12
Installation and Cable Connection
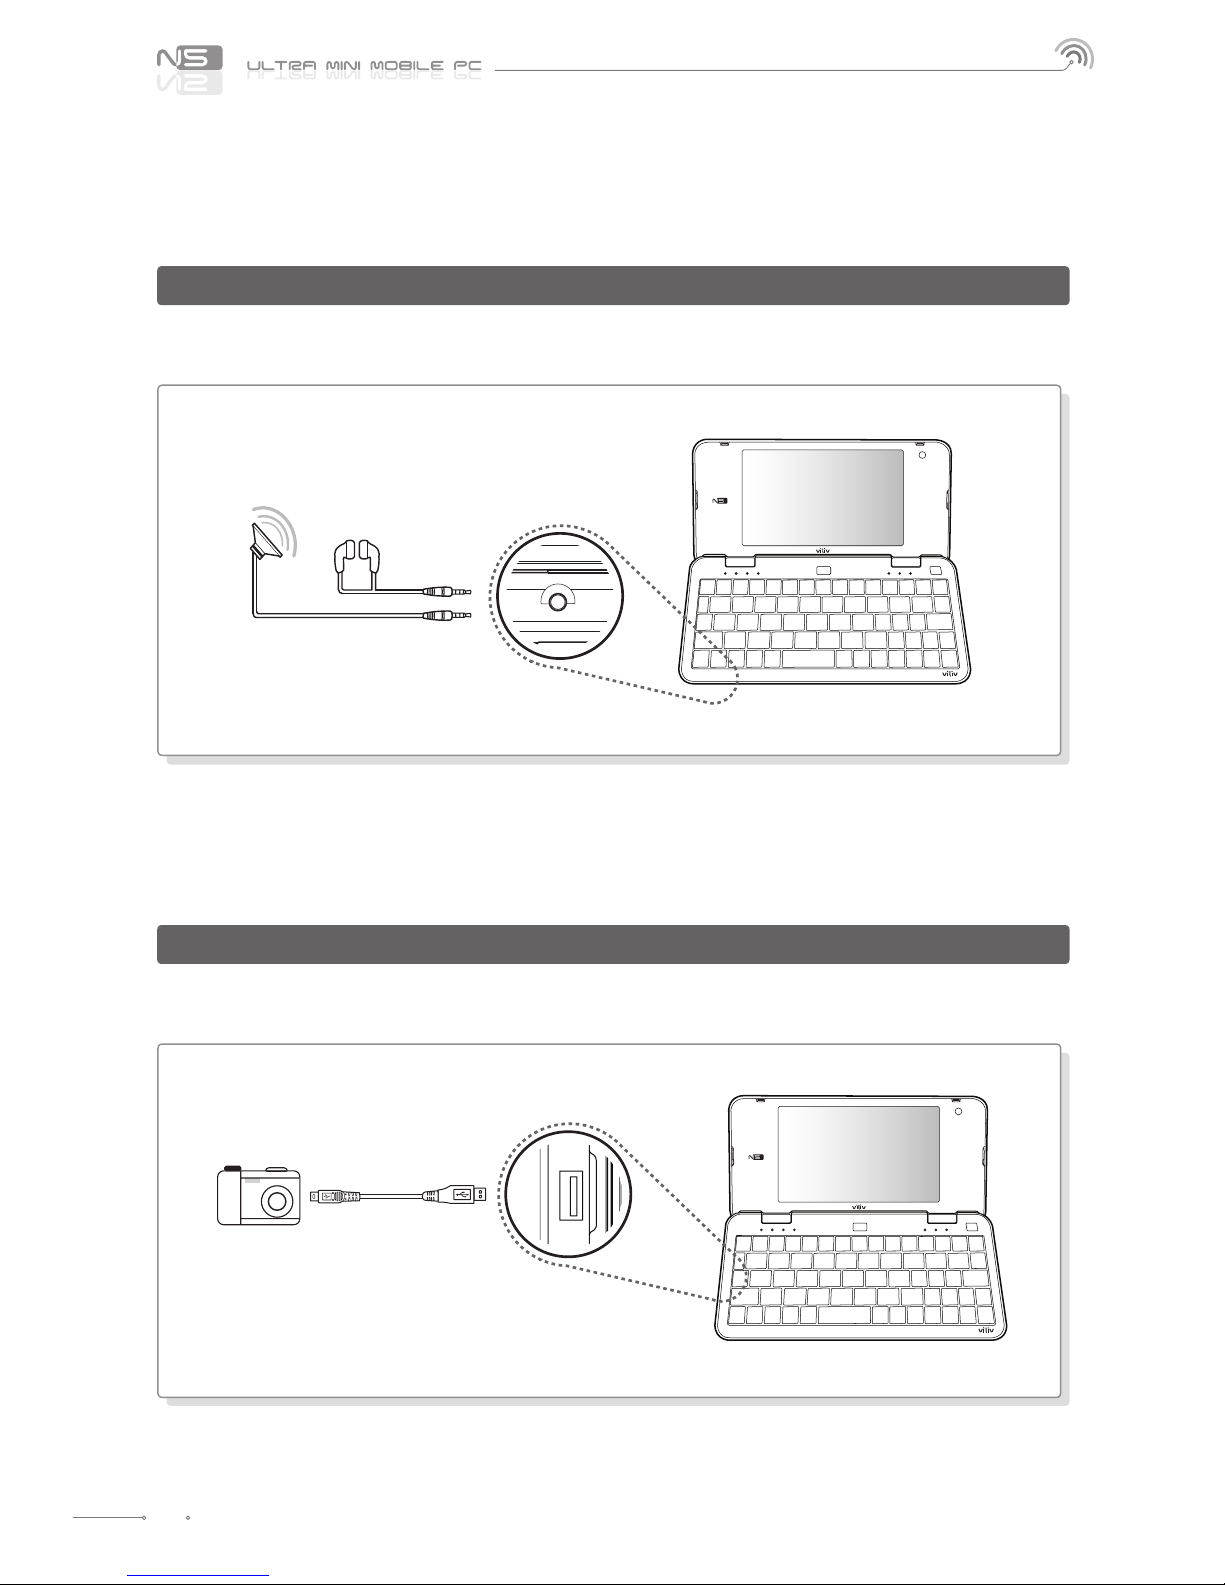
Insert the earphone to the earphone port on the lower side of the handset.
Connecting Earphone
This is used for the connection of external devices, such as digital camera, external HDD, etc.
USB HOST Connection
Page 13
English
13
Installation and Cable Connection
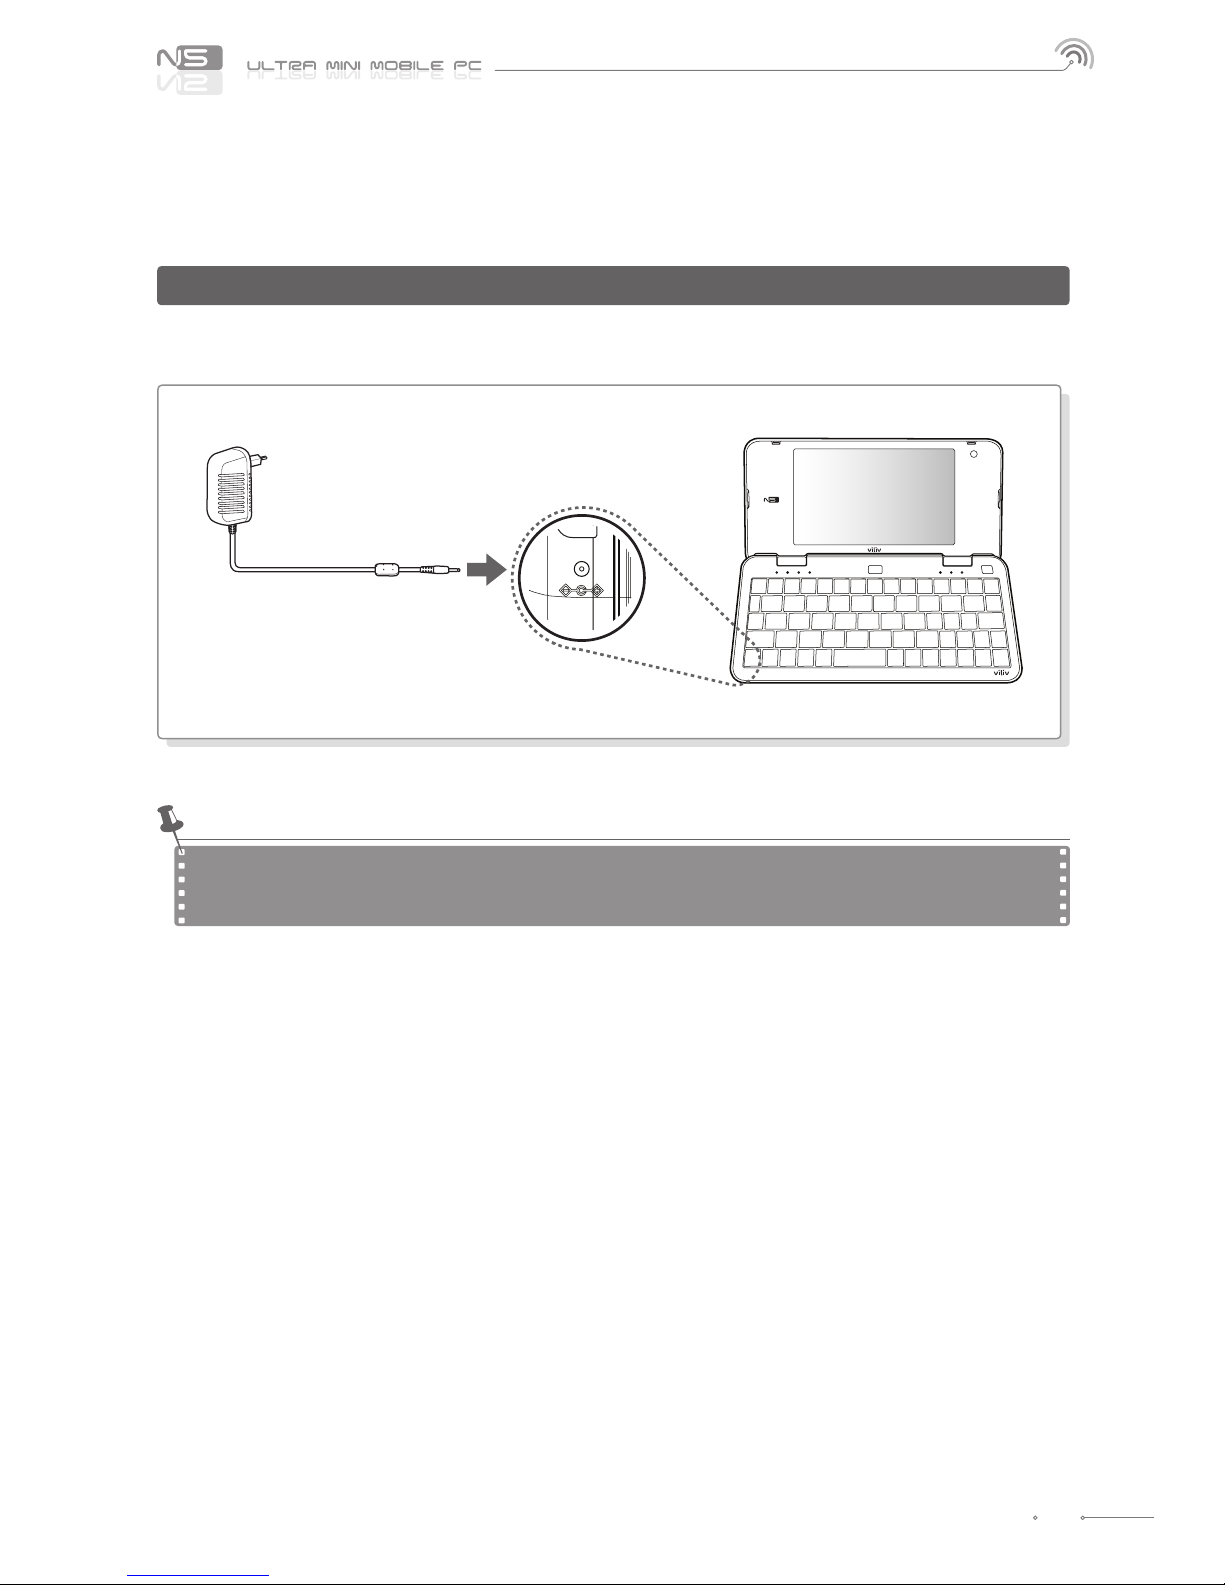
The charger is connected to the power adaptor terminal on the left side of the station.
Power Connection (Charging Adaptor)
Battery charging status indicator
While charging (using AC adaptor) Red: charging / Blue: fully charged
Notice
Page 14
English
14
Installation and Cable Connection
Inserting · Extracting MicroSD Memory Card
How to Insert :
Align the rear face of the MicroSD memory card toward the MicroSD memory slot
and push it in until you hear a clicking sound. (Do not use excessive force as it
could damage the MicroSD memory card)
How to Extract :
Press the tip of the MicroSD memory card gently and it will be removed
automatically as it is a one-touch removal type. (Pull out the slightly extracted
MicroSD memory card completely in the direction of the arrow)
Insertion Direction
Extraction Direction
Rear Side
MicroSD Memory Card
Front Side Rear Side
Page 15
English
15
Installation and Cable Connection
Inserting · Extracting USIM Card (Optional)
How to Insert :
Let the front of a USIM card face the USIM card slot and then push it in the arrow
direction until a click sound is heard. (If, however, you push the USIM card using
too much force, the card may be damaged.)
How to Extract :
Since this device adopts a one-touch method, you may gently press on the
end of the USIM card to extract it automatically. (Pull out the USIM card slightly
protruded.)
Insertion Direction
Extraction Direction
Please, turn the power of the station o before inserting or extracting the USIM card.
Notice
USIM Card
Front Side Rear Side
Page 16
English
16
Separating · Attaching Battery
Separating Battery
How to Remove the Battery
Press the Battery Open button on the
right side of the handset
Push the button in the direction
of the arrow.
Hold the tip of the battery and
lift it up.
To avoid electric shock, make sure to turn the power o rst and then separate the battery.
Notice
Page 17
English
17
Separating · Attaching Battery
Attaching Battery
How to Insert the Battery
Push the battery in the direction
of the arrow.
If the battery is misaligned with the groove and you attempt to mount the battery, the device may be
damaged.
Notice
Page 18
English
18
Basic Operation
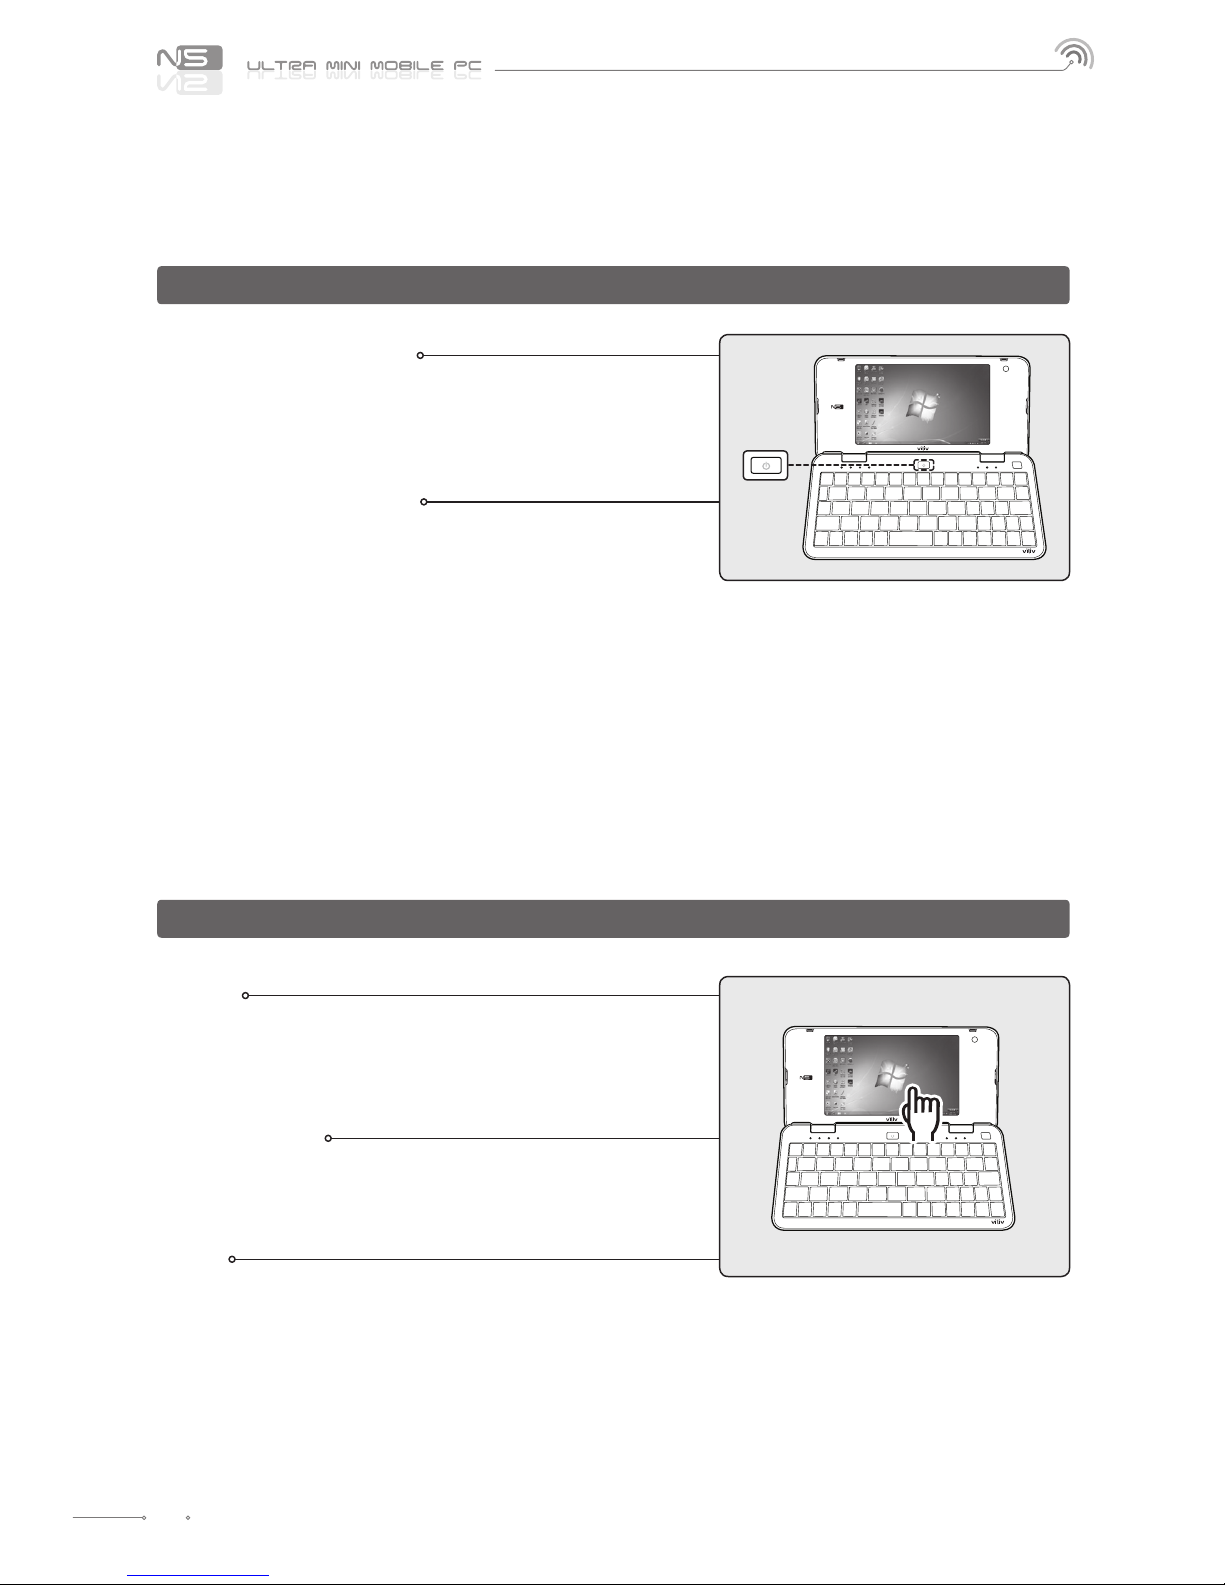
Turning the Power On
Depress the power button for about two seconds to turn
on the power.
The LCD screen turns on and the main screen is displayed. Z
Turning the Power O
Use the Shutdown menu in the Start Menu to turn o
the device while Windows is running.
If the system locks up while using the device, depress
the power button on the left for a long duration while
the device is on to turn the power o.
Avoid turning o by using the button as the working les Z
may not be saved.
Turning o the power with the button works depending Z
on the power option conguration of Windows.
Touch
Touch the desired location on LCD screen.
Touching one location for a long time has the same eect as Z
a right click.
Double Touch
It has the same eect as a double-click of a PC mouse.
Touch the desired location twice consecutively.
Drag
Touch the desired location, move to the desired location
while holding the nger on the screen, and release at
the nal destination.
It has the same eect as the drag function with a PC mouse. Z
Turning the Power On/O
Touch Screen
Page 19
English
19
Basic Operation
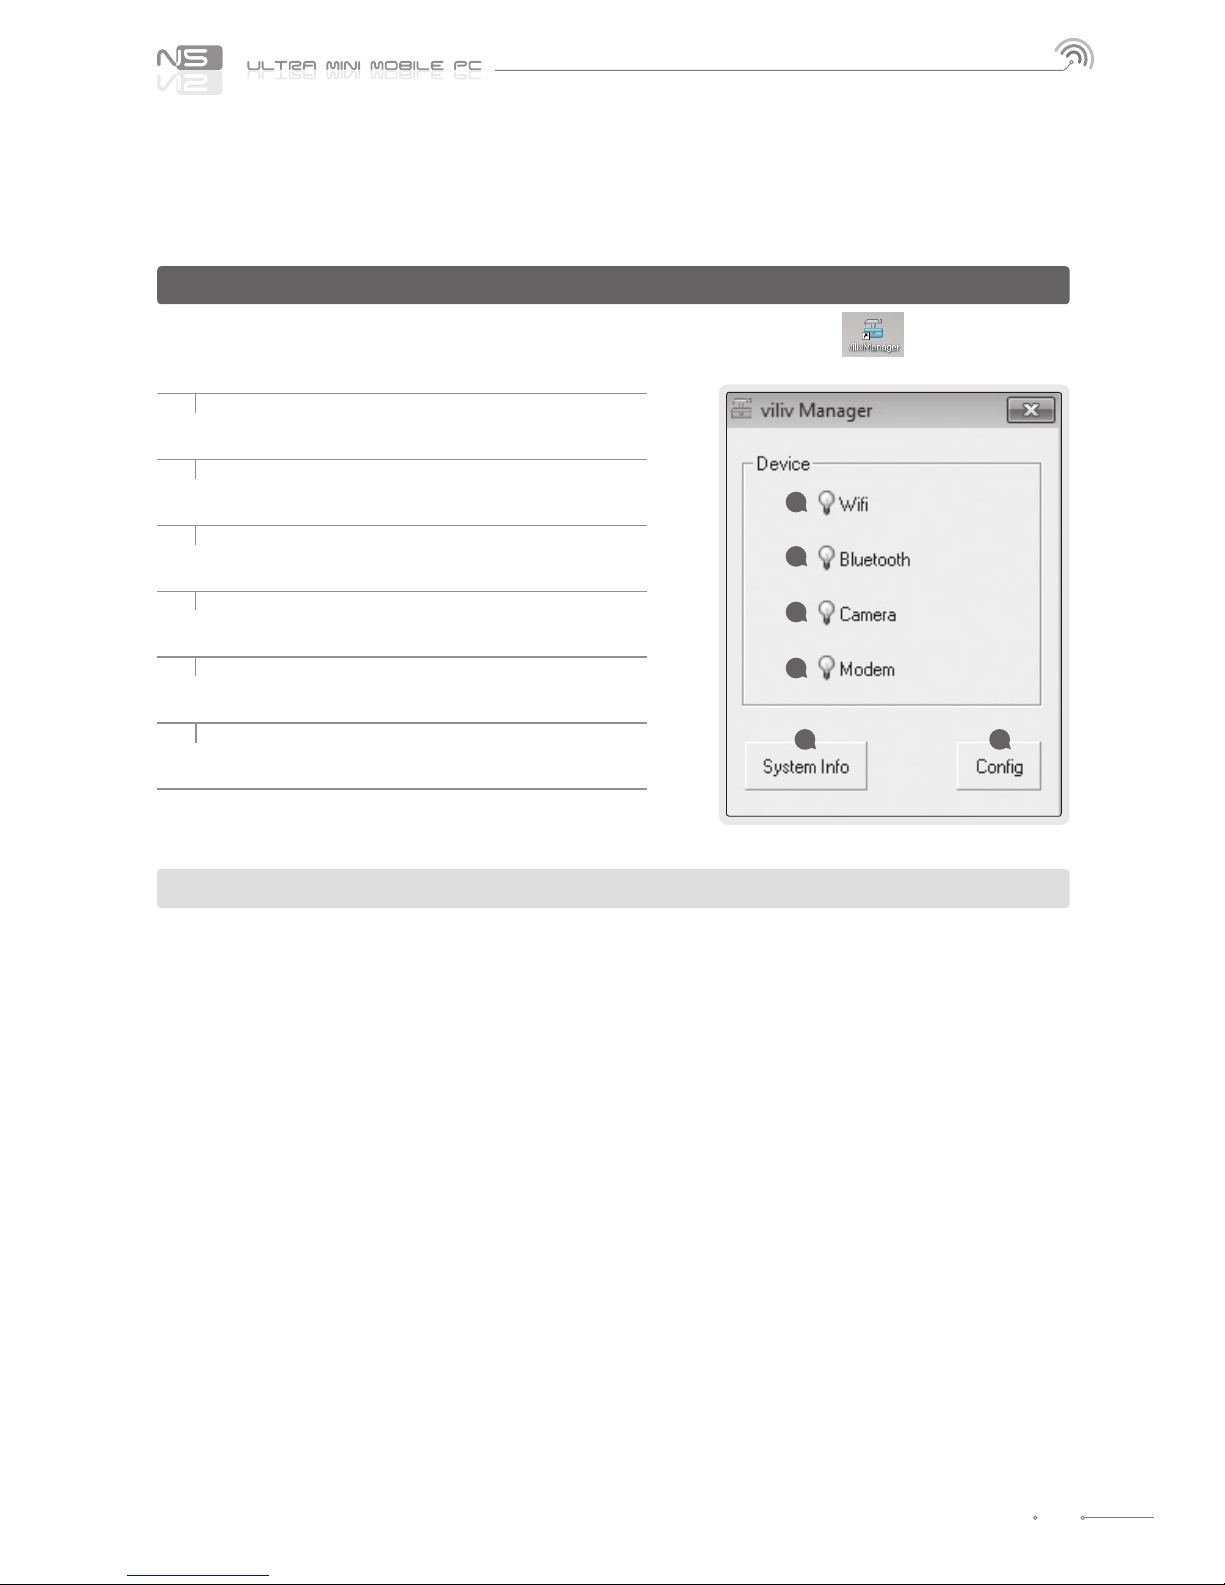
Set Up for viliv Manager
1 Wireless LAN Power
Activate the wireless LAN.
2 Bluetooth Power
Activate the Bluetooth function.
3 Camera Power
Activate the webcam.
4 Modem Power
Activate the Modem function.
5 System Information
To check the product information.
6 Cong
Congure the environment settings.
WiFi and 3G Modem (or HSDPA, HSUPA) do not operate simultaneously.
viliv Manager is executed by double touching vilivManager on the screen.
1
2
3
4
5 6
Page 20
English
20
Recovery Solution (AMI Rescue) Guide
When OS does not work properly, you can recover the device to the factory default following to this guide.
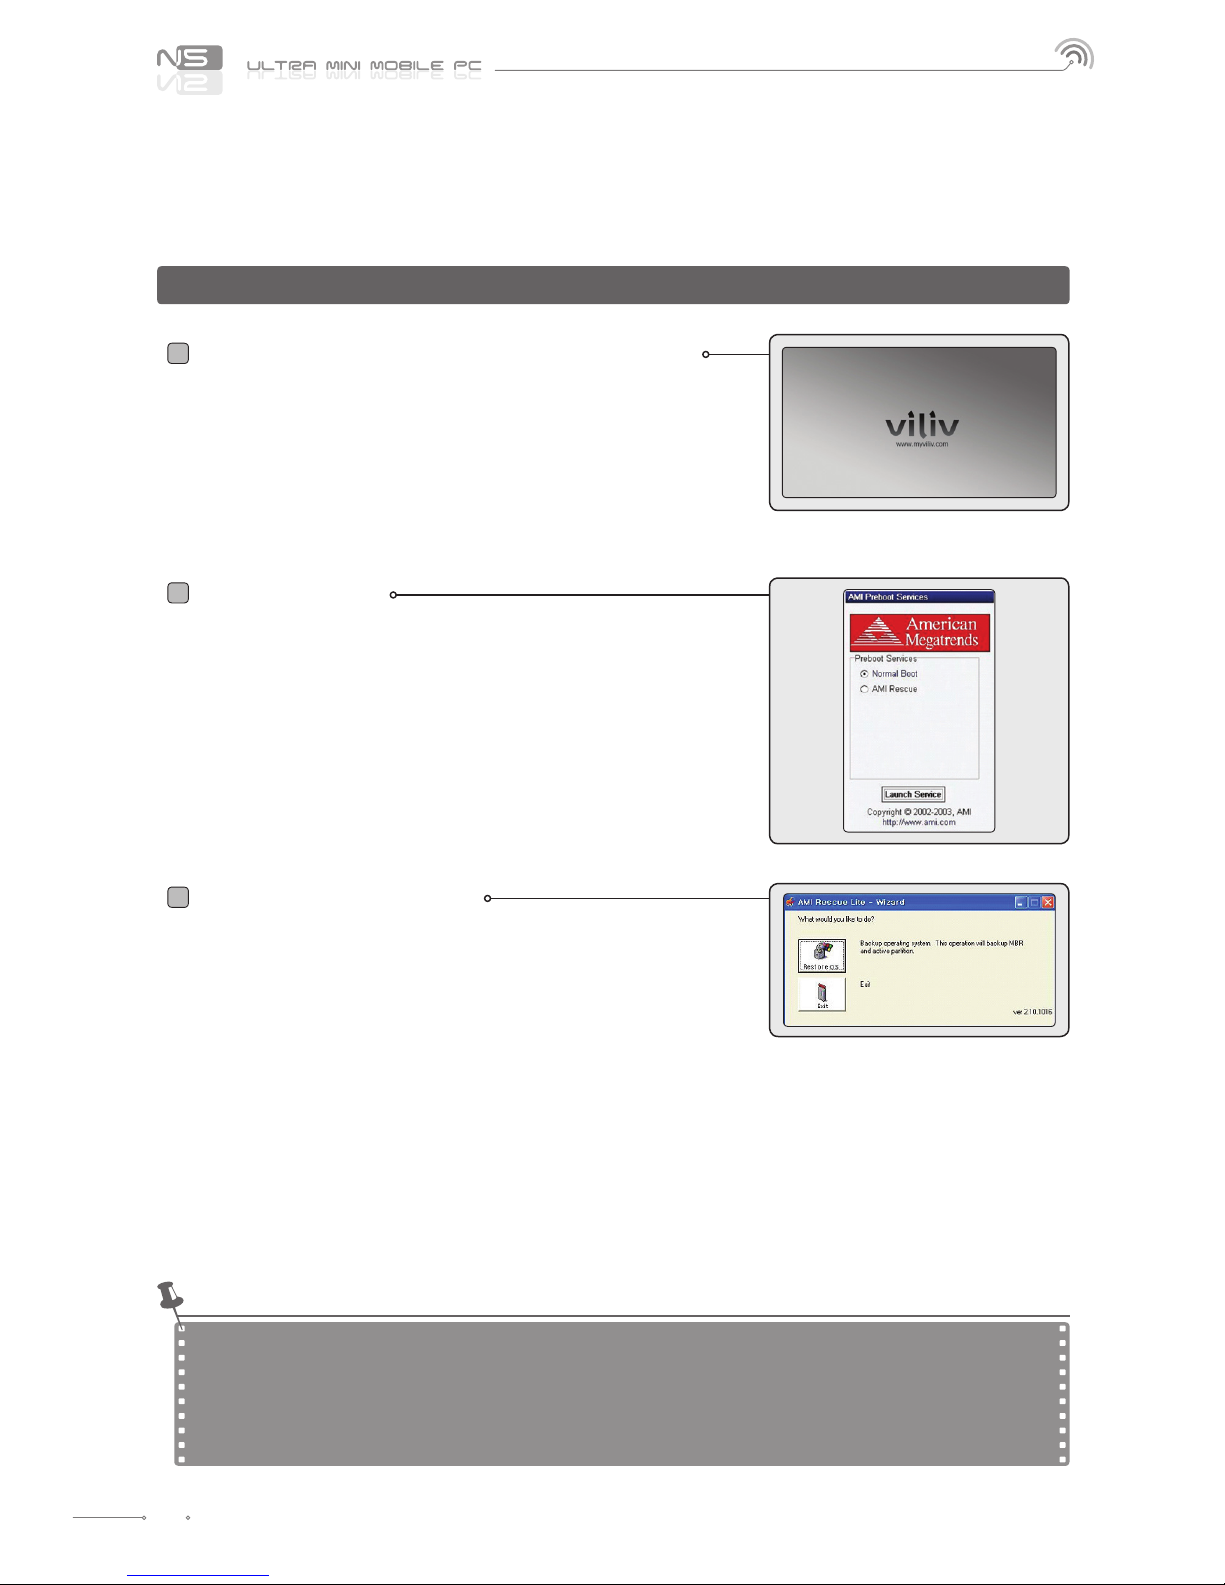
Execution of Recovery Solution (AMI Rescue)
When viliv logo appears to boot the system (BIOS POST),
press the F10 key 1-2 times.
As the logo disappears, Pre-Boot Menu window appears. Z
◆ In order to use F10 key in N5, press F10 key while pressing the
Fn key on the lower right side of the keyboard.
Pre-Boot Menu
When selecting Normal Boot, booting proceeds to Windows.
For recovering OS, select AMI Rescue and click Launch
Service.
AMI Rescue Lite-Wizard appears. Z
AMI Rescue Lite-Wizard
When clicking Restore OS button, a message that conrms
the recovery of OS is displayed. If you press Yes (Y), it starts
the recovery of OS.
If the process of OS recovery is completed, a message that
conrms the successful recovery is displayed.
(Partition 0 on disk 0 was successfully restored.)
If you press OK button, the system is booted again
automatically.
Now, if you boot to Windows, OS will be in the initial status of Z
shipment from factory.
The recovery solution should not be used on battery power. Please connect the unit to AC power before
beginning the recovery.
Since data is deleted in case of recovery, make sure to back up the data beforehand.
Please wait for 20 sec when black screen is showing to prepare boot up the Windows 7.
It will take more time for Windows 7 users.
Notice
Way to Use Recovery Solution (AMI Rescue)
2
3
1
Page 21
English
21
General Specications
Product Name N5
CPU & Chipset Intel® Atom
TM
1.33 (Z520) + SCH US15W
LCD 4.8-type WSVGA (1024 x 600) / Touch Panel
RAM 1GB
Storage SSD 16GB, 32GB, 64GB
LAN IEEE 802.11b/g
WWLAN (Optional) WiMAX, HSDPA
Bluetooth Bluetooth Ver2.0 + EDR
Connector Earphone Port x1, USB x1, MicroSD Slot x1
Audio Internal Speakers
Battery
Lithium Polymer (Removable)
Voltage 3.7V
Capacity : 4250mAh
Camera Webcam Built in
GPS
GPS Built in (Except Standard)
Dimension 172 (W) x 86.5 (H) x 25.5 (T) mm
OS Microsoft Windows
Operation Temperature 0°C ~ 40°C
Specications
The specications below may be changed for enhancement of product performance without prior notice.
Page 22

English
22
Memo
Page 23

English
23
Memo
Page 24

English
24
Memo
 Loading...