

Page 1
VIKING
Fingerprint
Lock
Enter
2
5
8
0
1
4
7
*
3
6
9
#
Viking Security Saf
e
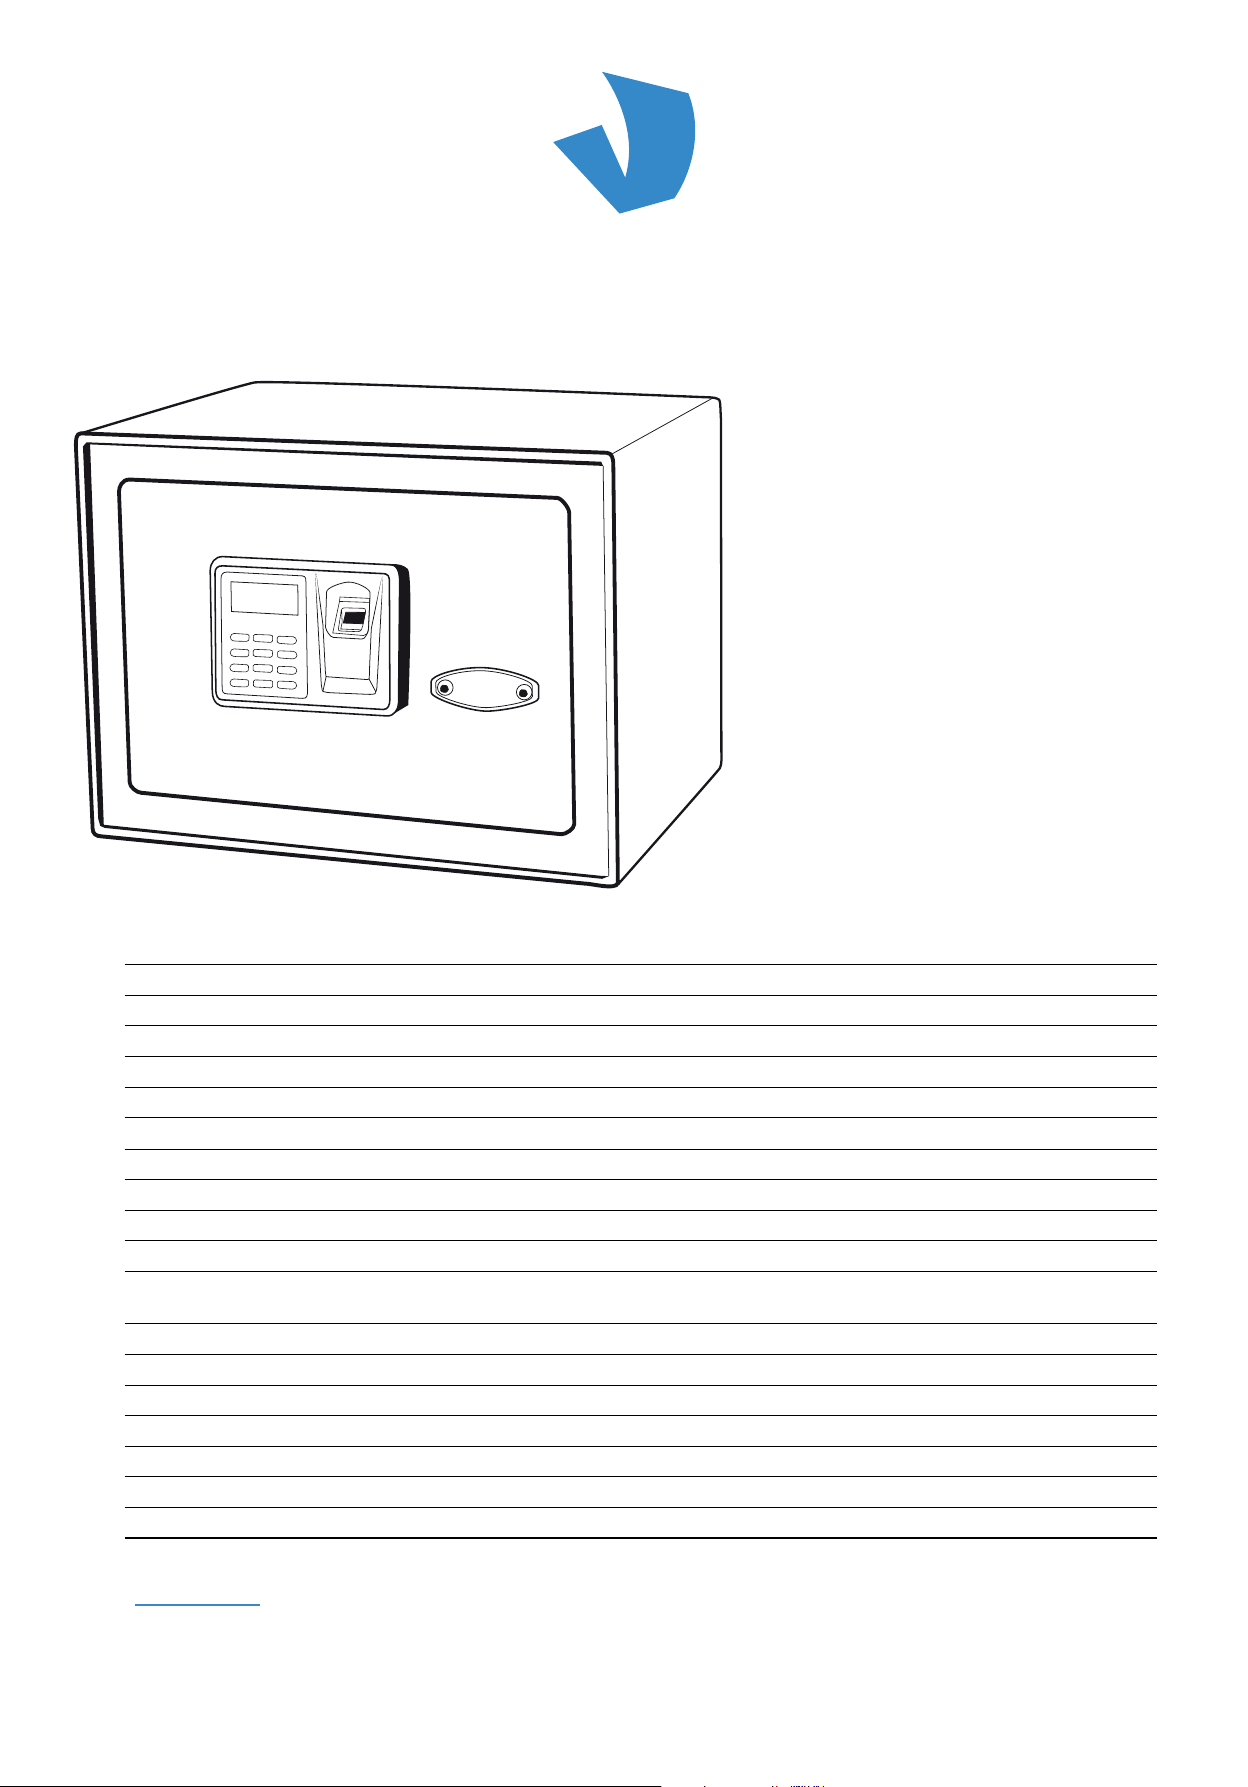
BIOMETRIC FINGERPRINT - LCD - KEYPAD SAFE
VS-12BL WALL SAFE
VS-14BL TOP OPENING DRAWER SAFE
VS-20BLX MINI
VS-25BL
VS-25DBLX (VS-25DBL)* SMALL DEPOSITORY SAFE
VS-35BLX (VS-35BL)*
VS-38BLX (VS-38BL)* EXTRA WIDE LAPTOP SAFE
VS-50BL LARGE
VS-52BLR (VS-52BL)* HIDDEN WALL SAFE
VS-52BLX HIDDEN WALL SAFE LASER CUT
* Models may change name with improvements and modifications
Body Material Steel
Can be open by Fingerprint / PIN code / Key
Optical Sensor 500 DPI, opens in fraction of a second
Fingerprint Entry Stores up to 32 ngerprints,
Memory Non-volatile memory - stored information is retained if batteries are removed.
Key Pad Entry Opens with 4-8 digits PIN code
Locking Syem Motorized door, deadbolt lock
High Security Keys 4 prong cross keys. Two included.
LCD display Battery Level indicator, Data Count indicator, OK and Error indicator, etc.
Sounds Mode On and OFF operational sounds
Warning sound Safe arts beeping if door is left unlocked for more than 1 minute.
Time Out Operation is put on HOLD for 2 minutes if multiple incorrect PIN or ngerprints are
input
LED light Build in LED light operates independently with 2 AA batteries
Warranty One-Year Limited Warranty
Batteries 4 AA
Included Accessories Mounting hardware and batteries
Fireproof No
Door Thickness 5 mm
Body Thickness 2 mm
DISCLAIMER: Not recommend for age groups 55 and above. Due to thinning fingerprints
ALL fingerprint readers will lose accuracy with increasing age.
www.vikingsecuritysafe.com | [email protected]
Page 2
VIKING SECURITY SAFE
VIKING
Fingerprint
Lock
Enter
2
5
8
0
1
4
7
*
3
6
9
#
D
B
E
A
F
G
I
H
C
M
LK
J
USER'S MANUAL
IMPORTANT - READ FIRST
• In default mode fingerprint function is disabled and safe can be unlocked ONLY with PIN code or key. To
activate fingerprint function, register at least one fingerprint.
• If safe is reset to factory default mode, only default PIN code can open the safe.
• When using fingerprint reader to unlock the safe, please register the same fingerprint in multiple positions.
• Remember to register new PIN code, so safe can no longer be open with factory default PIN “1234”
• Test with default PIN code. If safe opens, the safe is still in factory default mode.
• Operational sounds can be switched ON and OFF. However, Warning Beep sounds if safe is left UNLOCKED
for longer than 1 minute.
• If the safe is in lock position and locking bars stick out, ALL functions of the safe will be disabled and Red
Button (A) will NOT function.
• Time Out Period locks the safe for 2 minutes if multiple incorrect PIN codes or fingerprints are input. LCD
displays “HOLD-Err”.
• Test the keys and store them in a secure place, NOT inside of the safe.
• When the screen shows " ", please change the battery. All registered fingerprints and PIN will be
saved.
• When changing batteries, make sure the safe is in LOCKED position.
DISCLAIMER: Not recommend for age groups 55 and above. Due to thinning fingerprints ALL
fingerprint readers will lose accuracy with increasing age.
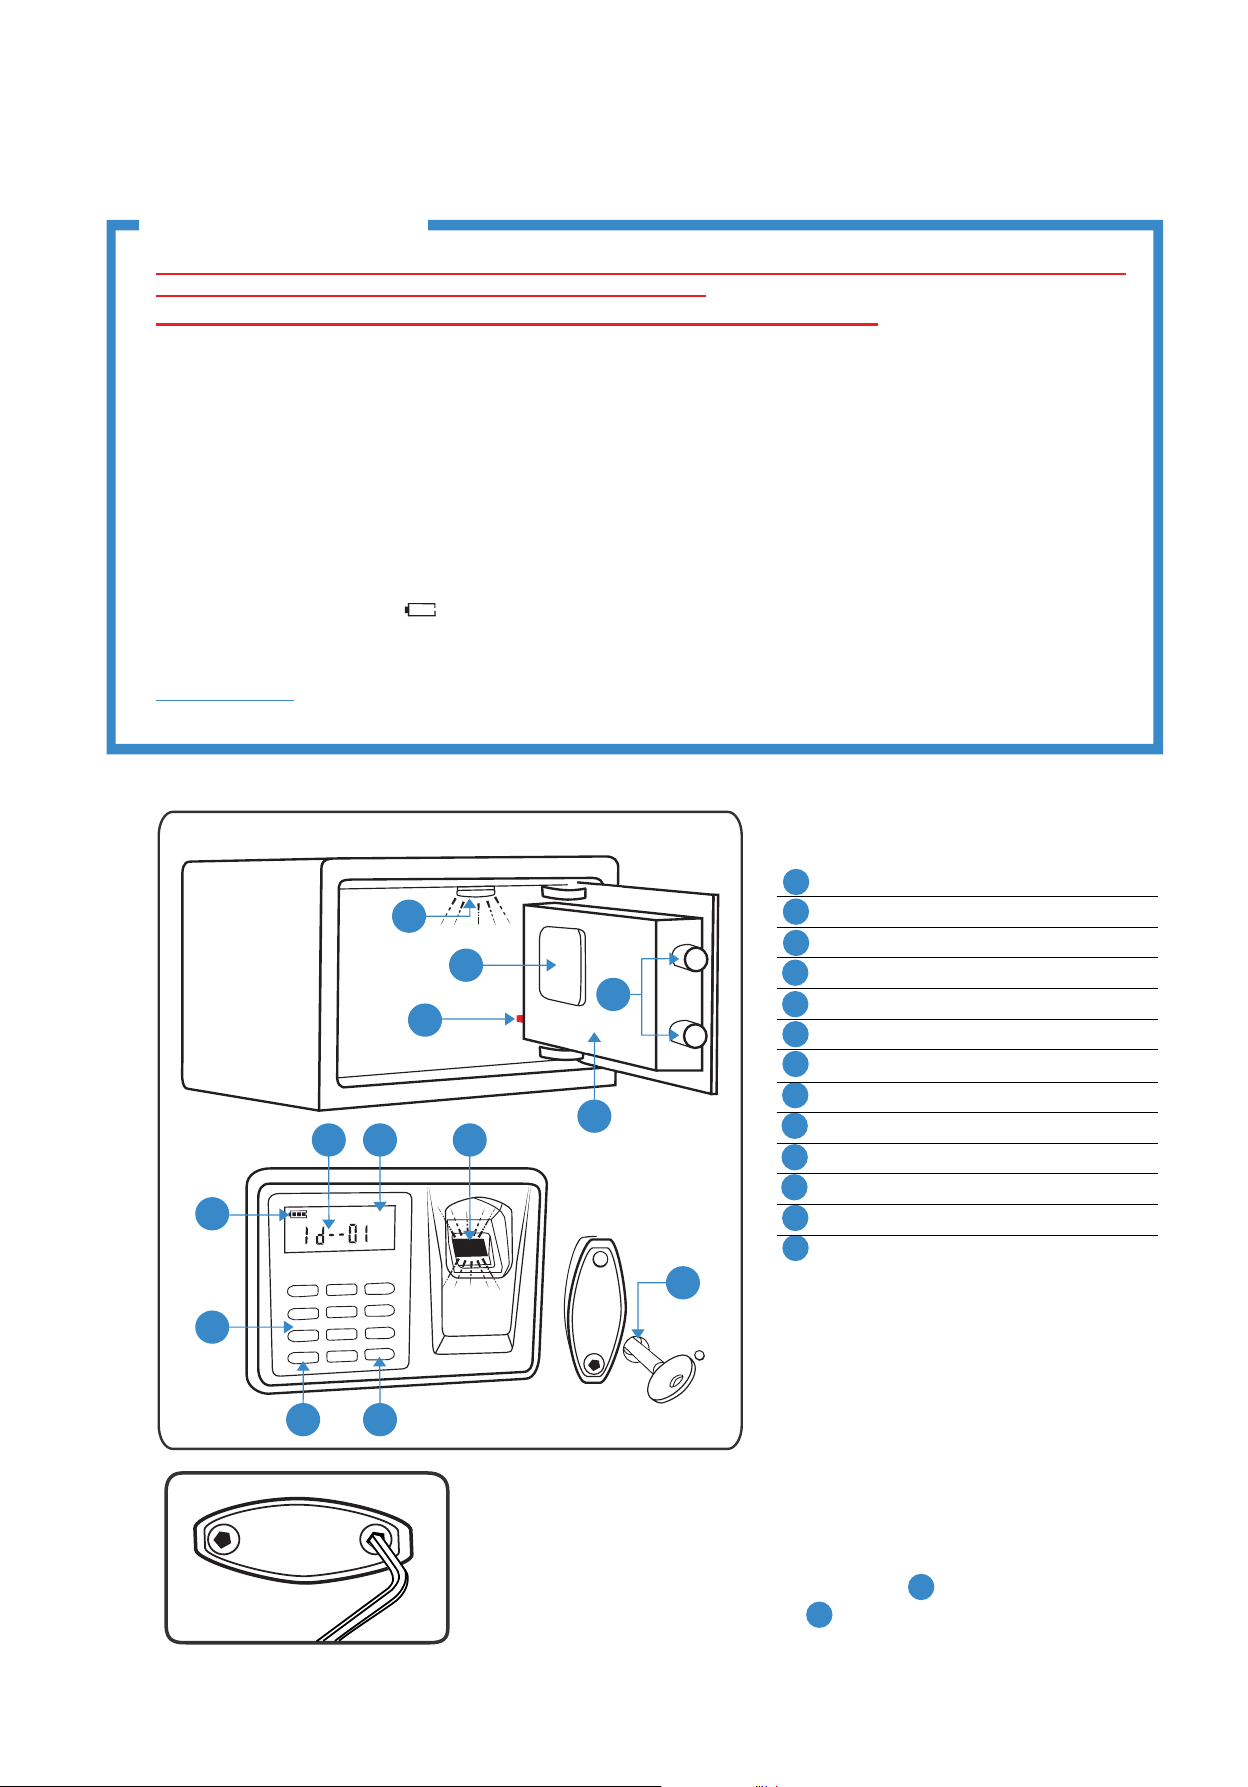
GENERAL DESCRIPTION
A
Initialization/Reset Red Button
B
Battery Compartment
C
Locking Bars
D
LED light
E
Motorized Door
F
Fingerprint Scanner
G
LCD display
H
Data Count Indicator
I
Battery Indicator
J
Key Pad
K
Star Button (*)
L
Pre-Scan Pound Button (#)
M
Logo Plate and Key Access
VIKING
1. BEFORE FIRST USE
1.1. Unlock the safe with key. Keyhole is located under the Logo Plate. Remove
using Allen Key.
1.2. Install 4 AA batteries in battery compartment
1.3. Install 2 AA batteries in LED light
www.vikingsecuritysafe.com | [email protected]
D (see point 9 for inructions).
B .
page 2/5
Page 3
2. HOW TO RESET SAFE TO FACTORY DEFAULT SETTINGS
Fingerprint
Lock
Enter
2
5
8
0
2
4
7
*
3
6
9
#
F
Center Left Right
...
Down
Up
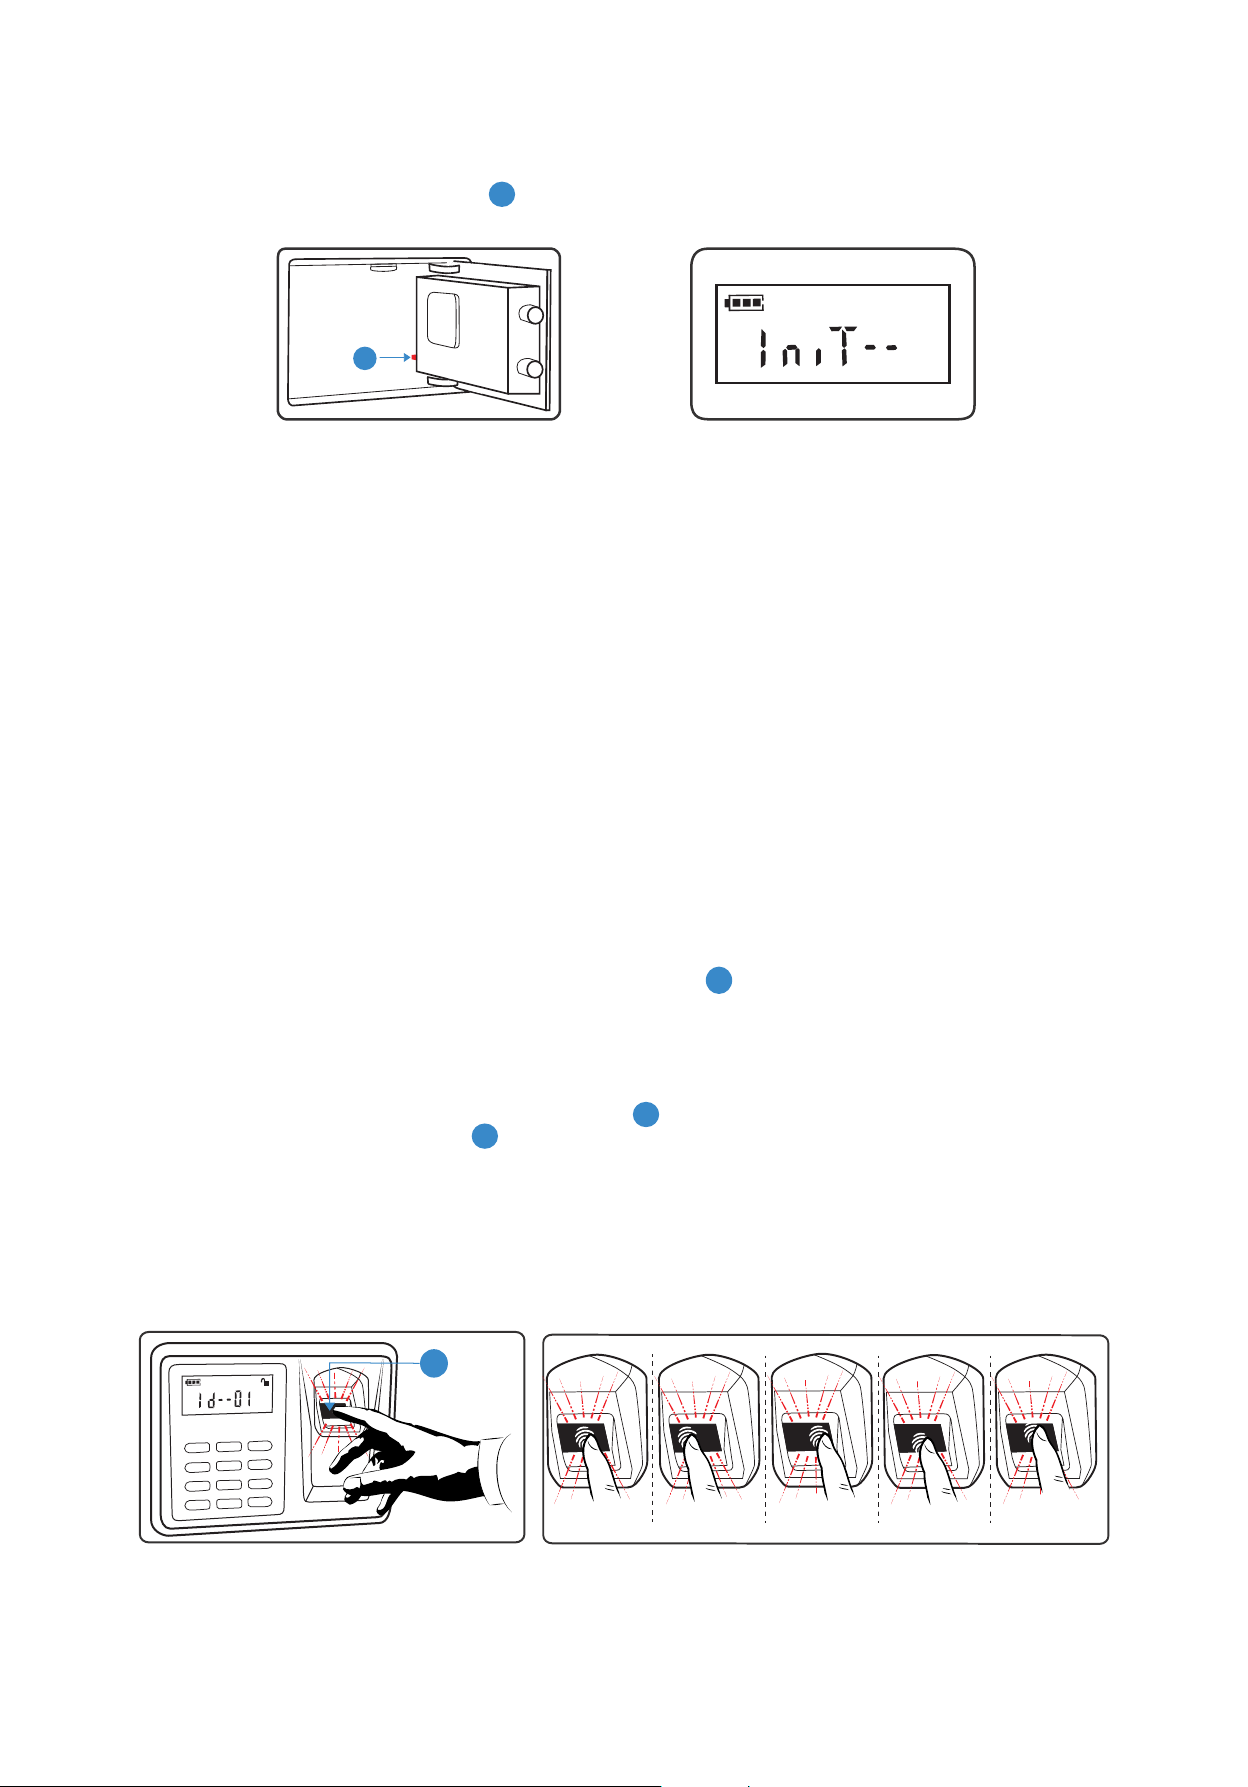
2.1. PRESS and HOLD down red button A for 10 seconds. “INIT” flashes on LCD display followed by “OK”. Safe is
reset to Factory Default. All data is deleted and you can begin new registration when red light comes on.
A
3. HOW TO CHANGE PIN CODE ON KEYPAD
Step 1:
Punch in the default PIN 1234 and HOLD the star (
) until the underscore ( _ ) shows up (1-2 seconds).
*
Step 2:
Punch in your Unique PIN Code and star (
DO NOT HOLD the star (
).
*
).
*
Step 3:
Punch in your Unique PIN Code and star (
DO NOT HOLD the star (
Note: After you enter your Unique PIN and star (
).
*
the screen. Only your Chosen Registered PIN Code will be working.
) for the Second time.
*
) twice in a row the New PIN Code is confirmed by OK sign on
*
Step 4: TEST
Punch in the old PIN Code 1234 and star (
Punch in your Unique PIN Code and star (
) it should give you ERR – Error.
*
). The safe should unlock.
*
Note:
1. Should you need to change a Registered PIN Code to another PIN Code: follow the same steps using
your Unique Registered PIN Code instead of the Default PIN Code.
2. If you rebooted the safe by holding down the Red Button
A for 10 seconds: your safe goes to Default
Mode. All data, including the Registered PIN Code, will be deleted. The safe will open with the Default PIN
Code 1234 and star (
4. HOW TO REGISTER FINGERPRINTS ON FINGERPRINT SCANNER
). To change it to your Unique PIN Code again, follow the steps above.
*
4.1. To register fingerprints PRESS BRIEFLY red button A . As soon as red light comes on, press your fingerprint
on the Glass Fingerprint Scanner F . LCD screen will display “OK”, battery indicator and data count indicator
“1d - -01”.
4.2. If the registration fails “Err” will be displayed on LCD screen. Register the same finger again by repeating Step 4.1.
4.3. Repeat Step 4.1 with the same fingerprint but change fingerprint position on the Glass Fingerprint Scanner - left,
right, up, down, to the side.
Note:
The more times and various positions you program one fingerprint the more likely it is to open in an emergency.
4.4. To register a completely different fingerprint, repeat Step 4.1.
www.vikingsecuritysafe.com | [email protected]
page 3/5
Page 4
5. HOW TO UNLOCK AND LOCK THE SAFE WITH YOUR FINGERPRINT
Mounting Holes
*Actual Model may vary
12
5.1. UNLOCK: Press pound button (#). When red light comes on, press a registered fingerprint on the Glass Fingerprint
Scanner. Battery indicator and data count indicator “1d - -01” will display on LCD screen. Safe is Unlocked.
5.2. LOCK: Press either star button (*) or pound button (#).
6. HOW TO UNLOCK AND LOCK THE SAFE WITH PIN CODE
6.1. UNLOCK: Punch in a registered PIN code and press star button (*).
6.2. LOCK: Press either star button (*) or pound button (#).
7. HOW TO UNLOCK AND LOCK THE SAFE WITH A KEY
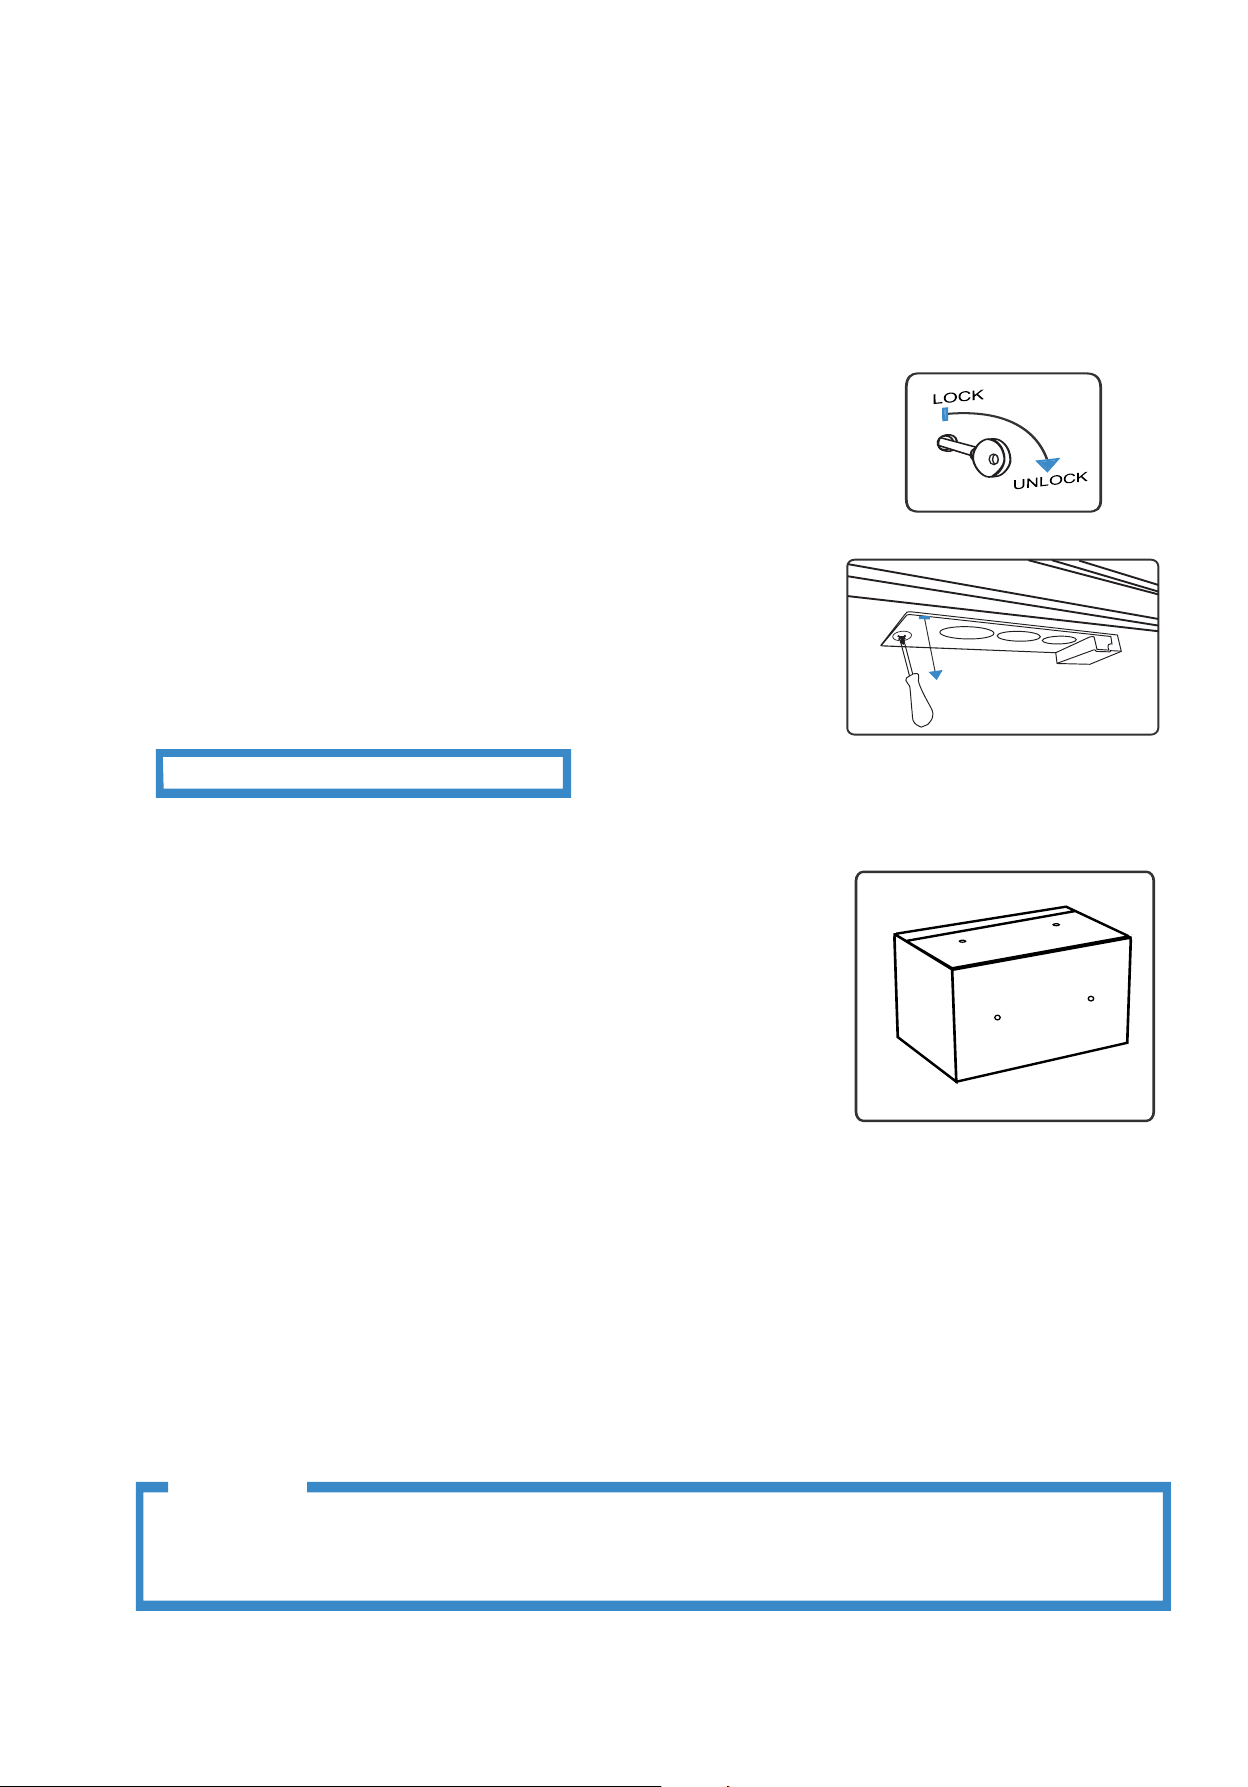
7.1. Insert the key in the keyhole and rotate to the right/clockwise to unlock
8. HOW TO TURN SOUNDS ON/OFF
8.1. SOUNDS ON: Press 1 & (*) star button, you will hear a long beep, sound is on.
8.2. SOUNDS OFF: Press 0 & (*)
9. HOW TO INSTALL/CHANGE BATTERIES ON LED LIGHT
9.1. Unscrew the little screw. Carefully pull down the LED light on the screw side
on the left. Put 2 fresh AA batteries on the back of the light. Put Back the
LED light starting on the right side of the LED light first.
Note: 2 AA batteries are provided and have to be installed
st
ar button, the sound is off.
.
MOUNTING INSTRUCTIONS
It is recommended to bolt down the safe.
Note: The safe may be mounted to a wall or floor. Be aware of the load
bearing. Failure to do so can result in personal injury and/or damage to
property. Use appropriate tools when performing work and always use eye
protection
• Wall Mounting
- Do not mount the safe without anchoring to the wall
- Find the studs in the wall, at your desired location. Most studs are
16 inches or 24 inches apart
- Check the wall for concealed wires or pipes
- Measure the location of the pre-set drill holes; mark their exact
position onto the wall ensuring that the studs or anything else behind
will not interfere
- Drill the appropriate size holes for the anchors you are using
- Carefully press the anchor into the holes at this time
- Mount the safe by running screws from inside of the safe and
securing to anchors; ensure the safe is mounted securely.
• Floor Mounting
- Use proper drill tools depending on the type of floor you are mounting the safe (wood, tile, or concrete)
- Measure the location of the pre-set drill holes; mark their exact position onto the floor
- Drill the appropriate size holes for the anchors you are using
- Carefully press the anchor into the holes at this time
- Mount the safe by running screws from inside of the safe and securing to anchors; ensure the safe is mounted
securely.
WARNING
Never store firearms and ammunition together. The safest protection against accidents involving
children is to store your firearm unloaded in an approved Firearm Safety Lock Box, with ammunition
stored separately.
www.vikingsecuritysafe.com | [email protected]
page 4/5
Page 5
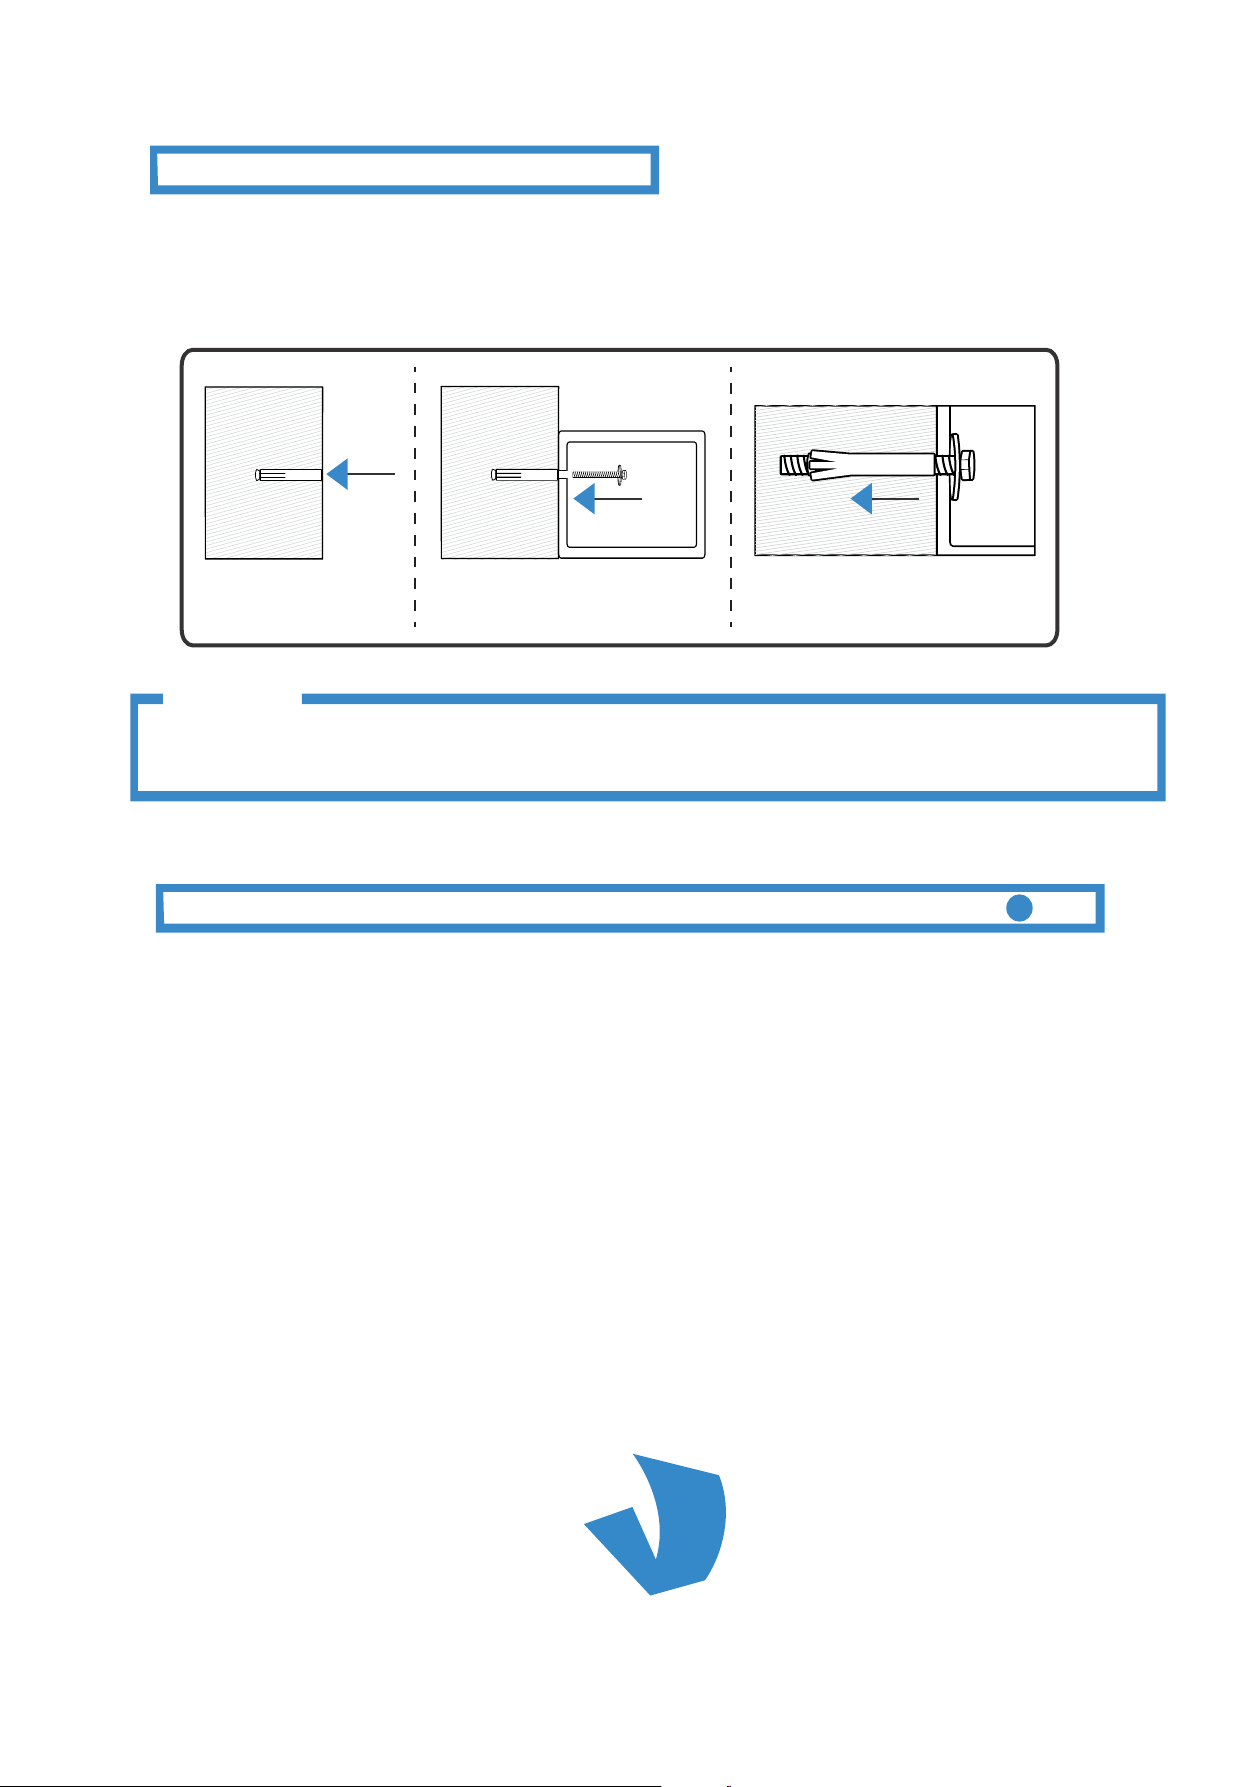
MOUNTING METHOD
e
Fix the safe in the place which is not easy to move.
• Drill holes for expansion bolts (or clamping screws) in the right place.
• Turn the expansion bolts counterclockwise to separate.
• Use the expansion bolts (or clamping screws) to secure the safe to the wall.
• Make sure the safe is mounted in place as required and then tighten all screws.
Wall
Wall
1
CAUTION
Use the expansion bolt when there is a concrete wall surface. Use the clamping screw when there is a
wooden wall surface.
CARE AND MAINTENANCE
To maximize the security and performance of the safe, keep Glass Fingerprint Scanner F clean
• Use a dry cloth to remove any smudges or prints off the Fingerprint Scanner after use
• Use gentle cleaning agents to clean the safe and Glass Fingerprint Sacnner
• Test registered fingerprints and PIN code every 6 months
• Keep liquids away from the control panel. Spills on the control panel will cause damage and possibly electric shock
• Secure safe in a proper area to prevent from falling and causing damage or injury
• DO NOT disassemble the product. For all repairs, contact Viking Security Safe Customer Service
Safe
2
Wall
3
Safe
Viking Security Saf
www.vikingsecuritysafe.com | [email protected]
page 5/5
 Loading...