

Page 1

Installation /
Use & Care Manual
Superheated Steam
Countertop Oven
VCTSO5200SS
Page 2

Service Information
If service is required:
1. Call your authorized service agency.
2. Have the following information readily available:
a. Model number
b. Serial number
c. Date purchased
d. Name of dealer from whom purchased
3. Clearly describe the problem that you are having.
If you are unable to obtain the name of an authorized service agency, or if you
continue to have service problem, contact Viking Range, LLC at (888) 845-4641 or
write to:
VIKING RANGE, LLC
PREFERRED SERVICE
111 Front Street
Greenwood, Mississippi (MS) 38930 USA
Record the information indicated below. You will need it if service is ever required.
The model and serial number for your oven are located on the left side of the oven
cavity on an identification label.
Model Number _______________________________ Serial Number ____________
Date of Purchase _____________________________ Date Installed ____________
Dealer's Name _________________________________________________________
Address
____________________________________________________________________________________
If service requires installation of parts, use only authorized parts to ensure protection
__________________________________________________________________________
under the warranty.
PLEASE RETAIN THIS MANUAL FOR FUTURE REFERENCE
2
Page 3

Table of Contents
2 SERVICE INFORMATION
3 TABLE OF CONTENTS
4 IMPORTANT SAFEGUARDS
5 INFORMATION YOU NEED TO
KNOW
5 ADDITIONAL IMPORTANT
SAFEGUARDS
5 INSTALLATION INSTRUCTIONS
5 UNPACK & EXAMINE THE
APPLIANCE
5 CHOOSING A LOCATION
5 GROUNDING INSTRUCTIONS
5 ELECTRICAL REQUIREMENTS
6 EXTENSION CORD
6 BEFORE OPERATING
6 CLEAN THE OVEN BEFORE
FIRST USE
6 PREPARATION
6 TO CLEAN THE OVEN
BEFORE USE, FOLLOW THESE
STEPS.
7 PART NAMES
7 ACCESSORIES
7 OTHERS
8 CONTROL PANEL
8 DISPLAY INFORMATION
9 IMPORTANT INSTRUCTIONS
9 WATER TANK
9 DRIP TRAY
10 COOKING
- NO PREHEAT IS
REQUIRED
10 COOKING CHART
11 BROILING PAN & CRISPER TRAY
11 TIPS FOR COOKING
11 TO SET ACCESSORIES
11 TO SET TOAST COLOR,
TEMPERATURE OR COOKING
TIME
11 TOAST
11 WARM, PIZZA, BAKE/REHEAT
12 BROIL/GRILL
13 OTHER FEATURES
13 EXTENDING COOKING TIME AT
THE END OF COOKING
13 MONITOR
13 SOUND ON/OFF
13 DRAIN WATER
14 CLEANING AND CARE
14 EXTERIOR
14 CONTROL PANEL
14 DOOR
14 INTERIOR
14 BROILING PAN/CRISPER TRAY
14 WATER TANK & WATER TANK
LID
14 DRIP TRAY
15 TROUBLESHOOTING
16 ERROR MODE
17 SPECIFICATIONS
3
Page 4

IMPORTANT SAFEGUARDS
When using electrical appliances basic safety precautions should always be followed,
including the following:
1. Read all instructions.
2. Do not touch hot surfaces. Use
Getting Started
handles or knobs.
3. To protect against electrical shock
do not immerse cord, plugs, or
appliance in water or other liquids.
4. Close supervision is necessary when
any appliance is used by or near
children.
5. Unplug from outlet when not in use
and before cleaning. Allow to cool
before putting on or taking off parts.
6. Do not operate any appliance with
a damaged cord or plug or after
the appliance malfunctions, or has
been damaged in any manner.
Return the appliance to the nearest
VIKING AUTHORIZED SERVICER for
examination, repair, or adjustment.
7. The use of accessory attachments
not recommended by the appliance
manufacturer may cause injuries.
8. Do not use outdoors.
9. Do not let cord hang over edge
of table or counter, or touch hot
surfaces.
10. Do not place on or near a hot gas or
electric burner, or in a heated oven.
11. Extreme caution must be used when
moving an appliance containing hot
oil or other hot liquids.
12. Do not use this appliance for other
than intended use.
13. Use extreme caution when removing
tray/pan or disposing of hot grease.
14. Oversize foods, metal foil packages,
or utensils must not be inserted in
the appliance as they may involve a
risk of fire or electric shock.
15. A fire may occur if the appliance
is covered or touching flammable
material, including curtains,
draperies, walls, and the like, when
in operation. Do not store any item
on top of the appliance when in
operation.
16. The appliance should not be left
unattended during operation.
17. Do not clean with metal scouring
pads. Pieces can break off the pad
and touch electrical parts involving
a risk of electric shock.
18. Extreme caution should be exercised
when using containers constructed
of other than metal or glass.
19. Do not store any materials, other
than manufacturers recommended
accessories, in this appliance when
not in use.
20. Do not place any of the following
materials in the appliance: that is
paper, cardboard, plastic, and the
like.
21. Do not cover any part of the
appliance except the broiling pan
with metal foil. This will cause
overheating of the appliance.
22. See cleaning instructions on page
14.
23. Press the CANCEL/OFF button to
turn off the appliance.
SAVE THESE INSTRUCTIONS
FOR HOUSEHOLD USE ONLY
4
Page 5

Information You Need To Know
Please make reading this Operation Manual your first step prior to using the appliance.
This important booklet explains exactly how the appliance works and what you need
to know to operate it successfully.
Getting Started
ADDITIONAL IMPORTANT
SAFEGUARDS
1. Do not put cooking utensils or baking
dishes on the opened door.
2. Do not touch the plug with wet hands
when inserting or removing from the
outlet. Plug securely into the electric
wall socket and remove by gripping
the plug. Never pull on just the cord
when unplugging from the wall.
3. Put cold, filtered tap water in the tank.
Do not put hot water or any other
liquids, in the water tank. See page 9.
4. Do not place sealed or airtight
containers in the appliance.
5. Do not operate the appliance if
the water tank is cracked and/or
leaking water. Contact a VIKING
AUTHORIZED SERVICER.
6. Do not try to adjust or repair the
appliance yourself.
7. Do not place or use the appliance
anywhere that water may splash
onto it.
8. Do not insert any objects in the steam
outlets or ventilation openings.
9. If the oven light fails, consult a VIKING
AUTHORIZED SERVICER.
INSTALLATION
INSTRUCTIONS
UNPACK & EXAMINE THE
APPLIANCE
Carefully unpack the appliance, and
remove all packing materials. Remove
the protective film (blue film) from the
outer cabinet.
Check the appliance for any damage,
such as misaligned or bent door, damaged door gasket, broken or loose door
hinges and latches and dents inside
the cavity. If there is any damage, do
not operate the appliance and contact
your dealer or VIKING AUTHORIZED
SERVICER.
CHOOSING A LOCATION
Place the appliance on a flat and sturdy
countertop. Allow at least 3 inches on
the sides, 6 inches above the top, and
1/2 inch at the rear of the appliance for
air circulation.
GROUNDING INSTRUCTIONS
This appliance must be grounded. It is
equipped with a cord having a grounding wire with a grounding plug. It must
be plugged into a wall receptacle that
is properly installed and grounded in
accordance with the National Electrical
Code and local codes and ordinances.
In the event of an electrical short circuit,
grounding reduces the risk of electric
shock by providing an escape wire for
the electric current.
ELECTRICAL REQUIREMENTS
The electrical power input requirement
should be a protected 15amp 120Vac 60
Hz electrical outlet. It is recommended
that a separate circuit serving only this
appliance be provided.
The appliance is equipped with a
3-prong grounding plug. It must be
plugged into a wall receptacle that is
5
Page 6

Information You Need To Know
properly installed and grounded. Should
you only have a 2-prong outlet, have a
qualified electrician install a correct wall
receptacle.
Getting Started
A 3-prong adapter may be purchased
and used temporarily if local codes allow.
Follow package directions.
EXTENSION CORD
A short power-supply cord is provided to
reduce the risks resulting from becoming
entangled in or tripping over a longer
cord. Longer extension cords may be
used if care is exercised.
If a long extension cord is used, its designated electrical rating must be at least as
great as the electrical rating of the appliance. The extension cord should also be
positioned so that it does not hang over
a countertop or tabletop where it can be
pulled on by children or tripped over.
The extension cord should be a grounding-type 3-wire cord.
BEFORE OPERATING
Before operating the appliance, read
and understand this operation manual
completely.
Before the appliance can be used, follow
these steps:
1. Place the drip tray correctly. See
page 9.
2. Plug in the appliance. A beep will
sound and the display will show
“Toast”.*
3. Fill the water tank with cold, filtered
tap water and install. Check that an
audible signal sounds and the blue
LED lights blinks.
4. Follow directions to clean the oven
before first use.
* Default mode is “Toast”. Once you use
the appliance, it will show the cooking
mode you set last.
CLEAN THE OVEN BEFORE
FIRST USE
You may detect smoke or a burning smell
when using the appliance for the first
time, this is normal and not a sign that
the appliance is out of order. To avoid
this problem, when first using the oven,
operate the appliance without food for
20 minutes.
PREPARATION
1. Ventilate the room.
2. Install the drip tray.
3. Fill the water tank with cold, filtered
tap water and install.
4. Make sure nothing is in the appliance.
TO CLEAN THE OVEN BEFORE
USE, FOLLOW THESE STEPS.
1. Turn the dial until Bake/Reheat
appears in the display.
2. Press SELECT.
3. Turn the dial to set the temperature
(485°F).
4. Press SELECT.
5. Turn the dial to set the heating time
(20 M).
6. Press START.
WARNING
The oven door, outer cabinet, oven cavity
and especially the heating elements will
become hot.
6
Page 7
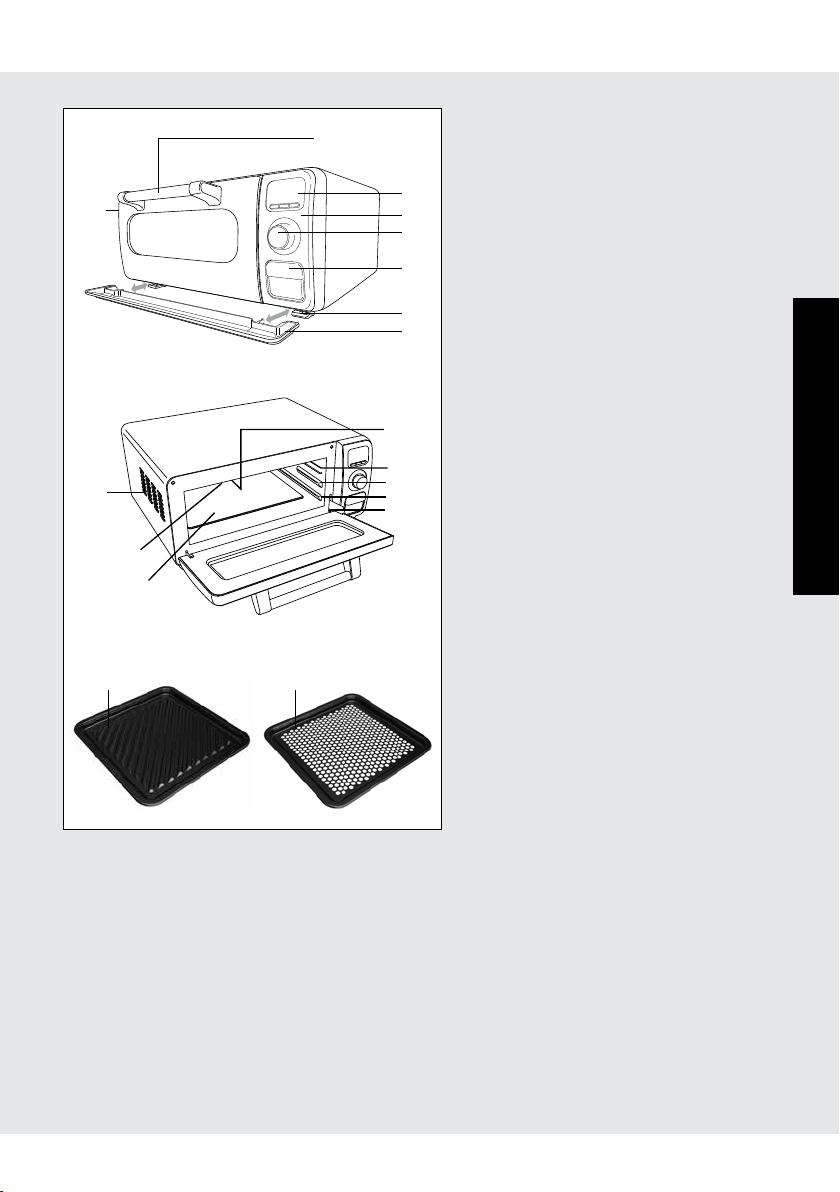
Part Names
1
1
14
15
16 17
2
1. Ventilation openings
Be aware that hot steam or air
comes out during cooking, and
3
4
5
6
keep children away from the
appliance.
2. Door open handle
3. LCD display
4. Control panel
5. Dial
7
8
6. Water tank (See page 9)
7. Legs
8. Drip tray (See page 9)
Product Controls
9. Oven light
10
It will light during cooking.
10. Steam outlets
9
11
12
13
11. Upper position
12. Lower position
13. Door hinge
14. Upper heating element
(at the oven cavity ceiling)
15. Lower heating element
(under the floor)
ACCESSORIES
16. Broiling pan
For Warm, Bake/Reheat and
Broil/Grill modes.
17. Crisper tray
For Toast, Pizza and
Bake/Reheat modes.
OTHERS
WARNING
The oven door, outer cabinet, oven cavity, accessory and especially the heating
elements will become hot. Use thick dry
pot holders when removing the foods
or accessory from the oven to prevent
burns.
• Operation Manual (Installation/
Use & Care Manual)
• Quick Start Guide
• Cook Book
7
Page 8
1
2
3
4
5
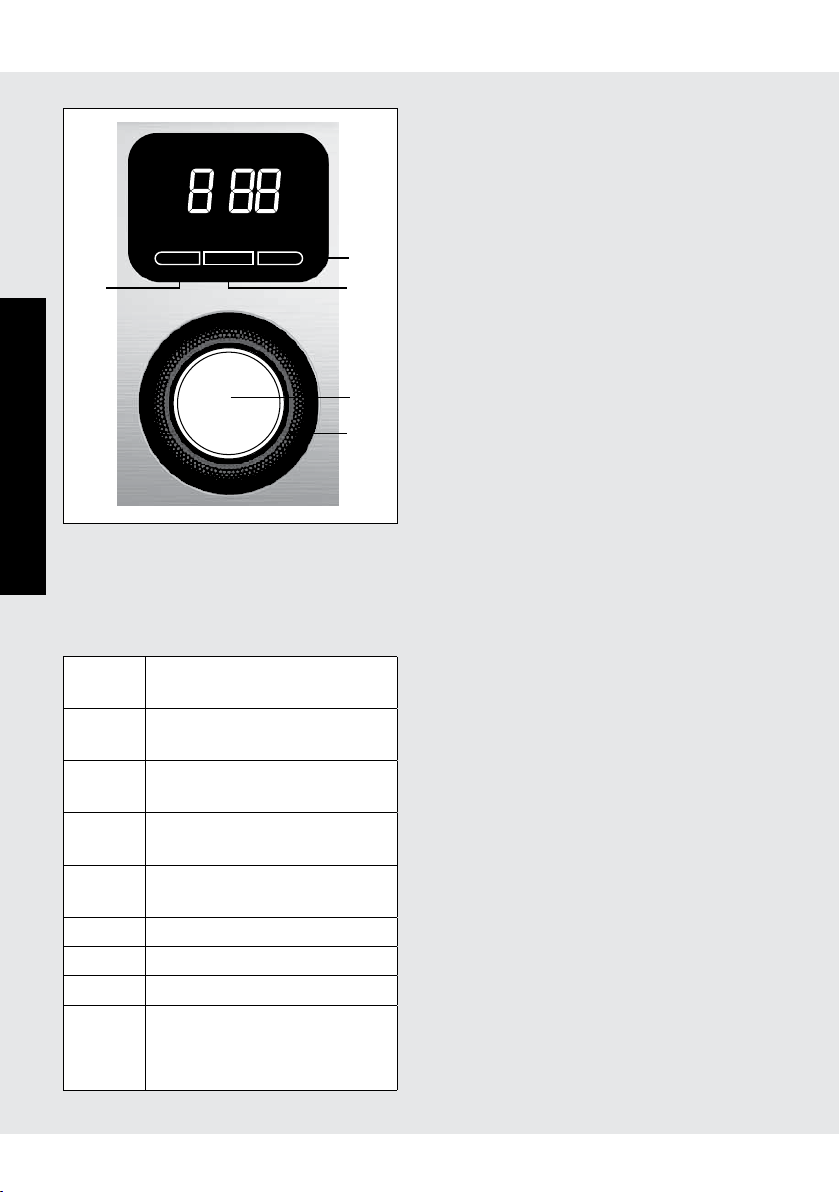
Control panel
1. CANCEL/OFF button:
Bake/Reheat Broil/Grill
Product Controls
Pizza
Warm
Toast
CANCEL
/OFF
D
SELECT
START
°
F
SMM
DISPLAY INFORMATION
The display shows information
including cooking time and cooking
mode.
Toast: Toast mode is selected or
in use.
Warm: Warm mode is selected or
in use.
Pizza: Pizza mode is selected or
in use.
Bake/
Reheat:
Broil/
Grill:
°F: Fahrenheit.
M: Minute.
This mode is selected or in
use.
This mode is selected or in
use.
S: Second.
D: Demonstration mode is set.
To release the demo mode,
see page 15.
• Press if you make a mistake
during programming.
• Press to stop the cooking
function.
2. START button:
• Press to begin the operation.
3. SELECT button:
• Press to set toast color.
• Press to set cooking temperature.
• Press to set cooking time.
4. Dial:
• Turn to select cooking mode.
• Turn to select toast color.
• Turn to select cooking
temperature.
• Turn the dial left or right to
decrease or increase cooking
time.
5. Blue LED light:
• The blue LED light will light up
during the operation. It will blink
with the various intensity when
the remaining cooking time is less
than 10 seconds.
• The blue LED light will blink
when the water tank is set after
plugging the appliance into an
outlet.
• The blue LED light will blink when
plugging the appliance into an
outlet while the water tank is set.
8
Page 9
Important Instructions
READ CAREFULLY BEFORE COOKING
WATER TANK
Filling the water tank with cold, filtered
tap water is necessary for all functions.
Follow the directions below before
cooking.
1. Pull the water tank toward you to
remove.
2. Wash the water tank and lid before first
time use.
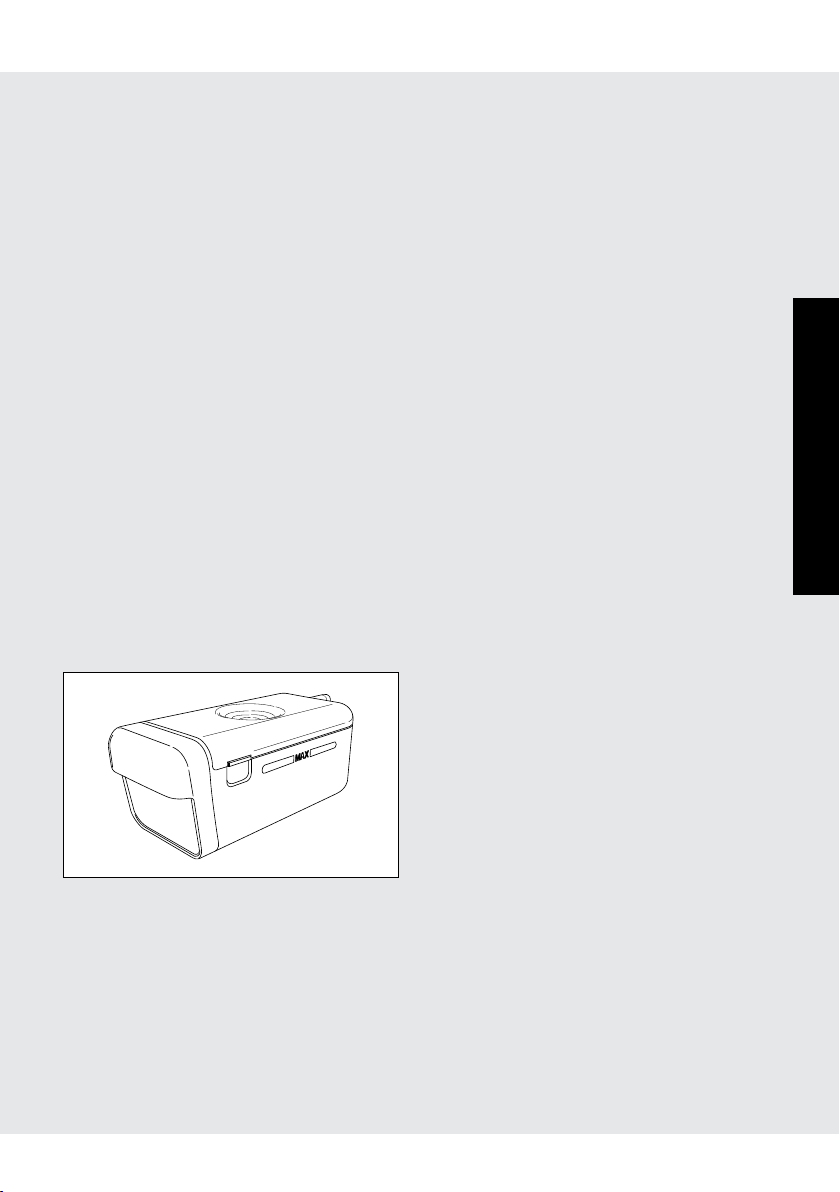
3. Open the lid and fill the water tank with
cold, filtered tap water to the MAX mark
each time you begin to cook. Do not fill
the water tank over the MAX mark. See
a figure below.
4. Close the lid tightly.
5. Reinstall the water tank, pushing it
firmly into place.
6. After cooking, empty and rinse the
water tank and the lid.
Do not leave it filled with water in the
oven for over a day.
• Do not drop or damage the water
tank. Heat may cause the water tank to
change shape. Do not use a damaged
water tank. Call an Authorized Service
Center to purchase a replacement
part.
• Do not block the air holes on the lid of
the water tank. It will cause trouble during
cooking.
DRIP TRAY
The drip tray must be in the correct position while cooking. For proper operation,
follow the directions below.
The drip tray is packed with the oven. Attach the drip tray under the oven door as
shown on page 7. This drip tray collects
the condensation from the oven door.
To remove the drip tray: Pull the drip
tray toward you with both hands. Water
should not be dripping before removing
the drip tray.
To replace the drip tray: Insert the drip
tray under the oven aligning its depressed parts and the legs, and push
firmly.
Insert the drip tray horizontally to attach.
Product Controls
NOTES:
• Do not add any liquid other than cold,
filtered tap water into the water tank.
• An insufficient amount of water in the
water tank may cause an undesired
result.
• We recommend that you empty the
water tank every time after cooking.
WARNING
• The oven will become very hot after
cooking.
• Do not open the door with your face
close to the oven. Steam from the
oven may cause burns.
• Wait until the oven has cooled before
emptying the drip tray. Once cooled,
wipe the oven cavity.
• Do not touch the water directly as
water in the drip tray may be hot.
9
Page 10
Cooking - No preheat is required.
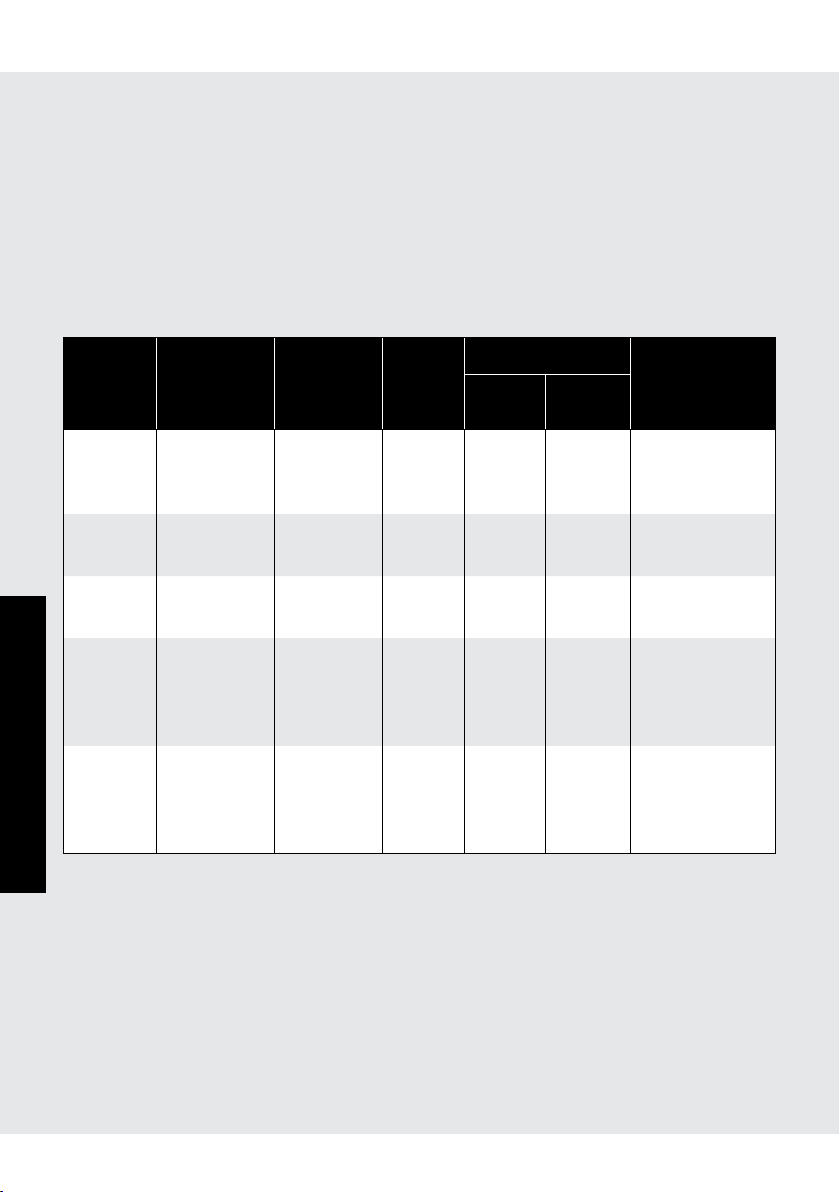
There are five cooking modes. Refer to the “COOKING CHART”. The chart gives
information on each setting.
The appliance has seven color settings for Toast, and one temperature setting for Broil/
Grill. Warm, Pizza and Bake/Reheat modes each have appropriate temperature ranges
from 14 preset temperatures (160, 200, 225, 250, 275, 300, 325, 350, 375, 400, 425,
450, 475 and 485°F) Preheating is not necessary.
For details, refer to the provided Cookbook.
COOKING CHART
COOKING
MODE
Toast
TOAST
COLOR
SETTING/
TEMP
1~7
(1 = lightest
7 = darkest)
TIME
No need
to set the
time.*
Warm 160 - 485°F 0 - 60 min. 160°F
Pizza 325 - 485°F 0 - 60 min. 400°F
Bake/
Reheat
Operation
300 - 485°F 0 - 60 min. 375°F
Broil/Grill 485°F 0 - 60 min. 485°F
DEFAULT
SETTING
4
ACCESSORIES
PAN/
TRAY
Crisper
Tray
Broiling
Pan
Crisper
Tray
Broiling
Pan or
Crisper
Tray
Broiling
Pan
POSITION
EXAMPLE
Toast, Bagels,
Upper**
Grilled Cheese,
English Muffins
Upper**
Keeping food
warm
Upper** Frozen Pizza
Chicken,
Upper**
Biscuits (Frozen),
Reheating
leftover foods
Chicken Wings,
Upper**
Beef Patties,
Salmon,
Seafood
* In toast mode, there is no need to set cooking time. Toast mode comes with default
cooking times for each color setting.
** See BROILING PAN & CRISPER TRAY #1 on page 11.
10
Page 11
Toast Color/Temperature
Lighter/
Reduce
temperature
temperature
Cooking - No preheat is required.
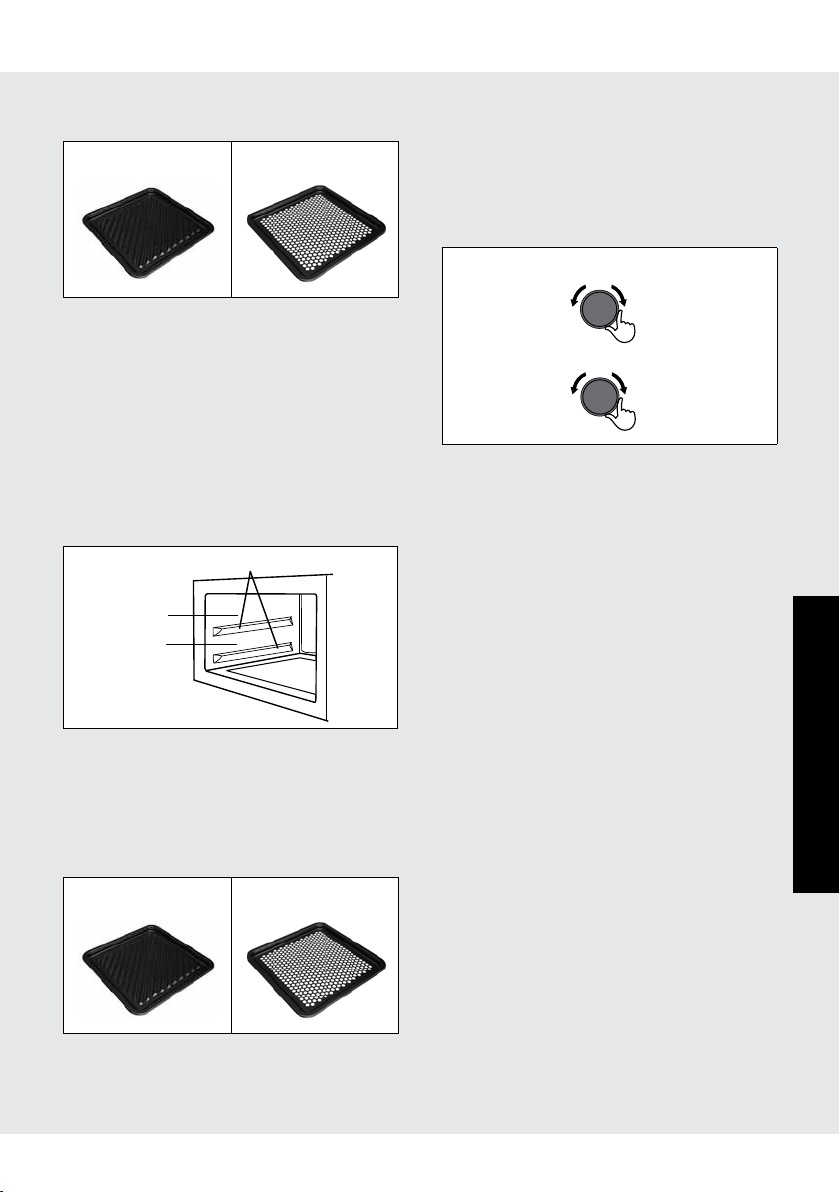
BROILING PAN & CRISPER TRAY:
Broiling Pan Crisper Tray
1. Select desired position depending
on the food size. Upper position
is recommended for most recipes.
Smoke will occur during the cooking
if the food touches the upper heaters.
2. Do not use upper and lower positions
at the same time.
3. Do not stack broiling pan and crisper
tray.
Tray guides
Upper
Lower
TIPS FOR COOKING
TO SET ACCESSORIES
Use the suitable accessory for each
cooking mode.
Broiling Pan Crisper Tray
TO SET TOAST COLOR,
TEMPERATURE OR COOKING
TIME
Turn the dial clockwise or counterclockwise.
Darker/
Increase
Cooking Time
Reduce
time
Increase
time
Toast
1. Fill the water tank with cold, filtered
tap water to the MAX mark and
install.
2. Place food on attached tray, and
place in oven.
3. Close the door. Turn the dial until to
“Toast”.
4. Press SELECT to select the toast
color. The display will show “4” as
the color setting.
5. Turn the dial to select desired toast
setting.
6. Press START. Cooking time will count
down.
7. When the cooking time reaches zero,
the oven will sound and stop.
Operation
Warm, Pizza, Bake/Reheat
1. Fill the water tank with cold, filtered
tap water to the MAX mark and
install.
2. Place food on pan or tray, and place
in oven.
11
Page 12

Cooking - No preheat is required.
3. Close door. Turn dial to the cooking
mode.
4. Press SELECT to set the temperature.
The display will show the preset
temperature.
5. Turn the dial to select desired
temperature.
6. Press SELECT to set the cooking time.
The display will show the preset time
depending on the temperature.
7. Turn the dial to set desired cooking
time.
8. Press START. The cooking time will
begin counting down.
9. When the cooking time reaches zero,
the oven will sound and stop.
Broil/Grill
1. Fill the water tank with cold, filtered
tap water to the MAX mark and
install.
2. Place food on pan, and place in the
oven.
3. Close the door. Turn the dial until
“Broil/Grill” is shown.
4. Press SELECT to see the temperature.
Operation
The display will show “485°F”. Broil/
Grill has one temperature setting.
5. Press SELECT to set the cooking time.
The display will show the preset time.
6. Turn the dial to set desired cooking
time.
7. Press START. The cooking time will
begin counting down.
8. When the cooking time reaches zero,
the oven will sound and stop.
WARNING
The oven door, outer cabinet, oven cavity, accessory and especially the heating
elements will become hot.
Use thick dry pot holders when removing
foods or accessories from the oven to
prevent burns and injury.
NOTES:
• To extend cooking time, see
EXTENDING COOKING TIME AT
THE END OF COOKING on page 13.
• The amount of water in the water tank
is sufficient for one cooking operation.
Water does not need to be added
during cooking.
• At the cooking end, the display will
show “cooking mode” and “0s”
for 3 minutes until CANCEL/OFF is
pressed. After 3 minutes or when you
press CANCEL/OFF, the display will
show only cooking mode. Moreover, if
the appliance is left for 5 minutes, the
oven will go into standby mode and
nothing will be shown on the display.
• After cooking, the oven will
automatically cool and you will hear
the sound of the cooling fan. The
fan may continue to operate up to 5
minutes depending on the oven and
parts temperature.
12
Page 13

Other Features
EXTENDING COOKING TIME
AT THE END OF COOKING
Cooking results may vary depending
on room temperature, initial food temperature and other factors. You can
adjust cooking results by adding more
cooking time at the end. When cooking
is finished, the display will show “0s”
for up to 3 minutes. It is only possible to
add extra cooking time within these 3
minutes. Extra cooking time can be extended up to 30 minutes for all cooking
modes except Toast mode (10 minutes).
Turn the dial to enter the desired time
then press START. The same cooking
mode will be continued.
Carefully check the cooking process.
NOTES:
• Extending Cooking Time function
is canceled when CANCEL/OFF is
pressed.
• The Extending Cooking Time function
can be repeated until the food is
cooked to your desired result.
MONITOR
You can check the toast color setting or
temperature that is set while cooking.
Press SELECT and the toast color setting
or temperature that was set will show on
the display for 2 seconds.
SOUND ON/OFF
You can mute the appliance.
Sound ON/OFF function is available
when the display shows any cooking
mode indicator only.
To mute the appliance, press and hold
SELECT until it beeps.
To unmute, press and hold SELECT until
the appliance beeps.
NOTES:
• After setting the sound on/off, press
CANCEL/OFF.
• Error sounds will sound even if setting
the sound off.
• The setting will be stored in memory
even if AC power is interrupted or
disconnected.
DRAIN WATER
After cooking, conducted water will
remain on the internal water tube. After
the last use of the day, we recommend to
operate the appliance with Bake/Reheat,
485°F for 20 minutes without food for
drying the residue water off.
Remove the water tank before carrying
out the drain water function.
Operation
13
Page 14

Cleaning And Care
Before cleaning, turn the appliance off.
Unplug and allow it to cool completely.
An authorized service representative
should perform any other servicing,
except for specific cases detailed in
the operation manual.
CAUTION: DO NOT USE COMMERCIAL
OVEN CLEANERS, STEAM CLEANERS,
ABRASIVE, HARSH CLEANERS, ANY
THAT CONTAIN SODIUM HYDROXIDE
OR SCOURING PADS ON ANY PART OF
THE APPLIANCE.
EXTERIOR
The outside of the appliance can be
cleaned with a soft damp cloth. Mild
soap and water can be used.
Make sure the soap is wiped off with a
moist cloth, and dry the exterior with a
soft towel.
CONTROL PANEL
Care should be taken when cleaning the
control panel. Using a cloth dampened
with water only, gently wipe the panel
until it becomes clean.
Avoid using excessive amounts of water.
Do not use any sort of chemical or abrasive cleaner.
DOOR
To remove all trace of dirt, regularly
clean both sides of the door, the door
seals and adjacent parts with a soft,
damp cloth. Do not use harsh abrasive
cleaners or sharp metal scrapers to clean
the door glass since they can scratch the
surface, which may result in shattering
of the glass.
INTERIOR
Important information:
• After every use, once the oven has
cooled down and is safe to touch,
wipe the oven walls with a soft cloth
and warm water (or mild soapy water).
Repeated use of the oven without
cleaning may lead to permanent
blemishes.
• Do not use caustic cleaners (acidic/
alkaline), spray type cleaners, abrasive
or harsh cleaners or scouring pads as
it may damage the surface of oven
walls.
DO NOT TOUCH THE UPPER HEATERS.
BROILING PAN / CRISPER TRAY
Wash broiling pan and crisper tray after
cooking, using mild soap or detergent
solution, rinse and dry.
Do not use harsh cleaners, sharp metal
scrapers or stiff brushes. Broiling Pan and
Crisper Tray are dishwasher safe.
WATER TANK & WATER TANK LID
After cooking, wash using mild soap or
detergent solution with a soft damp cloth
or sponge, rinse and dry. Do not wash in
the dishwasher. Do not use harsh cleaners, sharp metal scrapers or stiff brushes
on the water tank and water tank lid.
DRIP TRAY
Empty drip tray after cooking, wash using
mild soap or detergent solution with a
soft damp cloth or sponge, rinse, dry and
place below the oven front.
Do not wash in the dishwasher.
Product Care
14
Page 15
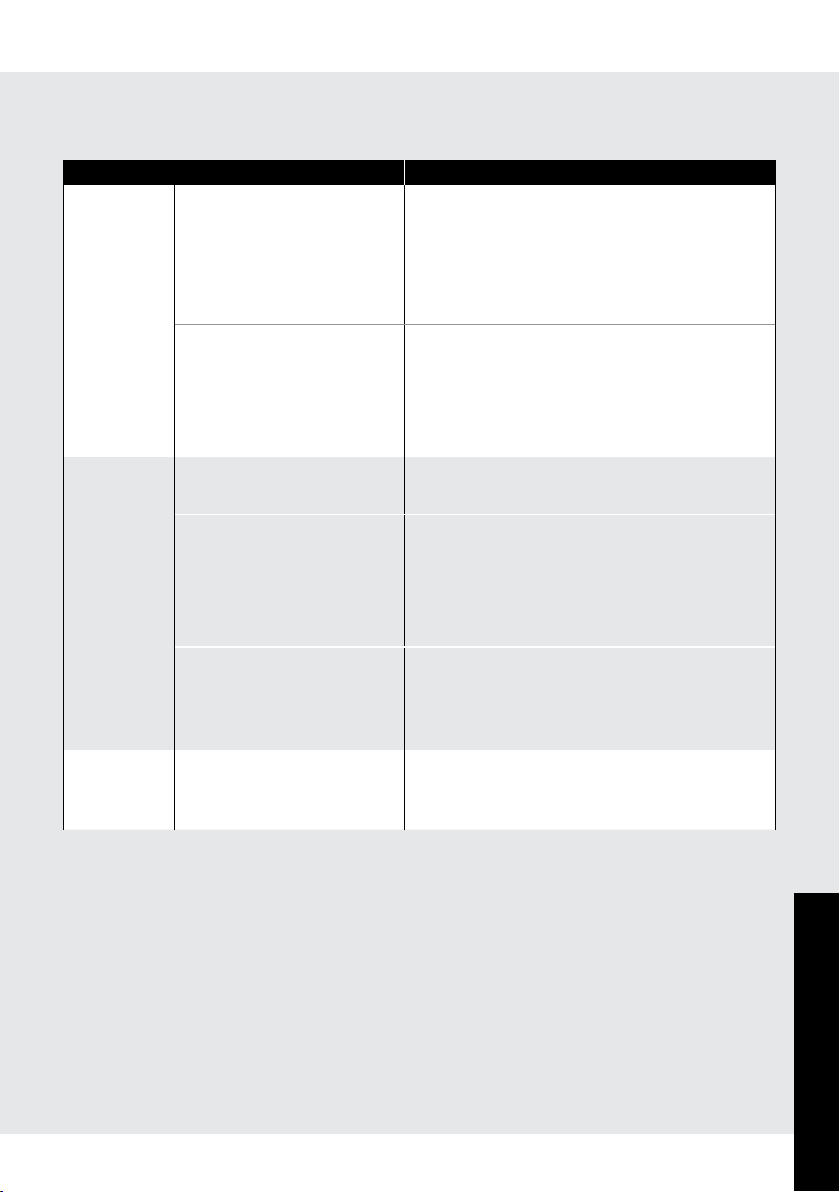
Troubleshooting
The following situations are normal and are not signs that the appliance is malfunctioning.
QUESTION / SITUATION ANSWER
1. Display Nothing appears on the
display.
Turn the dial or install the water tank.
Check that power plug is connected to a
suitable wall outlet. See page 5.
Check that fuse or circuit breaker is
functioning properly. If not, correct.
2. Noise /
Sound
3. Smoke /
Aroma
• Cooking time in the
display is counting
down very rapidly.
• The display shows
“D”.
Noise during cooking. You may hear water being pumped to
Noise after cooking. The cooling fan will operate until the
No sound when buttons
are pressed. No beeps
when operations are
completed etc.
When using the oven
for the first time, it may
smoke or smell.
The appliance is in demonstration mode.
This feature is mainly for use by retail
outlets.
To cancel, press and hold CANCEL/OFF
until it beeps and then press it 4 times.
the steam generator. This is normal.
oven is cool.
The fan may continue to operate up to
5 minutes depending on the oven and
parts temperatures.
Sound is turned OFF. See page 13 to
turn sound back on.
See page 6 for step-by-step instructions
for cleaning the oven before first use.
15
Product Care
Page 16
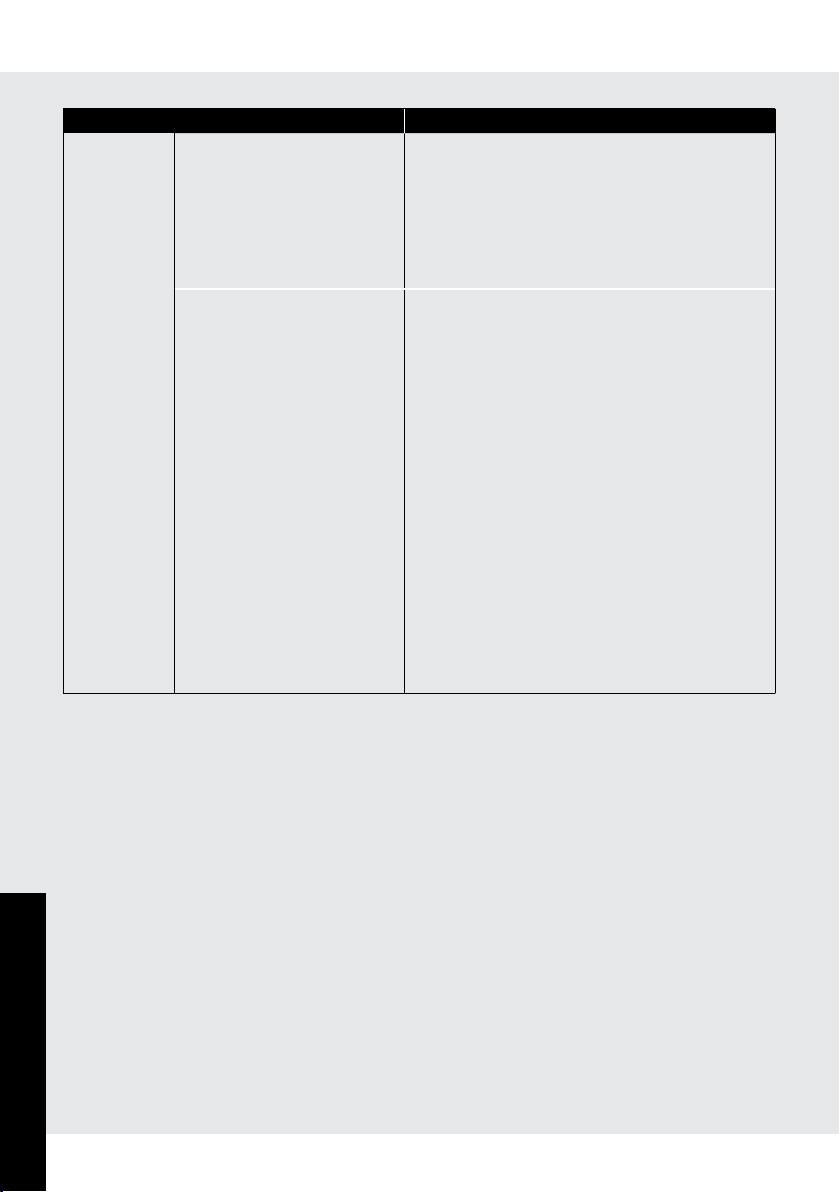
Troubleshooting
QUESTION / SITUATION ANSWER
4. Cooking
result
Food in oven is not
heated.
• Check that power plug is connected
to a suitable wall outlet. See page 5.
• Does the display show “D”? If so, the
oven is in demonstration mode. To
cancel it, see ANSWER for QUESTION/
SITUATION 1.
The menu does not have
a good result.
If you still require service, disconnect the plug from the outlet and CONTACT YOUR
NEAREST VIKING AUTHORIZED SERVICER.
• Did you set the water tank with water
before cooking?
• Did you fill the water tank with cold,
filtered tap water to the MAX mark
before cooking?
• Did you take the water tank off from
the oven during the cooking? Do not
remove the water tank during the
cooking.
• Did you use the suitable accessory?
Refer to the provided Cookbook.
• Did you set the broiling pan/crisper tray on the suitable position?
Upper position is recommended for
most recipes. Refer to the provided
Cookbook.
ERROR MODE
Any time “C with any number” appears, the servicer should be called.
Product Care
16
Page 17

Specifications
AC Line Voltage: Single phase 120V, 60Hz, AC only
AC Power Required: 1750 W, 14.5 amps.
Outside Dimensions: 19.7”(W) x 9.3”(H) x 19.3”(D)
Cavity Dimensions: 13.8”(W) x 4.6”(H) x 14.0”(D)
Cavity Volume: 0.5 Cu. Ft.
Net Weight: Approx. 24.5 lb.(without accessories)
17
Product Care
Page 18

NOTES
Page 19

NOTES
Page 20

VIKING RANGE, LLC
111 FRO N T S TR EE T
GREENWOOD, MISSISSIPPI 38930 USA
(662) 455-1200
FOR PRODUCT INFORMATION
CALL 1-888-845-4641
OR VISIT OUR WEB SITE AT VIKINGRANGE.COM
TINSEA013KRRZ
Printed in Thailand
 Loading...