

User Manual
Rev9.18.15
“Sailing Toward a Greener and Safer Tomorrow”
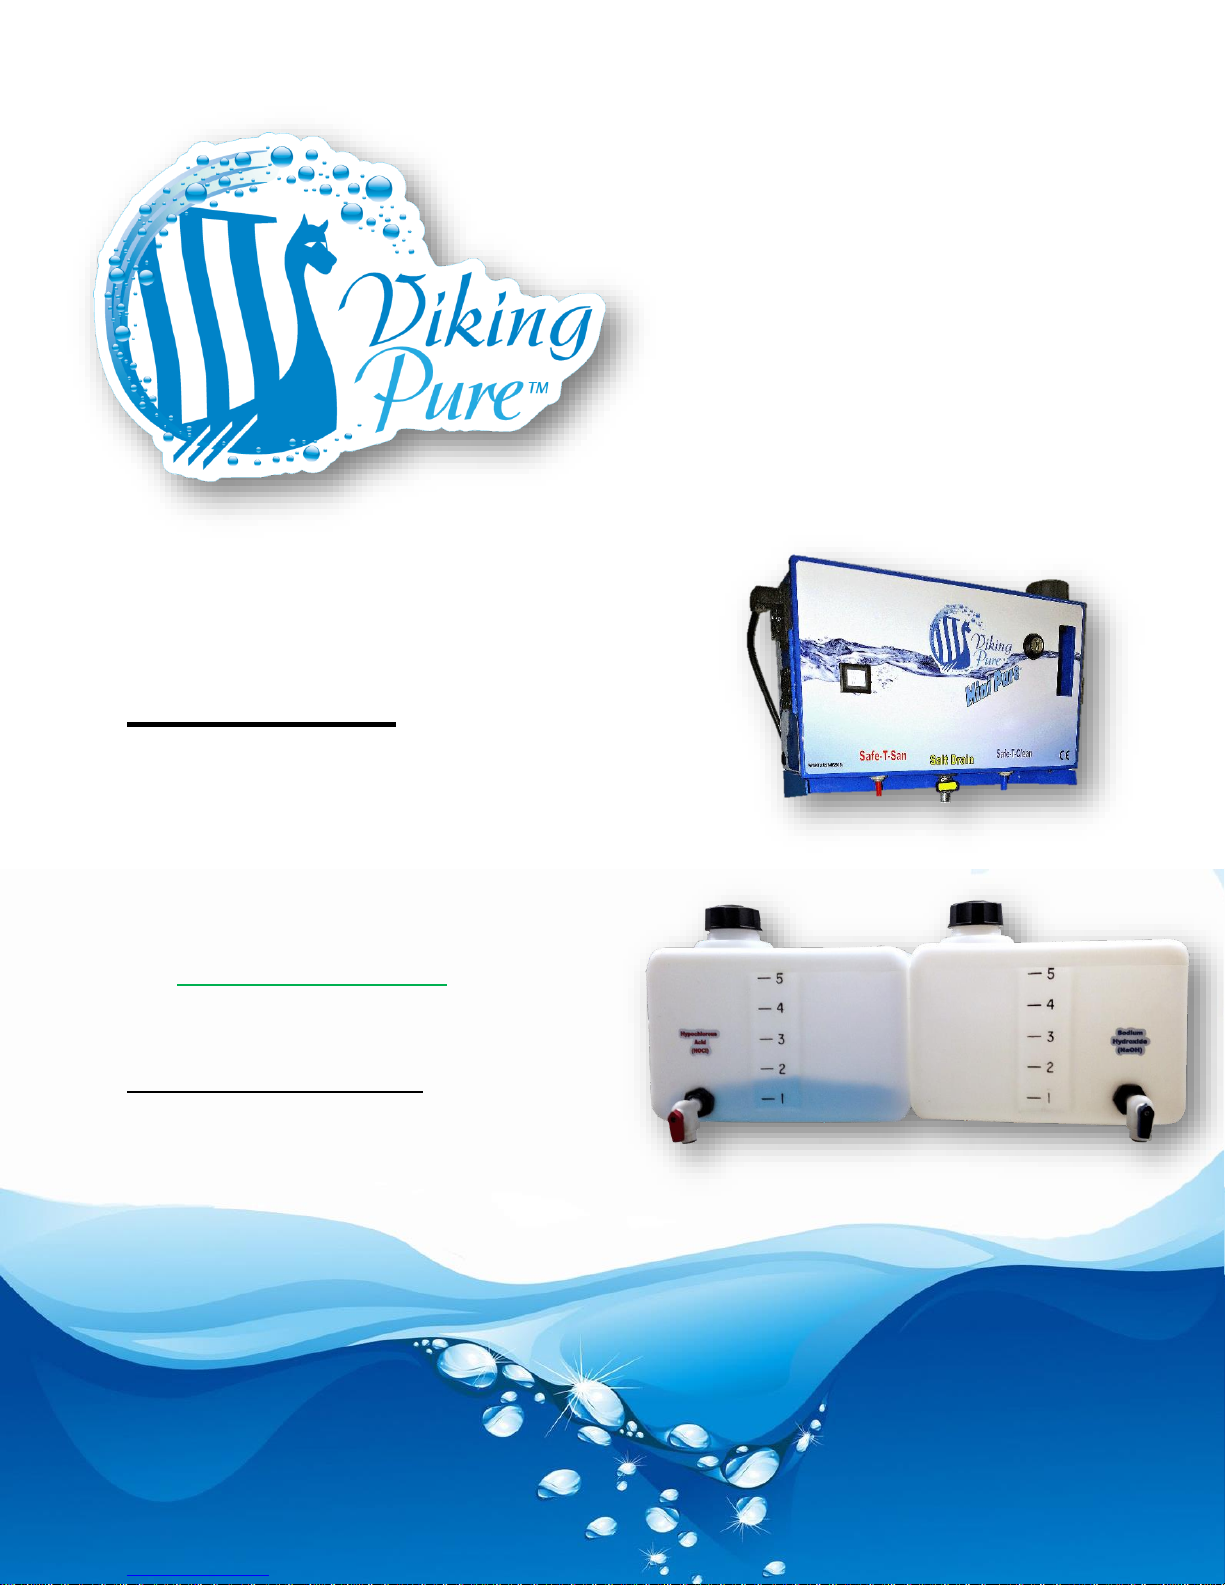
MiniMAXX™
A Revolutionary system used to produce a
limited supply of both a cleaner & a sanitizer
from just salt, water, and electricity. It is
not only a greener solution to cleaning…
it is 100% NON-TOXIC.
Model Number:
PN: VPM-MAXX (115VAC/230VAC)
1 | P a g e
Viking Pure, LLC
511 Pullman Rd., Suite C5 Edgewater, Fl. 32132, USA
© Viking Pure, LLC 2015

Contents
Warnings . . . . . . . . . . . . . . . . . . . . . . . . . . . . . . . . . . . . . 3
Diagrams
Unit Diagram . . . . . . . . . . . . . . . . . . . . . . . . . . . . . 4
Inside Unit Diagram . . . . . . . . . . . . . . . . . . . . . . . 5
Cell Diagram . . . . . . . . . . . . . . . . . . . . . . . . . . . . . 6
Installation & Set Up of Your Unit
Pre-installation Water Test. . . . . . . . . . . . . . . . . 7
Diagram. . . . . . . . . . . . . . . . . . . . . . . . . . . . . . . . . 8
Connecting the VPM-SB . . . . . . . . . . . . . . . . 9-10
User Information
Smart Button Instructions. . . . . . . . . . . . . . . 11-12
Adding Salt. . . . . . . . . . . . . . . . . . . . . . . . . . . . . . 13
Solution/Label Information. . . . . . . . . . . . . . . . . .14
Warranty Information . . . . . . . . . . . . . . . . . . . . . .15
Trouble Shooting Guide . . . . . . . . . . . . . . . . . . . 16
User Reference Guide . . . . . . . . . . . . . . . . . . . . 17
Other Products By Viking Pure . . . . . . . . . . . . . 18
2 | P a g e
Viking Pure, LLC
511 Pullman Rd., Suite C5 Edgewater, Fl. 32132, USA
© Viking Pure, LLC 2015
WARNING
If you have any questions or
comments regarding the warning
information above please contact us
at:
Info@vikingpure.com
Or
1-(386)-428-9800 USA
Warnings
The following warnings include general safety information for this equipment with detailed descriptions.
ELECTRIC SHOCK HAZARD
Improper grounding, setup, or usage of the system can cause electric shock and death.
•
Turn off and disconnect power cord before servicing equipment.
•
Use only grounded electrical outlets.
•
Use only 3-wire extension cords.
LIMITED PRODUCTION NOTICE
Unit is intended to be used for smaller applications only. Unit is limited to use in the following ways:
Unit shall not run, continuously, for more than 1 hour (6 runs) or unit may become damaged and/or
•
cause injury.
•
Unit shall not run for more than 3 hours (18 runs) per 24 hour period or unit may become damaged
And/or cause injury.
*Please See Warranty (Page 14) For Full Warranty Information*
.
EQUIPMENT MISUSE HAZARD
Misuse can cause death or serious injury.
•
Misuse of equipment will damage unit, void warranty (if new), or cause serious injury, even death.
•
Check equipment daily. Repair or replace worn or damaged parts immediately.
•
Do not alter or modify equipment.
•
For use only by trained staff.
•
Use equipment only for its intended purpose. Call your Viking Pure 1000 distributor for information.
•
Route hoses and cables away from traffic areas, sharp edges, moving parts, and hot surfaces.
•
Do not use hoses to pull equipment.
•
Only use Viking accessories for this unit. Any other accessories may damage unit & void warranty
Only Use Viking Pure® Salt
Use of any other types of salt will damage unit’s membranes, chemically change the solutions, and
may even cause physical harm.
WARNING
3 | P a g e
Viking Pure, LLC
511 Pullman Rd., Suite C5 Edgewater, Fl. 32132, USA
© Viking Pure, LLC 2015
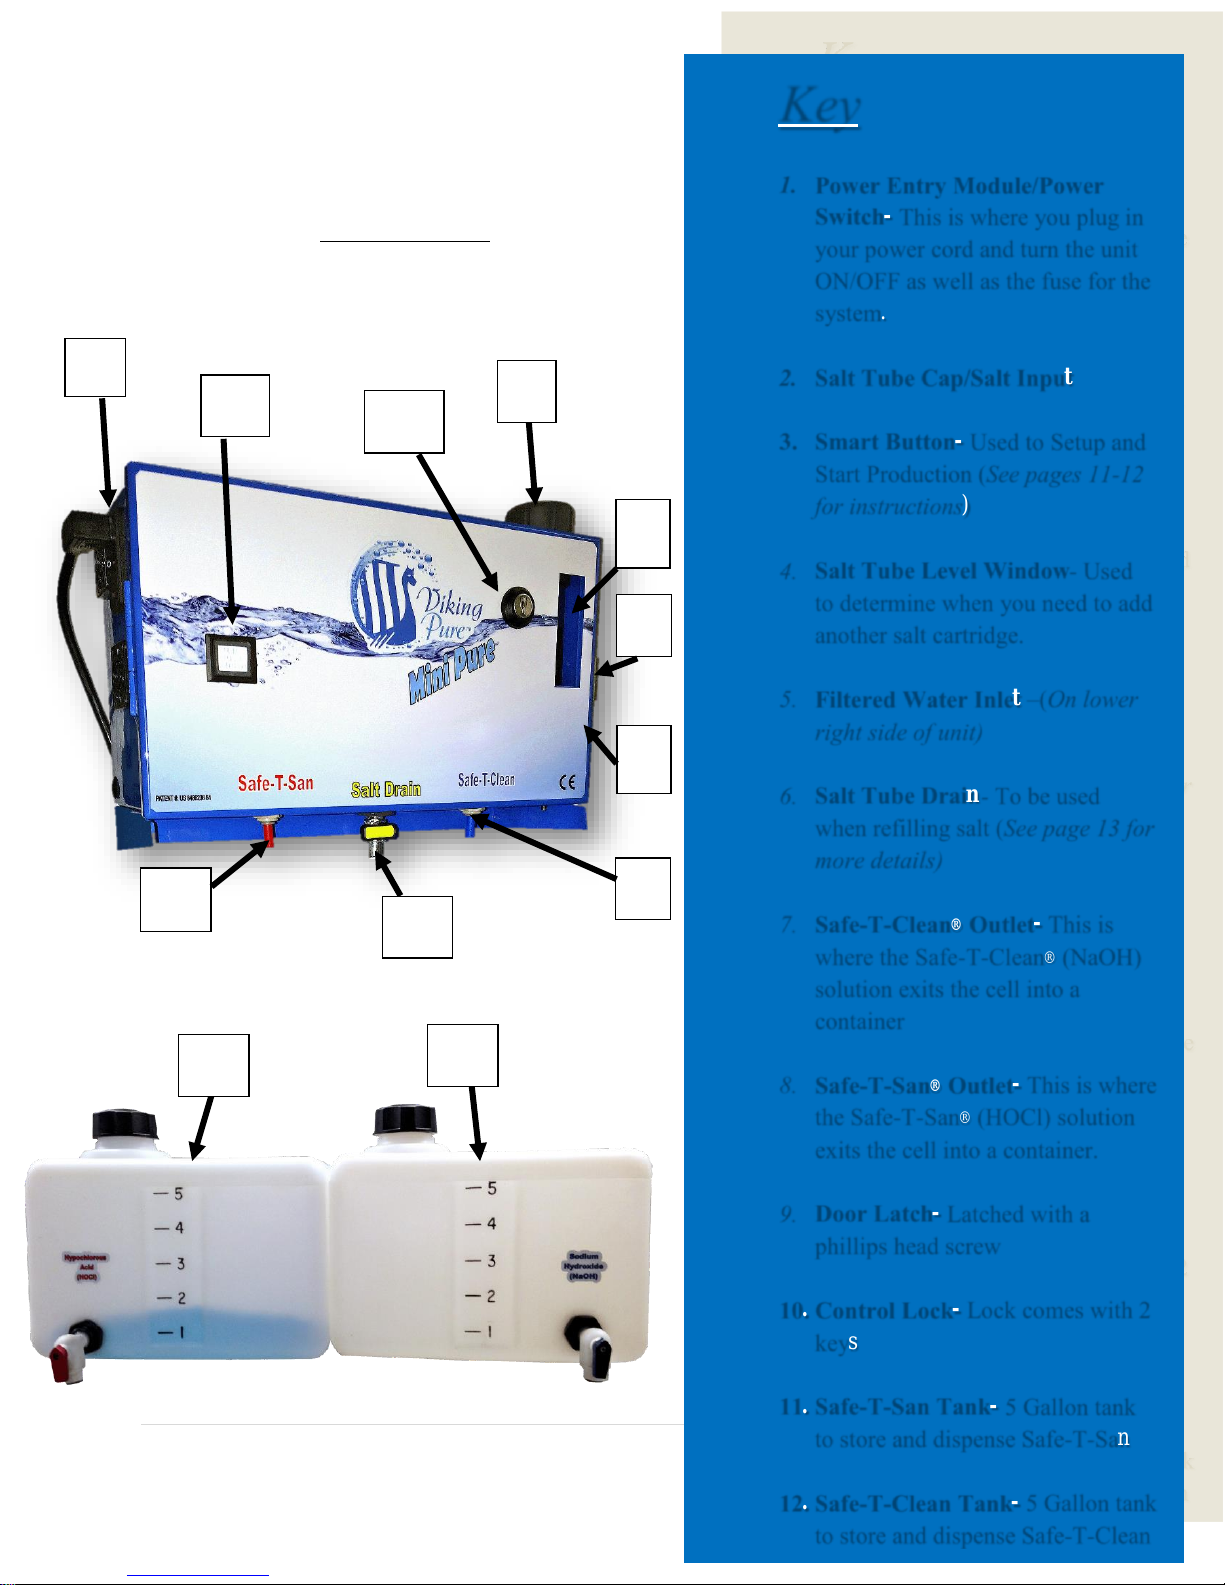
1
2
4
7
3
8
Key
to store and dispense Safe-T-Clean
5
6
9
10
11
12
Unit Diagram
VPM-MAXX
Mini Pure
4 | P a g e
Viking Pure, LLC
511 Pullman Rd., Suite C5 Edgewater, Fl. 32132, USA
© Viking Pure, LLC 2015
1. Power Entry Module/Power
Switch- This is where you plug in
your power cord and turn the unit
ON/OFF as well as the fuse for the
system.
2. Salt Tube Cap/Salt Input
3. Smart Button- Used to Setup and
Start Production (See pages 11-12
for instructions)
4. Salt Tube Level Window- Used
to determine when you need to add
another salt cartridge.
5. Filtered Water Inlet –(On lower
right side of unit)
6. Salt Tube Drain- To be used
when refilling salt (See page 13 for
more details)
7. Safe-T-Clean® Outlet- This is
where the Safe-T-Clean® (NaOH)
solution exits the cell into a
container
8. Safe-T-San® Outlet- This is where
the Safe-T-San® (HOCl) solution
exits the cell into a container.
9. Door Latch- Latched with a
phillips head screw
10. Control Lock- Lock comes with 2
keys
11. Safe-T-San Tank- 5 Gallon tank
to store and dispense Safe-T-San
12. Safe-T-Clean Tank- 5 Gallon tank
16
14
17
15
18
13
19
Key
Inside Unit Diagram
VPM-SB
Viking Pure: Mini Pure
13. Salt Tube- This is where
you will fill your salt tube.
14. Electrolyzer Cell- This is
where both HOCl and
NaOH solutions are
produced.
15. Safe-T-San® Flow
Control- This should be
adjusted only under the
direction of a Viking Pure
representative
16. Safe-T-Clean® Flow
Control- This should be
adjusted only under the
direction of a Viking Pure
representative
17. Safe-T-San® Outlet- This
is where the Safe-T-San®
(HOCl) solution exits the
cell into a container.
18. Safe-T-Clean® Outlet-
This is where the Safe-TClean® (NaOH) solution
exits the cell into a
container.
19. Electrical Compartment-
Turn off and Remove
power cord prior to opening
control door.
(KEEP AREA DRY)
5 | P a g e
Viking Pure, LLC
511 Pullman Rd., Suite C5 Edgewater, Fl. 32132, USA
© Viking Pure, LLC 2015
25
22
24
23
21
19
20
18
Key
Cell Diagram
VPM-SB
Viking Pure: Mini Pure
6 | P a g e
Viking Pure, LLC
511 Pullman Rd., Suite C5 Edgewater, Fl. 32132, USA
© Viking Pure, LLC 2015
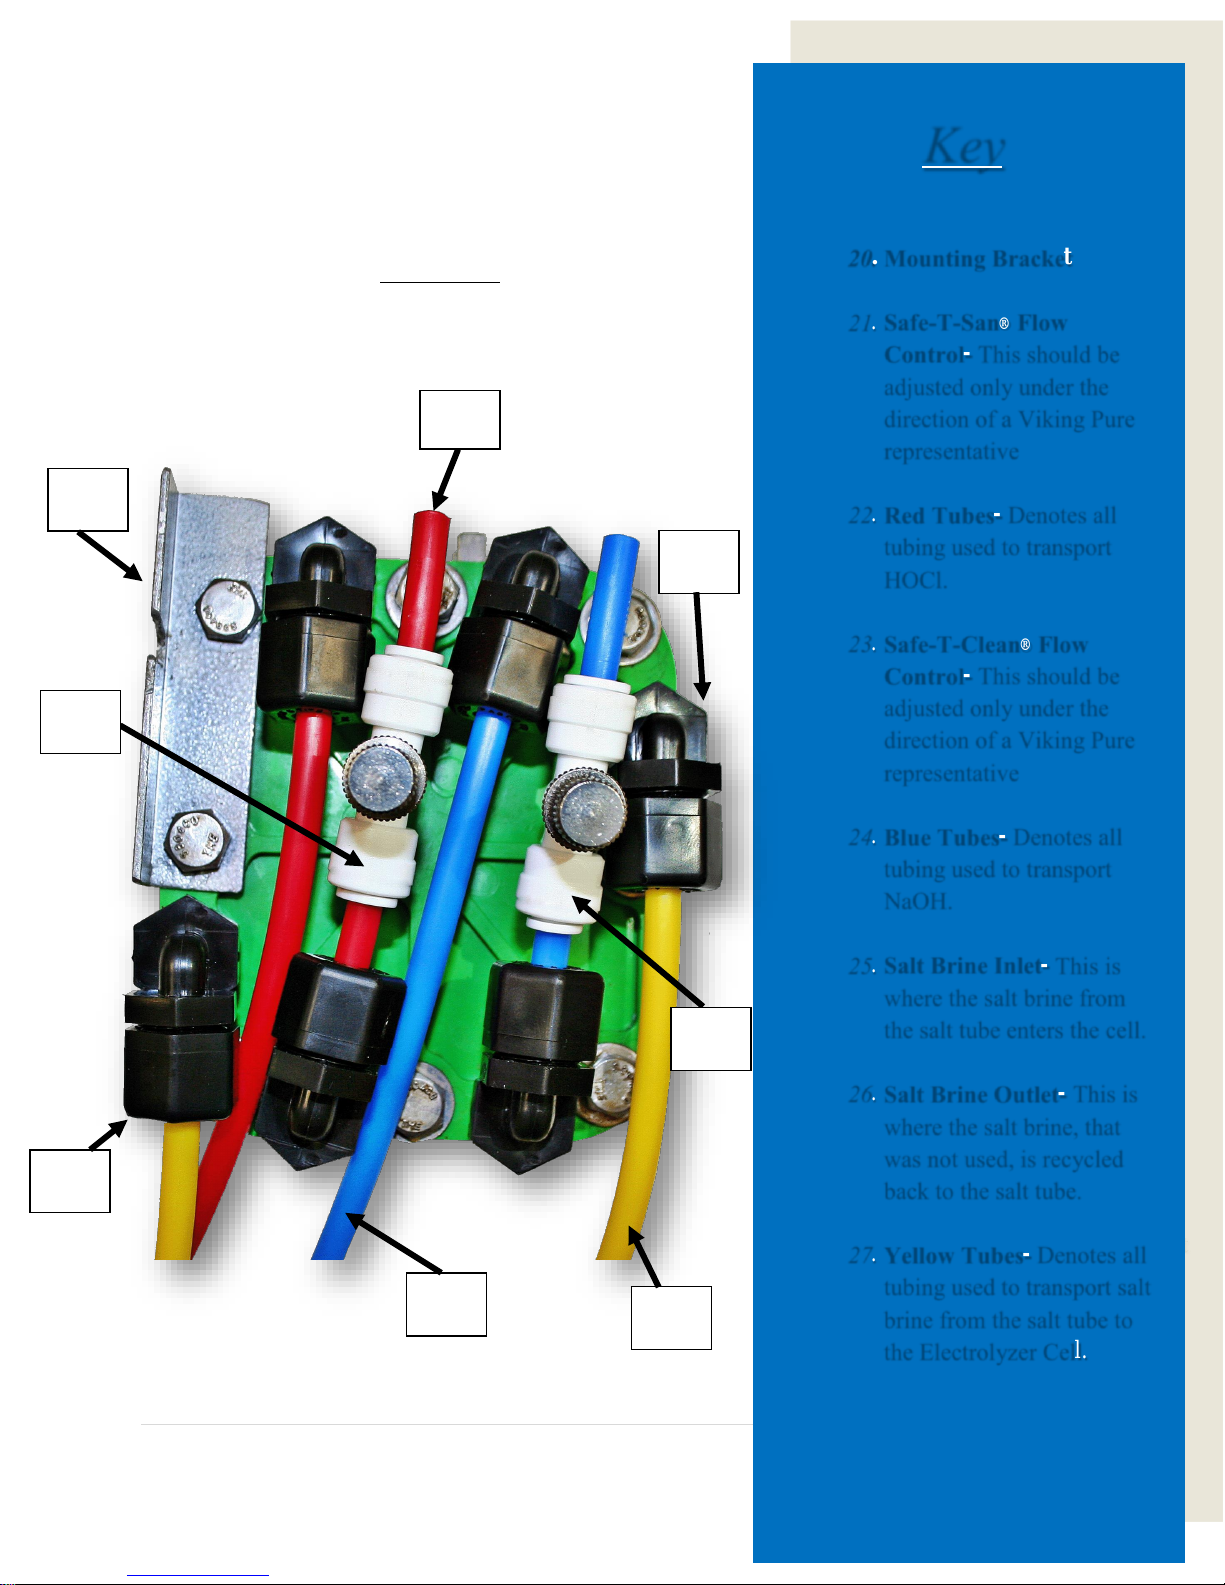
20. Mounting Bracket
21. Safe-T-San® Flow
Control- This should be
adjusted only under the
direction of a Viking Pure
representative
22. Red Tubes- Denotes all
tubing used to transport
HOCl.
23. Safe-T-Clean® Flow
Control- This should be
adjusted only under the
direction of a Viking Pure
representative
24. Blue Tubes- Denotes all
tubing used to transport
NaOH.
25. Salt Brine Inlet- This is
where the salt brine from
the salt tube enters the cell.
26. Salt Brine Outlet- This is
where the salt brine, that
was not used, is recycled
back to the salt tube.
27. Yellow Tubes- Denotes all
tubing used to transport salt
brine from the salt tube to
the Electrolyzer Cell.
Setting Up Your Control
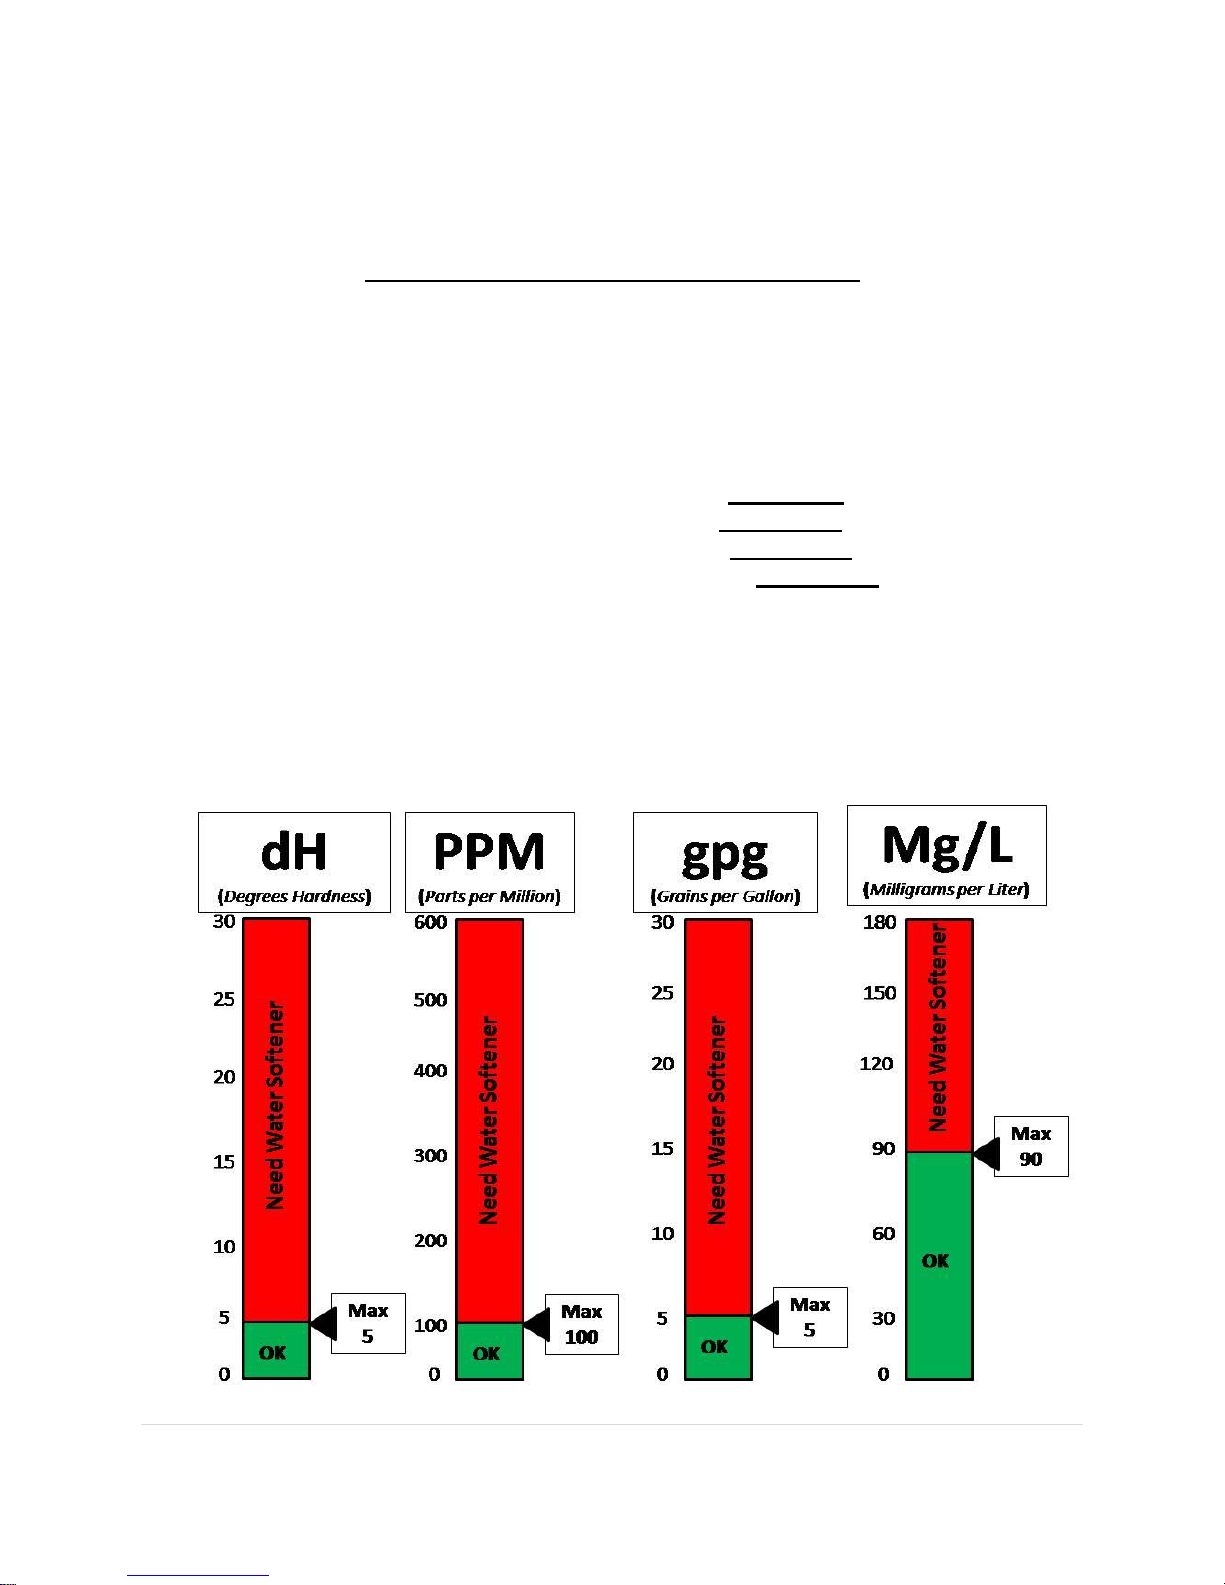
Pre-Installation Hard Water Test
1. Before installing your system you should do a quick Hard Water Test.
2. This test can be done by bringing a sample of your water (fresh out of the tap) to a local
water testing facility or you may purchase a water testing kit from Viking Pure.
3. The different levels you will be testing for are as follows:
a. Degrees Hardness: This test should result in NO MORE than 5 dH.
b. Parts per Million: This test should result in NO MORE than 100 PPM.
c. Grains per Gallon: This test should result in NO MORE than 5 gpg.
d. Milligrams per Liter: This test should result in NO MORE than 90 Mg/L
4. The test must be performed to determine if a water softener is needed to run the system
properly.
5. If a water softener is needed, shown by failed testing, one must be installed or warranty
will be void (See page 10 for all warranty information). This is due to the fact that hard
water will damage the membranes in the cell and drastically affect the lifespan of the
unit.
7 | P a g e
Viking Pure, LLC
511 Pullman Rd., Suite C5 Edgewater, Fl. 32132, USA
© Viking Pure, LLC 2015

Setting up your Control:
Water
Source
Water Softener
(Not Included)
Water
Filter
(Included)
Salt Tube Draining
(See Adding Salt
on page 11 for
more information)
Diagram
8 | P a g e
Viking Pure, LLC
511 Pullman Rd., Suite C5 Edgewater, Fl. 32132, USA
© Viking Pure, LLC 2015

Connecting your MiniMAXX
1. After removing the unit from the shipping container, inspect the unit for any marks
and/or damage that may have resulted from mishandling during freight. If the unit is
damaged report it to UPS or the shipping company involved.
2. Install unit in the best area, as determined by Pre-Install Site Evaluation Sheet (filled out
and sent to Viking Pure, Distributor or Sales Representative before purchase of unit).
Power connection is a standard wall outlet with ground, 3 prongs. FOR 115VAC AND
230VAC UNITS, USE PROPER OUTLET.
3. Water connection can be made with the fitting supplied or any other means that has a
shutoff valve. The connection should accommodate the ¼” plastic supply line supplied.
4. Mount the water filter using the bracket supplied. The filter comes with a fitting installed
on the Outlet end. Water supply should be connected to the inlet on filter.
5. Route the tubing from the water filter to the MiniMAXX in such a way as to protect the
tubing from damage and cut to size. Then install the tube into the Mini Pure lower right
side as indicated, FILTERED WATER INLET (Item #5 on Pg. 4 of Manual).
6. Turn water on and check for any leaks at the water supply or on the water filter, if leaks
occur: turn off water supply and check connection of all fittings to tubes and ensure they
are pressed in firmly as shipment may have loosened some connections.
7. Add salt to the unit (see pg. 13 for Adding Salt to Unit)
9 | P a g e
Viking Pure, LLC
511 Pullman Rd., Suite C5 Edgewater, Fl. 32132, USA
© Viking Pure, LLC 2015

8. Plug unit into a standard house hold type receptacle that is grounded to code (Item #9 on
Pg. 4 of Manual). FOR 115VAC AND 230VAC UNITS, USE PROPER OUTLET.
9. Turn system ON by activating power switch on upper left side of unit. (Item #1 on Pg. 4
of Manual).
10. Insert the One Gallon Containers (Provided) under their respective tubes, Red for
Safe-T-San® and Blue for Safe-T-Clean®, into the lower section
11. Activate Smart Button (Item #3 on Pg. 4 of Manual) to full and run 1 full run to allow the
air to purge out of all the lines then dispose of these solutions. (See page 11-12 in Manual
for Smart Button Instructions).
12. Replace the containers and reactivate the Smart Button (Item #3 on Pg. 4 of Manual),
watching the first cycle to insure the proper fill of the bottles. The bottles should fill to
the base of the handle.
13. If the fill is too high or too low please call Viking Pure, your distributor or your sales
representative and they will assist you on adjusting the fill volume.
14. If adjustment was necessary, please reactivate Smart Button for another full run to ensure
fill is now correct.
15. Place cap (provided) on the Safe-T-San® One Gallon Container to retain the strength of
the solution.
When required amount of product is obtained, turn the power off and it will be ready for the next
cycle when required just turn the power on and start Sailing with us Toward a Greener and Safer
Tomorrow.
10 | P a g e
Viking Pure, LLC
511 Pullman Rd., Suite C5 Edgewater, Fl. 32132, USA
© Viking Pure, LLC 2015

Smart Button Instructions
1. When unit is first powered up (activated by Item # 1 on Pg. 4 of
Manual), screen on Smart Button will display the Startup Screen
featuring the Viking Pure logo for a few seconds.
2. The next screen, Dashboard Screen, will show the Model Number,
Program Version Number and the Set Run Time.
3. Unit run time will be preset to fill the 5 Gallon Tanks (included). If you require more or
less fill solution output, for containers of varying sizes, you will need to adjust the run
time.
4. To adjust the time, hold the Smart Button for approx. 3 seconds
until the screen switches to a 10 Minute Adjustment Screen. Once
the 10 Minute Adjustment Screen appears, tap the screen to change
the time in 10 Minute increments. If adjustment is not made quickly
enough, screen will change to 1 Minute Adjustment Screen. (Image
to right shows the 10 minutes being set at 30 minutes).
5. Once you are done with the 1 Minute Adjustment Screen, do not
press Smart Button for a few seconds and screen will switch to the
Second Adjustment Screen. This screen will operate in the same
manner as the 10 Minute Adjustment Screen with the only difference
that you will be adjusting the time in 1 Minute increments. If
adjustment is not made quickly enough, screen will revert back to
the Dashboard Screen. (Image to right shows the 1 Minutes being set at 5 minutes).
11 | P a g e
Viking Pure, LLC
511 Pullman Rd., Suite C5 Edgewater, Fl. 32132, USA
© Viking Pure, LLC 2015

6. When you are ready to begin producing solution, press and release
Smart Button from the Dashboard Screen. Doing this will then
bring you to the Ready Screen. This screen will display the total
hours the unit has been in operation. This number will be used
when determining Warranty (See page 14 of Manual for more
Warranty information). (Image to the right shows that this unit has
been in operation, ie. Only making solution, for 48 minutes)
7. To start normal operation and begin producing solutions, press the
Smart Button one more time, from Ready Screen, and unit will start
production for the set time. As system is in production, you will see
an indication that the system is on (SYS ON) and a countdown
timer displayed. This will show you how much time is left on your
cycle. Once countdown reaches zero, your unit will stop production and will revert back
to the Dashboard Screen. If you need to stop production in the middle of the cycle, you
can press the Smart Button once and release.
Please Note: Stopping production during a cycle does not PAUSE the production. It
reverts the screen back to the Dashboard Screen and when you start production again,
you will be starting from the full production time. To prevent spillage, empty containter
before unit is turned back on (if tank drain is not being used).
12 | P a g e
Viking Pure, LLC
511 Pullman Rd., Suite C5 Edgewater, Fl. 32132, USA
© Viking Pure, LLC 2015

Adding Salt
1. Loosen salt tube cap (Item #2 on Pg. 4 of Manual).
2. Open salt tube drain valve (Item #6 on Pg.4 of Manual) at base of control and
allow liquid to drain into a container (Do not dispose of this liquid, it is used in
later steps).
3. When liquid stops draining close manual valve (Liquid will stop draining on its
own at the correct level).
4. Fully remove salt tube cap (Item #2 on Pg. 4 of manual)
5. Begin filling salt tube with salt, stopping when approximately ¼” of space is
still visible through clear salt tube.
6. Fill with the liquid drained (From step 2) to ½" from the top of the tube.
7. Ensure the outer surface of the tube is free from salt.
8. Replace the salt tube cap, but only until you feel it starts to get tight then stop.
13 | P a g e
Viking Pure, LLC
511 Pullman Rd., Suite C5 Edgewater, Fl. 32132, USA
© Viking Pure, LLC 2015

Solution/Label Information
Safe-T-San®-
Product Name: Safe-T-San®
Product Purpose: Sanitizing/Disninfecting
Active Ingredient: Hypochlorous Acid (HOCl)
HOCl EPA CAS# 7790-92-33
Product Labels:
Safe-T-Clean®-
Product Name: Safe-T-Clean®
Product Purpose: Cleaning/Degreasing
Active Ingredient: Sodium Hydroxide (NaOH)
HOCl EPA CAS# 1310-73-2
Product Labels:
14 | P a g e
Viking Pure, LLC
511 Pullman Rd., Suite C5 Edgewater, Fl. 32132, USA
© Viking Pure, LLC 2015

Warranty
Product
Warranty Limit
MiniMAXX
1 Year or 1000 Hours (Whichever occurs first)
Warranty
Viking Industries, Incorporated (Viking Pure) warrants that products manufactured by it shall be free of defects in
material and workmanship when operated in accordance with Viking’s operating and maintenance procedures for
the following period from the date of shipment:
Viking’s liability is limited to the repair or replacement, at Viking’s option, of any product, which proves to be
defective during the warranty period outlined. The product must be returned, prepaid by purchaser, to Viking after
obtaining a Return Authorization Number from Viking. Viking shall have the right of final determination as to the
existence and cause of any defects.
This warranty shall not cover unauthorized repairs, alterations, modifications, or use by the purchaser of product for
which it is not intended without prior written consent from Viking.
This warranty shall not cover abuse, neglect, improper operating or maintenance procedures, voluntary or
involuntary damages of the product by the purchaser.
Unit shall not be run, continuously, for more than 1 hour (6 runs) or unit may become damaged and/or
injury may occur.
Unit shall not be run more than 3 hours (18 runs) in a 24 hour period or unit may become damaged and/or
injury may occur.
Viking’s liability under this warranty shall in no event exceed the purchase order price and shall not cover any losses
caused by delays or for any expenses for labor, supplies, machine rental or loss or damages to other property.
No warranty is made with respect to customer equipment or products manufactured to purchaser’s specifications
except as specifically stated in writing by Viking.
Warranty will be void if salt other than that supplied by Viking Pure is used.
Warranty will be void if : a) Hard Water Test is not performed b)Hard Water Test is performed, failed to meet
Viking’s set limits (as defined on page 6) and no water softener is installed.
Viking’s responsibility for transportation under this warranty is limited to charges for delivery of repaired products
via the least expensive transportation available, to the purchaser in the Continental United States only. Payment for
shipment of Viking parts or products to Viking’s facilities is the responsibility of the purchaser.
Warranty for items that are repaired or replaced by Viking shall continue in effect for the remainder of the original
warranty period or for ninety (90) days following the date of shipment by Viking, whichever period is longer.
This warranty supersedes any other warranty, expressed or implied, and constitutes all of Viking Pure’s liability
with respect to its products.
15 | P a g e
Viking Pure, LLC
511 Pullman Rd., Suite C5 Edgewater, Fl. 32132, USA
© Viking Pure, LLC 2015

Trouble Shooting Guide
1. My unit won’t turn on…
Check to make sure power cord (supplied) is plugged into unit and also into wall outlet then turn switch on
(See #1 on Page 4).
If both ends of power cord are plugged in and flipping switch does nothing, you should check your power
outlet. If you are comfortable with electricity and have an Electrical Meter available, check to make sure
your power outlet is working properly by checking it for correct Voltage (115/230VAC). If you are not
comfortable with or knowledgeable of working with electricity, contact your electrician to complete this
step.
If you are unable to start up your Mini Pure after trying the two steps above, contact your Distributor,
Representative or Viking Pure. Quick Contact Info: ( ) _______-___________
2. Unit runs for a few seconds and then shuts off…
Check to ensure that your source water is turned on. If water does not flow to unit, unit will shut off to
protect itself.
Ensure there is salt in salt tube (See page 11 for proper salt filling procedure).
Make sure you have water, or enough water, in the salt tube (See page 11 for proper salt filling procedure).
Ensure there is not TOO MUCH salt in salt tube. If you have overfilled salt tube, you will not allow enough
water to convert to brine and flow through cell. (See page 11 for proper salt filling procedure).
If you are unable to start up your Mini Pure after trying the two steps above, contact your Distributor,
Representative or Viking Pure. Quick Contact Info: ( ) _______-___________
16 | P a g e
Viking Pure, LLC
511 Pullman Rd., Suite C5 Edgewater, Fl. 32132, USA
© Viking Pure, LLC 2015

MiniMAXX User Reference Guide:
Model Number :____________________
Serial Number :_____________________
Installation Date :___________________
User Notes:
__________________________________________________________________________________________
__________________________________________________________________________________________
__________________________________________________________________________________________
__________________________________________________________________________________________
__________________________________________________________________________________________
__________________________________________________________________________________________
__________________________________________________________________________________________
__________________________________________________________________________________________
__________________________________________________________________________________________
__________________________________________________________________________________________
__________________________________________________________________________________________
__________________________________________________________________________________________
__________________________________________________________________________________________
__________________________________________________________________________________________
__________________________________________________________________________________________
__________________________________________________________________________________________
17 | P a g e
Viking Pure, LLC
511 Pullman Rd., Suite C5 Edgewater, Fl. 32132, USA
© Viking Pure, LLC 2015

Other Products by Viking Pure
Recommended Accessories:
Mini Pure Convenience Kit (VPM-CK)
Extended Warranty (1,2 or 3 Years Available)
Recommended Accessories:
Viking Pure 1000 Convenience Kit (VP-CK)
Manual Dispense Kit (VPMD100)
SanStorm PSV Sprayers, 10 Pack (PSV-HA-CASE)
MistaClean PSV Sprayers, 10 Pack (PSV-SH-CASE)
Extended Warranty (1,2 or 3 Years Available)
Recommended Accessories:
Viking Pure 1000 Convenience Kit (VP-CK)
Manual Dispense Kit (VPMD100)
SanStorm PSV Sprayers, 10 Pack (PSV-HA-CASE)
MistaClean PSV Sprayers, 10 Pack (PSV-SH-CASE)
Extended Warranty (1,2 or 3 Years Available)
Viking Pure: Mini Pure
Part No: VPM-SB
Output: 1 Gallon/10 Minutes/Solution
Features: 2 X 1 Gallon Jugs
Viking Pure 1000 w/ Twin 25 Gallon Tanks
Part No: VPT2501
Output: 30-50 Gallons/Hour/Solution
Features: 2 X 25 Gallon Storage Tanks, Ultrasonic Sensors, Pumps, Touch Screen UI
Viking Pure 1000 w/ Twin 50 Gallon Tanks
Part No: VPT5001
Output: 30-50 Gallons/Hour/Solution
Features: 2 X 50 Gallon Storage Tanks, Ultrasonic Sensors, Pumps, Touch Screen UI
18 | P a g e
Viking Pure, LLC
511 Pullman Rd., Suite C5 Edgewater, Fl. 32132, USA
© Viking Pure, LLC 2015

Viking Pure, LLC
511 Pullman Rd.
Suite C5
Edgewater, FL 32132 USA
Phone: (386)428-9800
Fax: (386)409-0360
Email: Info@vikingpure.com
Website: www.vikingpure.com
19 | P a g e
Viking Pure, LLC
511 Pullman Rd., Suite C5 Edgewater, Fl. 32132, USA
© Viking Pure, LLC 2015
 Loading...