

Viking Components 33.6K, 56K User Manual

VIKING COMPONENTS
33.6K/56K
PC CARD MODEM
USER’S GUIDE
Manual No. 1005236
Release 04/99, Rev B
SPEED • POWER • PERFORMANCE
®

VIKING COMPONENTS 33.6K/56K PC CARD USER’S GUIDE
Table of Contents
1 Introduction
33.6K PC Card Features & Specifications 1
56K PC Card Features & Specifications 2
2 Before You Install
System Requirements 3
Card and Socket Services Software 4
Phone Requirements 4
Communications Software requirements 4
3 Installation
Hardware Installation 5-6
Software Installation 7
Mac OS 7.5.3 or Later 7-13
Newton OS 14
Windows 3.x 15
Windows 95 16-17
Windows 98 18-20
Windows CE 21
Windows NT 4.0 22-23
Cellular Driver Installation 24-26
Using Data & Fax Communication Software 27
Changing the Modem Initialization String 27
4 Technical Notes
Mac OS 7.5.3 or Later Extension folder 28
Windows 3.x COM Ports and IRQ Settings 28-30
Windows 95 & 98 COM Ports and IRQ Settings 30
5 Troubleshooting
General 31-33
Mac OS 7.5.3 or Later 34
Windows 3.x 35
I

VIKING COMPONENTS 33.6K/56K PC CARD USER’S GUIDE
Table of Contents (Continued)
6 Basic AT Commands
Guidelines 36
AT Commands 36-45
7 Modem Driver & Firmware Upgrades 46
8 Contacting Technical Support 47
9 Communication Regulations 48-49
10 Warranty & Disclaimer Information 50
II

VIKING COMPONENTS 33.6K/56K PC CARD USER’S GUIDE
1 Introduction
Congratulations on purchasing your Viking Components 33.6K/56K PC Card
fax/modem for your computer. To turn your notebook computer into a communications center, all you need is your Viking fax/modem and a standard analog
phone line.
Viking Components 33.6K PC Card Features &
Specifications:
•
33.6 kbps Raw Data Transfer
•
14.4 kbps Fax Send & Receive
•
Data Throughput to 115.2 kbps
•
Data Compression:V.42 bis and MNP 5
•
Error Correction: V.42 (LAPM and MNP 2-4)
•
Communication Standards:
Data Modem Protocols:V.34, V.FC, V.32 bis, V.32,V.23, V.22 bis,V.22, V.21,
Bell 212A, Bell 103
Fax Modem Protocols: V.17, V.29,V.27 ter,V.21 ch 2, V.33
•
Lower Power Operation: 144mA Operating, 13mA Standby
•
Auto Answer;Tone and Pulse Dial
•
True Plug and Play
Chapter 1
1

VIKING COMPONENTS 33.6K/56K PC CARD USER’S GUIDE
Viking Components 56K PC Card Features &
Specifications:
•
56 kbps Raw Data Reception
•
33.6 kbps Data Transmission
•
14.4 kbps Group III Fax Send & Receive
•
Data Throughput to 230.4 kbps
•
Data Compression:V.42 bis and MNP 5
•
Error Correction: V.42 (LAPM and MNP 2-4)
•
Cellular Ready: MNP10EC Cellular Support (Cable Kit Required)
•
Communication Standards:
Data Modem Protocols:V.90, K56 Flex,V.34, V.FC,
V.32 bis,V.32, V.23, V.22 bis, V.22, V.21,Bell 212A, Bell 103
Fax Modem Protocols: V.17, V.29,V.27 ter,V.21 ch 2, V.33
•
Flash Upgradable Modem Controller and Data Pump Firmware
•
Auto Answer;Tone and Pulse Dial
•
True Plug and Play
Chapter 1
2

VIKING COMPONENTS 33.6K/56K PC CARD USER’S GUIDE
2 Before You Install
Locate the PCMCIA (PC Card) Type II slot on your system. If you are not familiar
with its location, please refer to your computer’s “Owner’s Guide.” Also it is recom-
mended to read any additional information in your system’s “Owner’s Guide”
regarding the PCMCIA (PC Card) slots.
System Requirements
Computer:
•
Any computer with a PCMCIA 2.1 compliant Type II card slot
PCMCIA Type II Card Slots:
•
Card and socket services software (For DOS or Windows3.xx)
Compatible Operating Systems:
•
DOS, Mac OS 7.5.3 or later, Newton OS, Windows 3.x, Windows 95,
Windows 98, Windows CE, Windows NT 4.0
Computer Memory:
•
4MB of free Ram
Hard Disk Space:
•
2MB or more
Phone Line:
•
Standard residential (analog) RJ-11
Chapter 2
3

VIKING COMPONENTS 33.6K/56K PC CARD USER’S GUIDE
Card and Socket Services Software
The “Card and Socket Services” must be installed in your system before installing a
PC Card modem with Windows 3.x or Windows NT 4.0. Windows 95 or 98 does not
require “Card and Socket Services.” If “Card Services” or similar verbiage is not
found on your machine, please contact the computer’s manufacturer and they
will supply it.
Phone Line Requirements
The phone line required by the Viking Components fax/modem is an analog RJ-
11. This is a standard residential phone line.
Warning: Do not use a PBX or digital phone line. These phone lines may
damage the Viking Components PC Card fax/modem or phone equipment.
PBX or digital lines are used by many businesses for their phone systems. To
determine if the line you wish to use is analog,look on the jack or the phone. If it
says “analog,”“computer,”“data” or “modem,” it is an analog line. If you are in an
office and the phone is not labeled, check with the phone system administrator.
If you are in a hotel, call the hotel operator for more information.
Communications Software requirements
Please refer to the communication software “User Guide” for additional system
requirements for installing the communication software.
Chapter 2
4

VIKING COMPONENTS 33.6K/56K PC CARD USER’S GUIDE
3 Installation
This chapter contains instructions on installing your Viking PC Card fax/modem.
Hardware Installation
The hardware installation is the same for all operating systems unless otherwise
noticed.
Note: When installing a fax/modem into a Mac OS system, make sure that extensions are on.
Apple PowerBook 520 & 540 Note: Prior to installing the Viking Components PC
Card Fax/Modem, you must purchase and install an Apple PowerBook PC Card
Drive Adapter - Apple Part Number M2995LL/B. This adapter is available from
Apple and contains the necessary software enabling access to the PCMCIA card
slot. Follow the instructions provided with the package from Apple and then proceed with the following steps.
Apple Newton Note: The Apple Newton requires a different installation procedure. Please proceed to page 6, on “Hardware Installation for the Apple Newton.”
1. With your computer on, insert the
Viking fax/modem card into the
desired (PCMCIA) PC Card slot
(either the upper or lower). Insert
the corresponding end of the supplied cable into the your wall phone
jack and the other end of the cable
into the Viking modem. Be sure that
the word “TOP” on the connector
that inserts into the modem is facing up.
Chapter 3
5
VIKING COMPONENTS 33.6K/56K PC CARD USER’S GUIDE
Hardware Installation for the Apple Newton
MessagePad 120, 130 & 2000 Series
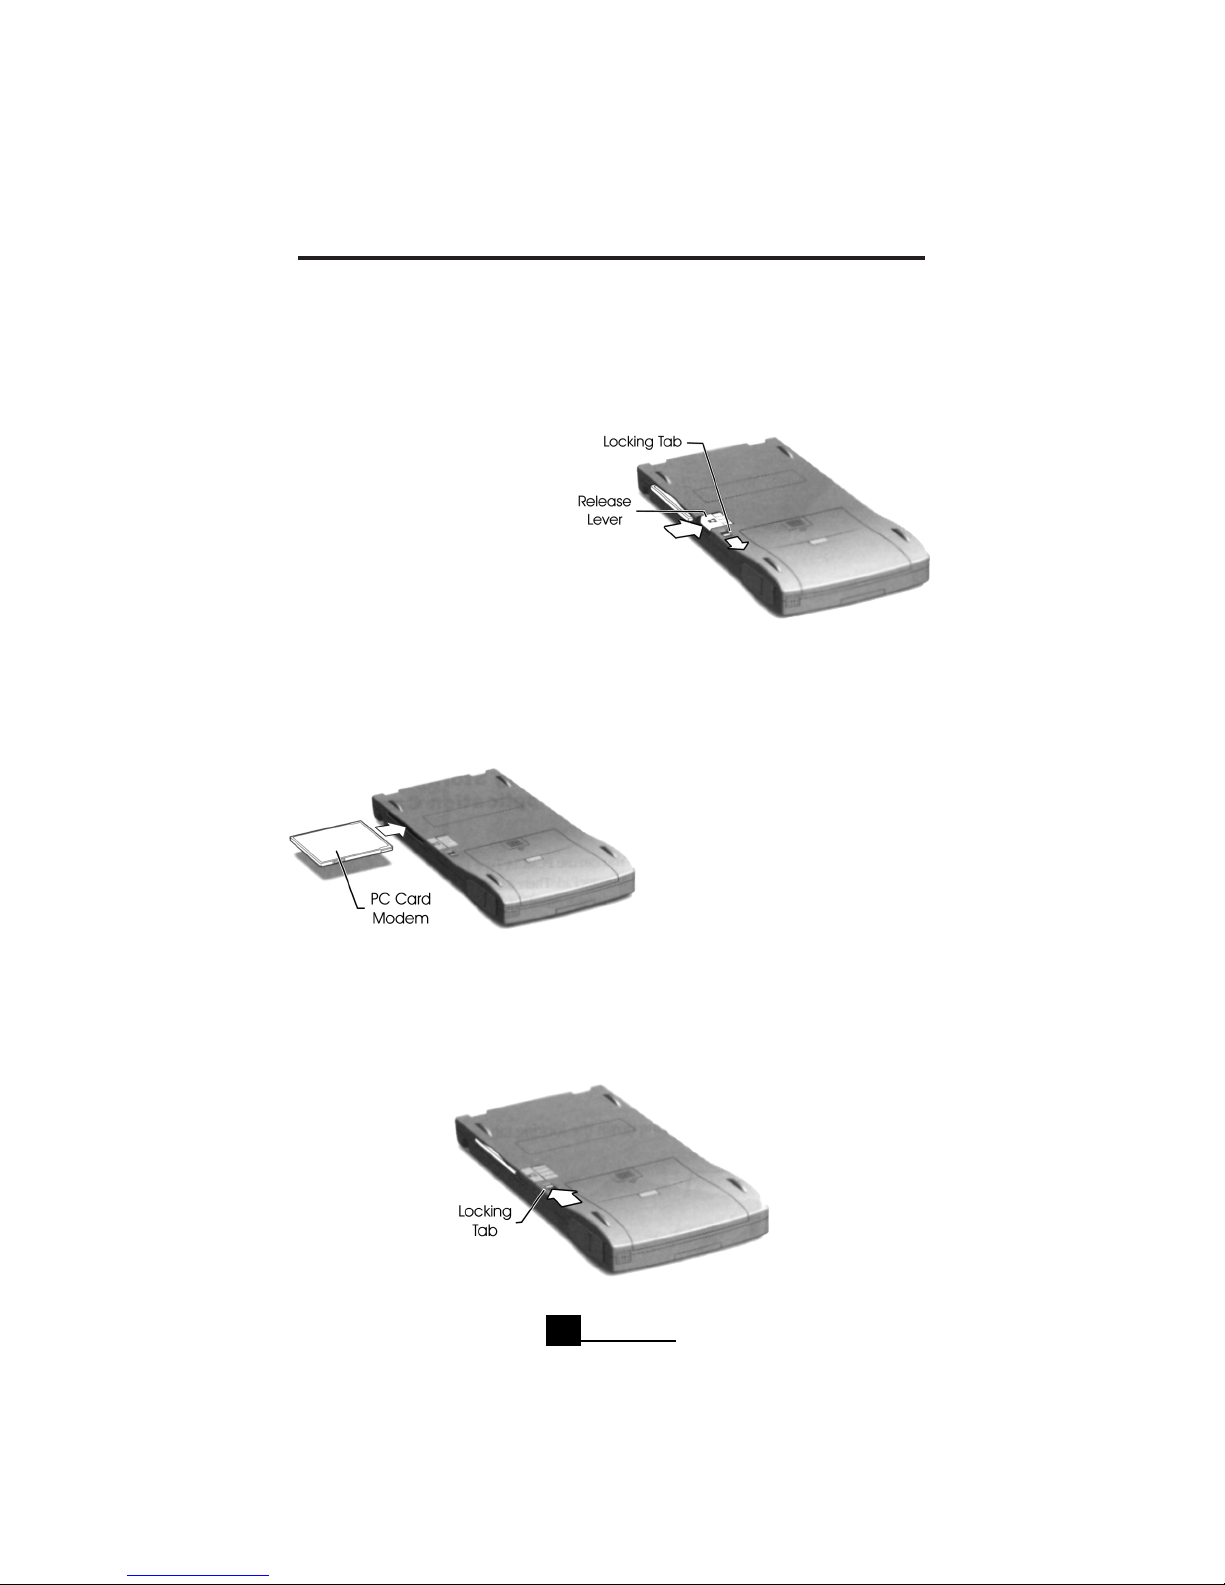
1. Before you can install a card into
your Newton MessagePad, you
must first remove the plastic card
that came in the PC Card slot.
2. Unlock the card slot by pushing
down the locking tab.
3. Release the plastic card by pushing the release lever, which pushes the card out
of the slot. Remove the card.
4. Insert the modem card in the card slot. The modem will only fit one way. Do
not force it. Insert the corresponding end of the supplied cable into the your wall
phone jack and the other end of the
cable into the Viking modem. Be
sure that the word “TOP” on the connector that inserts into the modem
is facing up.
5. Push the modem card all the way in to make sure it is connected properly, then
lock the card in the slot by pushing up the locking tab.
Note: The modem will not operate unless it has been locked into the card
slot.
Chapter 3
6

VIKING COMPONENTS 33.6K/56K PC CARD USER’S GUIDE
Software Installation
Once the Viking fax/modem is installed, you will need to install the software necessary to communicate with the fax/modem. This section will cover the steps
necessary to configure each of the operating systems. It includes instructions for
the following operating systems:
•
Mac OS 7.5.3 or later
•
Newton OS
•
Windows 3.x
•
Windows 95
•
Windows 98
•
Windows CE
•
Windows NT 4.0
Mac OS 7.5.3 or later Software (33.6K Only)
1. Remove the diskette from the MacComCenter software package and insert it
into your system. When the MacComCenter window appears on the desktop simply double click on the “Installer” icon.
2.You will be prompted to choose a modem
port and modem type prior to the software
installation.
3.You will now have the option to select the
correct port (upper or lower slot) where
your fax/modem card is located. Select
Class 2 for the modem type.
4. Click the “Install” button and the software will then finish the remainder of the
installation. Once you are prompted, restart your system.
Please procced to page 12,for information on Remote Access/Mac PPP Setup and
Free PPP Setup.
Chapter 3
7
VIKING COMPONENTS 33.6K/56K PC CARD USER’S GUIDE
Mac OS 7.5.3 or later Driver Software (56K Only)
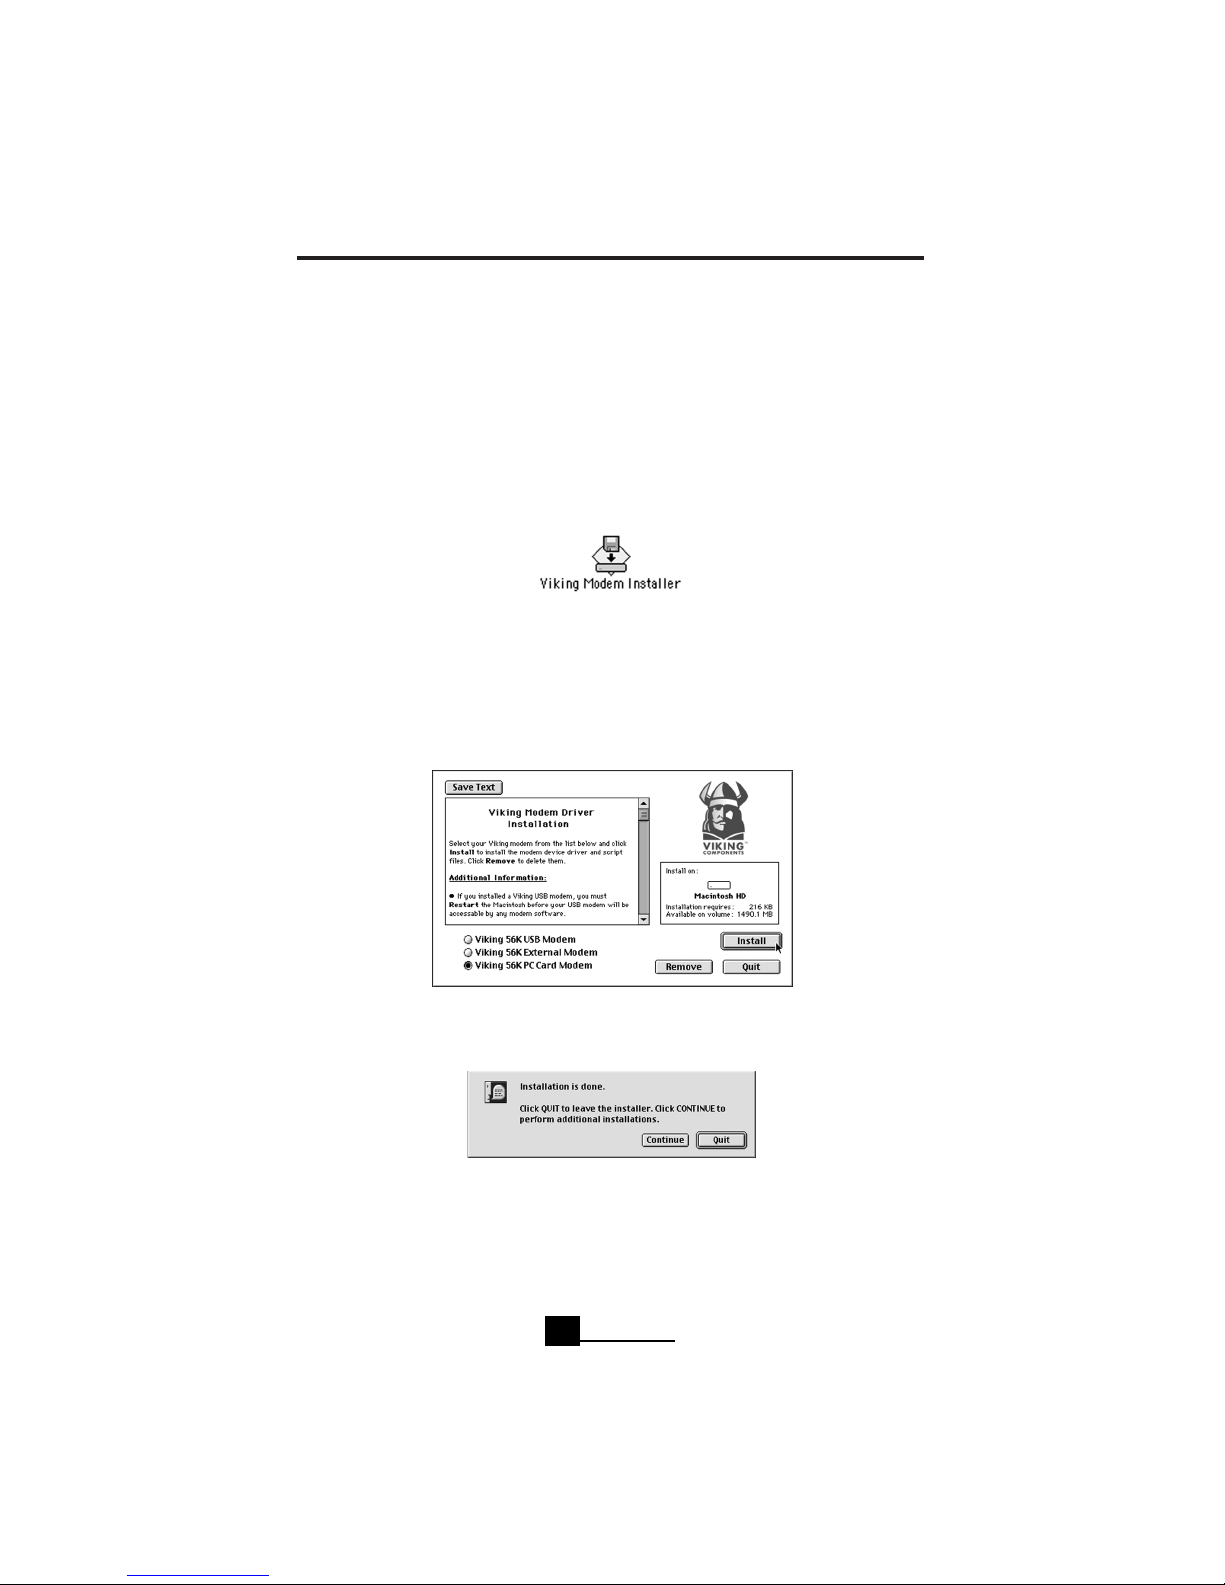
1. Insert the “Viking Modem Companion Software” CD into your computer’s CDROM drive. Once the CD appears on your system’s desktop, double-click on its
icon to open. Locate the “Viking Modem Installer”icon on the CD and double-click
on it to launch.
Note: If the CD can not be located,the drivers can be downloaded from the Viking
Components Web site at: www.vikingcomponents.com
3. Select “Viking 56K PC Card Modem” by clicking on its button. Then click the
“Install” button to begin the driver installation.
4. Once the driver installation is done, click the “Quit” button to leave the installer.
Chapter 3
8
VIKING COMPONENTS 56K USB MODEM USER’S GUIDE
Mac OS 8.5 or Later Driver Software (Continued)
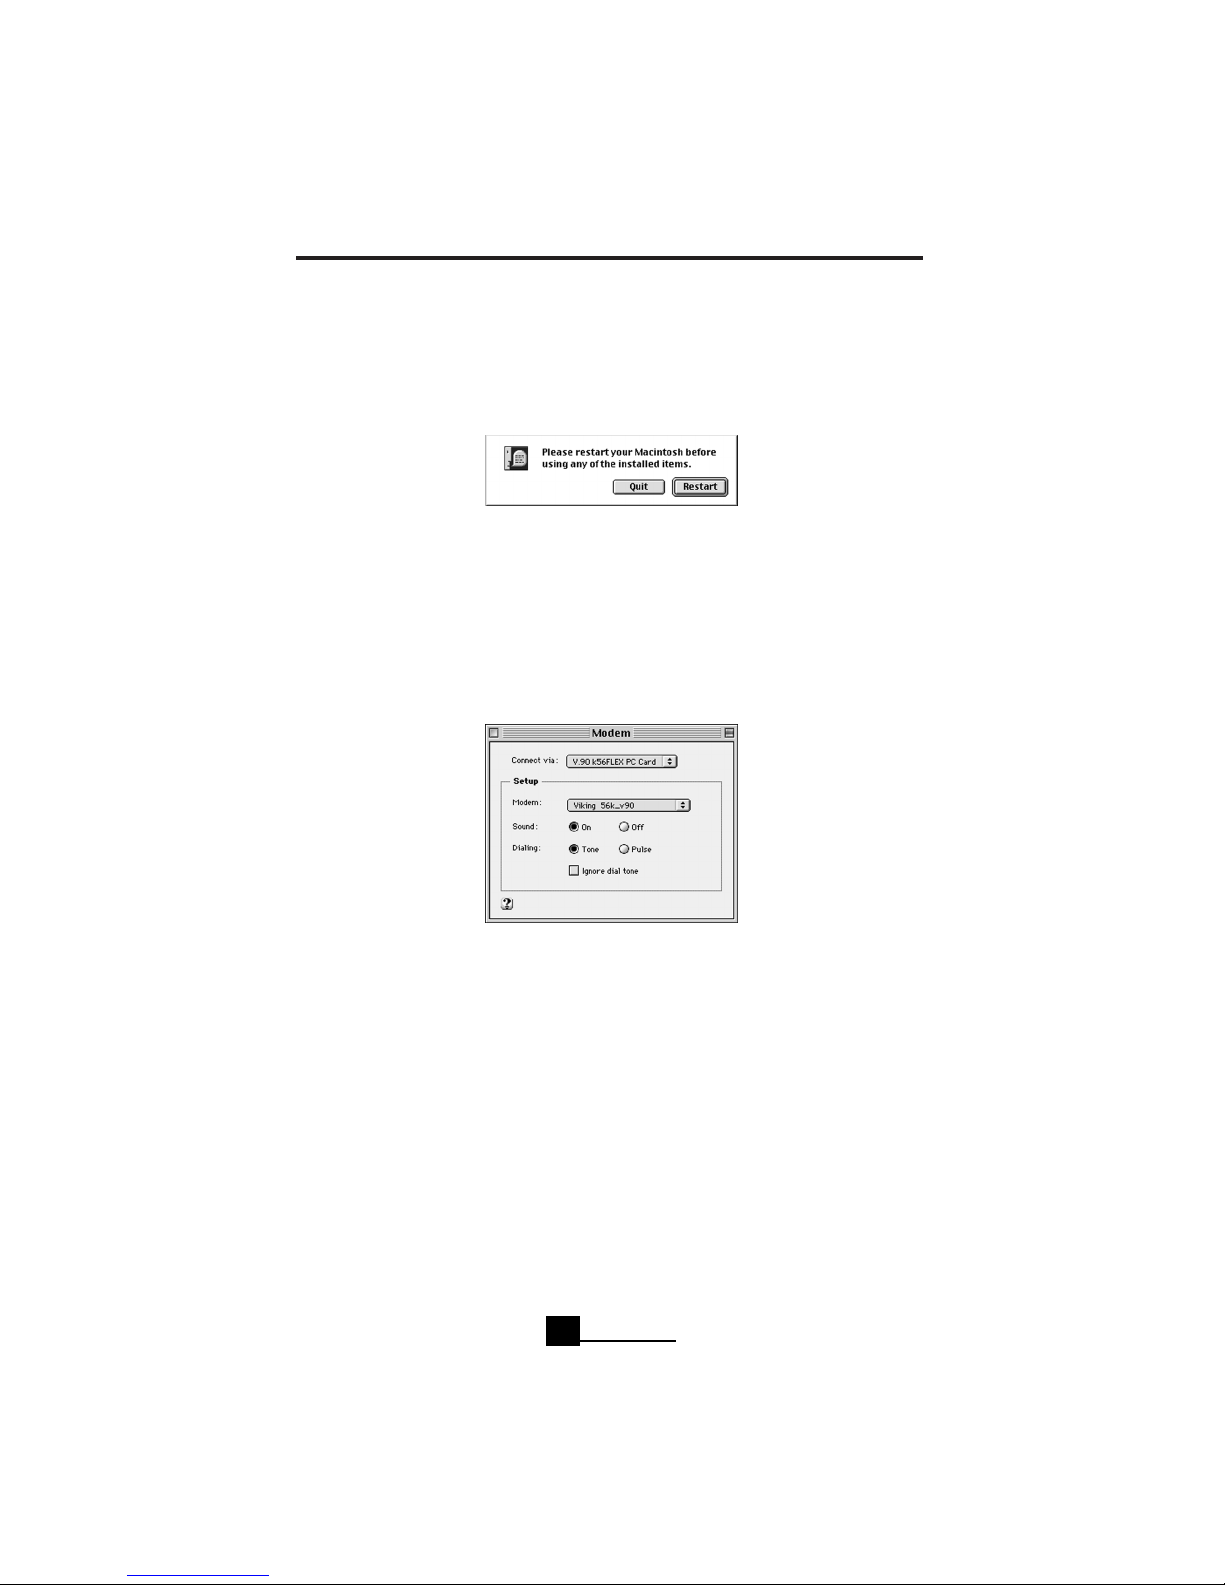
5. Click the “Restart”button to restart your system.
6. From the Apple (
) menu, select “Control Panel” and then choose “Modem.”
Next to “Connect via:” the “USB Rockwell Modem” should be listed. Locate the
“Modem:” pop-up menu in the “Setup” section. If your Internet Service Provider
(ISP) supports 56KFlex and V.90, select “Viking 56k_v90.” For ISP’s that only support
56KFlex, select “Viking force 56kflex.” Then close the “Modem” control panel and
click the “Save” button.
Note: If you experience problems connecting to your Internet Service Provider
(ISP) with the supplied modem script, try contacting your ISP for further instructions or go to the Viking Components Web site for updated modem scripts.
Your driver installation is now complete.
Chapter 3
9
VIKING COMPONENTS 56K USB MODEM USER’S GUIDE
MacComCenter Communication Software
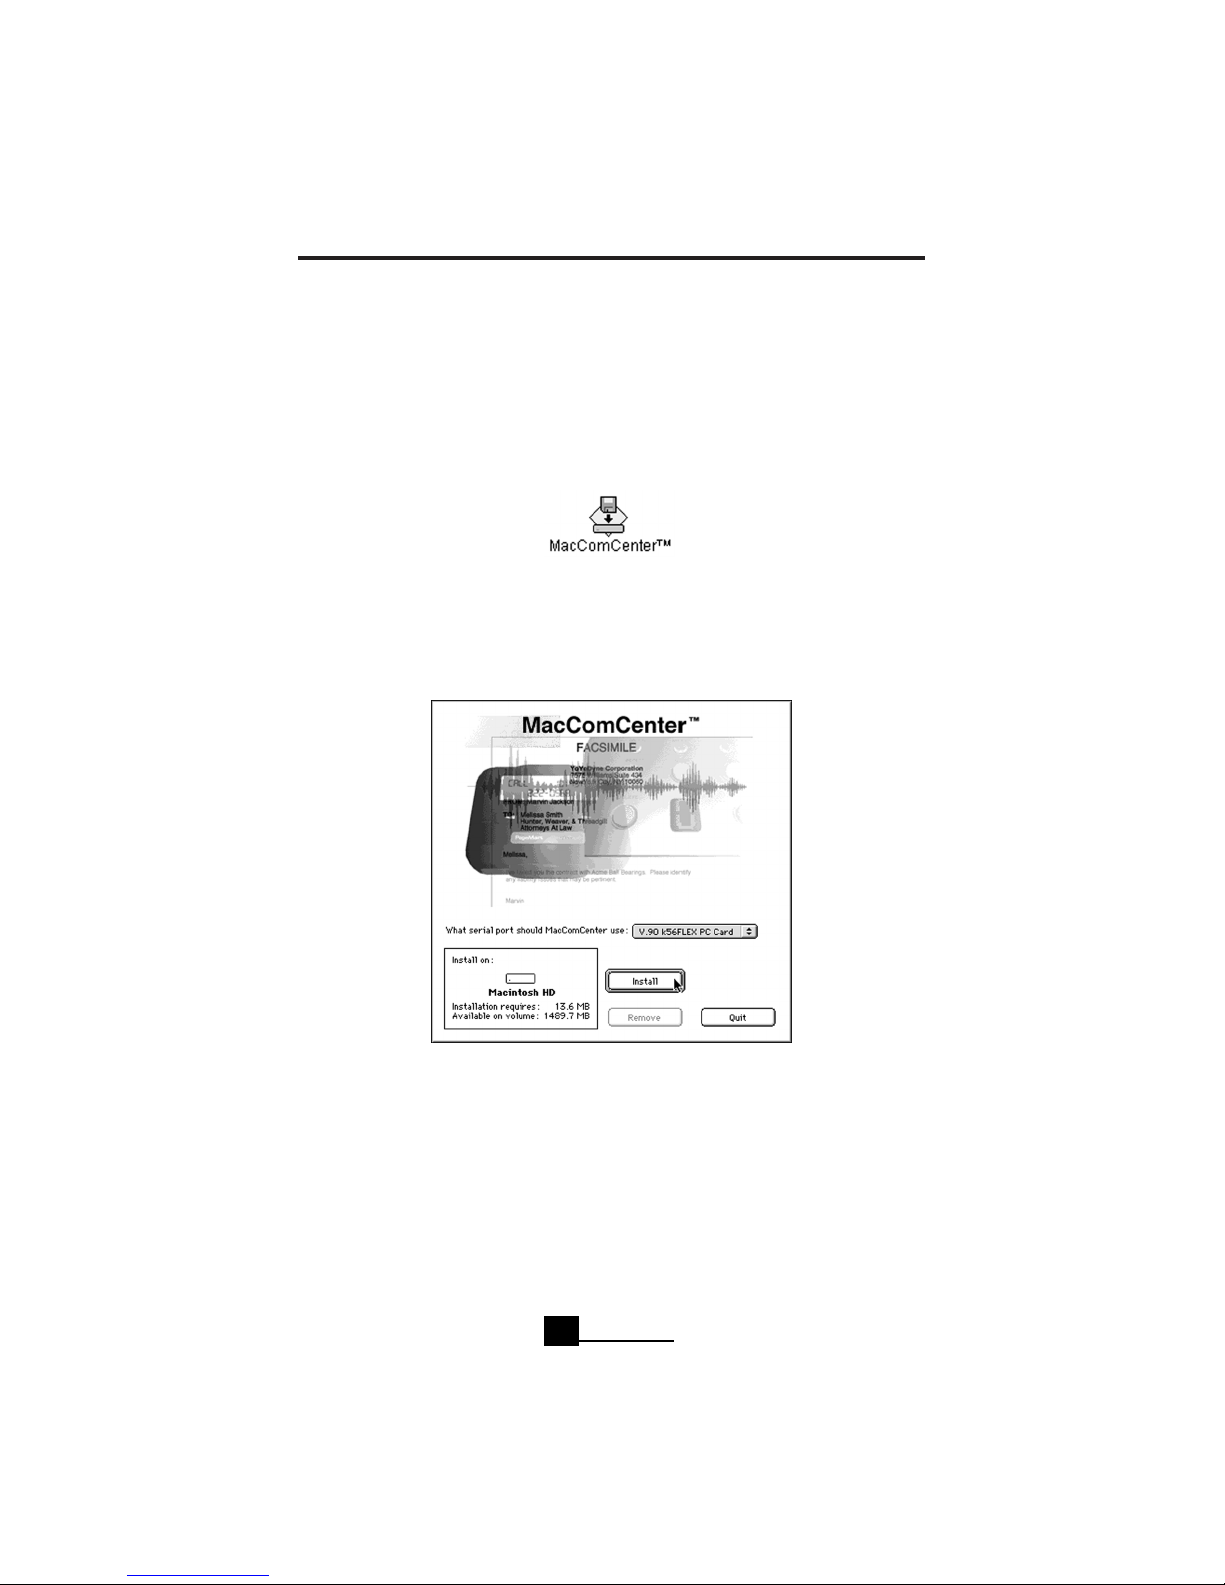
1. Insert the “Viking Modem Companion Software” CD in your computer’s CD-ROM
drive. Once the CD appears on your system’s desktop, double-click on its icon to
open. Locate the “MacComCenter”icon on the CD and double-click on it to launch.
2. In the “MacComCenter” window, the “V.90 k56FLEX PC CARD” should be selected
in the “What serial port should MacComCenter use:” pop-up menu. Click the “Install”
button to begin the communication software installation.
Chapter 3
10
VIKING COMPONENTS 56K USB MODEM USER’S GUIDE
MacComCenter Communication Software (Continued)
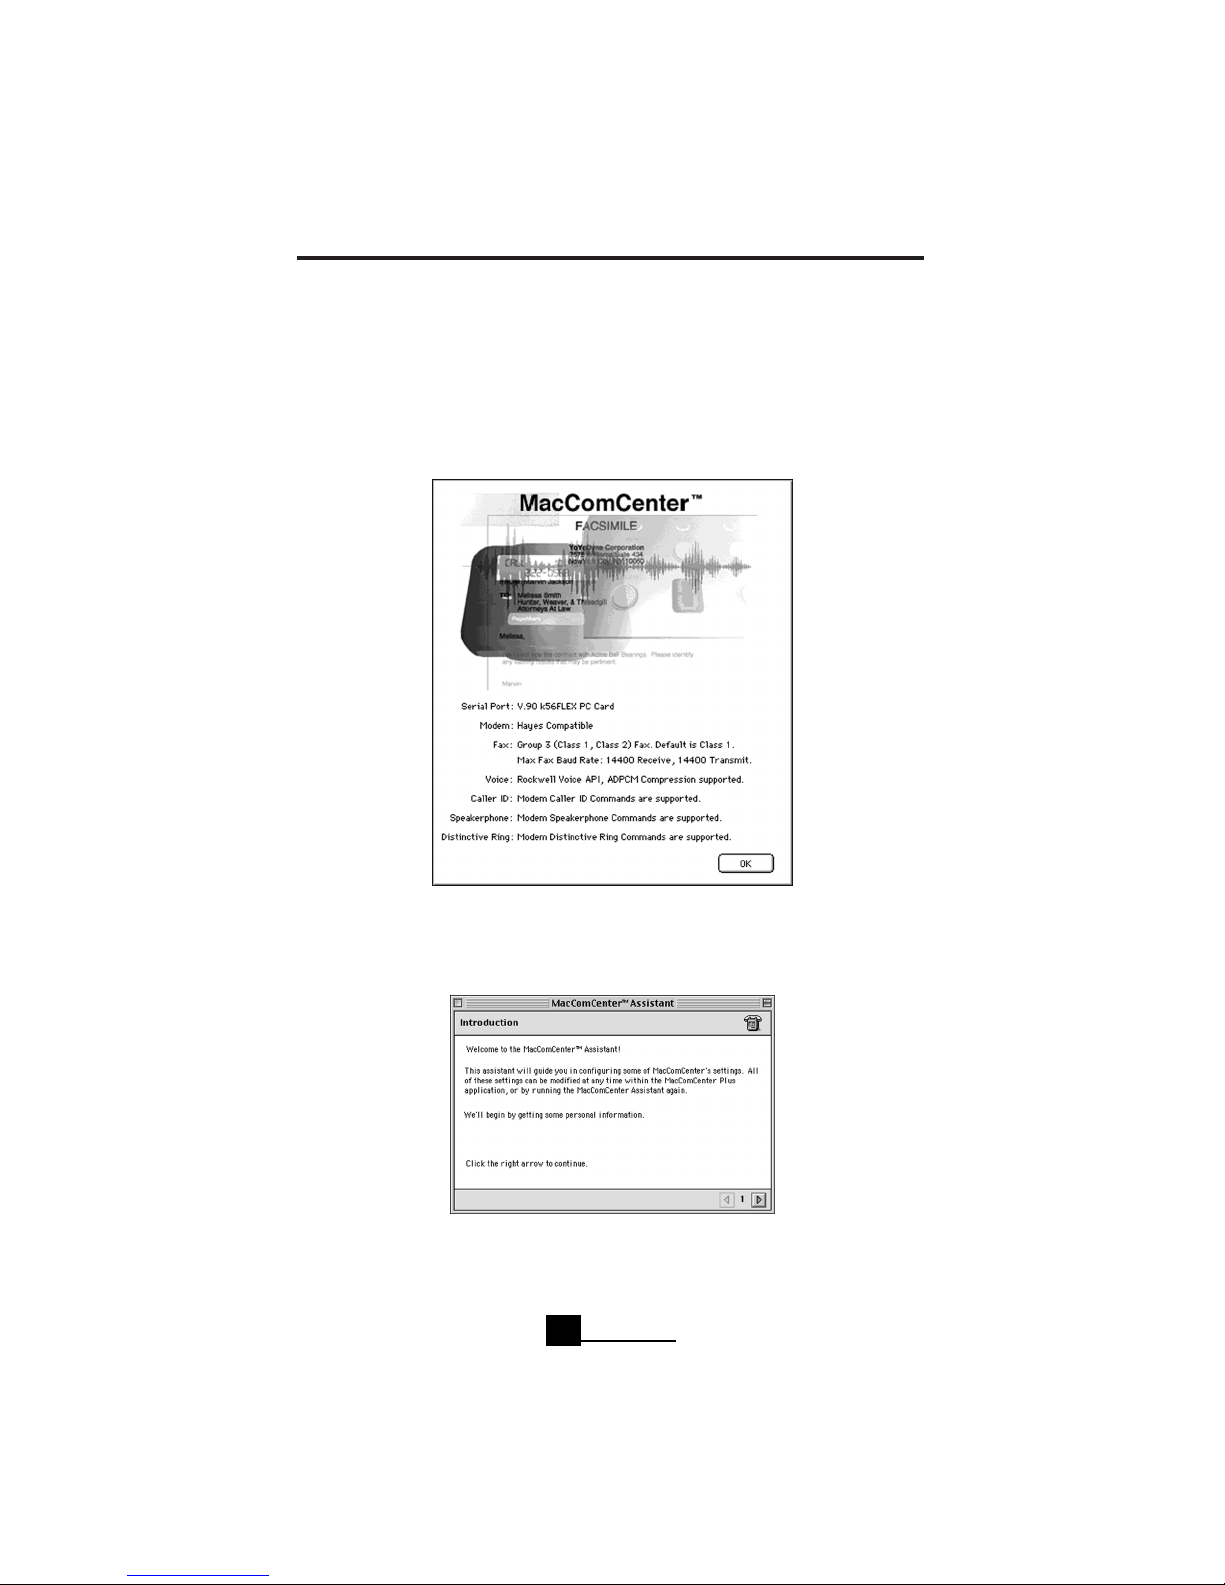
3. Once the software for MacComCenter has been loaded, a modem description
window will appear. Click the “OK” button to continue with the software setup.
4. The “MacComCenter Assistant”will guide you through the rest of the setup procedure. Follow the onscreen instructions until the setup has been completed.
Your MacComCenter software installation is now complete.
Chapter 3
11

VIKING COMPONENTS 33.6K/56K PC CARD USER’S GUIDE
Remote Access/Mac PPP Setup
Viking Apple Modem Scripts and Mac OS 7.6 or later are required for this setup.
“
1. Insert the “Apple Modem Scripts” disk into your systems floppy drive. Copy the
three modem scripts to the “Modem Scripts Folder.” This folder is located in your
systems hard drive under the “System Folder,” then “Extensions Folder,” and finally
in a folder called “Modem Scripts.” After these files have been copied, remove the
floppy disk by dragging it to the trash.
2. From the Apple (
) menu, select “Control Panel” and then choose “Modem.”
Select the PCMCIA port that you have installed your modem. Then select one of
the following modem types to reflect your modem:
A) “Viking V90/56K” for V90/Flex connections.
B) “Viking Force 56K”for Flex only connections.
C) “Viking Force V.34” for 33.6K only connections.
Then close the “Modem” control panel and click “Save.”
3. From the Apple menu,select “Control Panel”and then choose “TCP/IP.” From the
“Connect Via” pop-up menu, choose “PPP.” From the “Configure” pop-up menu,
choose “PPP Server.” In the text box labeled “IP Address,” enter the IP address
given to you by your ISP. In the text box labeled “Domain Name,” enter the domain
name given to you by your ISP. Close the “TCP/IP” control panel and click “Save.”
4. From the Apple menu, select “Control Panel” and then choose “Remote
Access/PPP.” Enter your user name, password and phone number in their appropriate text fields.
Your software installation and setup is now complete.
Chapter 3
12

VIKING COMPONENTS 33.6K/56K PC CARD USER’S GUIDE
Free PPP Setup
The Viking Apple Modem Script is not required for this setup. This setup is for version 2.6.2 of Free PPP.
1. Double-click the “Free PPP Setup” application.
2. Click the small arrow at the bottom left of the window for the pop-up menu.
Choose “General” from the pop-up menu and click the checkbox “Disconnect If
Idle” to disable.
3. Choose “Accounts” from the pop-up menu and click “New.” Complete all text
fields under “Account” and “Dialup.” Then click “OK.”
4. Choose “Modems” from the pop-up menu and click “New.” Give the modem a
name. Select a modem from “Connected To.” Set the port speed to 115200. Add
the AT Command: AT&FW2+MS=12,1 to the init string setting for V.90 preferred
and click “OK.”
5. Click “Open TCP/IP.” The “Connect Via” pop-up menu should have “Free PPP”chosen and the “Configure” pop-up menu should have “PPP Server”chosen. Complete
the text fields “Server Address” and “Search Domains.” Close and click “Save.”
Your software installation and setup is now complete.
Chapter 3
13
 Loading...