

Viking VGR5304BPGLP, VDR5304BAB Installation manual

Installation Guide
LPKPDR - Universal LP Conversion Kit for
Professional & Designer Ranges/Rangetops

Table of Contents
2
Warnings
_ _ _ _ _ _ _ _ _ _ _ _ _ _ _ _ _ _ _ _ _ _ _ _ _ _ _ _ _ _ _ _ _ _ _ _ _ _ _ _ _ _ _ _ _ _ _ _ _ _ _ _ _ _ _ _ _ _ _ _ _ _ _ _ _ _ _ _ _ _ _ _ _ _ _ _ 3
Kit Contents
_ _ _ _ _ _ _ _ _ _ _ _ _ _ _ _ _ _ _ _ _ _ _ _ _ _ _ _ _ _ _ _ _ _ _ _ _ _ _ _ _ _ _ _ _ _ _ _ _ _ _ _ _ _ _ _ _ _ _ _ _ _ _ _ _ _ _ _ _ _ _ _ _ 4
R e g u l a t o r C o n v e r s i o n _ _ _ _ _ _ _ _ _ _ _ _ _ _ _ _ _ _ _ _ _ _ _ _ _ _ _ _ _ _ _ _ _ _ _ _ _ _ _ _ _ _ _ _ _ _ _ _ _ _ _ _ _ _ _ _ 5
I n f r a r e d B r o i l e r C o n v e r s i o n _ _ _ _ _ _ _ _ _ _ _ _ _ _ _ _ _ _ _ _ _ _ _ _ _ _ _ _ _ _ _ _ _ _ _ _ _ _ _ _ _ _ _ _ _ _ _ _ _ _ _ _ 6
Surface Burner Conversion
S e a l e d T y p e 1 _ _ _ _ _ _ _ _ _ _ _ _ _ _ _ _ _ _ _ _ _ _ _ _ _ _ _ _ _ _ _ _ _ _ _ _ _ _ _ _ _ _ _ _ _ _ _ _ _ _ _ _ _ _ _ _ _ _ _ _ _ 7
S e a l e d T y p e 2 _ _ _ _ _ _ _ _ _ _ _ _ _ _ _ _ _ _ _ _ _ _ _ _ _ _ _ _ _ _ _ _ _ _ _ _ _ _ _ _ _ _ _ _ _ _ _ _ _ _ _ _ _ _ _ _ _ _ _ _ _ 8
Designer Range & Rangetop _ _ _ _ _ _ _ _ _ _ _ _ _ _ _ _ _ _ _ _ _ _ _ _ _ _ _ _ _ _ _ _ _ _ _ _ _ _ _ _ _ _ _ _ _ _ _ 9
Orifice Locations _ _ _ _ _ _ _ _ _ _ _ _ _ _ _ _ _ _ _ _ _ _ _ _ _ _ _ _ _ _ _ _ _ _ _ _ _ _ _ _ _ _ _ _ _ _ _ _ _ _ _ _ _ _ _ _ _ 1 0
O p e n T y p e 3 _ _ _ _ _ _ _ _ _ _ _ _ _ _ _ _ _ _ _ _ _ _ _ _ _ _ _ _ _ _ _ _ _ _ _ _ _ _ _ _ _ _ _ _ _ _ _ _ _ _ _ _ _ _ _ _ _ _ _ _ _ 1 1
Griddle Conversion
U-Shape Burner with Spark Ignition _ _ _ _ _ _ _ _ _ _ _ _ _ _ _ _ _ _ _ _ _ _ _ _ _ _ _ _ _ _ _ _ _ _ _ _ _ _ _ 12
S t r a i g h t T u b e B u r n e r w i t h S p a r k I g n i t i o n _ _ _ _ _ _ _ _ _ _ _ _ _ _ _ _ _ _ _ _ _ _ _ _ _ _ _ _ _ _ _ _ _ _ 1 3
S t r a i g h t T u b e B u r n e r w i t h G l o w B a r I g n i t i o n _ _ _ _ _ _ _ _ _ _ _ _ _ _ _ _ _ _ _ _ _ _ _ _ _ _ _ _ _ _ 1 4
G r i l l C o n v e r s i o n _ _ _ _ _ _ _ _ _ _ _ _ _ _ _ _ _ _ _ _ _ _ _ _ _ _ _ _ _ _ _ _ _ _ _ _ _ _ _ _ _ _ _ _ _ _ _ _ _ _ _ _ _ _ _ _ _ _ _ _ _ _ 1 5
W o k C o n v e r s i o n _ _ _ _ _ _ _ _ _ _ _ _ _ _ _ _ _ _ _ _ _ _ _ _ _ _ _ _ _ _ _ _ _ _ _ _ _ _ _ _ _ _ _ _ _ _ _ _ _ _ _ _ _ _ _ _ _ _ _ _ _ 1 6
Bake Conversion
“L” Shaped _ _ _ _ _ _ _ _ _ _ _ _ _ _ _ _ _ _ _ _ _ _ _ _ _ _ _ _ _ _ _ _ _ _ _ _ _ _ _ _ _ _ _ _ _ _ _ _ _ _ _ _ _ _ _ _ _ _ _ _ _ _ _ 1 7
“U” Shaped _ _ _ _ _ _ _ _ _ _ _ _ _ _ _ _ _ _ _ _ _ _ _ _ _ _ _ _ _ _ _ _ _ _ _ _ _ _ _ _ _ _ _ _ _ _ _ _ _ _ _ _ _ _ _ _ _ _ _ _ _ _ 1 8
Rating Label Locations _ _ _ _ _ _ _ _ _ _ _ _ _ _ _ _ _ _ _ _ _ _ _ _ _ _ _ _ _ _ _ _ _ _ _ _ _ _ _ _ _ _ _ _ _ _ _ _ _ _ _ _ _ _ _ 1 9
IMPORTANT–Please Read and Follow!
3
Fire/explosion hazard.
IF THE INFORMATION IN
THIS MANUAL IS NOT
FOLLOWED EXACTLY, A
FIRE OR EXPLOSION MAY RESULT
CAUSING PROPERTY DAMAGE,
PERSONAL INJURY, OR DEATH.
• DO NOT store or use gasoline or other
flammable vapors and liquids in the
vicinity of this or any other appliance.
• WHAT TO DO IF YOU SMELL GAS:
–DO NOT try to light any appliance.
–DO NOT touch any electrical switch;
DO NOT use any phone in your
building.
–Immediately call your gas supplier from
a neighbor’s phone.
–Follow the gas supplier’s instructions.
–If you cannot reach your gas supplier,
call the fire department.
• Installation and service must be
performed by a qualified installer, service
agency, or the gas supplier.
DANGER
4
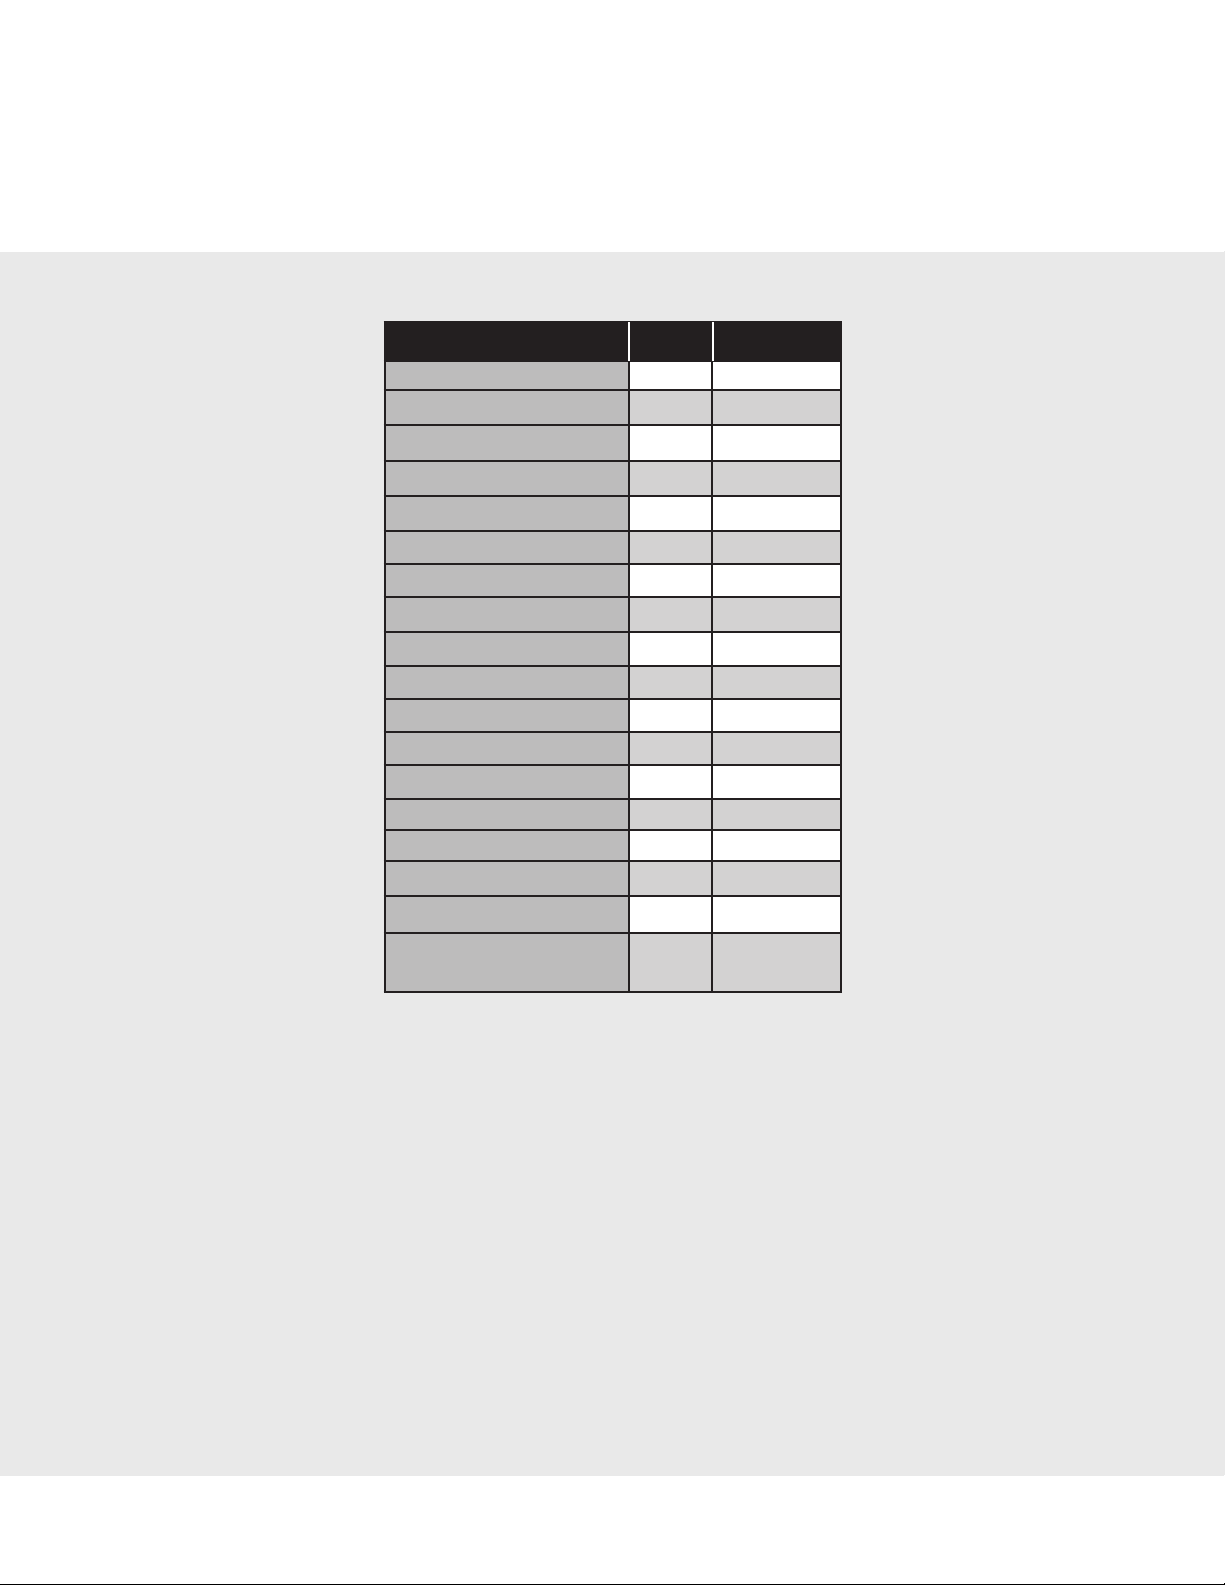
LP Orifice Conversion Kit Contents
VGIC
VGRC
VGRT
VGCC
VGSC
DCCG
DSCG
DGRT
VGR5
VDR5
VRT5
Burner Type Size Quantity
Infrared Broiler 56 (2)
Sealed Type 1 1.1 (8)
Sealed Type 2 1.07 (8)
Designer Surface Burner 57 (1)
Designer Surface Burner 61 (1)
Designer Surface Burner 63 (1)
Designer Surface Burner 65 (1)
Designer Surface Burner 67 (1)
Designer Surface Burner 58 (1)
Designer Surface Burner 60 (1)
Designer Surface Burner 70 (1)
Open Type 3 57 (6)
Griddle 57 (2)
Grill 57 (2)
Wok 52 (1)
“L” Type Bake 57 (4)
“U” Type Bake 52 (2)
Sealed Type 2
PowerPlus™ 1.24 (1)
For information on any other models, please
contact customer service at 1-888-845-4641.
Includes Models:
5
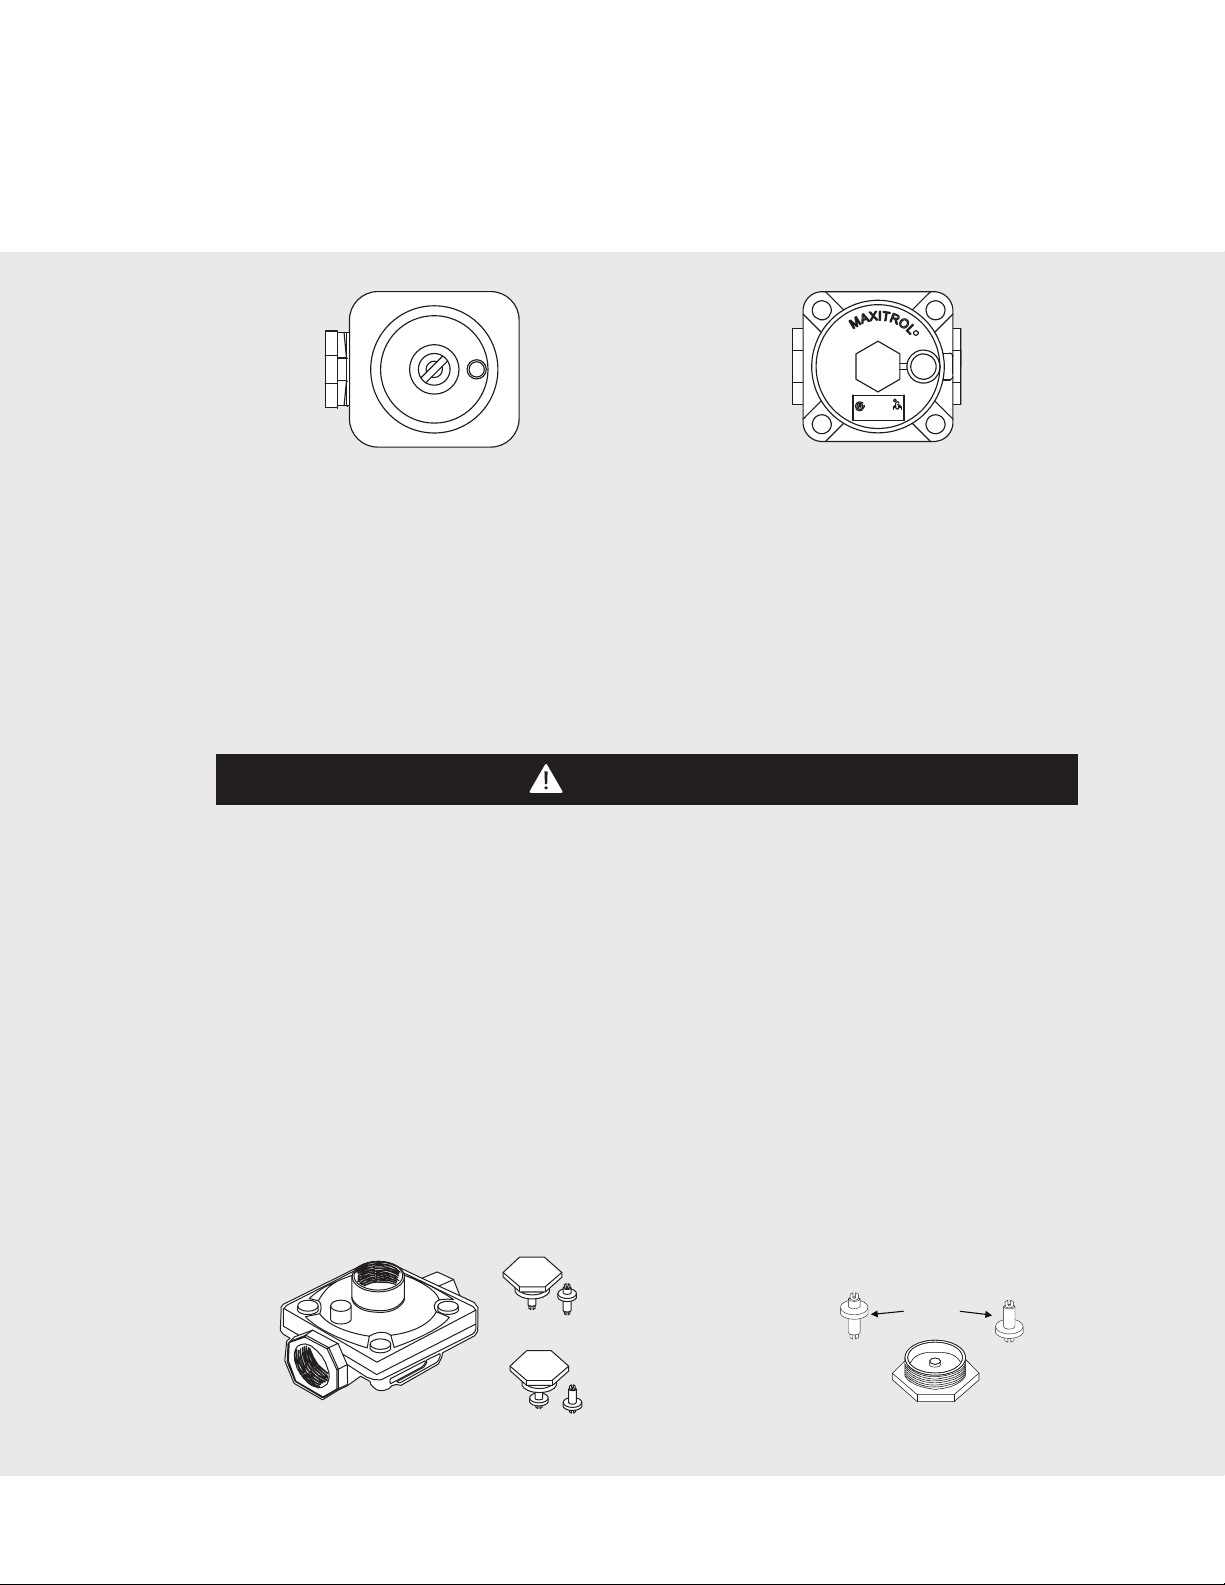
Regulator Conversion
Flip Cap
Hex Nut Cap
Before proceeding with conversion, turn off gas supply and disconnect power to unit.
•
Sealed Surface Burner Models
Identify regulator type from rear of range/rangetop located underneath main top assembly.
•
Open Surface Burner Models
Identify regulator type from front of unit by removing grates, burner bowls and grate
support from far left side of range/rangetop.
•
Flip Cap
Press downward on regulator cap and turn counterclockwise to remove. NOTE: Regulator
cap is marked “Nat” on one side and “LP” on opposite side. Reverse regulator cap and
reinstall with LP side facing upward for LP operation.
•
Hex Nut Cap
Remove brass hex nut from top of regulator.
Unsnap plastic plunger from brass hex nut.
Reverse plunger and reinstall onto brass hex nut by pressing firmly.
NOTE: Plunger is marked “Nat” and “LP”. Converted fuel type will be shown on the lower portion
of plunger.
Reinstall hex nut onto regulator in configuration desired.
NAT
LP
CAUTION
Natural
LP
Apply sideways
finger pressure to
remove pin from
cap
R
TN
E
V
P
RV48CL
1/2PSIG
NAT-5
LPG-10
NAT
LP
6
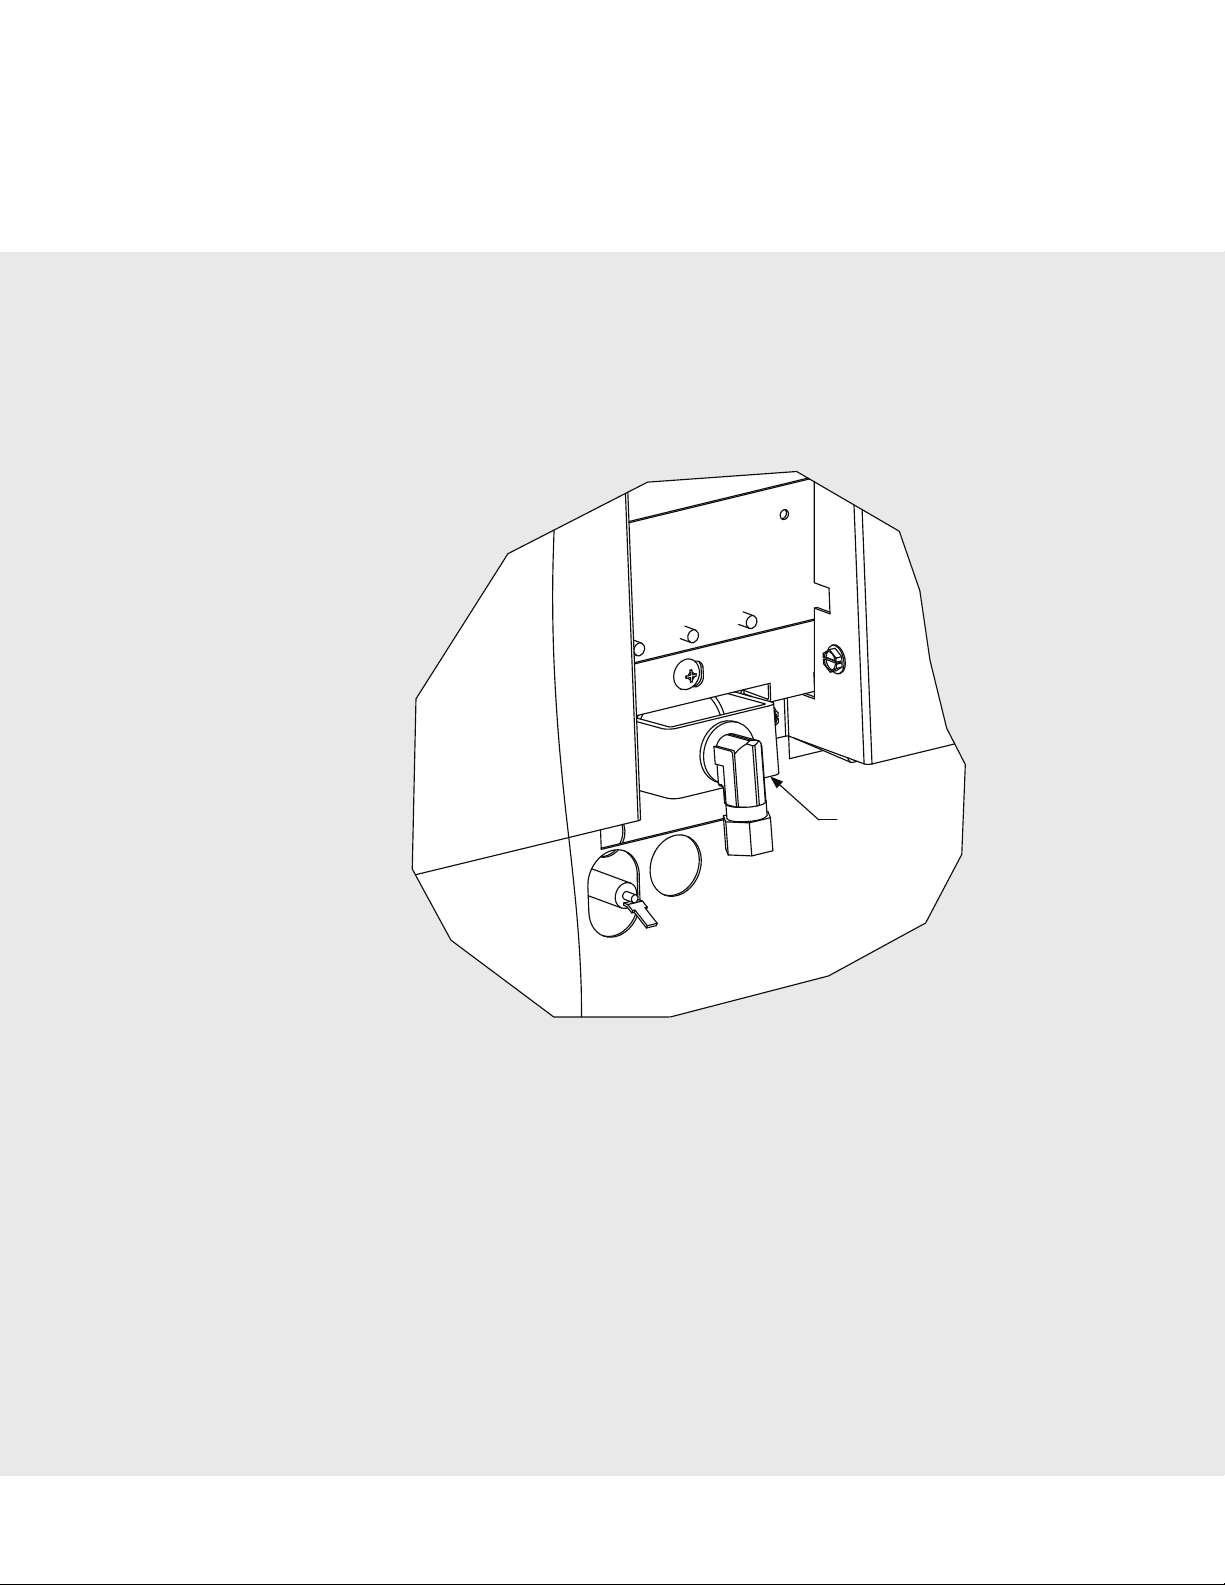
Infrared Broiler Conversion
IMPORTANT: The infrared broiler orifice must be changed from rear of range before unit is installed.
Locate bag labeled IR Broiler Orifice.
Remove nut securing 90 degree fitting and broiler tubing to rear of range.
Remove Orifice from 90 degree fitting and replace with orifice from bag labeled IR Broiler Orifice.
Reverse procedure as needed to reassemble.
Preparing for Top Surface Conversion
Remove all grates, burner bowls, grate supports, surface burner caps, griddle, grill grates and grill
grate supports.
NOTE: Some models may not be equipped with all parts mentioned above.
IMPORTANT: For models equipped with griddles, notice position of griddle temperature probe for
proper reinstallation. Failure to properly reinstall could result in damage to griddle temperature
probe.
Broil Nut
 Loading...