

Viking VGBQ53024NSS, VGBQ54224NSS User Manual

Installation Guide
100/300/500 Series
Outdoor Grill Conversion Kits
GAS CONVERSION
To convert a grill from natural to LP/Propane gas or LP/Propane to natural, you must use the conversion kit supplied by
the manufacturer. When converting to Natural Gas, use the NKVGBQ kit for VGBQ/CVGBQ models and NKVGIQ kit
for VGIQ/CVGIQ models. When converting to LP/Propane, use the LPKVGBQ kit for VGBQ/CVGBQ models and
LPKVGIQ kit for VGIQ/CVIQ models. Conversions should only be done by an authorized service technician.
NOTE: WHEN THE CONVERSION IS COMPLETED, THE CONVERSION LABEL MUST BE PLACED NEXT TO THE
RATING LABEL UNDER THE DRIP TRAY IN THE REAR LEFT CORNER NEXT TO THE INLET PIPE.
IMPORTANT: PLEASE READ AND FOLLOW
1. Before beginning, please read these instructions completely and
carefully.
2. Do not remove permanently affixed labels, warnings, or plates from
product. This may void the warranty.
3. Please observe all local and national codes and ordinances.
CAUTION: Before proceeding with the conversion, shut off the gas
supply to the appliance prior to disconnecting the electrical
power.
This conversion kit shall be installed by a
qualified service agency in accordance with the
manufacturer’s instructions and all applicable
codes and requirements of the authority having
jurisdiction. If the information in these
instructions is not followed exactly, a fire,
explosion or production of carbon monoxide
may result causing property damage, personal
injury or loss of life. The qualified service agency
is responsible for the proper installation of this
kit. The installation is not proper and complete
until the operation of the converted appliance is
checked as specified in the manufacturer’s
instructions supplied with the kit.
TNKVGBQ Conversion Kit Part List
(1) Natural Regulator Assembly
(1) Natural Orifice Kit
(3) #40 Grill Burner Orifices
(2) #51 Smoker Burner Orifice
(2) #49 Side Burner Orifies
(2) #48 Infrared Burner Orifices
(1) Natural Conversion Kit Label
TLPKVGBQ Conversion Kit Part List
(1) LP/Propane Regulator Assembly
(1) LP/Propane Orifice Kit
(3) #54 Grill Burner Orifices
(2) #62 Smoker Burner Orifice
(3) #57 Side Burner/Infrared Burner Orifices
(1) LP/Propane Conversion Kit Label
TNKVGIQ Conversion Kit Part List
(1) Natural Regulator Assembly
(1) Natural Orifice Kit
(2) #40 Grill Burner Orifices
(2) #51 Smoker Burner Orifice
(2) #49 Side Burner Orifies
(2) #48 Infrared Burner Orifices
(1) TruSear
TM
Infrared Burner Valve
(1) Natural Conversion Kit Label
TLPKVGIQ Conversion Kit Part List
(1) LP/Propane Regulator Assembly
(1) LP/Propane Orifice Kit
(2) #54 Grill Burner Orifices
(2) #62 Smoker Burner Orifice
(3) #57 Side Burner/Infrared Burner Orifices
(1) TruSear
TM
Infrared Burner Valve
(1) LP/Propane Conversion Kit Label
Depending on the grill model, all orifices in the kit may not be used.
FOR T/T1/E AND 100/300 SERIES GRILLS
2
WARNING
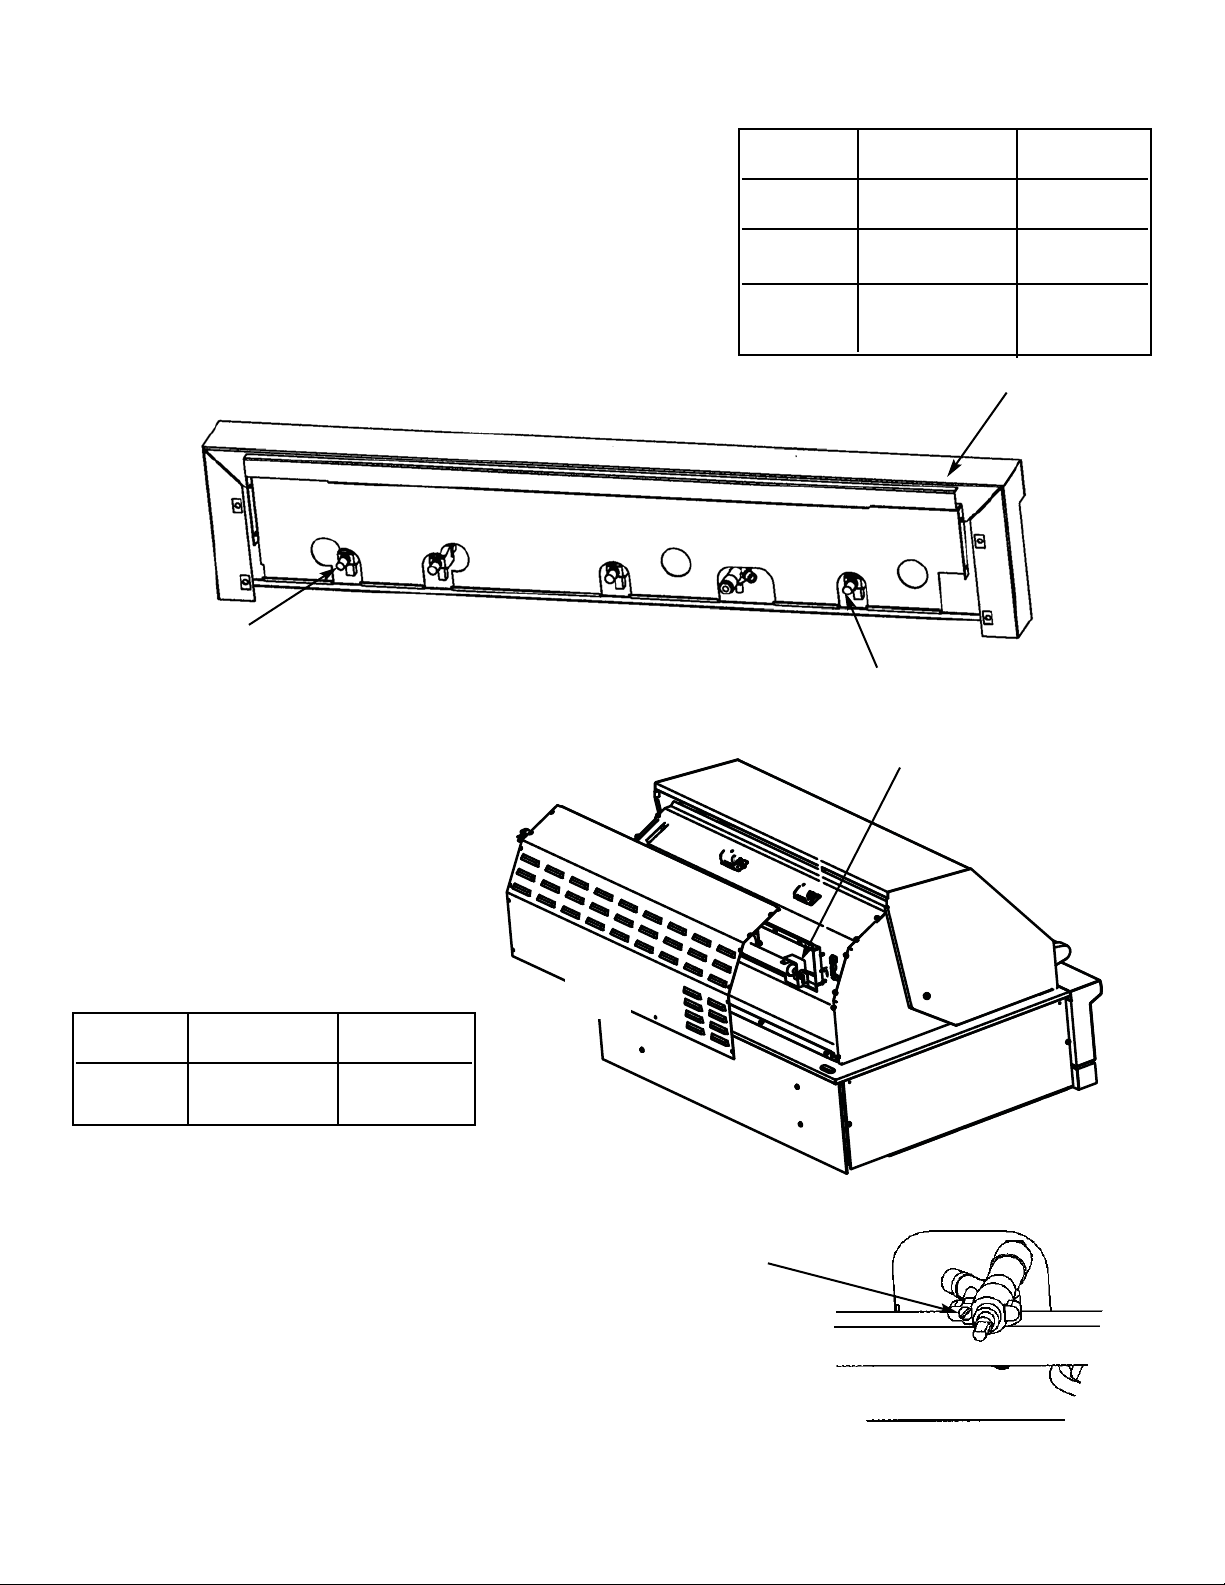
To convert the rotissiere infrared burner:
1. Remove the back cover from
the unit to expose the orifice
hood to the infrared burner.
2. Remove the gas orifice hood
located on the grill.
3. Replace with the gas orifice
hood supplied in the
conversion kit.
4. Replace the back cover.
Orifice hood
Back
Cover
Landing ledge
Grill Burner /
Side Burner
Orifice hoods
Rear side
of control
panel
Smoker Burner
Orifice hood
To convert grill burners, side burner and smoker burner:
1. Remove all grates, flavor generators and stainless steel burners
from the unit.
2. Look into the burner box back toward the control panel in order
to located the orifice hoods. Remove the gas orifice hoods
located on the grill burner valves.
3. Replace the orifice hoods with the correct gas orifice hoods
supplied in the conversion kit. (See chart)
4. Replace the stainless steel burners, flavor generators and
grates.
NOTE:
For installation in areas with altitudes greater than 2000 feet, the orifices must be derated at 4% for every
1000 feet above 2000 feet.
3
Natural LP/Propane
Orifice Hood Orifice Hood
Natural LP/Propane
Orifice Hood Orifice Hood
Grill
Burners (3) - 40 (3) - #54
Smoker
Burners (2) - #51 (2) - #62
Side
Burners (2) - #49 (2) - #57
VGBQ/CVGBQ T/T1/E AND 100/300 SERIES CONVERSIONS
To check LP/Propane to Natural Conversion of the rotissiere
infrared burner:
Ignite the rotissere burner and set it to low. If the burner will not
hold a flame, it will be necessary to adjust the low setting. Remove
the control panel to expose the rotissiere safety valve. Using a small
flat head screwdriver turn the adjustment screw counterclockwse.
Visually check the flame. When the burner is able to hold a flame
on the low setting, the setting is complete. Replace the control
panel.
adjustment
screw
(1) or (2) - #48 (1) or (2) - #57
Infrared
Burner
Depending on grill model
4
E1NKVGBQ Conversion Kit Part List
(1) Natural Regulator Assembly
(1) Natural Orifice Kit
(3) #37 Grill Burner Orifices
(2) #49 Smoker Burner Orifice
(2) #49 Side Burner Orifies
(2) #48 Infrared Burner Orifices
(1) Natural Conversion Kit Label
E1LPKVGBQ Conversion Kit Part List
(1) LP/Propane Regulator Assembly
(2) #57 Smoker Burner Orifice
(3) #57 Side Burner/Infrared Burner Orifices
(1) LP/Propane Conversion Kit Label
E1NKVGIQ Conversion Kit Part List
(1) Natural Regulator Assembly
(1) Natural Orifice Kit
(2) #37 Grill Burner Orifices
(2) #49 Smoker Burner Orifice
(2) #49 Side Burner Orifies
(2) #48 Infrared Burner Orifices
(1) TruSear
TM
Infrared Burner Valve
(1) Natural Conversion Kit Label
E1LPKVGIQ Conversion Kit Part List
(1) LP/Propane Regulator Assembly
(1) LP/Propane Orifice Kit
(2) #52 Grill Burner Orifices
(2) #57 Smoker Burner Orifice
(3) #57 Side Burner/Infrared Burner Orifices
(1) TruSear
TM
Infrared Burner Valve
(1) LP/Propane Conversion Kit Label
Depending on the grill model, all orifices in the kit may not be used.
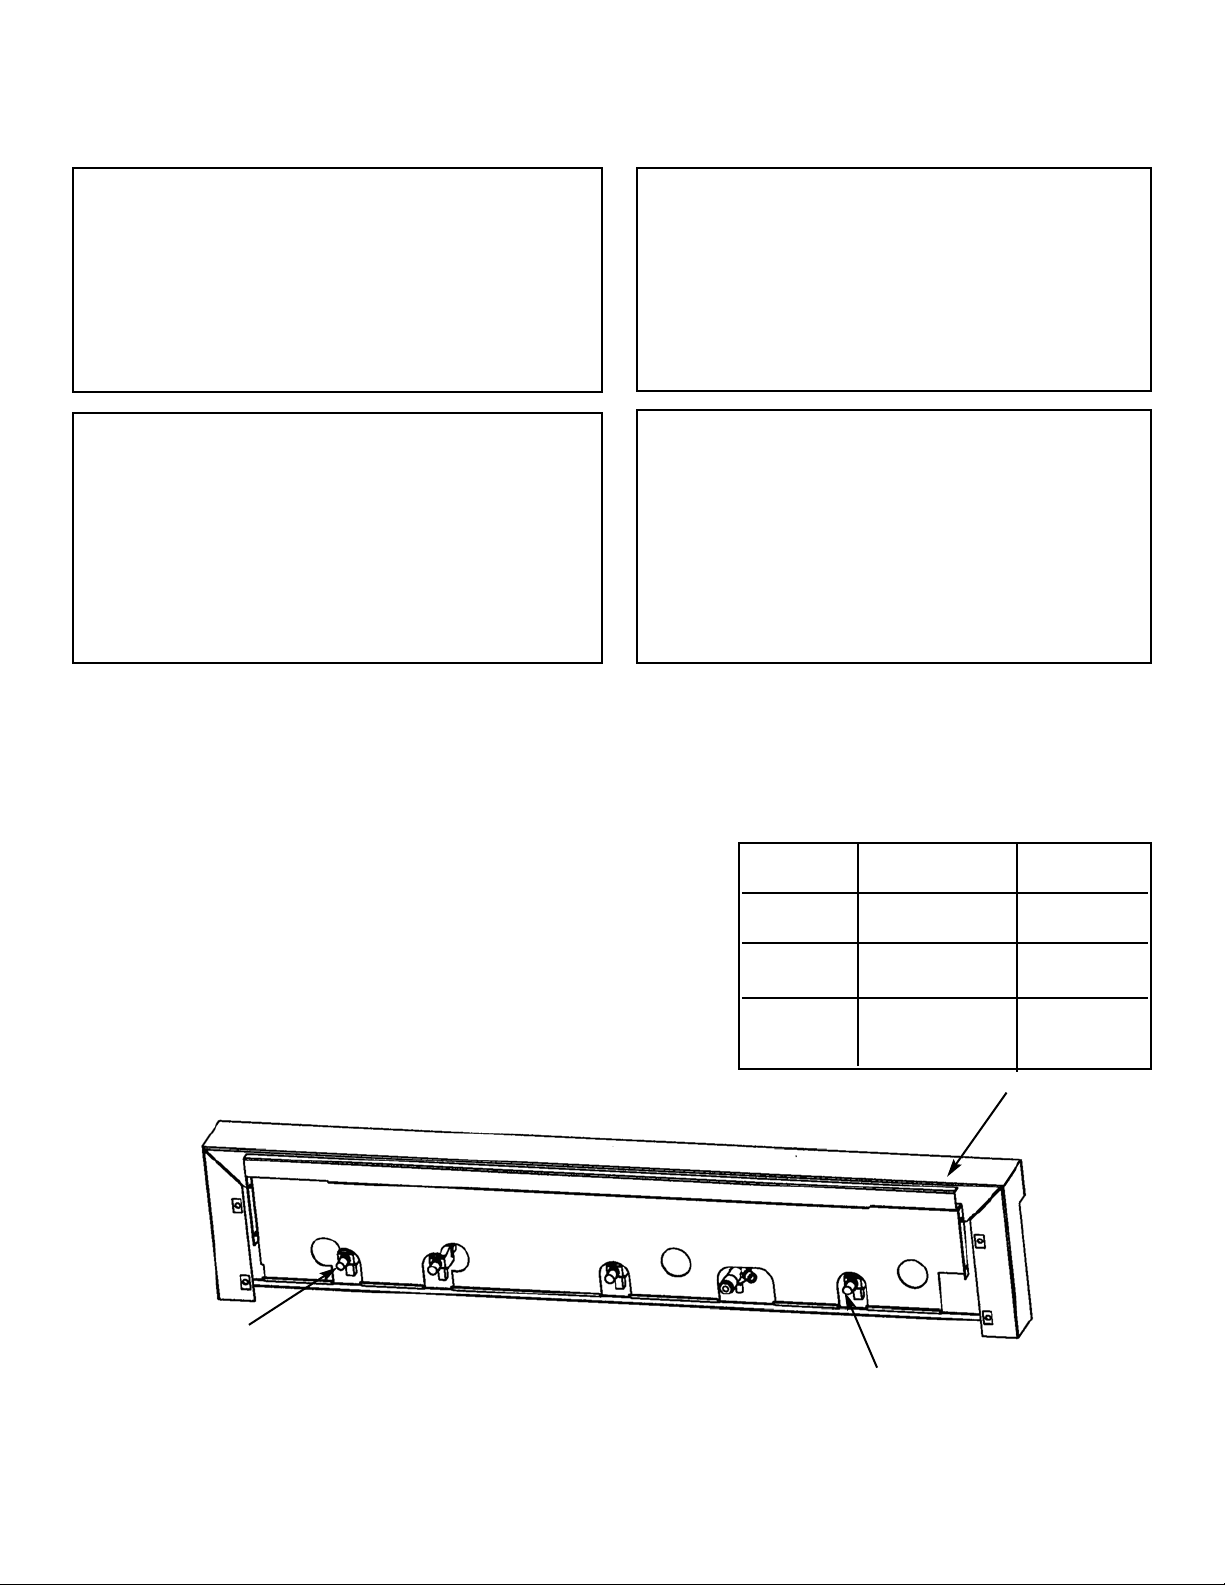
FOR E1/E2 AND 500 SERIES GRILLS
Landing ledge
Grill Burner /
Side Burner
Orifice hoods
Rear side
of control
panel
Smoker Burner
Orifice hood
To convert grill burners, side burner and smoker burner:
1. Remove all grates, flavor generators and stainless steel
burners from the unit.
2. Look into the burner box back toward the control panel in
order to located the orifice hoods. Remove the gas orifice
hoods located on the grill burner valves.
3. Replace the orifice hoods with the correct gas orifice hoods
supplied in the conversion kit. (See chart)
4. Replace the stainless steel burners, flavor generators and
grates.
Natural LP/Propane
Orifice Hood Orifice Hood
Grill
Burners (4) - #37 (4) - #52
Smoker
Burners (2) - #49 (2) - #57
Side
Burners (2) - #49 (2) - #57
VGBQ/CVGBQ E1/E2 500 SERIES CONVERSIONS
(1) LP/Propane Orifice Kit
(4) #52 Grill Burner Orifices
 Loading...