

Page 1
Viking Use & Care Manual
Viking Range Corporation
111 Front Street
Greenwood, Mississippi 38930 USA
(662) 455-1200
For product information,
call 1-888-VIKING1 (845-4641)
or visit the Viking Web site at
vikingrange.com
F20663A EN
Built-In Electric Warming Drawers
(Indoor and Outdoor Models)
(030911)
Page 2

Congratulations
Table of Contents
Congratulations and welcome to the elite world of Viking ownership.
We hope you will enjoy and appreciate the care and attention we have
put into every detail of your warming drawer.
Your Viking product is designed to offer years of reliable service. This
Use and Care Manual will provide you with the information you need
to become familiar with your drawer’s care and operation.
Your complete satisfaction is our ultimate goal. If you have any
questions or comments about this product, please contact the dealer
from whom you purchased it, or contact our Consumer Support Center
at 1-888-VIKING1 (845-4641).
We appreciate your choice of a Viking product and hope that you will
again select our products for your other major appliance needs.
For more information about the complete and growing selection
of Viking products, contact your dealer or visit us online at
vikingrange.com.
Getting Started
Warnings and Important Safety Information ______________________4
Before Using Rangetop________________________________________9
Product Controls
Drawer Features (Custom) ____________________________________10
Drawer Features (Designer) ___________________________________11
Operation
Warming Element ___________________________________________12
To use Moist Heat function (VEWD models only) ________________12
To use Dry Heat Function_____________________________________12
Drawer Indicator Light _______________________________________13
Optional Accessories for Moist or Dry Heat _____________________13
Temperature Control Settings _________________________________14
Proofing ____________________________________________________14
Warming Plates _____________________________________________14
Power “ON” Light ___________________________________________15
Moisture Selector Control (VEWD models only) _________________15
Suggested Heat Settings _____________________________________16
Product Care
Cleaning and Maintenance ___________________________________17
Troubleshooting _____________________________________________19
Service Information __________________________________________20
Warranty ___________________________________________________21
2 3
Page 3
Warnings
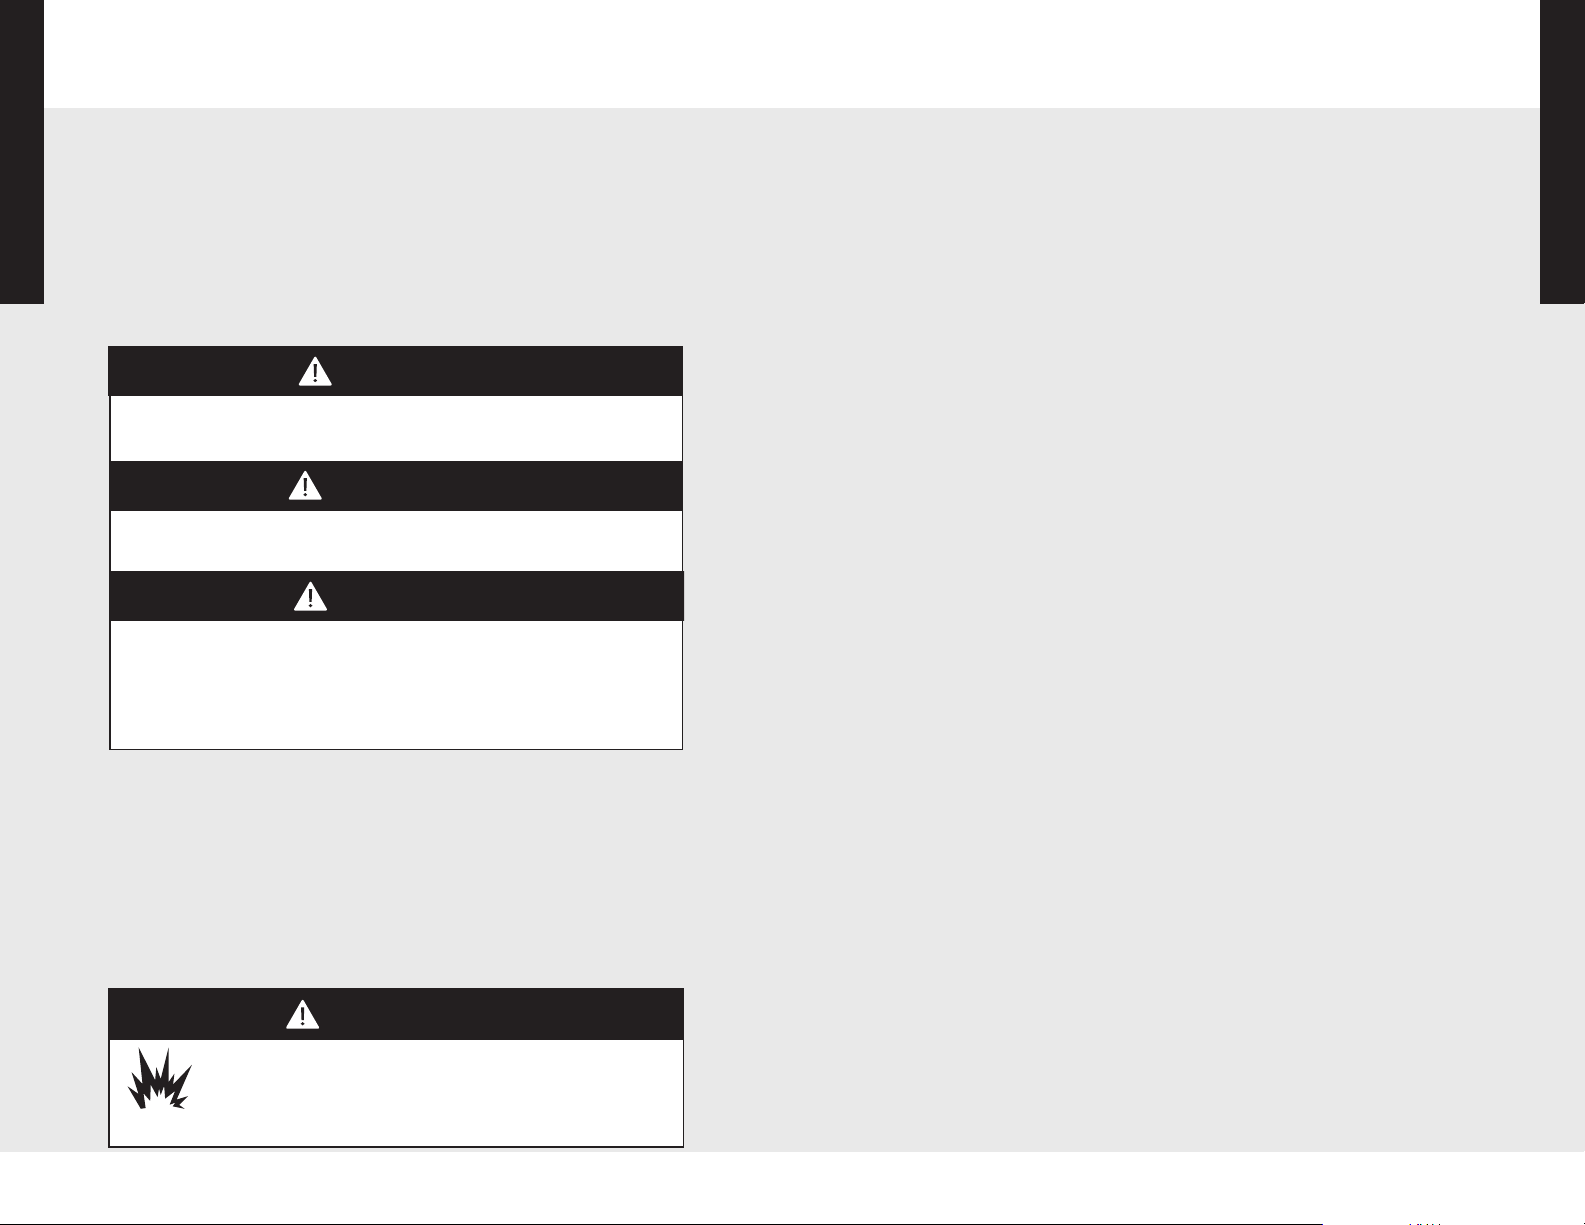
DANGER
WARNING
CAUTION
WARNING
Getting Started
Warnings
Warning and Important Safety Instructions appearing in this manual
Getting Started
are not meant to cover all possible conditions and situations that may
occur. Common sense, caution, and care must be exercised when
installing, maintaining, or operating the appliance.
ALWAYS contact the manufacturer about problems or conditions you do
not understand.
Recognize Safety Symbols, Words, Labels
Hazards or unsafe practices which WILL result in
severe personal injury or death
Hazards or unsafe practices which COULD result in
death or severe personal injury
T
o Prevent Fire or Smoke Damage
• Be sure all packing materials are removed from the appliance before
operating it.
• Keep area around appliance clear and free from combustible materials,
gasoline, and other flammable vapors and materials.
• Many aerosol-type spray cans are EXPLOSIVE when exposed to heat
and may be highly flammable. Avoid their use or storage near an
appliance.
• Many plastics are vulnerable to heat. Keep plastics away from parts of
the appliance that may become warm or hot. DO NOT leave plastic
items in the drawer as they may melt or soften if left too close to a
heating element.
• Combustible items (paper, plastic, etc.) may ignite and metallic items
may become hot and cause burns. DO NOT pour spirits over hot foods.
About your Appliance
• DO NOT touch the heating elements or interior surface of the drawer
while it is in use. Use handles or knobs.
• DO NOT store flammable materials in drawer.
Heating Elements
Hazards or unsafe practices which COULD result in
minor personal injury.
All safety messages will identify the hazard, tell you how
to reduce the chance of injury, and tell you what can happen if
the instructions are not followed.
Read and follow all instructions before using this appliance to prevent
the potential risk of fire, electric shock, personal injury or damage to the
appliance as a result of improper usage of the appliance. Use appliance
only for its intended purpose as described in this manual.
To ensure proper and safe operation: Appliance must be properly
installed and grounded by a qualified technician. DO NOT attempt to
adjust, repair, service, or replace any part of your appliance unless it is
specifically recommended in this manual. All other servicing should be
referred to a qualified servicer.
To avoid risk of property damage, personal injury or death;
follow information in this manual exactly to prevent a fire or
explosion. DO NOT store or use gasoline or other flammable
vapors and liquids in the vicinity of this or any appliance.
• Use only dry potholders. If moist or damp potholders are used, steam
from potholders could cause a steam burn. DO NOT let potholders
touch hot heating elements located under the drawer. DO NOT use a
towel or bulky cloths in place of potholders.
• Use care when opening the drawer. Let hot air or steam escape (open
vent) before removing or replacing food.
• DO NOT place food in unopened containers in the drawer. Pressure
could build up and cause the container to burst.
• NEVER use the appliance for other than intended use.
• DO NOT use water on grease fires. Smother fire or flame or use dry
chemical or foam-type extinguisher.
• DO NOT use aluminum foil to line the drawer. It is an excellent heat
insulator and will trap heat beneath it. This will upset the performance
and can damage the interior finish.
• Always place warming racks in desired position while drawer is cool.
• Keep drawer closed when not in use.
• DO NOT place items exposed to cooking oils in your warming drawer.
Items contaminated with cooking oils may contribute to a chemical
reaction that could cause a load to catch fire.
• DO NOT install or store indoor models where they will be exposed to
the weather.
4 5
Page 4
Warnings
WARNING
CAUTION
CAUTION
CAUTION
WARNING
WARNING
WARNING
WARNING
Getting Started
Warnings
Getting Started
NEVER use this appliance as a space heater to heat or warm the room.
Doing so may result in carbon monoxide poisoning and overheating of
the drawer.
DO NOT use plastic wrap to cover foods placed in the drawer, nor to keep
foods warm that are wrapped or placed in plastic containers for heating.
Plastics can melt onto the drawer if they are in direct contact. If melted onto
the drawer, they can be very difficult to remove.
DO NOT use any cleaning agent with chlorine or chlorine compounds on
stainless steel finish. Chlorine and chlorine compounds are corrosive to
stainless steel.
All special ordered brass parts are coated with an epoxy coating. DO NOT
use brass cleaners or abrasive cleaners on any brass parts. All brass body
parts should be wiped regularly with hot soapy water. When hot soapy
water will not do the job, use every day household cleaners that are not
abrasive.
BURN OR ELECTRICAL SHOCK HAZARD
Make sure all controls are OFF and drawer is COOL before
cleaning. Failure to do so can result in burns or electrical
shock.
If the information in this manual is not followed exactly, a fire or
explosion may result causing property damage, personal injury or death.
NEVER cover any slots, holes or passages in the drawer or cover an
entire rack with materials such as aluminum foil. Doing so blocks air
flow through the oven and may cause carbon monoxide poisoning.
Aluminum foil linings may also trap heat, causing a fire hazard.
To avoid sickness and food waste, do not allow defrosted food to remain
in the drawer for more than two hours.
6 7
Page 5
Getting Started
WARNING
WARNING
WARNING
WARNING
Warnings
Getting Started
FIRE AND ELECTRICAL SHOCK HAZARD
To reduce the risk of electric shock and fire, DO NOT use a
flexible power-supply cord with this appliance.
For outdoor installation, installer must install a ground fault
interrupt.
Make sure that incoming voltage is the same as unit rating. An electric
rating plate specifying voltage, hertz, wattage, amps, and phase is
attached to the product. Wiring the warming drawer with more voltage
than it is rated for may cause severe damage to the thermostat,
element, and other components. Wiring the warming drawer with less
voltage than it is rated for may cause significant decrease in
performance.
Before Using Drawer
All products are wiped clean with solvents at the factory to remove
any visible signs of dirt, oil, and grease which may have remained from
the manufacturing process. Before using, clean the drawer thoroughly
with hot, soapy water. There may be some burn off and odors on first
use of the appliance—this is normal.
To reduce the risk of fire, electric shock, or injury to persons, installation
work and electrical wiring must be done by qualified people in
accordance with all applicable codes and standards, including fire-rated
conditions.
8 9
Page 6
Drawer Features - Custom
M
O
I
S
T
U
R
E
–
+
M
O
I
S
T
U
R
E
–
+
M
O
I
S
T
U
R
E
–
+
Custom
1
2
3
4
5
1
2
3
4
Designer
Drawer Features - Designer
Product Controls
Product Controls
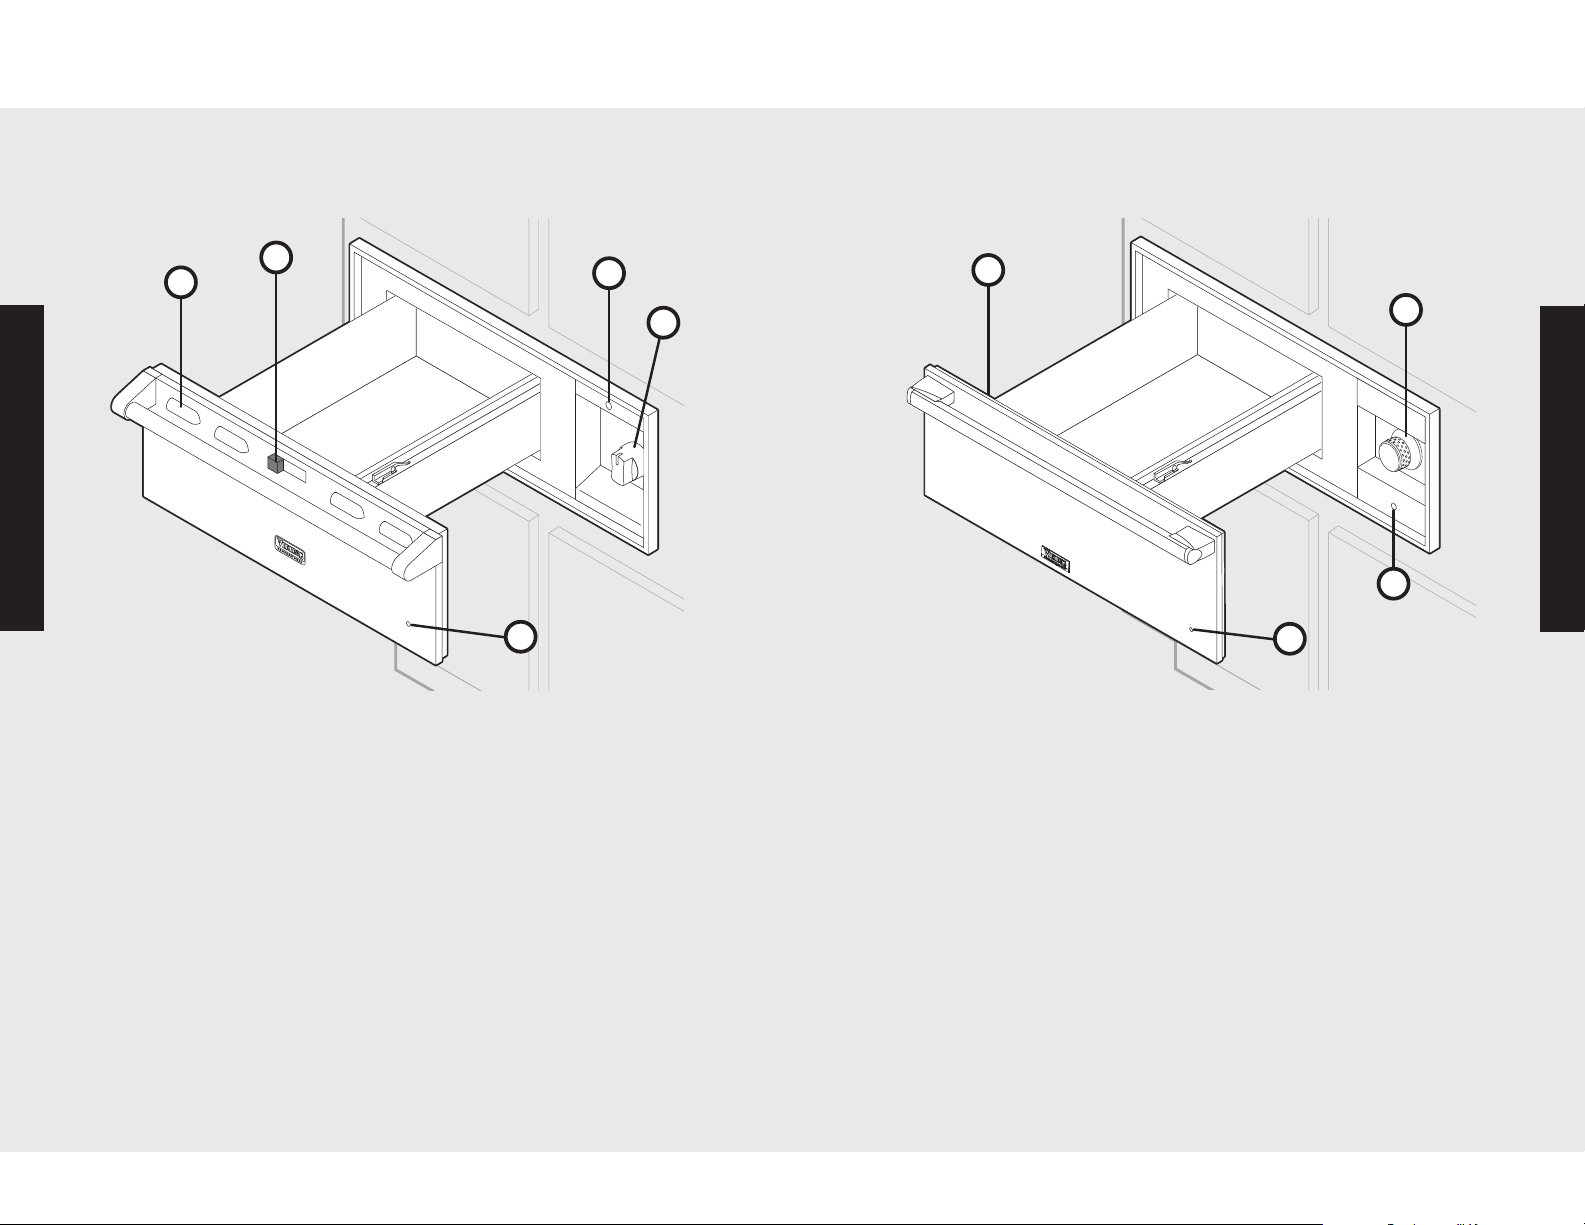
1. Vents
2. Moisture Selector Control
3. ON/OFF Indicator Light
4. Temperature Control Knob
5. Drawer Indicator Light
1. Vents (located inside unit)
2. Temperature Control Knob
3. ON/OFF Indicator Light
4. Drawer Indicator Light
10 11
Page 7
Operation
Low
racks
Moisture
cup
Operation
Your warming drawer works in two ways:
1. Seals moisture within the drawer to keep food moist.
2. Allows moisture to escape and keep food crisp.
The purpose of the warming drawer is to keep hot, cooked foods at
serving temperature. Always start with hot food; cold food cannot be
heated in the warming drawer.
Warming Element
Turn the control knob clockwise to the desired setting. The element
will cycle on and off to maintain the desired heat setting. When
finished turn the control to “OFF.”
Note: The majority of foods are held at a medium setting to maintain
a serving temperature.
Drawer Indicator Light
The drawer indicator light is located on the front panel of the drawer.
The drawer indicator light will glow red when the drawer element is
heated. The light will cycle on and off as the temperature is maintained.
Optional Accessories for Moist or Dry Heat
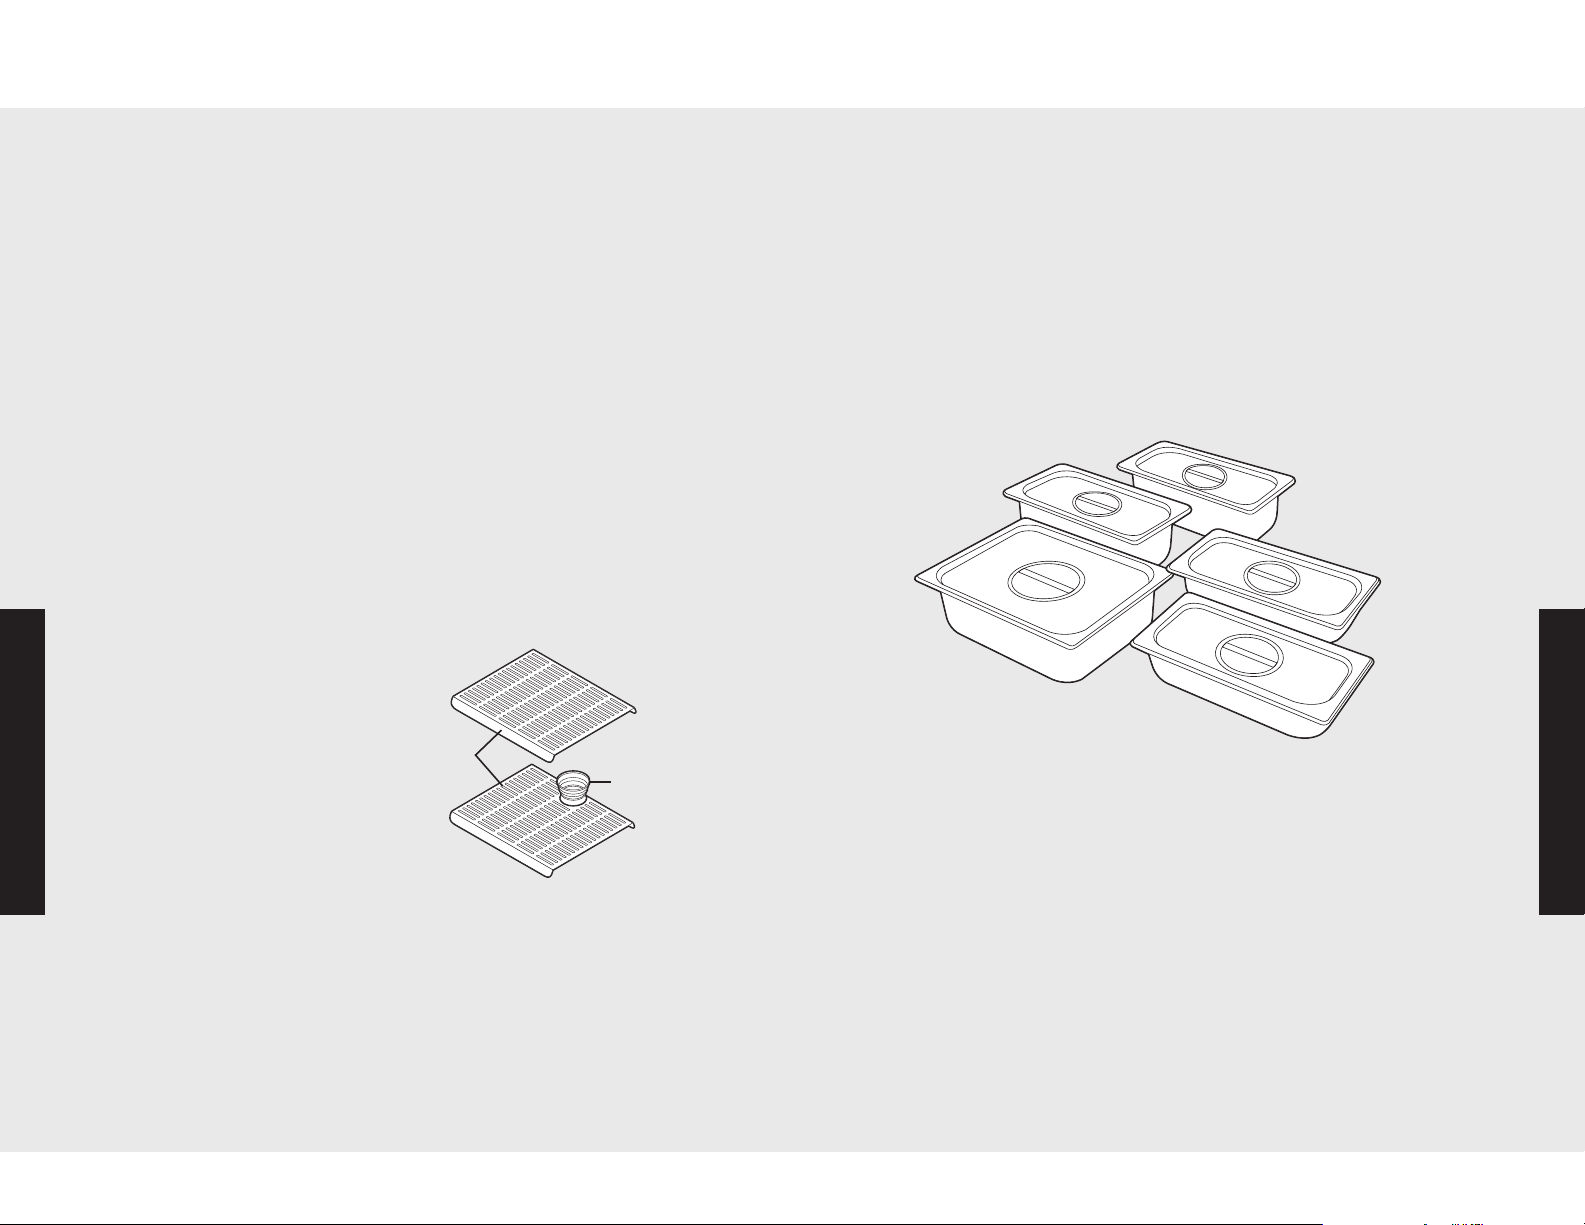
Pans/Lids - This warming drawer is designed to accommodate
standard size pan inserts. The optional pan/lid set consists of:
1) one 4” D. x 12” L. x 10½” W. pan/lid
2) two 4” D. x 12” L. x 7” W. pans/lids
3) two 2½” D. x 12” L. x 7” W. pans/lids
To use Moist Heat function (VEWD models only)
1. Place low racks in warming drawer.
2. Fill the moisture cup with 1/2 cup water and place the cup in the
rear center opening of the low rack.
3. Place the food or cookware with
food directly on the rack.
4. Turn the control knob to the desired
heat setting and close the drawer.
5. Slide the moisture control to the
right to close the vents which seals
Operation
in the heat.
Operation
Use moist heat when proofing breads
and keeping foods moist such as
casseroles, meats, and sauces.
To use Dry Heat Function
1. Place the food or cookware with food in the empty drawer pan.
2. Turn the control knob to the desired heat setting and close the
drawer.
3. Slide the moisture control to the left to open the vents which allows
the moist heat to escape.
Use dry heat when warming dishes and keeping foods crispy such as
pies, breads and fried foods.
1312
Page 8
Operation
CAUTION
Operation
Temperature Control Settings
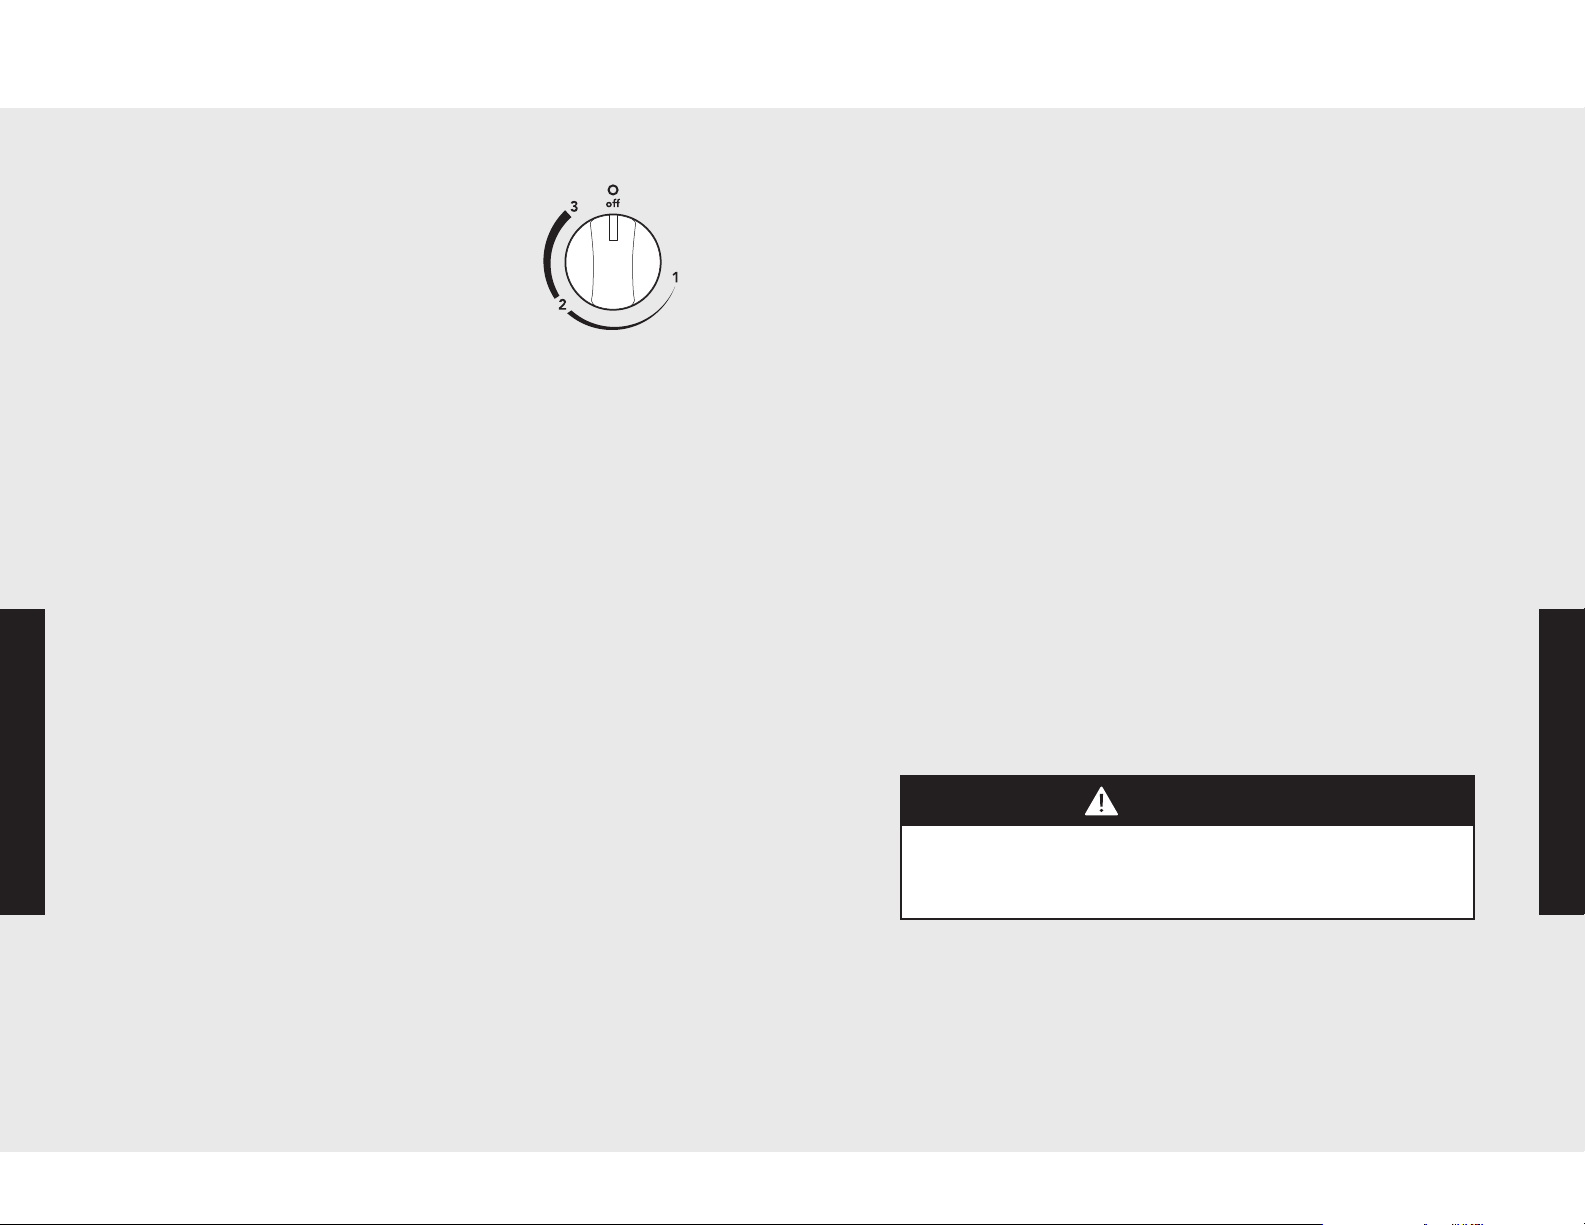
The knob is used to select the temperature of the
drawer and is located on the right side of the
control panel. The “1” setting represents low, “2”
represents medium, and “3” represents high. The
majority of foods are held at a medium setting to
maintain a serving temperature. However, your own
preference may be for hotter foods.
To keep several types of food hot for serving, key the temperature
setting for the meat. For example, to hold rare roast beef, select a
lower setting, cover the other foods that otherwise would be kept at a
higher setting.
Repeated opening of the drawer allows the hot air to escape and the
food to cool. The drawer should not be opened unless adding or
removing food.
Proofing
Yeast dough can be proofed in the warming drawer. Place the dough
in a bowl. Place the bowl on the low rack in the drawer. Fill the
moisture cup half full with water and place in the opening in the rear
center of the low rack. Turn the temperature control to the lowest
setting to facilitate the fermentation time. A towel should be placed
over the dough to minimize surface drying. The dough should remain
in the warming drawer until it has doubled in size and a slight
Operation
depression remains when the surface is touched gently with a finger.
Power “ON” Light
The power “ON” light is located above the temperature control knob
on Custom models and below the temperature control knob on
Designer models. It turns on when the control knob is set and cycles
on and off with the heating element as temperature is maintained.
Moisture Selector Control (VEWD models only)
The moisture selector control is located at the top of the warming
drawer. To keep foods moist, move the handle to the right. This closes
the vents and seals the moisture inside the drawer. For crisp foods,
move the handle to the left. This opens the vents and allows the
moisture to escape. The moisture selector can be placed in any
position between “-” (open for less moisture) and “+” (closed to retain
moisture) to maintain any degree of moisture.
In the closed position, the drawer is completely sealed which keeps
the hot foods moist and soft. In this setting, condensation may be
noticed around the inside edge of the drawer. If the drawer is not full,
there may be some drying on the surface of the food. If this happens,
simply cover the food with a lid or aluminum foil.
When in the open position, the drawer is vented, which lets moisture
escape. This dry heat keeps the foods exterior dry and crisp. With the
vents open, it is normal for moisture to collect on surfaces above the
warming drawer. Simply wipe up the moisture with a dry cloth.
Operation
Warming Plates
To warm serving bowls and plates, place temperature control on a low
setting. Place the empty dishes on the low rack to raise them off the
bottom of the drawer. If you want hotter dishes or want to heat fine
china, please check with the manufacturer of the dishes for their
maximum heat tolerance.
14
DO NOT use plastic wrap to cover foods placed in the drawer, nor to keep
foods warm that are wrapped or placed in plastic containers for heating.
Plastics can melt onto the drawer if they are in direct contact. If melted onto
the drawer, they can be very difficult to remove.
15
Page 9
Operation
Cleaning and Maintenance
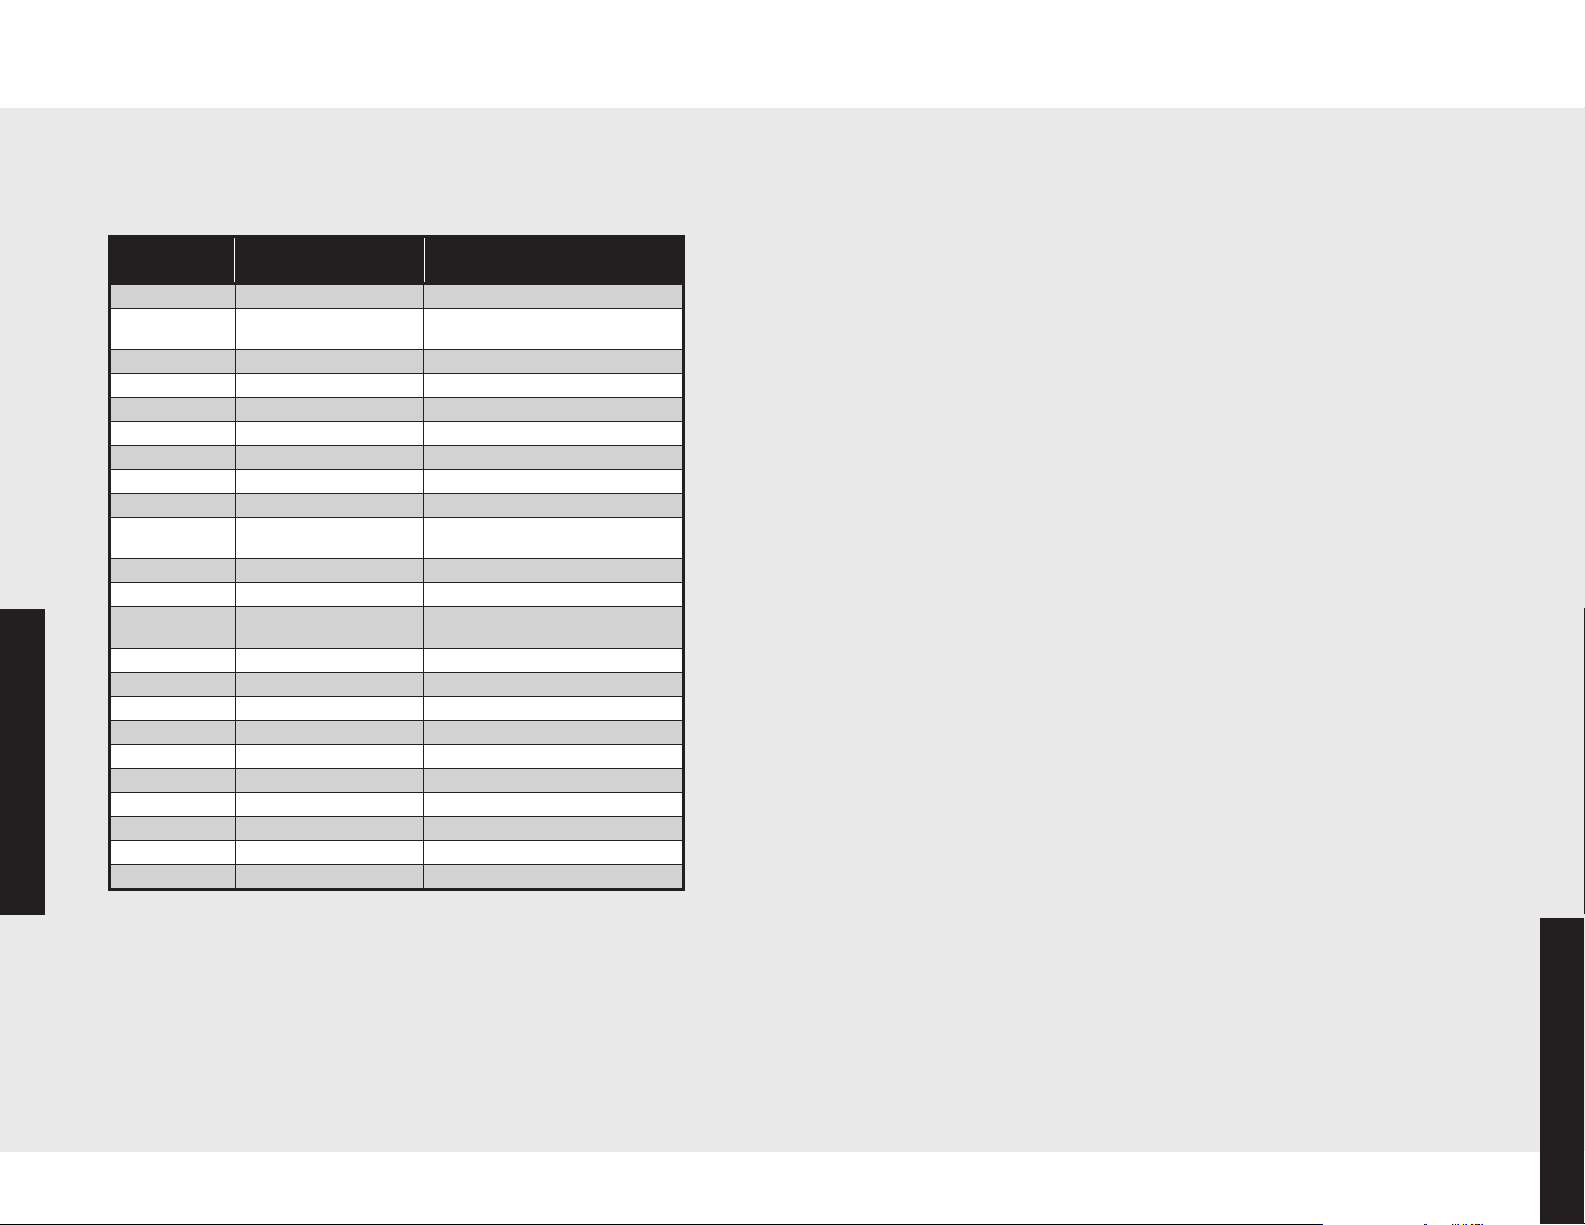
Suggested Heat Settings
The information below is given as a guide only. You may need to vary
the heat settings to suit your personal requirements.
Food
acon
B
Beef, medium
and well done
Beef, rare 1 –2 +
Bread, hard roll 2 –
Bread, soft rolls 2 –
Casseroles 2 +
Cooked cereal 2 +
Dough, proofing 1 +
Eggs 2 +
Fish, seafood
(baked)
Fried foods 3 –
Fruit 2 +
Gravy, creamed
sauces
Ham 2 +
Pancakes, waffles 2 –3 +
Pies, one crust 2 +
Pies, two crust 2 –
Pizza 2 –3 halfway
Pork 2 +
Operation
Potatoes, baked 3 halfway
Potatoes, mashed 2 +
Poultry 2 –3 +
Vegetables 2 –
Settings
–3
2
2 +
2 +
2 +
Temperature
Moisture
Settings
–
Any piece of equipment works better and lasts longer when
maintained properly and kept clean. Cooking equipment is no
exception. Your warming drawer must be kept clean and maintained
properly. Make sure all controls are in the “OFF” position.
1. Allow warming drawer to cool completely.
2. It is important to keep the slide rails clear and free from debris.
Periodic cleaning of slide rails and other adjoining parts is
necessary to assure smooth drawer operation.
3. If needed, the warming drawer pan support can be removed for
cleaning. Pull the warming drawer out until fully extended. Slide
finger along right and left side rail until you reach hand latches
(located at the front of rails). Pull up on both right and left latches.
Pull drawer support completely out.
4. When installed outdoors, annually inspect the silicon seal around
the flange of the appliance. Re-seal as needed to assure this seam
is waterproof.
Control Knobs
MAKE SURE ALL CONTROL KNOBS POINT TO THE “OFF” POSITION
BEFORE REMOVING. Pull the knobs straight off. Wash in detergent and
warm water. Dry completely and replace by pushing firmly onto stem.
Stainless Steel Parts
All stainless steel body parts should be wiped regularly with hot soapy
water at the end of each cooling period and with a liquid cleaner
designed for that material when soapy water will not do the job. DO
NOT use steel wool, abrasive cloths, cleansers, or powders. If necessary,
scrape stainless steel to remove encrusted materials, soak the area with
hot towels to loosen the material, then use a wooden or nylon spatula or
scraper. DO NOT use a metal knife, spatula, or any other metal tool to
scrape stainless steel. DO NOT permit citrus or tomato juice to remain
on stainless steel surface, as citric acid will permanently discolor stainless
steel. Wipe up any spills immediately.
Product Care
1716
Page 10
Cleaning and Maintenance
CAUTION
CAUTION
Troubleshooting
To avoid the risk of property damage, DO NOT USE BRASS
CLEANERS OR ABRASIVE CLEANERS ON ANY BRASS PARTS. All
brass body parts should be wiped regularly with hot, soapy water and a
soft, clean cloth. When hot, soapy water will not do the job, use every
day household cleaners that are not abrasive.
Brass Parts
All special ordered brass parts are coated with an epoxy coating.
DO NOT use any cleaning agent with chlorine or chlorine compounds on
stainless steel finish. Chlorine and chlorine compounds are corrosive to
stainless steel.
Cleaning Chart
Material/Problem
Stainless steel/
Enamels
Hard water spots
and scales
Cleaning Products Directions
Mild cleaners Sponge with cloth, then
rinse with clear water
and wipe dry.
Satisfactory for use on
all finishes.
Vinegar and water
Swab or wipe with cloth.
Rinse with clear water
and dry. Satisfactory for
use on all finishes.
Problem
Warming drawer will not
function.
Possible Cause and/or Remedy
Drawer is not connected to electrical power:
Have electrician check power circuit breaker,
wiring, and fuses.
Plastic
(Control knob)
Soft, non-abrasive cleaners
Soap and water
Apply with damp
sponge or cloth.
Satisfactory for use on
all finishes if rubbing
is light. Rub in direction
of the polish lines.
Pull off knob. Wash but
DO NOT soak. Rinse
with water, dry and
replace on control.
Product Care
Product Care
18
19
Page 11
Service Information
If service is required, call your dealer or authorized service agency.
The name of the authorized service agency can be obtained from the
dealer or distributor in your area.
Have the following information readily available.
• Model number
• Serial number
• Date purchased
• Name of dealer from whom purchased
Clearly describe the problem that you are having. If you are unable to
obtain the name of an authorized service agency, or if you continue
to have service problems, contact Viking Range Corporation at
1-888-VIKING1 (845-4641), or write to:
VIKING RANGE CORPORATION
PREFERRED SERVICE
1803 Hwy 82W
Greenwood, Mississippi 38930 USA
Record the information indicated below. You will
need it if service is ever required. The model and
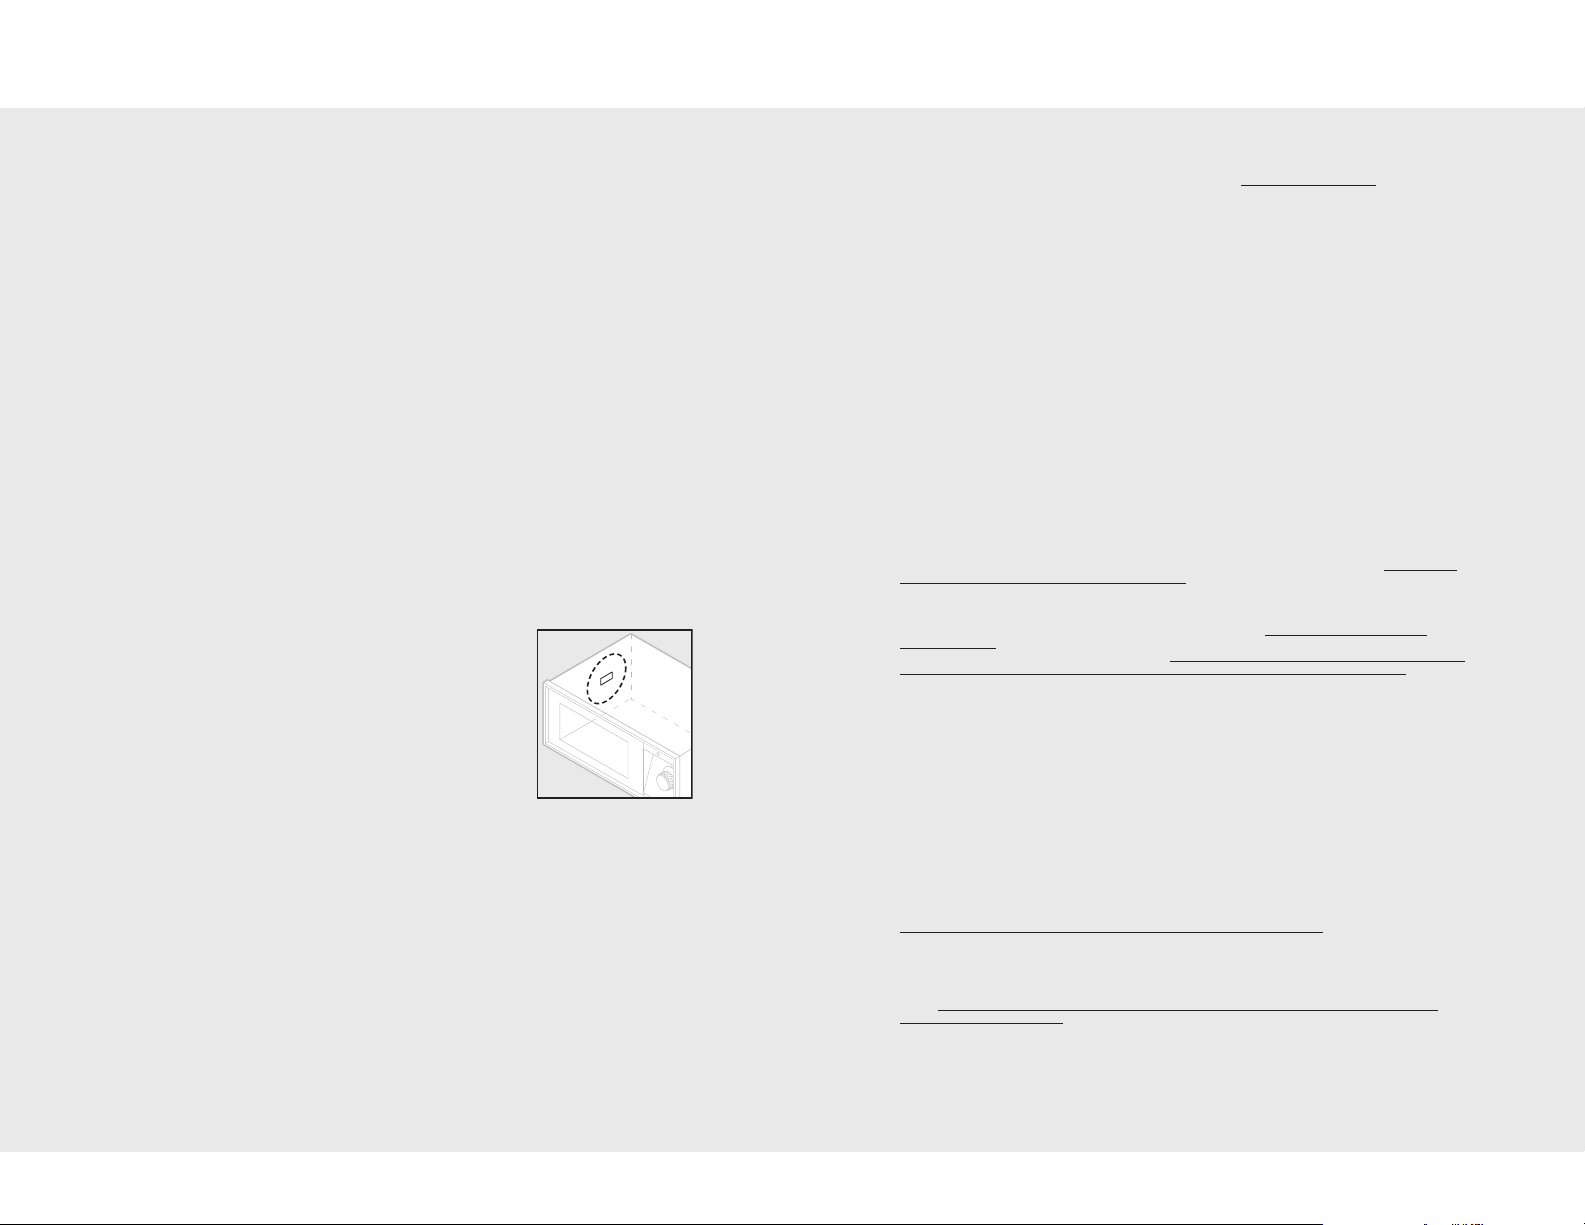
serial number for your warming drawer Rating/Serial
plate is located on the left, rear side.
Model no. _____________________ Serial no. ________________________
Date of purchase _______________ Date installed ___________________
Dealer’s name __________________________________________________
Address ________________________________________________________
_______________________________________________________________
If service requires installation of parts, use only authorized parts to
insure protection under the warranty.
Keep this manual for future reference.
Warranty
UILT-IN ELECTRIC WARMING DRAWER WARRANTY
B
uilt-in electric warming drawers and all of their component parts, except as detailed below*
B
be free from defective materials or workmanship in normal household use for a period of twelve (12) months
from the date of original retail purchase. Viking Range Corporation, warrantor, agrees to repair or replace, at its
ption, any part which fails or is found to be defective during the warranty period.
o
Painted and decorative items are warranted to be free from defective materials or workmanship for a period
*
of ninety (90) days from the date of original retail purchase. ANY DEFECTS MUST BE REPORTED TO THE
SELLING DEALER WITHIN NINETY (90) DAYS FROM DATE OF ORIGINAL RETAIL PURCHASE.
iking Range Corporation uses the most up-to-dateprocesses and best materials availableto produce all color finishes.
V
However, slight color variation may be noticedbecause of the inherent differencesin painted parts andporcelain parts
as well as differences in kitchenlighting, product locations,andotherfactors.
Any electric element which fails due to defective materials or workmanship in normal household use during
he second through fifth year from the date of original retail purchase will be repaired or replaced, free of
t
charge for the part itself, with the owner paying all other costs, including labor.
IFETIME LIMITED WARRANTY (Outdoor Models Only)
Any stainless steel part which rusts through due to defective material or workmanship in normal use during the
second year through the useful lifetime of the unit from date of original retail purchase will be repaired or
eplaced, free of charge for the part itself, with the owner paying all other costs, including labor.
r
This warranty appliesto applications where use of theproduct extends beyond normal residentialuse. Examples are,
butnot limitedto, bed and breakfasts, fire stations,private clubs,churches, etc.This warranty excludes all commercial
locations such as restaurants, food service locationsandinstitutionalfood service locations.
This warranty extends to the original purchaser of the product warranted here under and to each transferee
owner of the product during the term of the warranty.
This warranty shall apply to products purchased and located in the United States and Canada. Products must
be purchased in the country where service is requested. Warranty labor shall be performed by an authorized
Viking Range Corporation service agency or representative. Warranty shall not apply to damage resulting from
abuse, accident, natural disaster, loss of electrical power to the product for any reason, alteration, outdoor use,
improper installation, improper operation, or repair or service of the product by anyone other than an
authorized Viking Range Corporation service agency or representative. This warranty does not apply to
commercial usage. Warrantor is not responsible for consequential or incidental damage whether arising out of
breach of warranty, breach of contract, or otherwise. Some jurisdictions do not allow the exclusion or limitation
of incidental of consequential damages, so the above limitation or exclusion may not apply to you.
Owner shall be responsible for proper installation, providing normal care and maintenance, providing proof of
purchase upon request, and making the appliance reasonably accessible for service. If the product or one of its
component parts contains a defect or malfunction during the warranty period, after a reasonable number of
attempts by the warrantor to remedy the defects or malfunctions, the owner is entitled to either a refund or
replacement of the product or its component part or parts. Warrantor’s liability on any claim of any kind, with
respect to the goods or services covered hereunder, shall in no case exceed the price of the goods or service
or part thereof which gives rise to the claim.
Under the terms of this warranty, service must be performed by a factory authorized Viking Range Corporation
service agent or representative. Service will be provided during normal business hours, and labor performed at
overtime or premium rates shall not be covered by this warranty. To obtain warranty service, contact the dealer
from whom the product was purchased, an authorized Viking Range Corporation service agent, or Viking
Range Corporation. Provide model and serial number and date of original purchase. For the name of your
nearest authorized Viking Range Corporation service agency, call the dealer from whom the product was
purchased or Viking Range Corporation.
IMPORTANT: Retain proof of original purchase to establish warranty period.
The return of the Owner Registration Card is not a condition of warranty coverage.
return the Owner Registration Card so that Viking Range Corporation can contact you should any question of
safety arise which could affect you.
Any implied warranties of merchantability and fitness applicable to the above described electric element are
limited in duration to the period of coverage of the applicable express written limited warranties set forth
above. Some jurisdictions DO NOT allow limitations on how long an implied warranty lasts, so the above
limitation may not apply to you. This warranty gives you specific legal rights, and you may also have other
rights which may vary from jurisdiction to jurisdiction.
L
ONE YEAR FULL WARRANTY
FIVE YEAR LIMITED WARRANTY
NINETY (90) DAY RESIDENTIAL PLUS WARRANTY
WARRANTY SERVICE
Specifications subject to change without notice.
are warranted to
,
You should, however,
20
21
Page 12

22
23
 Loading...