

Viking Freestanding Refrigerated Drawer, Undercounter Refrigerated Drawer Use & Installation Manual
Page 1

F20411E EN
(111909J)
Viking Range Corporation
111 Front Street
Greenwood, Mississippi 38930 USA
(662) 455-1200
For product information
call 1-888-VIKNG1 (845-4641)
or visit the Viking Web Site at
vikingrange.com
Viking Use/Installation Guide
Undercounter/Freestanding Refrigerated Drawer
Page 2

3
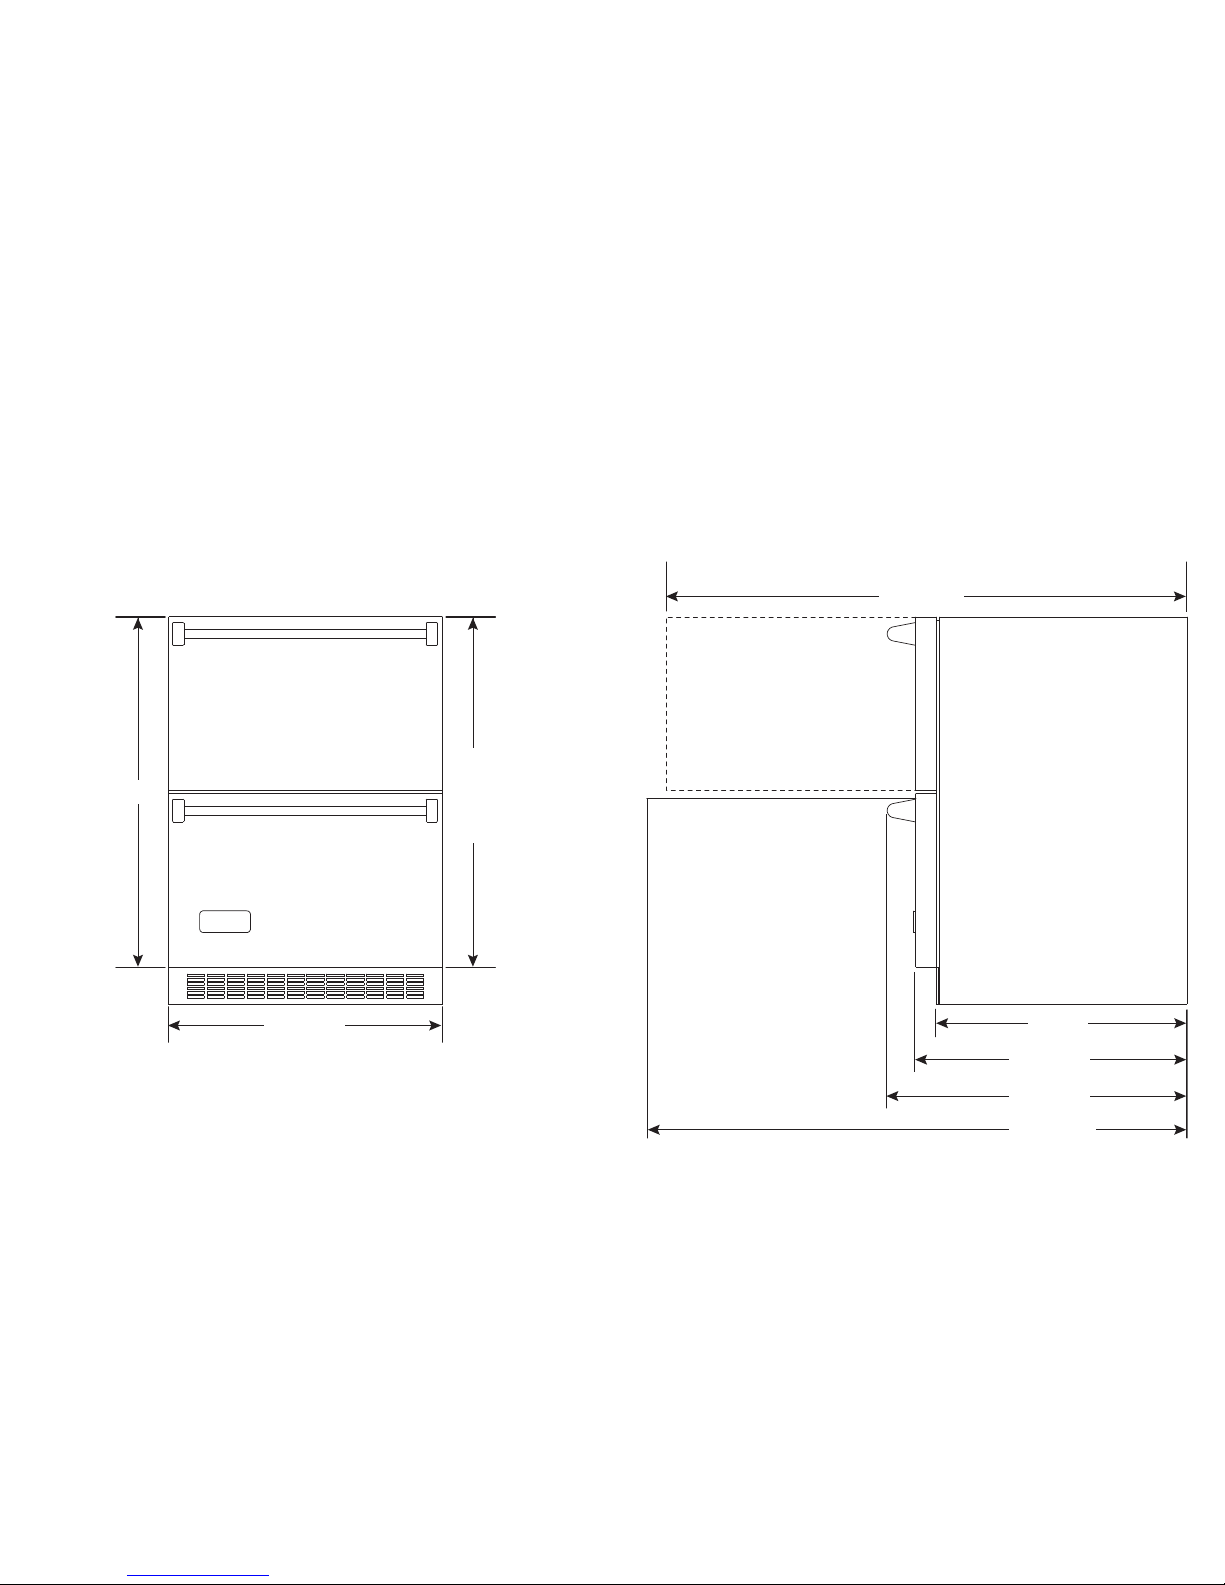
UNDERCOUNTER CABINET CUTOUT
AA
24” (61.0 cm)*
BB
Min. 34-1/2” (87.6 cm)
Max. 35-1/8” (89.2 cm)
CC
24” (61.0 cm)
Retain for Future Reference
IMPORTANT - PLEASE READ AND FOLLOW
••
Before beginning, please read these instructions completely and carefully.
• Do not remove permanently affixed labels, warnings, or plates from the product. This may void the warranty.
• Please observe all local and national codes and ordinances.
• Please ensure that this product is properly grounded.
• The installer should leave these instructions with the consumer who should retain for local inspector’s use and for future reference.
TToo rreedd uuccee tthhee rriisskk ooff ffiirree,, eelleeccttrriiccaall sshhoocckk,, oorr iinnjjuurryy wwhheenn uussiinngg yyoouurr rreeffrriiggeerraatteedd ddrraawweerr,, ffoollllooww bbaassiicc pprree ccaauuttiioonnss
iinncclluuddiinngg tthhee ffoolllloowwii nngg::
•FOR YOUR SAFETY•
DO NOT STORE OR USE GASOLINE OR OTHER FLAMMABLE VAPORS AND LIQUIDS IN THE VICINITY OF THIS OR
ANY OTHER APPLIANCE. THE FUMES CAN CREATE A FIRE HAZARD OR EXPLOSION.
IItt iiss yyoouurr rreessppoonnssiibbiilliittyy ttoo bbee ssuurree yyoouurr rreeffrriiggeerraatteedd ddrraawweerr iiss::
•located so the front is not blocked to restrict incoming or discharge air flow.
•properly leveled.
•located in a well ventilated area.
•connected to the proper kind of outlet, with the correct electric supply and grounding. A 115 volt, 60 Hz, 15 amp
fused electrical supply is required.
NNOOTTEE::
Time delay fuse or circuit breaker is recommended.
•not used by anyone unable to operate it properly.
•used only for its intended purpose.
•properly maintained.
•SAVE THESE INSTRUCTIONS•
SUFFOCATION HAZARD
Remove doors from your old refrigerated drawer. Failure to do so can
result in child entrapment, which can cause death or brain damage.
IMPORTANT: Child entrapment and suffocation are not problems of the
past. Junked or abandoned refrigerated drawers are still dangerous, even if
they will sit for “just a few days.” If you are getting rid of your refrigerated
drawer, please follow the instructions below to help prevent accidents.
BEFORE YOU THROW AWAY YOUR OLD REFRIGERATION PRODUCT:
•Take off the doors.
•Leave the shelves in place so that children may not easily climb inside.
2
B
C
A
*
*
Cabinet Cutout
*Optional: Cutout
for electrical outlet
can be placed in
adjacent cabinetry.
DANGER
WARNING
A GFI shall be used if required by NFPA-70 (National Electric Code), federal/state/local laws, or local
ordinances.
• The required use of a GFI is normally related to the location of a receptacle with respect to any
significant sources of water or moisture.
• Viking Range Corporation will NOT warranty any problems resulting from GFI outlets which are not
installed properly or do not meet the requirements below.
If the use of a GFI is required
, it should be:
• Of the receptacle type (breaker type or portable type NOT recommended)
• Used with permanent wiring only (temporary or portable wiring NOT recommended)
• On a dedicated circuit (no other receptacles, switches or loads in the circuit)
• Connected to a standard breaker of appropriate size (GFI breaker of the same size NOT recommended)
• Rated for Class A (5 mA +/- 1 mA trip current) as per UL 943 standard)
• In good condition and free from any loose-fitting gaskets (if applicable in outdoor situations)
• Protected from moisture (water, steam, high humidity) as much as reasonably possible
PROPER DISPOSAL OF YOUR OLD REFRIGERATION PRODUCT
Page 3
54
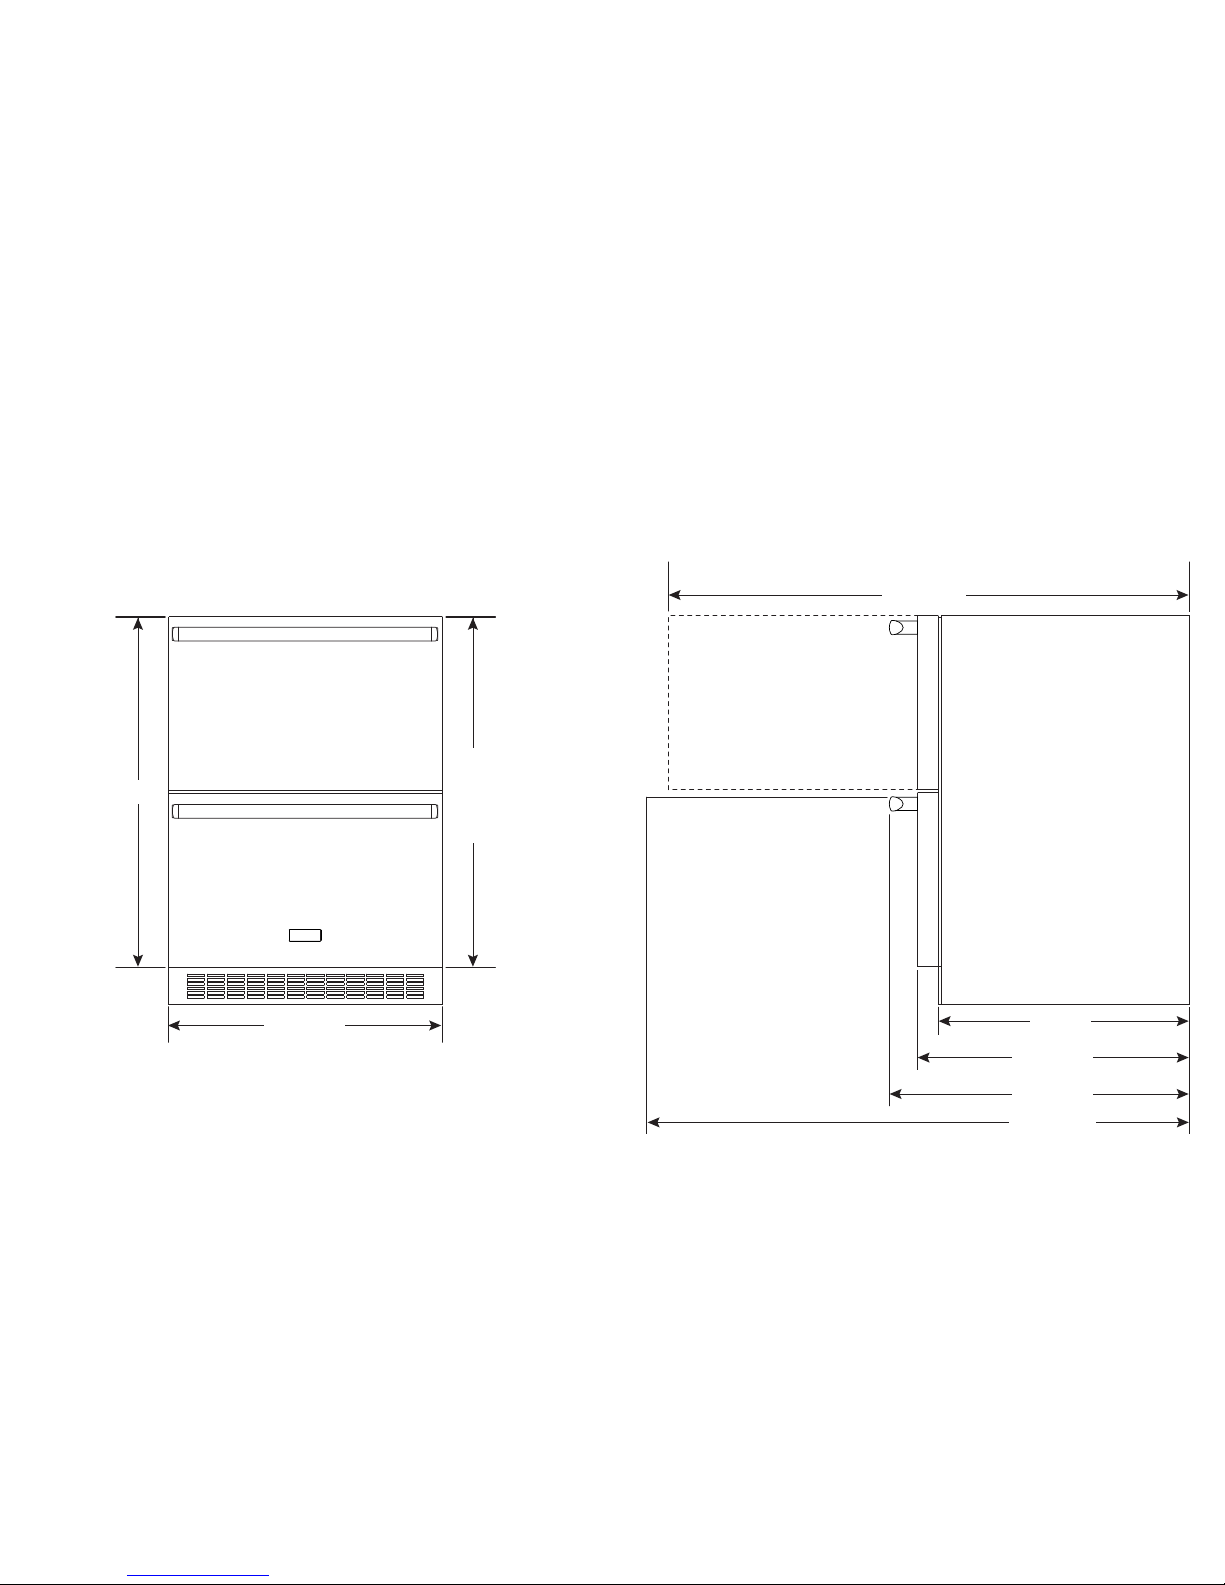
SPECIFICATIONS/DIMENSIONS PROFESSIONAL
BBaassiicc EElleeccttrriicc DDaattaa
•115 VAC/60 Hz
•Maximum amps - 3.3
•Approximate Shipping Weight - 180 lbs. (81.8 kg)
30-3/4”
(78.1 cm)
Min. 34-1/4”
(87.0 cm)
to
Max. 35”
(88.9 cm)
with leveling
legs fully
extended.
23-7/8” (60.6 cm)
Front View
Side View
26-7/8” (68.3 cm)
24-3/8” (61.9 cm)
22” (55.9 cm)
46-7/8” (119.0 cm)
48-3/4” (123.8 cm)
Page 4
76
SPECIFICATIONS/DIMENSIONS DESIGNER
BBaassiicc EElleeccttrriicc DDaatta
a
•115 VAC/60 Hz
•Maximum amps - 3.3
•Approximate shipping weight - 180 lbs. (81.8 kg)
30-3/4”
(78.1 cm)
Min. 34-1/4”
(87.0 cm)
to
Max. 35”
(88.9 cm)
with leveling
legs fully
extended.
23-7/8” (60.6 cm)
Front View
Side View
26-7/8” (68.3 cm)
24-3/8” (61.9 cm)
22” (55.9 cm)
46-1/2” (118.1 cm)
48-3/4” (123.8 cm)
Page 5

9
8
AREA REQUIREMENTS
Units Certified for Indoor Use - (black outer cabinet)
MUST BE INSTALLED IN AN AREA PROTECTED FROM THE ELEMENTS, SUCH AS WIND, RAIN, WATER (SPRAY OR
DRIP).
1. Place unit so the front side will be completely unobstructed to provide proper air flow. The unit may be closed in
on the top and three sides, but the front
MMUUSSTT BBEE
unobstructed for air circulation and proper operation.
Installation should be such that the cabinet can be moved for servicing if necessary.
2. Unit should be in a well ventilated area. Best results are obtained at temperatures between 55°F (12.8°C) and 80°F
(27°C) for built-in products and 55°F (12.8°C) and 90°F (32°C) for freestanding products.
3. Provisions for electricity and water connection should be determined before placing unit in proper place.
Units Certified for Outdoor Use - outdoor models contain a T after the base model number (ex. VURD144T) and
have a stainless steel outer cabinet.
MUST BE INSTALLED IN AN AREA PROTECTED FROM THE ELEMENTS, SUCH AS WIND, RAIN, WATER (SPRAY OR
DRIP).
1. Place unit so the front side will be completely unobstructed to provide proper air flow. The unit may be closed in
on the top and three sides, but the front
MMUUSSTT BBEE
unobstructed for air circulation and proper operation.
Installation should be such that the cabinet can be moved for servicing if necessary.
2. Unit should be in a well ventilated area with temperature above 40°F (4°C) and below 110°F (43°C).
3. Provisions for electricity should be determined before placing unit in proper place.
GENERAL INFORMATION
UUnnppaacckk
1. Remove banding from bottom of carton. Lift carton up and off of the unit.
2. Remove all tape and packaging material from the outside and inside of the cabinet.
3
. Keep all carton packaging until your unit has been thoroughly inspected and found to be in good condition.
IIMMPPOORRTTAANNTT!!
Disconnect power source before adjusting leveling legs. A cabinet “anti-tip” device is mounted to the back of your
refrigerated drawer. If installation is a built-in undercounter application, you do not need to apply this feature. If your
installation is a free-standing application with no counter top directly above the top of the refrigerated drawer, you
must apply this feature to prevent the unit from tipping forward when the drawers are pulled out. the “anti-tip” device
is attached at the back of each cabinet. Please see installation instructions supplied with the “anti-tip” device.
WARNING
LEG LEVELER INSTALLATION
RReeaadd BBeeffoorree IInnssttaalllliinngg LLeegg LLeevveelleerrss
1. Four leveling legs are pre-installed in the base of the unit at the factory.
2. The unit should be leveled from front to back and side to side. If floor
conditions do not allow the unit to sit level, adjust the leg levelers by turning
the required leg leveler counter-clockwise to increase the height and clockwise
to reduce the height.
WARNING
Do not lay unit on top, side, back, or front. If unit is accidentally laid in
any position other than right side up, then the unit must remain in the
upright position for at least 24 hours before plugging the unit in.
INSTALLING ANTI-TIP DEVICE
1. Push the unit against the wall so that the anti-tip bracket is flush to the wall adjacent to the back panel. Level
the unit with the leveling legs provided in the cabinet bottom. (See Leveling Legs on previous page.)
2. Using a pencil and the bracket as a template, trace the bracket on the wall, making sure two of the screw holes are
aligned with a stud in the wall.
3. Pull the unit away from the wall.
4. Remove the screws that connect the upper and lower sections of the anti-tip bracket.
5. Place the bracket on the wall and mark and drill 3/16” diameter Pilot holes for the provided 1/4” lag screws.
Mount the lower section ot the wall with the 1/4” lag screws.
6. Move the unit into place aligning the screw holes between the upper and lower brackets and secure with the
screws removed in Step 4.
A
cabinet anti-tip device is mounted to the back of your refrigerated drawer unit. If your installation is a built-in
u
ndercounter application with a countertop directly above the unit, this item can be removed. It does not need to be
applied.
If your unit is a free-standing application with no countertop directly above the top of the unit, you must apply this
feature to prevent the unit from tipping forward when the drawers are pulled out. The anti-tip device is installed on the
back of the unit. The anti-tip device reduces the chance of personal injury as well as property damage when properly
installed between the back of the unit and the adjacent wall. Please see the following instructions for installing the antitip device.
CAUTION
FIGURE 4
Remove these screws to seperate
upper and lower sections of anti-tip
bracket.
To Refrigerated
Drawer Cabinet
To wall
1/4” Lag screws
into wall
FIGURE 3
Anti-Tip device
Page 6

10
11
FULL OVERLAY PANEL INSTALLATION
Step #1
1
. A #10 pan head wood screw should be used to properly secure the overlay panel. A total of 8 screws will be
n
eeded.
2. Use only pan head screws.
3. Do not select a screw that is longer than the wood thickness of the screw locations.
4. Use recommended pilot holes for the frame material. (Use chart below.)
Gasket
5/16 Phillips Head Screws
Holding Drawer Front (8 total)
Step #2
RReemmoovvee DDrraawweerr FFrroonntts
s
(Note: The overlay panel may be installed without removing the drawer fronts from the drawer bodies, but the full
drawer assembly is not as easy to handle as the drawer front alone.)
1. Remove drawer from unit. Begin by
pulling ou t the drawer. Locat e the
drawer lock which can be found on the
outside of the cabinet slide (Figure 1).
Push the back of the draw er lock
forward and then down, releasing the
drawer from the cabinet slide (Figure 2).
Repeat this on the opposite side of the
drawer. Lift the drawer up from the
slides at 90oto fully remove the drawer
from the cabinet (Figure 3).
2. Remo ve draw er front s. Do th is by
removing the 8 phillips screws and
washers securing the drawer front to
the drawer body. Mark lightly with an
erasable marker the position of the
stainless drawer liner where it is secured
to the stainless drawer before removing
screws.
3. Remove the gasket from the drawer
front. Do this by pulling the gasket out
of the channel that holds it to the
drawer front. Th is will expo se the
clearan ce hol es for mounti ng the
overlay panel.
PPiilloott HHoollee DDrriillll SSiizzeess ffoorr WWoooodd SSccrreewwss
WWoooodd SSccrreeww SSiizzee ##1100
WWoorrkk MMaatteerriiaall
Pilot Hole Size
HHaarrddwwoooodd
3/32
SSooffttwwoooodd
5/64
Figure 1
Figure 2
Figure 3
NOTE: Drawer divider not shown.
FULL OVERLAY PANEL INSTALLATION
Page 7

12
FULL OVERLAY PANEL INSTALLATION (con’t)
Step #3
SSiizziinngg tthhee OOvveerrllaayy PPaanneell
Step #4
AAttttaacchhiinngg tthhee OOvveerrllaayy PPaanneell ttoo tthhee DDoooorr
1. Set the overlay panel on drawer front face and align edges. Clamp panel in position and mark pilot hole locations.
See Step #3 for nominal size and hole locations. Drill pilot holes (remove panel if necessary, re-align and re-clamp
overlay to drawer face.)
2. Insert wood screws through clearance holes and tighten to secure overlay panel.
3. Reinstall gasket into channel. Make sure the corners are inserted fully.
Step #5
RReeaattttaacchh DDrraawweerr FFrroonntt ttoo DDrraawweerr BBooddyy
Align mounting holes on drawer body with mounting holes on drawer front. Align the door liner to the front flanges by
using the erasable marker alignment lines that were applied prior to removing the door from the drawer. Reinstall
phillips head screws and washers. Snug down, but do not tighten fully, final adjustment of drawer front will be done
after reinstalling the drawer.
Step #6
RReeiinnssttaallll tthhee DDrraawweerr
1. Fully extend drawer slides and place drawer on slides. Be sure that drawer sits evenly on both sides.
2. Lock drawers into drawer slides. Push drawer locks down and then back to relock the drawer into the slide.
Step #7
AAddjjuusstt DDrraawweerr FFrroonntt
1. Adjust drawer front to achieve a 1/8” gap from the top of the drawer front to the top of the cabinet or (for bottom
drawers) 1/8” from the top of the drawer front to the bottom of the top drawer, the drawer front should be centered
between the cabinet edges.
2. Fully tighten phillips head screws
23-5/8” (60.0 cm)
15-3/16”
(38.6 cm)
14-5/8”
(37.1 cm)
7-19/32”
(19.3 cm)
9/16”
(1.4 cm)
9/16” (1.4 cm)
11-13/16” (30.0 cm)
23-1/16” (58.6 cm)
13
FINAL PREPARATION
1. Some stainless steel parts may have a plastic protective wrap which must be peeled off. The interior of the unit should be
washed thoroughly with hot, soapy water, rinsed and wiped dry to remove film residue and any installation dust or debris
before being used. Solutions stronger than soap and water are rarely needed.
2. All stainless steel parts should be wiped with hot soapy water. If buildup occurs, do not use steel wool, abrasive cloths,
cleaners, or powders. If it is necessary to scrape stainless steel to remove encrusted materials, soak with hot, wet cloths to
loosen the material, then use a wood or nylon scraper. Do not use a metal knife, spatula, or any other metal tool to scrape
stainless steel; scratches are almost impossible to remove.
ELECTRICAL CONNECTION
EElleeccttrriiccaall RReeqquuiirreemmeennttss
A
115 volt, 60 Hz, AC only 15 amp fused electrical supply is required. (A time delay
f
use or circuit breaker is recommended.) It is recommended that a separate circuit,
serving only this appliance, be provided.
••EELLEECCTTRRIICCAALL GGRROOUUNNDD IISS RREEQQUUIIRREEDD OONN TTHHIISS AAPPPPLLIIAANNCCEE..
••DDOO NNOOTT UUNNDDEERR AANNYY CCIIRRCCUUMMSSTTAANNCCEESS RREEMMOOVVEE TTHHEE PPOOWWEERR SSUUPPPPLLYY CCOORRDD
GGRROOUUNNDD PPLLUUGG..
••DDOO NNOOTT UUSSEE AANN EEXXTTEENNSSIIOONN CCOORRDD
RReeccoommmmeennddeedd GGrroouunnddiinngg MMeetthhooddss
For your personal safety, this unit must be grounded. This appliance is equipped with a 7’ (2.1 m) power supply cord having a 3prong grounding plug. To minimize possible shock hazard, the cord must be plugged into a mating 3-prong grounding type wall
receptacle grounded in accordance with the National Electrical Code and local codes and ordinances. If the circuit does not have
a grounding type receptacle, it is the responsibility and obligation of the customer to exchange the existing receptacle in
accordance with the National Electrical Code and applicable local codes and ordinances. The third ground plug SHOULD NOT,
under any circumstances, be cut or removed. All UL listed refrigerated drawers are equipped with this type of plug.
Power Supply
w
ith 3-prong
g
rounding plug
Grounding type wall
receptacle
ELECTRICAL SHOCK HAZARD
Failure to follow these instructions could result in fire or electrical
shock.
OPERATING INSTRUCTIONS
GGeenneerraall TTiippss aanndd SSuuggggeessttiioonnss
•After making a temperature adjustment, allow at least 24 hours for your unit to reach a new temperature setting.
•The motor will start and stop often. It must do this to maintain the temperature setting.
•Unplug the unit before working on anything with the electrical system.
•Exercise caution when sweeping, vacuuming, or mopping near the front of the unit.
•Avoid leaning on the drawer fronts. You may bend the drawer slides or tip the unit.
WARNING
Page 8

CCoonnttrrooll CCoonnffiirrmmaattiioonn//CCoommmmeenntt
DDiissppllaayy wwiillll bbee bbllaannkk wwhheenn rreeffrriiggeerraattiioonn ssyytteemm iiss ooffff.. LLiigghhttss wwiillll ssttiillll ffuunnccttiioonn,, bbuutt wwiillll ttiimmee--oouutt 1155 mmiinnuutteess aafftteerr
eeaacchh aaccttiivvaattiioonn,, iiff ddoooorr iiss lleefftt ooppeenn oorr ddiissppllaayy lliigghhttiinngg iiss oonn,, ttoo pprreevveenntt oovveerrhheeaattiinngg..
““SSeett”” wwii llll aappppeeaarr iinn ddiissppllaayy wwhheenn iinn sseett--ppooiinntt mmooddee.. ““SSEETT”” mmooddee wwiillll aauuttoommaattiiccaallllyy ttiimmee--oouutt iinn 1100 sseeccoonnddss iiff nnoo
kkeeyyppaadd aaccttiivviittyy ooccccuurrss,, oorr yyoouu mmaayy eexxiitt ““SSEETT”” mmooddee bbyy pprreessssiinngg tthhee kkeeyyppaadd aa sseeccoonndd ttiimmee..
TTeemmppeerraattuurree vvaarriiaattiioonn iinn ““ccoommppaarrttmmeenntt aaiirr””,, aabboovvee aanndd bbeellooww sseett--ppooiinntt,, iiss aa nnoorr mmaall eeffffeecctt ooff rreeffrriiggeerraattiioonn ssyysstteemm
ccyycclliinngg oonn aanndd ooffff.. SSttoorreedd iitteemmss wwiillll nnoott eexxppeerriieenn ccee tt hhee ffuullll tteemmppeerraattuurree sswwiinngg ooff tthhee ccoommppaarrttmmeenntt aaiirr dduuee ttoo tthhee
ddaammppeenniinngg eeffffeecctt ooff tthheeiirr tt hheerrmmaall mmaa ssss..
==
IInn aaddddiittiioonn,, tt hhee ccoonnttrrooll ppaanneell iiss hhiiddddeenn wwhheenn ddoooorr iiss cclloosseedd..
DDiissppllaayy wwiillll ffllaa sshh ffoouurr ((44)) ttiimmeess,, tthheenn uunniitt wwiillll eenntteerr SSaabbbbaatthh MMooddee.. TThhee ddiissppllaayy,, aauuddiibbllee aa llaarrmmss,, LLEEDD aanndd lliigghhttss wwiillll
bbee ddiissaabblleedd.. SSaabbbbaatthh MMooddee wwiillll aauuttoommaattiiccaallllyy ttiimmee--oouutt iinn 3366 hhoouurrss,, oorr cc aann bbee eexxiitteedd bbyy rreeppeeaattiinngg tthhee eennaabbllee kkeeyyppaadd
rroouu ttiinnee..
LLEEDD ddiissppllaayyss sstteeaaddyy ggrreeeenn wwhheenn TTrruuPPrrootteecctt™ iiss eennaabblleedd..
AAuuddiibbll ee aallaarrmm wwiillll ss oouunndd 33--ttiimmeess eevveerryy 3300--sseeccoonnddss,, LLEE DD wwiillll ffllaasshh ggrreeeenn..
AAllaarrmm wwiillll ssoouunndd 66--ttiimmee ss eevveerryy mmiinnuuttee aanndd LLEEDD wwiillll ffllaasshh rreedd iiff pprroodduucctt tteemmppeerraattuurree eexxccuurrssiioonnss ooccccuurr ffoorr aa dduurraattiioonn
oouuttssiiddee aacccceeppttaabbllee lliimmiittss..
LLEEDD wwiillll ffllaasshh aammbbeerr wwhheenneevveerr ppoowweerr iiss iinntteerrrruupptteedd ttoo uu nniitt.. NNoo aauuddiibbllee ssiiggnnaall..
NNoottee tthhaatt aalltthhoouugghh pprreessssiinngg tthhee kkeeyyppaadd wwiillll rreesseett tthhee aallaarrmmss,, tthhee aallaarrmm wwiillll rreessuumm ee iiff tthhee ““aallaarrmm ccoonnddiittiioonn”” ssttiillll
eexxiissttss..
LLEEDD ddiissppllaayyss sstteeaaddyy ggrreeeenn wwhheenn aallaarrmmss eennaabblleedd.. LLEEDD ddiissppllaayyss sstteeaaddyy aammbbeerr wwhheenn ddiissaabblleedd..
LIGHT
38˚
F
SET
WARMER
COLDER
˚
F/C
LIGHT
LIGHT
38˚
F
LIGHT
38˚
F
4˚
C
SET
WARMER
COLDER
˚
F/C
LIGHT
SET
WARMER
COLDER
˚
F/C
LIGHT
ON
OFF
SET
WARMER
COLDER
˚
F/C
LIGHT
WARMER
COLDER
˚
F/C
LIGHT
ON
OFF
SET
WARMER
COLDER
˚
F/C
LIGHT
SET
WARMER
COLDER
˚
F/C
LIGHT
WARMER
COLDER
˚
F/C
LIGHT
FFuunnccttiioonn FFuunnccttiioonn AAcccceessss
TTuurrnn UUnniitt OOnn && OOffff
PPrreessssiinngg aanndd hhoollddiinngg tthhee kkeeyyppaadd ffoorr 55--sseeccoonnddss wwiillll ttuurrnn tthhee uunniitt ““OONN”” oorr ““OOFFFF””..
AAddjjuusstt TTeemmppeerraattuurree SSeett--PPooiinntt TToo aaddjjuusstt tteemmppeerraattuurree sseett--ppooiinntt,, ttoouucc hh kkeeyyppaadd aanndd ccuurrrreenntt sseett--ppooiinntt wwiillll bbee ddiissppllaayyeedd..
UUssee tthhee oorr kkeeyyppaaddss ttoo aaddjjuusstt sseett--ppooiinn tt ttee mmppeerraattuurree ..
DDiissppllaayy ““AAccttuuaall”” TTeemmppeerr aattuurree DDiissppllaayy rreepprreesseennttss ““rreeaall--ttiimmee”” mmoonniittoorriinngg ooff tthhee ccoommppaarrttmmeennttss ssttoorreedd wwiinnee aanndd//oorr
ccoonntteennttss.. SSoommee tteemmppeerraattuurree fflluuccttuuaattiioonn aarroouunndd yyoouurr ddeessiirreedd sseett--ppooiinntt iiss nnoorrmmaall..
SSeelleecctt ººFF oorr ººCC DDiissppllaayy
PPrreessssiinngg tthh ee kkeeyyppaadd wwiillll ttooggggllee tthhee ddiissppllaayy bbeettwweeeenn FFaahhrreennhheeiitt aanndd CCeennttiiggrraaddee
tteemmppeerraattuurree ddiissppllaayy..
BBllaacckk--OOuutt MMooddee DDiissppllaayy aauuttoommaattiiccaallllyy sshhuuttss ooffff wwhheenn ddoooorr iiss cclloosseedd..
SSaabbbbaatthh MMooddee
PPrreessss aanndd hhoolldd tthhee kkeeyyppaadd wwhhiillee pprreessssiinngg tthhee kkeeyyppaadd ffoouurr ((44)) ttiimmeess..
TTrruuPPrrootteecctt™SSyysstteemm SSyysstteemm mmoonniittoorriinngg iiss aauuttoommaattiiccaallllyy eennaabblleedd uunnlleessss ssyysstteemm hhaass bbeeeenn ddiissaabblleedd.. ((SSeeee
bbeellooww..))
DDoooorr AAjjaarr AAllaarrmm
NN//AA
HHiigghh//LLooww TTeemmpp AAllaarr mm
NNoottee:: AA llaarrmm mmaayy ooccccuurr wwhheenn cchhaannggiinngg sseett--ppooiinnttss iinn eexxcceessss oo ff 1100ººFF,, aanndd//oorr hhiigghh uussaaggee,,
tthhiiss iiss nnoorrmmaall..
PPoowweerr FFaaiilluurree AAllaarrmm NNoo ttee:: AA llaarrmm wwiillll ooccccuurr uuppoonn iinniittiiaall iinnssttaallllaattiioonn,, ssiinnccee uunniitt wwaass rruunn aatt ffaaccttoorryy ttoo vveerriiffyy
qquuaalliittyy,, tthhiiss iiss nnoorr mmaall..
RReesseett AAll aarrmm ss
CClloossee ddoooorr ttoo rreesseett DDoooorr AAjjaarr aallaarrmm.. PPrreessss kkeeyyppaadd ttoo rreesseett aallll ootthheerr aallaarr mmss..
DDiissaabbllee//EEnnaabbllee TTrruuPPrrootteecctt
™
PPrreessss aanndd hhoolldd tthhee kkeeyyppaadd ffoorr 55--sseeccoonnddss ttoo ““ddiissaabbllee”” oorr ““eennaabbllee”” TTrruuPPrrootteecctt
™
SSyysstteemm..
15
O
N
OFF
S
ET
W
ARMER
COLDER
˚
F/C
PRESS AND HOLD
POWER FAILURE - Flashing Amber
H
IGH/LOW TEMP - Red
P
RESS ON/OFF - Reset
ALARMS OFF - Steady Amber
T
ruProtect System
38˚
14
SETTING THE CONTROLS
The temperature of our drawer unit ranges from 32°F to 45°F (0°C to 7°C).
WARMER
SET
WARMER
COLDER
˚
F/C
LIGHT
ON
OFF
SET
WARMER
COLDER
˚
F/C
LIGHT
WARMER
COLDER
˚
F/C
LIGHT
˚
F/C
LIGHT
SET
WARMER
COLDER
˚
F/C
LIGHT
˚
F/C
LIGHT
SET
WARMER
COLDER
˚
F/C
LIGHT
ON
OFF
SET
WARMER
COLDER
˚
F/C
LIGHT
TruProtect™“Basic” Function “Quick” Reference
WARMER
COLDER
˚
F/C
LIGHT
13˚
C
38˚
F
4˚
C
SA
Page 9

17
DDoooorr GGaasskkeett
The vinyl gasket may be cleaned with mild soap and water, a baking soda and water solution, or a mild scouring powder.
PPaaiinntteedd SSuurrffaacceess
W
ash with warm soapy water.
DDOO NNOOTT UUSSE
E
s
teel wool, abrasive cleansers, ammonia, acids or commercial oven cleaners
w
hich may damage the finish.
Odor in cabinet •Unit interior needs cleaning. •Clean inside of unit.
Noisy operation •Unit not level. •Adjust leveling legs.
Unit vibrates. •Unit not level. •Adjust leveling legs.
•Weak floor. •Rebuild floor or move to a different location.
Interior lighting not working. •LED light bur ned out. •Replace LED light.
•No power at outlet. •Test outlet with lamp.
Appliance will not run. •Control panel turned “OFF”. •Turn unit on with on/off pad on control panel.
•Power cord not plugged into power •Plug unit into power source
source
•House fuse blown. •Reset house fuse.
Appliance runs too long. •Prolonged door openings. •Reduce number and/or duration of openings.
•Control panel set too cold. •Raise temperature of unit via control panel.
•Condenser needs cleaning. •Clean condenser.
Moisture collects inside of unit. •Too many door openings •Reduce number of door openings.
•Prolonged door openings. •Reduce duration of door openings.
•Hot, humid weather increases •Move unit to cooler location.
condensation. •As humidity decreases, moisture will disappear.
Moisture collects on outside •Hot, humid weather increases •Move unit to a cooler location.
surface of the unit. •Control improperly set. •Reset to slightly warmer temperature.
Interior too hot/too cold •Control improperly set. •Reset control to desired temperature.
•Faulty thermometer. •Recheck with second thermometer.
PPrroobblleemm PPoossssiibbllee CCaauussee SSoolluuttiioonn
TROUBLESHOOTING CHART
LED LIGHT REPLACEMENT
Never pour liquids directly onto light assembly.
ELECTRICAL SHOCK HAZARD
Failure to disconnect the power cord when changing
the light bulb may result in electrical shock.
INTERIOR LIGHT
1. Unplug unit.
2. Remove drawers. (This is not required to remove the light, but will provide better access). See Figures 1 through 3
in Full Overlay Panel Installation on page 6.
3. Remove old lights. Use 2 small, thin bladed screwdrivers or putty knives to press in the locking tabs on the lens
housing. (Figures 4 and 5). With the locking tabs depressed, pull downward (Figure 6), the light housing will pop
free. Disconnect the wire lead by pulling straight out from the connector. Connect wire lead to new light and reinstall into metal housing. The light will only fit in the housing with the locator tabs pointing to the front of the unit.
4. Re-install drawers.
5. Plug in unit.
Figure 4 Figure 5
Figure 6
16
CLEANING AND MAINTENANCE
Any piece of equipment works better and lasts longer when maintained properly and kept clean.
CCoonnddeennsseerr
The condenser tubing inside the cabinet does not require frequent cleaning; however, satisfactory cooling depends on
adequate ventilation over the coils. Be sure that nothing obstructs the required air flow openings in front of the cabinet.
Spiders and insects can nest in and around the refrigerated drawer causing damage to the unit. Frequently brush or vacuum
lint and dirt from the condenser coils for efficient performance by unscrewing the grill on the bottom front of cabinet.
CCaabbiinneett
The cabinet can be washed with mild soap and water and thoroughly rinsed with clear water. Never use abrasive scouring
powders.
IInntteerriioorr
Wash interior compartment with mild soap and water. Do not use abrasive powder, solvent, polish cleaner or undiluted
detergent.
SSttaaiinnlleessss SStteeeell PPaarrttss
All stainless steel parts should be wiped regularly with hot soapy water. Use a liquid cleaner designed for stainless steel when
soapy water will not do the job.
DDoo nnoott uussee
steel wool, abrasive cloths, cleansers, or powders. Do not permit citrus or tomato
juice to remain on stainless steel surfaces, as citric acid will permanently discolor stainless steel.
BBrraassss PPaarrttss
CCAAUUTTIIOONN::
All brass parts are coated with an epoxy coating.
DDOO NNOOTT UUSSEE BBRRAASSSS OORR AABBRRAASSIIVVEE CCLLEEAANNEERRSS OONN TTHHEE
BBRRAASS SS PPAA RRTTSS..
All brass parts should be wiped regularly with hot soapy water. When hot soapy water will not do the job,
use every day non-abrasive household cleaners.
WARNING
CAUTION
Page 10

CCoonnttrrooll CCoonnffiirrmmaattiioonn//CCoommmmeenntt
SShhooww RRoooomm MMooddee wwiillll ddiissaabbllee tthhee rreeffrriiggeerraattoorr ssyysstteemm aanndd ffaannss wwhhiillee aalllloowwiinngg tthhee iinntteerrnnaall lliigghhttss,, ddii ssppllaayy aanndd uusseerr iinntteerrffaaccee
ppaannee ll ttoo ffuunncc ttiioonn.. LLiigghhttss wwiillll ttiimmee oouutt aaffttee rr 1155--mmiinnuutteess ooff ccoonnttiinnuuoouuss oonn-- ttiimmee wwhhiillee iinn SShhooww RRoooomm MMooddee aass aa ssaaffeettyy
ffeeaattuurree.. TThhee 1155--mmiinnuuttee lliigghhtt--oonn ttiimmee ccaann bbee rreeaaccttiivvaatteedd bbyy cc lloossiinngg aanndd ooppeenniinngg tthhee ddoooorr oorr bbyy pp rree ssssiinngg tt hhee kkeeyyppaadd..
SET
WARMER
COLDER
˚
F/C
LIGHT
WARMER
18 19
O
N
O
FF
SET
WARMER
C
OLDER
˚
F
/C
P
RESS AND HOLD
POWER FAILURE - Flashing Amber
HIGH/LOW TEMP - Red
PRESS ON/OFF - Reset
A
LARMS OFF - Steady Amber
T
ruProtect System
38˚
FFuunnccttiioonn FFuunnccttiioonn AAcccceessss
SShhooww RRoooomm MMooddee
SSeerrvviiccee DDiiaaggnnoossttiiccss
““EEnntteerr”” aanndd ““EExxiitt”” SSeerrvviiccee DDiiaaggnnoossttiiccss mmooddee bbyy pprreessssiinngg aanndd hhoollddiinngg tthhee kkeeyyppaadd
wwhhiillee pprreessssiinngg tthhee kkeeyyppaadd 44--ttiimmeess wwiitthhiinn 55--sseeccoonnddss.. SSeerrvviiccee DDiiaaggnnoossttiiccss mmooddee
aallssoo wwiillll aauu ttoommaatt iicc aallllyy eexxiitt aafftteerr 55--mmiinn uutteess ooff nnoo kkeeyyppaadd eennttrryy..
DDiissppllaayy EErrrroorr CCooddee RReeffeerreennccee::
TThhee mmiiccrroopprroocceessssoorr iinn tthhee ccoonnttrrooll ccoonnttiinnuuaallllyy mmoonniittoorrss ccrriittiiccaall rreeffrriiggeerraattiioonn ssyysstteemm
ccoommppoonneennttss ffoorr pprrooppeerr ooppeerraattiioonn.. IIff ccoommppoonneenntt ppaarraammeetteerrss eexxcc eeeedd nnoorrmmaall ooppeerraattiinngg
ssppeecciiffiiccaattiioonnss,, tthhee ddiissppllaayy wwiillll aauuttoommaattiiccaallllyy ffllaasshh tthhee rreessppeeccttiivvee eerrrroorr ccooddee aass ffoolllloowwss::
PPlleeaassee ccaallll aa qquuaalliiffiieedd sseerrvviiccee tteecchhnniicciiaann iiff aannyy ooff tthheessee ccooddeess aarree ddiissppllaayyeedd..
WARMER
WARMER
COLDER
˚
F/C
LIGHT
TruProtect™“Advanced” Function “Quick” Reference
ON
OFF
SET
WARMER
COLDER
˚
F/C
LIGHT
EEnnaabbllee tthhee SShh ooww RRoooomm MMooddee bbyy pprreessssiinngg aanndd hhoollddiinngg tthhee kkeeyyppaadd wwhhiillee
ppeerrffoorrmmiinngg aa ““PPoowweerr OOnn RReesseett””,, ((PPOORR)),, ii..ee.. -- ddiissccoonn nneecctt aanndd rreecc oonn nneecctt tthhee ppoowweerr
ssuuppppllyy tt oo uunniitt.. EExxiitt SShhooww RRoooomm MMooddee bbyy iinniittiiaattiinngg aa PPOORR oonnllyy..
E1
E2
E3
E4
Compressor fault, (high/low amps).
Condenser fan motor fault, (high/low amps).
Evaporator thermistor “sensor B” fault, (out-of-range).
Display thermistor “sensor A” fault, (out-of-range).
WARMER
COLDER
˚
F/C
LIGHT
LIGHT
SSeerrvviiccee DDiiaaggnnoossttiiccss MMooddee eennaabblleess sseerrvviiccee tt eecchhnniicciiaa nnss ttoo iiddeennttiiff yy tthhee ffiirrmmwwaarree aanndd ssooffttwwaarree vv eerrssiioonnss,, tteesstt ssttaattuuss ooff
““mmooddeell ssppeecciiffiicc”” ssyysstteemm ccoomm ppoonneennttss aanndd sseennssoorrss aanndd cchhaannggee ssttaattee ooff ccoommppoonneennttss wwhheerree aappppll iiccaabbllee,, ((ii..ee.. -- ccoommpprreessssoorr
oonn//ooffff,, eettcc......)).. WWhhiillee iinn SSeerrvviiccee DDiiaaggnnoossttiiccss MMooddee,, tteessttss aarree iinnccrreemmeenntteedd bbyy pprreessssiinngg tthhee kkeeyyppaadd aanndd ssppeecciiffiicc
ccoommppoonnee nntt ssttaattee ccaann bbee cchhaannggeedd ttoo ““oonn”” aanndd ““ooffff”” bbyy pprreessssiinngg tthh ee aanndd kkeeyyppaaddss rreessppeeccttiivveellyy.. TThhee
ffoolllloowwiinngg ccoommppoonneenntt tteessttss aarree aavvaaiillaabbllee::
Test # Component Description OK Off/Open On/Shorted
0 Temp Sensor A
1 Temp Sensor B
2 Compressor n/a
3 Interior/Ice Maker Fan n/a
4 Reverse Gas Solenoid n/a
5 Condenser Fan n/a
6 Mullion Heater n/a
7 Door A Sense n/a
8 Door B Sense n/a
9 Door C Sense n/a
Available Status Indicators
0 -
1 -
00
10
20
30
40
50
60
70
80
90
01
11
21
31
41
51
61
71
81
91
Note: Must use magnet to change state of Door C Sense.
ON
OFF
SET
PRESS AND HOLD
38˚
magnet sense area
SERVICE DIAGNOSTICS
Page 11

20 21
UNDERCOUNTER/FREESTANDING REFRIGERATED DRAWER WARRANTY
(Units certified for Indoor Use)
TTWWOO YYEEAARR FFUULLLL WWAARRRRAANNTTY
Y
U
ndercounter/freestanding refrigerated drawers and all of their components and accessories, except as detailed below*, are warranted to be free from defects in material or
w
orkmanship under normal household use for a period of two (2) years from the date of original retail purchase. Viking Range Corporation, warrantor, agrees to repair or
r
eplace, at its option, any part which fails or is found to be defective during the warranty period
*
Painted and decorative items are warranted to be free from defective materials or workmanship for a period of ninety (90) days from the date of original retail purchase.
A
NY DEFECTS MUST BE REPORTED TO THE SELLING DEALER WITHIN NINETY (90) DAYS FROM DATE OF ORIGINAL RETAIL PURCHASE.
SSIIXX YYEEAARR FFUULLLL WWAARRRRAANNTTYY
A
ny sealed refrigeration system component, as listed below, is warranted to be free from defective materials or workmanship in normal household use during the third
t
hrough the sixth year from the date of original retail purchase. Viking Range Corporation, warrantor, agrees to repair or replace, at its option, any part which fails or is found
t
o be defective during the warranty period.
SSeeaalleedd RReeffrriiggeerraattiioonn SSyysstteemm CCoommppoonneennttss::
C
ompressor, Evaporator, Condenser, Connecting Tubing, Dryer/Strainer
TTWWEELLVVEE YYEEAARR LLIIMMIITTEEDD WWAARRRRAANNTTYY
Any sealed refrigeration system component, as listed above, which fails due to defective materials or workmanship in normal household use during the seventh through the
twelfth year from the date of original retail purchase will be repaired or replaced, free of charge for the part itself, with the owner paying all other costs, including labor.
NNIINNEETTYY ((9900)) DDAAYY RREESSIIDDEENNTTIIAALL PPLLUUSS WWAARRRRAANNTTYY
T
his warranty applies to applications where use of the product extends beyond normal residential use.
E
xamples are, but not limited to, bed and breakfasts, fire stations, private clubs, churches, etc. This warranty excludes all commercial locations such as restaurants,
food service locations and institutional food service locations.
This warranty extends to the original purchaser of the product warranted hereunder and to each transferee owner of the product during the term of the warranty.
This warranty shall apply to products purchased and located in the United States and Canada. Products must be purchased in the country where service is requested.
W
arranty labor shall be performed by an authorized Viking Range Corporation service agency or representative. Warranty shall not apply to damage resulting from abuse,
accident, natural disaster, loss of electrical power to the product for any reason, alteration, improper installation, improper operation or repair or service to the product by
anyone other than an authorized Viking Range Corporation service agency or representative. Warranty shall not apply to damage resulting from indoor units being used in
outdoor situations. This warranty does not apply to commercial usage.
Warrantor is not responsible for consequential or incidental damage whether arising out of breach of
warranty, breach of contract, or otherwise. Some jurisdictions do not allow the exclusion or limitation of incidental or consequential damages, so the above limitation or
exclusion may not apply to you.
Owner shall be responsible for proper installation, providing normal care and maintenance, providing proof of purchase upon request, and making the appliance reasonably
accessible for service. If the product or one of its component parts contains a defect or malfunction during the warranty period, after a reasonable number of attempts by
the warrantor to remedy the defects or malfunctions, the owner is entitled to either a refund or replacement of the product or its component part or parts. Replacement of a
component part includes its free installation. Warrantor’s liability on any claim of any kind, with respect to the goods or services covered hereunder, shall in no case exceed
the price of the goods or service or part there of which gives rise to the claim.
WWAARRRRAANNTTYY SSEERRVVIICCEE::
Under the terms of this warranty, service must be performed by a factory authorized Viking Range Corporation service agent or representative.
Service will be provided during normal business hours, and labor performed at overtime or premium rates shall not be covered by this warranty. To obtain warranty service,
contact the dealer from whom the product was purchased, an authorized Viking Range Corporation service agent, or Viking Range Corporation. Provide model and serial
number and date of original purchase. For the name of your nearest authorized Viking Range Corporation service agency, call the dealer from whom the product was
purchased or Viking Range Corporation.
IIMMPPOORRTTAANNTT::
Retain proof of original purchase to establish warranty period.
The return of the Owner Registration Card is not a condition of warranty coverage.
You, however, should return the Owner Registration Card so that Viking Range
Corporation can contact you should any question of safety arise which could affect you.
Any implied warranties of merchantability and fitness applicable to the above described undercounter refrigerated drawer are limited in duration to the period of coverage of
the applicable express written limited warranties set forth above. Some jurisdictions do not allow limitations on how long an implied warranty lasts, so the above limitation
may not apply to you. This warranty gives you specific rights, and you may also have other rights which may vary from jurisdiction to jurisdiction.
SERVICE INFORMATION
If service is required, call your dealer or authorized service agency. The name of the authorized service agency can be
obtained from the dealer or distributor in your area.
Have the following information readily available.
• Model number
• Serial number
• Date purchased
• Name of dealer from whom purchased
Clearly describe the problem that you are having. If you are unable to obtain the name of an authorized service agency,
or if you continue to have service problems, contact Viking Range Corporation at 1-888-VIKING1 (845-4641), or write
to:
VIKING RANGE CORPORATION
PREFERRED SERVICE
1803 Hwy 82W
Greenwood, Mississippi 38930 USA
Record the following information indicated below. You will need it if service is ever required. The serial number and
model number for your refrigerated drawer is located on the front of the unit at the base of the door frame.
Model Number Serial Number
Date of Purchase Date Installed
Dealer’s Name
Address
IIff sseerrvviiccee rreeqquuiirreess iinnssttaallllaattiioonn ooff ppaarrttss,, uussee oonnllyy aauutthhoorriizzeedd ppaarrttss ttoo eennssuurree pprrootteeccttiioonn uunnddeerr tthhee wwaarr rraannttyy..
TThhiiss mmaannuuaall sshhoouulldd rreemmaaiinn wwiitthh tthhee rreeffrriiggeerraatteedd ddrraawweerr ffoorr ffuuttuurree rreeffeerree nnccee..
ENERGY SAVING TIPS
•Reduce drawer openings.
•Close the drawer as soon as you can.
•Keep the condenser coils on bottom of the unit clean. (See “Cleaning and Maintenance”.)
•
Adjust the temperature control to a war mer setting when practical.
•
Do not put hot foods in the unit.
•
Install unit away from the stove or other heat sources.
Specifications subject to change without notice.
Page 12

2322
UUNNDDEERRCCOOUUNNTTEERR//FFRREEEESSTTAANNDDIINNGG RREEFFRRIIGGEERRAATTEEDD DDRRAAWWEERR WWAARRRRAANNTTYY
(Units certified for Outdoor Use)
OONNEE YYEEAARR FFUULLLL WWAARRRRAANNTTYY
B
uilt-in/freestanding undercounter refrigerated drawers and all of their components and accessories, except as detailed below*, are warranted to be free from defects in
m
aterial or workmanship under normal household use for a period of one (1) year from the date of original retail purchase. Viking Range Corporation, warrantor, agrees to
r
epair or replace, at its option, any part which fails or is found to be defective during the warranty period.
*Painted and decorative items are warranted to be free from defective materials or workmanship for a period of ninety (90) days from the date of original retail purchase.
ANY DEFECTS MUST BE REPORTED TO THE SELLING DEALER WITHIN NINETY (90) DAYS FROM DATE OF ORIGINAL RETAIL PURCHASE.
FFIIVVEE YYEEAARR LLIIMMIITTEEDD WWAARRRRAANNTTYY
A
ny sealed refrigeration system component, as listed below, is warranted to be free from defective materials or workmanship in normal household use during the second
t
hrough the fifth year from the date of original retail purchase. Viking Range Corporation, warrantor, agrees to repair or replace, at its option, any part which fails or is found
t
o be defective during the warranty period.
SSeeaalleedd RReeffrriiggeerraattiioonn SSyysstteemm CCoommppoonneennttss::
C
ompressor, Evaporator, Condenser, Connecting Tubing, Dryer/Strainer
It is recommended that in temperatures above 100
o
F (37.8oC) and below 40oF (4.4oC) the unit be shut off. The normal operating range for the unit is between 60oF (15.6oF)
a
nd 100
o
F
(37.8
o
C
).
NNIINNEETTYY ((9900)) DDAAYY RREESSIIDDEENNTTIIAALL PPLLUUSS WWAARRRRAANNTTYY
This warranty applies to applications where use of the product extends beyond normal residential use.
E
xamples are, but not limited to, bed and breakfasts, fire stations, private clubs, churches, etc. This warranty excludes all commercial locations such as restaurants,
f
ood service locations and institutional food service locations.
This warranty extends to the original purchaser of the product warranted hereunder and to each transferee owner of the product during the term of the warranty.
This warranty shall apply to products purchased and located in the United States and Canada. Products must be purchased in the country where service is requested.
Warranty labor shall be performed by an authorized Viking Range Corporation service agency or representative. Warranty shall not apply to damage resulting from abuse,
a
ccident, natural disaster, loss of electrical power to the product for any reason, alteration, improper installation, improper operation or repair or service to the product by
anyone other than an authorized Viking Range Corporation service agency or representative. Warranty shall not apply to damage resulting from indoor units being used in
outdoor situations. This warranty does not apply to commercial usage.
Warrantor is not responsible for consequential or incidental damage whether arising out of breach
of warranty, breach of contract, or otherwise. Some jurisdictions do not allow the exclusion or limitation of incidental or consequential damages, so the above limitation or
exclusion may not apply to you.
Owner shall be responsible for proper installation, providing normal care and maintenance, providing proof of purchase upon request, and making the appliance reasonably
accessible for service. If the product or one of its component parts contains a defect or malfunction during the warranty period, after a reasonable number of attempts by
the warrantor to remedy the defects or malfunctions, the owner is entitled to either a refund or replacement of the product or its component part or parts. Replacement of a
component part includes its free installation. Warrantor’s liability on any claim of any kind, with respect to the goods or services covered hereunder, shall in no case exceed
the price of the goods or service or part there of which gives rise to the claim.
WWAARRRRAANNTTYY SSEERRVVIICCEE::
Under the terms of this warranty, service must be performed by a factory authorized Viking Range Corporation service agent or representative.
Service will be provided during normal business hours, and labor performed at overtime or premium rates shall not be covered by this warranty. To obtain warranty service,
contact the dealer from whom the product was purchased, an authorized Viking Range Corporation service agent, or Viking Range Corporation. Provide model and serial
number and date of original purchase. For the name of your nearest authorized Viking Range Corporation service agency, call the dealer from whom the product was
purchased or Viking Range Corporation.
IIMMPPOORRTTAANNTT::
Retain proof of original purchase to establish warranty period.
The return of the Owner Registration Card is not a condition of warranty coverage.
You, however, should return the Owner Registration Card so that Viking Range
Corporation can contact you should any question of safety arise which could affect you.
Any implied warranties of merchantability and fitness applicable to the above described undercounter refrigerated beverage center are limited in duration to the period of
coverage of the applicable express written limited warranties set forth above. Some jurisdictions do not allow limitations on how long an implied warranty lasts, so the above
limitation may not apply to you. This warranty gives you specific rights, and you may also have other rights which may vary from jurisdiction to jurisdiction.
Specifications subject to change without notice.
 Loading...