

Page 1
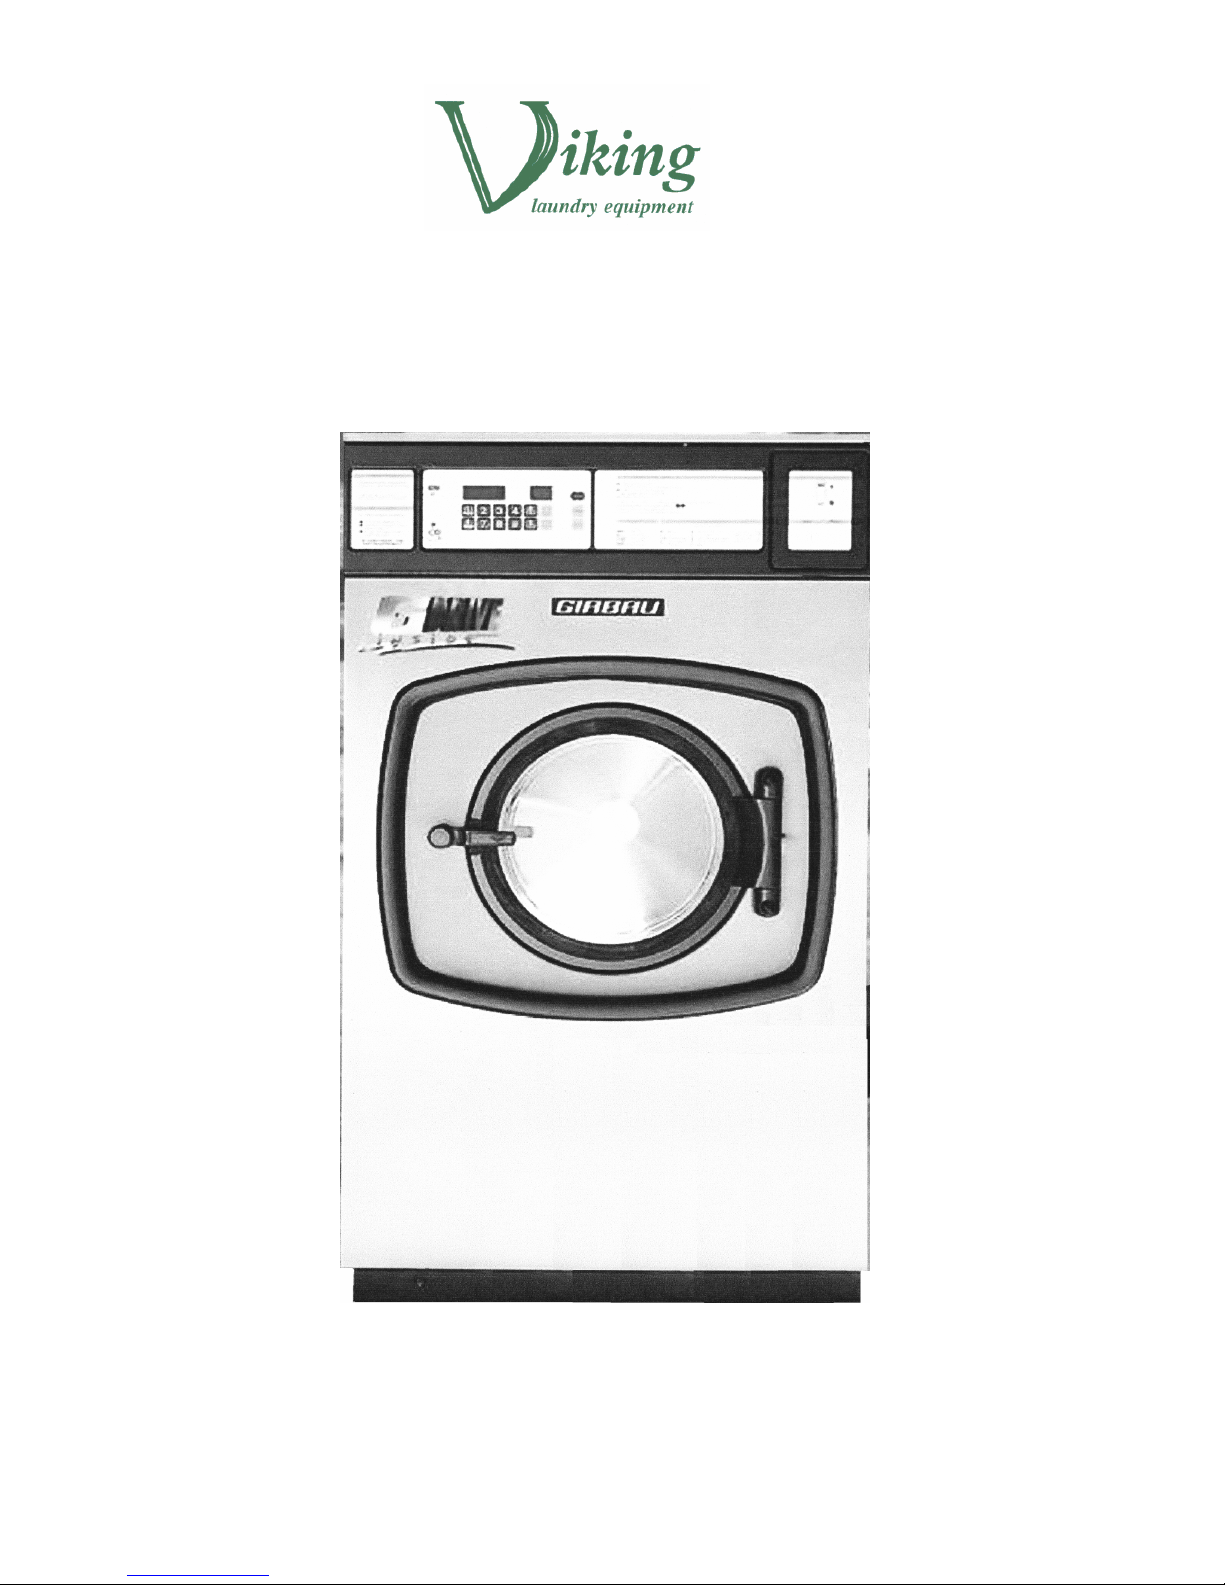
PROGRAMMING & OPERATING INSTRUCTIONS
FOR STANDARD MICROPROCESSOR CONTROLLED
WASHER-EXTRACTOR
SM 4 SERIES
Viking Laundry Equipment 1 Carlisle Road London NW9 0HZ
Tel: 020 8205 7285
Page 2

1
INTRODUCTION
THIS MANUAL COVERS THE OPERATION AND FEATURES
OF THE STANDARD MICROPROCESSOR CONTROLLED
WASHERS
SM
CONTENTS
1. SAFETY
2. CONTROL PANEL - STANDARD MICROPROCESSOR (SM)
2.1 OPENING THE DOOR
2.2 ADDINGDETERGENT ANDOTHERWASH PRODUCTS
2.3 CHOOSING THE RIGHT PROGRAMME
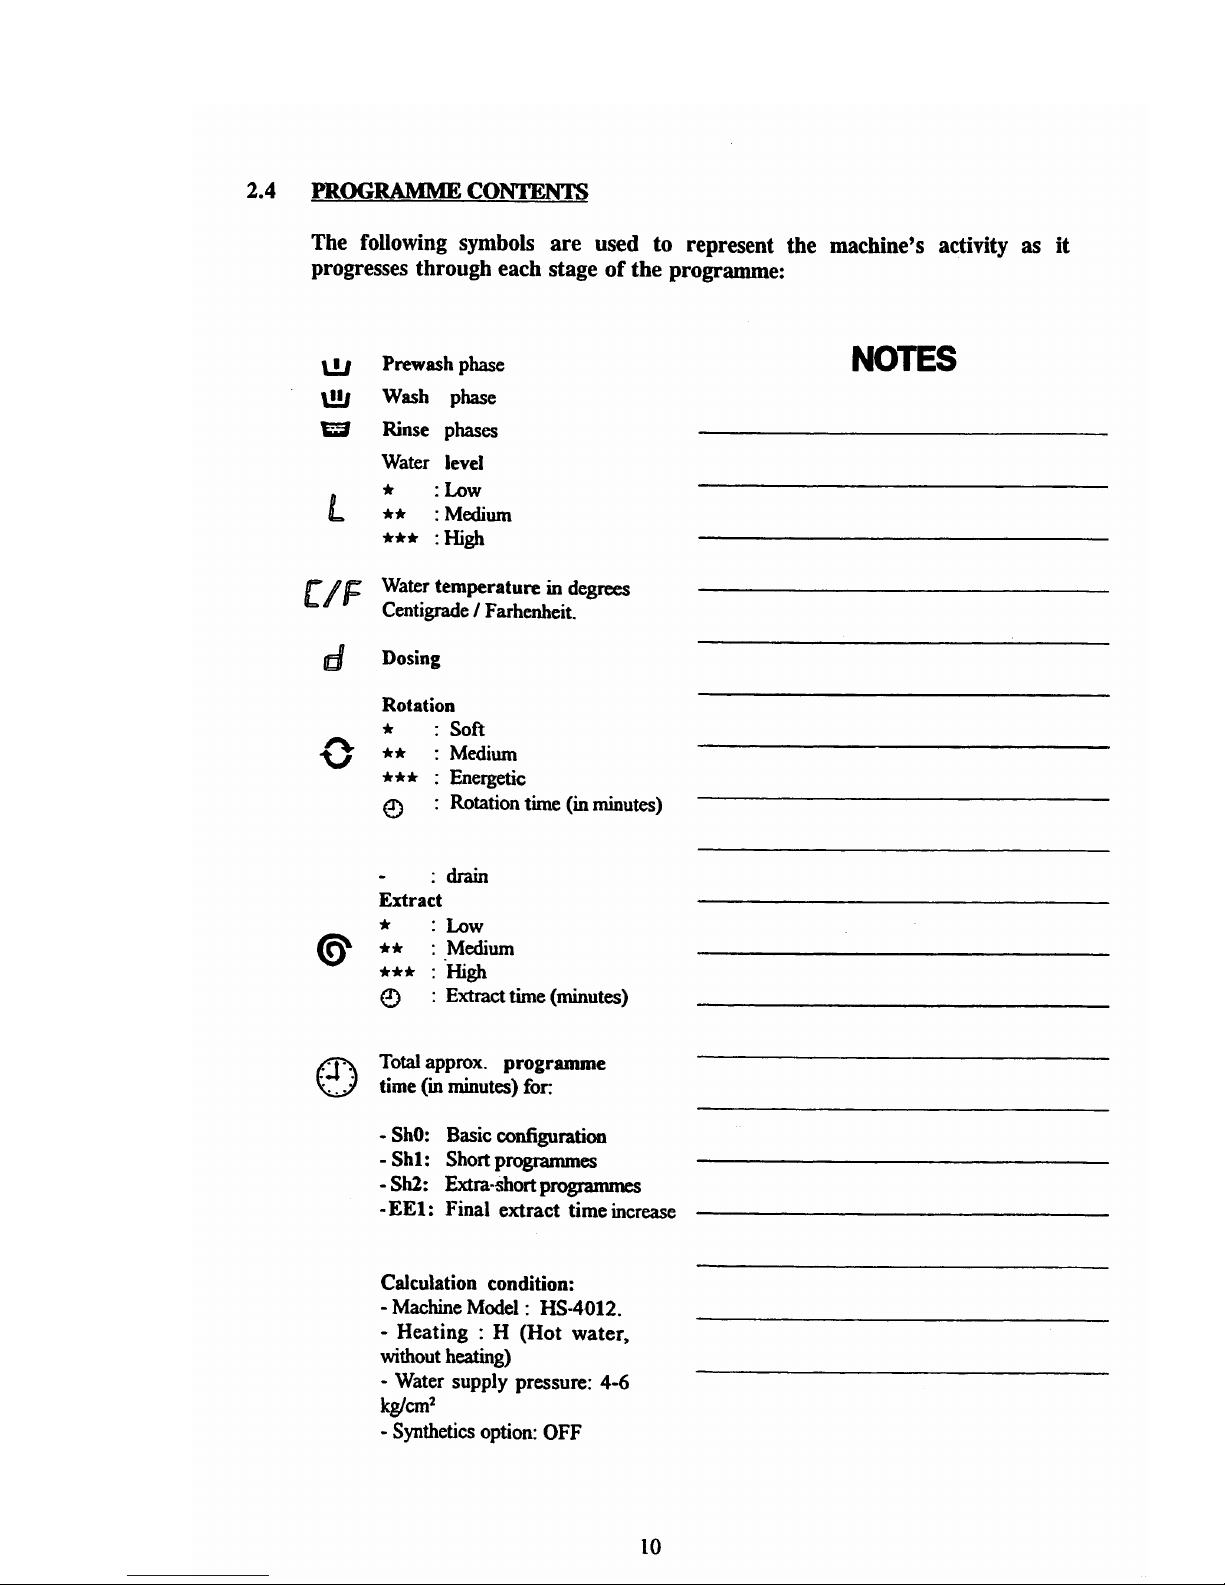
2.4 PROGRAMME CONTENTS
2.5 DISPLAY INFORMATION
2.6 ALTERING A PROGRAMME (TEMPORARY)
2.7 MODIFYING A PROGRAMME (PERMANENT)
2.8 OPERATING THE MACHINE
2.9 STOPPING THE MACHINE
3. DO'S AND DON'TS
3.1 USER MAINTENANCE
3.2 STATUS AND ALARMS
4. QUICK REFERENCE GUIDE
Page 3

2
1. SAFETY CONSIDERATIONS
Viking Laundry Equipment are pleased to advise you that these machines have been
rigorously tested and conform to CE standards for mechanical and electrical safety, carry
the CE mark of approval as well as a certificate of conformity.
They also comply with the Health and Safety Directive No 3073 Supply of Machinery
(Safety) Regulations 1992.
Modifying the machine in any way will contravene these standards and this would
invalidate the warranty.
C
E
SAFETY INSTRUCTIONS
1. All safety instructions included in this handbook should be reprinted and posted in
the laundry room.
2. Carefully readthe Operator's Instruction Handbooks beforeusing the machine.Keep
them accessible for operator's use.
3. FAILURE TO operate this machine according to the instructions can be
potentially hazardous.
4. All electrical connections, plumbing and steam MUST comply with the current
statutory safety standards and be made by qualified approved installers (refer to
Note 3).
5. The machine mustnotbe useduntil it has been commissioned by an authorised
Viking Laundry Equipment technician (Note 2).
6. Machine should only be used by qualified personnel (refer to Note 1) wholly
familiar with the machine's operation.
7. Do not allowthemachinetobe usedby children or people with handicapsthat affect
their ability to use the machine safely.
8. To minimisefire hazards, take specialcaretokeepthearea free of combustible
materials. Fire extinguishers should be easily accessible to all laundry staff.
9. Restrict access to danger areas and prevent public access to them.
10. On completion of the day's use, TURN OFF the manual supply valves and
DISCONNECT the electrical power from the external automatic switch or machine
switch isolator.
Page 4

3
11. CAUTION!
This machine has been made and designed for industrial washing in water, of
textiles that do not contain solvents. Unless approved by the manufacturer in
writing, it is not considered appropriate FOR OTHER PROCESSES.
12. BEFORE ATTEMPTING ANY SERVICE, isolate and mechanically interlock the
electrical, water, steam and compressed air supplies. Check that the machine has
COMPLETELY drained and cooled down and that no parts are still in motion.
13. NEVER operate the machine without the panels and guards, in place and
properly secured.
14. The room shall comply with the environmental conditions (air venting,
temperature, humidity, etc) specified in the Installation Instruction Handbook.
15. DO NOT OPERATE the machine if suspected of being faulty, or with missing or
broken parts.
16. Do not by-pass or disconnect any safety device. No responsibility will be
accepted if the machine has been modified (electrically or mechanically). This
could invalidate the warranty and would contravene the certificate of conformity
awarded as CE safety standards.
17. Always consult Viking Laundry Equipment or our approved service agent about
any problems you are concerned could affect safety.
18. As a safety precaution, the machine should be kept in the correct environment,
used and maintained properly.
19. WE ARE OBLIGED TO ADVISE YOU THAT VIKING LAUNDRY EQUIPMENT
ACCEPTS NO RESPONSIBILITY IF THE INSTRUCTIONS IN THIS HANDBOOK
ARE NOT FOLLOWED.
NOTES
1. Qualified Personnel refers to anyone who has carefully read the Instruction
Handbooks, has been trained and has a thorough understanding of the
machine's operation.
2. An Authorised Service Technician is one that has successfully completed
training on the product by Viking Laundry Equipment.
3. An Approved Installer is one that is suitably qualified in the procedures and
regulations that apply.
Page 5
4
SECTION TWO
Standard Microprocessor Control Panel
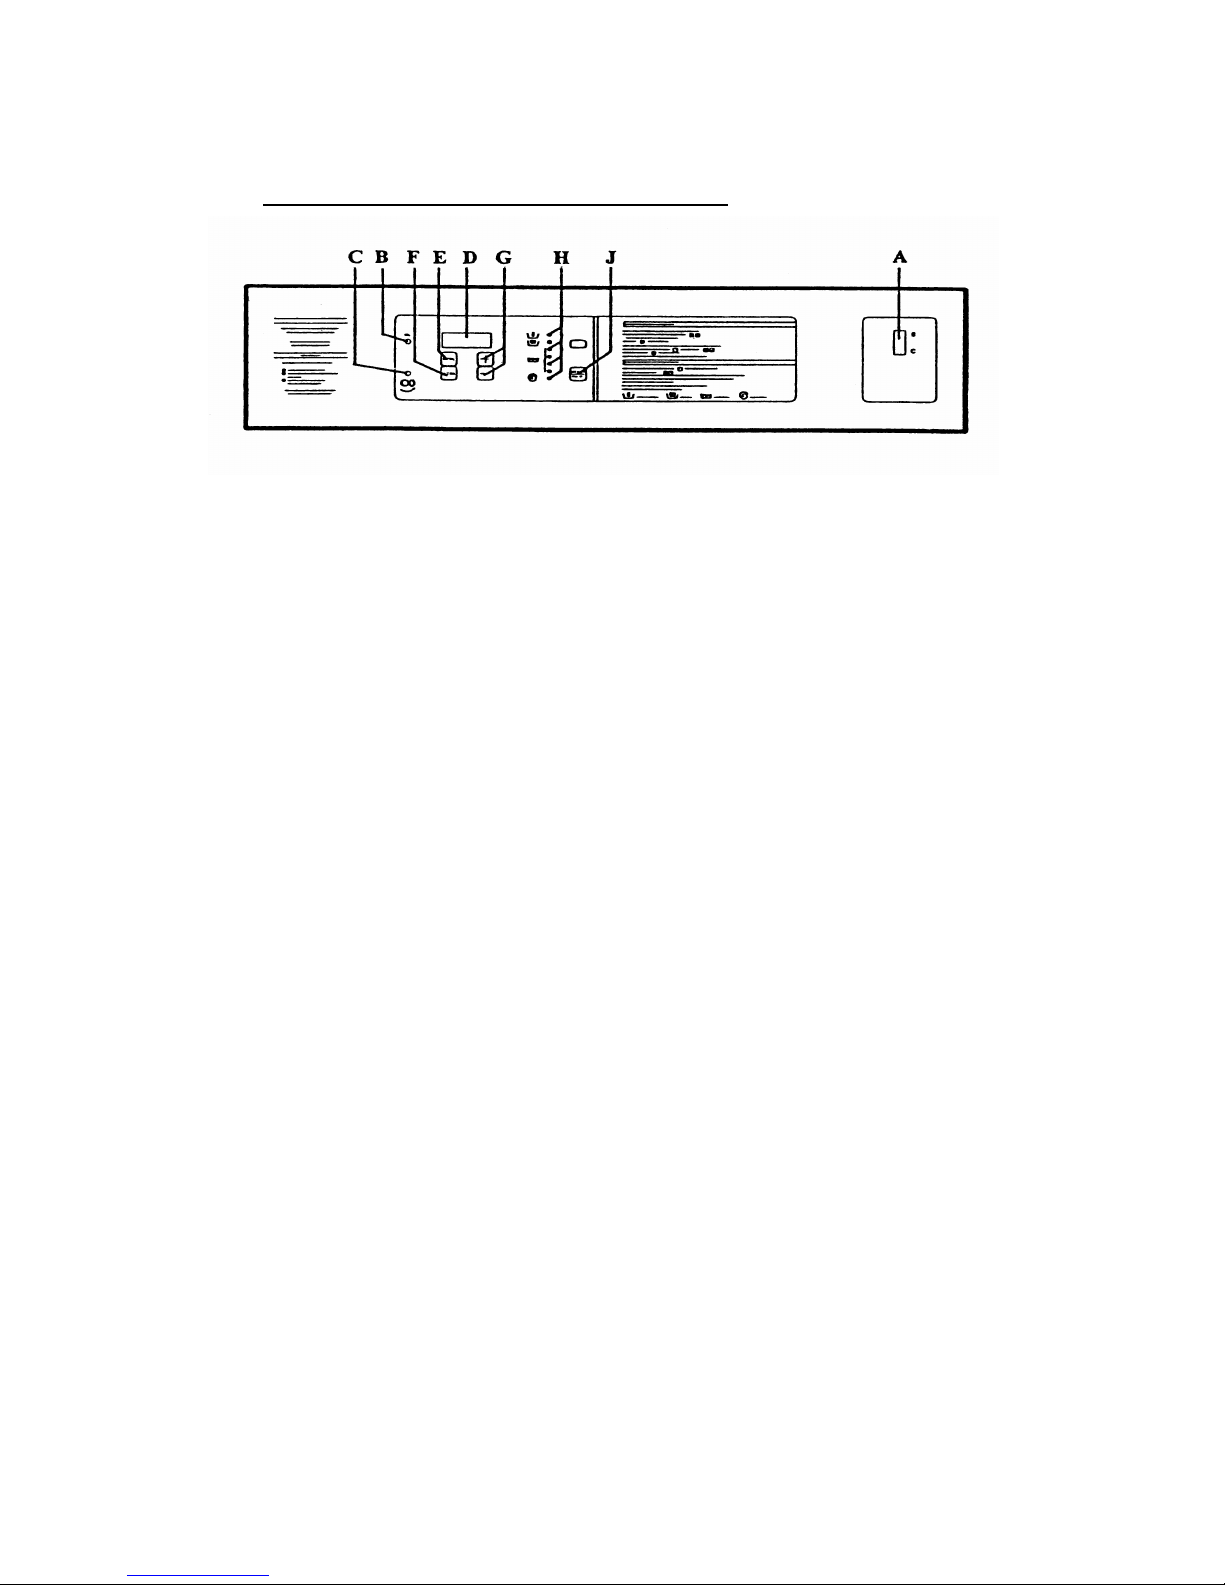
CONTROL KEYS (Fig 1)
I - 0 Switch (A)
Switches on the control circuit.
Start LED (B)
Indicates that the control circuit is on.
Door Opening Indicator (C)
Illuminates at the end of the cycle, signaling the safety lock is released.
Report Display (D)
Indicates the wash programme function, and other machine information.
Programming key PROG (E)
Permits configuration of options
Cycle Advance Key ACCEL (F)
Allows the function to extend or reduce the programme duration.
Programme and Options Selection keys + / - (G)
Permits the selection of programme, or the configuration/modification of options.
LEDS indicating the programme phase (H)
Indicates the programme format and intermittently the phase being executed.
Programme Start-Stop Key START/STOP (J)
Initiates (Starts) or stops the programme being executed.
Page 6
5
2.1 OPENING THE DOOR
This can only be done when the machine has completed its cycle and the
green LED is showing.
The machines have a safety delay to allow the drum to stop spinning before
the door can be opened. Attempting to open the door while it is locked
(Green LED not showing) is unsafe and would damage the mechanism.
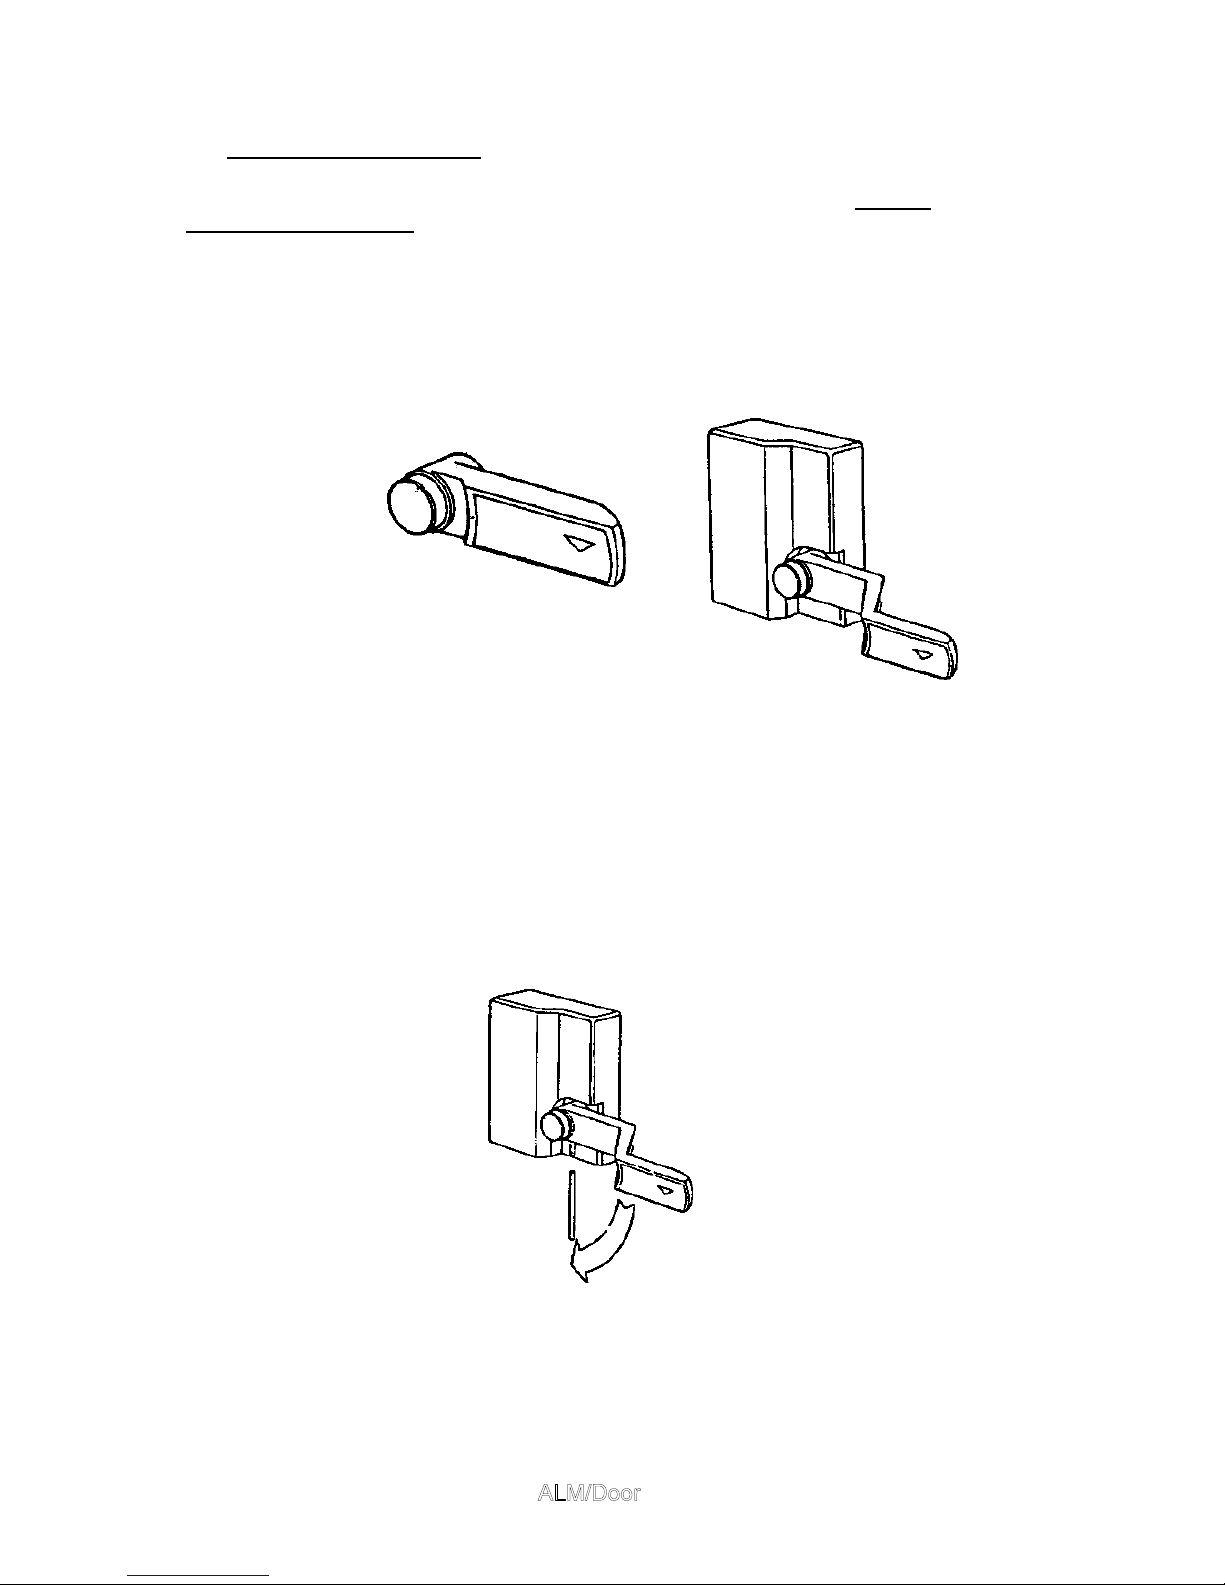
To open the door (Green LED on); turn the handle in the direction of the
arrow.
Fig 2
IN CASE OF EMERGENCY
On HS 4007/4012 models the door unlocks automatically after 5 minutes with
the power supply switched off. Before opening door ensure it is safe to do so.
On HS 4022 models only:To open the door in an emergency, insert the 3mm 'rod into the hole’ beneath
the lock cover (Fig 3) and push gently downwards on the door handle.
Fig 3
NOTE: The door interlock has a double safety system with two independent
micro switches. This system prevents the door from being opened once the
wash cycle has begun.
If the door is forced or opens inadvertently, the programme halts, an
alarm condition starts and appears on the display.
Page 7
6
At the start of a programme the machine allows 30 seconds to lock the door,
after which the cycle commences.
At the end of the programme the machine has a safety delay which allows the
drum to decelerate and stop before the door can be opened.
2.2 ADDING DETERGENT
The dispenser for detergent and other wash products is on top of the machine,
shielded by a protective cover.
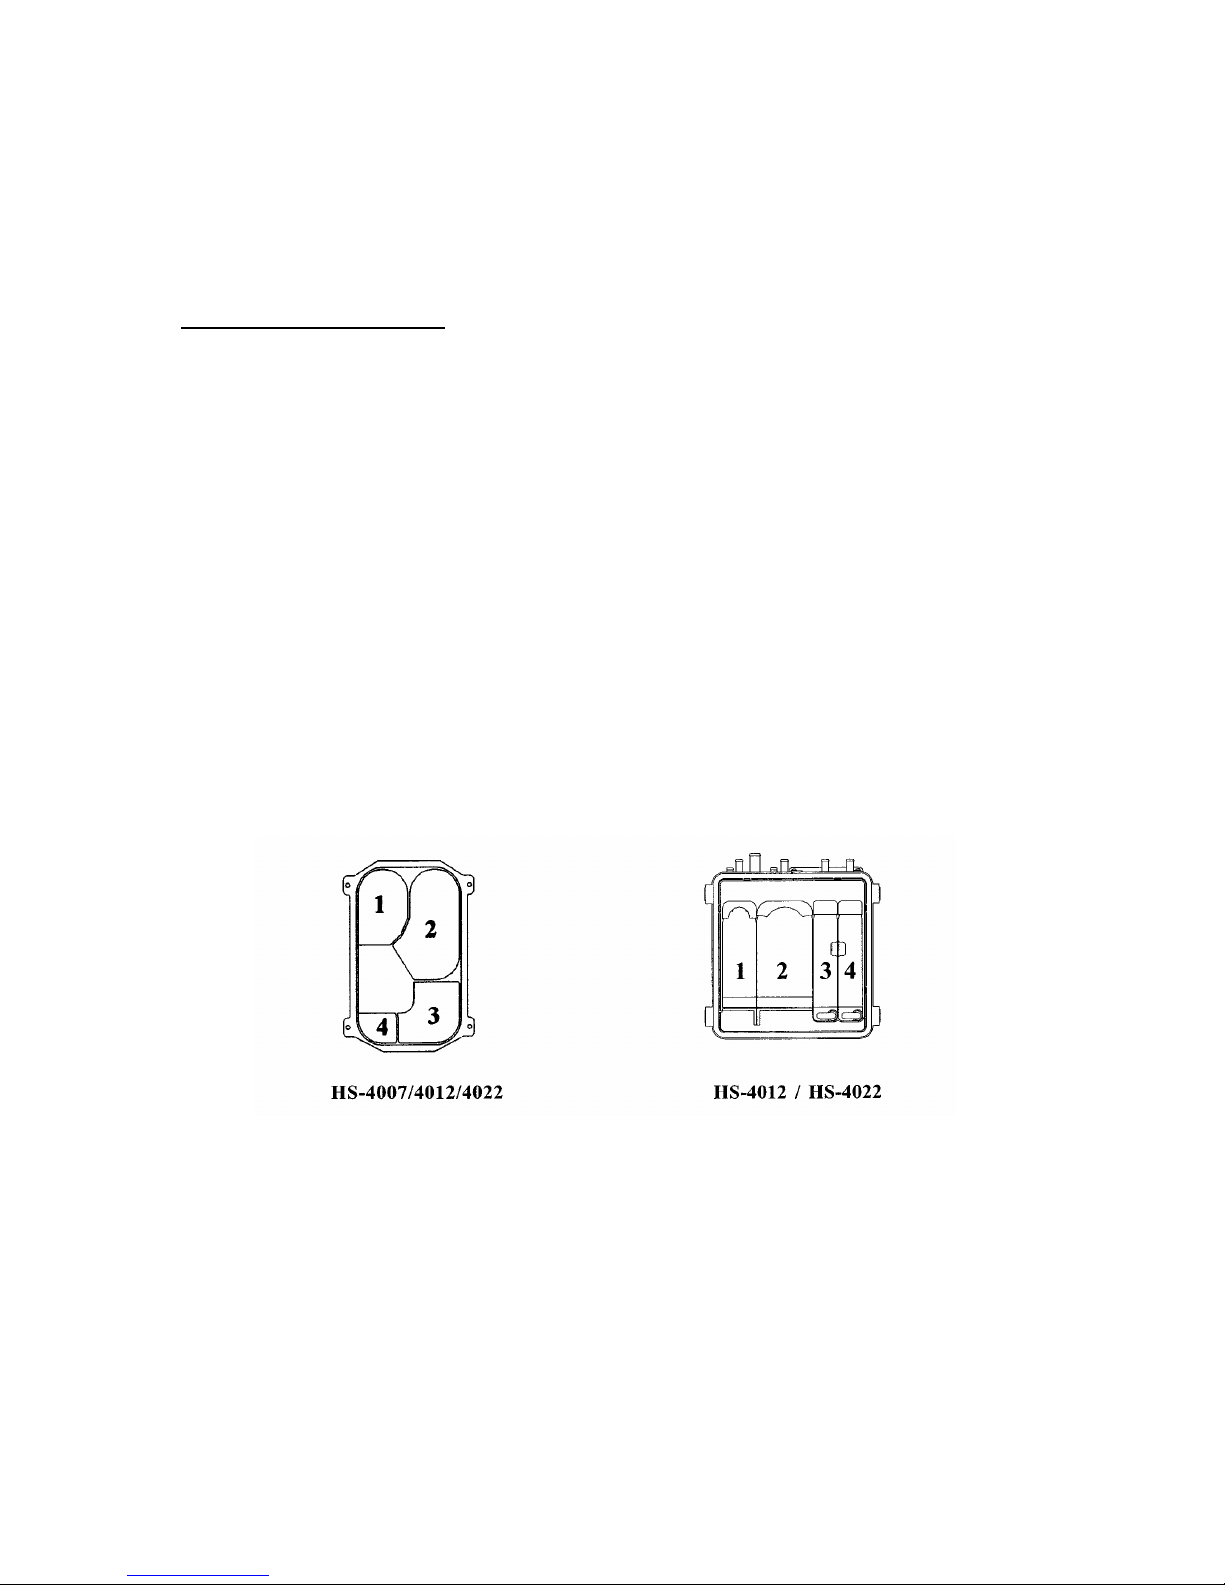
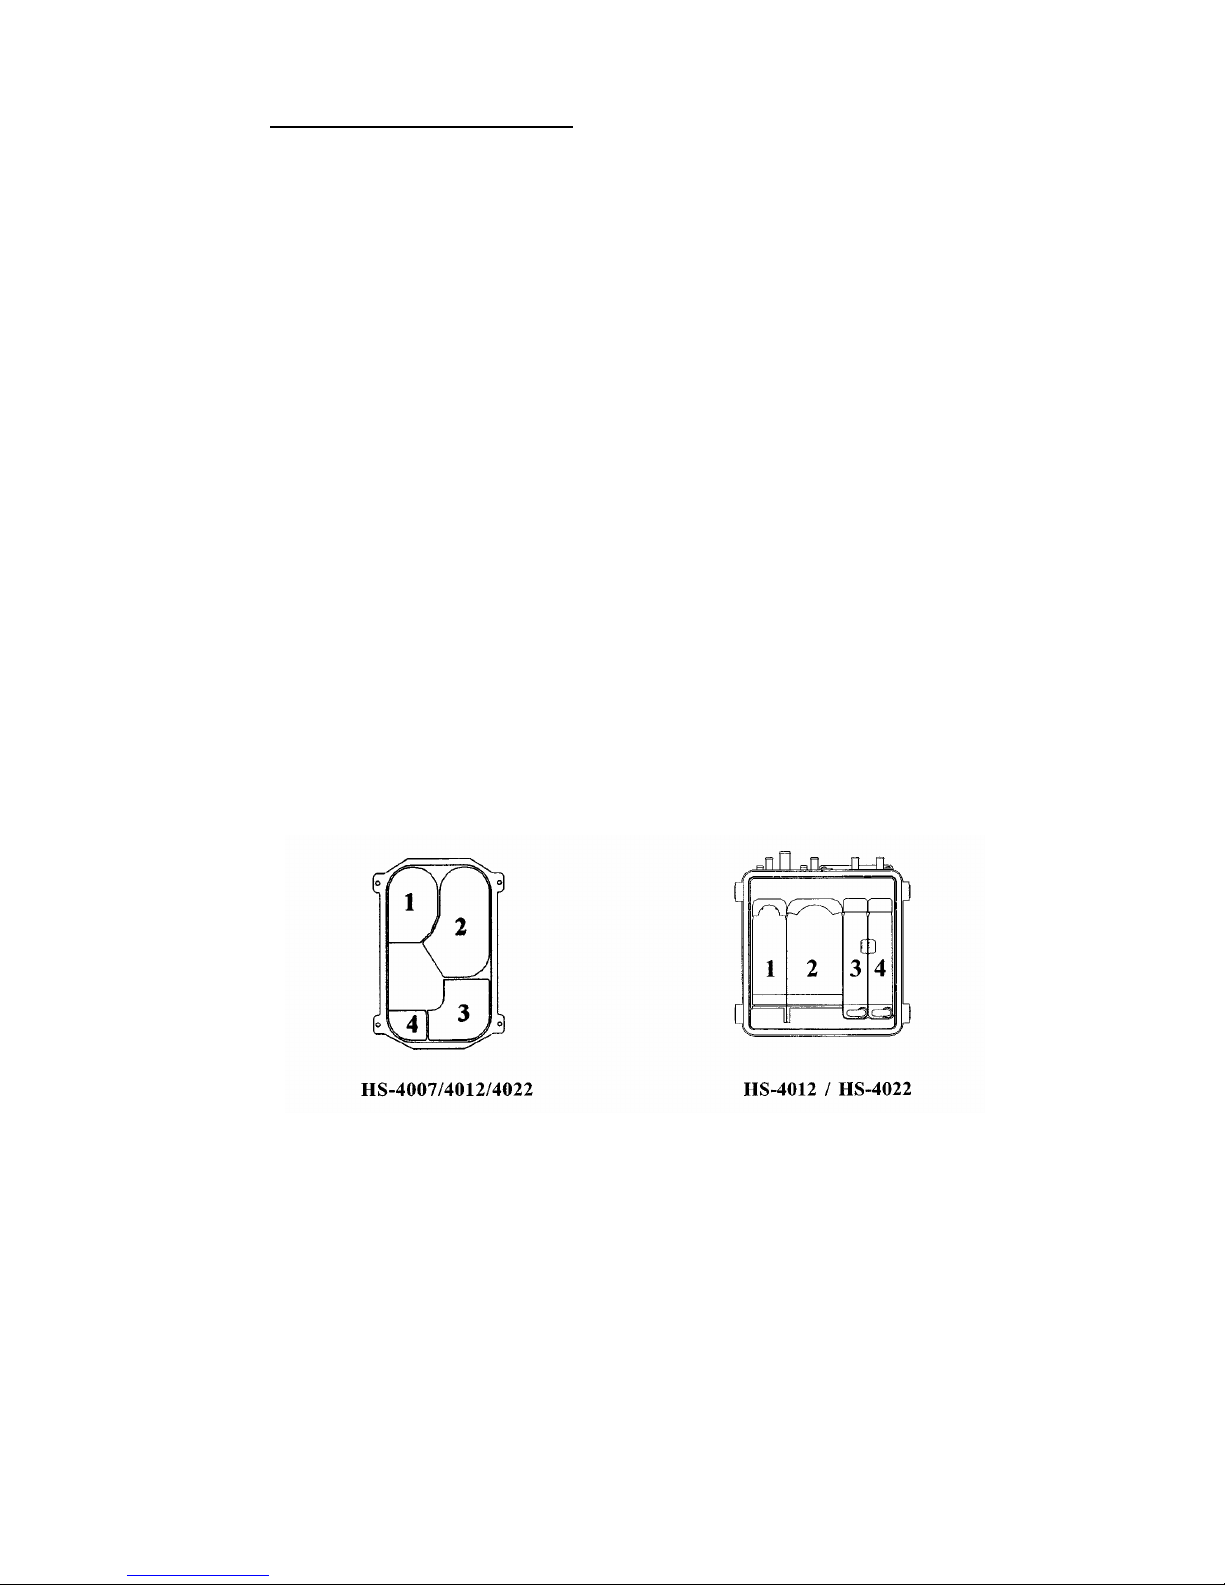
It is important to ensure the correct wash product goes into the right compartment.
Compartment 1 Pre-wash detergent
Compartment 2 Main-wash detergent
Compartment 3 Bleach (first rinse)
Compartment 4 Fabric Conditioner/Softener (last rinse)
The location of each compartment is specified on the protective cover and as
illustrated.
Fig 4
Page 8

7
2.3 CHOOSING A PROGRAMME
At the time of commissioning, your machine will have been given one of the 8
group sets available. Each group contains a set of programmes which are
tailored to particular applications.
The groups are categorised as follows:
Group set 1 Commercial Laundries
Prog No.
Reference Designation Wash Temp
1
A Standard Wash 600C
2
B Delicates & Woolens 400C
3
C Lightly Soiled White Linen 500C
4
E Medium Soiled White Linen 600C
5
G Heavily Soiled White Linen 800C
6
D Lightly Soiled Coloured Linen 400C
7
F Medium Soiled Coloured Linen 400C
8
H Heavily Soiled Coloured Linen 400C
Group set 2 Hotels/Schools
Prog No.
Reference Designation Wash Temp
1
B Bedspreads, Blankets, Delicates & Woolens 400C
2
C Lightly Soiled Sheets & Pillowcases 500C
3
E Medium Soiled Sheets & Pillowcases 600C
4
M Towels with Bleach 800C
5
I Towels without Bleach 600C
6
J White Table Linen & Uniforms 600C
7
K Coloured Table Linen & Uniforms 600C
8
G Kitchen Cloths 800C
Group 1 Commercial Laundries
Group 2 Hotels/Schools
Group 3 Institutions
Group 4 Restaurants
Group 5 Hospitals/Healthcare
Group 6 Leisure/Sports
Group 7 Industrial processes
Group 8 Shirt Laundries
Page 9

8
Group set 3 Institutions
Prog No.
Reference Designation Wash Temp
1
B Bedspreads, Blankets, Delicates & Woolens 400C
2
C Lightly Soiled Sheets & Pillowcases 500C
3
E Medium Soiled Sheets & Pillowcases 600C
4
M Towels with Bleach 800C
5
I Towels without Bleach 600C
6
J White Table Linen & Uniforms 600C
7
K Coloured Table Linen & Uniforms 600C
8
G Kitchen Cloths 800C
Group set 4 Restaurants
Prog No.
Reference Designation Wash Temp
1
A Standard Wash 600C
2
B Delicates & Woolens 400C
3
J White Table Linen & Uniforms 600C
4
K Coloured Table Linen & Uniforms 600C
5
M Towels with Bleach 800C
6
I Towels without Bleach 600C
7
L Floor Mops Heads 800C
8
G Kitchen Cloths 800C
Group set 5 Hospitals/Healthcare
Prog No.
Reference Designation Wash Temp
1
A Standard Wash 600C
2
B Bedspreads, Blankets, Delicates & Woolens 400C
3
C Lightly Soiled Sheets & Pillowcases 500C
4
E Heavily Soiled Sheets & Pillowcases 600C
5
M Towels & Uniforms 800C
6
J Table Linen & Kitchen Cloths 600C
7
L Pads, Diapers & Floor Mop Heads 800C
8
N Disinfection 900C
Page 10

9
Group set 6 Leisure & Sports
Prog No.
Reference Designation Wash Temp
1
A Standard Wash 600C
2
B Delicates & Woolens 400C
3
M White Towels & Table Linen with Bleach 800C
4
O Towels & Table Linen without Bleach 400C
5
F Lightly Soiled Athletic Uniforms 400C
6
H Heavily Soiled Athletic Uniforms 400C
7
G T Shirts & Socks 800C
8
L Floor Mop Heads 800C
Group set 7 Industrial Processes
Prog No.
Reference Designation Wash Temp
1
A Standard Wash 600C
2
N Stain Treatment 900C
3
M Towels 800C
4
L Floor Mop Heads 800C
5
E Lightly Soiled White Work Clothes 600C
6
G Heavily Soiled White Work Clothes 800C
7
F Lightly Soiled Coloured Work Clothes 400C
8
H Heavily Soiled Coloured Work Clothes 400C
Group set 8 Shirt Laundries
Prog No.
Reference Designation Wash Temp
1
A Standard Wash 600C
2
B Delicates & Woolens 400C
3
P White With Starch 600C
4
E White Without Starch 600C
5
Q Coloured With Starch 400C
6
F Coloured Without Starch 400C
7
R Starch & Extract Only ******
8
G Heavily Soiled Linen 800C
Page 11
Page 12
11
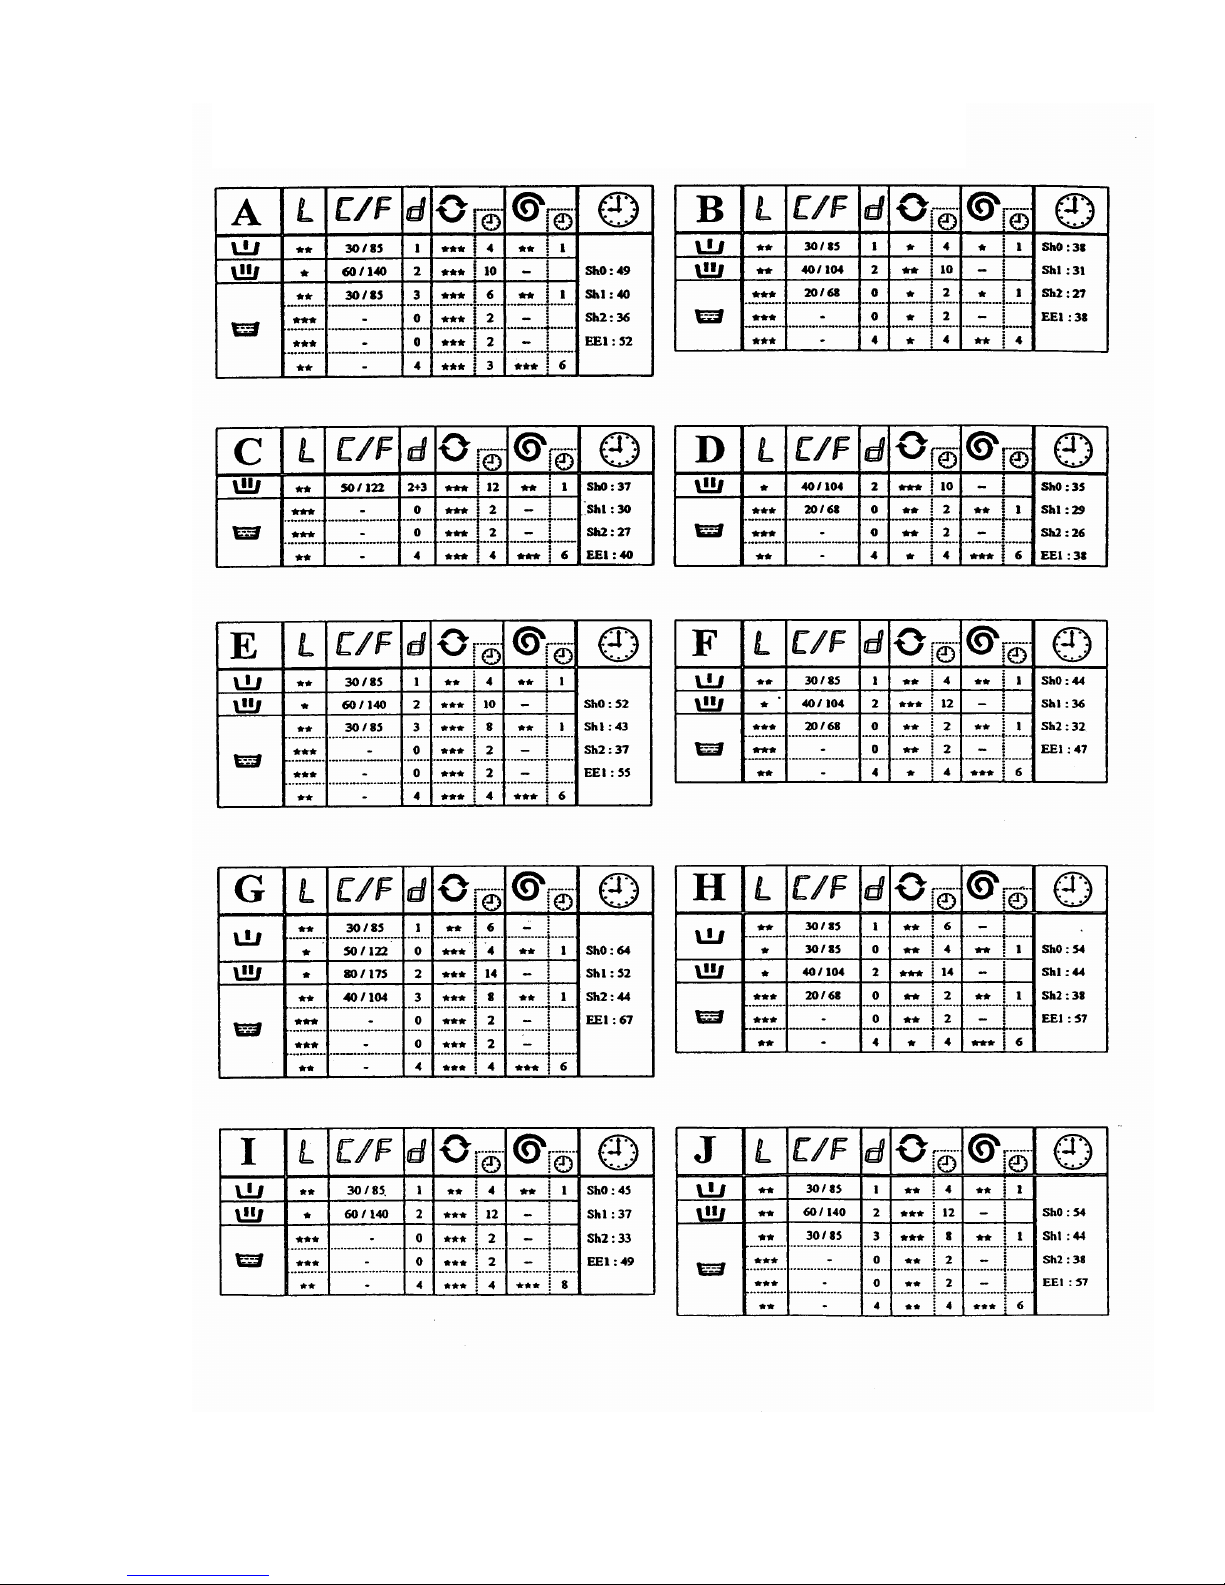
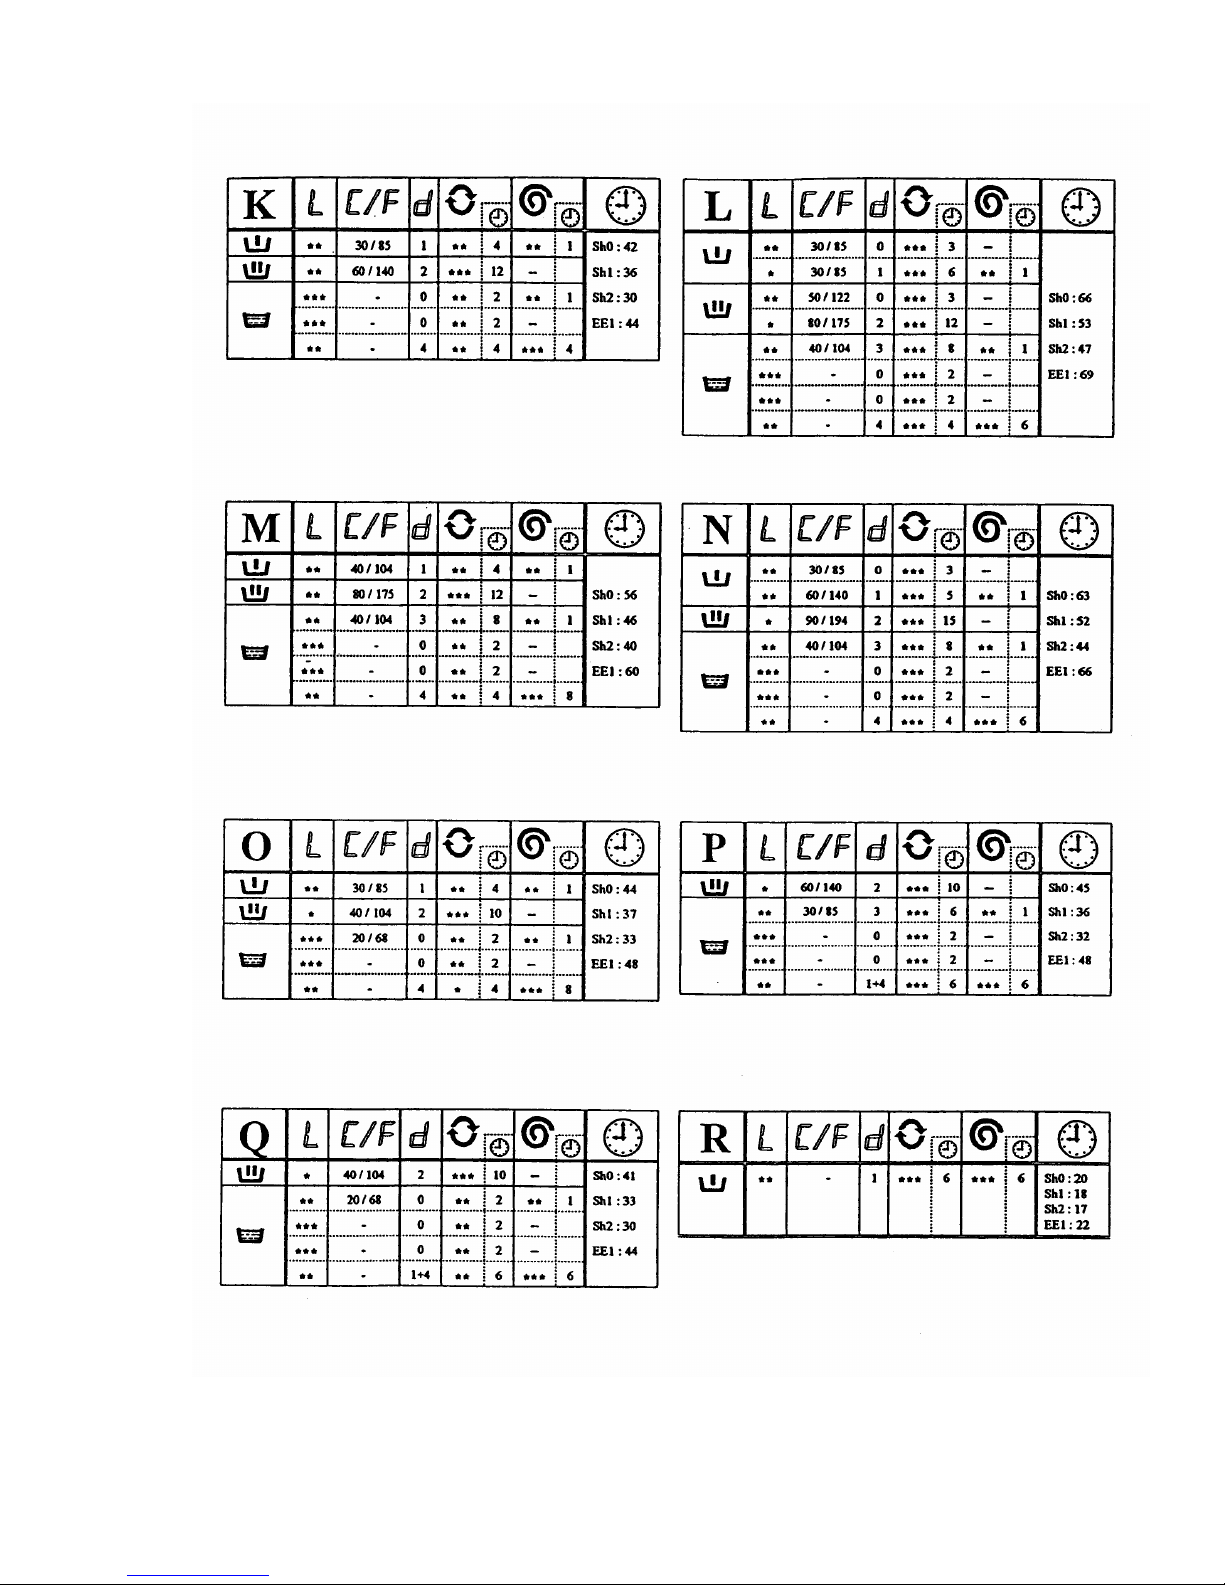
Content of Group programmes
Page 13
12
Page 14

13
2.6 ALTERING A PROGRAMME
The following proceduredescribes how to alterthe programme, should you wish to
amend some of the options. The changes must be entered before the
programme is started. Any changes made will revert to the original format when
the programme has finished.
If the machine is stopped or another programme is selected, the alterations are
cancelled and the machine will revert to the original programme format.
Options that can be amended:
2.6.1 Main Wash Temperature
Enables the temperature of the main wash to be raised or lowered from 0°C to
90°C.
2.6.2 Economy 1 or 2
Reduces the water levels during the wash and rinses, thus saving energy and
conserving water.
2.6.3 Synthetic Option
Progressively cools down the water at the end of main wash if the water
temperature was above 45°C.
(Some fabrics are prone to thermal shock which occurs when directly immersed
in cold water from a high temperature).
2.6.4 Extract Cancellation
For the protection of delicate fabrics, the extract can be cancelled.The machine
will drain but not spin.
2.6.5 Crease Guard
Halts the programme in final rinse, leaving the washing immersed in water.
To continue, press Start and the programme enters final extract (drains and spins).
To access a Programme to be Altered
Machine display must show SEL
Press + or - keys and display shows Pr and the number of the previous
programme.
Press + or - keys to scroll through the programme options 1 to 8, stopping
at the desired programme.
To make the alteration, press PROG key.
WASH TEMPERATURE (Ref 2.6.1)
The display shows the temperature of the main wash in °C
Options available: 0°C to 90°C
Press + or - to raise or lower the main wash temperature.
Pressing PROG key confirms the alteration and advances to the next step.
Page 15

14
ECONOMY (Ref 2.6.2)
The display shows EC
Options available:
EC - 0 Non economy
EC - 1 Economy 1 reduces the water intake by one level
EC - 2 Super Economy reduces the water intake by two levels.
Press the + or - keys to select the level of economy.
Pressing PROG key confirms the option and advances to the next step.
SYNTHETICOPTION (Ref 2.6.3)
Display shows St
Options available
St - 0 No progressive cool down at the end of main wash
St - 1 Provide progressive cooldown if temperatureof mainwash
was above 45°C.
Press + or - keys to select or cancel Synthetic Option
Pressing PROG key confirms the option and advances to the next step.
EXTRACT (Ref 2.6.4)
Display shows E -
Options available
E - 0 No extract (drain only)
E - 1 Extract and Drain
Press + or - key to engage or inhibit spin
Pressing PROG key confirms the option and advances to the next step.
CREASE GUARD (Ref 2.6.5)
Display shows Ar (arrested rinse)
Options available
Ar - 0 Without Crease Guard
Ar - 1 With Crease Guard,halts the final rinse, leaving the
washingsuspended in water.
Press + or - keys to select desired option.
Pressing PROG key confirms the option and the display shows Pr and
returns to the beginning of the programme.
TO START THE PROGRAMME, PRESS START
(REFER TO SECTION 2.8 OF THIS MANUAL).
Page 16

15
2.7 MODIFYING A PROGRAMME
All the changes made in Section 2.6 were temporary, reverting back to the
basic format when the programme finishes, or the machine is switched off, or
anotherprogramme is selected.
The following procedure describes how the programme options can be
permanently modified.
FEATURES THAT CAN BE MODIFIED
These are the same as those described in Section 2.6.
2.7.1 Main Wash Temperature
Enables the temperature of the main wash to be raised or lowered from 0°C
to 90°C.
2.7.2 Economy 1 or 2
Reduces the water levels during the wash and rinses, thus saving energy
and conserving water.
2.7.3 Synthetic Option
Progressively cools down the water at the end of main wash if the
water temperature was above 45°C.
(Some fabrics are prone to thermal shock which occurs when directly
immersed in cold water from a high temperature).
2.7.4 Extract Cancellation
For the protection of delicate fabrics, the extract can be cancelled. The
machine will drain but spin will be inhibited.
2.7.5 Crease Guard
Halts the programme in final rinse, leaving the washing suspended in water.
To continue, press Start and the programme enters final extract (drains and
spins).
ACCESSING A PROGRAMME TO BE MODIFIED
Machine display must show SEL
Press PROG key for 2 seconds
Display shows MOD
Pressing the PROG key 4 times brings you to the programme
selection Display shows Pr
Press the + or - key to scroll through the programmes 1 to 8, stopping
at the one to be modified
Pressing PROG key brings up the first option
WASH TEMPERATURE (REF 2.7.1)
The display shows the temperature of the main wash in
°C Options available: 0°C to 90°C
Press + or - to raise or lower the main wash temperature.
Pressing PROG key confirms the alteration and advances to the next step.
Page 17

16
ECONOMY (Ref 2.7.2)
The display shows EC
Options available:
EC - 0 Non economy
EC - 1 Economy 1 reduces the water intake by one level
EC - 2 Super Economy reduces the water intake by two levels.
Press the + or - keys to select the level of economy.
Pressing PROG key confirms the option and advances to the next step.
SYNTHETIC OPTION (Ref 2.7.3)
Display shows St
Options available
St – 0 No progressive cool down at the end of main wash
St - 1 Provide progressive cooldownif temperatureof main
Wash is above 45°C.
Press + or - keys to select or cancel Synthetic Option
Pressing PROG key confirms the option and advances to the next step.
EXTRACT (Ref 2.7.4)
Display shows E -
Options available
E - 0 No extract (drain only)
E - 1 Extract and Drain
Press + or - key to engage or inhibit spin
Pressing PROG key confirms the option and advances to the next step.
CREASE GUARD (Ref 2.7.5)
Display shows Ar (arrested rinse)
Options available
Ar - 0 Without Crease Guard
Ar - 1 With Crease Guard, haltsthefinal rinse, leaving the washing suspended
in water
Press + or - keys to select desired option
Pressing PROG key confirms the option and the display shows Pr and
returns to the beginning. Another programme can now be modified or the
same programme remodified or any errors corrected.
Pressing START will return the machine to programme selection
Display shows SEL
Press + key to select a programme
TO START THE PROGRAMME, PRESS START
(REFER TO SECTION 2.8 OF THIS MANUAL).
Page 18

17
CLEAR - returning the programmes to their basic format, cancelling all modifications.
Machine display must show SEL
Press PROG key for 2 seconds
Display shows MOD
Press PROG key 3 times
Display shows Clr
Press + key
Display asks SURE
Press ACCELkeyto cancel all modified programmes, returningthem to
their basic format
Press START/STOP leaves the option
Page 19
18
2.8 OPERATING THE MACHINE (SUMMARY)
- Switch On
Start switch A to position I
- Open Door (REF 2.1)
Display shows "Door"
- Load the Machine
Notes: ensure all the items can be safely washed together.
Always fully load the machine. Small loads or items which could cause the
machine to go out of balance are to be avoided. This includes pillows and
day bed mattresses.
Always consult the manufacturer's label for washing instructions.
If washing polyester/cotton, always select the synthetics function.
- Add Washing Products (REF 2.2)
Ensure the correct products go into the appropriate compartments:
1 Pre Wash Detergent
2 Main Wash Detergent
3 Bleach (First Rinse)
4 Conditioner (Last Rinse)
-Close the Dispenser Cover
Ensure that none of the items become trapped between the door and the
machine as this could seriously damage the item and cause the machine to
flood and/or tear the door the seal.
Display will show SEL
Page 20

19
- Selecting a Programme
Press + key:The displayshows Pr and the number of the last programme to run.
Use the + and - keys to select the required programme.
NOTE: The format of the programme determines which phases are used (prewash,
main wash, number of rinses, and final extract) illuminating the corresponding
L.E.D. in column H.
- Altering the programme
Any alterations to the programme can now be entered (Ref 2.6) -
Press Start
The display shows PrE/STAR while the door safety lock engages. After 40
seconds the machine will start the programme.
NOTE: During the cycle the function currently operating is displayed in
sequence:-
A Water fill
d • Detergent, bleach, conditioner dosing
C • Temperature ° C
F • Temperature °F
rt • Time to completion of wash phase
c Synthetic cool down
E • Drain time
Et Time to completion of spin (extract)
The phase in operation is indicated by flashingthe corresponding L.E.D (11).
Accel Key
Providing the option has been configured (AC-1) the Accel Key enables the wash
and extract times to be extended by using + key or
To shorten the wash and extract times and advance the programme to the next
function by using the - key.
End Programme
On completion of the final extract, the machine automatically engages a safety
count down of 150. This is to allow the drum to stop spinning before the door can
be opened.
Display shows: END
The green (door) L.E.D. is on.
Page 21

20
2.9 STOPPING THE MACHINE
AUTOMATIC
On completion of a programme, the machine displays END. All the washer functions
stop, the green door light illuminates, enabling the machine to be opened and
unloaded.
PROGRAMME STOP
Pressing the START/STOP key during a programme cancels the cycle, opens the
drain valve and commences the safety count down. When complete, the displayshows
END and the green door light illuminates.
SWITCHING OFF I/O SWITCH
Putting the I/O switch to the 0 position removes power to the control circuit, cancelling
all wash functions. The drain valve opens and although there will be no display, the
door safety lock will still give a 40 second delay before disengaging.
SUDDEN POWER FAILURE
In these circumstances the drain valve opens and washer function stops.
The programme recommences provided the door safetylockhas not disengaged.
Page 22

DO'S AND DON'TS
1. ALWAYSWASHTHESAMEFABRICTYPESTOGETHER- NEVER MIX FABRICS.
2. ALWAYSREADANDFOLLOW THEMANUFACTURER'SWASHINGINSTRUCTIONS.
3. ALWAYS SLUICE FOULED OR SOILED LINEN BEFORE WASHING.
4. ALWAYSUSETHEMACHINEFULLYLOADED-HALFLOADS ANDUNBALANCED
LOADS ARE TO BE AVOIDED.
5. ALWAYS HANDLE WASH PRODUCTS/DETERGENT WITH CAUTION
6. NEVER OVER-SOAP
7. AVOID MIXING COLOURS WITH WHITE LINEN.
8. DO NOT ATTEMPT TO OPEN THE DOOR WHILE THE MACHINE IS IN MID CYCLE.
(EMERGENCY DOOR OPENING PROCEDURE IS AT THE BEGINNING OF THIS
MANUAL).
9. NEVER ADD BLEACH TO A COLOURED WASH.
10. NEVER SLAM THE DOOR.
11. NEVERSTORECOMBUSTIBLEORHAZARDOUSCHEMICALSNEARTHEMACHINES.
12. NEVERUSETHEMACHINEIFYOU SUSPECTITISFAULTYORWITH ANY OFTHE
COVERS OR PANELS REMOVED.
13. REPORTANYFAULTSIMMEDIATELYANDHAVETHEMATTENDEDTOSTRAIGHTAWAY.
14. IF THE MACHINE DEVELOPS A FAULT OR BEGINS TO VIBRATE ALARMINGLY,
SWITCH OFF STRAIGHT AWAY.
15. IF THE MACHINE IS DEAD, CHECK:
(A) The Isolator Switches are ‘ON’
(B) The Supply fuse is not blown or tripped.
21
Page 23
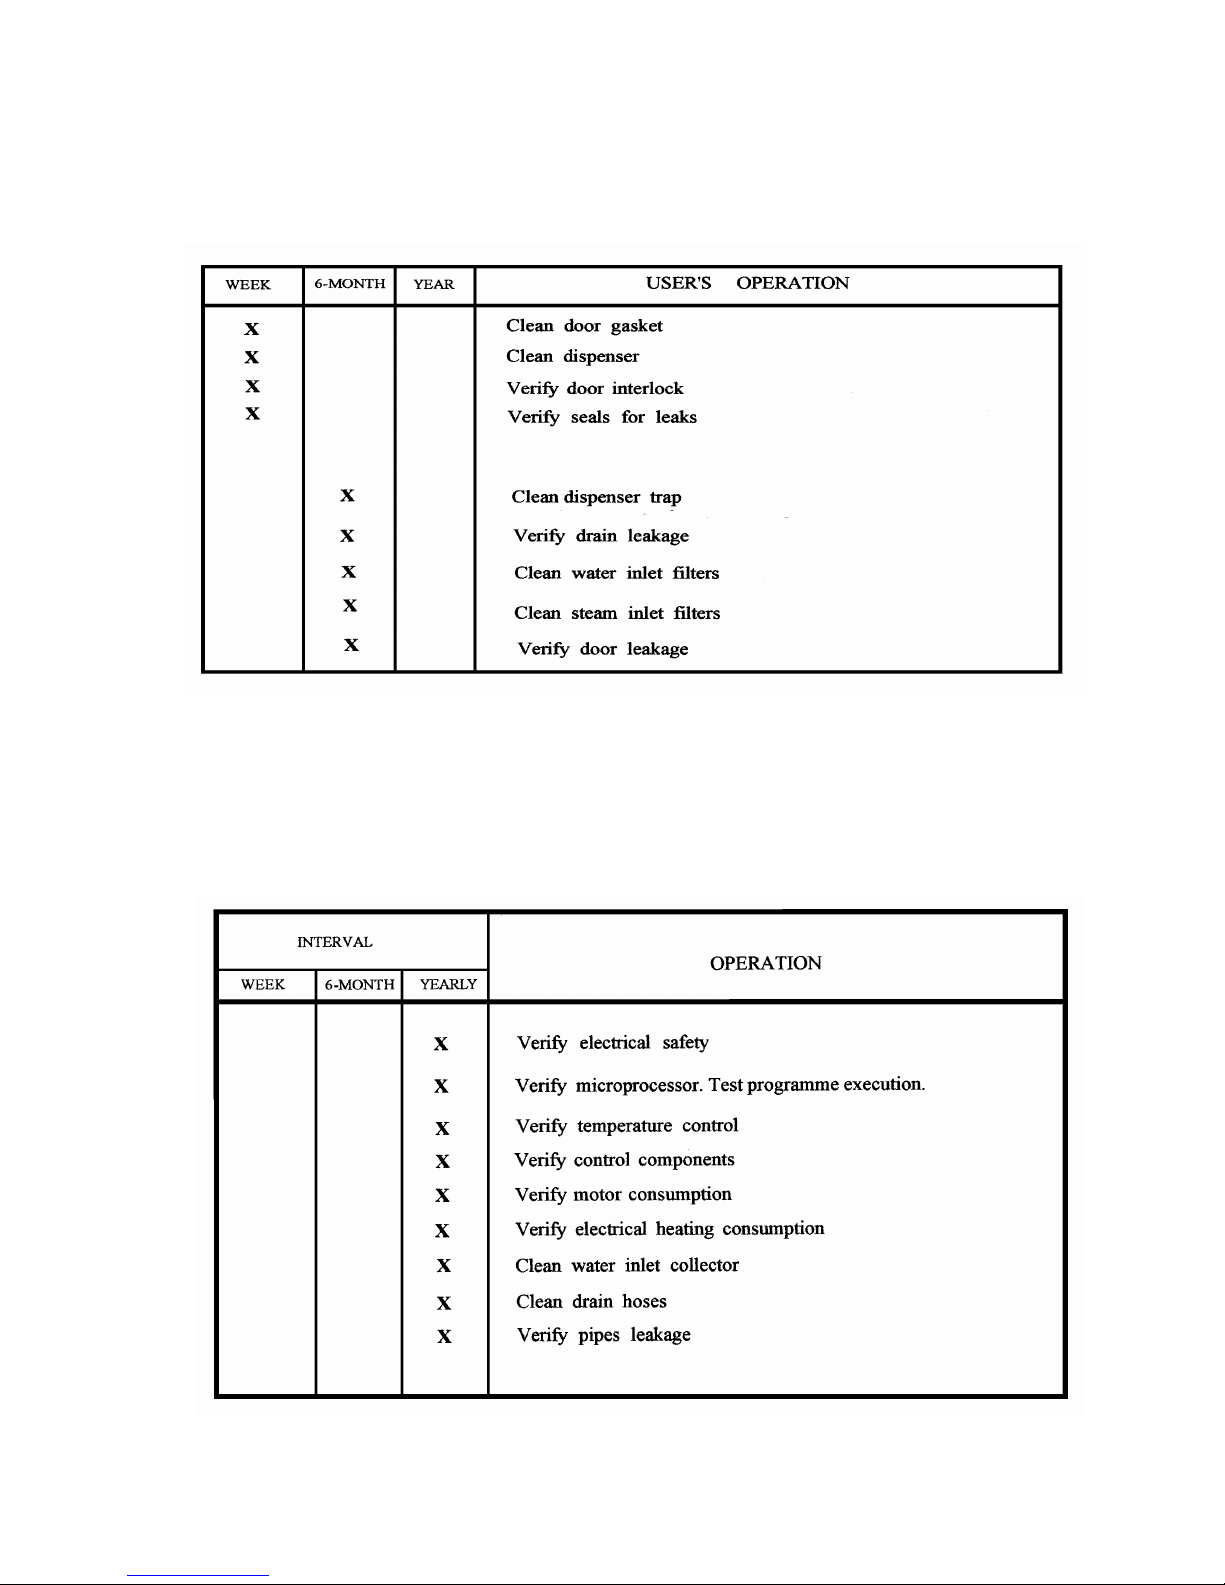
3.1 USER PREVENTIVE MAINTENANCE
The recommended user maintenance procedures listed below will keep the machine
In good condition, ensuring it is safe to use and avoid premature failures.
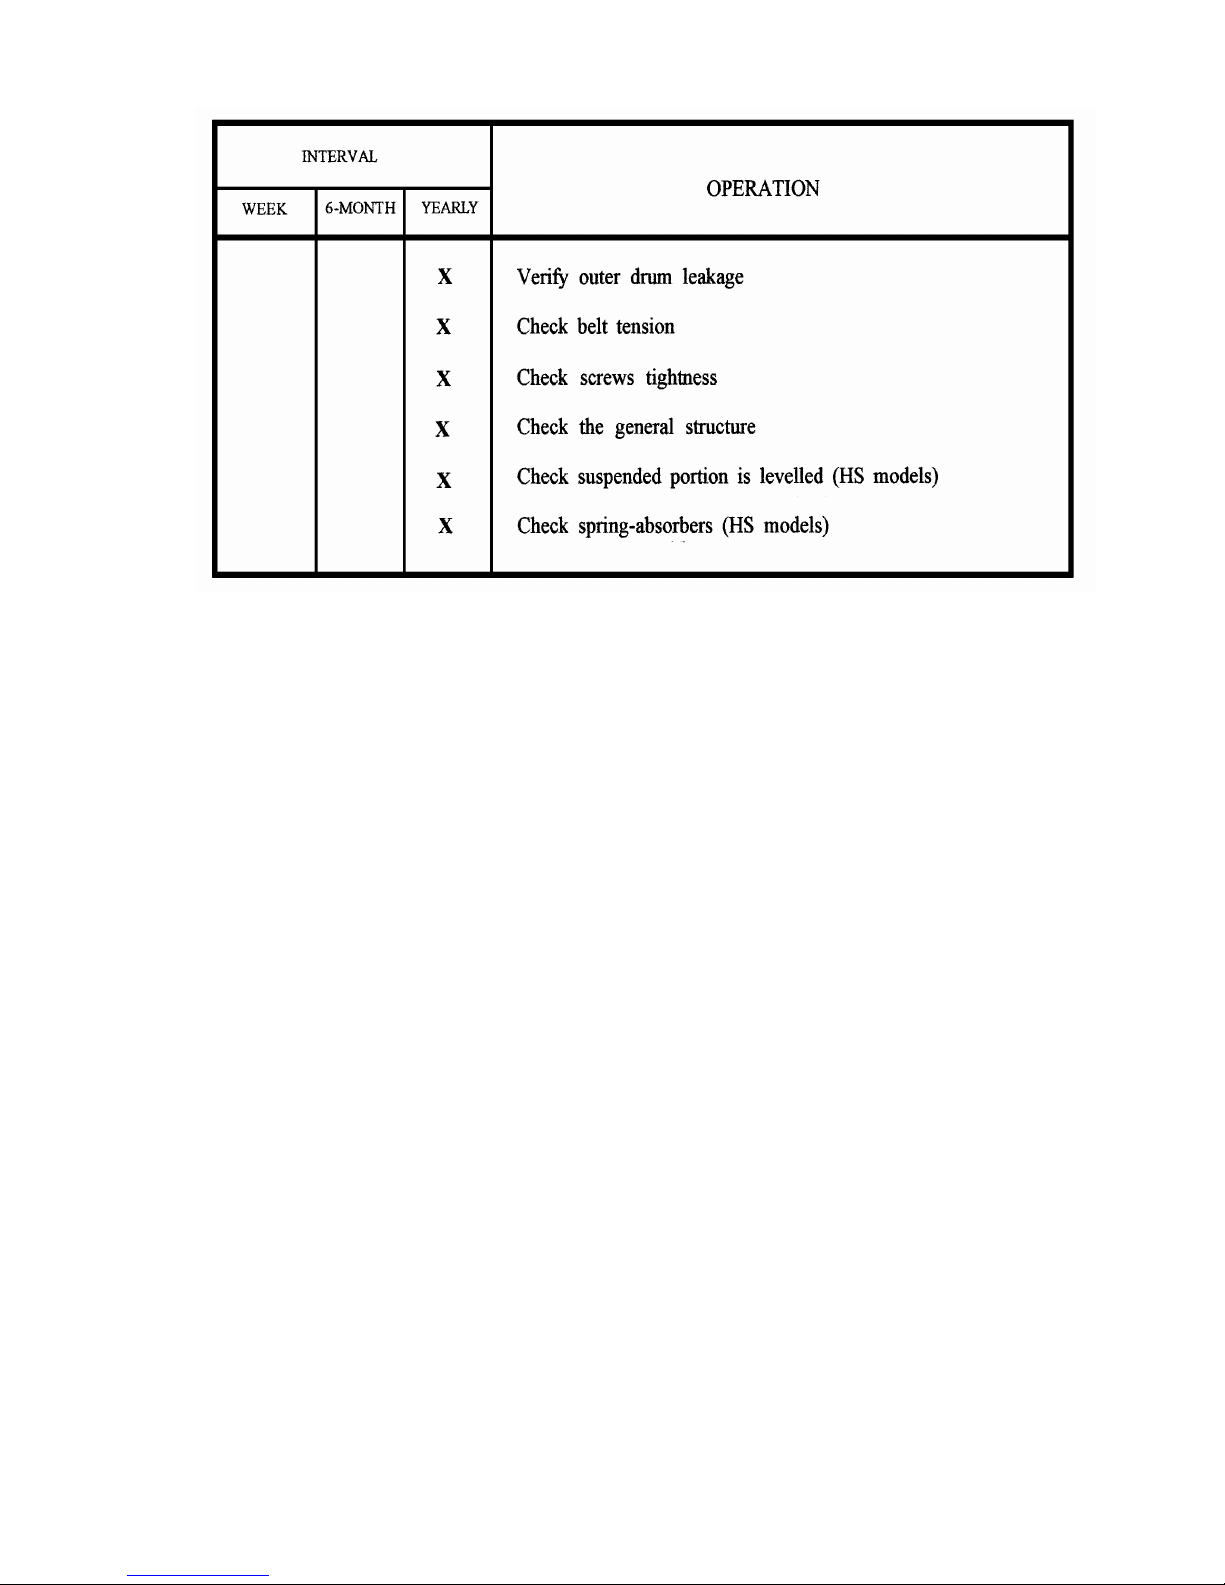
3.1.1 AUTHORISED SERVICE TECHNICAN
In addition to User maintenance procedure it is recommended that a Viking Approved
Service Technician carry-out the following procedures:-
List continued on next page.
22
Page 24
Whenever calling for Maintenance or Service it is important to give as much information as
possible relating to the problem encountered, together with the Model and Serial Numbers
of the machine being reported.
23
Page 25
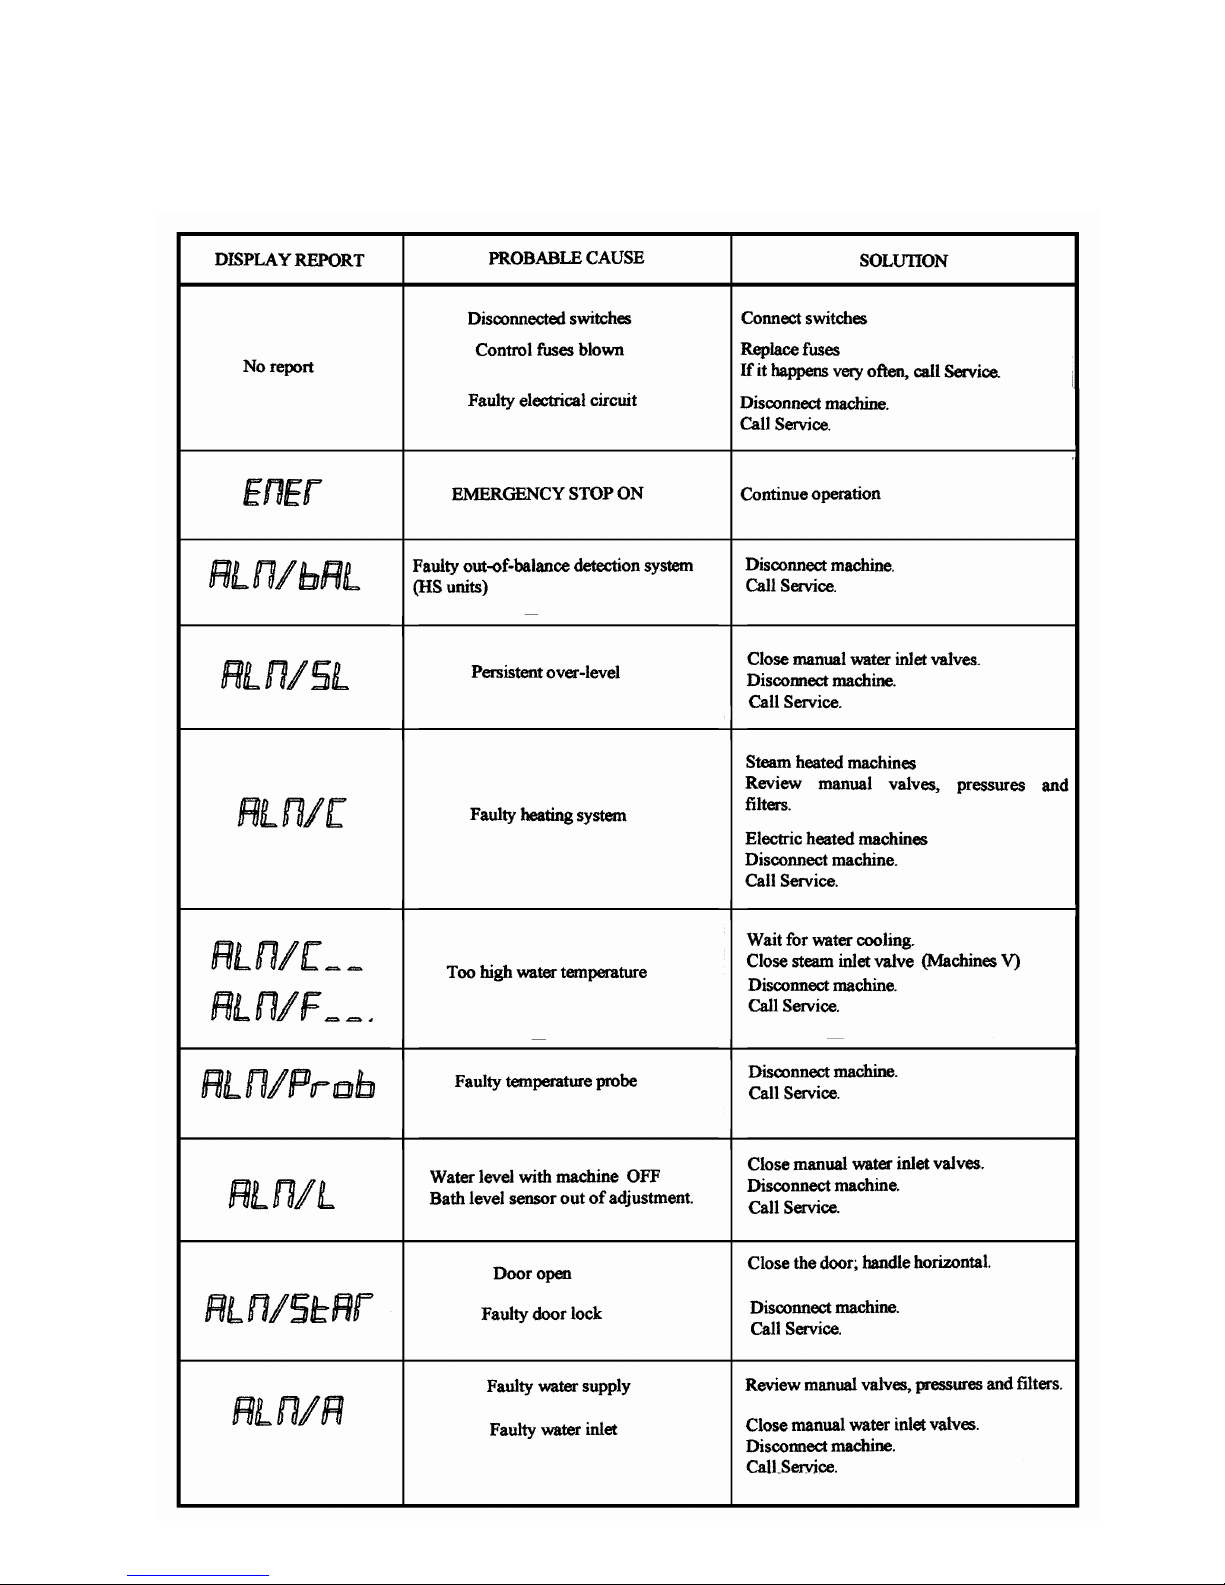
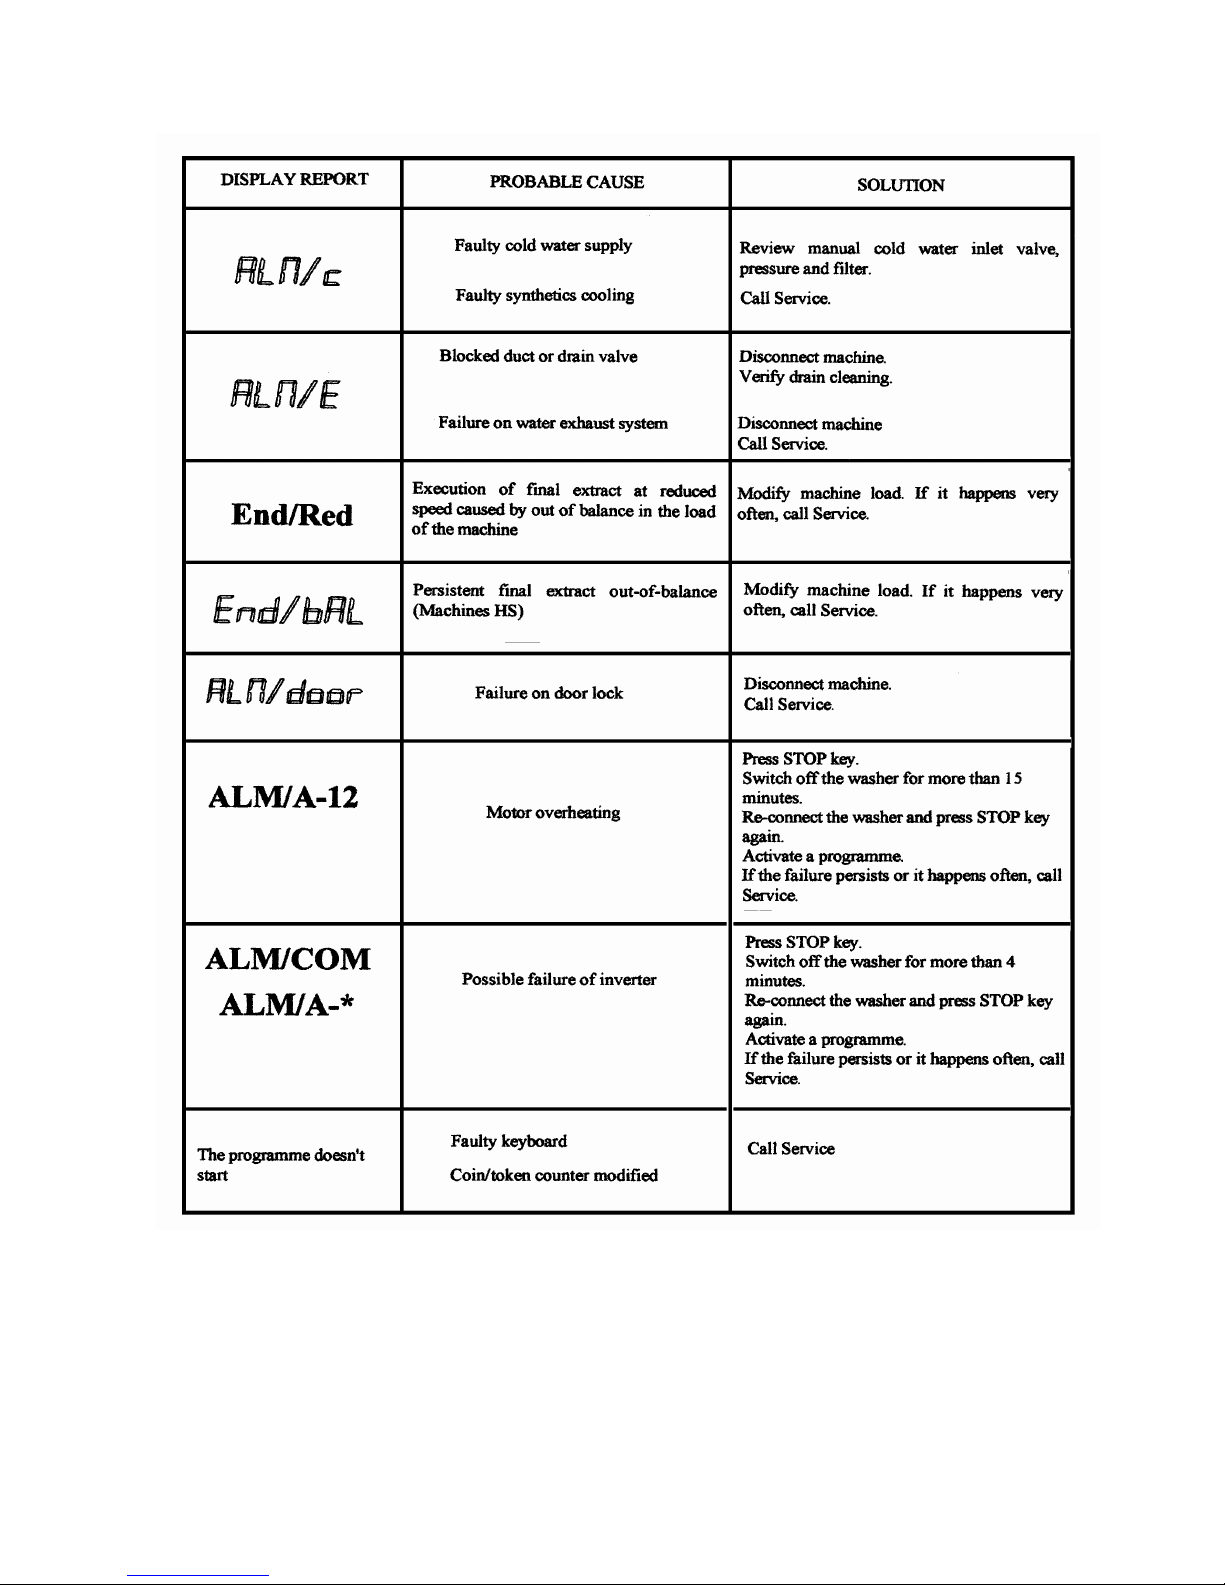
3.2 ALARM CONDITIONS AND POSSIBLE OPERATION FAILURES.
Common problems, their causes and known solutions.
24
Page 26
25
Page 27
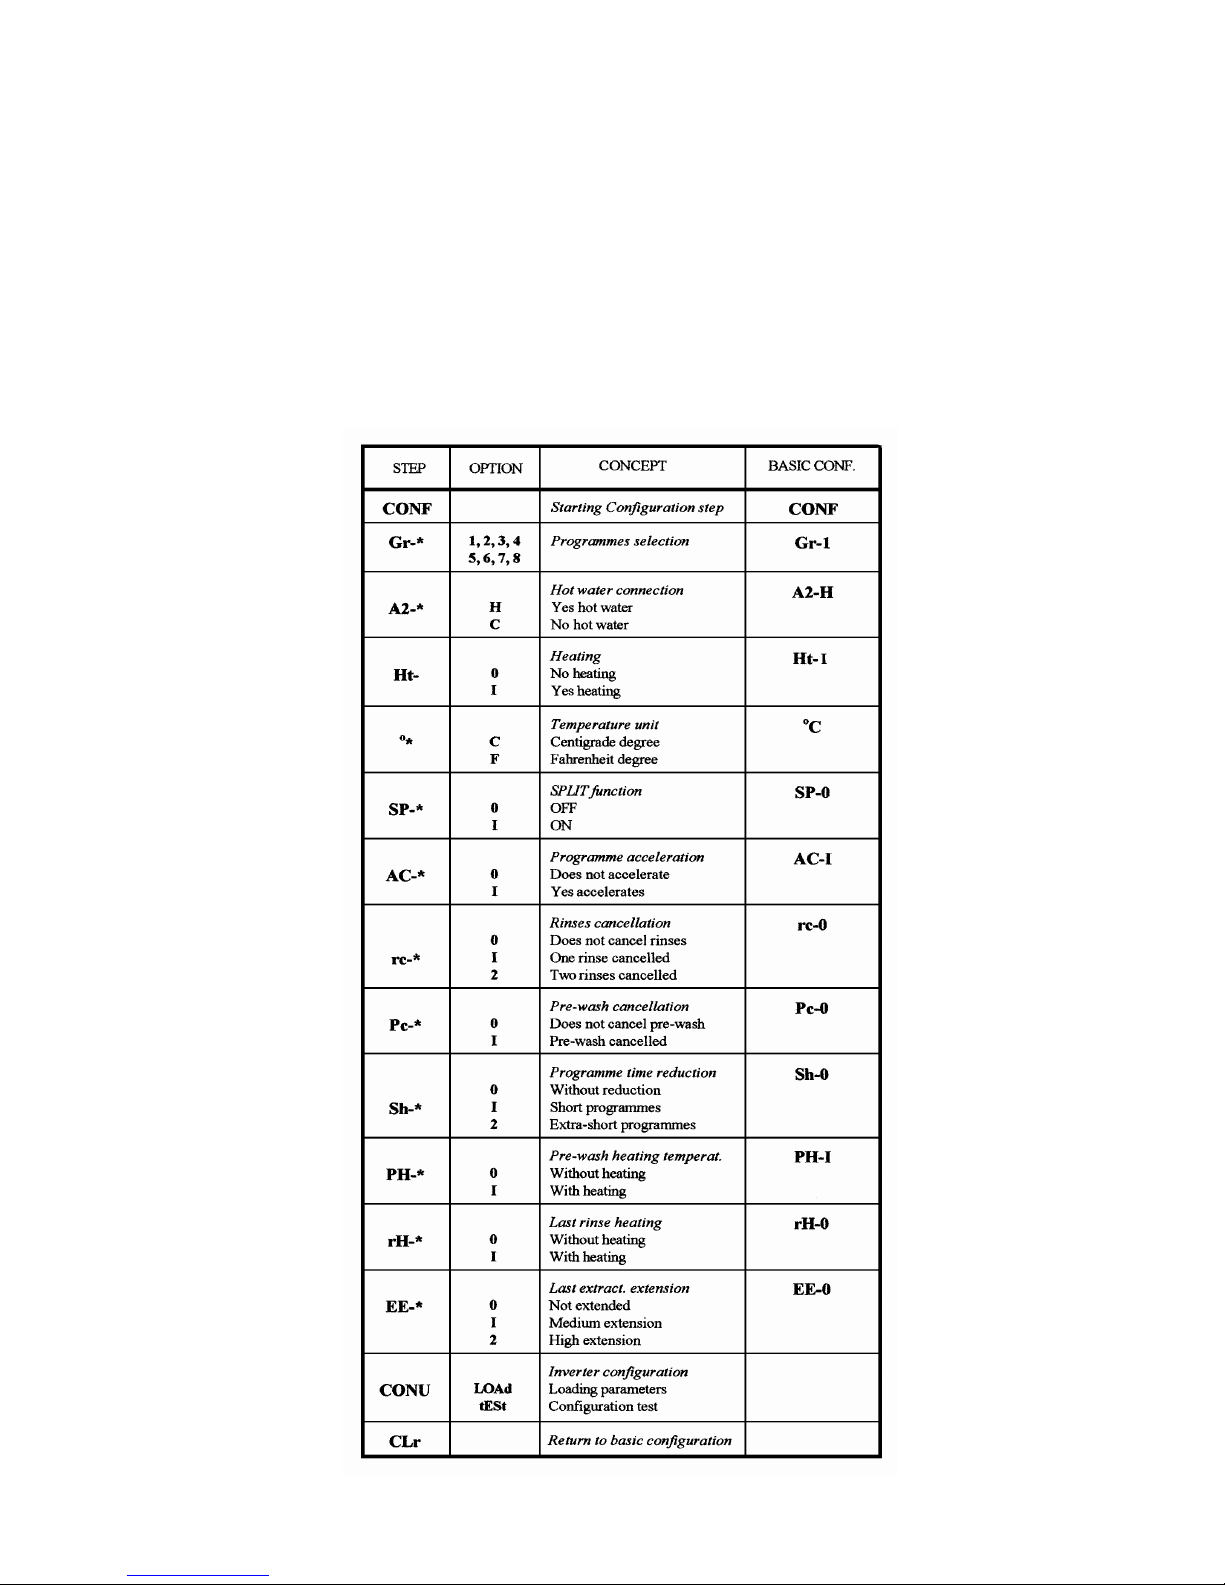
SM VERSION
INITIAL START-UP. MACHINE SET-UP
Access to ‘CONF’ programme
(A) Switch off electrical supply
(B) Slide over SET-UP switch position (microprocessor board)
(C) Switch on electrical supply
Display shows ‘CONF’
Press the ‘PROG’ key to confirm option and move to next step
+/- keys allows step options to be modified.
Whenever a processor board or Inverter Unit is replaced ‘CONU’ must be re-configured
26
Page 28
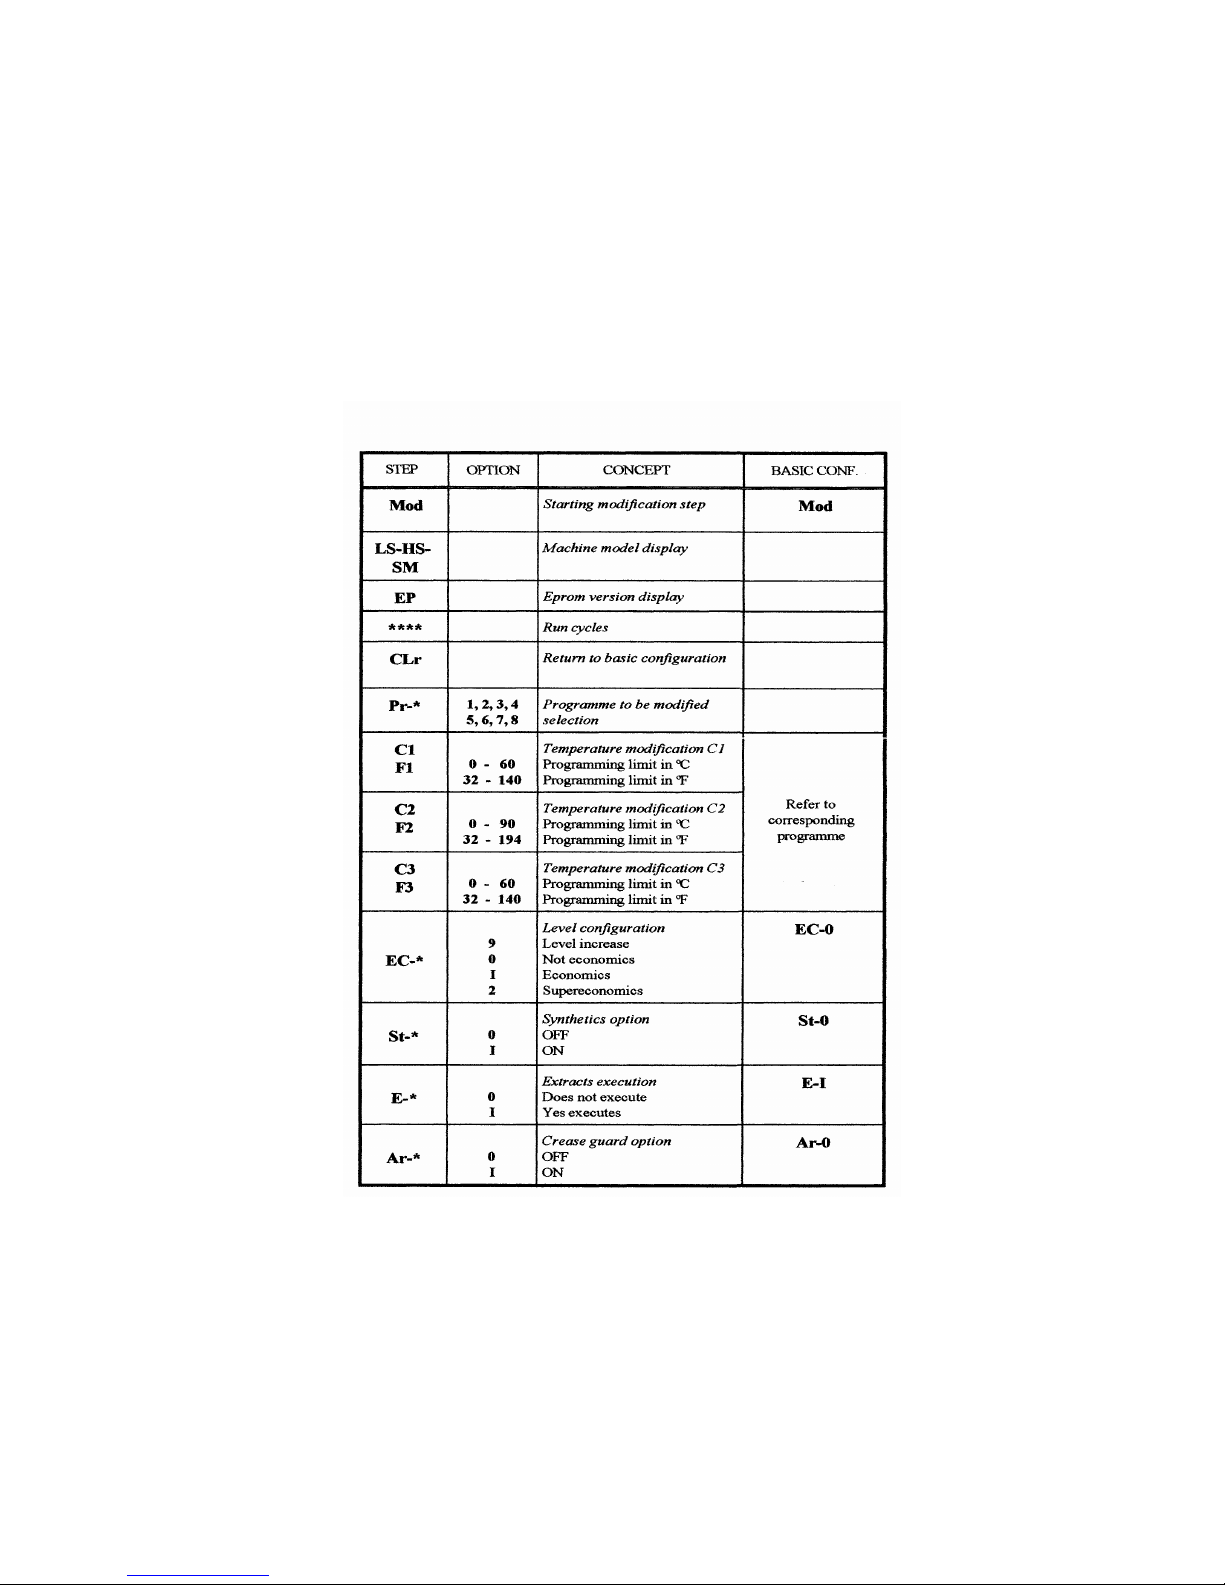
SM VERSION
PERMANENT PROGRAMME MODIFICATIONS
To access MOD programme, press the ‘PROG’ key for 2 seconds.
When the display shows ‘MOD’
Press the ‘PROG’ to confirm option and move to next step.
+/- keys allows step options to be modified.
27
Page 29

Page 30

Page 31

Page 32

 Loading...