

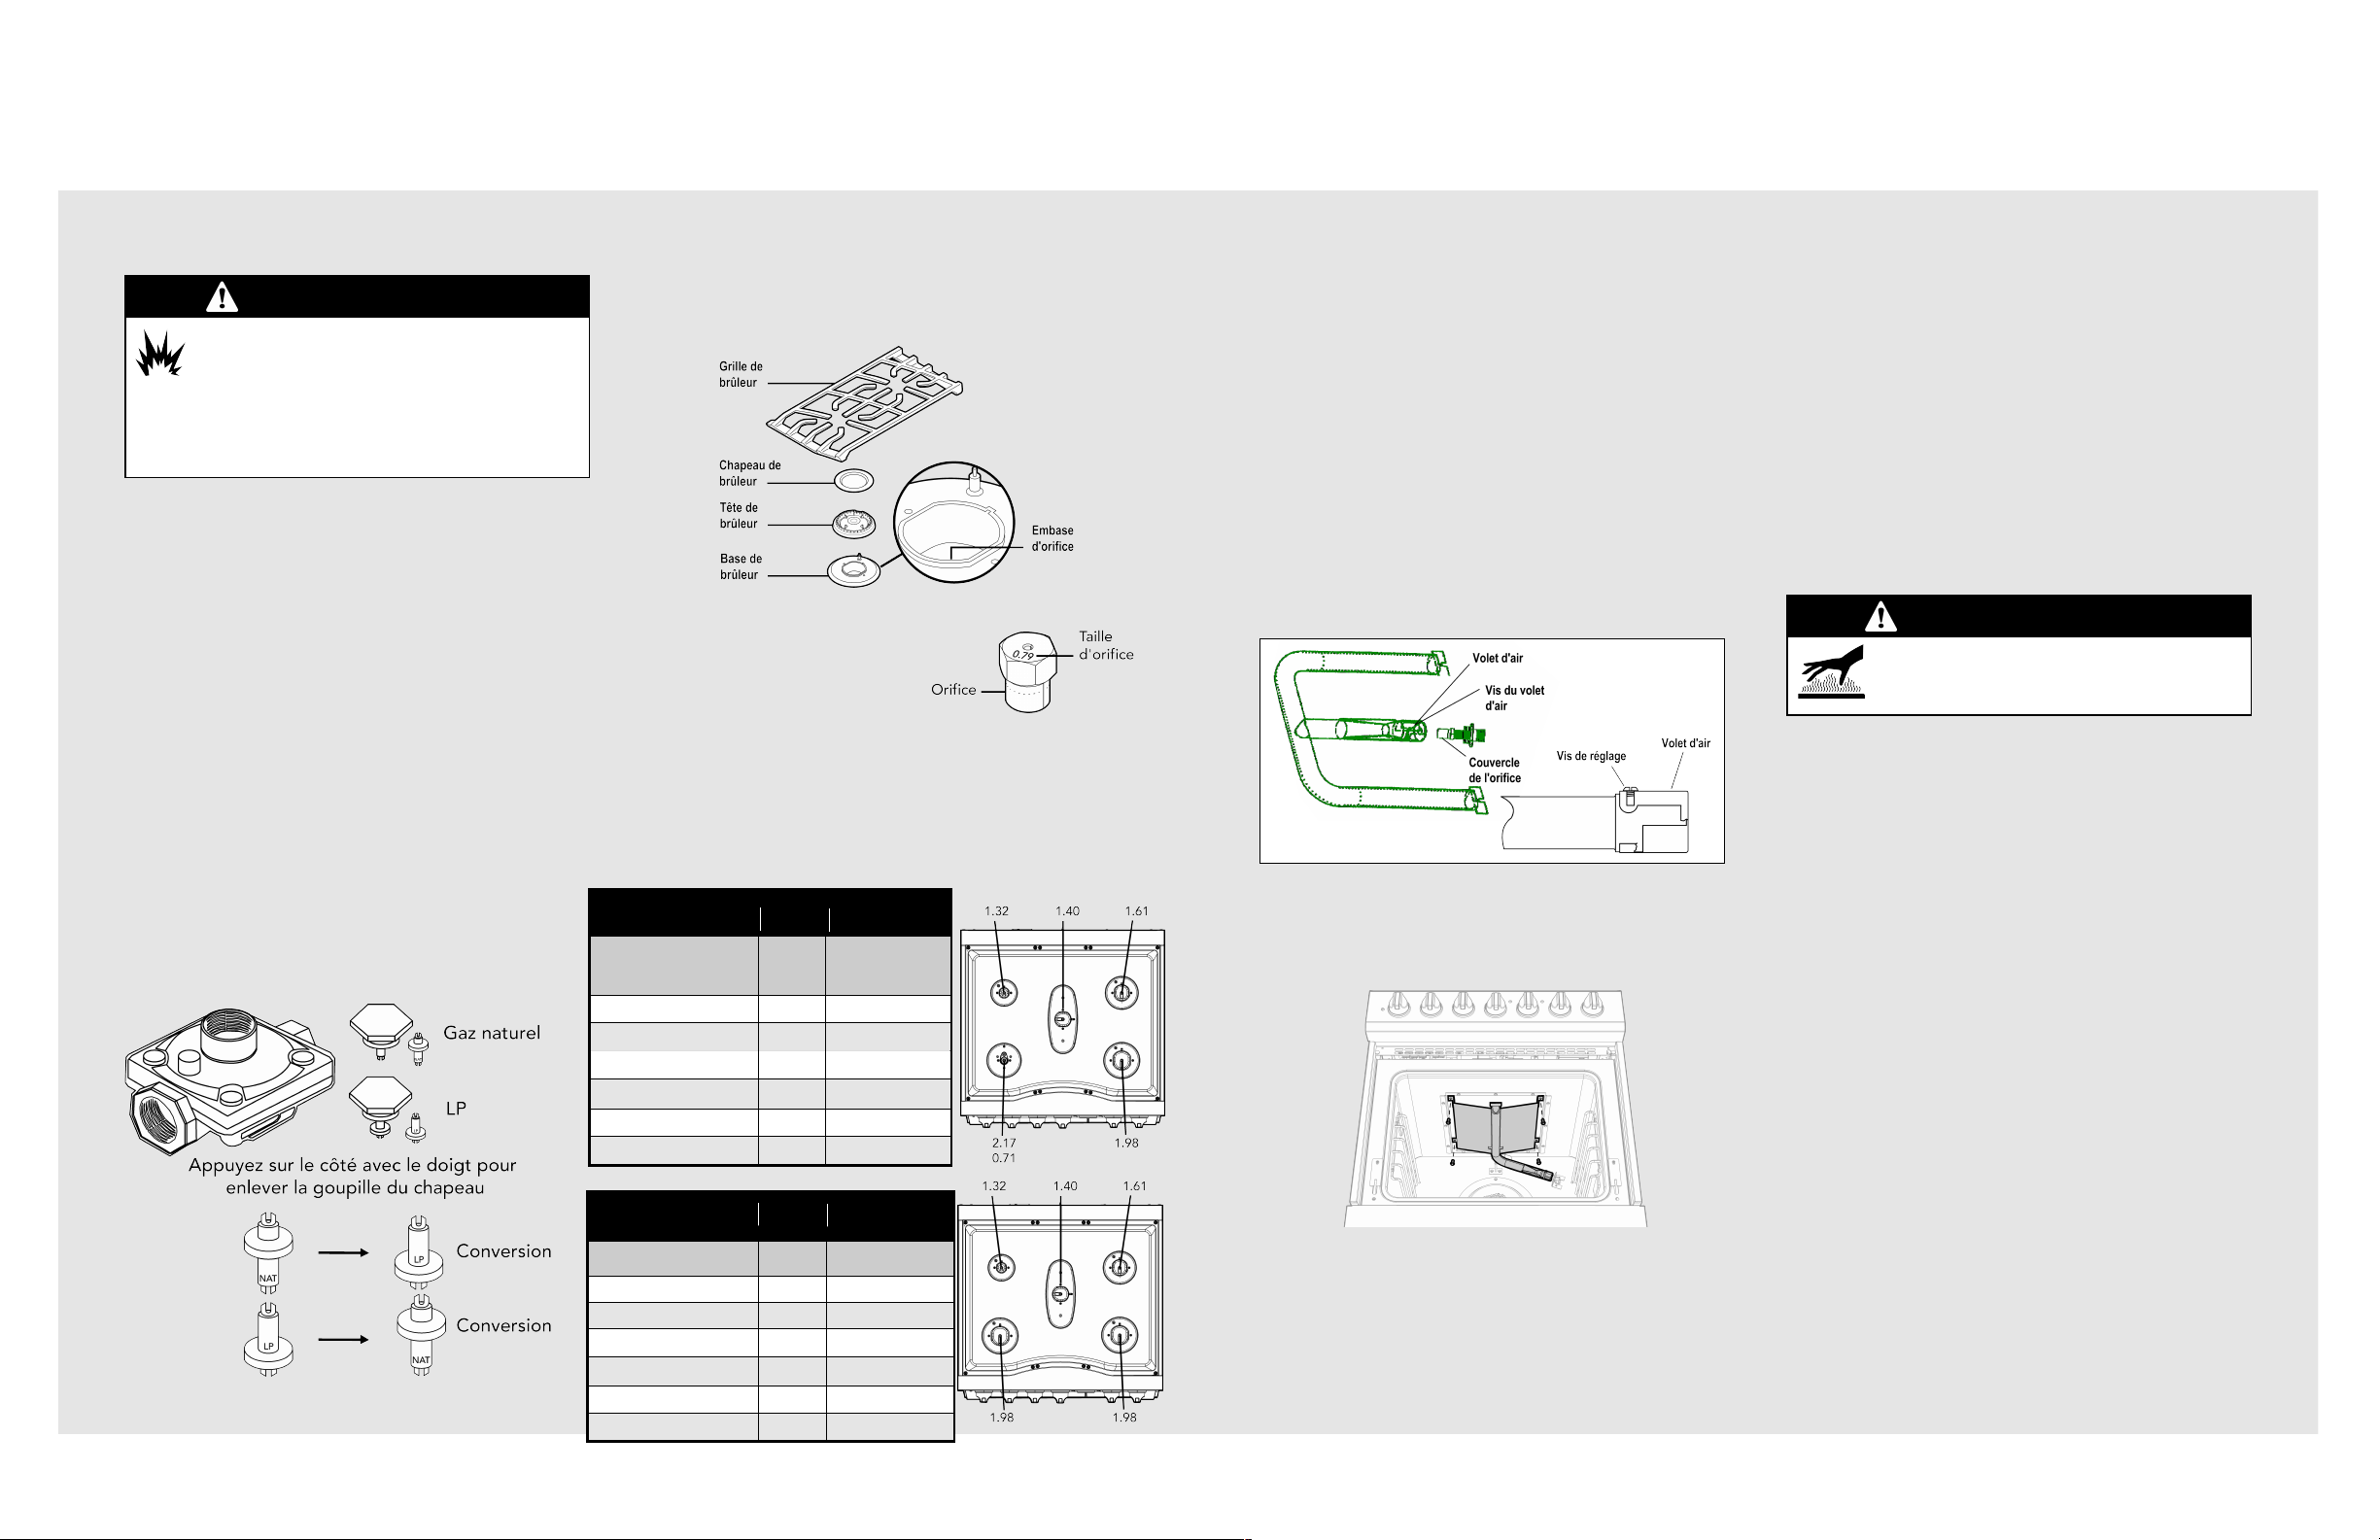
Converting the Bake Burner
1. Remove oven racks and oven support.
2. Remove oven bottom.
3. Remove screws securing bake igniter to bake burner.
4. Remove screws securing bake burner shield to oven burner box.
5. Remove screws securing bake burner to oven burner box.
6. Loosen air shutter screw and adjust opening on burner to 3/8”
and tighten air shutter screw.
7. Remove orifice by turning counterclockwise and replace with
orifice from bag labeled #38 (2.58).
Important: The orifice tip must be located 3/16” inside the burner
for proper gas mixture and combustion. The depth of the orifice
can be adjusted by turning the orifice counterclockwise (more
depth) or clockwise (less depth).
Reverse procedure as needed to reassemble.
Converting the Broil Burner
1. Remove the screws (4) from the broiler baffle.
2. Carefully remove the broiler burner
Note: Pay close attention to the igniter wire while removing the
broiler burner.
3. Disconnect the igniter wire.
4. Use a 1/2” wrench to remove the broiler burner LP gas orifice
hood and replace with NAT broiler burner hood #50 (1.87).
5. Reinstall the converted broiler burner by first firmly
attaching the igniter wire.
6. Reposition the broiler burner in its original position.
7. Replace the four screws into the broiler baffle.
Air Shutter Settings for Broiler Burner
1. Use a screwdriver to loosen the air shutter screw.
2. Adjust the air shutters for NAT gas by rotating the shutter to
the fully open position. Your final settings may vary.
3. Retighten the air shutter screw.
Bake and broiler flame must be checked with the door closed to
properly check flame characteristics.
4. Turn on the gas.
5. Turn on the electricity.
6. Retighten the air shutter screw.
7. Turn on the bake and broiler burner.
8. As you watch the flame with the oven door closed, check the
following through the oven door window:
a. If the flames are yellow, open the air shutter more.
b. If the flames blow away or flutter from the burner, close
the air shutter more.
9. Open the oven door and check the inner cone of the bake
and broiler burner flame. It should be approximately 1/2” to
3/4” long for the bake and broil burners. The combustion
quality of the burner flames needs to be determined visually.
10. When all adjustments are made and the results are
satisfactory then replace the oven bottom cover.
In some cases, foreign particles in the gas line may cause an
orange flame at first but this will soon disappear.
Note: To convert the oven back to LP gas, reverse the
instructions given for making the NAT gas adjustments.
Note: When the NAT conversion is finished, complete the
enclosed conversion label and place it next to the rating label.
NAT Conversion Kit Instructions (cont.)
WARNING
If you attempt to measure the inner cone of the
flame, please use caution as burns could result.
F21303A EN (041014)
VIKING RANGE, LLC
111 Front Street • Greenwood, Mississippi
38930 USA • (662) 455-1200
The pressure regulator and the burner orifices are set for LP gas.
To use natural gas, the regulator and burner orifices must be
converted.
To convert the range to NAT gas, follow these instructions:
1. Disconnect all electrical power at the main circuit breaker or
fuse box.
2. Shut off the gas supply to the range by closing the manual
shut-off valve.
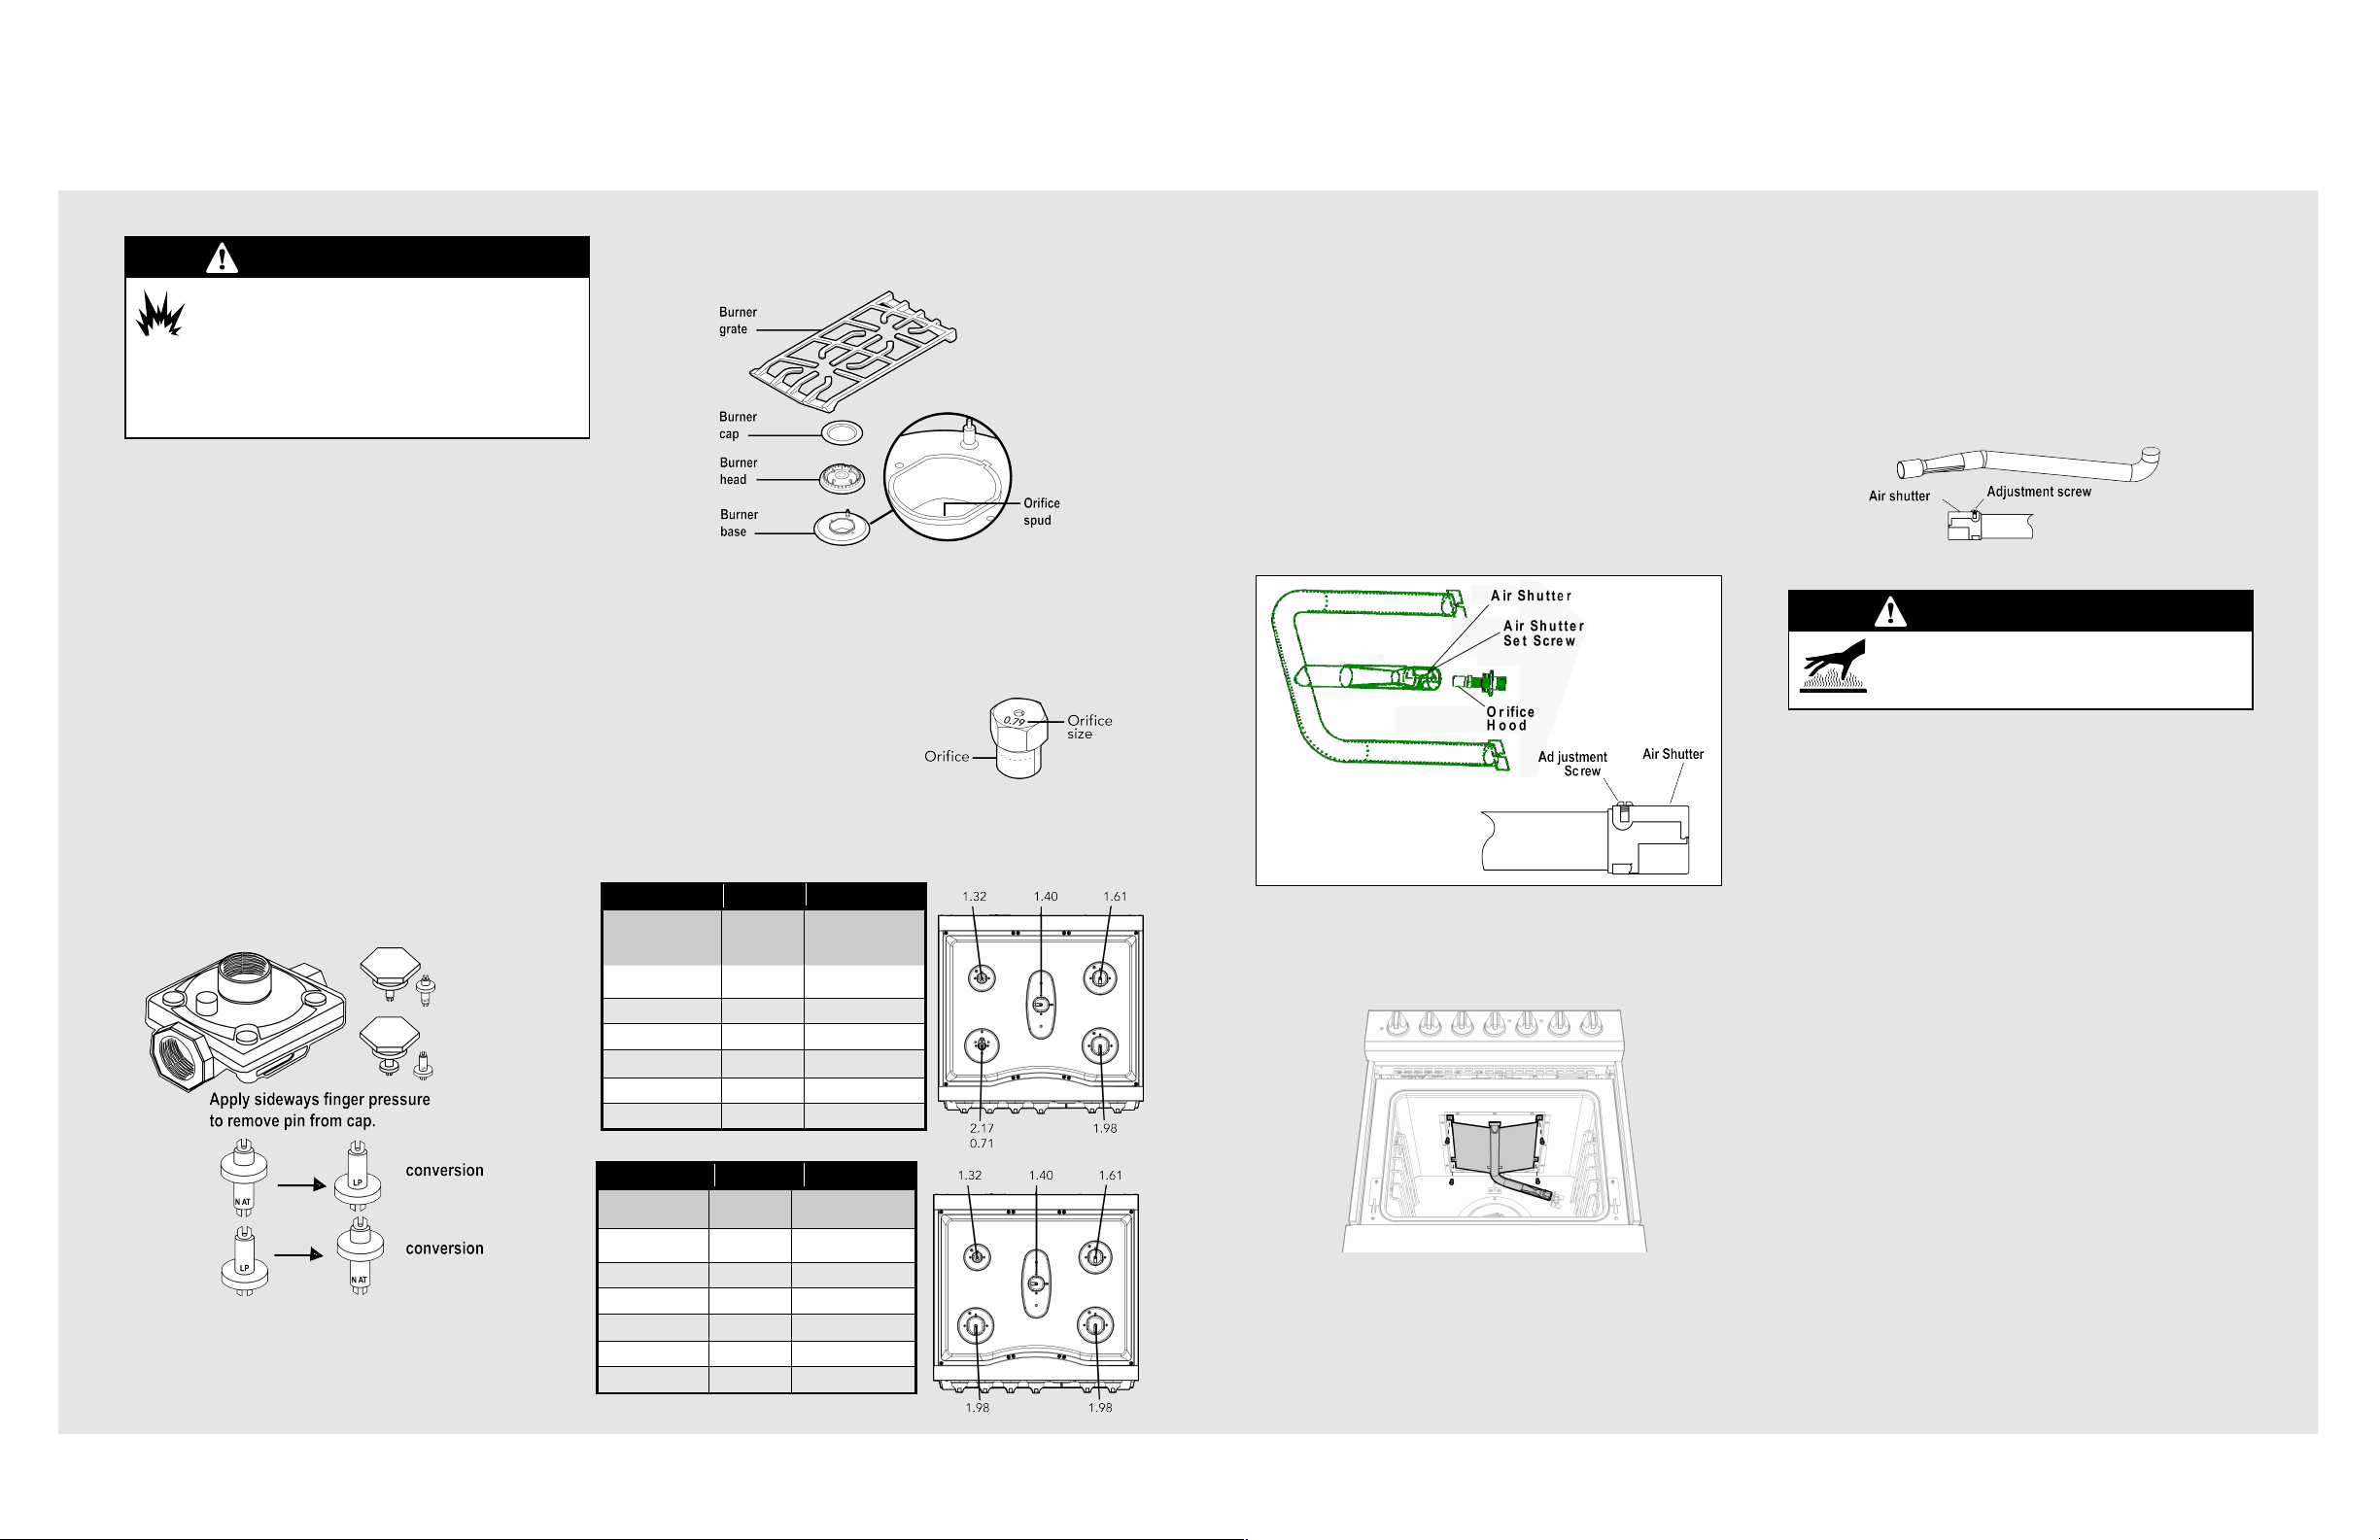
Converting the Pressure Regulator
1. Locate the pressure regulator which can be found on the back
of the range on the right hand side if facing the back of the
range.
2. Unscrew the hex nut cap from the top of the regulator.
3. Unsnap the plastic plunger from the hex nut.
4. Reverse the plunger and reinstall onto the hex nut by
pressing firmly.
Note: Plunger is marked “Nat” and “LP”. Converted fuel type will
be shown on the lower portion of the plunger.
Converting the Surface Burners
1. Remove the top grates, burner caps, and burner heads.
2. Using a 9/32” or 7 mm nut driver remove the top burner
orifices. These may be accessed through the opening in the
burner base.
Note: Save these orifices for future conversion back to NAT gas, if
required.
3. Locate the proper NAT surface
burner orifices included with
the kit according to the chart
below.
4. Install the orifices in their
correct location. To prevent leakage, make sure the orifice
spuds are securely screwed into the burner base.
WARNING
The conversion must be performed by a qualified
installer or gas supplier in accordance with the
manufacturer’s instructions and all codes and
requirements of the authority having jurisdiction. Failure to
follow ALL instructions could result in serious injury or
property damage. The qualified agency performing this
work assumes responsibility for this conversion.
Burner BTU Rate
Orifice Size
Left front (dual)
High
Low
18,000
1,400
2.17
0.71
Left rear
8,000 1.32
Center 9,000 1.40
Right front 17,000 1.98
Right rear 12,000 1.61
Bake 30,000 #38 (2.58)
Broil 15,000 #50 (1.87)
NAT Conversion Kit Instructions for D3 / 300 Series
Gas Self Clean and Dual Fuel Range
Burner BTU Rate
Orifice Size
Left front
18,000
1.98
Left rear
8,000 1.32
Center 9,000 1.40
Right front 17,000 1.98
Right rear 12,000 1.61
Bake 30,000 #38 (2.58)
Broil 15,000 #50 (1.87)
D3
300 Series
Conversion du brûleur de cuisson au four
1. Enlevez les grilles du four et leur support.
2. Enlevez le fond du four.
3. Enlevez les vis qui fixent l’allumeur du four au brûleur du four.
4. Enlevez les vis qui fixent la protection du brûleur du four au
boîtier du brûleur de four.
5. Enlevez les vis qui fixent le brûleur du four au boîtier du brûleur
de four.
6. Desserrez la vis du registre et ajustez l’ouverture du brûleur à
3/8”, puis resserrez la vis.
7. Enlevez l’orifice en tournant dans le sens anti-horaire et
remplacez-le par l’orifice du sachet étiqueté « #38 (2,58).
Important : Pour un mélange et une combustion des gaz corrects,
l’extrémité de l’orifice doit se situer à 5 mm à l’intérieur du
brûleur. La profondeur de l’orifice peut être ajustée en tournant
l’orifice dans le sens anti-horaire (plus profond) ou dans le sens
horaire (moins profond).
Inversez la procédure au besoin pour remonter.
Conversion du brûleur du gril
1. Retirez les vis (4) du déflecteur du gril.
2. Retirez soigneusement le brûleur du gril.
Remarque : Prêtez une attention particulière au câble de
l’allumeur en enlevant le brûleur du gril.
3. Débranchez le câble de l’allumeur.
4. Utilisez une clé de 1/2 po (12 mm) pour enlever le capot de
l’orifice à gaz PL du brûleur et remplacez-le par le capot de
brûleur de gril Naturel #50 (1,87).
5. Remontez le brûleur de gril converti en attachant
fermement le câble de l’allumeur dans un premier temps.
6. Remettez le brûleur du gril à sa position initiale.
7. Remettez les quatre vis dans le déflecteur du gril.
Réglages du volet d’air pour le brûleur du gril
1. Utilisez un tournevis pour desserrer la vis du volet d’air.
2. Ajustez les volets d’air pour gaz Naturel en tournant le volet en
position grand ouverte. Vos réglages finals pourront varier.
3. Resserrez la vis du volet d’air.
La flamme de cuisson au four ou du brûleur doit être vérifiée la
porte fermée pour contrôler correctement les caractéristiques de
la flamme.
4. Ouvrez le gaz.
5. Allumez l’électricité.
6. Resserrez la vis du volet d’air.
7. Allumez le brûleur de cuisson au four ou du gril.
8. En observant la flamme la porte du four fermée, vérifiez ce qui
suit à travers la fenêtre de la porte du four :
a. Si les flammes sont jaunes, ouvrez davantage le volet d’air.
b. Si les flammes se soulèvent ou vacillent à partir du brûleur,
fermez davantage le volet d’air.
9. Ouvrez la porte du four et vérifiez le cône interne de la flamme
du brûleur de cuisson au four ou du gril. Il doit mesurer entre
1/2 et 3/4 po (12 et 19 mm) de hauteur. La qualité de
combustion des flammes de brûleur doit être déterminée
visuellement. Avec le gaz Naturel, la présence de pointes
jaunes sur le cône externe est normale.
10.Une fois tous les réglages effectués et les résultats
satisfaisants, remettez le capot inférieur du four.
Dans certains cas, des particules étrangères dans la conduite de
gaz peuvent causer une flamme orange au départ, laquelle
disparaîtra peu après.
Remarque : Pour effectuer la reconversion au gaz PL, procédez
inversement.
Remarque : Une fois la conversion LP/Propane terminée,
remplissez l’étiquette de conversion et placez-la à côté de
l’étiquette des valeurs nominales.
Instructions de l’ensemble de conversion (suite)
AVERTISSEMENT
Si vous essayez de mesurer le cône interne de
la flamme, usez de prudence, car vous risquez
de vous brûler.
F21303A FR (041014)
VIKING RANGE, LLC
111 Front Street • Greenwood, Mississippi
38930 États-Unis • (662) 455-1200
Les orifices du détendeur et du brûleur sont réglés pour le gaz
naturel. Pour utiliser du gaz propane liquide, les orifices du
détendeur et du brûleur doivent être convertis.
Pour convertir la cuisinière au gaz Naturel, suivez ces
instructions :
1. Débranchez toute l’alimentation électrique au disjoncteur
général ou à la boîte à fusibles.
2. Coupez l’arrivée de gaz en fermant le robinet d’arrêt manuel.
Conversion du détendeur
1. Localisez le détendeur qui se trouve à l’arrière de la
cuisinière, sur le côté droit quand vous regardez l’arrière de la
cuisinière.
2. Dévissez l’écrou borgne à six pans du dessus du détendeur.
3. Détachez le piston plongeur en plastique de l’écrou.
4. Retournez le piston plongeur et réinstallez-le sur l’écrou en
pressant fermement.
Remarque : Le piston plongeur est marqué « Nat » et « LP ». Le
type de combustible converti apparaîtra sur la partie inférieure
du piston plongeur.
Conversion des brûleurs de surface
1. Enlevez les grilles supérieures, les chapeaux de brûleur et les têtes
de brûleur.
2. À l’aide d’un tourne-écrou de 9/32 po ou 7 mm, enlevez les orifices
supérieurs du brûleur. Vous pouvez y
accéder par l’ouverture dans la base
du brûleur.
Remarque : Mettez ces orifices de côté
pour une reconversion future au gaz naturel.
3. Localisez les orifices de brûleur Naturel corrects inclus avec
l’ensemble, conformément à la liste ci-dessus.
4. Installez les orifices au bon endroit. Pour éviter les fuites, assurezvous que l’embase des orifices est solidement vissée sur la base du
brûleur.
AVERTISSEMENT
La conversion doit être confiée à un installateur
qualifié ou un fournisseur de gaz conformément
aux instructions du fabricant et à tous les codes et
exigences de l’autorité ayant juridiction. Le non-respect de
TOUTES les instructions peut causer des blessures graves
ou des dégâts matériels. L’agence qualifiée réalisant le
travail endosse la responsabilité de cette conversion.
Brûleur BTU
Taille
d’orifice
Avant gauche (double)
High
Low
18 000
1 400
2,17
0,71
Arrière gauche
8 000 1,32
Centre 9 000 1,40
Avant droit 17 000 1,98
Arrière droit 12 000 1,61
Bake (cuisson au four) 30 000 #38 (2,58)
Broil (cuisson au gril) 15 000 #50 (1,87)
Instructions de l’ensemble de conversion au Naturel
pour les cuisinières au gaz autonettoyantes et à
brûleurs mixtes D3 et série 300
D3
Brûleur BTU
Taille
d’orifice
Avant gauche
18 000
1,98
Arrière gauche
8 000 1,32
Centre 9 000 1,40
Avant droit 17 000 1,98
Arrière droit 12 000 1,61
Bake (cuisson au four) 30 000 #38 (2,58)
Broil (cuisson au gril) 15 000 #50 (1,87)
Série 300
 Loading...