

Viking QSC200SS, QSC300SS, QSC412NSS, QSC200, QSC300 Installation Manual
...
F20293B EN (040308J)
Viking Range Corporation
111 Front Street
Greenwood, Mississippi 38930 USA
(662) 455-1200
For product information,
call 1-888-VIKING1 (845-4641)
or visit the Viking Web site at
vikingrange.com
Viking Installation Guide
C4™Outdoor Cooker Cart Assembly
3
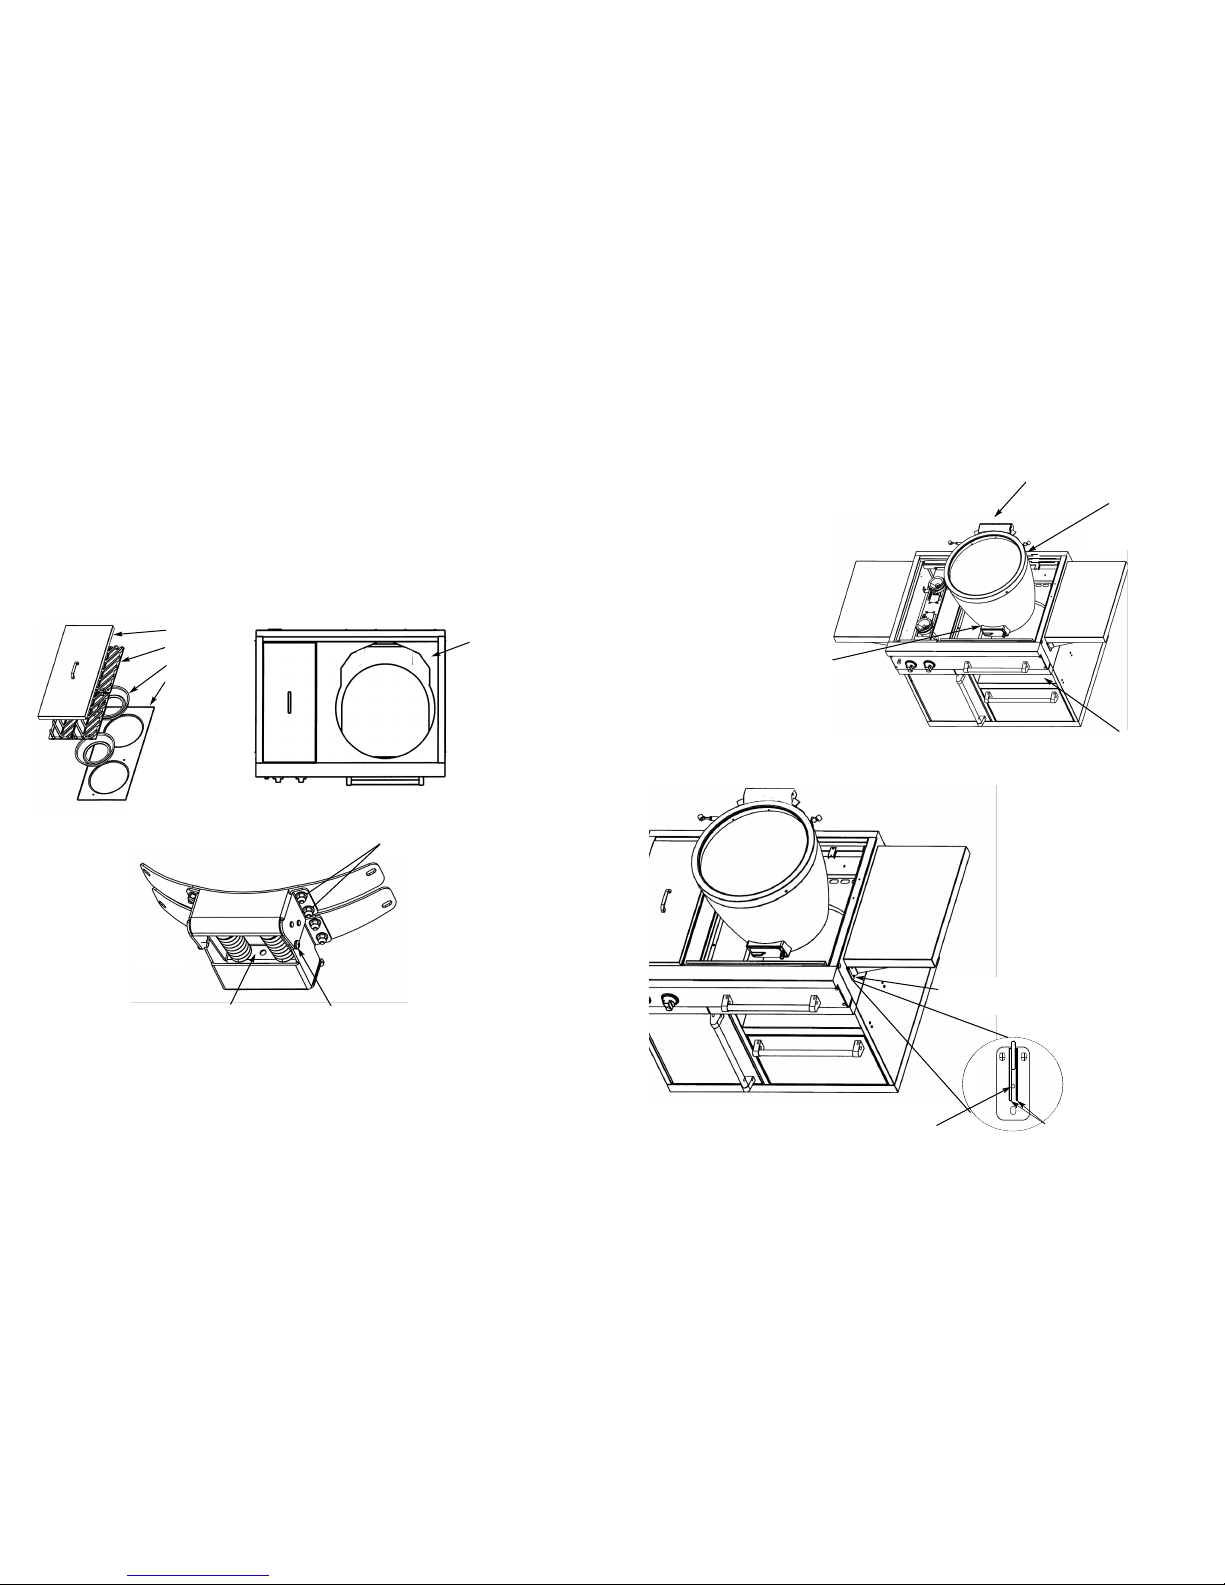
5. With a minimum of two people, place the cooker on the cooker shelf located in the cart. Also, make sure the
cooker is placed on the mounting bracket located on the cart directly under the hinge. The hinge and the inside
damper vent should be used for hand holds. (See Figure 3).
6. Re-install dome, hinge nuts and
washers. Remove shipping screws
from each side of hinge. Replace
inside parts
support bracket
screws
Shelf adjustment screw
Front View
Supports
Leveling the Side Shelves
To level the side shelves, lift the shelf
so that the shelf adjustment screw is
visible between the two supports on
the shelf brackets. Turn the screw
with the included 3/32” (.2 cm) allen
wrench counter clockwise to raise the
shelf and clockwise to lower th e
shelf. (See Figure 4)
Figure 4
Damper vent
Cooker shelf
Figure 3
Mounting Bracket
(located behind
cooker on cart
directly under hinge)
Hinge
IMPORTANT: PLEASE READ AND FOLLOW
1. Before beginning, please read these instructions completely and carefully.
2. Do not remove permanently affixed labels, warnings, or plates from product.
To mount the cooker to the cart:
Always wear gloves when installing the cooker. Although the cooker and cart is deburred prior to shipment, some
edges may still be sharp enough to cause injury during handling.
1. Remove the stainless steel side burner cover, side burner grates, bur ner bowls and grate support. (41” W. models
only)
2. Remove the top from the cart. (See Figure 1)
CAUTION: Keep hands and fingers away fro spring area.
3. Install two (2) shipping screws, (one set on each side). (See Figure 2) Remove the two (2) top nuts and washers on
each side of the hinge mount.
4. Remove all inside parts.
Figure 1
Stainless cover
Grates
Burner bowls
Grate support
Cart top
Remove the (2) top nuts and
washers on each side of hinge
Install (2) shipping screws
(one on each side)
CAUTION
Keep hands and fingers out of
spring area. Lift from bottom
or inside front of hinge.
Figure 2
2
5
CART DIMENSIONS
30” W. Cart - Front
30” W. Cart - Side
36-1/2”
(92.7 cm)
37-5/8”
(95.6 cm)
61-3/4” (156.9 cm)
37-7/8” (96.2 cm)
29-3/8” (77.6 cm)
37-5/8”
(95.6 cm)
23-7/8” (60.6 cm)
31-5/8” (79.7 cm)
33-3/8” (84.8 cm)
53-1/8” (134.5 cm)
Cart Door Adjustment (41” W. Model only)
The cart door comes adjusted from the factory. Depending on how level the surface the cart is being placed on, the
door may need to be adjusted after the grill is assembled on the cart.
There are two adjustment screws on the hinge receiver. (See Figure 5)
1) The front screw is used to center the door in the opening. Turning the front screws in or out will center the door in
the frame.
2) The back screw is used to align the front of the door with the cart frame and secure the door to the cart. Slightly
loosen the screw and slide the door in or out. Retighten the screw to secure the door.
Door Hinge
(2 places)
Back
Screw
Front
Screw
4
Figure 5
BASIC SPECIFICATIONS
DESCRIPTION QSC200 QSC300 QSC412
Overall Width 23” (58.4 cm) 61-3/4” (156.9 cm) 73-3/8” (186.4 cm)
Overall Height 21-3/4” (55.2 cm) 37-5/8” (95.6 cm) 37-1/2” (95.3 cm)
Overall Depth 21” (53.3 cm) To end of landing ledge 31-5/8” (79.7 cm)
To end of knobs 33-3/8” (84.8 cm)
Gas Requirements N/A N/A Natural: Standard residential 1/2”
(1.3 cm) ID gas service line
LP/Propane: Equipped with high
capacity hose/regulator
assembly for connection to
standard 5 gal, 20 lb.
LP/Propane gas cylinder
with Type 1, QCC-1
connection or standard
residential 1/2” (1.3 cm) ID
gas service line
Electrical Requirements N/A N/A 9 volt DC battery for electronic ignition
Surface Burner Rating N/A N/A 15,000 BTU Nat./13,500 LP/Propane
(4.4 kW Nat./4.0 kW LP/Propane)
Approx. Shipping Weight 50 lbs. (22.5 kg) 170 lbs. (76.5 kg.) 275 lbs. (123.8 kg)
 Loading...