

Viking Designer DGRT361-5B, Professional Custom VGRT536-4QSS, Professional Custom VGRT530-4BSS, Professional Custom VGRT536-4GSS, Professional Custom VGRT548-6GSS Quick Reference Manual
...
•
Before beginning,
please read these
instructions completely
and carefully.
•
DO NOT remove permanently
a
ffixed labels, warnings, orplates fromproduct. This
m
ay void thewarranty.
•
All local andnational codesand ordinancesmust be
observed. Installation mustconform withlocal codes
or in theabsence ofcodes, theNational FuelGas
Code ANSI Z223.1NFPA54-latest edition.
• Theinstaller mustleave these instructions with
t
he consumer forlocal inspector’s use and for
f
uture reference.
Installation of anygas-fired equipmentshould bemade
by a licensedplumber. A manual gasshut-off valve
must be installedin thegas supplyline aheadof the
D A N G E R
Hazards or unsafe practices
whichWILL resultin severepersonal
injury or death
Built-In Cooktops
Yoursafety andthe safetyof othersis
very important.
We have provided many importantsafety
messages in this manual andon your
appliance. Always read and obey all
safety messages.
This is the safety alertsymbol. This symbol
alerts you to hazards thatcan kill orhurt
you and others.
All safety messages will bepreceded by the
safety alert symbol and theword
“DANGER,” “WARNING” or “CAUTION.”
These words mean:
W A R N I N G
Hazards or unsafe practices
which COULD result insevere personal
injury or death
C A U T I O N
Hazards or unsafe practices which
COULD result in minorpersonal injuryor
property damage
All safety messages will identifythe
hazard, tell you how toreduce the chance
of injury, and tell you what canhappen if
the instructions are not followed.
FIRE/EXPLOSION HAZARD
IF THE INFORMATION IN THIS
MANUAL IS NOT FOLLOWED
EXACTLY, A FIRE OR EXPLOSION
MAY RESULTCAUSING PROPERTY
DAMAGE,PERSONAL INJURY,OR
W A R N I N G
This appliance shall not beused for space
heating. This information is basedon safety
considerations.
BURN HAZARD
The use of cabinets for storage abovethe
appliancemay result in a potential burn
hazard. Combustibleitems may ignite,
metallicitems may become hot and cause
burns. If a cabinet storageis tobe provided
the risk can be reduced by installinga
C A U T I O N
Before placing the cooktop intooperation,
always check for gas leakswith a soapy
water solution or other acceptablemethod.
DO NOT USE AN OPEN FLAME TO
CHECK FOR LEAKS.
A qualified installershould carryout thefollowing
checks:
hCheck top burner ignition.The lowflame should
light at everyport.
hStarting with the left
front burner,tur n the corresponding knob to theHI
position – seedrawing forproper flameheight.
IMPORTANT:Any conversionrequired must be
performed byyour dealeror aqualified licensed
plumber or gasservice company.The proper
conversion kit mustbe orderedfrom your
authorized service agencyor dealer.
hRepeat steps for other burners.
Surface Operation
Lighting Burners
A
ll burners areignited
b
y electric ignition.
There are no open-flame,
“standing” pilots.
Surface Burners/
Automatic Re-Ignition
T
o light thesurface burners,push andturn the
a
ppropriate control knob counter clockwiseto any
position. This control is botha gasvalve andan
electric switch. Burnerswill igniteat any“ON”
position with theautomatic re-ignitionsystem. Ifthe
flame goes outfor anyreason, theburners will
automatically re-ignite if thegas isstill flowing.When
gas is permittedto flowto theburners, the electric
igniters start sparking.On allsurface ignitersyou
should hear a“clicking” sound.If youdo not,tur n off
the control and checkthat theunit isplugged inand
that the fuseor circuitbreaker isnot blownor tripped.
Within afew moments,enough gaswill havetraveled
to the burnerto light.When theburner lights, turn
the burner controlto anyposition toadjust theflame
size. Setting theproper flameheight forthe desired
cooking process and selectingthe correctcooking
vessel will result in superiorcooking performance,
while also savingtime andenergy. Ifany oneor more
surface burners orgrill burnersextinguish, the
electronic igniter automatically activatesto re-lightthe
flame. DO NOT TOUCH THE BURNERS WHEN THE
IGNITERS ARE ACTIVE.
It is notuncommon tosee extinguishedflames, when:
• Proper ventilationis not used
• When theoven door is opened orclosed rapidly
• When spilloverof liquids or foods occur
• When theincorrect gas or impure gas is used
Surface Cooking Tips
• Use low or medium flameheights whencooking in
vessels that are poor conductorsof heat,such as
glass, ceramic, andcast-iron. Reducethe flame
height until itcovers approximately1/3 ofthe
cooking vessel diameter.This will ensure more even
heating within thecooking vesseland reducethe
likelihood of burningor scorchingthe food.
• Reduce the flame if itis extendingbeyond the
bottom of thecooking vessel.A flamethat extends
along the sidesof thevessel ispotentially
dangerous, heats the utensilhandle andkitchen
instead of thefood, andwastes energy.
•
Reduce the flameheight tothe minimumlevel
necessary to performthe desiredcooking process.
Remember that foodcooks justas quicklyat a
gentle boil asit doesat arolling boil.Maintaining a
higher boil thanis necessarywastes energy,cooks
a
way moisture, and causesa lossin foodflavor and
n
utrient level.
•
The minimum potor pan(vessel) diameter
recommended is 6” (15cm). Useof potsor pansas
small as 4”(10 cm)is possiblebut not
recommended.
Surface Heat Settings
Note: The above information is given as a guide only.
Youmay need tovary the heat settingsto suit your
personal requirements.
Heat
Setting
Use
Simmer
Melting small quantities
Steaming rice
Simmering sauces
Low
Melting large quantities
MedLow
Low-temperature frying(eggs, etc.)
Simmering large quantities
Heating milk, cream sauces, gravies,
and puddings
Med
Sauteing and browning, braising,
and pan-frying
Maintainingslow boilon largequantities
MedHigh
High-temperature frying
Pan broiling
Maintainingfast boilon largequantities
High
Boiling water quickly
Deep-fat frying inlarge cookware
C A U T I O N
DO NOT heat empty cookware or let cookware
boil dry.The cookwarecan absorban excessive
amount of heat very quickly, resulting in possible
damage to the cookware and ceramic glass.
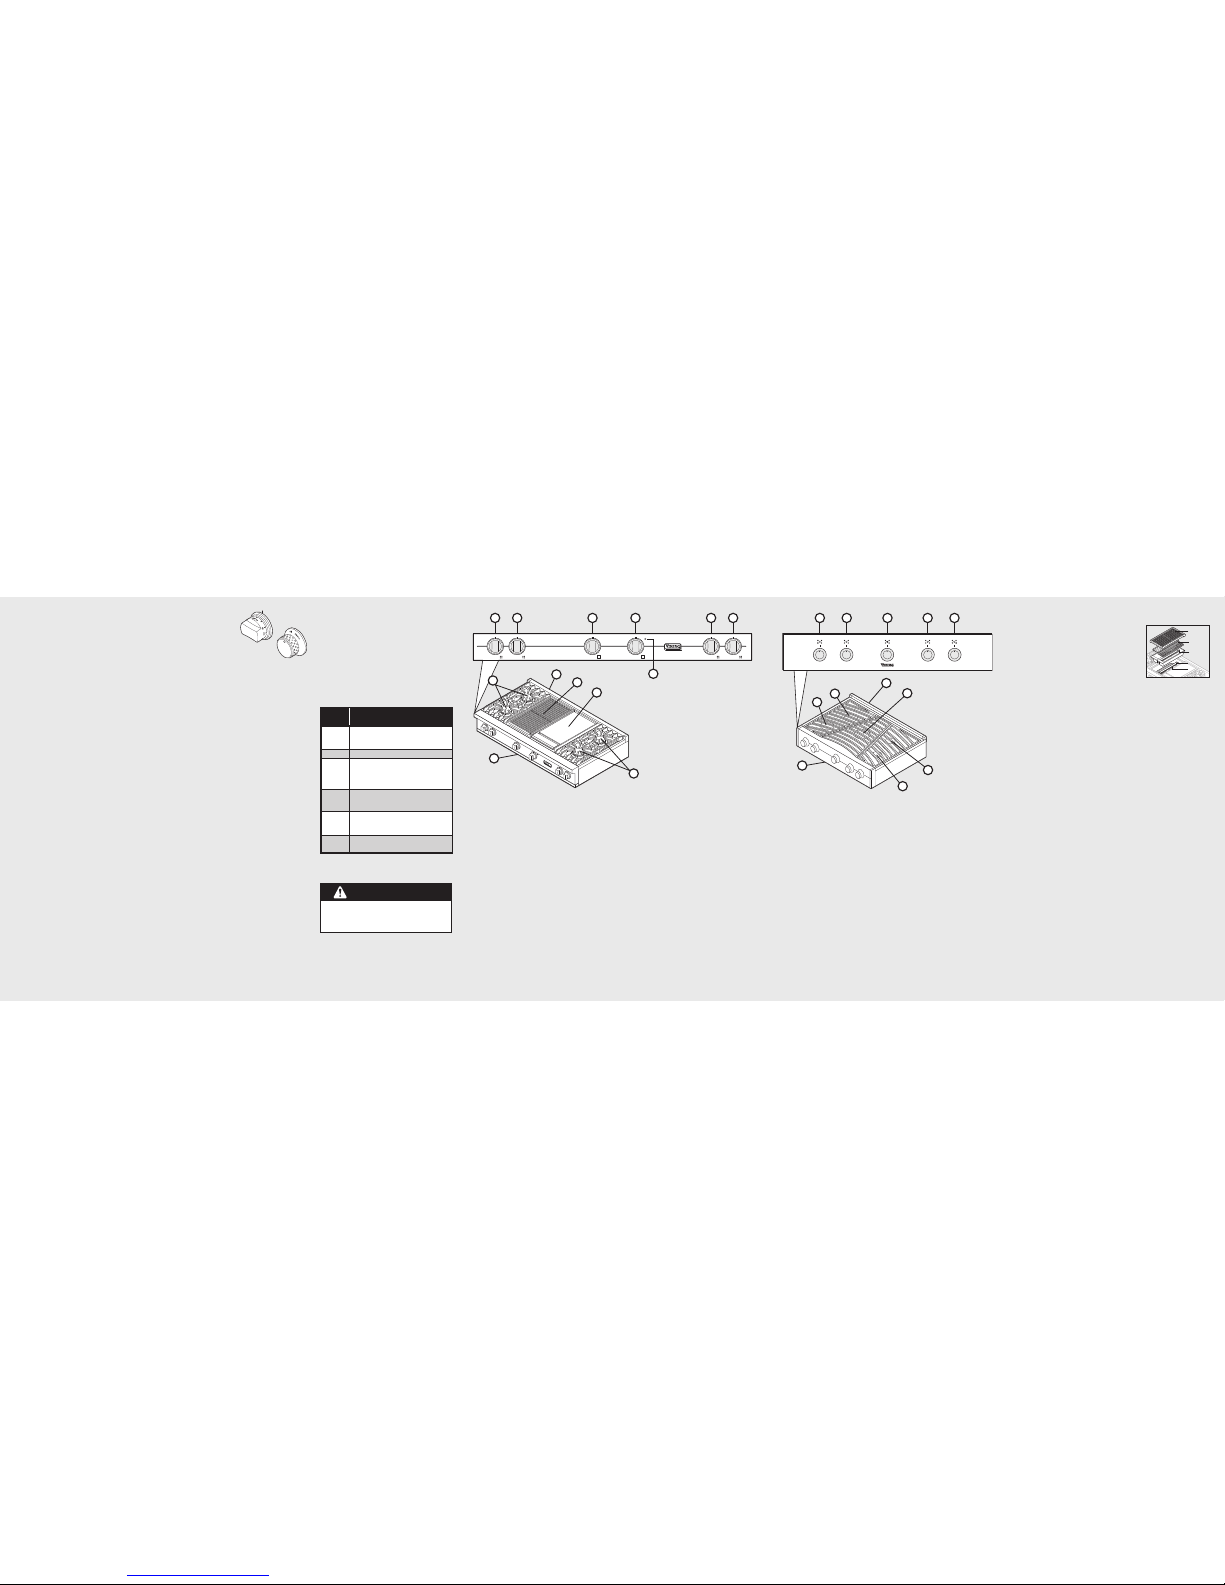
GRIDDLE
21 3 4
7
5 6
10
11
8
9
12
8
1. Left rearburner controlknob
2. Left frontburner controlknob
3. Char-Grill controlknob
4. Griddle controlknob
5. Right rearburner controlknob
6. Right frontburner controlknob
7. Griddle indicatorlight
8. Four 15,000BTU sealed burners with
porcelain/cast iron caps and automatic
ignition/re-ignition
9. Stainless steelisland trim
10.Char-Grill (optional)
11.Griddle (optional)
12.Identification plate
Rangetop Features (Professional)
48” four burner/Char-Grill/griddlemodel shown
VariSimmer™
Simmering is acooking techniquein whichfoods are
cooked in hotliquids keptat orjust barelybelow the
boiling point ofwater. Simmering ensures gentler
treatment than boiling toprevent foodfrom
toughening and/or breaking up. Thesize ofthe pan
and the volumeof foodcan havea significanteffect
on how highor lowa flameis neededfor simmering.
For this reason, Viking rangeand rangetopburners
are engineered with a VariSimmer setting. The
VariSimmer setting is not just onesimmer setting,but
provides a variable rangeof simmersettings. This
variable range ofsimmer settingsallows youto adjust
the flame heightto achievethe bestsimmer
depending on thetype andquantity offood being
simmered. It is thisability thatmakes theVariSimmer
setting the mostaccurate andtrustworthy simmeron
the market.
TruPower Plus™ Burner (whereapplicable)
Certain model rangesare equippedwith aTruPower
Plus 18,500 BTUburner inthe frontright burner
position. This burneris designedto provideextrahigh heat output,especially whenusing largepans,
and should beused forboiling largequantities orif
you need tobring somethingto aboil quickly.While
the TruPowerPlus burner has theextra powerneeded
to bring large quantities ofliquid toa boilrapidly, itis
also able tobe turneddown lowenough to provide a
very low anddelicate simmermaking thisburner the
most versatile onthe market.
A
ll products are wiped cleanwith solventsat the
f
actory to remove any visiblesigns ofdirt, oil,and
g
rease which may haveremained fromthe
manufacturing process. Before starting tocook, clean
the rangetop thoroughly with hot,soapy water. There
may be someburn offand odorson firstuse of the
appliance—this is normal.
Cooking Vessels
E
ach cook hashis orher ownpreference forthe
particular cooking vesselsthat aremost appropriate
for the typeof cookingbeing done.Any andall
cooking vessels are suitable foruse inthe rangeand it
is not necessaryto replaceyour presentdomestic
vessels with commercial cookware. This isa matterof
personal choice. Aswith anycookware, yoursshould
be in goodcondition andfree fromexcessive dents
on the bottomto providemaximum performanceand
convenience.
Note: When using big pots and/or high flames, it is
recommended to use the front burners. There is more
room in the front and potential cleanup at rear of
appliance due to staining or discoloration will be
minimized.
Before
Using Rangetop
21 3 4 5
9
8
6
10
11
12
7
Rangetop Features (Designer)
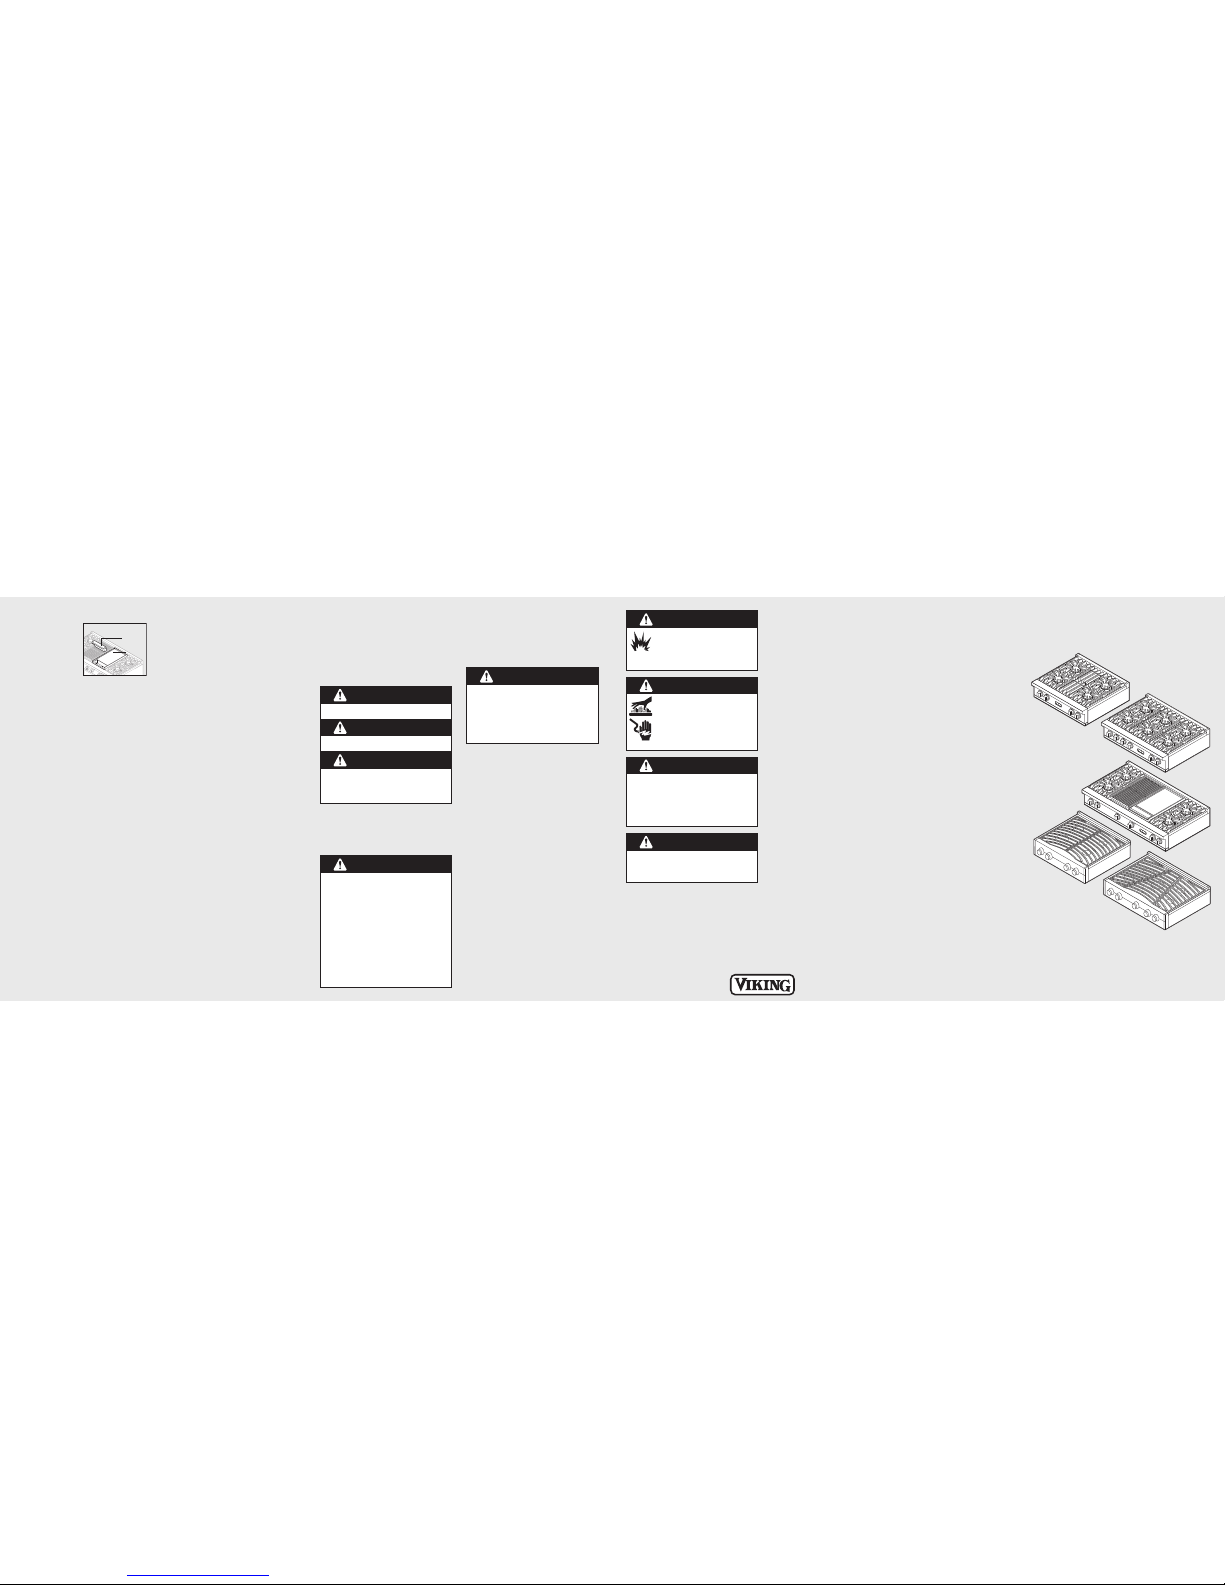
Char-Grill (Professional)
Char-Grill (
on applicablemodels)
T
he optional18,000 BTU
c
har-grillis equippedwith
a singlepiece, heavy-duty
porcelainizedcast-irongrill
gratefor easymovement
of grillingitems. Beneath
t
he grillgrate isa slotted
p
orcelainizedflavorg
eneratorplate which is
designedto catchdrippingsand circulate asmoke
flavorback intothe food.Beneath theflavor-generator
plateis atwo-piece drippan whichcatches any
drippingsthat might passbeyond theflavor-generator
plate.This uniquegrillingsystem isdesignedto provide
outdoorquality grillingindoors.
Char-Grill Operation
• Turnthe overheadventilation on priorto turningthe
grillon.
• Turnthe grillknob counterclockwiseto “HI”.
• Alwayspreheat the grillfor 5-10minutes before
placingfood onthe grillgrate.
• Placefood itemson thegrill, cookas desired.
• Toturn thegrilloff, turnthe grill knobclockwise to
the“OFF” position.
Char-Grill Cooking Tips
• Whengrilling chicken,roasts, well-donesteaks or
chops,and thickpieces ofmeat, searon “HI”. Then,
reducethe heatsettingto preventexcessiveflare-up.
Thiswill allowthe foodto cookthrough without
burningthe outside.
• Aftersteaks, chops,or hamburgers havebeen
allowedto searfor approximatelyone minute,you
mayslide aspatula underthe meatand turnit
approximately90 degreesto createa wafflepattern.
• Usea metalspatula insteadof tongsor afork toturn
themeat. Aspatula willnot puncturethe meat
allowingjuices toescape.
• Turnthe meat overonly once.Juices arelost when
steaks,chops orhamburgersare turnedseveraltimes.
Thebest timeto turnthe meatis afterthe juices have
begunto bubbleto thesurface.
• Totest for doneness,make asmall slashin thecenter
of themeat, notthe edge.This willprevent lossof
juices.
• Occasionallytheremay beflare-ups or flamesabove
thegrill dueto drops offat fallingon the flavorgeneratorplates. Use along handledspatula tomove
foodto anotherarea untilthe flamessubside.
• Forease ofcleaning, leavethe char-grillon for10
minuteswhen finishedgrilling. Thiswill helpmake
cleanupeasier once thechar-grill hascooled down
andlower theheat betweencooking.
1. Left front burnercontrol knob
2. Left rear burnercontrol knob
3. Center controlknob
4. Right rear burnercontrol knob
5. Right frontburner controlknob
6. 30” model– One 12,000BTU sealed burners
withporcelain/cast ironcaps andautomatic
ignition/re-ignition
36” model– One16,000 BTU sealedburners
withporcelain/cast ironcaps andautomatic
ignition/re-ignition
7. 30” model– One 10,000BTU sealedburners
withporcelain/cast ironcaps andautomatic
ignition/re-ignition
36” model– One12,000 BTU sealedburners
withporcelain/cast ironcaps andautomatic
ignition/re-ignition
8. Stainless steelisland trim
9. 36” model– One 16,000BTU sealed burners
withporcelain/cast ironcaps andautomatic
ignition/re-ignition
10.Identificationplate
11.30” &36” models– One6,000 BTUsealed
burnerswith porcelain/castiron caps and
automaticignition/re-ignition
12.30” &36” models– One8,000 BTUsealed
burnerswith porcelain/castiron caps and
automaticignition/re-ignition
36” five burnermodel shown
h
i
m
e
d
h
i
Grill
Two-piece
drippan
BurnerBurnerBurner
F
lavor-
g
enerator
plates
DriptrayDrip trayDriptray
Warnings
W
arningand ImportantSafetyInstructions appearing
i
n thisguide arenot meant to coverall possible
c
onditionsand situationsthat mayoccur.Common
sense,caution, andcare mustbe exercised when
installing,maintaining,or operatingthe appliance.
ALWAYScontactthe manufacturerabout problemsor
c
onditionsyou donot understand.
R
ecognize Safety Symbols,Words, Labels
Read and followall instructionsbefore using this
appliance to preventthe potentialrisk offire, electric
shock, personal injuryor damageto theappliance as
a result of improper usage ofthe appliance.Use
appliance only forits intendedpurpose asdescribed
in this guide.
T
o ensure properand safeoperation:
A
ppliance must beproperly installedand grounded
b
y a qualifiedtechnician. DONOT attemptto adjust,
repair,service, or replace any part of your appliance
unless it isspecifically recommendedin thisguide.
All other servicingshould bereferred toa qualified
servicer.
To Prevent Fire or Smoke Damage
• Be sureall packingmaterials areremoved fromthe
appliance beforeoperating it.
• Keep areaaround applianceclear andfree from
combustiblematerials, gasoline,and other
flammable vaporsand materials.
• If applianceis installednear awindow, proper
precautionsshould betaken toprevent curtains
from blowingover burners.
• NEVER leaveany itemson therangetop. Thehot
air from the ventmay igniteflammable itemsand
may increasepressure inclosed containerswhich
may cause them to burst.
• Many aerosol-typespray cansare EXPLOSIVEwhen
exposed to heat and maybe highlyflammable.
Avoid theiruse or storagenear anappliance.
• Many plasticsare vulnerableto heat.Keep plastics
away from partsof the appliancethat maybecome
warm or hot. DO NOT leave plastic items on the
rangetop as theymay melt or softenif lefttoo close
to a surface element.
• Combustible items(paper, plastic, etc.) mayignite
and metallic itemsmay becomehot andcause
burns. DO NOT pour spirits over hot foods.
In Case ofFire
Turnoff applianceand ventilatinghood toavoid
spreadingthe flame.Extinguish flame,then turnon hood
to remove smokeand odor.
• Smother fireor flamein apan witha lid or cookie
sheet. DO NOT use water on greasefires. Usebaking
soda, a dry chemicalor foam-typeextinguisher to
smother fireor flame.
• NEVER pickup ormove aflaming pan.
D A N G E R
Hazards or unsafepractices whichWILL resultin
severe personal injuryor death
W A R N I N G
Hazards or unsafepractices whichCOULD result
in death severepersonal injuryor death
C A U T I O N
Hazards or unsafe practices which COULD
result in minor personal injury.
Allsafety messageswill identify thehazard, tell you
howto reduce thechance of injury,and tellyou what
canhappen if theinstructions are notfollowed.
W A R N I N G
If the information in this manual isnot followed
exactly,a fireor explosionmay resultcausing
property damage, personal injury or death.
WHATTO DOIF YOU SMELL GAS:
• DO NOT try to light any appliance.
• DO NOT touch any electrical switch.
• DO NOT use any phone in your building.
• Immediately call your gas supplier from a
neighbor's phone. Follow the gas supplier's
instructions.
• If you cannot reach your gas supplier, call the
fire department.
Installation and service must be performed by a
qualified installer, service agency or the gas
supplier.
Warnings (cont.)
F20638BEN (092409J)
VIKING RANGECORPORATION
111 FrontStreet •Greenwood, Mississippi
38930 USA• (662)455-1200
Viking Quick Reference Guide
Professional Built-In Custom and
Designer Built-In Gas Rangetops
W A R N I N G
T
o avoid risk of property damage,
p
ersonal injury or death; follow
information in this guide exactly to
p
revent a fire or explosion. DO NOT
store or use gasoline or other flammable vapors
a
nd liquids in the vicinity of this or anyappliance.
W A R N I N G
BURN OR ELECTRICAL
SHOCK HAZARD
Toavoid riskof injuryor death, make
sure all controls are “OFF” and surface
is COOL before cleaning. Failure to do
so can result in burns or electrical
shock.
C A U T I O N
DO NOT heat empty cookware or let cookware
boil dry.The cookwarecan absorban excessive
amount of heat very quickly, resulting in possible
damage to the cookware and ceramic glass.
C A U T I O N
Toavoid therisk ofproperty damage, DO NOT
USE BRASS CLEANERS OR ABRASIVE
CLEANERS ON ANY BRASS PARTS.All brass
body parts should be wiped regularly with hot,
soapy water and a soft, clean cloth. When hot,
soapy water will not do the job, use everyday
household cleaners that are not abrasive.
C A U T I O N
Toprevent possibledamage tocabinets and
cabinet finishes, use only materials and finishes
that will not discolor or delaminate and will
withstand temperatures up to 194° F (90° C). Heat
and moisture resistant adhesive must be used ifthe
product is to be installed in laminated cabinetry.
Check with your builder or cabinet supplier tomake
sure that the materials meet these requirements.
Griddle/Simmer Plate (
on applicablemodels)
T
he optional15,000 BTU
g
riddleis constructedof
machinedsteel with a
blanchardfinish and is
uniquelydesigned to offer
excellentcooking
p
erformanceas wellas
e
asycleanup. Thegriddle
i
s equippedwith an
electronicthermostatto maintainan even temperature
acrossthe griddle oncethe desiredtemperaturehas
beenset. Thegriddle has apower “ON”indicatorlight
whichglows whenthe griddlethermostat has been
turnedon. Thiswill cycleon andoff asneeded to
indicatethe thermostatis maintainingthe selected
temperature.Beforethe griddleis used itis important
to seasonthe griddle.This seasoningprocesswill
changethe appearanceof thegriddle plate.However, it
willalso preventfood fromsticking and protectthe
surfacefrom moisture.
Seasoningthe Griddle BeforeFirst Use:
• Scrubthe griddle platewith amixture of onequart
warmwater and1/4 cupwhite vinegar,usinga blue
Scotch-Brite™pad. Drythoroughly.
• Washgriddle withwarm, soapywater.Rinse offand
drythoroughly.
• Seasongriddle by thinlycoating the surfacewith
approximately1/2 to 1teaspoon unsaltedvegetable
oil.Apply toentire griddleusing apaper towelor
cleancloth. Letoil siton griddlefor approximately1
hourand thenwipe with a cleancloth orpaper towel
to absorbany residualoil. Thegriddle is nowready to
be used.
Griddle/Simmer Plate Operation
•
Turnthe griddle controlknob counterclockwiseto the
d
esiredtemperature setting.The power “ON”
indicatorlight will glowindicating thegriddle
thermostatis on.
• Thedouble griddle hastwo thermostat controlknobs
whichcontrol separateburners located beneaththe
g
riddle.
•
Whenthe griddlehas reachedthe desired
t
emperature,the power“ON” indicator lightwill turn
off,indicating the griddleis preheatedto theselected
temperature.
• Useliquid cooking oilor butterfor eggs,pancakes,
Frenchtoast, fish, andsandwiches topreventsticking.
• Routinelyscrape loosefood particles witha metal
spatuladuring cookingto makethe cleanup easier
andto avoidthe particlesmixing withthe food.
• Toturn thegriddleoff, turnthe thermostatknob
clockwiseto the“OFF” position.
• ALWAYSturn tothe “OFF”positionwhen notin use.
Griddle/Simmer Plate (Professional)
GriddleGriddle
G
reasetrough
Griddle
 Loading...