

Page 1
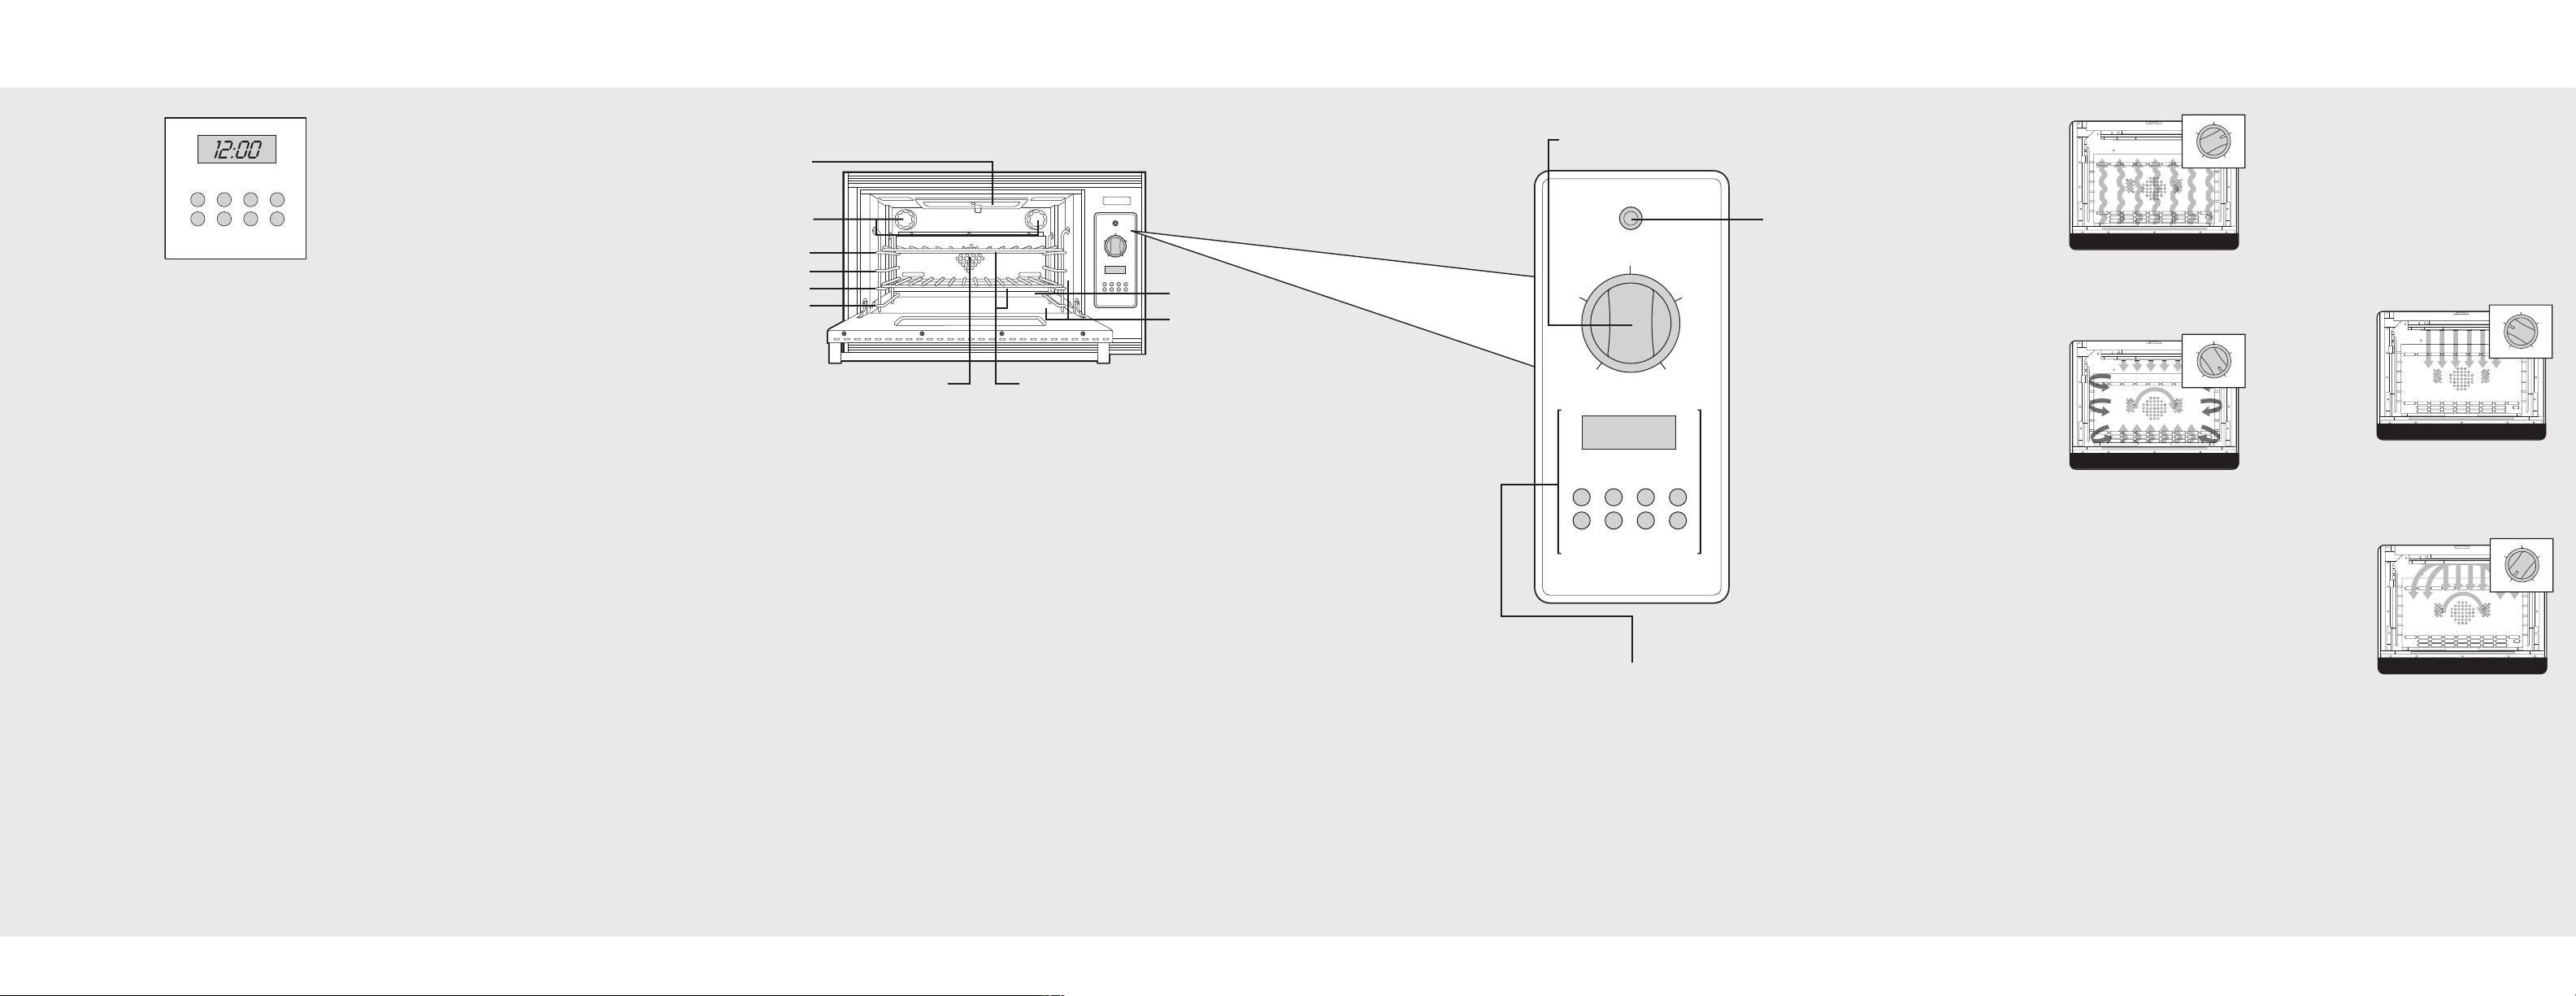
Clocks and Timers
OVEN
LIGHT
OFF
BROIL
CANCEL
CLOCK
TIMER
COOK
TIME
BROIL
HI/LOW
DOWN
BAKE
TEMP
UP
BAKE
CONVECTION
BAKE
CONVECTION
B
ROIL
O
VEN
L
IGHT
O
FF
B
ROIL
CANCEL
CLOCK
TIMER
C
OOK
TIME
B
ROIL
HI/LOW
D
OWN
BAKE
T
IMER
UP
B
AKE
C
ONVECTION
B
AKE
CONVECTION
BROIL
Interior Oven
Light Control
Oven Function Selector
Electronic Timing/Temperature Center
The electronic timing/temperature center is used to program
and control all timing and temperature functions. Each oven
has a separate temperature control and a separate oven
function selector. The button control can be set at any
temperature from 170°F (76.6°C) to 550°F (287.8°C) by
pressing “UP” or “DOWN”. There are separate settings for
broiling and HI/LO BROIL. ALWAYS be sure the controls are
in the OFF position when the oven is not in use.
IMPORTANT–The time-of-day must be set before any other
program can be used.
The oven has
interior oven
lights that are
controlled by one
switch on the
control panel.
Push the switch to
turn the interior
oven lights on
and off.
Gourmet Glo™
Infrared burner
Oven lights
Convection fan
Oven racks
Bake burner
Removable
bottom and sides
Rack positions
4
3
2
1
C
ANCEL
C
LOCK
T
IMER
C
OOK
T
IME
B
ROIL
H
I/LOW
D
OWN
BAKE
T
EMP
U
P
natural airflow bake
OFF
B
ROIL
B
AKE
C
ONVECTION
BAKE
CONVECTION
B
ROIL
convection bake
O
FF
B
ROIL
BAKE
CONVECTION
BAKE
CONVECTION
BROIL
infrared convection broil
OFF
BROIL
BAKE
CONVECTION
BAKE
CONVECTION
B
ROIL
infrared broil
OFF
BROIL
BAKE
CONVECTION
B
AKE
C
ONVECTION
BROIL
Oven Controls
Oven Settings
Electronic Timing/
Temperature
Center (Digital
Display)
The Electronic Timing/
Temperature Center
controls are used to
rogram timing and
p
emperature functions. It
t
as eight display buttons
h
and five programming modes. Both the COOK TIME
mode and TIMER mode can be used to time cooking
periods.
Setting the Clock
The time-of-day must be set before any other program
can be used. When your oven is first connected to the
power in your home, the timer display will show 12:00.
To Program the Time-of-Day:
1. Press the “CLOCK” button. A single tone will sound
and the colon will flash indicating the clock function
has been accessed.
2. “UP” and “DOWN” are used to set the time of day.
“UP” increases time; “DOWN” decreases time.
“UP/DOWN” will increase or decrease the time in
1 minute increments. When the button is held down,
time will increase or decrease in 5 minute increments
until the next hour is reached, then will continue to
increase or decrease in hour increments.
3. Release the button when the appropriate time has
been reached.
4. The clock mode will terminate if the time is not set
within 30 seconds of accessing the clock function.
The colon will cease flashing indicating the clock
mode has been terminated. Pressing “CANCEL”
once will also terminate the clock mode.
The time-of-day can be changed by following steps 1
through 4. It cannot be changed while there is a TIMER
or COOK TIME cycle programmed into the timer.
Setting the Min/Hour Timer
The MIN/HOUR TIMER is designed for accurate timing
of foods. It is ideal for baking delicate items such as
biscuits, cookies, and popovers, and for precise broiling.
To Program the Min/Hour Timer:
1. Press the “TIMER” button. The timer will display :00.
2. Press the “UP” or “DOWN” buttons to increase or
decrease time. The time will change in 1 minute
increments. When the button is held down, time will
change in 5 minute increments until the next hour is
reached.
Setting COOK TIME Program
OOK TIME automatically ends a cooking function. This
C
eature does not automatically start a cooking function.
f
This program is used for controlled timing of baked or
roasted foods.
1. Press the “COOK TIME” button once to access the
timed cook mode. A single tone will sound and 0:00
ill appear on the display.
w
. The UP and DOWN buttons are used to set the
2
imer. “UP” increases time; “DOWN” decreases time.
t
Tapping “UP” and “DOWN” will increase or
decrease the time in 1 minute increments. When the
“UP” or “DOWN” is held down, time will increase or
decrease in 5 minute increments until the next hour is
reached, then will continue to increase or decrease in
hour increments.
3. Release the button when the appropriate time has
been reached.
To Set The Bake Temperature
1. Press “BAKE TEMP” once. A single tone will sound,
the bake indicator light in the upper left corner and
the bar segments “---” of the display will light
prompting the setting of the bake temperature using
the “UP” or “DOWN” buttons.
2. The temperature will default to 350°F when either
“UP” or “DOWN” button is pressed. Tapping the
“UP” or “DOWN” buttons will increase or decrease
the temperature in 5-degree increments. The
temperature will increase or decrease in 25°
increments when the “UP” or “DOWN” buttons are
pressed and held down. The temperature can be set
from a low of 170°F to a high of 550°F. When the
desired temperature has been reached, a tone will
sound indicating the oven has preheated.
3. Set the Oven Function selector to the desired
function – BAKE, CONVECTION BAKE, BROIL OR
CONVECTION BROIL.
4. BAKE TEMP setting may be terminated by pressing
the “CANCEL” button.
Rack Positions
The convection oven is equipped with three tilt-proof
racks and four rack positions. Position 4 is the farthest
BAKE (Natural Airflow Bake)
Use this setting for baking, roasting, and preparing
casserole dishes.
from the oven bottom. Position 1 is the closest to the
oven bottom. The racks can be easily removed and
arranged at various levels. For best results with
conventional baking, DO NOT use more than one
rack at a time. It is recommended when using two
racks to do the following:
1. Arrange the oven racks in the desired position
BEFORE heating
the oven. If cooking on two racks at the same time,
use rack positions 2 and 4.
2. Turn the function selector to the desired function.
3. Set the temperature control to the desired
Convection Bake
Use this setting to bake and roast foods at the same
time with minimal taste transfer.
BROIL (Infrared Broil)
Use this setting for broiling dark meats at 1” thickness
or less where rare or medium doneness is desired.
CONVECTION BROIL (Infrared
Convection Broil)
Use this setting to broil thick cuts of meat.
temperature.
4. Place the food in the oven after preheating.
Preheating is complete when the tone sounds.
Convection Dehydrate (CONVECTION
BAKE)
Use this function to dehydrate fruits and vegetables.
Convection Defrost (CONVECTION
BAKE)
Use this function to defrost foods.
Note: For more information on oven functions see
“Oven Settings” section.
BAKE
(Natural
Airflow Bake)
Full power heat is
radiated from the
two bake burners in
the bottom of the
ven cavity and is
o
irculated with
c
atural airflow. This function is recommended for single
n
rack bakings. Many cookbooks contain recipes to be
cooked in the conventional manner. Conventional
baking is suitable for dishes that require a high
temperature. Use this setting for baking and casseroles.
CONVECTION
BAKE
Heat is radiated
from the bake
burners in the
bottom of the oven
cavity. The heated
air is circulated by
the motorized fan
in the rear of the oven providing more even heat
distribution. This even circulation of air equalizes the
temperature throughout the oven cavity and eliminates
the hot and cold spots found in convection ovens.
Multiple rack use is possible for the largest baking job.
When roasting, cool air is quickly replaced—searing
meats on the outside and retaining more juices and
natural flavor on the inside with less shrinkage. This
even circulation of air equalizes the temperature
throughout the oven cavity and eliminates the hot and
cold spots found in conventional ovens.
Convection Dehydrate
This oven is designed not only to cook, but also to
dehydrate fruits and vegetables. With the oven
function selector set to Convection Bake and the
temperature control on 170° F (76.6° C), warm air is
circulated by a motorized fan in the rear of the oven.
Over a period of time, the water is removed from the
food by evaporation. Removal of water inhibits growth
of microorganisms and retards the activity of enzymes.
It is important to remember that dehydration does not
improve the quality, so only fresh, top-quality foods
should be used.
1. Prepare the food as recommended.
2. Arrange the food on drying racks (not included with
the oven; contact a local store handling speciality
cooking utensils).
3. Set the appropriate low temperature and turn the
selector to “CONVECTION BAKE”.
Convection Defrost
ith the selector set to “CONVECTION BAKE” and
W
he temperature control off, air is circulated by a
t
motorized fan in the rear of the oven. The fan
accelerates natural defrosting of the food without heat.
To avoid sickness and food waste, DO NOT allow
defrosted food to remain in the oven for more than two
ours.
h
. Place the frozen food on a baking sheet.
1
2. Set the temperature control to “OFF”.
3. Turn the selector to “CONVECTION BAKE”.
BROIL
(Infrared Broil)
Heat radiates from
the Gourmet Glo™
infrared broiler
located at the top
of the oven cavity.
The distance
between the foods
and the broil elements determines broiling speed. For
“fast” broiling, food may be as close as 2” (5 cm) to
the broil element or on the top rack. “Fast” broiling is
best for meats where rare to medium doneness is
desired. Use this setting for broiling small and average
cuts of meat.
CONVECTION
BROIL (Infrared
Convection
Broil)
Exactly the same
as regular broiling
with the additional
benefit of air
circulation by the
motorized fan in the rear of the oven. Smoke is
reduced since the airflow reduces peak temperatures
on the food. Use this setting for thick cuts of meat.
Page 2
Warnings
arning and Important Safety Instructions appearing
W
n this manual are not meant to cover all possible
i
onditions and situations that may occur. Common
c
sense, caution, and care must be exercised when
installing, maintaining, or operating the appliance.
ALWAYS contact the manufacturer about problems or
onditions you do not understand.
c
ecognize Safety Symbols, Words, Labels
R
D A N G E R
Hazards or unsafe practices which WILL result in
severe personal injury or death
W A R N I N G
Hazards or unsafe practices which COULD result
in death severe personal injury or death
C A U T I O N
Hazards or unsafe practices which COULD
result in minor personal injury.
All safety messages will identify the hazard, tell you
how to reduce the chance of injury, and tell you what
can happen if the instructions are not followed.
Read and follow all instructions before using this
appliance to prevent the potential risk of fire, electric
shock, personal injury or damage to the appliance as
a result of improper usage of the appliance. Use
appliance only for its intended purpose as described
in this manual.
To ensure proper and safe operation: Appliance
must be properly installed and grounded by a
qualified technician. DO NOT attempt to adjust,
repair, service, or replace any part of your appliance
unless it is specifically recommended in this manual.
All other servicing should be referred to a qualified
servicer. Have the installer show you the location of
the gas shutoff valve and how to shut it off in an
emergency. A certified technician is required for any
adjustments or conversions to Natural or LP gas.
bout Your Appliance
A
C A U T I O N
EVER use appliance as a space heater to heat or
N
arm a room to prevent potential hazard to the
w
ser and damage to the appliance. Also, DO NOT
u
use the oven as a storage area for food or cooking
tensils.
u
• Avoid touching oven vent area while oven is on
and for several minutes after oven is turned off.
When the oven is in use, the vent and surrounding
area become hot enough to cause burns. After
oven is turned off, DO NOT touch the oven vent or
surrounding areas until they have had sufficient
time to cool.
• The misuse of oven doors (e.g. stepping, sitting, or
leaning on them) can result in potential hazards
and/or injuries.
• The appliance must be installed and electrically
grounded according to local codes. Have the
installer identify the location and shut-off valve on
the oven so you know where and how to turn off
gas if necessary.
W A R N I N G
If the information in this manual is not
followed exactly, a fire or explosion may
result causing property damage,
personal injury or death.
DO NOT store or use gasoline or other flammable
vapors and liquids in the vicinity of this or any
appliance.
WHAT TO DO IF YOU SMELL GAS:
• DO NOT try to light any appliance.
• DO NOT touch any electrical switch.
• DO NOT use any phone in your building.
• Immediately call your gas supplier from a
neighbor's phone. Follow the gas supplier's
instructions.
• If you cannot reach your gas supplier, call the
fire department.
Installation and service must be performed by a
qualified installer, service agency or the gas
supplier.
Warnings (cont.)
W A R N I N G
O NOT use commercial oven cleaners inside the
D
oven. Use of these cleaners can produce hazardous
fumes or can damage the porcelain finishes.
W A R N I N G
NEVER cover any slots, holes or passages in the
oven bottom or cover an entire rack with materials
such as aluminum foil. Doing so blocks air flow
through the oven and may cause carbon monoxide
poisoning. Aluminum foil linings may also trap heat,
causing a fire hazard.
W A R N I N G
To avoid risk of property damage,
personal injury or death; follow
information in this manual exactly
to prevent a fire or explosion.
W A R N I N G
ELECTRICAL SHOCK HAZARD
DO NOT touch a hot oven light bulb with
a damp cloth as the bulb could break.
to the appliance before removing bulb to avoid
electrical shock.
Should the bulb break, disconnect power
W A R N I N G
ELECTRICAL SHOCK HAZARD
Disconnect the electric power at the
main fuse or circuit breaker before
replacing bulb.
W A R N I N G
BURN OR ELECTRICAL
SHOCK HAZARD
Make sure all controls are OFF and oven
is COOL before cleaning. Failure to do
so can result in burns or electrical shock.
W A R N I N G
o avoid sickness and food waste when using
T
automatic time baking:
• DO NOT use foods that will spoil while waiting for
ooking to start, such as dishes with milk or eggs,
c
cream soups, custards, fish, pork, poultry, or
foods with stuffing.
Any food that has to wait for cooking to start
•
should be very cold or frozen before it is placed in
the oven.
• DO NOT use foods containing baking powder or
yeast when automatic time baking. They will not
rise properly.
• DO NOT allow food to remain in the oven for
more than two hours after the end of the cooking
cycle.
• To avoid sickness and food waste, DO NOT allow
defrosted food to remain in the oven for more
than two hours.
C A U T I O N
You must carefully check the food during the
dehydration process to ensure that it does not
catch fire.
N O T I C E
DO NOT turn the Temperature Control on during
defrosting. Turning the convection fan on will
accelerate the natural defrosting of the food
without the heat.
C A U T I O N
BURN HAZARD
The oven door, especially the glass,
can get hot. Danger of burning:
DO NOT touch the glass!
C A U T I O N
DO NOT store items of interest to children over the
unit. Children climbing to reach items could be
seriously injured.
Viking Quick Reference Guide
Professional Built-In Gas
Thermal-Convection 36”W. Oven
F20554 EN (090408J)
VIKING RANGE CORPORATION
111 Front Street • Greenwood, Mississippi
38930 USA • (662) 455-1200
 Loading...