

Page 1
Viking Installation Guide
Viking Range Corporation
111 Front Street
Greenwood, Mississippi 38930 USA
(662) 455-1200
For product information,
call 1-888-VIKING1 (845-4641)
or visit the Viking Web site at
vikingrange.com
F20518A EN
Professional Built-In Gas
Thermal-Convection Ovens
(091108J)
Page 2
Table of Contents
DANGER
WARNING
CAUTION
IMPORTANT
–Please Read and Follow
Warnings & Important Safety Information _______________________________________________3
Dimensions (30”W.) __________________________________________________________________6
Specifications (30”W.) ________________________________________________________________7
Dimensions (36”W.) __________________________________________________________________8
Specifications (36”W.) ________________________________________________________________9
Cutout Dimensions (30”W.) __________________________________________________________10
Cutout Dimensions (36”W.) __________________________________________________________11
Clearance Dimensions ______________________________________________________________12
Electrical & Gas Requirements _______________________________________________________12
General Information ________________________________________________________________14
Installation (30”W.)__________________________________________________________________15
Door Removal (30”W.)___________________________________________________________15
Connecting Gas & Electrical (30”W.) ______________________________________________16
Final Installation (30”W.) _________________________________________________________17
Door Replacement & Adjustment (30”W.)__________________________________________18
Installation (36”W.)__________________________________________________________________19
Door Removal (36”W.)___________________________________________________________19
Connecting Gas & Electrical (36”W.) ______________________________________________20
Final Installation (36”W. Single) ___________________________________________________21
Final Installation (36”W. Double) __________________________________________________22
Optional Center Trim Installation (36”W. Double) ___________________________________24
Door Replacement & Adjustment (36”W.)__________________________________________24
Final Preparation ___________________________________________________________________25
Performance Checklist ______________________________________________________________26
Service & Registration _______________________________________________________________27
• Before beginning, please read these
instructions completely and carefully.
• DO NOT remove permanently affixed
labels, warnings, or plates from product.
This may void the warranty.
• All local and national codes and ordinances
must be observed. Installation must
conform with local codes or in the absence
of codes, the National Fuel Gas Code ANSI
Z223.1 NFPA54-latest edition.
• The installer must leave these instructions
with the consumer who should retain for
local inspector’s use and for future
reference.
In Canada: Installation must be in accordance
with the current CAN/CGA B149.1 & 2 Gas
Installation codes and/or local codes. Electrical
installation must be in accordance with the
current CSA C22.1 Canadian Electrical Codes
Part 1 and/or local codes.
In Massachusetts: All gas products must be
installed by a “Massachusetts” licensed
plumber or gasfitter. A “T” type handle
manual valve must be installed in the gas
supply line to the appliance.
Your safety and the safety of others is
very important.
We have provided many important safety
messages in this manual and on your
appliance. Always read and obey all
safety messages.
This is the safety alert symbol. This
symbol alerts you to hazards that
can kill or hurt you and others.
All safety messages will be preceded by
the safety alert symbol and the word
“DANGER,” “WARNING” or “CAUTION.”
These words mean:
Hazards or unsafe practices
which WILL result in severe personal
injury or death
Hazards or unsafe practices
which COULD result in severe personal
injury or death
Hazards or unsafe practices which
COULD result in minor personal injury or
property damage
All safety messages will identify the
hazard, tell you how to reduce the chance
of injury, and tell you what can happen if
the instructions are not followed.
3
Page 3
DANGER
DANGER
DANGER
DANGER
WARNING
WARNING
WARNING
WARNING
WARNING
WARNING
IMPORTANT
–Please Read and Follow
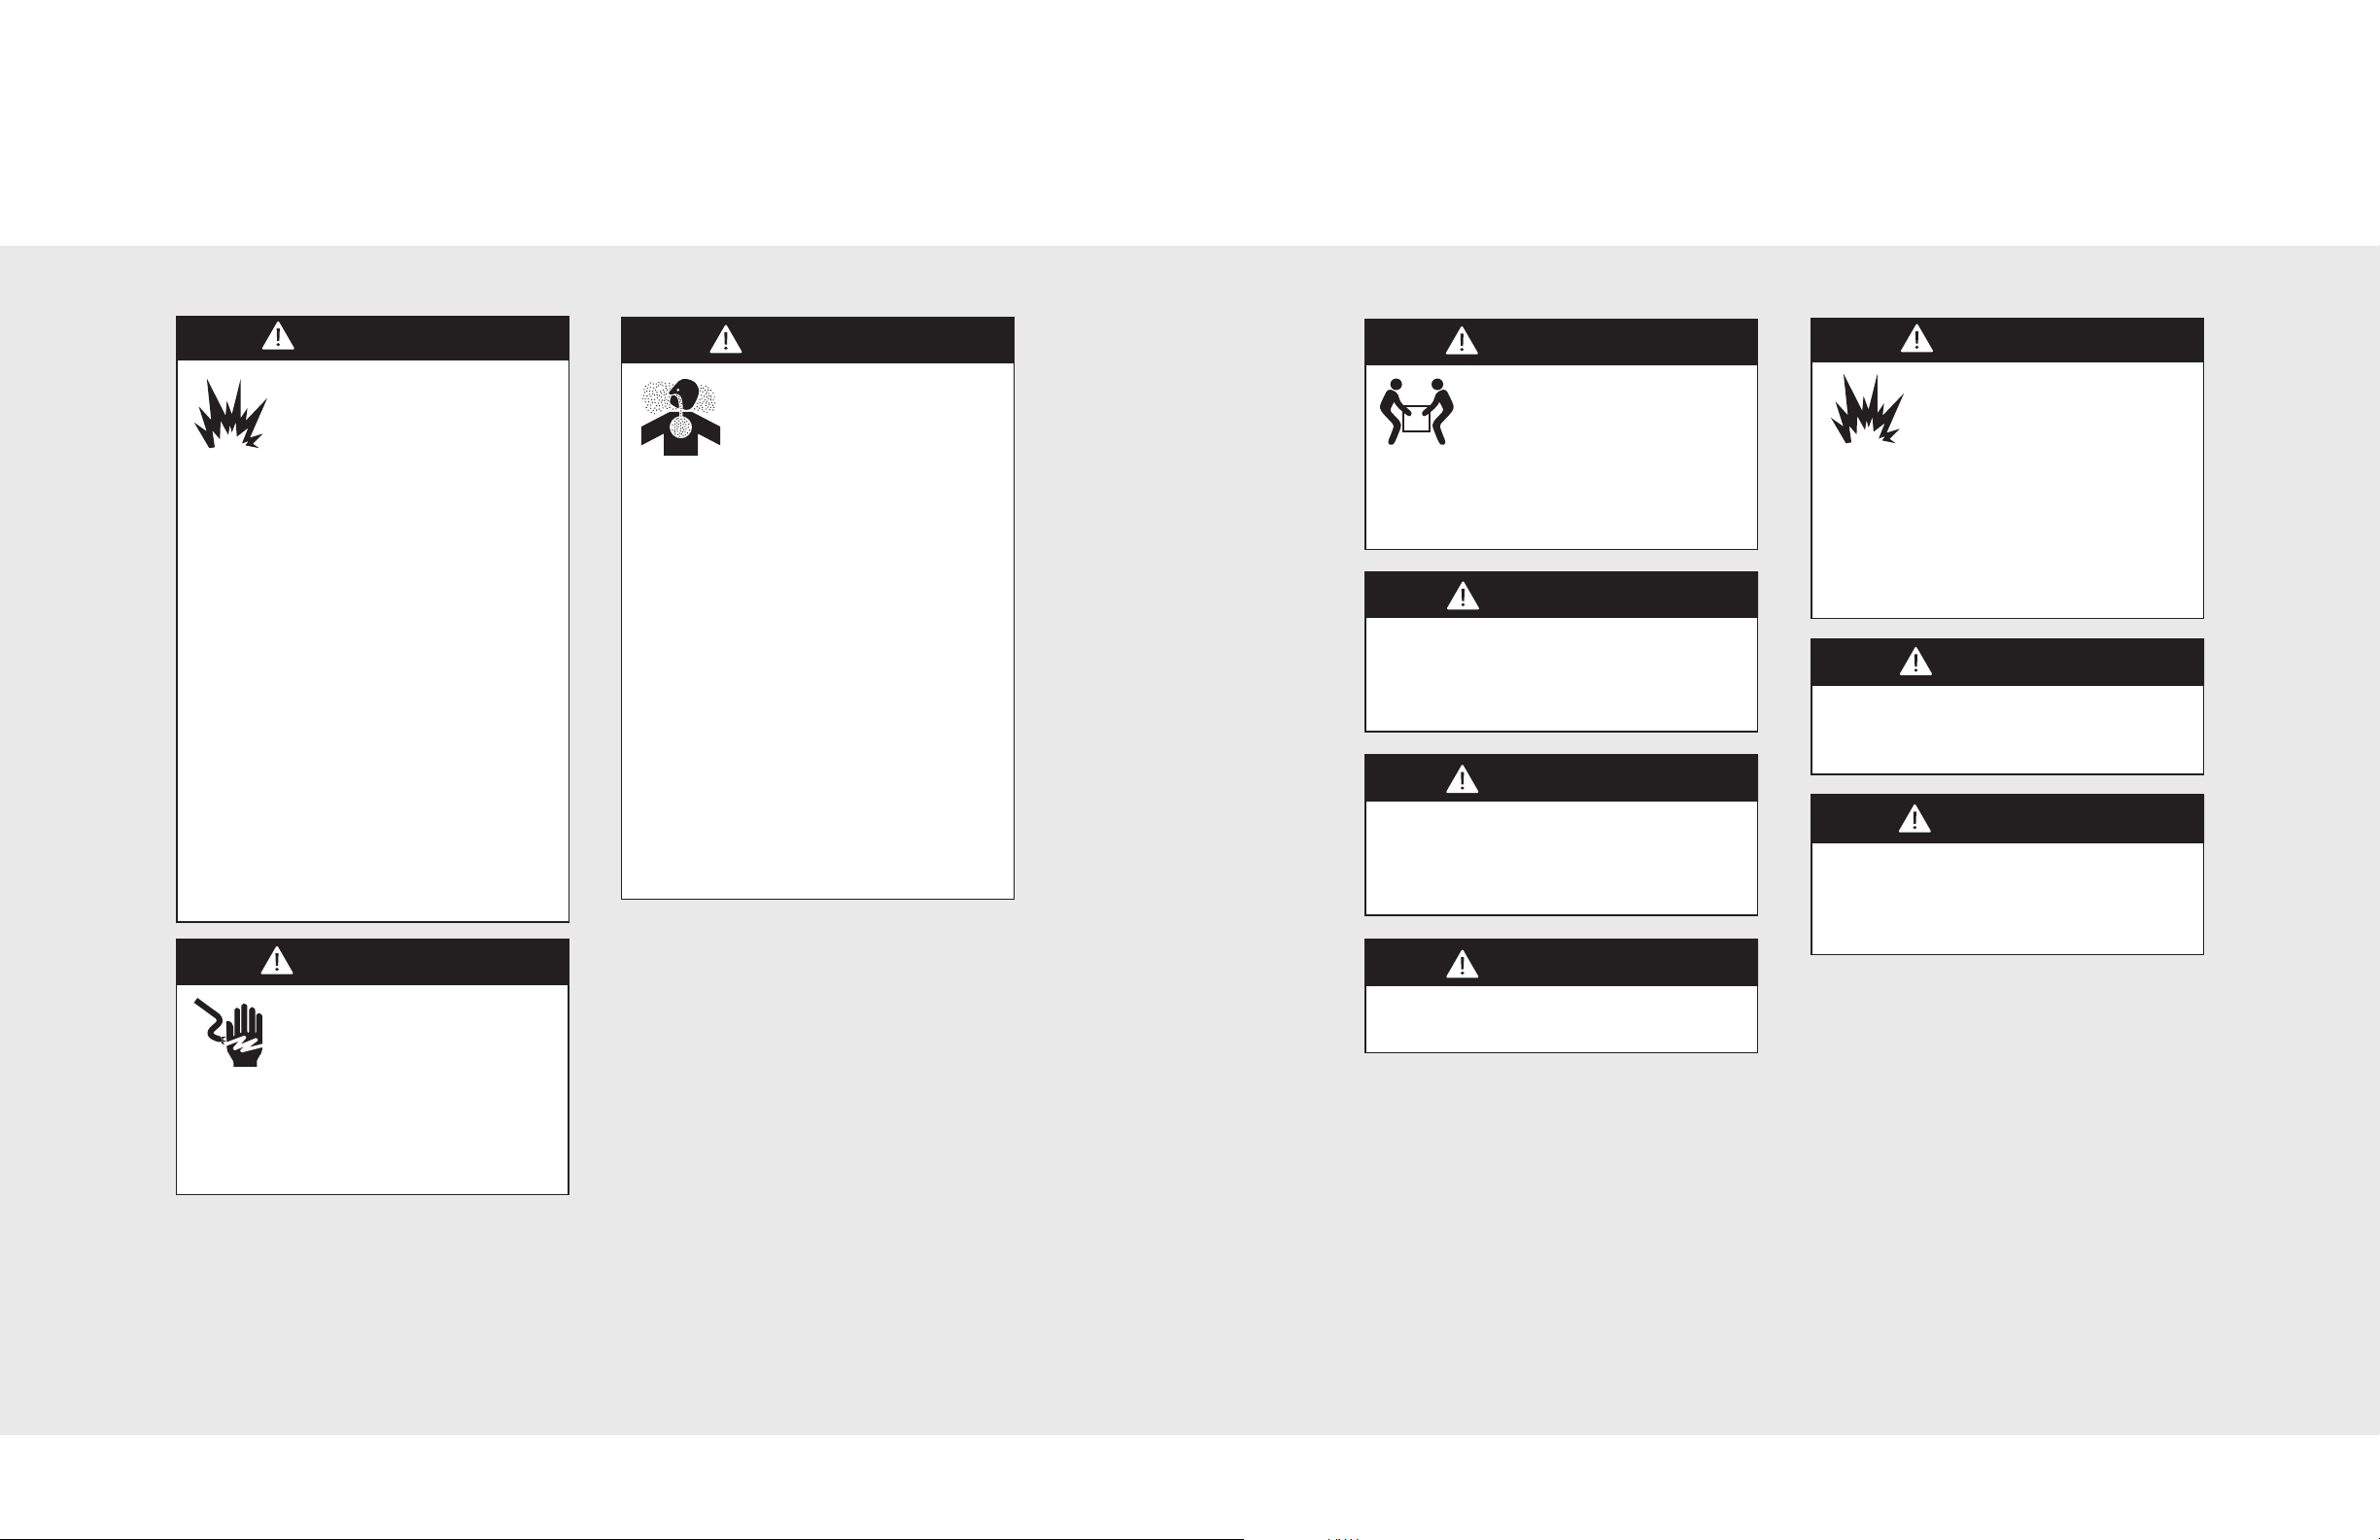
Fire/explosion hazard.
IF THE INFORMATION IN
THIS MANUAL IS NOT
FOLLOWED EXACTLY, A
FIRE OR EXPLOSION MAY RESULT
CAUSING PROPERTY DAMAGE,
PERSONAL INJURY, OR DEATH.
• DO NOT store or use gasoline or other
flammable vapors and liquids in the
vicinity of this or any other appliance.
• WHAT TO DO IF YOU SMELL GAS:
–DO NOT try to light any appliance.
–DO NOT touch any electrical switch.
–DO NOT use any phone in your
building.
–Immediately call your gas supplier from
a neighbor’s phone.
–Follow the gas supplier’s instructions.
–If you cannot reach your gas supplier,
call the fire department.
• Installation and service must be
performed by a qualified installer, service
agency, or the gas supplier.
Chemical hazard.
To avoid risk of property
damage and/or personal injury
or death; this appliance is not
to be used as a heating source.
• Benzene is a chemical which is part of
the gas supply to this cooking product,
which is consumed in the flames during
combustion. Exposure to a small
amount of benzene is possible if a gas
leak occurs. Formaldehyde and soot are
by-products of incomplete combustion.
• This appliance contains or produces
chemicals which can cause serious
injury or death and which are known to
the state of California to cause cancer,
birth defects or other reproductive harm.
To reduce the risk from substances in
the fuel or from fuel combustion make
sure this appliance is installed,
operated, and maintained in accordance
to the instructions in this document.
Moving hazard.
To avoid risk of severe
personal injury; this appliance
requires two or more personnel
while handling and moving. Possible
use of appliance moving devices is
recommended.
DO NOT use the handle or oven door to
lift the oven. Remove door before
installation to ensure that it is
not used to lift the unit.
NEVER use this appliance as a space
heater to heat or warm the room. Doing
so may result in carbon monoxide
poisoning and overheating of the oven.
Gas leak hazard.
To avoid risk of personal injury
or death; leak testing of the
appliance must be conducted
according to the manufacturer’s
instructions. Before placing appliance in
operation, always check for gas leaks
with soapy water solution.
• DO NOT USE AN OPEN FLAME TO
CHECK FOR GAS LEAKS.
The use of cabinets for storage above
the oven may result in potential
fire or burn hazard.
The misuse of the oven door(s) (e.g.
stepping, sitting, or leaning on them)
can result in hazards or injuries and
damage to the product.
Electrical shock hazard.
To avoid risk of electrical shock,
personal injury or death; verify
your appliance has been
properly grounded in accordance with
local codes or in absence of codes, with
the National Electrical Code (NEC).
ANSI/NFPA 70-latest edition.
No attempt should be made to operate
the appliance during power failure.
4
5
Page 4
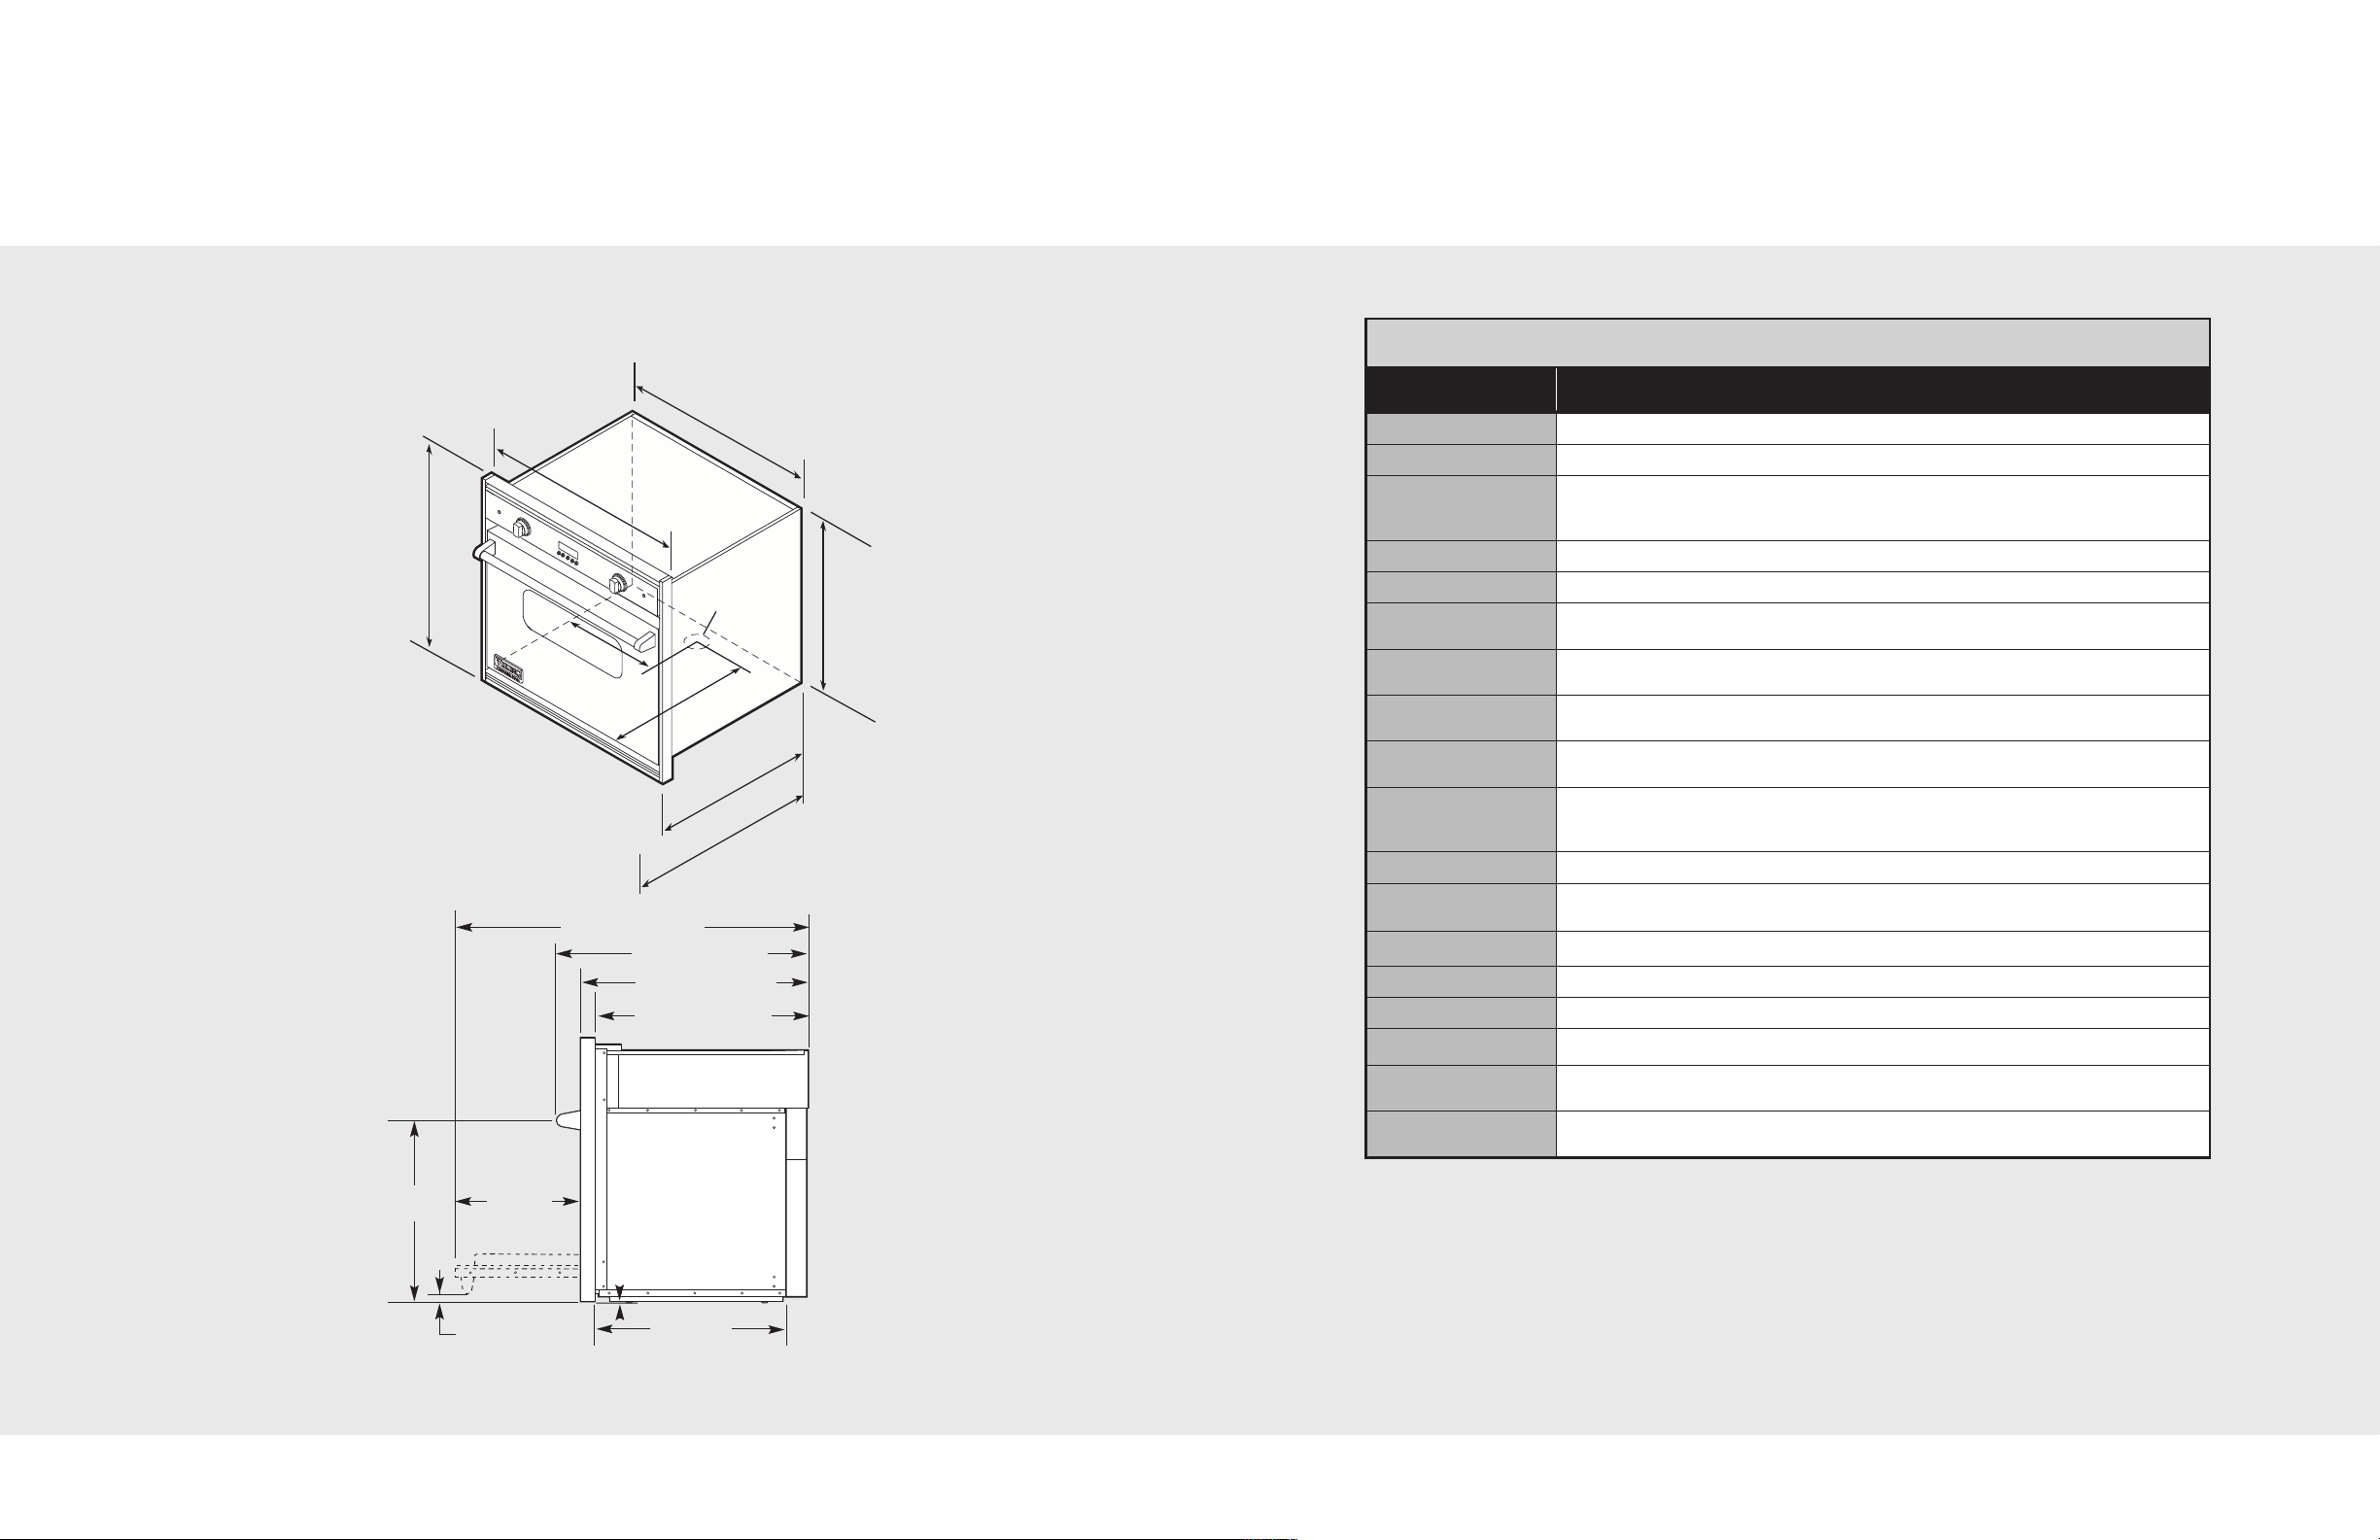
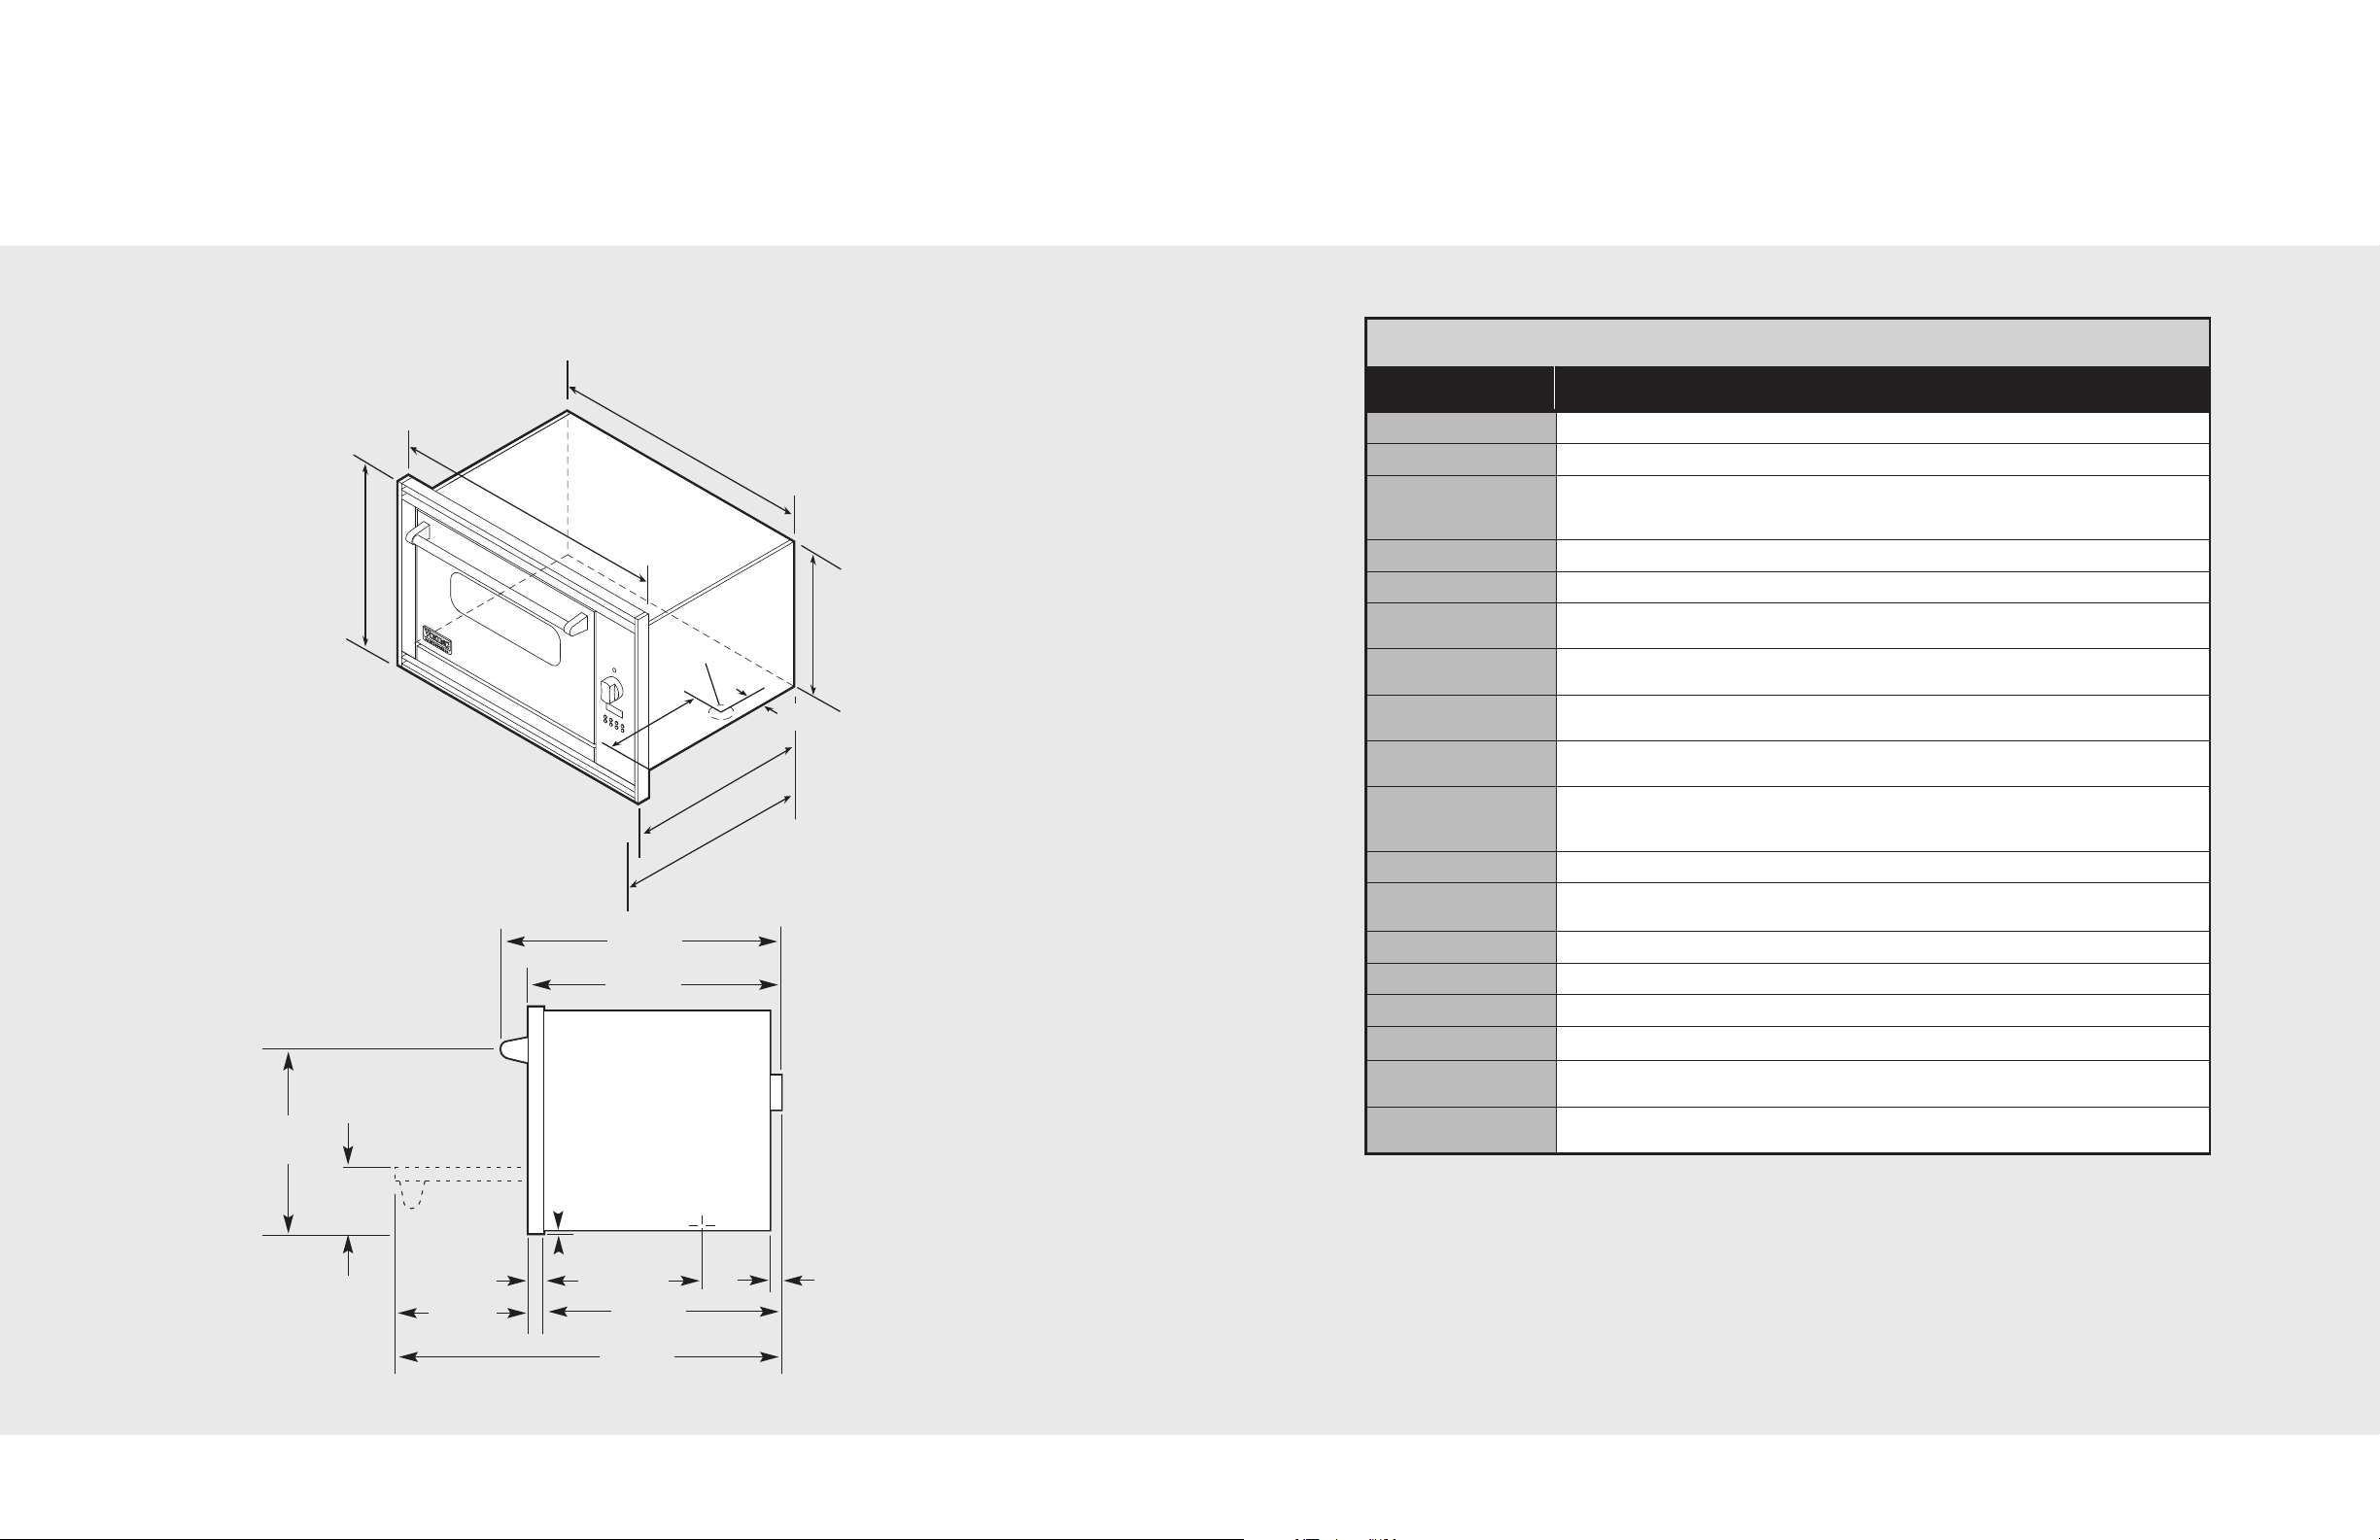
Dimensions (30”W.)
2
4
-
7
/
8
”
(
6
3
.
2
c
m
)
2
1
-
5
/
1
6
”
(
5
4
.
1
c
m
)
1
3
-
1
/
4
”
(
3
3
.
7
c
m
)
2
7
-
3
/
8
”
(
6
9
.
5
c
m
)
2
6
-
7
/
8
”
(
6
8
.
3
c
m
)
2
9
-
1
/
2
”
(
7
4
.
9
c
m
)
3
0
-
1
/
2
”
(
7
7
.
5
c
m
)
Gas inlet
3
1
”
(
7
8
.
7
c
m
)
18-5/8”
24-7/8” (63.2 cm)
27-3/8” (69.5 cm)
43-1/2” (110.5 cm)
(47.3 cm)
1/8”*
(.3 cm)
17-3/16”
(43.6 cm)
1/2”
(1.3 cm)
23-1/2 ” (60.0 cm)
Gas inlet
21-5/16”
(54.1 cm)
Specifications (30”W.)
Built-In 30”W. Gas Oven
Description
Overall width
Built-In 30“W. Gas Oven
VGSO100
29-1/2” (74.9 cm)
Overall height 31” (78.7 cm)
Overall depth from
rear
To edge of door—24-7/8” (63.2 cm)
To end of handle bracket—27-3/8” (69.5 cm)
With door open—43-1/2” (110.5 cm)
Cutout width 28-5/8” (72.7 cm)
Cutout height 30-5/8” (77.8 cm)
Cutout depth 24” (61.0 cm) min.; unit extends into cutout 23-7/8” (60.6 cm); cord protrudes 1/2”
(1.3 cm) beyond 23” (58.4 cm)
Cutout height
from floor
17” (43.2 cm) min.
Gas requirements Shipped natural or LP/Propane gas; LP must be specified after color code; accepts
standard residential 1/2” (1.3 cm) ID gas service line.
Gas manifold
pressure
Electrical
requirements
120 VAC/60 Hz 4 ft. (121.9 cm) 3-wire cord with grounded 3-prong plug attached to
product. Flexible cord/connector must be 1/2” ID (1.3 cm). Cord must be agency
Natural 5.0” W.C.P. / Liquid propane L/P 10.0” W.C.P.
approved for use with household gas ovens.
Maximum amp usage 8.0 amps
Infrared broil
18,000 BTU Nat. (5.3 kW)
burner rating
Bake burner rating
Oven interior width
Oven interior height
Oven interior depth
Oven volume Total oven capacity—4.0 cu. ft.
Approximate
shipping weight
*Note: The AHAM Stadard for measuring oven capacity subtracts the door plug and convection baffle
dimension from the total oven volume.
One 30,000 BTU Nat./LP (8.8 kW)
23” (58.4 cm)
16-1/8” (40.9 cm)
15-3/8” (39.1 cm)
AHAM Standard 3.3 cu. ft.*
310 lbs. (139.5 kg)
*Note: Bottom of cutout to bottom of trim–used for installing warming drawer below oven.
6
7
Page 5
Dimensions (36”W.)
2
7
-
3
/
8
”
(
6
9
.
5
c
m
)
3
3
-
3
/
4
“
(
8
5
.
7
c
m
)
1
1
-
7
/
8
“
(
3
0
.
2
c
m)
3
5
-
1
/
4
”
(
8
9
.
5
c
m
)
2
3
”
(
5
8
.
4
c
m
)
2
2
-
1
/
2
”
(
5
7
.
2
c
m
)
2
5
-
1
/
4
”
(
6
4
.
1
c
m
)
2
-
1
/
8
“
(
5
.
4
c
m
)
Gas inlet
39-7/8”
(101.3 cm)
1/4”*
(.6 cm)
27-3/8”
(69.5 cm)
25-1/4”
(64.1 cm)
5-13/16”
(14.8 cm)
1-3/8”
(3.5 cm)
14-5/8”
(37.1 cm)
23-7/8”
(60.6 cm)
Gas inlet
11-7/8”
(30.2 cm)
2”
(5.1 cm)
19-3/16”
(48.7 cm)
Specifications (36”W.)
Built-In 36”W. Gas Oven
Description
Overall width
Overall height 23” (58.4 cm)
Overall depth from
rear
Cutout width 33-7/8” (86.0 cm)
Cutout height 22-5/8” (57.5 cm)
Cutout depth 24” (61.0 cm) min.; unit extends into cutout 23-7/8” (60.6 cm); cord protrudes 1/2”
Cutout height
from floor
Gas requirements Shipped natural or LP/Propane gas; LP must be specified after color code; accepts
Gas manifold
pressure
Electrical
requirements
Maximum amp usage 8.0 amps
Infrared broil burner
rating
Bake burner rating
Oven interior width
Oven interior height
Oven interior depth
Oven volume Total oven capacity—3.6 cu. ft.
Approximate
shipping weight
*Note: The AHAM Stadard for measuring oven capacity subtracts the door plug and convection baffle
Built-In 36“W. Gas Oven
VGSO166
35-1/4” (89.5 cm)
To edge of door—25-1/4” (64.1 cm)
To end of handle bracket—27-3/8” (69.5 cm)
With door open—39-7/8” (101.3 cm)
(1.3 cm) beyond 23” (58.4 cm)
17” (43.2 cm) min.
standard residential 1/2” (1.3 cm) ID gas service line.
Natural 5.0” W.C.P. / Liquid propane L/P 10.0” W.C.P.
120 VAC/60 Hz 4 ft. (121.9 cm) 3-wire cord with grounded 3-prong plug attached to
product. Flexible cord/connector must be 1/2” ID (1.3 cm). Cord must be agency
approved for use with household gas ovens.
18,000 BTU Nat. (5.3 kW)
15,000 LP (4.4 kW)
Two 15,000 BTU Nat./LP (4.4 kW) (each)
24-1/8” (61.3 cm)
13-3/4” (34.9 cm)
17-1/8” (43.5 cm)
Measure to AHAM standards 3.3 cu. ft.*
257 lbs. (115.7 kg)
dimension from the total oven volume.
*Note: Bottom of cutout to bottom of trim–used for installing warming drawer below oven.
8
9
Page 6

Electrical outlet
to be located in
shaded area on
rear wall
2
4
”
(
6
1
.
0
c
m
)
m
i
n
.
24”
(61.0 cm) min.
2
4
”
(
6
1
.
0
c
m
)
m
i
n
.
3
3
-
7
/
8
”
(
8
6
.
0
c
m
)
D
i
m
e
n
s
i
o
ns
s
am
e
as
b
e
l
o
w
Dimensions same
as below
D
i
m
e
n
s
i
o
ns
s
am
e
as
b
e
l
o
w
3
”
(
7
.
6
c
m
)
d
i
a
.
2
-
1
/
8
”
(
5
.4
c
m
)
2
2
-
5
/8
”
(
5
7
.
5
c
m
)
2
-
1
/2
”
(
6
.
4
c
m
)
2-1/2”
(6.4 cm)
2
-
1
/2
”
(
6
.
4
c
m
)
1
7
”
(
4
3
.
2
c
m
)
m
i
n
.
3
0
”
(
7
6
.
2
c
m
)
R
e
c
o
m
m
e
n
d
e
d
Electrical outlet
to be located in
shaded area on
rear wall
2
4
”
(
6
1
.
0
c
m
)
m
i
n
.
24”
(61.0 cm) min.
2
4
”
(
6
1
.
0
c
m
)
m
i
n
.
3
3
-
7
/
8
”
(
8
6
.
0
c
m
)
3
”
(
7
.
6
c
m
)
d
i
a
.
2
-
1
/
8
”
(
5
.
4
c
m
)
2
2
-
5
/
8
”
(
5
7
.
5
c
m
)
1
1
-
7
/
8
”
(
3
0
.
2
c
m
)
3
”
(
7
.
6
c
m
)
3
-
1
/
2
”
(
8
.
9
c
m
)
3-1/2”
(8.9 cm)
3
-
1
/
2
”
(
8
.
9
c
m
)
1
7
”
(
4
3
.
2
c
m
)
m
i
n
.
3
0
”
(
7
6
.
2
c
m
)
R
e
c
o
m
m
e
n
d
e
d
3
”
(
7
.
6
c
m
)
3
-
1
/2
”
(
8
.
9
c
m
)
3-1/2”
(8.9 cm)
3
-
1
/2
”
(
8
.
9
c
m
)
Gas inlet
location
Gas inlet
location
Gas inlet
location
1
1
-
7
/
8
”
(
3
0
.
2
c
m
)
Gas inlet
location
Gas inlet
location
Gas inlet
location
Cutout Dimensions (30”W.)
2
4
”
(
6
1
.
0
c
m
)
m
i
n
.
1
-
1
/
2
”
(
3
.
8
c
m
)
3
”
(
7
.
6
c
m
)
d
i
a
.
1
4
-
1
/
4
”
(
3
6
.
2
c
m
)
3
0
-
5
/
8
”
(
7
7
.
8
c
m
)
Electrical outlet to be located
in shaded area on rear wall
Gas inlet
location
3
”
(
7
.
6
c
m
)
2
8
-
5
/
8
”
(
7
2
.
7
c
m
)
2
1
-
5
/
1
6
”
(
5
4
.
1
c
m
)
1
7
”
(
4
3
.
2
c
m
)
m
i
n
.
3
0
”
(
7
6
.
2
c
m
)
R
e
c
o
m
m
e
n
d
e
d
Cutout Dimensions (36”W.)
30”W. Cutout
10
36”W. Single
Cutout
Installation Options:
36”W. Double
Cutout
Double Stack: Use IKD-VGSO kit or DCT-VGSO-SS center trim (sold seperately).
Double Side-by-side: Repeat single cutout with 1-1/2” (3.8 cm) min. between openings.
11
Page 7

CAUTION
Clearance Dimensions
CAUTION
CAUTION
WARNING
Electrical & Gas Requirements (cont.)
Note: Door handle of oven should be 36”
(91.4 cm) above the floor.
Note: The grounded electrical socket should
be placed above or below cutout(s).
To prevent possible damage to cabinets
and cabinet finishes, use only moisture
resistant materials and finishes that will
withstand temperature up to 190°F
(88°C). When cabinets are covered with
laminates, an appropriate heat-resistant
adhesive must be used. Consult your
manufacturer for proper specifications.
in a potential burn hazard. Combustible
items may ignite, metallic items may
become hot and cause burns.
Burn hazard.
To avoid risk of personal injury;
the use of cabinets for storage
above the appliance may result
Electrical & Gas Requirements
Electrical Requirements
Check your national and local codes
regarding this unit. These ovens require
3-wire, 120 VAC/60 Hz. See “Connecting
Gas & Electrical” section for grounding
instructions.
Electrical shock hazard.
To avoid the risk of electrical
shock, personal injury or death;
verify electrical power is turned
off at the breaker box and gas supply is
turned off until the oven is installed and
ready to operate, installation by an
authorized installer only.
These ovens are designed specifically for
natural gas or liquid propane (LP) gas. It is
shipped from the factory adjusted for use
with natural or propane (LP) gas. Before
beginning installation verify that the
model is compatible with the intended
gas supply.
Manual shut-off valve:
This installer-supplied valve must be installed
in the gas service line before the appliance
in the gas stream and in a location where it
can be reached quickly in the event of
an emergency.
In Massachusetts: A “T” handle type
manual valve must be installed in the gas
supply line to the appliance.
Pressure Regulator:
• All heavy-duty, commercial type cooking
equipment must have a pressure regulator
on the incoming service line for safe and
efficient operation, since service pressure
may fluctuate with local demand. External
regulators are not required on this oven
since a regulator is built into each unit at
the factory. Under no condition bypass
this built-in regulator.
• Manifold pressure should be checked with
a manometer, natural gas requires 5.0”
W.C.P. and LP gas requires 10.0” W.C.P.
Incoming line pressure upstream from the
regulator must be 1” W.C.P. higher than
the manifold pressure in order to check
the regulator. The regulator used on these
ovens can withstand a maximum input
pressure of 1/2” PSI (14.0” W.C.P.). If the
line pressure is in excess of 1/2” PSI
(14.0” W.C.P.), a step down regulator
will be required.
• The appliance must be disconnected from
the gas supply piping system during any
pressure testing of that system.
Flexible Connections:
If the unit is to be installed with flexible
couplings and/or quick-disconnect fittings,
the installer must use a heavy-duty AGA
design-certified flexible connector of at least
1/2” (1.3 cm) ID NPT (with suitable strain
reliefs) in compliance with ANSI Z21.41
and Z21.69.
Rigid Connections:
30”W.
• Incoming gas from the service supply is
brought from an intake pipe (not supplied)
to the back center of the unit through the
shut-off valve (not supplied) to the
regulator. (See “Cutout Dimensions”
section for gas inlet location.)
36”W.
•
Incoming gas is brought from an intake
pipe (not supplied) to the lower right
center of the unit to the pressure
regulator. The only connection
necessary is from the service supply,
through the shut-off valve (not supplied)
to this intake pipe (not supplied) to the
regulator.
section for gas inlet location.)
(See “Cutout Dimensions”
In Canada: CAN 1-6, 10-88 metal
connectors for gas appliances and CAN
1-6.9 M79 quick disconnect devices for use
with gas fuel.
In Massachusetts: This appliance must be
installed with a 36” (3-foot) long flexible
gas connector.
Before placing the oven into operation,
always check for gas leaks with a soapy
water solution or other acceptable
method. DO NOT USE AN OPEN FLAME
TO CHECK FOR LEAKS.
Gas Connection
The gas supply (service) line must be the
same size or greater than the inlet line of the
appliance. This oven uses a 1/2” (1.3 cm) ID
NPT (Sch40) inlet. Sealant on all pipe joints
must be resistive to LP gas.
IMPORTANT: Any conversion required
must be performed by your dealer or a
qualified licensed plumber or gas service
company. Please provide the service person
with this manual before work begins.
12
13
Page 8

2
1
2
3
2
2
1
4
5
NOTICE
1
Door Removal (30”W.)
NOTICE
General Information
READ AND FOLLOW ALL WARNING
AND CAUTION INFORMATION WHEN
INSTALLING THIS APPLIANCE.
• All openings in the wall behind the
appliance or in the floor under the
appliance should be sealed.
• Keep appliance area clear and free from
combustible materials, gasoline and other
flammable vapors.
• Disconnect the electrical supply prior to
servicing or cleaning.
• When removing the appliance for cleaning
or service, disconnect AC power supply
and carefully remove the appliance by
pulling forward.
• Electrical requirements are listed in the
product specifications under the “Electrical
& Gas Requirements” section.
Recommendations for Unpacking
• Products are shipped on pallets with foam
footings and corrugated inner-packing and
exterior hoods.
• Products are anchored to the pallet using
metal straps that are screwed to the
bottom of the product and the pallet.
• DO NOT remove protective packaging
until you are ready to perform the
installation.
• To remove the packaging, first remove the
staples located at the bottom perimeter of
the corrugated cover.
• Remove the corrugated cover by lifting it
off the product and remove the innerpacking.
• Detach the product from the metal anchor
strip by removing the attachment screw.
Installation (30”W.)
DO NOT use the handle or oven door to
lift the oven. Remove door before
installation to ensure that it is not used to
lift the unit. DO NOT lift or carry the door
by the handle.
Removing the door must be done by your
dealer, a qualified licensed plumber, or
certified gas installer.
Remove wooden brace on front of pallet.
• Do not obstruct the flow of combustion and
ventilation air.
Moving, Handling, and Unpacking
Remove and discard all packing materials,
including cardboard and tape on the outside
and inside of the ovens.
Some stainless steel parts may have a plastic
protective wrap which must be peeled off.
The interior should be washed thoroughly
with hot, soapy water to remove film
residues and any dust or debris before being
used, then rinsed and wiped dry. Solutions
stronger than soap and water are rarely
needed.
Recommendations for Moving
• The appliance is heavy – use extreme care
when handling!
DO NOT use the handle or oven door to
lift the oven. Remove door before
installation to ensure that it is not used to
lift the unit. DO NOT lift or carry the door
by the handle.
Removing the door must be done by your
dealer, a qualified licensed plumber, or
certified gas installer.
• Only proper equipment should be used to
move products.
• ALWAYS take steps to protect flooring at
the installation location when moving
products.
Open door completely. Place pin in pin hole.
Note: Two pins included.
Close until pins stop door.
Remove hinge trim screws. Take off hinge trim.
Lift door up and out.
Note: Do not lift door using handle.
14
15
Page 9

1
2
3
4
5
6
Note: Refer to “Electrical & Gas
Requirements” section for proper
installation information.
Connecting Gas & Electrical (30”W.)
DANGER
WARNING
1
Final Installation (30”W.)
Gas leak hazard.
To avoid risk of personal injury
or death; leak testing of the
appliance must be conducted
according to the manufacturer’s
instructions. Before placing appliance in
operation, always check for gas leaks
with soapy water solution.
• DO NOT USE AN OPEN FLAME TO
CHECK FOR GAS LEAKS.
Electrical shock hazard.
To avoid the risk of electrical
shock, personal injury or death;
verify your appliance has been
properly grounded in accordance with
local codes or in absence of codes, with
the National Electrical Code (NEC).
ANSI/NFPA 70-latest edition.
Remove racks.
Unscrew pallet screws from side of oven.
Connect gas and electrical. Before placing appliance in
operation, always check for gas leaks. This must be
performed by your dealer, a qualified licensed plumber,
or gas service company.
16
Lift oven into position.
Attach screws to the side of the framing.
Note: Four screws (two on each side).
(Screws not included.)
Push oven straight into cabinet.
Replace racks.
17
Page 10

1
2
2
20°
1
2
3
NOTICE
1
2
3
4
Door Replacement & Adjustment (30”W.)
CAUTION
Replace door.
Open door completely. Reinstall hinge trim plates.
Note: Screw holes may need to be re-aligned.
Door Removal (36”W.)
Installation (36”W.)
DO NOT use the handle or oven door to
lift the oven. Remove door before
installation to ensure that it is not used to
lift the unit. DO NOT lift or carry the door
by the handle.
Removing the door must be done by your
dealer, a qualified licensed plumber, or
certified gas installer.
Open door approximately 20°, then slowly pull upward
until the door stop pops out of door socket.
To avoid risk of personal injury or property
damage, verify door stops are engaged
before removing door.
Take out pins.
Note: To adjust door turn adjustment screw
clockwise (up) or counterclockwise (down).
18
Close door.
Gently close until the door rests against one of the stop
notches.
Slide door completely from hinge arms.
19
Page 11

123
456
1
Note: Refer to “Electrical & Gas
Requirements” section for proper
installation information.
Connecting Gas & Electrical (36”W.)
DANGER
WARNING
Final Installation (36”W. Single)
Gas leak hazard.
To avoid risk of personal injury
or death; leak testing of the
appliance must be conducted
according to the manufacturer’s
instructions. Before placing appliance in
operation, always check for gas leaks
with soapy water solution.
• DO NOT USE AN OPEN FLAME TO
CHECK FOR GAS LEAKS.
Electrical shock hazard.
To avoid the risk of electrical
shock, personal injury or death;
verify your appliance has been
properly grounded in accordance with
local codes or in absence of codes, with
the National Electrical Code (NEC).
ANSI/NFPA 70-latest edition.
Lift oven into position.
Push oven straight into cabinet.
Connect gas and electrical. Before placing appliance in
operation, always check for gas leaks. This must be
performed by your dealer, a qualified licensed plumber,
or gas service company.
20
Remove all knobs, push buttons, and bezels on the
right control panel.
Insert four wood screws, (included with the oven),
through the cabinet side flange into the cabinet.
Remove lower access panel, side trim, and
control panel.
Replace lower access panel, side trim, and
control panel.
21
Page 12

7
8
1
3
2
9
10
Connect gas line and check
for leaks.
11
12
1
2
2
1
3
3
2
1
3
4
1
2
5
6
Final Installation (36”W. Double)
Note: Purchase necessary gas kit – IKD-VGSO.
Final Installation (36”W. Double) (cont.)
Install upper oven as described on page 21, “Final
Installation” (36”W. single).
Remove access panel from oven side and
pipe plug from pipe tee.
Place bottom oven on a protected area near the
cabinet. Remove 2” hole knockout from oven top.
Attach male connector to pipe tee. Feed flex tubing
through 2” hole and attach to the male connector.
Remove all knobs, push buttons, bezels, and lower
access panel, side trim, and control panel.
Attach 8” pipe nipple through lower oven cabinet to
upper oven pipe tee. Attach female connector to pipe
nipple. Attach flex tubing to female connector.
Remove control box, disconnecting the
three harness connectors.
Replace access panel.
22
Push lower oven straight into cabinet.
Reconnect three harness connectors and
replace control box.
Replace side trim, control panel, lower
access panel, control panel knobs,
push buttons, and bezels.
23
Page 13

Optional Center Trim Installation (36”W. Double)
option
1
option
2
1
3
1
2
2
Note: With purchase of DCT-VGSO-SS center trim kit.
Install mounting brackets.
Insert center trim piece over mounting brackets.
Door Replacement & Adjustment (36”W.)
Final Preparation
1. Some stainless steel parts may have a
plastic protective wrap, which must be
peeled off. All stainless steel body parts
should be wiped with hot soapy water
and with liquid cleaner designed for this
material. If build-up occurs, do not use
steel wool, abrasive cloths, cleaners or
powders! If it is necessary to scrape
stainless steel to remove encrusted
materials, soak with hot, wet cloths to
loosen the material, then use a wood or
nylon scraper. DO NOT use a metal knife,
spatula, or any other metal tool to scrape
stainless steel! Scratches are almost
impossible to remove.
2. The interior of the oven should be washed
thoroughly with hot, soapy water to
remove film residues and installation
debris before being used for food
preparation, then rinsed and wiped dry.
Solutions stronger than soapy water are
rarely needed.
Place door onto hinge arms.
Pull door stops up and slowly slide door down.
24
25
Page 14

Performance Checklist
OVEN
LIGHT
OVEN FUNCTION
OFF
BAKE
SET
OVEN
BROIL
CONV.
BROIL
CONV.
BAKE
TEMPERATURE
OFF
400
200
300
500
BROIL
MIN/SEC
TIMER
BAKE
TIMER
START
TIME
CLOCK
OVENOVEN
LIGHTLIGHT
OFFOFF
BROILBROIL
CANCELCANCEL
CLOCKCLOCK
TIMERTIMER
COOKCOOK
TIMETIME
BROILBROIL
HI/LOWHI/LOW
DOWNDOWN
BAKEBAKE
TEMPTEMP
UPUP
BAKEBAKE
CONVECTIONCONVECTION
BAKEBAKE
CONVECTIONCONVECTION
BROILBROIL
Electronic
Timing Center
Electronic
Timing Center
Off/On
Indicator light
Interior
Oven Light Control
Temperature
Control
Oven Function Selector
Oven Function Selector
Oven Light Button
VGSO100
VGSO166
Service & Registration
A qualified installer should carry out the
following checks:
1. Check oven bake function–bake burner on
full power. Tubular bake burner should
reignite on both sides. Convection bake
function–bake burners the same with the
convection fan on.
2. Check oven broil function–infrared broil
screen should glow. Covection broil function
is the same with convection fan on.
3. Check air shutter adjustment; sharp blue
flame, no yellow tipping, no sooting, no
flame lifting.
4. Check for gas leaks (odor) at all gas
conversions.
5. Check convection fan switch and fan
operation.
6. Check light switch and light operation.
7. Check for proper fit of door seals.
Only authorized replacement parts may be used in performing service on the appliance.
Do not repair or replace any part of the appliance unless specifically recommended in the
manual. All servicing should be referred to a qualified technician.
Contact Viking Range Corporation, 1-888-VIKING1 (854-4641), for the nearest service parts
distributor in your area or write to:
VIKING RANGE CORPORATION
PREFERRED SERVICE
1803 Hwy 82W
Greenwood, Mississippi 38930 USA
VGSO100—The serial number and model
number for your appliance can be found by
opening the door and looking under the
control panel.
VGSO166—The serial number and model
number for your appliance can be found by
opening the door and looking under the
top trim.
Service Codes – VGSO166
The Time/Temperature digital display is
designed to alert you if there is an error or
problem in the control. If one of the following
codes occur, disconnect the electrical supply to
the oven and contact an authorized servicer.
F1- Shorted probe
F2- Open probe
F3- Controller malfunction
Record the following information indicated below. You will need it if service is ever required.
Model number ____________________________________________________________________________________
Serial number _____________________________________________________________________________________
Date of purchase __________________________________________________________________________________
Date installed ______________________________________________________________________________________
Dealer's name _____________________________________________________________________________________
Address ___________________________________________________________________________________________
26
These installation instructions should remain with the unit for future reference.
27
 Loading...